Hey there, burger aficionados! Ava here, back from my little corner of Seattle, ready to whisk you away to burger paradise. Today, we’re not just making any burger; we’re diving headfirst into the realm of the utterly addictive: Crack Chicken Burgers. Yes, you heard that right. Crack. Chicken. Burgers. Prepare for a flavor explosion that will have everyone begging for seconds – and the recipe!
Remember those days in Oregon, watching my mom transform simple ingredients into feasts? This recipe is a tribute to that magic, a little bit of ‘wow’ packed between two buns. So, if you’re ready to elevate your burger game, get ready to unleash these bad boys on your taste buds. Trust me; you’ll thank me later.
Why You’ll Love This Crack Chicken Burger Recipe
Okay, let’s get real. Why should you dedicate precious kitchen time to *this* particular burger recipe? Because it’s not just good; it’s ridiculously good. It’s the kind of recipe that becomes a staple, the one you turn to when you need a guaranteed win. Here’s why:
Flavor Bomb: We’re talking a symphony of flavors. Creamy, cheesy, smoky, savory – it’s all happening in one glorious bite.
Easy Peasy: Don’t let the fancy name fool you; this recipe is surprisingly simple. Minimal effort, maximum reward.
Crowd-Pleaser: Whether you’re hosting a backyard BBQ or just want to impress your family, these burgers are a surefire hit.
Customizable: Want to kick up the heat? Add some jalapeños. Prefer a different cheese? Go for it! This recipe is your canvas.
Ready in Minutes: Get ready to enjoy a gourmet-tasting burger in under 30 minutes. Perfect for busy weeknights.
Seriously, if you’re looking for a burger that’s both incredibly delicious and incredibly easy to make, this is *it*. You’ll be hooked from the first bite!
Crack Chicken Burger Recipe
Ingredients
Here’s what you’ll need to create these amazing burgers. Don’t worry; most of these ingredients are pantry staples!
For the Chicken Patties
1 ½ pounds ground chicken breast
½ cup cream cheese, softened
1 cup shredded white cheddar cheese
4 strips bacon, cooked and chopped
2 cloves garlic, minced
1 tsp smoked paprika
1 tsp onion powder
salt to taste
black pepper to taste
For the Toppings & Assembly
4 brioche or burger buns
4 slices white cheddar cheese
½ cup ranch dressing or BBQ sauce
fresh lettuce leaves
How to Make Crack Chicken Burgers: Step-by-Step
Alright, let’s get cooking! Follow these simple steps, and you’ll be sinking your teeth into a juicy Crack Chicken Burger in no time.
Mix the Magic: In a large bowl, combine ground chicken, cream cheese, shredded cheddar, chopped bacon, garlic, smoked paprika, onion powder, salt, and black pepper. Mix gently until everything is just combined. Be careful not to overmix, as this can make the patties tough.
Shape the Patties: Divide the chicken mixture into 4 equal portions. Gently shape each portion into a patty, about ¾ inch thick. Press them slightly flat to ensure even cooking.
Preheat the Grill (or Skillet): Preheat your grill or skillet over medium-high heat. Lightly oil the cooking surface to prevent the patties from sticking. If you’re using a grill pan, make sure it’s nice and hot before adding the patties.
Cook the Chicken: Place the patties on the preheated grill or skillet. Cook for 5–6 minutes per side, or until the internal temperature reaches 165°F (74°C). Use a meat thermometer to be sure!
Melt the Cheese: During the last minute of cooking, place a slice of cheddar cheese on each patty. Cover the grill or skillet to help the cheese melt quickly and evenly.
Toast the Buns: Lightly toast the burger buns on the grill or in a pan. This adds a nice texture and prevents the buns from getting soggy.
Assemble the Burgers: Now for the fun part! Assemble your burgers: bottom bun → lettuce → patty with melted cheese → ranch dressing or BBQ sauce → top bun. Feel free to add any other toppings you love, like tomato or onion.
Serve and Enjoy: Serve immediately and enjoy these hot, juicy Crack Chicken Burgers! Get ready for the compliments to roll in.
Pro Tips for Perfect Crack Chicken Burgers
Want to take your Crack Chicken Burgers from good to *amazing*? Here are a few pro tips I’ve learned along the way:
Don’t Overmix: As I mentioned earlier, overmixing the chicken mixture can result in tough patties. Mix just until everything is combined.
Chill the Patties: If you have time, chill the patties in the refrigerator for about 30 minutes before cooking. This will help them hold their shape and prevent them from falling apart on the grill.
Use a Meat Thermometer: The best way to ensure that your chicken burgers are cooked through is to use a meat thermometer. Insert it into the thickest part of the patty; it should read 165°F (74°C).
Don’t Press Down: Resist the urge to press down on the patties while they’re cooking. This will squeeze out the juices and result in a dry burger.
Toast the Buns: Toasting the buns adds a nice texture and prevents them from getting soggy.
Get ready: Get ready for a flavor explosion when you bite into these.
Common Mistakes to Avoid
Even with a simple recipe, it’s easy to make a few common mistakes. Here’s what to watch out for:
Overcooking the Chicken: Overcooked chicken is dry and tough. Use a meat thermometer to ensure that the patties are cooked to the correct temperature.
Undercooking the Chicken: Undercooked chicken is not safe to eat. Make sure the internal temperature reaches 165°F (74°C).
Using Cold Cream Cheese: Make sure the cream cheese is softened before adding it to the chicken mixture. This will make it easier to mix and ensure that the patties are creamy and moist.
Skipping the Smoked Paprika: Smoked paprika adds a delicious smoky flavor to the burgers. Don’t skip it!
Forgetting to Season: Don’t forget to season the chicken mixture with salt and pepper to taste. This will enhance the flavors of all the other ingredients.
Crack Chicken Burger Variations
One of the best things about this recipe is how easy it is to customize. Here are a few variations to try:
Spicy Crack Chicken Burgers: Add a pinch of cayenne pepper or a dash of hot sauce to the chicken mixture for a spicy kick. You can also use pepper jack cheese instead of white cheddar.
Buffalo Crack Chicken Burgers: Mix in a few tablespoons of buffalo wing sauce into the chicken mixture and top with blue cheese dressing instead of ranch.
Bacon Ranch Crack Chicken Burgers: Add even more bacon! Mix some extra chopped bacon into the chicken mixture and top with crispy bacon strips.
BBQ Crack Chicken Burgers: Use BBQ sauce instead of ranch dressing for a smoky, sweet flavor. You can also add some grilled onions and a slice of cheddar on each patty during the last minute of cooking and cover until melted.
Cream cheese: The cream cheese is key to keeping these burgers moist and flavorful.
How to Store Leftover Crack Chicken Burgers
If you happen to have any leftover Crack Chicken Burgers (which is unlikely!), here’s how to store them:
In the Refrigerator: Store cooked chicken patties in an airtight container in the refrigerator for up to 3-4 days. Reheat them in the microwave, oven, or skillet until heated through.
Freezing: For longer storage, freeze the cooked chicken patties. Wrap each patty individually in plastic wrap and then place them in a freezer-safe bag or container. They can be stored in the freezer for up to 2-3 months. Thaw them in the refrigerator overnight before reheating.
Frequently Asked Questions (FAQ)
Got questions? I’ve got answers! Here are some common questions about Crack Chicken Burgers:
Can I use ground turkey instead of ground chicken? Yes, you can substitute ground turkey for ground chicken in this recipe. The cooking time will be the same.
Can I make these burgers ahead of time? You can prepare the chicken patties ahead of time and store them in the refrigerator for up to 24 hours before cooking.
Can I grill these burgers indoors? Yes, you can cook these burgers on a grill pan or in a skillet on the stovetop.
What if I don’t have smoked paprika? If you don’t have smoked paprika, you can use regular paprika or a pinch of chili powder instead.
Can I add other vegetables to the patties? Yes, you can add finely chopped vegetables like onions, bell peppers, or zucchini to the chicken mixture. Just be sure to drain any excess moisture before adding them.
Ground chicken: Ground chicken is the base of these delicious burgers.
Serving Suggestions
These Crack Chicken Burgers are delicious on their own, but here are a few serving suggestions to make them even better:
Sides: Serve with classic burger sides like french fries, sweet potato fries, onion rings, coleslaw, or a simple salad.
Toppings: Get creative with your toppings! Try adding sliced tomatoes, red onion, pickles, avocado, or a fried egg.
Sauces: Experiment with different sauces like BBQ sauce, honey mustard, sriracha mayo, or a creamy garlic aioli.
Drinks: Pair your Crack Chicken Burgers with a cold beer, a refreshing lemonade, or an iced tea.
On your: On your favorite burger buns of course!
So there you have it – the ultimate Crack Chicken Burger recipe that’s guaranteed to become a new favorite. I hope you enjoy making and eating these burgers as much as I do. Happy cooking, friends!
Indulge in a flavorful Crack Chicken Burger featuring juicy chicken patties loaded with cream cheese, cheddar, and bacon. This recipe delivers a satisfying and delicious burger experience.
Hey there, friends! Ava here, back in my Seattle kitchen, and let me tell you, the aroma of sizzling steak and peppers is currently intoxicating the air. If you’re anything like me, you crave those weeknight dinners that are both incredibly flavorful and surprisingly easy. That’s where this Easy Instant Pot Steak Fajitas recipe comes in. It’s a game-changer, a lifesaver, and honestly, just plain delicious.
I remember the first time I tried making fajitas. I was probably 20, attempting to impress a date with my culinary skills. Let’s just say, the steak was tough, the peppers were unevenly cooked, and the whole experience was a bit of a disaster. But I learned a valuable lesson that day: some recipes need a little help to reach their full potential. And that’s where the Instant Pot swoops in like a superhero.
This recipe isn’t just about convenience, though that’s a definite perk. It’s about achieving that perfect balance of tender, juicy steak and perfectly softened, slightly caramelized vegetables. It’s about creating a meal that’s both satisfying and healthy, that you can throw together in minutes and enjoy with your loved ones. So, pull up a chair, grab your Instant Pot, and let’s make some magic!
Why You’ll Love This Instant Pot Steak Fajitas Recipe
Seriously, where do I even begin? This recipe has become a staple in my household for so many reasons. It’s the kind of dish that makes you feel good from the inside out, and it’s so versatile that you can customize it to your heart’s content.
Unbelievably Tender Steak: The Instant Pot transforms even the most budget-friendly cuts of steak into melt-in-your-mouth perfection. The pressure cooking process breaks down the tough fibers, resulting in steak that’s juicy, flavorful, and incredibly tender.
Quick and Easy: We’re talking minimal prep time and a hands-off cooking process. Perfect for those busy weeknights when you just don’t have the energy to spend hours in the kitchen.
One-Pot Wonder: Less dishes to wash! Everything cooks together in the Instant Pot, making cleanup a breeze.
Customizable: You can easily adapt this recipe to your preferences. Use different types of steak, add your favorite vegetables, and adjust the seasonings to your liking.
Crowd-Pleaser: Everyone loves fajitas! This recipe is perfect for feeding a crowd or for a fun and interactive family dinner.
I’ve made this recipe countless times, and each time, it’s a hit. The aroma alone is enough to make your mouth water, and the taste is simply irresistible. I hope you’ll give it a try and see for yourself why this is one of my all-time favorite Instant Pot recipes.
Ingredients You’ll Need
Here’s what you’ll need to whip up a batch of these incredible Instant Pot Steak Fajitas. Don’t worry, the list is short and sweet, and you probably already have most of these ingredients in your pantry.
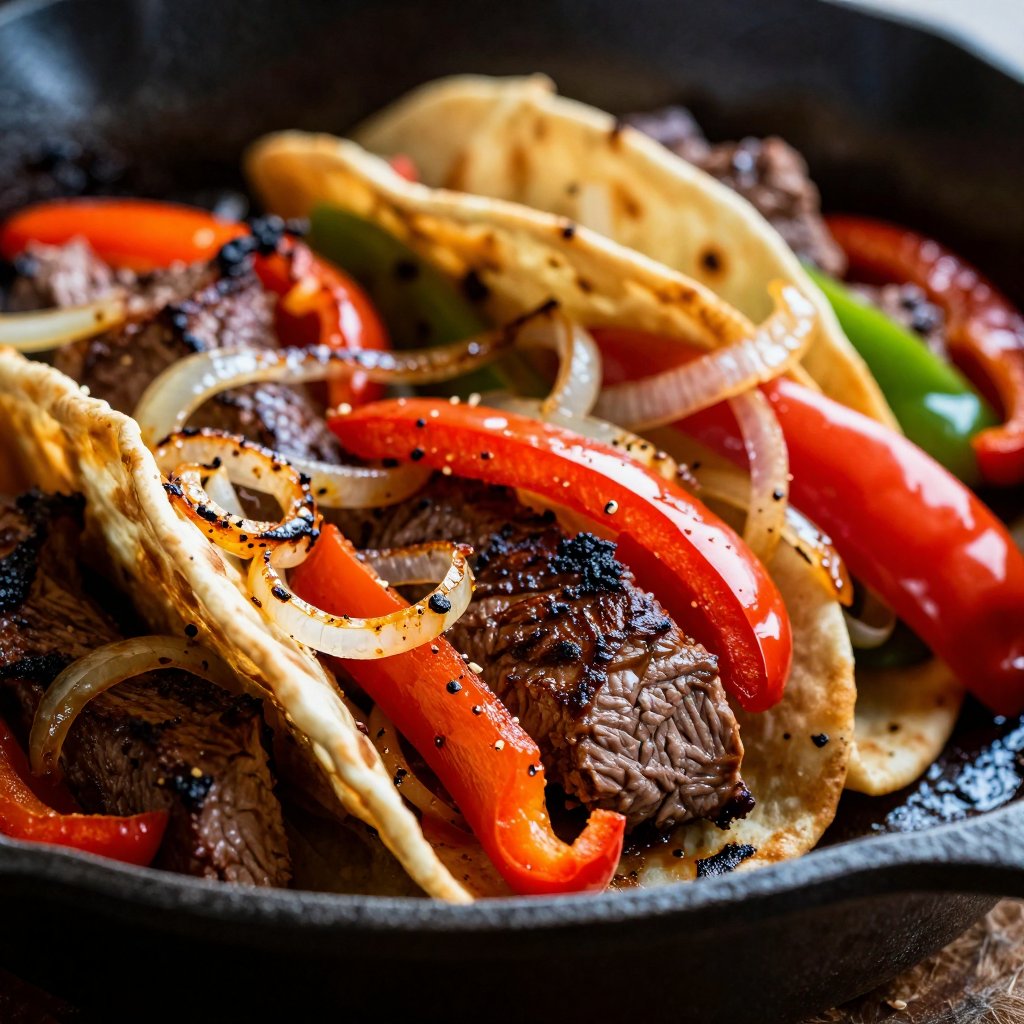
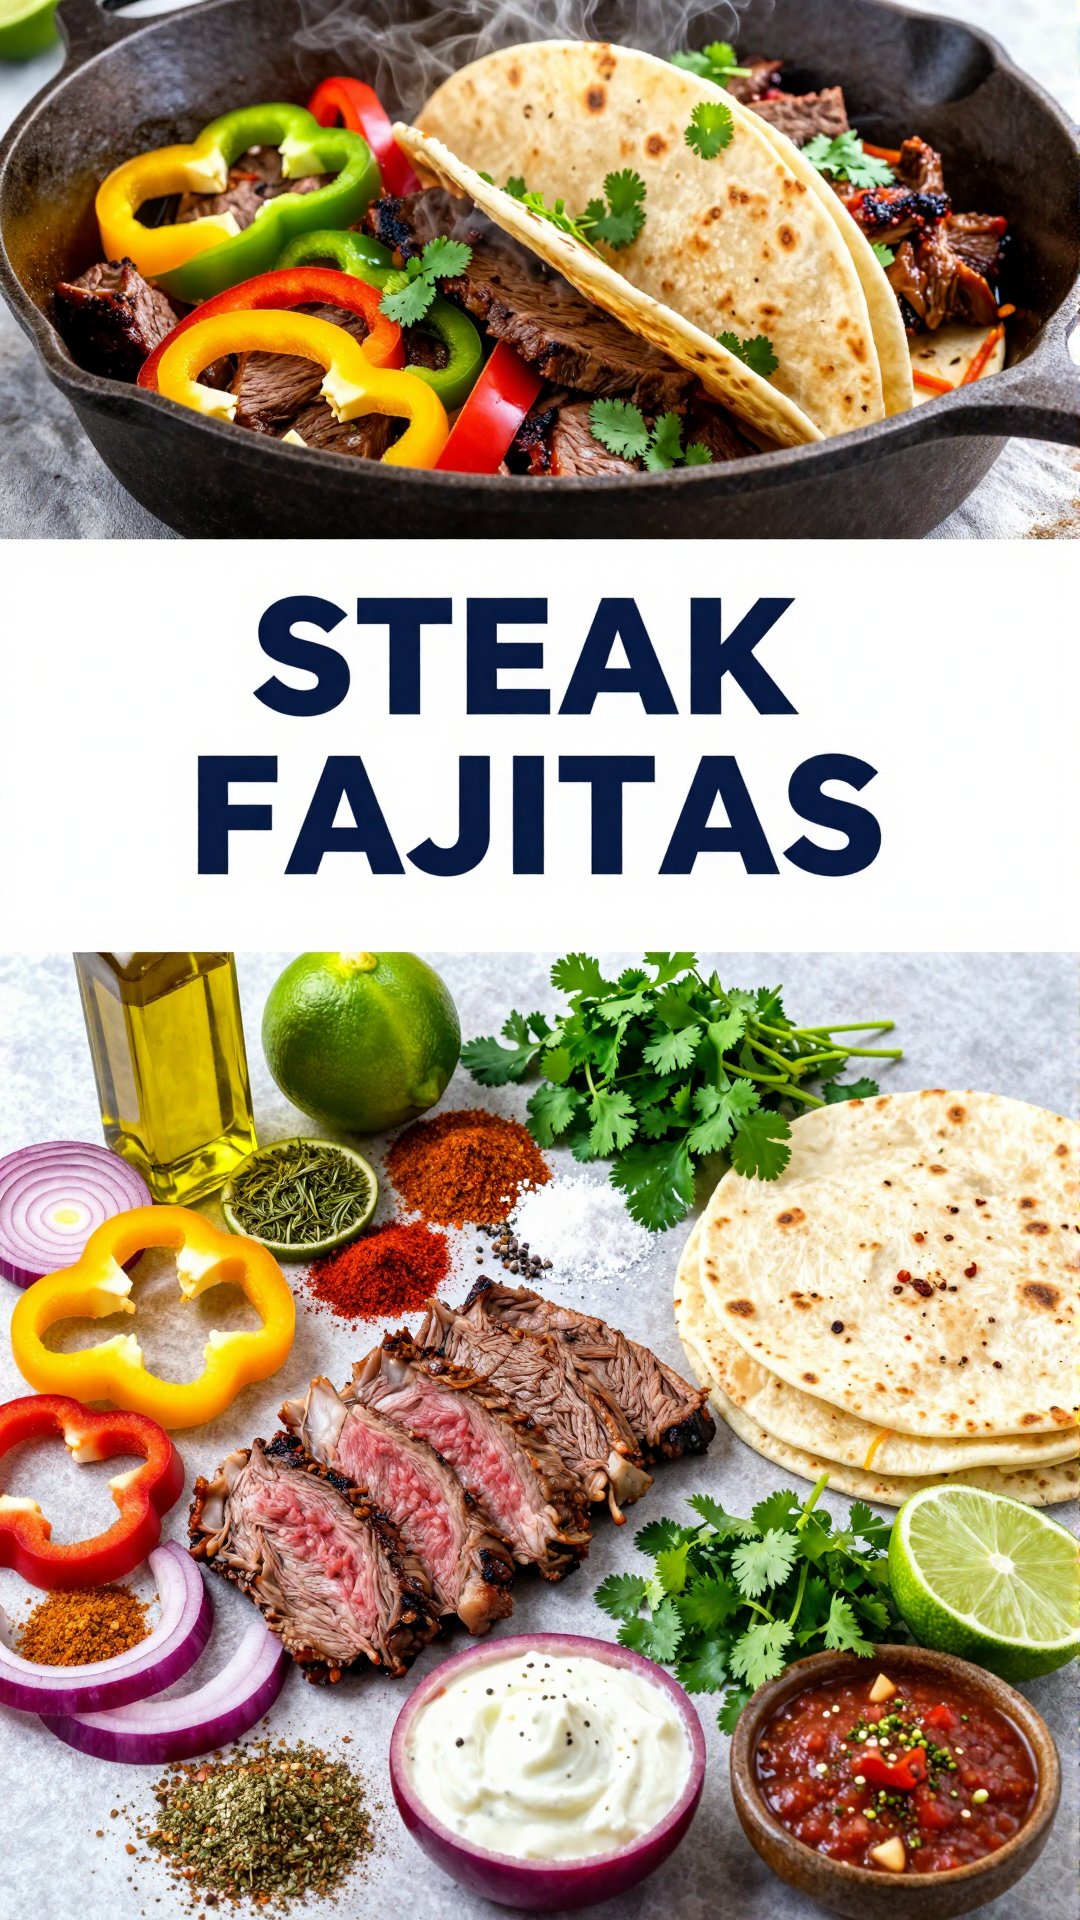
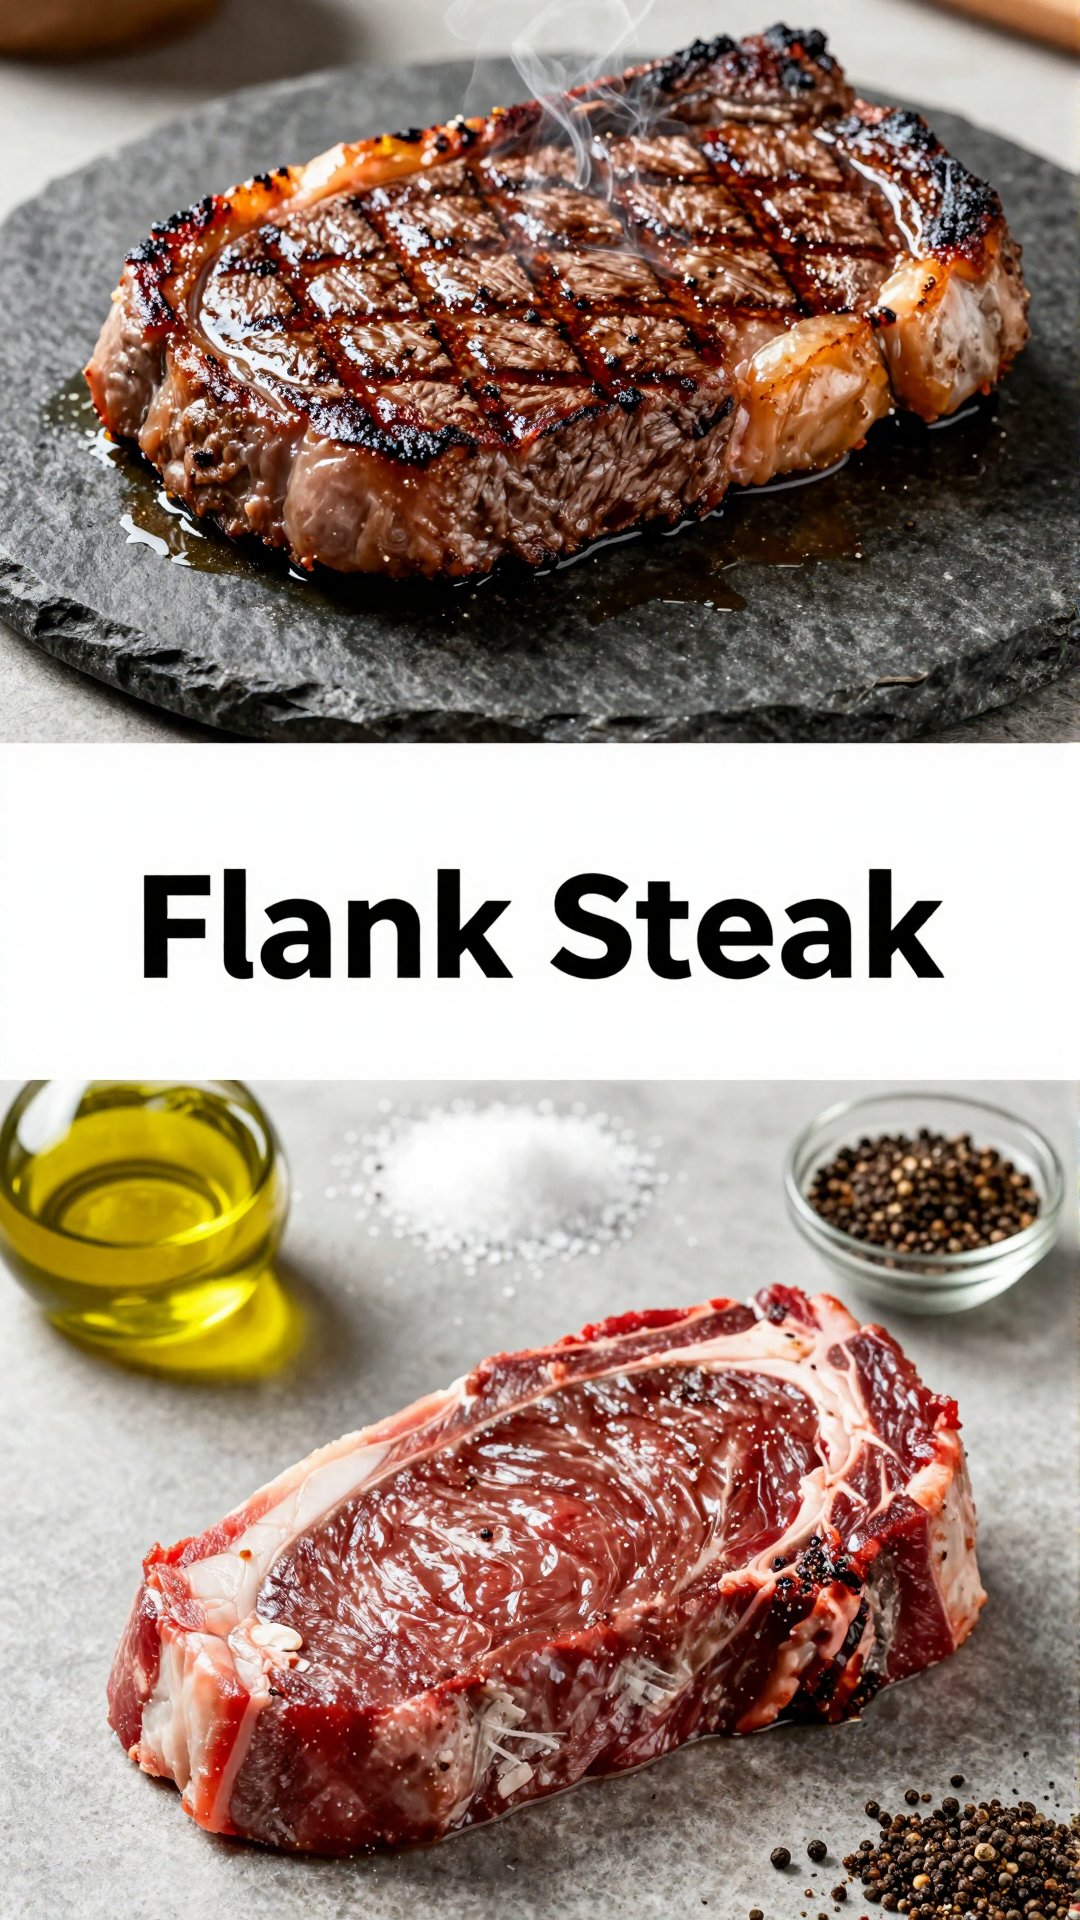
1.5 lbs flank steak, skirt steak, or sirloin steak, sliced thinly against the grain
How to Make Easy Instant Pot Steak Fajitas: Step-by-Step Instructions
Alright, let’s get cooking! Here’s a detailed guide on how to make these amazing Instant Pot Steak Fajitas. Don’t be intimidated – it’s a lot easier than you might think.
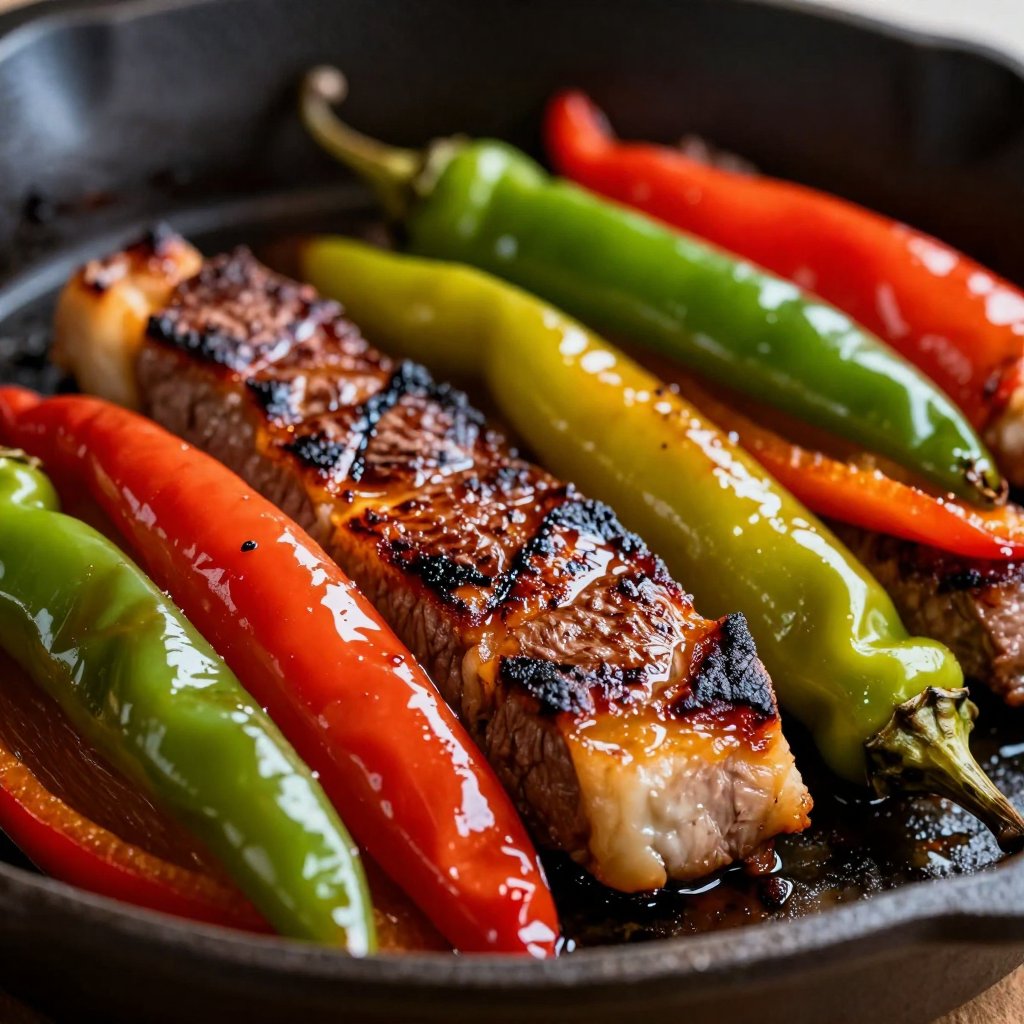
Prep the Vegetables: Place sliced bell peppers and onions in the Instant Pot. This forms the base for our fajitas and ensures they cook evenly.
Add the Steak: Add sliced steak on top of the vegetables. Layering the ingredients like this helps the steak absorb all the delicious flavors.
Season Generously: Sprinkle fajita seasoning evenly over the steak and vegetables. Don’t be shy with the seasoning – it’s what gives the fajitas their signature flavor.
Add Liquid: Pour beef broth or water into the Instant Pot. This creates the steam needed for pressure cooking and prevents the food from burning.
Pressure Cook: Secure the lid and set the valve to sealing. Cook on high pressure for 8 minutes. The cooking time may vary slightly depending on the thickness of your steak.
Natural Pressure Release: Allow for a natural pressure release for 10 minutes, then quick release any remaining pressure. This helps the steak retain its moisture and tenderness.
Open Carefully: Carefully remove the lid. Be careful of any remaining steam!
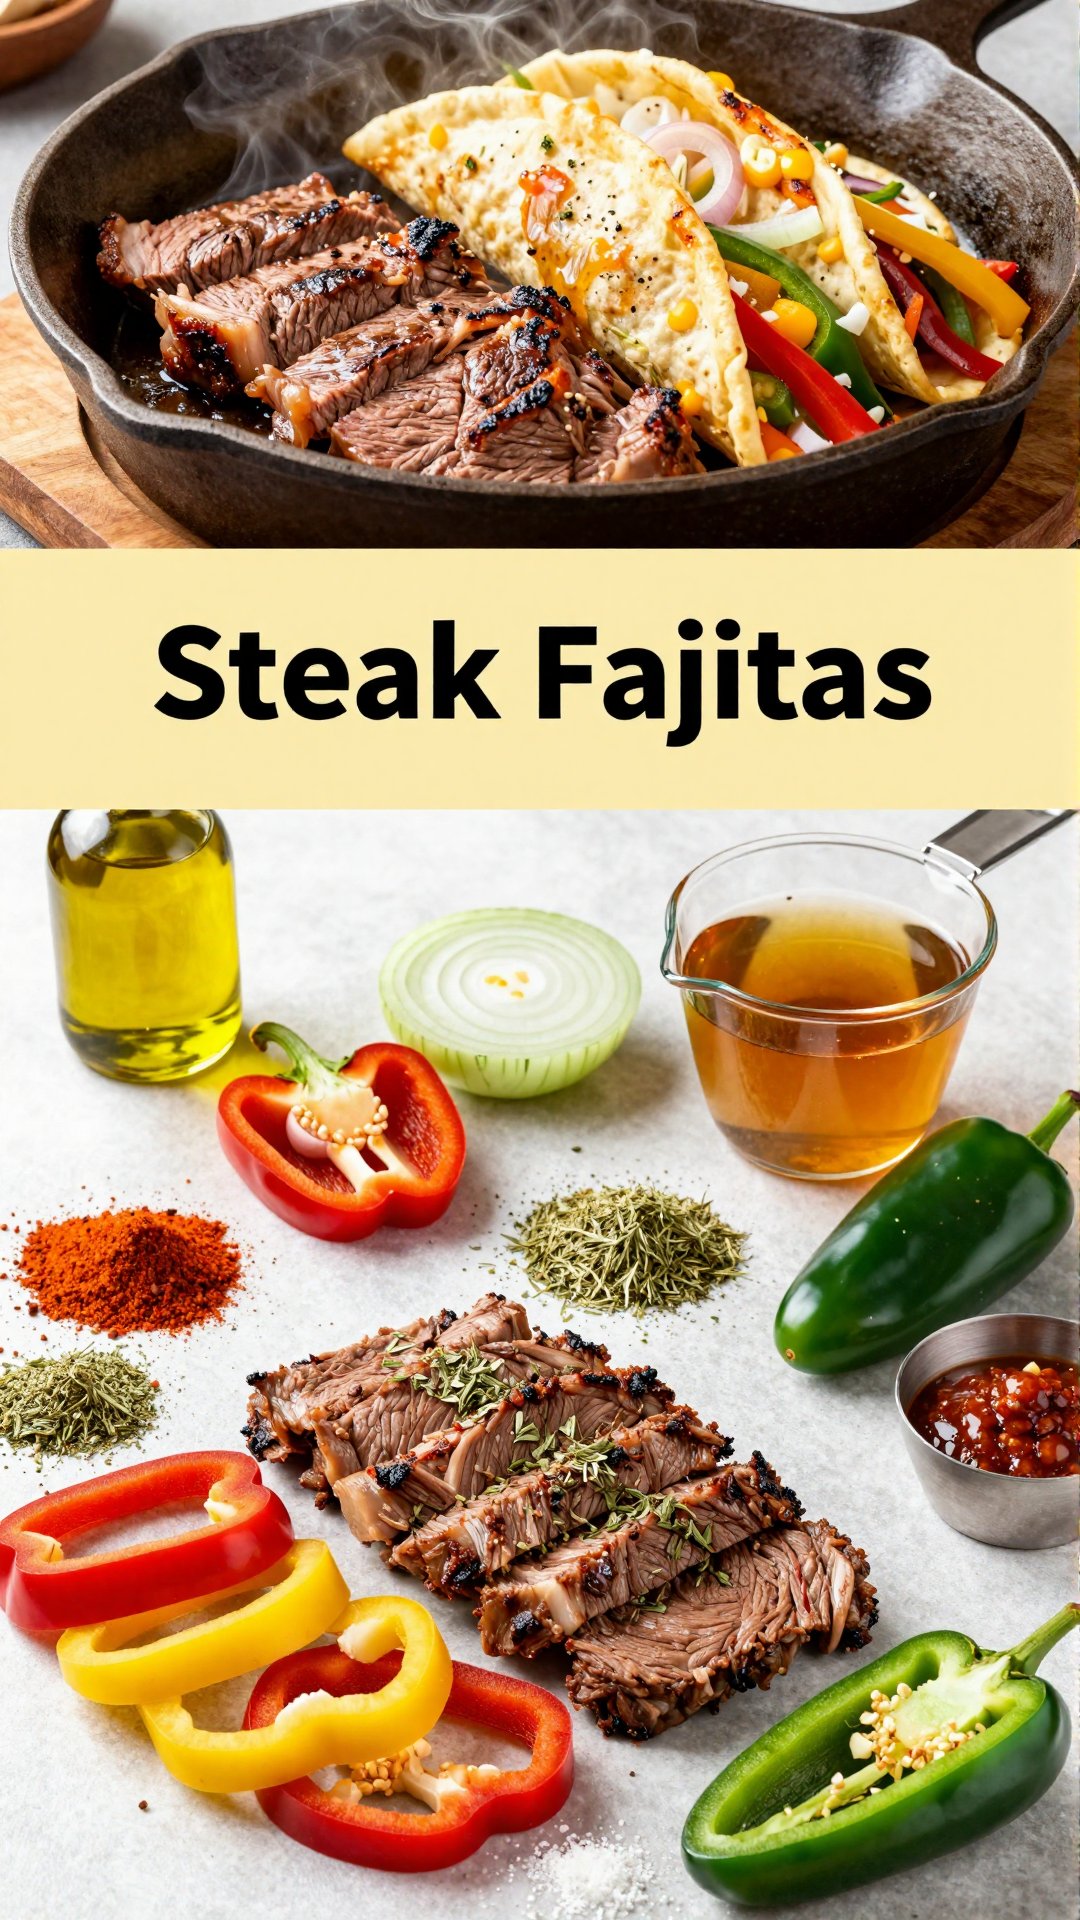
Serve and Enjoy: Serve the steak and vegetables immediately in warm tortillas with your favorite toppings. I personally love mine with salsa, sour cream, and a generous dollop of guacamole.
And that’s it! In just a few simple steps, you’ve created a restaurant-quality meal that’s sure to impress. I know, it’s almost too easy, right? I’ve tried many recipes and i hope you enjoy this one!
Pro Tips for Perfect Instant Pot Steak Fajitas
Want to take your Instant Pot Steak Fajitas to the next level? Here are a few of my favorite pro tips:
Slice the Steak Against the Grain: This is crucial for tender steak. Slicing against the grain shortens the muscle fibers, making it easier to chew.
Don’t Overcook the Steak: Overcooked steak will be tough and dry. I recommend cooking it for 8 minutes on high pressure for medium-rare to medium.
Use Fresh Vegetables: Fresh vegetables will have the best flavor and texture. If you don’t have fresh vegetables on hand, you can use frozen, but be sure to thaw them first.
Warm Your Tortillas: Warm tortillas are softer and more pliable. You can warm them in a dry skillet, in the microwave, or in the oven.
Get Creative with Toppings: The possibilities are endless! Experiment with different salsas, cheeses, and toppings to find your perfect combination.
These tips are simple, but they can make a big difference in the final result. Trust me, a little extra effort goes a long way!
Common Mistakes to Avoid
Even the most experienced cooks make mistakes sometimes. Here are a few common pitfalls to avoid when making Instant Pot Steak Fajitas:
Not Slicing the Steak Thinly Enough: Thick steak slices will take longer to cook and may not be as tender.
Overcrowding the Instant Pot: Overcrowding the Instant Pot can prevent the food from cooking evenly. If you’re making a large batch, cook it in two batches.
Not Using Enough Liquid: Insufficient liquid can cause the food to burn. Make sure you have at least 1/2 cup of liquid in the Instant Pot.
Releasing the Pressure Too Quickly: Releasing the pressure too quickly can cause the steak to be tough. Allow for a natural pressure release for at least 10 minutes.
Forgetting the Toppings: The toppings are what make fajitas so fun and flavorful! Don’t forget to set out a variety of toppings for your guests to choose from.
I’ve made all of these mistakes myself, so don’t feel bad if you do too. The important thing is to learn from them and keep practicing. I know, it s hard sometimes!
Delicious Variations to Try
One of the best things about this recipe is how easy it is to customize. Here are a few delicious variations to try:
Chicken Fajitas: Substitute the steak with chicken breasts or thighs. Adjust the cooking time accordingly.
Shrimp Fajitas: Use shrimp instead of steak. Reduce the cooking time to just a few minutes, as shrimp cooks very quickly.
Vegetarian Fajitas: Omit the meat and add more vegetables, such as mushrooms, zucchini, and corn.
Spicy Fajitas: Add a pinch of cayenne pepper or a few chopped jalapeños to the fajita seasoning for a spicy kick.
Pineapple Fajitas: Add some chunks of pineapple to the Instant Pot for a sweet and tangy twist.
Don’t be afraid to experiment and get creative! The possibilities are endless. I ve tried a few of these and they are all delicious.
How to Store and Reheat Leftovers
If you’re lucky enough to have leftovers, here’s how to store and reheat them:
Storage: Store the steak and vegetables in an airtight container in the refrigerator for up to 3 days.
Reheating: Reheat the leftovers in a skillet over medium heat or in the microwave. Add a splash of water or beef broth to prevent them from drying out.
Leftover fajitas are great for lunch the next day or for a quick and easy dinner. I often use them to make fajita bowls or salads.
Frequently Asked Questions (FAQ)
Here are some of the most common questions I get asked about this recipe:
Can I use frozen steak? Yes, you can use frozen steak, but you’ll need to increase the cooking time by a few minutes.
Can I use a different type of steak? Yes, you can use any type of steak that’s suitable for fajitas, such as skirt steak, sirloin steak, or flank steak.
Can I make this recipe in a slow cooker? Yes, you can make this recipe in a slow cooker. Cook on low for 6-8 hours or on high for 3-4 hours.
Can I add beans to the fajitas? Yes, you can add a can of black beans or pinto beans to the Instant Pot.
What are the best toppings for fajitas? The best toppings are a matter of personal preference, but some popular options include salsa, sour cream, guacamole, cheese, lettuce, and tomatoes.
If you have any other questions, feel free to leave a comment below! I’m always happy to help. I hope, if you have a question, i can help me!
Serving Suggestions for Instant Pot Steak Fajitas
These Instant Pot Steak Fajitas are delicious on their own, but here are a few serving suggestions to make them even better:
Fajita Bar: Set up a fajita bar with a variety of toppings and let your guests customize their own fajitas.
Fajita Bowls: Serve the steak and vegetables over rice or quinoa for a healthy and satisfying bowl.
Fajita Salads: Top a bed of lettuce with the steak and vegetables, along with your favorite salad toppings.
Fajita Quesadillas: Use the steak and vegetables as a filling for quesadillas.
Fajita Nachos: Top tortilla chips with the steak and vegetables, along with cheese and your favorite nacho toppings.
These are just a few ideas to get you started. The possibilities are endless! The rafflecopter is not included in this recipe, sorry!
So there you have it! My Easy Instant Pot Steak Fajitas recipe. I truly believe that this recipe is a game-changer, and I’m so excited for you to try it. Remember, cooking should be fun and enjoyable, so don’t be afraid to experiment and make it your own. Thank you for joining me in my kitchen today. Until next time, happy cooking!
I remember my mother s days of cooking and i try to emulate her. I know, the steak is the star of the show, but the peppers in this recipe are amazing! So i hope you make an effort, an effort to make this recipe. It s really simple to do! Grab your instant pots and lets make some steak fajitas! The meat is tender and juicy. I ve made this pot for you and your family to enjoy.
Enjoy delicious and tender steak fajitas made quickly and easily in your Instant Pot. This recipe is perfect for a weeknight meal and can be customized with your favorite toppings.
Ingredients
Ingredients
1.5lbsflank steak, skirt steak, or sirloin steak(sliced thinly against the grain)
Hey there, fellow food lovers! Ava here, ready to whisk you away on a culinary adventure that’s as quick as it is delicious. If you’re anything like me, you crave those weeknight dinners that are packed with flavor but don’t require hours in the kitchen. That’s where my Instant Pot Steak Fajitas come in! Imagine tender, juicy steak strips mingling with vibrant, perfectly softened peppers and onions, all infused with the zesty kick of fajita seasoning. And the best part? It all comes together in your trusty Instant Pot in a fraction of the time it would take on the stovetop or grill. This recipe is a game-changer, turning a traditionally longer cooking process into a speedy and satisfying meal. Let’s dive into how you can make these mouthwatering fajitas right in your own kitchen!
I remember the first time I tried making fajitas at home. It was a summer barbecue, and I was determined to impress my friends with my grilling skills. Let’s just say the steak ended up a bit… well, let’s call it “charred with character.” The peppers were unevenly cooked, and the whole experience was more stressful than enjoyable. But that’s the beauty of cooking, isn’t it? We learn from our mistakes and find new ways to make things easier and better. That’s precisely why I fell in love with the Instant Pot. It’s like having a sous chef who never gets tired or makes excuses. It consistently delivers perfectly cooked results, taking the guesswork (and the stress) out of cooking.
This Instant Pot Steak Fajitas recipe is a testament to that. It’s simple, straightforward, and practically foolproof. Whether you’re a seasoned cook or just starting out, you can confidently whip up a batch of these fajitas and enjoy a restaurant-quality meal without the restaurant price tag. So, grab your Instant Pot, gather your ingredients, and let’s get cooking! Your taste buds (and your schedule) will thank you.
Why You’ll Love This Instant Pot Steak Fajitas Recipe
Okay, let’s get real. Why should you even bother trying this recipe when there are a million other fajita recipes out there? Well, let me tell you, this Instant Pot version is a total winner for several reasons. It’s not just about convenience; it’s about flavor, texture, and the overall experience. Here’s why I think you’ll absolutely fall in love with these Instant Pot Steak Fajitas:
Speed Demon: Traditional fajitas can take a while, especially if you’re grilling the steak. This recipe slashes the cooking time significantly. The Instant Pot works its magic, delivering tender steak and perfectly cooked veggies in minutes.
Flavor Explosion: The Instant Pot locks in all those delicious juices and flavors. The steak becomes incredibly tender and absorbs the fajita seasoning like a sponge. You get a burst of flavor in every single bite.
Tender Meat: The Instant Pot is a master at tenderizing meat. Even tougher cuts of steak become melt-in-your-mouth tender when cooked under pressure. Say goodbye to chewy, dry fajitas!
Easy Cleanup: One-pot meals are the best, aren’t they? This recipe minimizes the number of dishes you have to wash. Everything cooks together in the Instant Pot, making cleanup a breeze.
Customizable: This recipe is incredibly versatile. You can easily adjust the spice level, add different veggies, or swap out the steak for chicken or shrimp. It’s a blank canvas for your culinary creativity.
Perfect for Meal Prep: These fajitas are great for meal prepping. You can cook a big batch on Sunday and enjoy them throughout the week in tacos, salads, or burrito bowls.
Crowd-Pleaser: Whether you’re cooking for your family or hosting a party, these fajitas are always a hit. They’re easy to serve and everyone can customize their own toppings.
I truly believe that this recipe is a game-changer for anyone who loves fajitas but doesn’t always have the time to make them from scratch. It’s a perfect blend of convenience and flavor, making it a staple in my kitchen. I hope it becomes one in yours too!
The Star Ingredients for Instant Pot Steak Fajitas
Alright, let’s talk ingredients! You know I’m all about using fresh, high-quality ingredients to create the best possible flavor. For these Instant Pot Steak Fajitas, the ingredients are simple but mighty. Here’s a breakdown of what you’ll need and why each one is so important:
1.5 lbs skirt steak, cut into strips: Skirt steak is my go-to for fajitas because it’s thin, flavorful, and cooks quickly. Cutting it into strips before cooking ensures that it gets evenly tender in the Instant Pot. You can also use flank steak, but skirt steak is generally more tender.
1 large bell pepper (any color), sliced: Bell peppers add a pop of color, sweetness, and crunch to the fajitas. I usually use a mix of red, yellow, and orange peppers for visual appeal, but any color will work just fine.
1 large onion, sliced: Onions provide a savory base for the fajitas. They soften and caramelize beautifully in the Instant Pot, adding depth of flavor to the dish. I prefer using yellow onions, but white or red onions can also be used.
1 packet fajita seasoning: Fajita seasoning is the key to that classic fajita flavor. You can use store-bought seasoning or make your own from scratch. I like to make my own so I can control the amount of salt and spice.
1 cup beef broth: Beef broth adds moisture and flavor to the fajitas. It helps to tenderize the steak and prevents it from drying out in the Instant Pot. You can also use chicken broth or vegetable broth if you prefer.
2 tablespoons olive oil: Olive oil is used to sauté the steak and vegetables. It adds flavor and helps to prevent the food from sticking to the bottom of the Instant Pot. You can also use vegetable oil or avocado oil.
Optional toppings: sour cream, salsa, guacamole, shredded cheese, cilantro, tortillas: Toppings are where you can really get creative and customize your fajitas to your liking. Sour cream adds a creamy tang, salsa adds a spicy kick, guacamole adds richness and flavor, shredded cheese adds a cheesy goodness, and cilantro adds a fresh, herbaceous note. And of course, you need warm tortillas to wrap it all up!
These ingredients are the foundation of a truly delicious and satisfying fajita experience. Don’t be afraid to experiment with different variations and substitutions to create your own signature fajita masterpiece!
Step-by-Step Guide: Making Instant Pot Steak Fajitas
Okay, now for the fun part – actually making the fajitas! Don’t worry, this recipe is super straightforward, even if you’re new to using an Instant Pot. I’ll walk you through each step with clear instructions and helpful tips along the way. Let’s get started!
Turn on the Instant Pot and select the ‘Saute’ function.: This is the first step to ensure the pot is ready for cooking. Make sure the inner pot is clean and dry before turning it on.
Add olive oil to the pot. Once heated, add the steak strips and cook until browned on all sides. This may need to be done in batches to avoid overcrowding.: Browning the steak adds flavor and texture to the fajitas. Don’t overcrowd the pot, or the steak will steam instead of brown. Work in batches if necessary.
Add the sliced bell pepper and onion to the pot. Cook for a few minutes until slightly softened.: Cooking the peppers and onions softens them and brings out their natural sweetness. Stir them occasionally to prevent sticking.
Sprinkle the fajita seasoning over the steak and vegetables. Stir well to coat everything evenly.: This is where the magic happens! The fajita seasoning infuses the steak and vegetables with that classic fajita flavor. Make sure everything is well coated for maximum flavor.
Pour in the beef broth. Deglaze the bottom of the pot, scraping up any browned bits.: Deglazing is important because it prevents the dreaded ‘Burn’ notice on your Instant Pot. The beef broth also adds moisture and flavor to the fajitas.
Cancel the ‘Saute’ function. Secure the lid and set the Instant Pot to ‘Manual’ or ‘Pressure Cook’ on high pressure for 8 minutes.: Now it’s time to let the Instant Pot do its thing! Secure the lid and set the cooking time.
Once the cooking time is complete, allow for a natural pressure release for 10 minutes, then quick release any remaining pressure.: Natural pressure release allows the steak to become even more tender. Quick release any remaining pressure after 10 minutes to prevent overcooking.
Carefully remove the lid. If there is excess liquid, you can select ‘Saute’ again and cook it down to your desired consistency.: If there’s too much liquid in the pot, you can cook it down to your desired consistency by selecting the ‘Saute’ function again. Be careful not to overcook the steak.
Serve the steak and vegetable mixture in warm tortillas with your favorite toppings.: Now for the best part – serving and enjoying your delicious Instant Pot Steak Fajitas! Warm the tortillas and set out your favorite toppings for a customizable fajita feast.
See? I told you it was easy! With these simple steps, you can whip up a batch of mouthwatering fajitas in no time. Now, let’s move on to some pro tips to help you take your fajitas to the next level.
Ava’s Pro Tips for Perfect Instant Pot Steak Fajitas
Alright, my friends, let’s elevate these fajitas from good to absolutely phenomenal! I’ve got a few pro tips up my sleeve that will help you achieve fajita perfection every single time. These are the little things I’ve learned over the years that make a big difference in flavor and texture.
Choose the Right Cut of Steak: While I recommend skirt steak for its tenderness and flavor, you can also use flank steak or sirloin. Just be sure to adjust the cooking time accordingly. Flank steak may require a slightly longer cooking time to become tender.
Don’t Overcrowd the Pot: When browning the steak, work in batches to avoid overcrowding the pot. Overcrowding will cause the steak to steam instead of brown, which will affect the flavor and texture.
Sear the Steak for Extra Flavor: Searing the steak before pressure cooking adds a delicious crust and enhances the overall flavor. Don’t skip this step!
Use Freshly Ground Spices: If you’re making your own fajita seasoning, use freshly ground spices for the best flavor. The difference is noticeable!
Deglaze the Pot Thoroughly: Make sure to scrape up all the browned bits from the bottom of the pot when deglazing. These bits are packed with flavor and will add depth to the fajitas.
Don’t Overcook the Steak: Overcooking the steak will make it tough and dry. Be sure to follow the cooking time in the recipe and adjust as needed based on your Instant Pot and the thickness of the steak.
Adjust the Spice Level to Your Liking: If you like your fajitas extra spicy, add a pinch of cayenne pepper or a dash of hot sauce to the fajita seasoning.
Warm the Tortillas: Warm tortillas are essential for the best fajita experience. You can warm them in a skillet, in the microwave, or in the oven.
Get Creative with Toppings: Don’t be afraid to experiment with different toppings to create your own signature fajitas. Some of my favorites include guacamole, sour cream, salsa, shredded cheese, cilantro, and pickled onions.
Rest the Steak Before Slicing: If you’re using a larger cut of steak like flank steak, let it rest for a few minutes before slicing against the grain. This will help to keep it tender and juicy.
These pro tips are your secret weapon for creating truly amazing Instant Pot Steak Fajitas. Follow them, and you’ll be amazed at the difference they make!
Common Mistakes to Avoid When Making Instant Pot Fajitas
We’ve all been there – a recipe that seems foolproof turns into a bit of a disaster. But don’t worry, I’m here to help you avoid some common pitfalls when making Instant Pot Steak Fajitas. These are the mistakes I’ve made (and learned from!) so you don’t have to.
Not searing the steak: Skipping the searing step results in less flavorful fajitas. The sear creates a delicious crust that enhances the overall taste.
Overcrowding the Instant Pot: Overcrowding prevents proper browning and can lead to unevenly cooked steak and vegetables. Work in batches to avoid this.
Using the wrong cut of steak: Tougher cuts of steak may not tenderize properly in the Instant Pot within the given cooking time. Stick to skirt steak or flank steak for best results.
Adding too much liquid: Adding too much liquid can result in watery fajitas. Stick to the amount specified in the recipe and adjust as needed.
Not deglazing the pot properly: Failing to scrape up the browned bits from the bottom of the pot can trigger the ‘Burn’ warning. Deglaze thoroughly to avoid this.
Overcooking the steak: Overcooking leads to dry, tough steak. Monitor the cooking time closely and adjust as needed based on your Instant Pot.
Using old or stale spices: Old spices lose their potency, resulting in less flavorful fajitas. Use fresh spices for the best taste.
Forgetting to release the pressure properly: Releasing the pressure too quickly can cause the steak to seize up and become tough. Allow for a natural pressure release for at least 10 minutes.
Not allowing the steak to rest before slicing: Slicing the steak immediately after cooking can cause it to lose its juices. Let it rest for a few minutes before slicing against the grain.
Serving with cold tortillas: Cold tortillas are a major mood killer! Warm them up for a much better fajita experience.
By avoiding these common mistakes, you’ll be well on your way to creating perfect Instant Pot Steak Fajitas every time. Remember, cooking is all about learning and experimenting, so don’t be afraid to try new things and adjust the recipe to your liking.
Delicious Variations on Instant Pot Steak Fajitas
One of the things I love most about cooking is the ability to customize recipes and make them your own. These Instant Pot Steak Fajitas are no exception! Here are a few delicious variations to try that will keep things interesting and cater to different tastes and dietary needs.
Chicken Fajitas: Swap out the steak for chicken breasts or thighs. Reduce the cooking time to 6 minutes on high pressure. Chicken fajitas are a lighter and equally delicious option.
Shrimp Fajitas: Use peeled and deveined shrimp instead of steak. Cook for just 2 minutes on high pressure, followed by a quick release. Shrimp fajitas are a quick and flavorful alternative.
Vegetarian Fajitas: Omit the meat and add more vegetables, such as mushrooms, zucchini, and corn. No need to adjust the cooking time. Vegetarian fajitas are a healthy and satisfying option.
Spicy Fajitas: Add a pinch of cayenne pepper or a dash of hot sauce to the fajita seasoning for an extra kick. You can also add sliced jalapeños to the Instant Pot.
Sweet and Savory Fajitas: Add a tablespoon of brown sugar or honey to the fajita seasoning for a touch of sweetness. This will balance out the savory flavors and create a unique taste.
Fajita Bowls: Serve the steak and vegetable mixture over rice or quinoa instead of tortillas. Top with your favorite toppings for a healthy and satisfying bowl.
Low-Carb Fajitas: Serve the fajitas in lettuce wraps instead of tortillas. This is a great option for those following a low-carb diet.
Pineapple Fajitas: Add chunks of pineapple to the Instant Pot for a tropical twist. The pineapple will caramelize and add a sweet and tangy flavor to the fajitas.
Bell Pepper Variety: Use a mix of different colored bell peppers (red, yellow, orange, green) for a more visually appealing and flavorful dish.
Add Beans: Incorporate black beans or pinto beans into the fajita mix for added protein and fiber.
These variations are just a starting point – feel free to get creative and experiment with different ingredients and flavors to create your own signature fajita recipe. The possibilities are endless!
How to Store and Reheat Leftover Instant Pot Steak Fajitas
So, you’ve made a big batch of Instant Pot Steak Fajitas and have some leftovers. Great! These fajitas store and reheat beautifully, making them perfect for meal prepping or enjoying the next day. Here’s how to properly store and reheat your leftovers to maintain their flavor and texture.
Storage:
Cool Completely: Allow the fajitas to cool completely before storing them. This will prevent condensation from forming, which can make them soggy.
Airtight Container: Transfer the cooled fajitas to an airtight container. This will help to keep them fresh and prevent them from absorbing odors from the refrigerator.
Refrigerate Promptly: Store the fajitas in the refrigerator within two hours of cooking. This will prevent bacterial growth and ensure food safety.
Storage Time: Leftover Instant Pot Steak Fajitas can be stored in the refrigerator for up to 3-4 days.
Reheating:
Microwave: The microwave is the quickest way to reheat fajitas. Place the fajitas on a microwave-safe plate and heat in 30-second intervals, stirring in between, until heated through. Be careful not to overheat, as this can make the steak tough.
Skillet: Reheating in a skillet is a great way to restore some of the original texture. Heat a skillet over medium heat and add the fajitas. Cook for a few minutes, stirring occasionally, until heated through.
Oven: Reheating in the oven is a good option if you’re reheating a large batch of fajitas. Preheat the oven to 350°F (175°C). Place the fajitas in an oven-safe dish and cover with foil. Bake for 10-15 minutes, or until heated through.
Instant Pot: You can also reheat the fajitas in the Instant Pot using the ‘Saute’ function. Add a splash of beef broth to the pot and heat the fajitas until warmed through, stirring occasionally.
When reheating, it’s best to add a little bit of moisture (such as beef broth or water) to prevent the fajitas from drying out. And remember, always reheat leftovers until they are steaming hot to ensure they are safe to eat.
Frequently Asked Questions About Instant Pot Steak Fajitas
Got questions about making Instant Pot Steak Fajitas? You’re not alone! Here are some of the most frequently asked questions I get about this recipe, along with my answers to help you make the perfect fajitas every time.
Can I use frozen steak?: While it’s best to use fresh steak for optimal flavor and texture, you can use frozen steak if you’re in a pinch. Just be sure to thaw it completely before cooking.
Can I make this recipe without an Instant Pot?: Yes, you can make this recipe on the stovetop or in the oven. Simply sear the steak and vegetables in a skillet, then simmer in beef broth until the steak is tender.
How do I prevent the ‘Burn’ warning on my Instant Pot?: To prevent the ‘Burn’ warning, make sure to deglaze the pot thoroughly after searing the steak and vegetables. Also, avoid adding thick sauces or ingredients that can stick to the bottom of the pot.
Can I add other vegetables to the fajitas?: Absolutely! Feel free to add other vegetables such as mushrooms, zucchini, corn, or jalapeños to the fajitas.
How do I make the fajitas spicier?: To make the fajitas spicier, add a pinch of cayenne pepper or a dash of hot sauce to the fajita seasoning. You can also add sliced jalapeños to the Instant Pot.
What kind of tortillas should I use?: You can use flour tortillas or corn tortillas, depending on your preference. I prefer flour tortillas for their soft texture and mild flavor.
Can I make this recipe ahead of time?: Yes, you can make the fajitas ahead of time and store them in the refrigerator until you’re ready to serve them. Reheat them according to the instructions above.
How do I keep the tortillas warm?: To keep the tortillas warm, wrap them in a clean kitchen towel and place them in a warm oven or microwave. You can also use a tortilla warmer.
Can I use a different type of meat?: Yes, you can use chicken, shrimp, or tofu instead of steak. Adjust the cooking time accordingly.
What are some good toppings for fajitas?: Some popular toppings for fajitas include guacamole, sour cream, salsa, shredded cheese, cilantro, pickled onions, and lime wedges.
I hope these FAQs have answered some of your questions about making Instant Pot Steak Fajitas. If you have any other questions, feel free to leave a comment below, and I’ll do my best to help you out!
Serving Suggestions for Your Delicious Instant Pot Steak Fajitas
Okay, you’ve made these incredible Instant Pot Steak Fajitas, and now it’s time to serve them up and enjoy! But what goes well with fajitas? Here are some of my favorite serving suggestions to create a complete and satisfying meal.
Classic Fajita Platter: Serve the fajitas with warm tortillas, guacamole, sour cream, salsa, shredded cheese, cilantro, and lime wedges. Let everyone customize their own fajitas with their favorite toppings.
Mexican Rice and Beans: Serve the fajitas with a side of Mexican rice and refried beans or black beans. This is a classic combination that’s always a hit.
Corn on the Cob: Grilled or roasted corn on the cob is a perfect summer side dish for fajitas. The sweetness of the corn complements the savory flavors of the fajitas.
Mexican Street Corn Salad: This creamy and flavorful salad is a delicious alternative to traditional corn on the cob. It’s made with grilled corn, mayonnaise, cotija cheese, chili powder, and lime juice.
Guacamole and Chips: Serve the fajitas with a side of homemade guacamole and tortilla chips. This is a great appetizer or snack to enjoy while you’re waiting for the fajitas to cook.
Sopa de Tortilla: This hearty and flavorful soup is a perfect starter for a fajita feast. It’s made with chicken broth, tomatoes, onions, garlic, chili peppers, and tortilla strips.
Margaritas: No Mexican meal is complete without margaritas! Serve the fajitas with classic margaritas or try a fun variation like strawberry or mango margaritas.
Mexican Caesar Salad: A twist on the classic Caesar salad, this version includes ingredients like black beans, corn, avocado, and a spicy chipotle dressing.
Elote Dip: Bring the flavors of Mexican street corn to a shareable dip served with tortilla chips.
Cilantro Lime Rice: A fragrant and flavorful rice that complements the fajitas perfectly.
These serving suggestions are just a starting point – feel free to get creative and experiment with different sides and drinks to create your own perfect fajita meal. And most importantly, enjoy!
So there you have it – my ultimate guide to making Instant Pot Steak Fajitas! I hope you’ve enjoyed this culinary journey with me. Remember, cooking is all about having fun and experimenting, so don’t be afraid to try new things and make this recipe your own. Until next time, happy cooking!
Enjoy delicious and easy steak fajitas made quickly in your Instant Pot. This recipe delivers tender steak and flavorful vegetables in minutes, perfect for a weeknight meal.
Bacon Cheese Stuffed Burgers: A Seattle Kitchen Classic
Hey there, burger aficionados! Ava here, straight from my little kitchen in Seattle, ready to share a recipe that’s been a game-changer in our household: Bacon Cheese Stuffed Burgers. If you’re anything like me, you believe a burger should be more than just a patty on a bun. It should be an experience, a flavor explosion, a moment of pure joy. And trust me, these burgers deliver all that and more.
I still remember the first time I made these. It was a rainy Seattle evening (surprise!), and I was craving something comforting but also a little exciting. I had some ground beef, a block of cheddar, and a package of bacon staring back at me from the fridge. An idea sparked – why not stuff all that goodness inside the burger itself? After a little experimentation, these bacon cheese stuffed burgers were born. Now, they’re a regular feature on our summer grill menu, and honestly, they’re just as good cooked indoors when the Seattle weather decides to be… well, Seattle weather.
Why You’ll Love This Bacon Cheese Stuffed Burger Recipe
Okay, let’s get real. Why should you try this recipe? Here’s the lowdown:
Flavor Bomb: We’re talking juicy ground beef, melty cheddar cheese, and crispy bacon all in one bite. It’s a symphony of flavors that will make your taste buds sing.
Surprisingly Easy: Don’t let the ‘stuffed’ part intimidate you. This recipe is incredibly straightforward and easy to make, even on a busy weeknight.
Customizable: Want to swap out the cheddar for pepper jack? Go for it! Feel like adding some caramelized onions? Absolutely! This recipe is a blank canvas for your burger dreams.
Impress Your Friends (and Yourself!): These burgers look and taste like something you’d order at a fancy restaurant, but you made them in your own kitchen. Bragging rights are definitely included.
I’ve tweaked and perfected this recipe over time, adding my own little touches to make it extra special. I can’t wait for you to try it and make it your own too! Be sure to adapt this recipe to your preferences.
Ingredients for the Ultimate Stuffed Cheeseburgers
Here’s what you’ll need to create these masterpieces:
Ground Beef (80/20): 1 1/2 pounds. This ratio gives you the perfect balance of flavor and juiciness.
Salt: 1 teaspoon. Enhances the flavor of the beef.
Black Pepper: 1/2 teaspoon. Adds a little kick.
Garlic Powder: 1/2 teaspoon. Because everything’s better with garlic.
Onion Powder: 1/4 teaspoon. A subtle hint of oniony goodness.
Cheddar Cheese: 4 slices, cut into cubes. The star of the show! Feel free to use your favorite cheese.
Cooked Turkey Bacon: 4 slices, crumbled. Adds a smoky, savory crunch. I prefer turkey bacon, but pork bacon works great too.
Hamburger Buns: 4. Choose your favorite kind – brioche, sesame, potato, whatever floats your boat.
Toppings of Choice: Lettuce, tomato, onion, ketchup, mustard, burger sauce, pickles – the sky’s the limit!
How to Make Bacon Cheese Stuffed Burgers: Step-by-Step
Alright, let’s get cooking! Here’s how to bring these bad boys to life:
Prep the Beef: In a large bowl, gently mix together the ground beef, salt, pepper, garlic powder, and onion powder. Be careful not to overmix, as this can make the burgers tough.
Divide and Flatten: Divide the ground beef into 8 equal portions. Flatten each portion into a thin patty. Aim for patties that are slightly larger than your buns, as they’ll shrink a bit during cooking.
Stuff ‘Em!: Place a quarter of the cheese cubes and crumbled turkey bacon in the center of 4 of the patties.
Seal the Deal: Top with the remaining 4 patties and pinch the edges together to seal, making sure the cheese and turkey bacon are completely enclosed. This is crucial to prevent the cheese from leaking out during cooking.
Preheat: Preheat your grill or skillet to medium-high heat. If using a grill, make sure the grates are clean and lightly oiled to prevent sticking.
Cook: Cook the burgers for about 4-6 minutes per side, or until cooked through and the internal temperature reaches 160°F. Use a meat thermometer to ensure they’re cooked safely.
Assemble and Enjoy: Place the cooked burgers on hamburger buns and add your favorite toppings. Serve immediately and enjoy the cheesy, bacony goodness!
Ava’s Pro Tips for Perfect Stuffed Burgers
Over the years, I’ve learned a few tricks to ensure burger perfection. Here are my top tips:
Don’t Overmix the Beef: Overmixing can result in tough burgers. Mix the ingredients just until they’re combined.
Seal Tightly: Make sure the edges of the patties are sealed tightly to prevent the cheese from leaking out. I like to use my fingers to pinch the edges together and then gently press down with a fork to create a decorative seal.
Use a Meat Thermometer: This is the best way to ensure your burgers are cooked to a safe temperature. Aim for an internal temperature of 160°F.
Let Them Rest: After cooking, let the burgers rest for a few minutes before serving. This allows the juices to redistribute, resulting in a more flavorful and juicy burger.
Toast the Buns: Toasting the buns adds a nice texture and prevents them from getting soggy.
Common Mistakes to Avoid When Making Stuffed Burgers
We all make mistakes in the kitchen – it’s part of the fun! But here are a few common pitfalls to watch out for when making stuffed burgers:
Using Lean Ground Beef: Lean ground beef can result in dry burgers. Opt for 80/20 ground beef for the best flavor and juiciness.
Overstuffing the Burgers: Too much cheese and bacon can make the burgers difficult to seal and cook evenly.
Cooking at Too High a Heat: Cooking the burgers at too high a heat can cause the outside to burn before the inside is cooked through.
Pressing Down on the Burgers While Cooking: This squeezes out the juices and results in dry burgers. Resist the urge to press down!
Bacon Cheese Stuffed Burger Variations
Want to mix things up? Here are a few fun variations to try:
Cheese Swaps: Try using pepper jack, mozzarella, or Gruyere cheese instead of cheddar.
Bacon Alternatives: Experiment with different types of bacon, such as maple bacon or jalapeno bacon. You can also use prosciutto or pancetta for a different flavor profile.
Add Veggies: Mix some finely chopped onions, peppers, or mushrooms into the ground beef mixture.
Spice It Up: Add a pinch of cayenne pepper or some chopped jalapenos to the ground beef mixture for a spicy kick.
Burger Sauce Magic: Mix mayonnaise, ketchup, mustard, and a dash of Worcestershire sauce for a classic burger sauce.
How to Store and Reheat Leftover Stuffed Burgers
If you happen to have any leftovers (which is rare in my house!), here’s how to store and reheat them:
Storage: Store the cooked burgers in an airtight container in the refrigerator for up to 3 days.
Reheating: Reheat the burgers in a skillet over medium heat or in the microwave until heated through. You can also reheat them in the oven at 350°F for about 10-15 minutes.
Frequently Asked Questions About Stuffed Burgers
Got questions? I’ve got answers!
Can I use frozen ground beef?: Yes, but make sure to thaw it completely before using.
Can I make these ahead of time?: You can prepare the patties ahead of time and store them in the refrigerator for up to 24 hours.
Can I freeze these burgers?: Yes, you can freeze the cooked burgers for up to 2 months. Wrap them individually in plastic wrap and then place them in a freezer-safe bag.
What if the cheese leaks out while cooking?: It happens! Just try to seal the patties as tightly as possible. A little leakage is okay.
Serving Suggestions for Bacon Cheese Stuffed Burgers
These burgers are delicious on their own, but here are a few serving suggestions to take them to the next level:
Classic Sides: Serve with fries, onion rings, or coleslaw.
Salads: Pair with a fresh green salad or a tomato and cucumber salad.
Grilled Veggies: Grill some vegetables, such as corn on the cob, zucchini, or bell peppers.
Burger Bar: Set up a burger bar with a variety of toppings and sauces so everyone can customize their own burger.
And there you have it – my go-to Bacon Cheese Stuffed Burger recipe! I hope you love it as much as we do. Remember, cooking is all about experimenting and having fun, so don’t be afraid to put your own spin on this recipe. And be sure to enter your email below to receive more delicious recipes like this one straight to your inbox, plus enjoy exclusive content I create just for my subscribers. I agree to keep your email safe and only send you the good stuff. You’re going to absolutely love these, and it’s easy to see why! The burger is calling your name!
Happy grilling, friends! And don’t forget to share your creations with me on social media using #AvasKitchenAdventures. I can’t wait to see what you come up with!
P.S. If you want to make sure you don’t miss out on any of my latest recipes, be sure to subscribe to your inbox! We’ll send this burger recipe and more straight to your email below! Here’s to making everyday meals a little more magical!
These juicy Bacon Cheese Stuffed Burgers are packed with flavor and are surprisingly easy to make. Perfect for a summer barbecue or a quick weeknight dinner!
Ingredients
Burger Ingredients
1.5poundsground beef (80/20)
1teaspoonsalt
0.5teaspoonblack pepper
0.5teaspoongarlic powder
0.25teaspoononion powder
Filling
4slicescheddar cheese, cut into cubes
4slicescooked turkey bacon, crumbled
Serving
4hamburger buns
Toppings of choice (lettuce, tomato, onion, ketchup, mustard, etc.)
Instructions
Mix ground beef, salt, pepper, garlic powder, and onion powder.
Divide beef into 8 portions; flatten into patties.
Place cheese and bacon in the center of 4 patties.
Top with remaining patties and seal edges.
Preheat grill or skillet to medium-high heat.
Cook burgers 4-6 minutes per side, until 160°F.
Place burgers on buns and add toppings.
Serve immediately.
Notes
For best results, don't overmix the ground beef. This will keep the burgers tender and juicy.
Easy Sheet Pan Steak Fajitas Recipe: A Flavor Fiesta on a Single Pan
Hey there, kitchen adventurers! Ava here, ready to whisk you away to a land where dinner is quick, easy, and bursting with flavor. If you’re anything like me, you love a good fajita night, but the thought of standing over a hot stove, juggling multiple pans, can sometimes feel…less than magical. That’s where these Easy Sheet Pan Steak Fajitas come to the rescue! This recipe is all about streamlining the process without sacrificing a single ounce of that authentic Tex-Mex taste we all crave. Imagine tender steak, vibrant bell peppers, and sweet red onions, all perfectly seasoned and roasted to perfection on just one sheet pan. Yes, you read that right—one pan! Less mess, more flavor, and a whole lot of happy faces around the dinner table. Let’s dive in!
Why You’ll Love This Sheet Pan Steak Fajitas Recipe
Seriously, where do I even begin? This recipe has become a staple in my Seattle kitchen for so many reasons. Firstly, the cleanup is a breeze. I mean, who doesn’t love a meal that requires minimal dishwashing? But beyond the convenience, it’s the taste that really seals the deal. The flavors are vibrant, the steak is juicy, and the vegetables are tender with just the right amount of char. It’s like a fiesta in your mouth! Plus, it’s incredibly versatile. You can customize the toppings to your heart’s content, making it a crowd-pleaser for even the pickiest eaters. Here’s a quick rundown of why this recipe will become your new go-to:
Quick and Easy: Ready in under 30 minutes, perfect for busy weeknights.
Minimal Cleanup: All cooked on a single sheet pan!
Bursting with Flavor: A delicious mix of savory, smoky, and slightly spicy.
Versatile: Customize your toppings to create your perfect fajita.
Healthy: Packed with protein and colorful veggies.
The Secret to the Best Sheet Pan Steak Fajitas
The secret to amazing sheet pan steak fajitas lies in a few key elements. First, the quality of the steak matters. I prefer flank steak or sirloin, thinly sliced, for its tenderness and ability to absorb flavors. Secondly, don’t skimp on the seasoning. A generous coating of chili powder, smoked paprika, cumin, and other spices is what gives these fajitas that authentic Tex-Mex taste. And finally, don’t overcrowd the pan. Spreading the steak and vegetables in a single layer ensures they roast evenly and develop that delicious char we all love. When I first started making these, I’d often try to cram everything onto one pan, resulting in steamed, rather than roasted, veggies. Lesson learned!
Sheet Pan Steak Fajitas Ingredients
1.5 lbs flank steak or sirloin, thinly sliced
3 bell peppers (red, yellow, green), seeded and sliced
1 large red onion, sliced
2 tbsp olive oil
Juice of 1 lime
2 tsp chili powder
1 tsp smoked paprika
1 tsp ground cumin
0.5 tsp garlic powder
0.5 tsp onion powder
0.5 tsp dried oregano
0.5 tsp salt
0.25 tsp black pepper
0.25 tsp crushed red pepper flakes (optional)
8 small flour or corn tortillas, warmed
Fresh cilantro, chopped
Sour cream (optional)
Salsa or pico de gallo (optional)
Lime wedges
How to Make Sheet Pan Steak Fajitas: Step-by-Step
Alright, let’s get cooking! Here’s how to make these incredibly easy and flavorful sheet pan steak fajitas:
Preheat your oven to 425°F (220°C). Line a large baking sheet with parchment paper or foil. This makes cleanup a breeze!
In a small bowl, whisk together the chili powder, smoked paprika, ground cumin, garlic powder, onion powder, dried oregano, salt, black pepper, and red pepper flakes (if using). This spice mix is the heart and soul of our fajita flavor.
In a large bowl, toss the sliced steak, bell peppers, and red onion with olive oil, lime juice, and the prepared seasoning. Make sure everything is thoroughly coated. This is where the magic happens!
Evenly spread the seasoned steak and vegetables in a single layer on the prepared baking sheet. Avoid overcrowding the pan; this ensures everything roasts properly.
Cook in the oven for 18 to 20 minutes, stirring halfway through, until the steak reaches your desired doneness and the vegetables are tender with slight charring.
Remove from the oven and let the mixture rest for 2 minutes. This allows the juices to redistribute, resulting in even more tender steak.
Serve hot with warmed tortillas, garnished with fresh cilantro, sour cream, salsa, and lime wedges, as preferred.
Pro Tips for Perfect Sheet Pan Fajitas
Use High Heat: Roasting at 425°F ensures the steak and vegetables get a nice char without becoming soggy.
Don’t Overcrowd the Pan: Spread the ingredients in a single layer to promote even cooking. If necessary, use two sheet pans.
Marinate the Steak: For even more flavor, marinate the steak for at least 30 minutes before cooking.
Preheat the Pan: Placing the sheet pan in the oven while it preheats can help the steak and vegetables sear better.
Rest the Steak: Allowing the steak to rest for a few minutes after cooking helps it retain its juices.
Common Mistakes to Avoid
Even the easiest recipes can have a few pitfalls. Here are some common mistakes to avoid when making sheet pan steak fajitas:
Overcooking the Steak: Steak cooks quickly in a hot oven, so keep a close eye on it to prevent it from becoming tough.
Not Using Enough Seasoning: Don’t be shy with the spices! They’re what give the fajitas their signature flavor.
Overcrowding the Pan: As mentioned before, overcrowding leads to steamed, not roasted, vegetables.
Skipping the Lime Juice: The lime juice not only adds flavor but also helps to tenderize the steak.
Forgetting the Toppings: The toppings are what make fajitas fun! Don’t forget the cilantro, sour cream, salsa, and lime wedges.
When I first tried this, I didn’t use enough seasoning, and the steak was bland. That’s when I realized the importance of a generous spice rub! Also, the first time I made sheet pan fajitas, the peppers were still crunchy because I didn’t slice them thin enough. It’s all about learning and adjusting!
Delicious Variations on Sheet Pan Steak Fajitas
One of the best things about fajitas is how easy they are to customize. Here are a few variations to try:
Chicken Fajitas: Substitute the steak with chicken breasts or thighs, sliced into strips.
Shrimp Fajitas: Use large shrimp instead of steak. Reduce the cooking time to about 12-15 minutes.
Vegetarian Fajitas: Add more vegetables like mushrooms, zucchini, and corn.
Spicy Fajitas: Add a pinch of cayenne pepper or a finely chopped jalapeño to the seasoning mix.
Pineapple Fajitas: Add chunks of fresh pineapple to the pan for a sweet and tangy twist.
I’d been wanting to try a pineapple version for a while now; something about the sweet and savory combination just sounds amazing! Another time, I added a mix of poblano and bell peppers for a smoky flavor.
How to Store and Reheat Leftover Fajitas
If you happen to have any leftovers (which is rare in my house!), here’s how to store and reheat them:
Storage: Store the cooked steak and vegetables in an airtight container in the refrigerator for up to 3 days.
Reheating: Reheat in a skillet over medium heat or in the microwave until warmed through. You can also reheat them in the oven at 350°F for about 10-15 minutes.
Freezing: While you can freeze the cooked steak and vegetables, the texture may change slightly upon thawing. Store in an airtight container for up to 2 months.
Frequently Asked Questions (FAQ)
Can I use a different type of steak? Yes, you can use other cuts of steak like skirt steak or ribeye. Just make sure to slice it thinly.
Can I make this ahead of time? You can slice the vegetables and prepare the seasoning mix ahead of time. Store them separately and combine them just before cooking.
Can I grill the steak and vegetables instead of roasting them? Absolutely! Grill the steak and vegetables separately until cooked to your liking.
What kind of tortillas should I use? I prefer flour tortillas for their soft texture, but corn tortillas are a great gluten-free option.
Can I add cheese to my fajitas? Of course! Shredded cheddar, Monterey Jack, or pepper jack cheese are all delicious options.
Serving Suggestions: Complete Your Fajita Feast
These sheet pan steak fajitas are fantastic on their own, but here are a few serving suggestions to take your meal to the next level:
Classic Fajitas: Serve with warmed tortillas, sour cream, salsa, guacamole, and fresh cilantro.
Fajita Bowls: Create a fajita bowl by serving the steak and vegetables over rice or quinoa, topped with your favorite fixings.
Fajita Salad: Toss the steak and vegetables with mixed greens, avocado, and a lime vinaigrette for a light and refreshing meal.
Fajita Nachos: Layer tortilla chips with the steak and vegetables, cheese, and your favorite nacho toppings.
Sides: Serve with Mexican rice, black beans, or a side salad.
And there you have it! Easy Sheet Pan Steak Fajitas that are quick and flavorful. This recipe is something that will bring a little Tex-Mex magic to your kitchen, perfect for a weeknight dinner or a weekend BBQ party food. Remember, cooking is all about having fun and experimenting, so don’t be afraid to put your own spin on this recipe. I’m sure you’ll create something that tasted like a masterpiece! Enjoy!
My name’s Ava, and if you’ve stumbled upon my kitchen, you’re probably here for one thing—the kind of recipes that make people pause mid-bite and say, ‘Wow.’ Today, we’re diving headfirst into burger bliss with my secret to the best stove top burgers you’ll ever make. Forget firing up the grill; we’re keeping things simple, quick, and outrageously delicious. I grew up in a small town in Oregon, where the smell of fresh bread and roasted vegetables often drifted out of my mother’s kitchen window. Cooking wasn’t just something we did to eat—it was how we celebrated, comforted, and connected. I was the kid who would rather stir a pot of chili than go ride my bike, and by the time I was twelve, I could whip up a pie from scratch that made my grandmother proud. These days, I’m 34 and living in Seattle, where my kitchen has become my favorite corner of the world. So, grab your skillet, and let’s get cooking!
Why You’ll Love This Stove Top Burgers Recipe
Let’s be honest, sometimes you just need a burger, and you need it now. That’s where this recipe comes in. It’s quick, easy, and delivers that classic burger satisfaction without any fuss. Plus, clean-up is a breeze! This recipe is perfect for busy weeknights when you crave something comforting and delicious. I believe the best recipes aren’t always the fanciest—they’re the ones that feel like a warm hug, the ones you make over and over because they just work. Sure, I’ve had my share of flops (ask me about the infamous triple-layer cake that collapsed right before a dinner party), but I’ve learned that every ‘oops’ moment is just an invitation to try again—this time with a little more patience and maybe a pinch more salt. Here’s why this recipe will become your new go-to:
Quick & Easy: Ready in under 30 minutes!
Minimal Ingredients: Only 7 key ingredients (plus toppings!).
Incredible Flavor: Perfectly seasoned ground beef, cooked to juicy perfection.
No Grill Needed: Perfect for any time of year, rain or shine!
Ingredients for the Best Stove Top Burgers
Here’s what you’ll need to make these mouthwatering stove top burgers. I’m a bit obsessed with balance: sweet with savory, creamy with crunchy, familiar with unexpected. And I believe that cooking is less about following rules and more about trusting your senses. If it smells amazing and makes you smile, you’re probably on the right track.
– 1 pound ground beef (80% lean)
– 1 teaspoon salt
– 1/2 teaspoon black pepper
– 1 teaspoon garlic powder
– 1 teaspoon onion powder
– 4 slices of cheese (optional)
– Hamburger buns
– Optional toppings: lettuce, tomato, pickles, and condiments
How to Make Stove Top Burgers: Step-by-Step
Crafting these flavorful Stove Top Burgers is easy when you follow these simple steps:
Place a large skillet over medium-high heat and allow it to heat up for about 2-3 minutes. Getting the skillet nice and hot is key to achieving a good sear on the burgers.
Prepare the Meat: In a mixing bowl, combine the ground beef, salt, black pepper, garlic powder, and onion powder. Mix until well combined but don’t overwork the meat. Overmixing can lead to tough burgers, and we definitely don’t want that!
Form Patties: Divide the mixture into four equal portions and shape each into a patty about 1 inch thick. Make a slight indentation in the center of each patty to prevent them from bulging as they cook.
Cook the Patties: Place the patties into the hot skillet. Cook for about 4-5 minutes on one side, undisturbed. This allows for a beautiful crust to form.
Flip and Cook: Carefully flip each patty and cook for another 4-5 minutes on the other side. If you are using cheese, add a slice on top of each patty in the last minute and cover the skillet to melt.
Toast the Buns: While the burgers are cooking, slice the hamburger buns and toast them in a toaster or on a separate skillet to your desired crispness. Toasted buns add a delightful texture contrast.
Assemble the Burgers: Place each cooked patty on the bottom half of the toasted burger bun. Add desired toppings such as lettuce, tomato, pickles, and your favorite condiments. Don’t be shy with your favorite sauces!
Serve: Cap the burgers with the top half of the buns and enjoy while hot!
Following these steps will guarantee a delicious meal with maximum flavor!
Pro Tips for Perfect Stove Top Burgers
Want to take your stove top burger game to the next level? Here are a few of my tried-and-true tips:
Don’t Overwork the Meat: Gently mix the seasonings into the ground beef until just combined. Overworking the meat results in a tough burger.
Hot Skillet is Key: Make sure your skillet is properly heated before adding the patties. This ensures a good sear and locks in the juices.
Use a Meat Thermometer: For perfectly cooked burgers, use a meat thermometer to check the internal temperature. The USDA recommends 160°F (71°C) for ground beef.
Let Rest Before Serving: Allow the burgers to rest for a few minutes after cooking to let the juices redistribute, resulting in a juicier burger.
Common Mistakes to Avoid
Even the best cooks make mistakes! Here are some common pitfalls to avoid when making stove top burgers:
Overcrowding the Skillet: Cook the patties in batches to avoid overcrowding the skillet, which can lower the temperature and result in steamed instead of seared burgers.
Pressing Down on the Patties: Resist the urge to press down on the patties while they’re cooking. This squeezes out the juices and results in a dry burger.
Using Too Lean Ground Beef: While lean ground beef is healthier, it can result in a dry burger. Opt for 80% lean ground beef for the best balance of flavor and juiciness.
Skipping the Seasoning: Don’t underestimate the power of seasoning! Salt, pepper, garlic powder, and onion powder are the perfect base for a flavorful burger.
Variations to Spice Things Up
Want to get creative with your stove top burgers? Here are a few fun variations to try:
Cheese Stuffed Burgers: Stuff the patties with your favorite cheese, such as cheddar, mozzarella, or blue cheese, for an extra gooey surprise.
Spicy Burgers: Add a pinch of cayenne pepper or a dash of hot sauce to the ground beef mixture for a fiery kick.
Mushroom & Swiss Burgers: Sauté sliced mushrooms and onions in butter and top the burgers with Swiss cheese for a gourmet twist.
BBQ Burgers: Brush the burgers with your favorite BBQ sauce during the last minute of cooking and top with crispy fried onions and coleslaw.
How to Store Leftover Stove Top Burgers
If you happen to have any leftover burgers (though I doubt you will!), here’s how to store them:
Refrigerate: Store cooked burger patties in an airtight container in the refrigerator for up to 3-4 days.
Freeze: For longer storage, wrap each patty individually in plastic wrap and place them in a freezer-safe bag. Freeze for up to 2-3 months.
Reheat: Reheat leftover burgers in a skillet over medium heat, in the microwave, or in the oven until heated through.
Frequently Asked Questions (FAQ)
Got questions? I’ve got answers! Here are some frequently asked questions about making stove top burgers:
Can I use frozen ground beef?: Yes, but make sure to thaw it completely before cooking.
Can I use a different type of ground meat?: Absolutely! Ground turkey, chicken, or even plant-based ground meat all work well in this recipe.
How do I prevent the burgers from shrinking?: Make a small indentation in the center of each patty before cooking to prevent them from bulging and shrinking.
Can I add breadcrumbs to the ground beef mixture?: Yes, adding a tablespoon or two of breadcrumbs can help bind the patties together and keep them from falling apart.
Serving Suggestions for Stove Top Burgers
These stove top burgers are delicious on their own, but here are a few serving suggestions to complete your meal:
Classic Sides: Serve with classic sides like french fries, onion rings, coleslaw, or potato salad.
Salads: Pair with a fresh salad, such as a garden salad, Caesar salad, or a tomato and cucumber salad.
Vegetable Skewers: Grill or roast vegetable skewers with bell peppers, onions, zucchini, and cherry tomatoes for a healthy and colorful side.
Sweet Potato Fries: For a healthier alternative to regular fries, serve with baked or air-fried sweet potato fries.
There you have it! My secret to incredible stove top burgers that are perfect for any weeknight meal. I share them because I want you to have a little magic in your kitchen too—meals that bring people together, that become your ‘go-to,’ that make someone you love ask for seconds. So whether you’re cooking for your family, impressing friends, or just treating yourself, I’m here to help you find your next favorite dish. Pull up a chair, grab a spatula, and let’s make something unforgettable together.
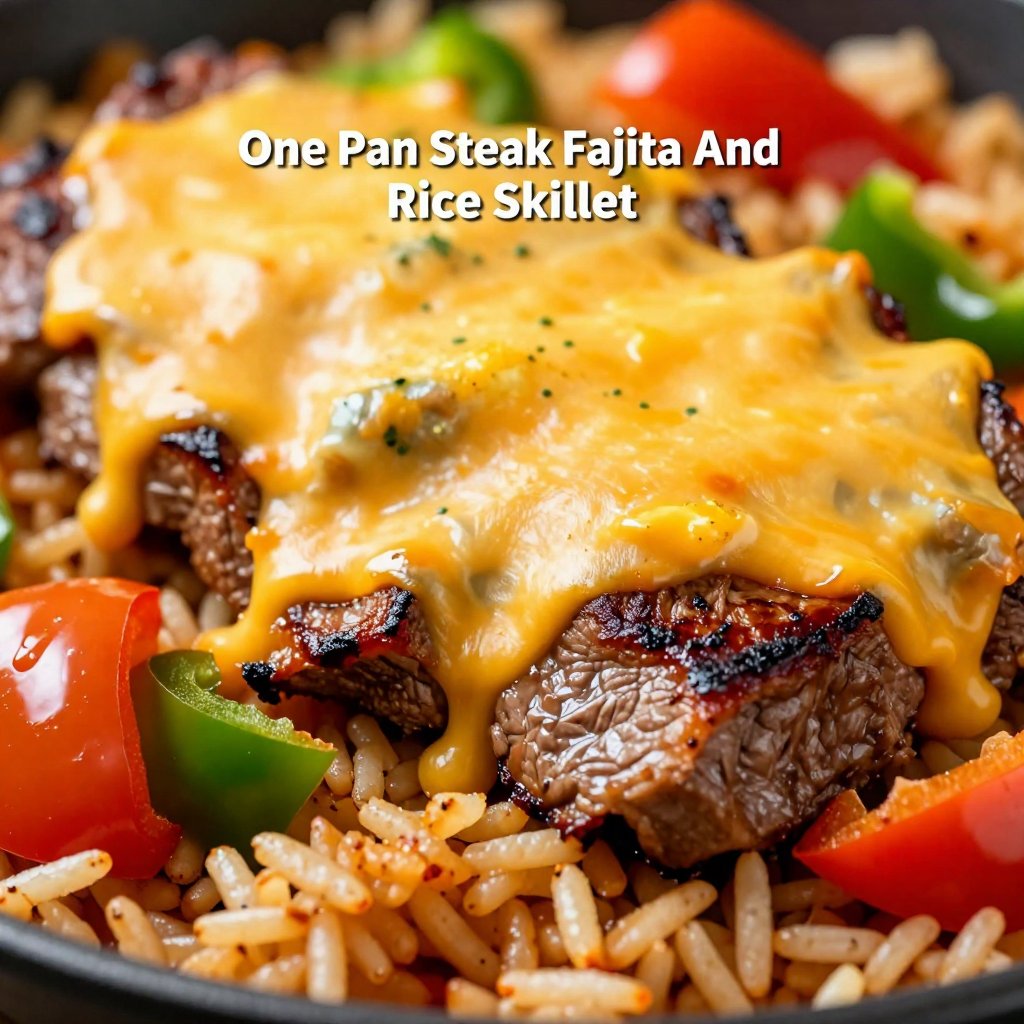
Hey there, fellow food lovers! Ava here, back in my Seattle kitchen, and I’m bursting to share a recipe that’s been a total game-changer for our weeknight dinners. Imagine tender, juicy steak strips mingling with vibrant, colorful peppers and fluffy, flavorful rice, all cooked together in one glorious pan. Sounds dreamy, right? Well, stop imagining and let’s make it a reality with this One Pan Steak Fajita and Rice Skillet!
This recipe isn’t just about convenience; it’s about creating a delicious symphony of flavors with minimal effort. It’s the kind of meal that makes you feel like a kitchen rockstar, even when you’re short on time and energy. Think of it as a warm, comforting hug in a skillet – the perfect antidote to a busy day.
Growing up, fajitas were always a special occasion meal. But with this simplified, one-pan version, you can enjoy that same festive flavor any night of the week. So, pull up a chair, grab your favorite skillet, and let’s dive into this culinary adventure together!
Why You’ll Love This One Pan Steak Fajita and Rice Skillet
Okay, let’s get real. We all crave those meals that are both incredibly tasty and unbelievably easy to make. This skillet ticks both boxes, and then some. Here’s why this dish is about to become your new weeknight staple:
Minimal Cleanup: Seriously, only one pan! Need I say more?
Quick and Easy: From prep to table in under 30 minutes – perfect for busy weeknights.
Flavor Explosion: A delicious blend of tender steak, vibrant veggies, and perfectly seasoned rice.
Customizable: Easily adapt the ingredients to suit your taste and dietary preferences.
Crowd-Pleaser: This dish is a guaranteed hit with both kids and adults.
I mean, who can resist the allure of a sizzling skillet filled with all those delicious goodies? It’s a visual feast that’s just as satisfying to eat as it is to look at. Plus, the aroma alone is enough to make your mouth water!
Ingredients You’ll Need
Here’s what you’ll need to whip up this amazing One Pan Steak Fajita and Rice Skillet. Don’t worry if you don’t have everything on hand; feel free to substitute and get creative!
0.5 pound strip steak
1 teaspoon minced garlic
1 teaspoon soy sauce
1 teaspoon baking soda
1.5 teaspoons steak seasoning blend
Avocado oil spray
0.5 red bell pepper, sliced
0.5 yellow bell pepper, sliced
0.5 green bell pepper, sliced
0.5 white onion, sliced
1 tablespoon butter
1 tablespoon tomato paste
1 cup pre-cooked basmati rice
1/3 cup store-bought white queso
1/3 cup Mexican cheese blend
Step-by-Step Instructions: Let’s Get Cooking!
Alright, let’s get down to business! Follow these simple steps, and you’ll have a sizzling skillet of deliciousness in no time. Remember, cooking should be fun, so don’t be afraid to experiment and make it your own.
Tenderize the Steak: Prepare the steak by sprinkling baking soda and letting it sit for 15 minutes to enhance tenderness. Rinse completely and thoroughly dry with paper towels. This is a crucial step to break down the fibers and ensure a melt-in-your-mouth texture.
Marinate the Steak: Combine steak seasoning, minced garlic, and soy sauce in a mixing bowl. Coat the steak strips evenly with the marinade and let rest for 5 minutes. This infuses the steak with flavor and helps to keep it moist during cooking.
Sear the Steak: Preheat a large skillet to medium-high heat and lightly coat with avocado oil. Sear steak strips for 2-3 minutes per side until golden brown and cooked to desired doneness. Transfer to a separate plate. You’re looking for a beautiful sear on the outside and a juicy, tender interior.
Sauté the Veggies: In the same skillet, melt butter and sauté bell peppers and onions for 4-5 minutes until they become slightly caramelized and tender. The key here is to not overcrowd the pan, so the vegetables can properly brown.
Add Tomato Paste and Rice: Incorporate tomato paste into the vegetable mixture, stirring to distribute evenly. Add pre-cooked basmati rice and gently mix to combine all ingredients. This adds depth of flavor and helps to bind the dish together.
Combine Everything: Return the cooked steak strips to the skillet, nestling them into the rice and vegetable mixture. Make sure everything is evenly distributed for maximum flavor in every bite.
Cheese it Up: Distribute white queso in dollops across the surface and sprinkle Mexican cheese over the entire dish. Because, let’s be honest, everything is better with cheese!
Broil to Perfection: Position the skillet under the broiler for 60-90 seconds, watching carefully to prevent burning. Remove once cheese is melted and slightly bubbling. This creates a beautiful, golden-brown crust that’s simply irresistible.
Garnish and Serve: Garnish with fresh cilantro and serve with lime wedges for an extra burst of flavor. Enjoy immediately while hot. The fresh cilantro and lime add a bright, zesty finish that complements the richness of the dish.
Pro Tips for the Perfect One Pan Steak Fajita and Rice Skillet
Want to take your skillet game to the next level? Here are a few of my tried-and-true tips for achieving skillet perfection:
Use High Heat: Searing the steak at high heat is crucial for developing a flavorful crust and locking in the juices. Make sure your skillet is nice and hot before adding the steak strips.
Don’t Overcrowd the Pan: Overcrowding the pan will lower the temperature and result in steamed, rather than seared, steak and veggies. Work in batches if necessary.
Pre-Cook the Rice: Using pre-cooked rice saves time and ensures that the rice doesn’t become mushy. You can use leftover rice or store-bought pre-cooked rice.
Adjust the Seasoning: Taste as you go and adjust the seasoning to your liking. Don’t be afraid to add a pinch of salt, a dash of chili powder, or a squeeze of lime juice to enhance the flavors.
Get Creative with Toppings: The possibilities are endless! Top your skillet with sour cream, guacamole, pico de gallo, or any of your favorite fajita toppings.
Remember, cooking is all about experimentation and having fun. Don’t be afraid to try new things and put your own spin on this recipe. You might just discover your new favorite flavor combination!
Common Mistakes to Avoid
We all make mistakes in the kitchen, but knowing what to watch out for can help you avoid common pitfalls. Here are a few mistakes to avoid when making this One Pan Steak Fajita and Rice Skillet:
Overcooking the Steak: Overcooked steak is tough and dry. Use a meat thermometer to ensure that the steak is cooked to your desired doneness.
Burning the Cheese: Keep a close eye on the skillet while it’s under the broiler to prevent the cheese from burning.
Using Too Much Liquid: Adding too much liquid can make the rice mushy. Use just enough liquid to moisten the rice without making it soggy.
Not Seasoning Properly: Seasoning is key to bringing out the flavors of the dish. Don’t be afraid to season generously with salt, pepper, and other spices.
Ignoring the Sizzle: If you don’t hear a sizzle when you add the steak to the pan, the pan isn’t hot enough. Wait until the pan is properly heated before adding the steak.
Even if you do make a mistake, don’t sweat it! Just learn from it and try again. Cooking is a journey, not a destination.
Variations: Customize Your Skillet
One of the best things about this recipe is how easily you can customize it to suit your taste and dietary preferences. Here are a few variations to get you started:
Chicken Fajita Skillet: Substitute the steak with chicken breast or chicken thighs.
Vegetarian Fajita Skillet: Omit the steak and add more vegetables, such as mushrooms, zucchini, or corn.
Spicy Fajita Skillet: Add a pinch of cayenne pepper or a few slices of jalapeño to kick up the heat.
Low-Carb Fajita Skillet: Omit the rice and serve the steak and vegetables over cauliflower rice or lettuce wraps.
Cheesy Fajita Skillet: Add more cheese! Use a combination of different cheeses, such as cheddar, Monterey Jack, or pepper jack.
Don’t be afraid to get creative and experiment with different ingredients and flavors. The possibilities are endless!
Storage Instructions
Got leftovers? No problem! This One Pan Steak Fajita and Rice Skillet stores beautifully in the refrigerator. Here’s how to store it properly:
Cool Completely: Allow the skillet to cool completely before transferring it to an airtight container.
Refrigerate Promptly: Refrigerate the skillet within two hours of cooking to prevent bacterial growth.
Use Within 3-4 Days: The skillet will keep in the refrigerator for 3-4 days.
Reheat Thoroughly: Reheat the skillet thoroughly before serving. You can reheat it in the microwave, in a skillet on the stovetop, or in the oven.
Leftovers can be just as delicious as the original dish, especially when stored and reheated properly.
Frequently Asked Questions (FAQ)
Got questions? I’ve got answers! Here are a few frequently asked questions about this One Pan Steak Fajita and Rice Skillet:
Can I use frozen vegetables?: Yes, you can use frozen vegetables, but be sure to thaw them completely before adding them to the skillet.
Can I use brown rice instead of basmati rice?: Yes, you can use brown rice, but it will take longer to cook. Make sure the rice is fully cooked before adding the other ingredients.
Can I make this dish ahead of time?: Yes, you can make this dish ahead of time and reheat it later. However, the cheese may not be as melty and gooey.
Can I freeze this dish?: I don’t recommend freezing this dish as the texture of the rice and vegetables may change.
What kind of steak is best for fajitas?: I prefer to use strip steak, but you can also use flank steak, skirt steak, or sirloin steak.
If you have any other questions, feel free to ask in the comments below. I’m always happy to help!
Serving Suggestions
This One Pan Steak Fajita and Rice Skillet is a complete meal in itself, but here are a few serving suggestions to take it to the next level:
Serve with Warm Tortillas: Warm tortillas are a must for fajitas! Serve the skillet with warm flour or corn tortillas for a customizable fajita experience.
Add Your Favorite Toppings: Top the skillet with sour cream, guacamole, pico de gallo, shredded lettuce, or any of your favorite fajita toppings.
Serve with a Side Salad: A simple side salad with a light vinaigrette is a refreshing complement to the richness of the skillet.
Pair with a Cold Drink: A cold beer, margarita, or iced tea is the perfect way to wash down this delicious meal.
Enjoy with Friends and Family: This skillet is best enjoyed with friends and family. Gather around the table, share some laughs, and savor every bite!
So there you have it – my One Pan Steak Fajita and Rice Skillet recipe! I hope you love it as much as we do. Happy cooking, and may your kitchen always be filled with delicious aromas and joyful moments!
Enjoy a delicious and easy One Pan Steak Fajita and Rice Skillet, perfect for a quick weeknight dinner. This recipe combines tender steak, colorful bell peppers, onions, and flavorful rice, all topped with melted cheese.
Ingredients
Ingredients
0.5poundstrip steak
1teaspoonminced garlic
1teaspoonsoy sauce
1teaspoonbaking soda
1.5teaspoonssteak seasoning blend
Avocado oil spray
0.5red bell pepper, sliced
0.5yellow bell pepper, sliced
0.5green bell pepper, sliced
0.5white onion, sliced
1tablespoonbutter
1tablespoontomato paste
1cuppre-cooked basmati rice
1/3cupstore-bought white queso
1/3cupMexican cheese blend
Instructions
Prepare steak with baking soda, let sit for 15 minutes, then rinse and dry.
Combine steak seasoning, garlic, and soy sauce. Marinate steak for 5 minutes.
Sear steak in skillet for 2-3 minutes per side. Transfer to plate.
Sauté bell peppers and onions in butter for 4-5 minutes.
Incorporate tomato paste, then add rice and mix.
Return steak to skillet, nestling into rice and vegetables.
Distribute queso and sprinkle Mexican cheese over dish.
Broil for 60-90 seconds until cheese is melted and bubbling.
Hey there, friend! Ava here, ready to share a kitchen secret that’s been a game-changer for me: cooking flank steak in the oven. Now, I know what you might be thinking – flank steak? Oven? Isn’t that usually a grill thing? Well, buckle up, because I’m about to show you how to get a perfectly tender, flavorful flank steak without ever firing up the barbecue. I’m talking melt-in-your-mouth deliciousness, all thanks to the magic of your oven. This method is so easy, it’s practically foolproof, and it’s become my go-to for busy weeknights or when the weather outside is less than ideal. This recipe is inspired by some lessons I learned from The Kitchn, incorporating my own personal touches and tips to make it even more accessible and delicious.
Why You’ll Love This Oven-Baked Flank Steak
Okay, let’s get real. Why should you even bother cooking flank steak in the oven? Here’s the lowdown:
Effortless: Seriously, it’s so simple. Minimal prep, minimal cleanup, maximum flavor.
Consistent Results: No more guessing games with grill temperatures. The oven provides consistent heat for even cooking.
Year-Round Enjoyment: Rain or shine, you can enjoy perfectly cooked flank steak any time you want.
Tender and Juicy: With the right technique, your flank steak will be incredibly tender and juicy, not tough and chewy.
Versatile: Perfect for tacos, salads, sandwiches, or a simple steak dinner.
This recipe is a winner, whether you’re a seasoned cook or just starting out. It’s all about taking a few simple steps and letting the oven do its thing.
Ingredients You’ll Need
Here’s what you’ll need to whip up this masterpiece. Don’t worry, it’s a short and sweet list:
1 (1 1/2- to 2-pound) flank steak
2 tablespoons olive oil
1 teaspoon kosher salt
1/2 teaspoon black pepper
Optional: Marinade or dry rub of your choice
That’s it! Of course, feel free to get creative with marinades and rubs, but sometimes, simple is best. A good quality flank steak, olive oil, salt, and pepper – that’s all you really need for a fantastic meal.
Step-by-Step: Cooking Flank Steak in the Oven
Alright, let’s get cooking! Here’s how to cook flank steak in the oven like a pro:
Preheat the oven: Set your oven to 425°F (220°C). High heat is key for searing the steak and locking in those juices.
Prepare the flank steak: Pat the flank steak dry with paper towels. This is crucial for getting a good sear. Moisture is the enemy of browning!
Season the steak: Rub the flank steak with olive oil, salt, and pepper. Don’t be shy with the seasoning! If using a marinade or dry rub, apply it evenly to both sides of the steak. A simple salt pepper blend is often the best way to highlight the flavor of the steak.
Sear the steak (optional, but recommended): Heat an oven-safe skillet (cast iron is ideal) over medium-high heat. Once the skillet is very hot, sear the flank steak for 2-3 minutes per side, until nicely browned. This step enhances flavor and texture. Trust me, it’s worth the extra effort!
Transfer to the oven: Place the skillet with the seared steak (or the unseared steak in an oven-safe dish) into the preheated oven.
Roast the steak: Roast for 8-12 minutes for medium-rare (internal temperature of 130-135°F or 54-57°C), or longer for more well-done. Use a meat thermometer to check the internal temperature. Remember, every oven is different, so keep an eye on it.
Rest the steak: Remove the steak from the oven and transfer it to a cutting board. Tent loosely with foil and let it rest for at least 10 minutes. This is the most important step! Letting the steak rest allows the juices to redistribute, resulting in a more tender steak.
Slice against the grain: Using a sharp knife, slice the flank steak thinly against the grain. This is crucial for tenderness, as flank steak has long muscle fibers. If you slice with the grain, you’ll end up with tough, chewy steak.
Serve: Serve immediately and enjoy!
See? Easy peasy! With these steps, you’ll have a perfectly cooked flank steak every time. This method ensures the steak is cooked evenly and retains its delicious flavor. Trust me, the resting period is non-negotiable!
Pro Tips for the Perfect Flank Steak
Want to take your flank steak game to the next level? Here are a few pro tips I’ve learned over the years:
Use a Meat Thermometer: Seriously, it’s the best way to ensure your steak is cooked to perfection. Aim for 130-135°F for medium-rare.
Don’t Overcook It: Flank steak is best served medium-rare to medium. Overcooking will make it tough.
Let It Rest: I can’t stress this enough! Resting is key for a tender, juicy steak.
Slice Thinly: Thin slices make all the difference in tenderness.
Marinate for Extra Flavor: If you have time, marinating the flank steak for a few hours (or even overnight) will add tons of flavor and help tenderize the meat.
Sear it Hot: If you’re searing the steak, make sure your skillet is screaming hot before you add the steak. This will give you a beautiful crust.
Common Mistakes to Avoid
We’ve all been there – kitchen mishaps happen! Here are a few common mistakes to avoid when cooking flank steak:
Not Patting the Steak Dry: Moisture prevents browning.
Overcooking: Flank steak is not forgiving when overcooked.
Skipping the Resting Period: This is crucial for tenderness.
Slicing with the Grain: This will result in tough steak.
Not Seasoning Properly: Don’t be afraid to use salt and pepper!
Remember, cooking is all about learning and experimenting. Don’t be discouraged if you make a mistake – just learn from it and try again!
Flavor Variations to Try
Want to mix things up? Here are a few delicious variations to try:
Garlic Herb Marinade: Combine olive oil, minced garlic, fresh herbs (like rosemary and thyme), salt, and pepper.
Citrus Marinade: Combine olive oil, lemon or lime juice, orange zest, garlic, and chili flakes.
Spicy Dry Rub: Combine chili powder, cumin, paprika, garlic powder, onion powder, salt, and pepper.
Coffee Rub: Combine ground coffee, brown sugar, smoked paprika, garlic powder, onion powder, salt, and pepper.
The possibilities are endless! Feel free to get creative and experiment with different flavors to find your favorite combination.
How to Store Leftover Flank Steak
If you happen to have any leftover flank steak (which is rare in my house!), here’s how to store it properly:
Cool Completely: Let the steak cool completely before storing.
Wrap Tightly: Wrap the steak tightly in plastic wrap or aluminum foil.
Store in the Refrigerator: Store in the refrigerator for up to 3-4 days.
To reheat, you can slice the steak and warm it gently in a skillet or microwave. Be careful not to overcook it!
Frequently Asked Questions (FAQ)
Can I use a different cut of steak? While this recipe is specifically for flank steak, you could try it with skirt steak or hanger steak. Just keep in mind that cooking times may vary.
Can I cook flank steak from frozen? I don’t recommend cooking flank steak from frozen, as it will be difficult to get a good sear and the steak may not cook evenly.
How do I know when the steak is done? The best way to tell if the steak is done is to use a meat thermometer. Insert the thermometer into the thickest part of the steak.
Can I grill flank steak instead? Absolutely! Flank steak is delicious grilled. Just be sure to preheat your grill to high heat and cook for about 4-5 minutes per side for medium-rare.
Serving Suggestions: What to Serve with Flank Steak
Now for the fun part – what to serve with your delicious flank steak! Here are a few of my favorite pairings:
Tacos: Slice the flank steak thinly and serve in warm tortillas with your favorite toppings, like salsa, guacamole, and sour cream.
Salads: Top a fresh salad with sliced flank steak for a protein-packed meal.
Sandwiches: Make a steak sandwich with crusty bread, horseradish mayo, and caramelized onions.
Roasted Vegetables: Serve with roasted vegetables like asparagus, Brussels sprouts, or sweet potatoes.
Mashed Potatoes: A classic pairing!
Hawaiian Rolls: Slice the steak thin and make sliders using Hawaiian Rolls.
The possibilities are endless! Flank steak is incredibly versatile and pairs well with just about anything. Whether you are looking to cook it in tacos, or broiling it to perfection, this recipe is sure to be a winner. It’s one of those meals that just works, no matter what you serve it with. Remember, cooking should be fun and stress-free. Trust your instincts, and don’t be afraid to experiment!
Instant Pot Steak Fajitas: A Weeknight Fiesta in Minutes!
Hey there, amigos! Ava here, back from my Seattle kitchen with a recipe that’s going to revolutionize your Taco Tuesday (or any night, really!). If you’re anything like me, you love the sizzling, flavorful goodness of steak fajitas but sometimes lack the time or energy for all the chopping, marinating, and pan-frying. Well, say hello to your new best friend: the Instant Pot! These Instant Pot Steak Fajitas are quick, easy, and packed with so much flavor, you’ll think you’re dining at your favorite Mexican restaurant. Seriously, get ready to have your taste buds do a happy dance!
I remember the first time I tried making fajitas. It was a total disaster. The steak was tough, the peppers were soggy, and the whole thing just tasted…blah. I almost gave up on my fajita dreams until I discovered the magic of the Instant Pot. This recipe is a game-changer, folks. Trust me.
Why You’ll Absolutely Love These Instant Pot Steak Fajitas
Let’s be honest, we all crave those dishes that are both delicious and convenient. This recipe delivers on both fronts! Forget slaving over a hot stove for hours. The Instant Pot transforms tough cuts of steak into tender, flavorful strips in a fraction of the time. And the best part? Clean-up is a breeze! But there are so many more reasons to love these. Here are a few:
Speedy Gonzales: Seriously, from prep to plate, you’re looking at about 30 minutes. That’s faster than takeout!
Tender, Juicy Steak: The Instant Pot’s pressure cooking magic turns even budget-friendly cuts of steak into melt-in-your-mouth goodness. If you’ve struggled with tough steak in the past, your struggles are over!
Flavor Explosion: We’re talking layers of smoky, savory, and slightly spicy flavors that will tantalize your taste buds. I’ve perfected the spice blend, and you’re going to love it.
One-Pot Wonder: Less mess, less stress! Everything cooks together in the Instant Pot, making clean-up a snap.
Customizable: Add your favorite toppings, swap out veggies, adjust the spice level – make it your own!
Perfect for Meal Prep: These fajitas are fantastic for meal prepping. Make a big batch on Sunday and enjoy delicious lunches or dinners all week long.
The Secret to Amazing Instant Pot Steak Fajitas
The secret to these Instapot Fajitas isn’t just the Instant Pot itself (although that definitely helps!). It’s all about the combination of quality ingredients, a killer spice blend, and the right cooking technique. Don’t skimp on the spices! This is where the magic happens. And don’t be afraid to experiment with different cuts of steak to find your favorite. I personally love flank steak or London broil, but skirt steak also works well.
Gather Your Ingredients for Instant Pot Fajitas Steak
Here’s what you’ll need to create these flavor-packed fajitas:
2 to 3 pounds flank steak or London Broil sliced into strips
1 tablespoon olive oil
1 onion, sliced
3 bell peppers in various colors, seeded and sliced
1 ½ cups beef broth
¼ teaspoon dried oregano
½ teaspoon smoked paprika
1 teaspoon chili powder
1 teaspoon garlic powder
½ teaspoon onion powder
1 teaspoon ground cumin
1 teaspoon salt
½ teaspoon black pepper
1 teaspoon chopped chipotle peppers in adobo sauce, optional
Step-by-Step: Making Your Instant Pot Steak Fajitas
Alright, let’s get cooking! Here’s how to make these amazing Instant Pot Steak Fajitas:
Start by setting your Instant Pot to sauté and heat that until it’s “hot”.
Next, add in olive oil and your sliced meat. Do so in small batches and make certain to brown it on both sides. Set aside but keep it warm.
Pour the beef broth into the Instant Pot and use this liquid to help scrape the bottom of the pot with a flat-edged spoon or spatula.
Next, add in the steak and all the seasonings and sliced veggies, too.
Grab the top of the lid and close while setting the valve to sealing. Set the Instant Pot to manual or pressure cook for 8 minutes of time.
Make certain that you naturally release for 5 minutes before you do a quick release.
Serve in a bowl or over rice or with a tortilla.
Pro Tips for Perfect Instant Pot Steak Fajitas Every Time
Want to take your Instant Pot Steak Fajitas to the next level? Here are a few of my tried-and-true tips:
Don’t overcrowd the pot: Brown the steak in batches to ensure even browning and prevent steaming. Overcrowding the pot will lower the temperature and result in less flavorful steak.
Deglaze, deglaze, deglaze!: Don’t skip the step of deglazing the pot with beef broth. This is crucial for preventing the dreaded “burn” notice and adding extra flavor to your fajitas.
Don’t overcook the steak: 8 minutes is usually perfect for flank steak or London broil, but adjust the cooking time depending on the thickness of your steak. You want it to be tender but not mushy.
Natural Pressure Release is Key: Allow for a natural pressure release of at least 5 minutes before doing a quick release. This helps the steak retain its juices and prevents it from becoming tough.
Warm Your Tortillas: Warm tortillas are a must! You can warm them in a dry skillet, in the microwave, or even in the oven.
Common Mistakes to Avoid When Making Instant Pot Steak Fajitas
Even with a simple recipe like this, it’s easy to make a few common mistakes. Here’s what to watch out for:
Not searing the steak: Searing the steak adds a depth of flavor that you just can’t get without it. Don’t skip this step!
Using the wrong cut of steak: Tougher cuts of steak like flank steak or London broil are best for the Instant Pot. More tender cuts like sirloin can become overcooked and dry.
Adding too much liquid: The Instant Pot needs liquid to create steam, but too much liquid will result in watery fajitas. Stick to the recipe’s recommendation of 1 ½ cups of beef broth.
Forgetting to season: Don’t be shy with the spices! Season the steak and vegetables generously for maximum flavor.
Variations: Spice Up Your Instant Pot Steak Fajitas
Want to get creative with your Instant Pot Steak Fajitas? Here are a few fun variations to try:
Spicy Fajitas: Add a pinch of cayenne pepper or a few extra chopped chipotle peppers to the spice blend for a fiery kick.
Chicken Fajitas: Substitute the steak with chicken breasts or thighs. Adjust the cooking time accordingly (usually around 6-7 minutes).
Vegetarian Fajitas: Skip the steak altogether and load up on extra veggies like mushrooms, zucchini, and corn.
Shrimp Fajitas: Add shrimp during the last minute of cooking for a quick and easy shrimp fajita variation.
Pineapple Fajitas: Add chunks of fresh pineapple to the Instant Pot for a sweet and tangy twist.
Serving Suggestions: Complete Your Fajita Fiesta!
These Instant Pot Steak Fajitas are delicious on their own, but they’re even better with all the fixings! Here are a few of my favorite serving suggestions:
Tortillas: Warm flour or corn tortillas are a must.
Toppings: Load up on your favorite toppings like sour cream, guacamole, salsa, shredded cheese, and chopped cilantro.
Sides: Serve with a side of rice and beans for a complete and satisfying meal.
Drinks: Wash it all down with a refreshing margarita or a cold Mexican beer.
How to Store and Reheat Leftover Instant Pot Steak Fajitas
Got leftovers? Lucky you! Here’s how to store and reheat them:
Storage: Store leftover fajitas in an airtight container in the refrigerator for up to 3-4 days.
Reheating: Reheat in the microwave, in a skillet over medium heat, or in the Instant Pot using the sauté function. Add a splash of beef broth to prevent drying out.
Frequently Asked Questions About Instant Pot Steak Fajitas
Still have questions? Here are some frequently asked questions about Instant Pot Steak Fajitas:
Can I use frozen steak? Yes, you can use frozen steak, but you’ll need to add a few minutes to the cooking time.
Can I make this ahead of time? Yes, you can make the fajitas ahead of time and store them in the refrigerator until ready to serve.
Can I use a different type of pepper? Absolutely! Feel free to use any type of pepper you like.
Can I add other vegetables? Of course! Mushrooms, zucchini, and corn are all great additions.
My Instant Pot says “burn.” What do I do? This usually means that there are stuck-on bits at the bottom of the pot. Release the pressure, carefully remove the steak and vegetables, and deglaze the pot thoroughly before continuing.
Let’s Get Cooking!
So there you have it, folks! My quick and easy Instant Pot Steak Fajitas recipe. I hope you enjoy it as much as my family and I do. Remember, cooking should be fun and stress-free. Don’t be afraid to experiment, get creative, and most importantly, enjoy the process. Happy cooking!
This recipe is sure to become a staple in your household. The combination of tender steak, flavorful vegetables, and a zesty spice blend is simply irresistible. And with the convenience of the Instant Pot, you can have delicious, restaurant-quality fajitas on the table in minutes. Taco Tuesday just got a whole lot easier!
These instant pot steak fajitas are the perfect solution for busy weeknights. The instant pot ensures the meat is incredibly tender and flavorful. You can easily adjust the ingredients to your liking, adding more or less spice, or including your favorite vegetables. It’s a versatile recipe that’s sure to please everyone.
To make the steak even more flavorful, consider marinating it for a few hours before cooking. A simple marinade of lime juice, soy sauce, and garlic can really enhance the taste. And don’t forget the toppings! A dollop of sour cream, a sprinkle of cheese, and a handful of fresh cilantro can take your fajitas to the next level.
If you’re looking for a quick, easy, and delicious meal, these instant pot steak fajitas are the perfect choice. They’re packed with flavor, incredibly tender, and ready in minutes. Give them a try and let me know what you think!
The meat is so tender, it practically melts in your mouth. The vegetables are perfectly cooked, retaining their crispness and flavor. And the spice blend is just right, adding a touch of heat without being overpowering. It’s a symphony of flavors that will leave you wanting more.
The instant pot is a game-changer for weeknight dinners. It’s so easy to use, and it cooks food incredibly quickly. These instant pot steak fajitas are a testament to the power of this amazing appliance. If you don’t have an instant pot, I highly recommend getting one. It will transform your cooking life!
The best part about this recipe is that it’s so customizable. You can easily adjust the ingredients to your liking, adding more or less spice, or including your favorite vegetables. It’s a versatile recipe that’s sure to please everyone.
So what are you waiting for? Grab your instant pot, gather your ingredients, and let’s get cooking! These instant pot steak fajitas are sure to become a new family favorite.
If you are, looking for something quick, easy, and delicious, you’ve found it! It’s a fantastic recipe to make.
Hey there, burger aficionados! Ava here, from my cozy Seattle kitchen, ready to share a secret weapon for burger bliss: cooking them on the stove. Now, I know what you might be thinking – burgers belong on the grill, right? Well, sometimes life (and weather!) throws you a curveball. Maybe it’s raining cats and dogs outside, or perhaps you just don’t feel like firing up the grill. That’s where the humble stovetop swoops in to save the day. Trust me, with the right technique, you can achieve juicy, flavorful, and perfectly cooked burgers right in your kitchen. Let’s dive in!
I grew up with the aroma of my mom’s cooking, always experimenting and improvising. I remember one time, we had a huge family gathering, and a sudden thunderstorm ruined our outdoor barbecue plans. Mom, without missing a beat, pulled out her trusty cast iron skillet and cooked the burgers on the stove. They were a hit! Everyone raved about how juicy and delicious they were. That’s when I realized the stovetop could be a burger’s best friend.
Why You’ll Love This Stovetop Burger Recipe
Okay, let’s get down to brass tacks. Why should you ditch the grill and embrace the stovetop burger? Here’s why:
Convenience: No need to brave the elements or wait for the grill to heat up. The stovetop is ready when you are.
Year-Round Burger Bliss: Rain or shine, you can enjoy a delicious burger any time of year.
Easy Cleanup: Fewer tools, less mess. Cleaning a skillet is a breeze compared to scrubbing a grill.
Perfect Sear: A hot skillet creates a beautiful, flavorful crust on the outside of the burger while keeping the inside juicy.
Customizable: Easily add cheese, sauté onions, or create a delicious pan sauce right in the same skillet.
Ingredients You’ll Need
Let’s gather our ingredients. This recipe is simple, but quality ingredients make all the difference. I always prefer to use high-quality ground beef; it truly elevates the flavor.
1 1/3 pounds ground beef
3 tablespoons butter, softened, divided
4 hamburger buns, split
1 teaspoon kosher salt
Optional: Cheese, lettuce, tomato, red onion, mayonnaise, ketchup and mustard
How to Cook the Burgers on the Stove: Step-by-Step
Alright, let’s get cooking! Follow these simple steps, and you’ll be enjoying a delicious stovetop burger in no time. Remember, the key is to keep an eye on the burgers and adjust the heat as needed. The goal is to achieve a beautiful sear without burning them.
Shape the Patties: Shape the ground beef into four 1-inch-thick patties. Using your thumb, press a 1/2-inch hole in the center of each patty. This helps prevent the burgers from bulging in the middle as they cook. Refrigerate the patties until cooking. Editor’s Tip: Store the burger patties in the refrigerator, covered, until you’re ready to cook. If the fat is cold, it will rapidly expand when the burgers hit the hot skillet, forming flavorful pockets inside the patties.
Toast the Buns: Spread 2 tablespoons butter over the cut sides of the buns. In a large cast-iron skillet over medium-high heat, toast the buns, cut sides down, in batches. Remove to serving plates, and wipe the skillet clean. Editor’s Tip: A wet paper towel is the easiest way to remove any errant crumbs from the skillet. The crumbs will cling to the damp towel, leaving the skillet clean of any debris that might burn.
Season the Patties: Sprinkle the chilled burger patties with salt. Editor’s Tip: Keep the salt away from your burger patties until the last possible moment. Salt draws out moisture, and you want the burgers to retain as much moisture as possible to keep them juicy. Salting hamburgers too early will make them dense and tough.
Cook the Burgers: In the same skillet, melt the remaining 1 tablespoon butter over medium-high heat. Add the chilled, seasoned patties. Cook until a thermometer reads 160°, 8 to 10 minutes, turning once. Editor’s Tip: Make sure the burger patties have a little space to breathe. If they’re crowded, the burgers won’t sear and cook properly. You’ll know it’s time to flip the burgers when the edges start to brown.
Serve and Enjoy: Serve the burgers on toasted buns with toppings as desired. Editor’s Tip: For cheeseburgers, place a slice of cheese on each burger immediately after removing it from the skillet. You can cover the burgers with a plate to help the cheese melt faster.
Pro Tips for the Best Pan-Fried Burgers
Want to take your stovetop burger game to the next level? Here are a few pro tips I’ve learned over the years:
Use a Cast Iron Skillet: Cast iron retains heat beautifully and provides even cooking, resulting in a perfect sear.
Don’t Overcrowd the Pan: Cook the patties in batches if necessary to avoid overcrowding the pan. Overcrowding lowers the temperature and prevents proper searing.
Don’t Press the Patties: Resist the urge to press down on the patties with a spatula. This squeezes out the juices and makes the burgers dry.
Use a Meat Thermometer: A meat thermometer is your best friend for ensuring the burgers are cooked to the perfect internal temperature.
Let the Meat Rest: After cooking, let the burgers rest for a few minutes before serving. This allows the juices to redistribute, resulting in a more flavorful and juicy burger.
Common Mistakes to Avoid
We all make mistakes in the kitchen, but knowing what to avoid can save you from a burger disaster. Here are a few common pitfalls to watch out for:
Overcooking the Burgers: Overcooked burgers are dry and tough. Use a meat thermometer and cook to an internal temperature of 160°F (71°C) for medium doneness.
Using Lean Ground Beef: Lean ground beef can result in dry burgers. Opt for ground beef with a higher fat content (around 80/20) for juicier results.
Salting Too Early: As mentioned earlier, salt draws out moisture. Wait until just before cooking to season the patties.
Not Preheating the Skillet: A hot skillet is essential for achieving a good sear. Make sure the skillet is properly preheated before adding the patties.
Flipping Too Often: Resist the urge to flip the burgers constantly. Let them cook for several minutes on each side to develop a nice crust.
Burger Variations to Try
The beauty of burgers is their versatility. Here are a few fun variations to spice things up:
Cheese Stuffed Burgers: Stuff the patties with your favorite cheese before cooking for a melty surprise.
Mushroom and Swiss Burgers: Sauté sliced mushrooms and top the burgers with Swiss cheese.
Bacon Cheeseburgers: Add crispy bacon to your cheeseburgers for extra flavor and texture.
Spicy Jalapeño Burgers: Mix diced jalapeños into the ground beef for a spicy kick.
BBQ Burgers: Brush the burgers with your favorite BBQ sauce during the last few minutes of cooking.
How to Store Leftover Burgers
If you happen to have any leftover burgers (which is rare in my house!), here’s how to store them properly:
Refrigerate: Store cooked burgers in an airtight container in the refrigerator for up to 3-4 days.
Reheat: Reheat the burgers in a skillet, microwave, or oven until heated through.
Freeze: For longer storage, freeze cooked burgers in an airtight container for up to 2-3 months.
Frequently Asked Questions (FAQ)
Got questions? I’ve got answers! Here are a few frequently asked questions about cooking burgers on the stove:
What is the best type of pan to use?: A cast iron skillet is ideal, but a heavy-bottomed stainless steel skillet will also work.
What is the best temperature to cook burgers on the stove?: Medium-high heat is generally recommended.
How long does it take to cook burgers on the stove?: It depends on the thickness of the patties, but typically 8-10 minutes, turning once.
How do I know when the burgers are done?: Use a meat thermometer to check the internal temperature. 160°F (71°C) for medium.
Can I cook frozen burgers on the stove?: Yes, but it’s best to thaw them first for even cooking.
Serving Suggestions
Now for the fun part: serving your delicious stovetop burgers! Here are a few ideas to get you started:
Classic Burger: Serve on a toasted bun with lettuce, tomato, onion, ketchup, and mustard.
Cheeseburger: Add your favorite cheese, such as cheddar, Swiss, or pepper jack.
Bacon Cheeseburger: Top with crispy bacon and cheese.
Gourmet Burger: Get creative with toppings like avocado, caramelized onions, and a special sauce.
Sides: Serve with fries, onion rings, coleslaw, or a fresh salad.
So there you have it! Everything you need to know to cook juicy and delicious burgers on the stove. Now go forth and create your own burger masterpiece! Remember, cooking is all about experimentation and having fun. Don’t be afraid to try new things and put your own spin on this recipe. And as always, happy cooking!
This recipe is one of my favorite ways to make the burger when the weather isn’t cooperating. I used the same technique my mom used when I was growing up. This recipe is sure to become your favorite, too! All the patties are cooked until the internal temperature reaches 160°F. You’ll find it’s like a restaurant-quality burger, but cooked in your own kitchen. Set aside some time this week to make this recipe and cook it for your family. I hope you enjoy!