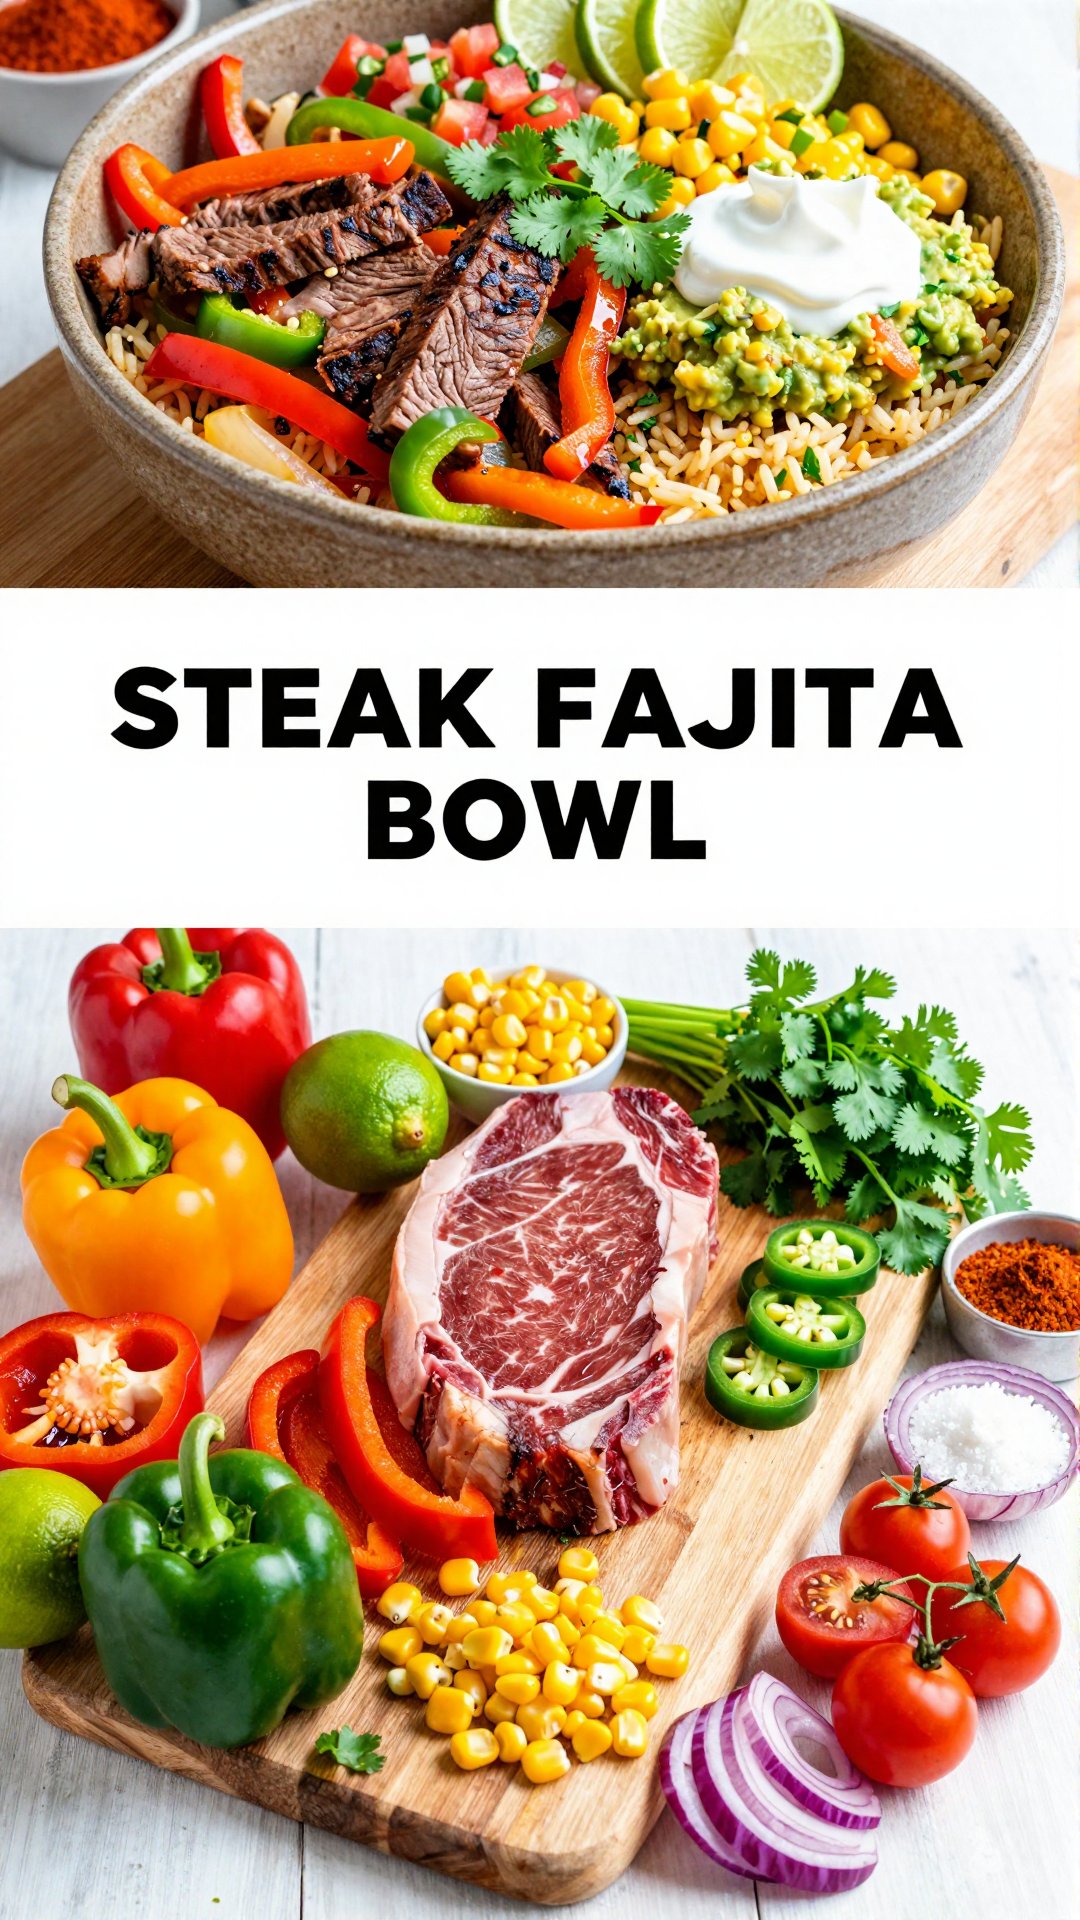
Hey there, friend! Ava here, welcoming you into my little corner of the internet where deliciousness meets simplicity. Today, we’re diving headfirst into a recipe that’s been a staple in my kitchen for years: the Steak Fajita Bowl. Think vibrant flavors, tender steak, and all your favorite toppings piled high. It’s like a party in a bowl, and you’re invited!
Growing up, fajitas were always a special occasion meal. The sizzle of the steak, the colorful peppers, and the endless possibilities for toppings—it was pure joy. But sometimes, you just want that fajita flavor without all the fuss. That’s where these Steak Fajita Bowls come in. They’re quick, easy, and perfect for a weeknight dinner or a satisfying meal prep option.
These bowls are not only incredibly tasty but also surprisingly healthy. Packed with protein, colorful veggies, and wholesome grains, they’re a balanced meal that will leave you feeling energized and satisfied. Plus, they’re totally customizable, so you can tailor them to your exact preferences. Whether you’re a spice lover, a guac enthusiast, or a cilantro fanatic, these bowls are your canvas. Let’s get cooking!
Why You’ll Love This Steak Fajita Bowl Recipe
Okay, so why should you try this recipe? Let me count the ways:
- Quick & Easy: Seriously, this recipe comes together in under 30 minutes. Perfect for those busy weeknights when you need a delicious meal fast.
- Customizable: The beauty of fajita bowls is that you can add or subtract ingredients to your heart’s content. Make it your own!
- Healthy & Balanced: Packed with protein, veggies, and wholesome grains, these bowls are a nutritious and satisfying meal.
- Meal Prep Friendly: These bowls are fantastic for meal prep. Make a big batch on Sunday and enjoy delicious lunches all week long.
- Flavor Explosion: The combination of tender steak, vibrant veggies, and zesty toppings creates a flavor explosion in every bite.
I mean, who doesn’t love a good fajita bowl? If you’re looking for a healthy, delicious, and easy meal, this is it. Trust me, once you try this recipe, it’ll become a regular in your rotation. And isn’t that what we all want? A few go-to recipes that we can always count on.
Ingredients You’ll Need
Before we dive into the cooking process, let’s gather our ingredients. Here’s what you’ll need to make these amazing Steak Fajita Bowls:
- 12 oz corn (grilled, boiled or frozen)
- 1 cup cherry tomatoes (quartered (more if desired))
- 1-2 jalapeños (diced (remove seeds and white membrane))
- 1/2 red onion (diced)
- 2 teaspoons lime zest
- 2 tablespoons lime juice
- 1/2 cup cilantro (roughly chopped)
- 1/4 teaspoon kosher salt (more to taste)
- 1/8 teaspoon ground black pepper
- 1/4 teaspoon chili powder (optional)
- 1/4 teaspoon cumin (optional)
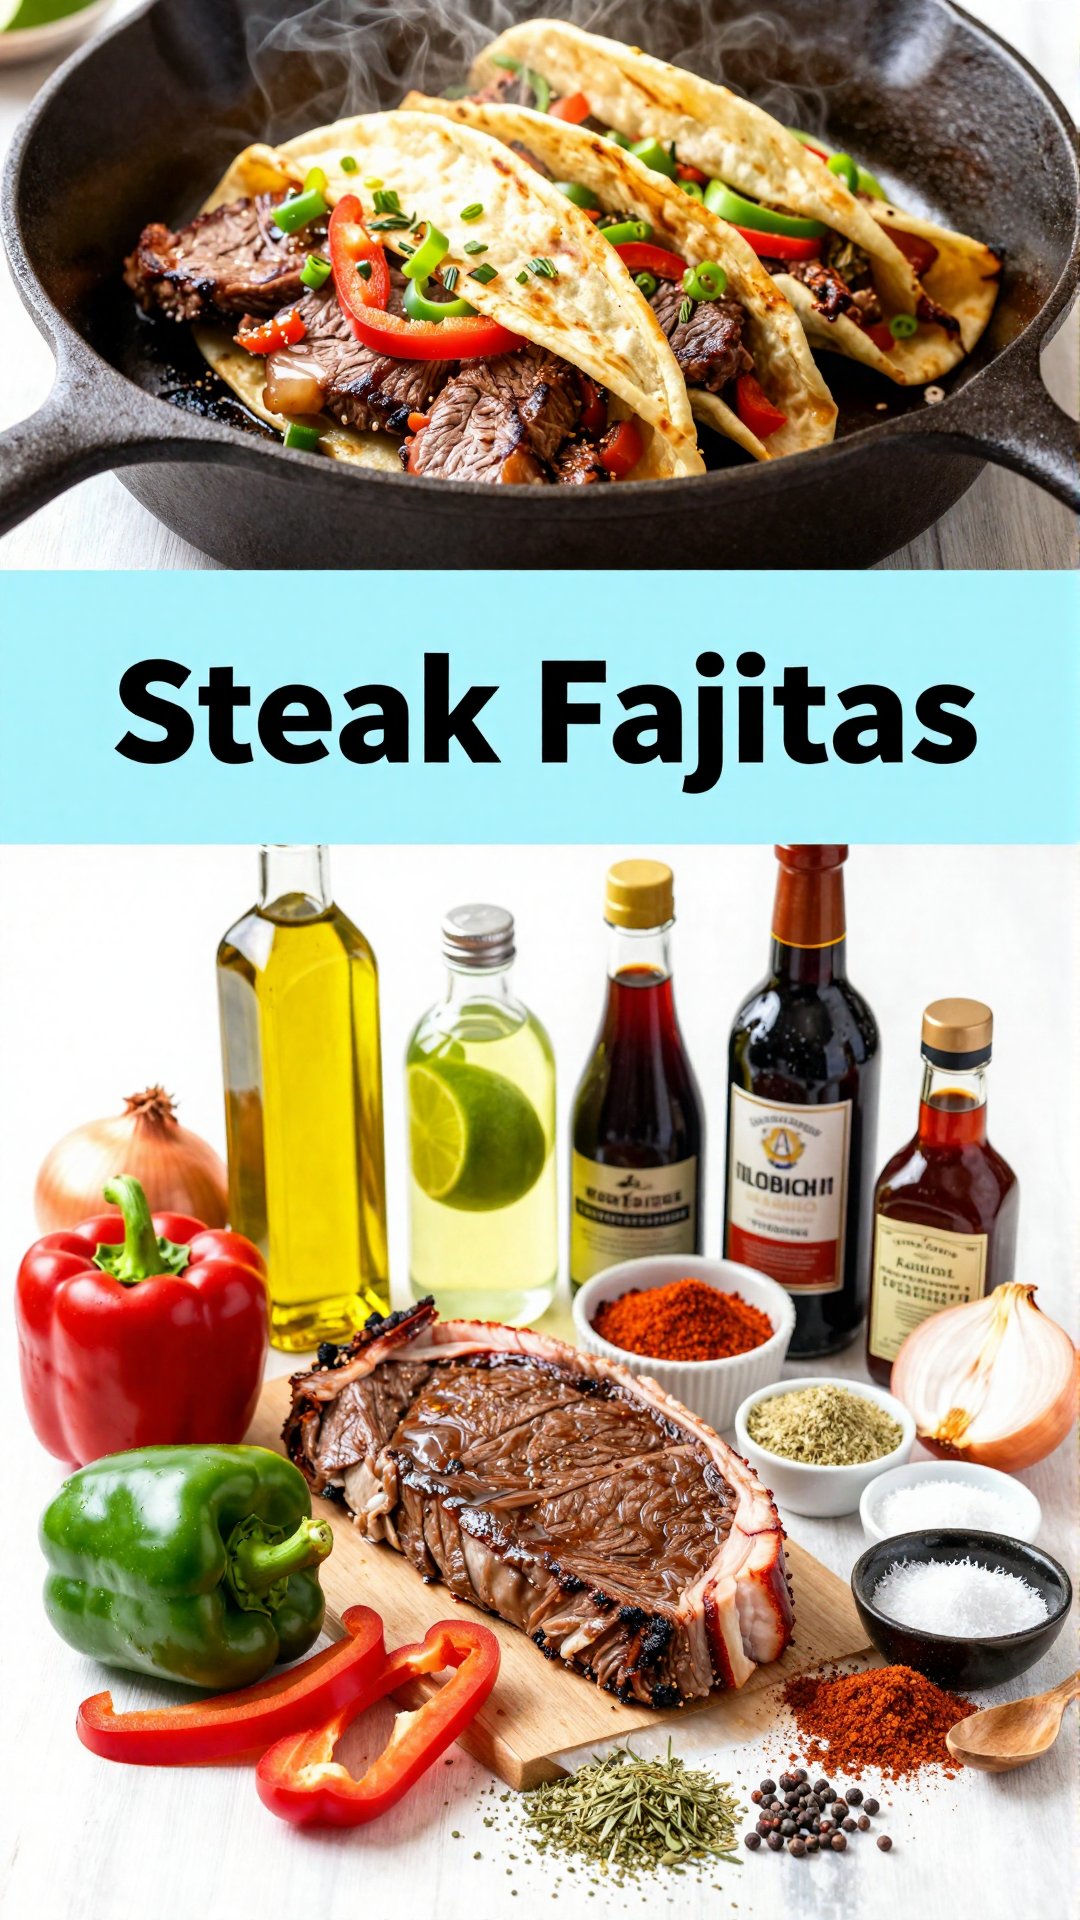
- 1.5 pound flank steak
- 1/4 cup olive oil
- 1/3 cup fresh lime juice (approx. 2 limes)
- zest of 2 limes
- 1/2 teaspoon chili powder
- 1/2 teaspoon ground cumin
- 1 tablespoon garlic (minced)
- 1 tablespoon soy sauce (use Tamari for gluten-free)
- 1/4 teaspoon kosher salt
- 1-2 tablespoons cilantro (chopped (optional))
- 2-3 tablespoons chicken broth (more if needed)
- 1 tablespoon garlic (minced)
- 1/2 red onion (sliced)
- 1/2 yellow onion (sliced)
- 3 bell peppers (red, green, orange, sliced)
- 2 tablespoons fajita seasoning
- additional kosher salt and ground black pepper (to taste)
- cilantro lime rice
- cilantro lime sauce
- homemade guacamole or avocado chunks
- tomatoes or blender salsa
- sour cream (regular or dairy-free sour cream)
- lime wedges
- fresh cilantro
How to Make Steak Fajita Bowls: Step-by-Step
Alright, let’s get down to business. Here’s how to make these amazing Steak Fajita Bowls, step by step:
- Make Corn Salsa: Add ingredients to a medium-sized mixing bowl. Stir to combine. Taste and add any additional salt, cilantro or lime juice. (If you want to take this recipe to the next level and make some Cilantro Lime Sauce.
- Prepare Steak: Pat the steak dry with clean paper towels. Season lightly with salt and pepper – pressing the salt and pepper into the meat. Place steak in a large reusable silicone bag or glass baking dish and set aside.
- Marinate Steak: Add olive oil, fresh lime juice, lime zest, chili powder, cumin, garlic, soy sauce, kosher salt and fresh cilantro (if using) into a small mixing bowl. Whisk until well combined. Pour the marinade over the steak, ensuring it is fully coated. Seal and place in the refrigerator for 30 minutes or more.
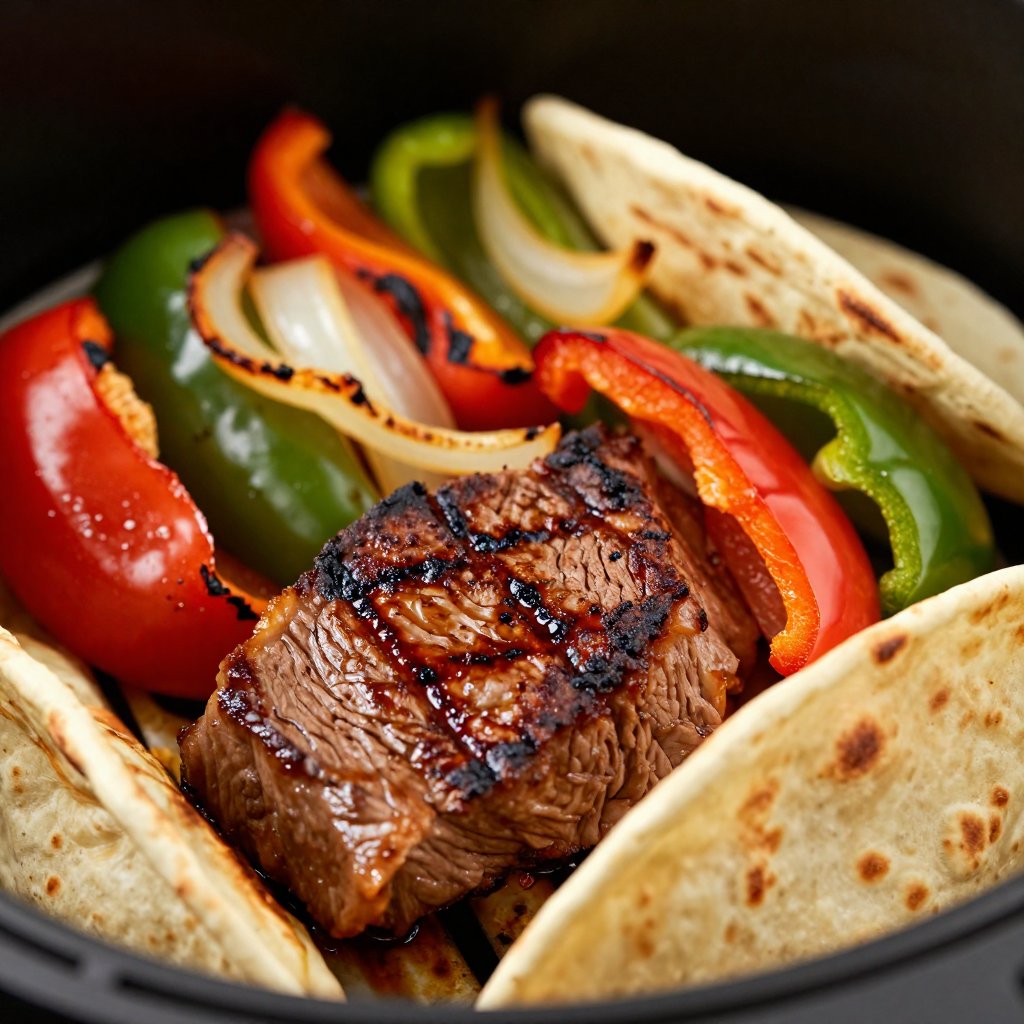
- Cook Steak: Bring a large cast iron skillet to medium-high heat. Add a oil, swirl to coat the pan. Remove flank steak from marinade letting excess marinade drip off the steak; discard marinade. Place the steak in the pan and sear 4-5 minutes per side and then 1-2 minutes per side until the internal temperature towards the thickest part of the steak reaches 130-135℉ for a medium-rare finish (use an internal meat thermometer for accuracy) – during the cooking process turn down the heat, as-needed, if your skillet really gets hot and/or add a little extra oil if the pan is dry – to avoid burning. Remove from skillet and place on a cutting board to rest 10 minutes while you cook the veggies.
- Cook Veggies: Keeping pan at medium-high heat add 2-3 tablespoons of chicken broth to deglaze the pan – use a spatula to scrape up the bits from the bottom of the pan. Add garlic and move around pan until it becomes fragrant, approx. 1 minute. Add onion, bell peppers and the fajita seasoning. Stir to combine. Add additional broth or olive oil to pan if you feel it is getting a bit dry.
- Finish Veggies: Sauté for approx. 10-15 minutes or until the peppers have reached your desired doneness (cook shorter for a more firm, but tender pepper – longer for a softer pepper). Taste and add any additional salt or pepper, to taste.
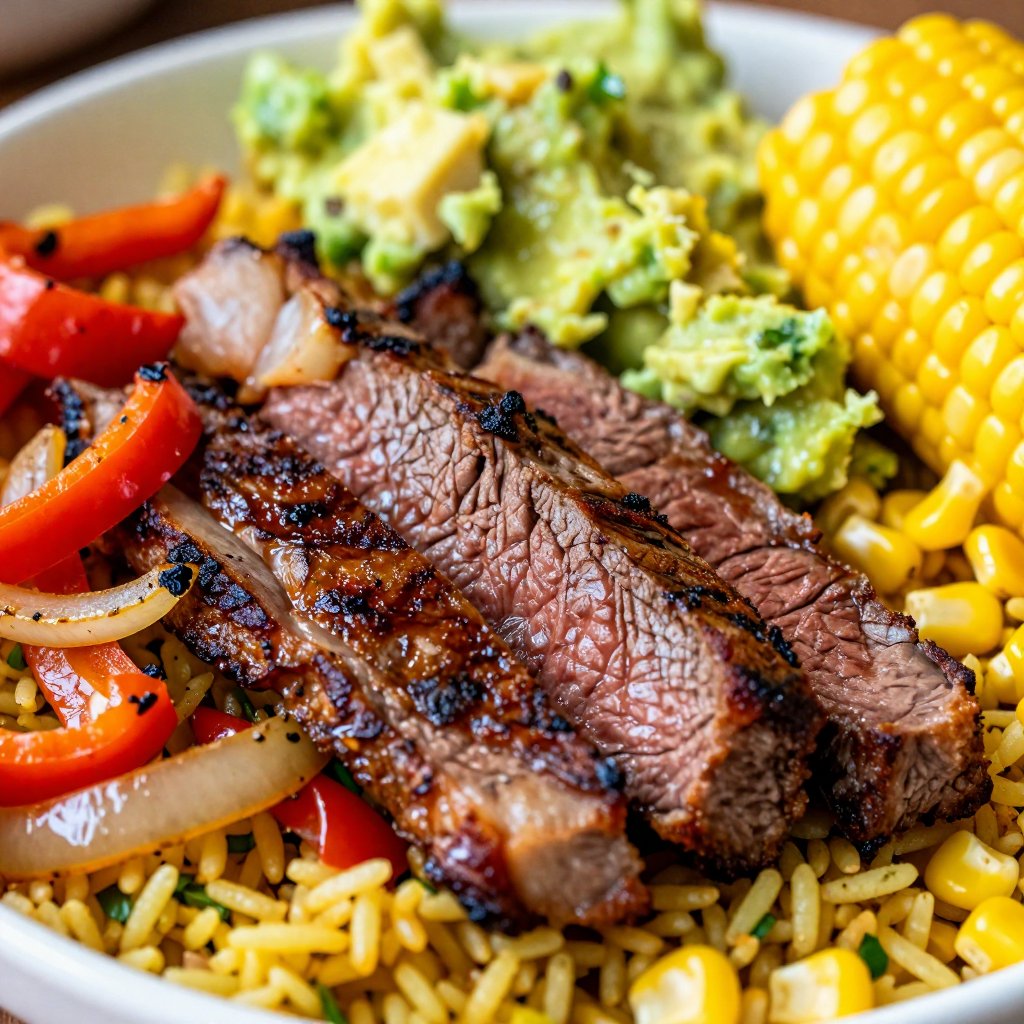
- Serve: Slice the steak against the grain into thin slices. In each bowl add some cilantro lime rice, steak, fajita veggies, corn salsa, guacamole, sour cream (or easy cilantro lime sauce), fresh cilantro, tomatoes and fresh lime wedges.
Pro Tips for the Best Steak Fajita Bowls
Want to take your Steak Fajita Bowls to the next level? Here are a few pro tips I’ve learned over the years:
- Marinate the Steak: Don’t skip the marinade! It’s what gives the steak that incredible flavor and tenderness. The longer you marinate, the better, but at least 30 minutes is ideal.
- Use a Hot Skillet: A screaming hot skillet is key to getting that beautiful sear on the steak. Make sure your pan is nice and hot before adding the steak.
- Don’t Overcrowd the Pan: When cooking the steak, make sure not to overcrowd the pan. This will lower the temperature and result in steamed, not seared, steak. Cook in batches if necessary.
- Rest the Steak: Let the steak rest for at least 10 minutes after cooking. This allows the juices to redistribute, resulting in a more tender and flavorful steak.
- Slice Against the Grain: Always slice the steak against the grain for maximum tenderness.
- Customize Your Toppings: Don’t be afraid to get creative with your toppings! Add your favorite salsas, sauces, and veggies to make it your own.
These little tweaks can make a big difference in the final result. Trust me, it’s worth the extra effort! These bowls are one of the best ways to enjoy a steak fajita. If you’re looking for fajitas meal prep ideas, this is a great one!
Common Mistakes to Avoid
We all make mistakes in the kitchen, but here are a few common ones to avoid when making Steak Fajita Bowls:
- Overcooking the Steak: Nobody wants a tough, dry steak. Use a meat thermometer to ensure you cook the steak to your desired doneness.
- Not Seasoning Properly: Seasoning is key to flavor. Don’t be afraid to season the steak and veggies generously.
- Using Dull Knives: A sharp knife makes all the difference when slicing the steak and veggies. Make sure your knives are sharp before you start cooking.
- Skipping the Resting Period: As mentioned earlier, resting the steak is crucial for tenderness. Don’t skip this step!
I’ve definitely made a few of these mistakes myself (who hasn’t?), but learning from them is what makes us better cooks. So don’t worry if you mess up – just keep practicing!
Steak Fajita Bowl Variations
The beauty of Steak Fajita Bowls is that they’re so versatile. Here are a few variations to try:
- Chicken Fajita Bowls: Swap the steak for chicken breast or thighs.
- Shrimp Fajita Bowls: Use shrimp instead of steak for a lighter option.
- Vegetarian Fajita Bowls: Omit the meat and add extra veggies like mushrooms, zucchini, and black beans.
- Spicy Fajita Bowls: Add extra jalapeños or a dash of hot sauce for a spicy kick.
- Sweet & Savory Fajita Bowls: Add grilled pineapple or mango for a touch of sweetness.
Don’t be afraid to experiment and find your favorite combination. It’s all about having fun in the kitchen!
How to Store Leftovers
If you have any leftovers (which is rare in my house!), here’s how to store them:
- Store Components Separately: Store the steak, veggies, rice, and toppings in separate containers to prevent them from getting soggy.
- Refrigerate Promptly: Refrigerate leftovers within two hours of cooking.
- Use Within 3-4 Days: Leftovers are best consumed within 3-4 days.
- Reheat Properly: Reheat the steak and veggies in a skillet or microwave until heated through. Add the rice and toppings just before serving.
Meal prep is a breeze with these bowls. Prepare all the components on Sunday, store them separately, and assemble your bowls throughout the week. Easy peasy!
Frequently Asked Questions (FAQ)
Got questions? I’ve got answers! Here are a few frequently asked questions about Steak Fajita Bowls:
- Can I use a different cut of steak? Absolutely! Flank steak is my go-to, but skirt steak, sirloin, or even ribeye would work well.
- Can I make this recipe ahead of time? Yes! These bowls are perfect for meal prep. Prepare all the components ahead of time and assemble when ready to eat.
- Can I freeze the steak? Yes, you can freeze cooked steak. Let it cool completely, then wrap it tightly in plastic wrap and place it in a freezer bag. It will keep for up to 2-3 months.
- What kind of rice should I use? I love using cilantro lime rice, but any type of rice will work. Brown rice, white rice, or even quinoa are great options.
- Can I add beans to the bowls? Definitely! Black beans or pinto beans would be a delicious addition.
If you have any other questions, feel free to ask in the comments below. I’m always happy to help!
Serving Suggestions
These Steak Fajita Bowls are a complete meal on their own, but here are a few serving suggestions to make them even more special:
- Serve with Tortilla Chips & Guacamole: Because who doesn’t love chips and guac?
- Add a Side Salad: A simple green salad with a zesty vinaigrette would be a refreshing addition.
- Offer a Variety of Toppings: Set out a variety of toppings like salsas, sauces, and fresh herbs so everyone can customize their bowls.
- Pair with a Refreshing Drink: A margarita, a Mexican beer, or a refreshing agua fresca would be the perfect complement to these bowls.
Whether you’re cooking for your family, entertaining friends, or just treating yourself, these Steak Fajita Bowls are sure to be a hit. They’re easy, delicious, and endlessly customizable. So grab your skillet, gather your ingredients, and let’s make some magic in the kitchen! And remember, the best steak starts with the best cut, so don’t skimp on quality. If you’re looking for the best meal prep option that includes steak fajita bowls, then this is it!
Steak Fajita Bowl Recipe
Ingredients
Corn Salsa
- 12 oz corn (grilled, boiled or frozen)
- 1 cup cherry tomatoes (quartered (more if desired))
- 1-2 jalapeños (diced (remove seeds and white membrane))
- 1/2 red onion (diced)
- 2 teaspoons lime zest
- 2 tablespoons lime juice
- 1/2 cup cilantro (roughly chopped)
- 1/4 teaspoon kosher salt (more to taste)
- 1/8 teaspoon ground black pepper
- 1/4 teaspoon chili powder (optional)
- 1/4 teaspoon cumin (optional)
Steak Marinade
- 1.5 pound flank steak
- 1/4 cup olive oil
- 1/3 cup fresh lime juice (approx. 2 limes)
- 2 limes (zest of 2 limes)
- 1/2 teaspoon chili powder
- 1/2 teaspoon ground cumin
- 1 tablespoon garlic (minced)
- 1 tablespoon soy sauce (use Tamari for gluten-free)
- 1/4 teaspoon kosher salt
- 1-2 tablespoons cilantro (chopped (optional))
Fajita Veggies
- 2-3 tablespoons chicken broth (more if needed)
- 1 tablespoon garlic (minced)
- 1/2 red onion (sliced)
- 1/2 yellow onion (sliced)
- 3 bell peppers (red, green, orange, sliced)
- 2 tablespoons fajita seasoning
Toppings
- kosher salt and ground black pepper (to taste)
- cilantro lime rice
- cilantro lime sauce
- homemade guacamole or avocado chunks
- tomatoes or blender salsa
- sour cream (regular or dairy-free sour cream)
- lime wedges
- fresh cilantro
Instructions
- Make Corn Salsa: Add ingredients to a bowl. Stir. Taste and adjust.
- Prepare Steak: Pat steak dry. Season with salt and pepper.
- Marinate Steak: Combine marinade ingredients. Marinate steak for 30+ minutes.
- Cook Steak: Sear steak in a hot skillet 4-5 minutes per side until 130-135℉. Rest 10 minutes.
- Cook Veggies: Deglaze pan with broth. Add garlic, onion, peppers, and seasoning. Stir.
- Finish Veggies: Sauté 10-15 minutes until peppers are tender. Season to taste.
- Serve: Slice steak. Assemble bowls with rice, steak, veggies, salsa, and toppings.
Notes