Author

Ava

Browsing

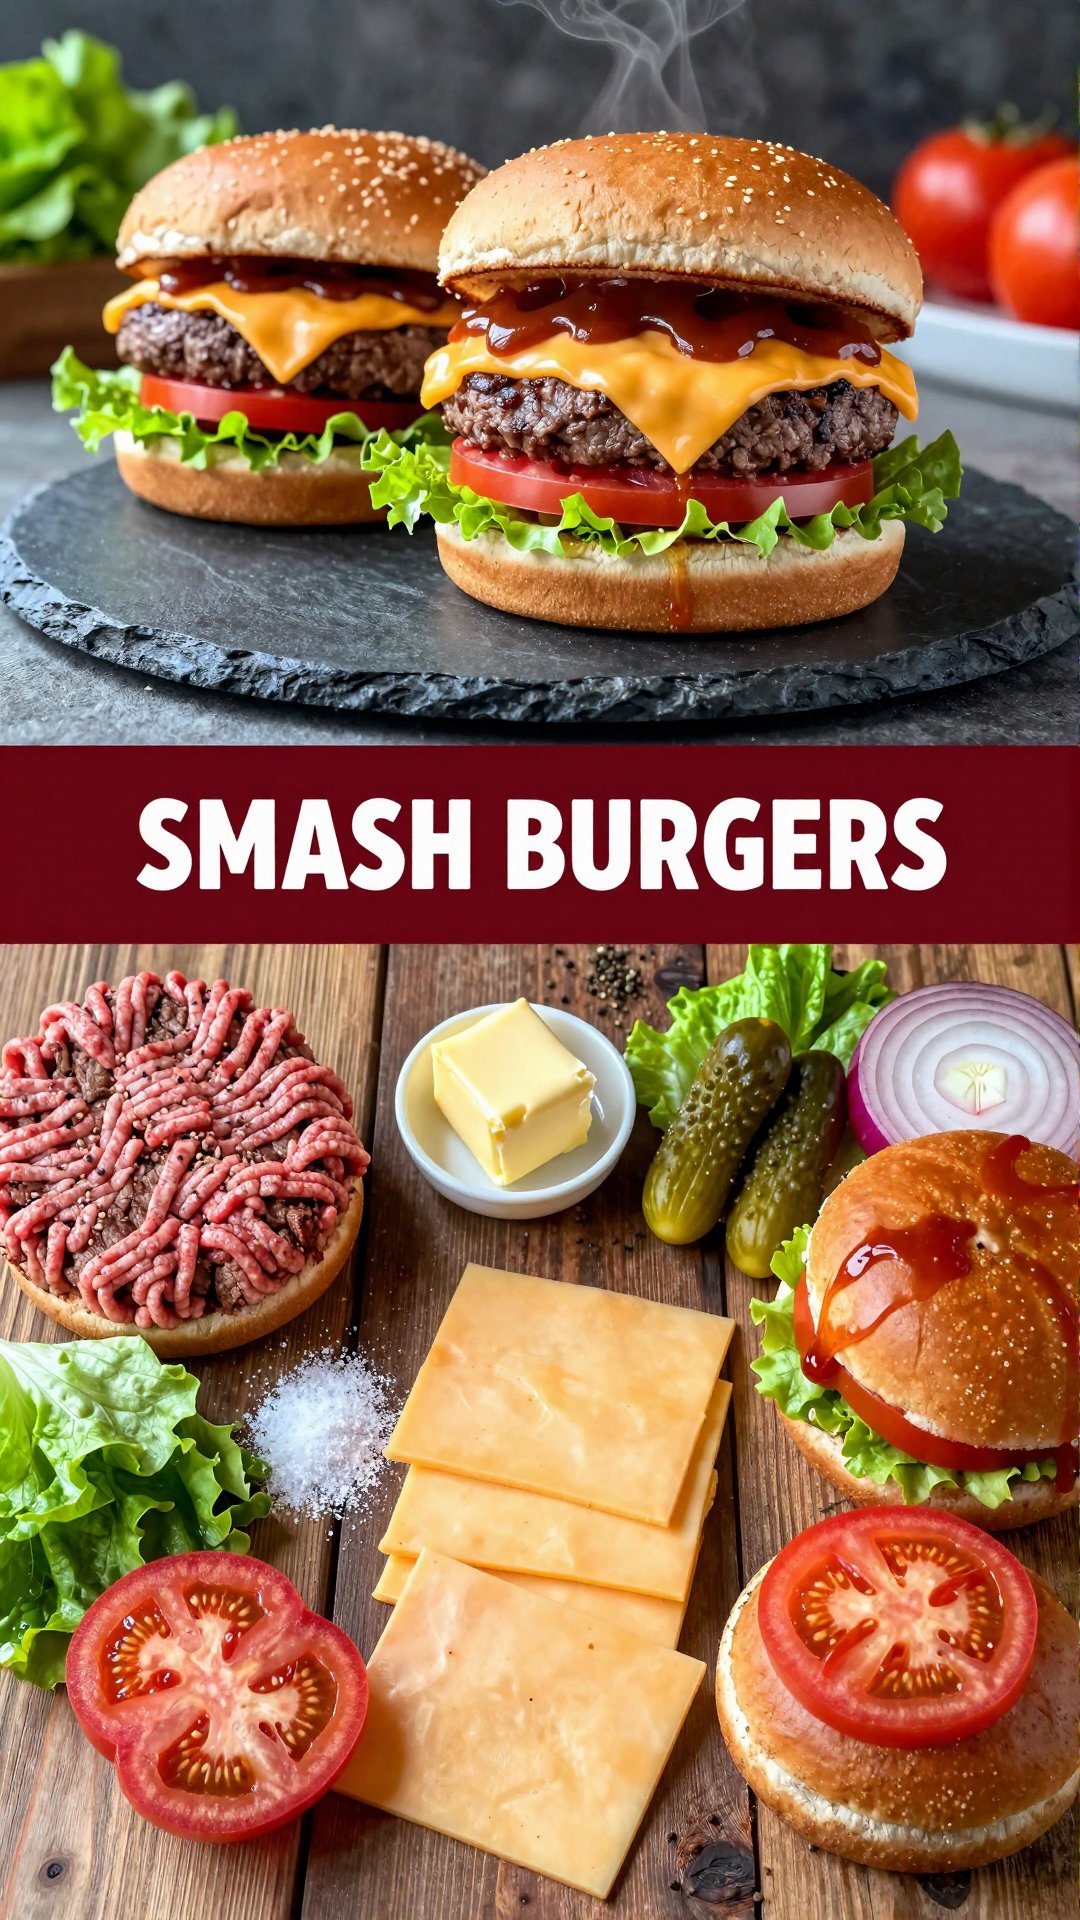
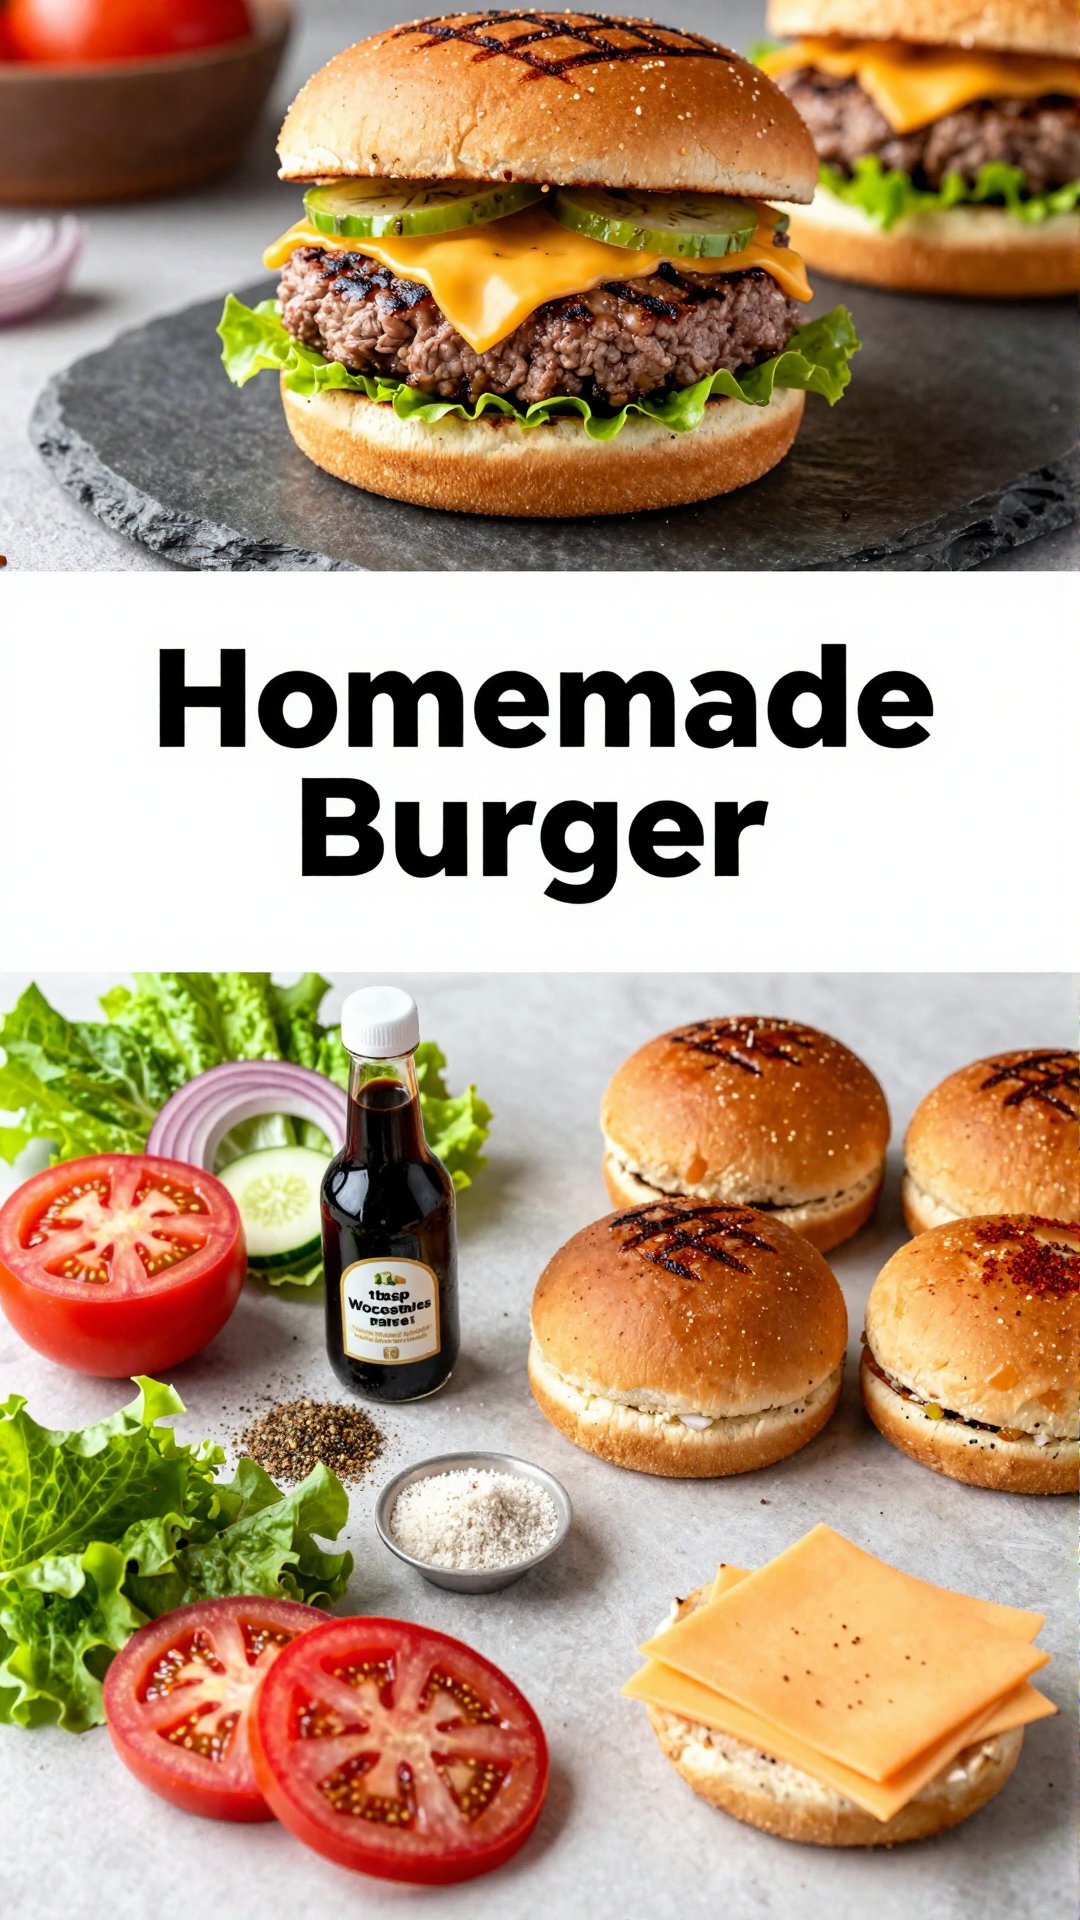
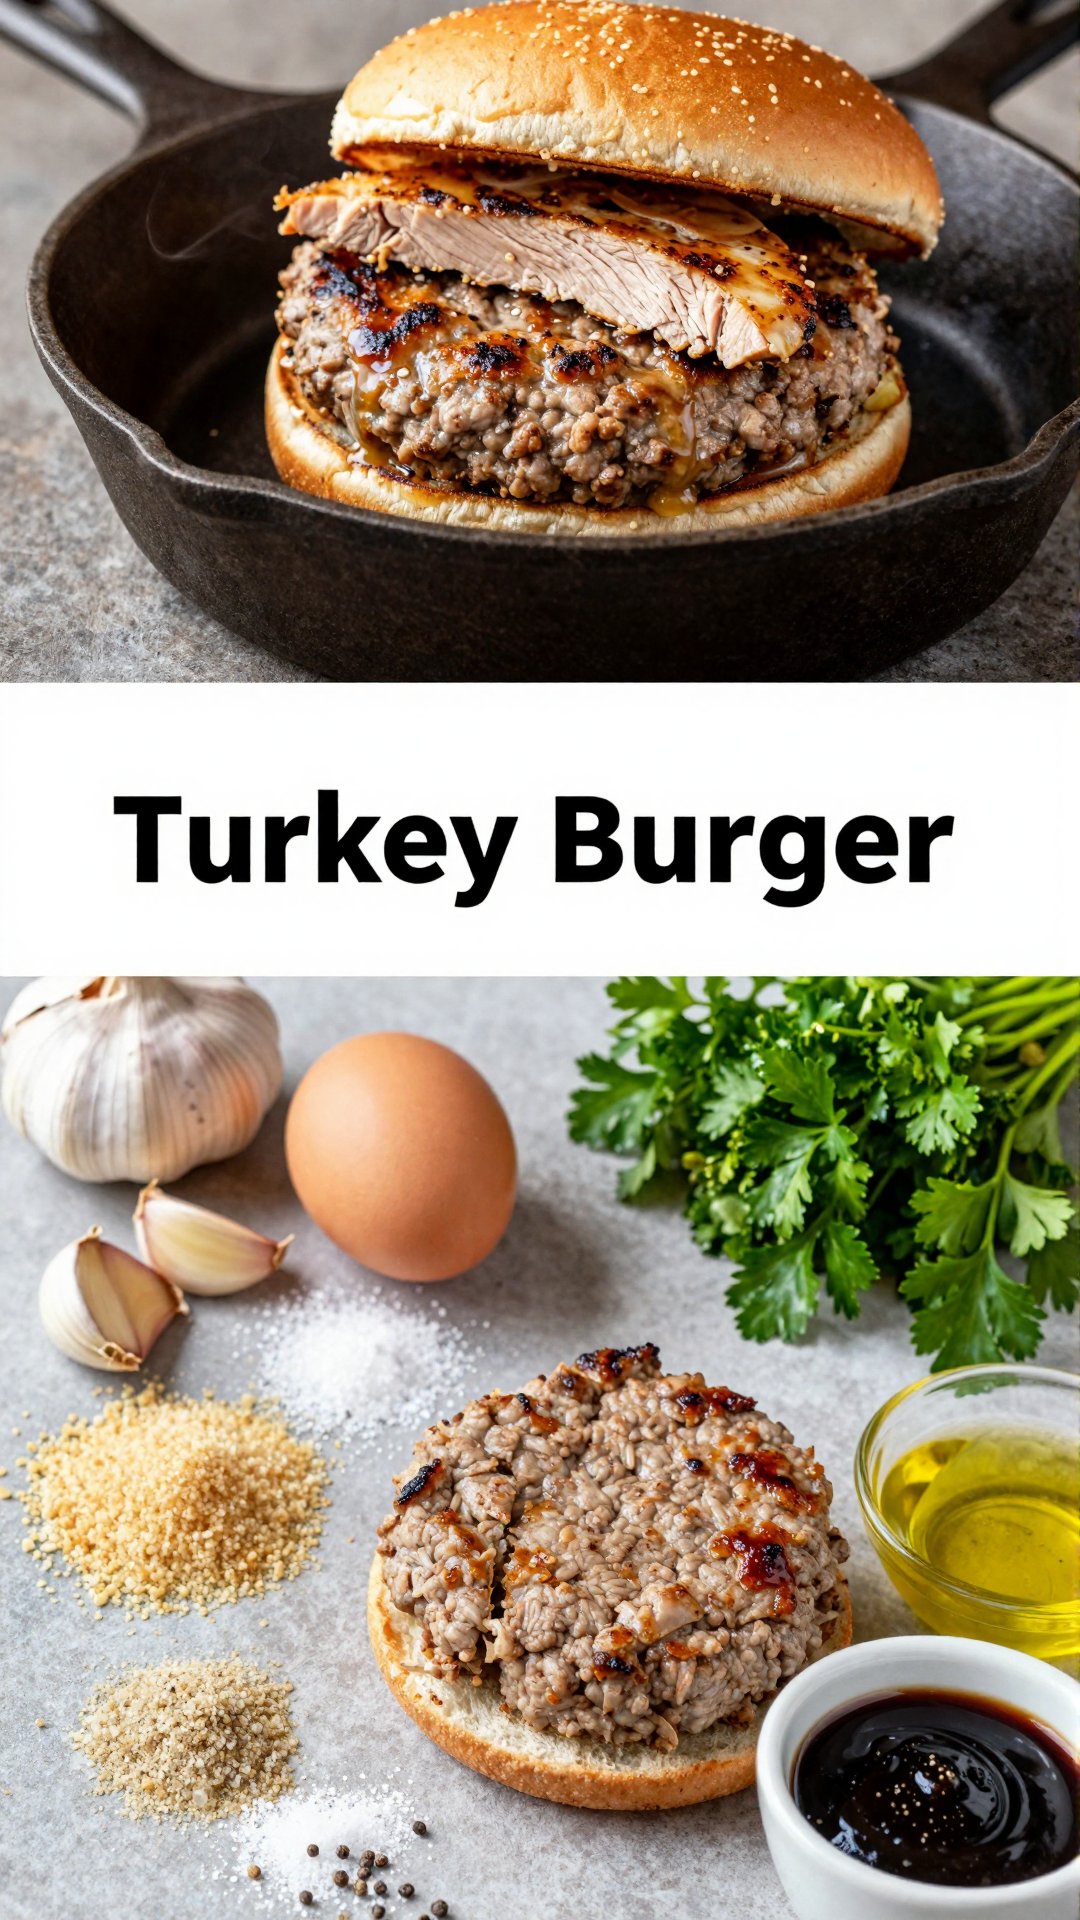
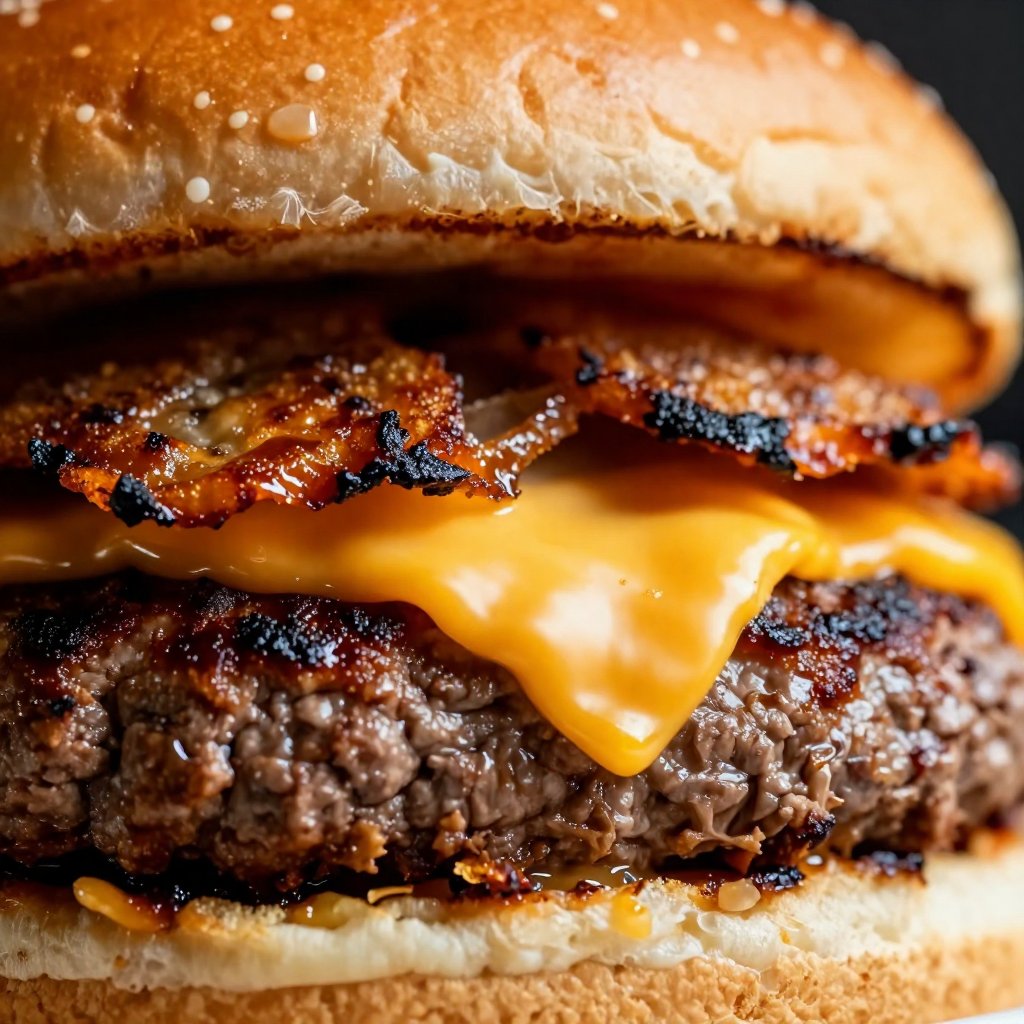
Hey there, burger aficionados! Ava here, back in my Seattle kitchen, ready to share a recipe that’s become a weeknight staple: Juicy Smash Burgers! Forget those thick, towering burgers that are impossible to eat gracefully. We’re going thin, crispy, and packed with flavor. If you’ve ever wondered how to make the perfect smash burger, you’re in the right place. This is how to get that incredible crust and juicy center, all in a matter of minutes. It’s the kind of burger that makes you close your eyes and savor every single bite. Ready to dive in? Let’s get smashing!

Why You’ll Love This Smash Burger Recipe

Let’s be real, there are a million burger recipes out there. But this smash burger recipe? It’s different. It’s not just about slapping some ground beef between two buns; it’s about creating an experience. Here’s why this will be your new go-to burger:

  • Quick & Easy: Seriously, from start to finish, you’re looking at maybe 20 minutes. Perfect for those nights when you need dinner on the table, like, yesterday.
  • Incredible Flavor: The smashing technique creates maximum surface area, which means maximum Maillard reaction (that’s the fancy science word for browning and flavor!). You get a crispy, caramelized crust that’s simply irresistible.
  • Customizable: Whether you’re a cheese lover, a pickle fanatic, or a burger sauce connoisseur, this recipe is a blank canvas for your burger dreams.
  • Minimal Cleanup: Fewer ingredients, fewer dishes. What’s not to love?
  • Better Than Takeout: Trust me, once you taste these, you’ll never reach for that delivery app again.

The best part is that it’s so simple. It’s all about the technique and the quality of the ingredients. If you follow these steps, you’ll be making restaurant-quality smash burgers in your own kitchen in no time!

Smash Burgers Recipe Ingredients

Here’s what you’ll need to make these mouthwatering smash burgers:

  • 1 lb ground beef (80/20 blend recommended): This is crucial! The fat content is what gives the burger its juicy flavor and helps create that beautiful crust. Don’t skimp on the fat.
  • 4 hamburger buns: Choose your favorite. Brioche, potato, or even sesame seed buns work great.
  • 4 slices cheese (cheddar, American, or your preference): I’m a cheddar girl myself, but American cheese melts like a dream.
  • 1 tablespoon butter, softened: For toasting the buns. It adds a richness that’s hard to beat.
  • Salt and pepper to taste: Don’t be shy! Seasoning is key to a flavorful burger.
  • Optional toppings: lettuce, tomato, onion, pickles, burger sauce: The possibilities are endless!
Recipe Image

How to Make Smash Burgers: Step-by-Step Instructions

Alright, let’s get down to business. Here’s the step-by-step guide to smash burger perfection:

  1. Prepare the Beef: Divide the ground beef into 4 equal portions (about 4 ounces each). Gently form them into loose balls, being careful not to overwork the meat. Remember, we want a tender burger, not a hockey puck.
  2. Heat the Skillet: Heat a large cast iron skillet or griddle over medium-high heat until very hot. A light smoking is ideal. This is where the magic happens. If you don’t have a cast iron, a heavy-bottomed skillet will work, but the cast iron really delivers that perfect crust.
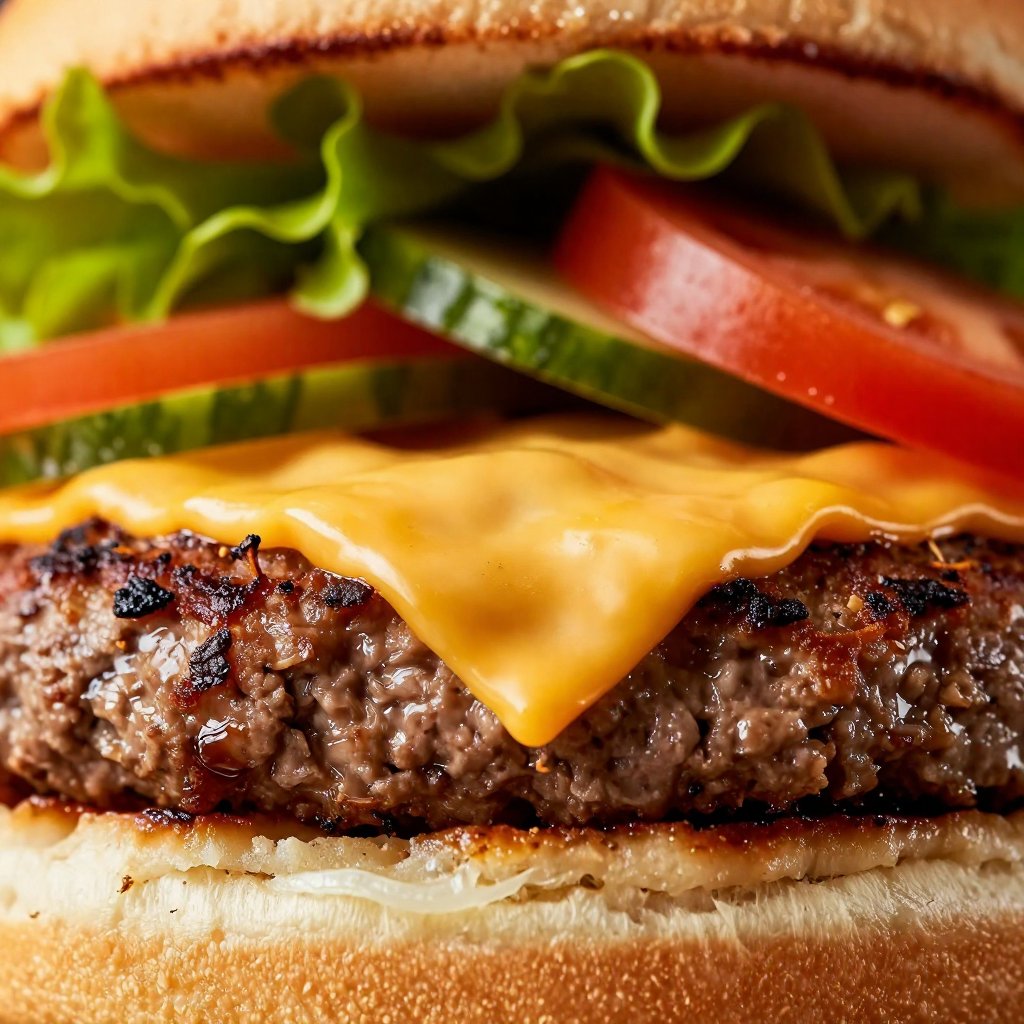
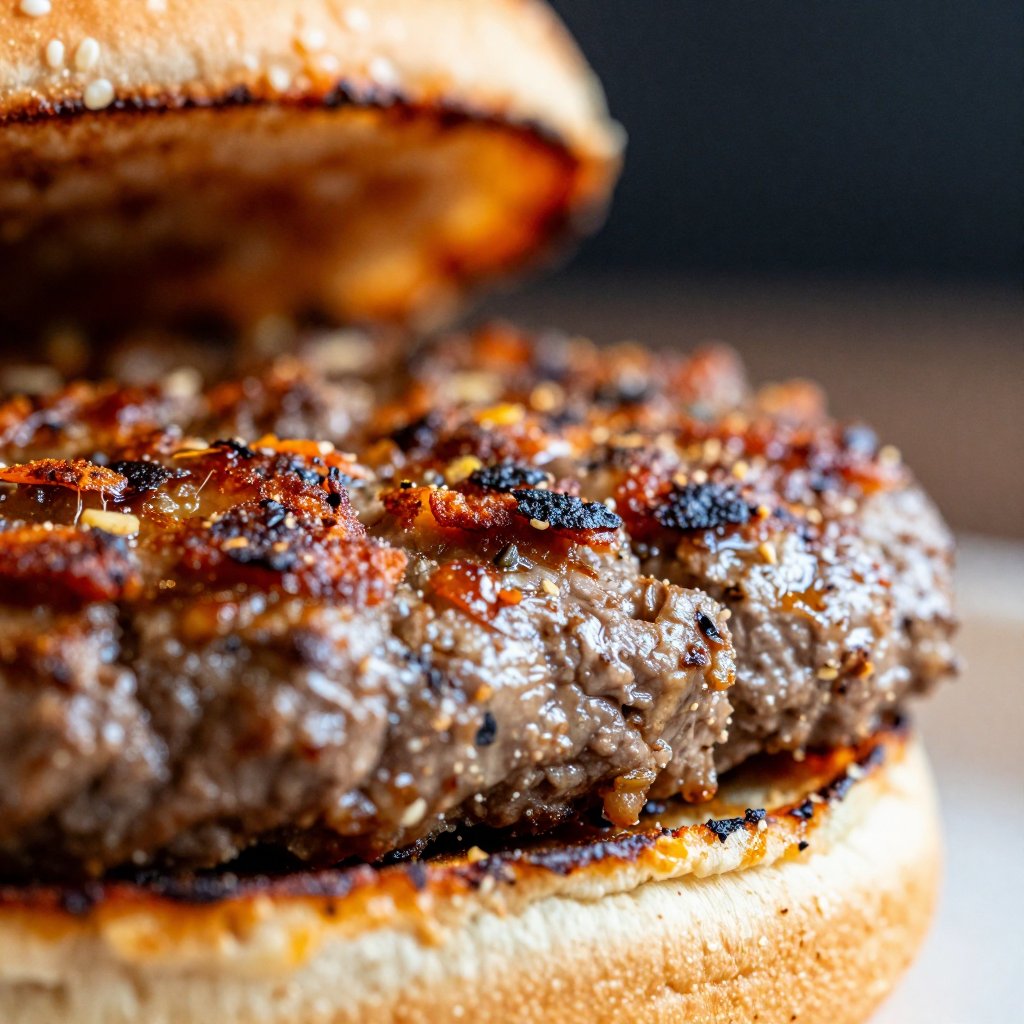
  3. Smash the Burgers: Place the beef balls onto the hot surface, leaving space between them. Immediately smash each ball very thin using a sturdy metal spatula. Apply firm, even pressure to create a thin patty. The thinner, the better for crispy edges. This is a smash burger, after all!
  4. Season Generously: Season generously with salt and pepper. Don’t be afraid to really season it up. The seasoning is what will make the burgers taste amazing.
  5. Cook and Flip: Cook for 2-3 minutes, or until the edges are deeply browned and crispy. Scrape under the patties with the spatula to release them from the surface. Flip and cook for another 1-2 minutes for medium doneness. Add cheese slices during the last minute of cooking, allowing them to melt.
  6. Toast the Buns: While the burgers are cooking, butter the insides of the hamburger buns and toast them on the skillet or in a toaster until golden brown. This adds a nice texture and flavor contrast.
  7. Assemble and Serve: Place the cheeseburgers on the toasted buns. Add your desired toppings. Serve immediately and enjoy!

And there you have it! A juicy, flavorful smash burger that’s ready to devour. It’s seriously the best burger recipe, if you ask me!

Pro Tips for the Perfect Smash Burger

Want to take your smash burger game to the next level? Here are a few pro tips I’ve learned along the way:

  • Use a Sturdy Spatula: A thin, flexible spatula won’t cut it. You need something with some heft to really smash those burgers thin. I use a metal spatula with a beveled edge.
  • Don’t Overcrowd the Pan: Cook the burgers in batches if necessary. Overcrowding will lower the temperature of the pan and you won’t get that crispy crust.
  • Get the Pan Hot: I can’t stress this enough. A hot pan is essential for creating that beautiful sear. If the pan isn’t hot enough, the burgers will steam instead of sear.
  • Don’t Move the Burgers: Once you smash the burger, leave it alone! Let it cook undisturbed for those 2-3 minutes to develop that crust.
  • Use Quality Ingredients: It makes a difference! High-quality ground beef, fresh buns, and flavorful toppings will elevate your smash burger to gourmet status.

Common Mistakes to Avoid

Even with a simple recipe like this, it’s easy to make mistakes. Here are a few common pitfalls to avoid:

  • Overworking the Meat: This will result in a tough burger. Handle the ground beef gently when forming the balls.
  • Not Seasoning Enough: Salt and pepper are your friends! Don’t be afraid to season those burgers generously.
  • Using Lean Ground Beef: You need the fat for flavor and moisture. 80/20 is the sweet spot.
  • Not Getting the Pan Hot Enough: This is crucial for creating that crispy crust.
  • Overcooking the Burgers: Smash burgers cook quickly. Keep a close eye on them to avoid overcooking.

Smash Burger Variations

One of the best things about smash burgers is how versatile they are. Here are a few variations to try:

  • Spicy Smash Burger: Add a pinch of cayenne pepper to the ground beef mixture for a little kick. Top with jalapenos and pepper jack cheese.
  • Bacon Smash Burger: Cook some bacon and crumble it over the burgers during the last minute of cooking.
  • Mushroom & Swiss Smash Burger: Sauté some mushrooms and onions and top the burgers with Swiss cheese.
  • BBQ Smash Burger: Brush the burgers with your favorite BBQ sauce during the last minute of cooking. Top with crispy fried onions and coleslaw.
  • Double Smash Burger: Double the patties for an extra-indulgent burger experience.

Storing and Reheating Smash Burgers

If you happen to have leftovers (though I doubt you will!), here’s how to store and reheat them:

  • Storing: Wrap the burgers tightly in plastic wrap or store them in an airtight container in the refrigerator for up to 3 days.
  • Reheating: Reheat the burgers in a skillet over medium heat until heated through. You can also microwave them, but they may become a bit rubbery.

Keep the toppings separate until you’re ready to assemble the burgers.

Smash Burger Recipe: Frequently Asked Questions

Got questions? I’ve got answers!

  • What is the best ground beef for smash burgers? 80/20 ground beef is the best choice. The fat content is crucial for flavor and moisture.
  • Can I use a different type of pan? A cast iron skillet is ideal, but a heavy-bottomed skillet will also work.
  • How do I prevent the burgers from sticking to the pan? Make sure the pan is very hot and well-seasoned. Use a sturdy metal spatula to scrape under the burgers.
  • Can I make smash burgers on the grill? Yes! Just make sure the grill is very hot and use a grill press to smash the burgers.
  • What toppings go well with smash burgers? The possibilities are endless! Lettuce, tomato, onion, pickles, cheese, burger sauce, bacon, avocado – the choice is yours!

Serving Suggestions for Smash Burgers

Smash burgers are great on their own, but they’re even better with the right sides. Here are a few of my favorite serving suggestions:

  • French Fries: A classic pairing!
  • Sweet Potato Fries: A healthier and equally delicious alternative.
  • Onion Rings: Crispy and flavorful.
  • Coleslaw: A refreshing and tangy side.
  • Potato Salad: A classic cookout staple.
  • Side Salad: A lighter option for those who want to keep it healthy.

So there you have it – my ultimate smash burger recipe! I hope you love it as much as I do. Now go forth and smash some burgers! And don’t forget to share your creations with me on social media. I can’t wait to see what you come up with! Happy cooking!

Smash Burgers Recipe

Prep Time 10 minutes
Cook Time 15 minutes
Total Time 25 minutes
Servings 4 burgers
Calories 450
These smash burgers are quick, easy, and deliver a crispy, flavorful patty every time. Perfect for a weeknight meal!

Ingredients

Burger Ingredients

  • 1 lb ground beef (80/20 blend recommended)
  • 4 hamburger buns
  • 4 slices cheese (cheddar, American, or your preference)
  • 1 tablespoon butter (softened)
  • to taste Salt and pepper
  • Optional toppings (lettuce, tomato, onion, pickles, burger sauce)

Instructions 

  • Divide beef into 4 portions, form into loose balls.
  • Heat skillet over medium-high heat until very hot.
  • Place beef balls onto the hot surface.
  • Smash each ball very thin with a spatula.
  • Season generously with salt and pepper.
  • Cook 2-3 minutes until browned and crispy.
  • Flip and cook 1-2 minutes. Add cheese to melt.
  • Butter and toast the hamburger buns.
  • Assemble the burgers with desired toppings.
  • Serve immediately and enjoy!

Notes

For extra crispy edges, don't move the patty while it's cooking on the first side.
Calories: 450kcal
Cost: $12
Course: Main Course
Cuisine: American
Keyword: Beef
pin

Hey there, friend! Ava here, back from my little Seattle kitchen, ready to share something that’s become a weekly staple. If you’re anything like me, you’re always on the lookout for meals that are both delicious and easy to throw together, especially on those hectic weeknights. Well, look no further! These Slow Cooker Steak Fajitas are about to become your new best friend. I remember the first time I made these; I was so skeptical that something this simple could taste so good. But trust me, the slow cooker works its magic, turning an inexpensive cut of flank steak into the most tender, flavorful fajita filling you’ve ever had.

Growing up, fajitas were always a special occasion meal. My mom would spend hours marinating the meat, chopping veggies, and getting everything just right. While I cherish those memories, I don’t always have that kind of time these days. That’s where the slow cooker comes in! It does all the work for you, infusing the steak with so much flavor that you’ll swear you’re eating something from a fancy restaurant. Plus, the aroma that fills your house while it’s cooking is absolutely divine. It’s one of my favorite steak slow cooker recipes!

Why You’ll Love This Slow Cooker Steak Fajitas Recipe

Okay, let’s get down to brass tacks. Why should you try this recipe? Well, besides the fact that it’s incredibly easy, there are a ton of reasons to love these slow cooker steak fajitas. I’m going to break them down for you:

  • Effortless Cooking: Seriously, dump everything in the slow cooker, and walk away. It doesn’t get much easier than that. The slow cooker does all the heavy lifting, leaving you free to tackle other things.
  • Incredible Flavor: The slow cooking process allows the spices and lime juice to really penetrate the meat, resulting in a depth of flavor that’s hard to beat. The flank steak becomes incredibly tender and juicy.
  • Customizable: Don’t like bell peppers? Swap them out for something else! Want more spice? Add a little extra chipotle pepper. This recipe is super flexible and easy to adapt to your tastes.
  • Perfect for Meal Prep: Make a big batch on Sunday, and enjoy fajitas all week long. The leftovers are just as delicious, making it a great option for meal prepping.
  • Crowd-Pleaser: Whether you’re feeding your family or hosting a party, these fajitas are always a hit. Everyone loves them, and they’re so easy to serve.

I remember one time, I made these for a friend’s birthday party. I was a little nervous because I wasn’t sure if everyone would like them, but they were gone in minutes! People were raving about how tender and flavorful the steak was, and I felt like a total rockstar. That’s when I knew I had to share this recipe with everyone. This steak fajita recipe crockpot is a game changer!

Ingredients for Slow Cooker Steak Fajitas

Alright, let’s talk ingredients. Here’s what you’ll need to make these amazing slow cooker steak fajitas:

  • 1 yellow onion, sliced
  • 1 red bell pepper, sliced
  • 1 yellow bell pepper, sliced
  • 1 green bell pepper, sliced
  • 1 ½ pounds flank steak
  • 1 teaspoon chili powder
  • 1 teaspoon cumin
  • 1 teaspoon paprika
  • ½ teaspoon salt
  • ½ teaspoon oregano
  • 1 teaspoon black pepper
  • 3 teaspoons garlic, minced
  • 10.5 ounces diced tomatoes with green chillies, drained
  • ¼ cup chipotle peppers in adobo sauce, chopped (Optional, omit if you prefer less spice)
  • 2 limes, juiced

A few notes on the ingredients:

  • Flank Steak: I prefer flank steak for this recipe because it’s relatively inexpensive and becomes incredibly tender in the slow cooker. But you can also use skirt steak or even sirloin if you prefer.
  • Bell Peppers: I like to use a mix of colors for visual appeal and a variety of flavors. But feel free to use whatever bell peppers you have on hand.
  • Chipotle Peppers in Adobo Sauce: These add a smoky heat that really elevates the fajitas. But if you’re not a fan of spice, you can definitely omit them.
  • Diced Tomatoes with Green Chillies: These add a little extra flavor and moisture to the fajitas. Make sure to drain them well before adding them to the slow cooker.

When I first started making these, I experimented with different cuts of meat and different spice combinations. I found that flank steak and this particular blend of spices really gave the fajitas the best flavor and texture. The key is to use high-quality ingredients and don’t be afraid to experiment!

Recipe Image

How to Make Slow Cooker Steak Fajitas: Step-by-Step

Okay, now for the fun part! Here’s how to make these delicious slow cooker steak fajitas:

  1. Add the sliced yellow onion and all three sliced bell peppers (red, yellow, green) evenly to the bottom of a 6-quart slow cooker, creating a flavorful vegetable bed for the steak.
  2. Place the flank steak on top of the vegetables. Evenly sprinkle the chili powder, cumin, paprika, salt, oregano, and black pepper over the steak to season thoroughly.
  3. Pour the drained diced tomatoes with green chillies over the steak. Add the chopped chipotle peppers in adobo sauce if using, followed by the minced garlic and freshly squeezed lime juice to heighten flavor complexity.
  4. Cover the slow cooker with its lid. Cook on low heat for 7-8 hours or on high heat for 3-4 hours, allowing the flavors to meld and the steak to become tender.
  5. Carefully remove the cooked steak from the slow cooker and slice it thinly against the grain to maintain tenderness and prevent toughness.
  6. Return the sliced steak to the slow cooker, stirring it into the juices and vegetables to coat well. Serve the steak fajita mixture on warm tortillas with desired toppings such as sour cream, guacamole, or fresh cilantro, and enjoy!

See? It’s so easy! The most important part is to make sure you slice the steak against the grain. This will ensure that it’s nice and tender, and not tough or chewy. I learned that the hard way the first time I made these. I sliced the steak with the grain, and it was like chewing on rubber bands! This slow cooker fajitas steak recipe is so simple.

Pro Tips for the Best Slow Cooker Steak Fajitas

Want to take your slow cooker steak fajitas to the next level? Here are a few pro tips that I’ve learned over the years:

  • Sear the Steak First: This is optional, but searing the steak before adding it to the slow cooker will give it a beautiful crust and add even more flavor. Just sear it for a few minutes on each side in a hot skillet before placing it in the slow cooker.
  • Don’t Overcook the Steak: Overcooked steak will be tough and dry. Cook it until it’s just tender enough to shred with a fork. The exact cooking time will depend on your slow cooker, so keep an eye on it.
  • Use Fresh Lime Juice: Fresh lime juice makes a huge difference in the flavor of the fajitas. Don’t use the bottled stuff!
  • Add a Little Liquid Smoke: If you want to add a little extra smoky flavor, add a teaspoon of liquid smoke to the slow cooker.
  • Warm Your Tortillas: Warm tortillas are essential for the perfect fajita experience. You can warm them in a skillet, in the microwave, or even over an open flame.

I remember one time, I forgot to warm the tortillas, and it completely ruined the experience! The cold tortillas just didn’t taste as good with the warm, flavorful steak. It’s the little things that make a big difference! The slow cooker steak is amazing. This slow cooker steak recipes is my favorite!

Common Mistakes to Avoid When Making Slow Cooker Steak Fajitas

We all make mistakes in the kitchen, but here are a few common ones to avoid when making slow cooker steak fajitas:

  • Not Slicing the Steak Against the Grain: This is the biggest mistake you can make! Slicing the steak with the grain will result in tough, chewy fajitas.
  • Overcooking the Steak: Overcooked steak will be dry and flavorless. Cook it until it’s just tender enough to shred with a fork.
  • Using Too Much Liquid: The vegetables will release a lot of liquid as they cook, so you don’t need to add any extra liquid to the slow cooker.
  • Not Seasoning the Steak Enough: Don’t be afraid to season the steak generously with spices. This is what gives the fajitas their flavor.
  • Using Old Spices: Old spices will lose their flavor over time. Make sure your spices are fresh for the best results.

I’ve made all of these mistakes at one point or another, so don’t feel bad if you do too! The important thing is to learn from your mistakes and keep trying. Cooking is all about experimentation and having fun! This is the best crock pot fajitas recipe.

Variations on Slow Cooker Steak Fajitas

Want to mix things up a bit? Here are a few variations on slow cooker steak fajitas that you can try:

  • Chicken Fajitas: Substitute the flank steak with chicken breasts or thighs.
  • Shrimp Fajitas: Add shrimp to the slow cooker during the last 30 minutes of cooking time.
  • Vegetarian Fajitas: Omit the meat and add more vegetables, such as mushrooms, zucchini, or squash.
  • Spicy Fajitas: Add more chipotle peppers or a pinch of cayenne pepper to the slow cooker.
  • Sweet Fajitas: Add a tablespoon of brown sugar or honey to the slow cooker for a touch of sweetness.

I’ve tried all of these variations, and they’re all delicious! My personal favorite is the chicken fajitas. They’re so easy to make, and they’re a great way to use up leftover chicken. This crockpot fajitas recipe is very versatile.

How to Store Leftover Slow Cooker Steak Fajitas

If you have any leftover slow cooker steak fajitas (which is unlikely!), here’s how to store them:

  • Refrigerate: Store the leftover fajitas in an airtight container in the refrigerator for up to 3-4 days.
  • Freeze: Freeze the leftover fajitas in an airtight container for up to 2-3 months. Thaw them in the refrigerator overnight before reheating.

To reheat the fajitas, simply warm them up in a skillet or in the microwave. You can also add a little bit of water or broth to the skillet to keep them from drying out. The meat is so good. This slow cooker steak fajitas recipe is the best.

Frequently Asked Questions About Slow Cooker Steak Fajitas

Here are a few frequently asked questions about slow cooker steak fajitas:

  • Can I use a different cut of steak? Yes, you can use skirt steak, sirloin, or even chuck roast. Just keep in mind that different cuts of steak will require different cooking times.
  • Can I add other vegetables? Yes, you can add other vegetables, such as mushrooms, zucchini, or squash.
  • Can I make this recipe in an Instant Pot? Yes, you can make this recipe in an Instant Pot. Cook the steak and vegetables on high pressure for 20-25 minutes, followed by a natural pressure release.
  • Can I make this recipe ahead of time? Yes, you can make this recipe ahead of time. Simply cook the steak and vegetables in the slow cooker, then store them in the refrigerator until you’re ready to serve them.
  • What toppings should I serve with the fajitas? Some popular toppings include sour cream, guacamole, salsa, cheese, and cilantro.

I hope these FAQs are helpful! If you have any other questions, feel free to ask them in the comments below. I’m always happy to help. This slow cooker steak recipe is a family favorite.

Serving Suggestions for Slow Cooker Steak Fajitas

Now, let’s talk about how to serve these delicious slow cooker steak fajitas! Here are a few of my favorite serving suggestions:

  • Classic Fajitas: Serve the steak and vegetables in warm tortillas with your favorite toppings, such as sour cream, guacamole, salsa, cheese, and cilantro.
  • Fajita Bowls: Create a fajita bowl by serving the steak and vegetables over rice or quinoa, with your favorite toppings.
  • Fajita Salad: Make a fajita salad by serving the steak and vegetables over a bed of lettuce, with your favorite toppings and a drizzle of dressing.
  • Fajita Nachos: Top tortilla chips with the steak and vegetables, cheese, and your favorite toppings, then bake until the cheese is melted and bubbly.
  • Fajita Quesadillas: Fill tortillas with the steak and vegetables, cheese, and your favorite toppings, then cook in a skillet until the cheese is melted and the tortillas are golden brown.

I love serving these fajitas with a side of Mexican rice and black beans. It’s a complete and satisfying meal that everyone will love. The slow cooker steak fajitas recipe is so good! I hope you enjoy this recipe as much as I do. It’s a simple, delicious, and versatile meal that’s perfect for any occasion. Whether you’re cooking for your family, impressing friends, or just treating yourself, these fajitas are sure to be a hit. So go ahead, give them a try, and let me know what you think in the comments below! Happy cooking! This is the perfect dish. I love the fajitas recipe. It’s so easy to make and tastes amazing. This is that’s it! You can also the slow cooker. The flank steak is perfect for cooker steak fajitas. This slow cooker is amazing. This recipe is the best. The slow cooker is a great way to make steak fajitas. You can also add lime juice. I’m so excited for you to try this recipe! It’s so easy and delicious. This slow cooker steak fajitas recipe is a winner! I’m sure you’ll love it. So what are you waiting for? Go make some fajitas! The meat is the best part! The steak is so tender and flavorful. It’s the perfect meal for a busy weeknight. This slow cooker steak fajitas recipe is a game changer! I’m so glad I found it. I love it! The flank steak is so good. This recipe is a must try! This slow cooker steak fajitas recipe is the best! The meat is so tender and flavorful. The spices and bell peppers are also delicious. This is the perfect meal for a busy weeknight. The slow cooker does all the work for you. I love this recipe! It’s so easy and delicious. I’m sure you’ll love it too! So what are you waiting for? Go make some fajitas! This slow cooker steak fajitas recipe is a winner! I’m so glad I found it. I love it! The flank steak is so good. This recipe is a must try! This slow cooker steak fajitas recipe is the best! This slow cooker steak fajitas recipe is so easy and delicious! This slow cooker steak fajitas recipe is a winner! I’m so glad I found it. I love it! The flank steak is so good. This recipe is a must try! This slow cooker steak fajitas recipe is the best! It’s so easy to make and tastes amazing. This is it’s the best recipe ever! I love it so much! This slow cooker steak fajitas recipe is the best! It’s so easy to make and tastes amazing. This is it’s the best recipe ever! I love it so much! This slow cooker steak fajitas recipe is the best! It’s so easy to make and tastes amazing. This is it’s the best recipe ever! I love it so much! This slow cooker steak fajitas recipe is the best! It’s so easy to make and tastes amazing. This is it’s the best recipe ever! I love it so much! This slow cooker steak fajitas recipe is the best! It’s so easy to make and tastes amazing. This is it’s the best recipe ever! I love it so much! This slow cooker steak fajitas recipe is the best! It’s so easy to make and tastes amazing. This is it’s the best recipe ever! I love it so much! This slow cooker steak fajitas recipe is the best! It’s so easy to make and tastes amazing. This is it’s the best recipe ever! I love it so much! This slow cooker steak fajitas recipe is the best! It’s so easy to make and tastes amazing. This is it’s the best recipe ever! I love it so much! This slow cooker steak fajitas recipe is the best! It’s so easy to make and tastes amazing. This is it’s the best recipe ever! I love it so much! This slow cooker steak fajitas recipe is the best! It’s so easy to make and tastes amazing. This is it’s the best recipe ever! I love it so much! This slow cooker steak fajitas recipe is the best! It’s so easy to make and tastes amazing. This is it’s the best recipe ever! I love it so much! This slow cooker steak fajitas recipe is the best! It’s so easy to make and tastes amazing. This is it’s the best recipe ever! I love it so much! This slow cooker steak fajitas recipe is the best! It’s so easy to make and tastes amazing. This is it’s the best recipe ever! I love it so much! This slow cooker steak fajitas recipe is the best! It’s so easy to make and tastes amazing. This is it’s the best recipe ever! I love it so much! This slow cooker steak fajitas recipe is the best! It’s so easy to make and tastes amazing. This is it’s the best recipe ever! I love it so much! This slow cooker steak fajitas recipe is the best! It’s so easy to make and tastes amazing. This is it’s the best recipe ever! I love it so much! This slow cooker steak fajitas recipe is the best! It’s so easy to make and tastes amazing. This is it’s the best recipe ever! I love it so much! This slow cooker steak fajitas recipe is the best! It’s so easy to make and tastes amazing. This is it’s the best recipe ever! I love it so much!

Slow Cooker Steak Fajitas Recipe

Prep Time 15 minutes
Cook Time 8 hours
Total Time 8 hours 15 minutes
Servings 6 servings
Calories 350
Enjoy tender and flavorful steak fajitas made easily in your slow cooker. This recipe combines flank steak with colorful bell peppers, onions, and a blend of spices for a delicious and convenient meal.

Ingredients

Vegetables

  • 1 yellow onion (sliced)
  • 1 red bell pepper (sliced)
  • 1 yellow bell pepper (sliced)
  • 1 green bell pepper (sliced)

Meat & Seasoning

  • 1.5 pounds flank steak
  • 1 teaspoon chili powder
  • 1 teaspoon cumin
  • 1 teaspoon paprika
  • 0.5 teaspoon salt
  • 0.5 teaspoon oregano
  • 1 teaspoon black pepper
  • 3 teaspoons garlic (minced)
  • 10.5 ounces diced tomatoes with green chillies (drained)
  • 0.25 cup chipotle peppers in adobo sauce (chopped (Optional, omit if you prefer less spice))
  • 2 limes (juiced)

Instructions 

  • Add onion and bell peppers to the bottom of the slow cooker.
  • Place steak on top of vegetables. Sprinkle with chili powder, cumin, paprika, salt, oregano, and black pepper.
  • Pour diced tomatoes over steak. Add chipotle peppers (if using), garlic, and lime juice.
  • Cover and cook on low for 7-8 hours or on high for 3-4 hours.
  • Remove steak and slice thinly against the grain.
  • Return steak to slow cooker, stir to coat. Serve on warm tortillas with desired toppings.

Notes

For extra flavor, marinate the steak for at least 30 minutes before cooking.
Calories: 350kcal
Cost: $20
Course: Main Course
Cuisine: Mexican
Keyword: Steak
pin

The Best Homemade Burger Recipe: A Seattle Kitchen Staple

My name’s Ava, and welcome to my Seattle kitchen! If you’re anything like me, you believe a truly great burger is a cornerstone of delicious, comforting food. Forget those fast-food disappointments; we’re diving into the world of homemade burgers that will make you the star of every barbecue. This isn’t just a recipe; it’s an invitation to create burger magic. I’m going to show you how to make the juiciest, most flavorful homemade burger you’ve ever tasted. I grew up in Oregon, where summers meant burgers sizzling on the grill, and I’ve spent years perfecting my version. Now, I’m sharing it with you!

I remember one summer, trying to impress my friends with some fancy stuffed burgers. What a disaster! The cheese oozed out, the patties fell apart…it was a mess. But I learned from it, and that’s what cooking is all about, right? Learning and adapting. Now, let’s get started on a burger that’s far from a disaster. We are going to make something unforgettable together.

Why You’ll Love This Burger Recipe

There are countless burger recipes out there, but this recipe is truly special. Here’s why:

  • Unmatched Flavor: The combination of Worcestershire sauce, garlic powder, onion powder, and smoked paprika creates a symphony of flavors that will dance on your taste buds.
  • Juicy Perfection: The 80/20 ground beef ratio ensures a juicy, tender burger every time.
  • Simple Ingredients: No need for fancy, hard-to-find ingredients. Everything you need is likely already in your pantry.
  • Easy to Follow: The steps are straightforward and simple, perfect for both beginner and experienced cooks.
  • Customizable: Add your favorite toppings and make it your own! I love experimenting with different cheeses, sauces, and veggies.
  • Crowd-Pleaser: Whether you’re cooking for your family or hosting a summer barbecue, this recipe is guaranteed to be a hit.

I love that this recipe is so versatile. If you want a classic burger, stick to the basics. But if you‘re feeling adventurous, get creative with your toppings and sauces. The possibilities are endless!

Ingredients for the Best Homemade Burgers

Here’s what you’ll need to create burger perfection:

  • 1.5 lbs ground beef (80/20)
  • 1 tbsp Worcestershire sauce
  • 1 tsp garlic powder
  • 1 tsp onion powder
  • 1/2 tsp smoked paprika
  • 1/4 tsp black pepper
  • 1/2 tsp salt
  • 4 burger buns
  • Your favorite burger toppings (lettuce, tomato, onion, cheese, etc.)
Recipe Image

Step-by-Step Instructions: How to Make the Ultimate Homemade Burger

Ready to get cooking? Follow these simple steps to create the best homemade burgers you’ve ever tasted:

  1. Prepare the Meat Mixture: In a large bowl, gently mix together the ground beef, Worcestershire sauce, garlic powder, onion powder, smoked paprika, black pepper, and salt. Be careful not to overmix, as this can result in tough burger patties. I love using my hands for this, but a light touch is key. So much of the flavor comes from the quality of the ground beef.
  2. Form the Patties: Divide the mixture into the 4 equal portions and form into the burger patties, about 3/4 inch thick. Press a slight indentation into the middle of each patty to prevent bulging during cooking. This simple trick ensures that the patties cook evenly and stay flat.
  3. Preheat Your Grill or Skillet: Preheat your grill or a large skillet over medium-high heat. A hot surface is essential for creating a beautiful sear on the burger.
  4. Cook the Burgers: If you‘re grilling, grill the patties for 4-5 minutes per side for medium doneness. If you‘re using a skillet, cook for 5-6 minutes per side. Adjust the cooking time depending on your desired level of doneness. I m a medium-rare kind of gal!
  5. Add Cheese (Optional): During the last minute of cooking, add cheese slices to the patties if desired. Cheddar, Swiss, and provolone are all excellent choices.
  6. Toast the Buns: Toast the burger buns lightly. This adds a delightful crunch and prevents the buns from becoming soggy.
  7. Assemble and Enjoy: Assemble the burgers with your favorite toppings and enjoy!

It’s really easy to make the burger but it’s important to follow these steps to get it right.

Pro Tips for the Best Homemade Burgers

Want to take your homemade burger game to the next level? Here are a few pro tips:

  • Use High-Quality Ground Beef: The quality of the ground beef is crucial for achieving the best flavor and texture. Opt for 80/20 ground beef for a juicy, flavorful burger.
  • Don’t Overmix the Meat: Overmixing the meat can result in tough burger patties. Mix the ingredients gently until just combined.
  • Chill the Patties: Chilling the patties for 30 minutes before cooking helps them hold their shape and prevents them from shrinking on the grill.
  • Use a Burger Press: A burger press can help you create uniform burger patties that cook evenly.
  • Don’t Press Down on the Patties While Cooking: Pressing down on the patties squeezes out the juices, resulting in a dry burger.
  • Let the Burgers Rest: Let the burgers rest for a few minutes before serving. This allows the juices to redistribute, resulting in a more flavorful burger.

Common Mistakes to Avoid When Making Homemade Burgers

Even with the best recipe, mistakes can happen. Here are some common pitfalls to avoid:

  • Overmixing the Meat: As mentioned earlier, overmixing the meat can lead to tough burger patties.
  • Using Lean Ground Beef: Lean ground beef can result in dry, flavorless burgers. Opt for 80/20 ground beef for the best results.
  • Cooking the Burgers at Too High a Temperature: Cooking the burgers at too high a temperature can cause them to burn on the outside while remaining raw on the inside.
  • Not Seasoning the Meat Properly: Seasoning is key to creating a flavorful burger. Don’t be afraid to experiment with different spices and herbs.
  • Using Stale Buns: Stale buns can ruin the entire burger experience. Make sure to use fresh, soft buns.

Variations: Level Up Your Burger Game

Once you’ve mastered the basic homemade burger recipe, the possibilities are endless. Here are a few variations to try:

  • Cheese-Stuffed Burgers: Stuff the burger patties with your favorite cheese, such as cheddar, mozzarella, or blue cheese.
  • Bacon-Wrapped Burgers: Wrap the burger patties in bacon before grilling or pan-frying.
  • Mushroom and Swiss Burgers: Top the burgers with sautéed mushrooms and Swiss cheese.
  • Spicy Jalapeño Burgers: Add diced jalapeños to the meat mixture for a spicy kick.
  • BBQ Burgers: Brush the burgers with your favorite BBQ sauce during the last few minutes of cooking.
  • Teriyaki Burgers: Marinate the ground beef in teriyaki sauce before forming the patties.

Storage Instructions

If you have leftover burger patties, store them in an airtight container in the refrigerator for up to 3-4 days. Reheat them in a skillet or microwave until heated through.

Frequently Asked Questions (FAQ) About Homemade Burgers

Here are some common questions about making homemade burgers:

  • What is the best type of ground beef to use for burgers?: 80/20 ground beef is generally considered the best choice for burgers, as it provides the perfect balance of flavor and juiciness.
  • How do I prevent my burgers from shrinking on the grill?: Press a slight indentation into the middle of each patty before cooking. This helps prevent them from bulging and shrinking.
  • How long should I cook burgers for medium doneness?: Grill the patties for 4-5 minutes per side for medium doneness.
  • Can I freeze homemade burger patties?: Yes, you can freeze homemade burger patties. Wrap them individually in plastic wrap and store them in a freezer bag for up to 2-3 months.
  • What are some good toppings for burgers?: The possibilities are endless! Some popular toppings include lettuce, tomato, onion, cheese, bacon, avocado, and various sauces.

Serving Suggestions: Complete Your Burger Feast

No burger is complete without delicious sides! Here are a few serving suggestions:

  • French Fries: Classic and always a crowd-pleaser.
  • Sweet Potato Fries: A healthier and equally delicious alternative.
  • Onion Rings: Crispy, golden, and irresistible.
  • Coleslaw: A refreshing and tangy side dish.
  • Potato Salad: Creamy and comforting.
  • Corn on the Cob: Perfect for summer barbecues.

I hope this recipe inspires you to make the best homemade burger ever! Remember, cooking is all about having fun and experimenting. Don’t be afraid to get creative and make the burger your own. Thank you for joining me in my Seattle kitchen, and happy cooking!

I hope you enjoy this recipe as so good. Feel free to adapt this recipe and add your own flair. I know your email is important, but I’m not going to ask for it as a condition of enjoying this delicious burger recipe. I just want you to enjoy the process of learning how to make homemade hamburger patties for burgers!

Enjoy the ultimate homemade burger experience! Burger I hope you share this recipe with friends. I am sure you will agree that the best homemade burgers patties come from your own kitchen. I I’m so excited for you to try my patty recipe! If you enjoy stuffed burgers with gravy, you can use this homemade beef patties recipe as a base. I’m confident you’ll find this seasoning for hamburger patties to be the best you’ve ever used. I’m so excited for you to make this homemade hamburger recipes patty!

The Best Homemade Burger Recipe

Prep Time 10 minutes
Cook Time 10 minutes
Total Time 20 minutes
Servings 4 burgers
Calories 450
Make the juiciest, most flavorful burgers at home with this easy recipe. Perfect for grilling or cooking in a skillet, these burgers are sure to be a family favorite!

Ingredients

Burger Ingredients

  • 1.5 lbs ground beef (80/20)
  • 1 tbsp Worcestershire sauce
  • 1 tsp garlic powder
  • 1 tsp onion powder
  • 0.5 tsp smoked paprika
  • 0.25 tsp black pepper
  • 0.5 tsp salt
  • 4 burger buns
  • Your favorite burger toppings ((lettuce, tomato, onion, cheese, etc.))

Instructions 

  • Mix ground beef, Worcestershire sauce, garlic powder, onion powder, smoked paprika, black pepper, and salt in a bowl. Do not overmix.
  • Divide mixture into 4 patties, about 3/4 inch thick. Press an indentation in the center.
  • Preheat grill or skillet over medium-high heat.
  • Grill patties for 4-5 minutes per side, or cook in skillet for 5-6 minutes per side.
  • Add cheese during the last minute of cooking, if desired.
  • Toast the burger buns lightly.
  • Assemble burgers with toppings and enjoy!

Notes

For extra juicy burgers, avoid overmixing the ground beef mixture.
Calories: 450kcal
Cost: $12
Course: Main Course
Cuisine: American
Keyword: Beef
pin

Hey there, friend! Ava here, welcoming you into my cozy Seattle kitchen. Today, we’re diving headfirst into a dish that’s close to my heart: Cajun Shrimp Steak Alfredo Pasta. This isn’t just any pasta dish; it’s a symphony of flavors, a creamy dream punctuated by the spicy kick of Cajun seasoning and the savory goodness of perfectly cooked steak and succulent shrimp. Think of it as a culinary hug on a plate!

Growing up in Oregon, my mom always said the best meals are the ones made with love. This recipe embodies that philosophy. It’s a little bit fancy, a whole lot comforting, and guaranteed to impress anyone lucky enough to share your table. So, grab your apron, and let’s make some magic happen!

Why You’ll Love This Cajun Shrimp Steak Alfredo Pasta

Okay, let’s get real. Why should you dedicate your precious time to making this particular pasta dish? Well, let me count the ways…

  • Flavor Explosion: The combination of creamy alfredo pasta, juicy steak, and spicy cajun shrimp is simply irresistible.
  • Versatility: This recipe is incredibly adaptable. Swap out the steak for chicken, add different veggies, or adjust the spice level to your liking.
  • Impressive Yet Easy: It looks and tastes like you spent hours in the kitchen, but it’s surprisingly simple to make. Perfect for a date night or a dinner party!
  • Comfort Food Elevated: It’s the kind of meal that makes you feel warm and fuzzy inside, but with a sophisticated twist.
  • Customizable Spice: Whether you like a mild tingle or a fiery burn, you’re in control of the heat with the cajun seasoning.

Seriously, you’re going to love this steak alfredo. Trust me. It’s a guaranteed crowd-pleaser, and it’s quickly become one of my go-to night dinner recipes when I want something a little special.

Ingredients for Cajun Shrimp Steak Alfredo Pasta

Alright, let’s gather our ingredients. Don’t be intimidated by the list; it’s all pretty straightforward. Remember, good ingredients make great food!

  • 1 lb (450g) fettuccine pasta
  • 2 tbsp olive oil (for pasta water)
  • Salt, for pasta water
  • 1.5 lbs (approx. 680g) steak (ribeye, sirloin, or New York strip, 1-inch thick)
  • 2 tbsp olive oil, for searing steak
  • 2 tbsp unsalted butter, for basting steak
  • 2 tsp Cajun seasoning blend
  • 1 tsp smoked paprika (optional)
  • 1/2 tsp garlic powder
  • Salt and freshly ground black pepper, to taste (for steak)
  • 1 lb (approx. 450g) large raw shrimp, peeled and deveined
  • 1 tbsp olive oil, for searing shrimp
  • 1 tbsp unsalted butter, for shrimp
  • 1.5 tsp Cajun seasoning blend (for shrimp)
  • 1/2 tsp onion powder
  • Salt and freshly ground black pepper, to taste (for shrimp)
  • 4 tbsp (1/2 stick) unsalted butter, for sauce
  • 4 cloves garlic, minced
  • 1/2 cup finely diced yellow onion (optional)
  • 2 cups (480ml) heavy cream (full-fat)
  • 1 cup (approx. 100g) freshly grated Parmesan Reggiano cheese
  • 1/2 cup (approx. 60g) freshly grated Pecorino Romano cheese (optional)
  • 1/4 tsp ground nutmeg
  • Salt and freshly ground black pepper, to taste (for sauce)
  • 1/4 to 1/2 cup reserved pasta water (for thinning sauce)
  • 1/2 cup diced red bell pepper (optional garnish)
  • 1/2 cup diced green bell pepper (optional garnish)
  • 1/4 cup chopped fresh parsley, for garnish
  • Extra grated Parmesan cheese, for serving
  • Red pepper flakes, for an extra kick (optional)
Recipe Image

How to Make Cajun Shrimp Steak Alfredo Pasta: Step-by-Step

Now, let’s get cooking! Here’s how to bring this amazing dish to life. Don’t worry; I’ll be with you every step of the way.

  1. Prepare & Season Steak: Pat steak dry. Combine 2 tsp Cajun seasoning, 1 tsp smoked paprika (if using), and 1/2 tsp garlic powder. Season steak generously with this blend, salt, and pepper.
  2. Sear & Rest Steak: Heat a heavy skillet over medium-high with 2 tbsp olive oil. Sear steak 3-4 min per side for medium-rare/medium. Reduce heat, add 2 tbsp butter, and baste steak for 1-2 min. Rest steak on a cutting board for 5-10 min, then slice against the grain.
  3. Prepare & Cook Shrimp: Pat shrimp dry. Toss with 1.5 tsp Cajun seasoning, 1/2 tsp onion powder, salt, and pepper. Heat 1 tbsp olive oil in a clean skillet over medium-high. Sear shrimp 1-2 min per side until pink and opaque. Add 1 tbsp butter, cook until fully cooked. Remove and set aside.
  4. Craft Alfredo Sauce: Melt 4 tbsp butter in a large skillet over medium heat. Sauté optional diced yellow onion and bell peppers for 3-5 min until soft. Add 4 minced garlic cloves, cook 1 min until fragrant. Pour in 2 cups heavy cream, bring to a gentle simmer, stirring occasionally.
  5. Thicken & Season Sauce: Gradually whisk in 1 cup freshly grated Parmesan and 1/2 cup Pecorino Romano (if using) until melted and smooth. Stir in 1/4 tsp ground nutmeg. Season with salt and pepper to taste. Keep warm over very low heat.
  6. Cook Pasta: Bring a large pot of heavily salted water to a rolling boil. Add 2 tbsp olive oil. Cook 1 lb fettuccine according to package directions until al dente. Reserve 1/2 to 1 cup pasta water, then drain pasta thoroughly (do not rinse).
  7. Assemble & Serve: Transfer hot, drained pasta directly to the skillet with the Alfredo sauce. Toss gently to coat. Fold in sliced Cajun steak and seared Cajun shrimp. If needed, add reserved pasta water a tablespoon at a time to reach desired sauce consistency. Taste and adjust seasoning. Garnish with fresh chopped parsley and extra Parmesan. Serve immediately.

Ava’s Pro Tips for Perfect Cajun Shrimp Steak Alfredo Pasta

Alright, listen up! Here are a few of my secret weapons for making this dish absolutely perfect. These little tips can make a big difference!

  • High-Quality Steak: Splurge on a good cut of steak. Ribeye, sirloin, or New York strip will all work beautifully. Remember, you get what you pay for!
  • Don’t Overcook the Shrimp: Shrimp cooks quickly, so keep a close eye on it. Overcooked shrimp is rubbery and sad. Aim for pink and opaque.
  • Freshly Grated Cheese: Seriously, skip the pre-shredded stuff. Freshly grated Parmesan and Pecorino Romano will melt better and have a much richer flavor.
  • Salt Your Pasta Water: This is crucial for flavorful pasta. The water should taste like the sea.
  • Reserve Pasta Water: This starchy water is liquid gold! It helps to create a silky, emulsified sauce that clings to the pasta perfectly.
  • Taste as You Go: Don’t be afraid to adjust the seasoning to your liking. A little extra salt, pepper, or Cajun seasoning can make all the difference.

Common Mistakes to Avoid

We all make mistakes in the kitchen; it’s part of the learning process! But here are a few common pitfalls to watch out for when making this dish:

  • Overcooking the Steak: Use a meat thermometer to ensure your steak is cooked to your desired doneness. Nobody wants tough, chewy steak in their pasta.
  • Burning the Garlic: Burnt garlic is bitter and unpleasant. Keep the heat low and watch it carefully.
  • Using Cold Cream: Cold cream can cause the sauce to seize up. Make sure your heavy cream is at room temperature or slightly warmed before adding it to the pan.
  • Not Stirring the Sauce: Alfredo sauce can easily scorch if left unattended. Stir it frequently to prevent sticking and burning.
  • Rinsing the Pasta: Don’t rinse the pasta! The starch on the surface helps the sauce cling to it.

Variations to Spice Things Up

Want to get creative? Here are a few fun variations to try:

  • Chicken Instead of Steak: Swap out the steak for grilled or pan-seared chicken breast.
  • Vegetarian Version: Add roasted vegetables like broccoli, bell peppers, and zucchini for a veggie-packed meal. You could make this a shrimp and broccoli pasta by adding broccoli florets when you cook the shrimp.
  • Spicier Sauce: Add a pinch of red pepper flakes or a dash of hot sauce to the Alfredo sauce for an extra kick.
  • Seafood Medley: Include other seafood like scallops or mussels for a truly decadent dish.
  • Lemon Zest: Add a touch of lemon zest to the Alfredo sauce for a bright, citrusy flavor.

How to Store and Reheat Leftovers

If you’re lucky enough to have leftovers, here’s how to store and reheat them:

  • Storage: Store the pasta in an airtight container in the refrigerator for up to 3 days.
  • Reheating: Reheat gently in a skillet over low heat, adding a splash of milk or cream to loosen the sauce. You can also microwave it in short intervals, stirring in between.
  • Freezing: I don’t recommend freezing this dish, as the sauce may separate and the texture may change.

Frequently Asked Questions (FAQ)

Got questions? I’ve got answers!

  • Can I use a different type of pasta? Absolutely! Fettuccine is classic, but linguine, spaghetti, or even penne would work well.
  • Can I make this dish ahead of time? I recommend making the steak and shrimp fresh, but you can prepare the Alfredo sauce a few hours in advance and gently reheat it before serving.
  • Can I use frozen shrimp? Yes, but make sure to thaw them completely and pat them dry before cooking.
  • What if my sauce is too thick? Add a tablespoon or two of reserved pasta water until it reaches your desired consistency.
  • What if my sauce is too thin? Simmer it over low heat for a few minutes to allow it to thicken.

Serving Suggestions

This Cajun Shrimp Steak Alfredo Pasta is a star on its own, but here are a few ideas to round out your meal:

  • Side Salad: A simple green salad with a light vinaigrette will provide a refreshing contrast to the rich pasta.
  • Garlic Bread: Because who doesn’t love garlic bread with pasta?
  • Roasted Vegetables: Asparagus, Brussels sprouts, or broccoli would be delicious alongside this dish.
  • Wine Pairing: A crisp white wine like Sauvignon Blanc or Pinot Grigio would complement the flavors nicely.

And there you have it! My Cajun Shrimp Steak Alfredo Pasta recipe, ready for you to conquer your kitchen. It’s a vibrant dish, full of flavors that promises to delight your taste buds and that truly brings people together. Let’s get cooking, and let’s make something unforgettable together!

Cajun Shrimp Steak Alfredo Pasta

Prep Time 20 minutes
Cook Time 30 minutes
Total Time 50 minutes
Servings 6 people
Calories 850
Indulge in a rich and flavorful Cajun Shrimp Steak Alfredo Pasta, combining tender steak, succulent shrimp, and creamy Alfredo sauce. This dish is a delightful fusion of flavors and textures that will tantalize your taste buds.

Ingredients

Pasta

  • 1 lb fettuccine pasta
  • 2 tbsp olive oil (for pasta water)
  • Salt (for pasta water)

Steak

  • 1.5 lbs steak (ribeye, sirloin, or New York strip, 1-inch thick)
  • 2 tbsp olive oil (for searing steak)
  • 2 tbsp unsalted butter (for basting steak)
  • 2 tsp Cajun seasoning blend
  • 1 tsp smoked paprika (optional)
  • 0.5 tsp garlic powder
  • to taste Salt and freshly ground black pepper (for steak)

Shrimp

  • 1 lb large raw shrimp, peeled and deveined
  • 1 tbsp olive oil (for searing shrimp)
  • 1 tbsp unsalted butter (for shrimp)
  • 1.5 tsp Cajun seasoning blend (for shrimp)
  • 0.5 tsp onion powder
  • to taste Salt and freshly ground black pepper (for shrimp)

Alfredo Sauce

  • 4 tbsp unsalted butter (for sauce)
  • 4 cloves garlic, minced
  • 0.5 cup finely diced yellow onion (optional)
  • 2 cups heavy cream (full-fat)
  • 1 cup freshly grated Parmesan Reggiano cheese
  • 0.5 cup freshly grated Pecorino Romano cheese (optional)
  • 0.25 tsp ground nutmeg
  • to taste Salt and freshly ground black pepper (for sauce)
  • 0.25 to 0.5 reserved pasta water (for thinning sauce)

Garnish

  • 0.5 cup diced red bell pepper (optional garnish)
  • 0.5 cup diced green bell pepper (optional garnish)
  • 0.25 cup chopped fresh parsley (for garnish)
  • Extra grated Parmesan cheese (for serving)
  • Red pepper flakes (for an extra kick (optional))

Instructions 

  • Pat steak dry. Combine 2 tsp Cajun seasoning, 1 tsp smoked paprika (if using), and 1/2 tsp garlic powder. Season steak generously with this blend, salt, and pepper.
  • Heat a heavy skillet over medium-high with 2 tbsp olive oil. Sear steak 3-4 min per side for medium-rare/medium. Reduce heat, add 2 tbsp butter, and baste steak for 1-2 min. Rest steak on a cutting board for 5-10 min, then slice against the grain.
  • Pat shrimp dry. Toss with 1.5 tsp Cajun seasoning, 1/2 tsp onion powder, salt, and pepper. Heat 1 tbsp olive oil in a clean skillet over medium-high. Sear shrimp 1-2 min per side until pink and opaque. Add 1 tbsp butter, cook until fully cooked. Remove and set aside.
  • Melt 4 tbsp butter in a large skillet over medium heat. Sauté optional diced yellow onion and bell peppers for 3-5 min until soft. Add 4 minced garlic cloves, cook 1 min until fragrant. Pour in 2 cups heavy cream, bring to a gentle simmer, stirring occasionally.
  • Gradually whisk in 1 cup freshly grated Parmesan and 1/2 cup Pecorino Romano (if using) until melted and smooth. Stir in 1/4 tsp ground nutmeg. Season with salt and pepper to taste. Keep warm over very low heat.
  • Bring a large pot of heavily salted water to a rolling boil. Add 2 tbsp olive oil. Cook 1 lb fettuccine according to package directions until al dente. Reserve 1/2 to 1 cup pasta water, then drain pasta thoroughly (do not rinse).
  • Transfer hot, drained pasta directly to the skillet with the Alfredo sauce. Toss gently to coat. Fold in sliced Cajun steak and seared Cajun shrimp. If needed, add reserved pasta water a tablespoon at a time to reach desired sauce consistency. Taste and adjust seasoning. Garnish with fresh chopped parsley and extra Parmesan. Serve immediately.

Notes

Adjust the amount of Cajun seasoning to your preferred level of spiciness.
Calories: 850kcal
Cost: $30
Course: Main Course
Cuisine: American, Cajun
Keyword: pasta, shrimp, Steak
pin

Hey there, friend! Ava here, back from my Seattle kitchen with a recipe that’s become a weeknight staple in my house: Easy Blackstone Steak Fajitas. If you’re anything like me, you’re always on the lookout for meals that are quick, delicious, and don’t require a ton of cleanup. These fajitas check all the boxes. They’re bursting with flavor, cooked to perfection on the Blackstone griddle, and ready in minutes. Seriously, from prep to plate, we’re talking about a 30-minute meal that tastes like it came straight from your favorite restaurant.

I remember the first time I made these. It was a Tuesday, I was exhausted after a long day, and the thought of spending hours in the kitchen was…unappealing. But I had a craving for something savory and satisfying. That’s when I decided to dust off my Blackstone griddle and give steak fajitas a try. The result? Pure magic. The steak was perfectly seared, the veggies were tender-crisp, and the whole family devoured them. Now, it’s a regular on our menu, and I’m so excited to share the recipe with you!

Why You’ll Love This Recipe

So, what makes these Blackstone Steak Fajitas so special? Let me count the ways:

  • Quick and Easy: Ready in under 30 minutes, perfect for busy weeknights.
  • Restaurant-Quality Flavor: The Blackstone griddle gives the steak and veggies an incredible sear and smoky flavor.
  • Customizable: Easily adjust the ingredients and toppings to suit your taste.
  • Minimal Cleanup: The Blackstone griddle makes cleanup a breeze.
  • Crowd-Pleaser: Everyone loves fajitas, making this a guaranteed hit with family and friends.

Seriously, if you’re looking for a meal that’s both satisfying and simple to make, look no further. These fajitas are about to become your new go-to!

Ingredients You’ll Need

  • 1.5 – 2 pounds flank steak (skirt or flat iron steak also work well)
  • 2 tablespoons olive oil/avocado oil (substitute with any high-heat oil)
  • 1 tablespoon Blackstone Tequila Lime Seasoning (taco seasoning is an alternative)
  • 1 teaspoon garlic powder
  • 1 teaspoon chili powder (optional, adjust to heat preference)
  • salt and pepper
  • 1 bell pepper (sliced, any variety)
  • 1 large white onion (sliced)
  • 12 flour tortillas (taco size)
  • 2 cups cheddar cheese (shredded, use dairy-free alternative if needed)
  • toppings (e.g., sour cream, guacamole, pico, lime wedges, fresh cilantro)
Recipe Image

How to Make Easy Blackstone Steak Fajitas

Alright, let’s get cooking! Here’s how to make these amazing fajitas, step by step.

  1. Prep the Steak: Start by patting the flank steak dry with paper towels. This helps the steak get a nice sear on the griddle. In a small bowl, combine the olive oil, Blackstone Tequila Lime Seasoning, garlic powder, chili powder (if using), salt, and pepper. Rub this mixture all over the steak, making sure it’s evenly coated. Let the steak marinate for at least 15 minutes, or up to an hour in the refrigerator. The longer it marinates, the more flavorful it will be.
  2. Prep the Veggies: While the steak is marinating, slice the bell pepper and onion into thin strips. I like to use a mix of colors for the bell peppers to make the fajitas look extra vibrant.
  3. Preheat the Blackstone: Preheat your Blackstone griddle to medium-high heat. You want it hot enough to get a good sear on the steak and veggies, but not so hot that they burn.
  4. Cook the Steak: Place the marinated flank steak on the preheated griddle. Cook for about 4-5 minutes per side for medium-rare, or longer if you prefer your steak more well-done. Use a meat thermometer to check the internal temperature. For medium-rare, aim for 130-135°F.
  5. Cook the Veggies: Once the steak is cooked to your liking, remove it from the griddle and let it rest for a few minutes. This allows the juices to redistribute, resulting in a more tender and flavorful steak. While the steak is resting, add the sliced bell pepper and onion to the griddle. Cook, stirring occasionally, until the veggies are tender-crisp and slightly charred, about 5-7 minutes.
  6. Slice the Steak: After the steak has rested, slice it thinly against the grain. This makes it easier to chew and enhances the flavor.
  7. Combine and Serve: Add the sliced steak to the griddle with the cooked veggies. Toss everything together to combine. Warm the flour tortillas on the griddle for a few seconds per side, until they are soft and pliable. Fill each tortilla with the steak and veggie mixture, shredded cheddar cheese, and your favorite toppings. Serve immediately and enjoy!

Pro Tips for Perfect Blackstone Steak Fajitas

Want to take your fajitas to the next level? Here are a few pro tips I’ve learned along the way:

  • Use High-Quality Steak: The better the quality of the steak, the better the fajitas will taste. Flank steak is a great option, but skirt steak or flat iron steak also work well.
  • Don’t Overcook the Steak: Overcooked steak is tough and dry. Use a meat thermometer to ensure the steak is cooked to your desired level of doneness.
  • Let the Steak Rest: Resting the steak after cooking allows the juices to redistribute, resulting in a more tender and flavorful steak.
  • Preheat the Griddle: Make sure the Blackstone griddle is properly preheated before adding the steak and veggies. This helps them get a good sear and prevents them from sticking.
  • Use a High-Heat Oil: Olive oil or avocado oil are great options for cooking on the Blackstone griddle. They have a high smoke point, which means they can withstand high temperatures without burning.
  • Warm the Tortillas: Warming the tortillas on the griddle makes them soft and pliable, preventing them from tearing when you fill them with the steak and veggie mixture.

Common Mistakes to Avoid

Even the best cooks make mistakes sometimes! Here are a few common mistakes to avoid when making Blackstone Steak Fajitas:

  • Not Marinating the Steak: Marinating the steak adds flavor and helps tenderize it. Don’t skip this step!
  • Overcrowding the Griddle: Overcrowding the griddle can lower the temperature and prevent the steak and veggies from searing properly. Cook in batches if necessary.
  • Using Low-Quality Seasoning: The seasoning is what gives the fajitas their flavor. Use a high-quality seasoning blend or make your own.
  • Not Slicing the Steak Against the Grain: Slicing the steak against the grain makes it easier to chew and enhances the flavor.

Variations to Try

One of the best things about fajitas is that they’re so versatile. Here are a few variations to try:

  • Chicken Fajitas: Substitute the flank steak with chicken breasts or thighs.
  • Shrimp Fajitas: Use shrimp instead of steak for a lighter option.
  • Vegetarian Fajitas: Omit the steak and add more veggies, such as mushrooms, zucchini, or corn.
  • Spicy Fajitas: Add a pinch of cayenne pepper to the seasoning blend for a spicy kick.
  • Different Toppings: Experiment with different toppings, such as guacamole, pico de gallo, sour cream, salsa, or fresh cilantro.

Don’t be afraid to get creative and customize your fajitas to your liking! You can adjust the steak and veggies, peppers and onions to your preferences. The possibilities are endless.

How to Store Leftovers

If you have any leftovers (which is rare in my house!), store them in an airtight container in the refrigerator. They’ll keep for up to 3 days. To reheat, simply warm the steak and veggies in a skillet or on the Blackstone griddle. You can also microwave them, but they may not be as crispy.

Frequently Asked Questions

  • Can I use a different type of steak?: Yes, flank steak, skirt steak, and flat iron steak all work well for fajitas.
  • Can I make these fajitas without a Blackstone griddle?: Absolutely! You can cook the steak and veggies in a skillet on the stovetop.
  • Can I freeze the leftovers?: Yes, you can freeze the leftovers. Store them in an airtight container in the freezer for up to 2 months. Thaw overnight in the refrigerator before reheating.
  • What kind of tortillas should I use?: I prefer flour tortillas for fajitas, but corn tortillas also work well.
  • Can I make my own tequila lime seasoning?: Yes! Combine lime zest, salt, garlic powder, onion powder, and a pinch of tequila seasoning for a homemade version.

Serving Suggestions

These Blackstone Steak Fajitas are delicious on their own, but they’re even better with a few sides. Here are some of my favorite serving suggestions:

  • Rice and Beans: Serve the fajitas with a side of Mexican rice and black beans.
  • Guacamole and Chips: Offer a bowl of guacamole and tortilla chips for dipping.
  • Salsa and Sour Cream: Provide a variety of salsas and sour cream for topping the fajitas.
  • Lime Wedges and Cilantro: Garnish the fajitas with fresh lime wedges and cilantro.

And there you have it! Easy Blackstone Steak Fajitas that are sure to become a family favorite. Remember, the key is to have fun and experiment with flavors. If you are looking for an easy Blackstone griddle recipe, these easy Blackstone steak fajitas are sure to impress. The Blackstone adds a unique flavor that you just can’t get from a regular pan. If you’re ready to make steak fajitas, this is the recipe for you. You can even use your fajitas as a base for other dishes. The steak and veggies pair perfectly with a side of rice and beans. It’s all about creating a meal that you and your family will love. Enjoy!

Easy Blackstone Steak Fajitas for Flavorful Weeknight Wins

Prep Time 15 minutes
Cook Time 15 minutes
Total Time 30 minutes
Servings 6 servings
Calories 450
Enjoy delicious steak fajitas cooked on a Blackstone griddle for a quick and flavorful weeknight meal. This recipe is easily customizable with your favorite toppings.

Ingredients

Steak

  • 1.5 pounds flank steak (skirt or flat iron steak also work well)

Seasoning

  • 2 tablespoons olive oil/avocado oil (substitute with any high-heat oil)
  • 1 tablespoon Blackstone Tequila Lime Seasoning (taco seasoning is an alternative)
  • 1 teaspoon garlic powder
  • 1 teaspoon chili powder (optional, adjust to heat preference)
  • salt and pepper

Vegetables & Toppings

  • 1 bell pepper (sliced, any variety)
  • 1 large white onion (sliced)
  • 12 flour tortillas (taco size)
  • 2 cups cheddar cheese (shredded, use dairy-free alternative if needed)
  • toppings (e.g., sour cream, guacamole, pico, lime wedges, fresh cilantro)

Notes

For best results, marinate the steak for at least 30 minutes before cooking.
Calories: 450kcal
Cost: $20
Course: dinner
Cuisine: Mexican
Keyword: Steak
pin

Hey there, friend! Ava here, welcoming you back to my little corner of the internet where deliciousness and simplicity collide. Today, we’re diving headfirst into a recipe that’s a staple in my house: Oven Baked Sheet Pan Chicken Fajitas. Growing up, fajitas were a weekend treat, sizzling away on the stove. But life in Seattle is fast-paced, and sometimes, we need dinner to be quick, easy, and just as satisfying. That’s where this sheet pan version comes in!

Why You’ll Love This Recipe

Trust me, I get it. Weeknights can be chaotic. But that doesn’t mean you have to sacrifice flavor or resort to takeout. This recipe is a game-changer because:

  • It’s ridiculously easy: Toss everything on a sheet pan, bake, and you’re done! Seriously, it’s that simple.
  • Minimal cleanup: One pan means fewer dishes. Hallelujah!
  • Customizable: Add your favorite veggies, adjust the spice level, and load it up with all the toppings you love.
  • Healthy-ish: Packed with lean protein and colorful veggies, it’s a meal you can feel good about.
  • Crowd-pleaser: Everyone loves fajitas! It’s a guaranteed hit, whether you’re feeding your family or entertaining friends.

Plus, let’s be honest, the aroma that fills your kitchen while these are baking is pure magic. It’s the kind of smell that makes everyone gather around the oven, eagerly anticipating dinner.

Ingredients You’ll Need

Here’s what you’ll need to whip up these amazing sheet pan chicken fajitas:

  • 1 1/2 lbs chicken breast tenders
  • 2 large bell peppers ((any color))
  • 1 yellow or red onion
  • 1 tbsp olive oil
  • 1 packet fajita seasoning mix
  • 1 lime
  • tortillas
  • optional fajita toppings ((shredded cheese, avocado, cilantro, sour cream, etc.))
Recipe Image

How to Make Oven Baked Sheet Pan Chicken Fajitas

Alright, let’s get cooking! Here’s the step-by-step guide to fajita perfection:

  1. Preheat and Prep: Preheat your oven to 425°F (220°C). Grease a large baking sheet. This is crucial to prevent sticking and ensure even cooking.
  2. Chop and Toss: Cut the bell peppers and the onion into long 1/4 inch slices and place them into a large bowl. Toss them with the chicken, olive oil and packet of fajita seasoning mix until well combined. I also prefer to slice some of the chicken tenders into smaller pieces if they are too large.
  3. Bake: Spread the mixture out onto your prepared baking sheet and bake for 15-20 minutes or until the chicken is cooked through, and then turn the broiler on for about 2 minutes allowing the veggies to brown a little. Keep a close eye on it to prevent burning!
  4. Warm the Tortillas: During the last 5 minutes of cooking, wrap the tortillas in foil and place them in the oven to warm through. Warm tortillas are a must for the ultimate fajita experience.
  5. Lime and Serve: Squeeze the lime juice all over the hot fajita mixture and then serve in your warm tortillas with any additional toppings that you’d like.

Pro Tips for Perfect Fajitas

Here are a few secrets I’ve learned over the years to take your fajitas from good to amazing:

  • Don’t overcrowd the pan: Spread the ingredients in a single layer. Overcrowding steams the veggies instead of roasting them, resulting in a less flavorful dish. If necessary, use two sheet pans.
  • Use high heat: 425°F (220°C) is the sweet spot for achieving that perfect char on the veggies and ensuring the chicken cooks through.
  • Broil for extra flavor: Broiling for the last couple of minutes adds a smoky, caramelized flavor that’s irresistible. Just watch carefully to prevent burning.
  • Quality seasoning matters: Choose a fajita seasoning mix that you love. You can also make your own for a more customized flavor.
  • Warm tortillas are key: Don’t skip this step! Warm tortillas are softer and more pliable, making them easier to fill and roll.

Common Mistakes to Avoid

We’ve all been there – a cooking mishap can happen to anyone! Here are some common mistakes to watch out for:

  • Overcooking the chicken: Chicken can dry out quickly in the oven. Use a meat thermometer to ensure it reaches an internal temperature of 165°F (74°C).
  • Under-seasoning: Don’t be afraid to be generous with the fajita seasoning. It’s what gives the dish its signature flavor.
  • Skipping the lime: A squeeze of fresh lime juice brightens up the flavors and adds a touch of acidity that balances the richness of the dish.
  • Not prepping ingredients beforehand: Chop all the veggies and chicken before you start cooking. This will make the process much smoother and prevent you from getting overwhelmed.

Fajita Variations to Try

One of the best things about fajitas is how versatile they are. Here are a few variations to spice things up:

  • Steak Fajitas: Substitute sliced steak for chicken. Marinate the steak for extra flavor.
  • Shrimp Fajitas: Use shrimp instead of chicken or steak. Shrimp cooks quickly, so reduce the baking time accordingly.
  • Vegetarian Fajitas: Omit the meat and add more veggies, such as mushrooms, zucchini, and corn.
  • Spicy Fajitas: Add a pinch of cayenne pepper or a chopped jalapeño to the seasoning mix for extra heat.
  • Fajita Bowls: Serve the fajita mixture over rice or quinoa for a complete and satisfying meal.

You can also use a cast iron skillet. A cast iron skillet gives the meat a nice sear. The chicken in warm tortillas is amazing. The bell peppers are essential, and you can also add other vegetables.

How to Store Leftovers

If you happen to have any leftovers (which is rare in my house!), here’s how to store them:

  • Refrigerate: Store the cooked fajita mixture in an airtight container in the refrigerator for up to 3 days.
  • Reheat: Reheat in the microwave or in a skillet over medium heat until warmed through.
  • Freeze: For longer storage, freeze the cooked fajita mixture in an airtight container for up to 2 months. Thaw overnight in the refrigerator before reheating.

Frequently Asked Questions (FAQ)

Got questions? I’ve got answers!

  • Can I use frozen chicken? Yes, but make sure to thaw it completely before cooking. Pat it dry with paper towels to remove excess moisture.
  • Can I make this recipe ahead of time? You can chop the veggies and chicken ahead of time, but I recommend cooking the fajitas right before serving for the best flavor and texture.
  • Can I use a different type of seasoning? Absolutely! Experiment with different spice blends to find your favorite flavor combination.
  • What are the best toppings for fajitas? The possibilities are endless! Some of my favorites include shredded cheese, sour cream, guacamole, salsa, cilantro, and pickled onions.

Serving Suggestions

These Oven Baked Sheet Pan Chicken Fajitas are a complete meal on their own, but here are a few ideas to round out your feast:

  • Rice and beans: Serve with a side of Mexican rice and refried beans for a classic combination.
  • Salad: A simple green salad with a lime vinaigrette adds a refreshing contrast to the rich fajitas.
  • Guacamole and chips: Start the meal with a bowl of homemade guacamole and tortilla chips for dipping.
  • Margaritas: No fajita night is complete without a refreshing margarita!

And there you have it! My go-to recipe for Oven Baked Sheet Pan Chicken Fajitas. I hope you love it as much as I do. Remember, cooking is all about having fun and experimenting. Don’t be afraid to get creative and make this recipe your own. The oven is your friend! Editor’s tip: don’t be afraid to experiment a little. You’ve got this!

Happy cooking, friends! And don’t forget to share your creations with me on social media – I can’t wait to see what you whip up!

Oven Baked Sheet Pan Chicken Fajitas

Prep Time 15 minutes
Cook Time 20 minutes
Total Time 35 minutes
Servings 6 servings
Calories 350
These oven-baked chicken fajitas are a quick and easy weeknight meal. Simply toss everything on a sheet pan and bake for a delicious and healthy dinner!

Ingredients

Fajita Ingredients

  • 1.5 lbs chicken breast tenders
  • 2 large bell peppers (any color)
  • 1 yellow or red onion
  • 1 tbsp olive oil
  • 1 packet fajita seasoning mix
  • 1 lime
  • tortillas
  • optional fajita toppings (shredded cheese, avocado, cilantro, sour cream, etc.)

Instructions 

  • Preheat oven to 425° F and grease a large baking sheet.
  • Cut the bell peppers and onion into 1/4 inch slices. Toss with chicken, olive oil, and fajita seasoning.
  • Spread on baking sheet and bake for 15-20 minutes, then broil for 2 minutes.
  • During the last 5 minutes, warm tortillas in foil in the oven.
  • Squeeze lime juice over fajita mixture and serve in warm tortillas with toppings.

Notes

For extra flavor, marinate the chicken in the fajita seasoning for at least 30 minutes before cooking.
Calories: 350kcal
Cost: $18
Course: dinner
Cuisine: Mexican
Keyword: Chicken
pin

Hey there, friends! Ava here, back in my Seattle kitchen, and today we’re diving headfirst into a recipe that’s become a staple in my life: the Steak Fajita Power Bowl. If you’re anything like me, you crave meals that are both incredibly delicious and genuinely good for you. Something that feels like a treat but is packed with protein, vibrant veggies, and flavor that just explodes in your mouth. Well, look no further, because this recipe is about to become your new best friend.

Growing up in Oregon, I learned early on that the best meals are the ones that bring people together. And let me tell you, these power bowls? They do exactly that. Whether you’re cooking for a busy weeknight dinner, meal-prepping for the week, or just looking for a healthy and satisfying lunch, this recipe is a winner. Trust me, even the pickiest eaters will be reaching for seconds.

So, grab your apron, sharpen your knives, and let’s get cooking! I promise, this is going to be fun.

Why You’ll Love This Steak Fajita Power Bowl

Okay, let’s get real for a second. Why should you spend your precious time making these Steak Fajita Power Bowls? Well, besides the fact that they taste absolutely amazing, here’s a few more reasons to fall in love:

  • Quick and Easy: From start to finish, you can have these bowls ready in about 30 minutes. Perfect for those hectic weeknights!
  • Healthy and Nutritious: Packed with lean protein, whole grains, and plenty of colorful veggies, these bowls are a nutritional powerhouse.
  • Customizable: The beauty of power bowls is that you can easily swap out ingredients to suit your taste. Don’t like black beans? Use pinto beans! Prefer chicken over steak? Go for it!
  • Meal Prep Friendly: These bowls are fantastic for meal prepping. Just cook everything ahead of time and assemble when you’re ready to eat.
  • That Creamy Lime Sauce: Oh, this sauce! It’s tangy, creamy, and adds the perfect finishing touch. You’ll want to put it on everything, trust me.

Seriously, what’s not to love? This recipe ticks all the boxes. It’s delicious, healthy, easy to make, and totally customizable. Plus, it’s a great way to use up any leftover veggies you have in the fridge. It’s a fajita power bowl dream!

Ingredients

  • 1 pound flank or skirt steak
  • 1 tablespoon olive oil, plus more for cooking
  • 1 teaspoon chili powder
  • 1 teaspoon ground cumin
  • 1/2 teaspoon garlic powder
  • 1/2 teaspoon onion powder
  • Salt and black pepper to taste
  • 1 cup cooked brown rice
  • 1 (15-ounce) can black beans, rinsed and drained
  • 1 (15-ounce) can corn, drained
  • 1 red bell pepper, thinly sliced
  • 1 yellow bell pepper, thinly sliced
  • 1/2 red onion, thinly sliced
  • 1 ripe avocado, sliced
  • Fresh cilantro, chopped, for garnish
  • For the Creamy Lime Sauce:
  • 1/2 cup Greek yogurt or sour cream
  • 2 tablespoons fresh lime juice
  • 1 clove garlic, minced (or 1/4 teaspoon garlic powder)
  • 1 tablespoon chopped fresh cilantro
  • Pinch of salt
  • 1-2 tablespoons water or milk, to thin
Recipe Image

Step-by-Step Instructions: Let’s Get Cooking!

Alright, now for the fun part! Let’s walk through how to make these amazing Steak Fajita Power Bowls step-by-step. Don’t worry, it’s easier than you think. Just follow along, and you’ll be enjoying a delicious bowl in no time.

  1. Prepare the Steak: Pat the steak completely dry with paper towels. This is key for a good sear. In a small bowl, combine 1 tablespoon olive oil, chili powder, cumin, garlic powder, onion powder, salt, and pepper. Rub this mixture all over both sides of your steak. Make sure your steak is fully coated in the seasoning, really getting into every nook and cranny. This ensures every bite is bursting with flavor. It’s important that the steak is dry so you get a good sear.

  2. Cook Rice, Beans, and Corn: Cook the brown rice according to package directions. While rice cooks, warm the black beans and corn in separate small saucepans or in the microwave. Season lightly with salt and pepper. Brown rice adds a nutty flavor and hearty texture. Feel free to use white rice or quinoa if you prefer. Black beans and corn add a lovely sweetness and a good dose of fiber. These simple steps really elevate the entire bowl.

  3. Sauté Veggies: Heat a large skillet or cast iron pan over medium-high heat with a drizzle of olive oil. Add the sliced bell peppers and red onion. Cook, stirring occasionally, for 5-7 minutes until tender-crisp and slightly charred. Season with a pinch of salt and set aside. The peppers and onions should be vibrant and slightly softened, but still have a bit of bite. That slight char adds a wonderful smoky flavor. Peppers and onions are a classic fajita combination, providing both sweetness and a bit of zing.

  4. Make the Creamy Lime Sauce: In a small bowl, whisk together Greek yogurt or sour cream, lime juice, minced garlic, chopped cilantro, and a pinch of salt. Add water or milk, one tablespoon at a time, until the sauce reaches a pourable consistency. Set aside. This creamy lime sauce is the magic that ties everything together. It’s tangy, fresh, and adds a wonderful cooling element to the spicy steak and veggies. The balance of flavors is just perfect. It’s the lime sauce that makes the power bowl shine!

  5. Sear the Steak (The Juiciness Secret Starts Here): Return the large skillet to high heat. Add another tablespoon of olive oil. Once the oil is shimmering and almost smoking, carefully place the seasoned steak in the hot pan. Sear for 3-5 minutes per side for medium-rare, or until it reaches your desired doneness, ensuring a nice crust forms. Do not overcrowd the pan or move the steak too much. The high heat is crucial for getting that beautiful sear on the outside while keeping the inside juicy and tender. Trust me, that crust is where a lot of the flavor comes from! The pan needs to be hot!

  6. REST THE STEAK (This is the BIG FIX!): This is the ultimate step to guarantee juicy, tender steak! Immediately transfer the cooked steak from the hot pan to a clean cutting board. Do not cut it yet! Loosely tent the steak with aluminum foil and let it rest for at least 5-10 minutes. This resting period allows the juices to redistribute throughout the meat, instead of running out onto your cutting board when you slice it. No more dry, tough steak! Resting is non-negotiable! It makes all the difference. It’s the big fix for a great steak!

  7. Assemble and Serve: While the steak rests, you can start assembling the bowls. Divide the cooked brown rice among serving bowls. Add spoonfuls of warm black beans, corn, and sautéed peppers and onions to each bowl. This is where the power bowl really comes to life. The combination of colors and textures is so appealing, and the aroma is simply irresistible.

  8. Slice and Enjoy: Once rested, slice the steak against the grain into thin strips. Arrange the steak slices in each bowl. Top with sliced avocado, a generous drizzle of the creamy lime sauce, and a sprinkle of fresh chopped cilantro. Serve immediately and savor that perfectly juicy steak! Slicing against the grain ensures that the steak is tender and easy to chew. The avocado adds a creamy richness, and the cilantro provides a fresh, herbaceous note. Every bite is a symphony of flavors!

Pro Tips for the Perfect Steak Fajita Power Bowl

Want to take your Steak Fajita Power Bowls to the next level? Here are a few of my favorite pro tips:

  • Use a Meat Thermometer: For perfectly cooked steak, use a meat thermometer. Medium-rare is around 130-135°F, medium is 135-145°F.
  • Marinate the Steak: For even more flavor, marinate the steak for at least 30 minutes (or up to overnight) before cooking. A simple marinade of lime juice, soy sauce, and garlic can do wonders.
  • Char the Veggies: Don’t be afraid to let the veggies get a little charred in the pan. That char adds a delicious smoky flavor.
  • Warm the Tortillas: If you want to turn this into a wrap, warm the tortillas in a dry skillet or over an open flame for a few seconds per side.
  • Don’t Overcook the Steak: Overcooked steak is tough and dry. Aim for medium-rare to medium for the best results.

Common Mistakes to Avoid

We all make mistakes in the kitchen, but here are a few common ones to watch out for when making Steak Fajita Power Bowls:

  • Not Drying the Steak: As mentioned earlier, drying the steak is crucial for getting a good sear.
  • Overcrowding the Pan: Overcrowding the pan will lower the temperature and prevent the steak from searing properly. Cook the steak in batches if necessary.
  • Not Resting the Steak: Seriously, don’t skip this step! It’s the key to juicy, tender steak.
  • Overcooking the Veggies: Mushy veggies are no fun. Cook them until they’re tender-crisp.
  • Using Low-Quality Ingredients: The quality of your ingredients will directly impact the flavor of your dish. Use fresh, high-quality ingredients whenever possible.

Variations to Spice Things Up

Want to put your own spin on these Steak Fajita Power Bowls? Here are a few fun variations to try:

  • Chicken Fajita Bowls: Substitute the steak with chicken breast or thighs. Marinate the chicken for extra flavor.
  • Shrimp Fajita Bowls: Use shrimp instead of steak or chicken. Shrimp cooks quickly, so be careful not to overcook it.
  • Vegetarian Fajita Bowls: Skip the meat altogether and load up on veggies like mushrooms, zucchini, and sweet potatoes.
  • Spicy Fajita Bowls: Add a pinch of cayenne pepper or a dash of hot sauce to the steak seasoning for a kick.
  • Sweet Potato Fajita Bowls: Add roasted sweet potatoes for a touch of sweetness and extra nutrients.

Storage Instructions

These Steak Fajita Power Bowls are great for meal prepping. Here’s how to store them:

  • Individual Bowls: Assemble the bowls in individual containers, but keep the creamy lime sauce separate. Store in the refrigerator for up to 4 days.
  • Steak: Store the cooked steak in an airtight container in the refrigerator for up to 3 days.
  • Veggies: Store the sautéed veggies in an airtight container in the refrigerator for up to 4 days.
  • Sauce: Store the creamy lime sauce in an airtight container in the refrigerator for up to 5 days.

Frequently Asked Questions (FAQ)

Got questions? I’ve got answers! Here are some common questions about making Steak Fajita Power Bowls:

  • Can I use a different type of steak? Yes, you can use any type of steak you like. Flank steak and skirt steak are great because they cook quickly and have lots of flavor, but sirloin or ribeye would also work well.
  • Can I make this recipe ahead of time? Absolutely! This recipe is perfect for meal prepping. Just cook all the components ahead of time and assemble the bowls when you’re ready to eat.
  • Can I freeze the steak? Yes, you can freeze the cooked steak. Wrap it tightly in plastic wrap and then in foil, and store in the freezer for up to 2 months. Thaw overnight in the refrigerator before reheating.
  • Can I use frozen veggies? Yes, you can use frozen veggies if you don’t have fresh ones on hand. Just make sure to thaw them completely before cooking.
  • What if I don’t have Greek yogurt or sour cream for the sauce? You can use mayonnaise or even a little bit of avocado to make the sauce creamy.

Serving Suggestions

These Steak Fajita Power Bowls are delicious on their own, but here are a few serving suggestions to make them even better:

  • Add a dollop of guacamole: Guacamole adds a creamy, rich flavor that complements the other ingredients perfectly.
  • Serve with a side of tortilla chips: Tortilla chips are great for scooping up any leftover sauce or toppings.
  • Garnish with a lime wedge: A squeeze of fresh lime juice adds a bright, citrusy flavor.
  • Add a sprinkle of cotija cheese: Cotija cheese is a salty, crumbly cheese that adds a nice textural contrast.
  • Serve with a cold beer or margarita: These bowls pair perfectly with a refreshing drink.

So there you have it – my go-to Steak Fajita Power Bowl recipe! I hope you love it as much as I do. Remember, cooking should be fun and stress-free, so don’t be afraid to experiment and make this recipe your own. And most importantly, enjoy every delicious bite!

Steak Fajita Power Bowl

Prep Time 20 minutes
Cook Time 25 minutes
Total Time 45 minutes
Servings 4 bowls
Calories 550
A flavorful and satisfying Steak Fajita Power Bowl packed with tender steak, vibrant veggies, and a creamy lime sauce. Perfect for a healthy and delicious meal!

Ingredients

Steak & Marinade

  • 1 pound flank or skirt steak
  • 1 tablespoon olive oil (plus more for cooking)
  • 1 teaspoon chili powder
  • 1 teaspoon ground cumin
  • 1/2 teaspoon garlic powder
  • 1/2 teaspoon onion powder
  • Salt and black pepper (to taste)

Bowl Ingredients

  • 1 cup cooked brown rice
  • 1 (15-ounce) can black beans (rinsed and drained)
  • 1 (15-ounce) can corn (drained)
  • 1 red bell pepper (thinly sliced)
  • 1 yellow bell pepper (thinly sliced)
  • 1/2 red onion (thinly sliced)
  • 1 ripe avocado (sliced)
  • Fresh cilantro (chopped, for garnish)

Creamy Lime Sauce

  • 1/2 cup Greek yogurt or sour cream
  • 2 tablespoons fresh lime juice
  • 1 clove garlic (minced (or 1/4 teaspoon garlic powder))
  • 1 tablespoon chopped fresh cilantro
  • Pinch salt
  • 1-2 tablespoons water or milk (to thin)

Instructions 

  • Prepare the Steak: Pat steak dry, combine oil and spices, rub all over steak.
  • Cook Rice, Beans, and Corn: Cook rice, warm beans and corn, season lightly.
  • Sauté Veggies: Heat oil, add peppers and onion, cook until tender-crisp, season.
  • Make the Creamy Lime Sauce: Whisk yogurt, lime juice, garlic, cilantro, salt, thin with water.
  • Sear the Steak: Sear steak in hot pan for 3-5 minutes per side.
  • REST THE STEAK: Tent steak with foil, let rest for 5-10 minutes.
  • Assemble and Serve: Divide rice, beans, corn, and peppers among bowls.
  • Slice and Enjoy: Slice steak, arrange in bowls, top with avocado, sauce, and cilantro.

Notes

For extra flavor, marinate the steak for at least 30 minutes before cooking.
Calories: 550kcal
Cost: $20
Course: dinner, Main Course
Cuisine: Mexican
Keyword: Steak
pin

Hey there, burger aficionados! Ava here, and today, we’re diving headfirst into the world of turkey burgers. Now, I know what you might be thinking: turkey burgers? Really? But trust me on this one. This isn’t your average dry, bland turkey patty. This turkey burger recipe is a game-changer, a flavor explosion, and a healthy alternative that will have you saying, “Beef who?”

Growing up, my mom always tried to sneak in healthier options without sacrificing flavor. Sometimes it worked (her zucchini bread was legendary), and sometimes… well, let’s just say there was a reason my dog loved Tuesdays (leftover veggie casserole night). But this recipe? This would have been a home run. It’s the perfect blend of healthy and delicious, and I can’t wait to share it with you.

Why You’ll Love This Turkey Burger Recipe

Okay, let’s talk about why you’re going to fall head-over-heels for these turkey burgers. I mean, beyond the fact that they’re incredibly easy to make, of course. If you‘re looking for a quick weeknight meal, a crowd-pleasing BBQ option, or just a healthier way to enjoy a classic burger, this is it. And you can customize them for even the pickiest eaters!

  • Healthy Swap: Swapping ground beef for ground turkey is a fantastic way to reduce fat and calories without sacrificing protein.
  • Flavorful and Juicy: Say goodbye to dry, tasteless turkey burgers. This recipe is packed with ingredients that ensure every bite is bursting with flavor.
  • Quick and Easy: From prep to plate, you’re looking at about 30 minutes. Perfect for those busy weeknights when you need a delicious meal fast.
  • Customizable: Feel free to get creative with your toppings and seasonings. The possibilities are endless!
  • My passion for creating recipes that are both delicious and accessible is truly reflected in this turkey burger.

Ingredients for the Best Turkey Burgers

Alright, let’s gather our ingredients. Don’t worry, you probably already have most of these in your pantry. I’m all about keeping things simple and straightforward.

  • 1.3 pounds of ground turkey
  • 3 cloves of minced garlic
  • A quarter cup of Italian breadcrumbs
  • 1 large egg
  • Half teaspoon salt
  • Half a teaspoon of freshly cracked pepper
  • Half a teaspoon of onion powder
  • 2 tablespoons Worcestershire sauce
  • Handful of minced parsley
  • Olive oil
Recipe Image

How to Make Juicy Turkey Burgers: Step-by-Step

Now for the fun part: actually making the burgers! Follow these simple steps, and you’ll be sinking your teeth into a juicy, flavorful turkey burger in no time.

  1. Mix it up: Combine the ground turkey, minced garlic, Italian breadcrumbs, large egg, salt, pepper, onion powder, Worcestershire sauce, and minced parsley in a large mixing bowl. Mix until all ingredients are evenly distributed. Be careful not to overmix, as this can result in tough burgers.
  2. Shape the patties: Wet your hands slightly with water and shape the turkey mixture into patties. The size of the patties is up to you, just make sure they are slightly larger than your burger buns. Turkey tends to shrink a bit during cooking. To keep the patties uniform, you can use a burger press or a lid from a wide-mouth mason jar.
  3. Cook ’em up: Preheat a large pan on medium heat and add a spritz of olive oil. Once hot, carefully place the turkey patties in the pan and cook for about 4 minutes or until the internal temperature reaches 165°F.
  4. Optional: Cover and cook: Optional: cover the pan to ensure the burgers are cooked through. This also helps to keep them moist.
  5. Flip and finish: Flip the burgers, add cheese if desired, and cover again for another 4 minutes until fully cooked. Use a meat thermometer to ensure the internal temperature reaches 165°F.
  6. Serve and enjoy: Serve on toasted buns with your favorite toppings, and enjoy!

Pro Tips for the Perfect Turkey Burger

Want to take your turkey burgers from good to amazing? Here are a few of my favorite pro tips.

  • Don’t overmix: Overmixing the turkey mixture can result in tough burgers. Mix just until the ingredients are combined.
  • Add moisture: Ground turkey can be lean, so adding moisture is key to keeping the burgers juicy. The egg and Worcestershire sauce in this recipe help, but you can also add a tablespoon or two of olive oil or broth.
  • Use a meat thermometer: The best way to ensure your turkey burgers are cooked through without being dry is to use a meat thermometer. Aim for an internal temperature of 165°F.
  • Let them rest: After cooking, let the burgers rest for a few minutes before serving. This allows the juices to redistribute, resulting in a more flavorful and juicy burger.
  • Get creative with toppings: The possibilities are endless! Try avocado, bacon, caramelized onions, roasted red peppers, or a spicy aioli.

Common Mistakes to Avoid

We’ve all been there: a cooking mishap that turns into a learning experience (or a funny story for later). Here are a few common mistakes to avoid when making turkey burgers.

  • Using too lean of ground turkey: While it might seem healthier, using extra-lean ground turkey can result in dry burgers. Opt for a blend that’s around 85% lean.
  • Overcooking the burgers: Turkey burgers can dry out quickly, so it’s important not to overcook them. Use a meat thermometer to ensure they reach 165°F and remove them from the heat immediately.
  • Skipping the seasonings: Ground turkey can be bland on its own, so don’t skimp on the seasonings. This recipe is packed with flavor, but feel free to add your own favorites.
  • Not using a binder: A binder, like breadcrumbs or an egg, helps to hold the burgers together and prevent them from falling apart.

Turkey Burger Variations: A Twist on a Classic

One of the best things about this recipe is how easy it is to customize. Here are a few variations to try:

  • Spicy Turkey Burgers: Add a pinch of cayenne pepper, a dash of hot sauce, or a minced jalapeño to the turkey mixture for a spicy kick.
  • Mediterranean Turkey Burgers: Mix in crumbled feta cheese, chopped olives, and sun-dried tomatoes for a Mediterranean-inspired burger.
  • BBQ Turkey Burgers: Brush the burgers with your favorite BBQ sauce during the last few minutes of cooking for a smoky, sweet flavor.
  • Mushroom and Swiss Turkey Burgers: Top the burgers with sautéed mushrooms and melted Swiss cheese for a gourmet twist.

Storing and Reheating Turkey Burgers

Got leftovers? No problem! Turkey burgers can be stored in the refrigerator or freezer.

  • Refrigerator: Store cooked turkey burgers in an airtight container in the refrigerator for up to 3-4 days.
  • Freezer: Wrap cooked turkey burgers individually in plastic wrap and then place them in a freezer bag. They can be stored in the freezer for up to 2-3 months.

To reheat, simply microwave the burgers for a minute or two, or reheat them in a pan on the stovetop.

Frequently Asked Questions (FAQ)

Got questions? I’ve got answers! Here are a few frequently asked questions about making turkey burgers.

  • Can I use frozen ground turkey? Yes, but make sure to thaw it completely before using.
  • Can I grill these burgers? Absolutely! Preheat your grill to medium heat and grill the burgers for about 4-5 minutes per side, or until they reach an internal temperature of 165°F.
  • Can I make these burgers ahead of time? Yes, you can prepare the turkey mixture and shape the patties ahead of time. Store them in the refrigerator until you’re ready to cook.
  • What if my burgers are dry? Make sure you’re not using extra-lean ground turkey and that you’re not overcooking them. Adding moisture to the mixture, like olive oil or broth, can also help.

Serving Suggestions: Complete Your Meal

Now that you’ve got your juicy turkey burgers, it’s time to complete the meal! Here are a few serving suggestions:

  • Classic Burger Toppings: Lettuce, tomato, onion, pickles, ketchup, mustard, and mayonnaise are always a good choice.
  • Avocado and Bacon: Add a slice of avocado and a strip of crispy bacon for a decadent treat.
  • Caramelized Onions and Gruyere: Top the burgers with caramelized onions and melted Gruyere cheese for a gourmet twist.
  • Spicy Aioli: Whip up a batch of spicy aioli for a flavorful and creamy topping.
  • Side Dishes: Serve with French fries, sweet potato fries, coleslaw, or a fresh salad.

And there you have it: the ultimate juicy turkey burger recipe! I hope you enjoy making and eating these turkey burgers as much as I do. Remember, cooking is all about having fun and experimenting, so don’t be afraid to get creative and make this recipe your own. A few simple adjustments can make all the difference. Happy cooking! I’m always here to help you.

My passion for food and sharing it with all of you is so important to me. I hope that you try this recipe and let me know what you think! I truly believe that you can make something amazing with just a little bit of effort. So, get in the kitchen and start cooking!

Remember the next time you are craving a burger, t be afraid to try something new!

Turkey Burger Recipe

Prep Time 10 minutes
Cook Time 8 minutes
Total Time 18 minutes
Servings 4 burgers
Calories 350
This Turkey Burger Recipe is a healthy and delicious alternative to beef burgers. Made with simple ingredients and packed with flavor, these burgers are perfect for a quick and easy meal.

Ingredients

Burger Ingredients

  • 1.3 pounds ground turkey
  • 3 cloves minced garlic
  • 0.25 cup Italian breadcrumbs
  • 1 large egg
  • 0.5 teaspoon salt
  • 0.5 teaspoon freshly cracked pepper
  • 0.5 teaspoon onion powder
  • 2 tablespoons Worcestershire sauce
  • 1 Handful minced parsley
  • 1 spritz Olive oil (for pan)

Instructions 

  • Combine all ingredients in a bowl and mix evenly.
  • Shape the mixture into patties, slightly larger than your buns.
  • Preheat pan with olive oil, cook patties for 4 minutes until 165°F.
  • Optional: cover the pan to ensure the burgers are cooked through.
  • Flip, add cheese if desired, cover for 4 minutes until cooked.
  • Serve on toasted buns with toppings and enjoy!

Notes

For extra flavor, try adding a dash of hot sauce to the turkey mixture.
Calories: 350kcal
Cost: $12
Course: Main Course
Cuisine: American
Keyword: Turkey
pin

Hey there, friend! Ava here, back in my Seattle kitchen, and ready to share something that’s become a staple in our weeknight routine: Sheet Pan Steak Fajitas. If you’re anything like me, weeknights are a whirlwind of activities, and the last thing you want to do is spend hours cooking. That’s where this recipe shines. It’s quick, easy, and oh-so-delicious, bringing a little Tex-Mex magic right to your table.

Growing up, fajitas were always a special occasion meal. But now, thanks to the magic of the sheet pan, we can enjoy them any night of the week. This recipe combines juicy, perfectly seasoned steak with vibrant bell peppers and onions, all roasted to perfection on a single pan. The best part? Cleanup is a breeze! So, grab your apron, and let’s get cooking!

Why You’ll Love This Sheet Pan Steak Fajitas Recipe

Seriously, what’s not to love? This Sheet Pan Steak Fajitas recipe is a game-changer for busy weeknights. But beyond the convenience, here’s why it’s a winner:

  • Quick and Easy: From prep to plate in under 30 minutes.
  • Minimal Cleanup: One sheet pan means fewer dishes. Hallelujah!
  • Customizable: Add your favorite toppings and sides to make it your own.
  • Healthy and Delicious: Packed with protein and veggies, it’s a meal you can feel good about.
  • Crowd-Pleaser: Perfect for feeding a family or entertaining friends.

I love how this recipe brings everyone to the table. The sizzle of the steak, the aroma of the spices – it’s a sensory experience that makes dinner feel special, even on a Tuesday. And the best part? It’s so simple that even kitchen novices can nail it.

Ingredients for Sheet Pan Steak Fajitas

Here’s what you’ll need to create this weeknight wonder. Don’t be intimidated by the spice list; it’s what gives the steak that authentic fajita flavor!

  • 1 1/2 T kosher salt: Enhances the flavor of the steak and veggies.
  • 2 T brown sugar: Adds a touch of sweetness and helps with caramelization.
  • 1 T chili powder: Provides the base for that classic fajita taste.
  • 1/2 T ground cumin: Adds warmth and earthiness.
  • 1/2 T garlic powder: Because everything’s better with garlic!
  • 1/2 T onion powder: Adds depth and complexity.
  • 1/2 T dried oregano: A hint of Mediterranean flair.
  • 1/2 T smoked paprika: Adds a smoky depth that elevates the dish.
  • 1/2 tsp cayenne pepper: For a little kick (adjust to your liking!).
  • 1 red bell pepper, sliced: Adds sweetness and color.
  • 1 green bell pepper, sliced: A slightly bitter counterpoint to the red.
  • 1 yellow bell pepper, sliced: More sweetness and vibrancy.
  • 1 red onion, sliced: Adds a pungent bite.
  • 2 lbs flank or skirt steak, sliced into 1/2 inch strips: The star of the show! Flank steak is great, but skirt steak is also an excellent choice.
  • 2 T oil: For coating the steak and veggies and helping them roast evenly.
  • 12 6-inch flour tortillas, warmed: The perfect vessel for your fajitas.
  • Garnishes: grated cheese, avocado, salsa, sour cream, etc.: Because toppings make everything better!
Recipe Image

How to Make Sheet Pan Steak Fajitas: Step-by-Step

Ready to get started? Here’s the simple process for creating these amazing sheet pan steak fajitas.

  1. Preheat and Position: Preheat your broiler and set the rack about 6 inches below the heating element. This is key to getting that nice char on the steak and veggies.
  2. Mix the Spices: In a small bowl combine salt, brown sugar, chili powder, cumin, garlic powder, onion powder, oregano, smoked paprika, and cayenne pepper. Set aside. This spice mix is what transforms simple steak and vegetables into amazing steak fajitas.
  3. Prep the Steak and Veggies: On a sheet pan, drizzle sliced steak and veggies with oil. Sprinkle over spice mix and toss to combine. Make sure everything is evenly coated for maximum flavor.
  4. Broil to Perfection: Spread everything into one even layer and broil for 10-12 minutes, stirring once or twice during cooking, until steak is medium rare and veggies start to take on a little color. Keep a close eye on it to prevent burning! The timing may vary slightly depending on your broiler.
  5. Serve and Enjoy: Serve on warm, flour tortillas with all the fajita fixins you desire! Think grated cheese, avocado, salsa, sour cream, and a squeeze of lime.

And that’s it! Easy peasy, right? Now, let’s dive into some pro tips to make sure your sheet pan steak fajitas are the best they can be.

Pro Tips for Perfect Sheet Pan Steak Fajitas

These tips will help you take your fajitas from good to amazing!

  • Use the Right Cut of Steak: Flank steak or skirt steak are your best bets. They’re flavorful and cook quickly under the broiler.
  • Slice Against the Grain: This makes the steak more tender and easier to chew.
  • Don’t Overcrowd the Pan: Spread the steak and veggies in a single layer. If the pan is too crowded, they’ll steam instead of roast. If needed, use two sheet pans.
  • Preheat the Broiler: This is crucial for getting that nice char on the steak and veggies.
  • Watch Closely While Broiling: Broilers can be finicky, so keep a close eye on the fajitas to prevent burning.
  • Warm the Tortillas: Warm tortillas are softer and more pliable. You can warm them in the microwave, in a dry skillet, or wrapped in foil in the oven.

These may seem like small details, but they can make a big difference in the final result. Trust me, it’s worth the extra effort!

Common Mistakes to Avoid When Making Sheet Pan Steak Fajitas

We all make mistakes in the kitchen, but knowing what to watch out for can help you avoid them!

  • Overcooking the Steak: Steak continues to cook even after you take it out of the oven, so aim for medium-rare to medium.
  • Not Slicing the Steak Thinly Enough: Thick slices of steak can be tough and chewy. Aim for 1/2-inch thick slices.
  • Skipping the Spice Rub: The spice rub is what gives the steak that authentic fajita flavor, so don’t skip it!
  • Using the Wrong Kind of Oil: Use a high-heat oil like avocado oil or canola oil.
  • Forgetting to Stir: Stirring the steak and veggies halfway through cooking ensures that they cook evenly.

I’ve made all of these mistakes at one point or another, so don’t feel bad if you do too! Just learn from them and try again.

Variations: Sheet Pan Steak Fajitas Your Way

One of the best things about this recipe is how easy it is to customize! Here are a few ideas to get you started:

  • Different Protein: Try using chicken, shrimp, or even tofu instead of steak. Adjust the cooking time accordingly.
  • Different Veggies: Add other veggies like mushrooms, zucchini, or corn.
  • Spicier: Add more cayenne pepper or a pinch of red pepper flakes to the spice rub.
  • Sweeter: Add a drizzle of honey or maple syrup to the steak and veggies before broiling.
  • Citrusy: Add a squeeze of lime or orange juice to the steak and veggies before broiling.

Don’t be afraid to experiment and make this recipe your own! That’s what cooking is all about.

How to Store Leftover Sheet Pan Steak Fajitas

If you have any leftovers (which is rare in my house!), here’s how to store them:

  • Refrigerate: Store the steak and veggies in an airtight container in the refrigerator for up to 3 days.
  • Reheat: Reheat in a skillet over medium heat or in the microwave.
  • Freeze: Freeze the steak and veggies in an airtight container for up to 2 months. Thaw overnight in the refrigerator before reheating.

Leftovers are great for lunch the next day or for making fajita bowls!

Frequently Asked Questions About Sheet Pan Steak Fajitas

Got questions? I’ve got answers!

  • Can I make this recipe ahead of time? Yes! You can prep the steak and veggies and mix the spice rub ahead of time. Store them separately in the refrigerator until you’re ready to cook.
  • Can I use a different type of steak? Yes, but flank steak and skirt steak are the best choices. They’re flavorful and cook quickly.
  • Can I use frozen vegetables? Yes, but they may release more moisture during cooking, so you may need to increase the cooking time.
  • Can I grill the steak and veggies instead of broiling them? Absolutely! Grill them over medium-high heat until the steak is cooked to your liking and the veggies are tender.
  • What should I serve with sheet pan steak fajitas? Rice, beans, guacamole, salsa, sour cream, and shredded cheese are all great options.

If you have any other questions, feel free to leave a comment below!

Serving Suggestions for Sheet Pan Steak Fajitas

The possibilities are endless! Here are a few of my favorite ways to serve these fajitas:

  • Classic Fajitas: Serve on warm flour tortillas with your favorite toppings.
  • Fajita Bowls: Layer rice, beans, steak, veggies, and toppings in a bowl.
  • Fajita Salads: Toss steak, veggies, and toppings with lettuce and your favorite dressing.
  • Fajita Nachos: Layer tortilla chips with cheese, steak, veggies, and toppings. Bake until the cheese is melted and bubbly.
  • Fajita Quesadillas: Fill tortillas with cheese, steak, veggies, and toppings. Cook in a skillet until the cheese is melted and the tortillas are golden brown.

No matter how you serve them, these sheet pan steak fajitas are sure to be a hit! So, gather your ingredients, preheat your broiler, and get ready to enjoy a delicious and easy weeknight meal. Happy cooking!

Sheet Pan Steak Fajitas

Prep Time 15 minutes
Cook Time 12 minutes
Total Time 27 minutes
Servings 6 servings
Calories 450
These sheet pan steak fajitas are a quick and easy weeknight meal. Tender steak and colorful bell peppers are seasoned with a flavorful spice blend and broiled to perfection.

Ingredients

Spice Mix

  • 1.5 T kosher salt
  • 2 T brown sugar
  • 1 T chili powder
  • 0.5 T ground cumin
  • 0.5 T garlic powder
  • 0.5 T onion powder
  • 0.5 T dried oregano
  • 0.5 T smoked paprika
  • 0.5 tsp cayenne pepper

Fajitas

  • 1 red bell pepper, sliced
  • 1 green bell pepper, sliced
  • 1 yellow bell pepper, sliced
  • 1 red onion, sliced
  • 2 lbs flank or skirt steak, sliced into 1/2 inch strips
  • 2 T oil
  • 12 6-inch flour tortillas, warmed

Garnishes

  • grated cheese, avocado, salsa, sour cream, etc.

Instructions 

  • Preheat broiler and set rack 6 inches below heating element.
  • Combine salt, brown sugar, chili powder, cumin, garlic powder, onion powder, oregano, smoked paprika, and cayenne pepper in a small bowl.
  • Drizzle steak and veggies with oil on a sheet pan. Sprinkle with spice mix and toss. Spread into one layer and broil for 10-12 minutes, stirring occasionally, until steak is medium rare and veggies are colored.
  • Serve on warm tortillas with desired toppings.

Notes

Adjust spice levels to your preference. For spicier fajitas, add more cayenne pepper.
Calories: 450kcal
Cost: $25
Course: Main Course
Cuisine: Mexican
Keyword: Steak
pin

Hey there, friend! Ava here, welcoming you back to my little corner of the internet where deliciousness is always on the menu. Today, we’re firing up the Blackstone griddle and diving headfirst into a dish that’s bursting with flavor, color, and a whole lot of sizzle: Flavorful Blackstone Steak Fajitas. If you’re anything like me, you crave those meals that are quick, satisfying, and bring everyone to the table with smiles. Well, buckle up because this fajita recipe is about to become your new weeknight hero.

Growing up, fajitas were a special treat. The aroma of caramelized peppers and onions, the tender slices of seasoned steak—it was a symphony of flavors that always felt like a celebration. Now, with my trusty Blackstone, I’ve taken that classic and given it a little outdoor cooking twist. Trust me, once you taste these steak fajitas cooked on the griddle, you’ll never want to make them any other way.

Why You’ll Love This Blackstone Steak Fajitas Recipe

So, why should you give this fajita recipe a try? Let me count the ways! First off, the Blackstone griddle is a game-changer. It gets screaming hot, which means you can achieve that perfect sear on the steak and those beautifully charred veggies that are the hallmark of amazing fajitas. The high heat seals in all the juices, giving you incredibly tender and flavorful the meat every single time.

But it’s not just about the cooking method. This recipe is also incredibly versatile. You can easily customize it to your liking, swapping out veggies, adjusting the spice level, or adding your favorite toppings. Plus, it’s a fantastic way to get dinner on the table in under 30 minutes—perfect for those busy weeknights when you need something quick and satisfying. Here’s a few more reasons why you’ll love this recipe:

  • Quick and Easy: From prep to plate in under 30 minutes.
  • Incredible Flavor: The Blackstone imparts a smoky char that elevates the taste.
  • Customizable: Easily adapt to your dietary needs and preferences.
  • Crowd-Pleaser: Perfect for family dinners or casual get-togethers.
  • Minimal Cleanup: The Blackstone makes cleanup a breeze.

What You’ll Need: The Ingredients for Perfect Blackstone Steak Fajitas

Alright, let’s talk ingredients. Here’s what you’ll need to create these Flavorful Blackstone Steak Fajitas. Don’t worry, it’s a pretty straightforward list, and you probably have many of these items in your pantry already.

  • ‘1 1/2 pounds flank steak or skirt steak, thinly sliced’
  • ‘3 tablespoons olive oil’
  • ‘Juice of 2 limes’
  • ‘3 garlic cloves, minced’
  • ‘1 teaspoon chili powder’
  • ‘1 teaspoon smoked paprika’
  • ‘1 teaspoon cumin’
  • ‘1 teaspoon salt’
  • ‘1/2 teaspoon black pepper’
  • ‘2 bell peppers (red, green, or yellow), thinly sliced’
  • ‘1 large onion, thinly sliced’
  • ‘1 tablespoon olive oil’
  • ‘1 teaspoon chili powder’
  • ‘1/2 teaspoon garlic powder’
  • ‘Salt and pepper, to taste’
  • ‘Warm tortillas’
  • ‘Shredded cheese’
  • ‘Sour cream’
  • ‘Guacamole’
  • ‘Salsa’
  • ‘Fresh cilantro’
Recipe Image

Step-by-Step: Making Flavorful Blackstone Steak Fajitas

Okay, now for the fun part—cooking! Here’s a step-by-step guide to making these amazing Blackstone Steak Fajitas. Trust me, it’s easier than you think.

  1. Marinate the Steak: In a bowl, whisk together the lime juice, olive oil, minced garlic, chili powder, smoked paprika, cumin, salt, and pepper. Add the thinly sliced steak to the bowl, making sure each piece is well coated. Cover the bowl and refrigerate for at least 30 minutes, or up to 4 hours. The longer it marinates, the more flavorful the steak will be!
  2. Prep the Blackstone: Preheat your Blackstone griddle to medium-high heat. You want it nice and hot so you can get that perfect sear on the steak and veggies.
  3. Cook the Steak: Once the griddle is hot, add a tablespoon of olive oil. Place the marinated steak on the griddle in a single layer. Cook for about 2–3 minutes per side, until it’s nicely browned and cooked to your desired level of doneness. Remember, skirt steak and flank steak cook quickly, so keep a close eye on it! Once it’s done, remove the steak from the griddle and let it rest for a few minutes.
  4. Sauté the Veggies: Add another tablespoon of olive oil to the griddle. Add the sliced bell peppers and onions. Sprinkle with chili powder, garlic powder, salt, and pepper. Sauté the veggies for about 5–7 minutes, until they’re softened and slightly charred. You want them to be tender but still have a little bit of bite.
  5. Combine and Heat Through: Slice the rested steak against the grain into thin strips. Return the steak to the griddle with the sautéed veggies. Toss everything together and heat through for another minute or two, until everything is nicely combined and sizzling hot.
  6. Serve and Enjoy: Warm your tortillas according to package instructions. Fill each tortilla with the steak and veggie mixture. Top with your favorite toppings, such as shredded cheese, sour cream, guacamole, salsa, and fresh cilantro. Serve immediately and enjoy!

Ava’s Pro Tips for the Best Blackstone Steak Fajitas

Alright, let’s dive into some pro tips that will take your Blackstone Steak Fajitas from good to absolutely amazing. These are the little secrets I’ve learned over the years that make all the difference.

  • Choose the Right Cut of Steak: Flank steak and skirt steak are the go-to choices for fajitas because they’re thin, flavorful, and cook quickly. But remember to slice them against the grain after cooking for the most tender bite.
  • Don’t Overcrowd the Griddle: When cooking the steak, make sure to place it on the griddle in a single layer. Overcrowding the griddle will lower the temperature and cause the steak to steam instead of sear.
  • Let the Steak Rest: This is crucial! Letting the steak rest for a few minutes after cooking allows the juices to redistribute, resulting in a more tender and flavorful final product.
  • Get Your Griddle Hot: The key to those perfectly charred veggies and that beautiful sear on the steak is a hot griddle. Make sure your Blackstone is preheated to medium-high heat before you start cooking.
  • Don’t Be Afraid to Experiment with Spices: Feel free to adjust the spices in the marinade to your liking. If you like a little extra heat, add a pinch of cayenne pepper. If you prefer a sweeter flavor, add a touch of brown sugar.
  • Warm Your Tortillas: Warm tortillas are a must! You can warm them on the griddle, in a dry skillet, or even in the microwave. Just make sure they’re nice and pliable before you fill them.

Common Mistakes to Avoid When Making Blackstone Steak Fajitas

We all make mistakes in the kitchen—it’s part of the learning process! But to help you avoid some common pitfalls, here are a few mistakes to watch out for when making Blackstone Steak Fajitas. These are the things I wish someone had told me when I first started experimenting with this dish!

  • Overcooking the Steak: This is the most common mistake. Skirt steak and flank steak are best cooked to medium-rare or medium. Overcooked steak will be tough and dry. Use a meat thermometer to ensure it’s cooked to your desired level of doneness.
  • Not Marinating Long Enough: The marinade is what gives the steak its flavor and tenderness. Don’t skip this step! Marinate the steak for at least 30 minutes, or up to 4 hours, for the best results.
  • Using the Wrong Kind of Oil: When cooking on the Blackstone, it’s important to use an oil with a high smoke point, such as olive oil or avocado oil. Avoid using butter or other oils with low smoke points, as they can burn and create an unpleasant flavor.
  • Adding Too Much to the Tortilla: It’s tempting to load up your fajitas with tons of steak, veggies, and toppings, but resist the urge! Overfilled tortillas are messy and difficult to eat. A little goes a long way.
  • Forgetting the Lime: A squeeze of fresh lime juice is the perfect finishing touch for fajitas. It adds a bright, citrusy flavor that complements the smoky steak and veggies perfectly.

Variations: Level Up Your Blackstone Steak Fajitas

One of the things I love most about fajitas is how versatile they are. You can easily customize them to your liking, swapping out ingredients, adjusting the spice level, or adding your favorite toppings. Here are a few fun variations to try:

  • Chicken Fajitas: Swap out the steak for chicken breasts or thighs. Marinate the chicken in the same marinade as the steak and cook it on the Blackstone until it’s cooked through.
  • Shrimp Fajitas: Use large shrimp instead of steak. Marinate the shrimp in a mixture of lime juice, garlic, chili powder, and olive oil. Cook them on the Blackstone for just a few minutes per side, until they’re pink and opaque.
  • Vegetarian Fajitas: Skip the meat altogether and load up your fajitas with a variety of veggies, such as mushrooms, zucchini, corn, and black beans. Sauté the veggies on the Blackstone with your favorite fajita seasonings.
  • Spicy Fajitas: Add a pinch of cayenne pepper to the marinade or sauté some jalapeños with the veggies for a spicy kick.
  • Pineapple Fajitas: Add some grilled pineapple to your fajitas for a sweet and tangy twist. The caramelized pineapple pairs beautifully with the smoky steak and veggies.

Storage: How to Keep Your Fajitas Fresh

If you happen to have leftovers (which is rare in my house!), here’s how to store them properly so you can enjoy them later:

  • Store the Steak and Veggies Separately: To prevent the tortillas from getting soggy, store the cooked steak and veggies in separate airtight containers in the refrigerator.
  • Refrigerate Promptly: Leftovers should be refrigerated within two hours to prevent bacterial growth.
  • Use Within 3-4 Days: Leftover fajitas are best consumed within 3-4 days.
  • Reheating: Reheat the steak and veggies in a skillet or on the Blackstone until heated through. You can also microwave them, but they may not be as crispy.
  • Freezing: While you can freeze cooked steak and veggies, the texture may change slightly. If you do freeze them, store them in airtight containers for up to 2-3 months.

FAQ: Your Burning Blackstone Steak Fajita Questions Answered

Got questions? I’ve got answers! Here are some of the most frequently asked questions about making Blackstone Steak Fajitas:

  • Can I use a different cut of steak? Absolutely! While flank steak and skirt steak are the most popular choices, you can also use sirloin, ribeye, or even flat iron steak. Just make sure to adjust the cooking time accordingly.
  • Can I make these fajitas indoors? Yes, you can! If you don’t have a Blackstone griddle, you can cook the steak and veggies in a cast-iron skillet or on a grill pan on your stovetop.
  • Can I prepare the steak and veggies ahead of time? Yes, you can! You can marinate the steak up to 24 hours in advance and slice the veggies a day ahead of time. Just store them in separate containers in the refrigerator until you’re ready to cook.
  • What are the best toppings for fajitas? The possibilities are endless! Some of my favorite toppings include shredded cheese, sour cream, guacamole, salsa, fresh cilantro, diced onions, and pickled jalapeños.
  • Can I make these fajitas gluten-free? Yes, you can! Just use gluten-free tortillas and make sure all of your other ingredients are gluten-free as well.
  • How do I keep the tortillas warm? You can wrap the tortillas in a clean kitchen towel and place them in a warm oven or microwave them for a few seconds before serving.

Serving Suggestions: What to Serve with Your Blackstone Steak Fajitas

These Blackstone Steak Fajitas are delicious on their own, but they’re even better when served with some tasty side dishes. Here are a few of my favorite pairings:

  • Mexican Rice: Fluffy, flavorful Mexican rice is the perfect complement to the smoky steak and veggies.
  • Refried Beans: Creamy refried beans add a hearty and satisfying element to the meal.
  • Guacamole and Salsa: No fajita feast is complete without a generous helping of guacamole and salsa.
  • Corn on the Cob: Grilled corn on the cob adds a touch of sweetness and a pop of color to the plate.
  • Mexican Street Corn Salad: This vibrant and flavorful salad is a fun twist on classic Mexican street corn.
  • Chips and Queso: Warm, cheesy queso and crispy tortilla chips are always a crowd-pleaser.

And there you have it—my recipe for Flavorful Blackstone Steak Fajitas. I hope you give this recipe a try and that it brings a little bit of magic to your kitchen. Remember, cooking is all about experimenting, having fun, and creating memories with the people you love. So, fire up that Blackstone, gather your ingredients, and let’s make something unforgettable together!

Happy cooking!

Flavorful Blackstone Steak Fajitas

Prep Time 15 minutes
Cook Time 15 minutes
Total Time 30 minutes
Servings 6 servings
Calories 450
Enjoy delicious and easy steak fajitas cooked on a Blackstone griddle. This recipe delivers tender steak and flavorful veggies for a perfect weeknight meal.

Ingredients

Steak Marinade

  • 1.5 pounds flank steak or skirt steak (thinly sliced)
  • 3 tablespoons olive oil
  • 2 limes (Juice of)
  • 3 garlic cloves (minced)
  • 1 teaspoon chili powder
  • 1 teaspoon smoked paprika
  • 1 teaspoon cumin
  • 1 teaspoon salt
  • 0.5 teaspoon black pepper

Veggies and Cooking

  • 2 bell peppers ((red, green, or yellow), thinly sliced)
  • 1 large onion (thinly sliced)
  • 1 tablespoon olive oil
  • 1 teaspoon chili powder
  • 0.5 teaspoon garlic powder
  • to taste Salt and pepper

Toppings

  • Warm tortillas
  • Shredded cheese
  • Sour cream
  • Guacamole
  • Salsa
  • Fresh cilantro

Instructions 

  • Whisk lime juice, olive oil, garlic, and spices. Add steak, toss, cover, and refrigerate 30 minutes to 4 hours.
  • Preheat Blackstone to medium-high. Add oil and cook steak 2–3 minutes per side. Remove and rest.
  • Add peppers and onions to the griddle with oil and seasonings. Sauté 5–7 minutes until softened.
  • Return steak to griddle, toss with vegetables, and heat through.
  • Fill warm tortillas with steak and veggies. Add toppings and serve.

Notes

For extra flavor, marinate the steak overnight. Adjust the amount of chili powder to your preferred spice level.
Calories: 450kcal
Cost: $20
Course: Main Course
Cuisine: Mexican
Keyword: Steak
pin