Author

Ava

Browsing

Hey there, friend! Ava here, back in my Seattle kitchen, where the magic (and delicious smells!) happen. Tonight, we’re ditching the complicated recipes and embracing pure weeknight bliss with these Sheet Pan Steak Fajitas. Seriously, if you’re anything like me, you crave meals that are both incredibly tasty and incredibly easy. And let me tell you, this one checks all the boxes.

Growing up, fajitas were a special occasion meal. My mom would spend hours marinating the steak and prepping all the fixings. While I loved those fajitas, as an adult, I needed a quicker, simpler version. That’s where the sheet pan comes in! It’s a game-changer, allowing you to roast everything together in one pan for maximum flavor and minimal cleanup. And trust me, once you taste these, you’ll wonder why you ever made fajitas any other way.

Why You’ll Love This Sheet Pan Steak Fajitas Recipe

Okay, let’s get real. Why should you try this recipe? Well, besides the fact that it’s ridiculously easy, here’s why I think you’re going to fall head-over-heels for these sheet pan steak fajitas:

  • Quick Prep: Seriously, you’re looking at about 15 minutes of prep time. That’s it!
  • Minimal Cleanup: Everything cooks on one sheet pan. Hallelujah!
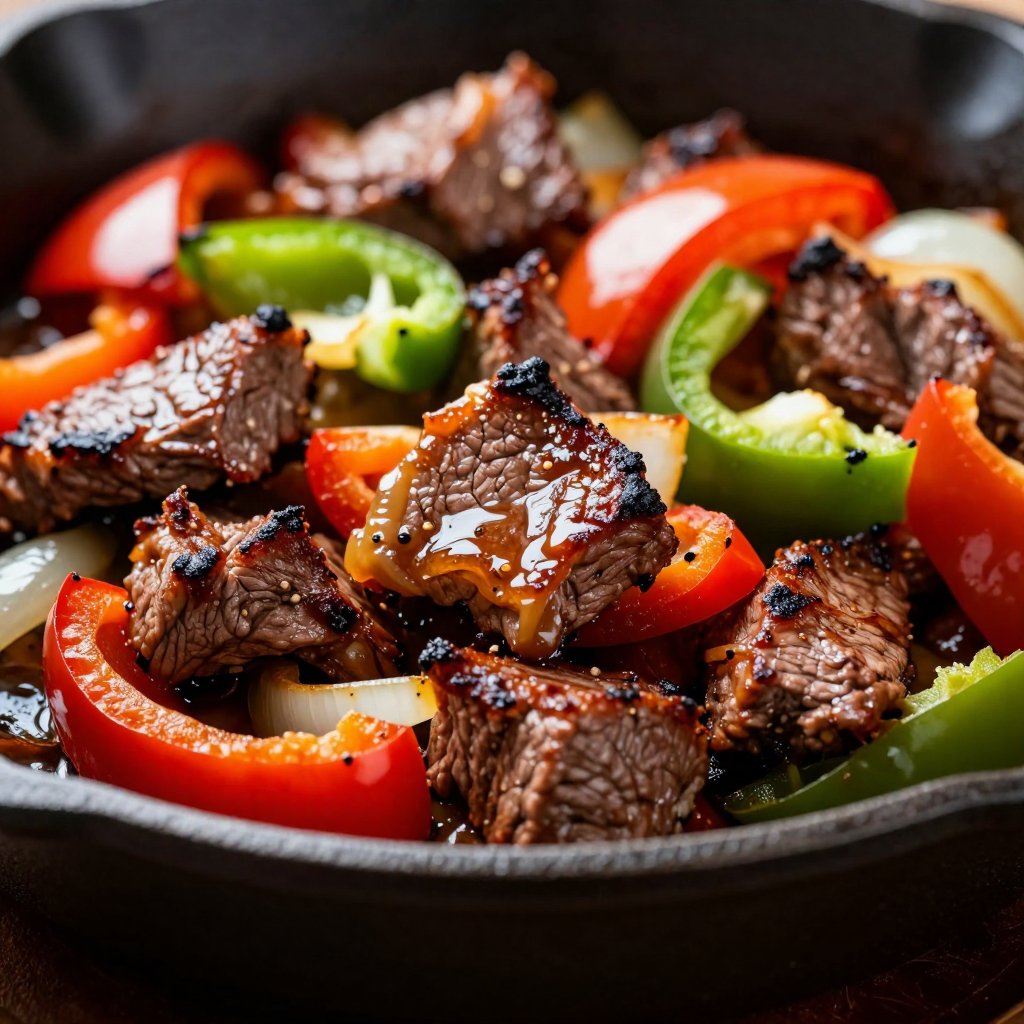
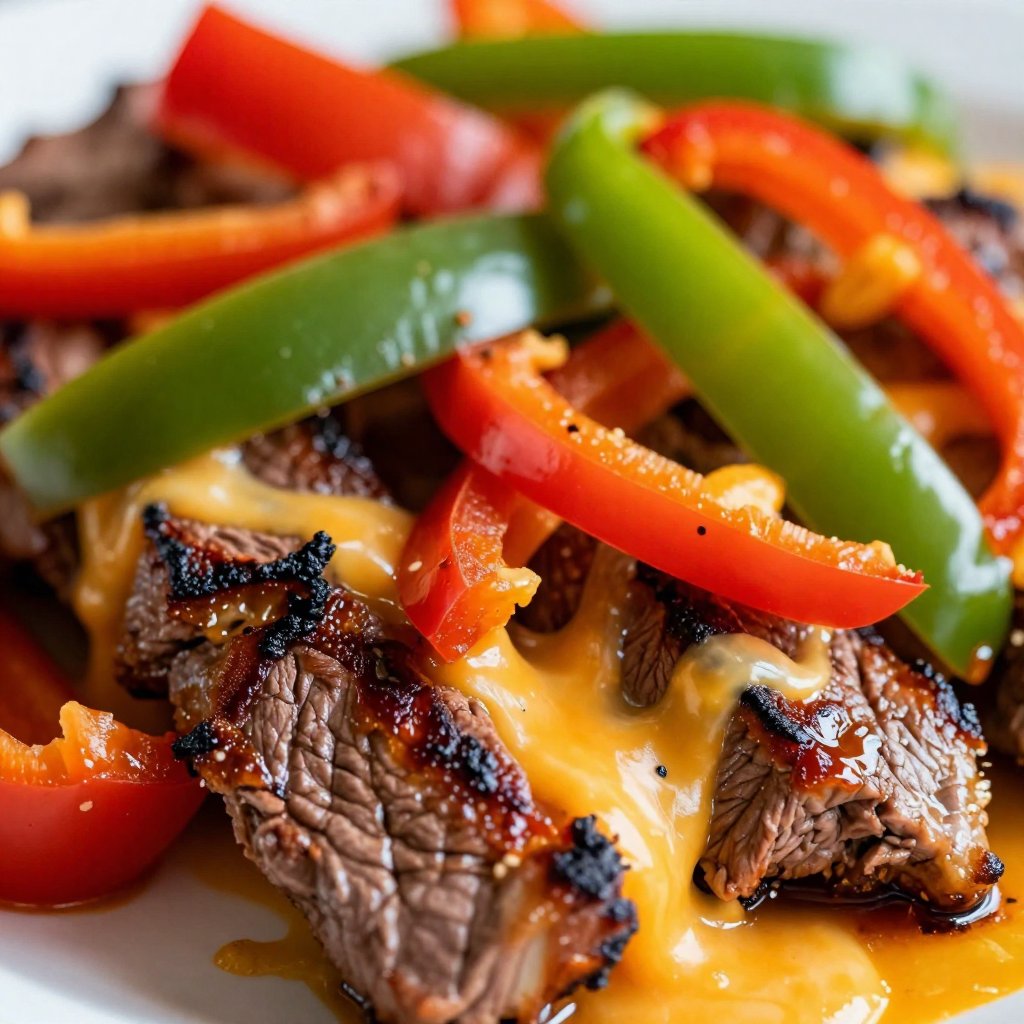
  • Flavor Explosion: The combination of spices, lime juice, and perfectly cooked steak and vegetables is simply irresistible.
  • Customizable: Add your favorite toppings and make it your own! Sour cream, salsa, guacamole… the possibilities are endless.
  • Weeknight Winner: This is the perfect meal for busy weeknights when you need something delicious and satisfying on the table fast.
  • Gluten-Free Friendly: Simply use corn tortillas to make these fajitas entirely gluten-free.

I remember the first time I made these. My husband, Mark, who is a bit of a steak snob, was skeptical. But after one bite, he was completely sold. He even declared them “better than restaurant fajitas!” And that, my friends, is high praise indeed.

Sheet Pan Steak Fajitas Ingredients

Here’s what you’ll need to create these flavor-packed fajitas. Don’t worry, it’s a pretty straightforward list!

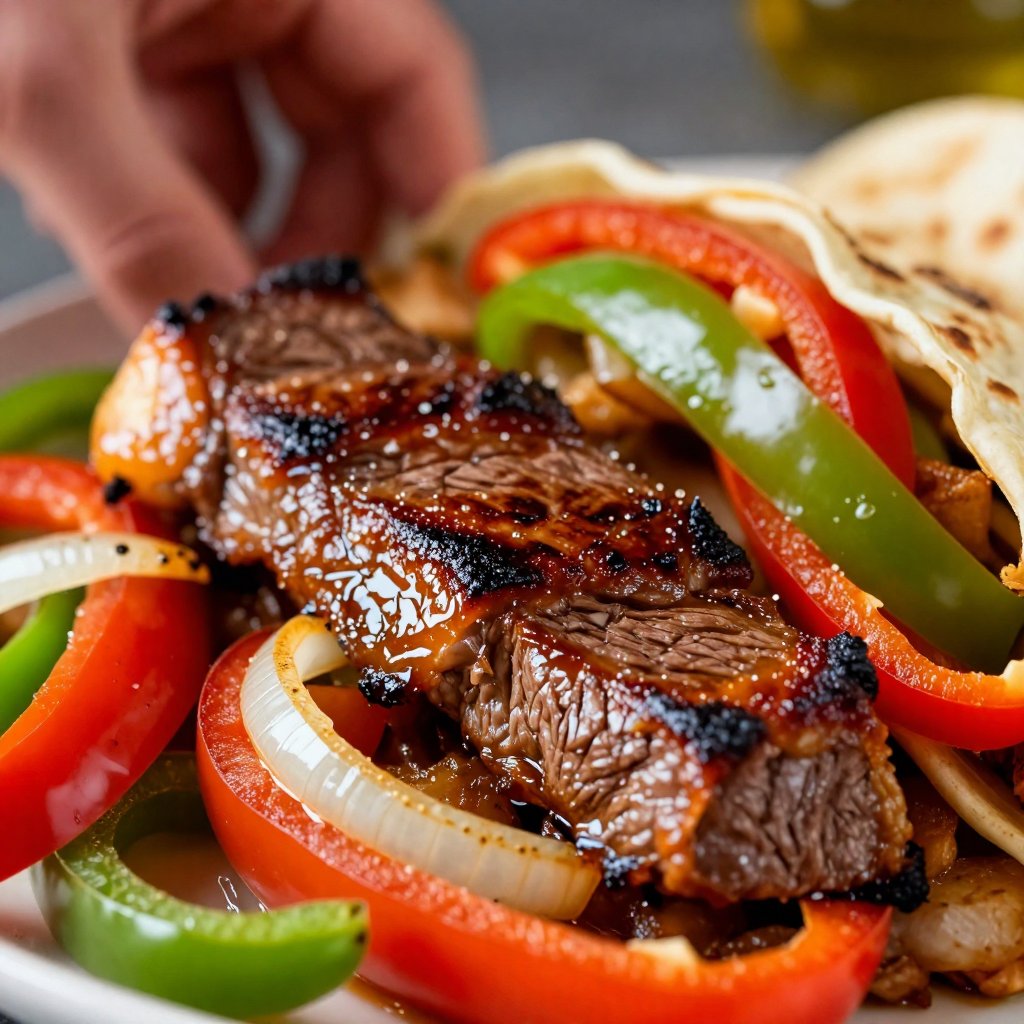
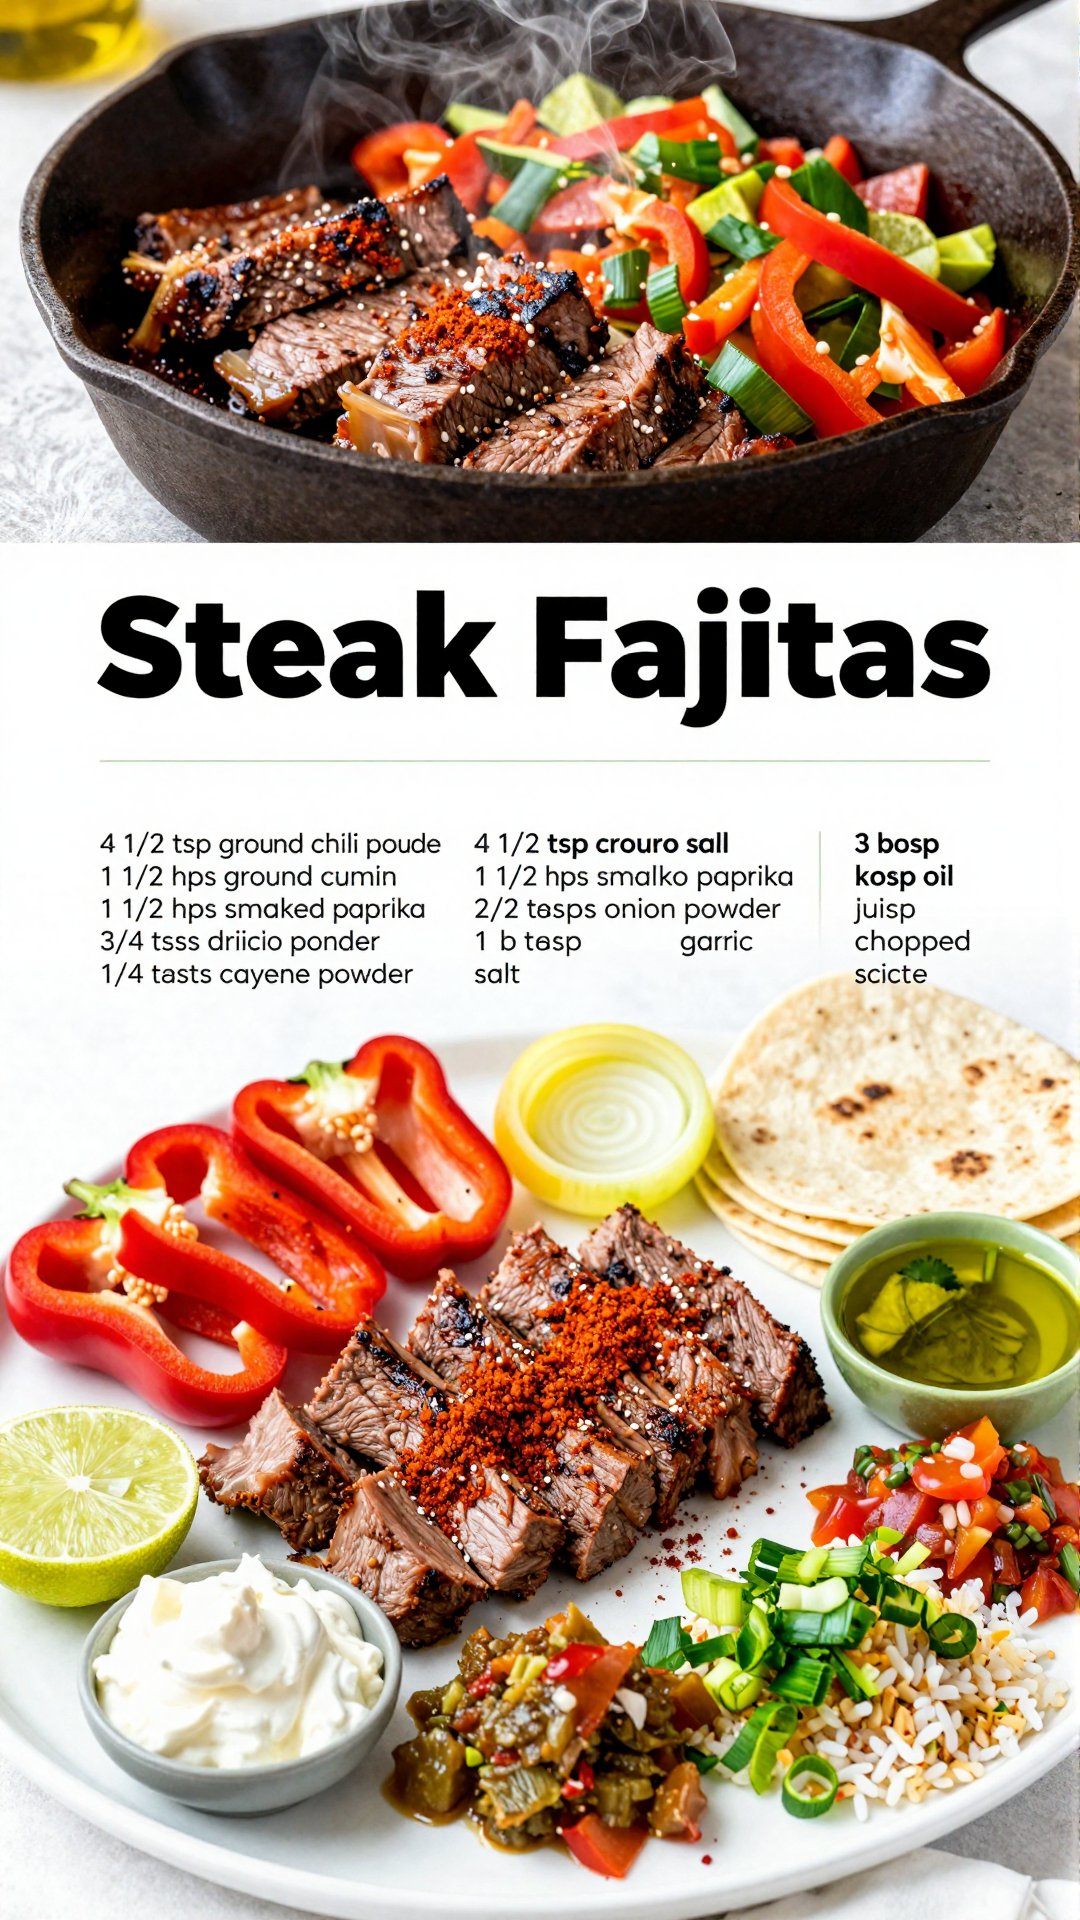
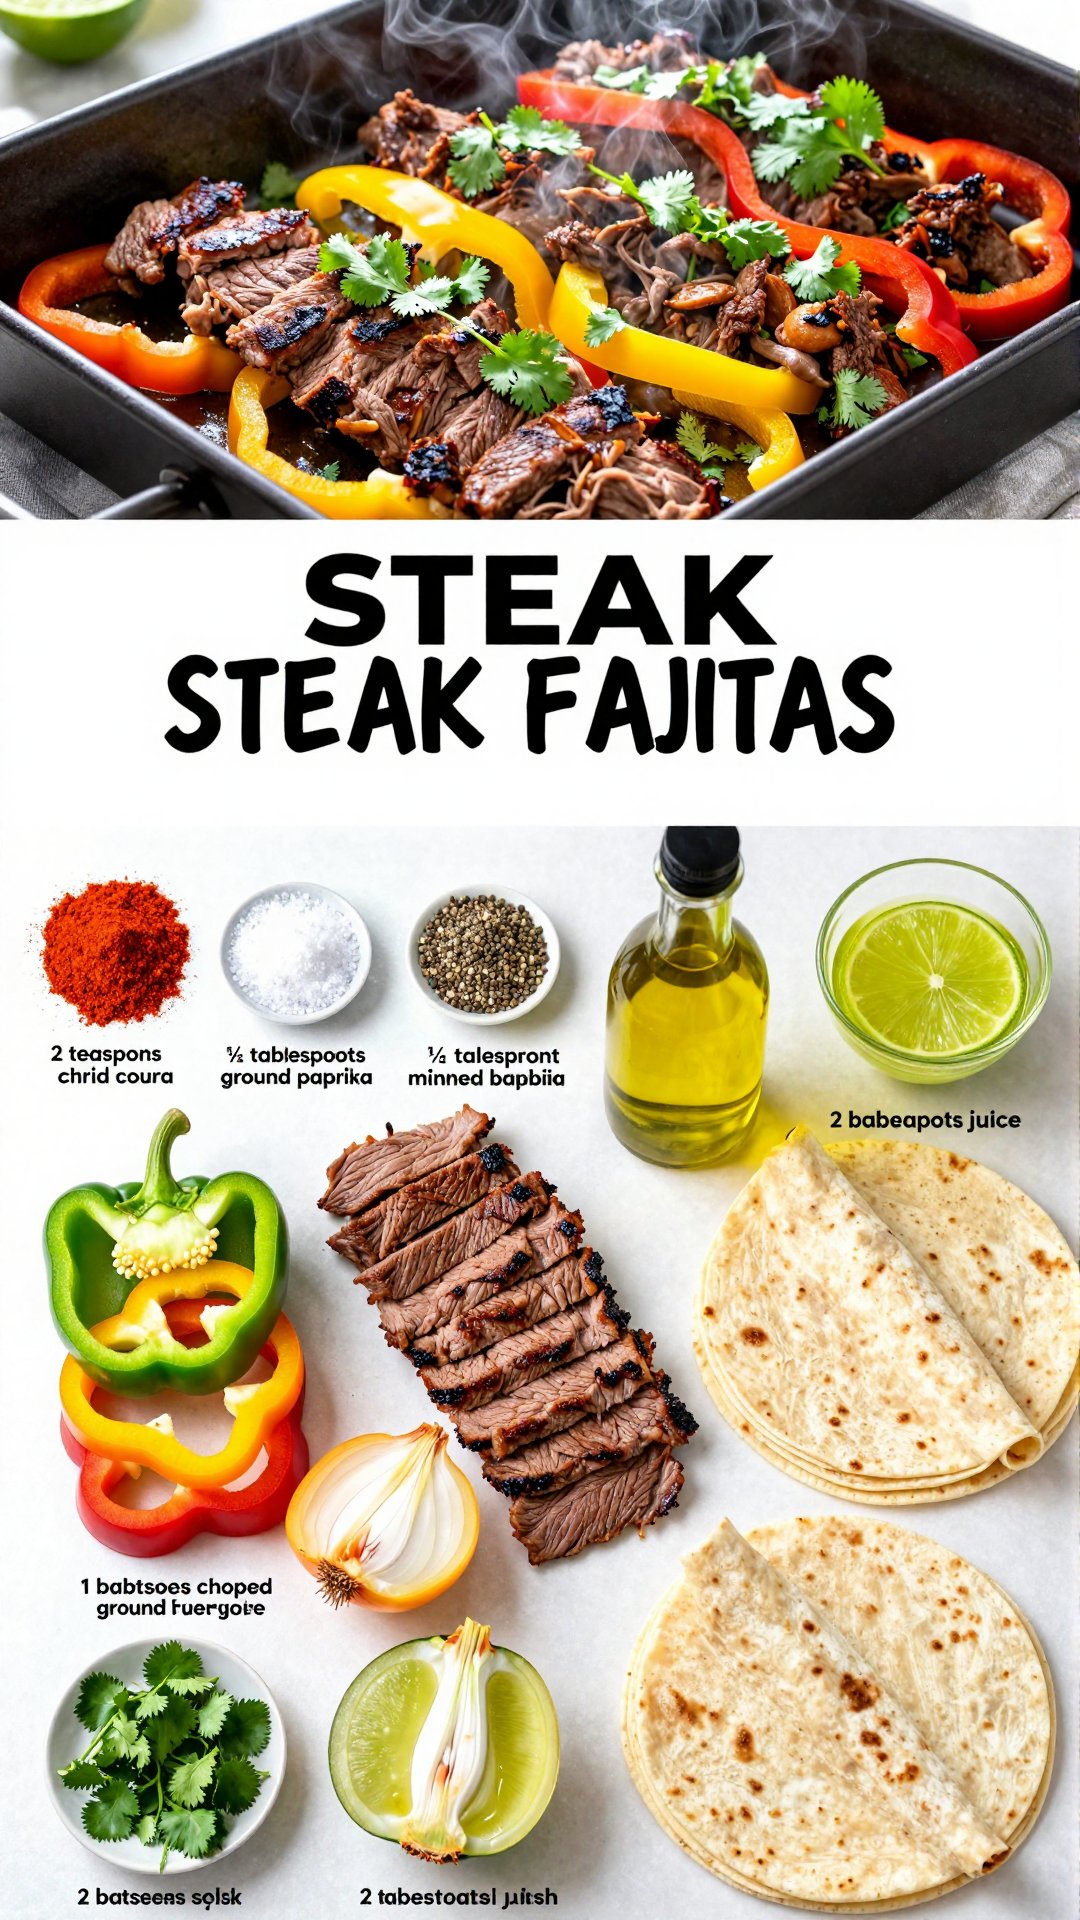
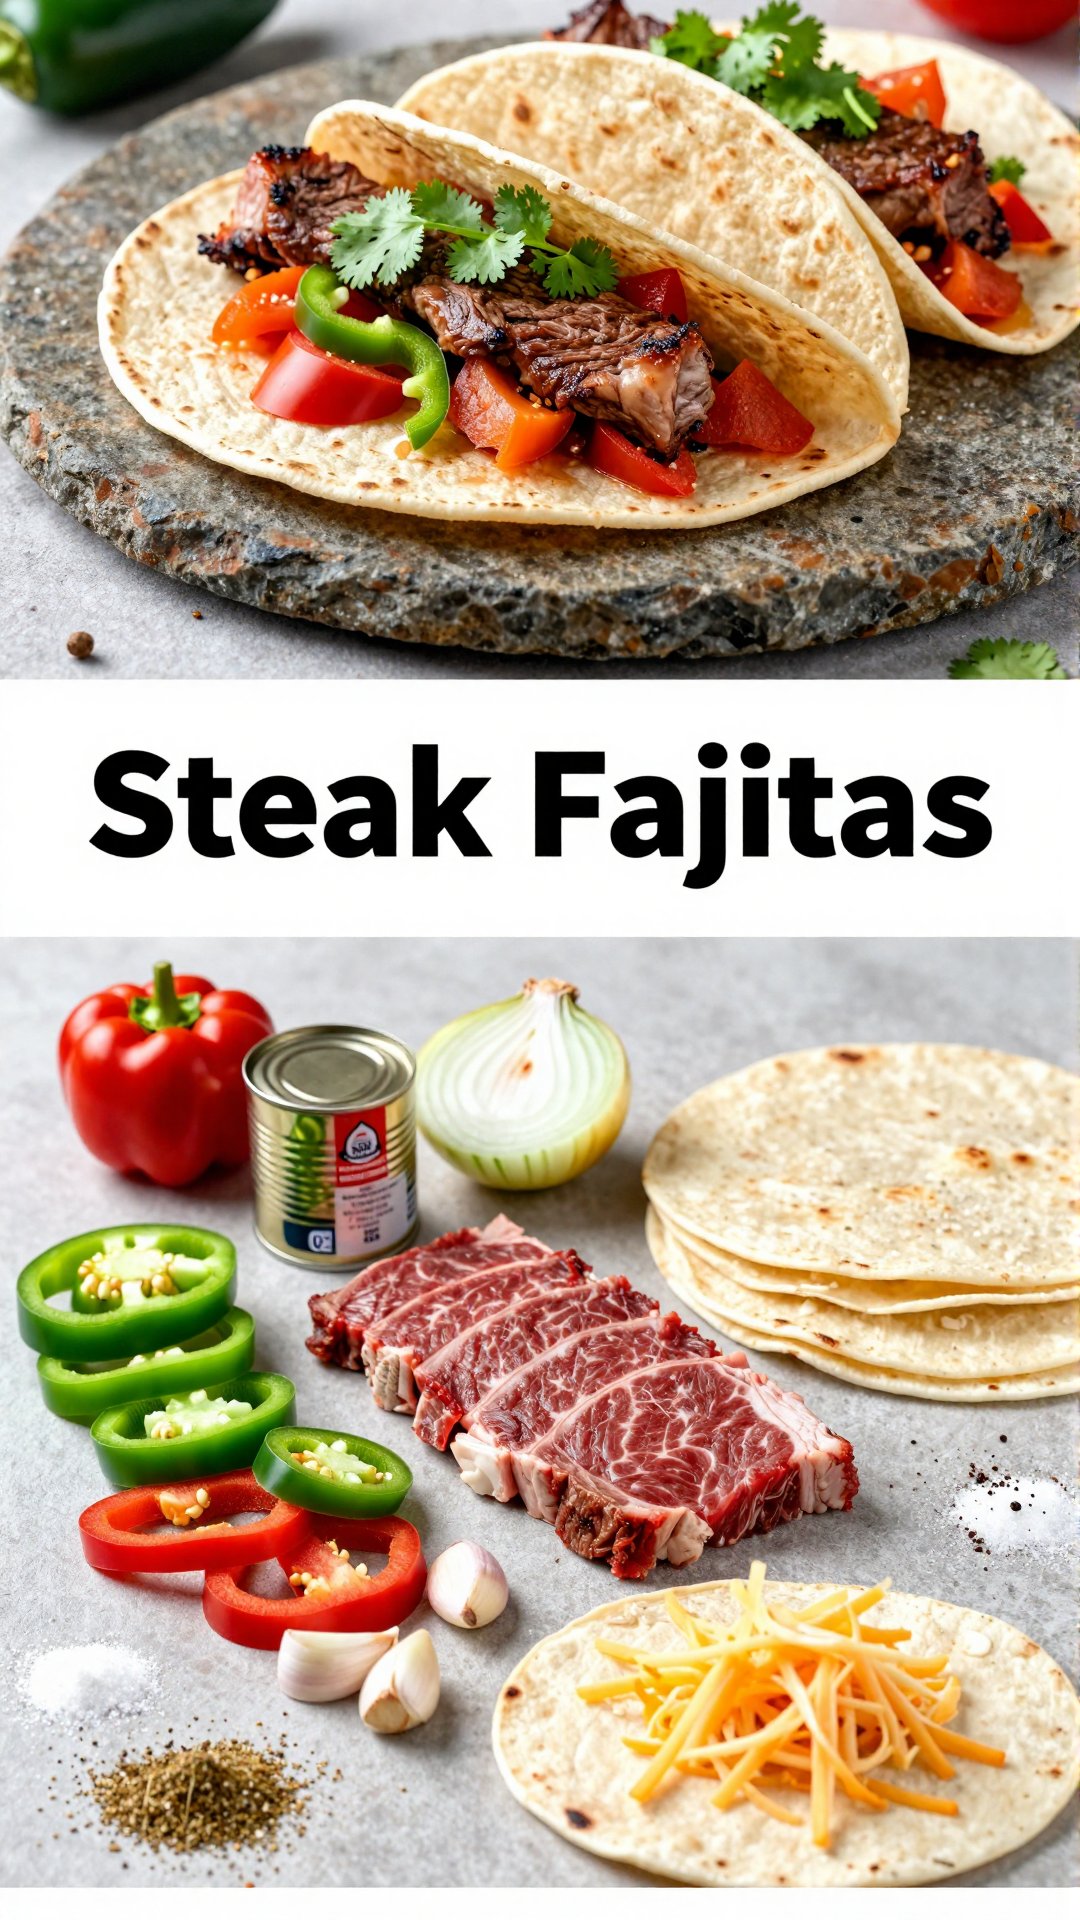
  • ‘1.5 lbs flank steak or sirloin, thinly sliced against the grain’
  • ‘3 bell peppers (red, yellow, green), seeded and sliced’
  • ‘1 large red onion, peeled and sliced’
  • ‘3 tbsp olive oil’
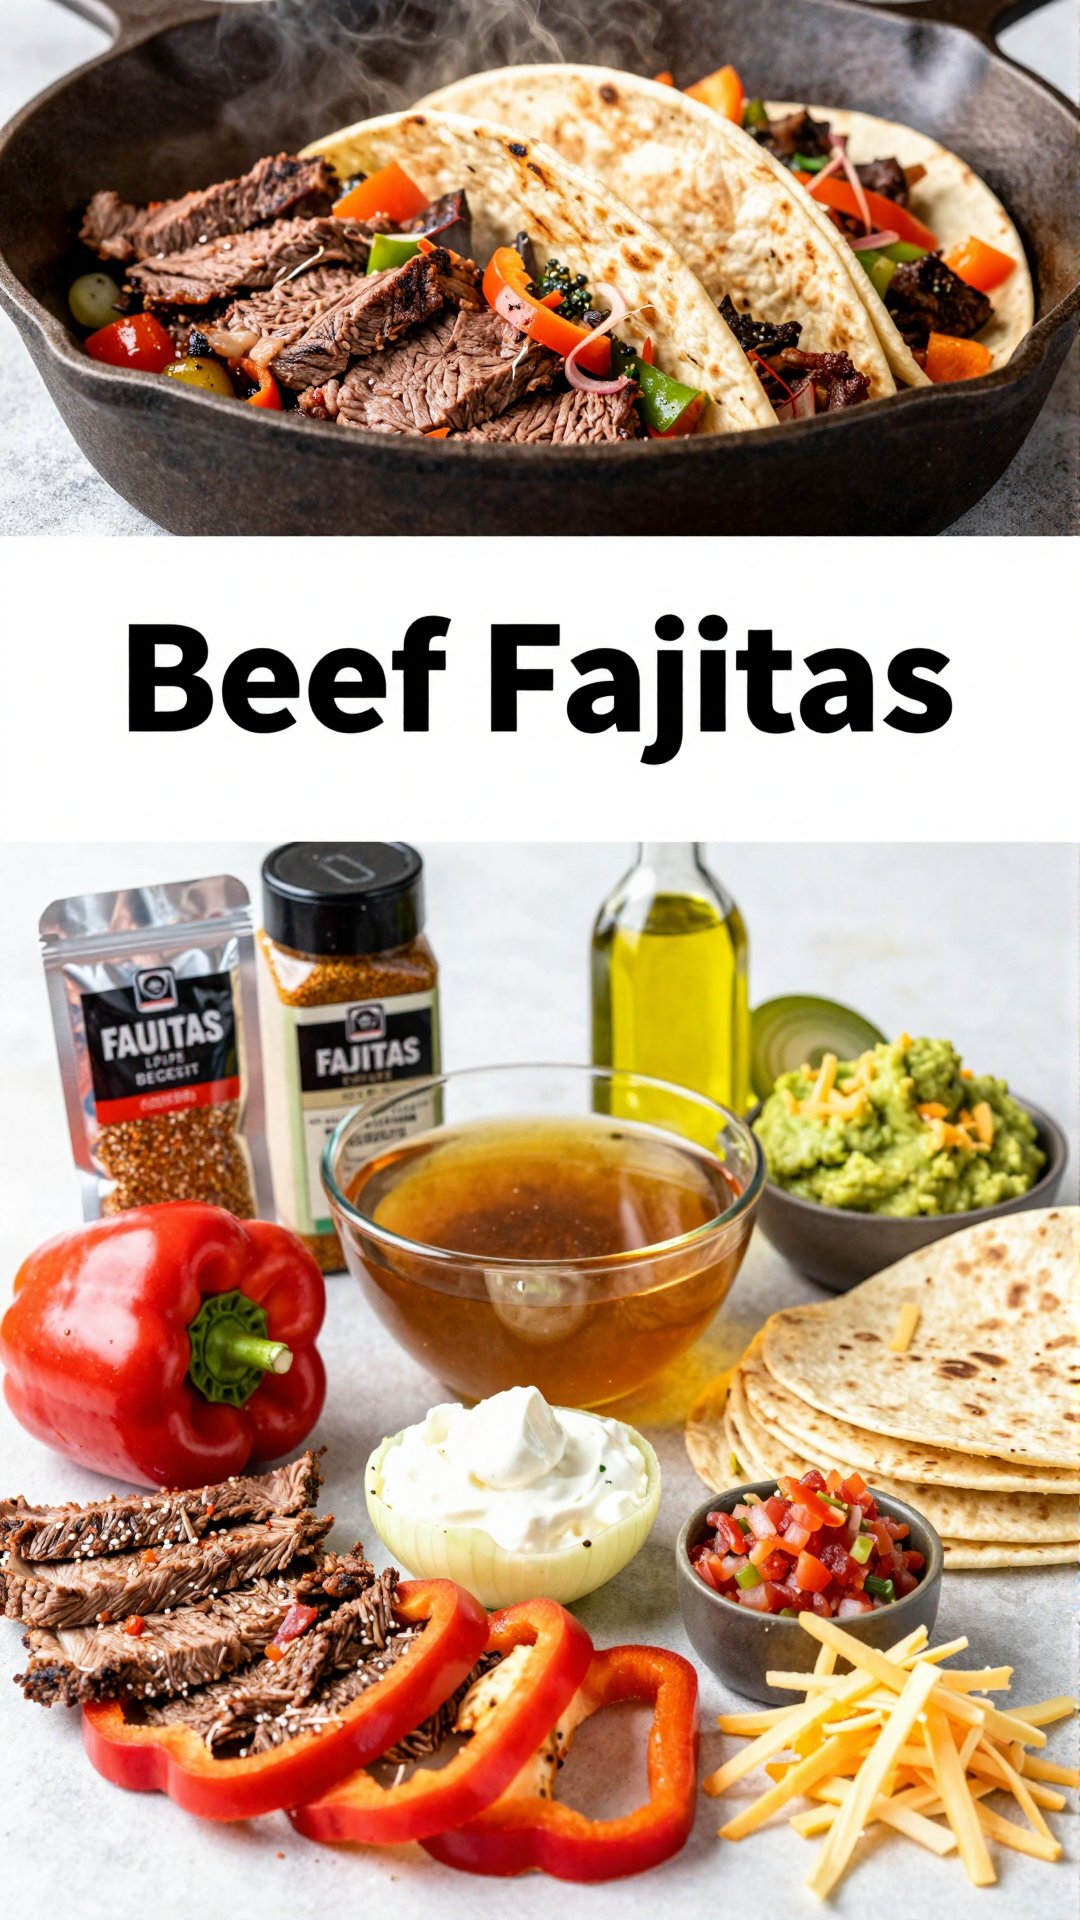
  • ‘2 tbsp lime juice (about 1 lime)’
  • ‘2 tsp chili powder’
  • ‘1 tsp ground cumin’
  • ‘1 tsp smoked paprika’
  • ‘0.5 tsp garlic powder’
  • ‘0.5 tsp onion powder’
  • ‘0.5 tsp dried oregano’
  • ‘1 tsp salt’
  • ‘0.5 tsp black pepper’
  • ‘8 small flour or corn tortillas, warmed’
  • ‘Lime wedges’
  • ‘Fresh cilantro, chopped’
  • ‘Optional: sour cream, salsa, sliced avocado, shredded cheese’
Recipe Image

How to Make Sheet Pan Steak Fajitas: Step-by-Step

Alright, let’s get cooking! Here’s a breakdown of how to make these amazing sheet pan steak fajitas:

  1. Prep the Oven and Pan: Preheat your oven to 425°F (220°C). Line a large sheet pan with parchment paper for easy cleanup, or lightly grease it with cooking spray.
  2. Make the Marinade: In a large bowl, whisk together the olive oil, lime juice, chili powder, cumin, smoked paprika, garlic powder, onion powder, oregano, salt, and black pepper. This marinade is the secret to the incredible flavor of these fajitas.
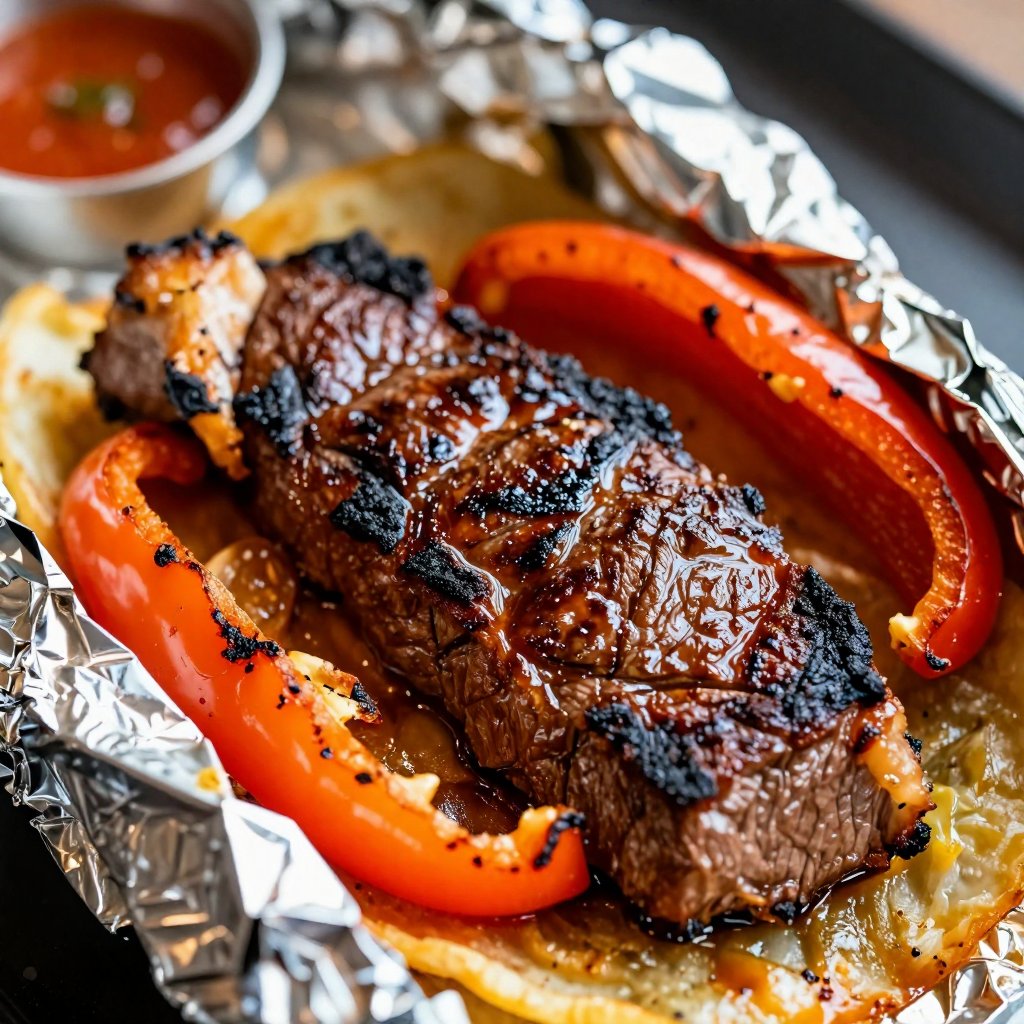
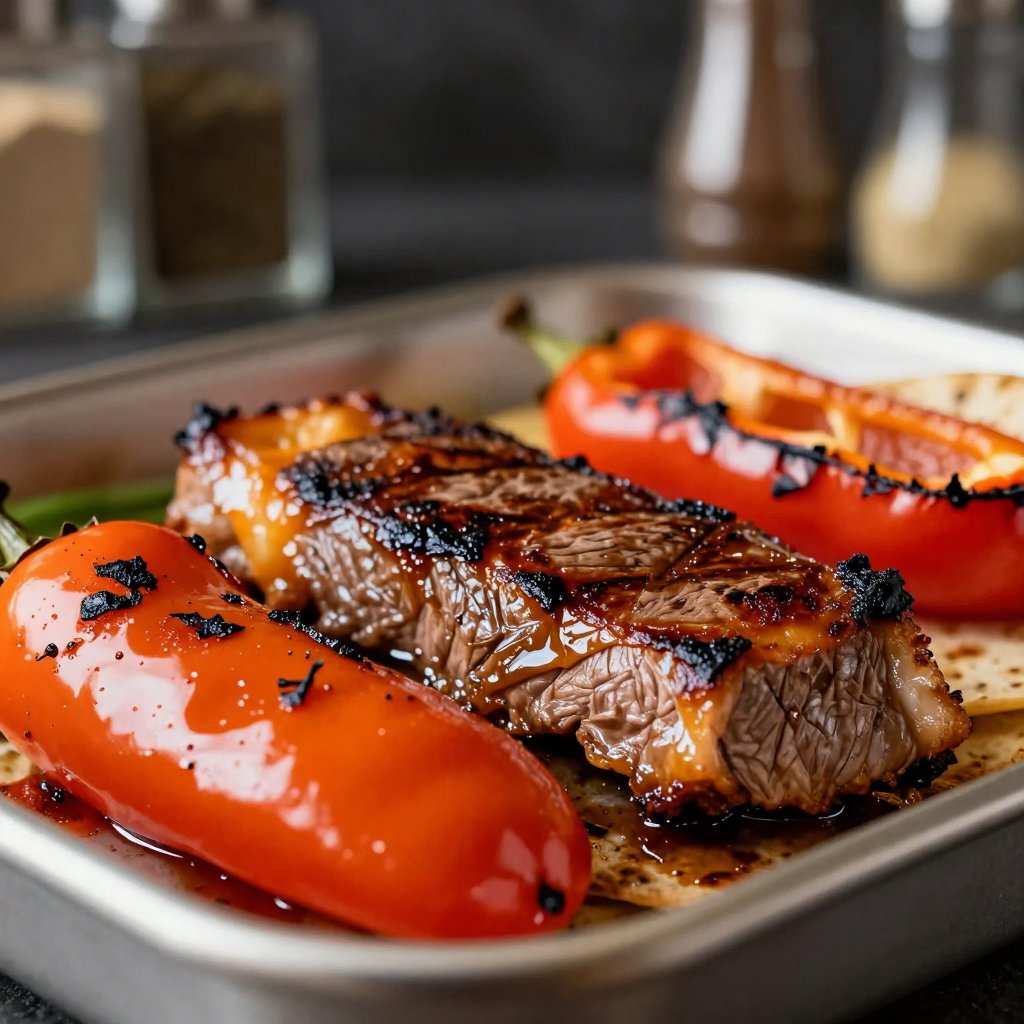
  3. Combine Ingredients: Add the sliced steak, bell peppers (red, yellow, and green for a colorful mix!), and red onion to the bowl with the marinade. Toss everything thoroughly to make sure the steak and vegetables are evenly coated.
  4. Arrange on Sheet Pan: Spread the steak and vegetables in a single layer on the prepared sheet pan. Try not to overcrowd the pan, as this can steam the vegetables instead of roasting them.
  5. Roast to Perfection: Roast in the preheated oven for 18 to 20 minutes, stirring halfway through. You’ll know they’re ready when the steak is cooked through and the vegetables are tender and slightly caramelized. The peppers and onions all should be tender and slightly charred.
  6. Warm Tortillas: While the fajitas are roasting, warm your tortillas. You can do this in a dry skillet, in the microwave, or wrapped in foil in the oven.
  7. Serve and Enjoy: Serve the cooked steak and vegetables with the warmed tortillas. Garnish with fresh cilantro and lime wedges. And don’t forget your favorite toppings!

Pro Tips for the Best Sheet Pan Steak Fajitas

Want to take your sheet pan steak fajitas to the next level? Here are a few of my favorite pro tips:

  • Choose the Right Steak: Flank steak or sirloin are both great choices for fajitas. Make sure to slice the steak thinly against the grain for maximum tenderness.
  • Don’t Overcrowd the Pan: Overcrowding the sheet pan will steam the vegetables instead of roasting them. If necessary, use two sheet pans to ensure everything cooks properly.
  • Marinate for Extra Flavor: While not essential, marinating the steak for 30 minutes to an hour before roasting will enhance the flavor.
  • Use Fresh Lime Juice: Fresh lime juice makes a huge difference in the flavor of the marinade.
  • Preheat the Pan: For even better caramelization, preheat the sheet pan in the oven for a few minutes before adding the steak and vegetables.

I learned the hard way about overcrowding the pan. The first time I made these, I piled everything on, and the vegetables ended up soggy. Now, I always make sure to spread everything out in a single layer, and the results are so much better!

Common Mistakes to Avoid

Even the easiest recipes can have pitfalls. Here are a few common mistakes to watch out for:

  • Overcooking the Steak: The steak should be cooked to medium-rare or medium for the best texture. Overcooked steak will be tough and dry.
  • Not Slicing Against the Grain: Slicing the steak with the grain will result in chewy, tough fajitas. Always slice against the grain to break up the muscle fibers.
  • Skipping the Marinade: The marinade is essential for adding flavor and tenderizing the steak. Don’t skip it!
  • Using Dull Spices: Make sure your spices are fresh for the best flavor.

That s when I realized the importance of using a meat thermometer! Now, I always check the internal temperature of the steak to make sure it’s cooked perfectly.

Variations on Sheet Pan Steak Fajitas

Want to mix things up? Here are a few fun variations on this recipe:

  • Chicken Fajitas: Substitute chicken breast or thighs for the steak.
  • Shrimp Fajitas: Use shrimp instead of steak for a lighter option.
  • Vegetarian Fajitas: Omit the steak and add extra vegetables, such as zucchini, squash, or mushrooms.
  • Spicy Fajitas: Add a pinch of cayenne pepper or a chopped jalapeño to the marinade for extra heat.
  • Different Vegetables: Feel free to experiment with different vegetables, such as poblano peppers, mushrooms, or even sweet potatoes.

One time, I added pineapple to the sheet pan, and it was a surprisingly delicious addition! The sweetness of the pineapple paired perfectly with the savory steak and spices.

How to Store and Reheat Leftovers

If you have any leftovers (which is rare in my house!), here’s how to store and reheat them:

  • Storage: Store the cooked steak and vegetables in an airtight container in the refrigerator for up to 3 days.
  • Reheating: Reheat in a skillet over medium heat until warmed through. You can also reheat in the microwave, but the steak may become a bit tougher.
  • Freezing: While you can freeze the cooked steak and vegetables, the texture may change upon thawing. If you do freeze them, store in an airtight container for up to 2 months.

I ve found that adding a little bit of water or broth to the skillet when reheating helps to keep the steak moist.

Frequently Asked Questions (FAQ)

Got questions? I’ve got answers! Here are some of the most common questions I get about this recipe:

  • Can I use a different type of steak? Yes, you can use other cuts of steak, such as skirt steak or ribeye. Just make sure to slice it thinly against the grain.
  • Can I make this ahead of time? You can prep the vegetables and marinade ahead of time. Store them separately in the refrigerator until ready to cook.
  • Can I use frozen vegetables? While fresh vegetables are best, you can use frozen vegetables in a pinch. Just make sure to thaw them completely and pat them dry before adding them to the sheet pan.
  • How do I know when the steak is cooked? Use a meat thermometer to check the internal temperature of the steak. Medium-rare is 130-135°F, medium is 135-140°F.
  • Can I grill the steak and vegetables instead of roasting them? Absolutely! Grill the steak over medium-high heat until cooked to your liking. Grill the vegetables until tender-crisp.

When I first started making these, I was always worried about overcooking the steak. But after a few tries, I got the hang of it, and now it’s a breeze!

Serving Suggestions for Sheet Pan Steak Fajitas

These Sheet Pan Steak Fajitas are delicious on their own, but here are a few ideas for how to serve them:

  • Classic Fajitas: Serve with warm tortillas, sour cream, salsa, guacamole, shredded cheese, and chopped cilantro.
  • Fajita Bowls: Create a fajita bowl with rice, black beans, corn, and your favorite toppings.
  • Fajita Salad: Top a bed of lettuce with the steak and vegetables, and add a dollop of sour cream and salsa.
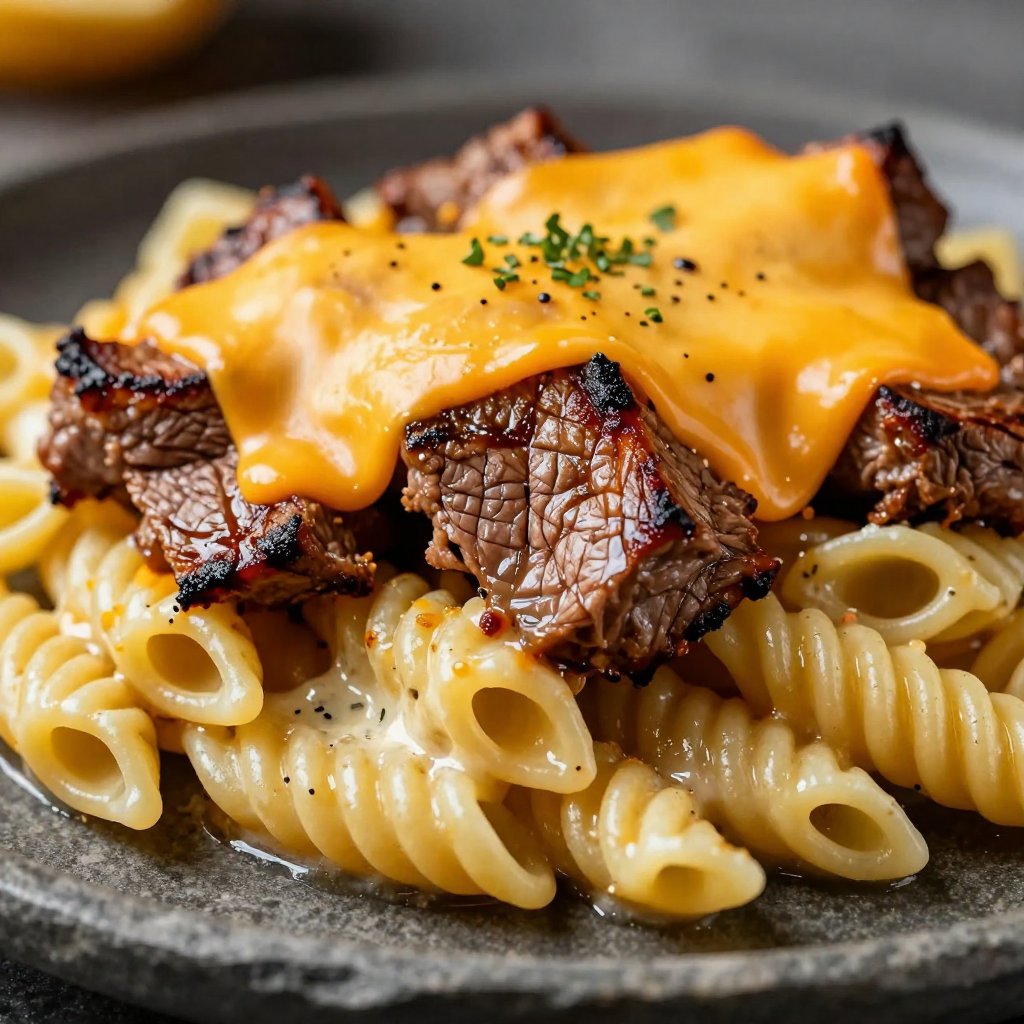
  • Fajita Nachos: Layer tortilla chips with the steak and vegetables, and top with melted cheese and your favorite toppings.

I love serving these with a side of Mexican rice and a refreshing margarita. It’s the perfect way to transport yourself to a sunny beach, even on a rainy Seattle evening.

So there you have it! My go-to recipe for Sheet Pan Steak Fajitas. I hope you love them as much as my family does. And remember, cooking is all about having fun and experimenting. So don’t be afraid to get creative and make this recipe your own. Happy cooking!

These fajitas feel like a warm hug. They make you feel like you re eating something people actually wanted to eat, because it s the best and because you can make them. That s what makes me love cooking. I hope it makes you feel the same.

Sheet Pan Steak Fajitas

Prep Time 15 minutes
Cook Time 20 minutes
Total Time 35 minutes
Servings 4 people
Calories 450
Enjoy a quick and easy weeknight dinner with these flavorful sheet pan steak fajitas. Tender steak and colorful bell peppers are roasted to perfection and served with warm tortillas and your favorite toppings.

Ingredients

Main Ingredients

  • 1.5 lbs flank steak or sirloin (thinly sliced against the grain)
  • 3 bell peppers (red, yellow, green, seeded and sliced)
  • 1 large red onion (peeled and sliced)

Marinade

  • 3 tbsp olive oil
  • 2 tbsp lime juice (about 1 lime)
  • 2 tsp chili powder
  • 1 tsp ground cumin
  • 1 tsp smoked paprika
  • 0.5 tsp garlic powder
  • 0.5 tsp onion powder
  • 0.5 tsp dried oregano
  • 1 tsp salt
  • 0.5 tsp black pepper

Serving

  • 8 small flour or corn tortillas (warmed)
  • Lime wedges
  • Fresh cilantro (chopped)
  • sour cream, salsa, sliced avocado, shredded cheese (Optional)

Instructions 

  • Preheat oven to 425°F. Line a sheet pan with parchment paper or grease it.
  • Whisk together olive oil, lime juice, chili powder, cumin, smoked paprika, garlic powder, onion powder, oregano, salt, and pepper.
  • Add steak, bell peppers, and red onion to the bowl. Toss to coat.
  • Spread the steak and vegetables in a single layer on the sheet pan.
  • Roast for 18-20 minutes, stirring halfway, until steak is cooked and vegetables are tender.
  • Warm tortillas. Serve steak and vegetables with tortillas, cilantro, and lime wedges. Add desired toppings.

Notes

For extra flavor, marinate the steak for at least 30 minutes before cooking.
Calories: 450kcal
Cost: $20
Course: dinner
Cuisine: Mexican
Keyword: Steak
pin

Hey there, burger aficionados! Ava here, and today we’re diving headfirst into the delicious world of homemade hamburger seasoning. More specifically, we’re tackling a recipe inspired by one of my all-time favorite burger joints: Five Guys. If you’ve ever craved that simple, yet utterly addictive flavor from their burgers, you’re in the right place. I’m going to show you how to recreate it in your own kitchen. Trust me, this is a game-changer. You’re about to level up your burger game!

Growing up, burgers were a staple at our family barbecues. My dad always had his secret blend of spices, but I was never quite satisfied. I wanted something more… something that would make my burgers sing. It wasn’t until I tasted a Five Guys burger that I knew I’d found my muse. The simplicity, the perfect balance of salt, pepper, and just a hint of something special. So, I did what any self-respecting food lover would do: I reverse-engineered it! And after many trials (and many delicious burgers), I cracked the code. This is it, folks. The Five Guys-inspired hamburger seasoning recipe that will make your taste buds do a happy dance.

Why You’ll Love This Hamburger Seasoning

Okay, let’s get down to brass tacks. Why should you bother making your own hamburger seasoning when you can just grab a pre-made blend from the store? Here’s why:

  • Control: You get to control every single ingredient. No weird additives, no excessive salt, just pure, unadulterated flavor.
  • Customization: Want a little more heat? Add a pinch of cayenne pepper. Craving a smoky flavor? Bump up the smoked paprika. This recipe is your canvas.
  • Freshness: Nothing beats the taste of freshly ground spices. The aroma alone will make you swoon.
  • It’s Easy!: Seriously, this recipe takes about 5 minutes to whip up. And it makes a big batch, so you’ll have plenty on hand for all your burger needs.

Plus, let’s be honest, there’s something incredibly satisfying about making something from scratch. It makes you feel like a culinary wizard, even if you’re just mixing a few spices together. And when you bite into that perfectly seasoned burger, you’ll know it was worth every second. Whether you’re a seasoned grill master or a newbie in the kitchen, this recipe is for you. It’s simple, straightforward, and guaranteed to deliver mouthwatering results. So, let’s get started!

Five Guys Hamburger Seasoning Ingredients

Here’s what you’ll need to create this magical blend:

  • 1 tablespoon kosher salt
  • 1 tablespoon ground black pepper
  • 1 teaspoon garlic powder
  • ½ teaspoon onion powder
  • ½ teaspoon smoked paprika (optional for added depth)
  • ¼ teaspoon ground mustard (optional for subtle tang)

A quick note on the ingredients: I highly recommend using kosher salt for this recipe. It has a cleaner, brighter flavor than regular table salt. As for the smoked paprika, it’s optional, but it adds a lovely depth of flavor that I personally adore. If you’re not a fan, feel free to leave it out. And if you’re feeling adventurous, try experimenting with different types of paprika – sweet, hot, or even Hungarian. The possibilities are endless!

Recipe Image

How to Make Five Guys Hamburger Seasoning: Step-by-Step

Alright, let’s get down to business. Here’s how to make this incredible hamburger seasoning, step-by-step:

  1. Mix the seasoning blend

    In a small bowl, combine salt, pepper, garlic powder, onion powder, paprika, and ground mustard (if using). Stir until fully combined.

  2. Store or use immediately

    Transfer the seasoning to an airtight container if storing for later, or set aside to use right away on your burgers.

  3. Form your patties

    Shape ground beef into 4-ounce patties, handling it gently to avoid overworking. Press a small dimple in the center of each to prevent puffing during cooking.

  4. Season the patties

    Just before cooking, sprinkle a generous pinch of seasoning on both sides of each patty. Press it in lightly.

  5. Cook to perfection

    Grill or cook the patties over medium-high heat for about 3–4 minutes per side, or until your preferred doneness. Add cheese during the last minute if desired.

  6. Assemble and serve

    Place the cooked burgers on toasted buns with your favorite toppings — lettuce, tomato, pickles, onions, ketchup, and mustard. Serve immediately.

See? I told you it was easy! Now, let’s talk about some pro tips to take your burger game to the next level.

Pro Tips for the Perfect Burger

Here are a few insider tips to ensure your burgers are nothing short of spectacular:

  • Use High-Quality Beef: This is crucial. Look for ground beef with a fat content of around 80/20. The fat is what makes the burgers juicy and flavorful. The meat will thank you.
  • Don’t Overwork the Meat: Overworking the ground beef will result in tough, dry burgers. Handle it gently and mix it as little as possible.
  • Make a Dimple: Press a small dimple in the center of each patty before cooking. This will prevent them from puffing up like little footballs.
  • Season Generously: Don’t be shy with the seasoning! The more, the merrier (within reason, of course).
  • Let the Meat Rest: After cooking, let the burgers rest for a few minutes before serving. This will allow the juices to redistribute, resulting in a juicier burger.

These tips might seem small, but they can make a world of difference in the final product. Trust me, your taste buds will thank you.

Common Mistakes to Avoid

We all make mistakes in the kitchen, it’s how we learn! Here are some common burger-making blunders to watch out for:

  • Overcooking the Burgers: Nobody likes a dry, hockey-puck burger. Use a meat thermometer to ensure they’re cooked to your preferred doneness.
  • Using Too Lean Ground Beef: Lean ground beef might seem healthier, but it will result in dry, flavorless burgers. Opt for 80/20 for the best results.
  • Skipping the Toasted Bun: A toasted bun adds texture and prevents the burger from becoming soggy. Don’t skip this step!
  • Forgetting the Condiments: Ketchup, mustard, mayo… they’re all essential for a truly satisfying burger experience.

Remember that infamous triple-layer cake I mentioned earlier? Well, I overcooked the layers, used the wrong type of flour, and forgot the frosting. It was a disaster! But I learned from my mistakes, and now I can whip up a triple-layer cake that would make even Martha Stewart jealous. The same goes for burgers. Learn from your mistakes, and you’ll be a burger-making pro in no time.

Hamburger Seasoning Variations

Okay, now for the fun part: variations! This recipe is a fantastic base, but feel free to get creative and add your own personal touch. Here are a few ideas to get you started:

  • Spicy Burger: Add a pinch of cayenne pepper or red pepper flakes for a little heat.
  • Smoked Burger: Use all smoked paprika instead of regular paprika for an extra smoky flavor.
  • Herbaceous Burger: Add a teaspoon of dried oregano, thyme, or rosemary for an herbaceous twist.
  • Sweet and Savory Burger: Add a teaspoon of brown sugar for a touch of sweetness.

Don’t be afraid to experiment! Cooking is all about having fun and discovering new flavors. Try different combinations of spices and herbs until you find your perfect blend.

How to Store Hamburger Seasoning

Proper storage is key to keeping your hamburger seasoning fresh and flavorful. Here’s what you need to know:

  • Airtight Container: Store the seasoning in an airtight container to prevent it from losing its potency.
  • Cool, Dark Place: Keep the container in a cool, dark place away from direct sunlight and heat.
  • Shelf Life: When stored properly, this seasoning will last for up to months.

I like to use a small mason jar with a tight-fitting lid. It’s cute, functional, and keeps the seasoning fresh for a long time. Plus, it looks great on my spice rack!

Frequently Asked Questions (FAQ)

Got questions? I’ve got answers! Here are some frequently asked questions about hamburger seasoning:

  • Can I use this seasoning on other meats?: Absolutely! This seasoning is fantastic on chicken, pork, and even fish.
  • Can I make a bigger batch?: Of course! Simply double, triple, or quadruple the recipe as needed.
  • Is this seasoning gluten-free?: Yes, this seasoning is naturally gluten-free.
  • Can I use fresh garlic instead of garlic powder?: While you can, the texture will be different. Fresh garlic is best used in the burger patty itself, not the seasoning blend.

If you have any other questions, feel free to ask in the comments below! I’m always happy to help.

Serving Suggestions

Now that you’ve made the perfect hamburger seasoning, it’s time to put it to good use! Here are a few serving suggestions to get your creative juices flowing:

  • Classic Burger: Serve the burgers on toasted buns with lettuce, tomato, onion, pickles, ketchup, and mustard.
  • Cheeseburger: Add a slice of your favorite cheese (cheddar, Swiss, or provolone are all great choices) during the last minute of cooking.
  • Bacon Cheeseburger: Add a few strips of crispy bacon for an extra layer of flavor.
  • Gourmet Burger: Top the burgers with caramelized onions, sautéed mushrooms, and a dollop of aioli.

No matter how you choose to serve them, these burgers are guaranteed to be a hit. They’re perfect for backyard barbecues, family dinners, or even a quick weeknight meal. And with this incredible hamburger seasoning, you’ll be able to recreate the iconic Five Guys flavor right in your own kitchen. Enjoy!

This seasoning makes a fantastic base for smash burger seasoning recipe. It’s also great for grilled hamburger seasoning recipes. Remember, the key is to season the beef just before cooking. You can store it for up to months in an airtight container. This seasoning is not just for Five Guys copycats; it’s the best hamburger patties seasoning. Whether you’re grilling or using a griddle, this seasoning will transform the beef. A big part of the flavor comes from salt pepper, garlic powder, and onion powder. This is hamburger seasoning recipe burgers will love. Try it on your next burger patty!

Five Guys Hamburger Seasoning Recipe

Prep Time 5 minutes
Cook Time 10 minutes
Total Time 15 minutes
Servings 6 burgers
Calories 15
Recreate the iconic Five Guys burger flavor at home with this simple seasoning blend. Perfect for adding a delicious kick to your homemade burgers.

Ingredients

Seasoning Blend

  • 1 tablespoon kosher salt
  • 1 tablespoon ground black pepper
  • 1 teaspoon garlic powder
  • 0.5 teaspoon onion powder
  • 0.5 teaspoon smoked paprika (optional for added depth)
  • 0.25 teaspoon ground mustard (optional for subtle tang)

Instructions 

  • Mix the seasoning blend
  • Store or use immediately
  • Form your patties
  • Season the patties
  • Cook to perfection
  • Assemble and serve

Notes

Adjust seasoning to taste. For a spicier kick, add a pinch of cayenne pepper.
Calories: 15kcal
Cost: $5
Course: Main Course
Cuisine: American
Keyword: Beef
pin

Easy Sheet Pan Steak Fajitas Recipe: A Weeknight Fiesta!

Hey there, kitchen adventurers! Ava here, ready to whisk you away on a culinary journey that’s as simple as it is sensational. If you’re anything like me, weeknights are a whirlwind of activity, and the last thing you want is a complicated dinner routine. That’s where this Easy Sheet Pan Steak Fajitas recipe comes in to save the day! It’s the perfect solution for a quick, delicious, and crowd-pleasing meal that will have everyone asking for seconds. Forget the complicated steps and mountains of dishes – we’re keeping it easy and flavorful!

Growing up, fajitas were always a special occasion meal. My mom would spend hours marinating the steak, chopping vegetables, and prepping all the fixings. While I loved the result, I always thought there had to be an easier way. And guess what? I found it! This sheet pan method simplifies the process without sacrificing any of that authentic fajita flavor. It’s a game-changer, trust me.

In Seattle, where I live now, finding fresh ingredients is a breeze, which makes this recipe even more enjoyable. The vibrant colors of the bell peppers and onions, combined with the sizzle of the steak, create a dish that’s as visually appealing as it is delicious. So, let’s dive in and make some magic happen!

Why You’ll Love This Sheet Pan Steak Fajitas Recipe

Okay, let’s get real. Why should you spend your precious time making this recipe? Here’s why:

  • Quick and Easy: From prep to plate, this meal is ready in under 30 minutes. Seriously, you can have dinner on the table faster than you can order takeout.
  • Minimal Cleanup: One sheet pan means fewer dishes. Hallelujah!
  • Customizable: Add your favorite veggies, adjust the spice level, and load up on your favorite toppings. This recipe is a blank canvas for your culinary creativity.
  • Flavor Explosion: The combination of tender steak, caramelized vegetables, and zesty spices creates a flavor profile that will tantalize your taste buds.
  • Healthy and Wholesome: Packed with protein and veggies, this is a meal you can feel good about serving your family.

I’m always looking for ways to make my life easier without sacrificing flavor, and this recipe does just that. Plus, it’s a great way to use up any leftover vegetables you have in the fridge. It’s a win-win!

Ingredients You’ll Need

Here’s what you’ll need to create this amazing sheet pan feast:

  • 2 lbs skirt or flank steak (diced into 1 inch pieces)
  • 1 large red bell pepper (sliced thinly (about 1/4 inch thick))
  • 1 small yellow onion (peeled and sliced thinly, about 1/4 inch thick)
  • 4 1/2 tsp ground chili powder
  • 1 1/2 tsp ground cumin
  • 1 1/2 tsp smoked paprika
  • 1 tsp dried oregano
  • 3/4 tsp garlic powder
  • 1/2 tsp onion powder
  • 1/4 tsp cayenne powder
  • 1 tbsp kosher salt
  • 2 tbsp extra virgin olive oil
  • 2 tbsp fresh lime juice
  • 3 tbsp scallions (finely chopped)
  • flour or corn tortillas (for serving)
  • sour cream (for serving)
  • guacamole (for serving)
  • salsa (for serving)
  • cilantro-lime rice (for serving)
Recipe Image

Step-by-Step Instructions: Let’s Get Cooking!

Ready to transform these ingredients into a mouthwatering meal? Follow these simple steps:

  1. Preheat the oven: Get that oven roaring at 375°F (190°C).
  2. Prep the veggies and steak: In a large bowl, add the steak, bell pepper, and onion. Make sure the steak is diced and the vegetables are thinly sliced for even cooking.
  3. Mix the spices: In a small bowl, add all of the spices and salt. Whisk to combine. This ensures that the spices are evenly distributed.
  4. Marinate: Pour extra virgin olive oil and 4 tablespoons of the fajita mixture onto the steak and vegetables. Toss until well-coated. Let sit at room temperature for at least 20 minutes. This step is crucial for infusing the steak and vegetables with flavor.
  5. Bake: Line a sheet pan with foil or parchment paper for easy cleanup. Spread the steak and vegetables in a single layer. Bake until the steak is cooked and browned on the outside, about 10 to 12 minutes. Use a meat thermometer to check the internal temperature of the steak. Aim for about 130-135°F for medium-rare and 145°F for medium. Stir once halfway through cooking to ensure even browning.
  6. Finish and serve: Just before serving, toss the steak and vegetables with fresh lime juice and scallions. Serve in warmed tortillas with your favorite toppings like sour cream, guacamole, salsa, cheese, and rice.

And there you have it! A delicious and easy meal that’s perfect for any night of the week. The aroma alone will have your family rushing to the table.

Pro Tips for Sheet Pan Steak Fajitas Perfection

Want to take your sheet pan steak fajitas to the next level? Here are a few pro tips that I’ve learned over the years:

  • Use high heat: While the recipe calls for 375F, you can broil for the last few minutes to get extra char.
  • Don’t overcrowd the pan: Make sure the steak and vegetables are spread out in a single layer. Overcrowding will cause them to steam instead of roast, resulting in soggy fajitas. If needed, use two sheet pans.
  • Marinate for at least 20 minutes: The longer you marinate, the more flavorful your fajitas will be. If you have time, marinate for a few hours in the refrigerator.
  • Use a meat thermometer: This is the best way to ensure that your steak is cooked to your desired level of doneness.
  • Warm your tortillas: Warm tortillas are softer and more pliable, making them easier to fill and roll. You can warm them in a dry skillet, in the microwave, or in the oven.

These tips are like little secrets that can elevate your cooking from good to great. Trust me, they make a difference!

Common Mistakes to Avoid

We all make mistakes in the kitchen, but knowing what to avoid can save you time and frustration. Here are a few common mistakes to watch out for when making sheet pan steak fajitas:

  • Not preheating the oven: A hot oven is essential for achieving that perfect sear on the steak and caramelization on the vegetables.
  • Using the wrong cut of steak: Tougher cuts of steak, like sirloin, can become dry and chewy when cooked on a sheet pan. Skirt or flank steak are your best bets.
  • Overcooking the steak: Overcooked steak is tough and dry. Use a meat thermometer to monitor the internal temperature and pull it out of the oven when it’s just a few degrees shy of your desired doneness. It will continue to cook as it rests.
  • Skipping the marinade: The marinade is what infuses the steak and vegetables with flavor. Don’t skip it!
  • Adding too much liquid to the sheet pan: Too much liquid will cause the steak and vegetables to steam instead of roast. Drain any excess marinade before spreading them on the sheet pan.

I’ve made all of these mistakes at one point or another (yes, even me!), so don’t feel bad if you do too. Just learn from them and keep practicing!

Variations: Spice It Up!

Want to put your own spin on this recipe? Here are a few variations to get you started:

  • Add different vegetables: Try adding sliced bell peppers (green, orange, or yellow), mushrooms, zucchini, or corn.
  • Adjust the spice level: If you like it hot, add more cayenne pepper or a pinch of chili flakes to the spice mixture. If you prefer a milder flavor, reduce the amount of chili powder.
  • Use different protein: Chicken, shrimp, or tofu can be used in place of steak. Adjust the cooking time accordingly.
  • Make it vegetarian: Use a combination of hearty vegetables like cauliflower, broccoli, and sweet potatoes. Add a can of black beans for extra protein.
  • Add a smoky flavor: Use smoked salt or liquid smoke to enhance the smoky flavor of the fajitas.

Don’t be afraid to experiment and create your own signature version of this recipe. Cooking is all about having fun and making it your own!

How to Store and Reheat Leftovers

If you have any leftovers (which is rare in my house!), here’s how to store and reheat them:

  • Storage: Store leftover steak and vegetables in an airtight container in the refrigerator for up to 3 days.
  • Reheating: Reheat in a skillet over medium heat until warmed through. You can also reheat them in the microwave, but they may become a little soggy.
  • Serving suggestions: Leftover steak and vegetables can be used in tacos, salads, or omelets. They’re also great on top of rice or quinoa.

I often make a double batch of this recipe so that I have leftovers for lunch the next day. It’s a delicious and convenient way to enjoy a healthy meal on the go.

Frequently Asked Questions (FAQ)

Got questions? I’ve got answers! Here are a few frequently asked questions about sheet pan steak fajitas:

  • Can I use frozen steak? Yes, but make sure to thaw it completely before marinating.
  • Can I make this recipe ahead of time? You can prep the vegetables and mix the spices ahead of time, but I recommend marinating the steak just before cooking.
  • What kind of tortillas should I use? Flour or corn tortillas work well. Choose your favorite!
  • Can I grill the steak and vegetables instead of baking them? Absolutely! Grill them over medium-high heat until cooked through.
  • Can I add cheese to my fajitas? Of course! Shredded cheddar, Monterey Jack, or pepper jack cheese are all great options.

If you have any other questions, feel free to leave a comment below. I’m always happy to help!

Serving Suggestions: Complete the Fiesta!

No fajita feast is complete without the right accompaniments. Here are a few of my favorite serving suggestions:

  • Sour cream: A dollop of sour cream adds a cool and creamy contrast to the spicy fajitas.
  • Guacamole: Creamy and flavorful, guacamole is a must-have for any fajita meal.
  • Salsa: Choose your favorite salsa, from mild to hot, to add a burst of flavor.
  • Cilantro-lime rice: This fragrant rice is the perfect side dish for fajitas.
  • Shredded cheese: Cheddar, Monterey Jack, or pepper jack cheese adds a cheesy goodness to your fajitas.
  • Pico de gallo: Fresh and vibrant, pico de gallo adds a zesty kick to your meal.

I love setting up a fajita bar with all of these toppings and letting everyone customize their own creations. It’s a fun and interactive way to enjoy a meal together.

And that’s a wrap on our Easy Sheet Pan Steak Fajitas adventure! I hope you enjoy this recipe as much as I do. Remember, cooking is all about experimenting, having fun, and creating memories. So, gather your ingredients, put on some music, and let’s get cooking!

Until next time, happy cooking!

Sheet Pan Steak Fajitas Recipe

Prep Time 20 minutes
Cook Time 12 minutes
Total Time 32 minutes
Servings 6 servings
Calories 450
Enjoy delicious and easy steak fajitas made on a sheet pan! This recipe is perfect for a quick weeknight dinner.

Ingredients

Fajita Ingredients

  • 2 lbs skirt or flank steak (diced into 1 inch pieces)
  • 1 large red bell pepper (sliced thinly (about 1/4 inch thick))
  • 1 small yellow onion (peeled and sliced thinly, about 1/4 inch thick)
  • 4.5 tsp ground chili powder
  • 1.5 tsp ground cumin
  • 1.5 tsp smoked paprika
  • 1 tsp dried oregano
  • 0.75 tsp garlic powder
  • 0.5 tsp onion powder
  • 0.25 tsp cayenne powder
  • 1 tbsp kosher salt
  • 2 tbsp extra virgin olive oil
  • 2 tbsp fresh lime juice
  • 3 tbsp scallions (finely chopped)

Serving Ingredients

  • flour or corn tortillas (for serving)
  • sour cream (for serving)
  • guacamole (for serving)
  • salsa (for serving)
  • cilantro-lime rice (for serving)

Instructions 

  • Preheat the oven to 375 F.
  • In a large bowl, add steak, bell pepper and onion.
  • In a small bowl, add all of the spices and salt and whisk to combine.
  • Pour extra virgin olive oil and 4 tablespoons fajita mixture onto steak and vegetables and toss until well-coated. Let sit at room temperature for at least 20 minutes.
  • Line a sheet pan with foil or parchment paper and spread steak and vegetables into single layer. Bake until steak is cooked until browned on the outside, about 10 to 12 minutes. Use a meat thermometer to check the internal temperature of the steak. Aim for about 130-135F for medium-rare and 145F for medium. Stir once halfway through cooking.
  • Just before serving, toss steak and vegetables with fresh lime juice and scallions. Serve in warmed tortillas with sour cream, guacamole, salsa, cheese and rice.

Notes

For extra flavor, marinate the steak for a longer period, up to 4 hours in the refrigerator.
Calories: 450kcal
Cost: $25
Course: dinner
Cuisine: Mexican
Keyword: Steak
pin

Hey there, fellow food lovers! Ava here, back in my Seattle kitchen, and today I’m beyond excited to share one of my absolute go-to recipes for a quick, easy, and utterly delicious weeknight meal: Sheet Pan Steak Fajitas. If you’re anything like me, you’re always on the lookout for recipes that don’t require a ton of fuss but still deliver big on flavor. And trust me, this one checks all the boxes. Growing up, fajitas were always a special treat, a vibrant explosion of flavors and textures that made any dinner feel like a fiesta. Now, I’ve streamlined the process to make it even simpler, perfect for busy weeknights or casual get-togethers. I’m so glad to be sharing this recipe with you!

This recipe is not only incredibly tasty, but it’s also a fantastic way to get a healthy and balanced meal on the table in under 30 minutes. It’s packed with lean protein, colorful veggies, and just the right amount of spice. Plus, the sheet pan method means minimal cleanup – which, let’s be honest, is always a win in my book. So, grab your apron, preheat that oven, and let’s get cooking!

Why You’ll Love This Sheet Pan Steak Fajitas Recipe

Okay, let’s dive into why this recipe is about to become your new favorite. I mean, who doesn’t love fajitas? But these aren’t just any fajitas; they’re sheet pan fajitas, which means maximum flavor with minimal effort. Think tender flank steak, perfectly charred peppers and onions, all infused with a smoky, slightly spicy seasoning blend. Seriously, what’s not to love?

  • Quick and Easy: From prep to plate, this recipe comes together in about 30 minutes. Perfect for busy weeknights!
  • Minimal Cleanup: One sheet pan means less dishwashing. Hallelujah!
  • Customizable: Easily adjust the spice level and toppings to suit your preferences.
  • Healthy and Balanced: Packed with lean protein and colorful vegetables.
  • Incredible Flavor: The combination of the steak, peppers, onions, and spices is simply irresistible.

I used to think making restaurant-quality fajitas at home was a daunting task, but this recipe proves that it’s totally achievable. The key is to use high-quality ingredients and to not overcrowd the sheet pan. Trust me, once you try this, you’ll never go back to ordering takeout again. Thank you so much for joining me on this culinary adventure!

Sheet Pan Steak Fajitas Ingredients

Let’s gather our ingredients. Freshness is key here, so try to use the best quality steak and veggies you can find. If you’re looking for a tender flank steak recipes oven, you’ve come to the right place!

  • 2 teaspoons chili powder
  • 1 teaspoon ground cumin
  • 1 teaspoon ground paprika
  • ½ teaspoon kosher salt
  • ½ teaspoon black pepper (freshly ground)
  • 1 ¼ pounds skirt steak (sliced thinly in ¼ inch strips across the grain)
  • 3 medium bell peppers (cored, seeded and sliced (I used green, yellow and red))
  • 1 medium yellow onion (halved and sliced)
  • 1 tablespoon minced fresh garlic
  • 3 tablespoons olive oil
  • 2 tablespoons lime juice (from 1 lime)
  • 2 tablespoons chopped fresh cilantro (optional garnish)
  • 6 fajita flour tortillas
Recipe Image

How to Make Sheet Pan Steak Fajitas: Step-by-Step Instructions

Alright, let’s get down to business. Follow these simple steps, and you’ll be enjoying delicious sheet pan beef fajitas in no time. This is how to cook beef fajitas in the oven like a pro!

  1. Preheat your oven to 400 degrees F. Lightly spray a large rimmed baking sheet with cooking spray.
  2. Prepare the seasoning by stirring the chili powder, cumin, paprika, salt and pepper in a small bowl until well combined. Set aside.
  3. In a large bowl, toss together the steak strips, peppers, onions and garlic. Drizzle with olive oil and gently toss to coat. Sprinkle with seasoning over mixture, a little at a time while continuing to toss to coat evenly.
  4. Evenly distribute steak and vegetable mixture on prepared baking sheet. Bake for 20 minutes, or until steak is done and vegetables are tender. During the last 5 minutes of baking, place the tortillas wrapped in aluminum foil in oven to heat.
  5. Once pan is removed from oven, drizzle evenly with lime juice and garnish with desired amount of fresh chopped cilantro.
  6. Serve in heated tortillas with your favorite toppings.

See? Easy peasy! This recipe is a total game-changer, and I’m so glad you’re trying it. Feel free to share your creations with me on Pinterest, Facebook, and Instagram. I love seeing your versions of this recipe!

Pro Tips for Perfect Sheet Pan Fajitas

Want to take your sheet pan fajitas to the next level? Here are a few of my tried-and-true pro tips:

  • Don’t Overcrowd the Pan: This is crucial for getting that nice char on the steak and veggies. If your pan is too crowded, the ingredients will steam instead of roast. If needed, use two sheet pans.
  • Slice the Steak Thinly: This ensures that the steak cooks quickly and evenly. Aim for ¼-inch strips.
  • Use High-Quality Steak: Skirt steak is my go-to for fajitas, but flank steak also works well. Look for a cut that is well-marbled for the best flavor and tenderness.
  • Preheat the Oven: Make sure your oven is fully preheated before you put the sheet pan in. This will help the steak and veggies cook properly.
  • Don’t Skip the Lime Juice: The lime juice adds a bright, tangy flavor that really elevates the fajitas.

These tips will help you achieve sheetpan fajitas beef perfection every time. Remember, cooking is all about experimenting and having fun. So don’t be afraid to tweak the recipe to your liking!

Common Mistakes to Avoid

Even the best cooks make mistakes sometimes! Here are a few common pitfalls to watch out for when making sheet pan fajitas:

  • Using Dull Knives: A sharp knife is essential for slicing the steak and veggies evenly.
  • Not Seasoning Enough: Don’t be shy with the spices! The seasoning is what gives the fajitas their signature flavor.
  • Overcooking the Steak: Nobody likes tough, chewy steak. Keep a close eye on the steak while it’s baking and pull it out when it’s just cooked through.
  • Forgetting to Preheat the Tortillas: Warm tortillas are a must for fajitas. Wrap them in foil and heat them in the oven during the last few minutes of baking.
  • Adding Too Many Toppings: While toppings are great, too many can overwhelm the flavor of the fajitas. Stick to a few of your favorites.

Avoiding these mistakes will help you create the best sheet pan steak fajitas possible. And if you do happen to make a mistake, don’t worry! Just learn from it and try again next time.

Variations and Add-Ins

One of the things I love most about this recipe is how versatile it is. Here are a few variations and add-ins to inspire you:

  • Sheet Pan Fajitas Chicken and Steak: Add chicken for a mix of proteins.
  • Keto Fajitas Steak: Serve with lettuce wraps instead of tortillas for a low-carb option.
  • Spicy Fajitas: Add a pinch of cayenne pepper to the seasoning blend for an extra kick.
  • Vegetarian Fajitas: Substitute the steak with mushrooms or tofu for a vegetarian-friendly version.
  • Add More Veggies: Include other vegetables like zucchini, squash, or mushrooms.

These variations will keep your sheet pan fajitas exciting and fresh. Experiment with different combinations and find your favorite!

How to Store and Reheat Leftovers

If you happen to have any leftovers (which is rare in my house!), here’s how to store and reheat them:

  • Storage: Store the steak and veggies in an airtight container in the refrigerator for up to 3 days.
  • Reheating: Reheat in a skillet over medium heat until warmed through. You can also reheat in the microwave, but the steak may become a bit tougher.
  • Freezing: I don’t recommend freezing the cooked steak and veggies, as the texture may change.

Leftovers are great for lunch the next day or for a quick and easy dinner. Just add them to a salad, a sandwich, or another batch of fajitas!

Frequently Asked Questions (FAQ)

Here are some common questions about sheet pan steak fajitas:

  • Can I use a different type of steak? Yes, flank steak, sirloin steak, or even chicken can be used instead of skirt steak.
  • Can I make this recipe ahead of time? You can slice the steak and veggies ahead of time and store them in the refrigerator. However, I recommend cooking the fajitas right before serving for the best flavor and texture.
  • Can I use pre-made fajita seasoning? Yes, you can use pre-made fajita seasoning, but I prefer to make my own so I can control the ingredients and spice level.
  • What are some good toppings for fajitas? Some popular toppings include sour cream, guacamole, salsa, cheese, and pico de gallo.
  • Are these healthy beef fajita recipe friendly? Absolutely! Packed with veggies and lean protein, this is a healthy and delicious meal.

If you have any other questions, feel free to ask in the comments below. I’m always happy to help!

Serving Suggestions

Now that your sheet pan steak fajitas are ready, let’s talk about serving them. Here are a few of my favorite serving suggestions:

  • Classic Fajitas: Serve the steak and veggies in warm tortillas with your favorite toppings.
  • Fajita Bowls: Create a fajita bowl with rice, beans, lettuce, and your choice of toppings.
  • Fajita Salad: Top a bed of lettuce with the steak and veggies for a light and refreshing salad.
  • Fajita Nachos: Layer tortilla chips with the steak, veggies, cheese, and your favorite nacho toppings.

No matter how you choose to serve them, these sheet pan steak fajitas are sure to be a hit. Enjoy the delicious flavors and the easy cleanup! This recipe has really came out well, and I hope you and your family enjoyed it this much as well. Join me on Pinterest, Facebook, and Instagram for more recipes and cooking inspiration. Thank you so much for cooking along with me! I’m so glad you’re here, and I can’t wait to see what you create in your kitchen. Happy cooking!

Sheet Pan Steak Fajitas

Prep Time 15 minutes
Cook Time 20 minutes
Total Time 35 minutes
Servings 6 tortillas
Calories 450
These sheet pan steak fajitas are a quick and easy weeknight meal. Tender steak and colorful bell peppers are seasoned to perfection and baked on a single pan for minimal cleanup.

Ingredients

Seasoning

  • 2 teaspoons chili powder
  • 1 teaspoon ground cumin
  • 1 teaspoon ground paprika
  • ½ teaspoon kosher salt
  • ½ teaspoon black pepper (freshly ground)

Main Ingredients

  • 1.25 pounds skirt steak (sliced thinly in ¼ inch strips across the grain)
  • 3 medium bell peppers (cored, seeded and sliced (I used green, yellow and red))
  • 1 medium yellow onion (halved and sliced)
  • 1 tablespoon minced fresh garlic
  • 3 tablespoons olive oil
  • 2 tablespoons lime juice (from 1 lime)
  • 2 tablespoons chopped fresh cilantro (optional garnish)
  • 6 fajita fajita flour tortillas

Instructions 

  • Preheat oven to 400 degrees F. Spray a baking sheet with cooking spray.
  • Prepare seasoning: chili powder, cumin, paprika, salt, and pepper.
  • Toss steak, peppers, onions, and garlic with olive oil and seasoning.
  • Distribute on baking sheet. Bake for 20 minutes, heating tortillas last 5 minutes.
  • Drizzle with lime juice and garnish with cilantro.
  • Serve in heated tortillas with toppings.

Notes

For extra flavor, marinate the steak for at least 30 minutes before cooking.
Calories: 450kcal
Cost: $22
Course: Main Course
Cuisine: Mexican
Keyword: Steak
pin

The BEST Salmon Burgers: An Easy Recipe You’ll Adore

Hey there, friends! Ava here, ready to share a recipe that’s become a staple in my Seattle kitchen: The BEST Salmon Burgers. If you’re looking for a quick, healthy, and utterly delicious weeknight meal, you’ve landed in the right place. These aren’t just any salmon burgers; they’re packed with flavor, incredibly easy to make, and guaranteed to impress. I’m so happy to share this recipe with you!

Growing up in Oregon, salmon was a regular on our dinner table. My mom had a knack for making simple ingredients sing, and this salmon burger recipe is a tribute to her. It’s a modern twist on a classic, perfect for busy weeknights or a casual weekend gathering. So, grab your apron, and let’s dive into making these amazing salmon patties burgers!

Why You’ll Love This Salmon Burger Recipe

Trust me, once you try this recipe, you’ll be hooked. Here’s why:

  • Quick and Easy: From prep to plate in under 30 minutes. Perfect for those busy weeknights when you need a healthy meal fast.
  • Healthy and Nutritious: Salmon is packed with Omega-3 fatty acids, protein, and essential nutrients. It’s a guilt-free indulgence.
  • Flavor Explosion: The combination of fresh dill, Dijon mustard, and Old Bay seasoning creates a symphony of flavors that will tantalize your taste buds.
  • Versatile: Customize the toppings to your liking. Avocado, lettuce, tomato, tartar sauce – the possibilities are endless!
  • Crowd-Pleaser: Whether you’re cooking for your family or entertaining guests, these salmon burgers are always a hit.

The Secret Ingredient: Freshness and Simplicity

The key to truly great salmon burgers is using high-quality, fresh salmon. Look for fillets that are vibrant in color and have a fresh, clean scent. The simpler the ingredients, the better the flavors will shine through. This recipe is all about letting the salmon be the star.

Ingredients You’ll Need

  • 1.5 lbs skinless salmon fillet, finely chopped
  • 1/4 cup finely chopped red onion
  • 1/4 cup chopped fresh dill
  • 2 tablespoons mayonnaise
  • 1 tablespoon Dijon mustard
  • 1 tablespoon lemon juice
  • 1 teaspoon Old Bay seasoning
  • 1/2 teaspoon salt
  • 1/4 teaspoon black pepper
  • 1/2 cup panko breadcrumbs
  • 2 tablespoons olive oil
  • 4 burger buns
  • Optional toppings: lettuce, tomato, avocado, tartar sauce
Recipe Image

Step-by-Step Guide: Making the Best Salmon Burgers

Alright, let’s get cooking! Here’s how to make these incredible salmon burgers:

  1. Combine Ingredients: In a large bowl, gently combine the chopped salmon, red onion, fresh dill, mayonnaise, Dijon mustard, lemon juice, Old Bay seasoning, salt, and pepper.
  2. Mix in Breadcrumbs: Gently fold in the panko breadcrumbs until just combined. Be careful not to overmix, as this can make the patties tough.
  3. Form the Patties: Divide the mixture into 4 equal-sized portions and form them into patties. Make sure they’re uniform in thickness for even cooking.
  4. Cook the Burgers: Heat the olive oil in a large skillet over medium heat. Carefully place the salmon burgers in the skillet and cook for 4-5 minutes per side, or until they are cooked through and golden brown.
  5. Serve and Enjoy: Serve the salmon burgers on burger buns with your favorite toppings. I love mine with avocado, lettuce, tomato, and a dollop of tartar sauce.

Pro Tips for Perfect Salmon Burgers

Here are a few of my tried-and-true tips for making the best salmon burgers every time:

  • Use Fresh Salmon: As I mentioned earlier, fresh salmon is key. If you can, buy your salmon the same day you plan to make the burgers.
  • Don’t Overmix: Overmixing the salmon mixture can result in tough, dry burgers. Gently combine the ingredients until just incorporated.
  • Chill the Patties: For firmer patties, chill them in the refrigerator for 15-20 minutes before cooking. This helps them hold their shape.
  • Use a Non-Stick Skillet: This will prevent the burgers from sticking and make them easier to flip.
  • Don’t Overcook: Salmon burgers are best when they’re slightly pink in the center. Overcooking them will make them dry and less flavorful.

Common Mistakes to Avoid

We all make mistakes in the kitchen, but here are a few common pitfalls to avoid when making salmon burgers:

  • Overmixing the Mixture: As mentioned earlier, overmixing can lead to tough burgers.
  • Using Too Much Breadcrumbs: Too many breadcrumbs can make the burgers dry and dense. Use just enough to bind the ingredients together.
  • Cooking at Too High a Heat: Cooking the burgers at too high a heat can cause them to burn on the outside while remaining raw on the inside. Medium heat is the sweet spot.
  • Flipping Too Often: Resist the urge to flip the burgers constantly. Let them cook for 4-5 minutes per side to develop a nice golden-brown crust.

Variations to Spice Things Up

Want to add a little twist to your salmon burgers? Here are a few variations to try:

  • Spicy Salmon Burgers: Add a pinch of red pepper flakes or a dash of hot sauce to the salmon mixture for a spicy kick.
  • Mediterranean Salmon Burgers: Incorporate sun-dried tomatoes, Kalamata olives, and feta cheese into the mixture for a Mediterranean-inspired flavor.
  • Asian-Inspired Salmon Burgers: Add grated ginger, soy sauce, and sesame oil to the salmon mixture for an Asian-inspired twist.
  • Ranch Salmon Recipes: While this recipe doesn’t specifically include ranch, you could certainly add a ranch-flavored mayo or dressing as a topping. Some people search for a Salmon Burger Recipe With Ranch, and this is a great base to experiment with.

How to Store Leftover Salmon Burgers

If you have any leftover salmon burgers (which is rare in my house!), here’s how to store them:

  • Refrigerate: Store cooked salmon burgers in an airtight container in the refrigerator for up to 3 days.
  • Reheat: Reheat the burgers in a skillet over medium heat or in the microwave.

Frequently Asked Questions (FAQ)

Here are some common questions I get asked about salmon burgers:

  • Can I use canned salmon? While fresh salmon is ideal, you can use canned salmon in a pinch. Just make sure to drain it well before adding it to the mixture.
  • Can I freeze salmon burgers? Yes, you can freeze cooked or uncooked salmon burgers. Wrap them individually in plastic wrap and store them in a freezer-safe bag for up to 2 months.
  • What toppings go well with salmon burgers? The possibilities are endless! Some of my favorites include avocado, lettuce, tomato, red onion, tartar sauce, and lemon wedges.
  • Are these burgers gluten-free? To make these burgers gluten-free, simply use gluten-free breadcrumbs.

Serving Suggestions: Complete the Meal

These salmon burgers are delicious on their own, but here are a few serving suggestions to make it a complete meal:

  • Side Salad: A simple green salad with a light vinaigrette is the perfect complement to the rich flavor of the salmon burgers.
  • Sweet Potato Fries: Crispy sweet potato fries add a touch of sweetness and crunch to the meal.
  • Coleslaw: A creamy coleslaw is a classic side dish that pairs perfectly with salmon burgers.
  • Grilled Vegetables: Grilled zucchini, bell peppers, and onions are a healthy and flavorful side option.

Final Thoughts: Sharing the Love of Good Food

I hope you enjoyed this salmon burger recipe! It’s a testament to how simple ingredients and a little bit of love can create something truly special. Remember, cooking is about experimenting, trusting your instincts, and most importantly, having fun. I’m so happy to share my love of food with you, and I can’t wait to hear how these salmon burgers turn out in your kitchen!

Thanks so much for taking the time to read this recipe. I truly hope you enjoyed the recipe. Yay so happy to hear you enjoyed the recipe. If you try this recipe, please leave a comment below and let me know what you think. Your feedback means the world to me!

Happy cooking, friends!

The BEST Salmon Burgers

Prep Time 15 minutes
Cook Time 10 minutes
Total Time 25 minutes
Servings 4 burgers
Calories 350
These salmon burgers are packed with flavor and easy to make. A healthy and delicious alternative to beef burgers!

Ingredients

Salmon Burgers

  • 1.5 lbs skinless salmon fillet (finely chopped)
  • 1/4 cup red onion (finely chopped)
  • 1/4 cup fresh dill (chopped)
  • 2 tablespoons mayonnaise
  • 1 tablespoon Dijon mustard
  • 1 tablespoon lemon juice
  • 1 teaspoon Old Bay seasoning
  • 1/2 teaspoon salt
  • 1/4 teaspoon black pepper
  • 1/2 cup panko breadcrumbs
  • 2 tablespoons olive oil

Serving

  • 4 burger buns
  • Optional toppings (lettuce, tomato, avocado, tartar sauce)

Instructions 

  • Combine salmon, red onion, dill, mayonnaise, mustard, lemon juice, Old Bay, salt, and pepper.
  • Mix in panko breadcrumbs gently.
  • Form into 4 patties.
  • Heat olive oil in a skillet over medium heat.
  • Cook 4-5 minutes per side, until golden brown.
  • Serve on buns with toppings.

Notes

For best results, use fresh, high-quality salmon.
Calories: 350kcal
Cost: $20
Course: Main Course
Cuisine: American
Keyword: Salmon
pin

Hey there, friend! Ava here, back in my Seattle kitchen, and today we’re whipping up something that’s become a weeknight staple: Instant Pot Beef Fajitas. Seriously, if you’re looking for a recipe that’s both incredibly delicious and surprisingly easy, you’ve come to the right place. Growing up, fajitas were always a special occasion meal, something my mom would make when we had company or just wanted to spice things up. But let’s be honest, who has time to stand over a hot stove for hours after a long day? That’s where the Instant Pot comes in to save the day!

I remember the first time I tried making fajitas in the Instant Pot. I was skeptical, to say the least. Could this magical appliance really deliver that same smoky, tender flavor that I loved? Well, let me tell you, the results were mind-blowing. The beef was incredibly tender, the vegetables were perfectly cooked, and the whole thing came together in a fraction of the time. Now, I can whip up a batch of these fajitas faster than you can say “taco Tuesday!”

So, grab your Instant Pot, and let’s get cooking! I promise, this recipe is so good, it’ll become a regular in your rotation. And the best part? It’s totally customizable, so you can adjust the flavors to your liking. Whether you’re a spice fanatic or prefer something a little milder, these fajitas are sure to please.

Why You’ll Love This Recipe

Okay, let’s talk about why these Instant Pot Beef Fajitas are about to become your new obsession. Trust me, there are plenty of reasons to love them!

  • Quick and Easy: Seriously, this recipe is a lifesaver on busy weeknights. You can have dinner on the table in under 30 minutes.
  • Tender Beef: The Instant Pot magically transforms even the toughest cuts of beef into melt-in-your-mouth perfection.
  • Flavorful Vegetables: The bell peppers and onions cook to tender-crisp perfection, soaking up all the delicious fajita seasoning.
  • Customizable: You can easily adjust the spice level and toppings to suit your taste.
  • Minimal Cleanup: One pot means less dishes to wash! Hallelujah!
  • Perfect for Meal Prep: Make a big batch on Sunday and enjoy fajitas all week long.
  • Crowd-Pleaser: Everyone loves fajitas! This recipe is perfect for parties, gatherings, or just a fun family dinner.

One of the things I love most about this recipe is how versatile it is. You can serve the fajitas in tortillas, over rice, or even in a salad. And the toppings? The possibilities are endless! Sour cream, guacamole, salsa, cheese, cilantro… the list goes on and on. It’s a fun way to get creative in the kitchen and let everyone customize their own meal.

Plus, this recipe is a great way to use up any leftover vegetables you have in the fridge. Don’t have bell peppers? No problem! Use zucchini, mushrooms, or even corn. The beauty of fajitas is that you can really make them your own.

Ingredients You’ll Need

Alright, let’s gather our ingredients. Here’s what you’ll need to make these amazing Instant Pot Beef Fajitas:

  • 1.5 lbs flank steak, thinly sliced: Flank steak is my go-to for fajitas because it’s flavorful and relatively affordable. But you can also use skirt steak or sirloin steak if you prefer.
  • 1 large bell pepper, sliced (any color): I usually use a combination of red, yellow, and green bell peppers for a colorful and flavorful mix.
  • 1 large onion, sliced: Yellow or white onion works best.
  • 1 packet fajita seasoning: You can use store-bought fajita seasoning or make your own. I’ll share my favorite homemade recipe later on.
  • 1 cup beef broth: Beef broth adds depth of flavor to the fajitas. You can also use chicken broth or vegetable broth if you don’t have beef broth on hand.
  • 2 tablespoons olive oil: Olive oil helps to brown the beef and vegetables.
  • Optional toppings: tortillas, sour cream, guacamole, salsa, cheese, cilantro, lime wedges

A quick note about the beef: make sure you slice it thinly against the grain. This will ensure that it’s tender and easy to chew. If you’re using flank steak, you’ll want to look for the grain (the direction the muscle fibers are running) and slice perpendicular to it.

And about the fajita seasoning: I highly recommend making your own! It’s so much better than the store-bought stuff, and you can customize the spice level to your liking. Plus, you probably already have most of the ingredients in your pantry. I usually use a mix of chili powder, cumin, paprika, garlic powder, onion powder, oregano, and cayenne pepper.

Recipe Image

How to Make Instant Pot Beef Fajitas: Step-by-Step

Okay, let’s get down to the nitty-gritty. Here’s how to make these amazing Instant Pot Beef Fajitas, step-by-step:

  1. Sauté the Beef: Add olive oil to the Instant Pot and turn on the saute function. Add sliced beef and cook until browned on all sides. This may need to be done in batches. Don’t overcrowd the pot, or the beef will steam instead of brown.
  2. Add Vegetables: Turn off the saute function. Add sliced bell peppers and onions to the Instant Pot.
  3. Season Generously: Sprinkle fajita seasoning over the beef and vegetables. Make sure everything is well coated.
  4. Add Broth: Pour beef broth over the mixture. This will help to create steam and prevent the food from burning.
  5. Pressure Cook: Close and lock the Instant Pot lid. Ensure the pressure release valve is set to sealing. Cook on high pressure for 8 minutes.
  6. Natural Pressure Release: Allow for a natural pressure release for 10 minutes, then quick release any remaining pressure. This will help to keep the beef tender.
  7. Serve and Enjoy: Carefully open the Instant Pot and serve the beef and vegetables in warm tortillas with your favorite toppings.

And that’s it! Seriously, it’s that easy. The Instant Pot does all the work for you, so you can sit back and relax while dinner cooks itself. And when you’re ready to eat, just pile everything into warm tortillas with your favorite toppings and enjoy!

I like to set up a fajita bar with all sorts of toppings, so everyone can customize their own meal. It’s a fun way to get everyone involved in the cooking process, and it’s always a hit with kids and adults alike. You can include things like sour cream, guacamole, salsa, cheese, cilantro, lime wedges, pickled onions, and even some grilled pineapple for a sweet and savory twist.

Pro Tips for Perfect Instant Pot Beef Fajitas

Alright, let’s talk about some pro tips that will take your Instant Pot Beef Fajitas to the next level. These are the little things I’ve learned over the years that make a big difference in the final result.

  • Don’t Overcrowd the Pot: When you’re browning the beef, make sure you don’t overcrowd the pot. This will prevent the beef from browning properly and can also make it tough. Work in batches if necessary.
  • Slice the Beef Thinly: This is crucial for tender fajitas. Slice the beef thinly against the grain to ensure that it’s easy to chew.
  • Don’t Skip the Natural Pressure Release: Allowing for a natural pressure release for 10 minutes will help to keep the beef tender. If you quick release all the pressure, the beef can become tough and dry.
  • Use High-Quality Fajita Seasoning: The fajita seasoning is what gives these fajitas their signature flavor, so make sure you use a good one. I highly recommend making your own, but if you’re using store-bought, look for one that’s low in sodium and doesn’t contain any artificial ingredients.
  • Warm Your Tortillas: Warm tortillas are a must for fajitas. You can warm them in a dry skillet, in the microwave, or even in the oven. Just make sure they’re nice and pliable before you fill them.
  • Get Creative with Toppings: Don’t be afraid to experiment with different toppings. Sour cream, guacamole, salsa, cheese, cilantro, lime wedges… the possibilities are endless!
  • Deglaze the Pot: After you’ve browned the beef, deglaze the pot with a little bit of beef broth. This will help to loosen any browned bits from the bottom of the pot and add extra flavor to the fajitas.

Another tip: If you want to add a little bit of smokiness to your fajitas, you can add a teaspoon of smoked paprika to the fajita seasoning. It’s a subtle touch, but it makes a big difference. And if you’re feeling adventurous, you can even add a splash of liquid smoke to the beef broth.

I also like to add a squeeze of lime juice to the fajitas right before serving. It brightens up the flavors and adds a touch of acidity that really balances out the richness of the beef and vegetables. And don’t forget to garnish with some fresh cilantro! It adds a pop of color and a fresh, herbaceous flavor.

Common Mistakes to Avoid

Okay, let’s talk about some common mistakes that people make when making Instant Pot Beef Fajitas. These are the things that can ruin your fajitas if you’re not careful.

  • Overcooking the Beef: This is the biggest mistake you can make. Overcooked beef is tough and dry, and no one wants that. Make sure you follow the cooking time in the recipe and don’t overcook the beef.
  • Not Slicing the Beef Thinly Enough: As I mentioned earlier, slicing the beef thinly is crucial for tender fajitas. If you slice it too thick, it will be tough and difficult to chew.
  • Using the Wrong Cut of Beef: Some cuts of beef are better suited for fajitas than others. Flank steak, skirt steak, and sirloin steak are all good choices. Avoid using tougher cuts of beef like chuck roast or brisket.
  • Not Using Enough Fajita Seasoning: The fajita seasoning is what gives these fajitas their signature flavor, so don’t be shy with it! Use a generous amount to ensure that the beef and vegetables are well seasoned.
  • Not Allowing for a Natural Pressure Release: As I mentioned earlier, allowing for a natural pressure release for 10 minutes will help to keep the beef tender. If you quick release all the pressure, the beef can become tough and dry.
  • Not Warming Your Tortillas: Cold tortillas are a major buzzkill. Make sure you warm them before you fill them with fajitas.
  • Using Too Much Liquid: Using too much liquid in the Instant Pot can result in soggy fajitas. Stick to the amount of beef broth called for in the recipe.

Another mistake that people often make is not browning the beef properly. Browning the beef adds a lot of flavor to the fajitas, so don’t skip this step! Make sure you get a nice sear on all sides of the beef before you add the vegetables.

And finally, don’t be afraid to experiment with different variations. Try adding different vegetables, different spices, or different toppings. The possibilities are endless! The most important thing is to have fun and make these fajitas your own.

Variations on Instant Pot Beef Fajitas

Okay, let’s talk about some fun variations you can try with these Instant Pot Beef Fajitas. This recipe is a great base, but you can easily customize it to suit your taste and preferences.

  • Spicy Fajitas: If you like your fajitas with a kick, add some chopped jalapeños or a pinch of cayenne pepper to the fajita seasoning. You can also add a few dashes of your favorite hot sauce to the beef broth.
  • Vegetarian Fajitas: Omit the beef and add extra vegetables like mushrooms, zucchini, and corn. You can also add some black beans or pinto beans for extra protein.
  • Chicken Fajitas: Substitute the beef with chicken breasts or chicken thighs. Cook on high pressure for 6 minutes, followed by a 10-minute natural pressure release.
  • Shrimp Fajitas: Add shrimp to the Instant Pot during the last minute of cooking. Shrimp cooks very quickly, so you don’t want to overcook it.
  • Sweet and Savory Fajitas: Add some grilled pineapple to the fajitas for a sweet and savory twist. You can also add a drizzle of honey or maple syrup to the beef broth.
  • Fajita Bowls: Serve the fajitas over rice or quinoa instead of in tortillas. Top with your favorite toppings and enjoy!
  • Fajita Salad: Serve the fajitas over a bed of lettuce with your favorite toppings. Drizzle with a lime vinaigrette or your favorite salad dressing.

One of my favorite variations is to add a can of diced tomatoes to the Instant Pot. It adds a touch of acidity and sweetness that really complements the flavors of the beef and vegetables. And if you’re feeling really adventurous, you can add a splash of tequila to the beef broth. It adds a subtle but delicious flavor that will impress your guests.

I also like to experiment with different types of peppers. Poblano peppers, Anaheim peppers, and even Scotch bonnet peppers can add a unique flavor and heat to your fajitas. Just be careful with the Scotch bonnet peppers – they’re very spicy!

How to Store and Reheat Leftovers

Okay, let’s talk about how to store and reheat any leftovers you might have. These Instant Pot Beef Fajitas are even better the next day, so don’t be afraid to make a big batch!

  • Storage: Store leftover fajitas in an airtight container in the refrigerator for up to 3-4 days.
  • Reheating: Reheat the fajitas in the microwave, in a skillet, or in the oven. If reheating in the microwave, add a splash of beef broth to prevent the fajitas from drying out.
  • Freezing: You can also freeze leftover fajitas for up to 2-3 months. Thaw overnight in the refrigerator before reheating.

When reheating the fajitas, I like to add a little bit of water or beef broth to the pan to prevent them from drying out. And if I’m reheating them in the microwave, I cover them with a damp paper towel to keep them moist.

Leftover fajitas are also great for making other dishes. You can use them to make fajita quesadillas, fajita nachos, or even fajita omelets. The possibilities are endless!

Frequently Asked Questions (FAQ)

Alright, let’s answer some frequently asked questions about these Instant Pot Beef Fajitas. I’ve compiled a list of the most common questions I get asked, so hopefully, this will clear up any confusion.

  • Can I use frozen beef? Yes, you can use frozen beef, but you’ll need to add a few minutes to the cooking time. Cook on high pressure for 12-15 minutes, followed by a 10-minute natural pressure release.
  • Can I make this recipe without an Instant Pot? Yes, you can make this recipe in a skillet on the stovetop. Brown the beef in a skillet over medium-high heat, then add the vegetables and fajita seasoning. Cook until the vegetables are tender-crisp.
  • Can I make this recipe ahead of time? Yes, you can make this recipe ahead of time. Store the cooked fajitas in the refrigerator for up to 3-4 days. Reheat before serving.
  • Can I use a different cut of beef? Yes, you can use a different cut of beef. Skirt steak, sirloin steak, and even chicken breasts or chicken thighs will work well.
  • Can I add different vegetables? Yes, you can add different vegetables. Mushrooms, zucchini, corn, and even bell peppers are all great additions.
  • Can I make my own fajita seasoning? Yes, you can make your own fajita seasoning. I’ll share my favorite homemade recipe below.
  • What toppings should I use? The possibilities are endless! Sour cream, guacamole, salsa, cheese, cilantro, lime wedges, pickled onions, and even grilled pineapple are all great choices.

One question I get asked a lot is whether you can use a different type of liquid instead of beef broth. The answer is yes! Chicken broth, vegetable broth, or even water will work in a pinch. Just keep in mind that the flavor of the fajitas will be slightly different depending on what you use.

And another question I get asked is whether you can add beans to the fajitas. The answer is yes! Black beans and pinto beans are both great additions. Just add them to the Instant Pot along with the vegetables and fajita seasoning.

Serving Suggestions for Instant Pot Beef Fajitas

Alright, let’s talk about some serving suggestions for these Instant Pot Beef Fajitas. These fajitas are delicious on their own, but they’re even better when paired with the right sides and toppings.

  • Tortillas: Warm tortillas are a must for fajitas. You can use flour tortillas, corn tortillas, or even gluten-free tortillas.
  • Toppings: Sour cream, guacamole, salsa, cheese, cilantro, lime wedges, pickled onions, and even grilled pineapple are all great toppings.
  • Sides: Rice, beans, and a simple salad are all great sides to serve with fajitas.
  • Drinks: Margaritas, beer, and iced tea are all great drinks to pair with fajitas.

I like to set up a fajita bar with all sorts of toppings and sides, so everyone can customize their own meal. It’s a fun way to get everyone involved in the cooking process, and it’s always a hit with kids and adults alike.

And if you’re looking for a more substantial meal, you can serve the fajitas over rice or quinoa. It’s a great way to add some extra carbs and fiber to your meal. You can also add some black beans or pinto beans for extra protein.

So there you have it! My ultimate guide to making Instant Pot Beef Fajitas. I hope you enjoyed this recipe and found it helpful. Now go forth and make some amazing fajitas! And don’t forget to share your creations with me on social media. I can’t wait to see what you come up with!

Happy cooking!

Instant Pot Beef Fajitas

Prep Time 15 minutes
Cook Time 20 minutes
Total Time 35 minutes
Servings 6 servings
Calories 350
Quick and easy beef fajitas made in the Instant Pot. Perfect for a weeknight meal!

Ingredients

Ingredients

  • 1.5 lbs flank steak (thinly sliced)
  • 1 large bell pepper (sliced (any color))
  • 1 large onion (sliced)
  • 1 packet fajita seasoning
  • 1 cup beef broth
  • 2 tablespoons olive oil

Optional Toppings

  • tortillas
  • sour cream
  • guacamole
  • salsa
  • cheese

Instructions 

  • Add olive oil to the Instant Pot and turn on the saute function.
  • Add sliced beef and cook until browned on all sides. This may need to be done in batches.
  • Turn off the saute function.
  • Add sliced bell peppers and onions to the Instant Pot.
  • Sprinkle fajita seasoning over the beef and vegetables.
  • Pour beef broth over the mixture.
  • Close and lock the Instant Pot lid. Ensure the pressure release valve is set to sealing.
  • Cook on high pressure for 8 minutes.
  • Allow for a natural pressure release for 10 minutes, then quick release any remaining pressure.
  • Carefully open the Instant Pot and serve the beef and vegetables in warm tortillas with your favorite toppings.

Notes

For extra flavor, marinate the flank steak for at least 30 minutes before cooking.
Calories: 350kcal
Cost: $20
Course: Main Course
Cuisine: Mexican
Keyword: Beef
pin

Hey there, friend! Ava here, welcoming you into my cozy Seattle kitchen. Today, we’re ditching the complicated and embracing the ridiculously delicious with my Easy Slow Cooker Steak Fajitas. If you’re anything like me, weeknights can be a whirlwind of activity, and the thought of spending hours in the kitchen is… well, let’s just say less than appealing. That’s where the magic of the slow cooker comes in! This recipe is all about flavor, convenience, and that warm, comforting feeling you get from a home-cooked meal. It’s a guaranteed crowd-pleaser, and honestly, it’s become a staple in my household. So, grab your apron, and let’s get started!

Growing up, fajitas were always a special occasion meal. My mom would sizzle the steak and veggies on a cast-iron skillet, filling the house with the most incredible aroma. But let’s be real, sometimes we just don’t have the time or energy for all that fuss. That’s why I set out to create a slow cooker version that captures all the vibrant flavors of traditional fajitas, but with minimal effort. And let me tell you, this recipe exceeded all my expectations. The steak comes out unbelievably tender, the bell peppers and onions are perfectly softened, and the spices infuse everything with a Tex-Mex zing that will have you reaching for seconds (and maybe even thirds!).

Why You’ll Love This Slow Cooker Steak Fajitas Recipe

Seriously, what’s not to love? But just in case you need a little convincing, here are a few reasons why this recipe is a game-changer:

  • Effortless Cooking: Dump everything in the slow cooker and let it do its thing. No babysitting required!
  • Incredible Flavor: The slow cooking process allows the flavors to meld together beautifully, creating a depth of taste that’s hard to beat.
  • Tender Steak: Say goodbye to tough, chewy steak. This method results in fall-apart tender meat every time.
  • Customizable: Easily adjust the spice level and toppings to suit your preferences.
  • Meal Prep Friendly: Make a big batch on Sunday and enjoy delicious fajitas all week long.

This recipe is particularly great because it’s so versatile. You can use the shredded steak for tacos, salads, burrito bowls, or even nachos. And if you’re feeling extra creative, try adding a dollop of guacamole or a sprinkle of cotija cheese. The possibilities are endless!

Ingredients You’ll Need

Here’s what you’ll need to whip up this magical slow cooker creation. Don’t worry, most of these are pantry staples!

  • 1.5 lbs beef flank steak, cut into 6 equal pieces: The star of the show! Flank steak is ideal for fajitas because the steak is relatively lean and becomes incredibly tender when slow-cooked.
  • 1 (8 oz) can chopped tomatoes: Adds moisture and a touch of acidity to the dish.
  • 1 onion, thinly sliced: Provides a savory base flavor.
  • 1 green bell pepper, sliced into strips: Adds sweetness and color.
  • 1 red bell pepper, sliced into strips: More sweetness and color! Feel free to use yellow or orange peppers too.
  • 1 jalapeño pepper, seeded and chopped: For a little kick! Adjust the amount to your spice preference.
  • 2 cloves garlic, minced: Essential for that classic Tex-Mex flavor.
  • 1 tsp chili powder: Adds warmth and depth.
  • 1 tsp ground cumin: A must-have spice for fajitas.
  • 1 tsp ground coriander: Adds a citrusy, slightly floral note.
  • ¼ tsp salt: Enhances the flavors of all the other ingredients.
  • 6 large flour tortillas (or as needed): For wrapping up all that deliciousness!
  • 1 cup shredded Mexican cheese blend: Because cheese makes everything better.
Recipe Image

How to Make Slow Cooker Steak Fajitas: Step-by-Step

Alright, let’s get cooking! Here’s the super simple process for making these amazing fajitas:

  1. Step 1: Prep the Steak and Veggies: Cut the flank steak into 6 equal pieces. Slice the onion and bell peppers into strips. Seed and chop the jalapeño. Mince the garlic.
  2. Step 2: Load Up the Slow Cooker: Place the flank steak pieces into your slow cooker. Add the chopped tomatoes, onion, both bell peppers, jalapeño, garlic, and spices (chili powder, cumin, coriander, and salt).
  3. Step 3: Slow Cook to Perfection: Cover and cook on Low for 8–10 hours or on High for 4–6 hours, until the steak is fall-apart tender. The longer you can cook it, the more tender the meat becomes.
  4. Step 4: Shred the Steak: Remove the steak from the slow cooker, shred it using two forks, and return it to the cooker. Stir well to mix it with the juices and vegetables.
  5. Step 5: Serve and Enjoy!: Serve hot with flour tortillas and shredded cheese. Let everyone build their own fajitas with optional toppings like sour cream, salsa, or guacamole.

See? I told you it was easy! This recipe is practically foolproof.

Pro Tips for the Best Slow Cooker Steak Fajitas

Want to take your fajitas to the next level? Here are a few of my favorite tips and tricks:

  • Sear the Steak First (Optional): For an extra layer of flavor, sear the flank steak in a hot skillet before adding it to the slow cooker. This will give it a nice crust and lock in the juices.
  • Don’t Overcook the Steak: While slow cooking is forgiving, overcooked steak can become dry. Check the steak periodically and remove it from the slow cooker as soon as it’s tender.
  • Use Fresh Ingredients: Fresh bell peppers, onions, and garlic will give your fajitas the best flavor.
  • Spice It Up: If you like your fajitas extra spicy, add a pinch of cayenne pepper or a few extra jalapeños.
  • Toast the Tortillas: For warm, pliable tortillas, toast them lightly in a dry skillet or over an open flame.

It’s all about those little details that elevate a good recipe to a great one!

Common Mistakes to Avoid

Even with a simple recipe like this, there are a few pitfalls to watch out for:

  • Using the Wrong Cut of Steak: Flank steak is the best choice for fajitas because it’s relatively lean and becomes tender when slow-cooked. Avoid using tougher cuts of steak, such as round steak or chuck steak.
  • Adding Too Much Liquid: The vegetables will release moisture as they cook, so you don’t need to add a lot of extra liquid. A few tablespoons of water or broth is all you need.
  • Skipping the Spices: The spices are what give fajitas their signature flavor. Don’t be afraid to experiment with different spice blends to find your perfect combination.
  • Not Shredding the Steak Properly: Shred the steak while it’s still warm for the best results. Use two forks to pull the meat apart into thin strands.

Learning from mistakes is part of the cooking journey! Remember that infamous cake I mentioned? Yeah, I definitely learned a thing or two about baking after that disaster!

Delicious Variations to Try

Want to mix things up? Here are some fun and tasty variations on this recipe:

  • Chicken Fajitas: Substitute the flank steak with chicken breasts or thighs.
  • Shrimp Fajitas: Add shrimp to the slow cooker during the last hour of cooking.
  • Vegetarian Fajitas: Omit the steak and add more vegetables, such as mushrooms, zucchini, and corn.
  • Pineapple Fajitas: Add chunks of pineapple to the slow cooker for a sweet and tangy twist.
  • Spicy Fajitas: Use hotter peppers like serranos or habaneros to increase the heat level.

Don’t be afraid to get creative and experiment with different ingredients! Cooking should be fun, after all!

How to Store and Reheat Leftovers

If you happen to have any leftovers (which is unlikely!), here’s how to store and reheat them:

  • Storage: Store the cooked steak and vegetables in an airtight container in the refrigerator for up to 3-4 days.
  • Reheating: Reheat the fajitas in a skillet over medium heat or in the microwave. You can also add a splash of water or broth to keep them from drying out.

Leftovers are a lifesaver on busy weeknights. I often use them for quick and easy lunches or dinners.

Frequently Asked Questions (FAQ)

Got questions? I’ve got answers! Here are some of the most common questions I get about this recipe:

  • Can I use a different cut of steak? While flank steak is the best choice, you can also use skirt steak or sirloin steak. Just be sure to adjust the cooking time accordingly.
  • Can I make this recipe in an Instant Pot? Yes! Cook on high pressure for 25-30 minutes, followed by a natural pressure release for 10 minutes.
  • Can I freeze the leftovers? Yes, you can freeze the cooked steak and vegetables for up to 2-3 months.
  • Can I add beans to this recipe? Absolutely! Black beans or pinto beans would be a great addition.
  • What are some good toppings for fajitas? The possibilities are endless! Some of my favorites include sour cream, guacamole, salsa, pico de gallo, shredded lettuce, and pickled onions.

If you have any other questions, feel free to leave a comment below! I’m always happy to help.

Serving Suggestions: Complete Your Fajita Feast

Now that you’ve got the main course covered, let’s talk about how to create the ultimate fajita feast! Here are some serving suggestions to complete your meal:

  • Sides: Serve your fajitas with classic sides like Mexican rice, refried beans, and guacamole.
  • Drinks: Margaritas, Mexican beer, or even just a refreshing glass of iced tea are perfect accompaniments.
  • Dessert: End your meal on a sweet note with churros, flan, or a scoop of ice cream.

Creating a delicious and memorable meal is all about the details. Don’t be afraid to go all out and make it a special occasion!

This dish is a family favorite in my house, and I know it will be in yours too. The beauty of Tex Mex cuisine lies in its bold flavors and simple preparations, and this recipe embodies both of those qualities perfectly.

So there you have it—my Easy Slow Cooker Steak Fajitas recipe! I hope you love it as much as I do. Remember, cooking is all about having fun and experimenting. Don’t be afraid to put your own spin on this recipe and make it your own. And most importantly, enjoy the process! Happy cooking, friends! And come back soon for more delicious recipes from my kitchen to yours!

A slow cooker is an amazing tool. Slow cooking is a great way to bring the flavor out of the ingredients. With a slow cooker steak, especially flank steak, will be tender and juicy. These steak fajitas are easy to make and taste amazing. You can use flour tortillas or corn tortillas, depending on your preference. Don’t forget the bell peppers and onions! They’re essential for that classic fajita flavor. They’re a key ingredient. Instead of grilling the steak, the slow cooker does all the work for you. Give this slow cooker steak fajitas recipe a try. You won’t regret it! Crockpot flank steak recipes are a great way to simplify dinner. Try these steak fajitas crockpot. Enjoy crockpot fajitas tonight. Here are more great crockpot steak recipes. This is the easy steak fajitas recipe you’ve been waiting for. These flank steak fajitas are perfect for a party. Try these skirt steak recipes. This steak fajita recipe is so easy! Make slow cooker steak tonight.

Slow Cooker Steak Fajitas

Prep Time 15 minutes
Cook Time 8 hours
Total Time 8 hours 15 minutes
Servings 6 servings
Calories 450
Enjoy delicious and easy steak fajitas made in your slow cooker! This recipe is perfect for a weeknight meal with minimal effort.

Ingredients

Ingredients

  • 1.5 lbs beef flank steak (cut into 6 equal pieces)
  • 8 oz canned chopped tomatoes
  • 1 onion (thinly sliced)
  • 1 green bell pepper (sliced into strips)
  • 1 red bell pepper (sliced into strips)
  • 1 jalapeño pepper (seeded and chopped)
  • 2 cloves garlic (minced)
  • 1 tsp chili powder
  • 1 tsp ground cumin
  • 1 tsp ground coriander
  • 0.25 tsp salt
  • 6 large flour tortillas (or as needed)
  • 1 cup shredded Mexican cheese blend

Instructions 

  • Place flank steak pieces into your slow cooker.
  • Add the chopped tomatoes, onion, both bell peppers, jalapeño, garlic, and spices (chili powder, cumin, coriander, and salt).
  • Cover and cook on Low for 8–10 hours or on High for 4–6 hours, until the steak is fall-apart tender.
  • Remove the steak from the slow cooker, shred it using two forks, and return it to the cooker. Stir well to mix it with the juices and vegetables.
  • Serve hot with flour tortillas and shredded cheese. Let everyone build their own fajitas with optional toppings like sour cream, salsa, or guacamole.

Notes

For extra flavor, sear the flank steak before adding it to the slow cooker.
Calories: 450kcal
Cost: $20
Course: Main Course
Cuisine: Mexican
Keyword: Steak
pin

My name’s Ava, and if you’ve stumbled upon my kitchen, you’re probably here for one thing—the kind of recipes that make people pause mid-bite and say, ‘Wow.’ Today, we’re diving headfirst into the world of homemade burgers. Forget those dry, flavorless patties you might have encountered before. We’re talking about the BEST BURGERS EVER: Irresistibly Juicy & Easy, that will redefine your burger experience. This isn’t just another burger recipe; it’s a journey into burger perfection, crafted with simple ingredients and a whole lot of love. Get ready to unleash your inner grill master because after this, you’ll be the go-to person for backyard cookouts.

I grew up in a small town in Oregon, where the smell of fresh bread and roasted vegetables often drifted out of my mother’s kitchen window. Cooking wasn’t just something we did to eat—it was how we celebrated, comforted, and connected. I was the kid who would rather stir a pot of chili than go ride my bike, and by the time I was twelve, I could whip up a pie from scratch that made my grandmother proud. These days, I’m 34 and living in Seattle, where my kitchen has become my favorite corner of the world. I believe the best recipes aren’t always the fanciest—they’re the ones that feel like a warm hug, the ones you make over and over because they just work. Sure, I’ve had my share of flops (ask me about the infamous triple-layer cake that collapsed right before a dinner party), but I’ve learned that every ‘oops’ moment is just an invitation to try again—this time with a little more patience and maybe a pinch more salt.

What I love most is taking a recipe and finding ways to make it even better—whether it’s swapping in a secret ingredient, adjusting the texture, or adding a touch of spice to wake up the flavors. I’m a bit obsessed with balance: sweet with savory, creamy with crunchy, familiar with unexpected. And I believe that cooking is less about following rules and more about trusting your senses. If it smells amazing and makes you smile, you’re probably on the right track. When I’m not stirring a pot or baking something golden, you’ll find me wandering local farmers’ markets, chatting with growers about their produce, or experimenting late at night when inspiration strikes. My recipes are a blend of comfort food classics, modern twists, and just enough adventure to keep things exciting. I share them because I want you to have a little magic in your kitchen too—meals that bring people together, that become your ‘go-to,’ that make someone you love ask for seconds.

So whether you’re cooking for your family, impressing friends, or just treating yourself, I’m here to help you find your next favorite dish. Pull up a chair, grab a spatula, and let’s make something unforgettable together. Let’s get ready to make the best burgers ever!

Why You’ll Love This Homemade Burger Recipe

Why will you adore this homemade burger recipe? Let me count the ways! First and foremost, it’s ridiculously easy. We’re not talking about a complicated, multi-step process that leaves you exhausted. This is simple, straightforward, and satisfying. It’s perfect for a weeknight dinner or a weekend barbecue.

  • Juiciness: These burgers are incredibly juicy, thanks to a few simple tricks we’ll get into later. No more dry, hockey-puck burgers!
  • Flavor: The combination of seasonings creates an explosion of flavor that will tantalize your taste buds. From the savory garlic salt to the subtle onion powder, every ingredient plays a crucial role.
  • Customizable: This recipe is a blank canvas! Feel free to add your favorite toppings and cheeses to create your dream burger. The possibilities are endless.
  • Crowd-Pleasing: Whether you’re cooking for a family of four or a crowd of twenty, this recipe is guaranteed to be a hit. It’s a surefire way to impress your guests.
  • Simple Ingredients: You probably have most of these ingredients in your pantry already. No need for a special trip to the grocery store.

This recipe truly delivers on the promise of the best burgers ever. It’s more than just a meal; it’s an experience. It’s about creating memories around the dinner table, sharing laughter, and enjoying good food with the people you love. The beauty of this recipe is that even if you aren’t a seasoned chef, you can still whip up an amazing burger that tastes like it came straight from a gourmet restaurant. So, let’s get into the ingredients and start the journey to the perfect homemade burger!

Ingredients for the BEST Burgers Ever

  • 1 lb Ground Beef (80/20)
  • 1 tsp Salt (to taste)
  • 1 tsp Pepper (freshly ground)
  • 1 tsp Garlic Salt
  • 1 tsp Onion Powder
  • 1 cup Bleu Cheese Crumbles (optional)
  • 2 tbsp Canola Oil (for searing)
  • 1 tbsp Water (for steaming cheese)
  • 4 slices Cheese Slices (American, cheddar, provolone, or gorgonzola)
  • 4 slices turkey bacon (crispy cooked)
  • 1 cup Potato Chips (crushed, for topping)
  • 1 medium Onions (thinly sliced)
  • 1 cup Pickles (dill or bread and butter)
  • 1 cup Lettuce (crisp iceberg or romaine)
  • 1 large Tomatoes (ripe, sliced)
  • 4 buns Hamburger Buns (soft, sturdy)
Recipe Image

Pro Tips for the Juiciest Burgers

Achieving burger nirvana isn’t just about following a recipe; it’s about understanding the nuances that elevate a good burger to an extraordinary one. Here are a few pro tips that will help you make the best burgers ever, every single time. These are the little secrets that make a big difference.

  • Don’t Overmix: This is crucial! Overmixing the ground beef will result in tough burgers. Mix the ingredients gently until just combined.
  • Keep it Cold: Cold ground beef is easier to handle and will help prevent the fat from melting before cooking. Place the ground beef in the freezer for about 15 minutes before forming the patties.
  • Make a Thumbprint: Press a small indentation in the center of each patty. This will prevent the burgers from puffing up in the middle while cooking.
  • High Heat Sear: Searing the burgers in a hot pan or on a hot grill creates a delicious crust and locks in the juices.
  • Don’t Press: Resist the urge to press down on the burgers while they’re cooking. This will squeeze out the juices and result in a dry burger.
  • Cheese Steaming: Add a tablespoon of water to the pan and cover it with a lid for the last minute of cooking. The steam will melt the cheese perfectly and add extra moisture to the burger.
  • Resting Period: Allow the burgers to rest for a few minutes after cooking. This will allow the juices to redistribute, resulting in a juicier burger.

These pro tips are the keys to unlocking the secrets of the best burgers ever. They’re simple, effective, and will transform your burger-making game. Remember, it’s the little things that make a big difference. So, take your time, pay attention to the details, and enjoy the process.

Common Mistakes to Avoid

Even with the best intentions, mistakes can happen in the kitchen. But don’t worry, I’m here to help you avoid some common pitfalls that can sabotage your burger dreams. Here are a few mistakes to watch out for and how to prevent them, ensuring you consistently create the best burgers ever.

  • Using Lean Ground Beef: Lean ground beef might seem like a healthier option, but it lacks the fat needed to keep the burgers juicy. Opt for 80/20 ground beef for the best results.
  • Forgetting to Season: Seasoning is key to a flavorful burger. Don’t be afraid to be generous with the salt, pepper, garlic salt, and onion powder.
  • Cooking at the Wrong Temperature: Cooking the burgers at too low of a temperature will result in a gray, unappetizing burger. Make sure the pan or grill is hot before adding the patties.
  • Overcooking the Burgers: Overcooked burgers are dry and tough. Use a meat thermometer to ensure the burgers are cooked to perfection. Aim for an internal temperature of 160°F for medium doneness.
  • Using Stale Buns: A stale bun can ruin even the best burger. Use soft, sturdy buns that can hold up to all the juicy goodness.
  • Skipping the Toppings: Toppings add flavor, texture, and visual appeal to your burger. Don’t be afraid to get creative and experiment with different combinations.

Avoiding these common mistakes will set you on the path to burger perfection. Remember, cooking is a learning process, and every mistake is an opportunity to improve. So, don’t be discouraged if things don’t go perfectly the first time. Just keep practicing, and you’ll be making the best burgers ever in no time.

Burger Variations to Try

One of the best things about making burgers at home is the ability to customize them to your liking. The possibilities are endless! Here are a few burger variations to inspire your creativity and help you discover your new favorite burger combination. Get ready to take your burger game to the next level and create the best burgers ever, tailored to your unique taste.

  • Blue Cheese and Bacon Burger: Add bleu cheese crumbles to the ground beef mixture and top with crispy bacon. This combination is a flavor explosion!
  • Mushroom and Swiss Burger: Sauté sliced mushrooms with butter and garlic and top the burger with melted Swiss cheese. This is a classic combination that never disappoints.
  • Jalapeño and Cheddar Burger: Add diced jalapeños to the ground beef mixture and top with melted cheddar cheese. This burger has a spicy kick!
  • BBQ Burger: Brush the burgers with your favorite BBQ sauce during the last few minutes of cooking and top with coleslaw and crispy fried onions.
  • Pizza Burger: Top the burger with marinara sauce, mozzarella cheese, and pepperoni. This is a fun and playful twist on a classic pizza.
  • Greek Burger: Mix crumbled feta cheese, chopped olives, and oregano into the ground beef mixture and top with tzatziki sauce.

These are just a few ideas to get you started. Don’t be afraid to experiment with different ingredients and create your own unique burger variations. The key is to have fun and let your creativity shine. With a little imagination, you can create the best burgers ever, tailored to your personal taste.

How to Store Leftover Burgers

Sometimes, despite our best efforts, we end up with leftover burgers. But don’t worry, they can be stored and enjoyed later. Here’s how to properly store leftover burgers to maintain their flavor and juiciness. Storing them correctly ensures that even the next day, you can still enjoy something close to the best burgers ever.

  • Cool Completely: Allow the burgers to cool completely before storing them. This will prevent condensation from forming, which can make the burgers soggy.
  • Wrap Individually: Wrap each burger individually in plastic wrap or aluminum foil. This will help prevent them from drying out.
  • Store in an Airtight Container: Place the wrapped burgers in an airtight container. This will further protect them from drying out and absorbing odors from the refrigerator.
  • Refrigerate Promptly: Refrigerate the burgers within two hours of cooking. This will prevent bacteria from growing.
  • Use Within 3-4 Days: Leftover burgers are best used within 3-4 days. After that, they may start to lose their flavor and texture.

When you’re ready to reheat the burgers, you can microwave them, bake them in the oven, or sauté them in a pan. Just be careful not to overcook them, as this will make them dry. With proper storage, you can enjoy leftover burgers that are almost as good as the best burgers ever you made fresh.

Frequently Asked Questions (FAQ)

Got questions about making the best burgers ever? You’re not alone! Here are some frequently asked questions to help you troubleshoot any issues and ensure burger success.

  • What is the best type of ground beef to use? The best type of ground beef to use is 80/20. This means that the ground beef is 80% lean and 20% fat. The fat is essential for keeping the burgers juicy.
  • Can I use frozen ground beef? Yes, you can use frozen ground beef. Just make sure to thaw it completely before using it. You can thaw it in the refrigerator overnight or in the microwave using the defrost setting.
  • How do I prevent the burgers from shrinking? To prevent the burgers from shrinking, don’t overmix the ground beef and don’t press down on the burgers while they’re cooking.
  • How do I know when the burgers are done? The best way to know when the burgers are done is to use a meat thermometer. Insert the thermometer into the thickest part of the burger. The internal temperature should be 160°F for medium doneness.
  • Can I grill these burgers? Yes, you can grill these burgers. Just make sure to preheat the grill to medium-high heat and oil the grates before adding the patties.
  • Can I make these burgers ahead of time? Yes, you can make the burger patties ahead of time. Just store them in the refrigerator until you’re ready to cook them.

These FAQs should address most of your concerns about making the best burgers ever. If you have any other questions, feel free to ask in the comments section below. I’m always happy to help!

Serving Suggestions for the Perfect Burger Experience

The best burgers ever deserve the best accompaniments. Here are a few serving suggestions to create the ultimate burger experience. These sides and toppings will complement the flavors of the burger and elevate your meal to the next level.

  • Classic Sides: Serve the burgers with classic sides like french fries, onion rings, coleslaw, or potato salad.
  • Fresh Salads: A fresh salad is a great way to balance out the richness of the burger. Try a simple green salad, a Caesar salad, or a tomato and cucumber salad.
  • Homemade Sauces: Homemade sauces can take your burger to the next level. Try making a homemade BBQ sauce, a spicy mayo, or a creamy garlic aioli.
  • Grilled Vegetables: Grilled vegetables are a healthy and delicious side dish. Try grilling zucchini, bell peppers, or asparagus.
  • Creative Toppings: Get creative with your toppings! Try adding avocado, fried eggs, caramelized onions, or roasted red peppers.
  • Craft Beers: Pair your burgers with a selection of craft beers. A hoppy IPA or a malty amber ale would be a great choice.

These serving suggestions will help you create a memorable burger experience. Remember, the goal is to create a meal that is both delicious and enjoyable. So, don’t be afraid to experiment and have fun! After all, you’ve put in the work to create the best burgers ever, so make sure the entire meal is equally amazing. The art of home cooking is all about making it your own!

BEST BURGERS EVER: Irresistibly Juicy & Easy

Prep Time 10 minutes
Cook Time 15 minutes
Total Time 25 minutes
Servings 4 burgers
Calories 650
These burgers are incredibly juicy and easy to make, perfect for a quick and satisfying meal. The combination of seasonings and toppings creates an unforgettable flavor experience.

Ingredients

Burger Ingredients

  • 1 lb Ground Beef (80/20)
  • 1 tsp Salt (to taste)
  • 1 tsp Pepper (freshly ground)
  • 1 tsp Garlic Salt
  • 1 tsp Onion Powder
  • 1 cup Bleu Cheese Crumbles (optional)
  • 2 tbsp Canola Oil (for searing)
  • 1 tbsp Water (for steaming cheese)
  • 4 slices Cheese Slices (American, cheddar, provolone, or gorgonzola)
  • 4 slices turkey bacon (crispy cooked)
  • 1 cup Potato Chips (crushed, for topping)
  • 1 medium Onions (thinly sliced)
  • 1 cup Pickles (dill or bread and butter)
  • 1 cup Lettuce (crisp iceberg or romaine)
  • 1 large Tomatoes (ripe, sliced)
  • 4 buns Hamburger Buns (soft, sturdy)

Notes

For extra flavor, try adding a dash of Worcestershire sauce to the ground beef mixture.
Calories: 650kcal
Cost: $18
Course: Main Course
Cuisine: American
Keyword: Beef
pin

Hey there, friend! Ava here, back from my little kitchen in Seattle, ready to share a recipe that’s become a staple in my life – especially during those long summer evenings. If you’re anything like me, you crave those meals that are bursting with flavor but don’t keep you chained to the kitchen all day. Well, buckle up, because these Easy Steak Fajita Foil Packets are about to become your new best friend. This recipe is a true game-changer, whether you’re firing up the grill in your backyard or embarking on a camping trip.

I remember the first time I tried foil packet cooking. It was a revelation! No messy pans to scrub, just delicious, perfectly cooked food. It’s like a mini-oven right in your campfire or on your grill. And the best part? The possibilities are endless. But today, we’re focusing on a classic: steak fajitas. The tender steak, the vibrant veggies, the smoky char… it’s a flavor explosion in every bite. Plus, the cleanup is a breeze. What’s not to love?

Why You’ll Love This Steak Fajita Foil Packet Recipe

Let’s get real for a second. We all lead busy lives. Sometimes, the thought of spending hours in the kitchen is enough to make you order takeout (no judgment – I’ve been there!). But this recipe? It’s designed for those moments when you want a delicious, home-cooked meal without the fuss. Here’s why you will absolutely adore these steak fajita foil packets:

  • Effortless Cleanup: Seriously, the best part is tossing the foil when you’re done.
  • Customizable: Don’t like bell peppers? Swap them for zucchini! Want extra spice? Add a pinch of cayenne pepper. The beauty of this recipe is that you can tailor it to your exact preferences.
  • Perfect for Camping: These foil packets are a camping trip essential. Prepare them ahead of time, and you’ve got a hearty, delicious meal ready to go.
  • Quick and Easy: From prep to plate, this recipe takes about 30 minutes. Perfect for those busy weeknights!
  • Packed with Flavor: The combination of tender steak, smoky veggies, and zesty fajita seasoning is simply irresistible.

Steak Fajita Foil Packet Ingredients

Here’s what you’ll need to create these amazing fajita foil packets. Don’t worry if you don’t have every single ingredient on hand. Part of the fun is experimenting and making it your own!

  • 1.5 pounds strip steak, or ribeye, thinly sliced
  • 1 red bell pepper, sliced
  • 1 orange bell pepper, sliced
  • 1 yellow bell pepper, sliced
  • 1 red onion, sliced
  • 2 tablespoons fajita seasoning
  • 2 tablespoons olive oil
  • Salt and pepper, to taste
  • Optional garnishes: fresh cilantro, lime wedges, sliced avocado, sour cream
  • 4 pieces of Stonefire®Original Mini Naan
  • Olive oil or melted butter, for brushing
Recipe Image

How to Make Steak Fajita Foil Packets: Step-by-Step

Alright, let’s get cooking! Here’s a step-by-step guide to creating these mouthwatering steak fajita foil packets. Trust me, it’s easier than it looks.

  1. Preheat: Preheat your campfire or grill to medium-high heat. If you’re using an oven, preheat to 400°F (200°C).
  2. Combine: In a large bowl, combine the thinly sliced strip steak, bell peppers, red onion, fajita seasoning, olive oil, salt, and pepper. Toss everything together until well coated. Make sure every piece of meat and vegetable is kissed with that delicious fajita seasoning.
  3. Prepare the Foil: Tear off four large pieces of heavy-duty aluminum foil, each about 12×12 inches. Using heavy-duty foil is key to avoid tearing, especially when cooking over a campfire.
  4. Assemble the Packets: Divide the steak and vegetable mixture evenly among the foil sheets, placing it in the center. Fold up the sides of the foil to create a packet, leaving some space for steam to circulate. You want to create a little pocket of flavor!
  5. Cook: Place the foil packets on the campfire grill or directly on the grill grates. Cook for about 8-10 minutes, flipping the packets once halfway through, until the steak is cooked to your desired doneness and the vegetables are tender. If you’re using the oven, bake for 15-20 minutes.
  6. Carefully Open: Once the foil packets are done, remove them from the grill and carefully open them (watch out for the hot steam!). That steam is hot, hot, hot!
  7. Grill the Naan: Place the brushed Stonefire mini naan on the grill and cook for about 2-3 minutes per side until lightly charred and heated through.
  8. Serve and Garnish: Serve the steak fajita foil packets alongside the grilled Stonefire naan. Garnish with fresh cilantro, lime wedges, avocado slices and sour cream. Yum!!

Pro Tips for Perfect Foil Packet Fajitas

Want to take your foil packet game to the next level? Here are a few pro tips I’ve learned over the years:

  • Use Heavy-Duty Foil: This is non-negotiable. Thin foil will tear, and nobody wants their dinner falling into the campfire.
  • Don’t Overcrowd the Packets: Leave some space in the foil packets for the steam to circulate. Overcrowding will result in steamed, not grilled, fajitas.
  • Preheat Your Grill: A hot grill ensures that the steak gets a nice sear, adding to the overall flavor.
  • Check for Doneness: Use a meat thermometer to ensure the steak is cooked to your liking. For medium-rare, aim for 130-135°F (54-57°C).
  • Let it Rest: Allow the foil packets to rest for a few minutes after cooking. This allows the juices to redistribute, resulting in a more tender and flavorful steak.

Common Mistakes to Avoid

Even the most seasoned cooks make mistakes. Here are a few common pitfalls to watch out for when making foil packet fajitas:

  • Under seasoning: Don’t be shy with the fajita seasoning! It’s what gives the dish its signature flavor.
  • Overcooking the Steak: Nobody likes tough, chewy steak. Keep a close eye on the cooking time and use a meat thermometer to ensure it’s cooked to perfection.
  • Not Sealing the Packets Properly: If the foil packets aren’t sealed tightly, the steam will escape, and your fajitas will be dry.
  • Forgetting the Acid: A squeeze of lime juice at the end brightens up the flavors and adds a touch of acidity.

Fajita Foil Packet Variations

The beauty of this recipe is that it’s incredibly versatile. Feel free to experiment and make it your own! Here are a few variations to get you started:

  • Chicken Fajitas: Substitute the steak with chicken breast or thighs. Adjust the cooking time accordingly.
  • Shrimp Fajitas: Use shrimp instead of steak for a lighter option. Shrimp cooks quickly, so reduce the cooking time to about 5-7 minutes. Shrimp fajitas foil pack recipe are a good alternative.
  • Vegetarian Fajitas: Omit the meat altogether and load up on extra veggies like mushrooms, zucchini, and corn.
  • Spicy Fajitas: Add a pinch of cayenne pepper or a diced jalapeño to the fajita mixture for an extra kick.
  • Add Rice: For a more complete meal, add a scoop of cooked rice to each foil packet. The rice will soak up all the delicious juices and flavors. The meat in the foil with rice is delicious!

How to Store Leftovers

If you happen to have any leftovers (which is rare in my house!), here’s how to store them:

  • Refrigerate: Allow the fajitas to cool completely, then transfer them to an airtight container and store in the refrigerator for up to 3 days.
  • Reheat: Reheat the fajitas in a skillet over medium heat or in the microwave until heated through.

Frequently Asked Questions (FAQ)

Got questions? I’ve got answers! Here are a few frequently asked questions about making steak fajita foil packets:

  • Can I prepare the foil packets ahead of time? Absolutely! Assemble the packets up to 24 hours in advance and store them in the refrigerator.
  • Can I use a different cut of steak? Yes, flank steak or skirt steak also work well. Just make sure to slice it thinly.
  • Can I add other vegetables? Of course! Feel free to add any of your favorite veggies, such as mushrooms, zucchini, or corn.
  • How do I know when the steak is done? Use a meat thermometer to check the internal temperature. For medium-rare, aim for 130-135°F (54-57°C).
  • Can I cook these in the oven? Yes, bake at 400°F (200°C) for 15-20 minutes.

Serving Suggestions

These steak fajita foil packets are delicious on their own, but here are a few serving suggestions to take them to the next level:

  • With Tortillas: Serve the fajitas in warm tortillas with your favorite toppings, such as sour cream, guacamole, and salsa.
  • Over Rice: Spoon the fajitas over a bed of fluffy rice for a hearty and satisfying meal.
  • In a Salad: Toss the fajitas with mixed greens, avocado, and a zesty vinaigrette for a light and refreshing salad.
  • With Grilled Corn: Serve the fajitas alongside grilled corn on the cob for a complete summer feast.

And there you have it! Easy Steak Fajita Foil Packets that are perfect for a quick dinner, your outdoor adventures, or a fun campfire meal. I hope you love this recipe as much as I do. If you try it, be sure to let me know in the comments below! I love hearing from you all. Happy cooking!

Remember, cooking is about having fun and experimenting. Don’t be afraid to get creative and make this recipe your own. Whether you’re using them on the grill or cooking over the campfire, make sure you enjoy the process and the delicious results. Now go forth and make something unforgettable together!

Steak Fajita Foil Packet

Prep Time 15 minutes
Cook Time 10 minutes
Total Time 25 minutes
Servings 4 packets
Calories 450
Enjoy delicious steak fajitas cooked in foil packets for an easy campfire or grill meal. This recipe is packed with flavor and perfect for outdoor cooking.

Ingredients

Fajita Ingredients

  • 1.5 pounds strip steak (thinly sliced)
  • 1 red bell pepper (sliced)
  • 1 orange bell pepper (sliced)
  • 1 yellow bell pepper (sliced)
  • 1 red onion (sliced)
  • 2 tablespoons fajita seasoning
  • 2 tablespoons olive oil
  • to taste Salt and pepper

Serving

  • 4 pieces Stonefire ® Original Mini Naan
  • Olive oil or melted butter (for brushing)

Instructions 

  • Preheat campfire or grill to medium-high heat.
  • Combine steak, peppers, onion, seasoning, and oil in a bowl. Toss to coat.
  • Tear off four large pieces of foil.
  • Divide mixture among foil sheets, create packets.
  • Cook packets for 8-10 minutes, flipping halfway.
  • Carefully open packets.
  • Grill brushed naan for 2-3 minutes per side.
  • Serve fajitas with naan and desired garnishes.

Notes

Adjust cooking time based on desired steak doneness and grill temperature.
Calories: 450kcal
Cost: $20
Course: Main Course
Cuisine: Mexican
Keyword: Steak
pin

Error: AI returned broken format. Expecting ‘,’ delimiter: line 2 column 12286 (char 12287)

Recipe Image

Creamy Steak Fajita Pasta Recipe

Prep Time 15 minutes
Cook Time 25 minutes
Total Time 40 minutes
Servings 4 people
Calories 650
Indulge in a delicious fusion of flavors with this Creamy Steak Fajita Pasta. Tender ribeye steak meets vibrant fajita veggies and creamy cheddar sauce, all tossed with perfectly cooked farfalle pasta.

Ingredients

Steak

  • 2 ribeye steaks (approximately 450g)

Pasta

  • 350 g Pasta (farfalle)

Sauce

  • 1/2 cup heavy cream (125ml double cream)
  • 1/2 cup salsa (125ml)
  • 50 g cheddar cheese (1/2 cup grated)
  • 30 g fajita seasoning

Vegetables

  • 3 bell peppers (multi colored)
  • 1 onion
  • 2 cloves garlic

Other

  • 2 tbsp olive oil
  • 10 g coriander (optional)
  • 1 tbsp butter

Instructions 

  • Rub half of the fajita seasoning onto the steaks with olive oil. Reserve the other half for the vegetables.
  • Sear steaks in a hot pan for 1.5 minutes per side. Add butter and baste for 30 seconds. Remove and let rest.
  • Cook pasta. Sauté onions and peppers with remaining fajita seasoning.
  • Add garlic and cook for another minute.
  • Stir in salsa and heavy cream. Simmer for 2 minutes.
  • Stir in cheddar cheese and coriander (if using). Add pasta water if needed.
  • Add drained pasta to the sauce. Slice steak and serve over pasta.

Notes

Adjust the amount of fajita seasoning to your taste preference. For a spicier dish, add a pinch of cayenne pepper to the sauce.
Calories: 650kcal
Cost: $25
Course: dinner
Cuisine: Italian, Mexican
Keyword: fajita, pasta, Steak
pin