Author

Ava

Browsing

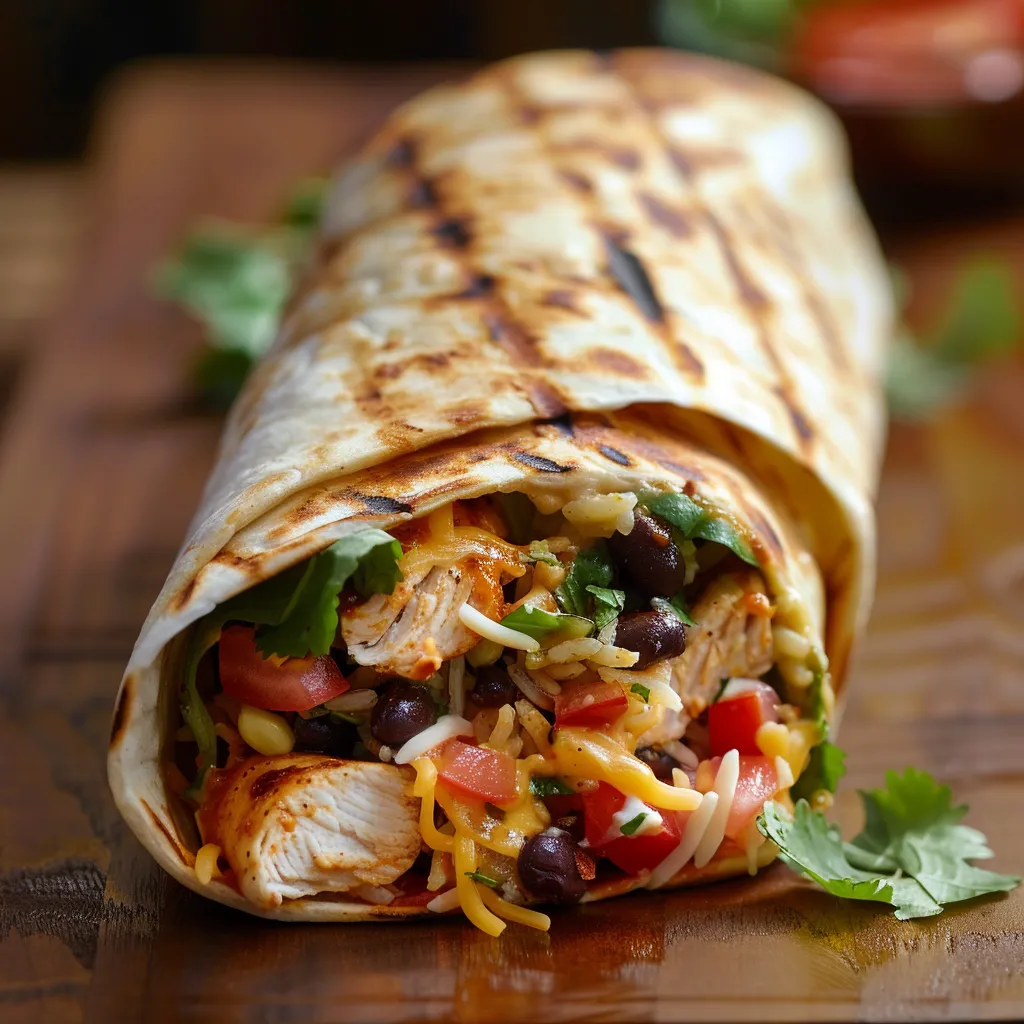
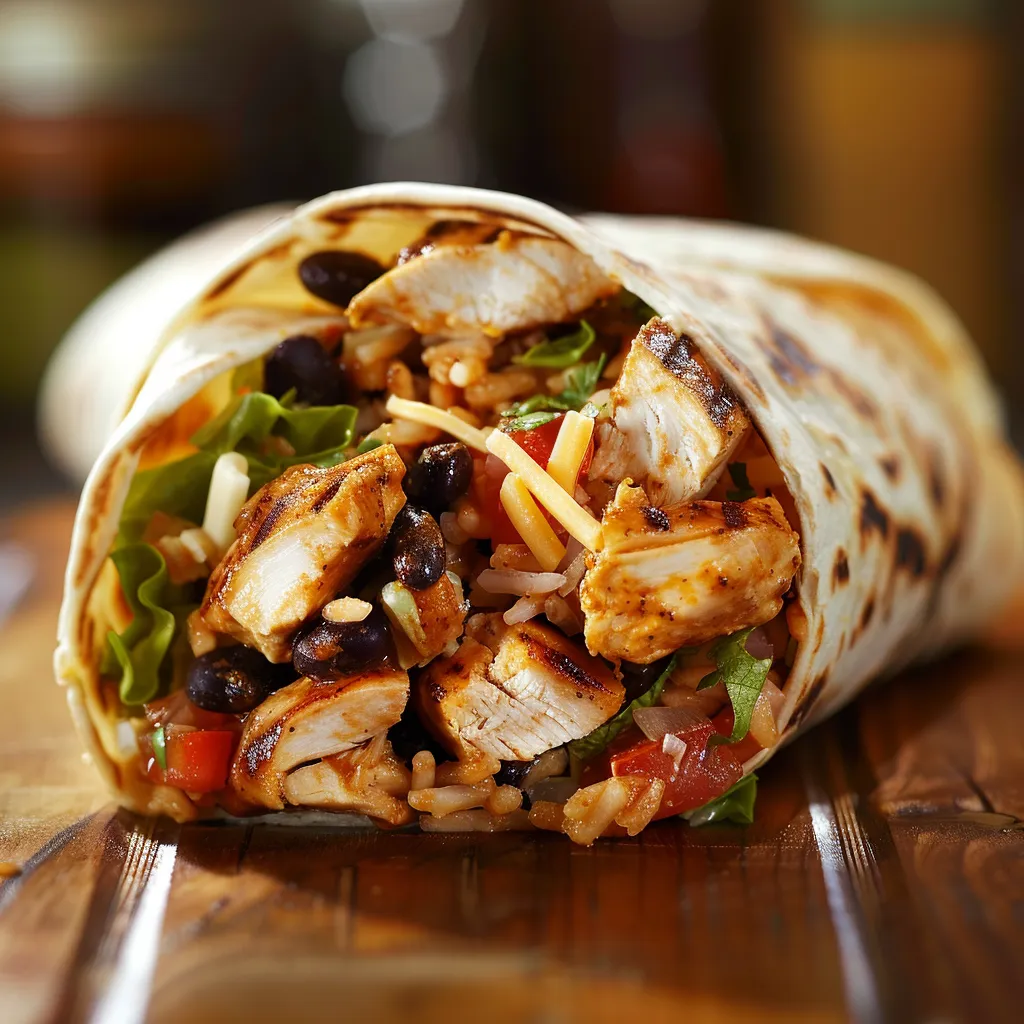
Wrap Your Taste Buds in a Flavorful Adventure: The Chipotle Ranch Grilled Chicken Burrito

Welcome to my kitchen, dear friends! If you’re anything like me, you know that a good burrito isn’t just a meal; it’s an experience. And when it’s a Chipotle Ranch Grilled Chicken Burrito, you’re in for a flavor explosion that’s bound to make your taste buds dance! This recipe is a celebration of bold flavors wrapped in a warm tortilla, bringing together juicy grilled chicken, creamy chipotle ranch dressing, and a medley of fresh ingredients. Let’s dive into this culinary adventure together!

Why You’ll Love This Chipotle Ranch Grilled Chicken Burrito

Imagine this: You take a bite, and the smoky, spicy goodness of chipotle ranch hits your palate, followed by the satisfying crunch of fresh veggies. This burrito doesn’t just fill your stomach; it fills your heart with warmth and joy. Not only is it incredibly delicious, but it’s also straightforward to prepare, making it perfect for busy weeknights or a fun gathering with friends. Plus, the satisfaction of making your own burritos is simply unmatched!

Ingredients Needed

An appetizing burrito filled with grilled chicken, lettuce, and cheese, placed on a rustic surface.

To create the ultimate Chipotle Ranch Grilled Chicken Burrito, you’ll need the following ingredients:

  • 2 boneless, skinless chicken breasts
  • 1/2 cup chipotle ranch dressing
  • 1 cup cooked rice
  • 1 cup black beans, rinsed and drained
  • 1 cup shredded cheese (cheddar or Monterey Jack)
  • 1 cup lettuce, shredded
  • 1 tomato, diced
  • 4 large flour tortillas
  • Salt and pepper to taste
  • Olive oil for grilling

For the Chicken Marinade:

The secret to flavor-packed chicken is in the marinade. You’ll use chipotle ranch dressing here, which adds a creamy, zesty kick that transforms ordinary chicken into something spectacular.

For the Chipotle Ranch Sauce:

While we’re using chipotle ranch dressing for marinating, you can also whip up a quick homemade version to drizzle over your burrito if you want an extra layer of flavor!

Other Burrito Ingredients:

Feel free to customize your burrito with your favorite ingredients! Sautéed peppers, corn, or even avocado can add delightful variations.

Step-by-Step Guide

Ready to get cooking? Let’s walk through the process step-by-step! This part is where the magic happens.

1. Marinate the Chicken

Start by marinating the chicken breasts in the chipotle ranch dressing. Cover them thoroughly, and let the flavors meld for at least 30 minutes. If you have time, marinating for a few hours or even overnight makes a huge difference!

2. Grill the Chicken

Once your chicken has marinated, preheat your grill or grill pan over medium heat. Brush it lightly with olive oil to prevent sticking. Season the marinated chicken with salt and pepper, then place it on the grill. Grill for about 6-7 minutes on each side or until the chicken is cooked through and has those beautiful grill marks. The aroma will be irresistible!

3. Prepare the Chipotle Ranch Sauce

If you’re feeling adventurous, mix up a quick chipotle ranch sauce by combining some ranch dressing with a bit of chipotle pepper in adobo sauce. Adjust the spice level to your liking!

4. Assemble the Burritos

Now for the fun part! Warm the tortillas in a dry skillet or microwave for a few seconds to make them pliable. On each tortilla, layer a scoop of rice, black beans, grilled chicken strips, shredded cheese, lettuce, and diced tomato. Don’t be shy—load them up!

5. Roll It Up

Fold in the sides of the tortilla and roll it up tightly from the bottom to the top. If you want that crispy finish, grill the assembled burritos on each side for an additional 2-3 minutes. Trust me, that golden crunch is worth it!

Tips for Customizing Your Chipotle Ranch Burrito

  • Spice it Up: Add jalapeños or a splash of hot sauce for extra heat.
  • Vegetarian Version: Swap out chicken for grilled veggies or sautéed mushrooms.
  • Cheesy Goodness: Mix different cheeses for a richer flavor profile.

Storage & Freezing

Got leftovers? First of all, lucky you! You can store assembled burritos in the fridge for up to three days. Just wrap them tightly in foil or plastic wrap. For longer storage, freeze them for up to 3 months. To reheat, you can microwave them straight from the freezer or bake them in the oven until heated through.

FAQs

Can I make this recipe ahead of time?

Absolutely! You can prep all the components ahead of time. Just marinate the chicken, cook the rice and beans, and chop the veggies. Assemble when you’re ready to eat!

What’s the best way to make the burritos freezer-friendly?

Wrap each burrito individually in plastic wrap and then in foil. This double layer will help prevent freezer burn and keep them fresh!

How do I tone down the spice level?

If you’re sensitive to spice, reduce the amount of chipotle in the marinade and sauce. You can also use a mild ranch dressing to keep things flavorful yet gentle on the palate.

Final Thoughts

There you have it—a recipe for a Chipotle Ranch Grilled Chicken Burrito that’s sure to impress! Whether you’re cooking for family, friends, or just treating yourself, these burritos are a perfect blend of comfort and excitement. They bring the warmth of home-cooked meals with a dash of adventure, just the way I like it! So grab your apron, roll up your sleeves, and let’s create some magic in the kitchen together. I can’t wait for you to try this recipe—your taste buds will thank you!

And if you loved this recipe, why not explore more delicious ideas? Try my Cheesy Garlic Chicken Wraps, or indulge in Cheesy Garlic Bread for a delightful side! Happy cooking!

Easy Chipotle Ranch Grilled Chicken Burrito

Prep Time 15 minutes
Cook Time 20 minutes
Total Time 35 minutes
Servings 4 servings
Calories 650
A flavorful and easy-to-make burrito featuring grilled chicken marinated in spicy chipotle ranch dressing, packed with rice, beans, cheese, and fresh veggies.

Ingredients

Protein

  • 2 pieces boneless, skinless chicken breasts
  • 1/2 cup chipotle ranch dressing

Carbohydrates

  • 1 cup cooked rice
  • 1 cup black beans, rinsed and drained

Dairy

  • 1 cup shredded cheese (cheddar or monterey jack)

Vegetables

  • 1 cup lettuce, shredded
  • 1 piece tomato, diced

Other

  • 4 large flour tortillas
  • to taste salt and pepper
  • for grilling olive oil

Instructions 

  • Marinate chicken in dressing for 30 mins, then grill with olive oil, salt, and pepper until cooked through.
  • Let chicken rest, then slice into strips.
  • Warm tortillas, then layer with rice, beans, chicken, cheese, lettuce, and tomato.
  • Fold and roll the burritos tightly, then serve immediately or grill for a crispy finish.

Notes

For extra flavor, add a squeeze of lime or hot sauce before serving.
Calories: 650kcal
Cost: $15
Course: Main Course
Cuisine: American
Keyword: Chicken

Loved this recipe? Save it to your favorite Pinterest board so you can easily find it later! It’s the perfect way to keep all your sweet ideas in one place. ✨

A detailed view of a burrito with soft flour tortilla, filled with chicken, rice, and fresh toppings.

One-Pan Wonder: The Lemon Balsamic Chicken and Potatoes That’ll Steal Your Heart

Welcome to my kitchen, where magic happens with just a dash of creativity and a sprinkle of love! Today, I’m thrilled to share a recipe that has stolen my heart time and time again: Sheet Pan Lemon Balsamic Chicken and Potatoes. This dish is not just a meal; it’s a comforting embrace on a plate, perfect for cozy dinners or impressing friends with minimal fuss.

If you’re anything like me, you appreciate the beauty of a one-pan meal. It’s the kind of cooking that means less mess and more time enjoying the flavors of your creation. With a tantalizing blend of lemon, balsamic vinegar, and fresh herbs, this recipe is a flavor explosion that will leave your taste buds dancing.

Quick Details

  • Prep Time: 10 minutes
  • Cook Time: 25-30 minutes
  • Total Time: 35-40 minutes
  • Servings: 4

Ingredients You’ll Need

A vibrant dish of lemon balsamic chicken thighs and halved baby potatoes on a sheet pan.

Gathering the right ingredients is key to achieving that delightful flavor profile we’re after. Here’s what you’ll need:

  • 4 boneless, skinless chicken thighs
  • 1 lb baby potatoes, halved
  • 1/4 cup balsamic vinegar
  • 1/4 cup olive oil
  • 2 lemons, juiced and zested
  • 4 garlic cloves, minced
  • 1 teaspoon dried oregano
  • 1 teaspoon salt
  • 1/2 teaspoon black pepper
  • Fresh parsley for garnish

How to Make Sheet Pan Lemon Balsamic Chicken and Potatoes

Let’s get cooking! This recipe is as simple as it is delicious, making it perfect for even the busiest of weeknights.

Step-by-Step Instructions

  1. Preheat the Oven: First things first, preheat your oven to 400°F (200°C). This will ensure your chicken and potatoes roast to perfection.
  2. Whisk the Marinade: In a large bowl, whisk together balsamic vinegar, olive oil, lemon juice, lemon zest, minced garlic, oregano, salt, and pepper. This marinade is where the magic begins—imagine the zesty aroma filling your kitchen!
  3. Coat the Chicken and Potatoes: Add the chicken thighs and halved baby potatoes to the bowl. Toss them well to ensure they are evenly coated with that vibrant marinade.
  4. Spread on a Sheet Pan: Transfer the chicken and potatoes to a large sheet pan, spreading them out in a single layer. This will help them roast evenly and develop that lovely golden-brown color.
  5. Bake Away: Pop the sheet pan into the preheated oven and bake for 25-30 minutes, or until the chicken is cooked through and the potatoes are tender. The sizzle you hear will be the sound of deliciousness!
  6. Garnish and Serve: Once done, take the pan out of the oven and sprinkle fresh parsley over the top for a burst of color and freshness. Serve warm and watch everyone gather around the table!

Tips for Success

  • Chicken Thighs vs. Breasts: I love using chicken thighs for this recipe because they stay juicy and flavorful. However, if you prefer chicken breasts, feel free to substitute!
  • Potato Size Matters: If your baby potatoes are larger, consider pre-roasting them for about 10 minutes before adding the chicken to ensure everything cooks evenly.
  • Marinating Time: For even more flavor, let the chicken and potatoes marinate for 30 minutes (or longer) in the fridge before cooking.

Variations to Try

This recipe is incredibly versatile, so don’t hesitate to switch it up!

  • Add Vegetables: Toss in some bell peppers, zucchini, or carrots for extra color and nutrition.
  • Change the Herbs: Experiment with different herbs like thyme or rosemary to find your perfect flavor combination.
  • Cheesy Twist: Sprinkle some feta cheese on top before serving for a creamy, tangy addition!

Common Substitutions

  • Balsamic Vinegar: If you don’t have balsamic vinegar, red wine vinegar is a decent substitute, although it will alter the flavor slightly.
  • Garlic: In a pinch, you can use garlic powder, but fresh garlic truly brings out the best flavors.

Equipment You’ll Need

  • Large mixing bowl
  • Whisk
  • Large sheet pan
  • Oven mitts (safety first!)
  • Knife and cutting board

Storage & Freezing

Leftovers? Yes, please! Here’s how to store them:

  • Refrigeration: Store any leftovers in an airtight container in the fridge for up to 3 days.
  • Freezing: This dish can be frozen! Just make sure to let it cool completely before transferring it to a freezer-safe container. It should keep well for up to 2 months. When ready to eat, thaw it overnight in the fridge before reheating.

FAQs

  • Can I use frozen chicken? Yes, but make sure to thaw it before marinating and cooking for even results.
  • What can I serve with this dish? This dish pairs beautifully with a fresh salad, crusty bread, or even a side of roasted vegetables.
  • How do I know when the chicken is done? The internal temperature should reach 165°F (75°C). A meat thermometer is a great investment for perfectly cooked chicken!

Time to Gather Around the Table!

As we wrap up, I hope this Sheet Pan Lemon Balsamic Chicken and Potatoes recipe finds a special place in your kitchen. This dish embodies everything I love about cooking—simple ingredients, bursting flavors, and the joy of sharing a meal with loved ones. Whether you’re cooking for family or friends, this one-pan wonder is bound to impress and create lasting memories.

So, gather your ingredients, preheat that oven, and let’s create some culinary magic together! And remember, if you make this dish, I’d love to hear how it turned out—drop a comment below or tag me on Instagram! Happy cooking, my friend!

Sheet Pan Lemon Balsamic Chicken and Potatoes

Prep Time 10 minutes
Cook Time 25 minutes
Total Time 35 minutes
Servings 4 servings
Calories 450
A flavorful and easy sheet pan dinner featuring tender chicken thighs, roasted potatoes, and a zesty lemon balsamic glaze.

Ingredients

Protein

  • 4 pieces boneless, skinless chicken thighs

Vegetables

  • 1 lb baby potatoes, halved

Sauces & Condiments

  • 1/4 cup balsamic vinegar
  • 1/4 cup olive oil
  • 2 lemons lemons, juiced and zested
  • 4 cloves garlic, minced
  • 1 teaspoon dried oregano
  • 1 teaspoon salt
  • 1/2 teaspoon black pepper

Garnish

  • fresh parsley (for garnish)

Instructions 

  • Preheat oven to 400°F (200°C).
  • Whisk together balsamic, olive oil, lemon juice, zest, garlic, oregano, salt, and pepper.
  • Toss chicken and potatoes in marinade, then spread on a sheet pan.
  • Bake for 25-30 minutes until cooked and tender.
  • Garnish with parsley before serving.

Notes

For extra flavor, marinate the chicken for 30 minutes before baking.
Calories: 450kcal
Cost: $15
Course: Main Course
Cuisine: American
Keyword: balsamic, Chicken, lemon

Loved this recipe? Save it to your favorite Pinterest board so you can easily find it later! It’s the perfect way to keep all your sweet ideas in one place. ✨

Delicious roasted chicken and potatoes, highlighted by natural light, with a cozy background.

One-Pan Wonder: Garlic Parmesan Chicken & Veggies That Feel Like Home

Hey there, fellow food lovers! If you’re like me and believe that the best meals are the ones that feel like home, you’re in for a treat. Today, I’m sharing my go-to recipe for Garlic Parmesan Sheet Pan Chicken & Veggies. This dish is not just easy to whip up; it wraps you in a cozy embrace of flavors that will make your kitchen smell heavenly. Plus, it requires minimal cleanup—perfect for those busy weeknights when you want a delicious dinner without the fuss!

Why Sheet Pan Meals Are a Game Changer

Let’s talk about why sheet pan meals are the absolute best. First off, they’re a major time-saver. You can toss everything onto one pan, stick it in the oven, and let it do its magic while you sip a glass of wine or catch up on your favorite show. And let’s be honest, who doesn’t love a meal that’s practically begging to be a part of your weekly rotation?

Plus, the beauty of this Garlic Parmesan Chicken & Veggies dish is that you can customize it based on what you have on hand. Got some leftover veggies? Toss them in! Want to switch up the protein? Go for it! Cooking is all about exploring and creating, and this dish lets you do just that.

Ingredients for Garlic Parmesan Sheet Pan Chicken & Veggies

Mouthwatering shot of chicken breasts surrounded by colorful vegetables.

Before we dive into the cooking process, let’s gather our ingredients. Here’s what you’ll need:

  • 4 boneless, skinless chicken breasts
  • 2 cups broccoli florets
  • 2 cups baby carrots
  • 1 cup cherry tomatoes
  • 1/2 cup grated Parmesan cheese
  • 4 cloves garlic, minced
  • 1/4 cup olive oil
  • 1 teaspoon Italian seasoning
  • Salt and pepper to taste
  • Fresh parsley for garnish (optional)

How to Prepare Your One-Pan Meal

Step 1: Preheat the Oven

First things first, let’s preheat that oven to 400°F (200°C). This is where the magic begins! If you’re like me and can’t wait to get cooking, this is the moment you can start to feel excited.

Step 2: Make Your Flavor Base

In a large mixing bowl, combine the olive oil, minced garlic, Italian seasoning, and a sprinkle of salt and pepper. Give it a good stir; the aroma of garlic will instantly elevate your mood. Seriously, how can you resist that smell?

Step 3: Coat the Chicken

Now, it’s time to add the chicken breasts to the bowl. Toss them around until they’re completely coated in this delicious mixture. I like to use my hands for this—getting a little messy is half the fun of cooking!

Step 4: Arrange on the Sheet Pan

On a large sheet pan, place the coated chicken breasts in the center. Surround them with the broccoli florets, baby carrots, and cherry tomatoes. The vibrant colors of the veggies will make your dish look like a work of art!

Step 5: Add the Finishing Touches

Drizzle any remaining olive oil mixture over the vegetables and sprinkle the grated Parmesan cheese on top. This cheesy goodness is what transforms this dish from good to absolutely divine.

Step 6: Bake to Perfection

Slide the sheet pan into the preheated oven and bake for 25-30 minutes. The chicken should be cooked through, and the veggies will be tender. You might want to check the chicken with a meat thermometer; it should read 165°F (75°C) to ensure it’s safe to eat.

Step 7: Garnish and Serve

Once everything is cooked to perfection, pull the pan out of the oven and let it cool for a few minutes. Garnish with some fresh parsley if you’re feeling fancy, and serve warm. Your family will thank you, and your taste buds will be dancing!

Tips for Making the Best Garlic Parmesan Chicken & Veggies

  • Don’t Overcrowd the Pan: Ensure that there’s enough space between the chicken and veggies for even cooking.
  • Customize the Veggies: If broccoli and carrots aren’t your favorites, feel free to swap in zucchini, bell peppers, or even Brussels sprouts!
  • Use Parchment Paper: If you want to make cleanup a breeze, line your sheet pan with parchment paper before adding the ingredients.
  • Let It Rest: Allow the chicken to rest for a few minutes after baking to keep it juicy.

Frequently Asked Questions

Can I Substitute the Chicken?

Absolutely! You can use chicken thighs for a richer flavor, or even swap in tofu for a vegetarian option. Just adjust your cooking time depending on the protein you choose.

What Can I Use Instead of Parmesan?

If you’re looking for a dairy-free option, try nutritional yeast for a cheesy flavor without the dairy. You could also use a dairy-free cheese alternative!

How Do I Store Leftovers?

Store any leftovers in an airtight container in the fridge for up to 3 days. Reheat in the oven or microwave until warmed through.

Can I Freeze This Meal?

Yes, you can freeze the uncooked chicken and veggies together for up to 3 months. Just make sure to thaw in the fridge overnight before cooking.

Variations to Try

If you’re feeling adventurous, here are some fun variations to switch things up:

  • Spicy Twist: Add red pepper flakes to the olive oil mixture for a bit of heat.
  • Herb-Infused: Swap out the Italian seasoning for fresh herbs like rosemary or thyme for a different flavor profile.
  • Cheesy Delight: Go wild with your cheese! Try adding mozzarella for a gooey finish or cheddar for a sharp taste.

Serving Suggestions

This Garlic Parmesan Sheet Pan Chicken & Veggies is fantastic on its own, but if you want to round out your meal, consider serving it with:

  • Warm crusty bread to soak up the juices
  • A fresh green salad for a refreshing contrast
  • Some fluffy rice or quinoa for extra heartiness

Final Thoughts

Cooking doesn’t have to be complicated to be delicious, and this Garlic Parmesan Sheet Pan Chicken & Veggies is the perfect example of that. With its simple yet flavorful ingredients, it’s a meal that feels like a hug from the inside out. Whether you’re cooking for family, friends, or just yourself, I hope this recipe brings a little magic into your kitchen. So, grab your ingredients, preheat that oven, and get ready to enjoy a comforting dinner that’s sure to impress. Happy cooking!

Garlic Parmesan Sheet Pan Chicken & Veggies | Dinner | Easy Recipe

Prep Time 10 minutes
Cook Time 30 minutes
Total Time 40 minutes
Servings 4 servings
Calories 450
A quick and flavorful sheet pan dinner featuring tender chicken breasts, roasted vegetables, and a cheesy Parmesan topping, perfect for an easy weeknight meal.

Ingredients

Protein

  • 4 pieces boneless, skinless chicken breasts

Vegetables

  • 2 cups broccoli florets
  • 2 cups baby carrots
  • 1 cup cherry tomatoes

Cheese & Seasonings

  • 1/2 cup grated parmesan cheese
  • 4 cloves garlic, minced
  • 1/4 cup olive oil
  • 1 teaspoon italian seasoning
  • to taste salt and pepper
  • for garnish fresh parsley (optional)

Instructions 

  • Preheat oven to 400°F (200°C). Mix olive oil, garlic, Italian seasoning, salt, and pepper.
  • Toss chicken with the mixture, then arrange on a sheet pan.
  • Add vegetables around the chicken, drizzle remaining mixture, and sprinkle Parmesan.
  • Bake for 25-30 minutes until cooked and tender. Garnish with parsley if desired.

Notes

For extra flavor, marinate the chicken beforehand or add your favorite herbs.
Calories: 450kcal
Cost: $15
Course: dinner
Keyword: Chicken, easy, vegetables

Loved this recipe? Save it to your favorite Pinterest board so you can easily find it later! It’s the perfect way to keep all your sweet ideas in one place. ✨

Detailed image of Garlic Parmesan chicken and veggies on a sheet pan.

One Pan Wonder: Hot Honey Garlic Chicken with a Zesty Twist

Welcome to my kitchen, dear friend! Today, we’re diving into a delightful culinary adventure with a recipe that’s not just dinner—it’s an experience. Picture this: juicy chicken thighs marinated in a luscious hot honey garlic sauce, accompanied by tender zucchini, all roasted together on a single sheet pan. Yes, you guessed it! We’re making Sheet Pan Hot Honey Garlic Chicken and Zucchini, and I promise, it’s going to be a game changer for your weeknight meals.

Why You’ll Love This Recipe

Let’s be honest—life can get hectic. Busy schedules often mean that cooking feels like a chore rather than a joy. That’s where this recipe shines! It’s easy, it’s quick, and best of all, it requires minimal cleanup (hello, one pan!). The combination of sweet honey, savory garlic, and a hint of heat from red pepper flakes creates a flavor profile that dances on your palate. Plus, with the added crunch and freshness of zucchini, you’re getting a well-rounded meal that feels both satisfying and nourishing.

Preparation and Cooking Time

Eye-level shot of succulent hot honey garlic chicken and zucchini, highlighted by warm, natural lighting in a cozy setting.

Let’s break it down:

  • Prep Time: 10 minutes
  • Cook Time: 25-30 minutes
  • Total Time: 35-40 minutes

Ingredients

Gather these simple yet flavorful ingredients:

  • 1 pound chicken thighs, boneless and skinless
  • 2 medium zucchinis, sliced
  • 1/4 cup honey
  • 3 tablespoons soy sauce
  • 3 cloves garlic, minced
  • 1 tablespoon olive oil
  • 1 teaspoon red pepper flakes
  • Salt and pepper to taste
  • Fresh parsley for garnish (optional)

Step-by-Step Instructions

Ready to create magic in your kitchen? Let’s get started!

1. Preheat the Oven

Set your oven to 400°F (200°C). This is crucial to ensure that your chicken is perfectly cooked and your zucchini is tender yet crisp.

2. Prepare the Marinade

In a small bowl, combine the honey, soy sauce, minced garlic, olive oil, red pepper flakes, salt, and pepper. This aromatic mixture is the heart of our dish, and it smells absolutely divine!

3. Season the Chicken

Place the chicken thighs on a sheet pan and season them generously with salt and pepper. This step ensures that every bite is packed with flavor.

4. Marinate the Chicken

Pour half of the honey garlic mixture over the chicken, making sure each piece is well coated. Let it sit for a few minutes while you prepare the zucchini. Trust me; the longer it marinates, the better!

5. Prepare the Zucchini

Add the sliced zucchini around the chicken on the sheet pan. Drizzle the remaining honey garlic mixture over the zucchini, giving them a little love as well!

6. Bake

Pop the sheet pan into the preheated oven and bake for 25-30 minutes. Keep an eye on it; the chicken should reach an internal temperature of 165°F (74°C) and the zucchini should be tender and slightly caramelized.

7. Rest and Garnish

Once done, remove the pan from the oven and let it rest for a few minutes. This lets the juices redistribute, ensuring every bite is succulent. Garnish with fresh parsley for that beautiful pop of color.

8. Serve and Enjoy

Now, the moment we’ve all been waiting for! Plate up your hot honey garlic chicken and zucchini, and dig in! Each bite is a sweet and savory explosion, making you wonder why you haven’t made this sooner.

How to Serve

This dish is versatile enough to stand alone, but if you want to elevate your meal, consider serving it over a bed of fluffy rice or quinoa. The grains soak up the delicious sauce, creating a hearty and satisfying dinner. You could also pair it with a simple green salad or some crusty bread to soak up every last drop of that honey garlic goodness.

Additional Tips

Here are a few tips to ensure your hot honey garlic chicken is a hit:

  • Marinate Longer: If you have the time, marinate the chicken for up to an hour (or overnight) for maximum flavor.
  • Adjust the Heat: Not a fan of spice? You can reduce the amount of red pepper flakes or leave them out entirely. On the flip side, if you love heat, feel free to add more!
  • Mix Up the Veggies: Zucchini is just the beginning! Feel free to add other vegetables like bell peppers, carrots, or broccoli to the pan for extra color and nutrition.

Recipe Variations

Cooking is all about creativity! Here are a few variations to try:

  • Sweet and Sticky: Substitute the honey with maple syrup for a unique twist.
  • Herbaceous Delight: Add fresh herbs like thyme or rosemary to the marinade for an aromatic touch.
  • Garlic Lovers: Increase the garlic to 5 cloves for an extra punch of flavor.

Storage and Freezing

If you find yourself with leftovers (which is rare because it’s so good!), here’s how to store them:

  • Refrigerator: Store in an airtight container in the fridge for up to 3 days.
  • Freezer: You can freeze the cooled chicken and zucchini in a freezer-safe container for up to 3 months. Just thaw in the fridge overnight before reheating.

Special Equipment

You really don’t need much to make this dish. A good quality sheet pan is essential, and a sharp knife for slicing your zucchini will make prep a breeze. If you have a meat thermometer, use it to ensure your chicken is perfectly cooked!

Frequently Asked Questions

Can I substitute chicken thighs for chicken breasts?

Absolutely! Chicken breasts will work just fine, though they may cook a bit faster. Just keep an eye on them to avoid drying out.

What if I don’t have hot honey?

No problem! Regular honey mixed with a pinch of red pepper flakes works beautifully. You can even add a dash of sriracha or chili sauce for an extra kick.

Can I use other vegetables?

For sure! This recipe is incredibly versatile. Feel free to toss in your favorite vegetables such as bell peppers, asparagus, or even cherry tomatoes!

Conclusion

And there you have it! Sheet Pan Hot Honey Garlic Chicken and Zucchini is not only a feast for the taste buds but also a celebration of simplicity. With its ease of preparation and the delightful blend of flavors, it’s bound to become a staple in your culinary repertoire. So, gather your ingredients, preheat that oven, and let’s create some magic together. Don’t forget to share your creations with me; I can’t wait to see how you make this dish your own. Happy cooking!

For more delicious recipes, check out my cozy chicken and potatoes recipe or explore my wholesome chicken pasta dish for more inspiration!

Sheet Pan Hot Honey Garlic Chicken and Zucchini

Prep Time 10 minutes
Cook Time 25 minutes
Total Time 35 minutes
Servings 4 servings
Calories 350
A quick and flavorful sheet pan dinner featuring tender chicken thighs and zucchini glazed with sweet and spicy honey garlic sauce.

Ingredients

Protein

  • 1 pound chicken thighs, boneless and skinless

Vegetables

  • 2 medium zucchinis zucchinis, sliced

Sauces & Condiments

  • 1/4 cup honey
  • 3 tablespoons soy sauce
  • 3 cloves garlic, minced
  • 1 tablespoon olive oil
  • 1 teaspoon red pepper flakes
  • to taste salt and pepper salt and pepper

Garnish

  • optional fresh parsley (for garnish)

Instructions 

  • Preheat oven to 400°F (200°C).
  • Mix honey, soy sauce, garlic, olive oil, red pepper flakes, salt, and pepper.
  • Season chicken with salt and pepper, place on sheet pan, and coat with half of the sauce.
  • Add zucchini around chicken, drizzle with remaining sauce.
  • Bake for 25-30 minutes, then rest before serving. Garnish with parsley if desired.

Notes

Adjust cooking time based on thickness of chicken thighs.
Calories: 350kcal
Cost: $15
Course: Main Course
Cuisine: American
Keyword: Chicken, honey, zucchini

Loved this recipe? Save it to your favorite Pinterest board so you can easily find it later! It’s the perfect way to keep all your sweet ideas in one place. ✨

A beautifully styled sheet pan featuring juicy chicken thighs glistening with honey garlic glaze alongside fresh zucchini slices.

A Wholesome Bite of Comfort: Keto Philly Cheesesteak Rolls That Will Steal Your Heart

Welcome, dear friends! If you’re anything like me, you have a soft spot for comfort food that hugs you from the inside out. Today, I’m thrilled to share a recipe that’s not just delicious but also fits beautifully into a keto lifestyle. Say hello to Keto Philly Cheesesteak Rolls! These little bundles of joy capture all the savory goodness of a classic Philly cheesesteak, minus the carbs. Ready to dive into this culinary adventure? Let’s get cooking!

Why You’ll Love This Recipe ❤️

Let me tell you, there are so many reasons to fall head over heels for these Keto Philly Cheesesteak Rolls:

  • Low-Carb Comfort Food: Perfect for anyone watching their carbs but still craving those rich, comforting flavors.
  • Quick & Versatile: Ready in under 30 minutes, and you can easily customize them with your favorite veggies or meats.
  • Make-Ahead Friendly: These rolls store beautifully, making them perfect for meal prep.

Serving Size 🍽️

An eye-level shot of delicious Keto Philly Cheesesteak Rolls with a creamy texture, garnished with fresh vegetables.

This recipe yields about 4 generous servings, but feel free to double it for a party or family gathering. Trust me; your friends are going to want seconds!

Ingredients List 🛒

Gather these simple, wholesome ingredients:

  • 1 pound thinly sliced beef (such as ribeye or flank steak)
  • 2 tablespoons olive oil
  • 1 green bell pepper, sliced
  • 1 small onion, sliced
  • 1 cup sliced mushrooms
  • 4 ounces cream cheese, softened
  • 1 cup shredded provolone cheese
  • 1 teaspoon garlic powder
  • Salt and pepper to taste
  • Lettuce leaves (for wrapping)

Preparation Time ⏳

Preparation will take about 10 minutes, and cooking will take another 15. In no time, you’ll be savoring these delightful rolls!

Cooking Time ⏲️

All in all, from start to finish, you’ll be looking at around 25-30 minutes to have these rolls ready for your table.

Instructions / Method 👩‍🍳

Step 1: Prepare Your Skillet

Heat 2 tablespoons of olive oil in a large skillet over medium heat. As the oil warms, it will start to shimmer—this is your cue that it’s time to add the veggies.

Step 2: Sauté the Veggies

Add the sliced onions, green bell pepper, and mushrooms to the skillet. Sauté these colorful beauties until they’re softened and fragrant, around 5-7 minutes. You’ll love how the kitchen smells at this point!

Step 3: Add the Beef

Now, it’s time to introduce the star of the show—the beef! Add the thinly sliced beef to the skillet, sprinkle in the garlic powder, and season with salt and pepper. Cook until the beef is browned and cooked through, about 3-5 minutes. The sizzling sound is music to my ears!

Step 4: Creamy Goodness

Reduce the heat to low and stir in the softened cream cheese. Watch as it melts into a creamy, dreamy mixture that binds everything together. Make sure it’s well combined; we want every bite to be luscious!

Step 5: Cheese, Please!

Remove the skillet from the heat and fold in the shredded provolone cheese until it melts into the beef mixture. It should be gooey and delightful—just the way we like it!

Step 6: Assemble the Rolls

Lay out your lettuce leaves (these will be the tasty wraps). Spoon generous amounts of the beef and cheese mixture onto each leaf. Roll them tightly, and voila! Your Keto Philly Cheesesteak Rolls are ready to be devoured.

Cooking Tools & Equipment 🛠️

Here’s what you’ll need:

  • A large skillet
  • A spatula for stirring
  • Measuring spoons
  • A cutting board and knife for slicing

Flavor Profile 🌶️

Taste Description

These rolls are a delightful combination of savory beef, creamy cheese, and the crunch of fresh lettuce. Each bite is a harmonious blend of textures and flavors, sure to make your taste buds dance!

Key Flavors & Spices

The garlic powder adds a subtle punch, while the provolone cheese brings a rich, melty goodness that perfectly complements the beef and vegetables.

How to Balance the Flavors

For a touch of brightness, consider adding a squirt of fresh lemon juice or a sprinkle of fresh herbs like parsley or basil before rolling them up. It’s all about balance!

Allergen Information ⚠️

Common Allergens

This recipe contains dairy (cream cheese and provolone) and beef. Make sure to check for allergies before serving!

Substitutions for Allergen-Free Options

If you need to make these dairy-free, you can use a plant-based cream cheese and a dairy-free cheese alternative. For those avoiding beef, feel free to swap in chicken or turkey, or even a plant-based protein like tempeh.

Nutritional Information 🥗

Each serving is low in carbs yet high in flavor, making these Keto Philly Cheesesteak Rolls a fantastic option for anyone following a ketogenic diet.

Dietary Considerations 🥑

Suitable for Special Diets

These rolls are keto-friendly, low-carb, and gluten-free. Perfect for those looking to indulge without the guilt!

How to Modify for Dietary Needs

Adjust the fillings to suit your dietary preferences—swap out beef for chicken, or add in more veggies to bulk them up.

Recipe Variations 🔄

Meat Alternatives

Feel free to use thinly sliced chicken breast or turkey instead of beef. The cooking times will remain similar.

Cheese Variations

If provolone isn’t your favorite, mozzarella or cheddar are excellent substitutes that melt beautifully.

Vegetable Options

Add in some diced zucchini or spinach to the mix for extra nutrients and flavor.

Alternative Preparation Methods

For a fun twist, consider grilling the wrapped rolls for a smoky flavor. Just be careful to keep the wraps tightly secured!

Pairings & Side Dishes 🍷

Recommended Side Dishes

These rolls pair wonderfully with a side salad or some roasted veggies for a complete meal.

Beverage Pairings

A chilled glass of iced tea or a light red wine can complement the rich flavors of the rolls beautifully.

Balanced Meal Suggestions

To make a well-rounded dinner, serve these rolls with a refreshing cucumber salad or some sautéed asparagus.

Serving Suggestions 🍽️

Presentation Ideas

Serve these rolls on a large platter and garnish with fresh herbs for a beautiful presentation that will wow your guests.

Garnishing Tips

Consider adding a sprinkle of crushed red pepper flakes for a little heat or some sliced jalapeños for those who like it spicy!

Storage & Shelf Life ❄️

Store any leftovers in an airtight container in the refrigerator for up to 3 days. These rolls reheat beautifully, making them perfect for quick lunches or dinners throughout the week.

Cooking Tips & Tricks 🔥

Techniques for Better Results

For the best texture, don’t overcook the beef—just enough to brown it is perfect. You want it juicy and flavorful!

Time-Saving Hacks

Prep your veggies ahead of time and store them in the fridge to save time on busy nights.

When Things Go Wrong 🤔

Common Issues and Solutions

If your rolls are falling apart, try using sturdier lettuce leaves like romaine or butter lettuce, which hold up better.

FAQs ❓

Can these be made in advance?

Absolutely! You can prepare the filling ahead of time and assemble the rolls just before serving.

Will any type of cheese work for the wraps?

Most cheeses will work, but I recommend sticking to varieties that melt well, like provolone or mozzarella.

Can I use sliced steak instead of ground beef?

Definitely! Thinly sliced ribeye or sirloin steak will give you that classic Philly cheesesteak experience.

How can I make these dairy-free?

Use a dairy-free cream cheese and cheese alternative for the filling, and you’ll have a delicious dairy-free option!

Can coconut flour replace almond flour in the fathead dough alternative?

Yes, but use only 1/4 to 1/3 cup of coconut flour per cup of almond flour due to its absorbency.

Are these suitable for meal prep?

Absolutely! These rolls are perfect for meal prep as they store and reheat beautifully.

Final Thoughts ❤️

And there you have it! Keto Philly Cheesesteak Rolls that are sure to steal your heart and satisfy your cravings. Cooking doesn’t need to be complicated, and with this recipe, you can create magic in your kitchen. Remember, the best meals are the ones made with love and shared with laughter. So grab a friend, roll up your sleeves, and enjoy this delightful dish together! Until next time, happy cooking!

Keto Philly Cheesesteak Rolls - So Tasty & Easy To Make

Prep Time 10 minutes
Cook Time 15 minutes
Total Time 25 minutes
Servings 4 servings
Calories 450
Enjoy these low-carb, flavorful Philly cheesesteak wraps made with tender beef and melted cheese, perfect for a quick and satisfying meal.

Ingredients

Meat

  • 1 pound thinly sliced beef (such as ribeye or flank steak)
  • 2 tablespoons olive oil
  • 1 green bell pepper green bell pepper, sliced
  • 1 small onion, sliced
  • 1 cup sliced mushrooms
  • 4 ounces cream cheese, softened
  • 1 cup shredded provolone cheese
  • 1 teaspoon garlic powder
  • to taste salt and pepper
  • lettuce leaves for wrapping lettuce leaves (for wrapping)

Instructions 

  • Heat olive oil in a skillet over medium heat.
  • Sauté onions, bell pepper, and mushrooms until softened, about 5-7 minutes.
  • Add beef, season with garlic powder, salt, and pepper; cook until browned, 3-5 minutes.
  • Reduce heat, stir in cream cheese until melted, then add provolone cheese and stir until melted.
  • Place mixture on lettuce leaves, roll up, and serve immediately.

Notes

Use fresh lettuce for best wrapping and flavor.
Calories: 450kcal
Cost: $15
Course: Main Course
Cuisine: American
Keyword: Beef, Cheesesteak, Keto

Loved this recipe? Save it to your favorite Pinterest board so you can easily find it later! It’s the perfect way to keep all your sweet ideas in one place. ✨

A vibrant image of Keto Philly Cheesesteak Rolls showcasing sautéed beef and vegetables wrapped in lettuce.

One-Pan Wonder: Teriyaki Chicken & Veggies That Tastes Like a Culinary Hug

Oh, the glorious chaos of weeknight dinners! You know the drill: the clock is ticking, your family is asking what’s for dinner, and your mind is racing through a mental list of takeout menus. But fear not, my friend! I have just the remedy for those frantic evenings—my Sheet Pan Teriyaki Chicken & Veggies. This dish is not only a delight for the taste buds but also a lifesaver for busy nights. Imagine the sweet and savory aroma wafting through your kitchen, the vibrant colors of fresh vegetables, and the sizzle of chicken roasting to perfection. It’s like a culinary hug that wraps you in warmth and comfort.

Why You’ll Love This Recipe

This one-pan wonder is a game-changer, especially for families. It requires minimal cleanup (hello, single sheet pan!), and the recipe is flexible enough to accommodate whatever veggies you have lying around. Plus, it’s packed with nutrients, making it a wholesome meal everyone will enjoy. And let’s not forget the best part: even the pickiest eaters will happily gobble this up! Trust me, my nephew used to avoid broccoli like the plague until I introduced him to this dish. Now, he’s the first one at the table when I make it!

Ingredients You’ll Need for Sheet Pan Teriyaki Chicken & Veggies

A vibrant plate featuring teriyaki chicken and an assortment of fresh veggies.

Gathering the right ingredients is the first step to culinary bliss. Here’s what you’ll need:

  • 1 lb chicken thighs or breasts, cut into bite-sized pieces
  • 2 cups broccoli florets
  • 1 bell pepper, sliced
  • 1 carrot, sliced
  • 1 cup snap peas
  • 1/2 cup teriyaki sauce
  • 2 tablespoons olive oil
  • 1 teaspoon garlic powder
  • 1 teaspoon ginger powder
  • Salt and pepper to taste
  • Sesame seeds for garnish
  • Chopped green onions for garnish

Step-by-Step Instructions for Delicious Sheet Pan Teriyaki Chicken & Veggies

Now that you have your ingredients ready, let’s dive into the cooking process. I promise it’s as easy as pie—only way more savory and satisfying!

  1. Preheat the oven: Preheat your oven to 400°F (200°C). This ensures that your chicken and veggies roast evenly and develop that delicious caramelization.
  2. Prepare the chicken and veggies: In a large bowl, combine the chicken pieces, broccoli florets, sliced bell pepper, carrot, and snap peas. You want to create a colorful medley that will make your taste buds dance!
  3. Mix the teriyaki sauce: In a separate bowl, mix the teriyaki sauce, olive oil, garlic powder, ginger powder, salt, and pepper. This flavorful concoction will be the star of the show, making everything taste absolutely divine.
  4. Toss it all together: Pour the teriyaki mixture over the chicken and veggies, and toss to coat everything evenly. It’s a little messy, but that just means you’re doing it right!
  5. Spread and bake: Spread the chicken and veggie mixture onto a large sheet pan in a single layer. This helps everything cook evenly. Bake for 20-25 minutes, or until the chicken is cooked through and the veggies are tender. You’ll know it’s ready when your kitchen fills with that mouthwatering aroma.
  6. Garnish and serve: Remove from the oven and sprinkle with sesame seeds and chopped green onions before serving. And voilà! You have a beautiful, nourishing meal ready to impress.

Nutritional Information for Sheet Pan Teriyaki Chicken & Veggies

This dish isn’t just a feast for the senses; it’s also packed with nutrition. Here’s a quick breakdown:

  • Protein: Chicken provides a great source of protein, essential for muscle repair and growth.
  • Vitamins: Broccoli, bell peppers, and carrots are rich in vitamins A and C, which are crucial for a healthy immune system.
  • Fiber: The variety of vegetables offers a good amount of fiber, promoting digestive health.
  • Low-calorie: This dish is relatively low in calories, making it a great option for those watching their intake.

How to Serve Sheet Pan Teriyaki Chicken & Veggies

Serving this dish is as easy as preparing it! You can serve it over a bed of rice or quinoa for a heartier meal, or enjoy it on its own for a lighter option. Either way, don’t forget to drizzle a little extra teriyaki sauce on top for that added burst of flavor. Pair it with a refreshing cucumber salad or a light soup to round out your meal. Your family will be asking for seconds, I promise!

Additional Tips for Perfect Sheet Pan Teriyaki Chicken & Veggies

To ensure your Sheet Pan Teriyaki Chicken & Veggies turns out perfectly every time, here are some helpful tips:

  • Vegetable Variety: Feel free to mix and match your vegetables! Zucchini, asparagus, or even baby corn can add delightful flavors and textures.
  • Marinating: If you have a little extra time, marinating the chicken in the teriyaki sauce for 30 minutes before cooking can enhance the flavor significantly.
  • Watch the Time: Keep an eye on your chicken, especially if you’re using chicken breasts, as they will cook faster than thighs. Always check for doneness with a meat thermometer—it should read 165°F (75°C).

Storage & Freezing

If you find yourself with leftovers (which is rare, but it happens), you can store them in an airtight container in the refrigerator for up to 3-4 days. To reheat, simply pop them in the microwave or oven until warmed through. If you want to freeze the dish, let it cool completely first, then transfer it to a freezer-safe container. It can be frozen for up to 2 months. When you’re ready to enjoy it again, thaw it in the refrigerator overnight and reheat as desired.

Frequently Asked Questions About Sheet Pan Teriyaki Chicken & Veggies (FAQ)

Here are some common questions I often receive about this recipe:

  • Can I use frozen vegetables for this recipe? While fresh vegetables are preferred for the best texture and flavor, you can use frozen vegetables if you’re in a pinch. Just be sure to thaw and pat them dry before tossing with the teriyaki sauce.
  • Can I substitute different proteins? Absolutely! Shrimp, tofu, or even beef can work beautifully in this recipe. Just adjust the cooking times accordingly.
  • How can I customize the flavors? If you’re looking for a little heat, add some red pepper flakes or a dash of sriracha to the teriyaki sauce. It adds a delightful kick!
  • What if I don’t have teriyaki sauce? No worries! You can quickly whip up a homemade version by mixing soy sauce, brown sugar, rice vinegar, ginger, and a touch of garlic.

Wrapping It Up

And there you have it—my Sheet Pan Teriyaki Chicken & Veggies recipe that’s not just a meal but an experience. It’s simple to make, full of flavor, and perfect for any busy weeknight. I hope you give it a try and let it work its magic in your kitchen. Cooking doesn’t have to be complicated; sometimes, the best meals are the simplest ones, made with love and a dash of creativity. So, pull up a chair, grab a spatula, and let’s create something unforgettable together. Happy cooking!

Wrap Yourself in Flavor: Cheesy Garlic Chicken Wraps That Will Steal the Show

A Flavorful Adventure: Chicken Fillet in Creamy Garlic Parmesan Sauce with Crispy Fries

The Simple Garlic Parmesan Chicken Pasta That Always Brightens My Day

Sheet Pan Teriyaki Chicken & Veggies

Prep Time 10 minutes
Cook Time 20 minutes
Total Time 30 minutes
Servings 4 servings
Calories 350
A quick and flavorful sheet pan meal combining tender chicken with colorful vegetables, all coated in savory teriyaki sauce.

Ingredients

Protein

  • 1 lb chicken thighs or breasts, cut into bite-sized pieces

Vegetables

  • 2 cups broccoli florets
  • 1 piece bell pepper, sliced
  • 1 piece carrot, sliced
  • 1 cup snap peas

Sauce & Oils

  • 1/2 cup teriyaki sauce
  • 2 tablespoons olive oil
  • 1 teaspoon garlic powder
  • 1 teaspoon ginger powder
  • to taste salt and pepper

Garnishes

  • to taste sesame seeds for garnish
  • to taste chopped green onions for garnish

Instructions 

  • Preheat oven to 400°F (200°C). Combine chicken and vegetables in a bowl.
  • Mix teriyaki sauce, olive oil, garlic powder, ginger powder, salt, and pepper. Pour over chicken and veggies, toss to coat.
  • Spread mixture on a sheet pan in a single layer. Bake for 20-25 minutes.
  • Remove from oven, sprinkle with sesame seeds and green onions before serving.

Notes

For extra flavor, marinate the chicken in teriyaki sauce for 30 minutes before cooking.
Calories: 350kcal
Cost: $15
Course: Main Course
Cuisine: Asian
Keyword: Chicken, teriyaki, vegetables

Loved this recipe? Save it to your favorite Pinterest board so you can easily find it later! It’s the perfect way to keep all your sweet ideas in one place. ✨

Tantalizing image of tender chicken pieces glistening with teriyaki sauce alongside bright vegetables.

The One-Pan Wonder That Turns Dinner into a Cozy Feast

Ah, dinner time. That magical hour when the day’s chaos pauses, and we gather around the table, ready to indulge in something delicious. If you’re like me, you know how hectic weeknights can be, and that’s why I’m excited to share a recipe that has transformed my approach to family dinners: the Sheet Pan Sausage & Veggies. This one-pan wonder not only simplifies cooking but also fills your home with the kind of comforting aromas that make everyone’s mouths water.

Why is Sheet Pan Sausage & Veggies the ultimate weeknight meal?

Imagine a dish that combines juicy sausage with vibrant vegetables, all roasted to perfection on a single sheet pan. This recipe is the epitome of ease and flavor, making it the perfect choice for busy weeknights. It’s quick, it’s delicious, and best of all, it requires minimal cleanup. What more could you ask for?

Here’s why this dish stands out:

  • Flavor Explosion: The combination of savory sausage and roasted veggies creates a delightful medley that bursts with taste in every bite.
  • Versatile Options: You can easily switch up the vegetables based on what’s in your fridge or even use chicken sausage for a lighter alternative.
  • Quick Cooking Time: In about 20-25 minutes, you’ll have a wholesome dinner ready to enjoy.
  • Family-Friendly Appeal: This dish is a hit with both kids and adults alike, meaning no complaints at the dinner table!

Sheet Pan Sausage & Veggies Ingredients

Close-up of a sheet pan featuring golden sausage slices and vibrant broccoli, bell pepper, and zucchini in a warm light.

Let’s gather what you need to create this delicious meal:

  • 1 pound smoked sausage, sliced
  • 2 cups broccoli florets
  • 1 bell pepper, sliced
  • 1 zucchini, sliced
  • 2 tablespoons olive oil
  • 1 teaspoon garlic powder
  • 1 teaspoon Italian seasoning
  • Salt and pepper to taste

How to Make Sheet Pan Sausage & Veggies

Now that we have our ingredients, let’s dive into the steps to create this cozy feast. Trust me, it’s as easy as it sounds!

  1. Preheat the Oven: Start by preheating your oven to 425°F (220°C). This is the key to getting that lovely caramelization on both the sausage and veggies.
  2. Mix It Up: In a large bowl, combine the sliced sausage, broccoli florets, bell pepper, and zucchini. This colorful array of veggies will not only taste good but also look beautiful on your dinner plate.
  3. Dress It: Drizzle everything with olive oil and sprinkle with garlic powder, Italian seasoning, salt, and pepper. Toss it all together until every piece is evenly coated. This is where the magic begins!
  4. Spread & Roast: Spread the mixture in a single layer on a sheet pan. This ensures even roasting, resulting in perfectly cooked ingredients. Bake for 20-25 minutes, stirring halfway through, until the sausage is browned and the vegetables are tender.
  5. Serve & Enjoy: Remove the pan from the oven and serve immediately. Your kitchen will smell heavenly, and your family will be eagerly waiting for their plates!

How to Store and Freeze Sheet Pan Sausage & Veggies

If you happen to have leftovers (though I doubt it!), here’s how to store and freeze your delicious creation:

  • Storage: Let the leftovers cool completely before transferring them to an airtight container. They can be kept in the fridge for up to 3 days. Just reheat them in the oven at 350°F (175°C) for about 15-20 minutes to retain that crispiness.
  • Freezing: You can freeze this dish for up to 3 months. Portion it into freezer-safe containers and label them with the date. When you’re ready to enjoy again, thaw overnight in the refrigerator before reheating.

Expert Tips for Sheet Pan Sausage & Veggies

To ensure that your meal turns out perfectly every time, keep these tips in mind:

  • Uniform Cutting: Cut your veggies into uniform sizes. This helps them cook evenly and enhances the overall texture of the dish.
  • Midway Stirring: Stir the pan halfway through cooking to promote even roasting and prevent any ingredients from burning.
  • Adjust Seasonings: Don’t hesitate to taste and adjust the seasonings based on your family’s preferences. A pinch of red pepper flakes can add a delightful kick!
  • Parchment Paper: For easier cleanup, consider lining your baking sheet with parchment paper before adding the ingredients.
  • Ingredient Flexibility: Feel free to get creative! Swap out veggies based on what you have available, ensuring a fresh take on each preparation of this dish.

Sheet Pan Sausage & Veggies Variations

This recipe is wonderfully adaptable! Here are some variations to keep things exciting:

  • Chicken Sausage: For a lighter twist, use chicken sausage instead of smoked sausage.
  • Seasonal Veggies: Incorporate seasonal vegetables like asparagus or eggplant for a fresh take.
  • Sweet Potato Swap: Replace regular potatoes with sweet potatoes for a hint of natural sweetness.
  • Balsamic Drizzle: Add a drizzle of balsamic glaze just before serving for a tangy finish.
  • Herb Infusion: Toss in fresh herbs like thyme or rosemary in the last few minutes of roasting for an aromatic boost.

What to Serve with Sheet Pan Sausage & Veggies?

While this dish is filling on its own, you might want to consider some complementary sides:

  • Crusty Bread: Pair it with a loaf of crusty bread to soak up all the delicious juices.
  • Simple Salad: A fresh garden salad can add a crisp contrast to the warm, roasted flavors.
  • Quinoa or Rice: Serve over a bed of fluffy quinoa or rice for added texture and heartiness.

Make Ahead Options

This recipe is perfect for meal prep enthusiasts! You can chop and season your vegetables up to 24 hours in advance, storing them in an airtight container in the refrigerator. This way, when you’re ready to cook, you can simply spread everything on the sheet pan, and you’re good to go!

Sheet Pan Sausage & Veggies Recipe FAQs

To help you navigate any questions you might have, here are some common FAQs:

What type of sausage should I use for this recipe?

You can choose between sweet or spicy Italian sausage, depending on your family’s taste. Chicken sausage is also a great option for a lighter dish!

How can I ensure my vegetables are perfectly cooked?

Cut your vegetables into similar sizes to guarantee even cooking and lay them out in a single layer on the pan to prevent steaming.

Can I freeze Sheet Pan Sausage & Veggies?

Yes! This dish freezes beautifully. Just portion it into freezer-safe containers and label them.

What can I do if my veggies are soggy instead of crispy?

If your veggies turn out soggy, they may have been overcrowded on the pan. Use a single layer for even roasting, and if needed, a quick trip under the broiler can help crisp them up!

Conclusion

Cooking doesn’t have to be complicated to be delicious, and this Sheet Pan Sausage & Veggies recipe exemplifies that beautifully. It’s a dish full of flavor, warmth, and the kind of comfort that makes you want to gather around the table with your loved ones. Whether you’re feeding a family or just treating yourself, this one-pan wonder is bound to become a staple in your kitchen. So, grab your ingredients, preheat that oven, and let’s create some cozy magic together!

And remember, cooking is a journey, not a destination. Embrace the process, make it fun, and enjoy every delicious bite!

Sheet Pan Sausage & Veggies – 30 Minute Dinner

Prep Time 10 minutes
Cook Time 20 minutes
Total Time 30 minutes
Servings 4 servings
Calories 350
A quick and flavorful dinner featuring sausage and colorful vegetables roasted to perfection in just 30 minutes.

Ingredients

Main

  • 1 pound smoked sausage, sliced
  • 2 cups broccoli florets
  • 1 bell pepper sliced bell pepper
  • 1 zucchini sliced zucchini
  • 2 tablespoons olive oil
  • 1 teaspoon garlic powder
  • 1 teaspoon italian seasoning
  • to taste salt and pepper salt and pepper

Instructions 

  • Preheat oven to 425°F (220°C).
  • Combine sausage and vegetables in a bowl, then toss with olive oil and seasonings.
  • Spread mixture on a sheet pan in a single layer.
  • Bake for 20-25 minutes, stirring halfway, until browned and tender.
  • Remove from oven and serve immediately.

Notes

Feel free to add your favorite herbs or adjust seasonings to taste.
Calories: 350kcal
Cost: $15
Course: dinner
Keyword: sausage, vegetables

Loved this recipe? Save it to your favorite Pinterest board so you can easily find it later! It’s the perfect way to keep all your sweet ideas in one place. ✨

A beautifully arranged sheet pan of cooked sausage and assorted vegetables, highlighted by soft shadows and natural light.

Slurp-Worthy Vegan Ramen Noodles That Feel Like a Hug in a Bowl

Ah, ramen noodles! If you’re anything like me, the mention of these delightful strings of goodness brings back memories of late-night snacks and cozy dinners. But what if I told you that you can whip up a delicious vegan ramen dish that not only hits the spot but also feels like a warm hug in a bowl? Let’s dive into this easy recipe for Easy Saucy Ramen Noodles that’s perfect for any occasion—be it a casual lunch or a fancy dinner party!

Why You’ll Love This Recipe

In my kitchen, comfort food reigns supreme. This vegan ramen recipe is not just quick and easy, but it also packs a flavor punch that will make you feel like a culinary wizard. The best part? You can customize it with your favorite vegetables or whatever you have on hand. Let’s be honest—who doesn’t love a meal that’s both satisfying and flexible?

Ingredients You’ll Need

Bowl of saucy ramen noodles featuring colorful vegetables and green onions, topped with sesame seeds.

Before we get started, let’s gather our ingredients. For this Easy Saucy Ramen Noodles recipe, you will need:

  • 2 packs of instant ramen noodles (discard the seasoning packets)
  • 2 tablespoons soy sauce
  • 1 tablespoon sesame oil
  • 1 tablespoon sriracha (adjust to taste)
  • 1 tablespoon maple syrup
  • 2 cloves garlic, minced
  • 1 teaspoon ginger, grated
  • 1 cup vegetable broth
  • 1 cup mixed vegetables (carrots, bell peppers, broccoli, etc.)
  • 2 green onions, sliced
  • Sesame seeds for garnish (optional)

Step-by-Step Guide: How to Make Easy Saucy Ramen Noodles

Now that you have your ingredients ready, let’s get cooking! Here’s how to make these scrumptious noodles:

1. Cook the Noodles

Start by boiling a pot of water. Once it’s bubbling like a hot spring, add in the instant ramen noodles. Cook them according to the package instructions, usually about 3-5 minutes. Once they’re al dente, drain and set aside. This part always reminds me of my childhood, when I’d impatiently wait for my noodles to soften, the aroma filling the air.

2. Sauté the Aromatics

In a skillet over medium heat, add the sesame oil. Let it warm up for a minute before adding the minced garlic and grated ginger. As they sizzle, you’ll be greeted with a heavenly aroma that makes you want to dance in the kitchen. Sauté until fragrant, about 1 minute. Trust me; your taste buds will thank you!

3. Add the Vegetables

Next up, toss in your mixed vegetables. I love using a colorful array like carrots, bell peppers, and broccoli not just for the health benefits but also for that vibrant presentation. Stir-fry for about 3-4 minutes until they’re tender yet still vibrant. You want that lovely crunch that gives your ramen that perfect texture!

4. Make the Sauce

While your veggies are cooking, grab a small bowl and mix together the soy sauce, sriracha, maple syrup, and vegetable broth. The sweet and spicy combo is what makes this ramen truly special. Pour this glorious sauce over your sautéed vegetables and let it bubble for a minute.

5. Combine Everything

Now, it’s time for the grand finale! Add the cooked ramen noodles to the skillet, tossing everything together until the noodles are well coated with the sauce and heated through. You’ll notice how beautifully the sauce clings to the noodles and vegetables, creating a symphony of flavors.

6. Serve and Garnish

Finally, it’s time to serve your masterpiece! Dish out the ramen into bowls and top with sliced green onions and a sprinkle of sesame seeds for that extra flair. I love how the green onions add a pop of color and a crisp bite, elevating the dish to new heights!

Tips for Perfect Vegan Ramen

Here are some tips to ensure your ramen is nothing short of perfection:

  • Adjust the spice: If you’re not a fan of heat, feel free to reduce the amount of sriracha or omit it altogether. You can always add a dash of it later if you want a kick!
  • Use fresh vegetables: Fresh veggies will not only taste better but will also provide more nutrients. Check your fridge for leftovers or visit a local farmers’ market for the freshest produce.
  • Customize it: Feel free to swap out vegetables or add proteins like tofu or edamame for a heartier meal. The sky’s the limit!

Variations and Substitutions

Here are a few ideas to keep things fun and fresh:

  • Protein Boost: Add some crispy tofu or tempeh for a protein-packed meal. Simply sauté them in the same skillet before adding the vegetables.
  • Substitute Ingredients: If you can’t have soy sauce, try tamari or coconut aminos for a gluten-free option. You can also swap maple syrup for agave or brown sugar.
  • Broth Variations: For an extra depth of flavor, use a homemade vegetable broth or miso broth instead of store-bought.

Storage & Freezing

If you happen to have leftovers (which is rare, but it happens!), you can store your ramen in an airtight container in the refrigerator for up to 3 days. Just reheat in a skillet or microwave, adding a splash of water or vegetable broth to loosen it up.

While I generally don’t recommend freezing cooked ramen noodles, you can freeze the sauce and vegetables separately. Just thaw and reheat when you’re ready to indulge again!

Frequently Asked Questions

Can I use other types of noodles?

Absolutely! Feel free to substitute instant ramen with soba noodles, udon, or even rice noodles. Just adjust the cooking time as needed.

What can I do if my sauce is too salty?

If you find the sauce too salty, add a splash of water or vegetable broth to dilute it. A pinch of sugar can also help balance the flavors.

Is this recipe gluten-free?

Yes, but make sure to use gluten-free soy sauce or tamari, and check your noodles for gluten-free options.

Conclusion: Your New Go-To Comfort Food

And there you have it—your very own Easy Saucy Ramen Noodles that are not only vegan but also bursting with flavor! Whether you’re indulging solo or sharing this dish with loved ones, it’s sure to bring smiles and slurps all around. Cooking is all about creating memories, and I hope this recipe becomes a cherished part of your culinary adventures.

So, go ahead, pull up a chair, and dig into that cozy bowl of ramen. And remember, the kitchen is a place for exploration and joy. Until next time, happy cooking, my friend!

For more comforting recipes, check out my Cheesy Garlic Chicken Wraps or give my Garlic Parmesan Chicken Pasta a try. Let’s keep filling our plates with love and flavor!

Easy Saucy Ramen Noodles (Vegan Recipe)

Prep Time 5 minutes
Cook Time 10 minutes
Total Time 15 minutes
Servings 2 servings
Calories 450
A quick and flavorful vegan ramen dish packed with vegetables and a spicy-sweet sauce.

Ingredients

Packs of instant ramen noodles

  • 2 packs instant ramen noodles (discard seasoning packets)
  • 2 tablespoons soy sauce
  • 1 tablespoon sesame oil
  • 1 tablespoon sriracha (adjust to taste)
  • 1 tablespoon maple syrup
  • 2 cloves garlic (minced)
  • 1 teaspoon ginger (grated)
  • 1 cup vegetable broth
  • 1 cup mixed vegetables (carrots, bell peppers, broccoli, etc.)
  • 2 green onions green onions (sliced)

Sesame seeds for garnish

Instructions 

  • Cook the ramen noodles as per package, then drain and set aside.
  • Sauté garlic and ginger in sesame oil until fragrant, about 1 minute.
  • Add vegetables and stir-fry for 3-4 minutes until tender.
  • Mix soy sauce, sriracha, maple syrup, and broth; pour over vegetables.
  • Add noodles, toss to coat, and heat through. Serve garnished with green onions and sesame seeds.

Notes

Feel free to add more spice or vegetables as desired.
Calories: 450kcal
Cost: $10
Course: Main Course
Cuisine: Vegan
Keyword: Noodles, ramen, Vegan

Loved this recipe? Save it to your favorite Pinterest board so you can easily find it later! It’s the perfect way to keep all your sweet ideas in one place. ✨

Detailed shot of a vegan ramen dish, showcasing noodles glistening in a flavorful sauce with garnishes.

Savor the Simplicity: One-Pan Garlic Herb Chicken That Feels Like Home

There’s something truly magical about a one-pan meal that can transform a simple weeknight into a cozy family gathering. The One-Pan Garlic Herb Chicken with Potatoes & Green Beans is the kind of dish that fills your home with warm, inviting aromas, beckoning everyone to the table. It’s not just a meal; it’s a hug on a plate, complete with all the flavors that remind you of home-cooked comfort. Let’s dive into this delightful recipe and discover how to bring it to life in your kitchen.

Why You’ll Love This Recipe

This recipe is a treasure trove of reasons to fall in love:

  • Effortless Preparation: With just one pan, you’ll save time on cooking and cleaning.
  • Flavorful Ingredients: The chicken is infused with garlic and herbs, while the potatoes and green beans soak up all the delicious juices.
  • Balanced Nutrition: This meal checks off all the boxes: lean protein, healthy carbs, and plenty of veggies.
  • Customizable: Feel free to tweak the herbs or add your favorite veggies to make it your own.

Ingredients You’ll Need

A delicious one-pan meal featuring garlic herb chicken, baby potatoes, and green beans.

To create this comforting dish, gather the following ingredients:

  • 4 boneless, skinless chicken breasts
  • 1 pound baby potatoes, halved
  • 8 ounces green beans, trimmed
  • 4 tablespoons olive oil
  • 4 cloves garlic, minced
  • 1 teaspoon dried thyme
  • 1 teaspoon dried rosemary
  • Salt and pepper to taste
  • Fresh parsley for garnish (optional)

Step‑by‑Step Directions

1. Preheat the Oven

Start by preheating your oven to 400°F (200°C). This ensures that everything cooks evenly and beautifully.

2. Prepare the Herb Mixture

In a large mixing bowl, combine the 4 tablespoons of olive oil, 4 cloves of minced garlic, 1 teaspoon of dried thyme, 1 teaspoon of dried rosemary, and a sprinkle of salt and pepper. This fragrant herb mixture will be the star of your dish, bringing out the best flavors in the chicken and vegetables.

3. Coat the Chicken

Add the chicken breasts to the bowl and coat them well with the herb mixture. Make sure every inch is covered; this will ensure the chicken is juicy and flavorful.

4. Prepare the Potatoes

In a large baking dish or sheet pan, arrange the halved baby potatoes in a single layer. Drizzle with a bit more olive oil and season with salt and pepper. This will give them a golden, crispy exterior while keeping the insides fluffy.

5. Combine Everything in the Pan

Now, place the seasoned chicken breasts right on top of the potatoes. This way, the chicken juices will drip down and flavor the potatoes as they cook. Add the green beans to the pan, tossing them in the remaining herb mixture for that extra punch of flavor.

6. Bake to Perfection

Slide the baking dish into your preheated oven and let it bake for about 25-30 minutes. You’ll know it’s ready when the chicken is cooked through and the internal temperature reaches 165°F (74°C), and the potatoes are tender and slightly crispy.

7. Garnish and Serve

Once done, take the pan out of the oven and let it rest for a few minutes. This helps the juices redistribute in the chicken, keeping it succulent. Garnish with fresh parsley for a pop of color and a hint of freshness before serving.

Tips for Perfect Results

  • Uniform Chicken Size: For even cooking, try to use chicken breasts that are similar in size. If they’re thick, consider pounding them to an even thickness.
  • Check for Doneness: Always use a meat thermometer to ensure your chicken is fully cooked—nobody wants dry chicken!
  • Fresh Herbs: If you have fresh thyme or rosemary, feel free to substitute them in for even more flavor.

Serving Suggestions

This One-Pan Garlic Herb Chicken can stand alone as a complete meal, but if you’re looking to elevate your dining experience, consider these pairings:

  • Crusty Bread: Perfect for soaking up the delicious juices from the pan.
  • Side Salad: A light mixed green salad with a zesty vinaigrette complements the dish beautifully.
  • Wine Pairing: A crisp Chardonnay or a light Pinot Noir pairs wonderfully with this meal.

Storage & Freezing

Leftovers? No problem! Here’s how to store and reheat your chicken:

  • Refrigerate: Allow the dish to cool, then store it in an airtight container in the fridge for up to 3 days.
  • Reheat: Gently reheat in the microwave or oven. If using the oven, cover with foil to keep it moist and warm at 350°F (175°C) for about 10-15 minutes.
  • Freezing: You can freeze this dish before baking. Just assemble everything in the pan, cover securely, and freeze. When ready to cook, thaw overnight in the fridge and bake as directed.

Recipe Variations

Feeling adventurous? Here are a few ways to switch things up:

  • Spicy Kick: Add some red pepper flakes or a dash of your favorite hot sauce to the herb mixture for a spicy twist.
  • Italian Flair: Mix in some Italian seasoning and add cherry tomatoes to the pan. Finish with a drizzle of balsamic reduction post-baking.
  • Swap the Veggies: Feel free to swap green beans for asparagus, broccoli, or even bell peppers—whatever you have on hand!

FAQs

Can I use bone-in chicken thighs instead?

Absolutely! Just be sure to adjust the cooking time; bone-in thighs may take a bit longer to cook through, around 45-60 minutes at the same temperature.

What if my green beans are overcooked?

If you prefer crisper beans, add them to the pan halfway through the cooking process. They’ll still get that nice roasted flavor without becoming mushy.

Can this go into an air fryer?

Yes, you can definitely adapt this recipe for an air fryer. Cook the potatoes first for about 10 minutes, then add the chicken and green beans and cook until the chicken is done.

Final Thoughts

This One-Pan Garlic Herb Chicken with Potatoes & Green Beans is more than just a meal; it’s a way to gather your loved ones around the table and create cherished moments. Whether you stick to the recipe or add your unique twist, I hope this dish becomes a staple in your kitchen. So, roll up your sleeves, put on your favorite apron, and let’s create something delicious together. Happy cooking!

One-Pan Garlic Herb Chicken with Potatoes & Green Beans

Prep Time 10 minutes
Cook Time 30 minutes
Total Time 40 minutes
Servings 4 servings
Calories 450
A flavorful and easy one-pan meal featuring tender chicken breasts, roasted potatoes, and green beans, perfect for a quick dinner.

Ingredients

Protein

  • 4 pieces boneless, skinless chicken breasts

Vegetables

  • 1 pound baby potatoes, halved
  • 8 ounces green beans, trimmed

Other

  • 4 tablespoons olive oil
  • 4 cloves garlic, minced
  • 1 teaspoon dried thyme
  • 1 teaspoon dried rosemary
  • to taste salt and pepper salt and pepper
  • for garnish optional fresh parsley

Instructions 

  • Preheat oven to 400°F (200°C). Mix olive oil, garlic, thyme, rosemary, salt, and pepper.
  • Coat chicken with herb mixture. Arrange potatoes on a baking sheet, drizzle with oil, season with salt and pepper.
  • Place chicken on potatoes, add green beans, toss in remaining herb mixture.
  • Bake for 25-30 minutes until chicken is cooked and potatoes are tender. Garnish with parsley if desired.

Notes

Ensure chicken is cooked through for safety.
Calories: 450kcal
Cost: $15
Course: Main Course
Cuisine: American
Keyword: Chicken, garlic, herbs

Loved this recipe? Save it to your favorite Pinterest board so you can easily find it later! It’s the perfect way to keep all your sweet ideas in one place. ✨

Eye-level shot of garlic herb chicken alongside halved potatoes and green beans in natural light.

A Cozy Dinner That Wraps You in Flavor: Garlic Parmesan Chicken & Potatoes

Welcome to my kitchen, my friends! Today, I’m inviting you to join me in whipping up a dish that’s not just a meal but a cozy hug on a plate: Garlic Parmesan Chicken & Potatoes. This is one of those recipes that brings back memories of family dinners, laughter, and the comforting aroma of garlic wafting through the air—just like my childhood kitchen in Oregon. Let’s dive into this heartwarming dish that’s simple enough for a weeknight but delicious enough to impress guests!

What Do I Need to Make Garlic Parmesan Chicken?

Before we embark on this culinary adventure, let’s gather our ingredients. This dish is a celebration of simple, wholesome flavors that come together beautifully. Here’s what you’ll need:

  • 4 boneless, skinless chicken breasts
  • 4 medium potatoes, diced
  • 4 cloves garlic, minced
  • 1/2 cup grated parmesan cheese
  • 1/4 cup olive oil
  • 1 teaspoon dried oregano
  • 1 teaspoon dried thyme
  • Salt and pepper to taste
  • Fresh parsley for garnish (optional)

Spices to Use for Baked Garlic Parmesan Chicken:

Eye-level shot showcasing Garlic Parmesan Chicken with golden-brown potatoes, enhanced by fresh parsley.

The magic of this dish lies in the aromatic spices. Dried oregano and thyme bring a lovely earthiness that complements the garlic and parmesan perfectly. Feel free to adjust the quantities based on your taste; cooking is all about making it your own!

How Do I Make Garlic Parmesan Chicken and Potatoes in the Oven?

Now that we have our ingredients ready, let’s get cooking! This recipe is all about ease and flavor, and it’s made on one pan, which means less cleanup and more time to enjoy your meal.

Step-by-Step Instructions:

1. Preheat the Oven: Start by preheating your oven to 400°F (200°C). This temperature is perfect for roasting, ensuring your potatoes are crispy and your chicken is juicy.

2. Prepare the Garlic Mixture: In a large bowl, combine the olive oil, minced garlic, oregano, thyme, salt, and pepper. This fragrant mixture is going to infuse both our chicken and potatoes with flavor.

3. Coat the Potatoes: Add the diced potatoes to the bowl and toss them well to coat them in the garlicky goodness. Make sure every piece gets a nice layer of that flavorful oil!

4. Spread the Potatoes: Spread the potatoes evenly on a baking sheet. It’s essential to give them enough space so they roast rather than steam.

5. Prepare the Chicken: In the same bowl (yes, we’re keeping it simple!), add the chicken breasts and coat them with the remaining garlic mixture. Make sure they’re well-covered for maximum flavor.

6. Combine on the Baking Sheet: Place the coated chicken on the baking sheet with the potatoes. This allows all those delicious juices to mingle while they roast.

7. Sprinkle with Parmesan: Now, the best part! Sprinkle the grated parmesan cheese over both the chicken and potatoes. This cheesy crust is going to be heavenly.

8. Bake: Pop the baking sheet into the oven and bake for about 25-30 minutes or until the chicken is cooked through (internal temperature of 165°F or 75°C) and the potatoes are tender and golden. You’ll know it’s done when your kitchen starts to smell absolutely divine!

9. Garnish and Serve: Once out of the oven, garnish with fresh parsley if desired. Serve warm and watch the smiles bloom around the dinner table.

What Potatoes Are Best for Roasting with Chicken?

I recommend using Yukon Gold or red potatoes for this recipe. They hold their shape beautifully during roasting and have a naturally sweet flavor that pairs perfectly with the savory garlic and parmesan.

Do Potatoes Need Longer to Cook Than Chicken?

Great question! Yes, generally, potatoes will take a bit longer to cook than chicken. That’s why we start by roasting them first for about 15 minutes before adding the chicken. This way, both components finish cooking at the same time without compromising texture or flavor.

What Can I Add to Chicken for Extra Flavor?

If you want to kick it up a notch, consider adding a splash of lemon juice or zest to the garlic mixture for a delightful brightness. You could also toss in some crushed red pepper flakes for a little heat. The beauty of this recipe is its versatility!

Ingredient Substitutions and Recommendations:

If you’re short on ingredients or have dietary preferences, here are some substitutions:

  • Chicken: You can use bone-in chicken thighs or drumsticks if you prefer. Just adjust the cooking time accordingly.
  • Potatoes: Sweet potatoes would also be a delightful alternative, adding an extra layer of sweetness.
  • Cheese: If parmesan isn’t on hand, try using pecorino romano or even a sharp cheddar for a different flavor profile.

Can I Bake Chicken and Potatoes on the Same Pan?

Absolutely! This is one of the main highlights of this recipe. Baking them together not only saves time but allows the flavors to meld beautifully. Just remember to stagger the cooking times for perfect results.

What Temperature Do I Bake Chicken and Potatoes?

The best temperature for baking chicken and potatoes together is 400°F (200°C). This temperature ensures crispy potatoes and juicy chicken without drying anything out.

What Can I Serve with Garlic Parmesan Chicken?

This dish is delightful on its own, but if you want to elevate your meal, consider serving it with:

  • A fresh garden salad
  • Steamed broccoli or green beans
  • Garlic bread for a comforting touch

Tips for the Perfect Garlic Parmesan Chicken & Potatoes

  • Don’t rush the roasting: Make sure to give the potatoes a head start for that lovely golden color.
  • Let it rest: After baking, let your chicken rest for a few minutes before slicing. This helps retain its juices.
  • Experiment: Feel free to add your favorite vegetables like carrots or bell peppers to the pan for a one-pan feast!

Storage & Freezing

If you have leftovers (which is rare, but it happens!), store them in an airtight container in the fridge for up to 3 days. Reheat in the oven for that crispy texture. You can also freeze the cooked chicken and potatoes for up to 3 months. Just make sure to cool them completely before transferring to a freezer-safe bag.

FAQs

Can I use frozen chicken breasts?

It’s best to use fresh chicken for this recipe. If using frozen, make sure to fully thaw them before cooking.

Can I make this recipe in an air fryer?

Yes! Cook at 375°F (190°C) for about 15-20 minutes, checking for doneness.

What if I don’t have fresh garlic?

You can substitute with garlic powder, but fresh garlic gives a much more robust flavor.

Conclusion

And there you have it, my dear friends! A cozy dinner that wraps you in flavor: Garlic Parmesan Chicken & Potatoes. It’s the kind of meal that not only fills your belly but warms your heart. Whether you’re cooking for your family or just treating yourself, I hope this dish brings a little magic into your kitchen. Don’t forget to share your creations with me, and remember, every bite is a chance to celebrate the joy of cooking. Happy cooking!

Garlic Parmesan Chicken & Potatoes

Prep Time 10 minutes
Cook Time 25 minutes
Total Time 35 minutes
Servings 4 servings
Calories 550
A flavorful baked dish featuring tender chicken breasts and crispy potatoes topped with Parmesan cheese and fresh herbs.

Ingredients

Protein

  • 4 pieces boneless, skinless chicken breasts

Vegetables

  • 4 medium potatoes, diced

Aromatics & Seasonings

  • 4 cloves garlic, minced
  • 1/2 cup grated parmesan cheese
  • 1/4 cup olive oil
  • 1 teaspoon dried oregano
  • 1 teaspoon dried thyme
  • to taste salt and pepper

Garnish

  • optional fresh parsley for garnish

Instructions 

  • Preheat oven to 400°F (200°C).
  • Mix olive oil, garlic, oregano, thyme, salt, and pepper. Toss potatoes in mixture and spread on a baking sheet.
  • Coat chicken with remaining garlic mixture and place on the baking sheet with potatoes.
  • Sprinkle Parmesan over chicken and potatoes, then bake for 25-30 minutes until cooked and golden.
  • Garnish with parsley if desired and serve warm.

Notes

For extra flavor, marinate the chicken for 30 minutes before baking.
Calories: 550kcal
Cost: $15
Course: Main Course
Cuisine: American
Keyword: Chicken, garlic, potatoes

Loved this recipe? Save it to your favorite Pinterest board so you can easily find it later! It’s the perfect way to keep all your sweet ideas in one place. ✨

Detailed view of Garlic Parmesan Chicken and potatoes, illuminated by soft, warm lighting with a blurred background.