Author

Ava

Browsing

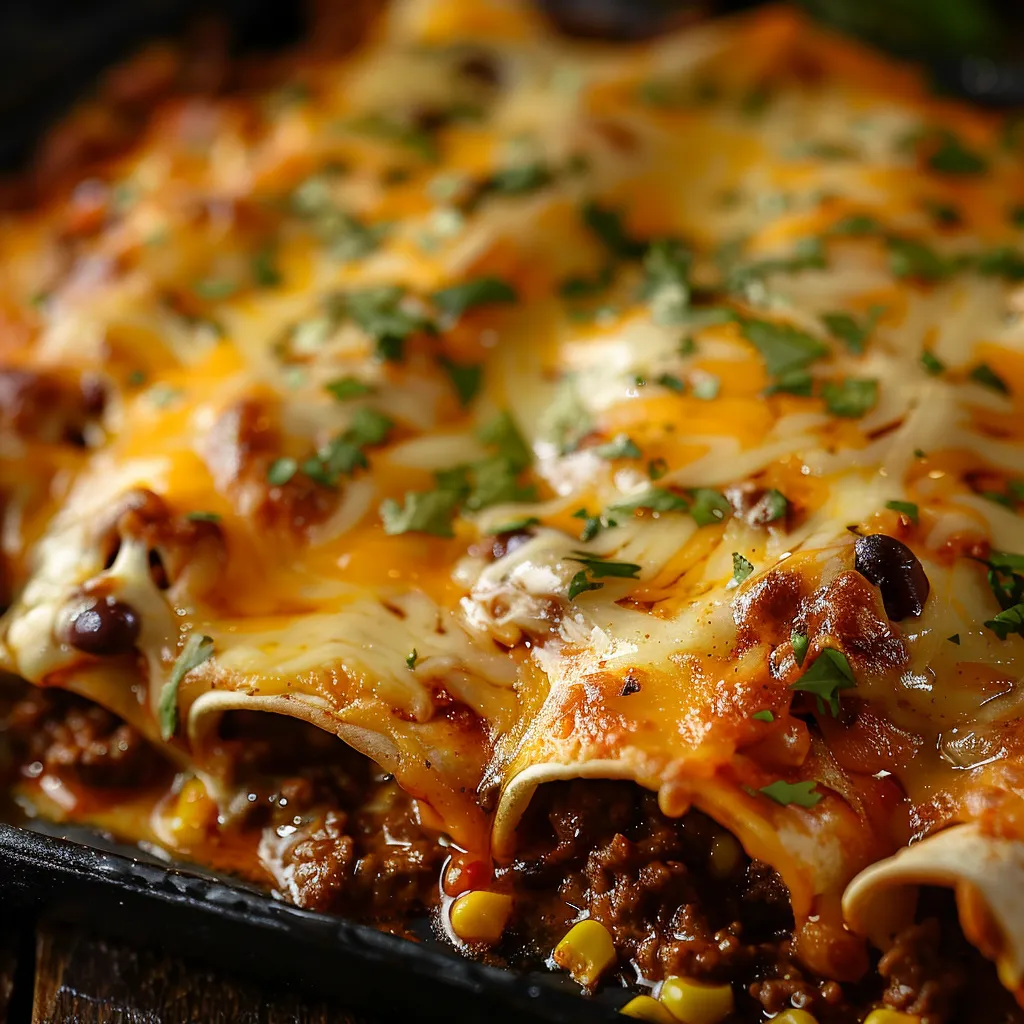
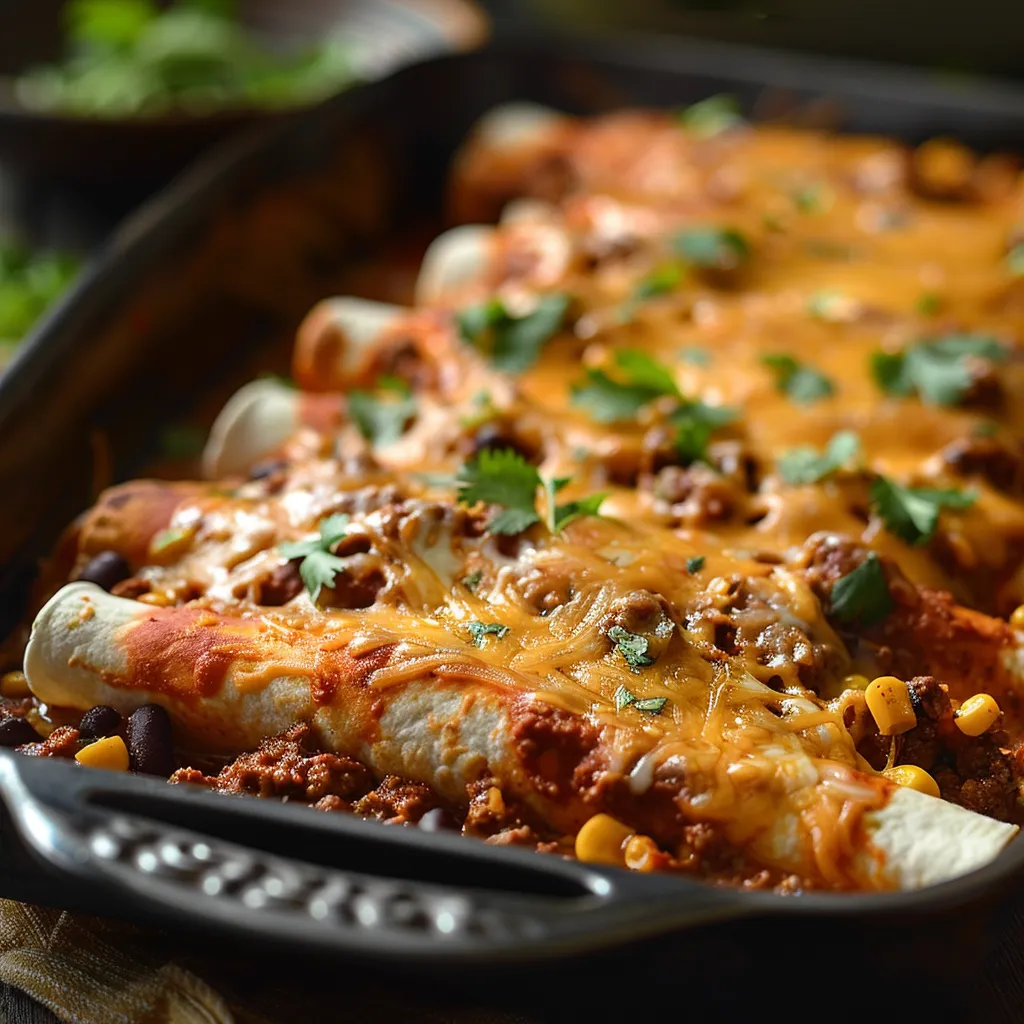
One-Pan Wonder: Enchiladas That Bring the Family Together

Welcome to the heart of my kitchen, where every recipe is a love letter to the joy of cooking! Today, we’re diving into a dish that resonates with warmth and togetherness: Easy Cheesy Ground Beef Enchiladas. Picture this: a chilly evening, laughter bubbling in the background, and the aroma of savory beef, zesty enchilada sauce, and melting cheese wafting through your home. Just the thought makes my heart flutter! These enchiladas are not just a meal; they’re a celebration of flavors that compel you to gather around the table with your loved ones. Let’s embark on this culinary adventure together!

Why You’ll Love This Recipe

Why are enchiladas a family favorite, you ask? Well, it’s simple. They’re incredibly easy to prepare, packed with flavors that appeal to both kids and adults, and they come together in one pan—perfect for busy weeknights! Plus, you can customize them to fit your family’s taste. Want to sneak in more veggies? Go for it! Prefer a spicier kick? Add jalapeños! Your kitchen, your rules. And the best part? Leftovers (if there are any) are just as delicious the next day.

Essential Ingredients

Deliciously baked enchiladas filled with ground beef, black beans, and corn, with a warm, inviting appearance.

Let’s get our hands on some fresh ingredients to make these enchiladas shine! Here’s what you’ll need:

  • 1 pound ground beef
  • 1 small onion, chopped
  • 2 cloves garlic, minced
  • 1 can (10 oz) enchilada sauce
  • 1 can (15 oz) black beans, drained and rinsed
  • 1 cup corn (frozen or canned)
  • 2 cups shredded cheese (cheddar or Mexican blend)
  • 8-10 flour tortillas
  • 1 teaspoon cumin
  • 1 teaspoon chili powder
  • Salt and pepper to taste
  • Chopped cilantro for garnish (optional)

Gather these ingredients, and you’re halfway to enchilada bliss!

Let’s Make It Together

Alright, let’s roll up our sleeves and get cooking! Here’s how to whip up these scrumptious enchiladas:

Step-by-Step Instructions

1. Preheat Your Oven: First things first, preheat your oven to 350°F (175°C). This will ensure your enchiladas bake to bubbly perfection.

2. Sauté the Aromatics: In a large skillet over medium heat, add the ground beef, chopped onion, and minced garlic. Cook until the beef is browned and the onion turns translucent—about 5-7 minutes. The sizzle of the beef and the fragrance of garlic wafting in the air is pure magic!

3. Mix in the Goodness: Drain any excess fat from the skillet (if necessary), then stir in the enchilada sauce, drained black beans, corn, cumin, chili powder, salt, and pepper. Let it simmer for 5 minutes. This is where the flavors mingle and deepen, creating a savory filling that will make your taste buds dance.

4. Prepare the Baking Dish: Spread a thin layer of the beef mixture on the bottom of a 9×13 inch baking dish. This will prevent the tortillas from sticking and keep everything nice and moist.

5. Assemble the Enchiladas: Spoon a generous amount of the beef mixture into each tortilla. Don’t forget to sprinkle some cheese in there! Roll them up tightly and place them seam-side down in the baking dish. Repeat until all tortillas are filled and in the dish. Your kitchen must be smelling heavenly by now!

6. Top It Off: Once all tortillas are snugly in the dish, pour any remaining beef mixture over the top and sprinkle with the remaining cheese. We all know cheese is the star of the show!

7. Bake to Perfection: Cover the dish with aluminum foil and bake for 20 minutes. After that, remove the foil and bake for an additional 10 minutes until the cheese is bubbly and golden brown. The anticipation will have everyone gathering around the kitchen, ready to dive in!

8. Serve and Garnish: Remove from the oven and allow to cool for a few minutes. Garnish with chopped cilantro if desired before serving. Now, take a moment to admire your masterpiece!

Perfecting the Cooking Process

Cooking enchiladas is a delightful experience, but let’s talk about a few tips to ensure they turn out perfectly every time:

Helpful Tips

  • Choose Your Tortillas Wisely: Flour tortillas are easy to roll and hold the filling well. If you prefer a healthier option, corn tortillas work too, but they may require a bit of warming in the microwave to make them pliable.
  • Customize Your Filling: Feel free to swap out ground beef for other proteins like shredded chicken, turkey, or even a vegetarian option like lentils or quinoa. The world is your oyster!
  • Preheat Your Oven: Always preheat your oven for the best baking results. This ensures even cooking and that cheesy topping you crave.

Add Your Touch

Let’s get creative! Here are a few variations to make these enchiladas truly your own:

Variations

  • Spicy Kick: Add chopped jalapeños or a dash of hot sauce to the beef mixture for some heat.
  • Veggie Lovers: Sneak in some chopped bell peppers, spinach, or zucchini into the filling for added nutrients and flavor.
  • Cheesy Goodness: Experiment with different cheese blends—Monterey jack, pepper jack, or even a sprinkle of feta can add an exciting twist!

Storing & Reheating

Now that you’ve made this delicious dish, what about leftovers? Here’s how to store and reheat your enchiladas:

Storage

Store leftover enchiladas in an airtight container in the fridge for up to three days. If you want to enjoy them later, you can freeze them. Just be sure to wrap them tightly in plastic wrap and then foil to prevent freezer burn.

Reheating

To reheat, you can pop them back in the oven at 350°F (175°C) for about 20 minutes until heated through. If you’re in a rush, the microwave works too—just be sure to cover them to keep the moisture in!

FAQs

Can I substitute ground beef?

Absolutely! Ground turkey, shredded chicken, or even lentils are excellent alternatives that can change up the flavor profile while keeping it delicious.

What can I serve with enchiladas?

These enchiladas pair beautifully with a fresh salad, guacamole, or a side of Mexican rice. You can’t go wrong!

Can I make enchiladas ahead of time?

Yes! You can assemble them a day ahead and keep them in the fridge until you’re ready to bake. Just add a few extra minutes to the cooking time if baking straight from the fridge.

Concluding Thoughts

There you have it—your roadmap to creating mouthwatering Easy Cheesy Ground Beef Enchiladas that bring your family together! This recipe is not just about the food; it’s about the memories made around the table, the laughter shared, and the warmth that fills your home. As you gather your loved ones to enjoy this delightful dish, remember that cooking is an adventure, and every dish tells a story. So, put on your apron, gather those ingredients, and let’s make some magic happen in the kitchen! And don’t forget to check out my other delicious recipes like Cheesy Garlic Chicken Wraps or One-Pan Chicken and Potatoes for more family-friendly meals. Happy cooking!

Easy Cheesy Ground Beef Enchiladas - One-Pan Family Favorite!

Prep Time 10 minutes
Cook Time 30 minutes
Total Time 40 minutes
Servings 4 servings
Calories 550
A quick and delicious family-friendly dish featuring seasoned ground beef, cheese, and flavorful enchiladas rolled in tortillas.

Ingredients

Meat and Beans

  • 1 pound ground beef
  • 1 small onion, chopped
  • 2 cloves garlic, minced
  • 1 can (10 oz) enchilada sauce
  • 1 can (15 oz) black beans, drained and rinsed
  • 1 cup corn (frozen or canned)
  • 2 cups shredded cheese (cheddar or mexican blend)
  • 8-10 flour tortillas flour tortillas
  • 1 teaspoon cumin
  • 1 teaspoon chili powder
  • to taste salt and pepper salt and pepper
  • for garnish optional chopped cilantro

Instructions 

  • Preheat oven to 350°F (175°C).
  • Cook beef, onion, and garlic until browned; stir in enchilada sauce, beans, corn, cumin, chili powder, salt, and pepper. Simmer 5 min.
  • Spread beef mixture in a baking dish. Fill tortillas with beef, roll up, and place seam-side down. Top with remaining beef and cheese.
  • Cover with foil and bake 20 min. Remove foil, bake 10 min until bubbly and golden.
  • Let cool slightly, garnish with cilantro if desired, then serve.

Notes

For a spicier flavor, add a dash of hot sauce or jalapeños.
Calories: 550kcal
Cost: $15
Course: Main Course
Cuisine: Mexican
Keyword: Enchiladas

Loved this recipe? Save it to your favorite Pinterest board so you can easily find it later! It’s the perfect way to keep all your sweet ideas in one place. ✨

An overhead view of enchiladas covered in enchilada sauce and cheese, highlighting textures and colors.

The 30-Minute Chicken Ramen Stir Fry That Will Steal Your Heart

Ah, the enchanting world of ramen! Who can resist a steaming bowl of noodles, especially when they’re fused with the vibrant flavors of a stir fry? If you’re anything like me, you know that weeknight dinners can often feel like a race against time. But what if I told you that you could whip up a heartwarming, flavor-packed dinner in just thirty minutes? Enter the 30-Minute Chicken Ramen Stir Fry—a delightful dish that’s bound to make your taste buds dance and your kitchen feel like a warm embrace.

What is Chicken Ramen Stir Fry?

Picture this: tender chicken, crisp vegetables, and chewy ramen noodles, all coming together in a savory, umami-rich sauce. Chicken ramen stir fry is a perfect blend of Japanese and Chinese culinary techniques, marrying the comforting slurp of ramen with the sizzling excitement of a stir fry. Unlike traditional ramen served in a broth, this dish is dry and reminiscent of lo mein, making it a delightful twist on both cuisines.

Essential Ingredients for the Perfect Chicken Ramen Stir Fry

Eye-level shot of a Chicken Ramen Stir Fry with broccoli, bell pepper, and carrots, garnished with green onions.

Before we dive into the cooking process, let’s gather our ingredients. Here’s what you will need:

  • 200g chicken breast, sliced
  • 2 packs of instant ramen noodles
  • 1 cup broccoli florets
  • 1 bell pepper, sliced
  • 1 carrot, julienned
  • 2 tablespoons soy sauce
  • 1 tablespoon oyster sauce
  • 2 tablespoons vegetable oil
  • 2 cloves garlic, minced
  • 1 teaspoon ginger, minced
  • Salt and pepper to taste
  • Sesame seeds and green onions for garnish

These ingredients come together to create a dish that is not only delicious but also visually appealing—think vibrant colors and textures!

Step-by-Step Guide to Making Chicken Ramen Stir Fry

Now that we have everything we need, let’s get cooking! Here’s your easy step-by-step guide to crafting this delightful dish:

  1. Cook the Ramen: Begin by cooking the ramen noodles according to the package instructions. Once they’re perfectly al dente, drain them and set aside. This will ensure they don’t get mushy when added to the stir fry.
  2. Heat the Skillet: In a large skillet or wok, heat the vegetable oil over medium-high heat. You want it hot enough that a drop of water would sizzle.
  3. Cook the Chicken: Add the sliced chicken breast to the skillet, stir-frying until it’s cooked through—about 5-7 minutes. The aroma of sizzling chicken is simply irresistible!
  4. Add Aromatics: Toss in the minced garlic and ginger, stirring for an additional minute until fragrant. This is where the magic begins; the kitchen will start to smell divine!
  5. Add Vegetables: Next, stir in the broccoli, bell pepper, and carrot. Cook for about 3-4 minutes until the veggies are tender-crisp, adding a lovely crunch to your dish.
  6. Combine Everything: Gently fold in the cooked ramen noodles, followed by soy sauce and oyster sauce. Toss everything together until well combined, letting the noodles soak up all those savory flavors.
  7. Season and Serve: Season with salt and pepper to taste, and cook for another 2 minutes. Serve hot, garnished with sesame seeds and sliced green onions for that extra flair!

Tips and Tricks for a Restaurant-Quality Dish

Want to elevate your chicken ramen stir fry to restaurant-level perfection? Here are some tips:

  • High Heat: Cooking on high heat is essential for stir-frying. It helps achieve that delightful char on the chicken and vegetables.
  • Prep Ahead: Chop your vegetables and slice your chicken breast ahead of time. This way, when you’re ready to cook, everything is at your fingertips.
  • Don’t Overcrowd the Pan: If you’re making a larger batch, consider cooking in batches. Overcrowding the pan can lead to steaming rather than stir-frying, which you want to avoid.

Variations and Customizations

One of the best things about this dish is its versatility. Here are some fun variations to try:

  • Add More Protein: Feel free to substitute chicken with shrimp, tofu, or beef for a tasty twist.
  • Vegetable Medley: Use whatever vegetables you have on hand! Snap peas, zucchini, or mushrooms can all add delightful flavors and textures.
  • Extra Spice: If you’re a spice lover, add a splash of sriracha or a sprinkle of red pepper flakes for a fiery kick.

Health Benefits of Chicken Ramen Stir Fry

This chicken ramen stir fry isn’t just a feast for the senses; it’s also packed with nutritional benefits:

  • Protein Power: With lean chicken breast, you’re getting a good dose of protein, which is essential for muscle maintenance and repair.
  • Veggie Boost: The colorful veggies not only add crunch and flavor but also provide essential vitamins and minerals.
  • Quick and Balanced: This dish is a quick, balanced meal option that can be made in thirty minutes, making it perfect for busy weeknights!

Pairing and Serving Suggestions

To make your dining experience even more delightful, consider pairing your chicken ramen stir fry with:

  • Spring Rolls: Crisp and fresh spring rolls are the perfect appetizer.
  • Asian Slaw: A tangy slaw can add a refreshing contrast to the savory noodles.
  • Chilled Green Tea: A soothing drink to round out your meal.

Storage and Freezing

Got leftovers? No problem! Here’s how to store your chicken ramen stir fry:

  • Refrigeration: Store leftovers in an airtight container in the fridge for up to 3 days. Reheat in a skillet or microwave before enjoying.
  • Freezing: While it’s best enjoyed fresh, you can freeze the stir fry for up to a month. Just be aware that the noodles may become softer upon reheating.

Recipe FAQs

Can I use other types of noodles?

Absolutely! While ramen noodles are a classic choice, feel free to substitute with egg noodles, udon, or even spaghetti in a pinch.

Can I prep this in advance?

Yes! You can chop vegetables and slice the chicken ahead of time. Just cook the dish just before serving for the best results.

How long do leftovers last?

Leftovers can be stored in an airtight container in the refrigerator for up to 3 days.

Conclusion

And there you have it, my friends! The 30-Minute Chicken Ramen Stir Fry is not just a meal; it’s a celebration of flavors, textures, and the joy of cooking. Whether you’re whipping it up for a cozy family dinner or impressing friends at a casual gathering, this dish is sure to steal hearts and satisfy cravings. So, grab your chopsticks, fire up that wok, and let the cooking adventure begin! Don’t forget to share your creations with me—I’d love to see how you’ve made this dish your own!

Chicken Ramen Stir Fry (30 minutes)

Prep Time 10 minutes
Cook Time 20 minutes
Total Time 30 minutes
Servings 4 servings
Calories 550
A quick and flavorful stir-fry combining tender chicken, fresh vegetables, and savory ramen noodles for a satisfying meal.

Ingredients

Protein

  • 200 g chicken breast, sliced

Noodles

  • 2 packs instant ramen noodles

Vegetables

  • 1 cup broccoli florets
  • 1 piece bell pepper, sliced
  • 1 piece carrot, julienned

Sauces & Oils

  • 2 tablespoons soy sauce
  • 1 tablespoon oyster sauce

Other

  • 2 tablespoons vegetable oil
  • 2 cloves garlic, minced
  • 1 teaspoon ginger, minced
  • to taste salt and pepper
  • for garnish sesame seeds and green onions

Instructions 

  • Cook ramen noodles as per package, drain, and set aside.
  • Heat oil in a skillet, cook chicken until done, then add garlic and ginger, stir-fry 1 min.
  • Add vegetables, cook 3-4 mins until tender-crisp.
  • Mix in noodles, soy, and oyster sauces, toss to combine, season with salt and pepper.
  • Cook 2 more mins, then serve garnished with sesame seeds and green onions.

Notes

Feel free to add more vegetables or adjust seasonings to taste.
Calories: 550kcal
Cost: $15
Course: Main Course
Cuisine: Asian
Keyword: Chicken, ramen, stir fry

Loved this recipe? Save it to your favorite Pinterest board so you can easily find it later! It’s the perfect way to keep all your sweet ideas in one place. ✨

Delicious Chicken Ramen Stir Fry displayed in a bowl, highlighting the textures of the noodles and fresh ingredients.

When Comfort Meets Spice: My Irresistible Bang Bang Chicken Pasta

Welcome to my cozy kitchen! If you’re here, you’re probably on the lookout for a recipe that has the power to make you feel all warm and fuzzy inside while also delivering a kick of flavor that brings your taste buds to life. Well, you’re in luck! Today, I’m sharing my beloved Bang Bang Chicken Pasta—a dish that perfectly marries creamy goodness with a spicy twist. Trust me; this is the kind of meal that transforms a mundane weeknight into something special, and it might just become a staple in your home too!

Let Me Tell You About This Bang Bang Chicken Pasta

Picture this: It’s a rainy Tuesday evening, and you’re rummaging through the fridge, feeling uninspired. That’s when I first came up with this recipe. I had a couple of chicken breasts, some pasta, and a wild craving for something spicy and creamy. With a little creativity and a splash of desperation, Bang Bang Chicken Pasta was born. It’s become a go-to dish in my house, with the perfect balance of comforting creaminess and zesty heat. Plus, my family loves it so much that it’s often requested for our weekend dinners.

Why You’ll Actually Like This

Bowl of penne pasta topped with chicken and garnished with green onions.

This recipe isn’t just about the food; it’s about the experience. There’s something magical about the way the creamy sauce clings to the penne pasta, creating a symphony of flavors that dance on your palate. The best part? It’s simple enough for a busy weeknight yet fancy enough to impress guests. Seriously, even my picky cousin who claims to hate mayo couldn’t resist a second helping! It’s a dish that brings everyone to the table, and trust me; you’ll want to make it again and again.

Here’s What You’ll Need (with my usual swaps)

  • 12 oz (340 g) penne pasta: You can use any pasta shape you have on hand, but penne holds the sauce beautifully!
  • 2 boneless, skinless chicken breasts, cut into bite-sized pieces: Feel free to swap with cooked shrimp or tofu for a delicious twist.
  • 2 tablespoons olive oil: Avocado oil works just as well if that’s what you have.
  • 1/2 teaspoon salt: Adjust to your taste; I like to use sea salt.
  • 1/4 teaspoon black pepper: Freshly ground is always best!
  • 1/2 cup mayonnaise: Greek yogurt can be a healthier substitute if you prefer a lighter sauce.
  • 1/4 cup sweet chili sauce: This adds a delightful sweetness; feel free to use homemade if you’re feeling adventurous!
  • 2 tablespoons sriracha sauce: Want more heat? Add an extra tablespoon!
  • 2 cloves garlic, minced: Because garlic makes everything better.
  • 2 green onions, sliced: For that fresh flavor and a pop of color.
  • 1 tablespoon chopped fresh parsley (optional): It adds a lovely herbaceous note, but you can skip it if you’re out.

How I Actually Make It (step by step, sort of)

Ready to dive into the kitchen? Here’s how you can whip up this deliciousness:

  1. Cook the pasta: Bring a large pot of salted water to a boil. Once boiling, add the penne pasta and cook according to package instructions until al dente. Drain and set aside, but don’t rinse it—let that starchy goodness cling to the pasta!
  2. Prepare the chicken: While the pasta cooks, season your chicken pieces with salt and pepper. Heat the olive oil in a large skillet over medium-high heat. Add the chicken and cook for about 6-8 minutes, or until it’s golden brown and cooked through. The smell will be absolutely mouthwatering!
  3. Make the bang bang sauce: In a small bowl, whisk together the mayonnaise, sweet chili sauce, sriracha sauce, and minced garlic. This sauce is where the magic happens—trust me!
  4. Combine it all: Add the cooked pasta and chicken to the skillet with the chicken. Pour the bang bang sauce over the top and toss everything together until well coated. Heat through for a minute or two, allowing the pasta to soak up all that flavor.
  5. Garnish and serve: Transfer to serving bowls and garnish with sliced green onions and parsley if desired. Serve immediately and watch your loved ones dig in!

Some Notes Only a Real Home Cook Would Know

Now, let’s chat about a few tips that will make this dish even better:

  • Don’t rush the sauce: I once tried to shortcut the sauce by heating it all together in the pan at high heat, and let’s just say it didn’t end well. Mixing it off the heat ensures a creamy, luscious sauce.
  • Leftover chicken? This recipe is fantastic for using up leftover rotisserie chicken. Just toss it in with the pasta and sauce, and you’re good to go!
  • Meal prep: If you’re planning for the week ahead, you can cook the chicken and pasta in advance and mix in the sauce right before serving for a quick meal.

Variations I’ve Tried (Some More Successful Than Others)

One of the joys of cooking is experimenting! Here are a few variations I’ve tried:

  • Vegetable-packed version: Add in some sautéed bell peppers or broccoli for a pop of color and extra nutrition.
  • Spicy shrimp version: Swap the chicken for shrimp for a delicious seafood twist. Just cook the shrimp until pink and tender!
  • Asian-inspired twist: Toss in some sesame oil and a sprinkle of sesame seeds for an Asian flair. It’s a delightful change!

What You’ll Need (But Don’t Worry If You Don’t Have Everything)

Cooking is all about improvisation. If you find yourself missing an ingredient or two, don’t fret! Here are some common substitutions:

  • If you don’t have sweet chili sauce, you can use a mix of honey and soy sauce for a similar effect.
  • Out of sriracha? Any hot sauce will do, or you can leave it out for a milder flavor.
  • No green onions? Chives or even diced onions can work in a pinch.

How to Store Leftovers (If They Last That Long)

Let’s be honest; this dish is so good, leftovers might not make it to the next day. But if you do have any, here’s how to store them:

  • Place any leftovers in an airtight container and store them in the refrigerator for up to 2 days.
  • To reheat, simply microwave until warmed through. You can add a splash of milk or a bit more mayo to revive the creaminess.

If I Could Give You Only One Bang Bang Pasta Pro Tip…

Trust your instincts! Cooking is as much about feeling as it is about following a recipe. If it tastes good, it is good! Don’t hesitate to adjust the spices or ingredients to suit your taste. And remember, if you accidentally burn the garlic, just start over; we’ve all been there!

Questions You (or My Friends) Might Actually Ask

Here are some FAQs that pop up when I share this recipe:

Can I make this dish vegetarian?

Absolutely! Just swap the chicken for your favorite plant-based protein or even chickpeas. You can also load it up with veggies!

What if I don’t have mayonnaise?

No problem! Greek yogurt or sour cream can be a great alternative, giving you that creamy texture without the mayo.

Is this dish kid-friendly?

Definitely! The flavors are mild enough for kids, but you can adjust the spice level to suit your family’s preferences.

Bang Bang Chicken Pasta

Ingredients

  • 12 oz (340 g) penne pasta
  • 2 boneless, skinless chicken breasts, cut into bite-sized pieces
  • 2 tablespoons olive oil
  • 1/2 teaspoon salt
  • 1/4 teaspoon black pepper
  • 1/2 cup mayonnaise
  • 1/4 cup sweet chili sauce
  • 2 tablespoons sriracha sauce
  • 2 cloves garlic, minced
  • 2 green onions, sliced
  • 1 tablespoon chopped fresh parsley (optional)

Instructions

  1. Cook the penne pasta according to package instructions. Drain and set aside.
  2. Season the chicken pieces with salt and black pepper. Heat olive oil in a large skillet over medium-high heat. Add the chicken and cook for 6-8 minutes, until golden and cooked through.
  3. In a small bowl, whisk together mayonnaise, sweet chili sauce, sriracha sauce, and minced garlic to make the bang bang sauce.
  4. Add the cooked pasta and chicken to the skillet. Pour the bang bang sauce over and toss everything together until well coated and heated through.
  5. Garnish with sliced green onions and chopped parsley if desired. Serve immediately.

Approximate Information for One Serving

Although the exact number of servings may vary depending on portion sizes, typically this recipe yields four servings. Enjoy!

Nutritional Disclaimers

Nutritional values are general guidelines and reflect information for 1 serving using the ingredients listed, not including any optional ingredients. Actual macros may vary slightly depending on specific brands and types of ingredients used.

Conclusion

So, there you have it—my Bang Bang Chicken Pasta recipe that’s sure to tickle your taste buds and warm your heart. Cooking is an adventure, and I hope this dish brings a bit of joy and comfort to your table. Whether you’re cooking for your family or impressing friends, this recipe is bound to be a hit. If you give it a try, let me know how it turns out! And remember, cooking is all about having fun and experimenting, so don’t hesitate to make it your own. Happy cooking, my friends!

Bang Bang Chicken Pasta

Prep Time 10 minutes
Cook Time 15 minutes
Total Time 25 minutes
Servings 4 servings
Calories 650
A quick and flavorful pasta dish featuring tender chicken and a spicy, creamy bang bang sauce.

Ingredients

Pasta

  • 12 oz penne pasta

Chicken

  • 2 pieces boneless, skinless chicken breasts (cut into bite-sized pieces)

Sauces and oils

  • 2 tablespoons olive oil
  • 1/2 teaspoon salt
  • 1/4 teaspoon black pepper
  • 1/2 cup mayonnaise
  • 1/4 cup sweet chili sauce
  • 2 tablespoons sriracha sauce
  • 2 cloves garlic (minced)
  • 2 green onions green onions (sliced)
  • 1 tablespoon chopped fresh parsley (optional)

Instructions 

  • Cook the penne pasta according to package instructions. Drain and set aside.
  • Season chicken with salt and pepper. Cook in olive oil until golden and cooked through, about 6-8 minutes.
  • Whisk mayonnaise, sweet chili sauce, sriracha, and garlic to make the sauce.
  • Add pasta and chicken to skillet. Pour sauce over and toss to coat. Heat through.
  • Garnish with green onions and parsley. Serve immediately.

Notes

For extra flavor, add a squeeze of lime or a sprinkle of sesame seeds.
Calories: 650kcal
Cost: $15
Course: Main Course
Cuisine: fusion
Keyword: pasta

Loved this recipe? Save it to your favorite Pinterest board so you can easily find it later! It’s the perfect way to keep all your sweet ideas in one place. ✨

Appetizing plate of Bang Bang Chicken Pasta featuring rich textures and sauce.

The Cozy Casserole That’s Always Ready for a Rainy Day

As the leaves turn golden and the air becomes crisp, there’s nothing quite like curling up with a warm, hearty meal to embrace the spirit of fall. And what better way to do that than with a comforting casserole that not only fills your belly but also warms your heart? Enter the Fall Comfort Food Recipes That Actually Freeze Well. This delightful dish combines tender beef, sweet butternut squash, and a medley of spices, creating a masterpiece that’s perfect for cozy nights in or for busy weeknights when you need to whip up something quick and delicious. Let’s dive into the world of casseroles that bring a touch of magic to your kitchen!

Why Casseroles Are the Ultimate Comfort Food

Casseroles are the ultimate solution for those rainy days when you crave something hearty and fulfilling. They’re versatile, easy to prepare, and can be made in advance, allowing you to enjoy that warm, gooey goodness at any moment. Plus, they’re a fantastic way to sneak in some veggies without anyone batting an eye!

How to Make the Perfect Fall Comfort Casserole

A visually appealing fall comfort food dish featuring beef and squash, with a cozy soft background.

Let’s get down to the nitty-gritty of creating this cozy casserole. You’ll love how easy it is to put together, and the aroma wafting through your kitchen will have everyone gathering around the table in anticipation.

Ingredients

  • 1 lb hearty beef (ground or cubed)
  • 2 cups butternut squash (peeled and cubed)
  • 1 can diced tomatoes (14 oz)
  • 1 can black beans (15 oz, drained and rinsed)
  • 1 cup corn (frozen or fresh)
  • 1 onion (chopped)
  • 2 cloves garlic (minced)
  • 1 tbsp taco seasoning
  • 2 cups shredded cheese (cheddar or Mexican blend)
  • Salt and pepper (to taste)
  • 1 cup beef broth (or vegetable broth)

Instructions

  1. Preheat your oven to 350°F (175°C).

  2. In a large skillet, brown the beef over medium heat until it’s fully cooked. Use a spatula to break it into smaller pieces as it cooks. This step not only adds flavor but also gives the beef that delightful sizzle that whets your appetite.

  3. Add the onion and garlic to the skillet, cooking until they become fragrant and the onion turns translucent—about 3-4 minutes.

  4. Stir in the butternut squash, diced tomatoes, black beans, corn, taco seasoning, and beef broth. Let everything simmer for about 10 minutes, allowing those flavors to meld beautifully together.

  5. Transfer the mixture into a greased 9×13 inch casserole dish. This is where the magic happens, as all those vibrant ingredients come together in one cozy vessel.

  6. Top with shredded cheese, spreading it evenly over the casserole. The more cheese, the better, right?

  7. Bake in the preheated oven for about 25-30 minutes, or until the cheese is melted and bubbly. Your kitchen will smell like a taco fiesta, and trust me, you’ll want to dive right in!

Storage & Freezing

One of the best aspects of this casserole is how well it stores and freezes. If you’re like me, you love cooking in batches. Here’s how to make the most of it:

  • To Refrigerate: Once the casserole has cooled, cover it tightly with foil or plastic wrap and store it in the fridge for up to 3 days. Simply reheat in the oven or microwave when you’re ready to eat.
  • To Freeze: If you’re planning for the future, you can freeze this casserole before baking. Assemble it in a freezer-safe dish, cover it tightly, and freeze for up to 3 months. When you’re ready to enjoy, thaw it in the fridge overnight and then bake as directed.

Tips for Success

Here are a few tips to ensure your casserole turns out perfectly:

  • Choose Your Beef Wisely: Ground beef is great, but you can also use shredded chicken or turkey for a lighter option.
  • Veggie Power: Feel free to mix in other vegetables you love, like bell peppers or zucchini. This is a great way to use up any leftover produce!
  • Cheese Selection: Experiment with different cheeses! Pepper jack adds a spicy kick, while mozzarella gives it that stretchy, gooey texture.

Variations to Explore

Don’t be afraid to get creative with this recipe! Here are some variations that can add a fun twist:

  • Mexican Style: Add some enchilada sauce for an extra layer of flavor.
  • Southwestern Twist: Mix in some diced jalapeños or green chiles for a spicy kick.
  • Vegan Option: Swap the beef for lentils or quinoa, and use vegan cheese to make this dish plant-based.

FAQs

Can I substitute the beef for something else?

Absolutely! Ground turkey, chicken, or even plant-based proteins work beautifully in this recipe. Just make sure to adjust the cooking times as needed.

What’s the best way to reheat leftovers?

The oven is the best method for reheating casseroles. Preheat to 350°F (175°C), cover with foil, and heat for about 15-20 minutes until warmed through.

Can I add more spices?

Of course! If you like it spicy, feel free to add more taco seasoning or even some cayenne pepper for an extra kick.

Wrap Up

As you can see, the Fall Comfort Food Recipes That Actually Freeze Well is not just a meal; it’s a hug in a dish. It’s a recipe that brings warmth to your table, fills your home with delightful aromas, and offers that much-needed comfort on chilly evenings. Whether you’re cooking for your family, hosting friends, or simply treating yourself, this casserole is sure to impress and satisfy. So grab your apron, gather your ingredients, and let’s make some magic happen in the kitchen!

If you enjoyed this recipe, be sure to check out my other favorites like Wholesome Delights: Simple Recipes for Family Gatherings, or A Wholesome Bowl of Broccoli Pasta That Feels Like a Cozy Evening at Home. Happy cooking, friends!

Fall Comfort Food Recipes That Actually Freeze Well

Prep Time 20 minutes
Cook Time 40 minutes
Total Time 1 hour
Servings 6 servings
Calories 450
Enjoy hearty, cozy fall meals like beef and butternut squash casseroles that can be prepared in advance and frozen for busy days.

Ingredients

Main Ingredients

  • 1.5 pounds hearty beef (diced)
  • 1 medium butternut squash (peeled and cubed)
  • 2 cups casserole ingredients (e.g., broth, cheese, spices)

Instructions 

  • Cook the beef until browned, then add butternut squash and simmer.
  • Transfer mixture to a casserole dish and top with cheese if desired.
  • Let it cool, then cover and freeze for future meals.

Notes

This casserole freezes well and can be reheated easily for a quick, comforting meal.
Calories: 450kcal
Cost: $15
Course: Main Course
Cuisine: American
Keyword: butternut squash, casseroles, hearty beef

Loved this recipe? Save it to your favorite Pinterest board so you can easily find it later! It’s the perfect way to keep all your sweet ideas in one place. ✨

Detailed image of a savory casserole showcasing beef and butternut squash, highlighted by soft shadows.

Cheesy Taco Pasta: A Flavorful Twist on a Classic Favorite

Welcome to my kitchen, where the aroma of simmering sauce and melting cheese creates an atmosphere of comfort and joy! Today, I’ve got a truly irresistible recipe for you: Cheesy Taco Pasta. This dish is the perfect blend of two beloved meals—tacos and pasta—resulting in a hearty, satisfying dinner that your family will be clamoring for. Trust me, once you try this, you’ll be adding it to your regular dinner rotation!

Why You’ll Love This Cheesy Taco Pasta Recipe

This recipe is not just about the flavors; it’s about the experience. Imagine a comforting, cheesy pasta dish that carries the zesty, robust flavors of your favorite tacos. Here are a few reasons why this Easy Cheesy Taco Pasta will become a staple in your home:

  • Quick and Easy: Ready in under 30 minutes, this one-pan wonder is perfect for busy weeknights.
  • One-Pan Meal: Less time cleaning means more time enjoying family dinners!
  • Customizable: You can easily modify the ingredients based on what you have in your pantry.
  • Kid-Approved: This dish is so cheesy and delicious that even picky eaters won’t be able to resist!

Ingredients for Cheesy Taco Pasta

Detailed view of various Cloudflare Service elements illuminated by natural light.

Let’s gather our ingredients! For this recipe, you’ll need:

  • 1 pound ground beef (or turkey for a lighter option)
  • 12 ounces pasta shells
  • 1 medium onion, diced
  • 2 cloves garlic, minced
  • 1 bell pepper, diced (optional, but adds great color and nutrition!)
  • 2 tablespoons homemade taco seasoning (or store-bought if you’re in a hurry)
  • 1 can (15 ounces) diced tomatoes
  • 2 cups beef broth (or chicken broth)
  • 1 cup shredded cheddar cheese
  • Salt and pepper to taste

Substitutions You Can Make

No ground beef? No problem! Here are a few substitutions that work perfectly in this recipe:

  • Ground Meat: Use ground turkey, chicken, or even a meat substitute for a vegetarian option.
  • Pasta Type: While I love using pasta shells, you can swap it for rotini or penne if that’s what you have.
  • Broth: Vegetable broth works great if you’re looking for a vegetarian-friendly version.
  • Cheese: Go wild! Pepper jack adds a spicy kick, or try a Mexican blend for a different taste.

How to Make Cheesy Taco Pasta

Ready to dive into cooking? Let’s get started with these simple steps:

  1. Brown the Meat: In a large skillet over medium heat, add your ground beef. Cook until browned, breaking it apart with a spatula. Drain any excess fat.
  2. Add the Vegetables: Toss in the diced onion, garlic, and bell pepper. Sauté for about 3-4 minutes until the vegetables are softened and fragrant.
  3. Season: Stir in the taco seasoning, ensuring every bit of meat and veggies is coated with those bold flavors.
  4. Combine the Pasta: Add the pasta shells, diced tomatoes (including juices), and beef broth to the skillet. Stir to combine.
  5. Simmer: Bring to a boil, then reduce heat. Cover and let it simmer for 10-12 minutes, stirring occasionally until the pasta is cooked al dente and the sauce has thickened.
  6. Cheesy Finish: Remove from heat and stir in the shredded cheddar cheese until it’s melted and gooey.
  7. Season to Taste: Add salt and pepper according to your preference.

Homemade Taco Seasoning: A Must-Have

If you want to take your taco pasta to the next level, making your own taco seasoning is a game changer! Here’s a quick recipe:

  • 1 tablespoon chili powder
  • 1 teaspoon cumin
  • 1 teaspoon paprika
  • 1 teaspoon garlic powder
  • 1 teaspoon onion powder
  • 1/2 teaspoon oregano
  • Salt and pepper to taste

Mix all the spices together and store in an airtight container. This seasoning is not just great for taco pasta but also perfect for any taco night!

Can You Use Leftover Taco Meat?

Absolutely! If you have leftover taco meat from a previous meal, this recipe is a fantastic way to repurpose it. Just warm it up in your skillet, skip the browning step, and proceed directly to adding the pasta and broth. It’s a great way to save time and reduce food waste!

How to Serve This Recipe

This Easy Taco Pasta is a meal in itself, but if you’re looking to elevate your dinner, consider serving it with:

  • Garlic Bread: A side of crispy, buttery garlic bread never hurt!
  • Salad: A refreshing green salad balances the richness of the pasta.
  • Fresh Toppings: Serve with toppings like sour cream, avocado, cilantro, or jalapeños for an extra kick.

Storage, Freezing & Reheating Instructions

Storage

Leftovers can be stored in an airtight container in the fridge for up to 4 days. Just make sure to let it cool completely before sealing it up. Reheating is a breeze—just pop it in the microwave or reheat on the stovetop, adding a splash of broth or water if needed.

Freezing

If you want to make a big batch and freeze some for later, you can do that too! This taco pasta freezes beautifully for up to 3 months. Just cool it completely, portion it out, and store in freezer-safe containers.

Reheating

To reheat frozen taco pasta, let it thaw overnight in the fridge, then microwave or reheat on the stovetop. Again, adding a splash of broth or water can help revive the creamy texture.

Tips for Success

  • Don’t Overcook the Pasta: Keep an eye on the pasta as it cooks to ensure it’s perfectly al dente.
  • Customize the Veggies: Feel free to sneak in more vegetables like spinach or zucchini for added nutrition.
  • Experiment with Cheeses: Try different cheese blends to find your family’s favorite!

FAQs

Can I make this dish vegetarian?

Definitely! Substitute the meat with black beans or lentils for a hearty vegetarian option.

What can I do if it’s too salty?

If your dish turns out too salty, add a little extra pasta or some cooked rice to balance the flavors.

How can I make it spicier?

Add diced jalapeños or a pinch of cayenne pepper to the meat while cooking for an extra kick!

Conclusion

This Cheesy Taco Pasta is more than just a meal; it’s a delightful experience that brings warmth to your kitchen and joy to your dining table. With its comforting flavors and ease of preparation, it’s sure to become a favorite in your household. So, gather your ingredients, pull up a chair, and let’s make some magic happen in the kitchen! Enjoy every bite of this cheesy goodness, and don’t forget to share it with those you love—because good food is best enjoyed together.

Cloudflare Services

Prep Time 10 minutes
Cook Time 20 minutes
Total Time 30 minutes
Servings 1 batch
Discover how Cloudflare’s connectivity cloud delivers a comprehensive suite of networking, security, and performance services tailored for organizations of all sizes.

Ingredients

Main Components

  • 1 service package connectivity cloud (Core networking, security, and performance services)
  • 1 enterprise enterprise solutions (For large organizations)
  • 1 small business small business plans (For small organizations)
  • 1 partner partner resources (Ecosystem of partners and resources)
  • 1 use case use cases (Various application scenarios)
  • 1 topic CXO topics (Executive-level insights)
  • 1 industry industries (Healthcare, Banking, Retail, Gaming, Public sector)
  • 1 resource resources (Product demos, guides, reference architectures)
  • 1 product products (Security, performance, networking solutions)
  • 1 plan plans & pricing (Enterprise, small business, individual plans)
  • 1 service global services (Worldwide network coverage)
  • 1 bundle support and success bundles (Customer support and success services)
  • 1 service professional services (Implementation and consulting)
  • 1 domain domain registration (Manage your domains)
  • 1 developer developers (Developer tools and resources)
  • 1 partner partners (Ecosystem of technology partners)
  • 1 company company (Cloudflare organization)

Instructions 

  • Deploy Cloudflare’s connectivity cloud to access 60+ networking, security, and performance services.
  • Configure solutions tailored for large enterprises, small businesses, and partners.
  • Utilize resources like product demos, guides, and reference architectures to optimize deployment.
  • Leverage security features such as web application firewall, DDoS protection, and zero trust access.
  • Access support, professional services, and manage domains to ensure seamless operation.

Notes

Ensure to tailor services to your organization’s needs for optimal results.
Cost: $15
Course: Technology
Cuisine: Digital
Keyword: Networking, security

Loved this recipe? Save it to your favorite Pinterest board so you can easily find it later! It’s the perfect way to keep all your sweet ideas in one place. ✨

Cozy, warm image showcasing Cloudflare Services in rich detail.

Dinner in a Flash: The Korean Ground Beef Bowl That Brings the Flavor

Hey there, fellow food lovers! If you’re anything like me, there are nights when you just want a meal that’s quick, satisfying, and packed with flavor—sort of like a hug in a bowl. Enter my Quick & Easy Korean Ground Beef Bowl, a dish that’s not only ready in a flash but also tastes so good you might just forget it’s a homemade meal. Seriously, it’s better than takeout!

Growing up in a small Oregon town, we often had cozy family dinners filled with laughter, stories, and the delightful aromas wafting from the kitchen. Fast-forward to my bustling Seattle life, and I still cherish those moments. This Korean beef bowl is a go-to for busy weeknights, just as comforting as those family meals but with a fun twist. Let’s dive into why this dish has become a staple in my home and how you can easily whip it up in your kitchen.

Why I Always Come Back to This Korean Beef Bowl

There’s something magical about the combination of sweet and savory flavors in this dish. The ground beef is not just your average protein; it absorbs the rich, umami-packed sauce, turning every bite into a flavor explosion. Plus, it’s versatile enough to be paired with various vegetables or served over fluffy rice, making it a complete meal.

The best part? This recipe is incredibly quick to prepare—less than 30 minutes from start to finish! After a long day, the last thing you want is to be stuck in the kitchen for hours. With this bowl, you can have a comforting dinner without the fuss. I mean, who doesn’t love a speedy meal that feels like a special treat?

Nutritional Perks You’ll Appreciate

A delicious bowl of Korean ground beef garnished with green onions and sesame seeds.

This dish isn’t just delicious; it’s also packed with nutrients. Ground beef is a fantastic source of protein, which is essential for muscle repair and overall health. When you pair it with rice and veggies, you create a balanced meal that’s satisfying and nutritious. If you’re looking for healthy bowl recipes, this one checks all the boxes!

Make It Your Way – Variations That Work

The beauty of the Korean Ground Beef Bowl is its flexibility. You can easily customize it to suit your dietary preferences or whatever ingredients you have on hand. Here are some variations to consider:

  • Swap the Beef: Not a fan of beef? No problem! Ground turkey or chicken make excellent substitutes.
  • Go Veggie: For a vegetarian option, try using crumbled tofu or tempeh seasoned with the same marinade.
  • Add More Veggies: Toss in some bell peppers, snap peas, or broccoli for an extra crunch. You can sauté them alongside the beef for added flavor.
  • Spice It Up: For those who like a kick, add some red pepper flakes or sriracha to the sauce for a spicy twist.

Quick & Easy Korean Ground Beef Bowl Recipe

Ingredients

Ready to get cooking? Here’s what you’ll need:

  • 1 lb ground beef
  • 1/4 cup soy sauce
  • 2 tablespoons brown sugar
  • 1 tablespoon sesame oil
  • 3 cloves garlic, minced
  • 1 teaspoon ginger, minced
  • 1/4 teaspoon black pepper
  • 2 green onions, chopped
  • 1 cup cooked rice
  • Sesame seeds for garnish

Instructions

Let’s turn those ingredients into a mouthwatering meal:

  1. In a large skillet over medium heat, brown the ground beef until fully cooked, breaking it apart with a spatula. The sizzle will be music to your ears!
  2. Drain excess fat from the skillet, if necessary. You want to keep the flavor without the greasiness.
  3. Add the soy sauce, brown sugar, sesame oil, garlic, ginger, and black pepper to the cooked beef. Stir well to combine—trust me, your kitchen will start to smell heavenly.
  4. Cook for an additional 2-3 minutes until the sauce is heated through and slightly thickened. This is where the magic happens!
  5. Serve the beef mixture over cooked rice. Don’t skimp on the rice; it soaks up all the delicious sauce!
  6. Garnish with chopped green onions and sesame seeds before serving. A sprinkle of green adds that fresh touch.

Tips to Make It Even Better

Want to elevate your Korean Ground Beef Bowl even more? Here are some tips:

  • Use Fresh Ingredients: Fresh garlic and ginger make a noticeable difference in flavor.
  • Let It Rest: If you have time, let the beef mixture sit for a minute before serving. This allows the flavors to meld even further.
  • Garnish Generously: Don’t be shy with the green onions and sesame seeds—they add visual appeal and extra flavor.

Storage & Freezing

If you’re lucky enough to have leftovers (or if you want to meal prep), here’s how to store it:

  • Refrigeration: Store in an airtight container in the fridge for up to 3 days. Reheat in the microwave or on the stovetop.
  • Freezing: You can freeze the beef mixture for up to 3 months. Thaw in the fridge overnight before reheating. Just cook some fresh rice when you’re ready to eat!

Common FAQs

How to make Korean Ground Beef Bowl less salty?

If you’re watching your sodium intake, opt for low-sodium soy sauce. You can also increase the amount of brown sugar to balance the flavors.

Can I substitute the ground beef with something else?

Absolutely! Ground turkey, chicken, or even plant-based proteins like lentils or crumbled tofu work wonderfully.

What’s the best way to serve this dish?

This bowl is fantastic on its own, but you can also serve it with a side of steamed veggies or a simple salad for a complete meal.

Let’s Stay Connected!

If you’ve enjoyed this recipe, I’d love to hear from you! Tag me in your photos or drop a comment below to share how your Korean Ground Beef Bowl turned out. And if you’re on Pinterest, come hang out! I’m always sharing quick, flavor-packed meals just like this one.

Looking for more delicious ideas? Check out these crowd-pleasers:

In Conclusion

Cooking is all about bringing joy to your table, and my Quick & Easy Korean Ground Beef Bowl does just that. It’s a dish that seamlessly blends simplicity and flavor, perfect for those hectic evenings when you need a quick meal without skimping on taste. So, pull up a chair, grab a bowl, and let’s create some delicious memories together. Happy cooking, friends!

Quick & Easy Korean Ground Beef Bowl – Better Than Takeout!

Prep Time 10 minutes
Cook Time 10 minutes
Total Time 20 minutes
Servings 4 servings
Calories 450
This flavorful Korean ground beef bowl is quick to prepare and perfect for a satisfying meal, mimicking takeout quality at home.

Ingredients

Meat

  • 1 lb ground beef
  • 1/4 cup soy sauce
  • 2 tablespoons brown sugar
  • 1 tablespoon sesame oil
  • 3 cloves garlic, minced
  • 1 teaspoon ginger, minced
  • 1/4 teaspoon black pepper
  • 2 green onions chopped
  • 1 cup cooked rice
  • sesame seeds for garnish sesame seeds

Instructions 

  • Brown the ground beef in a skillet over medium heat.
  • Drain excess fat, then add soy sauce, brown sugar, sesame oil, garlic, ginger, and black pepper. Stir well.
  • Cook for 2-3 minutes until heated through and slightly thickened.
  • Serve over cooked rice, garnished with chopped green onions and sesame seeds.

Notes

Use fresh garlic and ginger for best flavor.
Calories: 450kcal
Cost: $12
Course: Main Course
Cuisine: Korean
Keyword: ground beef

Loved this recipe? Save it to your favorite Pinterest board so you can easily find it later! It’s the perfect way to keep all your sweet ideas in one place. ✨

Eye-level shot of a Korean Ground Beef Bowl, showcasing rich textures and vibrant colors.

30-Minute Creamy Garlic Tomato Pasta: A Bowl of Cozy Goodness

Welcome to my kitchen, where we whip up heartwarming dishes that bring smiles to the dinner table! Today, I’m excited to share my version of a 30-Minute Creamy Garlic Tomato Pasta that’s not just quick to make, but also bursting with flavors that will wrap you in a comforting embrace. Picture this: a bowl of al dente pasta generously coated in a creamy tomato sauce, enriched with garlic and a sprinkle of cheese. It’s the kind of meal that makes you want to pause and savor every bite.

Why You’ll Love This Recipe

This creamy garlic tomato pasta is perfect for busy weeknights when you need something delicious but don’t have hours to spend in the kitchen. With just a handful of ingredients, you can create a dish that’s as delightful as a summer picnic yet cozy enough for a chilly evening. Plus, it’s versatile enough to adapt to whatever ingredients you have on hand. Let’s dive into the magic of this recipe!

What You’ll Need to Make This Creamy Garlic Tomato Pasta

An eye-level shot of a delicious bowl of creamy tomato pasta with garlic, surrounded by a blurred background.

Here’s a quick shopping list for your pantry staples:

  • 8 oz pasta (spaghetti or penne work beautifully)
  • 2 tablespoons olive oil
  • 4 cloves garlic, minced (because garlic is life!)
  • 1 can (14 oz) diced tomatoes (the juicier, the better!)
  • 1 cup heavy cream (for that luscious texture)
  • 1 teaspoon dried basil (or fresh if you have it!)
  • Salt and pepper to taste
  • 1/2 cup grated parmesan cheese (hello, cheesy goodness!)
  • Fresh basil leaves for garnish (optional, but why not?)

Instructions for This Creamy Garlic Tomato Pasta Recipe

Now that we’ve got our ingredients ready, let’s get cooking! This is where the magic happens:

  1. Cook the Pasta: Bring a pot of salted water to a boil and cook the pasta according to package instructions until al dente. Make sure to stir occasionally. Once done, drain the pasta and set it aside. (Pro tip: reserve a little pasta water to help loosen the sauce later if needed.)
  2. Heat the Olive Oil: In a large skillet, heat the olive oil over medium heat. You want it hot enough to sizzle but not so hot that it smokes.
  3. Add Garlic: Toss in the minced garlic and sauté for about 1 minute, just until it’s fragrant and golden. Be careful; burnt garlic is a no-go!
  4. Add Tomatoes: Pour in the diced tomatoes (with their juices) and stir. Let them cook together for about 3-4 minutes, allowing the flavors to mingle and the sauce to thicken slightly.
  5. Pour in the Cream: Now, it’s time for the heavy cream and dried basil to join the party. Stir well and let this simmer for another 2-3 minutes until it thickens to your desired consistency.
  6. Season: Don’t forget to season with salt and pepper to taste, adjusting as per your preference!
  7. Add Pasta: Toss the cooked pasta into the skillet, mixing until every strand is beautifully coated in the creamy sauce.
  8. Cheese, Please: Stir in the grated parmesan cheese until it melts and becomes part of this delicious creation.
  9. Serve: Garnish with fresh basil leaves if you like and serve immediately while it’s hot and comforting!

Substitutions: Make It Your Own!

Cooking is all about creativity, right? Here are some easy substitutions to customize your creamy garlic tomato pasta:

  • Pasta: If you’re feeling adventurous, try using whole wheat pasta, gluten-free pasta, or even zucchini noodles for a lighter option.
  • Cream: For a lighter version, you can substitute heavy cream with half-and-half or even cottage cheese blended until smooth.
  • Tomatoes: Fresh tomatoes can be used instead of canned; just be sure to chop them finely and adjust cooking time accordingly.
  • Herbs: Feel free to swap dried basil for fresh basil or even add a pinch of oregano or thyme for a twist!
  • Cheese: If you’re out of parmesan, try pecorino romano or even a sprinkle of feta for a tangy kick.

Essential Equipment

Here’s what you’ll need to bring this creamy garlic tomato pasta to life:

  • A large pot for boiling pasta
  • A strainer for draining the pasta
  • A large skillet for the sauce
  • A wooden spoon or spatula for stirring
  • A chef’s knife and cutting board for chopping

How to Store & Reheat Your Pasta

This creamy pasta is perfect for leftovers! Here’s how to store and reheat:

  • Storage: Place any leftovers in an airtight container and refrigerate for up to 3 days.
  • Reheating: Gently reheat on the stovetop over low heat, adding a splash of water or additional cream to loosen the sauce. Avoid the microwave if you can; it tends to dry out the pasta.
  • Freezing: I wouldn’t recommend freezing this dish due to the cream, which could separate upon thawing. However, you can freeze the sauce separately and then combine with fresh pasta later.

3 Top Tips for Success

  1. Don’t Overcook the Pasta: Aim for al dente! It will continue cooking slightly when tossed with the sauce.
  2. Use Fresh Ingredients: Fresh garlic and quality tomatoes can make a world of difference in flavor.
  3. Taste as You Go: Adjust seasoning and cream based on your preference. Cooking is all about personal taste!

FAQs

  • Can I make this dish vegan? Absolutely! Use a plant-based cream and nutritional yeast for a cheesy flavor.
  • What can I pair with this pasta? This creamy garlic tomato pasta pairs beautifully with a crisp salad, garlic bread, or even a glass of white wine!
  • How do I make this pasta spicier? Add a pinch of red pepper flakes when sautéing the garlic for an extra kick!

Related Recipes to Try

If you loved this creamy garlic tomato pasta, you might also enjoy:

Final Thoughts

This 30-Minute Creamy Garlic Tomato Pasta is more than just a quick dinner; it’s a warm hug on a plate and a reminder that cooking can be simple yet delightful. So gather your loved ones around the table, serve this comforting dish, and watch as smiles light up the room. Whether you’re feeding a crowd or treating yourself after a long day, this pasta is sure to become a comforting favorite in your kitchen. Happy cooking!

The Best Creamy Garlic Tomato Pasta – Done in Under 30 Minutes

Prep Time 5 minutes
Cook Time 20 minutes
Total Time 25 minutes
Servings 4 servings
Calories 550
This quick and delicious creamy garlic tomato pasta combines fresh flavors with a rich sauce, perfect for a speedy weeknight dinner.

Ingredients

Pasta

  • 8 oz pasta (spaghetti or penne)
  • 2 tablespoons olive oil
  • 4 cloves garlic, minced
  • 1 can (14 oz) diced tomatoes
  • 1 cup heavy cream
  • 1 teaspoon dried basil
  • to taste salt and pepper
  • 1/2 cup grated parmesan cheese

Garnish

  • fresh basil leaves for garnish

Instructions 

  • Cook pasta until al dente, then drain and set aside.
  • Heat olive oil in a skillet, sauté garlic for 1 minute.
  • Add diced tomatoes and cook for 3-4 minutes.
  • Pour in heavy cream, add basil, simmer 2-3 minutes.
  • Season with salt and pepper, add pasta, stir in Parmesan, then serve garnished with basil.

Notes

Use fresh basil for the best flavor and adjust seasoning to taste.
Calories: 550kcal
Cost: $15
Course: Main Course
Cuisine: Italian
Keyword: pasta

Loved this recipe? Save it to your favorite Pinterest board so you can easily find it later! It’s the perfect way to keep all your sweet ideas in one place. ✨

A detailed image of spaghetti in creamy garlic tomato sauce, showcasing vibrant colors and textures.

A Bold and Flavorful Adventure in a Bowl: Spicy Ground Beef Stir-Fry

There’s something undeniably enticing about a bowl of stir-fry—it’s the vibrant colors, the sizzle of ingredients hitting a hot pan, and the wafting aroma that fills your kitchen as everything comes together. My Spicy Ground Beef Stir-Fry Bowl is more than just a meal; it’s a journey of flavors that brings warmth and comfort right to your dinner table. If you’re looking for a quick weeknight dinner that doesn’t skimp on taste, you’re in for a treat!

A Comforting Classic with a Kick

This recipe was born out of my love for bold flavors and my penchant for quick, satisfying meals. On a particularly busy weeknight, I found myself staring at a bag of ground beef and a colorful array of fresh vegetables. As I pondered how to combine them, my cravings for something spicy kicked in, and thus began the adventure of creating this dish. It’s become a staple in my household, with its ability to adapt to whatever ingredients I have on hand.

What makes this dish truly special is the balance of flavors—the savory ground beef, the crisp garlic veggies, and the fluffy rice come together in perfect harmony. It’s a meal that not only fills your belly but also warms your heart. Plus, it’s ready in under 30 minutes, making it ideal for those nights when you want to whip up something delicious without spending hours in the kitchen.

Why You’ll Love This Spicy Ground Beef Stir-Fry Bowl

Detailed view of a bowl filled with ground beef, mixed veggies, and garnished with green onions.
  • Quick and Easy: Ready in 30 minutes, perfect for busy weeknights.
  • Flavor-Packed: A delightful blend of spicy, savory, and a hint of sweetness.
  • Customizable: Switch up the protein or veggies based on your preferences.
  • Meal Prep Friendly: Stores well for leftovers and can be easily reheated.
  • Nutritious: Balanced with protein, fiber, and healthy fats, making it a wholesome dinner option.

Recipe Overview

Prep Time: 10 minutes
Cook Time: 15 minutes
Total Time: 25 minutes
Servings: 4
Calories per Serving: ~550

Ingredients

For the Spicy Ground Beef

  • 1 lb ground beef

For the Garlic Veggies

  • 2 cups mixed vegetables (bell peppers, broccoli, and carrots)
  • 4 cloves garlic, minced
  • 1 teaspoon ginger, grated

For the Base

  • 2 cups cooked rice
  • 2 tablespoons soy sauce
  • 1 tablespoon sriracha or chili paste
  • 1 tablespoon vegetable oil
  • Salt and pepper to taste
  • Green onions, chopped (for garnish)

Instructions

Step 1: Prepare Your Ingredients

Before you dive into cooking, let’s set ourselves up for success. Start by measuring out your ingredients. Chop the mixed vegetables into bite-sized pieces, mince the garlic, and grate the ginger. Having everything prepped and ready to go will make the cooking process much smoother.

Step 2: Sauté the Aromatics

In a large skillet, heat the vegetable oil over medium-high heat. Once it shimmers, add the minced garlic and grated ginger. Sauté for about 30 seconds until fragrant. The moment those aromatics hit the pan, your kitchen will be filled with a delightful scent that hints at the deliciousness to come.

Step 3: Cook the Ground Beef

Add the ground beef to the skillet, breaking it up with a spatula. Cook until it’s nicely browned and fully cooked, about 5-7 minutes. Stirring occasionally will help ensure it cooks evenly. Once browned, stir in the soy sauce and sriracha, mixing well to combine all those rich flavors.

Step 4: Stir-Fry the Vegetables

Now it’s time to add in your colorful mix of vegetables. Toss them into the skillet and stir-fry for an additional 3-5 minutes until they’re tender-crisp. You want them to retain a bit of crunch for that satisfying texture against the beef. Season with salt and pepper to taste, adjusting as needed to suit your preference.

Step 5: Serve It Up!

To serve, place a generous scoop of cooked rice into each bowl. Top with the spicy ground beef and veggie mixture. For a final touch, sprinkle chopped green onions on top for a pop of freshness and color. And voilà! You have a vibrant, satisfying meal that’s ready to be devoured.

Tips for Success

  • Use Day-Old Rice: If you have leftover rice from a previous meal, use that! It’s less sticky and gives a better texture.
  • Don’t Overcook the Veggies: You want them vibrant and crisp. Overcooked vegetables can turn mushy and lose their nutritional value.
  • Tweak the Spice Level: If you’re sensitive to heat, reduce the amount of sriracha or chili paste. Conversely, if you love heat, feel free to add extra!

Variations and Substitutions

Protein Swaps

  • Ground Turkey or Chicken: For a leaner option.
  • Tofu or Tempeh: Perfect for a plant-based alternative.
  • Shrimp: A quick-cooking option that pairs beautifully with the sauce.

Vegetable Add-Ins

  • Snow Peas: Add them for a sweet crunch.
  • Spinach or Bok Choy: Great for added greens.
  • Carrots: Shredded or sliced—they add sweetness and color!

Rice Alternatives

  • Brown Rice: For more fiber and nutrients.
  • Cauliflower Rice: A low-carb option that’s gaining popularity.
  • Quinoa: Adds a nutty flavor and extra protein.

Storage and Freezing Tips

This Spicy Ground Beef Stir-Fry is fantastic for meal prep! Here’s how to store it:

  • Refrigerator: Store in an airtight container for up to 3-4 days. Reheat in the microwave or on the stove, adding a splash of water or soy sauce to keep it moist.
  • Freezer: Allow it to cool completely before transferring to a freezer-safe container. It can be frozen for up to 3 months. To reheat, thaw in the refrigerator overnight and warm on the stove.

FAQs

Can I make this dish in advance?

Absolutely! It’s a great recipe for meal prep. Just prepare everything ahead of time and store the components separately, then assemble when you’re ready to eat.

How can I adjust the flavors?

If you want a sweeter flavor, add a touch of honey or more sriracha for heat. For a tangy twist, consider a splash of rice vinegar.

What’s the best way to serve this dish?

While it’s delicious on its own, feel free to add toppings like sesame seeds, fresh herbs, or even a fried egg for extra richness.

Conclusion

There you have it—a Spicy Ground Beef Stir-Fry Bowl that’s as satisfying as it is simple. This dish is perfect for family dinners, meal prepping for the week, or even impressing friends at a casual gathering. With its vibrant colors and bold flavors, it’s sure to bring a little magic to your kitchen! So grab your spatula, turn up the heat, and let’s get cooking!

Spicy Ground Beef Stir-Fry Bowl with Garlic Veggies & Steamy Rice

Prep Time 10 minutes
Cook Time 15 minutes
Total Time 25 minutes
Servings 4 servings
Calories 550
A quick and flavorful stir-fry combining seasoned ground beef, vibrant vegetables, and spicy sauce served over fluffy rice.

Ingredients

Meat and Rice

  • 1 lb ground beef
  • 2 cups cooked rice

Vegetables and Aromatics

  • 2 cups mixed vegetables (bell peppers, broccoli, and carrots)
  • 4 cloves garlic, minced
  • 1 teaspoon ginger, grated

Sauces and Oils

  • 2 tablespoons soy sauce
  • 1 tablespoon sriracha or chili paste
  • 1 tablespoon vegetable oil
  • 1 teaspoon salt (to taste)
  • pepper to taste pepper

Garnish

  • green onions, chopped green onions (for garnish)

Instructions 

  • Heat oil in a skillet over medium-high heat.
  • Add garlic and ginger, sauté 30 seconds.
  • Add ground beef, cook 5-7 minutes until browned.
  • Stir in soy sauce and sriracha, cook 1 minute.
  • Add vegetables, stir-fry 3-5 minutes until tender-crisp. Season with salt and pepper.
  • Serve over rice, garnish with green onions.

Notes

Feel free to adjust spice levels with more or less sriracha.
Calories: 550kcal
Cost: $15
Course: Main Course
Cuisine: Asian
Keyword: Beef, stir fry

Loved this recipe? Save it to your favorite Pinterest board so you can easily find it later! It’s the perfect way to keep all your sweet ideas in one place. ✨

Gourmet presentation of a stir-fry bowl featuring beef, garlic veggies, and steamed rice.

One-Pot Magic: Creamy Cajun Sausage Pasta That Whispers Comfort

Hey there, fellow food lovers! If you’ve wandered into my cozy corner of the internet, I’m thrilled to share a dish that’s as comforting as a warm blanket on a chilly evening—my Creamy Cajun Sausage Pasta. This one-pot wonder is not just a meal; it’s a celebration of flavors and an invitation to gather around the table. Whether you’re looking for a quick weekday dinner or something to impress your friends, this recipe is about to become your new go-to.

Growing up in a small Oregon town, I learned that food is not just nourishment; it’s an experience. Each bite of this pasta brings me back to those family dinners where laughter filled the air, and the aroma of something delicious simmered on the stove. Now, as I whip this up in my Seattle kitchen, I can’t help but smile at the memories. So grab your apron, and let’s dive into the magic of Cajun cooking!

Ingredients You’ll Need

Before we get our hands dirty, let’s gather the stars of our culinary show. Here’s what you’ll need for this creamy delight:

  • 12 oz penne pasta
  • 1 lb smoked sausage, sliced
  • 1 tablespoon olive oil
  • 1 medium onion, chopped
  • 3 cloves garlic, minced
  • 1 bell pepper, diced
  • 1 can (14.5 oz) diced tomatoes
  • 2 cups chicken broth
  • 1 cup heavy cream
  • 2 teaspoons Cajun seasoning
  • Salt and pepper to taste
  • 1 cup shredded cheese (optional)
  • Fresh parsley for garnish

Step-by-Step Instructions

Delicious penne pasta with sliced sausage in a creamy sauce, garnished with parsley, against a softly lit backdrop.

Now that we’ve got our ingredients lined up like eager little soldiers, it’s time to bring this dish to life. Follow these simple steps, and you’ll have a creamy pasta dish that whispers comfort and joy:

  1. Heat things up: In a large pot, heat the olive oil over medium heat. Let that fragrant oil warm your kitchen as it dances around the pot.
  2. Sear the sausage: Add the sliced smoked sausage to the pot. Sear it until it’s beautifully browned—about 5 minutes. The sizzle will be music to your ears!
  3. Get those veggies in: Toss in the chopped onion, diced bell pepper, and minced garlic. Sauté until they soften and release their glorious aroma, about 3-4 minutes. This is where the magic begins!
  4. Mix it up: Stir in the diced tomatoes, chicken broth, and Cajun seasoning. Bring this vibrant mixture to a gentle boil, letting the flavors meld together. The scent is intoxicating!
  5. Pasta time: Once boiling, add the penne pasta. Reduce the heat to a simmer, uncovered, and let it cook for about 12-15 minutes, stirring occasionally. You want that pasta to soak up all those delicious flavors while cooking to al dente perfection.
  6. Make it creamy: Stir in the heavy cream and let it simmer for an additional 2-3 minutes until everything is beautifully creamy. Season with salt and pepper to taste. This is the moment it all comes together!
  7. Cheesy goodness: If you’re feeling indulgent, stir in the shredded cheese until it melts into the sauce, creating a gooey, rich texture that will have everyone coming back for seconds.
  8. Garnish and serve: Finish with a sprinkle of fresh parsley for a pop of color and freshness. Serve it hot and watch those smiles bloom around the table!

Tips for Customizing Your Cajun Sausage Pasta

This dish is wonderfully versatile! Here are some creative ways to make it your own:

  • Add protein: For a surf-and-turf twist, toss in some shrimp or cooked chicken. Just make sure to adjust the cooking time to ensure everything is perfectly cooked.
  • Vegetable love: Feel free to add in your favorite veggies. Spinach, zucchini, or even mushrooms could enhance the dish’s flavor and nutritional value.
  • Spice it up: If you’re a heat seeker, consider adding a pinch of cayenne pepper or some diced jalapeños for an extra kick!
  • Cheese options: Experiment with different types of cheese—think pepper jack for a spicy twist or a sharp cheddar for a rich flavor.

What to Serve with Cajun Sausage Pasta

This creamy dish pairs beautifully with a variety of sides. Here are some ideas to round out your meal:

  • Garlic bread: A side of warm, buttery garlic bread is perfect for soaking up the creamy sauce.
  • Simple salad: A fresh green salad with a light vinaigrette can balance the richness of the pasta.
  • Roasted vegetables: Some seasonal roasted veggies would add color and flavor to your table.

Storage & Freezing

Let’s face it—sometimes we make more than we can eat in one sitting, and that’s perfectly okay! Here’s how to properly store your leftovers:

Refrigeration: Store any leftover Creamy Cajun Sausage Pasta in an airtight container in the fridge for up to three days. When you’re ready to enjoy it again, simply reheat it on the stove with a splash of cream or chicken broth to keep it creamy and delicious.

Freezing: If you want to make a big batch for later, this dish freezes well. Just let it cool completely before transferring it to a freezer-safe container. It can be frozen for up to three months. To reheat, thaw in the fridge overnight and warm on the stove.

FAQs

Can I make this recipe ahead of time?

Absolutely! You can prep the ingredients ahead of time and store them separately in the fridge. When you’re ready to cook, just follow the steps, and you’ll have a delicious meal in no time.

Can I use a different type of pasta?

Yes, you can! While penne is a great choice for this recipe, feel free to try other short pasta shapes like fusilli, farfalle, or even shells. Just keep an eye on the cooking time as it may vary.

What’s the best way to store leftovers?

Store leftovers in an airtight container in the fridge for up to three days. Reheat gently on the stove or in the microwave, adding a splash of cream or broth to keep the sauce from getting too thick.

Conclusion

And there you have it! A delightful, creamy dish that’s as comforting as a hug on a cold day. My Creamy Cajun Sausage Pasta is perfect for those busy weeknights or when you want to impress your guests with minimal effort. I hope this recipe brings warmth and joy to your kitchen, just as it does in mine. So, what are you waiting for? Grab those ingredients and let’s create some magic together!

And remember, every meal is an opportunity to create memories, so make it delicious! If you’re looking for more comforting recipes, check out my Cheesy Garlic Chicken Wraps and my One-Pan Chicken and Potatoes. Happy cooking!

Creamy Cajun Sausage Pasta (One Pot)

Prep Time 10 minutes
Cook Time 20 minutes
Total Time 30 minutes
Servings 4 servings
Calories 650
A flavorful one-pot pasta dish combining smoky sausage, Cajun spices, and creamy sauce for a quick and satisfying meal.

Ingredients

Pasta

  • 12 oz penne pasta
  • 1 lb smoked sausage (sliced)

Vegetables and aromatics

  • 1 tbsp olive oil
  • 1 medium onion (chopped)
  • 3 cloves garlic (minced)
  • 1 bell pepper bell pepper (diced)

Canned Goods

  • 1 can diced tomatoes (14.5 oz)
  • 2 cups chicken broth
  • 1 cup heavy cream
  • 2 teaspoons cajun seasoning
  • to taste salt and pepper
  • 1 cup shredded cheese (optional)

Garnish

  • fresh parsley for garnish

Instructions 

  • Heat olive oil in a large pot, cook sausage until browned.
  • Add onion, bell pepper, and garlic; sauté until softened.
  • Stir in tomatoes, broth, and Cajun seasoning; bring to a boil, then add pasta.
  • Simmer uncovered for 12-15 minutes until pasta is al dente, then stir in cream and cheese if using.
  • Season with salt and pepper, garnish with parsley, and serve.

Notes

For a spicier kick, add more Cajun seasoning or hot sauce.
Calories: 650kcal
Cost: $15
Course: Main Course
Cuisine: American
Keyword: pasta

Loved this recipe? Save it to your favorite Pinterest board so you can easily find it later! It’s the perfect way to keep all your sweet ideas in one place. ✨

Bowl of Creamy Cajun sausage pasta showcasing rich textures, illuminated by warm natural light.

A Cozy Casserole That Brings Family Together: My Healthy Broccoli Chicken Delight

Welcome to my kitchen, where I believe every dish tells a story. Today, I’m excited to share a recipe that’s not just about food; it’s about connection, warmth, and a sprinkle of magic. This Healthy Broccoli Chicken Casserole is the perfect dish for those bustling weeknights when you crave comfort but don’t want to compromise on nutrition. Let’s dive into this delightful recipe that’s sure to have your family asking for seconds!

Why You’ll Love This Recipe

What makes this casserole truly special? It’s a harmonious blend of flavors and textures, combining tender chicken, vibrant broccoli, and creamy goodness—all wrapped up in a cheesy topping that melts in your mouth. Plus, it’s packed with protein and fiber, making it a healthy meal for the family that you can feel good about serving. Here are a few reasons why this casserole deserves a spot in your dinner rotation:

  • Easy Preparation: This recipe is straightforward, making it perfect for busy weeknights.
  • Nutritious Ingredients: Packed with lean protein from chicken and vitamins from broccoli, it’s both satisfying and nourishing.
  • Kid-Friendly: The cheesy topping is a hit with children, making it an easy way to sneak in some veggies!
  • Meal Prep Friendly: It’s a great option for healthy meals that last a week—just make extra for leftovers!

Ingredients

Delicious Healthy Broccoli Chicken Casserole served in a dish, with visible ingredients like broccoli and melted cheese.

Ready to get cooking? Here’s what you’ll need to whip up this cozy casserole:

  • 2 large chicken breasts, cooked and diced
  • 4 cups broccoli florets, steamed
  • 2 cups cooked brown rice
  • 1 cup Greek yogurt
  • 1 cup shredded cheddar cheese
  • 1 medium onion, finely chopped
  • 3 cloves garlic, minced
  • 1 cup low-sodium chicken broth
  • 2 tablespoons olive oil
  • Salt and pepper, to taste
  • 1 teaspoon paprika
  • 2 tablespoons chopped parsley (for garnish)

Directions

Let’s get started on this delicious dish! Follow these steps to create your Healthy Broccoli Chicken Casserole:

  1. Preheat your oven to 375°F (190°C). This step is crucial for achieving that perfect bubbly cheese topping.
  2. In a large skillet, heat the olive oil over medium heat. Add the finely chopped onion and minced garlic, cooking until softened and fragrant, about 3-4 minutes. The aroma will fill your kitchen and set the stage for the comforting meal to come.
  3. In a mixing bowl, combine the Greek yogurt, chicken broth, half of the shredded cheddar cheese, salt, pepper, and paprika. Stir until well blended; this creamy mixture will be the heart of your casserole.
  4. In a large bowl, combine the cooked chicken, steamed broccoli, cooked brown rice, and sautéed onions and garlic. Pour the creamy sauce over the mixture and stir until everything is well coated. Trust me, you’ll want to taste this filling before it goes into the oven!
  5. Transfer the mixture into a greased casserole dish. Sprinkle the remaining cheddar cheese on top for that irresistible cheesy crust.
  6. Bake in the preheated oven for 20-25 minutes or until the cheese is melted and bubbly. You’ll know it’s done when the edges are golden and the aroma is simply divine.
  7. Remove from the oven and garnish with chopped parsley before serving. This final touch not only adds color but also a hint of freshness.

Servings and Timing

This recipe serves about 6 people, making it ideal for families or for those who love to meal prep. The time from start to finish is about 45 minutes, so you can have a wholesome dinner ready in no time!

Variations

One of the best things about casseroles is their versatility. Here are a few ideas to customize your Healthy Broccoli Chicken Casserole:

  • Add other vegetables like bell peppers, zucchini, or carrots for extra flavor and nutrition.
  • Swap the cheddar cheese for mozzarella or Monterey Jack for a different flavor profile.
  • For a spicy kick, consider adding red pepper flakes or cayenne pepper to the sauce.
  • If you’re looking for a lower-carb option, substitute the brown rice with cauliflower rice for a lighter version.

Storage/Reheating

Got leftovers? This casserole stores beautifully! Here’s how to keep it fresh:

  • Refrigerator: Store any leftovers in an airtight container in the fridge for up to 3-4 days. Just reheat in the microwave or oven until warmed through.
  • Freezer: If you want to prepare this dish ahead of time, freeze it before baking. Just cover it tightly with foil and it can last up to 3 months. When you’re ready to eat, thaw in the refrigerator overnight and bake as instructed.

FAQs

Can I substitute Greek yogurt with something else?

Absolutely! If you don’t have Greek yogurt on hand, you can use sour cream or even a dairy-free yogurt alternative for a similar creamy texture.

What can I use instead of chicken?

If you’re looking for a vegetarian option, feel free to substitute the chicken with chickpeas or white beans for a protein boost.

How do I make it dairy-free?

For a dairy-free version, use dairy-free cheese and yogurt alternatives. Just make sure to check the labels for any hidden ingredients.

How can I make it spicier?

Add some diced jalapeños or a dash of hot sauce into the mixture before baking. This will give it a nice kick!

Tips for Success

To ensure your casserole comes out perfectly every time, here are a few handy tips:

  • Make sure to steam the broccoli just until tender; you want it to retain its bright green color and nutrients.
  • Don’t skip the garnishing step! A sprinkle of fresh parsley not only looks great but also enhances the flavor.
  • For a crunchier topping, try adding a layer of breadcrumbs mixed with a bit of olive oil before baking.

Conclusion

Cooking is not just about feeding the body; it’s about nourishing the soul. This Healthy Broccoli Chicken Casserole is a dish that brings people together, creating moments of laughter and joy around the dinner table. Whether you’re feeding a family or having a cozy night in, I hope this recipe brings a little warmth and magic to your kitchen. So grab your apron, turn on some music, and let’s make some memories together one delicious bite at a time!

And remember, I’d love to see your creations! If you try this recipe, share your photos and stories with me. Happy cooking!

For more delicious family-friendly recipes, don’t miss out on my wholesome chicken pasta broccoli dish or this cozy chicken and potatoes recipe. Let’s keep the culinary adventure going!

Healthy Broccoli Chicken Casserole – Easy and Delicious Recipe

Prep Time 10 minutes
Cook Time 25 minutes
Total Time 35 minutes
Servings 4 servings
Calories 520
A nutritious and flavorful casserole combining tender chicken, steamed broccoli, and cheesy goodness, perfect for a wholesome meal.

Ingredients

Protein

  • 2 large chicken breasts, cooked and diced

Vegetables

  • 4 cups broccoli florets, steamed

Carbohydrates

  • 2 cups cooked brown rice

Dairy & Eggs

  • 1 cup greek yogurt
  • 1 cup shredded cheddar cheese

Other

  • 1 medium onion, finely chopped
  • 3 cloves garlic, minced
  • 1 cup low-sodium chicken broth
  • 2 tablespoons olive oil
  • to taste salt and pepper
  • 1 teaspoon paprika
  • 2 tablespoons chopped parsley (for garnish)

Instructions 

  • Preheat oven to 375°F (190°C).
  • Heat olive oil, sauté onion and garlic until fragrant, about 3-4 minutes.
  • Mix Greek yogurt, chicken broth, half cheese, salt, pepper, and paprika to make sauce.
  • Combine chicken, broccoli, rice, and sautéed onions; pour sauce and mix.
  • Transfer to a greased dish, top with remaining cheese, and bake 20-25 minutes.
  • Garnish with chopped parsley before serving.

Notes

Use fresh ingredients for best flavor and texture.
Calories: 520kcal
Cost: $15
Course: Main Course
Cuisine: American
Keyword: Broccoli, Chicken, healthy

Loved this recipe? Save it to your favorite Pinterest board so you can easily find it later! It’s the perfect way to keep all your sweet ideas in one place. ✨

A vibrant Healthy Broccoli Chicken Casserole, highlighting its creamy texture and colorful ingredients.