Author

Ava

Browsing

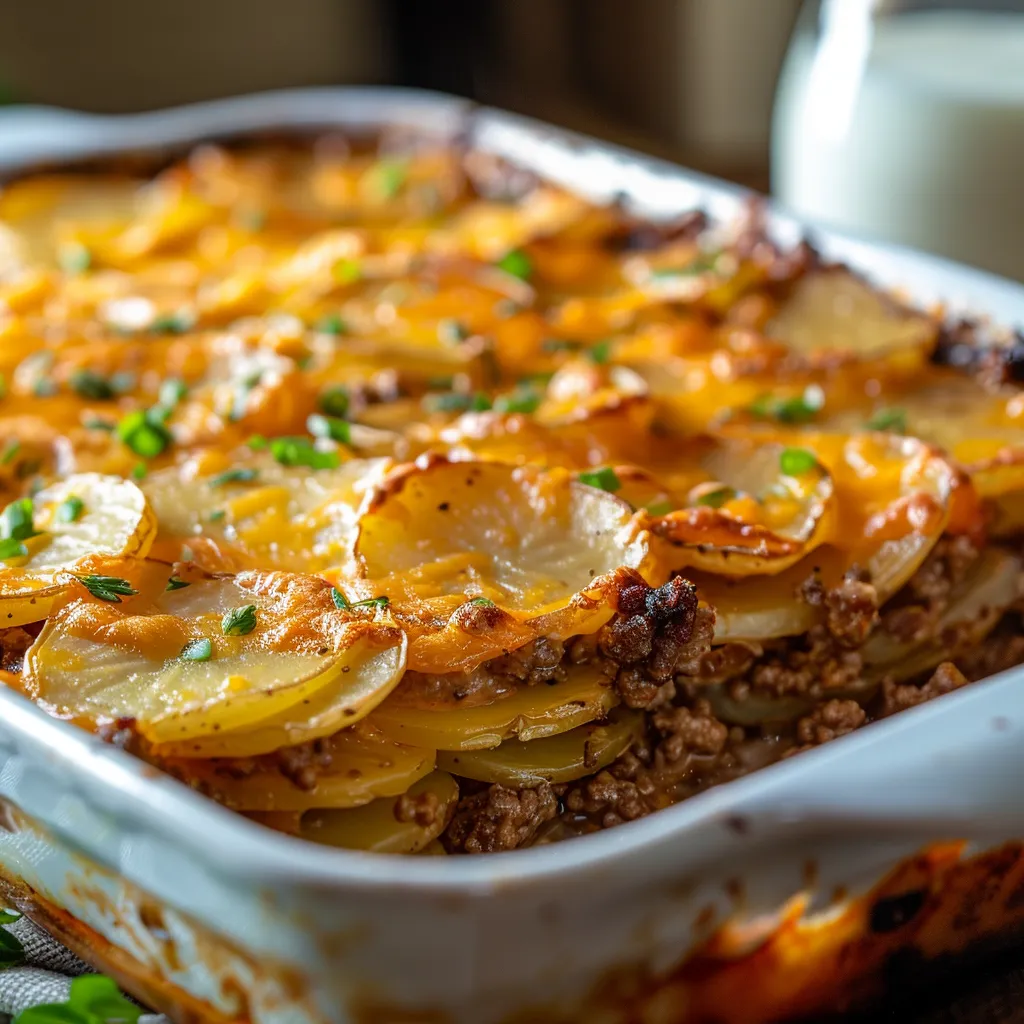
Welcome to the World of Hobo Casserole

Ah, the hobo casserole. Just saying it brings back memories of cozy dinners and the comforting aroma of melted cheese wafting through the kitchen. If you’re looking for a recipe that feels like home on a plate, you’ve landed in the right place! This dish is a delicious medley of ground beef, tender potatoes, and a cheesy topping that will make you feel all warm and fuzzy inside. Perfect for those chilly nights when you need a warm hug in a bowl, this cozy meal is not just easy to make but also incredibly satisfying. Let’s dive into why you’ll love this hobo casserole and how to whip it up in no time!

Why You’ll Love This Hobo Casserole

There are countless reasons to fall in love with this hobo casserole, but here are a few that stand out:

  • Quick Preparation: With just 15 minutes of prep time, this casserole fits seamlessly into your busy weeknight routine.
  • Family-Friendly: Kids adore this dish! The cheesy goodness combined with tender potatoes makes it a hit for all ages.
  • Customizable: This hobo casserole is a blank canvas; you can add your favorite vegetables or swap in different proteins!
  • Comforting Meal: There’s something inherently comforting about a casserole, especially when it’s packed with layers of flavor.
  • Make-Ahead Friendly: Prepare it in advance, cover, and refrigerate. Just pop it in the oven when you’re ready to eat!

Ingredients Breakdown: What You Need

Let’s gather our ingredients for this delightful hobo casserole! Here’s what you’ll need:

  • 1 lb ground beef: The star of the show! Go for an 80/20 blend for optimal flavor and juiciness.
  • 4–5 medium potatoes: Thinly sliced russet or red potatoes work like a charm.
  • 1 medium onion: Chopped—this adds a lovely sweetness and depth to the dish.
  • 2 cloves garlic: Minced for that aromatic punch.
  • 1 ½ cups shredded cheddar cheese: Because every casserole needs a cheesy top!
  • ½ cup grated Parmesan cheese: For extra flavor and that golden crust.
  • ½ cup beef broth or water: To keep everything moist and flavorful.
  • 1 tablespoon olive oil: For browning the beef and sautéing the veggies.
  • 1 teaspoon dried Italian seasoning: A must-have for that herbaceous flavor.
  • ½ teaspoon paprika: Adds a touch of warmth and color.
  • Salt and pepper to taste: Essential for enhancing all those flavors.
  • ¼ cup milk (optional): For creaminess if you desire it.
  • Fresh parsley for garnish (optional): Because a sprinkle of green makes everything better!

Feel free to switch out any of these ingredients based on what you have on hand. Need to use up some veggies? Toss in some carrots or bell peppers! Want a lighter version? Substitute ground turkey for the beef.

How to Make Hobo Casserole

Side view of Hobo Casserole highlighting layers of beef and potatoes.

Now that we’ve got our ingredients, let’s get cooking! Follow these simple steps:

  • Preheat the oven: Set it to 375°F (190°C) and grease a 9×13-inch baking dish.
  • Brown the ground beef: In a large skillet over medium heat, add olive oil and brown the ground beef for about 5–7 minutes; be sure to drain any excess fat.
  • Sauté onions and garlic: Add the chopped onions and minced garlic to the skillet, cooking until soft (about 3–4 minutes).
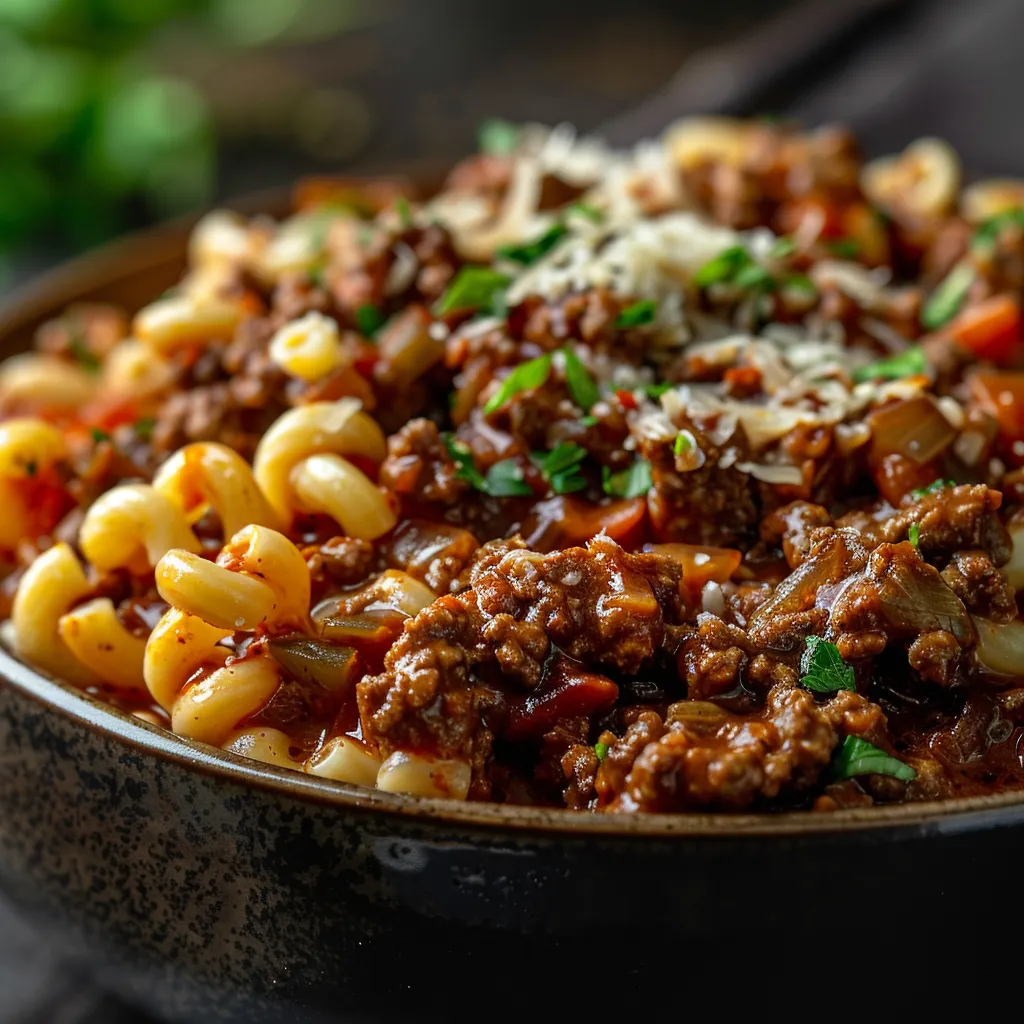
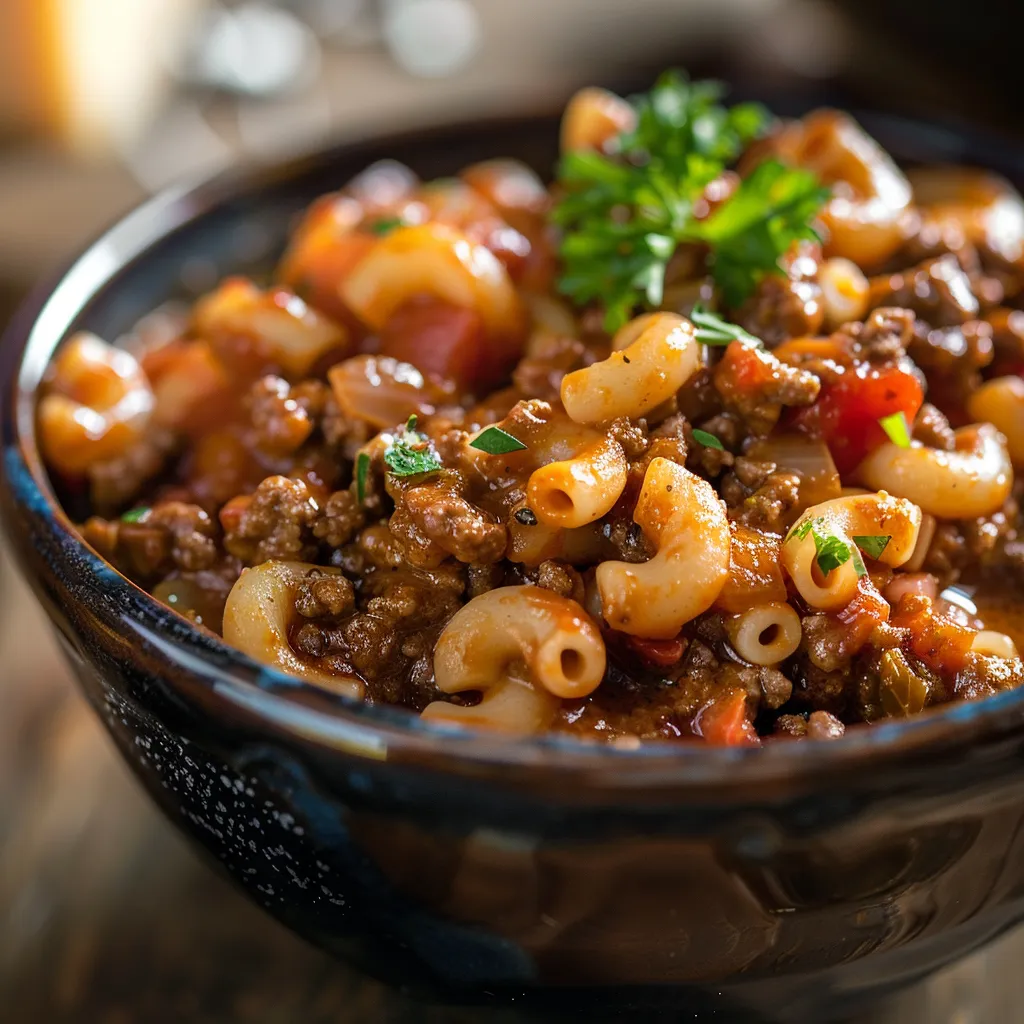
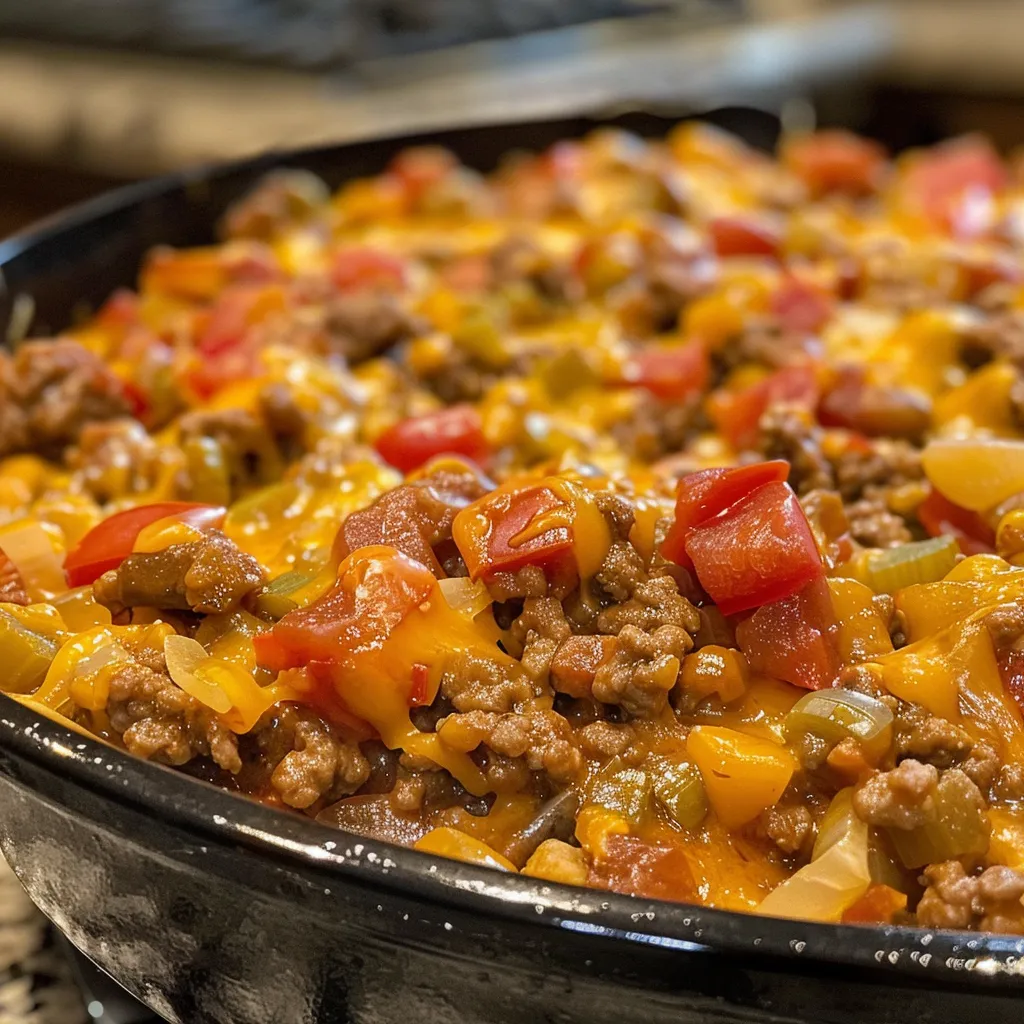
  • Layer the ingredients: In the prepared dish, layer the cooked beef, followed by thinly sliced potatoes seasoned with salt, pepper, Italian seasoning, and paprika.
  • Add the cheeses: Sprinkle the cheddar and Parmesan cheeses on top, then pour the broth around the edges of the dish. Cover with foil.
  • Bake: Pop it in the oven and bake for 30 minutes. After that, remove the foil and bake for an additional 15–20 minutes until the potatoes are tender and the top is golden.

Pro Tips for the Best Hobo Casserole

Now that you’re ready to make this casserole, here are some expert tips to elevate your dish:

  • Layering is key: Ensure even cooking by layering the ingredients properly. Start with meat, then potatoes, and top with cheese.
  • Don’t overcook the beef: Brown it just enough to render fat; it will finish cooking in the oven.
  • Experiment with flavors: Feel free to season the layers with your favorite spices, or try using a different cheese for a unique twist!
  • Test for doneness: Use a fork to check if the potatoes are tender—if they’re still firm, give it a few more minutes in the oven.
  • Let it rest: Allow the casserole to sit for 5-10 minutes after baking. This helps the layers set and makes serving easier.

Common Mistakes and Troubleshooting

Even the most seasoned cooks can face challenges in the kitchen. Here’s how to avoid common pitfalls:

  • Watery casserole: Ensure you’re not adding too much liquid. The beef will release juices during cooking, so stick to the broth.
  • Undercooked potatoes: If you slice them too thick, they may not cook through. Aim for even, thin slices.
  • Burnt cheese topping: If the cheese is browning too quickly, cover it with foil to prevent burning while the potatoes finish cooking.
  • Too greasy: Use lean ground beef or drain excess fat after browning to keep it from becoming too oily.

Delicious Variations

Let’s mix things up! Here are some fun variations of this hobo casserole:

  • Veggie Delight: Add a mix of your favorite vegetables like zucchini, bell peppers, and corn for a colorful, nutritious boost.
  • Cheesy Broccoli: Toss in steamed broccoli florets before layering, and double up on the cheese for a creamy texture.
  • Southwestern Twist: Incorporate black beans, corn, and a sprinkle of taco seasoning for a zesty kick.
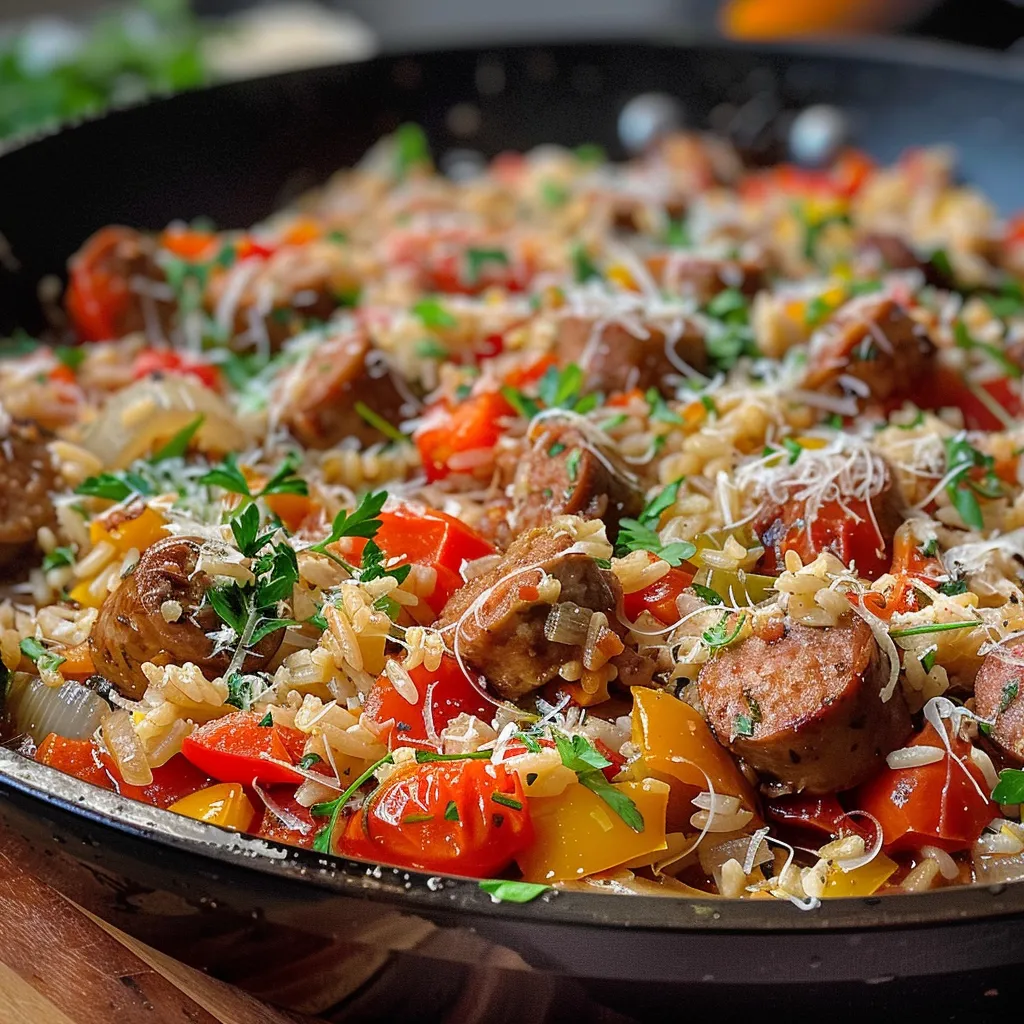
  • Italian Style: Mix in marinara sauce and Italian sausage instead of ground beef for a pasta-inspired dish.

Storage and Make-Ahead Instructions

If you want to make this hobo casserole ahead of time, here’s what you can do:

  • To prepare in advance: Assemble the casserole, cover it tightly with foil, and refrigerate for up to 24 hours before baking.
  • Leftovers: Store leftover casserole in an airtight container in the fridge for up to 4 days. Reheat in the oven or microwave until heated through.
  • Freezing: You can freeze the assembled casserole (before baking) for up to 3 months. Just thaw in the fridge overnight before baking.

Frequently Asked Questions

Got questions about hobo casserole? You’re not alone! Here are some FAQs:

  • What is hobo casserole made of? Hobo casserole is typically made with layers of ground beef, potatoes, onions, cheese, and seasonings.
  • Can I use other meats? Absolutely! Ground turkey, chicken, or even sausage can work well in this dish.
  • Do I need to cook the ground beef before baking? Yes, browning the beef is important for flavor and to drain excess fat.
  • Can I freeze hobo casserole with potatoes? Yes, you can freeze it before baking. Just make sure to thaw it completely before cooking.
  • What sides go well with hobo casserole? A simple green salad or some crusty bread pairs perfectly with this comforting meal.
  • How do I know when the casserole is done? The potatoes should be tender when pierced with a fork, and the cheese should be bubbly and golden.
  • Can I make this vegetarian? Yes! Substitute the ground beef with lentils or mushrooms for a hearty vegetarian option.
  • What is the best way to reheat leftovers? The oven is best for reheating to keep the cheese melted and the potatoes soft.

Nutritional Tips and Dietary Adaptations

Want to make this recipe fit your dietary preferences? Here are some tips:

  • Low-Carb: Use cauliflower instead of potatoes to create a low-carb version while maintaining the comfort.
  • Dairy-Free: Substitute cheese with dairy-free alternatives and use plant-based milk for creaminess.
  • Gluten-Free: This recipe is naturally gluten-free, but always check labels on your ingredients to be sure.

Equipment Recommendations

Here’s what you’ll need to make this hobo casserole:

  • 9×13-inch baking dish: Essential for holding all those delicious layers.
  • Large skillet: Perfect for browning the beef and sautéing the vegetables.
  • Sharp knife: To slice those potatoes and onions with ease.
  • Measuring cups and spoons: For precise ingredient measurements.

Serving Suggestions

When it comes time to serve your hobo casserole, here are a few ideas:

  • Garnish with fresh herbs: A sprinkle of parsley or chives adds a pop of color and freshness.
  • Pair with a side salad: A crisp green salad with a light vinaigrette complements the richness of the casserole.
  • Offer crusty bread: A warm loaf of bread is perfect for soaking up all those delicious flavors.

Cooking is about sharing joy and creating memories, and this hobo casserole is the perfect dish to bring everyone together. So, whether you’re cooking for your family, impressing friends, or just treating yourself, I hope you find a little magic in this recipe. Now, grab that spatula and let’s make something unforgettable!

Hobo Casserole Ground Beef

Prep Time 10 minutes
Cook Time 45 minutes
Total Time 55 minutes
Servings 4 servings
Calories 650
A hearty and cheesy baked dish combining ground beef, potatoes, and flavorful seasonings, perfect for a comforting family meal.

Ingredients

Meat

  • 1 lb ground beef
  • 4–5 medium potatoes potatoes, thinly sliced
  • 1 medium onion, chopped
  • 2 cloves garlic, minced
  • 1 ½ cups shredded cheddar cheese
  • ½ cup grated Parmesan cheese
  • ½ cup beef broth or water
  • 1 tablespoon olive oil
  • 1 teaspoon dried Italian seasoning
  • ½ teaspoon paprika
  • to taste Salt and pepper Salt and pepper
  • ¼ cup milk (optional) (for creaminess)
  • optional Fresh parsley for garnish

Instructions 

  • Preheat oven to 375°F (190°C). Grease a 9×13-inch baking dish.
  • Cook ground beef in a skillet with olive oil until browned; drain excess fat.
  • Add onions and garlic; sauté until soft. Layer beef and potatoes in dish, season, then top with cheeses.
  • Pour broth around edges, cover with foil, and bake for 30 minutes. Remove foil and bake 15–20 more minutes.

Notes

For extra flavor, add chopped fresh parsley before serving.
Calories: 650kcal
Cost: $15
Course: Main Course
Cuisine: American
Keyword: ground beef

Welcome to Your New Favorite Family Meal

Ah, the magic of a one-pan meal! There’s something incredibly comforting about a dish that not only brings the family together but also fills your kitchen with the aroma of roasted chicken, sun-dried tomatoes, and melting cheese. If you’re on the hunt for a quick yet satisfying recipe, look no further than this One-Pan Tuscan Chicken Bake. It’s a dish that embodies cozy family dinners, bursting with flavor and made with simple ingredients that you may already have in your pantry.

In this article, we’ll dive deep into everything you need to know about creating this delicious chicken bake. From ingredient swaps to pro tips, and even common mistakes to avoid, I’m here to ensure your culinary experience is as delightful as possible. So, grab your apron, and let’s make some kitchen magic!

Why You’ll Love This Recipe

  • One-Pan Wonder: This dish comes together in a single skillet, making both preparation and cleanup a breeze. No one wants to spend their evening scrubbing pots and pans!
  • Comforting Flavors: The combination of tender chicken, creamy sauce, and vibrant veggies creates a warm, satisfying meal that feels like a hug on a plate.
  • Customizable: Have some leftover veggies or a different type of cheese? Feel free to mix things up! This recipe is versatile and forgiving.
  • Quick and Easy: With most of the cooking done in under 30 minutes, this Tuscan chicken bake is perfect for busy weeknights when you need something hearty yet simple.
  • Family-Friendly: The mild flavors and creamy sauce make this dish appealing to both adults and kids, ensuring that everyone leaves the table happy.

Getting Started: Ingredients Breakdown

Deliciously arranged Tuscan Chicken Bake with melted cheese, cherry tomatoes, and fresh basil in natural light.

Before we dive into the cooking process, let’s take a closer look at the ingredients that make this Tuscan Chicken Bake shine. You’ll find that each component plays a vital role in creating that unforgettable flavor profile.

  • 4 boneless, skinless chicken breasts: The star of the show! You can substitute with thighs for a richer flavor.
  • 2 cups cherry tomatoes, halved: These add a burst of sweetness. If you don’t have fresh tomatoes, canned diced tomatoes can work in a pinch.
  • 1 cup fresh spinach: For a pop of color and nutrition. Kale or Swiss chard can also be substituted.
  • 1/2 cup shredded mozzarella cheese: This melts beautifully for that gooey texture. Feel free to use provolone or even a dairy-free alternative.
  • 1/4 cup grated Parmesan cheese: For an extra layer of flavor. Nutritional yeast can be a great substitute for a vegan option.
  • 3 cloves garlic, minced: Because everything is better with garlic! If you’re in a hurry, garlic powder can be used as a substitute.
  • 2 tablespoons olive oil: Helps in searing the chicken and adds flavor. Avocado oil is a great alternative.
  • 1 teaspoon Italian seasoning: A mix of dried herbs that enhances the Tuscan flair. You can make your own blend if you prefer fresh herbs.
  • Salt and pepper, to taste: Essential for seasoning.
  • Fresh basil for garnish (optional): Adds a lovely aroma and visual appeal.

How to Make Your One-Pan Tuscan Chicken Bake

Now that we have our ingredients ready, let’s get to the fun part—cooking! Follow these simple steps to create a dish that will have everyone asking for seconds.

  • Step 1: Preheat your oven to 400°F (200°C). This ensures that your chicken bakes evenly and retains its juiciness.
  • Step 2: In a large oven-safe skillet, heat the olive oil over medium heat. This is where the magic begins!
  • Step 3: Season the chicken breasts with salt, pepper, and Italian seasoning. Place them in the skillet, searing for about 5 minutes on each side until golden brown. This step locks in flavor.
  • Step 4: Add the minced garlic to the skillet and cook for an additional minute until fragrant—trust me, your kitchen will smell heavenly!
  • Step 5: Stir in the cherry tomatoes and spinach, mixing everything well. This is where the dish starts to come alive!
  • Step 6: Sprinkle the mozzarella and Parmesan cheese over the top, creating a cheesy blanket of goodness.
  • Step 7: Transfer the skillet to the preheated oven and bake for 20-25 minutes, or until the chicken is cooked through and the cheese is bubbly.
  • Step 8: Remove from the oven and let it rest for a few minutes. Garnish with fresh basil if desired, then serve warm and enjoy your delicious creation!

Pro Tips for the Perfect Bake

Here are some expert insights to take your One-Pan Tuscan Chicken Bake from good to outstanding:

  • Let the Chicken Rest: After baking, allow the chicken to rest for a few minutes to retain its juices.
  • Experiment with Cheese: Mix and match your cheeses! Fontina or goat cheese can also add delightful flavors.
  • Use Fresh Herbs: Fresh basil or oregano will elevate the dish even further. Add them just before serving for a burst of flavor.
  • Customize Veggies: Don’t hesitate to add other vegetables like bell peppers or zucchini based on your preference.
  • Mind the Heat: If you notice the cheese is browning too quickly, cover the skillet with foil to prevent burning.
  • Make it Spicy: Add red pepper flakes for a bit of heat if you enjoy spicy food!
  • Leftover Magic: Use leftovers in wraps, salads, or pasta for a quick lunch!
  • Batch Cooking: Make a double batch and freeze for those busy nights when cooking feels like a chore.

Common Mistakes and Troubleshooting

Even the best of us can make mistakes in the kitchen! Here’s how to avoid common pitfalls:

  • Overcooking Chicken: Use a meat thermometer; chicken is perfectly cooked at 165°F (75°C).
  • Not Enough Flavor: Don’t skimp on seasoning; taste as you go!
  • Cheese Burn: Keep an eye on the oven; if the cheese is browning too fast, cover with foil.
  • Vegetables Overcooked: If you prefer your veggies crisp, add them halfway through the baking process.

Delicious Variations to Try

Feel free to switch things up! Here are some variations to keep this Tuscan chicken bake exciting:

  • Sun-Dried Tomato & Spinach: Add more sun-dried tomatoes for an extra burst of flavor.
  • Italian Sausage: Swap out chicken for mild Italian sausage for a different protein twist.
  • Vegetarian Version: Use chickpeas instead of chicken and add more veggies like mushrooms and zucchini.
  • Herbed Quinoa Base: Serve over a bed of herbed quinoa for a nutritious twist.

Storing and Make-Ahead Instructions

This one-pan Tuscan chicken bake is not only great fresh but also stores well for future meals.

  • Refrigerator: Store leftovers in an airtight container for up to 3 days.
  • Freezer: Freeze in a single layer for easy reheating later. Thaw overnight in the fridge before reheating.
  • Make-Ahead: Assemble the dish a day ahead, cover, and bake when ready!

Frequently Asked Questions

Here are some common questions about the Tuscan Chicken Bake:

  • Can I use frozen chicken? Yes, but make sure to thaw it completely before cooking for even results.
  • What can I serve with this dish? It pairs beautifully with a side salad or garlic bread.
  • Can I make this dairy-free? Absolutely! Use dairy-free cheese and omit the Parmesan.
  • What if I don’t have Italian seasoning? Use a mix of dried basil, oregano, and thyme instead.
  • Is this recipe suitable for meal prep? Yes! It stores well and can be reheated easily.
  • How can I add more vegetables? Feel free to toss in your favorites; just be mindful of cooking times.
  • Can I use different types of cheese? Yes! Feel free to experiment with what you have on hand.
  • How long does it take to cook? The total cooking time is roughly 30-35 minutes, including prep.

Nutritional Tips and Dietary Adaptations

This One-Pan Tuscan Chicken Bake can be adapted for various dietary needs:

  • Low-Carb: Skip the tomatoes if you’re watching carbs closely.
  • Gluten-Free: This recipe is naturally gluten-free; just ensure your cheese is gluten-free.
  • High-Protein: Add chickpeas or substitute with turkey for a protein boost.

Essential Equipment Recommendations

To make your cooking experience smooth, here’s what you’ll need:

  • Oven-Safe Skillet: A cast-iron or non-stick skillet works perfectly.
  • Meat Thermometer: Ensures your chicken is cooked to perfection.
  • Spatula: For easy mixing and serving!

Serving Suggestions

Looking to elevate your meal? Here are some ideas:

  • Fresh Salad: A simple arugula salad drizzled with balsamic glaze complements the dish well.
  • Garlic Bread: Serve alongside warm, buttery garlic bread for the ultimate comfort.
  • Wine Pairing: A crisp white wine, like Sauvignon Blanc, pairs wonderfully with the creamy flavors.

Conclusion: Share the Love

And there you have it—your ultimate guide to crafting a One-Pan Tuscan Chicken Bake that will not only satisfy your taste buds but also create lasting memories around the dinner table. Cooking is all about sharing moments with friends and family, and I hope this dish brings warmth and joy into your home just as it does in mine. So, gather your loved ones, and let’s make some magic happen in the kitchen! Bon appétit!

This Quick One-Pan Tuscan Chicken Bake Recipe

Prep Time 10 minutes
Cook Time 25 minutes
Total Time 35 minutes
Servings 4 servings
Calories 450
A delicious and easy one-pan meal featuring tender chicken, cherry tomatoes, spinach, and melty cheeses, perfect for a quick dinner.

Ingredients

Protein

  • 4 pieces boneless, skinless chicken breasts

Vegetables

  • 2 cups cherry tomatoes, halved
  • 1 cup spinach, fresh

Cheese

  • 1/2 cup mozzarella cheese, shredded
  • 1/4 cup grated parmesan cheese

Seasonings & Oils

  • 3 cloves garlic, minced
  • 2 tablespoons olive oil
  • 1 teaspoon italian seasoning
  • to taste salt and pepper salt and pepper

Optional Garnish

  • fresh basil fresh basil for garnish ((optional))

Instructions 

  • Preheat oven to 400°F (200°C).
  • Season chicken with salt, pepper, and Italian seasoning; sear in skillet for 5 minutes per side.
  • Add garlic, cherry tomatoes, and spinach; sprinkle cheeses on top.
  • Transfer skillet to oven and bake for 20-25 minutes until cooked through.
  • Rest briefly, garnish with basil if desired, and serve.

Notes

For extra flavor, add a splash of balsamic vinegar before serving.
Calories: 450kcal
Cost: $15
Course: Main Course
Cuisine: Italian
Keyword: Chicken

Loved this recipe? Save it to your favorite Pinterest board so you can easily find it later! It’s the perfect way to keep all your sweet ideas in one place. ✨

A one-pan Tuscan Chicken Bake showcasing juicy chicken, vibrant cherry tomatoes, and spinach on a rustic backdrop.

The Ultimate Comfort Dish: Ground Beef Mongolian Noodles

Hey there, culinary adventurers! If you’re anything like me, you know that some meals have the power to transport you straight back to your childhood kitchen, filled with aromas that make your heart sing. Today, we’re diving into the world of Mongolian Noodles with a Ground Beef Twist. This easy, flavorful recipe is not just another weeknight dinner; it’s a comforting hug in a bowl that your entire family will adore.

With a delightful balance of savory and sweet, these ground beef noodles come together in under 30 minutes. Yes, you heard that right! So, let’s gather our ingredients and embark on this delicious journey together.

Why You’ll Love This Recipe

  • Quick and Easy: Perfect for busy weeknights, this recipe can be whipped up in no time, making it a go-to for those evenings when you want something hearty without spending hours in the kitchen.
  • One-Pan Wonder: Fewer dishes mean less cleanup! This dish is made in one skillet, allowing the flavors to meld beautifully while keeping your kitchen chaos to a minimum.
  • Customizable: This recipe allows for easy substitutions—whether you prefer chicken, tofu, or a mix of veggies, you can make it your own!
  • Family-Friendly: With its sweet and savory notes, this dish appeals to even the pickiest eaters. Watch as everyone goes back for seconds!
  • Meal Prep Friendly: Make a big batch and enjoy leftovers for lunch the next day—it tastes even better as the flavors develop!

Ingredients Breakdown

Let’s get into the nitty-gritty of what you’ll need to create this delightful dish. Here’s the full ingredient list:

  • 1 lb lean ground beef: The star of our show! Feel free to swap for turkey or a meat alternative if preferred.
  • 4 tsp fresh grated ginger: This adds a lovely warmth and aromatic quality that elevates the dish.
  • 6 cloves garlic (minced): Because let’s be real—garlic makes everything better!
  • 1/2 cup brown sugar: This provides a hint of sweetness that balances the savory elements.
  • 1/2 cup low-sodium beef broth: To keep things juicy and flavorful.
  • 1/2 cup low-sodium soy sauce: The backbone of our sauce—feel free to go gluten-free if needed!
  • 1/4 cup hoisin sauce: For that extra layer of deliciousness.
  • 1/2 tsp black pepper: A little heat goes a long way!
  • 1/4 tsp red pepper flakes (optional): Add this if you like a kick.
  • 8 oz linguine or fettuccine noodles: You can use any noodle you have on hand—lo mein, ramen, or even spaghetti work beautifully!
  • 2 tbsp cornstarch: This will help thicken our sauce perfectly.
  • 1/4 cup water: To make our slurry with cornstarch.
  • 4 green onions (sliced): For garnish and a fresh crunch!

Cooking Instructions

Side shot of a bowl filled with savory Ground Beef Mongolian Noodles.

Ready to get cooking? Let’s bring this magic to life!

  1. In a large skillet, heat a drizzle of oil over medium-high heat. Add the ground beef and cook until browned, about 5 minutes. Add the ginger and garlic during the last 2 minutes of cooking for that aromatic boost.
  2. While the beef is cooking, prepare your noodles according to package instructions until al dente. Drain and set aside.
  3. Once the beef is nicely browned, drain any excess fat. Then, stir in the brown sugar, beef broth, soy sauce, hoisin sauce, black pepper, and red pepper flakes (if using). Mix well.
  4. In a small bowl, whisk together the cornstarch and water to create a slurry. Pour this into the beef mixture and bring it to a simmer, allowing it to thicken for about 2-3 minutes.
  5. Add the cooked noodles to the skillet and toss gently to coat them evenly in the sauce. Let the dish sit for a couple of minutes so the noodles can absorb all that scrumptious flavor.
  6. Serve your Mongolian noodles hot, garnished with sliced green onions for that final touch of freshness.

Pro Tips for Perfect Mongolian Noodles

  • Use Cold Meat: If you’re using leftover beef, make sure it’s cold before adding it to the skillet. This helps it brown nicely!
  • Don’t Overcook the Noodles: Aim for al dente noodles so they hold up well in the stir-fry.
  • Customize Your Veggies: Feel free to add bell peppers, snap peas, or broccoli for extra nutrition and color!
  • Adjust the Sweetness: If you prefer a less sweet dish, reduce the brown sugar to taste.
  • Make It Ahead: This recipe is perfect for meal prep. Just store the components separately and combine when ready to eat!
  • Leftover Sauce: If you have extra sauce, store it in an airtight container in the fridge for up to a week.
  • Spice It Up: If you love heat, consider adding some chili paste or sriracha to the sauce.
  • Garnish Wisely: Other garnishes like cilantro or sesame seeds can elevate the dish even further!

Common Mistakes and Troubleshooting

Even the best chefs have their hiccups! Here are some common pitfalls and how to avoid them:

  • Too Salty: If your dish turns out too salty, add a splash of water or a pinch of sugar to balance the flavors.
  • Overcooked Noodles: If your noodles are mushy, ensure you’re cooking them just until al dente. They’ll continue to cook when tossed in the hot beef mixture.
  • Sauce Too Thick: If the sauce becomes too thick, add a bit more broth or water to loosen it up.
  • Not Enough Flavor: Taste as you go! Adjust seasoning with a bit more soy sauce or hoisin if needed.
  • Meat Sticking: Make sure your skillet is well-oiled to prevent sticking.

Variations to Try

Now that you’ve mastered the basics, here are some fun variations to keep things exciting:

  • Vegetarian Version: Swap the ground beef for crumbled tofu or tempeh and use vegetable broth.
  • Spicy Mongolian Noodles: Add more red pepper flakes or a dash of chili oil for a fiery kick!
  • One-Pan Veggie Delight: Toss in a mix of your favorite vegetables like bell peppers, carrots, and zucchini during the stir-fry.
  • Coconut Curry Twist: Add coconut milk and curry paste for a unique flavor profile!

Storage and Make-Ahead Instructions

Want to enjoy this dish later? Here’s how to store and reheat:

  • Refrigerator: Store leftovers in an airtight container for up to 3 days. The flavors will deepen, making it even more delicious!
  • Freezer: This dish can be frozen for up to 2 months. Just be sure to allow it to cool completely before freezing.
  • Reheating: To reheat, warm in a skillet over medium heat with a splash of broth or water to bring it back to life. You can also microwave it in short intervals, stirring occasionally.

Frequently Asked Questions

Let’s tackle some common queries to help you on your cooking journey:

  • What are Mongolian ground beef noodles made of? They primarily consist of ground beef, noodles, soy sauce, and a mix of aromatics.
  • Can I use ramen or lo mein for Mongolian noodles? Absolutely! Both types of noodles work wonderfully in this recipe.
  • How do I thicken Mongolian noodle sauce? Using cornstarch mixed with water is a classic method to achieve that desired thickness.
  • Is Mongolian ground beef noodles spicy? The spice level is adjustable; feel free to add more or less red pepper flakes based on your preference.
  • Can I make this dish gluten-free? Yes! Simply use gluten-free noodles and tamari instead of soy sauce.
  • How can I add more vegetables? Consider adding bell peppers, broccoli, or snap peas for added nutrition.
  • What’s the best way to store leftovers? Store in an airtight container in the fridge for up to 3 days or freeze for longer storage.
  • Can I double the recipe? Of course! Just ensure your skillet is large enough to accommodate the extra ingredients.

Nutritional Tips and Dietary Adaptations

This dish is not only delicious but can be adapted to fit various dietary needs:

  • Low-Carb: Substitute noodles with spiralized zucchini or shirataki noodles.
  • Gluten-Free: Use gluten-free noodles and soy sauce alternatives.
  • Dairy-Free: This recipe is naturally dairy-free, perfect for those with lactose intolerance.

Recommended Kitchen Equipment

Having the right tools can make cooking easier and more enjoyable:

  • Non-stick skillet: Essential for preventing sticking and making cleanup a breeze.
  • Measuring cups and spoons: Accurate measurements ensure perfect flavor balance.
  • Whisk: For mixing your cornstarch slurry without lumps.
  • Spatula: A good spatula helps you toss the noodles evenly with the sauce.

Serving Suggestions

Pair your Mongolian noodles with:

  • Steamed Vegetables: Broccoli or bok choy make a great side dish.
  • Spring Rolls: These add a nice crunch and extra flavor.
  • Fresh Salad: A light salad with sesame dressing complements the richness of the noodles.

Wrapping It All Up

And there you have it! A heartwarming, delicious recipe for Ground Beef Mongolian Noodles that’s sure to become a family favorite. Cooking should be a joyful experience, filled with creativity and love. So get in that kitchen, play with flavors, and make this dish your own! I can’t wait to hear how yours turns out. Happy cooking, my friends!

Ground Beef Mongolian Noodles

Prep Time 10 minutes
Cook Time 15 minutes
Total Time 25 minutes
Servings 4 servings
Calories 650
A quick and flavorful Asian-inspired dish featuring ground beef and noodles in a savory sauce.

Ingredients

Meat and Sauce

  • 1 lb lean ground beef
  • 4 tsp fresh grated ginger
  • 6 cloves garlic (minced)
  • 1/2 cup brown sugar
  • 1/2 cup low-sodium beef broth
  • 1/2 cup low-sodium soy sauce
  • 1/4 cup hoisin sauce
  • 1/2 tsp black pepper
  • 1/4 tsp red pepper flakes (optional)

Noodles

  • 8 oz linguine or fettuccine noodles
  • 2 tbsp cornstarch
  • 1/4 cup water
  • 4 green onions sliced green onions

Instructions 

  • Cook beef in a skillet until browned, then add ginger and garlic for 2 minutes.
  • Cook noodles until al dente, drain, and set aside.
  • Add sugar, broth, soy sauce, hoisin, pepper, and flakes to beef; stir well.
  • Mix cornstarch with water, add to beef mixture, and simmer until thickened, 2-3 minutes.
  • Add noodles to skillet, toss to coat, and let sit for 2-3 minutes.
  • Garnish with sliced green onions and serve.

Notes

For extra flavor, add a splash of sesame oil or sprinkle with sesame seeds before serving.
Calories: 650kcal
Cost: $15
Course: Main Course
Cuisine: Asian
Keyword: Beef, Noodles, quick

Welcome to a Taste of Comfort: The Italian Sausage and Rice Skillet

Ah, the Italian Sausage and Rice Skillet—a dish that embodies the warmth of home-cooked meals and the joy of gathering around the table. If you’re anything like me, you’ve experienced those busy weeknights where time is short, but the desire for something hearty and satisfying is high. This recipe brings together savory Italian sausage, vibrant bell peppers, and creamy Parmesan in a delightful one-pan wonder that will leave everyone asking for seconds. Let’s dive into why this skillet is a must-have in your weeknight rotation!

Why You’ll Love This Recipe

This recipe isn’t just about convenience; it’s about creating a meal that feels like a warm hug. Here are five reasons you’ll adore this dish:

  • Quick and Easy: Ready in under 30 minutes, this meal is perfect for hectic weeknights when you need something delicious without the fuss.
  • One-Pan Wonder: Less cleanup means more time enjoying your meal and less time scrubbing pots and pans.
  • Customizable: Feel free to swap out ingredients based on what you have on hand. Whether you want to add more veggies or change the protein, this recipe adapts beautifully.
  • Flavorful Comfort: The combination of Italian sausage and spices creates a dish that’s bursting with flavor, making it a family favorite.
  • Healthier Option: Packed with veggies and whole grains, this dish is a wholesome choice that doesn’t skimp on taste.

Ingredient Breakdown

Let’s talk about the stars of our show! Here’s what you need to create this Italian Sausage and Rice Skillet:

  • 1 tablespoon olive oil: For sautéing, adding a rich flavor.
  • 1 pound Italian sausage: Choose sweet or spicy based on your preference.
  • 1 onion (chopped): Adds sweetness and depth to the dish.
  • 2 cloves garlic (minced): A must for that aromatic base.
  • 1 bell pepper (chopped): Adds color and crunch; feel free to use any color you like!
  • 1 cup long-grain white rice: The heart of this skillet; cooks up fluffy and perfect.
  • 2 cups chicken broth: For cooking the rice and adding rich flavor.
  • 1 can (14.5 ounces) diced tomatoes (undrained): Provides moisture and acidity.
  • 1 teaspoon Italian seasoning: A blend of herbs that enhances the overall flavor.
  • Salt and pepper (to taste): Essential for seasoning.
  • 1/2 cup grated Parmesan cheese: For that creamy finish.
  • Fresh parsley (chopped, optional, for garnish): Adds a fresh touch on top.

If you’re missing an ingredient, don’t worry! Here are some handy substitutions:

  • Ground turkey or chicken: For a leaner option, swap out the sausage.
  • Vegetable broth: Use this instead of chicken broth for a vegetarian version.
  • Quinoa or brown rice: These can replace white rice for a healthier twist.
  • Zucchini or spinach: Toss these in for extra veggies if you’re feeling adventurous!

Step-by-Step Instructions

Side view of a delicious Italian sausage and rice dish in a skillet, showcasing vibrant ingredients.

Ready to whip this up? Let’s get to the cooking!

  1. Heat the olive oil in a large skillet over medium heat.
  2. Add the Italian sausage and cook until browned, breaking it up with a spoon as it cooks.
  3. Add the chopped onion, garlic, and bell pepper to the skillet. Cook until the vegetables are softened, about 5 minutes.
  4. Stir in the rice, chicken broth, diced tomatoes, Italian seasoning, salt, and pepper.
  5. Bring the mixture to a boil, then reduce the heat to low. Cover and simmer for about 20 minutes, or until the rice is tender and the liquid is absorbed.
  6. Stir in the Parmesan cheese until melted and well combined.
  7. Serve hot, garnished with fresh parsley if desired.

Pro Tips for Perfecting Your Skillet

Here are some tried-and-true insights to elevate your cooking experience:

  • Don’t rush the browning: Allow the sausage to brown properly for a deeper flavor.
  • Check the rice: If it’s not tender after 20 minutes, add a splash more broth and cover again.
  • Mix it up: Try adding different vegetables like peas or corn for a pop of color and nutrition.
  • Taste as you go: Adjust seasoning throughout to ensure the best flavor.
  • Let it rest: Allow the skillet to sit covered for a few minutes after cooking to let the flavors meld.

Common Mistakes and Troubleshooting

Even the best cooks have off days! Here are common pitfalls and how to avoid them:

  • Rice is too mushy: Ensure you’re using the correct ratio of liquid to rice; too much liquid can lead to mushy rice.
  • Dish is bland: Don’t skip the salt! Seasoning is key to bringing out the flavors.
  • Sausage isn’t cooked through: Always ensure your sausage is fully browned before adding other ingredients.

Delicious Variations to Try

Feeling like mixing things up? Here are some delightful variations:

  • Mexican Twist: Use chorizo instead of Italian sausage and add black beans and corn.
  • Vegetarian Delight: Replace sausage with mushrooms and add extra veggies like zucchini and spinach.
  • Spicy Kick: Add a pinch of red pepper flakes or diced jalapeños for heat.
  • Herbed Up: Try fresh herbs like basil or thyme for a different flavor profile.

Storage and Make-Ahead Instructions

Want to save some for later? Here’s how:

  • Refrigerate: Store leftovers in an airtight container for up to 4 days.
  • Freeze: This skillet can be frozen for up to 3 months—just thaw in the fridge overnight before reheating.
  • Make-Ahead: Prep your veggies and sausage in advance for an even quicker cook time during the week.

Frequently Asked Questions

Got questions? I’ve got answers!

  • Can I use brown rice instead of white? Yes, but adjust the cooking time and liquid ratio as brown rice takes longer to cook.
  • What if I don’t have Italian sausage? Feel free to substitute with any ground meat or even tofu for a vegetarian option.
  • Can I make this dish vegan? Absolutely! Use plant-based sausage, vegetable broth, and omit the cheese or use a vegan alternative.
  • What can I serve with this skillet? A simple green salad or garlic bread pairs wonderfully!
  • How do I reheat leftovers? Microwave or reheat on the stovetop until warmed through.
  • Can I add more vegetables? Yes! Chopped carrots, peas, or spinach are great additions.
  • What if I want extra sauce? Add more broth or diced tomatoes to create a saucier dish.
  • Is this dish spicy? It depends on the type of sausage you use—opt for spicy sausage if you like heat!

Nutritional Tips and Dietary Adaptations

Looking for ways to make this dish even healthier? Here’s how:

  • Whole grains: Swap white rice for brown rice or quinoa for added fiber.
  • Low-sodium options: Use low-sodium broth and tomatoes to control salt intake.
  • Extra veggies: Boost nutritional value by adding in more vegetables, which will also enhance the flavor.

Equipment Recommendations

Here’s what you’ll need for this recipe:

  • Large skillet: A good-quality skillet is essential for even cooking.
  • Wooden spoon: Perfect for stirring and breaking up the sausage.
  • Measuring cups and spoons: For accurate ingredient measurements.

Serving Suggestions

Finally, let’s talk about how to serve this delicious dish. Pair it with:

  • Crusty garlic bread: To soak up all the delicious flavors.
  • Simple green salad: A fresh side to balance the hearty skillet.
  • Freshly grated Parmesan: Offer additional cheese on the side for those who want a little extra creaminess.

With this Italian Sausage and Rice Skillet, you’re not just making dinner; you’re creating memories that linger long after the last bite is gone. Pull up a chair, invite your loved ones, and enjoy the warm, comforting flavors that this dish brings to the table. Happy cooking!

Italian Sausage and Rice Skillet

Prep Time 10 minutes
Cook Time 20 minutes
Total Time 30 minutes
Servings 4 servings
Calories 550
A flavorful one-pan meal combining savory Italian sausage, rice, and vegetables, topped with Parmesan cheese.

Ingredients

Main

  • 1 tablespoon olive oil
  • 1 pound Italian sausage (casings removed)
  • 1 onion onion (chopped)
  • 2 cloves garlic (minced)
  • 1 bell pepper bell pepper (chopped)
  • 1 cup long-grain white rice
  • 2 cups chicken broth
  • 1 can (14.5 ounces) diced tomatoes (undrained)
  • 1 teaspoon Italian seasoning
  • to taste salt and pepper salt and pepper
  • 1/2 cup grated Parmesan cheese
  • optional for garnish fresh parsley (chopped)

Instructions 

  • Heat olive oil in a skillet over medium heat.
  • Add sausage and cook until browned, breaking it apart.
  • Add onion, garlic, and bell pepper; cook until softened, about 5 minutes.
  • Stir in rice, broth, tomatoes, Italian seasoning, salt, and pepper; bring to boil.
  • Reduce heat, cover, and simmer 20 minutes until rice is tender.
  • Stir in Parmesan cheese until melted; serve garnished with parsley if desired.

Notes

For extra flavor, add a pinch of red pepper flakes or fresh basil.
Calories: 550kcal
Cost: $15
Course: Main Course
Cuisine: Italian
Keyword: Rice, sausage

Welcome to the World of Garlic Parmesan Chicken Pasta!

Ah, Garlic Parmesan Chicken Pasta—the dish that brings warmth to your kitchen and joy to your dinner table! If you’re looking for a recipe that combines comfort and flavor, you’ve landed in the right spot. This delightful dish is not just any pasta; it’s a celebration of fresh ingredients, rich textures, and savory goodness that will have your loved ones asking for seconds (or thirds!). Let’s dive into this culinary adventure together!

Why You’ll Love This Recipe

This Garlic Parmesan Chicken Pasta isn’t just another meal; it’s a delightful experience packed with flavor and nutrition. Here’s why you’ll adore it:

  • Quick to Prepare: This meal comes together in just 30 minutes, making it perfect for busy weeknights when you need something delicious yet effortless.
  • Nutritious Ingredients: With whole wheat pasta and fresh vegetables, this dish is as healthy as it is hearty. It’s a meal you can feel good about serving your family.
  • Customizable: Feel free to play with the ingredients—add more veggies, or swap in your favorite protein. The possibilities are endless!
  • Irresistible Flavor: The combination of garlic, olive oil, and creamy Parmesan creates a mouthwatering sauce that envelops the pasta beautifully.
  • Perfect for Meal Prep: This dish holds up well in the fridge, making it an excellent choice for meal prep. Enjoy it for lunch or dinner throughout the week!

Ingredient Breakdown

Appetizing Garlic Parmesan Chicken Pasta featuring vibrant colors and textures, captured in soft lighting.

Here’s everything you’ll need to whip up this delicious Garlic Parmesan Chicken Pasta, along with some thoughtful substitutions:

  • 8 oz whole wheat pasta: This adds fiber and nutrients. If you prefer gluten-free, opt for brown rice or chickpea pasta.
  • 2 boneless, skinless chicken breasts: The star protein! For a vegetarian option, replace with grilled tofu or chickpeas.
  • 2 tablespoons olive oil: A healthy fat for sautéing. You can also use avocado oil if you like.
  • 4 cloves garlic, minced: The aromatic backbone of this dish. If you’re a garlic lover, feel free to add more!
  • 1 cup cherry tomatoes, halved: These add a burst of sweetness. You can substitute with sun-dried tomatoes in a pinch.
  • 1 cup spinach: Fresh or frozen, spinach adds color and nutrients. Kale is a tasty alternative!
  • 1/2 cup grated Parmesan cheese: The creamy element that ties everything together. Nutritional yeast can be used for a dairy-free option.
  • Salt and pepper to taste: Essential for seasoning and enhancing flavors.
  • Fresh basil for garnish (optional): A bright finish that adds freshness. Dried herbs can work too!

Step-by-Step Instructions

Now that we’ve gathered our ingredients, let’s get cooking! Follow these steps for a delightful dish:

  1. Cook the whole wheat pasta according to package instructions until al dente. Drain and set aside.
  2. Season the chicken breasts with salt and pepper—don’t be shy!
  3. In a large skillet, heat the olive oil over medium heat. Add the chicken and cook for 6-7 minutes on each side until cooked through. Remove the chicken from the skillet and let it rest on a cutting board.
  4. In the same skillet, add the minced garlic and cook for about 30 seconds until fragrant. Your kitchen should start smelling heavenly!
  5. Add the cherry tomatoes and spinach to the skillet, cooking until the spinach wilts down.
  6. Slice the cooked chicken into strips and return it to the skillet. Add the cooked pasta and toss everything together.
  7. Stir in the grated Parmesan cheese until well combined, and let it melt into the sauce.
  8. Serve warm, garnished with fresh basil if desired. Enjoy your creation!

Pro Tips for the Perfect Garlic Parmesan Chicken Pasta

Want to ensure this dish turns out just right? Here are some expert insights:

  • Don’t Overcook the Pasta: Aim for al dente to prevent mushiness in the final dish.
  • Let the Chicken Rest: Allowing the chicken to rest before slicing keeps it juicy.
  • Adjust the Garlic: If you’re not sure how much garlic to use, start small and add more to taste.
  • Use Fresh Ingredients: Fresh herbs and ripe tomatoes can elevate the flavor significantly.
  • Mix in Extra Veggies: Consider adding bell peppers, zucchini, or mushrooms for added nutrition and variety.
  • Experiment with Cheese: Try mixing different cheeses, like goat cheese or mozzarella, for a unique twist.
  • Save Some Pasta Water: If your sauce seems too thick, add a splash of the reserved pasta water for a creamier consistency.
  • Top with Extra Parmesan: Don’t hold back on the cheese—everyone loves a cheesy finish!

Common Mistakes and Troubleshooting

Even the best of us can have kitchen mishaps. Here are some common mistakes to avoid:

  • Overcooking the Chicken: Aim for an internal temperature of 165°F. Overcooked chicken can become dry.
  • Not Enough Seasoning: Taste as you go! Don’t hesitate to adjust the salt and pepper to your preference.
  • Forgetting to Reserve Pasta Water: This can help achieve the perfect sauce consistency, so don’t skip it!
  • Using Pre-Grated Cheese: Freshly grated cheese melts better and provides superior flavor.

Delicious Variations to Try

If you’re feeling adventurous, here are some tasty variations to switch things up:

  • Spicy Garlic Parmesan Chicken Pasta: Add red pepper flakes for a kick!
  • Lemon Garlic Parmesan Chicken Pasta: Squeeze fresh lemon juice and zest for a zesty twist.
  • Sun-Dried Tomato and Spinach Version: Swap fresh tomatoes with sun-dried ones for a deeper flavor profile.
  • Vegetarian Option: Replace chicken with sautéed mushrooms or chickpeas for a hearty vegetarian dish.

Storage and Make-Ahead Instructions

This Garlic Parmesan Chicken Pasta is perfect for meal prep! Here’s how to store it:

  • Fridge: Store leftovers in an airtight container for up to 3 days.
  • Freezer: This dish can be frozen for up to 2 months. Just reheat in the microwave or on the stovetop.
  • Make-Ahead: You can cook the chicken and pasta ahead of time. Just toss them with the sauce when you’re ready to serve!

Frequently Asked Questions

Got questions? I’ve got answers! Here are some FAQs about this delightful dish:

  • Can I use regular pasta instead of whole wheat? Absolutely! Use whichever pasta you prefer; just adjust cooking times accordingly.
  • Can I make this dish gluten-free? Yes! Substitute whole wheat pasta with gluten-free pasta like brown rice or quinoa pasta.
  • How do I reheat leftovers? Reheat on the stove with a splash of water or broth to keep it moist, or in the microwave.
  • Can I add other vegetables? Yes! Feel free to add any vegetables you love or have on hand, like bell peppers or broccoli.
  • How spicy is this dish? It’s mild, but you can add red pepper flakes for heat if desired.
  • What can I serve with Garlic Parmesan Chicken Pasta? This dish pairs well with a fresh green salad or garlic bread.
  • Can I make this dish dairy-free? Yes! Substitute Parmesan with nutritional yeast or a dairy-free cheese alternative.
  • What’s the best way to store leftovers? Keep them in an airtight container in the fridge for up to three days.

Nutrition Tips and Dietary Adaptations

Want to make this dish even healthier? Here are some nutrition tips:

  • Add More Vegetables: Incorporate a variety of veggies to increase fiber and antioxidants.
  • Use Less Oil: If you’re watching fat intake, reduce the olive oil or use a non-stick spray.
  • Opt for Lean Chicken: Choosing chicken thighs can add flavor without too much fat.
  • Control Your Portions: Serve with a side salad to balance your meal and keep portions in check.

Essential Equipment Recommendations

To get the best results from this recipe, here’s a list of essential kitchen equipment:

  • Large Skillet: A heavy-bottomed skillet is ideal for even cooking of the chicken and sauce.
  • Pasta Pot: Invest in a good pot for boiling pasta; it makes a world of difference!
  • Wooden Spoon: Perfect for stirring without scratching your cookware.
  • Measuring Cups and Spoons: Accurate measurements ensure your dish turns out just right.

Serving Suggestions

This Garlic Parmesan Chicken Pasta is delicious on its own, but here are some serving suggestions to elevate your meal:

  • With a Fresh Salad: Serve with a crisp Caesar or garden salad for a refreshing contrast.
  • Pair with Garlic Bread: A side of garlic bread is always a hit and complements the dish beautifully.
  • Top with Extra Parmesan: Don’t skimp on the cheese—everyone loves a cheesy finish!
  • Drizzle with Balsamic Glaze: A drizzle of balsamic glaze can add a sweet acidity that enhances the flavors.

Final Thoughts

There you have it! A comprehensive guide to making the most scrumptious Garlic Parmesan Chicken Pasta that’s sure to impress. Whether you’re cooking for family or just treating yourself, this dish is bound to become a favorite in your kitchen. Remember, cooking is all about joy and creativity, so don’t hesitate to add your personal touch. Now, grab your apron and let’s create some magic in the kitchen!

Easy Garlic Parmesan Chicken Pasta Recipe for a Healthy Dinner

Prep Time 10 minutes
Cook Time 20 minutes
Total Time 30 minutes
Servings 4 servings
Calories 550
This healthy and flavorful chicken pasta combines whole wheat noodles, fresh vegetables, and Parmesan cheese for a quick, nutritious dinner.

Ingredients

Pasta

  • 8 oz whole wheat pasta

Protein

  • 2 pieces boneless, skinless chicken breasts

Oil

  • 2 tablespoons olive oil

Garlic

  • 4 cloves garlic, minced

Vegetables

  • 1 cup cherry tomatoes, halved
  • 1 cup spinach

Cheese

  • 1/2 cup grated parmesan cheese

Seasonings

  • to taste salt and pepper

Garnish

  • optional fresh basil for garnish

Instructions 

  • Cook pasta according to package; drain.
  • Season chicken with salt and pepper, then cook in a skillet with olive oil for 6-7 minutes per side. Rest and slice.
  • In the same skillet, sauté garlic for 30 seconds, then add cherry tomatoes and spinach; cook until spinach wilts.
  • Return sliced chicken to skillet, add cooked pasta, and toss. Stir in Parmesan cheese.
  • Serve warm, garnished with basil if desired.

Notes

For extra flavor, add a squeeze of lemon or red pepper flakes.
Calories: 550kcal
Cost: $15
Course: Main Course
Cuisine: American
Keyword: Chicken, healthy, pasta

Loved this recipe? Save it to your favorite Pinterest board so you can easily find it later! It’s the perfect way to keep all your sweet ideas in one place. ✨

Detail shot of a healthy Garlic Parmesan Chicken Pasta dish with fresh ingredients and a blurred background.

Welcome to Your New Favorite Comfort Food Recipe!

If you’ve arrived here, chances are you’re in search of a warm, satisfying meal that’s not just delicious but also easy to whip up. Let me introduce you to my Cheesy One Pot Beef and Potatoes dish, a wholesome creation that’s perfect for busy weeknights or when you simply want to indulge in some cozy flavors. Imagine savory ground beef, tender potatoes, and gooey melted cheese, all simmered together in one pot—this dish is truly a culinary hug!

Growing up in Oregon, I often found myself in my mother’s kitchen, surrounded by the comforting aromas of home-cooked meals. This recipe captures that essence of warmth and togetherness, just waiting for you to bring it to life in your own kitchen. So, grab your favorite pot, and let’s get cooking!

Why You’ll Love This Recipe

This dish isn’t just a meal; it’s an experience. Here are a few reasons why you’ll fall head over heels for this cheesy one pot wonder:

  • One-Pot Convenience: Say goodbye to a pile of dishes! Everything cooks together in a single pot, making cleanup a breeze.
  • Flavor Explosion: The combination of ground beef, spices, and creamy cheese creates a flavor profile that’s rich and satisfying.
  • Family-Friendly: This dish is a hit with both kids and adults, making it the perfect choice for family dinners.
  • Customizable: Feel free to swap in your favorite veggies or proteins, adjusting the dish to suit your preferences.
  • Quick and Easy: With minimal prep and cook time, you can have a hearty meal ready in under 30 minutes!

Ingredients You’ll Need

Gathering the right ingredients is key to making this dish a success. Here’s what you’ll need:

  • 1 lb ground beef: You can use lean ground beef for a healthier option or substitute with turkey or chicken for a lighter version.
  • 4 medium potatoes, peeled and diced: Starchy potatoes like Russets or Yukon Golds work best for that creamy texture.
  • 1 medium onion, chopped: Adds sweetness and depth of flavor.
  • 2 cloves garlic, minced: A must-have for flavor; feel free to add more if you’re a garlic lover!
  • 1 cup beef broth: Enhances the flavor; for a lighter taste, use chicken broth or vegetable broth.
  • 1 cup heavy cream: Makes the dish creamy and rich; you can use half-and-half as an alternative.
  • 2 cups shredded cheddar cheese: For that gooey topping; try using a mix of cheeses for extra flavor.
  • 1 tablespoon olive oil: For sautéing; you might also use butter for added richness.
  • 1 teaspoon dried thyme: Provides an earthy flavor; feel free to swap with rosemary or Italian seasoning.
  • 1 teaspoon paprika: Adds a hint of smokiness; chili powder works as a spicy alternative.
  • Salt and pepper, to taste: Always essential for seasoning!
  • Fresh parsley for garnish (optional): A sprinkle of color and freshness at the end.

Step-by-Step Instructions

Side view of a hearty beef and potato casserole, garnished with fresh parsley.

Now that we have everything prepped, let’s dive into the cooking process!

  1. In a large pot or Dutch oven, heat the olive oil over medium heat. Add the ground beef and cook until browned, breaking it apart with a spoon. Drain any excess fat if necessary.
  2. Add the chopped onion and minced garlic to the pot. Cook for 2-3 minutes until softened and fragrant.
  3. Stir in the diced potatoes, dried thyme, paprika, salt, and pepper. Cook for 2-3 minutes, stirring occasionally to coat the potatoes in the spices.
  4. Pour in the beef broth and heavy cream. Stir everything to combine and bring to a simmer.
  5. Cover the pot and let the potatoes cook for 20-25 minutes, stirring occasionally, until they are tender and the sauce has thickened slightly.
  6. Once the potatoes are tender, sprinkle the shredded cheddar cheese over the top. Stir until the cheese is completely melted and the sauce becomes creamy.
  7. Taste the dish and adjust the seasoning with more salt and pepper if needed.
  8. Serve the cheesy beef and potatoes hot, garnished with fresh parsley for a pop of color and added flavor.

Pro Tips for Perfection

To ensure your cheesy one pot beef and potatoes turns out perfectly, here are some expert tips:

  • Cut Uniformly: Make sure your potatoes are cut into uniform pieces to ensure even cooking.
  • Don’t Rush the Browning: Allow the beef to brown fully for a deeper flavor.
  • Use High-Quality Cheese: Good cheese melts better and enhances the overall taste of the dish.
  • Adjust the Creaminess: If you prefer a richer sauce, add more cream or cheese.
  • Let It Rest: Allow the dish to sit for a few minutes before serving; it thickens up beautifully.
  • Experiment with Toppings: Try adding crispy bacon, green onions, or even jalapeños for a twist!
  • Leftovers are Gold: This dish reheats wonderfully, so make extra for lunch the next day!
  • Flavor Variations: Don’t hesitate to experiment with spices to create your own signature version!

Common Mistakes and Troubleshooting

Even the best cooks can have mishaps in the kitchen. Here are some common mistakes to avoid:

  • Overcrowding the Pot: If using a smaller pot, cook in batches to ensure even cooking.
  • Not Enough Liquid: If the dish looks too dry, add a splash of broth or cream to loosen it up.
  • Underseasoning: Don’t be shy with salt and pepper; they enhance the flavors significantly.
  • Overcooking the Potatoes: Keep an eye on them; you want them tender but not mushy!

Delicious Variations to Try

This recipe is a blank canvas—here are some fun variations to keep things exciting:

  • Cheesy Veggie Delight: Add in frozen peas, corn, or bell peppers for an extra burst of color and nutrients.
  • Spicy Tex-Mex: Mix in diced jalapeños and swap cheddar for pepper jack cheese for a spicy kick.
  • Mediterranean Twist: Use ground lamb, add olives, and top with feta cheese for a unique flavor.
  • Loaded Baked Potato Style: Top with sour cream and chives for that classic loaded potato feel.

Storage and Make-Ahead Instructions

This dish is perfect for meal prep! Here’s how to store and reheat it:

  • Refrigeration: Store leftovers in an airtight container in the fridge for up to 4 days.
  • Freezing: This dish can be frozen for up to 3 months. Thaw overnight in the fridge before reheating.
  • Reheating: Warm in a pot over low heat, adding a splash of broth or cream to restore creaminess.

Frequently Asked Questions

Here are some common questions I receive about this recipe:

  • Can I use different types of meat? Absolutely! Ground turkey, chicken, or even sausage work well.
  • What if I don’t have beef broth? You can substitute with chicken broth or even vegetable broth for a lighter flavor.
  • Is there a vegetarian version? Yes! Substitute the beef with lentils or mushrooms and use vegetable broth.
  • How do I make this dish gluten-free? Ensure your broth and any other ingredients are gluten-free; this recipe is naturally gluten-free!
  • Can I make this dish in a slow cooker? Yes! Brown the beef first, then transfer everything to the slow cooker and cook on low for 6-8 hours.
  • What sides pair well with this dish? A simple salad or steamed veggies are great complements to this hearty meal.
  • Can I use instant potatoes? While fresh potatoes give the best texture, instant potatoes can be a quick alternative.
  • How can I make this dish spicier? Add red pepper flakes or hot sauce while cooking for an extra kick!

Nutritional Tips and Dietary Adaptations

For those looking to make this dish healthier or adhere to dietary restrictions, consider these adaptations:

  • Low-Carb Option: Substitute potatoes with cauliflower for a lower-carb alternative.
  • Dairy-Free: Use coconut cream and a dairy-free cheese alternative to keep it creamy without the dairy.
  • High-Protein: Add beans or lentils alongside the beef for an extra protein boost.

Essential Kitchen Equipment

To make this cheesy one pot beef and potatoes dish, you’ll need:

  • Large Pot or Dutch Oven: For even cooking and browning.
  • Wooden Spoon: To stir and break up the beef.
  • Measuring Cups and Spoons: Accurate measurements lead to the best results.
  • Sharp Knife: For chopping ingredients efficiently.

Serving Suggestions

To elevate your meal, consider these serving suggestions:

  • Top with Fresh Herbs: A sprinkle of cilantro or chives adds freshness.
  • Pair with a Crunchy Salad: A simple green salad can balance the richness of the dish.
  • Serve with Crusty Bread: Perfect for sopping up every last bit of cheesy goodness.

Conclusion: Your New Family Favorite Awaits!

Now that you have the ultimate guide to making this Cheesy One Pot Beef and Potatoes dish, it’s time to get cooking! Whether it’s a busy weeknight or a cozy weekend dinner, this recipe promises to deliver flavor, comfort, and happiness in every bite. I hope it becomes a cherished addition to your meal rotation—just like it has in mine. Happy cooking, my friend!

Cheesy One Pot Beef and Potatoes

Prep Time 10 minutes
Cook Time 30 minutes
Total Time 40 minutes
Servings 4 servings
Calories 650
A hearty and creamy one-pot dish combining ground beef, potatoes, and cheese for a satisfying meal.

Ingredients

Meat

  • 1 lb ground beef

Vegetables

  • 4 medium potatoes, peeled and diced
  • 1 medium onion, chopped
  • 2 cloves garlic, minced

Liquids

  • 1 cup beef broth
  • 1 cup heavy cream

Dairy & Cheese

  • 2 cups shredded cheddar cheese
  • 1 tablespoon olive oil

Spices & Herbs

  • 1 teaspoon dried thyme
  • 1 teaspoon paprika
  • to taste Salt and pepper

Garnish

  • optional Fresh parsley for garnish

Instructions 

  • Cook ground beef in a large pot until browned, then drain excess fat.
  • Add onion and garlic; cook 2-3 minutes until fragrant.
  • Stir in potatoes, thyme, paprika, salt, and pepper; cook 2-3 minutes.
  • Pour in beef broth and heavy cream; simmer until potatoes are tender, about 20-25 minutes.
  • Sprinkle cheese over the mixture; stir until melted and creamy. Garnish with parsley if desired.

Notes

For a richer flavor, let the dish rest for a few minutes before serving.
Calories: 650kcal
Cost: $15
Course: Main Course
Cuisine: American
Keyword: Beef, cheese, potatoes

Welcome to Your New Favorite Weeknight Recipe

If you’ve ever found yourself staring into the abyss of your kitchen, wondering what to whip up for dinner, let me introduce you to the ultimate comfort dish: Stovetop Creamy Ground Beef Pasta. This hearty meal is not just easy to make; it’s the kind of dish that wraps you in a warm hug after a long day. Packed with flavor and incredibly satisfying, it’s perfect for busy weeknights when you need something comforting yet quick.

Why You’ll Love This Recipe

  • Quick and Easy: This dish comes together in about 30 minutes, making it a lifesaver for hectic evenings.
  • Family-Friendly: With its creamy sauce and tender pasta, even picky eaters will ask for seconds!
  • Customizable: Feel free to swap in your favorite vegetables or spices to make this dish your own.
  • One-Pan Wonder: Less cleanup means more time enjoying dinner with your family.
  • Comfort in a Bowl: Each bite brings back nostalgic memories of home-cooked meals, making it a true crowd-pleaser.

Essential Ingredients for the Perfect Dish

Let’s gather what we need to create this creamy masterpiece. Here’s what you’ll need:

  • 1 lb ground beef: A great source of protein and the base of our sauce.
  • ¾ cup heavy/whipping cream: This is the secret to that luscious, creamy texture.
  • 14 oz canned diced tomatoes: A flavorful addition that adds a bit of acidity.
  • 8 oz uncooked pasta: Choose your favorite type—penne, rotini, or even gluten-free pasta!
  • 1 tablespoon olive oil: For sautéing the veggies—adds great flavor.
  • ½ sweet yellow onion: Chopped for that sweet, aromatic base.
  • 1½ teaspoons minced garlic: Because what’s cooking without garlic?
  • 2 tablespoons tomato paste: For richness and depth.
  • ½ teaspoon Dijon mustard: Adds a subtle tanginess that brightens the dish.
  • ¼ teaspoon Italian seasoning: A blend of herbs that give that classic Italian flair.
  • Salt and black pepper to taste: Essential for enhancing all the flavors.
  • Freshly grated parmesan cheese: Optional, but highly recommended for serving!

Step-by-Step Guide to Making Stovetop Creamy Ground Beef Pasta

Side perspective of a dish featuring creamy ground beef pasta, highlighting the pasta and minced beef.

Ready to dive into cooking? Here’s a detailed step-by-step guide:

  1. Bring a large pot of salted water to a boil. Cook pasta according to package instructions until al dente. Drain and set aside.
  2. In a large skillet, heat olive oil over medium-high heat. Add the chopped onion and sauté for about 4–5 minutes until softened.
  3. Stir in the minced garlic and cook for an additional minute until fragrant.
  4. Add the ground beef to the skillet. Cook for around 8 minutes, breaking it apart with a wooden spoon until browned. Drain any excess fat.
  5. Stir in the canned diced tomatoes, tomato paste, Dijon mustard, and Italian seasoning. Allow the mixture to simmer for 4–5 minutes, letting the flavors meld.
  6. Slowly pour in the heavy cream, stirring continuously until the sauce is creamy and slightly thickened (about 3–5 minutes).
  7. Toss the cooked pasta into the skillet, mixing well to coat the pasta with the sauce.
  8. Season with salt and pepper to taste. Serve hot, garnished with freshly grated parmesan cheese if desired.

Pro Tips for Perfecting Your Pasta

  • Don’t overcook the pasta: Aim for al dente; it’ll continue cooking in the sauce.
  • Fresh ingredients matter: Use fresh garlic and onion for the best flavor.
  • Adjust the creaminess: If you want a lighter dish, you can cut back on the cream or swap in half-and-half.
  • Spice it up: Add a pinch of red pepper flakes for a kick!
  • Leftovers are gold: This dish tastes even better the next day, as the flavors deepen.
  • Vegetarian option: Substitute ground beef with lentils or mushrooms for a delicious twist.
  • Make it cheesy: Add a cup of shredded cheese when you mix in the pasta for an extra gooey dish.
  • Save the pasta water: If the sauce is too thick, a splash of pasta water can help loosen it.

Common Mistakes and Troubleshooting

Even the best cooks have off days! Here are some common pitfalls and how to avoid them:

  • Too watery sauce: If your sauce turns out too runny, let it simmer a bit longer to thicken.
  • Overcooked pasta: Always check for al dente—no one likes mushy pasta!
  • Flavorless dish: Taste as you go! Don’t hesitate to adjust seasoning as needed.
  • Uneven cooking: Make sure to break up the ground beef well for even cooking.

Delicious Variations to Try

Feeling adventurous? Here are some fun twists on this classic recipe:

  • Italian Sausage Swap: Use ground Italian sausage for a spicy, flavorful kick.
  • Veggie-Loaded: Add in your favorite vegetables like spinach, bell peppers, or zucchini for extra nutrition.
  • Cheesy Alfredo: Mix in cream cheese and mozzarella for a rich, cheesy Alfredo-style dish.
  • Mexican Flair: Add taco seasoning and black beans for a Tex-Mex twist.

Storage and Make-Ahead Instructions

This dish is perfect for meal prep! Here’s how to store it:

  • Refrigerate: Store leftovers in an airtight container in the fridge for up to 3 days.
  • Freeze: You can freeze this dish for up to 2 months. Reheat it on the stovetop or in the microwave.
  • Make ahead: Prepare the sauce in advance, refrigerate, and cook the pasta fresh right before serving for optimal texture.

Nutritional Tips and Dietary Adaptations

Want to make this dish fit your dietary needs? Here’s how:

  • Low-Carb Version: Use zucchini noodles (zoodles) instead of pasta for a lighter meal.
  • Dairy-Free: Substitute heavy cream with coconut milk and omit cheese for a dairy-free option.
  • Gluten-Free: Use gluten-free pasta to make this dish accessible for those with gluten sensitivities.

Equipment Recommendations

Having the right tools makes cooking much easier! Here’s what I recommend:

  • Large Pot: For boiling pasta—choose one with a lid to speed up boiling time.
  • Skillet: A non-stick skillet is perfect for easy cooking and cleanup.
  • Wooden Spoon: Essential for breaking up the ground beef and stirring the sauce.
  • Measuring Cups and Spoons: For accurate ingredient measurements.

Serving Suggestions

This creamy ground beef pasta is delicious on its own, but here are some ideas to elevate your meal:

  • Side Salad: Pair with a simple green salad dressed with lemon vinaigrette.
  • Bread: Serve with warm garlic bread or a fresh baguette to soak up any extra sauce.
  • Wine Pairing: A glass of red wine, like a Chianti, complements the flavors perfectly.

Frequently Asked Questions

  • Can I use turkey instead of ground beef? Absolutely! Ground turkey or chicken works well for a lighter option.
  • What pasta works best for this dish? Short pasta shapes like penne or rotini hold the sauce beautifully.
  • Can I make this recipe vegetarian? Yes, just replace the ground beef with lentils or a meat substitute.
  • How can I make the sauce thicker? Simmer longer or add a cornstarch slurry for added thickness.
  • Can I prepare this ahead of time? Yes! The sauce can be made in advance and refrigerated.
  • How do I store leftovers? Keep them in an airtight container in the fridge for up to 3 days.
  • Is this dish freezer-friendly? Yes! It freezes well for up to 2 months.
  • What if I can’t find heavy cream? Use half-and-half or a dairy-free substitute like coconut cream.

This Stovetop Creamy Ground Beef Pasta is more than just a meal; it’s a reminder that cooking can be simple, fun, and incredibly rewarding. So grab your ingredients, put on some music, and let’s create some kitchen magic together! Enjoy every last bite, and don’t forget to share it with someone you love.

Stovetop Creamy Ground Beef Pasta

Prep Time 10 minutes
Cook Time 20 minutes
Total Time 30 minutes
Servings 4 servings
Calories 650
A quick and hearty pasta dish featuring seasoned ground beef in a creamy tomato sauce, perfect for a satisfying weeknight dinner.

Ingredients

Meat and Pasta

  • 1 lb ground beef
  • 14 oz canned diced tomatoes (undrained)
  • 8 oz uncooked pasta
  • 1 tablespoon olive oil
  • ½ yellow onion sweet yellow onion (chopped)
  • 1 ½ teaspoons minced garlic
  • 2 tablespoons tomato paste
  • ½ teaspoon Dijon mustard
  • ¼ teaspoon Italian seasoning
  • to taste salt and black pepper Salt and black pepper

Garnish

  • to taste parmesan cheese Freshly grated parmesan cheese (optional, for garnish)

Instructions 

  • Cook pasta in salted boiling water until al dente, then drain.
  • In a skillet, heat olive oil and sauté chopped onion for 4–5 minutes.
  • Add garlic and cook for 1 minute, then add ground beef and cook until browned, about 8 minutes. Drain excess fat.
  • Stir in diced tomatoes, tomato paste, Dijon mustard, and Italian seasoning. Simmer 4–5 minutes.
  • Pour in heavy cream, stir, and cook 3–5 minutes until sauce thickens. Toss with cooked pasta, season, and serve garnished with parmesan if desired.

Notes

For a richer flavor, let the sauce simmer longer before adding cream.
Calories: 650kcal
Cost: $15
Course: Main Course
Cuisine: American
Keyword: Beef, creamy, pasta

Discover the Heart of Home Cooking: Easy Ground Beef Potato Dinner

Welcome to my kitchen, where warmth and flavor come together like old friends! Today, we’re diving into a recipe that not only fills your belly but also wraps you in nostalgia and comfort. This Easy Ground Beef Potato Dinner is the kind of dish that brings families together and sparks lively conversations over the dinner table. So grab your apron, and let’s create something magical!

This recipe is perfect for busy weeknights or when you’re looking for a comforting meal that feels like home. With just a handful of ingredients and one pan, you can whip up a dish that will have everyone asking for seconds.

Why You’ll Love This Recipe

  • Quick and Easy: Prep and cook this meal in under 30 minutes, making it ideal for those hectic weeknights.
  • One-Pan Wonder: Less cleanup means more time to enjoy your delicious dinner and less time scrubbing pots and pans.
  • Hearty and Filling: Packed with protein and carbs, this dish will keep you satisfied and energized.
  • Customizable: Easily adapt the recipe with your favorite veggies or spices to suit your taste.
  • Family-Friendly: A meal that even the pickiest eaters will love, making it a go-to recipe for family dinners.

Ingredients You’ll Need

A warm, inviting dish of ground beef mixed with potatoes, onions, and peas in natural light.

Let’s gather our ingredients! This recipe calls for simple staples you likely already have in your pantry. Here’s what you’ll need:

  • 1 pound ground beef: I recommend using an 80/20 blend for optimal flavor and moisture.
  • 4 medium russet potatoes: Diced into bite-sized pieces for even cooking.
  • 1 onion: Chopped to add sweetness and depth to the dish.
  • 2 cloves garlic: Minced to infuse the meal with aromatic goodness.
  • 1 cup beef broth: This adds richness and helps cook the potatoes to perfection.
  • 1 teaspoon salt: To enhance all the flavors.
  • 1/2 teaspoon black pepper: For a bit of warmth.
  • 1 teaspoon paprika: Adds a lovely smokiness that complements the beef.
  • 1 cup frozen peas: A pop of color and nutrition.
  • 2 tablespoons olive oil: For sautéing the onion and garlic.

How to Make Easy Ground Beef Potato Dinner

Now that we have everything ready, let’s cook! Follow these simple steps to create your delicious dinner.

  1. In a large skillet, heat olive oil over medium heat.
  2. Add the chopped onion and minced garlic, sautéing until translucent and fragrant.
  3. Add the ground beef to the skillet, cooking until browned and cooked through, breaking it apart with a spatula.
  4. Stir in the diced potatoes, beef broth, salt, pepper, and paprika.
  5. Bring the mixture to a boil, then reduce the heat to low and cover the skillet.
  6. Simmer for about 20-25 minutes, or until the potatoes are tender and easily pierced with a fork.
  7. Add the frozen peas and cook for an additional 5 minutes, stirring gently to combine.
  8. Serve hot and enjoy your easy dinner!

Helpful Tips

  • Choose the right beef: For the best flavor, opt for a higher fat content in your ground beef—80/20 is perfect!
  • Don’t rush the simmer: Allow the dish to simmer and meld flavors; patience is key!
  • Substitute freely: Feel free to swap out russet potatoes for sweet potatoes or even cauliflower for a low-carb option.
  • Make it your own: Add your favorite spices like chili powder or Italian herbs for a twist.
  • For creamy richness: Stir in a dollop of sour cream or Greek yogurt before serving.
  • Leftovers are a win: This dish tastes even better the next day, so make extra for lunch!
  • Check for doneness: Ensure your potatoes are fully cooked by testing with a fork; they should be tender.
  • Keep it colorful: Add chopped carrots or bell peppers for extra color and nutrition.

Common Mistakes and Troubleshooting

Even the best cooks can have off days! Here are some common mistakes to watch for:

  • Overcooking the beef: Brown the beef just until it’s cooked through—overcooking can make it tough.
  • Undercooked potatoes: If your potatoes aren’t tender after the suggested time, cover and simmer a bit longer.
  • Too much liquid: If the dish seems too soupy, uncover it for the last few minutes of cooking to allow some liquid to evaporate.
  • Skipping seasoning: Don’t forget the salt and spices; they’re essential for flavor!

Variations to Try

Looking to shake things up? Here are some fun variations to try:

  • Cheesy Delight: Stir in shredded cheese during the last few minutes of cooking for a creamy finish.
  • Spicy Kick: Add diced jalapeños or a pinch of red pepper flakes for heat.
  • Herb Infusion: Mix in fresh herbs like parsley or cilantro right before serving for a fresh flavor.
  • Vegetarian Option: Substitute ground beef with lentils or quinoa for a hearty vegetarian meal.

Storage and Make-Ahead Instructions

This Easy Ground Beef Potato Dinner is perfect for meal prep! Here’s how to store and reheat it:

  • Refrigerate: Store leftovers in an airtight container in the refrigerator for up to 3 days.
  • Freeze: Freeze portions in airtight containers for up to 3 months; thaw overnight in the fridge before reheating.
  • Reheat: Reheat in the microwave or on the stove until warmed through, adding a splash of beef broth if needed to loosen it up.

Frequently Asked Questions

Got questions? I’ve got answers! Here are some common queries about this recipe:

  • Can I use ground turkey instead of beef? Absolutely! Just keep in mind that turkey may be a bit drier, so consider adding a bit more broth.
  • What can I serve with this dish? A simple side salad or some crusty bread makes a perfect pairing!
  • How can I make this dish spicier? Add some hot sauce or cayenne pepper to the ground beef while cooking.
  • Can I make this in a slow cooker? Yes! Brown the beef and add all ingredients to the slow cooker; cook on low for 6-8 hours.
  • What’s the best way to dice potatoes? Cut them into even pieces to ensure they cook uniformly.
  • Can I add other vegetables? Definitely! Try carrots, green beans, or corn for added flavor and nutrition.
  • How do I know when the potatoes are done? They should be tender enough to pierce easily with a fork.
  • Is this recipe good for meal prep? Yes! It stores well and makes for delicious leftovers.

Nutritional Insights

This dish is not only comforting but can also be adjusted to meet various dietary needs:

  • High in protein: Ground beef provides a hearty dose of protein, essential for muscle health.
  • Fiber-rich: Potatoes and peas contribute valuable fiber, aiding digestion.
  • Customizable: Adjust the recipe to be lower in carbs by using cauliflower instead of potatoes.
  • Balanced meal: This dish contains a good mix of protein, carbs, and vegetables, making it a well-rounded option.

Equipment Recommendations

For this recipe, here’s what you’ll need:

  • Large skillet: A good quality skillet helps in even cooking and browning.
  • Spatula: To break apart the ground beef and stir the ingredients.
  • Cutting board and knife: For chopping your veggies and potatoes.
  • Measuring cups and spoons: Get the proportions just right!

Serving Suggestions

When it comes to serving this delightful dish, you can keep it simple or dress it up:

  • Top with fresh herbs: A sprinkle of parsley or chives adds freshness.
  • Pair with crusty bread: Perfect for soaking up every last bite of this hearty meal.
  • Serve with a side salad: A light salad adds a refreshing contrast to the richness of the dish.
  • Add a dollop of sour cream: Creaminess enhances the flavors beautifully.

In conclusion, this Easy Ground Beef Potato Dinner is more than just a meal; it’s a recipe that invites love and laughter to your table. So whether you’re gathering with family or enjoying a cozy night in, I hope this dish becomes a beloved staple in your kitchen. Remember, cooking is about joy, creativity, and a sprinkle of love. Until next time, happy cooking!

Easy Ground Beef Potato Dinner Recipe

Prep Time 10 minutes
Cook Time 30 minutes
Total Time 40 minutes
Servings 4 servings
Calories 650
A quick and hearty meal combining ground beef, potatoes, and peas for a satisfying dinner.

Ingredients

Meat

  • 1 pound ground beef

Vegetables

  • 4 medium potatoes, diced
  • 1 onion onion, chopped
  • 2 cloves garlic, minced
  • 1 cup beef broth
  • 1 teaspoon salt
  • 0.5 teaspoon black pepper
  • 1 teaspoon paprika
  • 1 cup frozen peas
  • 2 tablespoons olive oil

Instructions 

  • Heat olive oil in a skillet over medium heat.
  • Sauté onion and garlic until translucent, then add ground beef and cook until browned.
  • Add potatoes, beef broth, salt, pepper, and paprika; bring to a boil.
  • Reduce heat, cover, and simmer for 20-25 minutes until potatoes are tender.
  • Stir in frozen peas and cook for 5 more minutes. Serve hot.

Notes

You can add cheese or herbs for extra flavor.
Calories: 650kcal
Cost: $15
Course: Main Course
Cuisine: American
Keyword: ground beef

Loved this recipe? Save it to your favorite Pinterest board so you can easily find it later! It’s the perfect way to keep all your sweet ideas in one place. ✨

A delicious Ground Beef Potato Dinner featuring tender diced potatoes and minced garlic, beautifully presented.

Welcome to Your New Weeknight Wonder!

Hey there, fellow food lover! If you’ve found your way to this cozy corner of the internet, you’re likely on the hunt for a recipe that not only fills your belly but also warms your heart. Let me introduce you to my Creamy Ground Turkey Pasta, an absolute showstopper that comes together in a flash. This dish is inspired by the legendary Gordon Ramsay, but with my own twist that’s sure to impress your family and friends. The best part? You don’t need to be a culinary wizard to pull it off!

Why You’ll Love This Recipe

  • Quick and Easy: This creamy ground turkey pasta can be on your table in under 30 minutes, making it perfect for busy weeknights.
  • Flavor Explosion: The combination of spices and creamy sauce creates a flavor profile that will have everyone asking for seconds.
  • Customizable: Whether you prefer turkey, beef, or a plant-based option, this recipe adapts beautifully to your dietary needs.
  • Kid-Friendly: With its creamy texture and cheesy goodness, even the pickiest eaters will enjoy this dish.
  • Leftover Magic: The flavors actually deepen the next day, making your lunch prep a breeze!

Ingredients Breakdown

Let’s dive into what you’ll need for this creamy delight. Don’t worry, I’ll also share some handy substitutions if you’re missing an ingredient or two!

  • 8 ounces Penne Pasta: Substitute with any pasta shape you love—rigatoni, fusilli, or even gluten-free options work beautifully.
  • 2 tablespoons Olive Oil: Canola or vegetable oil works just as well if you prefer.
  • 1 medium Yellow Onion: For a sharper twist, try red onion.
  • 1 pound Ground Turkey: Feel free to swap with ground beef, chicken, or even a plant-based ground meat.
  • 1 teaspoon Salt: Essential for enhancing flavors; adjust to your dietary requirements.
  • 1 teaspoon Black Pepper: Freshly cracked is recommended for maximum flavor.
  • 1 teaspoon Italian Seasoning: You can substitute with a mix of dried oregano, basil, and thyme if needed.
  • 2 cloves Garlic: Minced; garlic powder can also work in a pinch.
  • 2 tablespoons All-purpose Flour: Gluten-free flour can be a great alternative.
  • 1 cup Chicken Broth: Vegetable broth is an excellent vegetarian option.
  • 1 cup Tomato Sauce: Canned diced tomatoes can achieve a chunkier texture.
  • ½ cup Half-and-half: You can replace it with heavy cream or non-dairy milk.
  • 1 cup Mozzarella Cheese: Substitute with provolone or dairy-free cheese.
  • 1 cup Cheddar Cheese: Use any melty cheese you enjoy.
  • ¼ cup Fresh Parsley: Sprinkling this adds a fresh note to the presentation.
  • 1 teaspoon Red Chili Flakes: Optional for a little kick; you can omit or substitute with fresh chili if desired.

Pro Tips for Perfection

Juicy ground turkey pasta dish presented in a bowl with a creamy sauce.
  • Don’t Overcook the Pasta: Aim for al dente; it’ll continue cooking in the sauce.
  • Season as You Go: Taste at each step to build layers of flavor.
  • Use Fresh Herbs: If you can, fresh parsley or basil will elevate your dish.
  • Cheese Choices: Mix and match with your favorite cheeses for a unique flavor.
  • Prep Ahead: Chop your veggies and measure out ingredients in advance for a smoother cooking experience.
  • Leftover Potential: This dish makes great leftovers—store in an airtight container in the fridge for up to 3 days.
  • Use a Large Pan: A wide skillet helps the sauce coat the pasta evenly.
  • Add a Splash of Pasta Water: If the sauce is too thick, a little pasta water can help loosen it up.
  • Garnish Generously: A sprinkle of extra cheese or herbs makes it look extra special before serving!

Avoid These Common Mistakes

Even the best chefs make mistakes! Here are a few to watch out for:

  • Skipping the Salt: It’s essential for enhancing flavors, so don’t skip it!
  • Not Tasting the Sauce: Always taste and adjust seasoning before serving.
  • Overloading on Cheese: While cheese is fantastic, too much can overwhelm the dish—balance is key!
  • Cooking Ground Turkey Too Long: It dries out quickly; cook just until browned.

Variations to Spice Things Up

Feeling adventurous? Here are some fun twists on this classic:

  • Veggie Lover’s Delight: Add spinach, bell peppers, or zucchini for extra veggies.
  • Spicy Turkey Pasta: Toss in jalapeños or a dash of hot sauce to kick it up a notch.
  • Cheesy Broccoli Pasta: Stir in steamed broccoli florets for a nutritious boost.
  • Italian Sausage Addition: Swap half of the ground turkey for Italian sausage for a rich flavor.

Storage and Make-Ahead Instructions

This creamy ground turkey pasta is perfect for meal prep! Here’s how to store it:

  • Refrigerator: Store leftovers in an airtight container for up to 3 days.
  • Freezer: Freeze in a safe container for up to 3 months. Reheat gently on the stovetop with a splash of broth or water.
  • Make-Ahead: You can prepare the sauce a day in advance and just cook the pasta when you’re ready to eat.

FAQs: Your Burning Questions Answered

  • Can I use a different type of meat? Absolutely! Ground beef, chicken, or a plant-based option all work great.
  • Is this dish gluten-free? Yes, just swap the pasta for a gluten-free variety and use gluten-free flour.
  • Can I add more vegetables? Definitely! Feel free to add your favorite sautéed veggies.
  • What can I serve with this pasta? A simple side salad or garlic bread pairs beautifully.
  • How do I reheat leftovers? Reheat on the stovetop with a splash of broth to maintain creaminess.
  • Can I make this dish dairy-free? Yes! Use non-dairy cheese and milk alternatives.
  • What’s the best way to store leftovers? Use an airtight container in the fridge for up to 3 days.
  • Can I use homemade tomato sauce? Absolutely! Homemade sauce adds a lovely touch.

Nutritional Insights and Dietary Adaptations

This creamy ground turkey pasta can fit into various dietary preferences:

  • Protein Power: Ground turkey is lean and packed with protein, perfect for muscle maintenance.
  • Low-Carb Option: Swap pasta with zucchini noodles or spaghetti squash for a low-carb alternative.
  • Vegetarian-Friendly: Use plant-based ground meat and vegetable broth for a delicious vegetarian version.
  • Calorie-Conscious: Control calories by using less cheese or opting for low-fat dairy products.

Essential Equipment for Success

Before you grab your apron, make sure you have these tools ready:

  • Large Pot: For boiling pasta perfectly.
  • Large Skillet: Ideal for cooking the turkey and combining ingredients.
  • Wooden Spoon: For mixing everything together with ease.
  • Measuring Cups and Spoons: Accurately measure your ingredients for best results.
  • Colander: Necessary for draining the pasta once cooked.

Serving Suggestions for a Showstopping Meal

Presentation is key! Here are some ways to serve this creamy pasta:

  • Garnish with Fresh Parsley: A sprinkle of green adds color and freshness.
  • Serve with a Side Salad: A crisp side salad balances the creamy pasta beautifully.
  • Pair with Garlic Bread: A buttery, garlicky bread is the perfect accompaniment.
  • Top with Extra Cheese: For the cheese lovers, a little more mozzarella or Parmesan never hurts!

Final Thoughts: Your Culinary Adventure Awaits

This creamy ground turkey pasta is more than just a dish; it’s a warm, comforting hug in a bowl. Perfect for those busy nights when you crave something delicious yet quick, it’s sure to become a staple in your kitchen. So grab your apron, gather your ingredients, and let’s create some magic together!

Gordon Ramsay Ground Turkey Pasta: Creamy Comfort in Minutes

Prep Time 10 minutes
Cook Time 15 minutes
Total Time 25 minutes
Servings 4 servings
Calories 650
This quick and creamy ground turkey pasta combines savory flavors with a rich sauce, perfect for a comforting meal in minutes.

Ingredients

Pasta

  • 8 ounces Penne Pasta (Feel free to replace with any pasta shape you love.)
  • 2 tablespoons Olive Oil (Canola or vegetable oil works just as well if preferred.)
  • 1 medium Yellow Onion (Red onion can give a sharper twist if desired.)
  • 1 pound Ground Turkey (Substitute with turkey or ground beef for variety.)
  • 1 teaspoon Salt (Enhances all flavors; adjust per your dietary requirements.)
  • 1 teaspoon Black Pepper (Freshly cracked is recommended for maximum flavor.)
  • 1 teaspoon Italian Seasoning (Swap with dried oregano, basil, and thyme if needed.)
  • 2 cloves Garlic (Minced; garlic powder can also work in a pinch.)
  • 2 tablespoons All-purpose Flour (Gluten-free flour can be a great alternative.)
  • 1 cup Chicken Broth (Vegetable broth is an excellent vegetarian option.)
  • 1 cup Tomato Sauce (Canned diced tomatoes can achieve a chunkier texture.)
  • ½ cup Half-and-half (Replace with heavy cream or non-dairy milk if desired.)
  • 1 cup Mozzarella Cheese (Substitute with provolone or dairy-free cheese.)
  • 1 cup Cheddar Cheese (Use any melty cheese you enjoy.)
  • ¼ cup Fresh Parsley (Sprinkling adds a fresh note to the presentation.)
  • 1 teaspoon Red Chili Flakes (Optional for a little kick; omit or substitute with fresh chili if desired.)

Instructions 

  • Cook the pasta according to package instructions; drain and set aside.
  • Heat olive oil in a large skillet over medium heat; sauté chopped onion and minced garlic until fragrant.
  • Add ground turkey, salt, pepper, and Italian seasoning; cook until browned.
  • Stir in flour, then gradually add chicken broth and tomato sauce; simmer until slightly thickened.
  • Reduce heat, stir in half-and-half, cheeses, and chili flakes; cook until cheese melts and sauce is creamy.
  • Combine cooked pasta with sauce, garnish with chopped parsley, and serve hot.

Notes

For a healthier option, use whole wheat pasta and low-fat cheese.
Calories: 650kcal
Cost: $15
Course: Main Course
Cuisine: American
Keyword: creamy, ground turkey, pasta

Welcome to Your New Favorite One Pot Chicken and Vegetables Skillet

Before we dive into the magic of this one pot chicken and vegetables skillet, let me share a little story. Growing up in a small town in Oregon, my kitchen was always filled with laughter and the aroma of home-cooked meals. My mom had a knack for turning simple ingredients into comforting dishes that felt like a hug on a plate. That’s the spirit of this recipe. It’s not just about food; it’s about creating memories and nurturing connections. So, roll up your sleeves and let’s cook something that will make your home feel warm and inviting!

Why You’ll Love This Recipe

This one pot chicken and vegetables skillet is a game-changer for busy weeknights and family gatherings. Here are some reasons why:

  • Quick and Easy: With minimal prep and cooking time, you can whip this up in under 30 minutes, making it perfect for those hectic days.
  • Flavor-Packed: The combination of seasoned chicken, fresh vegetables, and savory soy sauce creates a dish bursting with flavor.
  • Healthy and Low Carb: Packed with lean protein and vibrant veggies, this dish is a great option for anyone watching their carb intake.
  • One-Pan Wonder: Fewer dishes mean less cleanup! Everything cooks in one skillet, maximizing both flavor and convenience.
  • Customizable: Feel free to swap out vegetables or proteins based on what you have on hand. This recipe is a canvas for your creativity!

Ingredients Breakdown

A vibrant skillet featuring chicken, sliced bell peppers, zucchini, onions, and garlic in natural lighting.

Let’s talk about what you’ll need to make this delicious chicken and vegetable skillet:

  • 3-4 boneless, skinless chicken breasts: The star of the dish! You can use thighs for a richer flavor or even tofu for a vegetarian option.
  • 1 cup mixed bell peppers (sliced): Use a mix of colors for a visually appealing dish. Feel free to substitute with other veggies like carrots or snap peas.
  • 1 medium zucchini (sliced into half-moons): This adds a lovely texture. Yellow squash works too!
  • 1 medium onion (chopped): Sweet or yellow onions will enhance the flavor profile.
  • 3 cloves garlic (minced): Because who doesn’t love garlic?
  • 2 tablespoons low-sodium soy sauce: For that umami kick. Tamari or coconut aminos are great gluten-free alternatives.
  • 2 tablespoons olive oil: Essential for sautéing and adds healthy fats.

Step-by-Step Instructions

Ready to get cooking? Let’s turn those ingredients into a wholesome meal!

  1. Prepare Ingredients: First things first, wash and slice your bell peppers, zucchini, onion, and garlic. This makes the cooking process smoother.
  2. Sauté Chicken: In a large skillet, heat the olive oil over medium heat. Season the chicken with salt and pepper. Cook until golden brown on both sides, about 5-7 minutes per side. Remove the chicken from the skillet and set aside.
  3. Add Aromatics: In the same skillet, add the minced garlic and chopped onion. Sauté until fragrant, about 2 minutes. Your kitchen will start smelling amazing!
  4. Combine Vegetables: Stir in the sliced bell peppers and zucchini, cooking until they’re tender-crisp, roughly 5 minutes.
  5. Return Chicken: Slice the cooked chicken and return it to the skillet. Pour in the soy sauce, stirring to combine all the delicious flavors.
  6. Finish Cooking: Let everything cook together for an additional 3 minutes to meld the flavors. Voila, it’s ready to serve!

Pro Tips for Perfection

To ensure your one pot chicken and vegetables skillet turns out flawless, keep these tips in mind:

  • Don’t overcook the chicken: Keep an eye on the internal temperature; it should reach 165°F (74°C) to ensure juiciness.
  • Customize the seasoning: Feel free to add herbs like thyme or rosemary for an extra layer of flavor.
  • Use fresh vegetables: Fresh produce will enhance both the taste and texture.
  • Don’t overcrowd the skillet: Give your ingredients space to cook evenly and develop a nice sear.
  • Leftovers are great! This dish stores well and can be reheated for lunch or dinner the next day.
  • Experiment with sauces: Try adding a splash of sesame oil or a sprinkle of chili flakes for a kick!
  • Check for tenderness: Ensure the vegetables are tender-crisp for the best texture.
  • Use a large skillet: A spacious skillet allows everything to cook evenly without steaming.

Common Mistakes and Troubleshooting

Even the best chefs have off days, but don’t worry! Here are some common mistakes and how to avoid them:

  • Overcooked chicken: Use a meat thermometer to check doneness, or cut into the chicken to ensure it’s no longer pink inside.
  • Soggy vegetables: Avoid overcrowding the skillet and ensure your heat is high enough to sauté, not steam.
  • Insufficient seasoning: Taste as you go! Adjust with salt, pepper, or additional spices to suit your palate.
  • Dry chicken: If you find your chicken is dry, make sure not to overcook it and consider marinating beforehand.

Variations to Try

This recipe is wonderfully versatile. Here are some fun variations to keep things exciting:

  • Spicy Mexican Skillet: Add diced jalapeños and top with fresh cilantro and avocado for a zesty twist.
  • Italian Style: Swap the soy sauce for balsamic vinegar and add Italian herbs like oregano and basil.
  • Curry-Inspired: Mix in curry powder and coconut milk for a creamy, aromatic dish that transports you to another world.
  • Mediterranean Flair: Toss in olives, sun-dried tomatoes, and feta cheese for a vibrant Mediterranean touch.

Storage and Make-Ahead Instructions

Want to make this dish ahead of time? Here’s how:

  • Make-Ahead: You can prep your vegetables and chicken the night before; store them separately in the fridge.
  • Storing Leftovers: Store cooled leftovers in an airtight container in the refrigerator for up to 3 days.
  • Reheating: Reheat in the microwave or on the stovetop until warmed through. Add a splash of broth if it seems dry.

FAQs

Got questions? I’ve got answers! Here are some common queries:

  • Can I use frozen chicken? Yes, but ensure it’s fully thawed before cooking for even results.
  • What can I substitute for soy sauce? Try tamari for a gluten-free option or coconut aminos for a sweeter flavor.
  • How can I make this dish spicier? Add red pepper flakes or diced jalapeños to kick up the heat.
  • What vegetables work best? Feel free to use whatever you have on hand, such as broccoli, green beans, or carrots.
  • Can I double the recipe? Absolutely! Just make sure your skillet is large enough to accommodate everything.
  • Is this dish suitable for meal prep? Yes! It stores well and can be portioned out for easy lunches.
  • How do I know the chicken is cooked through? Check that the internal temperature reaches 165°F (74°C).
  • What should I serve with this skillet? Pair it with rice, quinoa, or a fresh garden salad for a complete meal.

Nutritional Benefits and Dietary Adaptations

This one pot chicken and vegetables skillet is not only delicious but also packed with nutrients:

  • Lean protein: Chicken is an excellent source of protein, which is vital for muscle repair and growth.
  • Vitamins and minerals: Fresh vegetables provide essential vitamins like A and C, along with fiber for digestion.
  • Low in carbs: This dish is perfect for low-carb diets, helping you feel full without excess calories.
  • Gluten-free options: Make it gluten-free by using tamari instead of soy sauce.

Essential Equipment

Here’s what you’ll need to make this recipe:

  • Large skillet: A good quality skillet ensures even cooking and browning.
  • Cutting board and knife: For prepping your ingredients.
  • Meat thermometer: Optional, but it really helps ensure your chicken is cooked perfectly.

Serving Suggestions

Serve your one pot chicken and vegetables skillet in bowls, garnished with fresh herbs or a sprinkle of sesame seeds. Pair it with:

  • Brown rice or quinoa: These grains complement the dish beautifully and add a filling element.
  • Crusty bread: Perfect for soaking up any leftover sauce!
  • Green salad: A fresh side salad can balance the meal and add extra crunch.

Conclusion

And there you have it—a wholesome one pot chicken and vegetables skillet that’s not only easy to make but also packed with flavors and nutrients. Remember, cooking is all about experimentation and finding what brings you joy. So gather your loved ones, share this meal, and create some wonderful memories around the table. Happy cooking, my friend!

One Pot Chicken and Vegetables Skillet (Healthy & Low Carb)

Prep Time 10 minutes
Cook Time 15 minutes
Total Time 25 minutes
Servings 4 servings
Calories 350
A quick and healthy one-pan meal combining tender chicken with colorful vegetables, perfect for a low-carb diet.

Ingredients

Protein

  • 3-4 pieces boneless, skinless chicken breasts
  • 1 cup mixed bell peppers (sliced)
  • 1 medium zucchini (sliced into half-moons)
  • 1 medium onion (chopped)
  • 3 cloves garlic (minced)
  • 2 tablespoons low-sodium soy sauce
  • 2 tablespoons olive oil

Instructions 

  • Wash and slice vegetables and garlic.
  • Heat olive oil and cook chicken until golden, then remove.
  • Sauté garlic and onion until fragrant.
  • Add bell peppers and zucchini; cook until tender.
  • Slice chicken, return to skillet, add soy sauce, and stir.
  • Cook for 3 more minutes and serve.

Notes

Use fresh vegetables for best flavor and nutrition.
Calories: 350kcal
Cost: $15
Course: Main Course
Cuisine: Healthy
Keyword: Chicken, Low-Carb, vegetables

Loved this recipe? Save it to your favorite Pinterest board so you can easily find it later! It’s the perfect way to keep all your sweet ideas in one place. ✨

Eye-level shot of a healthy chicken and vegetable dish, highlighting the textures and colors of the ingredients.