Author

Ava

Browsing

Why You’ll Fall in Love with This Dish

Let’s face it: weeknight dinners can sometimes feel like a chore. You’re tired, the kids are cranky, and all you want is something that doesn’t require a PhD in culinary arts to whip up. Enter the Honey Garlic Salmon—the dish that turns your ordinary evening into a delightful celebration. This recipe combines the sweet allure of honey with the savory depth of soy sauce and the aromatic punch of garlic, creating a glaze that’s as easy to make as it is to love. It’s a quick, simple solution that’s sure to make your dinner table feel a little more festive.

Growing up in my mother’s kitchen, I learned that the best meals often come from simple ingredients and a sprinkle of love. This dish is a perfect example. With just a handful of ingredients, you can create a meal that not only tastes divine but also fills your home with a warm, inviting aroma that’s bound to make everyone gather around the table a bit faster.

Ingredients You’ll Need

Here’s what you’ll need to start the magic:

  • 4 salmon fillets
  • 1/4 cup honey
  • 1/4 cup soy sauce
  • 3 cloves garlic, minced
  • 1 tablespoon olive oil
  • 1 teaspoon ginger, minced
  • Salt and pepper to taste
  • Chopped green onions for garnish

Step-by-Step Cooking Instructions

A beautifully cooked salmon fillet with a shiny honey garlic glaze, set against a blurred cozy background.

Now that you’ve gathered your ingredients, let’s get cooking!

  1. In a mixing bowl, whisk together the honey, soy sauce, minced garlic, olive oil, and ginger. This aromatic concoction is your secret weapon—trust me, it’s going to bring your salmon to life!
  2. Season those beautiful salmon fillets with a sprinkle of salt and pepper. Don’t be shy; this is your chance to add a little flavor right from the start.
  3. Place the seasoned salmon in a shallow dish and pour the honey garlic marinade over the top. Allow it to marinate for at least 30 minutes. If you have the time, letting it sit longer enhances the flavor even more. Trust me—you want every bite to be a burst of flavor.
  4. Preheat your oven to 400°F (200°C). While it’s heating, you can take a moment to appreciate how delicious your kitchen smells already.
  5. Line a baking sheet with parchment paper for easy cleanup, and place the marinated salmon fillets on top. The parchment helps to ensure that the salmon cooks evenly while also allowing the glaze to caramelize beautifully.
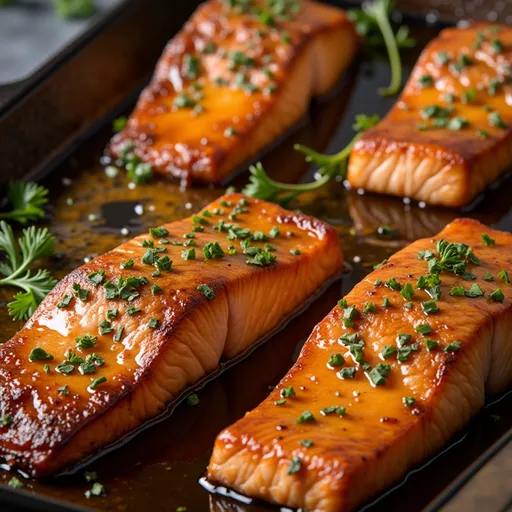
  6. Bake for 12-15 minutes, or until the salmon is cooked through and flakes easily with a fork. The edges should be just slightly crispy, and the glaze should be caramelized and glistening. Oh, the beauty!
  7. Once you take it out of the oven, drizzle any remaining marinade over the top for that extra touch of yum. Garnish with chopped green onions for a pop of color and freshness.

Tips for the Perfect Honey Garlic Salmon

Cooking should be fun and rewarding, so here are a few tips to ensure your salmon turns out perfect every time:

  • Choose Fresh Salmon: Whenever possible, opt for fresh salmon fillets. They tend to have a better flavor and texture compared to frozen. If you must use frozen, make sure to thaw them completely before cooking.
  • Don’t Rush the Marinade: Allowing your salmon to marinate for at least 30 minutes is crucial. This is where the magic happens, as the flavors seep into the fish.
  • Experiment with Cooking Time: Depending on the thickness of your salmon fillets, cooking times may vary. Thicker pieces may need a little longer, while thinner fillets may cook more quickly. Keep an eye on them to avoid drying out.

Variations to Try

This recipe is wonderfully adaptable! Here are some variations to consider:

  • Add Spice: If you like a little heat, consider adding a pinch of red pepper flakes to the marinade for a spicy kick.
  • Switch Up the Fish: While salmon is the star here, you can use this same marinade for other fish like tilapia or cod, or even chicken if you’re in the mood.
  • Additional Veggies: Throw some broccoli or asparagus on the baking sheet alongside the salmon for a complete meal. Just toss them in a bit of olive oil and seasoning before roasting.

Substitutions to Consider

Sometimes you might find yourself without certain ingredients. Here’s what you can swap without sacrificing flavor:

  • Honey Alternatives: If honey isn’t your thing, maple syrup or agave nectar can work in a pinch, bringing their own unique sweetness.
  • Low-Sodium Soy Sauce: If you’re watching your sodium intake, opt for low-sodium soy sauce without compromising the deliciousness of the dish.
  • Vegetable Oil: If you don’t have olive oil on hand, any neutral oil, like canola or avocado oil, can be substituted.

Equipment Needed

To make this dish, you’ll need a few basic kitchen tools:

  • Mixing bowl for combining your marinade
  • Whisk or fork for mixing
  • Baking sheet lined with parchment paper
  • Measuring cups and spoons

Storage and Freezing Tips

If you happen to have leftovers (which is rare because it’s so good), here’s how to store them:

  • Refrigeration: Store leftover salmon in an airtight container in the fridge for up to 3 days. Reheat gently in the oven or microwave.
  • Freezing: You can also freeze cooked salmon for up to 3 months. Just make sure to wrap it tightly in plastic wrap or foil before placing it in a freezer-safe container.

Frequently Asked Questions

Let’s tackle some common questions about this delightful recipe:

  • Can I use skin-on salmon fillets? Absolutely! Skin-on fillets can add extra flavor and texture. Just be sure to adjust the cooking time slightly, as they may take a bit longer to cook through.
  • What sides pair well with honey garlic salmon? Steamed rice, quinoa, or a simple salad are excellent choices. You can also serve it with roasted vegetables for a well-rounded meal.
  • Can I make the marinade ahead of time? Yes! You can prepare the marinade a day in advance and store it in the fridge. Just remember to give it a good stir before using it.

Troubleshooting Common Issues

Sometimes things don’t go as planned in the kitchen. Here’s how to navigate some common issues:

  • Salmon is Dry: This can happen if it’s overcooked. To prevent this, keep an eye on it during the last few minutes of baking. Remember, it should flake easily with a fork but not be dry.
  • Too Much Sauce: If you find the sauce overwhelming, try cutting back on the honey and soy sauce in your next batch. You can always add more flavor through herbs or spices!

Bringing It All Together

This Honey Garlic Salmon recipe is not just food; it’s a moment of joy, a small celebration in your home. It reminds us that even on the busiest days, we can create something beautiful and delicious with just a little effort and love. Whether you’re cooking for family or treating yourself to a well-deserved meal, each bite is a testament to the magic that happens when great ingredients come together.

So, grab your apron and let’s make some memories in the kitchen! I can’t wait for you to experience the joy of this dish. And remember, cooking is all about connecting with those you love—so don’t forget to invite someone to share in this delightful meal with you. Happy cooking!

Honey Garlic Salmon

Prep Time 10 minutes
Cook Time 15 minutes
Total Time 25 minutes
Servings 4 servings
Calories 350
A delicious and easy-to-make honey garlic salmon that’s perfect for a quick dinner or special occasion.

Ingredients

Main ingredients

  • 4 fillets salmon fillets
  • 1/4 cup honey
  • 1/4 cup soy sauce
  • 3 cloves garlic, minced
  • 1 tablespoon olive oil
  • 1 teaspoon ginger, minced
  • to taste salt and pepper
  • chopped green onions for garnish green onions

Instructions 

  • Whisk honey, soy sauce, garlic, olive oil, and ginger in a bowl.
  • Season salmon with salt and pepper, then marinate in the mixture for 30 minutes.
  • Preheat oven to 400°F (200°C). Place salmon on a lined baking sheet.
  • Bake for 12-15 minutes until cooked through. Drizzle with remaining marinade and garnish with green onions.

Notes

Marinate the salmon for at least 30 minutes for best flavor.
Calories: 350kcal
Cost: $15
Course: Main Course
Cuisine: American
Keyword: Salmon

Loved this recipe? Save it to your favorite Pinterest board so you can easily find it later! It’s the perfect way to keep all your sweet ideas in one place. ✨

Delicious Honey Garlic Salmon dish with a rich glaze, displayed on a plate with soft, warm lighting.

Why You’ll Love This Salad

Spring is the season of renewal, and what better way to celebrate it than with a vibrant, refreshing salad that captures the essence of the season? My Thai Mango Salad is a delightful blend of sweet and spicy flavors, a culinary dance that will awaken your taste buds and bring a burst of sunshine to your table. This salad is not just a dish; it’s an experience that transports you to a sun-soaked tropical getaway with every bite.

Imagine biting into juicy mango slices, paired with crunchy vegetables, and drizzled with a zesty dressing that has just the right kick. It’s one of those recipes that I find myself gravitating towards every spring, and it has quickly become a family favorite. Whether you’re hosting a picnic, needing a refreshing side for grilled meats, or simply craving something light, this salad checks all the boxes.

Overview of Ingredients

Before we dive into the making of this delightful salad, let’s take a moment to appreciate the star ingredients that create such a magical dish:

  • Mangoes: The foundation of this salad, ripe mangoes provide a natural sweetness that balances the spice.
  • Shredded Carrots: Adding vibrant color and crunch, carrots bring a slight earthiness to the mix.
  • Red Bell Pepper: Sweet and crunchy, this pepper adds a pop of color and a refreshing bite.
  • Cucumber: Cool and crisp, cucumbers lighten the salad, making it incredibly refreshing.
  • Cilantro and Green Onions: These herbs enhance the flavors, adding brightness and depth.
  • Roasted Peanuts: For that satisfying crunch, peanuts round out the texture of the salad.

The dressing is a simple yet powerful combination of lime juice, fish sauce, honey, and red chili flakes, creating a balance of sweet, salty, and spicy flavors that tie everything together beautifully.

How to Make Thai Mango Salad

Close-up image of a Thai Mango Salad filled with julienned mangoes, sliced bell peppers, and sprinkled peanuts in natural lighting.

Are you ready to create this burst of spring flavors? Let’s roll up our sleeves and jump into the cooking process!

Ingredients

Here’s what you’ll need:

  • 2 ripe mangoes, peeled and julienned
  • 1 cup shredded carrots
  • 1 red bell pepper, thinly sliced
  • 1 cucumber, julienned
  • 1/4 cup fresh cilantro, chopped
  • 2 green onions, sliced
  • 1/4 cup roasted peanuts, crushed
  • 2 tablespoons lime juice
  • 1 tablespoon fish sauce
  • 1 tablespoon honey
  • 1 teaspoon red chili flakes
  • Salt to taste

Steps to Prepare

Time to bring this salad to life!

  1. In a large bowl, combine the julienned mangoes, shredded carrots, sliced red bell pepper, and julienned cucumber.
  2. Add the chopped cilantro and sliced green onions to the bowl.
  3. In a separate small bowl, whisk together the lime juice, fish sauce, honey, red chili flakes, and salt until well combined.
  4. Pour the dressing over the salad and toss gently to combine all ingredients.
  5. Sprinkle crushed roasted peanuts on top for garnish.
  6. Serve immediately or let it sit for 10 minutes to allow the flavors to meld.

Tips for the Perfect Salad

To elevate your Thai Mango Salad experience, here are some helpful tips:

  • Choose Ripe Mangoes: The key to a perfect salad lies in choosing the right mangoes. Look for ones that are slightly soft to the touch and have a sweet aroma.
  • Prep Ahead: You can prep the veggies and even the dressing ahead of time. Just toss everything together right before serving to keep the ingredients fresh.
  • Adjust Spice Level: If you prefer a milder salad, feel free to reduce the amount of red chili flakes. You can also add fresh chili slices for a more intense kick.

Variations to Try

This salad is incredibly versatile! Here are a few variations to keep things interesting:

  • Add Proteins: For a heartier meal, consider adding grilled chicken, shrimp, or tofu.
  • Switch Up the Nuts: If you’re not a fan of peanuts, try using almonds or cashews for a different crunch.
  • Experiment with Fruits: Toss in other seasonal fruits like pineapple or papaya for added sweetness and variety.

Substitutions

If you’re missing some ingredients, here are a few substitutions you can make without sacrificing flavor:

  • Fish Sauce: If you want a vegetarian option, soy sauce or tamari can work as a great alternative.
  • Honey: Maple syrup or agave nectar can easily replace honey for a vegan-friendly version.

Equipment You’ll Need

To whip up this delicious salad, you’ll need a few basic kitchen tools:

  • Sharp knife for slicing and julienning
  • Cutting board
  • Large mixing bowl for combining ingredients
  • Small bowl for making the dressing
  • Whisk or fork for mixing the dressing

Storage and Freezing Tips

This salad is best enjoyed fresh, but if you have leftovers, here’s how to store them:

  • Refrigeration: Store any leftover salad in an airtight container in the fridge for up to two days. The vegetables may soften slightly, but the flavors will still be delicious!
  • Freezing: I wouldn’t recommend freezing this salad, as the texture of the veggies and fruits won’t hold up well once thawed.

FAQs About Thai Mango Salad

Here are some common questions I get about this recipe:

Can I make this salad ahead of time?

Yes, you can prepare the components of the salad in advance, but I recommend adding the dressing right before serving for the freshest taste.

Is this salad gluten-free?

Absolutely! Just ensure that your fish sauce is gluten-free if you’re sensitive to gluten.

Can I add more vegetables?

Of course! Feel free to include any of your favorite veggies—shredded cabbage, snap peas, or even bell peppers in different colors will work beautifully!

Troubleshooting Common Issues

If you encounter any hiccups, here’s what to do:

  • Too Sweet: If the salad leans too sweet, balance it out with a splash more lime juice or some extra chili flakes.
  • Too Spicy: If it turns out spicier than expected, add some extra mango or cucumber to tone it down.

Conclusion

My Thai Mango Salad is more than just a side dish; it’s a celebration of flavors and colors that embodies the spirit of spring. Each bite is a delightful journey filled with sweetness, crunch, and a hint of spice, making it the perfect addition to any meal or gathering. Whether you’re enjoying it as a light lunch or as a side to complement your favorite grilled dishes, I promise this salad will bring a smile to your face and a burst of joy to your palate. So gather your ingredients, get ready to toss, and let’s make some magic in the kitchen together!

Thai Mango Salad – A Sweet & Spicy Favorite for Spring Salads

Prep Time 15 minutes
Total Time 15 minutes
Servings 4 people
Calories 180
This vibrant Thai Mango Salad combines sweet, spicy, and tangy flavors, perfect for a refreshing spring meal.

Ingredients

Fruits and Vegetables

  • 2 pieces ripe mangoes, peeled and julienned
  • 1 cup shredded carrots
  • 1 piece red bell pepper, thinly sliced
  • 1 piece cucumber, julienned
  • 0.25 cup fresh cilantro, chopped
  • 2 green onions sliced
  • 0.25 cup roasted peanuts, crushed
  • 2 tablespoons lime juice
  • 1 tablespoon fish sauce
  • 1 tablespoon honey
  • 1 teaspoon red chili flakes
  • to taste salt

Instructions 

  • Combine mangoes, carrots, bell pepper, and cucumber in a large bowl.
  • Add cilantro and green onions to the bowl.
  • Whisk lime juice, fish sauce, honey, chili flakes, and salt to make the dressing.
  • Pour dressing over the salad and toss gently.
  • Top with crushed peanuts and serve immediately.

Notes

For extra flavor, let the salad sit for 10 minutes before serving.
Calories: 180kcal
Cost: $12
Course: Salad
Cuisine: Thai
Keyword: Mango

Loved this recipe? Save it to your favorite Pinterest board so you can easily find it later! It’s the perfect way to keep all your sweet ideas in one place. ✨

A beautifully arranged Thai Mango Salad showcasing ripe mango, fresh vegetables, and garnished with cilantro and crushed peanuts.

Why You’ll Fall in Love with This Dish

Imagine a busy weeknight when the world feels a little chaotic. You’ve got a mountain of laundry to tackle, a to-do list that seems endless, and dinner looming like a cloud overhead. But wait! In just 15-30 minutes, you can create a dish that smells heavenly and tastes even better. Enter my Air Fryer Honey Garlic Salmon—a recipe that is as delightful to eat as it is easy to prepare. This isn’t just another salmon recipe; it’s a culinary journey where sweet and savory flavors dance on your palate, leaving you craving more.

The best part? You can achieve that gourmet taste without needing a culinary degree or spending hours in the kitchen. With its crispy exterior and flaky interior, this dish will have you feeling like a five-star chef in your own home. Whether you’re cooking for yourself or trying to impress friends and family, this salmon is sure to be a crowd-pleaser.

Ingredients You’ll Need

Let’s gather our ingredients! Here’s what you’ll need to make the magic happen:

  • 4 salmon fillets (6 oz each)
  • 3 cloves garlic, minced
  • 1/4 cup honey
  • 2 tbsp low-sodium soy sauce
  • 2 tbsp freshly squeezed lemon juice
  • 1/2 tsp red pepper flakes

These ingredients not only work together beautifully but also provide a balanced meal that feels indulgent without the guilt. Plus, they’re easy to find at your local grocery store. Now let’s get cooking!

How to Create This Culinary Delight

Deliciously plated Air Fryer Honey Garlic Salmon, showcasing its rich color and texture.

Now that we have our ingredients ready, it’s time to dive into the cooking process. Follow these simple steps to prepare your Air Fryer Honey Garlic Salmon:

  1. Preheat your air fryer: Set it to 400°F (200°C). This ensures an even cook and helps achieve that crispy exterior we all love.
  2. Whisk the marinade: In a bowl, combine the minced garlic, honey, soy sauce, lemon juice, and red pepper flakes. Whisk until everything is well blended. The aroma will transport you to a happy place!
  3. Marinate the salmon: Place the salmon fillets in a shallow dish or zip-top bag and pour the marinade over them. Let them soak up all that goodness for at least 15-30 minutes. If you can, marinate them overnight for an even deeper flavor.
  4. Prepare for cooking: Remove the excess marinade from the salmon and place each fillet in the air fryer basket. Remember, they need their personal space—no touching!
  5. Cooking time: Air fry for about 10-12 minutes. You’ll know it’s done when the salmon flakes easily with a fork and reaches an internal temperature of 145°F (63°C). Those edges should be slightly crispy—trust me, you’ll want those crunchy bits!
  6. Serving suggestion: Transfer your beautifully cooked salmon to plates and drizzle any remaining sauce over each piece for an extra flavor boost. Pair it with steamed veggies or fluffy rice for a complete meal.

Perfecting the Cooking Process

Cooking salmon can be a bit tricky, but with a few simple tips, you’ll be a pro in no time! Here are some pointers to ensure your Air Fryer Honey Garlic Salmon turns out perfect every time:

  • Check the thickness: Cooking times may vary based on the thickness of your salmon fillets. If they’re particularly thick, you may need an extra minute or two.
  • Use a meat thermometer: To ensure your salmon is perfectly cooked, use a meat thermometer. Aim for an internal temperature of 145°F (63°C).
  • Don’t overcrowd the basket: Give your salmon room to breathe! Overcrowding can lead to uneven cooking. Air circulation is key to achieving that crispy exterior.

Add Your Personal Touch

While this recipe is delicious as is, feel free to get creative! Here are some ideas to customize your dish:

  • Spices: If you like a bit of heat, add more red pepper flakes or toss in some cayenne pepper. Want a smoky flavor? Try adding smoked paprika to the marinade.
  • Herbs: Fresh herbs like dill or parsley can brighten up the dish. Sprinkle some on top just before serving for a fresh touch.
  • Sweetness: If you prefer a different type of sweetness, consider swapping honey for maple syrup or brown sugar for a unique twist.
  • Garnish: Don’t forget the garnishes! Sesame seeds or sliced green onions can add a lovely finish that makes your dish look fancy.

Storage and Reheating Tips

Got leftovers? No problem! Here’s how to store and reheat your Air Fryer Honey Garlic Salmon:

  • Storage: Keep any leftover salmon in an airtight container in the fridge for up to three days. It’s a great option for meal prep!
  • Reheating: To reheat, simply pop it back into the air fryer at 350°F (175°C) for about 5 minutes. This keeps the salmon juicy and delicious!

FAQs About This Recipe

Can I use frozen salmon fillets?

Yes! You can use frozen salmon fillets, but it’s best to thaw them first for even cooking. If you’re short on time, you can cook them straight from frozen, but be prepared to add an extra 5-7 minutes to the cooking time.

What sides pair well with this dish?

Air Fryer Honey Garlic Salmon pairs wonderfully with steamed vegetables like broccoli or asparagus, or you can serve it over fluffy rice or quinoa to soak up that delicious sauce. A simple salad with mixed greens and vinaigrette also makes for a refreshing contrast.

How do I know when the salmon is done?

Your salmon is done when it flakes easily with a fork and has reached an internal temperature of 145°F (63°C). If you’re unsure, a meat thermometer is your best friend!

Chef’s Helpful Tips

Here are a few extra tips to ensure your Air Fryer Honey Garlic Salmon turns out perfectly:

  • Always preheat your air fryer to ensure even cooking.
  • Consider lining the air fryer basket with parchment paper for easy cleanup.
  • Experiment with different marinades to keep things exciting. Teriyaki sauce or a lemon-dill mix can offer a delightful twist!

Conclusion: A Dish Worth Making

So there you have it—my Air Fryer Honey Garlic Salmon recipe, a delightful dance of flavors that’s as simple as it is satisfying. Whether you’re a seasoned home cook or just starting out, this dish is sure to become a favorite in your kitchen. Cooking is all about joy, connection, and a sprinkle of magic, and I hope this recipe brings a little of that into your home.

So pull up a chair, grab your spatula, and let’s make some culinary memories together. And remember, every meal is an opportunity to celebrate life, even on the busiest of weeknights. Enjoy your cooking adventure, and don’t forget to share your creations with friends and family—who knows, you might inspire someone else to whip up their own delicious masterpiece!

Air Fryer Honey Garlic Salmon

Prep Time 10 minutes
Cook Time 12 minutes
Total Time 22 minutes
Servings 4 fillets
Calories 350
Enjoy tender, flavorful salmon cooked to perfection in your air fryer with a sweet and savory honey garlic glaze.

Ingredients

Salmon

  • 4 pieces salmon fillets ((6 oz each))
  • 3 cloves garlic (minced)
  • 0.25 cup honey
  • 2 tbsp low-sodium soy sauce
  • 2 tbsp freshly squeezed lemon juice
  • 0.5 tsp red pepper flakes

Instructions 

  • Preheat air fryer to 400°F (200°C).
  • Mix garlic, honey, soy sauce, lemon juice, and red pepper flakes.
  • Marinate salmon for 15-30 minutes.
  • Remove excess marinade and place fillets in the air fryer basket.
  • Cook for 10-12 minutes until flaky and internal temp reaches 145°F (63°C).
  • Serve with remaining sauce drizzled over the top.

Notes

For extra flavor, garnish with chopped green onions or sesame seeds.
Calories: 350kcal
Cost: $15
Course: Main Course
Cuisine: American
Keyword: Salmon

Loved this recipe? Save it to your favorite Pinterest board so you can easily find it later! It’s the perfect way to keep all your sweet ideas in one place. ✨

Eye-level shot of succulent Air Fryer Honey Garlic Salmon, with a warm, inviting background.

Why You’ll Crave This Dish Weekly

Let’s talk about comfort food—specifically, a dish that not only warms your heart but also transforms your kitchen into a paradise of mouthwatering aromas. Enter the vibrant world of Peruvian Chicken. This recipe is a celebration of flavors that dance together in perfect harmony, bringing a taste of South America right to your dinner table. With a superb marinade that infuses the chicken with zesty lime and fragrant spices, every bite is a delightful experience. And let’s not forget about the crispy skin that practically pulls you in for a second helping.

What makes this dish truly special is its versatility. Whether you’re whipping it up for a casual weeknight dinner or serving it at a festive gathering, this Peruvian Chicken will undoubtedly earn a spot in your weekly rotation. Plus, it pairs beautifully with sides like rice, roasted vegetables, or a fresh salad, making it a wholesome meal that checks all the boxes for a healthy dinner. So grab your apron, and let’s dive into this culinary adventure!

Overview of the Recipe

This Peruvian Chicken recipe is all about balancing flavors and textures. The marinade, which blends olive oil, garlic, lime juice, and a symphony of spices, is the secret weapon that makes the chicken incredibly juicy while yielding that coveted crispy skin. You’ll find that the marinade not only enhances the chicken’s natural flavors but also makes it an excellent candidate for leftovers.

Ingredients You’ll Need

A beautifully plated Peruvian chicken thigh, highlighted by natural light, with garlic and lime slices in the background.
  • 4 chicken thighs (bone-in, skin-on)
  • 2 tablespoons olive oil
  • 4 cloves garlic, minced
  • 1 tablespoon ground cumin
  • 1 tablespoon paprika
  • 1 teaspoon dried oregano
  • 1 teaspoon salt
  • 1/2 teaspoon black pepper
  • juice of 2 limes
  • fresh cilantro, for garnish

How to Make Peruvian Chicken

Step-by-Step Instructions

Now that you have your ingredients ready, let’s get cooking! Follow these straightforward steps to create a dish that will leave everyone asking for seconds.

Step 1: Create the Marinade

In a large bowl, combine the olive oil, minced garlic, cumin, paprika, oregano, salt, black pepper, and lime juice. Whisk them together until you have a beautifully aromatic marinade.

Step 2: Marinate the Chicken

Add the chicken thighs to the bowl, ensuring they are well coated in the marinade. Cover the bowl and refrigerate it for at least 1 hour, but for the best flavor, let it marinate overnight. Trust me, the longer the chicken sits in this zesty concoction, the more flavor it absorbs!

Step 3: Preheat the Oven

When you’re ready to cook, preheat your oven to 425°F (220°C). This temperature will help achieve that crispy skin we all love.

Step 4: Arrange the Chicken

Place the marinated chicken thighs on a baking sheet, skin side up. This allows the heat to circulate and crisp up the skin perfectly.

Step 5: Bake

Pop the baking sheet into the oven and bake for 35-40 minutes, or until the chicken is cooked through and the skin is a gorgeous golden brown. You can check for doneness using a meat thermometer; the internal temperature should reach 165°F (74°C).

Step 6: Let it Rest

Once out of the oven, let the chicken rest for a few minutes. This is crucial for keeping it juicy! After resting, garnish with fresh cilantro for a pop of color and flavor.

Step 7: Serve and Enjoy

Serve your Peruvian Chicken warm alongside rice, a fresh salad, or your favorite roasted veggies. Enjoy every juicy, flavorful bite!

Helpful Tips for Success

  • Marinating Time: If you’re short on time, even a quick 1-hour marinade will work, but plan ahead for maximum flavor.
  • Adjusting Spice Levels: If you prefer a little kick, consider adding a dash of cayenne pepper to your marinade or serving with some hot sauce on the side.
  • Leftover Chicken: This chicken makes fantastic leftovers! Use it in wraps, salads, or even quesadillas for quick meal options.
  • Cooking Method: If you don’t have an oven, feel free to grill the chicken on medium heat. Just ensure you turn it regularly for even cooking.

Variations and Substitutions

This recipe is super adaptable! Here are some ideas to switch things up:

  • Chicken Cuts: While thighs are delicious, you can also use drumsticks or a whole chicken cut into pieces. Just adjust the cooking time accordingly.
  • Herb Swaps: If you’re not a fan of cilantro, you can substitute it with parsley or basil in the marinade.
  • Lime Alternatives: Lemon juice can be used in place of lime for a different citrus twist.

Equipment You’ll Need

This recipe requires very few tools:

  • Large mixing bowl
  • Whisk
  • Baking sheet
  • Meat thermometer (optional, but recommended)

Storage and Freezing Instructions

If you have leftovers (which I doubt will happen!), here’s how to store them:

  • Refrigerator: Store the chicken in an airtight container in the fridge for up to 3 days.
  • Freezer: You can freeze marinated chicken for up to 2 months. Just make sure it’s well-sealed in a freezer-safe bag. Thaw it overnight in the fridge before cooking.

Frequently Asked Questions

Here are some common questions I often get about this recipe:

Can I use boneless chicken thighs?

Absolutely! Boneless thighs will work perfectly as well. Just reduce the cooking time to about 25-30 minutes to avoid overcooking.

Can I make the green sauce ahead?

Yes! If you’d like to serve a creamy sauce alongside, consider blending up some homemade green sauce. It can be made a few days in advance and stored in the fridge.

What can I serve with this chicken?

This dish pairs beautifully with rice, quinoa, a fresh salad, or roasted vegetables, making it a wonderfully balanced meal.

Troubleshooting Tips

If you encounter any hiccups while making this dish, here are a few troubleshooting tips:

  • Dry Chicken: Ensure you don’t overbake the chicken. The ideal internal temperature is 165°F (74°C).
  • Flavorless Marinade: Always taste your marinade before adding the chicken. Adjust seasoning as needed to ensure it’s bursting with flavor.

Conclusion

Peruvian Chicken with its creamy green sauce is more than just a meal; it’s a delightful experience that brings warmth and joy to your kitchen. With its spicy, zesty marinade and the satisfying crunch of crispy skin, this dish is destined to become a favorite in your home. Whether you’re cooking for family, friends, or just treating yourself, this recipe offers a wonderful balance of flavors that will keep you coming back for more. So gather your ingredients, invite a friend, and let’s create some memories over this scrumptious meal together! Remember, cooking is all about love and sharing, so make it a little magical in your kitchen!

Peruvian Chicken You’ll Crave Weekly

Prep Time 10 minutes
Cook Time 40 minutes
Total Time 50 minutes
Servings 4 servings
Calories 350
Enjoy flavorful, juicy chicken thighs with a zesty marinade, perfect for a quick and delicious meal.

Ingredients

Main ingredients

  • 4 pieces chicken thighs (bone-in, skin-on)
  • 2 tablespoons olive oil
  • 4 cloves garlic, minced
  • 1 tablespoon ground cumin
  • 1 tablespoon paprika
  • 1 teaspoon dried oregano
  • 1 teaspoon salt
  • 0.5 teaspoon black pepper
  • 2 limes juice of 2 limes
  • fresh cilantro for garnish

Instructions 

  • Mix olive oil, garlic, cumin, paprika, oregano, salt, pepper, and lime juice to make marinade.
  • Add chicken to marinade, coat well, cover, and refrigerate for at least 1 hour.
  • Preheat oven to 425°F (220°C). Place chicken on a baking sheet, skin side up.
  • Bake for 35-40 minutes until cooked through and crispy.
  • Rest briefly, garnish with cilantro, and serve.

Notes

Marinate the chicken overnight for extra flavor.
Calories: 350kcal
Cost: $15
Course: Main Course
Cuisine: Peruvian
Keyword: Chicken

Loved this recipe? Save it to your favorite Pinterest board so you can easily find it later! It’s the perfect way to keep all your sweet ideas in one place. ✨

A mouth-watering view of crispy-skinned Peruvian chicken surrounded by vibrant herbs and spices, enhancing its appeal.

Discover the Magic of Apple Crisp Cookies

Welcome to a world where the comforting aroma of baked goods dances through your home and lingers in your heart. If you’ve been searching for a recipe that not only satisfies your sweet tooth but also warms your soul, you’re in the right place! These **Apple Crisp Cookies** are a delightful blend of chewy goodness and nostalgic flavors, perfect for any occasion. Get ready to take a bite and experience a hug in cookie form!

Why You’ll Love This Recipe

These cookies aren’t just another dessert—they are a celebration of flavors and memories. Here are a few reasons why you’ll fall head over heels for them:

  • Irresistible Flavor Fusion: The combination of sweet apples, warm spices, and hearty oats creates a symphony of taste that perfectly embodies fall.
  • Texture Perfection: Expect a delightful contrast between the crisp edges and a chewy center that keeps you coming back for more.
  • Quick and Easy: With simple steps and common pantry ingredients, you’ll be baking these cookies in no time!
  • Customizable Options: Whether you prefer nuts, chocolate chips, or a drizzle of cream cheese frosting, there’s a variation for everyone.
  • Great for Sharing: Perfect for gatherings, these cookies will be a hit at parties, potlucks, or just a cozy night in.

Ingredient Breakdown

Before we dive into the baking, let’s chat about the ingredients. Each one plays a crucial role in making these cookies unforgettable. Here’s what you’ll need:

  • 1 cup (2 sticks) unsalted butter, softened: Adds richness and ensures a tender cookie.
  • 1 cup light brown sugar, packed: Infuses moisture and a deep caramel flavor.
  • ½ cup granulated sugar: Sweetens the dough without overpowering the other flavors.
  • 2 large eggs: Binds the ingredients together for a perfect texture.
  • 1 teaspoon vanilla extract: Enhances the overall flavor with a warm, inviting note.
  • 1 ½ cups all-purpose flour: The backbone of your cookie dough.
  • 1 teaspoon baking soda: Helps the cookies rise and achieve a light texture.
  • 1 teaspoon ground cinnamon: Adds warmth and that classic apple pie flavor.
  • ½ teaspoon ground nutmeg: A pinch of nutmeg elevates the spice profile.
  • ½ teaspoon salt: Balances the sweetness and enhances all the flavors.
  • 3 cups old-fashioned rolled oats: Provides chewiness and hearty texture.
  • 1 ½ cups peeled and finely diced apples (about 1 medium apple): The star ingredient that brings freshness and sweetness.
  • ½ cup chopped walnuts or pecans (optional): Adds a crunchy element if desired.
  • Powdered sugar or coarse sugar for garnish (optional): For that finishing touch!

Feel free to swap ingredients based on your preferences. For instance, if you’re out of oats, you can use flour instead, or try a gluten-free flour blend if you’re looking for a gluten-free option.

Step-by-Step Instructions

Side view of a freshly baked apple crisp cookie showcasing its chunky apple pieces.

Now that we’ve got our ingredients ready, let’s get baking! Follow these simple steps to create your own batch of delicious Apple Crisp Cookies:

  1. Preheat your oven to 350°F (175°C). Line your baking sheets with parchment paper or silicone baking mats.
  2. In a large bowl, use a mixer to cream together the softened butter, brown sugar, and granulated sugar until light and fluffy. Beat in the eggs one at a time, ensuring each is fully incorporated before adding the next. Stir in the vanilla extract.
  3. In another bowl, whisk together the flour, baking soda, cinnamon, nutmeg, and salt. Gradually add the dry ingredients to the wet ingredients, stirring gently until just combined.
  4. Fold in the rolled oats, diced apples, and chopped nuts if you choose to include them.
  5. Using a spoon or cookie scoop, drop rounded tablespoons of dough onto your prepared baking sheets, leaving about 2 inches between each cookie to allow for spreading.
  6. Bake in the preheated oven for 12-15 minutes, or until the edges turn golden and the centers are set.
  7. Remove the cookies from the oven and allow them to cool on the baking sheet for about 5 minutes before transferring them to a wire rack to cool completely. Lightly sprinkle with powdered sugar or coarse sugar if desired.
  8. Serve your apple crisp cookies once cooled and enjoy the delightful flavors!

Pro Tips for the Best Cookies

Want to elevate your cookie game? Here are some expert insights:

  • Room Temperature Ingredients: Ensure your butter and eggs are at room temperature for easier mixing and better texture.
  • Don’t Overmix: Once you add the flour, mix just until combined to maintain a chewy texture.
  • Chill the Dough: If time allows, chill the dough for 30 minutes before baking to enhance flavor and prevent spreading.
  • Use Fresh Apples: Freshly diced apples yield the best flavor and texture—go for crisp varieties like Granny Smith or Honeycrisp.
  • Experiment with Spices: Don’t hesitate to add a pinch of allspice or ginger for extra warmth.
  • Store Properly: Keep cookies in an airtight container to maintain freshness.
  • Freeze for Later: If you have leftover dough, you can freeze it for up to 3 months—just scoop and freeze!
  • Watch the Bake Time: Ovens vary, so keep an eye on your cookies during the last few minutes to avoid overbaking.

Common Mistakes and Troubleshooting

Even the best bakers encounter hiccups. Here are some common issues and how to solve them:

  • Flat Cookies: This could be due to melted butter or overmixing the dough. Ensure your butter is softened, not melted, and mix until just combined.
  • Dry Cookies: Overbaking or too much flour can lead to dryness. Measure flour accurately and check cookies a minute or two before the recommended time.
  • Uneven Baking: Make sure to rotate your baking sheets halfway through the baking time for even results.

Delightful Variations

Looking to switch things up? Here are some fun variations to try:

  • Chocolate Chip Apple Crisp Cookies: Add ½ cup of chocolate chips for a sweet twist.
  • Maple Pecan Apple Cookies: Substitute maple syrup for some of the sugar and fold in pecans.
  • Gluten-Free Option: Use a 1:1 gluten-free baking flour to replace all-purpose flour.
  • Spiced Apple Crisp Cookies: Add a teaspoon of pumpkin spice for an autumnal flavor boost.

Storage and Make-Ahead Instructions

Want to enjoy these cookies for days? Here’s how to store them:

  • Room Temperature: Keep cookies in an airtight container at room temperature for up to 5 days.
  • Refrigerate: For longer freshness, store in the fridge for up to 10 days.
  • Freezing: Freeze baked cookies for up to 3 months. To thaw, let them sit at room temperature for about an hour.
  • Dough Freezing: You can also freeze unbaked cookie dough. Just scoop onto a baking sheet and freeze until solid, then transfer to a zip-top bag. Bake from frozen, adding a couple of extra minutes to the baking time.

Frequently Asked Questions

Got questions? Here are answers to some common queries:

  • Can I use other fruits? Absolutely! Pears or peaches can be a delightful alternative.
  • What if I don’t have brown sugar? You can substitute it with an equal amount of granulated sugar, though the flavor will be slightly less rich.
  • Can I make these cookies vegan? Yes! Substitute the butter with vegan butter, the eggs with flax eggs, and use plant-based milk for the cream cheese frosting.
  • How do I fix cookies that are too hard? If they’re overbaked, they may be too hard. Keep an eye on them next time and reduce the baking time.
  • Can I add frosting? Of course! A simple cream cheese frosting drizzled over the top can add an extra layer of deliciousness.
  • What’s the best way to serve these cookies? They’re delightful on their own or paired with a scoop of vanilla ice cream.
  • How should I store leftover cookies? Keep them in an airtight container to maintain their chewiness.
  • Can I double the recipe? Absolutely! Just be sure to mix in batches if your mixer isn’t large enough.

Nutrition Tips and Dietary Adaptations

Want to make your cookies a tad healthier? Here are some suggestions:

  • Add Whole Grains: Substitute half of the all-purpose flour with whole wheat flour for added nutrients.
  • Reduce Sugar: You can cut the sugar by about ¼ cup without significantly affecting the taste.
  • Healthier Fats: Use unsweetened applesauce in place of some butter for a lower-fat option.
  • Nut-Free Version: Simply omit the nuts or use seeds like sunflower seeds instead.

Recommended Equipment

To make your baking experience seamless, here’s what you’ll need:

  • Mixing Bowls: A set of various sizes for mixing ingredients.
  • Electric Mixer: For easy creaming and mixing.
  • Baking Sheets: Ensure they’re lined or non-stick for easy cleanup.
  • Parchment Paper: Prevents sticking and makes for effortless cleanup.
  • Cookie Scoop: For uniform cookie sizes and even baking.

Serving Suggestions

These cookies shine on their own, but here are some ways to elevate your serving:

  • With Ice Cream: Serve warm with a scoop of vanilla or cinnamon ice cream.
  • Drizzled with Caramel: A caramel drizzle enhances the sweet apple flavor.
  • With Coffee or Tea: Pair with your favorite beverage for a cozy treat.
  • As a Gift: Package them up in a cute box or jar for a sweet, homemade gift.

Conclusion

There you have it—the ultimate recipe for Apple Crisp Cookies that will make any day feel special! Whether you’re baking for yourself or sharing with loved ones, these cookies are sure to bring joy to your kitchen. Embrace the magic of baking, trust your instincts, and let your creativity shine! I can’t wait to hear how your cookies turn out—happy baking, friends!

Easy Apple Crisp Cookies

Prep Time 15 minutes
Cook Time 15 minutes
Total Time 30 minutes
Servings 24 cookies
Calories 150
Delight in these soft, chewy cookies infused with warm spices and bits of apple, perfect for a cozy treat.

Ingredients

Dough

  • 1 cup unsalted butter, softened
  • 1 cup light brown sugar, packed
  • 0.5 cup granulated sugar
  • 2 large eggs
  • 1 teaspoon vanilla extract
  • 1.5 cups all-purpose flour
  • 1 teaspoon baking soda
  • 1 teaspoon ground cinnamon
  • 0.5 teaspoon ground nutmeg
  • 0.5 teaspoon salt
  • 3 cups old-fashioned rolled oats
  • 1.5 cups peeled and finely diced apples (about 1 medium apple)
  • 0.5 cup chopped walnuts or pecans (optional)

Garnish

  • Powdered sugar or coarse sugar for garnish (optional)

Instructions 

  • Preheat oven to 350°F (175°C) and line baking sheets with parchment.
  • Cream butter, brown sugar, and granulated sugar until fluffy. Beat in eggs and vanilla.
  • Mix dry ingredients and gradually add to wet mixture. Fold in oats, apples, and nuts.
  • Drop tablespoons of dough onto sheets, bake for 12-15 minutes until golden.
  • Cool cookies on racks, then sprinkle with sugar if desired. Serve once cooled.

Notes

For extra flavor, add a pinch of salt on top before baking.
Calories: 150kcal
Cost: $15
Course: Dessert
Keyword: apple, Baking, cookies

Why You’ll Love This Recipe

If you’re on the hunt for a dish that’s both simple and sensational, look no further than this Easy Honey Garlic Salmon. This recipe brings together the delightful balance of sweet and savory flavors, making it a go-to for busy weeknights or when you want to impress guests without spending hours in the kitchen. Just imagine a perfectly cooked salmon fillet glistening with a sticky honey garlic glaze, ready to steal the show on your dinner table.

As someone who adores cooking, I can assure you that this dish is not just about flavor; it’s about the experience. From the moment you whisk the marinade to the heavenly aroma that fills your kitchen while the salmon bakes, you’ll feel that special magic that cooking can bring. Plus, it’s a healthy option that doesn’t skimp on taste—you’ll feel good serving it to your loved ones!

Ingredients You’ll Need

Gather these simple ingredients for an unforgettable meal:

  • 4 salmon fillets
  • 1/4 cup honey
  • 1/4 cup soy sauce
  • 3 cloves garlic, minced
  • 1 tablespoon olive oil
  • Salt and pepper to taste
  • 1 tablespoon sesame seeds (optional)
  • Chopped green onions for garnish (optional)

Kitchen Tools Required

Eye-level view of a plate featuring honey garlic salmon garnished with green onions and sesame seeds.

Before you dive into the cooking process, make sure you have these essential tools on hand:

  • A mixing bowl for the marinade
  • A whisk or fork to combine ingredients
  • A baking dish or sheet for the salmon
  • Parchment paper (optional, for easy cleanup)
  • A small saucepan for thickening the leftover marinade

Step-by-Step Instructions

Preparation of Marinade

Let’s kick things off by preparing the marinade, the heart and soul of this dish. In a small mixing bowl, whisk together:

  • 1/4 cup honey
  • 1/4 cup soy sauce
  • 3 cloves minced garlic
  • 1 tablespoon olive oil
  • Salt and pepper to taste

Mix until everything is well combined and smooth. This honey garlic sauce is where the magic happens—sweet, savory, and just a little garlicky!

Baking the Salmon

Now that your marinade is ready, it’s time to prepare the salmon. Preheat your oven to 400°F (200°C). While the oven heats up, place the salmon fillets in a baking dish. Pour the honey garlic mixture over the salmon, ensuring each fillet is generously coated. Let the salmon marinate for at least 15-30 minutes if you have time, as this helps the flavors sink in.

Once the oven has reached the right temperature, pop the salmon in and let it bake for 12-15 minutes. You’ll know it’s ready when it flakes easily with a fork, indicating a juicy, tender texture. For an extra touch of flavor, consider broiling the salmon for an additional 2-3 minutes at the end to achieve a beautiful caramelization on top.

Preparing the Sauce

While the salmon bakes, take the reserved marinade (the part you didn’t pour over the fish) and transfer it to a small saucepan. Bring it to a boil over medium heat, then reduce to a simmer for about 5 minutes until it thickens slightly. This step is crucial as it transforms the marinade into a luscious sauce that you’ll drizzle over the salmon before serving.

Serving Suggestions

Once your salmon is out of the oven, sprinkle it with sesame seeds and chopped green onions for a pop of color and texture. Serve it immediately with your choice of side dishes—steamed rice, roasted vegetables, or a fresh salad work beautifully. You can also drizzle some of that delightful thickened sauce over your sides for an added flavor boost.

Tips & Tricks

Achieving Perfectly Cooked Salmon

Getting the salmon just right can be a bit tricky, but here are some tips:

  • Keep an eye on the cooking time. Salmon can go from perfectly flaky to dry quickly, so start checking at the 12-minute mark.
  • If you have a meat thermometer, the internal temperature should reach 145°F (63°C) for perfectly cooked salmon.
  • Let the salmon rest for a couple of minutes after removing it from the oven. This allows the juices to redistribute, keeping it moist.

Enhancing Flavor

If you want to elevate the flavors even more:

  • Add a squeeze of fresh lemon or lime juice to the marinade for a refreshing citrus twist.
  • Incorporate a teaspoon of fresh grated ginger for an extra zing.
  • Experiment with spices—try adding a pinch of cayenne for heat or smoked paprika for a deeper flavor.

Substitutions

Don’t have salmon? No problem! This honey garlic sauce works well with other proteins:

  • **Chicken**: Use boneless chicken thighs or breasts, adjusting the cooking time accordingly.
  • **Tofu**: For a vegetarian option, use firm tofu. Press it to remove excess water, cut it into cubes, and marinate just like the salmon.
  • **Fish Alternatives**: Tilapia, trout, or cod can also be wonderful substitutes.

Storage and Freezing Tips

Refrigeration

Leftovers can be stored in an airtight container in the refrigerator for up to 3 days. Just be sure to keep the salmon covered to maintain its moisture.

Freezing

If you have extra salmon, wrap each fillet tightly in plastic wrap, then place them in a freezer bag. It can last for up to 3 months in the freezer. When you’re ready to enjoy it again, thaw overnight in the fridge.

Reheating Instructions

The best way to reheat salmon is in the oven. Preheat to 275°F (135°C), place the salmon in a baking dish, cover with foil, and heat for about 15 minutes. This keeps it tender and prevents drying out.

FAQs

Can I use a different type of fish?

Absolutely! Many fish varieties will work well with this honey garlic sauce. Just adjust the cooking time based on the thickness of the fillets.

How long should I marinate the salmon?

A minimum of 30 minutes is recommended, but if time allows, marinating for up to two hours will yield even more flavor.

What to serve with honey garlic salmon?

This dish pairs beautifully with a variety of sides. Consider serving it with:

  • Steamed rice or quinoa
  • Roasted vegetables like asparagus or broccoli
  • A fresh garden salad for something light

Final Thoughts

This Easy Honey Garlic Salmon recipe is a delightful combination of simplicity and flavor that will make your dinner feel special without all the stress. It’s perfect for those evenings when you want something quick yet satisfying. Remember, cooking should be enjoyable, so don’t hesitate to add your personal flair to the recipe!

So fire up that oven, and let’s create some magic in the kitchen. Happy cooking, friends! I can’t wait to hear how your honey garlic salmon turns out—don’t forget to leave a comment below and share your experience!

Easy Honey Garlic Salmon for Quick Healthy Dinners

Prep Time 10 minutes
Cook Time 15 minutes
Total Time 25 minutes
Servings 4 servings
Calories 350
This flavorful salmon recipe combines sweet honey and savory garlic for a quick, healthy dinner option that's perfect for busy weeknights.

Ingredients

Salmon

  • 4 fillets salmon fillets
  • 0.25 cup honey
  • 0.25 cup soy sauce
  • 3 cloves garlic, minced
  • 1 tablespoon olive oil
  • to taste salt and pepper (to taste)
  • 1 tablespoon sesame seeds (optional)
  • chopped green onions for garnish (optional) chopped green onions (for garnish)

Instructions 

  • Preheat oven to 400°F (200°C).
  • Whisk honey, soy sauce, garlic, olive oil, salt, and pepper.
  • Pour mixture over salmon in a baking dish.
  • Bake for 12-15 minutes, then broil 2-3 minutes if desired.
  • Sprinkle with sesame seeds and green onions before serving.

Notes

For extra flavor, marinate the salmon in the honey garlic mixture for 30 minutes before baking.
Calories: 350kcal
Cost: $15
Course: Main Course
Cuisine: American
Keyword: Salmon

Loved this recipe? Save it to your favorite Pinterest board so you can easily find it later! It’s the perfect way to keep all your sweet ideas in one place. ✨

Delicious honey garlic salmon fillets glistening under warm natural light with soft shadows.

Why You’ll Love This Recipe

Welcome to my kitchen, where the aroma of spices and the promise of a hearty meal dance in the air! Today, I’m excited to share with you a dish that feels like a warm hug on a plate—my go-to Jollof Rice, perfectly paired with golden Fried Plantains, succulent Grilled Chicken, and a refreshing Vegetable Salad. This meal isn’t just food; it’s a celebration of flavors, colors, and the comforting essence of home.

Jollof Rice is a beloved staple in many West African households, often debated over which country makes it best—Nigeria or Ghana. Regardless of where your loyalties lie, one thing is for certain: once you take a bite of this rich, tomato-infused rice, you’ll understand why it holds such a special place in our hearts (and stomachs!).

So, roll up your sleeves, grab your apron, and let’s dive into this delicious adventure!

Ingredients You’ll Need

Here’s what you’ll need to whip up this delightful dish:

  • 2 cups long-grain parboiled rice
  • 4 cups chicken broth
  • 1/4 cup vegetable oil
  • 1 onion, chopped
  • 2 cloves garlic, minced
  • 1 bell pepper, chopped
  • 2 tomatoes, blended
  • 2 tablespoons tomato paste
  • 1 teaspoon thyme
  • 1 teaspoon curry powder
  • 1 bay leaf
  • Salt and pepper to taste
  • 2 ripe plantains, sliced
  • 2 chicken breasts
  • 1 tablespoon paprika
  • 1 tablespoon olive oil
  • Lettuce leaves
  • 1 cucumber, sliced
  • 2 tomatoes, diced
  • 1 carrot, grated
  • Lemon juice for dressing

Step-by-Step Instructions

A vibrant plate featuring Jollof rice, plantains, chicken, and a colorful salad.

Now that we have our ingredients lined up, let’s get cooking!

  1. Rinse the Rice: Start by rinsing the rice under cold water until the water runs clear. This helps to remove excess starch and prevents the rice from becoming too sticky. Set it aside.
  2. Sauté the Aromatics: In a large pot, heat the vegetable oil over medium heat. Add the chopped onion and sauté until it becomes translucent, about 3-5 minutes. This step is essential for building a flavorful base for your Jollof Rice.
  3. Add Garlic and Bell Pepper: Stir in the minced garlic and chopped bell pepper, cooking for another 2 minutes until fragrant and vibrant.
  4. Tomato Mixture: Pour in the blended tomatoes and tomato paste. Let this mixture cook for about 10 minutes, stirring occasionally until it thickens and the flavors meld beautifully.
  5. Seasoning: Add thyme, curry powder, bay leaf, salt, and pepper. Mix well to ensure all the ingredients are combined.
  6. Incorporate the Rice: Gently fold in the rinsed rice, making sure every grain is coated in that luscious tomato mixture.
  7. Add the Chicken Broth: Pour in the chicken broth, bring everything to a boil, then reduce the heat to low. Cover the pot and let it simmer for 20-25 minutes until the rice is cooked and the liquid is absorbed.
  8. Grill the Chicken: While the rice is cooking, let’s prepare the chicken! Marinate the chicken breasts with paprika, olive oil, salt, and pepper. Grill or bake them until fully cooked, juicy, and golden. This adds a nice protein component to your meal.
  9. Fry the Plantains: In a frying pan, heat oil over medium heat. Fry the sliced plantains until they are golden brown on both sides, about 3-4 minutes per side. Remove them and let them drain on paper towels. These sweet, caramelized slices are the perfect contrast to the savory rice!
  10. Prepare the Salad: For a fresh touch, combine lettuce, cucumber, diced tomatoes, and grated carrot in a bowl. Drizzle with lemon juice and toss to combine for a refreshing salad that perfectly complements the richness of the Jollof Rice.

Tips for the Perfect Jollof Rice

  • Use Quality Tomatoes: Fresh tomatoes yield the best flavor, but good-quality canned tomatoes work in a pinch.
  • Don’t Rush the Cooking: Allow the rice to simmer and steam—this is where the magic happens!
  • Taste as You Go: Everyone’s palate is different, so adjust the seasoning as needed to suit your taste.

Variations to Try

Want to shake things up? Here are a few variations you can try:

  • Vegetarian Version: Substitute chicken with grilled vegetables or tofu, and use vegetable broth instead of chicken broth.
  • Spicy Kick: Add chopped Scotch bonnet peppers or a dash of hot sauce for some heat!
  • Seafood Delight: Incorporate shrimp or fish for a delightful seafood twist!

Substitutions

If you’re missing some ingredients, don’t worry! Here are a few substitutions:

  • Rice: Use basmati rice for a fragrant alternative.
  • Broth: Any broth will work—vegetable or beef broth can be used in place of chicken broth.
  • Plantains: Sweet potatoes or butternut squash can serve as a delicious substitute.

Essential Equipment

Before you start cooking, make sure you have the following equipment handy:

  • A large pot or Dutch oven for cooking the rice.
  • A frying pan for frying the plantains.
  • A grill or oven for cooking the chicken.
  • A blender for the tomatoes (if using fresh).

Storage and Freezing

This dish can be stored in the refrigerator for up to 3-4 days. Just make sure to let it cool completely before transferring it to an airtight container. For longer storage, you can freeze the Jollof Rice for up to 2 months. When ready to eat, simply reheat on the stove or in the microwave until warmed through.

Frequently Asked Questions

Here are some common questions I get about this recipe:

Can I make Jollof Rice in advance?

Absolutely! In fact, many believe Jollof Rice tastes even better the next day as the flavors have more time to meld.

What’s the secret to vibrant Jollof Rice?

Using fresh ingredients and allowing the tomato mixture to cook down properly before adding the rice is key. This step enhances the flavor and color!

Can I add protein directly to the rice?

Yes! You can add shrimp or chicken pieces directly into the rice during the last 10 minutes of cooking for a one-pot meal.

Troubleshooting Common Issues

If you encounter any hiccups along the way, here are some quick fixes:

  • Rice Too Sticky: This can happen if the rice wasn’t rinsed properly. Make sure you rinse until the water runs clear next time!
  • Too Much Liquid: If you find your rice too wet, uncover the pot and let it simmer for a few more minutes to evaporate excess liquid.
  • Burnt Bottom: If the rice starts to stick to the bottom, you can gently fluff it with a fork to loosen any bits without ruining the overall dish.

Conclusion

There you have it—my delicious Jollof Rice with Fried Plantains, Grilled Chicken, and a Fresh Vegetable Salad. This recipe is not just a meal; it’s a celebration of flavor, culture, and the joy of cooking. Whether you’re sharing it with loved ones or enjoying it solo, I hope it brings a little magic to your kitchen, just as it has for me. So gather your ingredients, get cooking, and don’t forget to savor every bite. Happy cooking!

Delicious Jollof Rice with Fried Plantains Grilled Chicken and Fresh Vegetable Salad

Prep Time 15 minutes
Cook Time 30 minutes
Total Time 45 minutes
Servings 4 servings
Calories 650
A flavorful West African-inspired meal featuring spicy Jollof rice, crispy fried plantains, grilled chicken, and a fresh vegetable salad.

Ingredients

Rice and Broth

  • 2 cups long-grain parboiled rice
  • 4 cups chicken broth

Vegetables and Seasonings

  • 1/4 cup vegetable oil
  • 1 piece onion, chopped
  • 2 cloves garlic, minced
  • 1 piece bell pepper, chopped
  • 2 tablespoons tomato paste
  • 2 cups blended tomatoes
  • 1 teaspoon thyme
  • 1 teaspoon curry powder
  • 1 bay leaf bay leaf
  • to taste salt and pepper

Fried Plantains

  • 2 pieces ripe plantains, sliced

Grilled Chicken

  • 2 pieces chicken breasts
  • 1 tablespoon paprika
  • 1 tablespoon olive oil

Vegetable Salad

  • 1 head lettuce leaves
  • 1 piece cucumber, sliced
  • 2 tomatoes diced
  • 1 carrot grated
  • to taste lemon juice for dressing

Instructions 

  • Rinse rice and set aside.
  • Sauté onion in oil until translucent, then add garlic and bell pepper; cook 2 minutes.
  • Add blended tomatoes, tomato paste, and spices; cook until thickened. Stir in rice, then add broth, simmer 20-25 minutes.
  • Marinate chicken with paprika, olive oil, salt, and pepper; grill or bake until cooked.
  • Fry plantains until golden. Prepare salad with vegetables and lemon juice.

Notes

For extra flavor, add a dash of hot sauce or herbs to the rice.
Calories: 650kcal
Cost: $15
Course: Main Course
Cuisine: West African
Keyword: Jollof Rice

Loved this recipe? Save it to your favorite Pinterest board so you can easily find it later! It’s the perfect way to keep all your sweet ideas in one place. ✨

Delicious Jollof rice garnished with fried plantains and accompanied by grilled chicken and salad.

Welcome to the Cozy World of Pumpkin Pie Dump Cake

Ah, fall! The time of year when the leaves turn golden, the air grows crisp, and our kitchens start to smell of warm spices and sweet treats. If you’re looking for a dessert that captures the essence of autumn while being incredibly easy to whip up, then let me introduce you to the magical Pumpkin Pie Dump Cake. This delightful dessert is not just a recipe; it’s a comforting hug in cake form that will have your loved ones asking for seconds—and maybe even thirds!

In my little kitchen in Seattle, I’ve learned that the best recipes are those that combine simplicity with soul. This Pumpkin Pie Dump Cake is a perfect example. It combines the richness of pumpkin and spices with the buttery goodness of cake mix, creating a dessert that is both indulgent and effortlessly simple.

Why You’ll Love This Recipe

Let me share why this Pumpkin Pie Dump Cake is not just another dessert; it’s a must-try for any fall gathering or cozy night in:

  • Quick and Easy: With just a handful of ingredients, you can have this cake in the oven in under 15 minutes. Perfect for those busy days!
  • Alluring Aroma: The combination of pumpkin and spices will fill your home with a warm, inviting smell that’s sure to get everyone’s attention.
  • Versatile Dessert: Serve it warm with a scoop of vanilla ice cream for a comforting treat, or enjoy it cold as a delightful snack.
  • Minimal Cleanup: Since everything is dumped into one baking dish, cleanup is a breeze. You can spend more time enjoying your dessert and less time washing dishes!
  • Perfect for Gatherings: Whether it’s a family dinner or a potluck, this dump cake is sure to impress and satisfy a crowd.

Ingredient Breakdown

Let’s dive into what you’ll need to make this scrumptious Pumpkin Pie Dump Cake. Here’s the full list of ingredients, along with some handy substitutions:

  • 1 can (15 oz) pumpkin purée: This is the star of the show! Make sure it’s pure pumpkin, not pumpkin pie filling, for the best results.
  • 1 can (12 oz) evaporated milk: This adds creaminess. If you’re looking for a dairy-free option, you can substitute with coconut milk.
  • 3 large eggs: For binding and richness. You can use flax eggs (1 tablespoon ground flaxseed + 2.5 tablespoons water per egg) if you want a vegan version.
  • 1 cup sugar (white or brown): Brown sugar will give a deeper flavor, while white sugar will keep it light and sweet.
  • 2 tsp pumpkin pie spice: This blend of spices is what gives the cake its warm flavor. If you don’t have it, a mix of cinnamon, nutmeg, and ginger works well too.
  • 1 tsp vanilla extract: A dash of vanilla enhances all the flavors.
  • 1 box (15.25 oz) yellow cake mix: This is the magic ingredient that creates the cake topping. Don’t worry about using a fancy brand; any will do!
  • 3/4 cup butter, melted: This adds richness. For a lighter version, you can use a non-dairy butter substitute.

How to Make Pumpkin Pie Dump Cake

A side view of a Pumpkin Pie Dump Cake showcasing its rich, layered texture and melted butter topping.

Now that we have our ingredients ready, let’s get to the fun part—making the cake! Follow these simple steps for a delicious dessert:

  1. Preheat your oven to 350°F (175°C). Grease a 9×13-inch baking dish with butter or cooking spray.
  2. Mix the filling: In a large bowl, whisk together the pumpkin purée, evaporated milk, eggs, sugar, pumpkin pie spice, and vanilla until smooth.
  3. Spread the filling: Pour the pumpkin mixture into the greased baking dish and spread it evenly.
  4. Add the cake mix: Sprinkle the dry yellow cake mix evenly over the pumpkin filling. Don’t mix; just let it sit on top.
  5. Drizzle with butter: Pour the melted butter evenly over the dry cake mix, covering as much of the surface as possible.
  6. Bake: Place the baking dish in the preheated oven and bake for 50–60 minutes, or until the top is golden brown, the edges are bubbling, and the center is set.
  7. Cool down: Let the cake cool for 20–30 minutes before serving to allow the custard to firm up. This is the hardest part—waiting!

Pro Tips for the Perfect Dump Cake

To achieve the best results with your Pumpkin Pie Dump Cake, consider these expert tips:

  • Use room temperature ingredients: This helps the mixture combine more easily, leading to a smoother texture.
  • Don’t skip the cooling time: Cooling helps the flavors meld together and allows the cake to set properly.
  • Cover with foil: If the top is browning too quickly, cover it loosely with foil to prevent burning.
  • Try different spices: Experiment with different spices like allspice or cardamom for a unique twist.
  • Double the recipe: This cake is so good, you might want to make two! Just use two baking dishes.
  • Serve with toppings: A dollop of whipped cream or a scoop of ice cream takes this dessert to the next level!
  • Store leftovers properly: Keep any leftover cake covered in the fridge for up to 4 days.
  • Make ahead: You can prepare the filling the night before and bake it fresh the next day!

Common Mistakes and Troubleshooting

If you encounter any hiccups while making your Pumpkin Pie Dump Cake, don’t worry! Here are some common mistakes and how to fix them:

  • Too runny filling: If your filling seems too liquidy, make sure to whisk well and let it bake longer. The cake will set as it cools.
  • Dry topping: Ensure that the melted butter is evenly drizzled over the cake mix. A dry topping can result from insufficient butter.
  • Burnt edges: If the edges are browning too fast, lower your oven temperature by 25°F and cover the top with foil.
  • Not enough spice flavor: Adjust the spice levels to your preference. Don’t be afraid to taste the filling before it bakes!

Delicious Variations to Try

While the classic Pumpkin Pie Dump Cake is delightful on its own, here are some variations to spice things up:

  • Chocolate Pumpkin Dump Cake: Add 1 cup of chocolate chips to the pumpkin filling for a rich, chocolatey twist.
  • Nutty Pumpkin Dump Cake: Stir in 1/2 cup of chopped pecans or walnuts into the cake mix for extra crunch.
  • Maple Pumpkin Dump Cake: Replace the sugar with maple syrup for a deeper, more complex flavor.
  • Spiced Rum Pumpkin Dump Cake: Add a splash of spiced rum to the pumpkin mixture for a boozy kick!

Storage and Make-Ahead Instructions

This Pumpkin Pie Dump Cake is perfect for prepping ahead of time. Here’s how to store it:

  • Refrigeration: Store covered in the fridge for up to 4 days.
  • Freezing: Freeze individual slices in airtight containers for up to 3 months. Just thaw before serving.
  • Make-ahead: Prepare the filling the night before, store it in the fridge, and bake it fresh the next day.

Frequently Asked Questions

Here are some common questions about making this Pumpkin Pie Dump Cake:

  • Can I use fresh pumpkin? Yes! Just make sure to cook and puree it before using.
  • What can I substitute for evaporated milk? You can use coconut milk or regular milk instead.
  • How do I know when it’s done baking? The top should be golden brown, and the center should be set, not jiggly.
  • Can I use a different cake mix? Absolutely! Spice cake mix works wonderfully for an extra layer of flavor.
  • Is this dessert gluten-free? You can use a gluten-free cake mix to make it gluten-free.
  • Can I make this vegan? Yes! Use flax eggs and a non-dairy butter substitute to make it vegan-friendly.
  • What should I serve with it? A scoop of vanilla ice cream or a dollop of whipped cream is perfect!
  • How do I reheat leftovers? Reheat in the microwave for about 30 seconds or until warmed through.

Nutritional Tips and Dietary Adaptations

Here are some tips to make this recipe a bit healthier:

  • Reduce sugar: You can cut down the sugar by half without sacrificing flavor.
  • Whole grain option: Use whole wheat cake mix for added fiber.
  • Add more pumpkin: You can increase the pumpkin puree to enhance fiber and nutrients.
  • Low-fat version: Use low-fat evaporated milk and light butter for a lighter version.

Equipment Recommendations

To make your Pumpkin Pie Dump Cake, here’s what you’ll need:

  • 9×13-inch baking dish: This is the perfect size for this recipe.
  • Mixing bowls: A large bowl for mixing the filling and a smaller one for any toppings.
  • Whisk: For a smooth filling, a whisk is essential!
  • Spatula: A rubber spatula will help in spreading the filling evenly.

Serving Suggestions

Once your Pumpkin Pie Dump Cake is baked and cooled, it’s time to serve! Here are some ideas:

  • Warm with Ice Cream: Serve slices warm with a scoop of vanilla ice cream on top.
  • With Whipped Cream: A dollop of whipped cream adds a lovely lightness to the dessert.
  • Drizzle with Caramel: A drizzle of caramel sauce enhances the sweetness beautifully.
  • Sprinkle with Nuts: Add some chopped pecans or walnuts for a crunchy texture contrast.

So there you have it, my dear friends! The Pumpkin Pie Dump Cake is not just a recipe; it’s a celebration of fall flavors that anyone can master. I hope you find joy in making this cake as much as I do in sharing it with you. Now, grab your ingredients, preheat that oven, and let the magic happen in your kitchen!

Pumpkin Pie Dump Cake

Prep Time 10 minutes
Cook Time 1 hour
Total Time 1 hour 10 minutes
Servings 8 pieces
Calories 350
A quick and delicious dessert combining pumpkin, spices, and cake for an easy holiday treat.

Ingredients

Canned Goods

  • 15 oz pumpkin purée
  • 12 oz evaporated milk
  • 3 large eggs
  • 1 cup sugar (white or brown)
  • 2 tsp pumpkin pie spice
  • 1 tsp vanilla extract
  • 15.25 oz yellow cake mix
  • 3/4 cup butter, melted

Instructions 

  • Preheat oven to 350°F (175°C). Grease a 9×13-inch baking dish.
  • Mix pumpkin purée, evaporated milk, eggs, sugar, spices, and vanilla until smooth.
  • Pour into dish, sprinkle cake mix on top, then drizzle melted butter over evenly.
  • Bake for 50–60 minutes until golden and set.
  • Cool for 20–30 minutes before serving.

Notes

For best results, serve slightly cooled to allow the filling to set.
Calories: 350kcal
Cost: $12
Course: Dessert
Cuisine: American
Keyword: pumpkin

Why You’ll Fall in Love with This Salmon Dish

There’s something magical about cooking with just one pan. The simplicity, the ease of cleaning, and the delightful mingling of flavors all come together to create a dish that is not only satisfying but also a true crowd-pleaser. 25-Minute One-Pan Honey Garlic Butter Salmon is exactly that—a harmonious blend of sweet and savory that transforms simple ingredients into a gourmet meal. This recipe is perfect for busy weeknights when you want something quick, yet delicious. Plus, it’s fancy enough to impress even the most discerning guests!

Imagine coming home after a long day, the smell of garlic sizzling in butter wafting through your kitchen, and in just 25 minutes, you have a delightful dinner on the table. The salmon, with its rich, buttery glaze, paired with a side of your favorite greens or grains, makes for a wholesome meal that nourishes both body and soul.

Ingredients You’ll Need

Gather these simple ingredients to create your culinary masterpiece:

  • 4 salmon fillets (skin-on recommended for the best texture)
  • 3 tbsp unsalted butter, melted
  • 2 tbsp honey
  • 3 cloves garlic, minced
  • 1 tbsp soy sauce or tamari (for a gluten-free option)
  • 1 tbsp fresh lemon juice
  • 1 tbsp olive oil (optional, for searing)
  • Salt and black pepper, to taste
  • Chopped fresh parsley, for garnish
  • Red pepper flakes (optional, if you like a little heat)
  • Lemon wedges (optional, for serving)

Directions to Deliciousness

Succulent salmon fillets glazed with honey garlic butter, showcasing vibrant colors and textures.

Now that you have everything ready, let’s dive into the steps of creating this dish:

  1. Preheat your oven: Start by preheating your oven to 375°F (190°C). This ensures that your salmon cooks evenly and gets beautifully flaky.
  2. Prep the salmon: Pat the salmon fillets dry with a paper towel. This step is crucial for achieving that perfect sear. Season both sides with salt and black pepper.
  3. Make the sauce: In a medium bowl, whisk together the melted butter, honey, minced garlic, soy sauce, and fresh lemon juice. This sweet and savory sauce is what makes this recipe a standout!
  4. Heat the skillet: Place a large oven-safe skillet over medium-high heat. If you’re using olive oil, add it to the pan and swirl it around to coat the bottom. This helps prevent the salmon from sticking.
  5. Sear the salmon: Carefully place the salmon fillets skin-side down into the hot skillet. Press gently with a spatula for about 10–15 seconds to ensure good contact and a crispy skin. Sear undisturbed for 2–3 minutes.
  6. Add the sauce: Lower the heat and pour the sauce over and around the fillets, making sure to spoon some over the tops. The sauce will start to bubble and coat the salmon beautifully.
  7. Bake to perfection: Transfer the skillet to the preheated oven and bake for 10–12 minutes, or until the salmon is cooked through and flakes easily with a fork.
  8. Optional broiling: For a deeper glaze, switch your oven to broil and let the salmon broil for an additional 30–60 seconds. Just keep a close eye on it to avoid burning!
  9. Finish and serve: Once done, remove the skillet from the oven and let the salmon rest for 2–3 minutes. Spoon the luscious sauce over the fillets and garnish with chopped parsley, a sprinkle of red pepper flakes, and lemon wedges if desired.

Servings and Timing

This recipe yields 4 servings and can be prepared in just 25 minutes. Perfect for a family dinner or a cozy gathering with friends!

Tips for the Perfect Salmon

Here are some handy tips to ensure your salmon is nothing short of stellar:

  • Patience is key: Allow the salmon to reach room temperature before cooking. This helps it cook more evenly.
  • Dry skin = crispy skin: Make sure to pat the skin dry before seasoning. A dry surface will give you that coveted crispy texture.
  • Use a meat thermometer: For perfectly cooked salmon, aim for an internal temperature of 125°F to 130°F (52°C to 54°C) for moist, flaky fish.
  • Experiment with flavors: Don’t hesitate to tweak the sauce with different herbs or spices. A pinch of ginger or a splash of sesame oil can take this dish to a whole new level!

Variations to Spice Things Up

This recipe is incredibly versatile, and you can switch things up based on your flavor preferences:

  • Spicy twist: Add sriracha or crushed red pepper flakes for a fiery kick.
  • Herbaceous notes: Fresh dill or basil can be added for a refreshing twist.
  • Sweet substitutions: Try maple syrup instead of honey for a unique flavor profile.

Storage and Reheating

Leftovers? No problem! Here’s how to store and reheat your delicious salmon:

  • Refrigeration: Store any leftovers in an airtight container in the fridge for up to 3 days.
  • Reheating: To reheat, place the salmon in a preheated oven at 300°F (150°C) until warmed through, or use a skillet over low heat to avoid drying it out.
  • Flake it: Consider flaking the salmon into salads, wraps, or grain bowls for a quick lunch option!

FAQs: Everything You Need to Know

Can I use frozen salmon?

Absolutely! Just be sure to thaw it completely in the fridge and pat it dry before cooking. Cooking from frozen can result in a less desirable glaze.

Can I make the sauce ahead of time?

Yes! You can prepare the sauce up to 3 days in advance and store it in the fridge. Just rewarm it before adding it to the pan.

How do I get crispy salmon skin?

Ensure the skin is very dry and the pan is hot before placing the salmon in. Don’t move it around once it’s in the pan for the best results!

What’s the best internal temp for salmon?

Aim for 125°F to 130°F (52°C to 54°C) for perfectly moist and flaky salmon.

Can I cook this entirely on the stovetop?

Yes! After searing, you can cover the skillet and cook on low heat for an additional 6–8 minutes if you prefer not to use the oven.

Conclusion: A Recipe to Cherish

This 25-Minute One-Pan Honey Garlic Butter Salmon is more than just a meal; it’s a celebration of flavors, a testament to simplicity, and a reminder that great food doesn’t have to be complicated. Whether you’re cooking for your family, hosting friends, or just treating yourself, this dish promises to be a hit every time. So don your apron, pour a glass of your favorite drink, and get ready to create a little magic in your kitchen. Happy cooking!

25-Minute One-Pan Honey Garlic Butter Salmon

Prep Time 5 minutes
Cook Time 20 minutes
Total Time 25 minutes
Servings 4 servings
Calories 350
This quick and flavorful salmon recipe combines honey, garlic, and butter for a delicious meal ready in just 25 minutes.

Ingredients

Main

  • 4 fillets salmon fillets (skin-on recommended)
  • 3 tbsp unsalted butter, melted
  • 2 tbsp honey
  • 3 cloves garlic, minced
  • 1 tbsp soy sauce or tamari
  • 1 tbsp fresh lemon juice
  • 1 tbsp olive oil (optional, for searing)
  • to taste salt and black pepper
  • chopped fresh parsley, for garnish
  • optional red pepper flakes (for heat)
  • optional lemon wedges (for serving)

Instructions 

  • Preheat oven to 375°F (190°C). Pat salmon dry and season with salt and pepper.
  • Whisk melted butter, honey, garlic, soy sauce, and lemon juice in a bowl.
  • Heat an oven-safe skillet with olive oil over medium-high. Sear salmon skin-side down for 2–3 minutes.
  • Pour sauce over salmon, then transfer skillet to oven and bake for 10–12 minutes.
  • Optional: Broil for 30–60 seconds for glaze. Rest 2–3 minutes, then garnish with parsley, red pepper flakes, and lemon wedges.

Notes

Ensure not to overcook the salmon for best texture and flavor.
Calories: 350kcal
Cost: $15
Course: Main Course
Cuisine: American
Keyword: Salmon

Loved this recipe? Save it to your favorite Pinterest board so you can easily find it later! It’s the perfect way to keep all your sweet ideas in one place. ✨

Gourmet presentation of honey garlic butter salmon, featuring lemon wedges and a blurred cozy background.

Why You’ll Fall in Love with This Dish

There’s something so heartwarming about a big serving of pasta, especially when it’s stuffed with creamy goodness and baked to bubbly perfection. These Easy Spinach and Ricotta Stuffed Shells are not just a meal; they’re a celebration of flavors and textures that evoke the kind of nostalgia that makes you feel like a kid again, sitting at the dinner table with your loved ones. As we dive into this recipe, get ready to create a dish that is not only delicious but also deeply satisfying. It’s perfect for a healthy veggie dinner, and I promise, it’s simple enough to whip up even on the busiest weeknights. Let’s get started!

Ingredients You’ll Need

Gathering the right ingredients is half the battle, and luckily, this dish doesn’t require anything too fancy. Here’s what you’ll need:

  • 12 large pasta shells
  • 2 cups fresh spinach, chopped
  • 1 cup ricotta cheese
  • 1 cup shredded mozzarella cheese
  • 1/2 cup grated parmesan cheese
  • 1 egg
  • 2 cups marinara sauce
  • 1 teaspoon garlic powder
  • 1 teaspoon onion powder
  • Salt and pepper to taste
  • Fresh basil for garnish (optional)

Step-by-Step Instructions

Delicious stuffed shells filled with spinach and ricotta, garnished with cheese and herbs.

Step 1: Preheat the Oven

Before we dive into the cooking, preheat your oven to 375°F (190°C). This will ensure that your dish bakes evenly and comes out perfectly bubbly.

Step 2: Cook the Pasta Shells

Cook your large pasta shells according to the package instructions until they reach that perfect al dente stage. Usually, this takes about 8-10 minutes. Be careful not to overcook them; they will continue to soften as they bake. Once cooked, drain the shells and set them aside to cool a little while you prepare the filling.

Step 3: Make the Ricotta Filling

In a large mixing bowl, combine the chopped spinach, ricotta cheese, half of the shredded mozzarella, grated Parmesan cheese, the egg, garlic powder, onion powder, and a pinch of salt and pepper. Mix everything together until it’s well combined. The colors of the spinach and cheeses will be a beautiful sight, almost as inviting as the aroma that will soon fill your kitchen!

Step 4: Assemble the Dish

It’s time to bring it all together! Spread a thin layer of marinara sauce on the bottom of a baking dish. This not only prevents the shells from sticking but adds a delicious base flavor. Now, take each cooked shell and carefully stuff it with about 2 tablespoons of the ricotta-spinach mixture. Place them in the baking dish, open side up. Once all the shells are nestled in there, pour the remaining marinara sauce over the top, and then sprinkle the rest of the mozzarella cheese on top. This is where the magic happens; the cheese will melt and create that irresistible gooey topping.

Step 5: Bake to Perfection

Cover the baking dish with aluminum foil and pop it into the preheated oven for 25 minutes. After 25 minutes, carefully remove the foil and bake for an additional 10 minutes, or until the cheese is bubbly and golden. Your kitchen will smell amazing, and you might find it hard to resist sneaking a taste!

Step 6: Serve and Enjoy

Once baked, let the dish cool for a few minutes before serving. This will allow the flavors to meld beautifully together. Garnish with fresh basil for a pop of color and a hint of freshness. Serve these stuffed shells hot, perhaps with a side of garlic bread or a crisp green salad for a complete meal.

Tools I Used for This Recipe

While you can certainly make this dish with basic kitchen tools, here are a few items that will make your life a little easier:

  • Large pot for boiling pasta
  • Colander for draining
  • Mixing bowl
  • Baking dish (9×13-inch works great)
  • Spoon for stuffing shells
  • Aluminum foil

Tips for Success

Here are a few tips to ensure your Spinach and Ricotta Stuffed Shells turn out perfectly:

  • Don’t Overcook the Shells: As mentioned earlier, al dente is key! The shells will continue to cook in the oven.
  • Use Fresh Spinach: Fresh spinach adds a vibrant flavor and texture. If you only have frozen spinach, make sure to drain it well to remove excess moisture.
  • Let it Rest: Allowing your dish to rest after baking helps the flavors meld and makes serving easier.

Variations to Try

If you’re looking to mix things up, consider these variations:

  • Add Meat: For a heartier dish, add cooked ground turkey or sausage to the ricotta mixture.
  • Swap the Cheese: Experiment with different cheeses like feta or goat cheese for a unique twist.
  • Make it Gluten-Free: Use gluten-free pasta shells to accommodate dietary preferences.

Substitutions

If you’re missing an ingredient or two, don’t worry! Here are some substitutions:

  • Ricotta Cheese: Cottage cheese works in a pinch, though the texture will be a bit different.
  • Marinara Sauce: Try a homemade tomato sauce or even Alfredo for a creamy variation.

Storage and Freezing

If you happen to have leftovers (though I doubt it!), here’s how to store them:

  • Refrigerator: Store any leftovers in an airtight container in the fridge for up to 3 days.
  • Freezer: You can freeze stuffed shells before baking. Just assemble the dish, cover tightly with foil, and freeze. When ready to bake, simply add an additional 10-15 minutes to the cooking time.

FAQs

Can I make these shells ahead of time? Absolutely! You can assemble the dish a day in advance and store it in the refrigerator until you’re ready to bake.

What can I serve with stuffed shells? These shells pair wonderfully with garlic bread and a simple green salad for a complete meal.

Can I use different vegetables? Yes! Feel free to add sautéed mushrooms, zucchini, or bell peppers for extra flavor and nutrition.

Troubleshooting

If your dish doesn’t turn out as expected, here are a few common issues and solutions:

  • Too Dry: If your dish seems dry, try adding more marinara sauce before baking or cover tightly with foil.
  • Soggy Shells: This can happen if you overcook the shells initially. Make sure to follow the package instructions closely!

Making these Easy Spinach and Ricotta Stuffed Shells is more than just preparing a meal; it’s about creating a dish that brings comfort and joy to your table. Whether you’re enjoying it on a cozy weeknight or serving it to guests, this recipe is sure to impress. So grab your ingredients, roll up your sleeves, and let’s make some magic happen in the kitchen! I can’t wait to hear how yours turn out—share your creations with me! Happy cooking!

Easy Spinach and Ricotta Stuffed Shells – A Healthy Veggie Dinner

Prep Time 15 minutes
Cook Time 35 minutes
Total Time 50 minutes
Servings 4 servings
Calories 450
A delicious and healthy vegetarian dish featuring pasta shells filled with spinach and ricotta, baked to perfection with melted cheese.

Ingredients

Pasta

  • 12 large pasta shells (cooked al dente)

Vegetables

  • 2 cups fresh spinach, chopped

Cheese

  • 1 cup ricotta cheese
  • 1 cup shredded mozzarella cheese
  • 1/2 cup grated parmesan cheese

Other ingredients

  • 1 egg egg
  • 2 cups marinara sauce
  • 1 teaspoon garlic powder
  • 1 teaspoon onion powder
  • to taste salt and pepper
  • optional fresh basil for garnish

Instructions 

  • Preheat oven to 375°F (190°C). Cook shells until al dente, then drain.
  • Mix spinach, ricotta, half mozzarella, Parmesan, egg, garlic, onion, salt, and pepper.
  • Spread marinara in a baking dish, stuff shells with filling, and place in dish.
  • Top with remaining marinara and mozzarella, cover, and bake 25 minutes. Uncover and bake 10 more minutes.
  • Let cool slightly, garnish with basil if desired, and serve.

Notes

You can add extra basil or cheese for more flavor.
Calories: 450kcal
Cost: $15
Course: Main Course
Cuisine: Italian
Keyword: pasta, vegetarian

Loved this recipe? Save it to your favorite Pinterest board so you can easily find it later! It’s the perfect way to keep all your sweet ideas in one place. ✨

A dish of pasta shells stuffed with ricotta and spinach, drenched in marinara sauce under warm lighting.