Author

Ava

Browsing

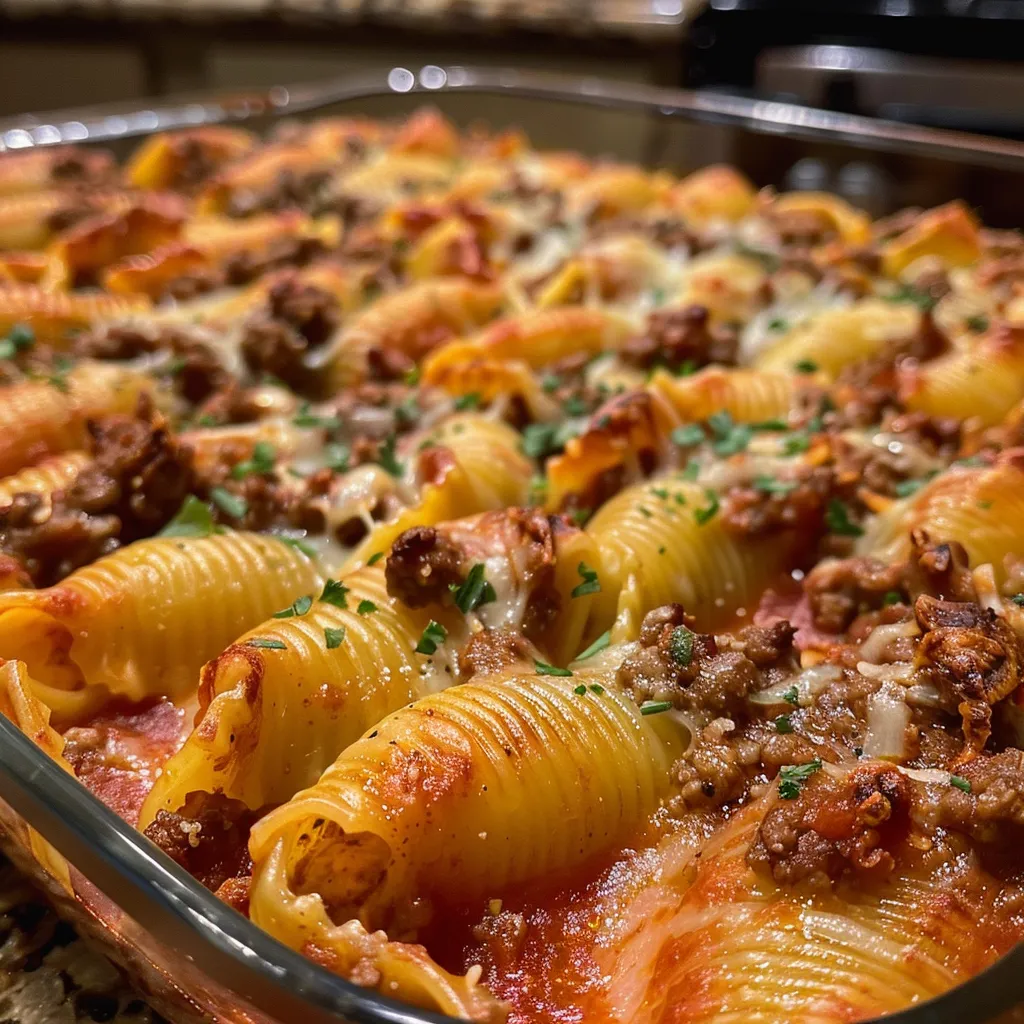
Welcome to my kitchen! Today, we’re diving deep into a dish that has become a family favorite in my home: my Heavenly Ricotta Lasagna. This recipe is a beautiful layering of creamy ricotta, gooey mozzarella, and vibrant vegetables, bringing comfort and joy to every dinner table. Whether you’re a seasoned chef or a beginner, this dish is designed to impress and satisfy. Let’s embark on this delicious journey together!

Why You’ll Love This Recipe

There are many reasons why my lasagna stands out, and I can’t wait to share them with you! Here are just a few:

  • Comfort Food Classic: This lasagna embodies everything we love about comfort food—it’s warm, hearty, and full of flavor, perfect for family gatherings.
  • Layered Perfection: The combination of ricotta, mozzarella, and fresh vegetables makes for a delicious medley of textures and tastes that are sure to impress.
  • Versatile Ingredients: You can easily customize this lasagna based on what you have on hand or your dietary preferences, making it a flexible option for any occasion.
  • Make-Ahead Friendly: This dish can be prepared in advance and frozen, making it a convenient option for busy weeknights or gatherings.
  • Kid-Approved: With its cheesy goodness and tasty layers, this lasagna is a hit with kids and adults alike, ensuring that everyone at the table will be asking for seconds!

Essential Ingredients for Perfect Lasagna Recipe with Ricotta

Let’s break down the key players that make this lasagna so heavenly. Here’s what you’ll need:

  • Lasagna Noodles: 12 pieces (Consider whole wheat or gluten-free noodles as a substitute.)
  • Ricotta Cheese: 15 oz (Cottage cheese can work in a pinch.)
  • Shredded Mozzarella Cheese: 3 cups (Feel free to use low-fat mozzarella if preferred.)
  • Grated Parmesan Cheese: 1 cup (Use Pecorino cheese for a sharper taste.)
  • Fresh Spinach: 2 cups (Kale or Swiss chard are great alternatives.)
  • Marinara Sauce: 2 cups (Homemade or store-bought works wonderfully.)
  • Zucchini: 1 piece, sliced (Yellow squash is a lovely substitute.)
  • Bell Pepper: 1 piece, chopped (Any color works well, or swap for carrots.)
  • Mushrooms: 1 cup, sliced (Use any variety you prefer.)
  • Garlic: 2 cloves, minced (Garlic powder can be a quick substitute.)
  • Olive Oil: 1 tablespoon (Avocado or canola oil can be alternatives.)
  • Fresh Herbs: Basil, parsley, oregano (Dried herbs can work, but use more if opting for dried.)
  • Salt and Pepper: To taste (Essential for balancing flavors.)

Step-by-Step Assembly Instructions

Now that we have our ingredients, let’s put this all together! Follow these simple steps:

  1. Preheat your oven to 375°F (190°C).
  2. Cook the lasagna noodles according to package instructions until al dente. Drain and set aside.
  3. In a large skillet, heat the olive oil over medium heat. Add garlic, zucchini, bell pepper, and mushrooms, sautéing until tender.
  4. Mix the cooked vegetables with the fresh spinach, marinara sauce, and season with salt and pepper.
  5. In a separate bowl, combine ricotta cheese with a pinch of salt, pepper, and your choice of fresh herbs.
  6. In a baking dish, spread a thin layer of marinara sauce on the bottom, then layer 4 noodles, followed by half of the ricotta mixture, half of the vegetable mixture, and a layer of mozzarella. Repeat the layers, finishing with noodles topped with marinara sauce and remaining mozzarella and Parmesan cheese.
  7. Cover the dish with foil and bake for 25 minutes. Remove the foil and bake for an additional 15 minutes or until the cheese is bubbly and golden.
  8. Let it rest for 10-15 minutes before serving to allow the layers to set.

Pro Tips for the Perfect Lasagna

Side view of a delicious ricotta lasagna, showing melted mozzarella and fresh vegetables.

Want to elevate your lasagna game? Here are some expert insights:

  • Resting Time: Don’t skip letting your lasagna rest before slicing. This helps the layers hold together and makes serving easier.
  • Quality Ingredients: Use the best-quality cheese and sauce you can find. It makes a noticeable difference in flavor.
  • Mix It Up: Feel free to experiment with different vegetables or proteins! Ground turkey or lentils can be great additions.
  • Cheese Layering: For extra creaminess, mix some mozzarella into the ricotta layer.
  • Herb Infusion: Try adding fresh basil or oregano to the marinara sauce for an extra burst of flavor.
  • Batch Cooking: Make two lasagnas at once and freeze one for an easy meal later!
  • Cooking Time Adjustment: If using frozen lasagna, increase the baking time by 15-20 minutes.
  • Don’t Overcook Noodles: Cook them just until al dente; they will continue to cook in the oven.

Common Mistakes and Troubleshooting

Even the best cooks make mistakes! Here’s how to avoid common pitfalls:

  • Watery Lasagna: Make sure to drain vegetables well and use thicker marinara sauce to prevent excess moisture.
  • Dry Layers: Ensure you have enough sauce in each layer; parboiling the noodles will also help them absorb moisture.
  • Uneven Baking: Rotate your lasagna halfway through baking for even cooking.

Variations to Try

Feeling adventurous? Here are some fun twists on the classic recipe:

  • Meat Lover’s Lasagna: Add ground beef, sausage, or turkey for a protein-packed version.
  • Vegetable Lasagna: Skip the meat and load up on extra veggies like roasted eggplant or artichokes.
  • Pesto Lasagna: Replace marinara with homemade or store-bought pesto for a fresh twist.
  • Spicy Lasagna: Add crushed red pepper flakes or diced jalapeños to the sauce for some heat.

Storage and Make-Ahead Instructions

This lasagna is perfect for meal prep! Here’s how to store and reheat:

  • Refrigeration: Store leftovers in an airtight container for up to 4 days in the refrigerator.
  • Freezing: Wrap tightly and freeze for up to 3 months. Thaw in the refrigerator overnight before baking.
  • Reheating: Reheat in the oven at 350°F (175°C) until warmed through, about 20-30 minutes.

Frequently Asked Questions

Got questions? I’ve got answers! Here are some FAQs about making lasagna:

  • Can I use no-boil lasagna noodles? Yes! Just adjust the liquid in the sauce to ensure the noodles cook properly.
  • How can I make my lasagna healthier? Use whole wheat noodles, lean meats, and load up on veggies!
  • Can I make this lasagna vegetarian? Absolutely! Just omit the meat and add more vegetables.
  • Is it okay to use store-bought marinara sauce? Yes! Just choose a quality brand for the best flavor.
  • How do I know when my lasagna is done? The cheese should be bubbly and golden, and the internal temperature should reach 165°F (74°C).
  • Can I prepare this dish a day in advance? Yes! Just cover it well and refrigerate until you’re ready to bake.
  • What’s the secret to a cheesy lasagna? Use a mix of cheeses and make sure to distribute them evenly throughout the layers.
  • Can I add other ingredients? Definitely! Feel free to customize based on your preferences and what you have on hand.

Nutritional Information and Dietary Adaptations

This Heavenly Ricotta Lasagna is not only delicious but can also be adapted to fit various dietary needs:

  • Gluten-Free: Use gluten-free lasagna noodles for a gluten-free version.
  • Low-Carb: Swap noodles for sliced zucchini or eggplant to reduce carbs.
  • Dairy-Free: Substitute ricotta and mozzarella with dairy-free alternatives.

Equipment Recommendations

To create your masterpiece, you’ll need a few essential tools:

  • Large Pot: For boiling your lasagna noodles.
  • Skillet: For sautéing vegetables and mixing sauces.
  • Baking Dish: A deep 9×13 inch dish works best for layering.
  • Mixing Bowls: For combining your cheese and vegetable mixtures.
  • Aluminum Foil: To cover and keep moisture in while baking.

Serving Suggestions

To elevate your lasagna experience, consider these serving suggestions:

  • Fresh Salad: Pair your lasagna with a crisp, green salad for a refreshing contrast.
  • Breadsticks: Serve alongside warm garlic breadsticks for a comforting touch.
  • Wine Pairing: A nice Chianti or a light Pinot Grigio complements the flavors beautifully.

Cooking is all about love, connection, and the joy of sharing meals with those we cherish. My Heavenly Ricotta Lasagna is a celebration of those moments—a dish that brings family and friends together, creating memories that linger long after the last bite. So grab your apron, gather your ingredients, and let’s make some magic in the kitchen!

Heavenly Ricotta Lasagna

Prep Time 20 minutes
Cook Time 40 minutes
Total Time 1 hour
Servings 8 pieces
Calories 450
A delicious and wholesome lasagna layered with ricotta, fresh vegetables, and melted cheese, perfect for a comforting meal.

Ingredients

Lasagna Noodles

  • 12 pieces lasagna noodles (Consider whole wheat or gluten-free noodles as a substitute.)

Ricotta Cheese

  • 15 oz ricotta cheese (Cottage cheese can work in a pinch.)

Mozzarella Cheese

  • 3 cups shredded mozzarella cheese (Feel free to use low-fat mozzarella if preferred.)

Parmesan Cheese

  • 1 cup grated Parmesan cheese (Use Pecorino cheese for a sharper taste.)

Fresh Spinach

  • 2 cups fresh spinach (Kale or Swiss chard are great alternatives.)

Marinara Sauce

  • 2 cups marinara sauce (Homemade or store-bought works wonderfully.)

Zucchini

  • 1 piece zucchini, sliced (Yellow squash is a lovely substitute.)

Bell Pepper

  • 1 piece bell pepper, chopped (Any color works well, or swap for carrots.)

Mushrooms

  • 1 cup mushrooms, sliced (Use any variety you prefer.)

Garlic

  • 2 cloves garlic, minced (Garlic powder can be a quick substitute.)

Olive Oil

  • 1 tablespoon olive oil (Avocado or canola oil can be alternatives.)

Fresh Herbs

  • to taste fresh herbs (basil, parsley, oregano) (Dried herbs can work, but use more if opting for dried.)

Salt and Pepper

  • to taste salt and pepper (For seasoning balance.)

Instructions 

  • Cook lasagna noodles according to package instructions, then drain and set aside.
  • Sauté garlic and chopped bell pepper in olive oil until fragrant and tender.
  • Mix ricotta, spinach, and herbs; season with salt and pepper.
  • Layer noodles, ricotta mixture, vegetables, marinara, and cheeses in a baking dish.
  • Bake at 375°F (190°C) for 40 minutes until bubbly and golden.

Notes

For a vegetarian option, skip the meat and add extra vegetables.
Calories: 450kcal
Cost: $15
Course: Main Course
Cuisine: Italian
Keyword: lasagna

Why You’ll Love These Salmon Bites

If you’re on the hunt for a dish that perfectly balances sweet and savory flavors, look no further than these delightful Honey Garlic Salmon Bites. They’re not just food; they’re a culinary experience that transforms a simple piece of fish into a flavor-packed sensation. With their crispy exterior and tender, flaky interior, these bites are perfect for any occasion—whether it’s a cozy family dinner or an elegant gathering with friends. Plus, they come together in a flash, making them an ideal choice for busy weeknights or last-minute entertaining.

But what really sets these salmon bites apart is the magical honey garlic glaze. It coats each piece in a luscious blend of sweetness and umami goodness, creating a dish that will have everyone coming back for seconds. Trust me, once you try these, they’ll become a staple in your meal rotation.

Quick Recipe Information

  • Prep Time: 15 minutes (plus marinating time)
  • Cook Time: 8 minutes
  • Total Time: 23 minutes
  • Servings: 4

Ingredients to Make Honey Garlic Salmon Bites

Succulent salmon pieces coated in a shiny honey garlic glaze, captured in warm natural light.

What You’ll Need

  • 1 pound salmon fillet, cut into bite-sized pieces
  • 2 tablespoons honey
  • 2 tablespoons soy sauce
  • 2 cloves garlic, minced
  • 1 tablespoon olive oil
  • 1 teaspoon ginger, grated
  • Salt and pepper to taste
  • Green onions, chopped (for garnish)

Steps to Make Honey Garlic Salmon Bites

Step 1: Prepare the Marinade

In a mixing bowl, whisk together the honey, soy sauce, minced garlic, olive oil, grated ginger, salt, and pepper. This marinade is the heart of the recipe, giving the salmon its delicious flavor profile. Let it sit for a few minutes to allow the flavors to meld.

Step 2: Marinate the Salmon

Add the bite-sized pieces of salmon to the bowl with the marinade. Gently toss to coat each piece thoroughly. Allow the salmon to marinate for at least 15 minutes. If you have time, letting it sit for 30 minutes will enhance the flavor even more!

Step 3: Heat the Skillet

While the salmon is marinating, heat a non-stick skillet over medium-high heat. A well-heated skillet ensures a nice sear, which will give the salmon bites a beautiful golden crust.

Step 4: Cook the Salmon Bites

Once the skillet is hot, carefully add the marinated salmon pieces to the skillet in a single layer, making sure not to overcrowd the pan. Cook for about 3-4 minutes on each side, or until the salmon is golden brown and cooked through. Keep an eye on them to avoid overcooking; salmon should be flaky and tender.

Step 5: Garnish and Serve

Remove the skillet from heat and transfer the salmon bites to a serving platter. Garnish with chopped green onions for a fresh pop of color and flavor. These bites are best enjoyed immediately, while they’re warm and crispy.

Serving Suggestions

These Honey Garlic Salmon Bites are incredibly versatile! Here are some delicious ways to serve them:

1. With Rice or Grains

Serve your salmon bites over a bed of fluffy rice, quinoa, or farro. The grains are perfect for soaking up that luscious honey garlic glaze.

2. With Roasted Vegetables

Pair the salmon with a colorful array of roasted vegetables like broccoli, bell peppers, and carrots. The combination of crispy salmon and tender veggies creates a balanced meal.

3. Over a Salad

For a lighter option, place the salmon bites atop a fresh mixed green salad. Add some sliced cucumbers, cherry tomatoes, and avocado for a refreshing crunch.

4. With Noodles

Stir-fried noodles make a great pairing! Toss cooked noodles with sesame oil, soy sauce, and your favorite veggies, then top with the honey garlic salmon for a satisfying meal.

5. As an Appetizer

These bites are also a fantastic appetizer. Serve them on a platter with toothpicks and a small bowl of the honey garlic sauce for dipping. Watch them disappear!

Tips for Perfect Salmon Bites

  • Always dry the salmon pieces with a paper towel before marinating to help achieve a crispy texture.
  • Don’t overcrowd the skillet; cook the salmon in batches if necessary to ensure even cooking.
  • Feel free to adjust the sweetness or saltiness of the marinade to suit your taste preferences.

Variations to Try

This recipe is wonderfully adaptable! Here are some variations you can try:

  • Spicy Honey Garlic Salmon: Add a pinch of red pepper flakes to the marinade for a kick of heat.
  • Citrus Twist: Substitute lime or orange juice for the soy sauce for a bright, zesty flavor.
  • Sesame Flavor: Drizzle some toasted sesame oil into the marinade for a nutty depth.

Substitutions

If you don’t have something on hand, don’t fret! Here are some easy substitutions:

  • Salmon: You can use other fish like trout or even chicken if you prefer.
  • Honey: Maple syrup or agave nectar work well as alternatives.
  • Soy Sauce: Tamari or coconut aminos can be used for a gluten-free option.

Equipment You’ll Need

  • A sharp knife for cutting the salmon
  • A mixing bowl
  • A non-stick skillet for cooking
  • A spatula for flipping the salmon

Storage Instructions

Leftovers can be stored in an airtight container in the refrigerator for up to three days. When reheating, use a skillet over low heat to maintain their crispy texture. Avoid the microwave as it can make the salmon dry.

Can You Freeze Honey Garlic Salmon Bites?

Absolutely! To freeze, arrange the cooled salmon bites on a baking sheet in a single layer and freeze until firm. Then transfer them to a freezer-safe container or bag. They can be stored in the freezer for up to two months. Thaw them in the refrigerator overnight before reheating.

FAQs

1. Can I use frozen salmon for this recipe?

Yes, just make sure to thaw it completely and pat it dry before marinating.

2. How do I know when the salmon is cooked properly?

The internal temperature should reach 145°F (63°C), and the fish should flake easily with a fork.

3. Can I make the sauce in advance?

Certainly! You can prepare the honey garlic sauce ahead of time and store it in the refrigerator for up to a week.

4. Can I make this recipe gluten-free?

Yes! Just use gluten-free soy sauce or tamari as a substitute for regular soy sauce.

Conclusion

There you have it—your new go-to recipe for Honey Garlic Salmon Bites. It’s a dish that’s not only easy to prepare but also bursting with flavor that will impress everyone at your table. Whether you’re enjoying them on a busy weeknight or serving them at a gathering, these bites are sure to steal the show. So pull up a chair, grab a fork, and dig into these delightful morsels. Happy cooking! And remember, every bite is an invitation to savor the moment.

Honey Garlic Salmon Bites Recipe

Prep Time 15 minutes
Cook Time 10 minutes
Total Time 25 minutes
Servings 4 servings
Calories 250
Delicious bite-sized salmon cooked in a sweet and savory honey garlic marinade, perfect for a quick and healthy meal.

Ingredients

Main ingredients

  • 1 pound salmon fillet, cut into bite-sized pieces
  • 2 tablespoons honey
  • 2 tablespoons soy sauce
  • 2 cloves garlic, minced
  • 1 tablespoon olive oil
  • 1 teaspoon ginger, grated
  • to taste salt and pepper
  • green onions, chopped for garnish

Instructions 

  • Mix honey, soy sauce, garlic, olive oil, ginger, salt, and pepper.
  • Marinate salmon for at least 15 minutes.
  • Cook salmon in a skillet over medium-high heat for 3-4 minutes per side.
  • Remove from heat and garnish with green onions.

Notes

Serve immediately for best flavor and texture.
Calories: 250kcal
Cost: $15
Course: Main Course
Cuisine: American
Keyword: Salmon

Loved this recipe? Save it to your favorite Pinterest board so you can easily find it later! It’s the perfect way to keep all your sweet ideas in one place. ✨

A mouthwatering arrangement of Honey Garlic Salmon Bites, highlighting their glistening texture and inviting appearance.

Why You’ll Love These Duchess Potatoes

Imagine a dish so creamy and fluffy that it practically melts in your mouth, a dish that has the power to elevate any meal to a level of elegance usually reserved for fancy restaurants. That’s exactly what you get with Duchess Potatoes. These delightful little mounds of potato perfection are not just visually stunning; they’re also incredibly simple to make at home. Whether you’re serving them up for a festive holiday dinner, a cozy family gathering, or even just a weeknight treat, they’re sure to steal the show.

Growing up, my family often celebrated special occasions with dishes that had a bit of flair—like my mother’s roasted vegetables or her iconic mashed potatoes. But Duchess Potatoes? Oh, they were saved for the big moments. I remember the first time I tried them. I was captivated by their golden tops and creamy interiors. I knew I had to learn how to make them myself. With this recipe, I’m excited to share that same experience with you!

The Magic of Creamy Potatoes

Potatoes are a staple in many households, but when you take the humble spud and whip it into a light, airy delight, magic happens. Duchess Potatoes combine the best of both worlds: the comforting taste of traditional mashed potatoes with the sophistication of a gourmet side dish. They are perfect for Christmas lunches, Xmas dinners, or even as a standout at any holiday dinner. This recipe is here to bring a touch of elegance to your table while remaining surprisingly simple to whip up!

Ingredients You’ll Need

Creamy Duchess Potatoes with a perfectly piped shape, showcasing a fluffy texture.

Before we dive into the cooking process, let’s take a look at the ingredients you’ll need:

  • 2 pounds potatoes, peeled and cubed
  • 4 tablespoons unsalted butter
  • 1/2 cup milk
  • 1/2 teaspoon salt
  • 1/4 teaspoon black pepper
  • 1/4 teaspoon nutmeg
  • 2 large egg yolks
  • 1 egg, beaten (for egg wash)

Cooking Steps

Ready to make some magic? Here’s how to whip up these Duchess Potatoes in no time:

  1. Preheat the oven: Start by preheating your oven to 400°F (200°C). This will ensure that your potatoes bake to a beautiful golden color.
  2. Boil the potatoes: In a large pot, boil the cubed potatoes in salted water until they are fork-tender, about 15-20 minutes. You want them soft enough to mash easily.
  3. Drain and return: Once the potatoes are cooked, drain them and return them to the pot. This step allows any excess moisture to evaporate, which is crucial for creamy, non-soggy potatoes.
  4. Add your ingredients: To the pot, add the butter, milk, salt, pepper, and nutmeg. Mash the potatoes until they are smooth and creamy. This is where the magic happens—don’t rush this step! A good mash yields the best texture.
  5. Incorporate the eggs: Stir in the egg yolks until fully incorporated. This will help bind the mixture and give your Duchess Potatoes that lovely golden hue when baked.
  6. Pipe the potatoes: Transfer your potato mixture to a piping bag fitted with a star tip. If you don’t have a piping bag, a zip-top bag with a corner cut off will do just fine. Pipe the potatoes onto a baking sheet in decorative swirls or mounds. Get creative here!
  7. Brush with egg wash: Brush the tops of your piped potatoes with the beaten egg. This step is key for achieving that gorgeous golden-brown finish.
  8. Bake: Pop your baking sheet in the preheated oven and bake for 20-25 minutes, or until the tops are golden and slightly crisp. The aroma will be divine!
  9. Serve: Serve these warm as a side dish, and watch as your guests marvel at your culinary skills.

Tips for Perfect Duchess Potatoes

To ensure your Duchess Potatoes turn out perfectly every time, consider these handy tips:

  • Choose the right potatoes: For the best texture, use starchy potatoes like Russets or Yukon Golds. They mash beautifully!
  • Don’t skip the nutmeg: A pinch of nutmeg adds a lovely depth of flavor that balances the richness of the butter and cream.
  • Get creative with toppings: Sprinkle some grated cheese or fresh herbs on top before baking for an extra flavor boost.

Variations to Try

While the classic Duchess Potatoes are absolutely delightful, you can easily put your spin on them:

  • Cheesy Duchess Potatoes: Mix in some shredded cheese, like Gruyère or cheddar, for a cheesy twist that will have everyone coming back for seconds.
  • Herb-Infused: Add finely chopped herbs like chives or parsley for a fresh flavor profile that pairs beautifully with any meal.
  • Garlic Lovers: Roast a few cloves of garlic and mash them in with the potatoes for a creamy, garlicky delight.

Substitutions

If you’re looking to tweak this recipe based on what you have at home or dietary preferences, here are some substitutions:

  • Butter: You can use olive oil or vegan butter for a dairy-free version.
  • Milk: Substitute with almond milk, soy milk, or any other plant-based milk for a dairy-free option.
  • Eggs: If you’re avoiding eggs, consider using flaxseed meal mixed with water as a binding agent.

Equipment You’ll Need

Before you start, make sure you have these essential tools on hand:

  • A large pot for boiling potatoes
  • A potato masher or ricer for creamy results
  • A piping bag with a star tip (or a zip-top bag)
  • A baking sheet lined with parchment paper
  • A whisk for mixing your egg wash

Storage and Freezing

Have leftovers? No problem! Duchess Potatoes can be stored in the refrigerator for up to 3 days. Just make sure to keep them in an airtight container. You can also freeze them! To freeze, pipe the potatoes onto a baking sheet and freeze until solid. Once frozen, transfer them to a freezer bag. When you’re ready to enjoy them again, bake them directly from the freezer, adding a few extra minutes to the baking time.

FAQs

Got questions? Let’s tackle some common ones:

  • Can I make these ahead of time? Absolutely! You can prepare the potato mixture a day in advance and pipe them onto the baking sheet. Just cover and refrigerate. When you’re ready to bake, brush them with egg and pop them in the oven!
  • What can I serve with Duchess Potatoes? These elegant potatoes pair wonderfully with roasted meats, like chicken or beef, and are a stunning addition to any holiday spread.
  • Can I use leftover mashed potatoes? Yes! If you have leftover mashed potatoes, you can mix in the egg yolks and pipe them as directed. Just be mindful of the consistency; they should be fluffy enough to hold their shape.

Troubleshooting Common Issues

Sometimes things don’t go as planned in the kitchen. Here are a few tips to help you troubleshoot:

  • Too dry: If your potato mixture is too dry, add a splash more milk or melted butter to loosen it up.
  • Not holding shape: If the potatoes aren’t holding their shape when piped, they might need a bit more egg yolk mixed in.
  • Uneven baking: Make sure to space the potato mounds evenly on the baking sheet to allow for even heat distribution.

Conclusion

There you have it—your guide to making the most heavenly Duchess Potatoes that are sure to impress! Whether you’re preparing for a cozy family dinner or a lavish holiday feast, these fluffy, creamy delights will have your guests raving. Remember, the best meals are made with love and a sprinkle of creativity, so don’t hesitate to put your own spin on this classic recipe. I can’t wait for you to experience the joy of serving these delightful morsels. Happy cooking, friends!

Easy Duchess Potatoes

Prep Time 15 minutes
Cook Time 25 minutes
Total Time 40 minutes
Servings 4 servings
Calories 250
Delight in these elegant, fluffy duchess potatoes with a crispy top, perfect as a sophisticated side dish.

Ingredients

Main

  • 2 pounds potatoes, peeled and cubed
  • 4 tablespoons unsalted butter
  • 1/2 cup milk
  • 1/2 teaspoon salt
  • 1/4 teaspoon black pepper
  • 1/4 teaspoon nutmeg
  • 2 large egg yolks
  • 1 egg beaten egg (for egg wash)

Instructions 

  • Preheat oven to 400°F (200°C). Boil potatoes until tender, then mash with butter, milk, salt, pepper, and nutmeg.
  • Stir in egg yolks, pipe onto a baking sheet, brush with beaten egg.
  • Bake for 20-25 minutes until golden brown. Serve warm.

Notes

Ensure potatoes are fully mashed for a smooth texture.
Calories: 250kcal
Cost: $12
Course: Side Dish
Cuisine: French
Keyword: potatoes

Loved this recipe? Save it to your favorite Pinterest board so you can easily find it later! It’s the perfect way to keep all your sweet ideas in one place. ✨

A tempting plate of Duchess Potatoes, lightly browned with a soft, inviting appearance.

Why This Bowl is a Must-Try

There’s something undeniably comforting about a bowl of food that feels like a warm hug. This Honey Ginger Salmon Bowl is not just another recipe; it’s a delightful experience that brings together the sweetness of honey, the zest of fresh ginger, and the rich, flaky goodness of salmon. Every bite is like a reunion with an old friend, reminding you of home-cooked meals and cozy evenings spent around the dinner table.

Perfect for busy weeknights or leisurely weekends, this dish is incredibly versatile and packed with nutrients. With colorful vegetables and a hint of Asian flair, it’s a dish that pleases both the palate and the eye. Plus, it’s quick to whip up, which means you can spend less time in the kitchen and more time enjoying the company of those you love. Let’s dive into what makes this recipe so special.

Preparation and Cooking Time

Time is precious, especially in today’s fast-paced world. This recipe is designed to fit into your busy schedule while still delivering a satisfying meal. Here’s a quick breakdown:

  • Preparation Time: 10 minutes
  • Cooking Time: 10 minutes
  • Total Time: 20 minutes

Ingredients You’ll Need

A vibrant Honey Ginger Salmon Bowl garnished with sesame seeds, showcasing salmon and fresh veggies.

Gather your ingredients and let’s get started on this tasty adventure! Here’s what you’ll need:

  • 2 salmon fillets
  • 2 tablespoons honey
  • 1 tablespoon fresh ginger, grated
  • 2 tablespoons soy sauce
  • 1 tablespoon olive oil
  • 1 cup cooked rice (white or brown)
  • 1 cup steamed broccoli
  • 1/2 cup shredded carrots
  • 1/4 cup green onions, sliced
  • Sesame seeds for garnish

Step-by-Step Instructions

Now, let’s get our hands a little messy and cook up this delicious bowl!

  1. Mix the Marinade: In a small bowl, combine the honey, grated ginger, soy sauce, and olive oil. This mixture is the magic that will elevate your salmon.
  2. Prepare the Skillet: Preheat your skillet over medium heat. This is where the salmon will get its beautiful sear.
  3. Cook the Salmon: Place the salmon fillets skin-side down in the skillet. Pour the honey ginger mixture over the salmon, ensuring it’s well-coated. Cook for about 4-5 minutes.
  4. Flip the Salmon: Carefully flip the salmon fillets and cook for another 4-5 minutes, or until the salmon is cooked through and flakes easily with a fork. Your kitchen will smell like a dream!
  5. Assemble the Bowl: In a serving bowl, layer the cooked rice, steamed broccoli, and shredded carrots. This is where you can get creative with your presentation!
  6. Top it Off: Place the cooked salmon on top of the vegetables and rice. Drizzle any remaining sauce from the skillet over the salmon for extra flavor.
  7. Garnish: Finish off your bowl with sliced green onions and a sprinkle of sesame seeds. These little touches add both color and crunch.

How to Serve

This Honey Ginger Salmon Bowl is not just a meal; it’s a centerpiece that deserves to be admired. Serve it hot, and watch as everyone gathers around to dig in. You can enjoy it as is, or pair it with a light salad or some crispy spring rolls for an extra treat. It’s perfect for family dinners, casual gatherings, or even meal prep for the week ahead.

Tips for Perfection

Here are a few tips to ensure your Honey Ginger Salmon Bowl turns out perfectly every time:

  • Fresh Ingredients: Use fresh ginger for the best flavor. The zing from fresh ginger makes a world of difference!
  • Don’t Overcook: Salmon is best when it’s cooked just right. Keep an eye on it, as cooking times can vary based on thickness.
  • Experiment with Veggies: Feel free to add or substitute your favorite vegetables. Bell peppers, snap peas, or even bok choy work beautifully in this dish.
  • Make it Spicy: If you enjoy a little kick, consider adding a dash of sriracha or red pepper flakes to the marinade.

Recipe Variations

One of the joys of cooking is the ability to adapt recipes to your taste. Here are a few variations to consider:

  • Swap the Protein: If salmon isn’t your thing, try using chicken or tofu. Both will soak up that delicious honey ginger marinade beautifully.
  • Grain Options: Instead of rice, try serving this bowl with quinoa or cauliflower rice for a low-carb option.
  • Add Nuts: For a bit of crunch, sprinkle some toasted almonds or cashews on top before serving.

Storage and Freezing

If you find yourself with leftovers (which is rare because it’s so delicious!), here’s how to store them:

  • Refrigeration: Store any leftovers in an airtight container in the fridge for up to 2 days.
  • Freezing: You can freeze the marinated salmon before cooking. Just ensure it’s in a freezer-safe bag. When you’re ready to cook, thaw it in the refrigerator overnight.

Special Equipment

No special equipment is needed for this recipe, but having a good non-stick skillet will make cooking the salmon a breeze. A rice cooker can also be a helpful tool if you’re cooking rice regularly.

Frequently Asked Questions

Can I use frozen salmon for this recipe?

Absolutely! Just be sure to thaw it properly in the refrigerator before cooking for the best texture and flavor.

What can I pair with the Honey Ginger Salmon Bowl?

This dish pairs wonderfully with a light salad or some steamed dumplings. You can also serve it with a side of pickled vegetables for an extra zing.

Can I substitute the salmon with another protein?

Yes! Chicken, shrimp, or even tofu would work well. Just adjust the cooking time accordingly.

Is this recipe suitable for meal prep?

Definitely! This bowl is perfect for meal prep. Just store the components separately to keep everything fresh, and assemble when you’re ready to eat.

Conclusion

And there you have it—a Honey Ginger Salmon Bowl that’s bound to become a staple in your kitchen. It’s simple, quick, and bursting with flavor that brings a smile with every bite. Whether you’re cooking for yourself or sharing with friends, this recipe is sure to impress. So roll up your sleeves, gather your ingredients, and let’s create some magic in the kitchen together. Happy cooking, friends!

Honey Ginger Salmon Bowl

Prep Time 10 minutes
Cook Time 10 minutes
Total Time 20 minutes
Servings 2 servings
Calories 520
A delicious and healthy salmon bowl featuring a sweet and spicy honey ginger glaze, served over rice and vegetables.

Ingredients

Protein

  • 2 pieces salmon fillets

Sauces & Condiments

  • 2 tablespoons honey
  • 1 tablespoon fresh ginger, grated
  • 2 tablespoons soy sauce
  • 1 tablespoon olive oil

Grains

  • 1 cup cooked rice (white or brown)

Vegetables

  • 1 cup steamed broccoli
  • 1/2 cup shredded carrots
  • 1/4 cup green onions, sliced

Garnish

  • to taste sesame seeds for garnish

Instructions 

  • Mix honey, grated ginger, soy sauce, and olive oil in a small bowl.
  • Cook salmon fillets in a skillet over medium heat, pouring sauce over and cooking 4-5 minutes per side.
  • Layer cooked rice, broccoli, and carrots in a bowl, then top with salmon.
  • Drizzle remaining sauce over salmon, garnish with green onions and sesame seeds.

Notes

For extra flavor, marinate the salmon in the sauce for 15 minutes before cooking.
Calories: 520kcal
Cost: $15
Course: Main Course
Cuisine: fusion
Keyword: Salmon

Loved this recipe? Save it to your favorite Pinterest board so you can easily find it later! It’s the perfect way to keep all your sweet ideas in one place. ✨

Eye-level shot of a Honey Ginger Salmon Bowl with salmon fillets, rice, and steamed broccoli in natural light.

Why This Pasta Dish Will Be Your New Favorite

If you’ve been searching for a recipe that effortlessly transforms a regular weeknight dinner into a cozy gathering, look no further! This Creamy Chicken Garlic Parmesan Pasta is not just a meal; it’s an experience. Picture this: tender chicken simmered in a rich, creamy garlic sauce, enveloping perfectly cooked pasta that clings to every delectable bite. It’s like a warm hug for your taste buds and a guaranteed family favorite.

As someone who has spent countless evenings in the kitchen, I can assure you this dish is all about simplicity and flavor. With minimal ingredients and maximum comfort, it’s the kind of recipe that brings everyone to the table, eager for a second helping. Let’s dive into the magic of this creamy delight and explore how you can whip it up in no time!

Ingredients You’ll Need

  • 8 oz pasta (fettuccine or penne)
  • 2 tablespoons olive oil
  • 1 pound chicken breast, diced
  • 4 cloves garlic, minced
  • 1 cup heavy cream
  • 1 cup grated parmesan cheese
  • Salt and pepper to taste
  • Fresh parsley, chopped (for garnish)

How to Make It: Step-by-Step Guide

Delicious fettuccine pasta with chicken in a creamy garlic parmesan sauce, beautifully arranged.

Now that you have your ingredients ready, let’s get cooking! This recipe is incredibly straightforward, making it perfect for both novice cooks and seasoned chefs alike.

  1. Cook the Pasta: Begin by boiling a pot of water. Once it’s at a rolling boil, add your pasta. Follow the package instructions and cook until al dente—about 8-10 minutes is usually perfect. Once cooked, drain it and set aside.
  2. Prepare the Chicken: In a large skillet, heat the olive oil over medium heat. Add the diced chicken to the pan and season generously with salt and pepper. Cook until the chicken is browned and fully cooked through, which should take about 5-7 minutes. Make sure to stir occasionally for even cooking.
  3. Add Garlic: Once your chicken is cooked, it’s time to infuse that garlicky goodness. Add the minced garlic to the skillet and sauté for about 1 minute, just until it becomes fragrant. Be careful not to burn it; burnt garlic can turn bitter!
  4. Make the Creamy Sauce: Pour in the heavy cream and bring it to a gentle simmer. Reduce the heat and stir in the grated Parmesan cheese, mixing until melted and creamy. This is where the magic truly happens—watch as the sauce thickens and transforms into a luscious coating.
  5. Toss in the Pasta: Add the drained pasta to the skillet, tossing gently to coat it all in that heavenly sauce. If the sauce seems too thick, don’t worry! You can always adjust the consistency by adding a splash of reserved pasta water.
  6. Garnish and Serve: Finally, serve your creamy pasta warm, garnished with fresh chopped parsley for a pop of color. Dig in and enjoy the delightful flavors!

Expert Tips for the Perfect Pasta

To ensure your Creamy Chicken Garlic Parmesan Pasta turns out fabulously every time, here are a few expert tips:

  • Use Quality Ingredients: The better the ingredients, the better the dish. Opt for fresh garlic and high-quality Parmesan cheese for maximum flavor.
  • Don’t Overcook the Chicken: Keep an eye on your chicken to avoid drying it out. It’s perfectly cooked when it reaches an internal temperature of 165°F.
  • Adjust the Sauce: If you like a saucier pasta, feel free to double the cream and cheese. You can never have too much creaminess!
  • Experiment with Flavors: Consider adding a pinch of red pepper flakes for a kick or some sautéed spinach for added nutrients and color.

Variations to Try

This recipe is versatile and lends itself well to adaptations. Here are a few variations you might enjoy:

  • Vegetarian Option: Swap out the chicken for sautéed mushrooms or grilled zucchini. You can also add some roasted cherry tomatoes for a burst of sweetness.
  • Seafood Twist: Replace chicken with shrimp for a delightful seafood version. Just sauté the shrimp until they turn pink and opaque.
  • Spicy Version: Add diced jalapeños or a splash of hot sauce to the sauce for a spicy kick!

Substitutions You Can Make

Running low on ingredients? No problem! Here are some substitutions that work well:

  • Pasta: If you don’t have fettuccine or penne, any pasta shape will do—spaghetti, rigatoni, or even gluten-free pasta are great alternatives.
  • Heavy Cream: You can use half-and-half for a lighter version or cashew cream for a dairy-free option.
  • Parmesan Cheese: While Parmesan is classic, you can use Pecorino Romano or even a vegan cheese if you’re looking for a dairy-free alternative.

Equipment You Might Need

Before you start cooking, ensure you have the right tools at hand:

  • Large Pot for boiling pasta
  • Large Skillet for cooking chicken and sauce
  • Measuring Cups and Spoons
  • Wooden Spoon or Spatula for stirring
  • Colander for draining pasta

Storage and Freezing Tips

Got leftovers? This dish stores beautifully! Here’s how to keep it fresh:

  • Refrigeration: Store any leftover pasta in an airtight container in the refrigerator for up to 3 days. Reheat gently on the stove or in the microwave.
  • Freezing: You can freeze the pasta before adding the cream sauce. Just cook the chicken and pasta, let them cool completely, and store in freezer-safe containers. When ready to eat, thaw, add the cream sauce, and warm it up.

Frequently Asked Questions

Here are some common queries about this delicious dish:

  • Can I use a different type of pasta? Absolutely! Feel free to experiment with any pasta shape you enjoy.
  • Is this dish kid-friendly? Yes! The creamy sauce is typically a hit with kids, and you can adjust the garlic to suit their taste.
  • Can I make this dish ahead of time? While it’s best enjoyed fresh, you can prepare the chicken and sauce ahead, then combine with pasta when you’re ready to serve.

Troubleshooting Common Issues

Even the best cooks face challenges in the kitchen. Here’s how to troubleshoot common problems:

  • Too Thick Sauce: If your sauce is thicker than you’d like, simply stir in a little reserved pasta water to reach your desired consistency.
  • Not Enough Flavor: Taste your sauce before serving. If it needs a boost, add more salt, pepper, or a sprinkle of garlic powder.
  • Chicken Not Cooking Evenly: Make sure to cut your chicken into uniform pieces for even cooking. If some pieces are small, they’ll cook faster than larger ones.

Wrap-Up: Your Cozy Dinner Awaits

This Creamy Chicken Garlic Parmesan Pasta is truly a treasure in the realm of comfort food. It’s not just a dish; it’s an opportunity to gather around the table, share stories, and savor every moment with loved ones. As you whip this up in your kitchen, I hope it brings you as much joy as it does to me. Remember, cooking is all about having fun and experimenting, so don’t hesitate to make it your own. Whether it’s a casual family dinner or a special occasion, this pasta will steal the show. So grab your apron, turn on your favorite tunes, and let’s make some magic happen in the kitchen!

Creamy Chicken Garlic Parmesan Pasta

Prep Time 10 minutes
Cook Time 20 minutes
Total Time 30 minutes
Servings 4 servings
Calories 650
A rich and creamy pasta dish featuring tender chicken, garlic, and Parmesan cheese, perfect for a comforting meal.

Ingredients

Pasta

  • 8 oz pasta (fettuccine or penne)
  • 2 tablespoons olive oil

Chicken

  • 1 pound chicken breast, diced
  • 4 cloves garlic, minced
  • 1 cup heavy cream
  • 1 cup grated parmesan cheese
  • to taste salt and pepper
  • for garnish fresh parsley, chopped

Instructions 

  • Cook pasta until al dente, then drain and set aside.
  • Heat olive oil in a skillet, cook diced chicken until browned, about 5-7 minutes.
  • Add minced garlic and sauté for 1 minute.
  • Pour in heavy cream, simmer, then stir in Parmesan until melted.
  • Add cooked pasta, toss to coat, season with salt and pepper, then serve garnished with parsley.

Notes

For extra flavor, add a pinch of red pepper flakes or grated lemon zest.
Calories: 650kcal
Cost: $15
Course: Main Course
Cuisine: Italian
Keyword: pasta

Loved this recipe? Save it to your favorite Pinterest board so you can easily find it later! It’s the perfect way to keep all your sweet ideas in one place. ✨

Appetizing bowl of creamy pasta featuring diced chicken and a sprinkle of parsley.

Discover the Comfort of Baked Stuffed Shells

Welcome to my kitchen! If you’re here, it’s likely because you’re in search of a recipe that wraps you in warmth and nostalgia—just like my beloved Baked Stuffed Shells. This dish is more than just a meal; it’s a hug on a plate, filled with creamy ricotta and savory ground beef, all smothered in a rich pasta sauce. Perfect for family gatherings or a cozy night in, it’s a recipe that has transformed ordinary evenings into cherished memories.

In this comprehensive guide, we’ll cover everything you need to know to create the ultimate Baked Stuffed Shells. From a detailed breakdown of ingredients to expert tips, variations, and even troubleshooting common mistakes, I’m here to ensure that your culinary adventure is both delightful and successful. Let’s dive in!

Why You’ll Love This Recipe

  • Comfort Food Classic: This recipe is a nostalgic reminder of family dinners and cozy nights in, making it a perfect dish for any occasion.
  • Customizable Fillings: You can easily switch up the filling to suit your taste or dietary needs—think spinach and ricotta or a meatless option!
  • Make Ahead Friendly: These stuffed shells can be prepared in advance and stored, making dinner planning a breeze.
  • Delicious Leftovers: The flavors deepen overnight, making the leftovers just as delightful as the first serving.
  • Easy to Follow Instructions: With straightforward steps, even beginner cooks can shine in the kitchen.

Ingredient Breakdown

Let’s take a closer look at the ingredients that make up this comforting dish. Each component plays a crucial role in achieving the perfect flavor and texture.

  • Jumbo Pasta Shells: These large shells are perfect for holding the delicious filling. If you can’t find jumbo shells, you can substitute with cannelloni or manicotti.
  • Olive Oil: A splash of olive oil enhances the flavors of the sautéed onions and garlic.
  • Onion and Garlic: These aromatics are essential for building a flavorful base.
  • Ground Beef: A classic choice for stuffing, feel free to use ground turkey or sausage for a different flavor profile.
  • Pasta Sauce: Use your favorite store-bought sauce or whip up a homemade version; either works wonderfully!
  • Ricotta Cheese: This creamy cheese serves as the main filling base. If you’re looking for a lighter option, cottage cheese is a great substitute.
  • Shredded Mozzarella and Parmesan Cheese: These cheeses create a gooey, cheesy topping that’s hard to resist.
  • Egg: The egg binds the filling together, giving it a nice texture.
  • Dried Parsley: A sprinkle of parsley adds a touch of freshness to the filling.

Pro Tips for Perfect Baked Stuffed Shells

Juicy baked stuffed shells topped with melted cheese, seen from the side.

To elevate your stuffed shells to the next level, consider these expert insights:

  • Undercook Your Pasta: Boil the shells for 1-2 minutes less than package instructions. This makes them easier to handle and allows for perfect baking with the filling.
  • Use Fresh Herbs: If you have fresh parsley or basil on hand, they can add a delightful burst of flavor to your filling.
  • Let the Filling Cool: After cooking the ground beef, let the filling cool for a few minutes before stuffing the shells to prevent them from breaking.
  • Layering is Key: Spread a thin layer of sauce on the bottom of your baking dish before adding the filled shells. This prevents sticking and adds flavor.
  • Keep It Covered: Bake covered with foil for the first half of the baking time to ensure even cooking.
  • Cheese Options: Mixing different types of cheese in the filling can enhance the flavor. Try adding some goat cheese or ricotta for a tangy twist!
  • Adjust the Spice: For a bit of heat, add red pepper flakes to the meat sauce or in the cheese filling.
  • Creamy Sauce Alternative: For a richer twist, consider adding a layer of béchamel sauce over the pasta sauce before baking.

Common Mistakes and Troubleshooting

Even the best of us can make a misstep in the kitchen. Here are some common pitfalls and how to avoid them:

  • Overcooking the Shells: Avoid overcooking the pasta; it should be al dente. They’ll continue to cook in the oven.
  • Filling Spillage: If your shells are breaking, make sure they are not overstuffed. A generous tablespoon of filling per shell is usually sufficient.
  • Sauce Too Thick: If your pasta sauce is too thick, add a splash of water or broth to loosen it up before layering.
  • Cheese Not Melting: If your cheese isn’t melting nicely, ensure it’s shredded and not packed too tightly in the measuring cup.
  • Dry Filling: If your filling feels dry, add a little more ricotta or a splash of cream to achieve a smoother consistency.

Flavor Variations

Feeling adventurous? Here are some delightful variations to try:

  • Spinach and Ricotta: Swap out the ground beef for sautéed spinach and additional ricotta for a lighter, vegetarian option.
  • Mexican-Inspired: Add taco seasoning to your ground beef, and top with salsa and cheese for a fun twist.
  • Pesto-Stuffed Shells: Mix pesto with ricotta for a fresh, herby flavor that will brighten your dish.
  • Buffalo Chicken: Substitute shredded chicken mixed with buffalo sauce for a spicy kick!

Storage and Make-Ahead Instructions

These stuffed shells are perfect for meal prep! Here’s how to store them:

  • Refrigerator: Store covered in the fridge for up to 3 days.
  • Freezer: Assemble shells but do not bake. Cover tightly and freeze for up to 2 months. When ready to bake, thaw in the fridge overnight and bake as instructed.
  • Reheating: To reheat, cover with foil and bake at 350°F until heated through, about 20 minutes.

Comprehensive FAQ

Here are some frequently asked questions to further assist you:

  • Can I use a different type of cheese? Absolutely! Feel free to experiment with different cheeses to find your favorite combination.
  • What can I serve with Baked Stuffed Shells? A fresh side salad or garlic bread pairs beautifully with this dish.
  • How do I prevent the shells from sticking together? Ensure they are well-coated in sauce before layering in the baking dish.
  • Can I prepare the filling in advance? Yes! The filling can be made a day ahead and stored in the refrigerator until you’re ready to stuff the shells.
  • What can I use instead of ground beef? Ground turkey, chicken, or even lentils can make great substitutes for a lighter or vegetarian option.
  • Is this dish gluten-free? You can use gluten-free pasta shells to make this dish gluten-free.
  • Can I make this dish vegetarian? Absolutely! Just skip the meat and add more veggies or beans to the filling.
  • How long does it take to bake the shells? Typically, they bake for about 35-40 minutes, but this can vary based on your oven.

Nutrition Tips and Dietary Adaptations

Keeping health in mind? Here are some tips to make this dish a bit lighter or fit specific dietary needs:

  • Low-Fat Alternatives: Use low-fat cheese or reduce the amount of cheese for a lighter option.
  • Increase Fiber: Incorporate whole wheat pasta shells or add vegetables like zucchini or spinach to the filling.
  • Gluten-Free Option: Use gluten-free pasta shells and ensure your sauce is gluten-free as well.

Equipment Recommendations

Here are a few kitchen tools that will make your cooking experience easier and more enjoyable:

  • 9×13 Inch Baking Dish: Essential for baking your stuffed shells.
  • Large Skillet: Perfect for sautéing the filling ingredients.
  • Mixing Bowls: Use these for mixing your filling ingredients.
  • Measuring Cups and Spoons: Accurate measurements are key to recipe success!

Serving Suggestions

To elevate your meal, consider these serving ideas:

  • Fresh Herbs: Garnish with fresh basil or parsley to add a pop of color and flavor.
  • Parmesan Cheese: A sprinkle of freshly grated Parmesan over the top enhances the dish’s richness.
  • Side Salad: Pair with a simple mixed greens salad dressed with balsamic vinaigrette for a refreshing contrast.

Conclusion

There you have it—a detailed guide to creating Baked Stuffed Shells that are sure to impress. Whether you’re gathering around the dinner table with loved ones or enjoying a quiet night in, this dish is a reminder that food is not just about sustenance; it’s about connection, love, and joy. So, pull up a chair, grab a spatula, and let’s make some culinary magic happen together. Happy cooking!

Baked Stuffed Shells

Prep Time 20 minutes
Cook Time 40 minutes
Total Time 1 hour
Servings 6 servings
Calories 650
A delicious baked pasta dish featuring jumbo shells filled with a cheesy meat mixture, topped with sauce and melted cheese.

Ingredients

Pasta

  • 20 jumbo shells jumbo pasta shells
  • 2 tablespoons olive oil
  • 1 small onion (chopped)
  • 3 cloves garlic (minced)
  • 0.5 pound ground beef
  • 24 ounces pasta sauce (or homemade meat sauce)
  • 15 ounces ricotta cheese
  • 2 cups shredded mozzarella (divided)
  • 0.5 cup grated Parmesan cheese
  • 1 egg egg
  • 2 tablespoons dried parsley

Instructions 

  • Preheat oven to 350°F (175°C). Cook shells and prepare sauce.
  • Sauté garlic and onion, add ground beef, then sauce. Mix cheese, egg, parsley, and half the mozzarella.
  • Layer sauce in baking dish, fill shells with cheese mixture, place in dish, top with remaining sauce.
  • Cover with foil and bake 30 minutes. Remove foil, sprinkle remaining mozzarella, bake uncovered 5-10 minutes.

Notes

Ensure shells are fully cooked before stuffing for best results.
Calories: 650kcal
Cost: $15
Course: Main Course
Cuisine: Italian
Keyword: pasta

Why You’ll Fall in Love with This Recipe

Let’s be real: life can be a whirlwind. Between juggling work, family, and social commitments, sometimes the thought of whipping up dinner feels more daunting than climbing a mountain. Enter my go-to Effortless 20-Minute Honey Garlic Salmon Recipe. This dish has become my kitchen lifesaver, and I can’t wait to share it with you!

Picture this: it’s a hectic Tuesday evening, the kids are famished, and I’m running on empty. I need something quick, comforting, and oh-so-delicious. This recipe is my secret weapon! It’s not just about getting dinner on the table; it’s about creating a moment of joy that leaves everyone asking for seconds. With just a handful of ingredients and minimal cleanup, this honey garlic salmon is a true weeknight hero.

Essential Ingredients for Your Honey Garlic Salmon

Before we dive into the cooking process, let’s gather our ingredients. Trust me, you won’t need a whole grocery list for this one! Here’s what you’ll need:

  • 4 salmon fillets
  • 1/4 cup honey
  • 1/4 cup soy sauce
  • 3 cloves garlic, minced
  • 1 tablespoon olive oil
  • 1 teaspoon ginger, grated
  • Salt and pepper to taste
  • Chopped green onions for garnish
  • Lemon wedges for serving

It’s amazing how these simple ingredients come together to create a flavor explosion! The honey gives a lovely sweetness, while the soy sauce provides that umami kick we all crave. And let’s not forget about the garlic and ginger—they’re like the dynamic duo of flavor.

Crafting Your Honey Garlic Salmon: A Step-by-Step Guide

A beautifully plated honey garlic salmon dish with a warm, inviting background.

This recipe is as straightforward as it gets, making it perfect for both novice cooks and seasoned pros. Let’s walk through the steps together:

1. Whisk Up the Magic Sauce

In a small bowl, whisk together the honey, soy sauce, minced garlic, grated ginger, olive oil, and a sprinkle of salt and pepper. This sauce is the heart of the dish and will transform your salmon into a delectable masterpiece. Just imagine that sweet and savory flavor coating your fish!

2. Heat the Skillet

Now, heat a non-stick skillet over medium-high heat. This is where the magic happens—those beautiful salmon fillets are about to get crispy!

3. Cook the Salmon

Place the salmon fillets skin-side down in the hot skillet. Let them cook for about 4-5 minutes until the skin turns crispy and golden brown. This step is crucial; it locks in moisture and flavor.

4. Add the Sauce

Now comes the fun part! Flip the salmon fillets and pour that luscious honey garlic sauce over them. Let it sizzle for an additional 4-5 minutes, basting the salmon with the sauce until it’s cooked through. You’ll want to keep an eye on it—salmon cooks quickly, and you want it to be perfectly flaky.

5. Garnish and Serve

Once your salmon is cooked to perfection, remove it from heat and garnish with chopped green onions. Serve with lemon wedges on the side for that extra zing. And voilà! Dinner is served!

Tips for the Best Honey Garlic Salmon Experience

To ensure your honey garlic salmon is a hit every time, here are some tried-and-true tips:

  • Ingredient Swaps: Don’t hesitate to mix things up! If you’re out of ginger, a dash of ground ginger works in a pinch. Feeling adventurous? Add a sprinkle of red pepper flakes for a hint of heat.
  • Perfect Doneness: The best way to know your salmon is ready is by its texture. It should flake easily when poked with a fork and look moist rather than dry.
  • Play with Garnishes: Besides green onions, try topping with sesame seeds or cilantro for a fresh twist.

Frequently Asked Questions About This Recipe

Can I prepare the honey garlic sauce ahead of time?

Absolutely! You can mix the sauce a day in advance and store it in an airtight container in the fridge. This makes dinner prep even quicker!

What side dishes pair well with honey garlic salmon?

This salmon is incredibly versatile! Serve it alongside steamed veggies, fluffy rice, or a light quinoa salad to keep things healthy and balanced.

Is honey garlic salmon healthy?

You bet! Salmon is packed with lean protein and omega-3 fatty acids, making it a heart-healthy choice. Just be mindful of your soy sauce if you’re watching your sodium intake—opting for low-sodium soy sauce can help!

Storing and Freezing Your Honey Garlic Salmon

If you happen to have leftovers (which is rare in my house!), here’s how to store them:

  • Let the salmon cool completely.
  • Transfer any leftovers and the flavorful sauce from the foil packet into an airtight container.
  • Store in the refrigerator for up to 2-3 days.

When you’re ready to enjoy it again, gently reheat in a covered oven-safe dish at 325°F (160°C) for about 10-15 minutes. This helps keep the salmon moist and delicious—almost like it was freshly made!

Conclusion: Your New Go-To Recipe

I hope you’re as excited about this Effortless 20-Minute Honey Garlic Salmon Recipe as I am! This dish is not just about feeding your family; it’s about creating moments of joy and connection around the dinner table. With its sweet and savory flavors, it’s sure to become a staple in your kitchen, just like it is in mine. Remember, cooking should be fun and approachable—don’t stress about perfection. Embrace the process, trust your instincts, and enjoy every bite. I can’t wait to hear about your culinary adventures with this recipe! Share your thoughts and let’s keep the conversation going. Happy cooking!

Effortless 20-Minute Honey Garlic Salmon Recipe

Prep Time 5 minutes
Cook Time 15 minutes
Total Time 20 minutes
Servings 4 servings
Calories 350
This quick and flavorful salmon recipe combines honey and garlic for a delicious meal in just 20 minutes.

Ingredients

Salmon

  • 4 fillets salmon fillets
  • 0.25 cup honey
  • 0.25 cup soy sauce
  • 3 cloves garlic, minced
  • 1 tablespoon olive oil
  • 1 teaspoon ginger, grated
  • to taste salt and pepper
  • chopped green onions for garnish
  • lemon wedges for serving

Instructions 

  • Whisk honey, soy sauce, garlic, ginger, olive oil, salt, and pepper.
  • Cook salmon skin-side down in a skillet for 4-5 minutes until crispy.
  • Flip salmon and pour sauce over; cook for another 4-5 minutes, basting.
  • Remove from heat, garnish with green onions, and serve with lemon wedges.

Notes

Use fresh salmon for best flavor and crispy skin.
Calories: 350kcal
Cost: $15
Course: Main Course
Cuisine: American
Keyword: Salmon

Loved this recipe? Save it to your favorite Pinterest board so you can easily find it later! It’s the perfect way to keep all your sweet ideas in one place. ✨

An enticing view of salmon fillets glazed with honey garlic sauce, featuring side garnishes.

Why You’ll Fall in Love with This Recipe

Ah, honey soy salmon! Just saying the words brings a smile to my face. This dish is one of those magical recipes that can turn a mundane weeknight dinner into a special occasion without requiring a culinary degree. Imagine tender, flaky salmon fillets glazed in a sweet-and-savory marinade that dances on your taste buds and fills your kitchen with an irresistible aroma. It’s the kind of meal that makes you want to linger at the dinner table, sharing stories and laughter long after the last bite has been savored.

This recipe is not just about flavor; it’s about ease and versatility. Whether you’re whipping up a quick dinner for your family or impressing friends at a cozy gathering, this honey soy salmon will have everyone asking for your secret. And because it can be on the table in under 30 minutes, it’s perfect for those busy nights when you crave something delicious but don’t have the time to fuss around in the kitchen.

Key Ingredients You’ll Need

Let’s get into what makes this dish so delightful. The ingredients are simple yet impactful, and I bet you might even have most of them in your pantry already!

  • 4 salmon fillets – Freshness is key here; look for bright, vibrant fillets.
  • 1/4 cup soy sauce – This brings that umami flavor that pairs beautifully with salmon.
  • 1/4 cup honey – Sweetness to balance the saltiness of the soy sauce.
  • 2 cloves garlic, minced – Aromatic and flavorful, a must-have in any savory dish.
  • 1 tablespoon fresh ginger, grated – Adds a zesty kick and brightness.
  • 2 tablespoons olive oil – Helps to keep the salmon moist while cooking.
  • Salt and pepper to taste – Always essential for seasoning.
  • 2 green onions, sliced (for garnish) – A touch of color and crunch.
  • Sesame seeds (optional, for garnish) – For a little extra flair.
  • Cooked rice or quinoa (for serving) – A wholesome base for your fabulous salmon.

How to Make Honey Soy Salmon Dinner

A plate featuring golden-brown salmon, glistening with honey soy glaze, alongside fluffy cooked rice and vibrant green onions.

Now that we have our ingredients lined up, let’s dive into the steps to create this culinary masterpiece.

  1. Preheat your grill or oven to 400°F (200°C). This step is crucial for achieving that perfect caramelization on the salmon.
  2. Whisk together the marinade: In a bowl, mix the soy sauce, honey, minced garlic, grated ginger, olive oil, salt, and pepper until well combined.
  3. Marinate the salmon: Place the salmon fillets in a shallow dish and pour the marinade over them, making sure they’re well coated. Let them soak in those flavors for 15-20 minutes. Trust me, the longer, the better!
  4. Cooking time: If you’re grilling, oil the grill grates and place the salmon skin-side down. Grill for about 5-6 minutes per side until cooked through. If baking, arrange the salmon on a lined baking sheet and bake for 12-15 minutes until the salmon flakes easily with a fork. The smell will be heavenly!
  5. Garnish and serve: Once cooked, remove the salmon from the heat, garnish with sliced green onions and sesame seeds if you’re feeling fancy. Serve it over a bed of cooked rice or quinoa, and watch how quickly it disappears!

Tips and Tricks for Success

While this recipe is straightforward, a few tips can elevate your dish to new heights:

  • Choose Quality Salmon: Look for fresh, brightly colored fillets. Avoid any that have a strong fishy smell—freshness is key!
  • Don’t Overcook: Keep an eye on your salmon while cooking. Overcooking can lead to dryness, and nobody wants that! Aim for an internal temperature of 145°F (63°C).
  • Experiment with Flavors: Feel free to add spices like chili flakes for some heat or a splash of lime juice for an extra zing. Personalize it!
  • Garnish Thoughtfully: Adding fresh herbs like cilantro, parsley, or dill can enhance both flavor and presentation. Don’t skip this step!

Common Mistakes to Avoid

Even the best recipes can go awry. Here are some pitfalls to steer clear of:

  • Not Marinating Long Enough: Allowing the salmon to marinate helps the flavors penetrate. If you’re short on time, even 15 minutes can help, but longer is always better.
  • Cooking at the Wrong Temperature: Ensure your oven or grill is preheated. Cooking too quickly can lead to burnt edges and an undercooked center.
  • Skipping the Drying Step: Pat your salmon fillets dry before marinating to help the glaze adhere better and achieve that beautiful caramelization.

Serving Suggestions That Wow

What’s a meal without some delightful sides? Here are a few ideas to round out your honey soy salmon:

  • Roasted Vegetables: Pair this dish with a colorful medley of asparagus, bell peppers, and zucchini. Drizzle with olive oil, salt, and pepper, then roast at 400°F for 20 minutes.
  • Quinoa or Rice: Serve over a fluffy bed of quinoa or brown rice, adding a bit of lemon zest for flavor and brightness.
  • Fresh Salad: A crisp arugula salad with cherry tomatoes and a lemon vinaigrette will balance the richness of the salmon.
  • Creamy Mashed Potatoes: For comfort food lovers, creamy mashed potatoes or cauliflower puree make a wonderful pairing.

Storage and Freezing Tips

If you find yourself with leftovers (which is rare, but it happens!), here’s how to keep them fresh:

  • Let the leftover salmon cool completely before placing it in an airtight container.
  • Refrigerate within two hours; it can last up to three days in the fridge.
  • To reheat, gently warm in the oven at 350°F for about 10 minutes or until warmed through.
  • You can also freeze cooked salmon for up to three months. Just make sure to thaw it in the fridge overnight before reheating.

FAQs About Honey Soy Salmon

Got questions? I’ve got answers!

  • Can I use frozen salmon? Yes! Just ensure it’s thawed properly before marinating and cooking.
  • What can I substitute for honey? Maple syrup or agave nectar can work as alternatives, but they might slightly alter the flavor.
  • Is this recipe healthy? Absolutely! Salmon is packed with omega-3 fatty acids and high-quality protein, making it a nutritious option.

Conclusion: A Whimsical Dinner Delight Awaits

So there you have it! This honey soy salmon recipe is not just a meal; it’s an experience filled with flavor, warmth, and joy. Whether you’re cooking for yourself or sharing it with loved ones, this dish brings a little sunshine to your plate. I hope you enjoy crafting this delightful dish as much as I do. When you take that first bite and see everyone’s delighted faces, you’ll understand why this recipe has earned a special place in my heart.

Remember, cooking is about love and creativity, so don’t be afraid to make it your own. Gather your ingredients, invite a friend into the kitchen, and let’s create something magical together. Bon appétit!

Quick and Easy Honey Soy Salmon Dinner

Prep Time 10 minutes
Cook Time 15 minutes
Total Time 25 minutes
Servings 4 servings
Calories 350
A delicious and quick salmon dish glazed with honey and soy, perfect for a weeknight dinner.

Ingredients

Main ingredients

  • 4 fillets salmon fillets
  • 1/4 cup soy sauce
  • 1/4 cup honey
  • 2 cloves garlic, minced
  • 1 tablespoon fresh ginger, grated
  • 2 tablespoons olive oil
  • to taste salt and pepper
  • 2 green onions sliced (for garnish)
  • optional sesame seeds (for garnish)
  • cooked rice or quinoa for serving

Instructions 

  • Whisk soy sauce, honey, garlic, ginger, olive oil, salt, and pepper.
  • Marinate salmon for 15 minutes.
  • Grill or bake salmon until cooked through, about 5-6 minutes per side or 12-15 minutes in oven.
  • Garnish with green onions and sesame seeds, then serve over rice or quinoa.

Notes

For extra flavor, add a squeeze of lime before serving.
Calories: 350kcal
Cost: $15
Course: Main Course
Cuisine: Asian-inspired
Keyword: Salmon

Loved this recipe? Save it to your favorite Pinterest board so you can easily find it later! It’s the perfect way to keep all your sweet ideas in one place. ✨

Mouthwatering salmon dinner, showcasing a shiny glaze and side of rice, with a cozy blurred background.

Why You’ll Love This Recipe

Cinnamon Roll Twists made from crescent roll dough are the embodiment of comfort baking. With their flaky golden exterior and sweet cinnamon-sugar inside, these delightful treats are perfect for any occasion. Whether it’s a lazy Sunday morning or a festive gathering, these twists are sure to bring smiles and satisfy cravings. They’re not just easy to make, but they also fill your home with an irresistible aroma that beckons everyone to the kitchen. Plus, they’re versatile enough to adapt to your taste preferences or whatever ingredients you’ve got on hand.

Key Ingredients

Before we dive into the magic of making these twists, let’s talk about the key ingredients that make this recipe shine:

  • 1 can of refrigerated crescent roll dough: This is the star of the show! Its flaky texture provides the perfect base for our sweet filling.
  • 1/4 cup granulated sugar: Sweetness is essential, and this sugar will caramelize slightly during baking.
  • 2 teaspoons ground cinnamon: The warm spice that pairs perfectly with the sugar and brings that cozy flavor.
  • 2 tablespoons melted butter: This adds richness and helps the sugar adhere, creating that delightful, gooey center.
  • Optional: icing for drizzling: A simple icing can elevate these twists, giving them a sweet finish that’s hard to resist.

How to Make Crescent Roll Cinnamon Twists

Flaky and twisted cinnamon rolls made from crescent dough, illuminated by warm natural light.

Now that we have our ingredients ready, it’s time to roll up our sleeves and get baking! Follow these steps for a foolproof way to create these delicious twists:

  1. Preheat your oven: Set it to 375°F (190°C). A hot oven is crucial for achieving that golden, flaky texture.
  2. Unroll the crescent roll dough: Carefully separate the dough into triangles on a clean surface. Be gentle to keep the dough intact.
  3. Mix sugar and cinnamon: In a small bowl, combine the granulated sugar and ground cinnamon. This is the magic dust that will transform your dough!
  4. Brush with butter: Use a pastry brush to apply melted butter generously over each triangle. This step not only adds flavor but also helps the sugar mixture stick.
  5. Sprinkle the cinnamon sugar: Evenly sprinkle the cinnamon-sugar mixture over the buttered dough. Don’t skimp—this is where the flavor comes from!
  6. Roll it up: Starting from the wide end, tightly roll up each triangle into a crescent shape. Ensure they are sealed well to keep the filling inside.
  7. Create the twist: Twist each rolled triangle a few times to create a beautiful spiral shape. It’s okay if they look a little rustic—homemade is charming!
  8. Arrange on a baking sheet: Place your twists on a baking sheet lined with parchment paper, giving them enough space to expand while baking.
  9. Bake: Pop them into the preheated oven and bake for 10-12 minutes or until they are golden brown and the sugar starts to caramelize.
  10. Cool and glaze: Once out of the oven, let them cool slightly before drizzling with icing, if desired. This step is optional, but it adds a lovely finish.

Serving Suggestions

These cinnamon twists are incredibly versatile and can be enjoyed in various ways:

  • Breakfast Treat: Serve them warm alongside a cup of coffee or tea for a delightful breakfast.
  • Brunch Delight: Perfect for brunch gatherings, these twists will impress your guests and have them asking for the recipe!
  • Snack Time: Enjoy them as a sweet afternoon snack, paired with a glass of milk or a hot cocoa.
  • Holiday Gatherings: Add festive flair by incorporating chopped nuts or dried fruits into the filling for special occasions.

How to Store Your Twists

To keep your cinnamon twists fresh and delicious:

  • Room Temperature: Store any leftovers in an airtight container at room temperature for up to 3 days.
  • Refrigeration: If you want to extend their shelf life, they can be refrigerated for about a week.
  • Freezing: For longer storage, freeze the twists for up to 2 months. To reheat, simply pop them in the oven at 350°F (175°C) for about 5-10 minutes.

Tips for Success

  • Don’t skip the butter: It’s essential for flavor and helps the sugar adhere perfectly.
  • Sprinkle generously: Don’t be shy with the cinnamon sugar—this is where the flavor really comes from!
  • Twist them well: The more you twist, the more layers you’ll have. This adds texture and makes them visually appealing.
  • Watch them closely: Ovens can vary, so keep an eye on your twists as they bake. You want them golden, not burnt!

Variations to Try

Feel free to get creative with this recipe! Here are some variations:

  • Nutty Add-Ins: Add chopped pecans or walnuts to the cinnamon sugar for a delightful crunch.
  • Fruit Flavors: Incorporate dried fruits such as raisins or cranberries for a fruity twist.
  • Chocolate Drizzle: For a decadent touch, drizzle melted chocolate over the top once they have cooled.
  • Herbal Infusion: Experiment with adding a pinch of nutmeg or cardamom to the sugar for an aromatic change.

Common Substitutions

If you find yourself lacking an ingredient, don’t fret! Here are some easy substitutions:

  • Butter: You can use margarine or coconut oil in place of butter for a dairy-free version.
  • Cinnamon: If you’re not a huge fan of cinnamon, try using pumpkin spice or ginger for a different flavor profile.
  • Granulated Sugar: Brown sugar can be swapped for granulated sugar, adding a deeper flavor to your twists.
  • Crescent Roll Dough: If you have puff pastry or biscuit dough, those can also work, though the texture will vary slightly.

FAQs

Can I make these cinnamon twists ahead of time?

Absolutely! You can prepare the twists and store them in the fridge before baking. Just bake them fresh when you’re ready to serve.

What if I don’t have icing sugar for the glaze?

No worries! You can simply dust them with powdered sugar instead for a sweet touch.

Can I use a different type of dough instead of crescent roll dough?

Yes, you can try puff pastry for a flakier texture, but keep in mind that baking times may vary.

How long do leftovers last?

They’ll stay fresh in an airtight container at room temperature for up to 3 days, or you can refrigerate them for about a week.

Can I freeze the cinnamon twists?

Yes! They freeze beautifully. Just wrap them tightly and store in an airtight container for up to 2 months.

Conclusion

These Crescent Roll Cinnamon Twists are a delightful way to bring a touch of magic to your kitchen. With their flaky layers and sweet cinnamon filling, they’re sure to be a hit with family and friends. They’re easy to whip up, making them perfect for any occasion, from cozy breakfasts to festive gatherings. So gather your ingredients and let’s make some cinnamon magic happen! If you try this recipe, I’d love to hear how it turns out—drop a comment and share your twists on this classic treat. Happy baking!

Crescent Roll Cinnamon Twists

Prep Time 10 minutes
Cook Time 12 minutes
Total Time 22 minutes
Servings 8 pieces
Calories 150
Delight in these easy, flaky cinnamon twists made with refrigerated crescent roll dough, perfect for a quick treat or breakfast.

Ingredients

Dough

  • 1 can refrigerated crescent roll dough
  • 0.25 cup granulated sugar
  • 2 teaspoons ground cinnamon
  • 2 tablespoons melted butter
  • optional icing for drizzling (optional)

Instructions 

  • Preheat oven to 375°F (190°C). Unroll dough and separate into triangles.
  • Mix sugar and cinnamon. Brush triangles with melted butter and sprinkle cinnamon sugar.
  • Roll up from wide end and twist into a spiral. Place on baking sheet.
  • Bake for 10-12 minutes until golden. Cool slightly and drizzle with icing if desired.

Notes

For extra flavor, add a sprinkle of powdered sugar or a drizzle of icing.
Calories: 150kcal
Cost: $5
Course: Dessert
Cuisine: American
Keyword: Cinnamon, Crescent Roll

Loved this recipe? Save it to your favorite Pinterest board so you can easily find it later! It’s the perfect way to keep all your sweet ideas in one place. ✨

A deliciously twisted cinnamon roll displaying a rich texture and warm hues.

Welcome to my kitchen, where magic happens one delicious recipe at a time! Today, we’re diving into a timeless classic: Southern fruit cobbler. This dish is more than just a dessert; it’s a warm hug on a plate, a comforting reminder of family gatherings, and a delightful way to celebrate the fruits of the season. Whether you’re a seasoned baker or just starting out, this cobbler is the perfect recipe to bring a little joy into your kitchen. So, roll up your sleeves and let’s create something unforgettable!

Why You’ll Love This Recipe

This Southern fruit cobbler isn’t just a feast for the taste buds; it’s an experience! Here’s why this recipe will become your go-to:

  • Easy to Follow: Even if you’re a beginner, this recipe breaks down each step so that you can confidently whip it up.
  • Customizable: Use whatever fruit is in season or whatever you have in your pantry—peaches, berries, or even apples!
  • Perfect for Any Occasion: Whether it’s a family gathering, a holiday feast, or a cozy night in, this cobbler fits right in.
  • Deliciously Comforting: The warm, buttery topping over sweet, juicy fruit is pure comfort food.
  • Make Ahead Friendly: Prepare it in advance and pop it in the oven just before serving for an effortless dessert.

Ingredients for Southern Fruit Cobbler

Let’s gather our ingredients! Here’s what you’ll need for the classic Southern fruit cobbler:

  • 4 cups fruit: Choose from peaches, strawberries, blueberries, or blackberries—fresh or frozen will work!
  • 1 cup sugar: This will sweeten the fruit and the batter. You can adjust based on your sweetness preference.
  • 1 tablespoon lemon juice: A splash of acidity brightens the flavors.
  • 1 cup all-purpose flour: The base of our delicious batter.
  • 1 teaspoon baking powder: This will help the batter rise beautifully.
  • 1/4 teaspoon salt: Enhances the overall flavor.
  • 1/2 cup milk: Adds moisture for a lovely texture.
  • 1/4 cup melted butter: Because butter makes everything better!

How to Make Southern Fruit Cobbler

Ready to make some magic? Let’s walk through the steps together!

Prep Time: 15 minutes | Cook Time: 35-40 minutes | Total Time: 1 hour

Step 1: Preheat and Prep

First things first, preheat your oven to 350°F (175°C). Grease a 9×9-inch baking dish with butter or non-stick spray.

Step 2: Mix the Fruit Filling

In a large bowl, toss your chosen fruit with 1/2 cup of sugar and the lemon juice. Spoon this delightful mixture into your greased baking dish.

Step 3: Make the Batter

In a separate medium bowl, combine the flour, remaining 1/2 cup of sugar, baking powder, and salt. Pour in the milk and melted butter, mixing until the batter is smooth and well combined.

Step 4: Pour Over Fruit

Gently pour the batter evenly over the prepared fruit. Don’t worry about covering the fruit completely; it’ll spread as it bakes.

Step 5: Bake It

Pop it in the oven and bake for 35-40 minutes, or until the top is golden brown and the batter is set. You’ll know it’s ready when the kitchen smells like heaven!

Step 6: Serve and Enjoy

Let it cool slightly before serving. Pair your cobbler with a scoop of vanilla ice cream or a dollop of whipped cream for a truly indulgent treat!

Pro Tips for Perfecting Your Cobbler

Side view of a warm Southern fruit cobbler, showcasing vibrant fruit filling and a flaky top crust.

Want to elevate your cobbler game? Here are some expert insights:

  • Use Seasonal Fruit: Fresh, in-season fruit will give you the best flavor. Think summer berries or juicy peaches!
  • Try Different Sugars: Experiment with brown sugar or coconut sugar for a deeper flavor.
  • Don’t Overmix: When making the batter, mix just until combined to keep it light and fluffy.
  • Let It Rest: Allowing your cobbler to cool for a few minutes will help the filling thicken up a bit.
  • Add Spices: A sprinkle of cinnamon or nutmeg can add a lovely warmth to the fruit filling.
  • Gluten-Free Option: Substitute all-purpose flour with a 1:1 gluten-free flour blend.
  • Fruit Combinations: Mix and match your fruits for a more complex flavor profile—berries with peaches is a personal favorite!
  • Top with Oats: For a crunchier topping, mix oats into the batter or sprinkle them on top before baking.

Common Mistakes and Troubleshooting

Even the best of us can run into a few hiccups. Here’s how to avoid common pitfalls:

  • Overbaking: Keep an eye on the cobbler; if it’s getting too dark on top but isn’t set in the middle, cover it with foil.
  • Runny Filling: If your cobbler is too runny, try letting it cool longer to allow it to thicken.
  • Too Sweet or Not Sweet Enough: Adjust the sugar based on your fruit’s natural sweetness. Taste as you go!
  • Heavy Batter: If your batter is too thick, add a splash more milk for the right consistency.

Variations to Try

Feel like experimenting? Here are some fun twists on the classic recipe:

  • Pineapple Coconut Cobbler: Replace the fruit with canned pineapple and add shredded coconut for a tropical flavor.
  • Mixed Berry Cobbler: Use a combination of raspberries, blackberries, and blueberries for a berry medley.
  • Apple Cinnamon Cobbler: Swap in sliced apples and add a teaspoon of cinnamon to the batter for a cozy fall vibe.
  • Peach and Ginger Cobbler: Add diced ginger or ginger ale to the fruit filling for a spicy kick.

Storage and Make-Ahead Instructions

This cobbler can be made ahead and stored for later enjoyment:

  • Refrigerator: Store leftovers in an airtight container for up to 3 days.
  • Freezer: You can freeze the unbaked cobbler for up to 3 months. Just thaw and bake when you’re ready!
  • Reheating: Warm in the oven at 350°F until heated through, about 15-20 minutes.

Comprehensive FAQ

Got questions? I’ve got answers!

  • Can I use frozen fruit? Absolutely! Just toss it in straight from the freezer without thawing.
  • What’s the best way to serve it? I recommend warm with a scoop of vanilla ice cream or whipped cream on top.
  • Can I double the recipe? Yes, just use a larger baking dish and adjust the baking time as needed.
  • How do I know when it’s done? The top should be golden brown and the batter set, not jiggly.
  • Can I make it vegan? Substitute milk with almond milk and use a flax egg as a binder.
  • What fruits work best? Peaches and berries are favorites, but feel free to experiment!
  • Should I peel the fruit? For apples and peaches, peeling is optional. It adds texture and fiber if you leave the skin on!
  • What if I don’t have a baking dish? You can use a cast-iron skillet or any oven-safe dish you have on hand!

Nutrition Tips and Dietary Adaptations

If you’re watching your diet, here are some tips:

  • Lower Sugar: Use less sugar or natural sweeteners like honey or maple syrup.
  • Whole Wheat Flour: For added fiber, swap out half of the all-purpose flour for whole wheat flour.
  • Dairy-Free: Use non-dairy milk and butter alternatives to keep it dairy-free.
  • Portion Control: Serve in smaller portions if you’re looking to indulge without overdoing it.

Equipment Recommendations

To make your cobbler, here’s what you’ll need:

  • Baking Dish: A 9×9-inch glass or ceramic dish works perfectly.
  • Mixing Bowls: Having a few different sizes will help keep things organized.
  • Spatula: For spreading the batter evenly over the fruit.
  • Measuring Cups and Spoons: Accurate measurements lead to delicious results!

Serving Suggestions

Once your cobbler is ready, consider these serving ideas:

  • A La Mode: Top with a scoop of vanilla ice cream for a classic touch.
  • With Whipped Cream: A dollop of freshly whipped cream adds a lovely lightness.
  • Drizzle with Caramel: For a sweet twist, drizzle some warm caramel sauce over the top.
  • Fresh Mint: Garnish with fresh mint leaves for a pop of color and freshness.

In conclusion, my friends, this Southern fruit cobbler is more than just a recipe; it’s a dish that brings people together and creates lasting memories. I hope you feel inspired to bring this charming dessert into your own kitchen. Trust me, once you take that first bite, you’ll be transported back to simpler times, filled with laughter and love. So gather your ingredients, invite some friends over, and let’s make some magic happen in the kitchen!

Classic Southern Fruit Cobbler

Prep Time 10 minutes
Cook Time 40 minutes
Total Time 50 minutes
Servings 8 pieces
Calories 250
A warm, comforting dessert featuring juicy fruit topped with a golden batter, perfect for any occasion.

Ingredients

Fruit

  • 4 cups fruit (peaches, strawberries, blueberries, or blackberries)
  • 1 cup sugar
  • 1 tablespoon lemon juice
  • 1 cup all-purpose flour
  • 1 teaspoon baking powder
  • 0.25 teaspoon salt
  • 1 cup milk
  • 0.25 cup melted butter

Instructions 

  • Preheat oven to 350°F (175°C).
  • Toss fruit with 1/2 cup sugar and lemon juice; place in a greased baking dish.
  • Mix flour, remaining 1/2 cup sugar, baking powder, and salt; add milk and melted butter to form batter.
  • Pour batter over fruit and bake for 35-40 minutes until golden.
  • Serve warm with ice cream or whipped cream.

Notes

You can use any seasonal fruit for variation.
Calories: 250kcal
Cost: $12
Course: Dessert
Cuisine: Southern
Keyword: cobbler, fruit