Author

Ava

Browsing

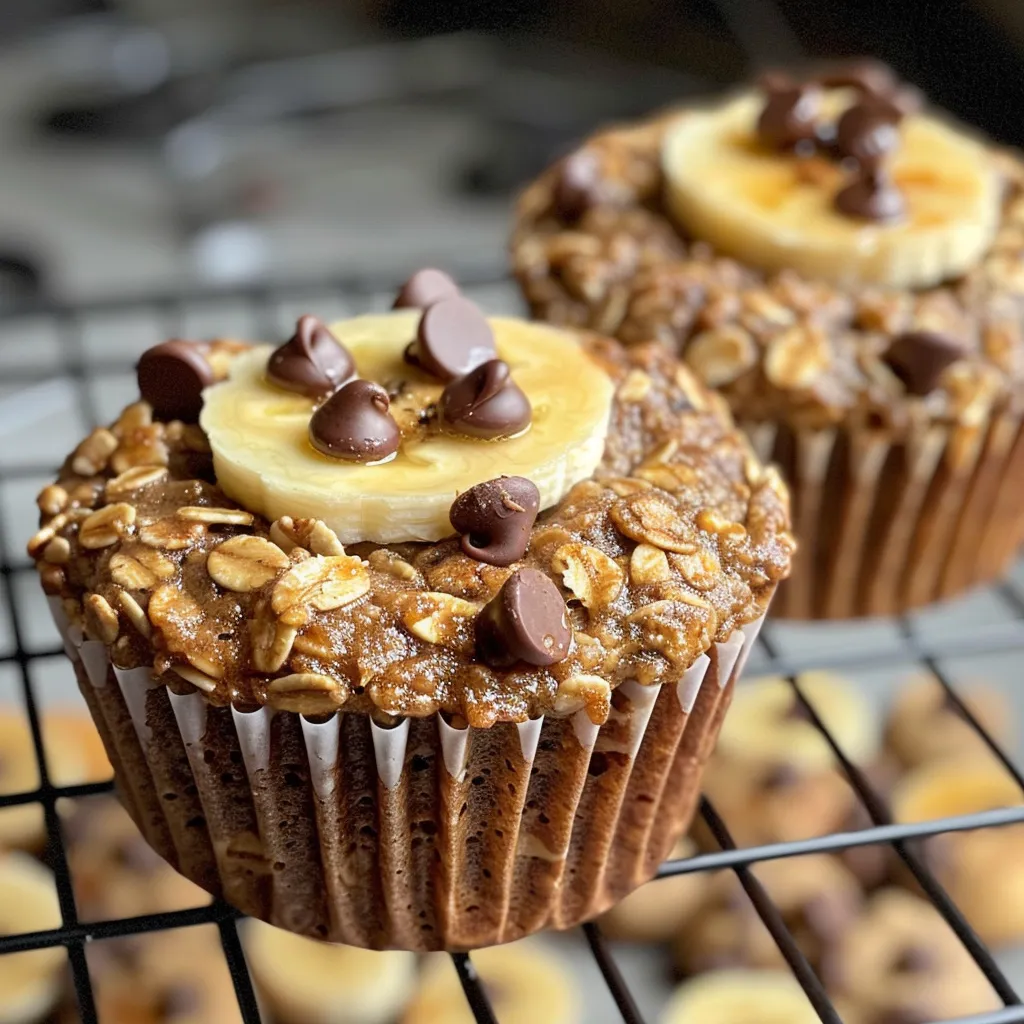
Start Your Day Right with Oatmeal Breakfast Muffins

Welcome to the cozy corner of my kitchen, where the aroma of freshly baked muffins dances through the air and wraps around you like a warm hug. If you’re looking for a delightful and nutritious way to jumpstart your mornings, you’ve landed in the right spot! These Oatmeal Breakfast Muffins are not just muffins—they’re a sweet embrace of comfort and nourishment that will brighten your day. With the perfect balance of ripe bananas, rolled oats, and a sprinkle of chocolate chips, these muffins are a delicious way to fuel your body and soul.

In this comprehensive guide, I’ll walk you through everything you need to know to whip up these magical muffins. Whether you’re a seasoned baker or just starting out, I promise you’ll find joy in every step. Let’s dive in!

Why You’ll Love This Recipe

  • Wholesome Ingredients: Made with rolled oats and ripe bananas, these muffins offer a healthy start to your day without sacrificing flavor.
  • Quick and Easy: With just a few simple steps, you can have a batch of muffins ready in no time—perfect for busy mornings!
  • Customizable: Feel free to mix in your favorite add-ins, from nuts to dried fruits; the possibilities are endless!
  • Freezable: Make a double batch and freeze half for those mornings when you need a quick breakfast solution.
  • Kid-Friendly: These muffins are a hit with kids, making them an excellent choice for family breakfasts or lunchbox treats.

Ingredient Breakdown

Here’s what you’ll need to create your Oatmeal Breakfast Muffins:

  • Rolled Oats (2 cups): The heart of this recipe, providing fiber and a chewy texture. You can substitute with quick oats for a softer muffin.
  • Ripe Bananas (2): They add natural sweetness and moisture. Overripe bananas work best; you want them to be mushy!
  • Chocolate Chips (½ cup): Because who doesn’t love a little chocolate? You can use dark, milk, or even white chocolate, depending on your preference.
  • Flour (1 ½ cups): All-purpose flour gives the muffins structure. For a healthier twist, try whole wheat flour or a gluten-free blend.
  • Eggs (2 large): They help bind the ingredients together. If you’re vegan, replace them with flax eggs (1 tablespoon flaxseed meal + 2.5 tablespoons water per egg).
  • Baking Powder (2 teaspoons): This is your leavening agent, giving the muffins a nice rise.
  • Milk (¾ cup): Dairy or non-dairy, this adds moisture. Almond milk or oat milk works great if you’re going dairy-free!
  • Honey or Maple Syrup (2 tablespoons): A touch of sweetness. Feel free to adjust based on your taste preferences.
  • Vanilla Extract (1 teaspoon): Adds a lovely aromatic flavor that enhances the muffins.
  • Cinnamon (optional, ½ teaspoon): A warm spice that elevates the flavor profile; it’s optional but highly recommended!

Pro Tips for Perfect Muffins

Juicy and delicious baked oat cups with chocolate chips and a golden top.
  • Don’t Overmix: Gently combine your wet and dry ingredients. Overmixing can lead to tough muffins.
  • Use Room Temperature Ingredients: Eggs and milk should be at room temperature for a smoother batter.
  • Test for Doneness: Insert a toothpick into the center; it should come out clean when the muffins are done.
  • Let Them Cool: Allow muffins to cool in the pan for a few minutes before transferring them to a wire rack. This helps maintain their texture.
  • Experiment with Add-Ins: Add nuts, dried fruits, or even a swirl of peanut butter to customize each batch!
  • Use a Cookie Scoop: This ensures even distribution of the batter, resulting in uniformly sized muffins.
  • Check the Oven Temperature: An oven thermometer can help ensure your baking temperature is accurate.
  • Use Muffin Liners: They make for easy cleanup and help the muffins maintain their shape.

Avoid Common Mistakes

Here are some pitfalls to watch out for:

  • Using Unripe Bananas: They don’t provide the same sweetness or moisture. Choose bananas with lots of brown spots!
  • Skipping the Baking Powder: This is essential for fluffy muffins. Always check your baking powder’s expiration date.
  • Not Preheating Your Oven: This can affect how well your muffins rise. Always preheat for best results.
  • Overfilling the Muffin Cups: Fill them about ¾ full to allow space for rising.
  • Storing Incorrectly: Store muffins in an airtight container to keep them fresh for longer.

Delicious Variations

Feeling adventurous? Try these variations:

  • Nutty Banana Muffins: Add ½ cup of chopped walnuts or pecans for a delightful crunch.
  • Berry Blast Muffins: Swap in 1 cup of fresh or frozen berries for a fruity twist.
  • Peanut Butter Swirl Muffins: Add a dollop of peanut butter to the center of each muffin before baking for a surprise treat.
  • Spiced Pumpkin Muffins: Substitute 1 cup of pumpkin puree for the bananas and add pumpkin spice for a fall-inspired flavor!

Storage and Make-Ahead Instructions

These muffins are perfect for meal prep! Here’s how to store them:

  • Room Temperature: Store in an airtight container for up to 3 days.
  • Refrigerator: Keep in the fridge for up to a week to extend freshness.
  • Freezing: Freeze muffins in a single layer on a baking sheet, then transfer to a zip-top bag. They can be frozen for up to 3 months. Just thaw and enjoy!

Frequently Asked Questions

  • Can I use quick oats instead of rolled oats? Yes, but the texture will be softer. Rolled oats provide a chewier bite.
  • Can I make these muffins vegan? Absolutely! Substitute eggs with flax eggs and use non-dairy milk.
  • What’s the best way to ripen bananas? Place them in a brown paper bag at room temperature. They’ll ripen faster!
  • How can I make these muffins gluten-free? Use a gluten-free all-purpose flour blend in place of regular flour.
  • Can I add protein powder? Yes, just replace a portion of the flour to maintain texture.
  • How do I know when the muffins are done? A toothpick inserted in the center should come out clean or with a few crumbs.
  • Can I substitute honey for sugar? Yes! Use about ¾ cup of honey for every cup of sugar, but reduce the liquid in the recipe slightly.
  • What’s the best way to reheat frozen muffins? Microwave them for about 30 seconds or place them in a preheated oven at 350°F (175°C) until warm.

Nutritional Benefits and Dietary Adaptations

These muffins are not only delicious but also packed with nutrients:

  • High Fiber: The rolled oats and bananas provide a good dose of dietary fiber, aiding digestion.
  • Natural Sweetness: Using ripe bananas reduces the need for added sugars, making these muffins a healthier choice.
  • Protein Source: Eggs add essential protein, which is crucial for muscle repair and growth.
  • Rich in Antioxidants: Dark chocolate chips can provide antioxidants, contributing to overall health.

Equipment Recommendations

To make your baking experience smooth, here are some must-have tools:

  • Muffin Tin: A standard 12-cup muffin tin is essential for baking these treats.
  • Mixing Bowls: Have a few bowls on hand—one for dry ingredients, one for wet, and a larger one for mixing.
  • Whisk: A good whisk is crucial for combining ingredients smoothly.
  • Silicone Spatula: Perfect for folding ingredients without deflating the batter.
  • Cooling Rack: Essential for letting your muffins cool completely and preventing sogginess.

Serving Suggestions

Serve these muffins warm with a drizzle of honey or a smear of nut butter for an extra layer of flavor. Pair them with a steaming cup of coffee or a refreshing smoothie for a balanced breakfast. You can even crumble them over yogurt or oatmeal for a delightful twist!

Conclusion

There you have it! A warm, inviting recipe for Oatmeal Breakfast Muffins that’s sure to become a staple in your kitchen. These muffins are not just food; they’re a way to create moments of joy and comfort, one bite at a time. So gather your ingredients, put on your favorite apron, and let’s bake some magic together! Remember, cooking is all about love and sharing, so don’t forget to share these muffins with someone special. Happy baking!

Oatmeal Breakfast Muffins (Chocolate Baked Oat Cups)

Prep Time 10 minutes
Cook Time 25 minutes
Total Time 35 minutes
Servings 12 muffins
Calories 180
Start your day with these healthy and delicious oatmeal muffins packed with bananas and chocolate chips, perfect for a quick breakfast or snack.

Ingredients

Dry Ingredients

  • 2 cups Rolled Oats
  • 1.5 cups Flour
  • 2 teaspoons Baking Powder
  • 0.5 teaspoon Cinnamon (optional)

Wet Ingredients

  • 2 ripe Bananas
  • 2 large Eggs
  • 0.75 cup Milk
  • 2 tablespoons Honey or Maple Syrup
  • 1 teaspoon Vanilla Extract
  • 0.5 teaspoon Cinnamon (optional)

Add-ins

  • 0.5 cup Chocolate Chips

Instructions 

  • Preheat oven to 350°F (175°C) and prepare a muffin tin.
  • Mash bananas, then mix with eggs, milk, honey, and vanilla.
  • Combine dry ingredients in a bowl. Mix into wet ingredients and fold in chocolate chips.
  • Divide batter into muffin cups, filling ¾ full. Top with oats if desired.
  • Bake for 20-25 minutes until golden and a toothpick comes out clean. Cool before serving.

Notes

For added flavor, sprinkle some oats on top before baking.
Calories: 180kcal
Cost: $10
Course: Breakfast
Cuisine: American
Keyword: oats

Why You’ll Love These Portobello Mushroom Pizzas

Hey there, fellow food lovers! If you’re anything like me, you’re always on the lookout for quick, delicious meals that make your heart sing and your taste buds dance. Well, pull up a chair because I’m about to share a recipe that’ll do just that. Enter the Amazing 30-Minute Portobello Mushroom Pizzas—your new go-to for cozy dinners that are not just easy to whip up but also bursting with flavor!

Why do I adore this recipe? Let me count the ways! First off, it’s a fantastic option for anyone, whether you’re a busy parent, a student cramming for exams, or just someone who wants to enjoy a hearty meal without spending hours in the kitchen. Plus, these pizzas are low-carb, making them a fabulous choice for those following a keto diet or anyone looking to cut back on carbs without sacrificing taste.

And let’s not forget the star of the show—the portobello mushrooms! They serve as the perfect pizza base, offering a meaty texture that holds up beautifully under all those delicious toppings. Trust me, once you take a bite, you’ll be hooked!

The Irresistible Charm of Portobello Mushroom Pizzas

Picture this: you’ve had a long day, and the last thing you want to do is spend hours slaving over a hot stove. Enter these portobello mushroom pizzas, which come together in just 30 minutes! The best part? You can customize them to suit your taste preferences or what you have on hand. From savory toppings like cooked sausage to fresh veggies like bell peppers and onions, the options are endless!

Not only are they quick and customizable, but they also present beautifully. Imagine serving these colorful, cheesy, and aromatic pizzas to your family or friends. They’ll be none the wiser about how easy they were to make! Plus, you’ll feel like a culinary wizard, and who doesn’t love that?

Essential Ingredients for Your Portobello Mushroom Pizzas

A delicious Portobello Mushroom Pizza featuring a golden crust, colorful toppings, and fresh basil garnish.

To make these delightful pizzas, you’ll need the following ingredients:

  • 4 large portobello mushroom caps, stems removed
  • 1 tablespoon olive oil
  • Salt and pepper to taste
  • 1/2 cup low-sugar tomato sauce or pizza sauce
  • 1 cup shredded mozzarella cheese
  • 1/4 cup grated parmesan cheese
  • Your favorite low-carb toppings (e.g., sliced bell peppers, onions, olives, cooked sausage)
  • Fresh basil leaves for garnish

These ingredients are not just basic; they’re flavorful! The combination of rich tomato sauce, gooey mozzarella, and the earthy taste of portobello mushrooms creates a mouthwatering dish that’s hard to resist.

Tools for Perfect Portobello Mushroom Pizzas

Before we dive into the cooking process, let’s chat about a few essential tools that will make your life easier:

  • Baking Sheet: A sturdy baking sheet is a must for this recipe. It’s where the magic happens!
  • Parchment Paper: Line your baking sheet with parchment paper for easy cleanup. Trust me, your future self will thank you.
  • Measuring Cups and Spoons: Accuracy is key in cooking, even in a recipe this simple!
  • Brush: A pastry brush is handy for spreading olive oil on the mushroom caps.

With these tools at the ready, you’re all set to create a delicious masterpiece!

Crafting Your Portobello Mushroom Pizzas: Step-by-Step

Alright, let’s get cooking! Follow these simple steps for a dinner that’s sure to impress:

  1. Preheat your oven to 400°F (200°C).
  2. Gently wipe the mushroom caps clean to remove any dirt. Place them gill-side up on a baking sheet lined with parchment paper.
  3. Brush the tops and undersides of the mushroom caps lightly with olive oil. Season with salt and pepper to taste.
  4. Bake the caps plain for 10 minutes to release some moisture. This step is crucial for achieving that perfect texture!
  5. Remove from the oven and spoon the tomato sauce evenly inside each mushroom cap.
  6. Sprinkle the shredded mozzarella and grated parmesan cheese over the sauce, allowing the cheese to melt beautifully.
  7. Add your chosen low-carb toppings over the cheese. Get creative here! You could even make a veggie pizza or a meaty one—whatever your heart (and stomach) desires.
  8. Return the pizzas to the oven and bake for another 10-15 minutes, or until the cheese is melted and bubbly, and the mushrooms are tender.
  9. Garnish with fresh basil before serving immediately. Enjoy every bite!

Tips for Success with Portobello Mushroom Pizzas

Here are a few tips to ensure your portobello mushroom pizzas turn out perfectly every time:

  • **Patience is Key:** Resist the urge to skip the initial baking of the mushroom caps. It prevents the pizzas from becoming soggy.
  • **Experiment with Toppings:** Don’t be afraid to try different combinations of toppings. You can even use leftovers from your fridge!
  • **Cheese Lovers Unite:** If you’re a cheese fanatic, feel free to add more cheese on top for extra gooeyness.
  • **Make It Spicy:** Add a sprinkle of red pepper flakes or a drizzle of hot sauce before serving for a spicy kick.

Variations to Consider

While I adore the classic version of these portobello mushroom pizzas, there are so many ways to switch things up:

  • **Mediterranean Style:** Top with feta cheese, black olives, and artichokes for a Mediterranean twist.
  • **BBQ Chicken:** Use shredded rotisserie chicken mixed with barbecue sauce as a topping for a smoky flavor.
  • **Caprese Delight:** Fresh tomatoes, mozzarella, and basil create a beautiful Caprese-inspired pizza.
  • **Buffalo Cauliflower:** Roast cauliflower with buffalo sauce and pile it on top for a spicy vegetarian option.

Substitutions You Can Make

If you’re missing some ingredients or want to make these pizzas even healthier, here are a few substitutions:

  • **Mushrooms:** If portobello mushrooms aren’t available, large portobello caps can be swapped for big button mushrooms.
  • **Sauce:** If you’re out of tomato sauce, try using pesto or even hummus for a unique flavor!
  • **Cheese:** For a dairy-free option, use vegan cheese or nutritional yeast for a cheesy flavor without the dairy.

Storage and Freezing Tips

If you happen to have leftovers (which is rare in my house), here’s how to store them:

  • **Refrigeration:** Place leftover portobello mushroom pizzas in an airtight container in the fridge. They’ll last for 2-3 days.
  • **Freezing:** To freeze, wrap each pizza tightly in plastic wrap and then place them in a freezer-safe bag. They’ll keep for up to a month. Just thaw and reheat in the oven when you’re ready to enjoy!

Frequently Asked Questions

Let’s tackle some common questions about these delicious portobello mushroom pizzas:

Can I prepare the toppings ahead of time?

Absolutely! You can chop your veggies, slice the meat, and even make the sauce a day in advance. Just store them in airtight containers in the fridge.

What sides pair well with these pizzas?

These mushrooms are fantastic on their own, but if you’d like to serve sides, consider a simple salad, roasted vegetables, or even a light soup.

Can I make these pizzas vegetarian?

Definitely! Just load them up with your favorite veggies, and you’ll have a delicious vegetarian meal.

Conclusion: A Cozy Dinner Awaits!

So there you have it—your guide to making Amazing 30-Minute Portobello Mushroom Pizzas! They are not only incredibly easy to prepare but also a satisfying and heartwarming meal that’s sure to impress family and friends alike. With just a handful of ingredients and a dash of creativity, you can create a dinner that’s both comforting and delicious.

As you gather around the table to enjoy your homemade pizzas, take a moment to appreciate the joy that cooking brings. Whether it’s sharing stories, laughter, or simply enjoying each other’s company, these portobello mushroom pizzas are bound to become a cherished part of your culinary repertoire. So, roll up your sleeves, get cooking, and let the deliciousness unfold! I can’t wait to hear how yours turn out—happy cooking!

Amazing 30-Minute Portobello Mushroom Pizzas

Prep Time 10 minutes
Cook Time 20 minutes
Total Time 30 minutes
Servings 4 pieces
Calories 250
Enjoy a quick and healthy pizza alternative with savory portobello mushrooms topped with cheese and your favorite low-carb toppings.

Ingredients

mushrooms

  • 4 large portobello mushroom caps (stems removed)
  • 1 tablespoon olive oil
  • salt and pepper to taste salt and pepper
  • 1/2 cup low-sugar tomato sauce or pizza sauce
  • 1 cup shredded mozzarella cheese
  • 1/4 cup grated parmesan cheese
  • your favorite low-carb toppings (e.g., sliced bell peppers, onions, olives, cooked sausage) low-carb toppings
  • fresh basil leaves for garnish fresh basil leaves

Instructions 

  • Preheat oven to 400°F (200°C).
  • Clean mushroom caps, place gill-side up on a parchment-lined baking sheet, and brush with olive oil. Season with salt and pepper.
  • Bake for 10 minutes, then remove from oven.
  • Spread tomato sauce inside each mushroom, top with cheese, add toppings, and bake for another 10-15 minutes until bubbly and tender.
  • Garnish with basil and serve immediately.

Notes

Use fresh basil for best flavor and customize toppings to your preference.
Calories: 250kcal
Cost: $12
Course: Main Course
Cuisine: American
Keyword: Low-Carb, pizza, Portobello Mushroom

Loved this recipe? Save it to your favorite Pinterest board so you can easily find it later! It’s the perfect way to keep all your sweet ideas in one place. ✨

Eye-level shot of a savory Portobello Mushroom Pizza, showcasing rich tomato sauce and gooey mozzarella.

Why You’ll Fall for This Dish

There’s something magical about a dish that can effortlessly blend sweet and savory flavors, and Honey Garlic Baked Salmon is just that. If you’ve ever found yourself wondering how to elevate your dinner game without spending hours in the kitchen, then you’re in for a treat. This recipe is not only simple to prepare but also delivers impressive results that will leave your taste buds dancing. Imagine tender, flaky salmon drizzled with a sticky, sweet glaze that brings out the fish’s natural richness. It’s comfort food at its finest—a dish that will quickly become a staple on your dinner table.

Ingredients You’ll Need

Before you dive into the cooking process, let’s gather our ingredients. You’ll need:

  • 4 salmon fillets
  • 1/4 cup honey
  • 1/4 cup soy sauce
  • 4 cloves garlic, minced
  • 1 tablespoon olive oil
  • 1 teaspoon sesame oil
  • Salt and pepper to taste
  • Chopped green onions for garnish

These ingredients are not only easy to find but they also come together to create a flavor explosion that will have your family asking for seconds (or thirds!).

Let’s Get Cooking!

A perfectly baked salmon fillet drizzled with honey garlic sauce, garnished with green onions.

Now that we have everything ready, it’s time to make your kitchen smell amazing. Here’s how to whip up this delectable dish:

  1. Preheat your oven: Set your oven to 375°F (190°C). This ensures that your salmon will cook evenly and get that perfect flaky texture.
  2. Prepare the sauce: In a small bowl, whisk together honey, soy sauce, minced garlic, olive oil, and sesame oil. This mixture is where the magic happens—sweet, savory, and oh-so-delicious!
  3. Season the salmon: Place the salmon fillets in a baking dish. Don’t forget to season them with a little salt and pepper to enhance the flavors.
  4. Pour on the glaze: Generously pour the honey garlic mixture over the salmon, ensuring every inch is coated. This is where you can get a little creative—don’t be shy!
  5. Bake: Pop the dish into your preheated oven and bake for 15-20 minutes. Keep an eye on it; your salmon is ready when it flakes easily with a fork.
  6. Garnish and serve: Once out of the oven, garnish your beautifully baked salmon with chopped green onions. This adds not only a pop of color but also a fresh crunch that complements the dish perfectly.

Tips for the Perfect Salmon

Here are some tips to ensure your Honey Garlic Baked Salmon turns out just right:

  • Choose fresh salmon: Always opt for fresh, high-quality salmon. The flavor and texture of the fish can greatly affect the outcome of your dish.
  • Marinate for deeper flavor: If you have a little extra time, consider marinating the salmon in the honey garlic mixture for 30 minutes to an hour before baking. This allows the flavors to penetrate the fish more deeply.
  • Watch the cooking time: Salmon can overcook quickly, so check it a couple of minutes before the 15-minute mark to ensure it doesn’t dry out.

Variations to Try

One of the joys of cooking is experimentation! Here are some variations to consider:

  • Add a kick: If you love a little heat, add some red pepper flakes or sriracha to the honey garlic sauce.
  • Try different fish: While salmon is the star of this recipe, you can also use other fish like trout or halibut. Just adjust cooking times accordingly.
  • Roasted vegetables: Consider adding some seasonal vegetables, like asparagus or broccoli, to the baking dish. They’ll soak up some of that delicious sauce while cooking alongside the salmon.

Substitutions You Can Make

If you’re missing an ingredient or looking to make some adjustments, here are some substitutions:

  • Honey: Maple syrup or agave nectar can be used in place of honey if you want a vegan option.
  • Soy sauce: If you’re looking for a gluten-free option, use tamari instead.
  • Garlic: Fresh garlic is best, but if you’re in a pinch, garlic powder will do.

Essential Equipment

To make this recipe, you’ll need the following equipment:

  • A baking dish (glass or ceramic works best)
  • A whisk for mixing the sauce
  • A small bowl for the sauce
  • A spatula or spoon for drizzling the sauce

Storage and Freezing Tips

If you’re lucky enough to have leftovers (or if you want to meal prep), here’s how to store your salmon:

  • Refrigerator: Store any leftover salmon in an airtight container in the fridge for up to 3 days.
  • Freezing: You can freeze the baked salmon for up to 2 months. Just make sure to wrap it tightly to prevent freezer burn. When ready to enjoy, thaw in the fridge overnight and reheat gently in the oven.

Frequently Asked Questions

Let’s tackle some common questions about this delightful dish:

  • Can I use frozen salmon? Absolutely! Just make sure to thaw it completely before baking.
  • What should I serve with this salmon? This dish pairs wonderfully with rice, quinoa, or a fresh salad. You can also serve it with roasted vegetables for a complete meal.
  • How do I know when the salmon is done? The salmon is done when it flakes easily with a fork and is opaque in the center. A meat thermometer should read 145°F (63°C).

Troubleshooting Common Issues

Here are a few common issues and how to fix them:

  • Salmon is dry: This can happen if it’s overcooked. Keep an eye on it while baking, and consider using a timer.
  • Flavors are bland: Make sure to properly season the salmon with salt and pepper before adding the glaze. You can also increase the amount of garlic or honey for a stronger flavor.

In Conclusion

Cooking should be a joyful experience, and this Honey Garlic Baked Salmon recipe embodies that spirit perfectly. It’s a dish that will not only impress your family and friends but also bring a little warmth and magic to your dinner table. So, don your apron, roll up your sleeves, and let’s create some delicious memories together. Trust me, once you whip this up, you might just find yourself dreaming of it long after the last bite! Happy cooking, my friend!

Honey Garlic Baked Salmon

Prep Time 10 minutes
Cook Time 20 minutes
Total Time 30 minutes
Servings 4 servings
Calories 350
This delicious baked salmon is infused with sweet honey and savory garlic, making it a perfect quick and healthy dinner.

Ingredients

Main ingredients

  • 4 fillets salmon fillets
  • 1/4 cup honey
  • 1/4 cup soy sauce
  • 4 cloves garlic, minced
  • 1 tablespoon olive oil
  • 1 teaspoon sesame oil
  • to taste salt and pepper (for seasoning)
  • for garnish chopped green onions

Instructions 

  • Preheat oven to 375°F (190°C).
  • Mix honey, soy sauce, garlic, olive oil, and sesame oil.
  • Season salmon with salt and pepper, place in baking dish, and pour sauce over.
  • Bake for 15-20 minutes until flaky.
  • Garnish with green onions before serving.

Notes

Serve with steamed rice or vegetables for a complete meal.
Calories: 350kcal
Cost: $15
Course: Main Course
Cuisine: American
Keyword: Salmon

Loved this recipe? Save it to your favorite Pinterest board so you can easily find it later! It’s the perfect way to keep all your sweet ideas in one place. ✨

Sizzling Honey Garlic Baked Salmon displayed artistically with a blurred cozy background.

Why This Dish Will Become Your New Favorite

Let me take you on a culinary journey—one that’s quick, cozy, and downright delicious. This Creamy Spinach Artichoke Chicken is not just a meal; it’s a delightful experience that brings together succulent chicken, creamy cheeses, and the vibrant freshness of spinach and artichokes. Picture this: a busy weeknight, the clock ticking, and you need a meal that feels like a warm embrace without spending hours in the kitchen. This recipe, ready in just 20 minutes, is your answer.

From the moment you start cooking, the savory aroma of garlic and melted cheese will wrap around your kitchen like a comforting hug. Each bite bursts with flavor, making it impossible not to feel happy. It’s the kind of dish that makes you pause, savor, and perhaps even go back for seconds (or thirds!). Plus, it’s so simple to prepare that you might just find yourself making it a weekly staple. Let’s dive into the details!

Ingredients You’ll Need

Gathering your ingredients is half the fun! Here’s what you’ll need for this creamy delight:

  • 2 boneless, skinless chicken breasts
  • 1 cup fresh spinach, chopped
  • 1 can (14 oz) artichoke hearts, drained and chopped
  • 1/2 cup cream cheese, softened
  • 1/2 cup grated Parmesan cheese
  • 1/2 cup mozzarella cheese, shredded
  • 2 cloves garlic, minced
  • 1 tablespoon olive oil
  • Salt and pepper to taste
  • Optional: red pepper flakes for a little heat

Step-by-Step Instructions

Plate of spinach artichoke chicken with a rich, creamy sauce and vibrant greens.

Now that you have your ingredients ready, let’s get cooking! Follow these steps to create a dish that’s sure to impress:

  1. Heat Things Up: In a large skillet, heat the olive oil over medium heat. It should be hot enough that a drop of water sizzles when it hits the surface.
  2. Season the Chicken: While the skillet heats, season your chicken breasts generously with salt and pepper. This enhances their natural flavor and gives them a delicious crust.
  3. Cook the Chicken: Add the chicken breasts to the skillet and cook for about 5-6 minutes on each side, until they are golden brown and no longer pink in the center. Once cooked, remove them from the skillet and set aside.
  4. Bring on the Garlic: In the same skillet, add the minced garlic and sauté for about 30 seconds until fragrant. Be careful not to let it brown; we want to keep that fresh garlic flavor.
  5. Add the Greens: Toss in the chopped spinach and artichoke hearts, cooking for 2-3 minutes until the spinach wilts down and everything is nicely combined.
  6. Make It Creamy: Lower the heat and mix in the softened cream cheese, Parmesan cheese, and half of the mozzarella. Stir until it’s all melted and creamy, creating a luscious sauce.
  7. Reintroduce the Chicken: Slice the cooked chicken and return it to the skillet, coating each piece with that dreamy creamy mixture.
  8. Finish with Cheese: Sprinkle the remaining mozzarella on top and cover the skillet for a minute, allowing the cheese to melt beautifully.

And just like that, you have a plate of Creamy Spinach Artichoke Chicken that’s ready to serve hot! Trust me, your taste buds will thank you.

Serving Suggestions

This dish is versatile and pairs wonderfully with various sides. Here are some suggestions to round out your meal:

  • Garlic Buttered Noodles: The buttery noodles soak up the creamy sauce perfectly.
  • Fluffy Rice: A bed of fluffy rice is another great option, providing a nice base for the creamy chicken.
  • Mashed Potatoes: Creamy mashed potatoes can elevate this dish to comfort food heaven.
  • Steamed Vegetables: For a lighter balance, serve alongside steamed or roasted vegetables like asparagus or green beans.
  • Fresh Salad: A crisp mixed green salad with a lemon vinaigrette adds a refreshing contrast.

Tips for Success

Here are some tips to ensure your Creamy Spinach Artichoke Chicken turns out perfectly every time:

  • Even Chicken Breasts: Pound the chicken breasts to an even thickness before cooking for uniform cooking.
  • Use Fresh Ingredients: Fresh spinach and artichokes make a significant difference in flavor and texture.
  • Don’t Rush the Sauce: Allow the sauce to heat gently to prevent curdling. Stir it constantly until creamy.

Variations and Substitutions

Feel free to mix things up! Here are some delicious variations and substitutions you can try:

  • Chicken Thighs: Substitute chicken breasts with thighs for extra juiciness and flavor.
  • Dairy-Free Option: Use coconut cream instead of cream cheese for a dairy-free version.
  • Cheese Swap: Experiment with different cheese blends—try gouda or feta for a twist!
  • Spice it Up: Add a pinch of red pepper flakes or a dash of hot sauce for a little kick.

Equipment You’ll Need

To whip up this delightful dish, you’ll need a few key pieces of kitchen equipment:

  • A large skillet for cooking
  • A sharp knife for slicing
  • A cutting board for prep
  • A spatula or wooden spoon for stirring

Storage and Freezing

Got leftovers? Here’s how to store your Creamy Spinach Artichoke Chicken:

Storing Leftovers

Store leftovers in an airtight container in the refrigerator. They’ll stay fresh for about 3-4 days.

Freezing

This dish freezes beautifully! Allow it to cool completely, then portion it into freezer-safe containers. It will keep for up to 3 months. To reheat, thaw overnight in the fridge and warm gently on the stove.

Reheating

When reheating, add a splash of cream or broth to restore creaminess. Heat on low to avoid scorching.

FAQs

Here are some common questions about this recipe:

Can I use frozen spinach and artichokes for this recipe?

Absolutely! Just make sure to thaw and drain them well before adding to the sauce to avoid excess water.

Is this recipe suitable for meal prep?

Yes! This dish reheats nicely, making it a great option for meal prep.

Can I make this recipe dairy-free?

Yes! Use coconut cream instead of cream cheese and nutritional yeast for a cheesy flavor.

What sides go best with the Creamy Spinach Artichoke Chicken?

Serve it with garlic butter noodles, roasted vegetables, or a refreshing salad for a balanced meal.

How do I know when the chicken is fully cooked?

The chicken is done when it’s golden brown and the internal temperature reaches 165°F. You can also cut into the thickest part to check for any pinkness.

Conclusion

If you’re looking for a dish that’s as comforting as it is delicious, this Creamy Spinach Artichoke Chicken is sure to become your go-to recipe. It’s quick, satisfying, and perfect for any occasion—whether you’re cooking for family or entertaining friends. I hope you enjoy making this dish as much as I do. Happy cooking, and remember, a little love in the kitchen goes a long way!

Creamy Spinach Artichoke Chicken Ready in 20 Minutes

Prep Time 5 minutes
Cook Time 15 minutes
Total Time 20 minutes
Servings 4 servings
Calories 450
A quick and delicious chicken dish loaded with spinach, artichokes, and creamy cheeses, perfect for a fast weeknight dinner.

Ingredients

Protein

  • 2 pieces boneless, skinless chicken breasts

Vegetables

  • 1 cup fresh spinach, chopped
  • 1 can (14 oz) artichoke hearts, drained and chopped

Dairy

  • 1/2 cup cream cheese, softened
  • 1/2 cup grated parmesan cheese
  • 1/2 cup mozzarella cheese, shredded

Other

  • 2 cloves garlic, minced
  • 1 tablespoon olive oil
  • to taste salt and pepper (for seasoning)
  • optional for heat red pepper flakes (garnish if desired)

Instructions 

  • Heat olive oil in a skillet, season chicken, and cook 5-6 minutes per side until done. Remove and set aside.
  • Sauté garlic in the same skillet for 30 seconds, then add spinach and artichokes, cooking 2-3 minutes.
  • Lower heat, stir in cream cheese, Parmesan, and half the mozzarella until melted.
  • Slice chicken, return to skillet, coat with sauce, sprinkle remaining mozzarella, cover, and cook 1 minute.
  • Serve hot, garnished with red pepper flakes if desired.

Notes

This dish comes together quickly with simple ingredients, making it perfect for busy weeknights.
Calories: 450kcal
Cost: $15
Course: Main Course
Cuisine: American
Keyword: Artichoke, Chicken, Spinach

Loved this recipe? Save it to your favorite Pinterest board so you can easily find it later! It’s the perfect way to keep all your sweet ideas in one place. ✨

Delicious chicken breasts smothered in a creamy spinach and artichoke mixture.

Welcome to the World of Egg Noodle Lasagna

Oh, Egg Noodle Lasagna! Just saying those words brings back memories of cozy family dinners, the aroma of bubbling cheese, and the joy of sharing a hearty meal. This recipe is not just about layers of noodles and sauce; it’s about warmth, comfort, and the magic that happens when you gather around the table. If you’re looking for a dish that combines simplicity with rich flavors, you’ve landed in the right place. In this article, I’ll take you on a delicious journey through the making of Egg Noodle Lasagna, offering tips, variations, and everything you need to create a meal that will leave everyone asking for seconds.

Why You’ll Love This Recipe

  • Simple Ingredients: No need for fancy or hard-to-find items! Everything you need is available at your local grocery store—perfect for any home cook.
  • Comfort Food Classic: This dish brings all the nostalgic flavors of traditional lasagna, layered with cheesy goodness that makes every bite feel like a warm hug.
  • Hearty and Filling: Packed with protein from ground beef and layers of noodles, it’s a dish that sustains and satisfies, ideal for family gatherings.
  • Flexible Recipe: Whether you want to make it vegetarian, swap the meat, or add extra veggies, the variations are endless, allowing you to customize it to your taste.
  • Slow Cooker Magic: Using a slow cooker means you can set it and forget it! Perfect for busy days when you want a home-cooked meal waiting for you.

Ingredient Breakdown

Let’s dive into what makes this Egg Noodle Lasagna so special.

  • Egg Noodles: 6-1/2 cups of uncooked wide egg noodles. These provide the perfect texture and hold the layers together beautifully. If you can’t find egg noodles, you can use lasagna sheets, but the texture will differ.
  • Ground Beef: 1-1/2 pounds of ground beef adds richness to the dish. For a healthier option, you can substitute with ground turkey or a plant-based alternative.
  • Spaghetti Sauce: 2-1/4 cups of your favorite spaghetti sauce. You can use store-bought for convenience or make your own for a fresher taste.
  • Velveeta Cheese: 6 ounces, cubed. This cheese melts beautifully and adds a creamy texture. If you prefer a different cheese, use cream cheese or ricotta for a slightly different flavor.
  • Shredded Mozzarella Cheese: 3 cups for that ooey-gooey factor. Feel free to mix in other cheeses like cheddar or provolone for a flavor twist.

How to Make Egg Noodle Lasagna

Appetizing egg noodle lasagna showcasing layers of ground beef and melted cheese.

Ready to get cooking? Here’s a step-by-step guide to crafting your own Egg Noodle Lasagna.

1. Cook the Noodles

Start by cooking the egg noodles according to the package directions. Once cooked, drain and toss them with 3 tablespoons of butter to prevent sticking. This simple step ensures your noodles are flavorful and delightful to eat!

2. Make the Meat Sauce

In a large skillet, cook the ground beef over medium heat until no longer pink. Drain any excess fat. This step is crucial to achieving a rich and hearty sauce. Stir in your spaghetti sauce and let it simmer for a few minutes to meld the flavors.

3. Layer It Up

In an ungreased 5-quart slow cooker, spread a fourth of the spaghetti sauce on the bottom. Then, layer with one-third of the noodles, one-third of the beef mixture, and one-third of the cheeses. Repeat the layers until all ingredients are used, finishing with a layer of cheese on top for that perfect golden crust.

4. Slow Cook to Perfection

Cover the slow cooker and cook on low for about 3 hours. The key here is patience! This allows all the flavors to combine beautifully, resulting in a dish that’s bubbling and delicious.

Pro Tips for the Perfect Egg Noodle Lasagna

  • Don’t Overcook Your Noodles: They should be al dente since they will continue cooking in the slow cooker.
  • Layering Technique: Ensure that every layer has a good amount of sauce and cheese to avoid dry bites.
  • Experiment with Veggies: Add spinach, zucchini, or mushrooms between the layers for added nutrition and flavor.
  • Let It Rest: After cooking, let the lasagna rest for about 10 minutes before serving. This helps it hold together when you slice it.
  • Leftovers? Yes, Please!: This dish tastes even better the next day, making it a perfect candidate for meal prep.
  • Cheese Swap: Feel free to try different cheeses! Gouda or a blend of Italian cheeses can elevate the flavor.
  • Spice It Up: Add red pepper flakes or Italian seasoning to the meat sauce for an extra kick.
  • Meal Prep Friendly: You can assemble the lasagna ahead of time and store it in the refrigerator until you’re ready to cook.

Common Mistakes and Troubleshooting

Even the best chefs have their off days! Here are a few things to watch out for:

  • Too Watery: If your lasagna comes out watery, it may be due to excess sauce. Try reducing the amount of sauce or draining some liquid from the meat.
  • Dry Layers: Ensure you have enough sauce between layers to keep everything moist and flavorful.
  • Cheese Not Melting: If your cheese doesn’t melt properly, consider covering the slow cooker for the last 30 minutes of cooking.

Variations to Try

This recipe is incredibly versatile! Here are a few creative ideas:

  • Vegetarian Delight: Substitute the ground beef with lentils, mushrooms, or a plant-based meat alternative for a delicious vegetarian lasagna.
  • Cheesy Spinach Lasagna: Add layers of fresh spinach or sautéed kale for a healthy twist.
  • Mexican Flare: Use enchilada sauce instead of spaghetti sauce and add black beans and corn for a zesty version.
  • Buffalo Chicken Lasagna: Swap ground beef for shredded buffalo chicken and use blue cheese for a spicy kick.

Storage and Make-Ahead Instructions

If you have leftovers (which I doubt you will!), store them in an airtight container in the refrigerator for up to 3 days. You can also freeze individual portions for up to 3 months. Just reheat in the oven or microwave until warmed through.

Frequently Asked Questions

  • Can I make this lasagna ahead of time? Yes! You can assemble it the night before and store it in the fridge. Just add a bit of extra cooking time.
  • What can I substitute for Velveeta? Cream cheese or ricotta can be used as alternatives for a creamier texture.
  • How do I know when it’s done? The cheese should be melted, and the edges should be bubbling.
  • Can I use whole wheat noodles? Absolutely! Whole wheat egg noodles add a nice, nutty flavor.
  • Is this recipe gluten-free? You can use gluten-free noodles to make it suitable for those with gluten sensitivities.
  • Can I add more cheese? The more cheese, the better! Feel free to sprinkle extra mozzarella or your favorite cheese on top.
  • What should I serve with lasagna? A simple green salad and garlic bread pair wonderfully with this dish.
  • How do I reheat leftovers? Use the oven for best results, but the microwave works in a pinch. Just cover with a damp paper towel to retain moisture.

Nutritional Tips and Dietary Adaptations

This Egg Noodle Lasagna can be made healthier with just a few tweaks. Consider the following:

  • Lean Proteins: Use ground turkey or chicken instead of beef for a lower-fat option.
  • Add Fiber: Incorporate veggies like spinach, carrots, or zucchini into the layers for added fiber and nutrients.
  • Cheese Alternatives: Use low-fat cheeses to reduce calories while still enjoying the creamy texture.

Essential Equipment

To create this masterpiece, you’ll need:

  • Slow Cooker: A good quality slow cooker is essential for even cooking and flavor melding.
  • Large Skillet: For browning the meat and making the sauce.
  • Cooking Pot: For boiling the noodles to the perfect texture.
  • Measuring Cups and Spoons: Accurate measuring ensures consistent results.

Serving Suggestions

When it’s time to serve, consider adding these delightful sides to elevate your meal:

  • Garlic Bread: A crispy, buttery accompaniment that complements the lasagna beautifully.
  • Simple Green Salad: A fresh salad with a light vinaigrette balances the richness of the lasagna.
  • Wine Pairing: A nice Chianti or Merlot pairs perfectly with the flavors of the beef and cheese.

So there you have it—a comprehensive guide to making Egg Noodle Lasagna that’s not just a meal, but an experience. I hope you find joy in crafting this dish in your kitchen, just as I have in mine. Remember, cooking is all about experimenting and making it your own, so don’t hesitate to add your personal touch. Now, gather your loved ones, serve this delightful dish, and let the magic unfold at your table!

Egg Noodle Lasagna

Prep Time 20 minutes
Cook Time 3 hours
Total Time 3 hours 20 minutes
Servings 8 servings
Calories 850
A hearty and cheesy lasagna made with wide egg noodles and a rich meat sauce, perfect for family dinners.

Ingredients

Pasta and Grains

  • 6-1/2 cups uncooked wide egg noodles
  • 3 tablespoons butter
  • 1-1/2 pounds ground beef
  • 2-1/4 cups spaghetti sauce
  • 6 ounces Velveeta, cubed
  • 3 cups shredded mozzarella cheese

Instructions 

  • Cook noodles according to package; drain. Toss with butter.
  • Cook beef until no longer pink; drain. Layer sauce, noodles, beef, and cheeses in slow cooker, repeating layers.
  • Cover and cook on low for 3 hours until cheese melts and dish is heated through.

Notes

For a creamier texture, add a layer of ricotta cheese between layers.
Calories: 850kcal
Cost: $15
Course: Main Course
Cuisine: Italian-American
Keyword: cheese, egg noodles, lasagna

Why This Dish Will Steal Your Heart

Picture this: it’s a busy weeknight, and you’re staring into the fridge, wondering what to throw together for dinner. You want something quick, but you also want to impress. Enter Crispy Honey Garlic Salmon. This dish is not just a meal; it’s a celebration of flavors that will elevate your dinner table and make your taste buds dance. In just 30 minutes, you can transform a simple salmon fillet into a gourmet experience that’s light, crispy, and bursting with sweetness and savory goodness.

This recipe combines the delightful crunch of perfectly cooked salmon skin with a honey garlic sauce that will have you questioning if you should really be eating this at home or if it’s time to book a table at your favorite restaurant. The best part? It’s all made in one skillet, so cleanup is a breeze—perfect for those of us who want to savor the flavor without the fuss.

So, whether you’re cooking for yourself or whipping up a meal for family and friends, this honey garlic salmon recipe is sure to impress. Let’s dive into the ingredients and get cooking!

Ingredients You’ll Need

For the best Crispy Honey Garlic Salmon, you’ll need:

  • 4 salmon fillets (wild-caught is preferable for flavor)
  • 2 tablespoons honey (sweetness that caramelizes beautifully)
  • 3 cloves garlic, minced (the aromatic superstar)
  • 2 tablespoons soy sauce (for that umami kick)
  • 1 tablespoon olive oil (to help achieve that crispy skin)
  • Salt and pepper to taste (the classic seasoning duo)
  • Chopped green onions for garnish (a splash of color and freshness)
  • Lemon wedges for serving (a bright finish)

Step-by-Step Instructions

An appetizing shot of honey garlic salmon, showcasing its golden crust and glossy sauce, set against a softly blurred background.

1. Prepare the Honey Garlic Sauce

Let’s start with the star of the show: the honey garlic sauce. In a small bowl, whisk together the honey, minced garlic, soy sauce, olive oil, and a pinch of salt and pepper. This sauce is what will elevate your salmon from good to absolutely mouthwatering, so don’t be shy with those flavors!

2. Get the Skillet Ready

Preheat a skillet over medium-high heat. You want it hot enough to give your salmon that beautiful sear. Add a drizzle of olive oil to the pan—this will help the skin get crispy and delicious.

3. Season Those Fillets

While the skillet heats up, season your salmon fillets generously with salt and pepper on both sides. This simple step is crucial for flavor, ensuring that every bite is savory and satisfying.

4. Cook the Salmon

Once your skillet is hot (you should hear a nice sizzle), place the salmon fillets skin-side down. Cook for about 4-5 minutes without moving them. This patience is key—the longer you let them sit, the crispier the skin will get!

5. Add the Sauce

After 4-5 minutes, flip the salmon fillets carefully. Pour the honey garlic sauce over the fillets and let it sizzle and bubble around them. Cook for an additional 3-4 minutes, basting the salmon with the sauce as it cooks. You’ll know it’s done when it flakes easily with a fork.

6. Garnish and Serve

Once cooked, remove the salmon from the heat and garnish with chopped green onions. Serve immediately with lemon wedges on the side for that zesty brightness. Your Crispy Honey Garlic Salmon is ready to be devoured!

Tips & Tricks for Perfect Salmon

Perfecting the Recipe

To ensure your salmon turns out perfectly every time, keep these tips in mind:

  • Pat it dry: Moisture is the enemy of crispy skin. Make sure to pat your salmon fillets with paper towels before seasoning.
  • High heat is key: Make sure your skillet is hot enough before adding the salmon. This promotes that lovely golden crust.
  • Baste wisely: While it’s tempting to drown the salmon in sauce, a light drizzle will do. You can always add more at the end!

Flavor Enhancements

If you want to take your dish to the next level, consider these tasty additions:

  • Fresh ginger: Grate a teaspoon of ginger into your sauce for a delightful zing.
  • Sesame oil: A splash of toasted sesame oil at the end can add a nutty depth.
  • Chili flakes: For a bit of heat, sprinkle some red pepper flakes over the top just before serving.

Common Mistakes to Avoid

To make sure you avoid any culinary disasters, keep these pointers in mind:

  • Don’t overcrowd the pan: If you’re making more than four fillets, do it in batches to ensure even cooking.
  • Skip the foil: Using parchment paper instead allows the skin to get crispy while preventing sticking.

Pro Tips

Lastly, here are some pro tips to help you shine in the kitchen:

  • Use a digital thermometer: Aim for an internal temperature of 125°F (52°C) for perfectly cooked salmon.
  • Let it rest: After cooking, give the salmon a few minutes to rest. This helps the juices redistribute, keeping it moist.

Delicious Variations

Ingredient Swaps

Feel free to play around with different ingredients. Here are some ideas:

  • Try using maple syrup or agave in place of honey for a different sweetness profile.
  • If you’re looking for a milder flavor, swap salmon for trout or Arctic char.

Dietary Adjustments

Whether you’re gluten-free, dairy-free, or following a keto diet, this recipe can easily adapt to your needs:

  • Use gluten-free soy sauce or tamari for a gluten-free version.
  • For keto, reduce the honey to one tablespoon and add a pinch of erythritol for sweetness.

Serving Suggestions

Pair your honey garlic salmon with sides that complement its rich flavors. Here are a few ideas:

  • Coconut-lime rice: The creaminess and zest balances the sweetness of the salmon perfectly.
  • Steamed veggies: Roasted asparagus or green beans offer a refreshing crunch.
  • Light salad: A simple mixed green salad with a vinaigrette can cut through the richness.

Storage and Freezing Tips

Leftover Storage

If you happen to have any leftovers (though I doubt it!), let them cool to room temperature, then store in an airtight container in the refrigerator for up to three days.

Reheating Instructions

To reheat, place the salmon on a baking sheet, cover loosely with foil, and warm in a 300°F (150°C) oven for 10-12 minutes. Alternatively, you can microwave it on medium power for 1-2 minutes, adding a splash of broth or extra glaze to keep it moist.

Frequently Asked Questions

Can I make this recipe ahead of time?

While it’s best enjoyed fresh, you can prep the sauce in advance and store it in the fridge. Just assemble and cook the salmon when you’re ready to eat.

What if I only have frozen salmon fillets?

No problem! Just thaw your fillets in the refrigerator overnight before cooking, and proceed with the recipe as usual.

What side dishes pair best with honey garlic salmon?

Great options include quinoa pilaf, buttery mashed cauliflower, or even a crusty sourdough to mop up the delicious sauce!

How do I know when the salmon is perfectly cooked?

When it flakes easily with a fork and reaches an internal temperature of 125°F (52°C), it’s perfectly cooked. Remember, it will continue to cook slightly after you remove it from the heat.

Final Thoughts

So there you have it! This Crispy Honey Garlic Salmon recipe is not just a meal; it’s a ticket to a cozy dinner that feels special without requiring hours in the kitchen. With just a handful of ingredients and a simple process, you can create a dish that’s not only healthy but also bursting with flavor. Whether it’s a weeknight dinner or a gathering with friends, it’s bound to impress. So, roll up your sleeves, grab your spatula, and let’s make some culinary magic together! Happy cooking!

Crispy Honey Garlic Salmon in 30 Minutes or Less

Prep Time 10 minutes
Cook Time 20 minutes
Total Time 30 minutes
Servings 4 servings
Calories 350
This quick and flavorful salmon recipe combines crispy skin with a sweet and savory honey garlic sauce, perfect for a fast dinner.

Ingredients

Salmon

  • 4 fillets salmon fillets
  • 2 tablespoons honey
  • 3 cloves garlic, minced
  • 2 tablespoons soy sauce
  • 1 tablespoon olive oil
  • to taste salt and pepper
  • chopped green onions for garnish chopped green onions
  • lemon wedges for serving lemon wedges

Instructions 

  • Whisk honey, garlic, soy sauce, olive oil, salt, and pepper.
  • Heat a skillet with olive oil over medium-high heat.
  • Season salmon with salt and pepper, then cook skin-side down for 4-5 minutes.
  • Flip salmon, pour sauce over, and cook 3-4 minutes, basting.
  • Garnish with green onions and serve with lemon wedges.

Notes

Ensure the salmon is cooked through but still moist for best flavor.
Calories: 350kcal
Cost: $15
Course: Main Course
Cuisine: American
Keyword: Salmon

Loved this recipe? Save it to your favorite Pinterest board so you can easily find it later! It’s the perfect way to keep all your sweet ideas in one place. ✨

A detailed view of salmon fillets glistening with honey garlic sauce, adorned with fresh green onions and lemon slices.

Why You’ll Love This Dish

If you’re searching for a meal that’s cozy, delicious, and effortlessly brings a smile to your face, look no further than the Hot Honey Chicken Bowl. This dish is a delightful dance of sweet and spicy flavors that will have your taste buds singing. Picture this: tender chicken glazed in a sticky, spicy honey sauce, nestled atop fluffy rice, and surrounded by vibrant vegetables. It’s not just food; it’s a warm hug on a plate that you can enjoy any day of the week.

But what makes this bowl even more special? It’s the versatility and ease of preparation. Whether you’re a seasoned chef or a kitchen novice, you’ll find this recipe approachable and fun. Trust me, once you try it, it’s bound to become a staple in your weekly meal rotation!

What Is a Hot Honey Chicken Bowl?

A Hot Honey Chicken Bowl is a modern culinary delight that combines the best of sweet and spicy worlds. At its core, it features juicy chicken coated in a hot honey glaze made from a blend of honey and chili, which gives it that irresistible kick. This dish is typically served over a base of rice—whether you prefer white, brown, or even cauliflower rice—with an array of colorful vegetables that add not just nutrition but also crunch and vibrancy.

This recipe is perfect for busy weeknights or meal prepping for a week of healthy lunches. It’s customizable, so whether you love a little extra heat or you prefer to dial it back, you can adjust it to suit your palate. And let’s be honest—who doesn’t love a one-bowl meal that satisfies cravings while keeping things healthy?

Ingredient Breakdown

Delicious Hot Honey Chicken Bowl featuring golden chicken, vibrant veggies, and fluffy rice in natural light.

To create your very own Hot Honey Chicken Bowl, you’ll need the following ingredients:

  • 1 lb chicken breast, diced: The star of our dish! Chicken breast is lean and takes on flavors beautifully.
  • 1/4 cup hot honey: The secret sauce that brings the sweet and spicy dynamic to life. Feel free to adjust the amount based on your spice tolerance!
  • 2 cups cooked rice: The comforting base for our bowl. You can use any variety you love.
  • 2 cups mixed vegetables: A colorful medley—think bell peppers, broccoli, and carrots. They’ll add both nutrition and crunch.
  • 2 tablespoons olive oil: For cooking the chicken and veggies; it adds richness.
  • 2 cloves garlic, minced: Because garlic makes everything better!
  • 1 tablespoon soy sauce: For an umami punch that rounds out the flavors.
  • Salt and pepper to taste: Essential for seasoning.
  • Chopped green onions for garnish: A fresh and zesty finish.
  • Sesame seeds for garnish: Optional, but they add a lovely crunch and aesthetic appeal.

Step-by-Step Cooking Instructions

Ready to dive into the cooking process? Here’s how you can whip up this flavor-packed bowl:

  1. In a medium bowl, combine the diced chicken, hot honey, soy sauce, minced garlic, and season with salt and pepper. Mix well and let the chicken marinate for at least 15 minutes. This step is crucial for infusing that sweet and spicy flavor into the chicken.
  2. While the chicken is marinating, heat the olive oil in a large skillet over medium-high heat. Once hot, add the marinated chicken to the skillet.
  3. Cook the chicken for about 7-10 minutes, stirring occasionally, until it’s browned and cooked through. You’ll know it’s done when the internal temperature reaches 165°F (75°C).
  4. Next, add the mixed vegetables to the skillet. Stir-fry for an additional 5 minutes until the veggies are tender but still crisp. This keeps them vibrant and packed with nutrients!
  5. Serve the hot honey chicken and veggies over a bed of cooked rice. Don’t skimp on the delicious sauce that’s left in the pan—drizzle that over your bowl for extra flavor.
  6. Finally, garnish with chopped green onions and sesame seeds before serving. Enjoy your delicious creation!

Common Mistakes to Avoid

Even the best cooks can make mistakes now and then. Here are a few common pitfalls to watch out for when making your Hot Honey Chicken Bowl:

  • Skipping the marination: Don’t rush this step! Marinating the chicken is key to developing layers of flavor.
  • Overcrowding the pan: If your skillet is too full, the chicken won’t brown properly. Cook in batches if necessary.
  • Not checking for doneness: Always ensure your chicken is fully cooked. Use a meat thermometer if you’re unsure.
  • Overcooking the veggies: Aim for that perfect tender-crisp texture. You want them vibrant and full of life!

Tips for Perfecting Your Bowl

Want to elevate your Hot Honey Chicken Bowl? Here are some tips to make it even better:

  • Use local honey: Not only does it support local producers, but it also adds a unique flavor profile.
  • Experiment with veggies: Try adding snap peas, zucchini, or even corn for a different twist!
  • Spice it up: If you’re a heat lover, consider adding a dash of cayenne pepper or red pepper flakes for an extra kick.
  • Make it a meal prep superstar: This dish stores well in the fridge, so double the recipe for easy lunches throughout the week.

Variations to Try

One of the best parts about this recipe is its adaptability. Here are a few variations you might want to consider:

  • Protein swaps: Not a fan of chicken? Try shrimp, tofu, or even beef for a different protein source.
  • Grain alternatives: Switch out rice for quinoa, farro, or even a leafy green base for a lighter option.
  • Different sauces: Swap the hot honey for a teriyaki glaze or a spicy peanut sauce for a completely different flavor.

Equipment You’ll Need

Before you start cooking, ensure you have the following equipment on hand:

  • A medium bowl for marinating the chicken.
  • A large skillet for cooking.
  • A spatula for stirring.
  • A meat thermometer (optional, but helpful for checking chicken doneness).

Storage and Freezing

Leftovers are a fantastic perk of this recipe! To store:

  • Place any leftover chicken bowl in an airtight container in the fridge. It should keep well for up to 3-4 days.
  • For longer storage, freeze the chicken and veggies in a freezer-safe container. They can last for about 2-3 months. When ready to eat, thaw and reheat on the stovetop or in the microwave.

FAQs

Here are a few frequently asked questions to help you out:

  • Can I make this dish ahead of time? Absolutely! You can marinate the chicken a day in advance and store it in the fridge, making it even easier to cook on a busy night.
  • Is this dish gluten-free? To make it gluten-free, use tamari instead of soy sauce.
  • Can I use frozen vegetables? Yes! Just be sure to thaw them before adding them to the skillet to avoid excess moisture.

Troubleshooting

If your bowl doesn’t turn out as expected, here are some troubleshooting tips:

  • If the chicken is dry, try cooking it for a shorter time next time, or use chicken thighs for a juicier option.
  • If the sauce is too thick, add a splash of water or chicken broth to loosen it up.
  • If the veggies are mushy, reduce the cooking time to keep them crisp and colorful.

Final Thoughts

There you have it! A Hot Honey Chicken Bowl that’s not just a meal; it’s an experience. With its sweet heat and wholesome ingredients, this dish is bound to become a favorite in your home. Whether you’re cooking for family or just treating yourself, you can’t go wrong with this comforting bowl of goodness. So grab your ingredients, roll up your sleeves, and get ready to create something truly magical in your kitchen. Happy cooking!

Hot Honey Chicken Bowl Recipe – Sweet & Spicy Dinner with Rice and Veggies

Prep Time 15 minutes
Cook Time 20 minutes
Total Time 35 minutes
Servings 4 servings
Calories 550
Enjoy a flavorful bowl of tender chicken glazed with sweet and spicy hot honey, served over rice with colorful vegetables.

Ingredients

Protein

  • 1 lb chicken breast, diced
  • 1/4 cup hot honey

Carbohydrates

  • 2 cups cooked rice

Vegetables

  • 2 cups mixed vegetables (bell peppers, broccoli, carrots)

Fats

  • 2 tablespoons olive oil
  • 2 cloves garlic, minced
  • 1 tablespoon soy sauce

Seasonings & Garnishes

  • to taste salt and pepper
  • chopped green onions for garnish green onions
  • sesame seeds for garnish sesame seeds

Instructions 

  • Marinate chicken with hot honey, soy sauce, garlic, salt, and pepper for 15 minutes.
  • Cook marinated chicken in olive oil until browned and cooked through, about 7-10 minutes.
  • Add vegetables and stir-fry for 5 minutes until tender but crisp.
  • Serve over cooked rice and garnish with green onions and sesame seeds.

Notes

Adjust seasoning to taste and enjoy!
Calories: 550kcal
Cost: $15
Course: dinner
Cuisine: American
Keyword: Chicken, honey, Rice

Loved this recipe? Save it to your favorite Pinterest board so you can easily find it later! It’s the perfect way to keep all your sweet ideas in one place. ✨

Tasty Hot Honey Chicken Bowl showcasing seasoned chicken, rice, and vegetables with garnishes.

Welcome to the World of Easy Dump Cake

Ah, the magic of dessert! There’s something undeniably comforting about a cake that practically makes itself. Enter the easy dump cake—a delightful concoction that brings together simple ingredients to create something truly extraordinary. This particular recipe combines the tropical sweetness of crushed pineapple with the tartness of cherry pie filling, all wrapped up in a buttery cake mix topping. If you’re looking for a dessert that’s as effortless to make as it is delicious to eat, you’ve come to the right place!

In this guide, I’ll walk you through everything you need to know about making the perfect easy dump cake. We’ll dive into the recipe, explore variations, tackle common mistakes, and even provide tips for storage and serving. So grab your apron, and let’s get baking!

Why You’ll Love This Recipe

This easy dump cake isn’t just a dessert; it’s a celebration of flavors and convenience! Here’s why it deserves a spot in your recipe repertoire:

  • Effortless Preparation: Simply dump the ingredients into a baking dish. No mixing or complicated steps required!
  • Minimal Ingredients: With just a handful of pantry staples, you can whip this up anytime.
  • Versatile Dessert: Great for gatherings, family dinners, or just a cozy night in—this cake is a crowd-pleaser!
  • Customizable: Feel free to swap in your favorite fruits or add extras like nuts or spices.
  • Deliciously Decadent: The combination of pineapple and cherry is a match made in dessert heaven, delivering a burst of flavor in every bite.

Ingredients Breakdown

Let’s take a closer look at what you’ll need for this delightful easy dump cake:

  • 1 box dry yellow cake mix: This is the base of your cake. You can substitute with a gluten-free cake mix if needed.
  • 1 big can crushed pineapple (undrained): Adds moisture and sweetness; you could use fresh pineapple for a twist!
  • 1 can cherry pie filling: Provides a lovely tart contrast; feel free to use other fruit fillings like blueberry or peach.
  • 1/2 cup melted butter: This adds richness; coconut oil can be a great alternative.
  • Optional: chopped pecans: For a crunchy texture; walnuts or almonds work well too.
  • Optional: cinnamon: A sprinkle enhances the flavor profile beautifully.

Step-by-Step Instructions

A slice of easy dump cake showing layers of pineapple and cherry filling.

Ready to create your masterpiece? Here’s how to make your easy dump cake:

  1. Preheat the oven to 350 degrees Fahrenheit (175 Celsius).
  2. Grab a 9×13 inch baking dish.
  3. Spread the crushed pineapple evenly across the bottom of the baking dish.
  4. Spoon the cherry pie filling over the pineapple.
  5. Sprinkle the dry yellow cake mix evenly over the pie filling.
  6. If using, sprinkle chopped pecans over the cake mix.
  7. Drizzle the melted butter over the top of the cake mix.
  8. Bake in the preheated oven for about 40 to 45 minutes until the top is golden brown and the fruit filling is bubbling.
  9. Let it cool for a few minutes before serving.

Pro Tips for the Perfect Dump Cake

Want to elevate your cake game? Here are some expert insights to ensure your dump cake comes out perfectly every time:

  • Even Layering: Spread your crushed pineapple and pie filling evenly to ensure even cooking.
  • Don’t Skimp on Butter: The melted butter is essential for that golden, crispy top layer.
  • Check for Doneness: Every oven is different. Look for golden brown tops and bubbling fruit.
  • Cool Before Serving: Allowing it to cool slightly enhances the flavors and makes serving easier.
  • Experiment with Flavors: Don’t hesitate to try different fruit combinations or cake mixes!
  • Serve Warm: This cake is best served warm, perhaps with a scoop of vanilla ice cream.
  • Use Fresh Ingredients: Quality fruits will elevate your cake’s flavor significantly.
  • Prep Ahead: You can prepare the ingredients in advance and bake just before serving.

Common Mistakes and Troubleshooting

Even the best chefs have their off days. Here are some common pitfalls and how to avoid them:

  • Dry Cake: If your cake turns out dry, ensure you’re using enough butter and don’t overbake.
  • Uneven Cooking: Make sure your oven is preheated and that your ingredients are evenly distributed.
  • Too Sweet: If you find the cake overly sweet, consider using unsweetened fruit or reducing the sugar in the cake mix.
  • Sticking to the Pan: Greasing your baking dish can help prevent sticking, or line it with parchment paper.

Delicious Variations to Try

This easy dump cake recipe is a blank canvas! Here are some fun variations to consider:

  • Chocolate Cherry Dump Cake: Swap the yellow cake mix for chocolate for a decadent twist!
  • Berry Medley: Use a mix of fresh berries instead of pie filling for a summery vibe.
  • Pineapple Coconut Cake: Add shredded coconut to the topping for a tropical flair.
  • Spiced Pumpkin Dump Cake: Replace the fruit with canned pumpkin and spice it up with cinnamon and nutmeg.

Storage and Make-Ahead Instructions

Want to enjoy your dump cake later? Here’s how to store it:

  • Refrigerating: Store leftovers in an airtight container in the fridge for up to 4 days.
  • Freezing: You can freeze the baked cake (without toppings) for up to 3 months. Thaw before serving.
  • Make-Ahead Option: You can prepare the fruit layer and cake mix ahead of time, then assemble and bake when ready.

Frequently Asked Questions

Have questions? I’ve got answers! Here are some commonly asked questions about dump cake:

  • Can I use fresh fruit? Yes! Fresh fruits can be used, but adjust the moisture levels accordingly.
  • Is dump cake gluten-free? You can make it gluten-free by using a gluten-free cake mix.
  • How do I know when it’s done? Look for a golden brown top and bubbling fruit filling.
  • Can I add nuts? Absolutely! Nuts add a delightful crunch—just sprinkle them over the top.
  • What can I serve it with? Vanilla ice cream, whipped cream, or even a drizzle of caramel sauce work beautifully!
  • How long does it last? It lasts for about 4 days in the refrigerator.
  • Can I make it vegan? Yes! Use a vegan cake mix and substitute the butter with coconut oil.
  • Can I double the recipe? Yes, just use a larger baking dish and adjust baking time as needed.

Nutritional Tips and Dietary Adaptations

Looking to make your dump cake a bit healthier? Here are some tips:

  • Reduce Sugar: Use unsweetened fruit or a sugar substitute in the cake mix.
  • Whole Grain Option: Opt for whole wheat cake mix for added fiber.
  • Fruit Variety: Incorporate a variety of fruits to boost vitamins and minerals.

Essential Equipment Recommendations

Before you start baking, make sure you have the right tools:

  • 9×13 inch Baking Dish: A must-have for this recipe.
  • Mixing Spoon: For easy layering of ingredients.
  • Oven Mitts: Safety first! Protect your hands when handling hot dishes.
  • Cooling Rack: Helps cool the cake evenly before serving.

Serving Suggestions

Let’s make your dump cake even more delightful when serving:

  • A la Mode: Serve warm with a scoop of vanilla ice cream.
  • Whipped Cream: A dollop of whipped cream on top adds a lovely touch.
  • Fresh Berries: Garnish with fresh berries for a pop of color and flavor.

Conclusion: Let the Baking Begin!

And there you have it—the ultimate guide to making an easy dump cake that will bring sunshine to every bite! With its straightforward preparation and endless variations, this dessert is perfect for any occasion. Remember, cooking should be a joyful experience, so don’t hesitate to make this recipe your own. Whether you’re serving it at a family gathering or enjoying a slice on a quiet evening at home, this dump cake is bound to impress. So, roll up those sleeves, gather your ingredients, and let’s create some delicious memories together in the kitchen!

Easy Dump Cake

Prep Time 10 minutes
Cook Time 45 minutes
Total Time 55 minutes
Servings 8 pieces
Calories 350
A simple and delicious dessert that comes together quickly with minimal effort, perfect for any occasion.

Ingredients

Cake Mix

  • 1 box dry yellow cake mix

Fruit

  • 1 big can crushed pineapple (undrained)
  • 1 can cherry pie filling

Butter

  • 1/2 cup melted butter

Optional Toppings

  • to taste chopped pecans (optional)
  • to taste cinnamon (optional)

Instructions 

  • Preheat oven to 350°F (175°C).
  • Spread crushed pineapple in a 9x13 inch baking dish.
  • Top with cherry pie filling, then sprinkle cake mix evenly.
  • If desired, add chopped pecans and cinnamon on top.
  • Drizzle melted butter over the top.
  • Bake for 40-45 minutes until golden and bubbly. Cool slightly before serving.

Notes

This dessert is best served warm with a scoop of ice cream or whipped cream.
Calories: 350kcal
Cost: $10
Course: Dessert
Cuisine: American
Keyword: cake

Why This Dish Will Steal Your Heart

Cooking is one of life’s great joys, and when you can whip up a meal that combines sweet and savory in just 20 minutes, it feels like you’ve hit the culinary jackpot. Enter the magical realm of Honey Garlic Salmon. It’s not just a recipe; it’s an experience that brings the family together, a dish that makes your friends ask for the recipe, and perhaps most importantly, it’s a quick and easy weeknight dinner that packs a punch of flavor without the fuss. Picture this: tender salmon fillets glazed in a luscious honey garlic sauce, their crispy skin crackling as they sizzle in the pan. Whether you’re cooking for yourself or entertaining guests, this dish is your ticket to the culinary spotlight.

Essential Ingredients You’ll Need

Before we dive into the cooking process, let’s take a moment to talk about the star players in this recipe. You might already have most of them in your pantry! Here’s your shopping list for this Honey Garlic Salmon:

  • 2 salmon fillets (fresh or frozen)
  • 2 tablespoons honey
  • 2 tablespoons soy sauce
  • 2 cloves garlic, minced
  • 1 tablespoon olive oil
  • Salt and pepper to taste
  • Chopped green onions for garnish (optional, but highly recommended!)

These ingredients work together like a well-rehearsed symphony, creating a dish that’s both simple and satisfying.

Step-by-Step Guide to Culinary Bliss

A beautifully glazed Honey Garlic Salmon with a warm, inviting background.

Now that you’ve gathered your ingredients, let’s get cooking! Here’s how to transform those lovely salmon fillets into a dish that’s sure to impress:

  1. Whisk It Up: In a small bowl, whisk together the honey, soy sauce, minced garlic, and a pinch of salt and pepper. This sauce is the magic potion that will elevate your salmon to new heights!
  2. Heat Things Up: Heat the olive oil in a non-stick skillet over medium-high heat. You want it hot enough to sizzle but not so hot that it smokes.
  3. Season the Salmon: While the skillet is heating up, season your salmon fillets generously with salt and pepper on both sides. This step is crucial for flavor!
  4. Cook the First Side: Place the salmon fillets in the skillet, skin-side down, and let them cook for about 4-5 minutes. You’re looking for that perfect crispy skin. Don’t rush this step; it’s where the magic begins!
  5. Flip and Glaze: Carefully flip the salmon fillets over, and pour the honey garlic sauce over them. This is when your kitchen will start smelling heavenly! Cook for an additional 3-4 minutes, basting with the sauce to keep everything moist and flavorful.
  6. Rest and Garnish: Once the salmon is cooked through, remove it from the heat and let it rest for a minute. This is the moment where all the juices redistribute, making sure each bite is tender and juicy. If you’re feeling extra fancy, garnish with chopped green onions for that pop of color.

And there you have it—your Amazing Honey Garlic Salmon is ready to shine on your dining table!

Tips for Perfecting Your Dish

As with any recipe, a few tips can help you take your salmon from good to absolutely spectacular:

  • Choose Quality Salmon: Look for fresh, firm salmon fillets that bounce back when pressed gently. This ensures you’re starting with the best possible ingredient.
  • Don’t Skip the Drying: Pat your salmon fillets dry with a paper towel before seasoning. A dry surface is key to achieving that beautiful sear.
  • Watch the Sauce: Keep an eye on the honey garlic sauce as it cooks. If it thickens too much before your salmon is done, add a splash of water to loosen it up.
  • Experiment with Flavor: Feel free to add a pinch of red pepper flakes for a kick, or swap out the soy sauce for tamari if you’re gluten-free.

Ingredient Spotlight: The Sweet and Savory Dance

Let’s take a closer look at two of our key ingredients: honey and soy sauce. Together, they create a flavor profile that dances between sweet and savory, making every bite an adventure.

Honey adds a natural sweetness that caramelizes beautifully when cooked, giving the salmon a rich, glossy finish. On the other hand, soy sauce introduces that umami depth that balances the sweetness with its salty richness. This harmonious combination is what makes this dish so irresistible.

Serving Suggestions to Elevate Your Meal

Now that you have your Honey Garlic Salmon ready to go, what do you serve it with? The possibilities are endless! Here are some of my favorite pairing ideas:

  • Steamed Veggies: Bright, crunchy steamed broccoli or asparagus drizzled with a bit of lemon juice can provide a refreshing contrast to the rich salmon.
  • Cauliflower Rice: For a low-carb option, serve your salmon over cauliflower rice. It’s light and soaks up all that delicious sauce.
  • Green Salad: A crisp green salad with a light vinaigrette can complement the flavors beautifully and add some freshness to the meal.
  • Quinoa or Brown Rice: If you’re in the mood for something heartier, serve your salmon with quinoa or brown rice to create a complete meal.

Frequently Asked Questions

Can I substitute the honey in Honey Garlic Salmon?

Absolutely! If you’re looking for a lower-sugar option, try a sugar-free maple syrup or agave nectar. The flavors will still be fantastic!

What’s the best way to store leftovers?

Let the salmon cool completely, then transfer it to an airtight container. It will keep well in the fridge for about 2 days. Reheat gently in a pan or the microwave.

Is this recipe keto-friendly?

Yes, but keep in mind that honey does contain sugar. For a keto-friendly version, use a sugar-free honey substitute or adjust the amount to fit your dietary needs.

Nutritional Information

When it comes to nutrition, this dish is a winner! Each serving of Amazing Honey Garlic Salmon (based on the recipe as written) typically contains:

  • Calories: 350
  • Protein: 36g
  • Fat: 18g
  • Carbohydrates: 12g
  • Sugar: 10g

These numbers can vary based on the specific ingredients you use, but overall, you’re looking at a healthy, protein-packed meal!

Final Thoughts

Cooking is all about creating memories and sharing moments with those you love. This Honey Garlic Salmon recipe is not just a dish; it’s a way to bring a little magic into your kitchen. With its perfect blend of sweet and savory, it’s bound to become a family favorite. So, whether you’re cooking for a special occasion or simply treating yourself after a long day, I hope you find joy in making this dish as much as I do. Don’t forget to share your creations with me—I can’t wait to hear how your Honey Garlic Salmon turns out! Happy cooking, my friends!

Amazing Honey Garlic Salmon in Under 20 Min

Prep Time 5 minutes
Cook Time 15 minutes
Total Time 20 minutes
Servings 2 servings
Calories 350
This quick and flavorful salmon recipe combines honey, garlic, and soy sauce for a delicious meal ready in under 20 minutes.

Ingredients

Salmon

  • 2 fillets salmon fillets
  • 2 tablespoons honey
  • 2 tablespoons soy sauce
  • 2 cloves garlic, minced
  • 1 tablespoon olive oil
  • to taste salt and pepper (for seasoning)
  • chopped green onions for garnish (optional) green onions (for garnish)

Instructions 

  • Whisk honey, soy sauce, garlic, salt, and pepper in a bowl.
  • Heat olive oil in a skillet over medium-high heat.
  • Season salmon with salt and pepper, then cook skin-side down for 4-5 minutes.
  • Flip salmon, pour sauce over, and cook 3-4 minutes, basting.
  • Remove from heat, garnish with green onions if desired, and serve.

Notes

Serve immediately for best flavor and texture.
Calories: 350kcal
Cost: $15
Course: Main Course
Cuisine: fusion
Keyword: Salmon

Loved this recipe? Save it to your favorite Pinterest board so you can easily find it later! It’s the perfect way to keep all your sweet ideas in one place. ✨

Freshly cooked salmon fillet drizzled with honey garlic sauce and surrounded by soft shadows.

Why This Recipe is a Must-Try

There are few combinations as comforting as tomato soup and grilled cheese. This classic pairing doesn’t just fill your belly; it warms your soul. Each spoonful of Simple Tomato Soup Paired with Grilled Cheese Delight feels like a nostalgic trip back to childhood, where cozy kitchens and the smell of melting cheese created a sense of home. Whether you’re facing a chilly day or just need a little comfort food, this recipe is here to wrap you in a warm hug.

Ingredients You’ll Need

Gathering your ingredients is half the fun! Here’s what you need to create this delightful dish:

  • 2 cups canned crushed tomatoes
  • 1 cup vegetable broth
  • 1 small onion, chopped
  • 2 cloves garlic, minced
  • 1 teaspoon dried basil
  • Salt and pepper to taste
  • 1 tablespoon olive oil
  • 4 slices of bread
  • 4 slices of cheese (cheddar or your choice)
  • Butter for grilling

Let’s Get Cooking

Eye-level shot of creamy tomato soup with a grilled cheese sandwich, showcasing texture and colors.

Now that you have all your ingredients, it’s time to dive into the cooking process. Trust me, it’s easier than you think!

  1. In a pot, heat the olive oil over medium heat. Once it’s shimmering, add the chopped onion and minced garlic. Sauté until the onion becomes translucent and soft, about 5 minutes. The aroma will be heavenly!
  2. Next, add the crushed tomatoes, vegetable broth, dried basil, salt, and pepper to the pot. Stir everything together, and let that mixture come to a simmer. You want the flavors to meld, so let it simmer for about 15 minutes, stirring occasionally.
  3. While the soup is simmering, let’s prepare the grilled cheese! Heat a skillet over medium heat. Butter one side of each slice of bread generously.
  4. Place two slices of bread, butter-side down, in the skillet. Lay a slice of cheese on each, and then top with the remaining slices of bread, butter-side up.
  5. Grill until the bread turns golden brown, about 3-4 minutes on each side. Don’t rush this step; we want that perfect melty goodness!
  6. Once the soup is ready, you can use an immersion blender to puree it for a smooth texture, if that’s your preference. It’s optional, but it does make for a velvety finish.
  7. Serve the hot tomato soup with your perfectly grilled cheese sandwiches cut in half on the side. Enjoy!

Tips for the Perfect Tomato Soup

Even though this recipe is straightforward, here are a few tips to elevate it:

  • Fresh Herbs: If you have fresh basil on hand, feel free to use it instead of dried. Just toss it in at the end of the cooking process for a burst of flavor.
  • Don’t Skip the Garlic: Garlic adds depth to the soup. You can even roast the garlic beforehand for a sweeter, caramelized flavor.
  • Cheese Choice: Cheddar is a classic, but feel free to experiment with mozzarella, gouda, or even pepper jack for a little kick!
  • Grilling Method: If you have a panini press, use that for your grilled cheese to ensure an evenly crispy exterior.

Variations to Try

Want to switch things up? Here are some fun variations:

  • Tomato Basil Soup: Add fresh basil leaves right before serving for that garden-fresh taste.
  • Spicy Tomato Soup: Add a pinch of red pepper flakes or a few dashes of hot sauce to give your soup a kick!
  • Roasted Tomato Soup: Roast fresh tomatoes and garlic in the oven before blending them into the soup for a richer flavor.

Substitutions

Sometimes, you just don’t have everything on hand, and that’s okay! Here are a few substitutions:

  • Instead of vegetable broth, you can use chicken broth if that’s what you have.
  • If you’re out of crushed tomatoes, diced tomatoes work well, too; just blend them for a smoother texture.
  • Feeling adventurous? Try using sourdough bread for your grilled cheese for a tangy twist!

Essential Equipment

No need for fancy tools here! Just grab:

  • A good pot for the soup
  • A skillet for grilling
  • A spatula for flipping the sandwiches
  • An immersion blender (if you want a smooth soup)

Storage and Freezing Tips

Got leftovers? No problem! Here’s how to store and freeze your delicious creations:

  • Refrigeration: Store the soup in an airtight container in the fridge for up to 4 days. Just reheat on the stove or in the microwave.
  • Freezing: Tomato soup freezes beautifully! Let it cool, then transfer to freezer-safe bags or containers. It can last up to 3 months in the freezer. Just thaw in the fridge overnight before reheating.
  • Grilled Cheese: While it’s best enjoyed fresh, you can store leftovers in the fridge. Reheat in a skillet for that crispy texture.

Frequently Asked Questions

Let’s tackle some common questions:

  • Can I make this soup ahead of time? Absolutely! In fact, the flavors deepen if it sits for a day in the fridge.
  • What can I serve with tomato soup? Besides grilled cheese, try pairing it with a simple salad or some crusty bread for dipping!
  • Is this recipe vegan? You can easily make it vegan by using a dairy-free cheese and ensuring your bread is free from dairy.

Troubleshooting Tips

If your soup isn’t turning out as expected, consider these pointers:

  • Too Acidic: If your soup tastes too acidic, add a pinch of sugar to balance the flavors.
  • Too Thick: If it’s too thick, simply add more broth or water until you reach your desired consistency.
  • Lacking Flavor: Make sure to season adequately with salt and pepper. Taste as you go!

Wrapping Up

So there you have it! A cozy bowl of Simple Tomato Soup Paired with Grilled Cheese Delight that feels like home. This recipe isn’t just about the ingredients; it’s about the memories you create while cooking—and the joy of sharing a delicious meal with the ones you love. So, gather your loved ones (or just treat yourself), and enjoy a meal that’s sure to bring smiles all around. Happy cooking, friends! 🤗

Simple Tomato Soup Paired with Grilled Cheese Delight

Prep Time 10 minutes
Cook Time 20 minutes
Total Time 30 minutes
Servings 4 servings
Calories 350
A comforting and easy-to-make meal combining flavorful tomato soup with crispy grilled cheese sandwiches.

Ingredients

Soup Ingredients

  • 2 cups canned crushed tomatoes
  • 1 cup vegetable broth
  • 1 small onion, chopped
  • 2 cloves garlic, minced
  • 1 teaspoon dried basil
  • to taste salt and pepper

For the Sandwiches

  • 4 slices bread
  • 4 slices cheese (cheddar or your choice)
  • 1 tablespoon olive oil
  • butter for grilling

Instructions 

  • Heat olive oil in a pot, sauté onion and garlic until soft.
  • Add crushed tomatoes, vegetable broth, basil, salt, and pepper; simmer for 15 minutes.
  • While the soup simmers, butter bread slices, assemble sandwiches with cheese, and grill until golden, about 3-4 minutes per side.
  • Puree the soup with an immersion blender for a smooth texture (optional).
  • Serve hot with grilled cheese cut in halves.

Notes

Use fresh basil for best flavor and adjust salt and pepper to taste.
Calories: 350kcal
Cost: $15
Course: Main Course
Cuisine: American
Keyword: Grilled Cheese, Tomato

Loved this recipe? Save it to your favorite Pinterest board so you can easily find it later! It’s the perfect way to keep all your sweet ideas in one place. ✨

Delicious tomato soup in a rustic bowl alongside a crispy grilled cheese cut into triangles.