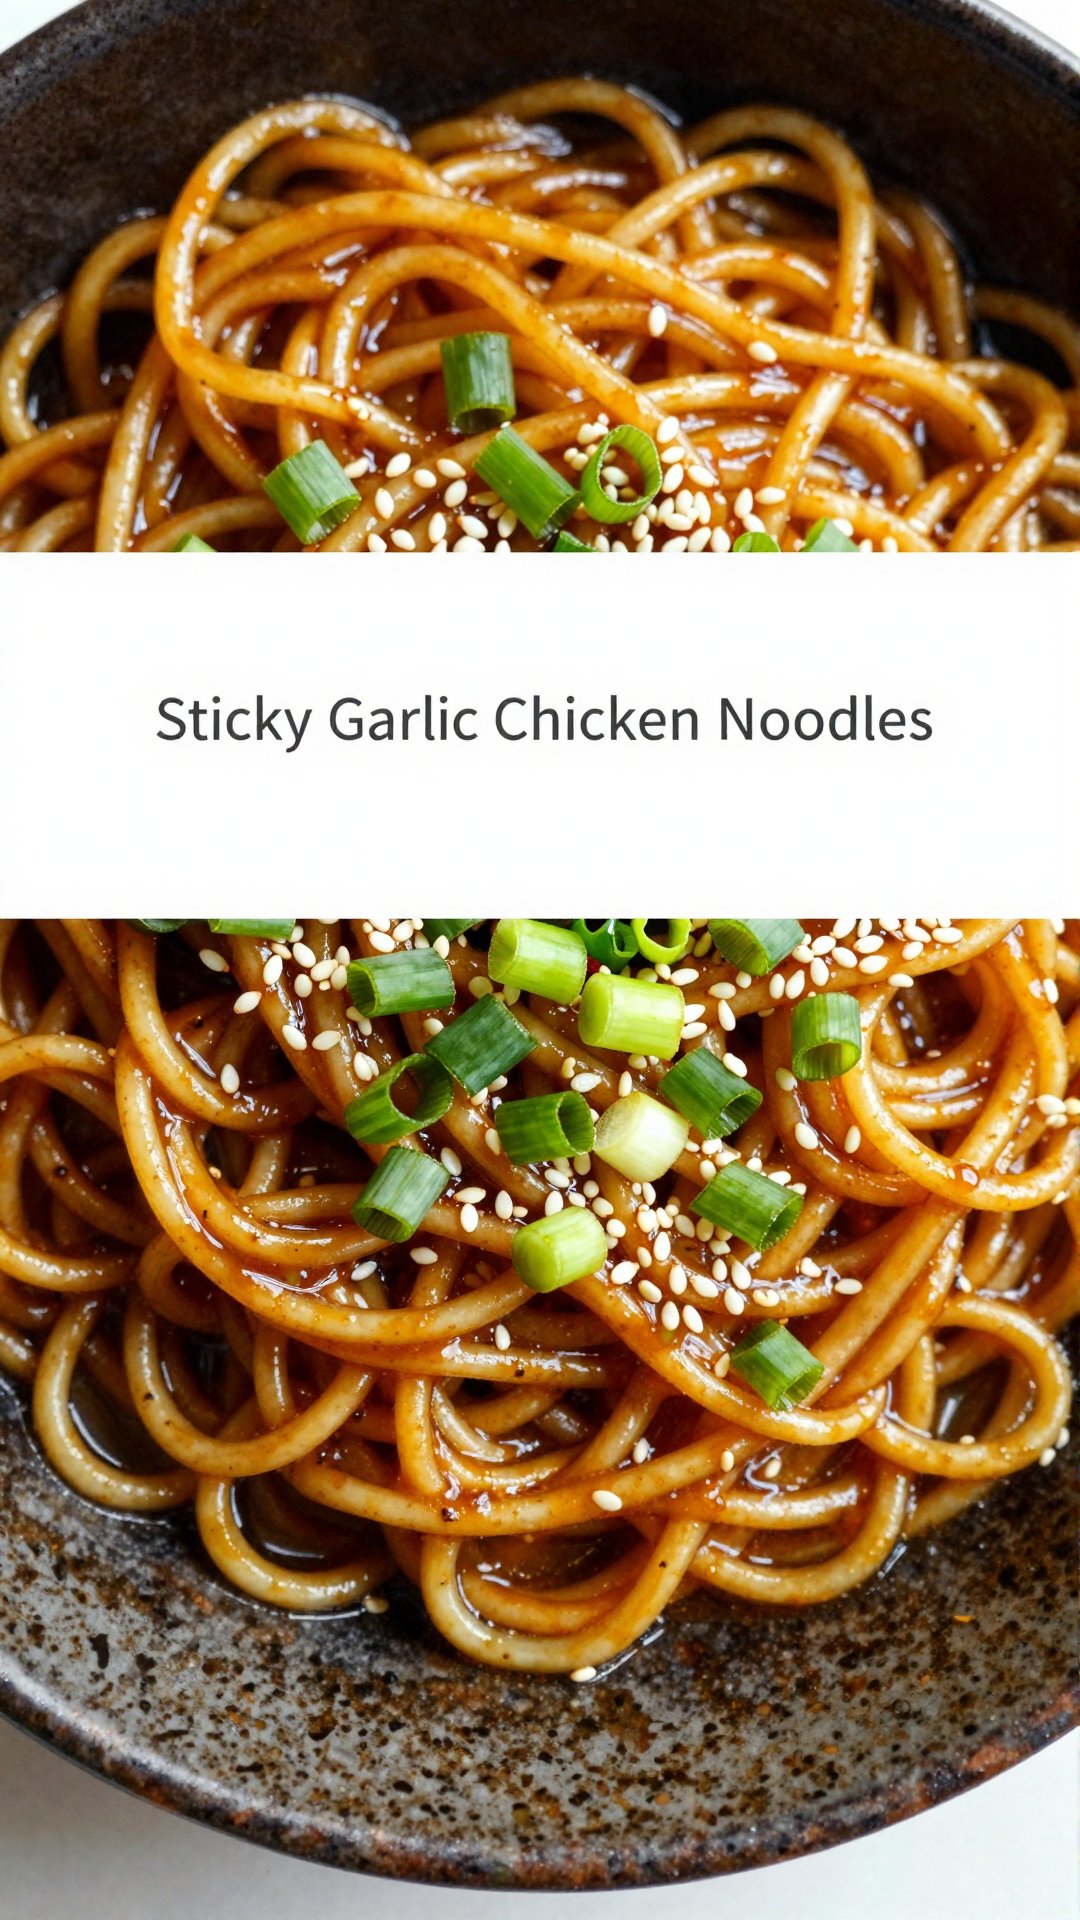
Sticky Garlic Chicken Noodles: An Incredible Ultimate Recipe
Prep Time 15 minutesminutes
Cook Time 20 minutesminutes
Total Time 35 minutesminutes
Servings 4servings
Calories 450
This Sticky Garlic Chicken Noodles recipe delivers a flavorful combination of tender chicken, crisp vegetables, and perfectly cooked noodles coated in a delicious sticky garlic sauce. It's a quick and easy meal that's sure to become a family favorite!
Ingredients
Ingredients
2chicken breasts(thinly sliced)
8ozegg noodles
4clovesgarlic(minced)
0.25cupsoy sauce
2tablespoonshoney
1tablespoonsesame oil
1tablespoonvegetable oil
1teaspoonred chili flakes(optional)
1cupbroccoli florets
1bell pepper(sliced)
0.25cupgreen onions(chopped)
Sesame seeds(for garnish)
Instructions
Bring a large pot of salted water to a boil. Add noodles and cook until al dente. Drain and set aside.
In a small bowl, whisk together soy sauce, honey, and red chili flakes. Set aside.
Heat vegetable oil in a large pan over medium-high heat. Add chicken and cook until browned and cooked through, about 5-7 minutes.
Add minced garlic to the pan and sauté for an additional minute until fragrant.
Toss in the broccoli florets and bell pepper slices. Stir-fry for 3-4 minutes until the vegetables are tender-crisp.
Pour the prepared sauce over the chicken and vegetables. Stir well to coat everything evenly. Let it simmer for 2-3 minutes.
Add the cooked noodles to the pan. Toss everything together until the noodles are thoroughly coated with the sauce.
Drizzle sesame oil over the noodles and give everything one last toss.
Remove from heat and sprinkle chopped green onions and sesame seeds on top before serving.
Notes
Adjust the amount of red chili flakes to your preferred level of spiciness.
Hey there, friend! Ava here, back from my little corner of Seattle with a recipe that’s been making waves in my kitchen—and I have a feeling it’s about to do the same in yours. I’m talking about Dairy-Free Marry Me Chicken Pasta. Yes, you heard that right. It’s the creamy, dreamy comfort food you crave, without the dairy drama. So, if you’re looking for easy crockpot recipes non dairy, then look no further!
Now, before you start picturing bland, boring, dairy-free fare, let me assure you: this dish is anything but. It’s rich, flavorful, and so satisfying that even the most dedicated dairy lovers won’t miss the cheese. Trust me, I tested it on my skeptical brother-in-law, and he asked for seconds! I’m telling you, the sauce is incredible.
But first, a little backstory. You see, “Marry Me Chicken” is a recipe that’s been floating around the internet for a while, promising to be so delicious that it’ll convince your significant other to pop the question. While I can’t guarantee a proposal (sorry!), I can promise a seriously amazing meal. My dairy-free version takes all the best parts of the original—tender chicken, luscious sauce, sun-dried tomatoes—and makes it accessible to everyone, whether you’re lactose-intolerant, vegan, or just trying to cut back on dairy. This recipe is dairy free marry me chicken at its finest!
Why You’ll Love This Dairy-Free Marry Me Chicken Pasta
Okay, let’s get down to brass tacks. Why should you spend your precious time making this recipe? Here’s the lowdown:
It’s Incredibly Flavorful: We’re talking umami-packed sun-dried tomatoes, savory garlic, and a hint of spice from red pepper flakes. It’s a flavor explosion in every bite.
It’s Creamy (Without the Cream!): The secret? Full-fat coconut milk. It adds a richness and silkiness that you won’t believe is dairy-free.
It’s Easy to Make: Seriously, this recipe comes together in about 30 minutes. Perfect for a weeknight dinner when you’re short on time but still want something special.
It’s Customizable: Don’t like sun-dried tomatoes? Swap them for roasted red peppers. Want more spice? Add an extra pinch of red pepper flakes. Make it your own!
It’s a Crowd-Pleaser: Whether you’re cooking for your family, hosting a dinner party, or just treating yourself, this dish is guaranteed to be a hit.
I’ve made this dish countless times, tweaking and perfecting it until it’s just right. And I’m so excited to share it with you. So, let’s get cooking! You’re going to love this dairy free pasta meals recipe.
Ingredients for Dairy-Free Marry Me Chicken Pasta
Here’s what you’ll need to whip up this deliciousness:
1 cup canned coconut milk (full fat for creaminess)
1/2 cup sun-dried tomatoes, chopped
1 tsp dried oregano
1/2 tsp red pepper flakes
10 oz gluten-free pasta of your choice
Fresh basil, for garnish
How to Make Dairy-Free Marry Me Chicken Pasta: Step-by-Step
Alright, let’s dive into the process. Don’t worry, it’s easier than it looks! Here’s how to bring this dish to life:
Prep the Chicken: Season the chicken breasts with salt and pepper. Remember, a little love goes a long way!
Sear the Chicken: Heat the olive oil in a large skillet over medium-high heat. Sear the chicken for 3-4 minutes per side, until golden brown. Don’t worry about cooking it all the way through—it’ll finish cooking in the sauce. Remove the chicken from the skillet and set aside.
Sauté the Aromatics: Add the chopped onion to the skillet and cook until softened, about 5 minutes. Add the minced garlic and cook for another minute, until fragrant. This is where the magic starts to happen.
Create the Sauce: Pour in the chicken broth and scrape up any browned bits from the bottom of the skillet. This adds tons of flavor! Stir in the coconut milk, sun-dried tomatoes, dried oregano, and red pepper flakes. Bring to a simmer.
Simmer and Thicken: Return the chicken to the skillet and let it simmer in the sauce for 10-15 minutes, or until the chicken is cooked through and the sauce has thickened slightly.
Cook the Pasta: While the chicken is simmering, cook the gluten-free pasta according to package directions. Drain and set aside.
Combine and Serve: Add the cooked pasta to the skillet with the chicken and sauce. Toss to coat. Serve immediately, garnished with fresh basil.
And there you have it! Dairy-Free Marry Me Chicken Pasta that’s sure to impress. It’s a fantastic dinner idea dairy free!
Pro Tips for Perfect Dairy-Free Marry Me Chicken Pasta
Want to take this dish from good to great? Here are a few of my go-to pro tips:
Use Full-Fat Coconut Milk: This is crucial for achieving that creamy, decadent texture. Light coconut milk just won’t cut it.
Don’t Overcook the Chicken: Nobody likes dry chicken. Sear it well, but let it finish cooking in the sauce to keep it moist and tender.
Taste and Adjust: Seasoning is key! Taste the sauce as it simmers and adjust the salt, pepper, and red pepper flakes to your liking.
Use High-Quality Sun-Dried Tomatoes: The better the sun-dried tomatoes, the better the flavor. I prefer the ones packed in oil.
Garnish Generously: Fresh basil adds a pop of color and freshness that really elevates the dish. Don’t skimp on it!
These tips will help you create a dish that’s truly unforgettable. This dish, when made right, is amazing.
Common Mistakes to Avoid
We all make mistakes in the kitchen—it’s how we learn! Here are a few common pitfalls to watch out for when making this recipe:
Not Searing the Chicken Properly: Searing the chicken adds flavor and texture. Don’t skip this step!
Using Low-Quality Ingredients: This recipe is all about flavor, so use the best ingredients you can find.
Overcooking the Pasta: Nobody likes mushy pasta. Cook it al dente for the best texture.
Not Adjusting the Seasoning: Taste, taste, taste! Seasoning is crucial for a balanced and flavorful dish.
Skipping the Garnish: Fresh basil adds a pop of freshness and visual appeal. Don’t forget it!
Avoiding these mistakes will help you create a dish that’s both delicious and visually appealing. You can create the most amazing dairy free marry me chicken by following these tips.
Variations and Adaptations
One of the things I love most about cooking is the opportunity to get creative and make a recipe your own. Here are a few variations and adaptations you can try with this Dairy-Free Marry Me Chicken Pasta:
Add Vegetables: Sauté some spinach, kale, or mushrooms along with the onion and garlic for added nutrients and flavor.
Swap the Protein: Not a fan of chicken? Use shrimp, tofu, or chickpeas instead.
Spice It Up: Add a pinch of cayenne pepper or a dash of hot sauce for extra heat.
Make It Vegan: Use vegetable broth instead of chicken broth and substitute the chicken with tofu or chickpeas.
Add a Splash of Wine: Deglaze the pan with a splash of white wine after sautéing the onion and garlic for added depth of flavor.
Get creative and experiment with different flavors and ingredients to create a dish that’s perfect for you. This recipe is all about exploring and finding what you love. It’s so easy to adapt df and gf recipes!
How to Store and Reheat Dairy-Free Marry Me Chicken Pasta
Got leftovers? Lucky you! Here’s how to store and reheat this dish:
Storage: Store the leftover pasta in an airtight container in the refrigerator for up to 3 days.
Reheating: Reheat the pasta in a skillet over medium heat, adding a splash of chicken broth or coconut milk if needed to loosen the sauce. You can also reheat it in the microwave, but be careful not to overcook it.
This dish is just as delicious the next day, making it perfect for meal prepping or a quick and easy lunch. You’re going to love this marry me chicken pasta, even as leftovers!
Frequently Asked Questions (FAQ)
Got questions? I’ve got answers! Here are a few frequently asked questions about this recipe:
Can I use regular pasta instead of gluten-free pasta? Absolutely! Use any pasta you like.
Can I use light coconut milk instead of full-fat coconut milk? I don’t recommend it. Full-fat coconut milk is essential for achieving that creamy texture.
Can I freeze this dish? I don’t recommend freezing it, as the coconut milk may separate and become grainy.
Can I make this dish ahead of time? Yes, you can make the sauce ahead of time and store it in the refrigerator for up to 2 days. Just add the cooked pasta and chicken when you’re ready to serve.
Can I add cheese to this dish? Of course! If you’re not dairy-free, feel free to add a sprinkle of Parmesan cheese or mozzarella cheese.
If you have any other questions, feel free to leave a comment below. I’m always happy to help! You can enjoy this as one of your healthy no dairy dinner recipes.
Serving Suggestions
Looking for some serving inspiration? Here are a few ideas:
Serve with a Side Salad: A simple green salad with a light vinaigrette is the perfect complement to this rich and creamy pasta.
Serve with Garlic Bread: Who can resist garlic bread? It’s the perfect accompaniment to soak up all that delicious sauce.
Serve with Roasted Vegetables: Roast some broccoli, Brussels sprouts, or asparagus for a healthy and flavorful side dish.
Serve with a Glass of Wine: A crisp white wine, such as Sauvignon Blanc or Pinot Grigio, pairs perfectly with this dish.
No matter how you choose to serve it, this Dairy-Free Marry Me Chicken Pasta is sure to be a hit. Enjoy! It’s one of the best chicken dinners dairy free that I know of!
So there you have it – my Dairy-Free Marry Me Chicken Pasta recipe. It’s a dish that’s close to my heart, and I hope it becomes a favorite in your kitchen too. Remember, cooking is all about having fun and experimenting, so don’t be afraid to put your own spin on things. And most importantly, enjoy every bite! Happy cooking, friends! And don’t forget to try all my other recipes non dairy.
A creamy and delicious dairy-free take on the popular Marry Me Chicken Pasta. This recipe uses coconut milk for a rich and flavorful sauce that everyone will love.
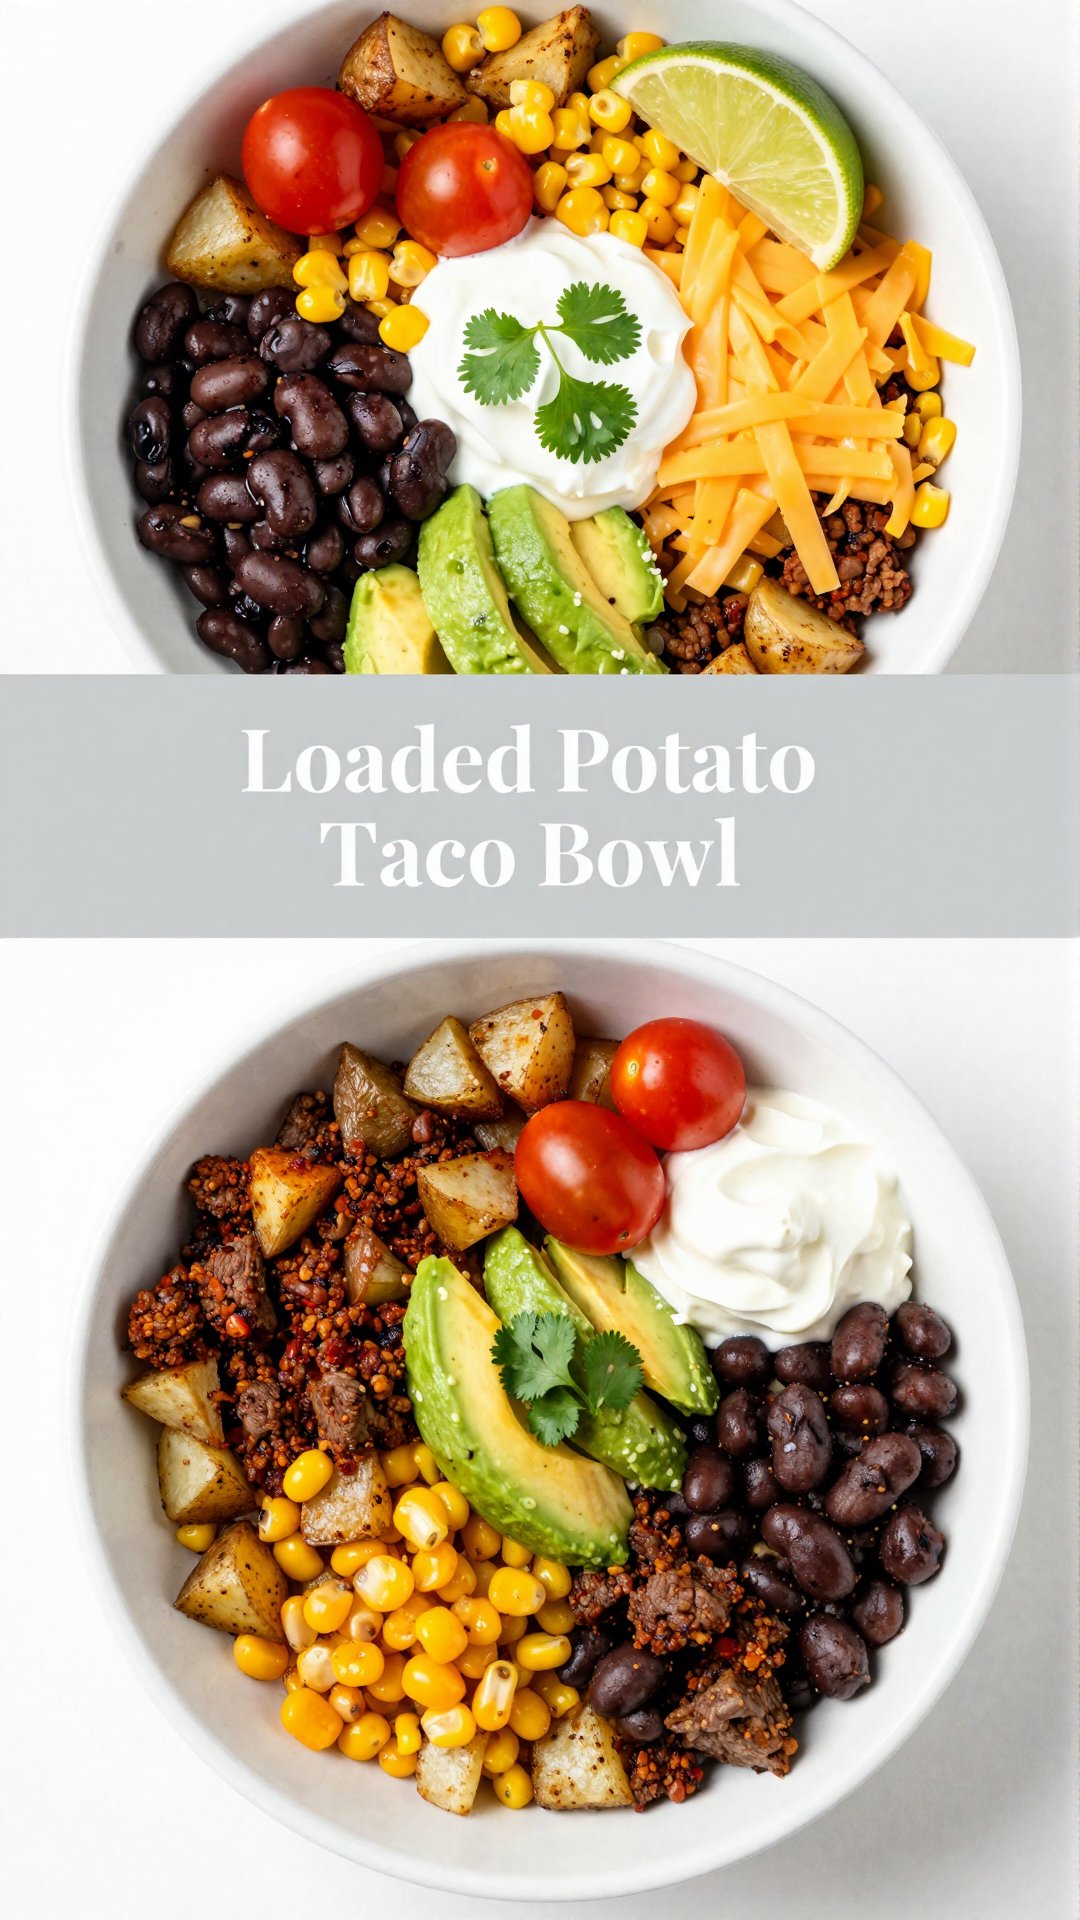
My name’s Ava, and welcome to my kitchen! Today, we’re diving headfirst into a dish that’s not only a crowd-pleaser but also ridiculously easy to make: the Loaded Potato Taco Bowl. If you’re anything like me, you’re always on the lookout for meals that are quick, satisfying, and leave you feeling good. This recipe ticks all those boxes and then some. It’s a flavorful explosion that brings together the comfort of roasted potatoes with the zesty kick of taco fillings. Trust me, this is one of those recipes that will quickly become a staple in your weekly rotation.
Growing up, taco night was a sacred event in my family. But as I’ve gotten older, I’ve loved finding new ways to remix those classic flavors. The idea for this loaded potato taco bowl came to me one evening when I had leftover taco meat and a fridge full of potatoes. I thought, ‘Why not combine the two?’ The result was pure magic. The crispy potatoes provide the perfect base for the savory meat mixture and all your favorite taco toppings. It’s like a taco salad, but with a comforting, starchy twist.
Why You’ll Love This Loaded Potato Taco Bowl
Seriously, where do I even begin? This isn’t just another taco bowl; it’s an experience. Here’s why my family and I are obsessed:
Quick & Easy: From start to finish, you’re looking at about 45 minutes. Perfect for busy weeknights.
Customizable: The beauty of a taco bowl is that you can add whatever toppings your heart desires.
Comfort Food with a Twist: It’s familiar, yet exciting. The combination of the potatoes and the taco flavors is simply irresistible.
Meal Prep Friendly: You can easily prep the potatoes and meat mixture ahead of time for a quick and easy lunch or dinner during the week.
High Protein: Packed with protein from the meat, beans, and cheese, this bowl will keep you full and satisfied.
Ingredients for the Best Taco Bowl
Here’s what you’ll need to create this masterpiece:
‘4 medium russet potatoes (peeled and diced into 3/4-inch pieces)’
‘2 tablespoons olive oil’
‘1 teaspoon garlic powder’
‘1 teaspoon onion powder’
‘1 teaspoon smoked paprika’
‘Salt and black pepper (to taste)’
‘1 pound ground beef or turkey (93/7 lean recommended)’
‘1 teaspoon chili powder’
‘1 teaspoon cumin’
‘1 small red onion (chopped)’
’15 ounces black beans (1 can, drained and rinsed)’
‘1 cup corn kernels (fresh, canned, or frozen)’
‘1 cup shredded cheddar cheese’
‘1 cup cherry tomatoes (halved)’
‘1 medium avocado (diced)’
‘1/4 cup fresh cilantro (loosely packed and chopped)’
‘Lime wedges (for serving)’
‘Sour cream (for topping)’
How to Make a Loaded Potato Taco Bowl: Step-by-Step
Let’s get cooking! Follow these simple steps for taco bowl perfection:
Roast the Potatoes: Preheat your oven to 425°F (220°C). Spread the diced potatoes on a large baking sheet in a single layer. Drizzle with olive oil and sprinkle with garlic powder, onion powder, smoked paprika, salt, and black pepper. Toss to coat evenly. Bake for 30-35 minutes, flipping at the 15-minute mark, until golden brown and crispy. The crispy edges are key!
Cook the Meat Mixture: While the potatoes roast, heat a large skillet over medium heat. Add ground beef or turkey and cook for 7-8 minutes, breaking it up with a wooden spoon, until browned. Drain any excess fat if needed. Add chili powder, cumin, and chopped red onion. Stir well and cook for 5 minutes until the onion softens.
Add Beans and Corn: Stir in black beans and corn. Cook for 3-4 minutes until heated through. Taste and adjust seasonings as needed.
Assemble the Bowls: Divide the roasted potatoes among 4 serving bowls. Top each with the meat mixture. Immediately sprinkle with shredded cheddar cheese and let sit for seconds, about 30 seconds, to melt.
Add Toppings and Serve: Add cherry tomatoes, diced avocado, and fresh cilantro. Serve with lime wedges and a dollop of sour cream.
Pro Tips for the Perfect Taco Bowl
Here are a few insider tips to take your loaded potato taco bowl to the next level:
Crispy Potatoes are Key: Make sure the potatoes are spread in a single layer on the baking sheet to ensure they get crispy. Don’t overcrowd them!
Don’t Skip the Spices: The garlic powder, onion powder, and smoked paprika add a ton of flavor to the potatoes.
Use High-Quality Meat: The better the quality of the meat, the better the flavor. I recommend using 93/7 lean ground beef or turkey.
Customize Your Toppings: Don’t be afraid to get creative with your toppings. Add your favorite salsa, guacamole, or even a sprinkle of cotija cheese.
Warm the Tortillas: For a delightful twist, warm flour tortillas and cut them into strips for a crispy topping adding texture and flavor.
Common Mistakes to Avoid
Even the simplest recipes can have pitfalls. Here’s what to watch out for:
Overcrowding the Potatoes: This will steam the potatoes instead of roasting them. Use a large baking sheet and spread them out.
Not Seasoning Enough: Don’t be shy with the spices! Season the potatoes and the meat mixture generously.
Using Soggy Potatoes: Make sure the potatoes are dry before roasting them. Pat them dry with a paper towel if needed.
Overcooking the Meat: Cook the meat until it’s browned but not dry. Overcooked meat will be tough and flavorless.
Variations to Try
Want to mix things up? Here are some fun variations on this recipe:
Sweet Potato Taco Bowl: Substitute sweet potatoes for russet potatoes for a sweeter flavor.
Vegetarian Taco Bowl: Use black beans, lentils, or crumbled tofu in place of the meat.
Spicy Taco Bowl: Add a pinch of cayenne pepper or a dash of hot sauce to the meat mixture for extra heat.
Chicken Taco Bowl: Use shredded chicken instead of ground beef or turkey.
Cauliflower Rice Taco Bowl: Swap out the potatoes for cauliflower rice for a low-carb option.
Roasted Vegetables: Add some roasted bell peppers, zucchini, or onions to the potatoes for added flavor and nutrients.
How to Store Leftovers
Got leftovers? Here’s how to store them:
Potatoes: Store the roasted potatoes in an airtight container in the refrigerator for up to 3 days.
Meat Mixture: Store the meat mixture in an airtight container in the refrigerator for up to 4 days.
Toppings: Store the toppings separately in airtight containers in the refrigerator.
Reheating: Reheat the potatoes and meat mixture in the microwave or in a skillet over medium heat. Assemble the bowls with fresh toppings just before serving.
Frequently Asked Questions (FAQ)
Here are some common questions about this recipe:
Can I use a different type of potato? Yes, you can use Yukon gold potatoes, red potatoes, or even sweet potatoes.
Can I make this recipe ahead of time? Yes, you can prep the potatoes and meat mixture ahead of time. Store them separately in the refrigerator and assemble the bowls just before serving. This makes it a perfect loaded potato meal prep option.
Can I freeze the leftovers? I don’t recommend freezing the potatoes, as they may become mushy when thawed. However, you can freeze the meat mixture for up to 2 months.
How many grams of protein are in this recipe? This recipe contains approximately 30-40 grams of protein per serving, depending on the type of meat you use and the amount of cheese you add.
Is this recipe gluten-free? Yes, this recipe is naturally gluten-free.
Serving Suggestions
These loaded potato taco bowls are fantastic on their own, but here are some serving suggestions to make it a complete meal:
Side Salad: Serve with a simple green salad or a Mexican-inspired salad with corn, black beans, and a lime vinaigrette.
Tortilla Chips and Salsa: Add some tortilla chips and your favorite salsa for dipping.
Guacamole: Serve with a side of homemade guacamole.
Mexican Street Corn Salad: Pair with a refreshing Mexican street corn salad.
And there you have it! A loaded potato taco bowl recipe that’s sure to become a family favorite. It’s the perfect blend of comfort and flavor, and it’s so easy to customize to your liking. Give it a try, and let me know what you think! I promise, you won’t be disappointed. Happy cooking!
Enjoy a delicious and hearty Loaded Potato Taco Bowl! Crispy roasted potatoes topped with seasoned ground meat, black beans, corn, and all your favorite taco toppings.
Ingredients
Potatoes
4mediumrusset potatoes(peeled and diced into 3/4-inch pieces)
2tablespoonsolive oil
1teaspoongarlic powder
1teaspoononion powder
1teaspoonsmoked paprika
to tasteSalt and black pepper
Meat Mixture
1poundground beef or turkey(93/7 lean recommended)
1teaspoonchili powder
1teaspooncumin
1smallred onion(chopped)
15ouncesblack beans(1 can, drained and rinsed)
1cupcorn kernels(fresh, canned, or frozen)
Toppings
1cupshredded cheddar cheese
1cupcherry tomatoes(halved)
1mediumavocado(diced)
1/4cupfresh cilantro(loosely packed and chopped)
Lime wedges(for serving)
Sour cream(for topping)
Instructions
Preheat oven to 425°F (220°C). Roast diced potatoes with olive oil and spices for 30-35 minutes, flipping halfway, until golden brown and crispy.
While potatoes roast, cook ground beef or turkey in a skillet until browned. Drain excess fat if needed.
Add chili powder, cumin, and chopped red onion to the cooked meat. Cook for 5 minutes until onion softens.
Stir in black beans and corn. Cook for 3-4 minutes until heated through.
Divide crispy potatoes among bowls. Top with meat mixture, cheddar cheese, tomatoes, avocado, and cilantro. Serve with lime wedges and sour cream.
Notes
For extra flavor, add a pinch of cayenne pepper to the meat mixture. You can also use sweet potatoes instead of russet potatoes.
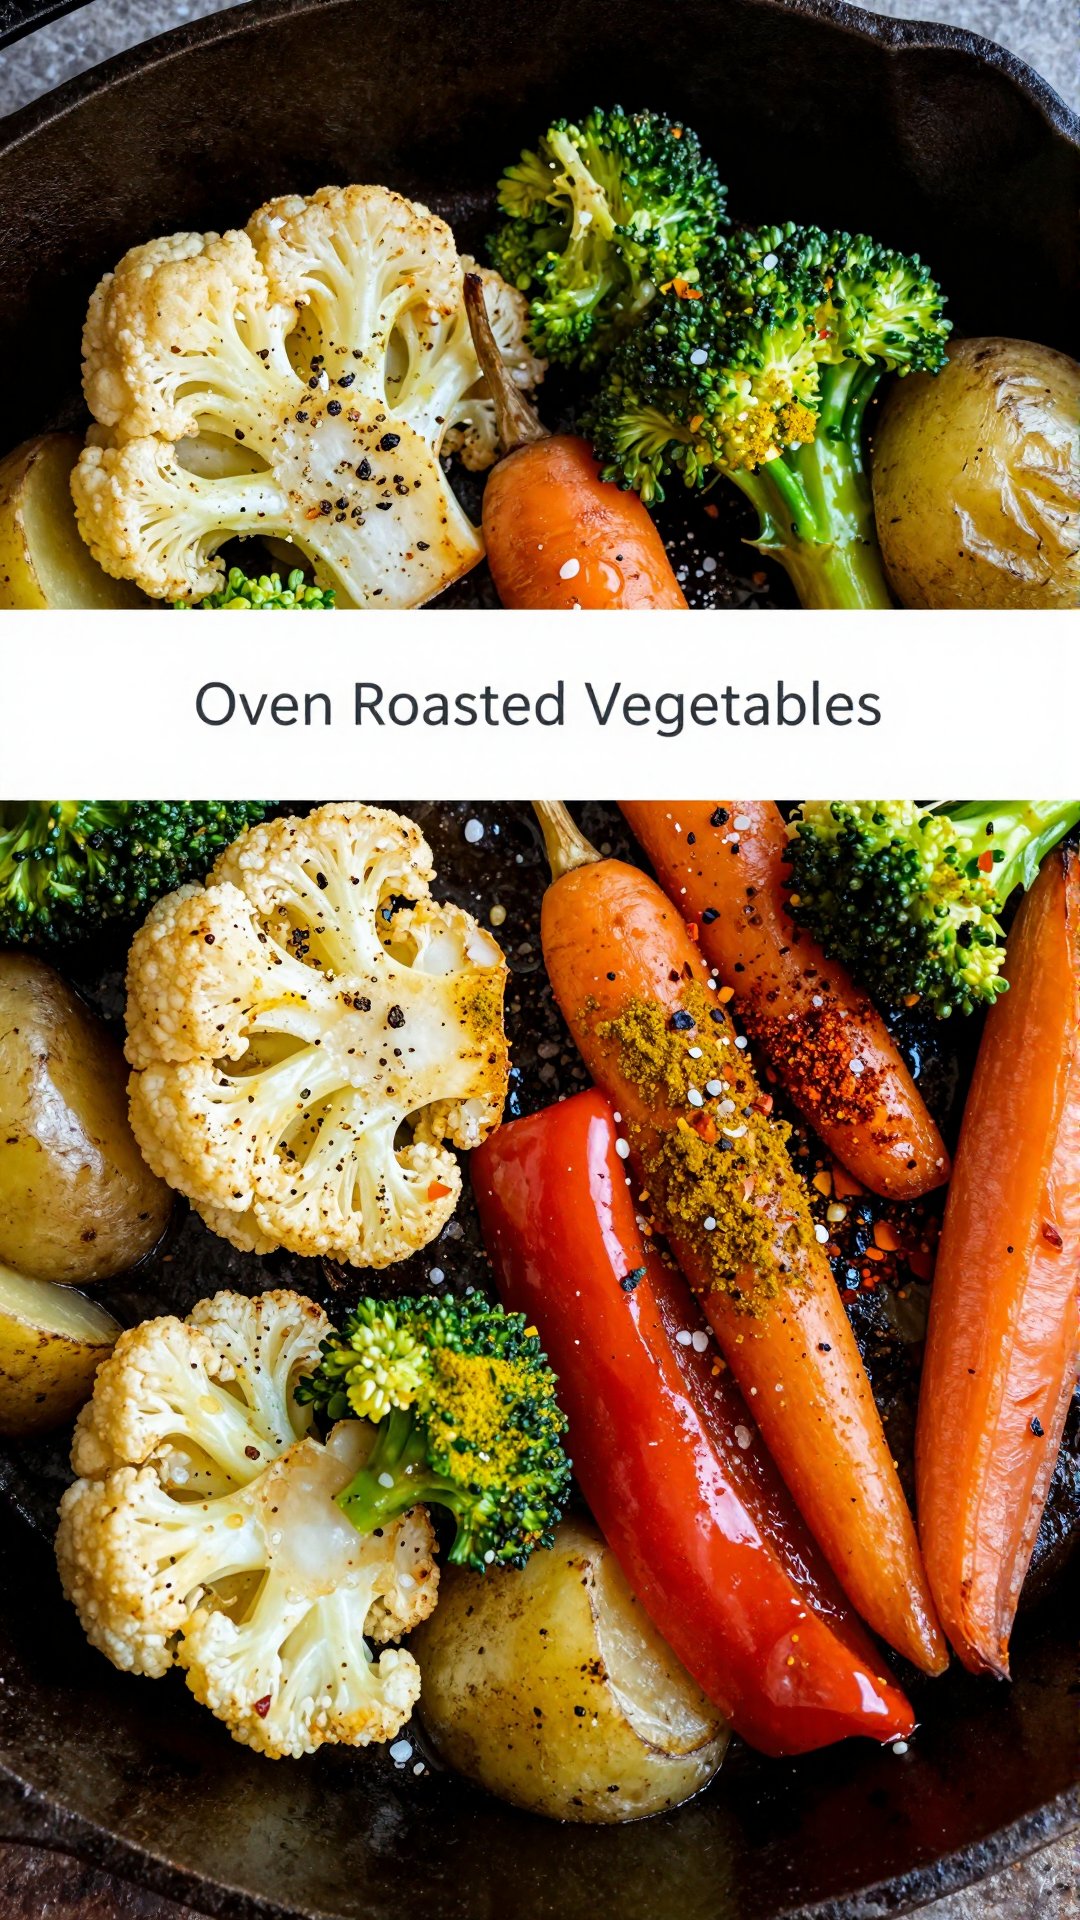
Hey there, friend! Ava here, back in my Seattle kitchen, where the aroma of spices is currently making everything feel extra cozy. Today, we’re diving into a recipe that’s not only incredibly easy but also a total game-changer when it comes to getting your veggies in – Oven-Roasted Vegetables with Aromatic Spices. This isn’t just about throwing some chopped veggies in the oven; it’s about creating a symphony of flavors that will make even the pickiest eaters ask for seconds. Growing up, I wasn’t always the biggest fan of vegetables, but my mom had a knack for roasting them just right, bringing out their natural sweetness and turning them into something truly delicious. This recipe is my ode to her, with a little Ava twist, of course!
What I love about this dish is its versatility. You can use almost any type of vegetable you have on hand, making it perfect for those nights when you’re trying to clean out the fridge. Plus, the aromatic spices add a warmth and depth that elevates the humble roasted vegetable to something truly special. And let’s be honest, who doesn’t love a good side dish that requires minimal effort? This recipe is so simple, even my cat could probably make it (if he had opposable thumbs, that is!).
Why You’ll Love This Recipe
Seriously, where do I even begin? This recipe is more than just a way to cook vegetables; it’s a culinary hug on a plate. Here’s why I think you’ll fall head-over-heels for it:
Effortless Elegance: This recipe is incredibly simple to prepare, yet it delivers restaurant-quality flavor.
Versatile Veggies: You can use virtually any combination of vegetables you like, making it a great way to use up what you have on hand.
Aromatic Spice Blend: The combination of spices creates a warm, inviting flavor that complements the natural sweetness of the vegetables. It’s a beautiful blend of savory and subtly spicy.
Healthy and Delicious: This is a fantastic way to get your daily dose of veggies without sacrificing flavor.
Crowd-Pleaser: Whether you’re cooking for a family dinner or a potluck, this dish is always a hit.
Easy Cleanup: One pan means minimal cleanup, which is always a win in my book!
When you’re looking for easy dinner recipes veggies, this is a great option. It fits into healthy night meals, and it’s a great healthy plate recipes option for both lunch and night recipes.
Ingredients
1 whole cauliflower
1 whole broccoli
3 medium potatoes
1 red bell pepper
2 large carrots
70 ml olive oil
3 cloves of garlic, grated
1 small teaspoon black pepper
1 small teaspoon dried thyme
1 small teaspoon curry powder
1/2 teaspoon red pepper flakes
1/2 teaspoon chili powder
Salt, to taste
How to Roast Vegetables: Step-by-Step
Alright, let’s get down to business! Here’s how to roast these vegetables to perfection. Don’t worry, it’s easier than teaching my dog a new trick (and trust me, that’s saying something!).
Preheat the Oven: Begin by preheating your oven to 200°C (392°F). This ensures that the vegetables roast evenly and develop a beautiful caramelization.
Prep the Veggies: Cut the cauliflower and broccoli into florets. Optionally, blanch them in boiling water for a moment and then drain. This step is for those who prefer their vegetables with a softer texture. Thinly slice the potatoes and carrots. Cut the red pepper into strips.
Arrange on Baking Tray: Arrange all the vegetables on a baking tray in a single layer to ensure even cooking. Overcrowding the tray can lead to steaming instead of roasting, which we want to avoid.
Make the Sauce: In a small bowl, mix together the olive oil, grated garlic, black pepper, thyme, curry powder, red pepper flakes, chili powder, and salt to create the sauce. This is where the magic happens!
Coat the Vegetables: Pour the sauce over the vegetables on the tray, and toss them until they are well coated with the seasoning. Make sure every piece gets a fair share of the flavorful goodness.
Roast: Place the tray in the preheated oven and roast the vegetables for 40 minutes. Halfway through, at around 20 minutes, give the vegetables a good stir to ensure they roast evenly. This also helps prevent any sticking.
Prepare Garlic Yogurt (Optional): While the vegetables are roasting, you can prepare a side of garlic yogurt by simply mixing yogurt with some minced garlic and a pinch of salt. This adds a cool, creamy element that complements the roasted vegetables beautifully.
Serve: Once the vegetables are tender and nicely caramelized, remove them from the oven. Serve the roasted vegetables with a dollop of the garlic yogurt on the side.
Pro Tips for Perfectly Roasted Vegetables
Want to take your roasted vegetables to the next level? Here are a few of my go-to tips:
Don’t Overcrowd the Pan: This is crucial! Overcrowding causes the vegetables to steam instead of roast. Use two pans if necessary.
Cut Vegetables Evenly: Uniform sizes ensure even cooking. No one wants a half-raw potato next to a perfectly roasted carrot.
Use High Heat: Roasting at a higher temperature helps to caramelize the vegetables and bring out their natural sweetness.
Toss Halfway Through: This ensures even browning and prevents sticking.
Don’t Be Afraid of Color: A little char is a good thing! It adds flavor and texture.
Dry Your Veggies: Excess moisture can lead to steaming. Pat your vegetables dry before roasting.
Quality Olive Oil: Use a good quality olive oil for the best flavor.
Common Mistakes to Avoid
We’ve all been there – a cooking mishap that turns into a learning experience. Here are some common mistakes to avoid when roasting vegetables:
Not Preheating the Oven: This can lead to uneven cooking and less-than-perfect caramelization.
Using the Wrong Pan: A dark, heavy pan will help the vegetables to brown more evenly.
Skipping the Toss: Forgetting to toss the vegetables halfway through can result in uneven roasting.
Adding Too Much Salt Too Early: Salt draws out moisture, which can hinder browning. Add salt towards the end of the roasting process.
Variations and Adaptations
The beauty of this recipe is that it’s incredibly adaptable. Feel free to experiment with different vegetables, spices, and herbs. Here are a few ideas to get you started:
Root Vegetable Medley: Use a mix of potatoes, sweet potatoes, parsnips, and carrots for a sweet and savory combination.
Mediterranean Twist: Add Kalamata olives, feta cheese, and oregano for a taste of the Mediterranean.
Spicy Kick: Increase the amount of red pepper flakes or add a pinch of cayenne pepper for an extra kick.
Herby Goodness: Experiment with different herbs such as rosemary, sage, or thyme.
Balsamic Glaze: Drizzle with balsamic glaze after roasting for a touch of sweetness and acidity.
This is a healthy meals with cauliflower option that you can serve with a pound ground beef or chicken. You can also change up the type of vegetables with your favorite selections.
How to Store Roasted Vegetables
If you have any leftovers (which is rare in my house!), store them in an airtight container in the refrigerator for up to 3 days. To reheat, simply spread the vegetables on a baking sheet and warm them in a preheated oven at 350°F (175°C) for about 10 minutes, or until heated through. You can also reheat them in a skillet over medium heat.
Frequently Asked Questions (FAQ)
Can I use frozen vegetables? While fresh vegetables are ideal, you can use frozen vegetables if you’re in a pinch. Just be sure to thaw them completely and pat them dry before roasting.
Can I roast the vegetables ahead of time? Yes, you can roast the vegetables ahead of time and reheat them when you’re ready to serve. This is a great option for meal prepping.
What other vegetables can I use? The possibilities are endless! Some other great options include Brussels sprouts, asparagus, zucchini, and eggplant.
Can I add protein to this dish? Absolutely! Roasted vegetables are a great accompaniment to grilled chicken, fish, or tofu.
How do I prevent the vegetables from sticking to the pan? Make sure to use enough olive oil and toss the vegetables halfway through roasting. You can also line the baking sheet with parchment paper.
Serving Suggestions
These Oven-Roasted Vegetables with Aromatic Spices are incredibly versatile and can be served in a variety of ways. Here are a few of my favorite serving suggestions:
As a Side Dish: Serve alongside grilled chicken, fish, or steak for a complete and balanced meal.
As a Vegetarian Main Course: Toss with cooked quinoa or pasta for a hearty and satisfying vegetarian meal.
In a Salad: Add to a bed of mixed greens with your favorite dressing for a flavorful and nutritious salad.
In a Wrap: Wrap in a tortilla with hummus and feta cheese for a quick and easy lunch.
As a Topping: Use as a topping for pizza, bruschetta, or tacos.
With a Dipping Sauce: Serve with a side of garlic yogurt, tzatziki sauce, or pesto for dipping.
This recipe truly is one of my favorites, and I hope it becomes one of yours too! It’s a fantastic way to enjoy this recipe, and get your daily dose of vegetables in the oven. Remember, cooking should be fun and stress-free. So, don’t be afraid to experiment, get creative, and most importantly, enjoy the process! Here s to many delicious meals ahead!
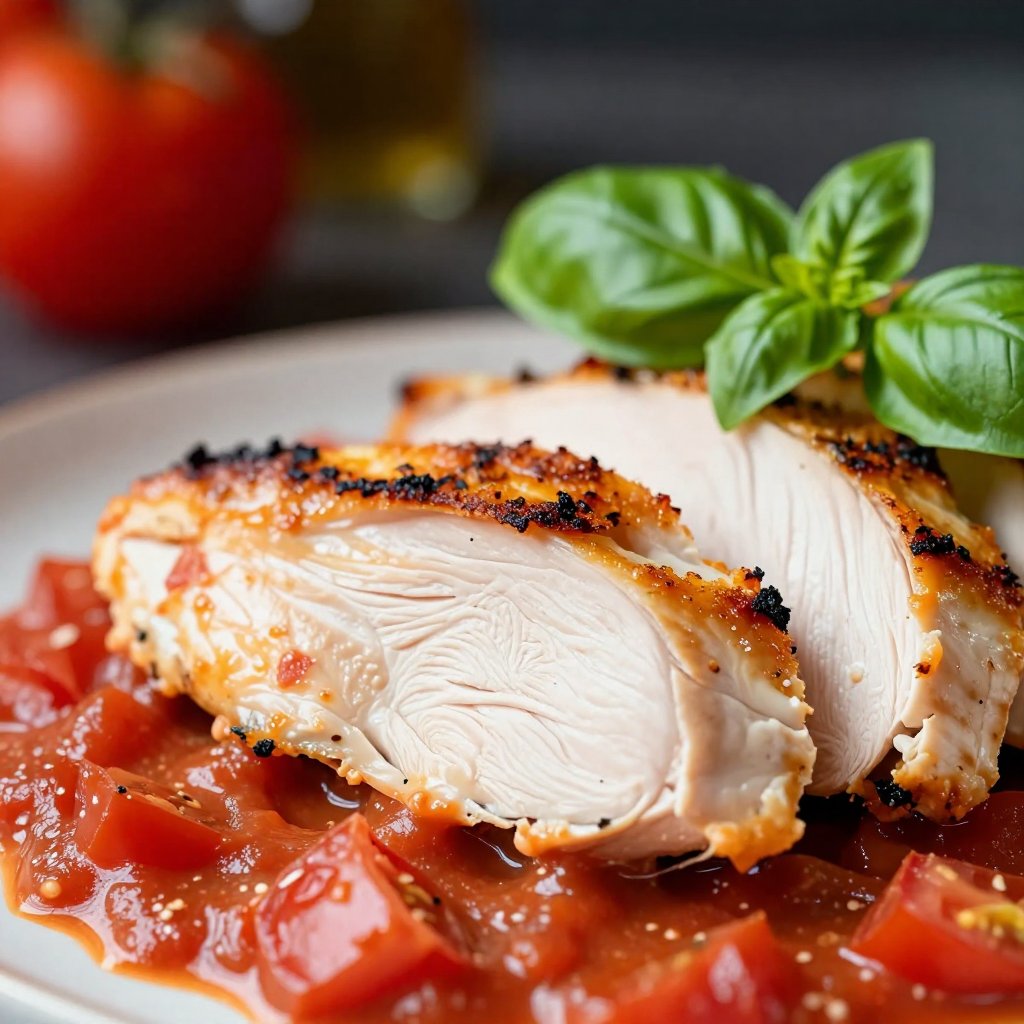
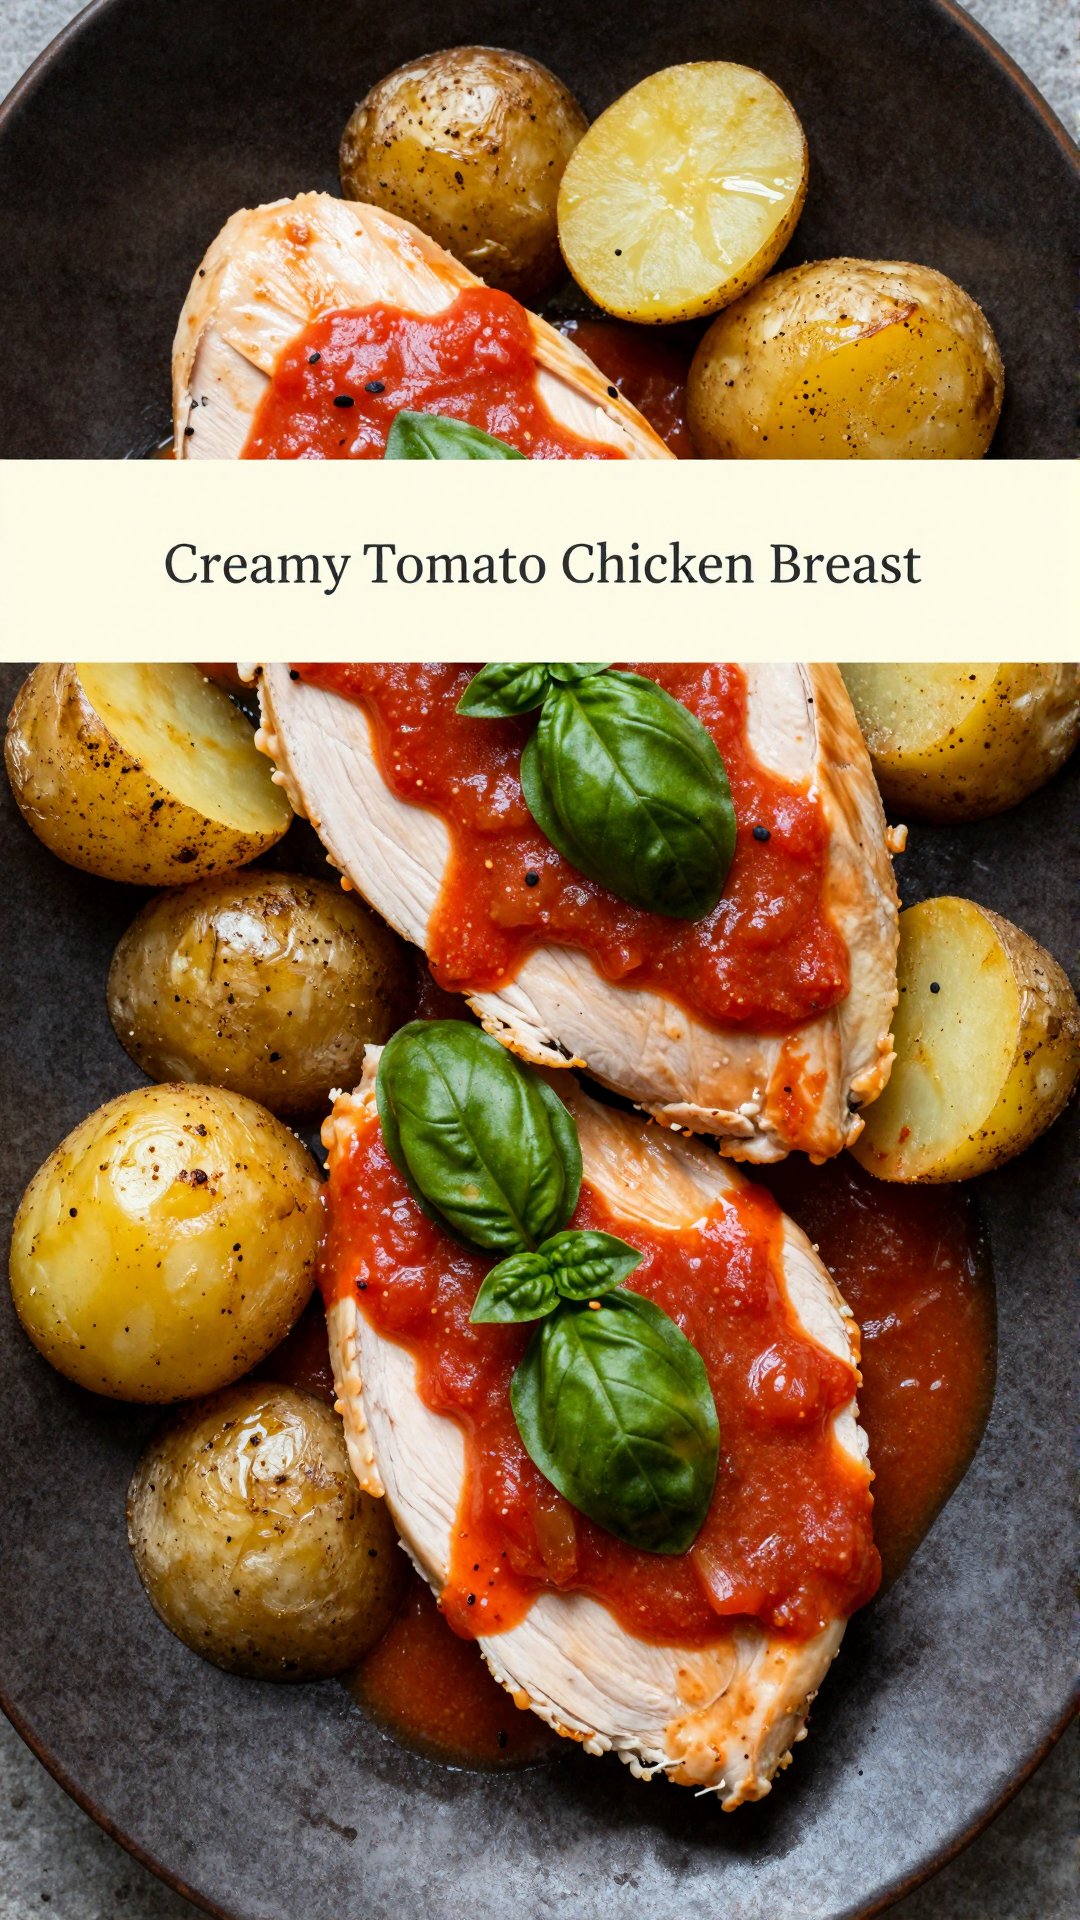
Creamy Tomato Chicken Breast: Your New Weeknight Hero
Hey there, kitchen adventurers! Ava here, ready to share a recipe that’s become a staple in my Seattle kitchen. This Creamy Tomato Chicken Breast is the kind of dish that makes you look like a culinary genius, even when you’re short on time and energy. Picture this: tender, juicy chicken breasts swimming in a luscious, creamy tomato sauce, bursting with the flavors of basil and garlic. It’s comfort food elevated, and it’s ready in under 30 minutes. Trust me, this is one you’ll want to bookmark!
I remember the first time I made this. It was a Tuesday night, I was exhausted from a long day, and the thought of ordering takeout was incredibly tempting. But I had some chicken breasts in the fridge and a craving for something comforting. I threw this together on a whim, and my husband declared it the best chicken dish I’d ever made. High praise, indeed!
Why You’ll Absolutely Love This Creamy Tomato Chicken Breast
Let’s be honest, we all need those go-to recipes that are both delicious and easy. This creamy tomato chicken recipe ticks all the boxes. Here’s why it’s about to become your new favorite:
Quick and Easy: From prep to plate, this dish is ready in under 30 minutes. Perfect for busy weeknights.
Incredibly Flavorful: The creamy tomato sauce is rich, vibrant, and packed with flavor from fresh basil, garlic, and Italian seasoning.
Versatile: Serve it over pasta, rice, mashed potatoes, or with a side of roasted vegetables. The possibilities are endless!
Crowd-Pleasing: Even the pickiest eaters will love this dish. The creamy tomato sauce is universally appealing.
Simple Ingredients: You probably already have most of the ingredients in your pantry and fridge.
This recipe is more than just a meal; it’s a hug on a plate. It’s the kind of dish that makes you feel good from the inside out. And who doesn’t need a little extra comfort in their lives?
Ingredients: The Magic Makers
Here’s what you’ll need to create this culinary masterpiece. Don’t worry, it’s a simple list!
Baby potatoes (sliced ½ inch thick)
¼ cup frying oil
Salt (to taste)
Garlic powder
Paprika
1 dried rosemary
400 g cherry tomatoes
2 tbsp olive oil
A whole garlic bulb
1 teaspoon Italian seasoning
½ teaspoon red pepper flakes (adjust to taste)
Salt and freshly ground black pepper (to taste)
Fresh basil leaves (chopped)
1/4 cup heavy cream
Chicken breast
Olive oil
Salt
Garlic powder
Paprika
Oregano
Black pepper
Step-by-Step: Let’s Get Cooking!
Alright, let’s get down to business. Here’s how to bring this creamy tomato chicken breast to life:
Prep the Chicken: Pat the chicken breasts dry with paper towels. This helps them get a nice sear. Season generously with olive oil, salt, garlic powder, paprika, oregano, and black pepper. Don’t be shy with the seasoning!
Sear the Chicken: Heat olive oil in a large skillet over medium-high heat. Add the chicken breasts and sear for 4-5 minutes per side, until golden brown and cooked through. Remove the chicken from the skillet and set aside.
Sauté the Aromatics: Add the cherry tomatoes, olive oil, and whole garlic bulb to the same skillet. Cook, stirring occasionally, until the tomatoes begin to soften and burst, about 5-7 minutes.
Simmer the Sauce: Stir in the Italian seasoning, red pepper flakes (if using), salt, and freshly ground black pepper. Let the sauce simmer for a few minutes, allowing the flavors to meld together.
Add the Cream: Pour in the heavy cream and stir to combine. Reduce the heat to low and let the sauce simmer gently for another 5 minutes, or until it thickens slightly.
Return the Chicken: Place the seared chicken breasts back into the skillet, nestling them into the creamy tomato sauce. Spoon some of the sauce over the chicken to coat.
Finish and Serve: Sprinkle the chopped fresh basil leaves over the chicken and sauce. Serve immediately over your favorite pasta, rice, or with a side of roasted vegetables.
See? I told you it was easy! The key is to not rush the process. Let the flavors develop and meld together for the best results.
Pro Tips for Creamy Tomato Chicken Perfection
Want to take your creamy tomato chicken breast to the next level? Here are a few of my favorite pro tips:
Sear the Chicken Properly: Don’t overcrowd the pan when searing the chicken. This will lower the temperature of the pan and prevent the chicken from browning properly. Work in batches if necessary.
Use Fresh Basil: Fresh basil makes a huge difference in this recipe. Its vibrant flavor really elevates the dish. If you don’t have fresh basil, you can use dried basil, but use about half the amount.
Don’t Overcook the Chicken: Overcooked chicken is dry and tough. Use a meat thermometer to ensure the chicken is cooked to an internal temperature of 165°F (74°C).
Adjust the Spice Level: If you like a little heat, add more red pepper flakes. If you prefer a milder flavor, omit them altogether.
Deglaze the Pan: After searing the chicken, deglaze the pan with a splash of white wine or chicken broth before adding the tomatoes. This will add extra flavor to the sauce.
Common Mistakes to Avoid
Even the easiest recipes can have their pitfalls. Here are a few common mistakes to watch out for:
Overcooking the Chicken: As mentioned earlier, overcooked chicken is a no-no. Use a meat thermometer and don’t be afraid to pull the chicken out of the pan a little early. It will continue to cook as it rests in the sauce.
Using Low-Quality Tomatoes: The quality of your tomatoes will impact the flavor of the sauce. Use good-quality canned tomatoes or, even better, fresh tomatoes when they are in season.
Skipping the Searing Step: Searing the chicken adds a lot of flavor and helps to seal in the juices. Don’t skip this step!
Adding Cold Cream: Adding cold cream to a hot sauce can cause it to curdle. Let the cream come to room temperature before adding it to the sauce.
Variations: Make It Your Own!
One of the best things about this recipe is how easy it is to customize. Here are a few variations to try:
Creamy Tomato Spinach Chicken: Add a few handfuls of fresh spinach to the sauce during the last few minutes of cooking.
Creamy Tomato Mushroom Chicken: Sauté sliced mushrooms with the garlic before adding the tomatoes.
Creamy Tomato Pesto Chicken: Stir in a spoonful of pesto to the sauce for an extra burst of flavor.
Creamy Tomato Sun-Dried Tomato Chicken: Add chopped sun-dried tomatoes to the sauce for a tangy twist.
Spicy Creamy Tomato Chicken: Add a pinch of cayenne pepper or a dash of hot sauce to the sauce.
Don’t be afraid to experiment and find your own favorite variations! Cooking is all about having fun and creating something that you love.
Storage: Keeping It Fresh
If you have any leftovers (which is unlikely!), here’s how to store them:
In the Fridge: Store the creamy tomato chicken breast in an airtight container in the refrigerator for up to 3-4 days.
Reheating: Reheat gently in a skillet over low heat, or in the microwave. Add a splash of chicken broth or water to the sauce to prevent it from drying out.
Freezing: While you can freeze this dish, the creamy sauce may change texture slightly upon thawing. If freezing, store in an airtight container for up to 2 months. Thaw overnight in the refrigerator before reheating.
Frequently Asked Questions (FAQ)
Got questions? I’ve got answers!
Can I use chicken thighs instead of chicken breasts? Absolutely! Chicken thighs will add even more flavor and moisture to the dish. Just adjust the cooking time accordingly.
Can I use canned tomatoes instead of fresh tomatoes? Yes, you can. Use a 28-ounce can of crushed tomatoes or diced tomatoes.
Can I make this dish dairy-free? You can substitute the heavy cream with coconut cream or cashew cream for a dairy-free version.
What kind of pasta goes well with this dish? Penne, rigatoni, and farfalle are all great choices.
Can I add vegetables to this dish? Absolutely! Bell peppers, zucchini, and eggplant would all be delicious additions.
Serving Suggestions: Complete the Meal
This creamy tomato chicken breast is delicious on its own, but here are a few serving suggestions to make it a complete meal:
Over Pasta: Serve over your favorite pasta shape, such as penne, rigatoni, or spaghetti.
With Rice: Serve with a side of fluffy white rice or brown rice.
With Mashed Potatoes: Creamy mashed potatoes are the perfect complement to the rich tomato sauce.
With Roasted Vegetables: Serve with a side of roasted broccoli, asparagus, or Brussels sprouts.
With a Salad: A simple green salad with a vinaigrette dressing is a refreshing contrast to the creamy chicken.
Ultimately, this Creamy Tomato Chicken Breast is more than just a recipe; it’s an invitation to create, experiment, and enjoy the simple pleasures of cooking. I hope you love it as much as I do! And remember, if you make this, I’d love to know what you think. Leave a comment below and let me know how it turned out. Thank you for joining me in my kitchen today! I’m so glad you’re here. I love sharing these recipes with you, and I hope you enjoyed the recipe! I am so glad you enjoyed the creamy tomato basil chicken! I hope this dish becomes one of your favorite ways to prepare chicken breasts. If you didn’t add basil, make it next time, it’s worth it!
Hey there, kitchen adventurers! Ava here, ready to share a recipe that’s become a staple in my Seattle kitchen: Easy Cajun Chicken and Rice. If you’re anything like me, you love a meal that’s bursting with flavor but doesn’t keep you chained to the stove all night. This one-pan wonder is exactly that—a symphony of savory, spicy, and oh-so-satisfying goodness that’s perfect for a weeknight dinner or a cozy weekend gathering.
Growing up in Oregon, my mom always had a knack for turning simple ingredients into extraordinary dishes. This recipe is inspired by her resourcefulness and her love for bold flavors. It’s a dish that warms you from the inside out, like a comforting hug on a chilly day. So, grab your apron, and let’s get cooking!
Why You’ll Love This Cajun Chicken and Rice
Seriously, what’s not to love? This isn’t just a meal; it’s an experience. Here’s why this recipe will become your new go-to:
One-Pan Wonder: Fewer dishes mean more time to relax. Everything cooks together in one pan, making cleanup a breeze.
Flavor Explosion: The Cajun seasoning infuses every grain of rice and morsel of chicken with a delightful kick.
Customizable: Easily adapt the spice level and ingredients to suit your taste.
Comfort Food at Its Best: Hearty, satisfying, and guaranteed to please even the pickiest eaters.
Weeknight Winner: Quick enough for a busy weeknight, impressive enough for company.
Ingredients You’ll Need
Before we dive in, let’s gather our ingredients. Don’t worry; you probably already have most of these in your pantry!
How to Make Easy Cajun Chicken and Rice: Step-by-Step
Alright, let’s get down to business! This recipe is super straightforward, and I promise, even if you’re a beginner, you’ll nail it.
Prep the Chicken: Cut the chicken into bite-sized pieces. In a bowl, toss the chicken with 1 tbsp olive oil, 1 tbsp Cajun seasoning, salt, and pepper. Make sure each piece is nicely coated with the cajun seasoning.
Sear the Chicken: Heat 1 tbsp olive oil in a large, oven-safe skillet or Dutch oven over medium-high heat. Add the chicken and sear on all sides until golden brown. This usually takes about 5-7 minutes. Remove the chicken from the pan and set aside.
Sauté the Veggies: Add the diced onion and bell peppers to the same pan. Sauté until they soften, about 5-7 minutes. Add the minced garlic and cook for another minute until fragrant.
Add Rice and Broth: Stir in the uncooked rice, chicken broth, remaining 1 tsp Cajun seasoning, and smoked paprika. Bring the mixture to a boil.
Combine and Bake: Return the seared chicken to the pan, nestling it into the rice mixture. Cover the pan tightly with a lid or aluminum foil.
Bake: Bake in a preheated oven at 375°F (190°C) for 25-30 minutes, or until the rice is cooked through and the liquid is absorbed.
Rest and Garnish: Remove the pan from the oven and let it rest for 5-10 minutes before fluffing the rice with a fork. Garnish with chopped parsley or green onions and serve with lemon wedges, if desired.
Pro Tips for Perfect Cajun Chicken and Rice
Want to take your Cajun Chicken and Rice to the next level? Here are a few tricks I’ve learned along the way:
Use Quality Cajun Seasoning: The flavor of this dish hinges on the Cajun seasoning. I prefer to make my own, so I can control the spice level and ingredients.
Don’t Skip the Sear: Searing the chicken adds a beautiful depth of flavor and helps to keep it juicy.
Low-Sodium Broth is Key: Using low-sodium chicken broth allows you to control the saltiness of the dish. You can always add more salt to taste, but you can’t take it away!
Evenly Diced Veggies: Make sure your onion and bell peppers are diced into similar sizes to ensure they cook evenly.
Resting is Essential: Letting the dish rest after baking allows the rice to fully absorb the remaining liquid, resulting in a fluffier texture.
Common Mistakes to Avoid
We all make mistakes in the kitchen—it’s how we learn! Here are a few common pitfalls to watch out for:
Overcooking the Rice: Keep an eye on the rice while it’s baking. If it starts to dry out too quickly, add a splash more chicken broth.
Not Searing the Chicken Properly: Searing the chicken is crucial for flavor. Make sure the pan is hot before adding the chicken, and don’t overcrowd the pan. Work in batches if necessary.
Using Too Much Salt: Cajun seasoning can be quite salty, so be mindful of how much salt you add to the dish. Taste as you go and adjust accordingly.
Skipping the Resting Period: The resting period is essential for allowing the rice to fully absorb the liquid and achieve the perfect texture.
Variations to Spice Things Up
One of the best things about this recipe is how versatile it is. Feel free to get creative and customize it to your liking!
Add Sausage: For an even heartier meal, add some sliced andouille sausage or chorizo to the pan along with the chicken. This is a great way to flavor this dish.
Spice It Up: If you like things extra spicy, add a pinch of cayenne pepper or a dash of hot sauce to the rice mixture.
Add Vegetables: Feel free to add other vegetables, such as celery, carrots, or corn, to the pan along with the onion and bell peppers.
Use Different Protein: Not a fan of chicken? Try using shrimp, turkey, or even tofu instead.
Make it Creamy: Stir in a dollop of sour cream or Greek yogurt after baking for a creamy, tangy twist.
How to Store Leftover Cajun Chicken and Rice
If you happen to have any leftovers (which is rare in my house!), here’s how to store them:
In the Fridge: Allow the Cajun Chicken and Rice to cool completely before transferring it to an airtight container. Store in the refrigerator for up to 3-4 days.
Reheating: Reheat the leftovers in the microwave or in a skillet over medium heat. Add a splash of chicken broth or water to keep the rice from drying out.
Freezing: For longer storage, freeze the Cajun Chicken and Rice in an airtight container for up to 2 months. Thaw overnight in the refrigerator before reheating.
To keep the flavors fresh, store in an airtight container. If you are storing it in the fridge, make sure to store in an airtight container. You can store in the fridge for up to days.
Frequently Asked Questions (FAQ)
Got questions? I’ve got answers! Here are some of the most common questions I get about this recipe:
Can I use brown rice instead of white rice? Yes, but keep in mind that brown rice takes longer to cook. You may need to add more chicken broth and increase the baking time.
Can I make this recipe in a slow cooker? Absolutely! Sear the chicken and sauté the vegetables as directed, then transfer everything to a slow cooker. Cook on low for 6-8 hours, or on high for 3-4 hours.
Can I use bone-in chicken? Yes, but you’ll need to adjust the cooking time accordingly. Make sure the chicken is cooked through before serving.
Is this recipe gluten-free? Yes, as long as you use a gluten-free Cajun seasoning blend.
Can I make this vegetarian? Definitely! Substitute the chicken with your favorite plant-based protein, such as tofu or tempeh.
Serving Suggestions: What to Serve with Cajun Chicken and Rice
This Cajun Chicken and Rice is a complete meal on its own, but if you want to round it out, here are a few serving suggestions:
Side Salad: A simple green salad with a vinaigrette dressing provides a refreshing contrast to the richness of the dish.
Roasted Vegetables: Roasted broccoli, asparagus, or Brussels sprouts are delicious and healthy additions to the meal.
Cornbread: A slice of warm cornbread is the perfect accompaniment to soak up all the flavorful juices.
Coleslaw: Creamy coleslaw adds a cool and crunchy element to the meal.
Garlic Bread: Because who doesn’t love garlic bread?
So there you have it—my Easy Cajun Chicken and Rice recipe! I hope you love it as much as my family and I do. Remember, cooking is all about having fun and experimenting, so don’t be afraid to put your own spin on this dish. And as always, if you try it, be sure to let me know what you think in the comments below. Happy cooking, friends!
Enjoy this hearty summer meals recipe! This easy weekly dinners will become one of your family dinner ideas with chicken. Give this fancy chicken and rice recipe a try and be amazed!
This flavorful Cajun Chicken and Rice is an easy one-pot meal perfect for a weeknight dinner. It's packed with chicken, vegetables, and spices for a delicious and satisfying dish.
Ingredients
Chicken
1lbboneless, skinless chicken thighs (or breasts)
1tbspolive oil
1tbspCajun seasoning
0.5tspsalt(adjust to taste)
0.25tspblack pepper
Vegetables and Rice
1tbspolive oil(for sautéing)
1small yellow onion(diced)
1red bell pepper(diced)
1green bell pepper(diced)
3clovesgarlic(minced)
1cuplong grain white rice(uncooked)
2cupslow-sodium chicken broth
1tspCajun seasoning
0.25tspsmoked paprika(for extra flavor)
Garnish
Chopped parsley or green onions(for garnish)
Lemon wedges(optional, for a bright finish)
Instructions
Season chicken with olive oil, Cajun seasoning, salt, and pepper.
Sauté onion and bell peppers in olive oil until softened. Add garlic and cook until fragrant.
Add rice, chicken broth, Cajun seasoning, and smoked paprika. Bring to a boil, then reduce heat and simmer until rice is cooked and liquid is absorbed.
Stir in chicken and cook until heated through. Garnish with parsley or green onions and serve with lemon wedges, if desired.
Notes
For a spicier dish, add a pinch of cayenne pepper or a dash of hot sauce.
My name’s Ava, and if you’ve stumbled upon my kitchen, you’re probably here for one thing—the kind of recipes that make people pause mid-bite and say, ‘Wow.’ And let me tell you, these Ground Beef Philly Cheesesteaks will absolutely deliver that ‘wow’ factor! Forget complicated recipes and hours in the kitchen. This recipe is all about maximum flavor with minimum effort. I grew up in a small town in Oregon, where the smell of fresh bread and roasted vegetables often drifted out of my mother’s kitchen window. Cooking wasn’t just something we did to eat—it was how we celebrated, comforted, and connected. This recipe reminds me of those comforting times, but with a Philly twist!
These days, I’m 34 and living in Seattle, where my kitchen has become my favorite corner of the world. And trust me, my kitchen has seen its fair share of cheesesteaks. But this ground beef version? It’s a game-changer. It’s perfect for a quick weeknight dinner, a casual get-together, or even a fun weekend lunch. Sure, I’ve had my share of flops (ask me about the infamous triple-layer cake that collapsed right before a dinner party), but I’ve learned that every ‘oops’ moment is just an invitation to try again—this time with a little more patience and maybe a pinch more salt. And these cheesesteaks? They’re pretty much foolproof.
What I love most is taking a recipe and finding ways to make it even better—whether it’s swapping in a secret ingredient, adjusting the texture, or adding a touch of spice to wake up the flavors. I’m a bit obsessed with balance: sweet with savory, creamy with crunchy, familiar with unexpected. And I believe that cooking is less about following rules and more about trusting your senses. If it smells amazing and makes you smile, you’re probably on the right track. And believe me, the aroma of this Ground Beef Philly wafting through your kitchen will definitely make you smile!
So whether you’re cooking for your family, impressing friends, or just treating yourself, I’m here to help you find your next favorite dish. Pull up a chair, grab a spatula, and let’s make something unforgettable together. Let’s dive into this incredible recipe that’s about to become your new go-to!
Why You’ll Love This Ground Beef Philly Cheesesteak Recipe
Okay, let’s be real. There are a million cheesesteak recipes out there. So why should you try this one? Here’s why:
Quick & Easy: This recipe comes together in under 30 minutes. Perfect for those busy weeknights when you need a fast dinner.
Budget-Friendly: Ground beef is a more affordable option than thinly sliced steak, making this a wallet-friendly meal.
Kid-Friendly: Even the pickiest eaters will love this cheesy, beefy goodness served in a soft hoagie roll.
Customizable: You can easily adapt this recipe to your liking by adding different veggies, cheeses, or spices.
Seriously Delicious: The combination of savory ground beef, tender vegetables, and melty cheese is simply irresistible.
This recipe is a blend of comfort food classics, modern twists, and just enough adventure to keep things exciting. I share them because I want you to have a little magic in your kitchen too—meals that bring people together, that become your ‘go-to,’ that make someone you love ask for seconds. And trust me, they will be asking for seconds!
Ingredients You’ll Need
Here’s what you’ll need to whip up these mouthwatering Ground Beef Philly Cheesesteaks. Don’t worry, most of these are pantry staples!
– 1 pound ground beef
– 1 medium onion, thinly sliced
– 1 medium green bell pepper, thinly sliced
– 1 cup mushrooms, sliced (optional)
– 1 teaspoon garlic powder
– 1 teaspoon Worcestershire sauce
– Salt, to taste
– Black pepper, to taste
– 4 slices provolone cheese (or any cheese of your preference)
– 4 hoagie rolls
– Olive oil, for cooking
How to Make the Ultimate Ground Beef Philly Cheesesteaks: Step-by-Step
Creating the amazing Ground Beef Philly Cheesesteaks involves straightforward steps that will guide you through the process:
In a large skillet, add a drizzle of olive oil and heat over medium-high. This is where the magic begins!
Cook Vegetables: Add the sliced onions and bell peppers. Sauté for about 3-5 minutes until they are tender. If using, add mushrooms and cook for an additional 3 minutes. You want them softened and slightly caramelized.
Brown the Beef: Push the vegetables to the side of the skillet and add the ground beef to the pan. Break apart and cook until no longer pink, about 5-7 minutes. Make sure to crumble the beef well for even cooking.
Season: Stir in garlic powder, Worcestershire sauce, salt, and pepper. Mix everything together properly for about 2 minutes. The Worcestershire sauce adds a depth of flavor that’s simply divine.
Melt the Cheese: Reduce the heat to low. Place a slice of cheese over the beef mixture. Cover the skillet with a lid and allow the cheese to melt, about 2-3 minutes. The cheese is the star of the show, so don’t rush this step!
Prepare the Rolls: While the cheese is melting, slice the hoagie rolls lengthwise without cutting all the way through.
Assemble the Sandwiches: Once the cheese has melted, spoon the beef and vegetable mixture into each roll. Be generous!
Serve Hot: Optionally, toast the rolls for added texture before serving. A little toasting goes a long way!
These steps are designed to help you create the ultimate Ground Beef Philly Cheesesteaks filled with rich flavors and satisfying textures. Remember, cooking is about trusting your instincts. If it looks good and smells amazing, you’re on the right track!
Pro Tips for the Perfect Philly Cheesesteak
Want to take your Ground Beef Philly Cheesesteaks to the next level? Here are a few of my favorite pro tips:
Use Quality Ground Beef: Opt for 80/20 ground beef for the best flavor and texture. The extra fat adds richness and keeps the beef from drying out.
Don’t Overcook the Vegetables: You want your onions and peppers to be tender-crisp, not mushy.
Toast the Rolls: Toasting the hoagie rolls adds a delightful crunch and prevents them from getting soggy.
Get Creative with Cheese: While provolone is traditional, feel free to experiment with other cheeses like mozzarella, pepper jack, or even a creamy cheese sauce.
Season Generously: Don’t be shy with the salt, pepper, and garlic powder. These seasonings are essential for bringing out the flavors of the beef and vegetables.
Remember, the best recipes aren’t always the fanciest—they’re the ones that feel like a warm hug, the ones you make over and over because they just work. And these pro tips will help you make them work even better!
Common Mistakes to Avoid
Even with a simple recipe like this, it’s easy to make a few common mistakes. Here’s what to watch out for:
Overcrowding the Pan: If you overcrowd the pan, the vegetables and beef will steam instead of brown. Cook in batches if necessary.
Using Low-Quality Rolls: The hoagie rolls are an important part of the cheesesteak experience. Choose fresh, soft rolls that can hold up to the filling.
Forgetting to Season: Seasoning is key to a flavorful cheesesteak. Don’t forget to add salt, pepper, and garlic powder to the beef and vegetables.
Not Melting the Cheese Properly: The cheese should be melted and gooey, not just sitting on top of the beef. Cover the pan with a lid to help the cheese melt quickly and evenly.
Adding Cold Ingredients: The heat of the beef melts the cheese perfectly.
I believe that cooking is less about following rules and more about trusting your senses. If it smells amazing and makes you smile, you’re probably on the right track. And avoiding these mistakes will definitely keep you on the right track!
Variations to Try
Want to mix things up? Here are a few fun variations to try with your Ground Beef Philly Cheesesteaks:
Spicy Philly: Add a pinch of red pepper flakes or a dash of hot sauce to the beef mixture for a spicy kick.
Mushroom Swiss Philly: Use Swiss cheese instead of provolone and add extra mushrooms for a savory twist.
Pizza Philly: Add a spoonful of marinara sauce and a sprinkle of Parmesan cheese for a pizza-inspired cheesesteak.
BBQ Philly: Toss the ground beef with your favorite BBQ sauce for a sweet and smoky flavor.
Chicken Philly: Substitute ground chicken for ground beef for a lighter option.
I love taking a recipe and finding ways to make it even better—whether it’s swapping in a secret ingredient, adjusting the texture, or adding a touch of spice to wake up the flavors. These variations are a great way to get creative in the kitchen!
How to Store and Reheat Leftovers
Got leftovers? Here’s how to store and reheat them:
Storage: Wrap leftover cheesesteaks tightly in plastic wrap or aluminum foil and store them in the refrigerator for up to 3 days.
Reheating: Reheat the cheesesteaks in a skillet over medium heat until heated through. You can also reheat them in the microwave, but the rolls may get a bit soggy.
Freezing: For longer storage, you can freeze the beef and vegetable mixture separately from the rolls. Thaw overnight in the refrigerator before reheating and assembling the cheesesteaks.
My recipes are a blend of comfort food classics, modern twists, and just enough adventure to keep things exciting. And knowing how to properly store and reheat leftovers is essential for making the most of your culinary creations!
Frequently Asked Questions (FAQ)
Here are some frequently asked questions about Ground Beef Philly Cheesesteaks:
Can I use a different type of cheese? Absolutely! Provolone is traditional, but you can use any cheese that melts well, such as mozzarella, cheddar, or pepper jack.
Can I add other vegetables? Of course! Feel free to add other vegetables like jalapeños, banana peppers, or roasted red peppers.
Can I make this recipe ahead of time? Yes, you can cook the beef and vegetable mixture ahead of time and store it in the refrigerator. When you’re ready to eat, simply reheat and assemble the cheesesteaks.
Can I use different rolls? While hoagie rolls are the classic choice, you can use any type of roll that you like. Just make sure they’re sturdy enough to hold the filling.
Is this recipe gluten-free? To make this recipe gluten-free, use gluten-free hoagie rolls and gluten-free Worcestershire sauce.
I’m here to help you find your next favorite dish. And answering these frequently asked questions is just one way I can help you feel confident in the kitchen!
Serving Suggestions
What to serve with your Ground Beef Philly Cheesesteaks? Here are a few ideas:
French Fries: A classic pairing!
Onion Rings: Crispy and delicious.
Coleslaw: A refreshing side dish to balance the richness of the cheesesteak.
Potato Salad: Another classic picnic side.
Pickles: For a tangy crunch.
These serving suggestions are a blend of comfort food classics, modern twists, and just enough adventure to keep things exciting. I share them because I want you to have a little magic in your kitchen too—meals that bring people together, that become your ‘go-to,’ that make someone you love ask for seconds. Enjoy!
Ground Beef Philly Cheesesteaks: An Incredible Ultimate Recipe That Will Change Your Game
Prep Time 10 minutesminutes
Cook Time 20 minutesminutes
Total Time 30 minutesminutes
Servings 4sandwiches
Calories 450
Enjoy a delicious twist on the classic Philly Cheesesteak with this ground beef version. This recipe is easy to make and packed with flavor, perfect for a quick and satisfying meal.
Ingredients
Ingredients
1poundground beef
1mediumonion(thinly sliced)
1mediumgreen bell pepper(thinly sliced)
1cupmushrooms(sliced (optional))
1teaspoongarlic powder
1teaspoonWorcestershire sauce
to tasteSalt
to tasteBlack pepper
4slicesprovolone cheese(or any cheese of your preference)
4hoagie rollshoagie rolls
for cookingOlive oil
Instructions
Creating the amazing Ground Beef Philly Cheesesteaks involves straightforward steps.
In a large skillet, add olive oil and heat over medium-high.
Add sliced onions and bell peppers. Sauté for 3-5 minutes until tender. Add mushrooms and cook for 3 minutes.
Push vegetables to the side and add ground beef. Cook until no longer pink, about 5-7 minutes.
Stir in garlic powder, Worcestershire sauce, salt, and pepper. Mix for 2 minutes.
Reduce heat to low. Place cheese over beef. Cover and melt cheese, about 2-3 minutes.
Slice hoagie rolls lengthwise without cutting all the way through.
Spoon beef and vegetable mixture into each roll.
Serve Hot: Optionally, toast the rolls for added texture before serving.
Notes
For an extra layer of flavor, try adding a sprinkle of your favorite hot sauce before serving.
Lentil Quinoa Patties: An Easy High-Protein Recipe That Will Wow You
Hey there, friend! Ava here, back in my Seattle kitchen and ready to share a recipe that’s become a staple in our household: Lentil Quinoa Patties. If you’re on the hunt for a healthy vegetarian dinner, a quick lunch option, or just a delicious way to sneak more plant-based protein into your diet, you’ve come to the right place. These patties are not only incredibly easy to make, but they’re bursting with flavor and packed with nutrients. Trust me; even the meat-lovers in your life will be asking for seconds!
Growing up, lentils weren’t exactly the star of the show in my family’s meals. But over the years, I’ve discovered the magic of these little legumes and how versatile they can be. Combined with the powerhouse that is quinoa, these patties are a game-changer. I love how they’re perfect for meal prepping, and they’re also a fantastic way to use up leftover cooked quinoa. Plus, they’re incredibly customizable, so you can adapt the recipe to suit your taste and what you have on hand. So, let’s dive in and create some kitchen magic together!
Why You’ll Absolutely Love This Lentil Quinoa Patty Recipe
Seriously, these patties are a total winner. Here’s why I think you’ll be obsessed:
Healthy and Delicious: These lentil quinoa patties are packed with protein and fiber, making them a satisfying and nutritious meal.
Easy to Make: With simple ingredients and straightforward steps, this recipe is perfect for busy weeknights.
Versatile: Serve them as a main course, in sandwiches, or as a tasty appetizer.
Customizable: Swap out the feta for parmesan, add different herbs and spices, or adjust the texture to your liking.
Great for Meal Prep: Make a batch on Sunday and enjoy them throughout the week.
Budget-Friendly: Lentils and quinoa are affordable staples, making this a cost-effective meal option.
Mediterranean Inspired: These patties have a delicious Mediterranean flavor profile, thanks to the feta, lemon zest, and herbs.
They re also a great way to get picky eaters to enjoy lentils! My nephew, who turns his nose up at most vegetables, devours these. It’s a small victory, but a victory nonetheless!
Ingredients You’ll Need
Here’s a rundown of everything you’ll need to whip up these amazing lentil quinoa patties. Don’t worry; most of these are pantry staples!
Lentils: 1 can (15 oz or 400 g) rinsed and drained well, or 1½ cups cooked brown or green lentils.
Salt and Pepper: ¾ teaspoon salt (plus black pepper to taste).
Flour: ½ cup all-purpose flour (+ 2 to 6 tablespoons water if the batter looks dry).
Olive Oil: 1 tablespoon extra virgin olive oil (for cooking the patties).
Step-by-Step Guide to Making the Perfect Lentil Quinoa Patties
Alright, let’s get cooking! Here’s how to make these delicious patties:
Prep the Lentils: Drain and rinse the canned lentils. Shake off as much water as possible. In a large bowl, mash about half of the lentils with a fork. This helps the mixture stick together.
Add Flavor and Mix: Add the cooked quinoa, egg, feta, lemon zest, parsley, onion, garlic, smoked paprika, oregano, salt, pepper, and flour to the bowl. Mix well with a spoon. The mixture should be thick and spoonable. If the mixture feels dry, add 1 tablespoon of water at a time until it reaches the right consistency.
Cook the Fritters: Heat a thin layer of olive oil in a non-stick skillet over medium heat. Scoop spoonfuls of the mixture into the skillet, flatten them slightly, and cook for 3–4 minutes per side, until golden and crisp. Be sure not to overcrowd the pan; cook in batches if necessary.
Serve: Serve warm with tzatziki or Greek yogurt, a squeeze of lemon, lettuce, olives, and tomatoes.
And there you have it! Easy peasy, right?
Pro Tips for Patty Perfection
Want to take your lentil quinoa patties to the next level? Here are a few of my favorite pro tips:
Drain Lentils Well: Make sure to drain and rinse the lentils thoroughly. Excess moisture can make the patties soggy.
Mash Some Lentils: Mashing about half of the lentils helps bind the mixture together.
Adjust Consistency: If the mixture is too dry, add water one tablespoon at a time. If it’s too wet, add a little more flour.
Don’t Overcrowd the Pan: Cook the patties in batches to ensure they cook evenly and get crispy.
Use a Non-Stick Skillet: This will prevent the patties from sticking and make them easier to flip.
Get Creative with Toppings: Experiment with different toppings and sauces to find your favorite combination.
The key to the recipe is to be patient when cooking the patties. Make sure they re golden brown before flipping them. You re looking for that perfect crispiness!
Common Mistakes to Avoid
Even the best cooks make mistakes. Here are a few common pitfalls to watch out for when making lentil quinoa patties:
Using Too Much Water: Overwatering the mixture can result in soggy patties that fall apart.
Not Mashing Enough Lentils: Failing to mash some of the lentils can make the patties too crumbly.
Overcrowding the Pan: Overcrowding the skillet can lower the temperature and cause the patties to steam instead of crisp.
Cooking on Too High Heat: Cooking on high heat can burn the outside of the patties before the inside is cooked through.
Not Seasoning Enough: Don’t be afraid to season generously with salt, pepper, and other spices.
If it feels like the patties aren’t holding together, add a bit more flour or even some breadcrumbs to the mixture. That usually does the trick!
Delicious Variations to Try
One of the best things about this recipe is how easy it is to customize. Here are a few variations to inspire you:
Spicy Patties: Add a pinch of red pepper flakes or a dash of hot sauce to the mixture for a spicy kick.
Mediterranean Style: Incorporate sun-dried tomatoes, Kalamata olives, and more feta for an extra Mediterranean flair.
Indian-Inspired: Add curry powder, cumin, and coriander for an Indian-inspired twist.
Vegan Option: Substitute the egg with a flax egg (1 tablespoon flaxseed meal mixed with 3 tablespoons water) for a vegan version.
Cheesy Goodness: Swap the feta for your favorite cheese, such as cheddar, mozzarella, or Monterey Jack.
Herb Infusion: Experiment with different herbs like dill, mint, or cilantro to change up the flavor profile.
For anyone who loves experimenting, the possibilities are endless! Glad you asked about variations because this is where the fun really begins!
How to Store and Reheat
These lentil quinoa patties are perfect for meal prepping, and they store beautifully. Here’s how:
Storage: Store cooked patties in an airtight container in the refrigerator for up to 4 days.
Reheating: Reheat the patties in a skillet over medium heat until warmed through and crispy. You can also reheat them in the oven at 350°F (175°C) for about 10-15 minutes, or in the air fryer for a quicker option.
Freezing: For longer storage, freeze the patties in a single layer on a baking sheet until solid, then transfer them to a freezer bag or container. They can be stored in the freezer for up to 2 months. Thaw overnight in the refrigerator before reheating.
You can even cook the patties in the air fryer. They come out wonderfully crispy! Just spray them lightly with olive oil and cook at 375°F (190°C) for about 8-10 minutes, flipping halfway through.
Frequently Asked Questions (FAQ)
Got questions? I’ve got answers! Here are some common questions about making lentil quinoa patties:
Can I use a different type of lentil? Yes, you can use brown or green lentils instead of canned lentils. Just make sure they are cooked until tender but not mushy.
Can I substitute the quinoa? Yes, you can use brown rice, couscous, or even finely chopped cauliflower rice as a substitute for quinoa.
Can I make these patties gluten-free? Yes, substitute the all-purpose flour with a gluten-free flour blend or almond flour.
Can I add other vegetables? Absolutely! Feel free to add grated carrots, zucchini, or bell peppers to the mixture.
How do I prevent the patties from falling apart? Make sure to mash some of the lentils, drain the lentils well, and add enough flour to bind the mixture together.
Serving Suggestions: Complete Your Meal
These lentil quinoa patties are delicious on their own, but they’re even better when paired with the right accompaniments. Here are a few serving suggestions:
Tzatziki or Greek Yogurt: A dollop of tzatziki or Greek yogurt adds a creamy, tangy element that complements the patties perfectly.
Lemon Wedges: A squeeze of fresh lemon juice brightens up the flavors.
Salad: Serve the patties with a fresh salad of lettuce, tomatoes, cucumbers, and olives for a light and healthy meal.
Pita Bread: Stuff the patties into pita bread with your favorite toppings for a delicious sandwich.
Hummus: A side of hummus adds a creamy, nutty flavor that pairs well with the Mediterranean-inspired flavors of the patties.
Roasted Vegetables: Serve the patties with roasted vegetables like broccoli, sweet potatoes, or Brussels sprouts for a hearty and nutritious meal.
I often serve these with a simple side salad and a dollop of homemade tzatziki. It’s an inspired meal that’s both satisfying and healthy.
So, there you have it! My go-to lentil quinoa patty recipe that’s easy, healthy, and incredibly delicious. I hope you love it as much as we do. Now, go get your apron on and let’s make some magic in the kitchen!
These lentil quinoa patties are a delicious and healthy way to enjoy a high-protein meal. They're easy to make and perfect for a quick lunch or dinner.
Ingredients
Ingredients
1canlentils(15 oz or 400 g can - rinsed and drained well - sub 1½ cups cooked brown or green lentils)
1.5cupscooked quinoa
1largeegg
0.5cupcrumbled feta(sub grated parmesan)
1lemon(the grated zest)
0.25cupparsley(or fresh dill, chopped)
1onion(finely chopped)
2clovesgarlic(grated)
2teaspoonssmoked paprika
1teaspoondried oregano(or ground cumin)
0.75teaspoonsalt(+ black pepper to taste)
0.5cupall-purpose flour(+ 2 to 6 tablespoons water if batter looks dry and does not hold together)
1tablespoonextra virgin olive oil(for cooking the patties)
Instructions
Prep the lentils: Drain and rinse lentils, mash half with a fork.
Add flavor and mix: Add quinoa, egg, feta, lemon zest, parsley, onion, garlic, paprika, oregano, salt, and flour. Mix, adding water if needed.
Cook the fritters: Heat olive oil in a skillet. Scoop in mixture, flatten, and cook for 3–4 minutes per side.
Serve: Serve warm with tzatziki or Greek yogurt, lemon, lettuce, olives, and tomatoes.
Notes
For a vegan option, replace the egg with a flax egg (1 tablespoon ground flaxseed mixed with 3 tablespoons water) and omit the feta or use a vegan feta alternative.
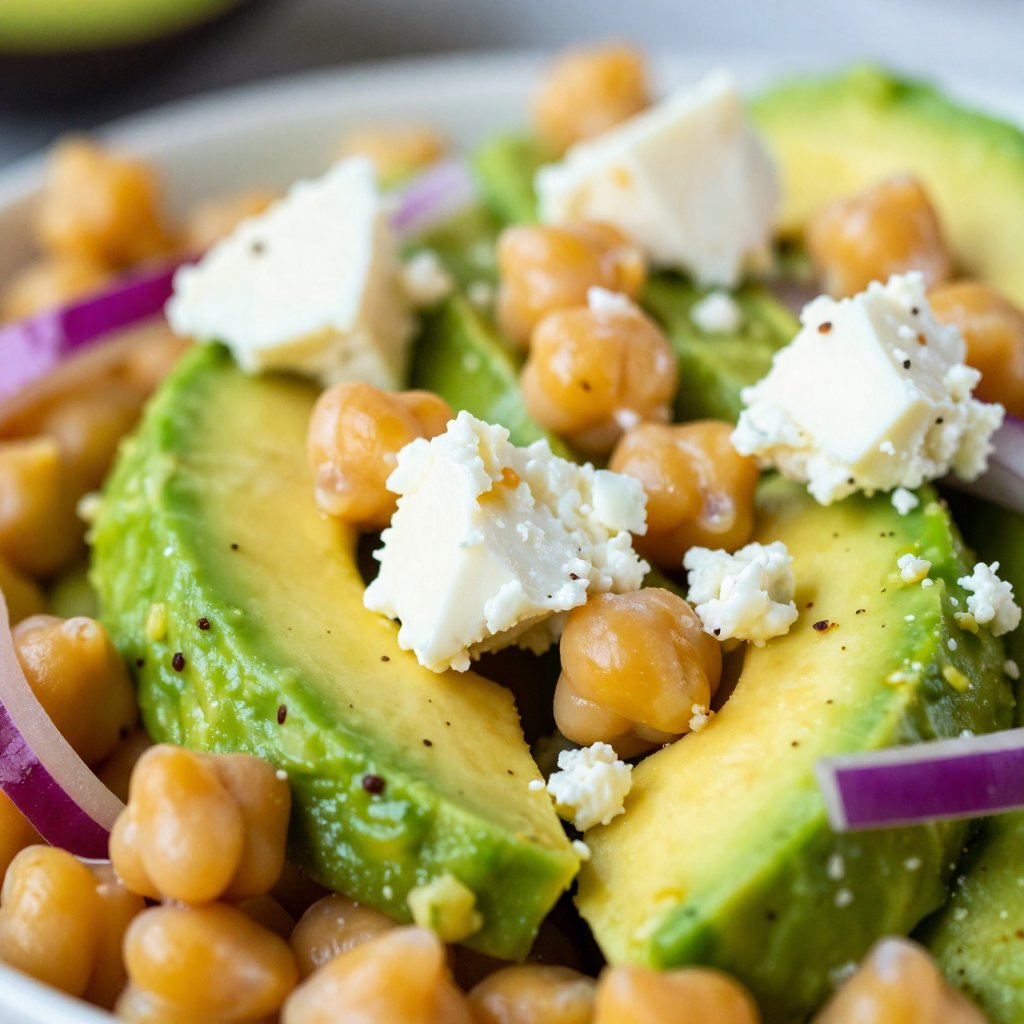
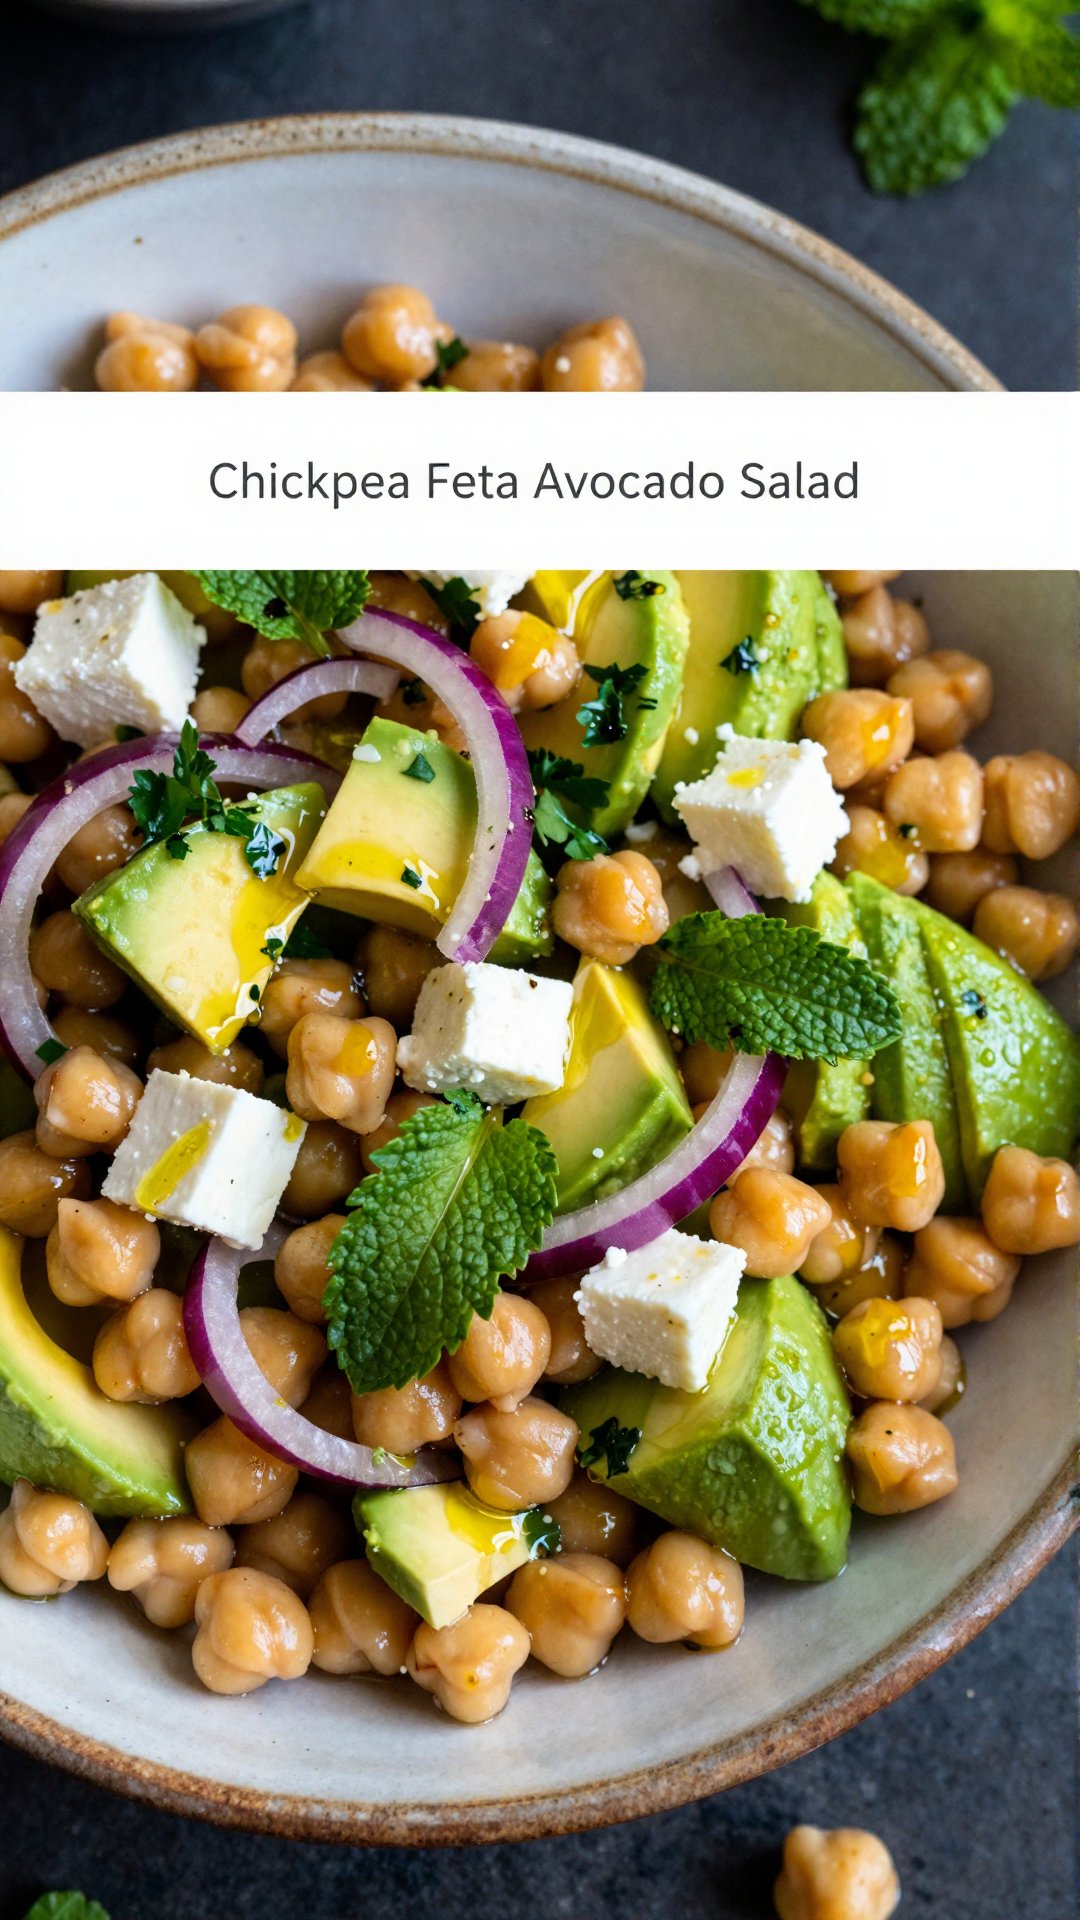
Hey there, friend! Ava here, back in my Seattle kitchen, and today we’re diving headfirst into a bowl of sunshine: Chickpea Feta Avocado Salad. If you’re anything like me, you’re always on the hunt for that *perfect* balance – something that’s quick, easy, ridiculously tasty, and, let’s be honest, makes you feel good from the inside out. Well, buckle up, because this salad ticks all the boxes. Think vibrant Mediterranean flavors, creamy avocado, salty feta, and a zesty dressing that’ll make your taste buds sing. Ready to get started?
This **avocado salad** is a game-changer. It’s not just another boring salad; it’s a flavor explosion that will leave you feeling satisfied and energized. It’s **perfect for** a light lunch, a vibrant side dish, or even a quick dinner on those nights when you just can’t be bothered to cook anything complicated.
Why You’ll Love This Chickpea Feta Avocado Salad
Okay, let’s get real. There are a million and one salads out there, so why should you give *this* one a try? Here’s the lowdown:
It’s Quick and Easy: Seriously, from start to finish, you’re looking at maybe 15 minutes. Perfect for busy weeknights or when unexpected guests pop by.
Bursting with Flavor: We’re talking creamy avocado, salty feta, zesty lemon, and fresh herbs. Each bite is a party in your mouth.
Healthy and Nutritious: Packed with protein, healthy fats, and vitamins, this salad is as good for your body as it is for your taste buds.
Versatile: This **feta avocado salad** can be customized to your heart’s content. Add your favorite veggies, swap out the herbs, or even throw in some grilled chicken or shrimp for extra protein.
Meal Prep Friendly: Make a big batch on Sunday and enjoy it for lunch throughout the week. The flavors actually meld together and get even better over time.
Honestly, **this salad is** my go-to when I need something satisfying and healthy, and I know it will be yours too. **It’s** just so versatile. You can serve **this chickpea feta avocado** creation as a simple lunch, a side for grilled chicken or fish, or even as a topping for toasted bread. The possibilities are endless!
The Ingredients You’ll Need
Let’s gather our ingredients. **The ingredients** are simple and fresh:
1 (15-ounce/425g) can chickpeas, drained and rinsed
1 avocado, pitted and diced
4 ounces/115g feta cheese, crumbled
1/2 cup/75g red onion, thinly sliced
1/2 cup/50g fresh parsley, chopped
1/4 cup/25g fresh mint, chopped
3 tablespoons/45ml olive oil
2 tablespoons/30ml lemon juice, freshly squeezed
1 clove garlic, minced
1/2 teaspoon/2.5ml dried oregano
Salt and pepper to taste
How to Make Chickpea Feta Avocado Salad: Step-by-Step
Alright, let’s get down to business! This **chickpea feta avocado salad** is so easy to make, you’ll be enjoying it in no time.
Combine Ingredients: In a large bowl, combine the drained chickpeas, diced avocado, crumbled feta cheese, thinly sliced red onion, chopped parsley, and chopped mint.
Make the Dressing: In a small bowl or jar, whisk together the olive oil, fresh **lemon juice**, minced garlic, and dried oregano. Season with salt and pepper to taste.
Dress the Salad: Pour **the dressing** over the salad ingredients. Gently toss until everything is well coated.
Serve: Serve immediately or chill for later.
See? I told you it was easy! **This chickpea feta** recipe is truly a breeze to throw together, making it **perfect for** those days when you’re short on time but still want something delicious and healthy.
Pro Tips for the Best Salad Ever
Want to take your **feta avocado salad** to the next level? Here are a few of my favorite pro tips:
Use Ripe Avocado: The avocado should be firm but yield to gentle pressure. Too hard, and it’ll be difficult to dice. Too soft, and it’ll turn to mush.
Don’t Overdress: Start with less dressing and add more to taste. You want the salad to be flavorful, not swimming in dressing.
Chill Before Serving: Chilling the salad for at least 30 minutes allows the flavors to meld together and intensifies the taste.
Fresh Herbs are Key: Don’t skimp on the fresh parsley and mint. They add a brightness and freshness that really elevates the salad.
Taste and Adjust: Before serving, taste the salad and adjust the seasoning as needed. Add more salt, pepper, **lemon juice**, or olive oil to your liking.
These tips will ensure your **avocado salad is** always a hit. Remember, **this salad** is all about fresh flavors and simple preparation, so don’t overthink it. Just have fun and experiment with different variations to find your perfect combination.
Common Mistakes to Avoid
Even the simplest recipes can have their pitfalls. Here are a few common mistakes to avoid when making **this salad**:
Overripe Avocado: Using an overripe avocado will result in a mushy, unappetizing salad.
Not Draining Chickpeas: Make sure to thoroughly drain and rinse the chickpeas to remove any excess liquid and improve the texture of the salad.
Using Pre-Grated Feta: Pre-grated feta often contains cellulose, which can prevent it from melting properly and affect the overall texture of the salad.
Over-Salting: Feta cheese is already quite salty, so be careful not to over-salt the salad. Taste as you go and adjust accordingly.
Skipping the Fresh Herbs: Fresh herbs are essential for adding brightness and flavor to the salad. Don’t skip them!
Avoiding these mistakes will help you create a **feta avocado** masterpiece every time. Remember, cooking is all about learning and experimenting, so don’t be afraid to try new things and find what works best for you.
Variations to Spice Things Up
One of the best things about **this chickpea feta avocado** salad is how easily you can customize it. Here are a few variations to try:
Add Vegetables: Cucumber, bell peppers, tomatoes, and Kalamata olives all make great additions to this salad.
Spice it Up: Add a pinch of red pepper flakes to the dressing for a little heat.
Add Protein: Grilled chicken, shrimp, or salmon would be delicious additions.
Swap the Cheese: If you’re not a fan of feta, try goat cheese or halloumi instead.
Add Nuts or Seeds: Toasted almonds, walnuts, or pumpkin seeds add a nice crunch.
Feel free to get creative and experiment with different combinations. **You can** really make **this salad** your own by adding your favorite ingredients and flavors.
How to Store Leftovers
If you happen to have any leftovers (which is unlikely, because **it’s** so delicious!), here’s how to store them:
In the Fridge: Store the salad in an airtight container in the refrigerator for up to 3 days.
Preventing Avocado Browning: To prevent the avocado from browning, squeeze a little extra **lemon juice** over the salad before storing it.
Best Served Fresh: While the salad can be stored for a few days, it’s best served fresh for optimal flavor and texture.
Keep in mind that the avocado may soften slightly over time, but the salad will still be delicious. Just give it a good toss before serving to redistribute the dressing and flavors.
Frequently Asked Questions (FAQ)
Got questions? I’ve got answers! Here are some frequently asked questions about **this avocado salad**:
Can I make this salad ahead of time? Yes, you can make the salad ahead of time, but I recommend adding the avocado just before serving to prevent it from browning.
Can I use dried herbs instead of fresh? While fresh herbs are preferred, you can use dried herbs in a pinch. Use about 1 teaspoon of dried parsley and 1/2 teaspoon of dried mint.
Is this salad gluten-free? Yes, this salad is naturally gluten-free.
Is this salad vegan? No, this salad is not vegan because it contains feta cheese. However, you can easily make it vegan by omitting the feta or using a vegan feta alternative.
Can I add other beans to this salad? Absolutely! Cannellini beans, kidney beans, or black beans would all be great additions.
If you have any other questions, feel free to leave a comment below, and I’ll do my best to answer them!
Serving Suggestions: The Perfect Side Dish or Light Meal
**This salad is a** versatile dish that can be enjoyed in many different ways. Here are a few serving suggestions:
As a Side Dish: Serve it alongside grilled chicken, fish, or vegetables for a complete and balanced meal.
As a Light Lunch: Enjoy it on its own for a quick and healthy lunch.
In a Wrap or Sandwich: Stuff it into a pita pocket or wrap for a portable and delicious meal.
As a Topping: Use it as a topping for toasted bread, crackers, or even pizza.
With Hummus and Pita: Serve it with hummus and warm pita bread for a Mediterranean-inspired feast.
No matter how you choose to serve it, **this chickpea feta** salad is sure to be a hit. It’s a crowd-pleasing dish that’s **perfect for** potlucks, picnics, and parties.
So there you have it! My Chickpea Feta Avocado Salad – a simple, flavorful, and healthy dish that’s sure to become a staple in your kitchen. I hope you love it as much as I do! Now, go forth and create some magic in your kitchen. Until next time, happy cooking!
Enjoy this **a quick** and easy Mediterranean delight. This **feta avocado salad is** truly special!
Crispy Honey Garlic Chicken Bites Recipe: A Kitchen Love Story
My name’s Ava, and if you’ve stumbled upon my kitchen, you’re probably here for one thing—the kind of recipes that make people pause mid-bite and say, ‘Wow.’ These Crispy Honey Garlic Chicken Bites are exactly that. I grew up in a small town in Oregon, where the smell of fresh bread and roasted vegetables often drifted out of my mother’s kitchen window. Cooking wasn’t just something we did to eat—it was how we celebrated, comforted, and connected. These chicken bites? They’re pure comfort, pure celebration.
These days, I’m 34 and living in Seattle, where my kitchen has become my favorite corner of the world. I believe the best recipes aren’t always the fanciest—they’re the ones that feel like a warm hug, the ones you make over and over because they just work. And trust me, this recipe works. It’s simple enough for a weeknight, impressive enough for company, and delicious enough to satisfy even the pickiest eaters.
What I love most is taking a recipe and finding ways to make it even better—whether it’s swapping in a secret ingredient, adjusting the texture, or adding a touch of spice to wake up the flavors. These Crispy Honey Garlic Chicken Bites are a testament to that philosophy. They’re the perfect balance of sweet, savory, and crispy, and I can’t wait for you to try them!
Why You’ll Love This Crispy Honey Garlic Chicken Bites Recipe
Let’s be real, there are a million chicken recipes out there. So why should you try this one? Well, let me tell you:
Unbelievably Flavorful: The combination of honey and garlic creates a sweet and savory glaze that’s simply irresistible. It’s a flavor explosion in every bite.
Ridiculously Easy: From start to finish, this recipe takes less than 30 minutes. Perfect for busy weeknights when you need a fast simple dinner idea for two.
Crowd-Pleasing: Whether you’re serving a family or hosting a party, these chicken bites are always a hit. They disappear fast!
Versatile: Serve them as an appetizer, a main course, or even as a snack. The possibilities are endless.
Meal Prep Friendly: These chicken bites are great for meal prep. Make a batch on Sunday and enjoy them throughout the week. It is the perfect meal prep idea for two people.
I make these Crispy Honey Garlic Chicken Bites all the time because it is so easy to prepare. The chicken pieces are coated in a simple cornstarch mixture, which gives them that perfect crispy texture. Then, they’re tossed in a luscious honey garlic sauce that’s both sweet and savory. Trust me, you’ll be hooked!
Ingredients You’ll Need
Here’s what you’ll need to create these little bites of heaven:
1 lb chicken breast cut into bites
3 tbsp cornstarch
1/2 tsp salt
1/2 tsp black pepper
2 tbsp olive oil
1/3 cup honey
3 tbsp soy sauce
3 cloves garlic minced
1/4 tsp red pepper flakes
2 tbsp chopped parsley
How to Make Crispy Honey Garlic Chicken Bites: Step-by-Step
Alright, let’s get cooking! Here’s how to make these delectable chicken bites:
Prep the Chicken: Toss the chicken pieces with cornstarch, salt, and pepper until lightly coated. This is key for achieving that crispy texture we all crave.
Make the Sauce: In a small bowl, whisk together the honey, soy sauce, minced garlic, and red pepper flakes until smooth and well combined. This is the magic sauce that will transform the chicken into something truly special. The sauce is what makes this recipe so delicious.
Cook the Chicken: Heat olive oil in a skillet over medium-high heat. Cook the chicken in a single layer until golden brown and cooked through. Be careful not to overcrowd the skillet; you may need to work in batches.
Glaze the Chicken: Pour the honey garlic sauce into the skillet and toss the chicken while simmering until the glaze thickens and evenly coats all the pieces. This usually takes just a few minutes. The goal is for the sauce to cling to the chicken, creating a beautiful, glossy finish.
Garnish and Serve: Remove from heat, garnish with chopped parsley, and serve warm over rice or vegetables. Enjoy!
Pro Tips for the Best Crispy Honey Garlic Chicken Bites
Want to take these chicken bites from good to amazing? Here are a few of my favorite pro tips:
Use High-Quality Honey: The flavor of the honey really shines through in this recipe, so use the best quality you can find. Local honey is always a great choice.
Don’t Overcrowd the Skillet: Cooking the chicken in batches ensures that it gets nice and crispy. Overcrowding the skillet will steam the chicken instead of frying it.
Adjust the Heat: If you like a little more kick, add a pinch more red pepper flakes to the sauce. If you prefer a milder flavor, you can omit them altogether.
Watch the Sauce Carefully: The honey garlic sauce can burn easily, so keep a close eye on it while it’s simmering. Stir frequently to prevent sticking.
Serve Immediately: These chicken bites are best served hot and fresh. They tend to lose their crispiness as they sit.
Common Mistakes to Avoid
We all make mistakes in the kitchen, but here are a few common ones to watch out for when making these Crispy Honey Garlic Chicken Bites:
Not Coating the Chicken Properly: Make sure the chicken pieces are evenly coated with cornstarch, salt, and pepper. This ensures a crispy exterior.
Using Too Much Oil: You only need a thin layer of olive oil in the skillet to cook the chicken. Too much oil will make the chicken greasy. I use olive oil because it adds a nice flavor.
Overcooking the Chicken: Overcooked chicken will be dry and tough. Cook it just until it’s cooked through and no longer pink inside.
Burning the Sauce: As mentioned earlier, the honey garlic sauce can burn easily. Keep the heat on medium and stir frequently to prevent burning.
Not Serving Immediately: These chicken bites are best enjoyed right away. If you let them sit for too long, they’ll lose their crispiness.
Variations to Spice Things Up
Want to put your own spin on this recipe? Here are a few variations to try:
Spicy Honey Garlic Chicken Bites: Add a tablespoon of sriracha or your favorite hot sauce to the sauce for an extra kick.
Lemon Honey Garlic Chicken Bites: Add the juice and zest of one lemon to the sauce for a bright, citrusy flavor.
Ginger Honey Garlic Chicken Bites: Add a teaspoon of grated ginger to the sauce for a warm, aromatic twist.
Sesame Honey Garlic Chicken Bites: Sprinkle sesame seeds over the chicken bites before serving for added texture and flavor.
Honey Garlic Chicken Skewers: Thread the chicken pieces onto skewers and grill them instead of cooking them in a skillet.
How to Store and Reheat
If you happen to have leftovers (which is rare!), here’s how to store and reheat them:
Storage: Store the chicken bites in an airtight container in the refrigerator for up to 3 days.
Reheating: Reheat the chicken bites in a skillet over medium heat until warmed through. You can also reheat them in the microwave, but they may not be as crispy. For extra crispy chicken bites, you can reheat them in an air fryer.
While they’re best fresh, reheating still delivers a comforting and flavorful experience. I often make a big batch specifically so I have leftovers for lunch the next day!
Frequently Asked Questions (FAQ)
Got questions? I’ve got answers!
Can I use chicken thighs instead of chicken breasts? Absolutely! Chicken thighs will work just as well in this recipe. They may take a little longer to cook, so adjust the cooking time accordingly.
Can I make this recipe ahead of time? Yes, you can prepare the chicken and sauce ahead of time. Store them separately in the refrigerator and combine them just before cooking.
Can I freeze these chicken bites? I don’t recommend freezing them, as they tend to lose their crispiness when thawed. However, if you must freeze them, store them in an airtight container for up to 2 months.
Can I make this recipe gluten-free? Yes, simply substitute the soy sauce with tamari, a gluten-free soy sauce alternative.
Can I add vegetables to this recipe? Of course! Bell peppers, broccoli, and onions all pair well with the honey garlic sauce. Add them to the skillet along with the chicken.
Serving Suggestions for Crispy Honey Garlic Chicken Bites
These Crispy Honey Garlic Chicken Bites are incredibly versatile. Here are a few of my favorite ways to serve them:
Over Rice: Serve them over a bed of fluffy white rice or brown rice for a complete and satisfying meal.
With Noodles: Toss them with your favorite noodles, such as lo mein or udon noodles, for a delicious Asian-inspired dish.
As an Appetizer: Serve them on a platter with toothpicks for easy snacking at parties and gatherings.
In Lettuce Wraps: Serve them in crisp lettuce cups with shredded carrots and cucumbers for a light and refreshing meal.
With Roasted Vegetables: Serve them alongside roasted vegetables, such as broccoli, carrots, and bell peppers, for a healthy and balanced meal.
No matter how you choose to serve them, these Crispy Honey Garlic Chicken Bites are sure to be a hit. They’re the perfect combination of sweet, savory, and crispy, and they’re guaranteed to put a smile on your face. Enjoy!
These Crispy Honey Garlic Chicken Bites are a delicious and easy-to-make dish that's perfect for a quick dinner or appetizer. The chicken is coated in a crispy cornstarch mixture and then tossed in a sweet and savory honey garlic sauce.
Ingredients
Chicken
1lbchicken breast(cut into bites)
3tbspcornstarch
1/2tspsalt
1/2tspblack pepper
Sauce
2tbspolive oil
1/3cuphoney
3tbspsoy sauce
3clovesgarlic(minced)
1/4tspred pepper flakes
2tbspchopped parsley
Instructions
Toss chicken with cornstarch, salt, and pepper.
Whisk honey, soy sauce, garlic, olive oil, and red pepper flakes.
Heat olive oil and cook chicken until golden.
Pour sauce into skillet and toss until glaze thickens.
Remove from heat, garnish with parsley, and serve.
Notes
Serve over rice or vegetables for a complete meal.