Author

Ava

Browsing

Why You’ll Adore This Dish

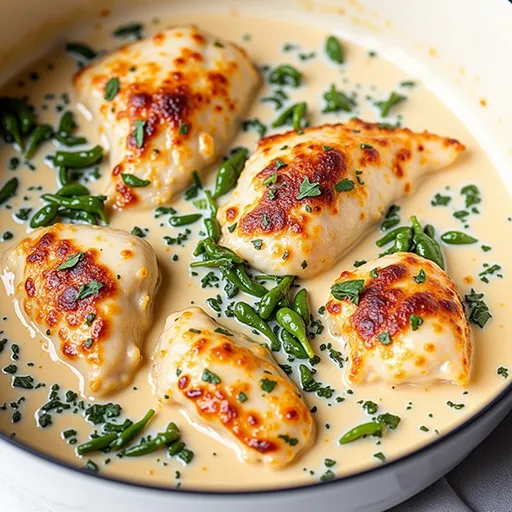
Every now and then, a recipe comes along that not only satisfies your hunger but also captures your heart—and this Crispy One-Pan Honey Garlic Butter Salmon is precisely that dish. Imagine buttery, flaky salmon fillets basking in a sweet and savory honey garlic sauce, all cooked effortlessly in just one pan. It’s the kind of meal that transforms a mundane weeknight into a special occasion. Trust me; your taste buds will thank you, and your loved ones will be asking for seconds!

The Magic of One-Pan Cooking

In our fast-paced world, we all crave meals that are not only delicious but also quick and easy to prepare. This one-pan wonder checks off every box! Minimal cleanup? Check. Flavor explosion? Check. Heartwarming comfort food? Double check! Whether you’re a busy professional or a home cook navigating the chaos of family life, this recipe is your ticket to a stress-free dinner.

All About the Ingredients

Succulent salmon fillets sautéed with garlic and honey, resting on a plate with a blurred background.

Let’s dive into the star players of this dish:

  • 4 salmon fillets: Fresh, high-quality salmon is key. Wild-caught is often best for flavor.
  • 2 tablespoons honey: This adds a delightful sweetness that balances the savory garlic.
  • 3 tablespoons butter: Butter gives a rich, creamy texture that enhances the overall taste.
  • 4 cloves garlic, minced: Garlic is the aromatic hero of this dish, infusing it with depth and warmth.
  • Salt and pepper: Essential for seasoning—don’t skip this step!
  • 1 tablespoon olive oil: Helps to achieve that perfect crispy skin.
  • Juice of 1 lemon: Brightens up the dish and adds a refreshing zing.
  • Fresh parsley, chopped: For garnish, because we eat with our eyes first!

How to Create This Culinary Delight

Ready to impress? Let’s break down the steps to make this Crispy One-Pan Honey Garlic Butter Salmon:

  1. Preheat your oven: Start by preheating your oven to 400°F (200°C). This will ensure your salmon cooks beautifully.
  2. Mix the magic: In a small bowl, combine the honey, melted butter, minced garlic, lemon juice, salt, and pepper. Stir this mixture until well blended—it’s going to be the glaze of your dreams!
  3. Heat the pan: Grab a large oven-proof skillet and heat the olive oil over medium-high heat. You want it hot enough to crisp the salmon skin.
  4. Season the salmon: Generously season the salmon fillets with salt and pepper. This is your foundation of flavor!
  5. Get crispy: Place the salmon skin-side down in the skillet and let it cook for about 3-4 minutes. You want that skin to be nice and crispy, so resist the urge to flip it too soon.
  6. Glaze it up: Once the skin is crispy, pour the honey garlic mixture over the salmon fillets. Watch it sizzle and bubble—it’s a beautiful sight!
  7. Oven time: Transfer the skillet to your preheated oven and bake for 10-12 minutes. The salmon should be cooked through and flake easily with a fork.
  8. Garnish and serve: Once out of the oven, sprinkle with fresh parsley. Serve warm, and get ready for the compliments!

Tips for the Perfect Salmon

Here are a few tips to ensure your salmon turns out perfectly every time:

  • Always start with fresh salmon. Look for fillets with vibrant color and minimal fishy smell.
  • If you want extra crispy skin, try patting the salmon dry with a paper towel before seasoning.
  • Let the salmon rest for a few minutes after baking. This helps the juices redistribute and keeps it moist.

Delicious Variations to Try

This recipe is wonderfully versatile. Here are some variations to consider:

  • Add a kick: Spice things up by incorporating a pinch of red pepper flakes into the honey garlic mixture.
  • Experiment with herbs: Instead of parsley, try fresh dill or cilantro for a different flavor profile.
  • Veggie medley: Toss some asparagus or green beans into the pan before baking for a complete meal.

Substitutions You Can Make

If you’re missing an ingredient, don’t fret! Here are some substitutions:

  • Use maple syrup instead of honey for a vegan-friendly option.
  • If you’re out of butter, coconut oil works beautifully and adds a unique flavor.
  • Lemon juice can be swapped for lime juice for a zesty twist.

Essential Equipment

To make this recipe, you’ll need:

  • A large, oven-proof skillet (cast iron works wonderfully).
  • A small mixing bowl for combining your sauce.
  • A spatula for flipping if you choose to.

Storage and Freezing Tips

If you happen to have leftovers (which is rare!), here’s how to store them:

  • Refrigerate in an airtight container for up to 3 days.
  • This dish can be frozen, but the texture may change slightly. To freeze, wrap tightly in plastic wrap and then in foil. Use within 3 months for the best quality.

FAQs about Honey Garlic Butter Salmon

Can I use frozen salmon? Yes! Just make sure to thaw it before cooking for even cooking.

What should I serve with this salmon? This dish pairs beautifully with steamed rice, quinoa, or a fresh salad.

Can I make this on the grill? Absolutely! Just be cautious with the glaze as it can caramelize quickly on the grill.

Troubleshooting Common Issues

If things don’t go as planned, here’s how to address some common concerns:

  • Salmon is overcooked: Use a meat thermometer. Salmon is perfectly cooked at an internal temperature of 145°F (63°C).
  • Skin is not crispy: Make sure your pan is hot enough and don’t move the salmon too early.

Conclusion: A Recipe to Cherish

This Crispy One-Pan Honey Garlic Butter Salmon is more than just a meal; it’s an experience, a moment shared with loved ones, and a dish that will surely become a favorite in your household. The balance of sweet and savory flavors, paired with the ease of one-pan cooking, makes this recipe a true gem. So, the next time you find yourself in need of a quick yet impressive dinner, remember this magical recipe. Pull up a chair, invite your loved ones, and let the compliments roll in as you savor every delightful bite. Happy cooking!

Crispy One-Pan Honey Garlic Butter Salmon

Prep Time 10 minutes
Cook Time 15 minutes
Total Time 25 minutes
Servings 4 servings
Calories 350
This delicious salmon recipe features a crispy skin, sweet honey garlic glaze, and a buttery finish, all cooked in one pan for easy cleanup.

Ingredients

Main Ingredients

  • 4 fillets salmon fillets
  • 2 tablespoons honey
  • 3 tablespoons butter
  • 4 cloves garlic, minced
  • salt and pepper to taste salt and pepper
  • 1 tablespoon olive oil
  • juice of 1 lemon lemon juice
  • fresh parsley, chopped (for garnish) fresh parsley (for garnish)

Instructions 

  • Preheat oven to 400°F (200°C).
  • Mix honey, melted butter, garlic, lemon juice, salt, and pepper.
  • Heat olive oil in a skillet over medium-high heat, season salmon, and cook skin-side down for 3-4 minutes.
  • Pour the honey garlic mixture over salmon and transfer skillet to oven. Bake for 10-12 minutes.
  • Remove from oven, garnish with parsley, and serve.

Notes

Ensure the salmon skin is crispy for the best texture.
Calories: 350kcal
Cost: $15
Course: Main Course
Cuisine: American
Keyword: Salmon

Loved this recipe? Save it to your favorite Pinterest board so you can easily find it later! It’s the perfect way to keep all your sweet ideas in one place. ✨

One-pan honey garlic butter salmon glistening in natural light, showcasing its crispy texture and vibrant colors.

Why These Bites Are a Must-Try

If you’re looking to elevate your appetizer game, look no further than these delightful Shrimp Guacamole Bites. Imagine this: a crispy tortilla chip cradling a generous scoop of creamy guacamole, topped with perfectly seasoned shrimp. Sounds dreamy, right? These little treasures are not just a feast for the taste buds but also a visual delight that will have your guests clamoring for more. They’re versatile enough for any gathering, be it a casual game night, a festive taco Tuesday, or even a fancy dinner party. Trust me, the flavor explosion in each bite is something you won’t want to miss!

Essential Ingredients for Flavorful Bites

Let’s gather our ingredients and ensure we have everything we need to whip up these crowd-pleasers. Here’s what you’ll need:

  • 1 pound cooked shrimp, peeled and deveined
  • 2 ripe avocados
  • 1 lime, juiced
  • 1 small red onion, finely chopped
  • 1 tomato, diced
  • 1/2 cup cilantro, chopped
  • 1 jalapeño, finely chopped (optional)
  • Salt and pepper to taste
  • Tortilla chips or cucumber slices for serving

The beauty of these ingredients is not just in their taste but also in their ability to come together in harmony. The creamy avocados paired with the fresh cilantro and the zingy lime juice create a vibrant base that’s just begging for a succulent shrimp to top it off. And let’s not forget the crunch of the tortilla chips or the refreshing bite of cucumber slices!

Let’s Make It Together

Delicious shrimp guacamole bites displayed on a wooden platter, featuring vibrant toppings.

Ready to roll up your sleeves? Here’s how to create these Shrimp Guacamole Bites step by step:

  1. In a bowl, mash the ripe avocados with the lime juice until creamy. You want a smooth yet slightly chunky texture that will hold up on your chips.
  2. Add the finely chopped red onion, diced tomato, chopped cilantro, and jalapeño (if using) to the avocado mixture.
  3. Season generously with salt and pepper to taste, mixing until everything is well combined. This is where you can really adjust flavors to your liking!
  4. Chop the cooked shrimp into bite-sized pieces and gently fold them into the guacamole. You want them to be evenly distributed without breaking them apart too much.
  5. Using a spoon, generously scoop the shrimp guacamole onto tortilla chips or cucumber slices. Don’t be shy; we want these bites to be loaded!
  6. Serve immediately as a festive appetizer at your next gathering. Enjoy the compliments!

And just like that, you have an impressive appetizer that’s ready to steal the show!

Perfecting the Cooking Process

Cooking shrimp can be a bit tricky if you’re not used to it, but don’t worry! Here are some tips to ensure your shrimp come out perfectly every time:

  • Buy Fresh or Quality Frozen Shrimp: If you can, opt for fresh shrimp from your local fishmonger. If using frozen, make sure to thaw them properly before cooking.
  • Don’t Overcook: Shrimp cooks quickly, usually in about 2-3 minutes per side. Overcooking can lead to rubbery shrimp, which we definitely want to avoid!
  • Seasoning is Key: Don’t be afraid to season your shrimp before adding them to your guacamole. A sprinkle of garlic powder or a dash of smoked paprika can elevate the flavor.

Add Your Personal Touch

This recipe is incredibly versatile, which means you can add your twist to make it uniquely yours! Here are a few ideas to get those creative juices flowing:

  • Spice It Up: If you like a bit of heat, consider adding diced jalapeños or a dash of hot sauce to the guacamole.
  • Herb Swap: If cilantro isn’t your favorite (I know, it’s a polarizing herb), feel free to swap it out for parsley or even chives for a different flavor profile.
  • Switch the Base: Instead of tortilla chips, try serving the guacamole on cucumber slices or endive leaves for a fresh twist that’s also low-carb!

Storage and Reheating Tips

While these shrimp guacamole bites are best enjoyed fresh, you may find yourself with some leftovers. Here’s how to store them properly:

  • Refrigerate: Store any leftover shrimp guacamole in an airtight container in the fridge for up to 2 days. The avocados may brown slightly, but they’ll still taste delicious.
  • Keep Components Separate: If possible, store the guacamole and chips separately to maintain the crunchiness of the chips.
  • Reheat Shrimp Gently: If you need to reheat the shrimp, do so in a pan over low heat, making sure not to overcook them again.

Chef’s Helpful Tips

Here are a few extra nuggets of wisdom to help you on your culinary journey:

  • Use Ripe Avocados: Make sure your avocados are perfectly ripe. They should yield slightly to gentle pressure when squeezed.
  • Fresh Lime Juice: Always use fresh lime juice instead of bottled for the best flavor!
  • Taste as You Go: Don’t be shy about tasting your guacamole as you mix. Adjust the salt, lime, or spice until it’s just right for you.

FAQ

Let’s address some common questions about making these scrumptious bites:

  • Can I use frozen shrimp for this recipe? Absolutely! Just make sure to thaw them properly before cooking to ensure they’re evenly heated.
  • What can I serve with Shrimp Guacamole Bites? They pair beautifully with tortilla chips, but you can also serve them on fresh veggies or even toast for a twist!
  • How can I prevent my guacamole from browning? The best way is to add lime juice just before serving and store it in an airtight container with plastic wrap pressed directly onto the surface of the guacamole.

Irresistible Flavor Combinations

As you dive into making these bites, don’t hesitate to experiment with additional flavors. Here are some irresistible combinations to try:

  • Avocado Shrimp Bagel: Spread the guacamole on a toasted bagel and top with shrimp for a delightful brunch option.
  • Shrimp Avocado Toast: Elevate your breakfast game by layering shrimp and guacamole on crusty bread.
  • Shrimp Canapés: Use mini toast or crackers for a sophisticated party appetizer.

Conclusion

There you have it, my friend! These Shrimp Guacamole Bites are not only easy to make but also bursting with flavor and ideal for any occasion. Whether you’re entertaining guests or just treating yourself, these bites are sure to impress. So grab your apron, gather your ingredients, and let’s make some kitchen magic happen! I can’t wait for you to share your creations with me. Happy cooking!

Flavorful Shrimp Guacamole Bites for a Fiesta Feast

Prep Time 15 minutes
Total Time 15 minutes
Servings 8 pieces
Calories 250
Enjoy these vibrant shrimp guacamole bites, perfect for adding a festive touch to your celebration.

Ingredients

Main

  • 1 pound cooked shrimp, peeled and deveined
  • 2 ripe avocados
  • 1 lime lime, juiced
  • 1 small red onion, finely chopped
  • 1 tomato diced tomato
  • 0.5 cup cilantro, chopped
  • 1 jalapeño finely chopped jalapeño (optional)
  • to taste salt and pepper
  • for serving tortilla chips or cucumber slices

Instructions 

  • Mash avocados with lime juice until creamy.
  • Add red onion, tomato, cilantro, and jalapeño; mix well.
  • Season with salt and pepper; fold in chopped shrimp.
  • Spoon onto chips or cucumber slices and serve immediately.

Notes

Use fresh ingredients for best flavor and serve immediately.
Calories: 250kcal
Cost: $15
Course: Appetizer
Cuisine: Mexican
Keyword: shrimp

Loved this recipe? Save it to your favorite Pinterest board so you can easily find it later! It’s the perfect way to keep all your sweet ideas in one place. ✨

Appetizing shrimp guacamole bites with fresh ingredients, served on a rustic table setting.

Why This Dish Will Become Your Go-To

When it comes to whipping up a meal that feels both special and comforting, Delicious Honey Garlic Glazed Salmon & Quinoa hits all the right notes. Picture this: tender salmon fillets bathed in a sweet and savory honey garlic glaze, paired with fluffy quinoa that practically begs to soak up every drop of that heavenly sauce. It’s like a culinary hug on a plate, and trust me, once you try it, you’ll want to make it over and over again.

This recipe is not just about pleasing your taste buds; it’s also about ease and nutrition. In our busy lives, we often crave meals that are quick to prepare yet still deliver on flavor and health benefits. The combination of salmon and quinoa not only makes for a delicious dinner but also packs a punch of nutrients that will leave you feeling satisfied and energized.

The Story Behind the Recipe

Let me take you on a little journey. This recipe was born out of a love for simple, wholesome ingredients that can be easily transformed into something magical. Growing up in Oregon, I was surrounded by fresh seafood and vibrant produce, and salmon was a staple in our household. My mom had a knack for making meals that felt special without requiring a culinary degree. She taught me that the secret to a great dish often lies in the quality of the ingredients and a little bit of creativity.

Years later, as I ventured into my own kitchen in Seattle, I found myself experimenting with flavors that resonated with me. One day, I decided to pair my beloved salmon with quinoa—a grain that had recently taken center stage in health circles. The sweet and garlicky glaze was the cherry on top, and I knew I had stumbled upon something truly delightful.

Ingredients Breakdown

A beautifully plated honey garlic salmon dish with quinoa and garnished with green onions.

Salmon

For this recipe, you’ll need two beautiful salmon fillets. Salmon is not only delicious but also packed with omega-3 fatty acids, which are fantastic for heart health. Look for skin-on fillets if you can; they tend to hold together better while cooking and add an extra layer of flavor.

Honey Garlic Glaze

The magic of this dish lies in the glaze. Made from just a handful of ingredients—1/4 cup of honey, 3 cloves of minced garlic, 2 tablespoons of soy sauce, and 1 tablespoon of olive oil—it’s a simple yet powerful combination. The honey caramelizes beautifully, giving the salmon that irresistible sticky finish, while the garlic and soy sauce provide a savory depth that elevates the dish.

Quinoa

Quinoa is a fantastic grain that’s often hailed as a superfood. In this recipe, you’ll use 1 cup of quinoa and 2 cups of water. Rinsing the quinoa before cooking is essential; it removes saponins, which can impart a bitter taste. Once cooked, quinoa becomes fluffy and nutty, making it the perfect base for your salmon.

Equipment Needed

  • Non-stick skillet or frying pan
  • Small saucepan
  • Measuring cups and spoons
  • Mixing bowl
  • Fork for fluffing quinoa

Preparation Method

  1. Start by rinsing the quinoa under cold water to remove any bitterness. Drain well.
  2. In a saucepan, combine the rinsed quinoa and 2 cups of water. Bring the mixture to a boil, then reduce the heat to a simmer. Cover and cook for about 15 minutes or until the water is fully absorbed.
  3. While the quinoa is cooking, prepare the honey garlic glaze. In a small bowl, mix together the honey, minced garlic, soy sauce, and olive oil.
  4. Heat a non-stick skillet over medium heat. Season the salmon fillets with salt and pepper on both sides.
  5. Place the salmon fillets in the skillet, skin-side down, and cook for about 4-5 minutes, allowing a nice sear to form.
  6. Carefully flip the salmon fillets and pour the honey garlic glaze over the top. Cook for another 4-5 minutes, spooning the glaze over the salmon as it cooks.
  7. Once the salmon is cooked through and beautifully caramelized, remove it from the heat.
  8. Fluff the quinoa with a fork and serve it on plates, topping it with the glazed salmon.
  9. Garnish with chopped green onions for a burst of freshness and enjoy!

Cooking Tips & Techniques

To ensure your salmon turns out perfectly every time, here are some handy tips:

  • Preheat the skillet: Make sure your skillet is hot before adding the salmon. This helps achieve that coveted golden-brown crust.
  • Watch the glaze: When cooking the glaze, keep the heat on medium-low to avoid burning the garlic. A gentle simmer is best!
  • Check for doneness: Salmon is perfectly cooked when it flakes easily with a fork and is opaque in the center. Avoid overcooking to keep it moist.
  • Don’t stir the quinoa: Once you’ve added the quinoa to the boiling water, resist the urge to stir. This will help keep it fluffy rather than mushy.

Variations & Adaptations

This recipe is wonderfully versatile, and you can easily adapt it to fit your taste preferences or dietary needs:

  • Switch up the grain: If quinoa isn’t your thing, try substituting with brown rice, couscous, or even farro for a different texture.
  • Add vegetables: To make it even more nutritious, throw in some steamed broccoli or sautéed spinach alongside the salmon.
  • Spice it up: If you love a bit of heat, add a pinch of red pepper flakes to the glaze for a spicy kick!
  • Change the protein: This glaze works equally well on chicken or tofu, so feel free to switch it up if you’re looking for variety.

Serving & Storage Suggestions

Once your meal is ready, it’s time to serve! This dish is perfect for a cozy dinner at home or impressing guests at a dinner party. Here are a few serving tips:

  • Garnish: A sprinkle of chopped green onions or sesame seeds adds a beautiful touch and enhances the flavor.
  • Pair with a drink: A crisp white wine or a refreshing sparkling water infused with lemon complements this dish beautifully.
  • Storage: Leftovers can be stored in separate airtight containers in the refrigerator for up to 3 days. To reheat, warm the salmon in a skillet over low heat and microwave the quinoa for 1-2 minutes, adding a splash of water if needed.

Nutritional Information & Benefits

Not only is this meal delicious, but it’s also packed with nutrients:

  • Salmon: A great source of high-quality protein and omega-3 fatty acids, which support heart and brain health.
  • Quinoa: A complete protein containing all nine essential amino acids, making it a fantastic option for vegetarians and vegans.
  • Garlic: Known for its numerous health benefits, garlic can help boost your immune system and has anti-inflammatory properties.

FAQs

Can I use frozen salmon for this recipe?

Absolutely! Just ensure that the salmon is fully thawed before cooking for even results.

What can I use instead of quinoa?

You can substitute quinoa with rice, couscous, or even mashed potatoes for a different texture.

How do I prevent the salmon from sticking to the pan?

Make sure your skillet is hot enough and use enough oil for a non-stick surface. Skin-on fillets also help minimize sticking.

Is this recipe gluten-free?

Yes, as long as you use gluten-free soy sauce or coconut aminos, this recipe is completely gluten-free!

Can I make the glaze ahead of time?

Absolutely! Prepare the glaze and store it in an airtight container in the fridge for up to 3 days. Just reheat gently before using.

Conclusion

There you have it! A simple yet impressive dish that’s sure to become a staple in your kitchen. Whether you’re cooking for yourself, your family, or hosting a dinner party, Delicious Honey Garlic Glazed Salmon & Quinoa is the perfect choice. It’s quick to prepare, bursting with flavor, and packed with nutritious ingredients. Give it a try, and you might just find it becomes your new favorite recipe! Don’t forget to share your variations or tips in the comments below—I’d love to hear how you made it your own. Happy cooking!

Delicious Honey Garlic Glazed Salmon & Quinoa

Prep Time 10 minutes
Cook Time 20 minutes
Total Time 30 minutes
Servings 4 servings
Calories 450
A flavorful and healthy dish featuring tender salmon glazed with honey garlic sauce served over fluffy quinoa.

Ingredients

Protein

  • 2 pieces salmon fillets

Sauces & Condiments

  • 1/4 cup honey
  • 3 cloves garlic, minced
  • 2 tablespoons soy sauce
  • 1 tablespoon olive oil

Grains

  • 1 cup quinoa
  • 2 cups water

To taste

  • to taste salt and pepper

Garnish

  • chopped green onions for garnish

Instructions 

  • Cook quinoa in water until fluffy, about 15 minutes.
  • Mix honey, garlic, soy sauce, and olive oil to make the glaze.
  • Cook salmon in a skillet 4-5 minutes per side, then add glaze and cook until caramelized.
  • Fluff quinoa and serve topped with glazed salmon, garnished with green onions.

Notes

Ensure not to overcook the salmon for best flavor and texture.
Calories: 450kcal
Cost: $15
Course: Main Course
Cuisine: fusion
Keyword: Salmon

Loved this recipe? Save it to your favorite Pinterest board so you can easily find it later! It’s the perfect way to keep all your sweet ideas in one place. ✨

Succulent salmon glazed with honey and garlic served with a side of quinoa and herbs.

Why You’ll Love These Cookies

Ah, the holiday season! A time for warmth, laughter, and of course, the delightful aroma of baked goodies wafting through the air. If you’re anything like me, the holidays evoke memories of gathering around the kitchen with loved ones, sharing stories, and indulging in sweet treats that make our hearts sing. This year, let me introduce you to a festive favorite that’s sure to capture the essence of your Yuletide celebrations: Midi Red Velvet Christmas Cookies.

These cookies are not just a feast for the taste buds; they’re a visual delight too! With their vibrant red hue and decadent chocolate bits, they bring a pop of color and joy to any holiday spread. The soft, chewy texture combined with the rich flavor of chocolate will have your friends and family reaching for seconds (and thirds!). Plus, they’re simple to make, making them a perfect addition to your holiday cookie platter or a sweet gift for neighbors.

The Magic of Ingredients

Let’s dive into the enchanting world of ingredients that come together to create these delightful cookies. Here’s what you’ll need:

  • 100 g unsalted butter, softened – This is the base that provides richness and flavor.
  • 50 g brown sugar – For that deep, caramel-like sweetness that pairs perfectly with the red velvet.
  • 30 g granulated sugar – A touch of sweetness to balance out the brown sugar.
  • A pinch of salt – To enhance all those delicious flavors.
  • 1 tsp red velvet extract – The secret ingredient that brings that signature flavor and vibrant color.
  • 1 egg, room temperature – Acts as a binder, giving the cookies their lovely texture.
  • 180 g all-purpose flour – The backbone of our cookie dough.
  • 2 g cocoa powder – Just a hint of cocoa to deepen the flavor.
  • ½ tsp baking soda – Helps the cookies rise and become perfectly soft.
  • 100 g chocolate chips – Because, let’s be honest, chocolate makes everything better!
  • 50 g white chocolate, chopped – For a sweet contrast that adds a luxurious touch.

Let’s Get Baking!

A deliciously baked red velvet cookie, highlighted by soft shadows and a blurred cozy background.

Now that we have our ingredients ready, let’s get to the fun part—baking these delicious cookies! Follow these simple steps, and you’ll have a batch of cookies that will fill your home with the spirit of the season.

Step-by-Step Instructions

  1. Preheat your oven to 160°C (320°F) and line a baking tray with parchment paper. This ensures that your cookies bake evenly and don’t stick.
  2. In a mixing bowl, beat the softened butter, brown sugar, and granulated sugar together until the mixture turns pale and creamy. This step is crucial as it incorporates air into the dough, making your cookies light and fluffy.
  3. Add the egg and red velvet extract, mixing until fully incorporated and smooth. You’ll love the rich aroma that fills your kitchen at this stage!
  4. In a separate bowl, sift together the flour, cocoa powder, and baking soda. This helps to avoid lumps and ensures an even distribution of the dry ingredients.
  5. Gently fold the dry mixture into the wet mixture, mixing just until combined to avoid overworking the dough. Remember, gentle is the keyword here!
  6. Finally, fold in the chocolate chips and chopped white chocolate for that delightful texture and flavor contrast.
  7. Transfer the dough to a piping bag for easy shaping. If you don’t have one, you can also use a spoon to dollop the dough onto the baking tray.
  8. Pipe or portion the dough onto the prepared baking tray, spacing them slightly apart. These cookies will spread a bit, so give them room to breathe!
  9. Bake in the preheated oven for about 20 minutes, or until the cookies are set but still soft in the center. They will continue to firm up a bit as they cool.

Tips for Perfect Cookies

Before you dive into your baking adventure, here are some helpful tips to ensure your Midi Red Velvet Christmas Cookies turn out perfectly:

  • Make sure your butter is truly softened, not melted. This is key to achieving that creamy texture.
  • Use room temperature eggs for better incorporation into the batter.
  • Don’t skip the sifting step! It helps to aerate the flour and create a lighter cookie.
  • Keep an eye on the baking time. Every oven is different, so start checking your cookies a couple of minutes before the timer goes off.

Variations to Try

Feeling adventurous? Here are a few variations to put a twist on this classic recipe:

  • Nutty Delight: Add 50 g of chopped walnuts or pecans for a crunchy texture.
  • Spiced Up: Incorporate ½ tsp of cinnamon or nutmeg for a warm, spiced flavor.
  • Minty Fresh: Add a few drops of peppermint extract to the dough for a refreshing holiday twist.

Substitutions

If you have any dietary preferences or restrictions, don’t worry! Here are some substitutions you can try:

  • Dairy-Free: Swap the butter for a vegan butter alternative and use dairy-free chocolate chips.
  • Gluten-Free: Use a gluten-free all-purpose flour blend in place of regular flour.
  • Lower Sugar: You can reduce the amount of sugar slightly without compromising the texture too much.

Equipment You Need

Gathering the right tools will make your baking experience smoother:

  • Baking tray
  • Parchment paper
  • Mixing bowls
  • Electric mixer or whisk
  • Piping bag or cookie scoop
  • Sifter

Storage and Freezing Tips

Once your cookies are baked and cooled, you might be wondering how to store them:

  • Store your cookies in an airtight container at room temperature for up to a week. They might even get better as they rest!
  • If you want to prepare ahead, you can freeze the dough. Just portion it out and freeze for up to 2 months. When ready to bake, let it thaw in the fridge overnight, then bake as usual.

FAQs

Got questions? Here are some frequently asked questions about making these delightful cookies:

  • Can I make these cookies ahead of time? Yes! They store well and can be made a few days in advance.
  • What if I don’t have red velvet extract? You can use vanilla extract, but the flavor will be slightly different.
  • Can I use a different type of chocolate? Absolutely! Feel free to use dark chocolate or even white chocolate chips for a different flavor profile.

Troubleshooting Common Issues

If your cookies don’t turn out as expected, don’t fret! Here are some common issues and solutions:

  • Cookies are too dry: This can happen if you overmix the dough or add too much flour. Make sure to measure carefully and mix just until combined.
  • Cookies are too flat: This may indicate that your butter was too soft or you didn’t use enough flour. Try chilling the dough for 30 minutes before baking.

Conclusion

There you have it—Midi Red Velvet Christmas Cookies that are not only a feast for the eyes but also a treat for the taste buds! These cookies are perfect for sharing with friends and family during the holiday season or enjoying with a warm cup of cocoa on a chilly evening. As you embark on your baking journey, remember that the best recipes are those made with love. So, roll up your sleeves, crank up your favorite holiday tunes, and let the magic of the season infuse your kitchen. Happy baking, and may your cookies be as delightful as the memories they create!

Midi Red Velvet Christmas Cookies

Prep Time 15 minutes
Cook Time 20 minutes
Total Time 35 minutes
Servings 12 cookies
Calories 150
Delight in these festive red velvet cookies, perfect for holiday celebrations with rich chocolate and vibrant color.

Ingredients

butter and sugars

  • 100 g unsalted butter, softened
  • 50 g brown sugar
  • 30 g granulated sugar

dry ingredients

  • 180 g all-purpose flour
  • 2 g cocoa powder
  • 0.5 tsp baking soda

wet ingredients

  • 1 egg 1 egg, room temperature
  • 1 tsp red velvet extract

add-ins

  • 100 g chocolate chips
  • 50 g white chocolate, chopped

Instructions 

  • Preheat oven to 160°C and line a baking tray with parchment.
  • Cream butter with sugars, then mix in egg and red velvet extract.
  • Mix in sifted flour, cocoa, and baking soda until just combined.
  • Fold in chocolate chips and white chocolate, then pipe onto tray.
  • Bake for 20 minutes until set but soft inside.

Notes

Chill the dough for easier piping if needed.
Calories: 150kcal
Cost: $12
Course: Dessert
Cuisine: American
Keyword: red velvet

Loved this recipe? Save it to your favorite Pinterest board so you can easily find it later! It’s the perfect way to keep all your sweet ideas in one place. ✨

Eye-level shot of a red velvet cookie, decorated with chocolate pieces, capturing its enticing texture.

Why You’ll Love This Recipe

Welcome to a culinary journey that promises to delight your taste buds and warm your heart! If you’re anything like me, you appreciate a quick yet mouthwatering dinner that feels like a cozy hug. Let me introduce you to a dish that checks all the boxes: Sally’s Baking 101. This recipe combines the sweetness of honey, the depth of soy sauce, and the aromatic charm of garlic to create a glaze that transforms ordinary salmon into something extraordinary. Whether you’re cooking for your family or hosting a dinner party, this recipe is sure to impress.

Cooking with Love: The Beauty of Salmon

Salmon is not just a fish; it’s a canvas for flavors. As a staple in my kitchen, I love how versatile it is. You can grill it, bake it, or even turn it into a delicious salmon salad. But today, we’re focusing on a dish that pairs beautifully with a range of sides, making it perfect for any occasion. The Garlic Soy Glazed Salmon is particularly special because it marries sweet and savory elements, creating a flavor profile that’s both comforting and exciting. Plus, it’s so easy to make that even the most novice cook can whip it up!

Essential Ingredients & Their Magic

Delicious treat from Sally's Baking 101 with soft shadows highlighting its details and ingredients.

To create this delicious dish, you’ll need just a handful of ingredients. Here’s what you’ll need:

  • 4 salmon filets (approximately 6 ounces each)
  • 1/4 cup soy sauce
  • 1/4 cup honey
  • 3 cloves garlic, minced
  • 1 tablespoon fresh ginger, grated
  • 1 tablespoon sesame oil
  • Optional: sesame seeds and green onions for garnish

Each ingredient plays a vital role:

  • Salmon: Rich in omega-3 fatty acids, it’s not only good for your heart but also incredibly flavorful.
  • Soy Sauce: This adds a savory umami flavor that enhances the natural taste of the fish.
  • Honey: The sweetness balances the saltiness of the soy sauce, creating a perfect glaze.
  • Garlic and Ginger: These aromatics bring warmth and depth, making each bite feel like a comforting hug.
  • Sesame Oil: Just a splash adds a nutty flavor that rounds out the dish beautifully.

How to Make Garlic Soy Glazed Salmon

Now that we have our ingredients, let’s dive into the cooking process. Follow these detailed steps to ensure your salmon comes out perfectly every time:

  1. Prep the Marinade: In a small bowl, whisk together the soy sauce, honey, minced garlic, grated ginger, and sesame oil. This aroma will make your kitchen smell heavenly!
  2. Marinate the Salmon: Place the salmon filets in a shallow dish or a resealable plastic bag. Pour half of the marinade over the salmon, ensuring it’s well coated. Allow it to marinate for at least 15 minutes, but for an even deeper flavor, aim for 1-2 hours. If you’re short on time, even a quick 15-minute soak will do wonders!
  3. Prepare for Baking: Preheat your oven to 400°F (200°C). Line a baking sheet with parchment paper or foil for easy cleanup.
  4. Bake the Salmon: Place the marinated salmon on the lined baking sheet and bake for about 12-15 minutes or until the salmon flakes easily with a fork. Basting the salmon with reserved marinade halfway through baking can enhance the flavor.
  5. Make the Glaze: While the salmon is baking, pour the remaining marinade into a small saucepan. Bring it to a simmer over medium heat and let it reduce for about 5-10 minutes, stirring frequently until it thickens into a glaze.
  6. Serve: Once the salmon is cooked, drizzle the thickened glaze over the filets. Garnish with sesame seeds and chopped green onions for that beautiful finishing touch!

Tips for Perfect Salmon Every Time

Here are some of my favorite tips to ensure your salmon turns out perfectly:

  • Use Fresh Ingredients: Fresh garlic and ginger will enhance the flavors significantly, so don’t substitute with powdered versions if you can help it.
  • Don’t Overcook: Salmon can dry out quickly. Keep an eye on it, and remember that it will continue to cook slightly after you take it out of the oven.
  • Experiment with Marinade Times: If you have more time, let the salmon marinate longer for an even richer flavor.
  • Pair Wisely: This dish pairs beautifully with steamed broccoli, jasmine rice, or a fresh salad.

Variations & Substitutions

Feel free to get creative! Here are some variations and substitutions you can consider:

  • Different Proteins: This marinade is not just for salmon! Try it with chicken, tofu, or even veggies like eggplant and zucchini.
  • Spicy Kick: Add a teaspoon of sriracha or red pepper flakes to the marinade for a spicy twist.
  • Honey Alternatives: If you’re looking for a sugar-free option, consider using agave syrup or maple syrup instead of honey.

Storing & Freezing

If you happen to have leftovers (though I doubt it!), here’s how to store them:

  • Refrigeration: Store any leftovers in an airtight container in the refrigerator for up to 3 days.
  • Freezing: You can freeze the cooked salmon for up to 2 months. Just ensure it’s well-wrapped to prevent freezer burn. Thaw in the refrigerator overnight before reheating.

FAQs

Here are some common questions about making this recipe:

  • Can I use frozen salmon? Absolutely! Just thaw it completely before marinating.
  • What if I don’t have sesame oil? You can substitute it with olive oil, but you’ll miss out on that unique flavor.
  • Can I make this in advance? Yes! You can marinate the salmon ahead of time and bake it when you’re ready to eat.

Troubleshooting Common Issues

If you encounter any hiccups, here are some quick fixes:

  • Salmon is too salty: Make sure to use low-sodium soy sauce if you’re concerned about the saltiness.
  • Glaze didn’t thicken: If your glaze is too runny, simmer it a bit longer to reduce it further.
  • Salmon is overcooked: If you find your salmon dry, consider adding a drizzle of olive oil or a squeeze of lemon juice before serving to add moisture.

Conclusion

There you have it—a delightful recipe that’s as easy as it is delicious! Sally’s Baking 101 is not just about cooking; it’s about creating memories and sharing meals that nourish the soul. I hope you feel inspired to try this dish in your own kitchen. Gather your loved ones, set the table, and savor every bite of your homemade garlic soy glazed salmon. Remember, cooking is all about joy, so don’t forget to have a little fun along the way! Happy cooking, my friends!

Sally’s Baking 101

Prep Time 20 minutes
Cook Time 30 minutes
Total Time 50 minutes
Servings 4 pieces
Calories 250
Discover the essentials of baking with Sally’s comprehensive guide, perfect for bakers of all levels. Filled with beautiful photographs and expert tips, this recipe ensures success every time.

Ingredients

Dry Ingredients

  • 2 cups all-purpose flour
  • 1 cup granulated sugar
  • 1 teaspoon baking powder

Wet Ingredients

  • 1 cup milk
  • 2 large eggs
  • 1/2 cup vegetable oil

Instructions 

  • Preheat the oven to 350°F (175°C) and prepare your baking pan.
  • Mix dry ingredients in a bowl until combined.
  • Whisk wet ingredients in a separate bowl.
  • Combine wet and dry ingredients until smooth.
  • Pour batter into the prepared pan and bake for 30 minutes.
  • Let cool, then enjoy with your favorite toppings.

Notes

For best results, measure ingredients accurately and do not overmix the batter.
Calories: 250kcal
Cost: $15
Course: Dessert
Cuisine: American
Keyword: Baking

Loved this recipe? Save it to your favorite Pinterest board so you can easily find it later! It’s the perfect way to keep all your sweet ideas in one place. ✨

Eye-level shot of a baked good from Sally's Baking 101, displaying its rich colors and inviting appearance.

Why This Dish Will Become Your New Favorite

There’s something undeniably magical about a dish that brings people together, isn’t there? Imagine this: a chilly evening, the glow of the kitchen lights casting a warm ambiance, and the rich aroma of garlic filling the air. This is the essence of Comfort Food Alert: Creamy Garlic Chicken. Not only is it a feast for the senses, but it also holds the power to create cherished memories around your dinner table.

As I prepared this creamy delight for a recent gathering, I was reminded of the cozy dinners at my mother’s house, where laughter mingled with the sizzling sounds of garlic in a pan. With each bite of this creamy garlic chicken, I could see the smiles on my friends’ faces as they savored the luscious sauce, making it a dish that truly feels like a warm embrace.

Essential Ingredients

Let’s dive into the heart of this recipe. The beauty of Creamy Garlic Chicken lies in its simplicity and the quality of ingredients. Here’s what you’ll need:

  • 4 boneless, skinless chicken breasts: The star of the show! These will be juicy and tender when cooked just right.
  • 1 tablespoon olive oil: A splash of good-quality oil goes a long way in enhancing flavors.
  • 4 cloves garlic, minced: Because you can never have too much garlic in a creamy sauce!
  • 1 cup heavy cream: This adds that rich, velvety texture we all love.
  • 1 cup chicken broth: Opt for low-sodium to keep the dish balanced.
  • 1 teaspoon Italian seasoning: A delightful blend that transports your taste buds to Italy.
  • Salt and pepper to taste: Essential for bringing out all the flavors.
  • Fresh parsley, chopped: For that final touch of color and freshness.

Let’s Make it Together

Detailed image of succulent chicken breasts in a creamy garlic sauce.

Cooking should be an adventure—a journey through flavors and aromas. So, let’s get started on making this creamy garlic chicken together!

Step-by-Step Instructions

  1. Heat the Olive Oil: In a large skillet, warm the olive oil over medium heat until it shimmers.
  2. Season the Chicken: Sprinkle salt and pepper on the chicken breasts, ensuring they’re well-seasoned on both sides.
  3. Cook the Chicken: Place the chicken breasts in the skillet, cooking each side for about 6-7 minutes until they are golden brown and cooked through. Once done, remove them from the skillet and set aside.
  4. Sauté the Garlic: In the same skillet, add the minced garlic and sauté for about 1 minute until it becomes fragrant. This is where the magic begins!
  5. Deglaze with Chicken Broth: Pour in the chicken broth, scraping the bottom of the skillet to release all those delicious bits stuck to the pan.
  6. Add the Cream and Seasoning: Stir in the heavy cream and Italian seasoning, allowing the sauce to simmer for a few minutes until it thickens slightly.
  7. Combine Everything: Return the chicken to the skillet, making sure it’s well-coated with that luscious creamy sauce. Let it cook for an additional 2-3 minutes to heat through.
  8. Serve and Garnish: Plate the creamy garlic chicken hot, garnished with fresh parsley for a pop of color.

Perfecting the Cooking Process

Cooking is an art, my friends, and like any great artist, we must refine our techniques. Here are some tips to elevate your creamy garlic chicken:

  • Don’t Rush the Garlic: Allowing the garlic to sauté until fragrant is crucial. It ensures that the flavors bloom beautifully.
  • Use Fresh Ingredients: If possible, opt for fresh herbs and spices. They make a world of difference in flavor.
  • Watch the Heat: Keep an eye on the skillet. Too high of a heat can burn the garlic or overcook the chicken.

Add Your Touch

One of the best parts about cooking is making a recipe your own. Here are some creative variations to consider:

  • Add Spinach: Toss in a couple of cups of fresh spinach right after sautéing the garlic. It wilts beautifully and adds a pop of color and nutrition.
  • Sun-Dried Tomatoes: For a touch of sweetness and tang, chop some sun-dried tomatoes and add them to the sauce.
  • Spice it Up: If you like a bit of heat, consider adding a pinch of red pepper flakes to the sauce.

Storing & Reheating

We all know that sometimes the best meals are the leftovers! Here’s how to store your creamy garlic chicken:

  • In the Fridge: Store in an airtight container for up to 3 days. Just make sure it’s cooled down before sealing.
  • To Reheat: Gently warm in a skillet over low heat, adding a splash of cream to bring back that creamy texture.

Chef’s Helpful Tips

Here are a few more nuggets of wisdom to make your cooking experience even better:

  • Double the Recipe: This dish is perfect for meal prep or serving a crowd. Trust me, everyone will want seconds!
  • Pair it Right: Creamy garlic chicken pairs beautifully with pasta, rice, or a crusty loaf of bread for soaking up that sauce.
  • Experiment: Don’t hesitate to play around with the recipe. Cooking is about discovery—make it uniquely yours!

FAQ

Let’s tackle some common questions about this recipe:

  • Can I use chicken thighs instead of breasts? Absolutely! Chicken thighs will add an extra layer of richness and flavor.
  • Is there a dairy-free alternative? You can try coconut cream or a dairy-free cream alternative, but the flavor will vary slightly.
  • What if I don’t have Italian seasoning? A mix of dried oregano, basil, and thyme works wonderfully in a pinch.

Conclusion

Cooking and sharing meals is one of life’s simplest joys, and Comfort Food Alert: Creamy Garlic Chicken embodies that spirit perfectly. It’s a dish that not only fills your belly but also warms your heart. From the creamy garlic sauce that wraps around each bite of chicken to the delightful conversation it sparks at the dinner table, this meal has all the makings of a timeless favorite.

So why not gather your loved ones, whip up this delicious recipe, and enjoy a cozy gathering? After all, food is not just about nourishment; it’s about connection, laughter, and creating memories that linger long after the last bite. Happy cooking, and may your kitchen always be filled with love and laughter!

Comfort Food Alert: Creamy Garlic Chicken

Prep Time 10 minutes
Cook Time 20 minutes
Total Time 30 minutes
Servings 4 servings
Calories 550
A rich and creamy garlic chicken dish that's perfect for a comforting meal any night of the week.

Ingredients

Protein

  • 4 pieces boneless, skinless chicken breasts

Sauce

  • 1 tablespoon olive oil
  • 4 cloves garlic, minced
  • 1 cup heavy cream
  • 1 cup chicken broth
  • 1 teaspoon italian seasoning
  • to taste salt and pepper
  • for garnish fresh parsley, chopped

Instructions 

  • Heat olive oil in a skillet and cook seasoned chicken until golden, then set aside.
  • Sauté minced garlic in the same skillet until fragrant.
  • Pour in chicken broth, simmer, then add heavy cream and Italian seasoning; cook until slightly thickened.
  • Return chicken to skillet, coat with sauce, and heat through.
  • Garnish with chopped parsley and serve hot.

Notes

For a richer flavor, let the sauce simmer longer to thicken.
Calories: 550kcal
Cost: $15
Course: Main Course
Cuisine: American
Keyword: Chicken, creamy, garlic

Loved this recipe? Save it to your favorite Pinterest board so you can easily find it later! It’s the perfect way to keep all your sweet ideas in one place. ✨

Eye-level view of creamy garlic chicken with a warm, blurred background.

Discover the Comfort of Roasted Chicken Alfredo Pasta Bake

Welcome to my culinary haven! If you’re looking for a dish that wraps you in a cozy blanket of flavor, you’ve come to the right place. My Roasted Chicken Alfredo Pasta Bake is the ultimate comfort food, perfect for family gatherings or a quiet night in. This dish combines tender penne pasta with savory shredded chicken and a creamy Alfredo sauce, topped with gooey mozzarella and a sprinkle of fresh parsley. Let’s dive into the magic of this recipe and discover why it deserves a place in your kitchen!

Why You’ll Love This Recipe

  • Quick and Easy: This baked chicken alfredo recipe is simple to prepare, making it perfect for busy weeknights. With just a few steps, you can have dinner ready in under an hour!
  • Kid-Friendly: With its creamy sauce and cheesy topping, this dish is sure to be a hit with kids and adults alike. It’s a meal that brings the whole family together.
  • Make-Ahead Friendly: You can prepare this dish in advance and pop it in the oven when you’re ready to serve. It’s a lifesaver for those hectic days!
  • Customizable: Not a fan of chicken? No problem! This recipe allows for numerous variations, so you can tailor it to your taste.
  • Delicious Leftovers: If you happen to have any leftovers (which is rare!), they reheat beautifully, making for a quick lunch or dinner the next day.

Ingredients Breakdown

Before we get cooking, let’s take a closer look at what you’ll need for this delightful dish. Each ingredient plays a vital role in creating that rich, comforting flavor.

  • 8 ounces penne pasta: This pasta holds the creamy sauce beautifully. You can substitute with rotini or fusilli for a fun twist.
  • 2 cups cooked, shredded chicken: Use rotisserie chicken for a shortcut, or roast your own for extra flavor.
  • 2 cups Alfredo sauce: Store-bought works well, but making your own from scratch adds a gourmet touch.
  • 1 cup shredded mozzarella cheese: This creates a bubbly, gooey topping that everyone loves.
  • 1/2 cup grated Parmesan cheese: For that extra depth of flavor—don’t skip this!
  • 1 teaspoon garlic powder: A must-have for that aromatic touch.
  • 1/2 teaspoon Italian seasoning: Adds a wonderful herbaceous note.
  • Salt and pepper (to taste): Essential for seasoning your dish to perfection.
  • 1/4 cup chopped fresh parsley: This is for garnish, adding a pop of color and freshness.

Step-by-Step Instructions

Side view of a creamy Roasted Chicken Alfredo Pasta Bake displaying melted cheese and pasta textures.

Now, let’s transform these ingredients into a comforting masterpiece!

  1. Bring a large pot of salted water to a boil. Add the penne pasta and cook according to package instructions until al dente, about 10-12 minutes. Drain and set aside.
  2. In a large mixing bowl, combine the shredded chicken and Alfredo sauce. Sprinkle in the garlic powder, Italian seasoning, salt, and pepper. Stir until the chicken is well coated.
  3. Add the drained pasta to the chicken mixture and gently toss to combine, ensuring every piece is enveloped in that creamy goodness.
  4. Preheat your oven to 375°F (190°C). Lightly grease a baking dish and transfer the pasta mixture into it, spreading it evenly.
  5. Top with shredded mozzarella and grated Parmesan, making sure every inch is covered.
  6. Place the dish in the oven and bake for 20-25 minutes, or until the cheese is melted, bubbly, and lightly golden.
  7. Let it cool for about 5 minutes, then sprinkle with fresh parsley before serving.

Pro Tips for the Perfect Bake

  • Use Quality Ingredients: The better the ingredients, the better your dish will taste. Opt for high-quality pasta and cheese.
  • Don’t Overcook the Pasta: Since the pasta will bake again, make sure to cook it al dente to avoid mushiness.
  • Experiment with Sauces: Feel free to add a splash of white wine or a hint of lemon juice to the Alfredo sauce for a unique twist.
  • Cheese Alternatives: Mix it up with cheddar or gouda for a different flavor profile.
  • Add Veggies: Incorporate sautéed spinach, mushrooms, or broccoli for added nutrients and texture.
  • Season Well: Taste as you go! Adjust salt, pepper, and seasonings to your preference.
  • Cover with Foil: If the top is browning too quickly, cover with foil for part of the baking time.
  • Let it Rest: Allow the pasta bake to sit for a few minutes after baking. This helps it set and makes serving easier.

Common Mistakes and Troubleshooting

Even the best cooks encounter hiccups! Here are a few common mistakes to avoid:

  • Overcooking the Pasta: This can lead to a mushy texture. Always cook your pasta al dente.
  • Using Too Much Sauce: While creamy is good, too much sauce can drown the dish. Stick to the recipe for the perfect balance.
  • Not Enough Seasoning: Make sure to taste and adjust seasoning as you prepare.
  • Skipping the Resting Time: Allowing the dish to set after baking makes a big difference in texture.

Delicious Variations

Want to mix things up? Here are some delightful variations to consider:

  • Veggie Alfredo Bake: Add a mix of your favorite roasted vegetables for a colorful twist.
  • Buffalo Chicken Alfredo: Mix in some buffalo sauce for a spicy kick!
  • Seafood Alfredo: Swap chicken for shrimp or crab for a luxurious seafood version.
  • Spicy Italian Sausage: For a heartier meal, add crumbled Italian sausage to the mix.

Storage and Make-Ahead Instructions

This dish is perfect for meal prep. Here’s how to store it:

  • Refrigerate: Store leftovers in an airtight container for up to 3 days.
  • Freeze: Freeze before baking for up to 3 months. When ready to eat, thaw overnight in the fridge and bake as directed.
  • Reheat: To reheat, cover with foil and bake at 350°F (175°C) until warmed through, about 20-25 minutes.

Frequently Asked Questions

Got questions? I’ve got answers!

  • Can I use whole wheat pasta? Absolutely! Whole wheat pasta adds fiber and a nutty flavor.
  • Is this recipe gluten-free? You can use gluten-free pasta and Alfredo sauce for a gluten-free version.
  • Can I make this dish vegetarian? Yes, just omit the chicken and add more veggies or beans for protein.
  • What’s the best way to reheat leftovers? Reheat in the oven covered with foil to maintain moisture.
  • How can I make my Alfredo sauce from scratch? Combine butter, heavy cream, garlic, and cheese over low heat until melted and creamy.
  • Can I add cheese on top? Yes! Feel free to sprinkle additional cheese for an extra cheesy top.
  • How long does it take to bake? Bake for about 20-25 minutes or until the cheese is bubbly and golden.
  • Can I use frozen chicken? Yes, just ensure it’s fully cooked before shredding.

Nutritional Insights

This dish can be a part of a balanced diet. Here are some nutritional tips:

  • Protein Power: With shredded chicken, this dish is packed with protein, essential for muscle repair and growth.
  • Calcium Boost: The cheeses provide calcium, important for bone health.
  • Fiber Up: Consider adding whole grain pasta or veggies to increase fiber content.
  • Portion Control: Enjoy in moderation, especially if you’re watching your weight!

Kitchen Equipment Recommendations

Here’s what you’ll need to whip up this cozy dish:

  • Large Pot: For boiling pasta.
  • Mixing Bowl: To combine your ingredients.
  • Baking Dish: A 9×13 inch dish works perfectly for this recipe.
  • Measuring Cups and Spoons: For accuracy in your ingredients.
  • Wooden Spoon: Ideal for mixing without scratching your bowls.

Serving Suggestions

This Roasted Chicken Alfredo Pasta Bake pairs wonderfully with:

  • Garlic Bread: A classic side that complements the creamy flavors.
  • Fresh Salad: A light salad with vinaigrette adds a refreshing contrast.
  • Steamed Vegetables: Broccoli or green beans for a nutritious boost.
  • Red Wine: A glass of red wine elevates the dining experience.

Final Thoughts

There you have it! A delicious, comforting Roasted Chicken Alfredo Pasta Bake that I know will become a staple in your home. Remember, cooking is about making memories and enjoying the process. So, gather your loved ones, pull up a chair, and let’s create some magic together in the kitchen! I can’t wait to hear how your version turns out. Happy cooking!

Roasted Chicken Alfredo Pasta Bake

Prep Time 15 minutes
Cook Time 25 minutes
Total Time 40 minutes
Servings 4 servings
Calories 850
A creamy, cheesy baked pasta dish combining tender chicken, Alfredo sauce, and melted cheese for a comforting meal.

Ingredients

Pasta

  • 8 ounces penne pasta

Chicken

  • 2 cups cooked, shredded chicken (roasted)

Sauce

  • 2 cups Alfredo sauce

Cheese

  • 1 cup shredded mozzarella cheese
  • 1/2 cup grated Parmesan cheese

Seasonings

  • 1 teaspoon garlic powder
  • 1/2 teaspoon Italian seasoning
  • to taste salt and pepper

Fresh herbs

  • 1/4 cup chopped fresh parsley

Instructions 

  • Cook penne pasta in salted boiling water until al dente, then drain.
  • Mix shredded chicken, Alfredo sauce, garlic powder, Italian seasoning, salt, and pepper in a bowl.
  • Combine cooked pasta with the chicken mixture and toss gently.
  • Transfer to a greased baking dish, top with mozzarella and Parmesan cheeses.
  • Bake at 375°F (190°C) for 20-25 minutes until bubbly and golden. Garnish with parsley before serving.

Notes

For extra flavor, add a pinch of red pepper flakes or a squeeze of lemon before serving.
Calories: 850kcal
Cost: $15
Course: Main Course
Cuisine: American
Keyword: pasta

Why You’ll Love This Quick Salmon Recipe

Imagine a weeknight dinner that’s not just easy to prepare but also bursts with flavor and nutrition. These Sweet & Savory Honey Garlic Salmon Bites are everything you need when life gets busy. In under 30 minutes, you can whip up a dish that will have your family asking for seconds and your friends swooning over your culinary skills. The combination of sweet honey, soy sauce, and savory garlic creates a delightful glaze that perfectly complements the rich, buttery texture of salmon. Not only are these bite-sized morsels delectable, but they also pack a nutritional punch, making them a fantastic choice for health-conscious eaters.

Ingredients You’ll Need

To create these mouthwatering salmon bites, gather the following ingredients:

  • 1 lb salmon fillet, skin removed and cut into bite-sized pieces
  • 2 tablespoons honey
  • 2 tablespoons soy sauce
  • 3 cloves garlic, minced
  • 1 tablespoon olive oil
  • 1 teaspoon sesame oil
  • Salt and pepper to taste
  • Chopped green onions for garnish
  • Sesame seeds for garnish

Steps to Culinary Success

Appetizing salmon pieces coated in a honey garlic glaze on a rustic surface.

Follow these simple steps to create your own Honey Garlic Salmon Bites:

  1. In a small bowl, whisk together honey, soy sauce, minced garlic, olive oil, and sesame oil until well combined.
  2. Season the salmon pieces with salt and pepper for an added flavor boost.
  3. Heat a non-stick skillet over medium-high heat and add the salmon pieces in a single layer.
  4. Cook the salmon for 2-3 minutes until browned, then flip and cook for another 2 minutes.
  5. Pour the honey garlic sauce over the salmon and cook for an additional 1-2 minutes, allowing the sauce to thicken slightly.
  6. Remove from heat and garnish with chopped green onions and sesame seeds.
  7. Serve immediately and enjoy your quick weeknight delight!

Why These Bites Are a Hit

These Honey Garlic Salmon Bites have quickly gained a place in my heart—and my recipe book—because they are:

  • Quick and Easy: Perfect for those busy weeknights when you need dinner on the table in a flash.
  • Versatile: Enjoy them over rice, in a salad, or as a stand-alone appetizer. The possibilities are endless!
  • Nutritious: Loaded with omega-3 fatty acids, these salmon bites are as good for your heart as they are for your taste buds.
  • Kid-Friendly: The sweet and savory flavors appeal to all ages, making them a great family dinner choice.

Tips for Cooking Perfect Salmon Bites

To elevate your salmon bites from good to great, keep these tips in mind:

  • Pat the Salmon Dry: Moisture can prevent a good sear. Gently patting the salmon with paper towels will help achieve that golden-brown exterior.
  • Don’t Overcrowd the Pan: Give each piece space to sear properly. Overcrowding can lead to steaming instead of browning.
  • Use Medium-High Heat: This ensures a crispy texture without overcooking the inside of the salmon.
  • Let the Sauce Thicken: Allow the sauce to bubble and cling to the fish for maximum flavor.

Delicious Variations

Feeling adventurous? Here are some fun twists on the classic recipe:

  • Add Spice: Incorporate a teaspoon of sriracha or chili garlic sauce for a spicy kick.
  • Citrus Zing: Squeeze some fresh lime or orange juice into the sauce for a bright, zesty flavor.
  • Herb Infusion: Mix in fresh herbs like cilantro or basil for a fresh twist on the glaze.

Substitutions You Can Make

Don’t have all the ingredients on hand? No problem! Here are some substitutions:

  • Honey: Maple syrup can be an excellent vegan alternative for sweetness.
  • Soy Sauce: For a gluten-free option, use tamari instead.
  • Salmon: If salmon isn’t your thing, try using chicken breast or tofu, adjusting the cooking time as necessary.

Essential Equipment

To make your Honey Garlic Salmon Bites, you will need:

  • A non-stick skillet or frying pan
  • A small mixing bowl
  • A whisk or fork for mixing
  • A spatula or tongs for flipping the salmon

Storage and Freezing Tips

Want to prepare ahead or preserve leftovers? Here’s how:

  • Refrigeration: Store cooked salmon bites in an airtight container in the fridge for up to 3 days.
  • Freezing: For longer storage, freeze the salmon before cooking. Marinate and freeze raw pieces in a sealed bag. Thaw in the fridge before cooking.

Frequently Asked Questions

Let’s address some common queries about this delightful recipe:

  • Can I use frozen salmon? Absolutely! Just make sure to thaw it properly before cooking.
  • What can I serve with these salmon bites? They pair beautifully with steamed veggies, rice, or a fresh salad.
  • Is it okay to double the recipe? Yes! Just ensure your skillet can accommodate the salmon without overcrowding.

Troubleshooting Common Issues

If you encounter any hiccups during cooking, here’s how to fix them:

  • Salmon is sticking: Make sure your pan is hot enough and use a non-stick skillet for best results.
  • Sauce isn’t thickening: Allow it to simmer a bit longer to reach the desired consistency.
  • Salmon is overcooked: Keep an eye on the cooking time; salmon cooks quickly, and it’s best enjoyed slightly undercooked for optimal texture.

Serving Suggestions

Presentation is key when it comes to impressing your guests. Here are some ideas for serving:

  • Serve on a beautiful platter with a sprinkle of sesame seeds and chopped green onions for a pop of color.
  • Pair with a side of jasmine rice and steamed broccoli for a complete meal.
  • For entertaining, serve as an appetizer on toothpicks with a side of dipping sauce.

Conclusion: Bring the Magic Home

Cooking should be a joyful experience, and Sweet & Savory Honey Garlic Salmon Bites bring just the right mix of ease and delight to your kitchen. They are a reminder that great food doesn’t have to be complicated; it just needs a little love and the right ingredients. So whether you’re treating your family to a wholesome meal or impressing friends at a gathering, these salmon bites are sure to become a beloved staple in your recipe rotation. Let’s make some magic happen together—grab your apron, and let’s get cooking!

Sweet & Savory Honey Garlic Salmon Bites: A Quick Weeknight Delight

Prep Time 10 minutes
Cook Time 10 minutes
Total Time 20 minutes
Servings 4 servings
Calories 350
Enjoy these quick and flavorful honey garlic salmon bites, perfect for a weeknight dinner.

Ingredients

Main

  • 1 lb salmon fillet, skin removed and cut into bite-sized pieces
  • 2 tablespoons honey
  • 2 tablespoons soy sauce
  • 3 cloves garlic, minced
  • 1 tablespoon olive oil
  • 1 teaspoon sesame oil
  • to taste salt and pepper
  • chopped green onions for garnish chopped green onions
  • sesame seeds for garnish sesame seeds

Instructions 

  • Whisk honey, soy sauce, garlic, olive oil, and sesame oil.
  • Season salmon with salt and pepper.
  • Cook salmon in a skillet over medium-high heat for 2-3 minutes per side.
  • Add sauce and cook for 1-2 minutes until thickened.
  • Garnish with green onions and sesame seeds, then serve.

Notes

Use fresh garlic for the best flavor.
Calories: 350kcal
Cost: $15
Course: Main Course
Cuisine: American
Keyword: garlic, honey, Salmon

Loved this recipe? Save it to your favorite Pinterest board so you can easily find it later! It’s the perfect way to keep all your sweet ideas in one place. ✨

Succulent salmon bites with a shiny glaze, showcasing the texture and garnishes.

Why You’ll Love This Cozy Chili

If you’ve ever wanted a recipe that feels like a warm hug on a chilly evening, then my Ultimate Slow Cooker Cream Cheese Crack Chicken Chili is just the thing. This dish is not only incredibly comforting but also incredibly easy to whip up. Imagine tender chicken simmered with rich cream cheese, zesty ranch seasoning, and a medley of savory ingredients, all coming together to create a symphony of flavors that will have everyone at the table reaching for seconds. It’s perfect for family gatherings, game nights, or simply a cozy night in with your favorite movie.

This recipe is one of those gems that transform a simple weeknight dinner into something special. You know those evenings when you want to throw something in the slow cooker and forget about it for a few hours? That’s where this chili shines! The slow cooking process allows the flavors to meld together beautifully, resulting in a creamy, hearty chili that feels indulgent yet is surprisingly simple to make.

Ingredients You’ll Need

To make this delicious dish, gather the following ingredients:

  • 2 pounds boneless, skinless chicken breasts
  • 1 packet ranch seasoning mix
  • 1 can (10 oz) diced tomatoes with green chilies
  • 1 can (15 oz) black beans, drained and rinsed
  • 1 can (15 oz) corn, drained
  • 1 cup chicken broth
  • 8 oz cream cheese, softened
  • 1 cup shredded cheddar cheese
  • 1/2 cup chopped green onions
  • 1/2 teaspoon garlic powder
  • 1/2 teaspoon onion powder
  • Salt and pepper to taste

These ingredients come together to create a creamy sauce that envelops juicy chicken and delightful veggies, making a bowl of chili that’s both satisfying and delicious.

How to Create the Magic

Delicious bowl of cream cheese chicken chili with a smooth texture and vibrant toppings.

Ready to dive in? Here’s how to bring this cozy dish to life:

  1. Start by placing the chicken breasts in the bottom of your slow cooker. This will serve as the base for your chili.
  2. Next, sprinkle the ranch seasoning mix evenly over the chicken. This seasoning is the star of the show, infusing the dish with that signature flavor.
  3. Add the diced tomatoes with green chilies, black beans, corn, chicken broth, garlic powder, and onion powder to the slow cooker. Give it a gentle stir to combine everything.
  4. Cover the slow cooker and set it on low for 6-8 hours or high for 3-4 hours, depending on your schedule. The longer cooking time allows the flavors to meld beautifully.
  5. About 30 minutes before you’re ready to serve, shred the chicken in the slow cooker using two forks. This will ensure every bite is packed with flavor.
  6. Stir in the softened cream cheese until well combined. Watch as it melts into the chili, creating a luscious, creamy texture.
  7. Once the cream cheese is melted and mixed in, stir in the shredded cheddar cheese until it’s gooey and delightful.
  8. Season with salt and pepper to taste, and serve hot, garnished with chopped green onions. Enjoy!

Perfecting the Cooking Process

To truly elevate your chili, consider these tips:

  • Brown the Chicken: For an extra layer of flavor, you can sear the chicken breasts in a skillet before adding them to the slow cooker. This simple step brings out the richness of the chicken.
  • Customize Your Spice Level: If you like a little heat, throw in some diced jalapeños or a pinch of cayenne pepper. Alternatively, you can keep it mild for a family-friendly version.
  • Experiment with Ingredients: Don’t hesitate to mix things up! Swap black beans for pinto beans, or toss in some chopped bell peppers or zucchini for added nutrition.

Add Your Personal Touch

One of the best parts about cooking is making a recipe your own. Here are some ideas to personalize your chili:

  • Top It Off: Consider serving your chili with a variety of toppings. Sour cream, avocado, tortilla chips, or fresh cilantro can add an extra layer of flavor and texture.
  • Serve with Sides: Pair your chili with crusty bread, cornbread, or a simple green salad to round out the meal.
  • Make It a Meal Prep Star: This chili stores beautifully, making it perfect for meal prep. Portion it out for lunches or quick dinners throughout the week.

Storing & Reheating Your Chili

Got leftovers? Here’s how to store and reheat your chili so it tastes just as good the next day:

  • Refrigeration: Store any leftovers in an airtight container in the fridge for up to three days. The flavors actually deepen and improve overnight!
  • Freezing: You can freeze the chili for up to three months. Just make sure to cool it completely before transferring it to a freezer-safe container.
  • Reheating: To reheat, warm it on low in a pot on the stove or microwave until heated through. Add a splash of chicken broth if it’s too thick after thawing.

FAQs About This Recipe

Let’s tackle some common questions you might have:

  • Can I use frozen chicken breasts? Yes! You can add frozen chicken directly to the slow cooker. Just make sure to extend the cooking time slightly.
  • Is this recipe spicy? The heat level is mild, thanks to the ranch seasoning and diced tomatoes. Feel free to adjust the spice by adding hot sauce or jalapeños.
  • Can I make this chili on the stove? Absolutely! Just simmer all the ingredients in a large pot for about 30-40 minutes, or until the chicken is cooked through.

Troubleshooting Common Issues

If you encounter any hiccups while making your chili, here’s how to troubleshoot:

  • Too Thick: If your chili ends up thicker than you like, simply stir in a little more chicken broth until you reach your desired consistency.
  • Too Salty: If you accidentally over-season, add a splash of apple cider vinegar or a little sugar to balance out the saltiness.
  • Not Creamy Enough: If you want a creamier texture, add more cream cheese or even a splash of heavy cream at the end.

Final Thoughts

Cooking, to me, is all about creating memories and sharing joy through food. This Ultimate Slow Cooker Cream Cheese Crack Chicken Chili is a dish that does just that—it brings people together. As you gather around the table, I hope the laughter and stories flow as freely as the chili itself. Trust me, once you serve this dish, it will become a cherished favorite in your home.

So, grab your ingredients, set that slow cooker, and let the magic happen. Enjoy every comforting bite, and don’t forget to share your own twists and turns with me. Happy cooking!

Did you enjoy making this recipe? Please rate it with ⭐⭐⭐⭐⭐ or leave a comment below! I love hearing from you!

Ultimate Slow Cooker Cream Cheese Crack Chicken Chili

Prep Time 10 minutes
Cook Time 4 hours
Total Time 4 hours 10 minutes
Servings 6 servings
Calories 550
A creamy, flavorful chili combining tender chicken, cheese, and spices, perfect for a comforting meal made in the slow cooker.

Ingredients

Protein

  • 2 pounds boneless, skinless chicken breasts
  • 1 packet ranch seasoning mix
  • 1 can (10 oz) diced tomatoes with green chilies
  • 1 can (15 oz) black beans, drained and rinsed
  • 1 can (15 oz) corn, drained
  • 1 cup chicken broth
  • 8 oz cream cheese, softened
  • 1 cup shredded cheddar cheese
  • 1/2 cup chopped green onions
  • 1/2 teaspoon garlic powder
  • 1/2 teaspoon onion powder
  • to taste salt and pepper

Instructions 

  • Place chicken in slow cooker and sprinkle with ranch mix.
  • Add tomatoes, beans, corn, broth, garlic, and onion powder. Cover and cook on low 6-8 hours.
  • Shred chicken with forks, then stir in cream cheese until melted.
  • Mix in shredded cheddar, season with salt and pepper, and serve topped with green onions.

Notes

This dish is perfect for a cozy family dinner or meal prep for the week.
Calories: 550kcal
Cost: $15
Course: Main Course
Cuisine: American
Keyword: Chicken, Chili, slow cooker

Loved this recipe? Save it to your favorite Pinterest board so you can easily find it later! It’s the perfect way to keep all your sweet ideas in one place. ✨

Savory chicken chili with cream cheese, garnished with green onions and cheddar cheese.

Welcome to the Magic of Slow Cooker Desserts

Hey there, lovely bakers! If you’ve landed here, you’re probably ready to dive into the delightful world of slow cooker desserts. Trust me, you’re in for a treat! There’s something enchanting about tossing a few ingredients into your slow cooker and letting it work its magic while you go about your day. Imagine coming home to the warm aroma of chocolate cobbler or a sweet bread pudding wafting through your kitchen. Yum!

In this definitive guide, we’re not just going to scratch the surface. Get ready for a deep dive into the realm of slow cooker desserts that will leave your loved ones asking for seconds (or thirds!). This article will cover everything from my favorite recipes and ingredient tips to troubleshooting common pitfalls. So pull up a chair, grab your spatula, and let’s get started!

Why You’ll Love These Slow Cooker Desserts

Let’s talk about why slow cooker desserts are the unsung heroes of the kitchen. Here are five reasons to fall in love with them:

  • Convenient Prep: Toss ingredients in and set it; no constant stirring or monitoring required!
  • Perfect for Entertaining: Prepare your dessert in advance, so you can focus on your guests instead of slaving away in the kitchen.
  • Gooey Goodness: Slow cooking creates rich flavors and textures that are hard to beat—think fudgy brownies and creamy rice puddings.
  • Versatile Recipes: From cakes to cobblers to puddings, there’s a slow cooker dessert for every taste.
  • Less Cleanup: One pot means fewer dishes, and who doesn’t love that?

Essential Ingredients for Your Slow Cooker Desserts

Before we get to the recipes, let’s break down some key ingredients and their possible substitutions:

  • Flour: All-purpose flour is a staple, but you can swap in whole wheat or gluten-free blends if needed.
  • Sugar: Granulated sugar is standard, but brown sugar adds a lovely depth of flavor.
  • Cocoa Powder: Unsweetened cocoa powder is essential for chocolate desserts, but carob powder can be a fun alternative for a unique flavor.
  • Milk: Whole milk gives the best texture, but you can use almond, oat, or coconut milk for dairy-free versions.
  • Butter: Unsalted butter is my go-to, but feel free to use coconut oil or vegan butter for dairy-free recipes.

Pro Tips for Perfect Slow Cooker Desserts

Side view of delicious crockpot chocolate cobbler served with a scoop of vanilla ice cream.

Want to elevate your slow cooker dessert game? Here are my top pro tips:

  • Grease the Pot: Always grease your slow cooker to prevent sticking and make cleanup easier.
  • Layer Smartly: Follow the order of ingredients carefully to ensure even cooking and optimal texture.
  • Don’t Overfill: Leave some space at the top of the slow cooker to allow for rising and bubbling.
  • Use High-Quality Ingredients: Fresh ingredients lead to better flavor, so don’t skimp!
  • Experiment with Spices: Don’t be afraid to add cinnamon, nutmeg, or vanilla for an extra flavor kick.
  • Check the Temperature: Invest in a thermometer to ensure your desserts are cooked perfectly.
  • Let it Rest: Allow your dessert to cool slightly after cooking; it helps set the texture.
  • Make-Ahead Options: Prepare ingredients the night before for a seamless cooking experience!

Common Mistakes and Troubleshooting

Even the best of us make mistakes in the kitchen! Here are some common issues and how to fix them:

  • Overcooked Desserts: If your dessert is dry, try reducing the cooking time or checking earlier next time.
  • Undercooked Centers: If the edges are done but the center is gooey, consider cooking on HIGH instead of LOW.
  • Sticking: Always ensure you’ve greased the pot well or use slow cooker liners for easy cleanup.
  • Texture Issues: If your dessert is too dense, you may have overmixed or added too much liquid.
  • Burnt Sides: This can happen if the slow cooker is overfilled; keep it at 2/3 full for best results.

Delicious Variations to Try

The beauty of slow cooker desserts is their versatility! Here are some fun variations to experiment with:

  • Berry Cobbler: Swap out chocolate for mixed berries for a fruity twist.
  • Peanut Butter Chocolate Cake: Add peanut butter to chocolate cake batter for an indulgent flavor.
  • Spiced Apple Bread Pudding: Incorporate seasonal spices like cinnamon and nutmeg for a warm fall treat.
  • Vegan Chocolate Lava Cake: Use flax eggs and coconut yogurt for a vegan-friendly dessert that’s still rich and gooey.

Storage and Make-Ahead Instructions

Want to enjoy your slow cooker desserts later? Here’s how to store them:

  • Refrigeration: Most desserts can be stored in an airtight container for up to a week in the fridge.
  • Freezing: Many desserts freeze well. Just ensure they’re cooled completely before wrapping tightly and freezing.
  • Reheating: For the best results, reheat in the slow cooker on LOW or in the microwave until warmed through.

Your Frequently Asked Questions

Let’s tackle some common queries about slow cooker desserts:

  • Can I use frozen fruit in my slow cooker desserts? Absolutely! Just don’t thaw them; add them directly to your recipe.
  • How do I know when my dessert is done? Check for a set texture and use a toothpick to test for doneness.
  • Can I double recipes in a slow cooker? Yes, but ensure your cooker isn’t overfilled and adjust cooking time as needed.
  • Are slow cooker desserts healthy? They can be! Opt for whole ingredients and reduce sugar to make them healthier.
  • What’s the best slow cooker for desserts? A programmable slow cooker with a timer is ideal for perfect results.
  • Can I make gluten-free slow cooker desserts? Yes! Substitute gluten-free flour blends for all-purpose flour.
  • How long can I keep leftovers? Most desserts are good in the fridge for up to a week; freeze for longer storage.
  • What’s the best way to serve slow cooker desserts? Top with whipped cream, ice cream, or fresh fruit for added flair!

Nutritional Tips and Dietary Adaptations

For those watching their diet, here are some tips to make your desserts a bit healthier:

  • Reduce Sugar: Cut sugar by 1/3 to 1/2 without losing flavor.
  • Use Whole Grains: Substitute white flour with whole grain or oat flour for added fiber.
  • Go Dairy-Free: Use plant-based alternatives to cream and milk.
  • Control Portions: Serve smaller portions to satisfy sweet cravings without overindulging.

Essential Equipment for Slow Cooker Desserts

Before you begin your journey into slow cooker desserts, here’s what you need:

  • Slow Cooker: A reliable slow cooker with a good seal for even cooking.
  • Measuring Cups and Spoons: Accurate measurements are key to baking success!
  • Mixing Bowls: A set of various sizes will help with ingredient prep.
  • Spatula: A sturdy spatula is essential for mixing and scraping down sides.
  • Whisk: For combining dry ingredients smoothly.

Serving Suggestions for Your Slow Cooker Desserts

Now that your dessert is ready, how do you serve it up? Here are some delightful ideas:

  • With Ice Cream: Warm desserts paired with a scoop of vanilla ice cream are heavenly.
  • Garnished with Fresh Fruit: Berries, bananas, or even a sprinkle of nuts can elevate your dish.
  • Drizzled with Sauce: Top with chocolate, caramel, or fruit sauce for an extra touch of sweetness.
  • Served with Whipped Cream: A dollop of whipped cream adds a light, fluffy contrast.

Conclusion: Let’s Create Some Magic!

There you have it! A comprehensive guide to the enchanting world of slow cooker desserts. I hope you’re feeling inspired to try your hand at these sweet creations. Remember, cooking is all about exploration—don’t hesitate to tweak recipes and make them your own. I can’t wait to hear about the magical moments you create in your kitchen. Happy cooking, my friends!

Delicious Crockpot Chocolate Cobbler In Slow Cooker

Prep Time 15 minutes
Cook Time 2 hours 30 minutes
Total Time 2 hours 45 minutes
Servings 8 servings
Calories 350
A rich and fudgy chocolate cobbler cooked effortlessly in your slow cooker, perfect for a cozy dessert.

Ingredients

Dry Ingredients

  • 1 cup all-purpose flour
  • 3/4 cup granulated sugar
  • 2 tablespoons unsweetened cocoa powder
  • 2 teaspoons baking powder
  • 1/4 teaspoon salt

Wet Ingredients

  • 1/2 cup whole milk
  • 1/4 cup unsalted butter (melted and slightly cooled)
  • 1 1/2 teaspoons vanilla extract

Brown Sugar Mixture

  • 1 cup packed light brown sugar light brown sugar
  • 1/4 cup unsweetened cocoa powder
  • 1 1/2 cups hot water

For Serving

  • as needed vanilla ice cream (for serving)

Instructions 

  • Mix dry ingredients in a bowl until lump-free.
  • Add wet ingredients and stir to form a thick batter.
  • Spread batter in a greased slow cooker.
  • Mix brown sugar and cocoa, sprinkle over batter.
  • Pour hot water over the mixture without stirring.
  • Cook on high for 2-2.5 hours, then rest 30 minutes before serving with ice cream.

Notes

This dessert is best enjoyed warm with a scoop of vanilla ice cream for extra indulgence.
Calories: 350kcal
Cost: $15
Course: Dessert
Cuisine: American
Keyword: chocolate