Author

Ava

Browsing

Why You’ll Love This Dish

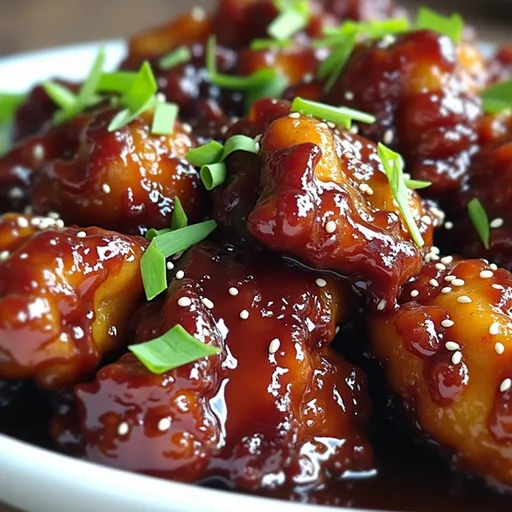
Ah, honey glazed chicken bites! If you’re a fan of dishes that bring together that delightful sweet-and-savory harmony, you’re in for a treat. This recipe is one of those magical creations that transforms simple ingredients into something absolutely irresistible. Picture this: tender, juicy chicken pieces coated in a sticky glaze that glistens like liquid gold. It’s the kind of meal that makes your kitchen smell divine, and it’s bound to have everyone hovering around the dinner table, eager for their first bite.

What I adore about these chicken bites is their versatility. Whether you’re serving them at a cozy family dinner, a festive gathering, or simply treating yourself after a long day, they never fail to impress. Plus, they’re super easy to whip up! With just a handful of ingredients and minimal prep time, you can create a dish that tastes like it’s come straight from a five-star restaurant.

Ingredients You’ll Need

Let’s gather what we need to make these Irresistibly Sticky Honey Glazed Chicken Bites. Here’s the shopping list:

  • 1 pound boneless chicken thighs, cut into bite-sized pieces
  • 1/4 cup honey
  • 2 tablespoons soy sauce
  • 1 tablespoon rice vinegar
  • 2 cloves garlic, minced
  • 1 teaspoon fresh ginger, grated
  • 1 tablespoon sesame oil
  • 1/2 teaspoon red pepper flakes (optional for a kick)
  • 2 tablespoons cornstarch
  • 2 tablespoons vegetable oil
  • Sesame seeds, for garnish
  • Chopped green onions, for garnish

Let’s Make These Together

Golden-brown chicken pieces coated in a shiny honey glaze with a blurred cozy background.

Now that we have everything, let’s dive into the cooking process! Here’s how you can create this delightful dish:

  1. Prepare the Marinade: In a mixing bowl, combine the honey, soy sauce, rice vinegar, minced garlic, grated ginger, sesame oil, and red pepper flakes (if using). Mix well until all ingredients are fully incorporated.
  2. Marinate the Chicken: Add the chicken pieces to the marinade, ensuring each piece is thoroughly coated. Cover and let it marinate for at least 30 minutes, or if you have the time, up to 2 hours in the refrigerator. This step is crucial as it infuses the chicken with incredible flavor!
  3. Coat the Chicken: After marinating, remove the chicken from the marinade and toss it with cornstarch until evenly coated. This will help achieve that perfect sticky texture we all love.
  4. Cook the Chicken: In a large skillet or wok, heat the vegetable oil over medium-high heat. Add the chicken pieces in a single layer and cook until golden brown and cooked through, about 5-7 minutes, stirring occasionally. The cornstarch will create a lovely crust!
  5. Add the Glaze: Once the chicken is beautifully browned, pour the remaining marinade into the skillet. Stir to coat the chicken and cook for an additional 2-3 minutes until the sauce thickens and becomes glossy.
  6. Garnish and Serve: Remove from heat and garnish with sesame seeds and chopped green onions before serving hot.

Tips for Success

To ensure your honey glazed chicken bites turn out perfectly every time, here are a few tips:

  • For the best flavor, let the chicken marinate longer. Overnight works wonders!
  • Use chicken thighs for a juicier bite. If you prefer chicken breasts, be careful not to overcook them.
  • Keep an eye on the glaze. It should coat the back of a spoon and have a syrup-like consistency—this usually takes about 3-5 minutes of cooking.
  • If you like a bit of heat, feel free to toss in more red pepper flakes or even some diced fresh chili!

Variations to Try

If you’re feeling adventurous or just want to switch things up, here are some fun variations you can try:

  • Pineapple Twist: Add chunks of fresh pineapple when you pour in the glaze for a tropical twist.
  • Veggie Boost: Toss in some bell peppers, snap peas, or broccoli during the last few minutes of cooking for a colorful and nutritious addition.
  • Sweet and Sour: Mix in some sweet chili sauce along with the honey for a sweet and tangy flavor.

Substitutions You Can Make

Don’t have all the ingredients on hand? No problem! Here are some substitutes you can use:

  • Replace rice vinegar with apple cider vinegar or white wine vinegar.
  • For a gluten-free version, use tamari instead of soy sauce.
  • If you’re out of sesame oil, olive oil works in a pinch, but you’ll miss that distinctive nutty flavor.

Equipment You’ll Need

Before you start cooking, let’s make sure you have the right tools:

  • Large mixing bowl
  • Skillet or wok
  • Spatula or wooden spoon for stirring
  • Measuring cups and spoons
  • Cutting board and knife for prepping your ingredients

Storing and Freezing

Leftovers? Yes, please! Here’s how to store them:

  • Refrigeration: Store any leftovers in an airtight container in the fridge for up to 3 days. Reheat in a skillet over medium heat until warmed through.
  • Freezing: If you want to make a big batch, these chicken bites freeze beautifully! Place them in an airtight container or freezer bag for up to 3 months. Thaw in the refrigerator before reheating.

Frequently Asked Questions

Here are some common questions I get about this recipe:

  • Can I use chicken breasts instead of thighs? Absolutely! Just be cautious not to overcook them. Thighs tend to be more forgiving.
  • What can I serve this with? These glazed bites are fantastic served over jasmine rice, cauliflower rice, or even tossed into lettuce wraps for a lighter option.
  • How can I make it spicier? Add more red pepper flakes, or even a drizzle of Sriracha right before serving!

Troubleshooting

If your glaze isn’t thickening, it might need a few more minutes on the heat. Just stir continuously until you reach that glossy finish. If it’s too thick, a splash of water can help loosen it up.

Final Thoughts

Cooking is all about discovery, and with my Irresistibly Sticky Honey Glazed Chicken Bites, you’re sure to find a new favorite in your recipe rotation. The combination of sweet honey, savory soy sauce, and a touch of spice creates a symphony of flavors that will satisfy even the pickiest of eaters. Plus, the beauty of this dish is how adaptable it is—you can make it your own with just a few tweaks.

So, whether you’re gathering around the dinner table with loved ones or enjoying a cozy night in, these chicken bites are bound to bring smiles and satisfied bellies. Don’t forget to snap a photo of your creation and share it with me! Happy cooking!

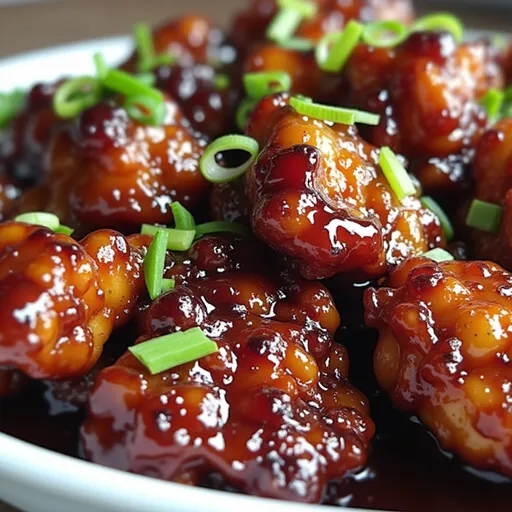
Irresistibly Sticky Honey Glazed Chicken Bites with Sweet and Savory Asian Flavors

Prep Time 10 minutes
Cook Time 15 minutes
Total Time 25 minutes
Servings 4 servings
Calories 350
Enjoy tender chicken bites coated in a sweet and savory honey glaze, infused with Asian flavors for a deliciously sticky experience.

Ingredients

Protein

  • 1 pound boneless chicken thighs, cut into bite-sized pieces
  • 1/4 cup honey
  • 2 tablespoons soy sauce
  • 1 tablespoon rice vinegar
  • 2 cloves garlic, minced
  • 1 teaspoon fresh ginger, grated
  • 1 tablespoon sesame oil
  • 1/2 teaspoon red pepper flakes (optional)
  • 2 tablespoons cornstarch
  • 2 tablespoons vegetable oil

Garnish

  • sesame seeds (for garnish)
  • chopped green onions (for garnish)

Instructions 

  • Mix honey, soy sauce, rice vinegar, garlic, ginger, sesame oil, and red pepper flakes.
  • Marinate chicken in the mixture for at least 30 minutes.
  • Toss chicken with cornstarch until coated.
  • Cook chicken in hot oil until golden, about 5-7 minutes.
  • Add remaining marinade, cook 2-3 minutes until sticky. Garnish with sesame seeds and green onions.

Notes

Ensure chicken is cooked through and sauce is sticky before serving.
Calories: 350kcal
Cost: $15
Course: Main Course
Cuisine: Asian
Keyword: Chicken, glaze, honey

Loved this recipe? Save it to your favorite Pinterest board so you can easily find it later! It’s the perfect way to keep all your sweet ideas in one place. ✨

A plate of savory honey glazed chicken bites arranged neatly, showcasing their texture and garnishes.

Welcome to the Cozy World of Apple Crisp

Ah, the delightful aroma of baked apples wafting through the kitchen! If there’s a dessert that feels like a warm hug on a chilly day, it’s definitely apple crisp. This easy apple crisp combines sweet Fuji apples with warm spices and a buttery oat topping, creating a symphony of flavors that will make you and your loved ones pause mid-bite and exclaim, ‘Wow!’ In this guide, we’re going to explore everything you need to know to make the perfect apple crisp that will not only satisfy your sweet tooth but will also make your kitchen feel like home.

Why You’ll Love This Recipe

  • Simple Preparation: With just a handful of ingredients and straightforward steps, you’ll whip up this dessert in no time.
  • Versatile Flavor: The combination of tart and sweet apples paired with warm spices makes this dessert a crowd-pleaser for all seasons.
  • Comforting Texture: The crunchy oat topping contrasts beautifully with the tender, spiced apples underneath.
  • Perfect for Sharing: Great for family gatherings, potlucks, or cozy nights in, this recipe is sure to bring people together.
  • Endless Variations: Customize this recipe with different fruits, toppings, or add-ins to make it uniquely yours!

Ingredients Breakdown

Let’s gather our ingredients and prepare to create some magic in the kitchen! Here’s what you’ll need for this classic apple crisp:

  • Fuji apples: About 6 medium, peeled, cored, and thinly sliced. These apples are perfect for baking because they hold their shape and have a great balance of sweetness and tartness.
  • Granulated sugar: 1/2 cup. This will help sweeten the apples and enhance their natural flavors.
  • All-purpose flour: 1/4 cup. This is for thickening the apple mixture and ensuring a perfect crisp.
  • Salt: A pinch to enhance all the flavors.
  • Lemon zest: Just a teaspoon to add brightness to the dish.
  • Cinnamon: 1 teaspoon, because what’s an apple crisp without a sprinkle of cinnamon?
  • Nutmeg and cloves: A pinch of each for that warm, spicy kick.
  • Unsalted butter: 1/2 cup, softened. This gives the topping its buttery goodness.
  • Brown sugar: 1/2 cup for a deeper, caramel-like sweetness.
  • Quick-cooking oats: 1 cup to create the crunchy topping.

Let’s Get Cooking!

Side view of a delicious apple crisp showcasing sliced apples and a crunchy oat topping.

Now that we have everything, it’s time to bring our apple crisp to life. Follow these simple steps:

  1. Preheat your oven to 350°F (175°C).
  2. Prepare the apples: In a large bowl, lightly toss the sliced Fuji apples with granulated sugar, all-purpose flour, salt, lemon zest, cinnamon, nutmeg, and cloves.
  3. Layer the apples: Spread the spiced apple mixture evenly into a greased baking dish.
  4. Make the topping: In a separate bowl, mix together the softened unsalted butter, brown sugar, all-purpose flour, and quick-cooking oats until crumbly.
  5. Dot the topping: Sprinkle the oat mixture evenly over the apple layer.
  6. Bake: Place in the oven and bake for about 45 minutes, or until the topping is golden brown and the apples are bubbling.

Expert Tips for the Perfect Apple Crisp

  • Choose the right apples: For the best flavor and texture, mix tart apples like Granny Smith with sweet apples like Fuji.
  • Don’t skimp on spices: The right spices elevate the dish, so don’t be shy with the cinnamon and nutmeg!
  • Let it cool: Allow your apple crisp to sit for at least 10 minutes before serving; this lets the flavors meld beautifully.
  • Serve warm: For an extra treat, serve your apple crisp warm with a scoop of vanilla ice cream!
  • Experiment with toppings: Try adding chopped nuts, coconut flakes, or even chocolate chips to the topping for added flavor.
  • Make it gluten-free: Substitute all-purpose flour with almond flour or gluten-free flour for a delightful twist.
  • Add some zing: A splash of bourbon or rum in the apple mixture can add an exciting depth of flavor.
  • Use a mix of textures: Incorporate some crushed graham crackers or crushed cookies for a different topping texture.

Common Mistakes and Troubleshooting

Even the best chefs can encounter a few hiccups! Here are some common mistakes to avoid:

  • Overmixing the topping: This can lead to a dense topping instead of a crumbly one. Mix just until combined.
  • Not enough apples: A generous amount of apples ensures a juicy filling. Aim for at least 6 cups of sliced apples.
  • Underbaking: Be sure to bake until the topping is golden brown and the apples are soft; this usually takes about 45 minutes.

Delicious Variations to Try

Want to shake things up? Here are some fun variations to consider:

  • Berry Bliss Apple Crisp: Add a cup of fresh or frozen berries like blueberries or raspberries for a fruity twist.
  • Peachy Apple Crisp: Mix in sliced peaches for a sweet and juicy combination.
  • Maple Pecan Crisp: Replace brown sugar with maple syrup and add chopped pecans for an earthy flavor.
  • Spiced Rum Apple Crisp: A splash of spiced rum in the apple filling takes this dessert to the next level.

Storage and Make-Ahead Instructions

Wondering how to keep your apple crisp fresh? Here’s how:

  • Refrigeration: Store leftovers in an airtight container in the fridge for up to 3 days.
  • Freezing: You can freeze apple crisp for up to 3 months. Just make sure to let it cool completely before wrapping it tightly.
  • Reheating: To enjoy leftovers, simply reheat in the oven at 350°F for about 20 minutes or until warmed through.

Frequently Asked Questions

Here are some common questions about making apple crisp:

  • Can I use other fruits? Absolutely! Pears, cherries, or even mixed berries work beautifully.
  • What’s the best way to peel apples? A good vegetable peeler or paring knife does the trick. Just be careful with your fingers!
  • Do I need to peel the apples? Peeling is recommended for the best texture, but you can leave the skins on for added fiber.
  • Can I make this recipe ahead of time? Yes! You can prepare the apple filling and topping separately, then assemble and bake when ready.
  • How do I know when it’s done baking? Look for a golden topping and bubbling apples; a fork should easily pierce the apples.
  • Can I use frozen apples? Yes, but make sure to thaw and drain excess moisture before baking.
  • What’s the best way to serve apple crisp? Warm, with a scoop of vanilla ice cream or a dollop of whipped cream!
  • Can I add nuts to the topping? Definitely! Chopped walnuts or pecans add a nice crunch and flavor.

Nutrition Tips and Dietary Adaptations

If you’re looking to make this dessert a bit healthier, consider these tips:

  • Reduce sugar: Cut down on sugar by using a sugar substitute or reducing the amount of granulated sugar.
  • Oats for fiber: Using whole oats in the topping boosts fiber and makes it more filling.
  • Dairy-free option: Substitute coconut oil for butter to make it dairy-free.
  • Gluten-free option: As mentioned, use gluten-free flour and oats for a gluten-free dessert.

Equipment Recommendations

To make your apple crisp, you’ll need a few essential tools:

  • Baking dish: A 9×13-inch glass or ceramic dish works perfectly for this recipe.
  • Mixing bowls: You’ll need a couple of bowls for mixing the apple filling and the topping.
  • Measuring cups and spoons: Accurate measurements are key to baking success!
  • Peeler and knife: For peeling and slicing the apples.

Serving Suggestions

Now that your apple crisp is baked to perfection, here are some serving ideas:

  • With ice cream: A scoop of vanilla or caramel ice cream adds creaminess that pairs beautifully with warm apple crisp.
  • With whipped cream: A dollop of whipped cream on top makes for a light and fluffy contrast.
  • With yogurt: For a healthier twist, serve with Greek yogurt for added protein.
  • With a drizzle of caramel: Drizzling warm caramel sauce over the top gives it an extra indulgent touch.

So there you have it! Your guide to creating the most delightful homemade apple crisp that feels like home on a rainy day. Whether you’re baking for yourself or sharing with friends and family, this recipe is sure to become a beloved favorite. It’s time to get cooking, and don’t forget to enjoy every moment in the kitchen—you’re creating magic!

Classic Apple Crisp

Prep Time 15 minutes
Cook Time 45 minutes
Total Time 1 hour
Servings 8 pieces
Calories 350
A warm, comforting dessert featuring tender spiced apples topped with a crunchy oat streusel.

Ingredients

Fruits

  • 4 medium Fuji apples, peeled, cored, and thinly sliced
  • 0.5 cup granulated sugar
  • 2 tablespoons all-purpose flour
  • 0.25 teaspoon salt
  • 1 teaspoon lemon zest
  • 1 teaspoon cinnamon
  • 0.5 teaspoon nutmeg
  • 0.25 teaspoon cloves
  • 1 cup unsalted butter, softened
  • 0.75 cup brown sugar
  • 1.5 cups quick-cooking oats

Instructions 

  • Preheat the oven to 350°F (175°C).
  • Toss sliced apples with sugar, flour, salt, lemon zest, cinnamon, nutmeg, and cloves.
  • Layer apples in a baking dish.
  • Mix butter, brown sugar, flour, and oats for topping.
  • Spread topping over apples.
  • Bake until golden and bubbly, about 45 minutes.

Notes

For extra flavor, serve with vanilla ice cream.
Calories: 350kcal
Cost: $15
Course: Dessert
Cuisine: American
Keyword: apple

Why You’ll Love This Recipe

Are you looking for a quick, healthy dinner option that doesn’t skimp on flavor? Well, look no further than these Delicious Honey Garlic Salmon Bowls! In just 15 minutes, you can whisk together a meal that not only fills your belly but also warms your soul. The combination of sweet honey and savory soy sauce creates a delightful sauce that perfectly complements the rich flavor of salmon. Add some vibrant veggies and creamy avocado, and you have a dish that’s as beautiful as it is delicious. Whether you’re cooking for yourself after a long day or impressing friends at a dinner party, this recipe is sure to steal the show.

Ingredients

  • 2 salmon fillets
  • 2 tablespoons honey
  • 2 tablespoons soy sauce
  • 2 cloves garlic, minced
  • 1 tablespoon olive oil
  • 1 cup cooked rice (white or brown)
  • 1 cup steamed broccoli
  • 1/2 avocado, sliced
  • Sesame seeds for garnish
  • Chopped green onions for garnish

Step-by-Step Instructions

A beautifully arranged bowl featuring honey garlic salmon, white rice, and vibrant vegetables.

Preparation of the Marinade

Let’s kick things off with the star of our show—the honey garlic marinade! In a small bowl, whisk together the honey, soy sauce, and minced garlic. This magical mixture is what gives our salmon that irresistible flavor. The sweetness of the honey balances perfectly with the salty soy sauce, while the garlic adds a punch of savory goodness. Set this aside for a moment while we get everything else ready.

Cooking the Salmon

Heat the olive oil in a skillet over medium-high heat. Once the oil is shimmering, gently place the salmon fillets in the skillet, skin-side down. Let them sizzle for about 3-4 minutes. This is the point where you can just breathe in the amazing aroma wafting from the skillet—it’s like a warm hug for your senses! After 3-4 minutes, flip the salmon carefully and pour the honey garlic mixture over the top. Cook for an additional 3-4 minutes, or until the salmon is cooked through. You’ll know it’s done when it easily flakes with a fork and has a beautiful golden hue.

Assembling the Bowls

While your salmon is cooking, you can prepare the rice and steam the broccoli if it’s not already done. Once the salmon is ready, remove it from the skillet and flake it into bite-sized pieces. Now comes the fun part—assembling your bowls! Start with a generous scoop of cooked rice at the bottom of each bowl. Then add a layer of steamed broccoli and the flaked salmon. For that extra touch of creaminess, add sliced avocado on top. Finally, sprinkle with sesame seeds and chopped green onions for that finishing touch. Voila! Your delicious honey garlic salmon bowl is ready to be devoured.

Tips & Tricks

Ensuring Perfect Salmon

To achieve the perfect salmon, keep an eye on the cooking time. Salmon is best when it’s not overcooked. For a more precise method, use a food thermometer; the internal temperature should reach 145°F for safe consumption. If you’re a fan of crispy skin, you can start cooking the salmon skin-side up and flip it after a minute or so.

Presentation Tips

Presentation matters, especially when you want to impress! Aim for a rainbow of colors in your bowl. The vibrant green of broccoli, the golden salmon, and the creamy avocado make for a beautiful presentation. You can even drizzle a bit of extra honey or soy sauce on top for added flair before serving.

Variations

Ingredient Substitutions

This recipe is very flexible! If you’re not a fan of salmon or want to switch it up, you can easily substitute with chicken or tofu. Both options soak up the honey garlic glaze wonderfully. For a vegetarian option, try using roasted chickpeas or tempeh. You can also replace the broccoli with other veggies like steamed asparagus, snap peas, or even sautéed bell peppers for a pop of color.

Flavor Enhancements

Want to kick the flavor up a notch? Add a pinch of red pepper flakes to the marinade for a spicy kick, or a sprinkle of smoked paprika for some depth. You could also experiment with different sauces—try adding a splash of sriracha for heat or a dash of teriyaki sauce for a sweet twist.

Storage Info

How to Store Leftovers

If you happen to have leftovers (which I doubt, because they’re so delicious!), simply place them in an airtight container in the fridge. They’ll keep well for up to 3 days. Just remember to let the salmon cool down before sealing to avoid sogginess.

Meal Prep Tips

To make weeknight dinners a breeze, consider meal prepping! You can cook extra rice and veggies in advance and store them in the fridge. Another great tip is to marinate the salmon ahead of time. Just place the fillets in the marinade and let them soak in the flavors. When you’re ready to eat, all you have to do is cook the salmon and assemble your bowls!

FAQs

How long does it take to make Honey Garlic Salmon Bowls?

From start to finish, you can have this amazing dish ready in just 15 minutes! It’s perfect for busy weeknights.

Can I use frozen salmon for this recipe?

Absolutely! Just make sure to thaw the salmon in the fridge overnight or run it under cold water for about 30 minutes. Then, follow the same cooking instructions, and you’ll have a delicious meal!

What can I serve with the salmon bowls?

If you’re looking to round out your meal, consider serving these bowls with a light salad, some roasted sweet potatoes, or even a side of edamame for added protein.

Conclusion

There you have it! A delightful recipe for Honey Garlic Salmon Bowls that’s not only quick to prepare but also packed with flavor. Whether you’re cooking for a family dinner or a cozy night in, this recipe is sure to impress. So grab your ingredients, pull up a chair, and let’s make some magic happen in the kitchen together. Happy cooking!

Delicious Honey Garlic Salmon Bowls in 15 Minutes!

Prep Time 5 minutes
Cook Time 10 minutes
Total Time 15 minutes
Servings 2 servings
Calories 550
Enjoy a quick and flavorful salmon bowl with honey, garlic, and fresh toppings, perfect for a nutritious meal in just 15 minutes.

Ingredients

Protein

  • 2 pieces salmon fillets
  • 2 tablespoons honey
  • 2 tablespoons soy sauce
  • 2 cloves garlic, minced
  • 1 tablespoon olive oil

Carbohydrates

  • 1 cup cooked rice (white or brown)

Vegetables

  • 1 cup steamed broccoli
  • 0.5 avocado sliced avocado

Garnishes

  • sesame seeds sesame seeds for garnish
  • chopped green onions chopped green onions for garnish

Instructions 

  • Whisk honey, soy sauce, and garlic.
  • Cook salmon in oil for 3-4 minutes per side.
  • Pour sauce over salmon and cook until done.
  • Prepare rice and steam broccoli.
  • Flake salmon and layer with rice, broccoli, avocado, and garnish. Serve.

Notes

Use fresh salmon for best flavor and adjust cooking time as needed.
Calories: 550kcal
Cost: $15
Course: Main Course
Cuisine: fusion
Keyword: Salmon

Loved this recipe? Save it to your favorite Pinterest board so you can easily find it later! It’s the perfect way to keep all your sweet ideas in one place. ✨

Detailed view of a Honey Garlic Salmon Bowl, showcasing the glistening salmon and fresh toppings.

Why You’ll Love This Recipe

There’s something truly enchanting about the way a well-made curry can wrap you in a warm embrace, isn’t there? Penang Curry Chicken is not just a meal; it’s an invitation to travel to the vibrant streets of Malaysia without ever leaving your kitchen. This dish whispers comfort with every bite, combining the richness of coconut milk with the aromatic embrace of spices. It’s perfect for a cozy dinner alone, an intimate gathering with friends, or even a festive celebration. Trust me when I say, once you taste this dish, it will become a cherished staple in your home.

Overview of Penang Curry Chicken

This recipe captures the essence of traditional Malaysian cuisine, blending Indian and local flavors into a creamy, fragrant curry. The magic lies in the Penang curry paste, which is a harmonious mix of spices that elevates the chicken and vegetables to a whole new level. The addition of coconut milk creates a luscious sauce that clings to the chicken, making each bite an experience worth savoring. Let’s dive into how you can create this comforting dish right in your own kitchen!

Nutritional Information

Eye-level view of a steaming plate of Penang Curry Chicken, rich in sauce and garnished with basil leaves.

Before we start cooking, let’s take a quick look at what you can expect nutritionally from this dish. Each serving of Penang Curry Chicken (based on a four-serving calculation) contains approximately:

  • Calories: 450
  • Protein: 30g
  • Fat: 30g
  • Carbohydrates: 20g
  • Sugar: 5g

This dish is a great source of protein and healthy fats, making it a satisfying meal that will keep you full and happy!

Ingredients

Here’s what you’ll need to create this delightful dish:

  • 500g chicken, cut into pieces
  • 2 tablespoons Penang curry paste
  • 1 can (400ml) coconut milk
  • 2 tablespoons vegetable oil
  • 1 onion, sliced
  • 3 cloves garlic, minced
  • 1 tablespoon ginger, minced
  • 1 tablespoon fish sauce
  • 1 tablespoon sugar
  • 1 bell pepper, sliced
  • Fresh basil leaves for garnish
  • Salt to taste

Essential Equipment Guide

Having the right tools makes cooking so much smoother! Here’s what I recommend:

  • Large Pan or Wok: A sturdy pan helps achieve that beautiful stir-fry finish.
  • Knife: A sharp chef’s knife for chopping your ingredients quickly and safely.
  • Measuring Spoons: For precise measuring of those flavorful ingredients.
  • Cutting Board: A good cutting board provides a stable surface for prepping your ingredients.

Preparation Methods

Let’s break down the steps to making this Penang Curry Chicken, ensuring each bite is packed with flavor.

Step 1: Heat the Oil

In a large pan over medium heat, add 2 tablespoons of vegetable oil. Allow it to warm up—this will help in sautéing your aromatics beautifully.

Step 2: Sauté Aromatics

Add the sliced onion, minced garlic, and minced ginger to the pan. Sauté for about 2-3 minutes until fragrant and the onion turns translucent. This step will form the aromatic foundation of your curry.

Step 3: Incorporate the Curry Paste

Stir in the Penang curry paste and cook for an additional 2-3 minutes until the oil separates from the paste. This step is key to releasing all those wonderful flavors.

Step 4: Cook the Chicken

Next, add the chicken pieces to the pan. Cook until they are no longer pink, stirring frequently to ensure even cooking. This should take about 5-7 minutes. You want to see a lovely golden color on your chicken!

Step 5: Add Coconut Milk

Pour in the can of coconut milk, stirring well to combine it with the chicken and spices. The rich creaminess of the coconut milk will balance the heat of the curry paste.

Step 6: Season and Simmer

Add the fish sauce and sugar to the mix, then bring everything to a gentle simmer. This is where the magic happens—let the flavors meld together for about 10-15 minutes.

Step 7: Add Vegetables

Incorporate the sliced bell pepper into the curry and cook for an additional 5-7 minutes. You want the pepper to retain some crunch while soaking up all the flavors of the sauce.

Step 8: Final Seasoning

Taste the curry and season with salt as needed. Remember, the flavors will deepen as they simmer, so adjust according to your taste preferences.

Serving Suggestions

Serve your Penang Curry Chicken hot, garnished with fresh basil leaves. Pair it with jasmine rice or roti for a complete meal that will have everyone asking for seconds!

Tips for Perfecting Your Curry

  • Quality Ingredients: Always use high-quality curry paste and coconut milk for the best flavor.
  • Adjusting Spice Levels: If you prefer a milder curry, start with less curry paste and add more as needed.
  • Resting Time: Letting the curry sit for a few minutes after cooking allows the flavors to develop further.

Variations and Substitutions

Feel free to play around with this dish! Here are a few ideas:

  • Vegetarian Option: Substitute chicken with tofu or chickpeas for a plant-based version.
  • Extra Veggies: Add in other vegetables like broccoli, carrots, or snap peas for added nutrition.
  • Different Proteins: Try using shrimp or beef instead of chicken for a different flavor profile.

Storage and Freezing

Leftovers can be stored in an airtight container in the refrigerator for up to 3 days. If you want to freeze your Penang Curry Chicken, it can last for up to 3 months. Just thaw it overnight in the refrigerator before reheating on the stove.

Common FAQs

What can I serve with Penang Curry Chicken?
Jasmine rice or roti are perfect accompaniments. They soak up the delicious sauce beautifully!

Can I make this curry in advance?
Absolutely! You can prepare the curry paste and chop your vegetables a day ahead to save time.

How do I adjust the recipe for dietary restrictions?
For a gluten-free option, ensure your fish sauce is gluten-free. For vegan, swap chicken for tofu and use vegetable broth instead of fish sauce.

Troubleshooting Common Issues

My sauce is too thin: If your sauce isn’t thickening, allow it to simmer uncovered for a few more minutes.

It’s too salty: Balance the saltiness with a touch of sugar or a splash of coconut milk.

Conclusion

Cooking Penang Curry Chicken is more than just preparing a dish; it’s about sharing a slice of culture and comfort with those you love. I hope this recipe inspires you to bring a little piece of Malaysia into your kitchen. As you gather around the table, savoring each bite, remember that the best meals are those made with love and a pinch of adventure. So grab your ingredients, and let’s create some culinary magic together!

Make Authentic Penang Curry Chicken Flavor Tonight

Prep Time 10 minutes
Cook Time 20 minutes
Total Time 30 minutes
Servings 4 servings
Calories 450
Enjoy a flavorful and authentic Penang Curry Chicken made easily at home with rich coconut milk and fragrant spices.

Ingredients

Protein

  • 500 g chicken, cut into pieces
  • 2 tablespoons penang curry paste
  • 1 can (400ml) coconut milk
  • 2 tablespoons vegetable oil
  • 1 onion sliced onion
  • 3 cloves garlic, minced
  • 1 tablespoon ginger, minced
  • 1 tablespoon fish sauce
  • 1 tablespoon sugar
  • 1 bell pepper sliced bell pepper
  • to taste salt

Garnish

  • fresh basil leaves fresh basil leaves for garnish

Instructions 

  • Heat oil in a pan, sauté onion, garlic, and ginger until fragrant.
  • Add curry paste and cook 2-3 minutes until oil separates.
  • Add chicken and cook until no longer pink.
  • Pour in coconut milk, add fish sauce and sugar, simmer.
  • Add bell pepper, cook 5-7 minutes, season with salt, garnish with basil, serve.

Notes

Adjust salt and spice to taste. Serve with rice for a complete meal.
Calories: 450kcal
Cost: $15
Course: Main Course
Cuisine: Malaysian
Keyword: Chicken

Loved this recipe? Save it to your favorite Pinterest board so you can easily find it later! It’s the perfect way to keep all your sweet ideas in one place. ✨

Delicious Penang Curry Chicken presented in a bowl, featuring a creamy coconut sauce and bell peppers.

Discover the Magic of Homemade Peach Pie

Welcome to a slice of summer bliss! If you’ve ever wondered how to capture the essence of sun-ripened peaches in a dessert, then you’re in for a treat. This Homemade Peach Pie is more than just a dessert; it’s a heartfelt invitation to savor the nostalgic flavors of warm summer days, gathered with loved ones. With a flaky crust and a luscious filling that whispers sweet secrets, this recipe will make you the star of any gathering!

In the following sections, we’ll dive deep into why this recipe stands out, how to master each step, and even some fun variations to keep things interesting. So, let’s roll up our sleeves and get started!

Why You’ll Love This Recipe

  • Comforting nostalgia: Every bite of this pie takes you back to simpler times, evoking childhood memories of family gatherings.
  • Easy to make: With just a few simple ingredients and straightforward steps, this pie is perfect for both beginner and experienced bakers.
  • Versatile dessert: Enjoy it warm with vanilla ice cream, or serve it chilled for a refreshing summer treat.
  • Impressive presentation: The golden crust and vibrant peach filling make this pie a stunning centerpiece for any table.
  • Customizable flavors: With endless variations, you can adapt this pie to suit your taste, whether you like it classic or with a twist!

Ingredient Breakdown

Let’s talk about the magic ingredients that make this pie a must-bake. Here’s what you’ll need:

  • 2 Packages of Pie Crust: Store-bought or homemade, the crust is the foundation of your pie. For a homemade option, use flour, butter, and water for a flaky texture.
  • 4 cans of Sliced Peaches (15 oz): Canned peaches are perfect for this recipe, but feel free to use fresh or frozen if they’re in season!
  • 1 cup of White Sugar: This sweetness balances the tartness of the peaches.
  • 1 cup of Brown Sugar: Adds depth and a hint of caramel flavor.
  • 1 Tbsp. Vanilla Extract: Enhances the flavor profile, making it truly irresistible.
  • 1 tsp Ground Cinnamon: A warm spice that complements the peaches beautifully.
  • 1 tsp Nutmeg: Just a pinch adds warmth and earthiness.
  • 3 Tbsp Butter (Melted): This adds richness and helps the filling stay moist.
  • 1 Tbsp. Lemon Juice (optional): A splash of acidity brightens the flavors.

Pro Tips for Perfect Peach Pie

Side view of a freshly baked peach pie, with visible peach slices and a shiny glaze.
  • Choose ripe peaches: If using fresh, make sure they are slightly soft to the touch for the best flavor.
  • Let the filling sit: Allowing the peach mixture to rest for 15 minutes helps meld the flavors and creates a syrupy filling.
  • Don’t skip the butter: Dotting your pie filling with melted butter ensures it stays rich and flavorful.
  • Seal it well: Crimp the edges of the pie crust tightly to prevent any filling from leaking out during baking.
  • Cool before slicing: Letting the pie cool for at least 30 minutes helps the filling set, making it easier to slice.
  • Experiment with spices: Feel free to add a pinch of cardamom or ginger for an unexpected twist!
  • Serve with flair: Top each slice with whipped cream or a scoop of ice cream for a delightful finish.
  • Make it ahead: This pie can be baked a day in advance, making it perfect for parties!

Avoiding Common Mistakes

Even the best bakers have their off days, but don’t worry! Here are some common pitfalls and how to avoid them:

  • Soggy bottom crust: Pre-baking the crust for 10 minutes can help prevent this issue.
  • Overcooked filling: Monitor your pie closely to avoid burning, particularly the edges of the crust.
  • Too sweet or too tart: Adjust the sugar based on the ripeness of your peaches. Taste before you bake!
  • Crust cracking: Make sure your pie crust is well-chilled before rolling it out for a more pliable texture.

Delicious Variations

Once you’ve mastered the classic peach pie, why not try some exciting variations? Here are a few ideas:

  • Peach Blueberry Mix: Add a cup of fresh blueberries for a burst of flavor and color.
  • Spicy Peach Pie: Incorporate jalapeño or chili powder for a sweet-heat experience.
  • Crumble Topping: Top your pie with a mixture of oats, flour, and brown sugar for a crunchy texture.
  • Peach Melba Pie: Swirl in some raspberry preserves for a delightful contrast in flavor.

Storage and Make-Ahead Instructions

This pie is perfect for prepping in advance! Here’s how to store it:

  • Room Temperature: Keep your pie covered at room temperature for up to 2 days.
  • Refrigerator: For longer storage, refrigerate for up to 5 days. Just be sure to cover it to maintain freshness.
  • Freezing: You can freeze the baked pie for up to 3 months. Just wrap it tightly in plastic wrap and aluminum foil.

Frequently Asked Questions

  • Can I use fresh peaches instead of canned? Absolutely! Just peel and slice about 5-6 ripe peaches.
  • How do I know when the pie is done? The crust should be golden brown, and the filling should be bubbly.
  • Can I make the crust ahead of time? Yes! You can prepare the crust and store it in the refrigerator for up to 3 days.
  • What can I do with leftover pie? Leftover pie is great for breakfast! Just heat a slice in the microwave.
  • Is this recipe gluten-free? You can substitute the pie crust with a gluten-free option available at most grocery stores.
  • How can I make my pie more flavorful? Consider adding almond extract or a splash of bourbon to the filling for extra depth.
  • Can I use other fruits? Definitely! This recipe works beautifully with cherries, plums, or even apples.
  • How do I prevent the crust from burning? If the edges brown too quickly, cover them with aluminum foil until the pie finishes baking.

Nutritional Insights and Dietary Adaptations

If you’re keeping an eye on your nutrition, here are some tips:

  • Reduced Sugar: Substitute half of the sugar with a natural sweetener like honey or maple syrup for a healthier twist.
  • Vegan Alternative: Use a vegan pie crust and replace butter with coconut oil or vegan butter.
  • Whole Grain Crust: Opt for whole wheat flour instead of all-purpose flour for a nuttier flavor and more fiber.

Essential Equipment

To create this delicious peach pie, you’ll need a few essential kitchen tools:

  • Pie Dish: A 9-inch pie dish is perfect for this recipe.
  • Mixing Bowl: A large bowl for mixing your peach filling.
  • Rolling Pin: To roll out your pie crust evenly.
  • Measuring Cups and Spoons: Accurate measurements are key to perfecting your pie!

Serving Suggestions

Serving your peach pie can be just as delightful as making it! Here are a few ideas:

  • À la mode: Serve with a scoop of vanilla ice cream on top for a decadent treat.
  • With Whipped Cream: Lightly sweetened whipped cream adds a lovely touch of creaminess.
  • Cheese Pairing: A slice of cheddar cheese complements the sweetness of the peaches beautifully.
  • With Fresh Mint: Garnish with mint leaves for a pop of color and freshness on your plate.

So there you have it—the ultimate guide to making the perfect peach pie that will not only impress but also warm hearts. Every slice is an invitation to enjoy life’s sweet moments. Now it’s your turn to create some magic in your kitchen. Happy baking!

Delicious Peach Pie

Prep Time 20 minutes
Cook Time 45 minutes
Total Time 1 hour 5 minutes
Servings 8 pieces
Calories 350
A classic homemade peach pie with sweet, spiced filling and flaky crust, perfect for dessert or a special treat.

Ingredients

Pie Crusts

  • 4 cans Sliced Peaches (15 oz)
  • 1 cup White Sugar
  • 1 cup Brown Sugar
  • 1 Tbsp Vanilla Extract
  • 1 tsp Ground Cinnamon
  • 1 tsp Nutmeg
  • 3 Tbsp Butter (Melted)
  • 1 Tbsp Lemon Juice (optional)

Instructions 

  • Line a pie dish with one pie crust.
  • Drain peaches, mix with sugars, spices, vanilla, and lemon juice; let sit 15 minutes.
  • Pour filling into crust, dot with melted butter, cover with top crust, seal edges, and cut slits.
  • Bake at temperature specified on crust package for 45 minutes, then cool before serving.

Notes

For a crisper crust, chill the pie before baking.
Calories: 350kcal
Cost: $15
Course: Dessert
Cuisine: American
Keyword: peach

Why This Dish Will Be Your New Favorite

There’s something incredibly heartwarming about the aroma of honey-garlic roasted salmon wafting through your kitchen. Picture this: after a long day, you walk into your home, and the sweet scent of honey combined with the savory notes of garlic greets you like an old friend. This dish doesn’t just satisfy hunger; it wraps you in a comforting embrace, reminding you of cozy evenings spent around the dinner table with loved ones.

What makes this dish so special? It’s the perfect harmony of flavors—a sticky, sweet glaze that caramelizes beautifully in the oven, elevating simple salmon fillets into a culinary masterpiece. Whether you’re hosting a dinner party or simply treating yourself to a well-deserved meal, this honey-garlic roasted salmon is sure to impress. Let’s dive into this flavorful journey that will steal your heart.

Essential Ingredients

To create this magical dish, you don’t need a long list of fancy ingredients. Here’s what you’ll need:

  • 4 salmon fillets: Fresh or frozen, just make sure to thaw them before cooking for even results.
  • 1/4 cup honey: Opt for pure honey for that rich, natural sweetness.
  • 3 cloves garlic, minced: Fresh garlic is key here; it infuses the salmon with a delightful flavor.
  • 2 tablespoons soy sauce: Low-sodium soy sauce works wonders, enhancing the dish without overwhelming it.
  • 1 tablespoon olive oil: This helps achieve that golden-brown crust we all love.
  • 1 tablespoon lemon juice: Freshly squeezed adds brightness that balances the sweetness.
  • Salt and pepper: Essential for seasoning; adjust according to your preference.
  • Fresh parsley for garnish (optional): A sprinkle adds a touch of color and freshness.

Let’s Make It Together

Now that we have everything we need, let’s get cooking! Follow these simple steps to create your own honey-garlic roasted salmon.

Preparation Steps

  1. Preheat your oven: Start by preheating your oven to 400°F (200°C). This temperature is perfect for achieving that lovely caramelization.
  2. Mix the sauce: In a small bowl, whisk together the honey, minced garlic, soy sauce, olive oil, and lemon juice until well combined. You want it to be smooth and glossy—like liquid gold!
  3. Prepare the salmon: Lay your salmon fillets on a lined baking sheet and season them generously with salt and pepper.
  4. Coat the salmon: Drizzle that fabulous honey-garlic mixture over the fillets, ensuring each one is well coated. We want all that flavor to soak in!
  5. Bake: Place the baking sheet in the preheated oven and bake for 12-15 minutes, or until the salmon flakes easily with a fork. For an extra caramelized finish, broil for an additional 2-3 minutes.
  6. Garnish and serve: Remove from the oven, garnish with fresh parsley if desired, and serve immediately. Pair it with steamed veggies or fluffy rice for a complete meal.

Perfecting the Cooking Process

Cooking salmon might seem intimidating, but it’s easier than you think! Here are some tips to ensure your honey-garlic roasted salmon turns out perfectly every time:

  • Choose quality salmon: Wild-caught salmon tends to have a richer flavor and better texture compared to farmed varieties.
  • Don’t overcook: Keep an eye on your salmon! It’s done when it flakes easily with a fork. Overcooking will result in dry fish.
  • Use parchment paper: Lining your baking sheet with parchment paper not only makes cleanup a breeze but also prevents sticking.
  • Experiment with the sauce: Feel free to adjust the honey and soy sauce ratios based on your taste. Love it sweeter? Add more honey!

Add Your Touch

One of the best things about cooking is the ability to personalize your dishes. Here are a few variations and substitutions to consider:

  • Chili flakes: If you like a bit of heat, sprinkle some red pepper flakes into the honey-garlic mixture.
  • Maple syrup: Don’t have honey? Maple syrup makes a fantastic substitute, adding its own unique flavor.
  • Herbs: Fresh herbs like dill or cilantro can be added to the glaze for an extra layer of flavor.
  • Vegetable sides: Serve your salmon with roasted vegetables or a fresh salad to create a colorful, nutritious plate.

Storing & Reheating

Got leftovers? No problem! Here’s how to store and reheat your honey-garlic roasted salmon:

  • Storage: Store any leftover salmon in an airtight container in the fridge for up to three days.
  • Reheating: To preserve moisture, reheat gently in the oven at 350°F (175°C) until warmed through. You can also microwave it, but be careful not to overdo it!

Chef’s Helpful Tips

Here are some additional insights to elevate your cooking experience:

  • Use a meat thermometer: For perfectly cooked salmon, aim for an internal temperature of 145°F (63°C).
  • Marinate: For an even deeper flavor, consider marinating the salmon in the honey-garlic mixture for 30 minutes before cooking.
  • Pair with sides: This salmon pairs beautifully with quinoa, rice, or even a hearty grain salad.

FAQ

Here are some common questions you may have:

  • Can I use frozen salmon? Absolutely! Just make sure to thaw it thoroughly before cooking.
  • What should I serve with this dish? It goes wonderfully with steamed vegetables, rice, or a fresh salad.
  • Can I make this recipe ahead of time? While it’s best fresh, you can prepare the sauce ahead of time and store it in the fridge.

Troubleshooting

Even the best chefs have off days. Here are some troubleshooting tips:

  • Salmon is dry: This can happen if it’s overcooked. Invest in a good meat thermometer to avoid this in the future.
  • Too salty: If you find your dish too salty, balance it with a squeeze of lemon juice or serve alongside a neutral side like rice.

Conclusion

Cooking is a journey filled with love, creativity, and a sprinkle of magic. This honey-garlic roasted salmon is not just a meal; it’s an experience that brings warmth and joy to your kitchen and dining table. Whether you’re cooking for yourself or for a gathering, this dish is bound to make a lasting impression. So roll up your sleeves, grab your apron, and let’s make something unforgettable together. I can’t wait to hear how it turns out for you! Share your culinary creations with me; I love seeing what you whip up in your own kitchens!

Why You’ll Love This Colorful Dish

Stuffed bell peppers are more than just a meal; they’re an experience! Each pepper is like a little edible gift filled with a delightful blend of flavors that come together in perfect harmony. Picture this: vibrant bell peppers bursting with seasoned rice, black beans, sweet corn, and juicy tomatoes, all topped with melted cheese (if you choose!). It’s not only visually appealing but also incredibly satisfying and nourishing.

Whether you’re hosting a dinner party or simply trying to get more vegetables into your daily routine, this recipe is your ticket to flavor town! And let’s be honest, who can resist the allure of a dish that looks as good as it tastes? Plus, these stuffed beauties are easily customizable, allowing you to cater to everyone’s taste preferences.

Ingredients You’ll Need

Let’s gather our ingredients before diving into the cooking magic! You’ll need:

  • 4 bell peppers (any color you fancy)
  • 1 cup cooked rice (white, brown, or any variety you love)
  • 1 cup diced tomatoes (canned works like a charm)
  • 1 cup black beans (canned, rinsed, and drained)
  • 1 cup corn (canned or frozen)
  • 1 small onion, diced
  • 2 cloves garlic, minced
  • 1 teaspoon cumin
  • 1 teaspoon paprika
  • Salt and pepper to taste
  • 1 cup shredded cheese (optional, but oh-so-delicious!)
  • Fresh parsley for garnish (optional)

Preparing the Bell Peppers

Colorful bell peppers stuffed with a mixture of rice and vegetables, showcasing their texture and vibrant colors.

Before we can enjoy these gorgeous stuffed peppers, we need to prep them. Start by preheating your oven to 375°F (190°C). While that’s heating up, grab your bell peppers. Cut off the tops and carefully remove the seeds and membranes. Don’t worry if they don’t look perfect; a little character never hurt anyone!

Once you have your peppers ready, set them aside while we whip up the filling. It’s time to get cozy in the kitchen!

Creating the Flavorful Rice Filling

Now, let’s make that filling sing! In a skillet, heat a drizzle of oil over medium heat. Toss in the diced onion and minced garlic, sautéing them until they’re softened and fragrant—about 3-4 minutes. You’ll love how your kitchen starts to smell at this point!

Next, add in your cooked rice, diced tomatoes, black beans, corn, cumin, paprika, salt, and pepper. Mix everything together and let it cook for a few minutes until heated through. This filling is the heart of your stuffed peppers, so make sure it’s well-seasoned and delicious. Give it a taste and adjust the seasoning if needed. A little extra salt or a sprinkle of cayenne can add a lovely kick if you’re in the mood!

Assembling and Baking the Peppers

Time for the fun part—stuffing those peppers! Grab your prepared bell peppers and gently pack the rice filling into each one, pressing down slightly to ensure they’re full of goodness. If you’re feeling extra indulgent, sprinkle some shredded cheese on top of each stuffed pepper.

Now, place the peppers upright in a baking dish. Pour a little water into the bottom of the dish—this helps steam the peppers and keeps them moist during baking. Cover the dish with foil and pop it in the oven for 25-30 minutes.

After that, carefully remove the foil and let them bake for an additional 10 minutes. The peppers should be tender and the cheese, if you added it, will be bubbly and golden. The anticipation is real!

Serving Suggestions and Storage Tips

Once your stuffed peppers are out of the oven, let them cool for a few minutes before garnishing with fresh parsley. They’re gorgeous, aren’t they? Serve them as a main dish or alongside a fresh salad or crusty bread for a complete meal. These stuffed peppers are perfect for meal prep too! You can store leftovers in an airtight container in the refrigerator for up to 4 days.

Want to save some for later? You can freeze them after baking! Just wrap each pepper individually and store them in an airtight container for up to 2 months. Reheat them in the oven at 350°F (175°C) until warmed through, and they’ll taste just as delightful as the first time!

Variations to Spice Things Up

Feeling adventurous? Here are some variations to keep things fresh:

  • Different Grains: Swap out the rice for quinoa, couscous, or even cauliflower rice for a lighter option.
  • Extra Veggies: Add chopped mushrooms, spinach, or zucchini to your filling for an extra veggie boost.
  • Spice it Up: If you like a bit of heat, consider adding some diced jalapeños or a splash of hot sauce to the filling.
  • Cheesy Goodness: Experiment with different types of cheese. Feta, goat cheese, or even a sprinkle of nutritional yeast can bring a unique flavor.

FAQs About Stuffed Bell Peppers

Can I make these ahead of time?

Absolutely! You can prepare the filling and stuff the peppers in advance. They can be stored in the refrigerator for up to 24 hours before baking.

Can I freeze stuffed bell peppers?

Yes! After baking, wrap each pepper individually and store them in an airtight container in the freezer for up to 2 months. Just reheat in the oven when you’re ready to enjoy them again!

Can I use different vegetables?

Definitely! Feel free to add or substitute vegetables based on what you have on hand. Carrots, zucchini, or even cooked lentils can be great additions.

What can I substitute for rice?

You can use quinoa, couscous, or even cauliflower rice for a low-carb option. Each will give a delightful twist to the dish!

Final Thoughts

Cooking is about joy, exploration, and bringing people together. These stuffed bell peppers are not just a delicious meal; they’re a celebration of colors, flavors, and wholesome ingredients. Whether you’re dishing them up for a family dinner, a cozy night in, or a gathering with friends, they’re sure to impress and satisfy. So roll up your sleeves, gather your ingredients, and let’s create some culinary magic together! Happy cooking!

Stuffed Bell Peppers with Rice & Veggies

Prep Time 15 minutes
Cook Time 35 minutes
Total Time 50 minutes
Servings 4 servings
Calories 350
A delicious and healthy dish featuring bell peppers stuffed with a flavorful rice and vegetable mixture, perfect for a satisfying meal.

Ingredients

Bell Peppers

  • 4 pieces bell peppers (any color)
  • 1 cup cooked rice
  • 1 cup diced tomatoes
  • 1 cup black beans (canned, rinsed and drained)
  • 1 cup corn (canned or frozen)
  • 1 small onion, diced
  • 2 cloves garlic, minced
  • 1 teaspoon cumin
  • 1 teaspoon paprika
  • to taste salt and pepper
  • 1 cup shredded cheese (optional)
  • for garnish fresh parsley (optional)

Instructions 

  • Preheat oven to 375°F (190°C).
  • Cut tops off peppers, remove seeds. Sauté onion and garlic until soft.
  • Add rice, tomatoes, beans, corn, cumin, paprika, salt, and pepper. Mix and heat through.
  • Stuff peppers with mixture, top with cheese if desired.
  • Place in baking dish, add water, cover with foil, and bake 25-30 mins. Uncover and bake 10 mins more.
  • Garnish with parsley before serving.

Notes

You can customize the filling with your favorite vegetables or add hot sauce for extra flavor.
Calories: 350kcal
Cost: $15
Course: Main Course
Cuisine: American
Keyword: Bell Peppers, vegetarian

Loved this recipe? Save it to your favorite Pinterest board so you can easily find it later! It’s the perfect way to keep all your sweet ideas in one place. ✨

Deliciously arranged stuffed bell peppers on a plate, highlighting the filling and natural lighting.

Why You’ll Fall in Love with This Recipe

Imagine this: you come home after a long day, the weight of the world on your shoulders, and you’re greeted by the mouthwatering aroma of honey and garlic wafting through the air. That’s the magic of Air Fryer Honey Garlic Salmon. Not only does it come together in less than half an hour, but it also packs a punch of flavor that’ll make your taste buds dance. This dish is perfect for busy weeknights when you want something wholesome and satisfying without spending hours in the kitchen. Plus, it’s so easy to make that even your kids can help! Trust me, this recipe will quickly become a staple in your home, and it might just steal your heart (and your dinner guests’ hearts too).

Ingredients You’ll Need

Before we dive into the cooking process, let’s gather our ingredients. You’ll need:

  • 2 salmon fillets
  • 2 tablespoons honey
  • 2 tablespoons soy sauce
  • 2 cloves garlic, minced
  • 1 tablespoon olive oil
  • 1 teaspoon salt
  • 1/2 teaspoon black pepper
  • 1 teaspoon sesame seeds (optional)
  • Chopped green onions for garnish (optional)

Each ingredient plays a crucial role in creating that perfect balance of sweet and savory that makes Honey Garlic Salmon so irresistible. The salmon is rich in omega-3 fatty acids, while the honey adds a natural sweetness that complements the saltiness of the soy sauce and the punch of the garlic. It’s a match made in culinary heaven!

How to Make Air Fryer Honey Garlic Salmon

Crispy salmon fillet drizzled with honey garlic sauce, garnished with green onions and sesame seeds.

Alright, let’s roll up our sleeves and get cooking! Here’s a step-by-step guide to making this delightful dish:

Step 1: Prepare the Marinade

In a small bowl, whisk together the honey, soy sauce, minced garlic, olive oil, salt, and black pepper. This marinade is where all the flavor magic happens, so give it a good stir until everything is well combined. You can even taste a little to see if it needs more sweetness or salt. Remember, cooking is all about adjusting to your taste!

Step 2: Marinate the Salmon

Place the salmon fillets in a shallow dish and pour the marinade over them. Make sure each piece is well-coated. Let the salmon marinate for about 15 to 30 minutes. This step is essential because it allows the flavors to penetrate the fish, making it even more delicious.

Step 3: Preheat the Air Fryer

While the salmon is marinating, preheat your air fryer to 400°F (200°C). This ensures that your salmon cooks evenly and gets that beautiful crispy exterior.

Step 4: Cook the Salmon

Remove the salmon from the marinade and place it in the air fryer basket, skin side down. Air fry the salmon for 8 to 10 minutes, or until it flakes easily with a fork and reaches an internal temperature of 145°F (63°C). If you want an extra crunch, sprinkle some sesame seeds on top during the last minute of cooking.

Step 5: Garnish and Serve

Once the salmon is cooked, carefully remove it from the air fryer. Garnish with chopped green onions if desired, and serve immediately. You’ll want to dig in while it’s hot and sticky!

Tips for Perfect Results

To ensure your Honey Garlic Salmon turns out perfectly every time, keep these tips in mind:

  • Make sure to pat the salmon dry before marinating to help the marinade stick better.
  • Don’t overcrowd the air fryer basket; give the salmon space to cook evenly.
  • If you want a sweeter sauce, feel free to add more honey to the marinade.
  • For a bit of heat, consider adding a pinch of red pepper flakes to the marinade.
  • For a gluten-free option, swap the soy sauce with tamari or coconut aminos.

Serving Suggestions

This dish is incredibly versatile and can be served in a variety of ways. Here are some ideas to inspire your next meal:

  • Over Rice: Serve your salmon over a bed of steamed rice or quinoa for a hearty meal.
  • In Lettuce Wraps: For a lighter option, wrap the salmon in crisp lettuce leaves with some sliced cucumbers and carrots for a refreshing bite.
  • With Noodles: Toss the salmon with some cooked noodles and drizzle with extra honey garlic sauce for a delicious noodle bowl.
  • Alongside Roasted Veggies: Pair with roasted vegetables like broccoli or asparagus for a balanced dinner.

Storage & Reheating

Got leftovers? No problem! Store any remaining salmon in an airtight container in the fridge for up to three days. When you’re ready to enjoy it again, simply reheat it in the air fryer at 350°F (175°C) for about 3 to 4 minutes until warmed through. You can also freeze the salmon without the sauce for up to two months. Just remember to thaw it completely before reheating for the best texture.

FAQs

Can I use frozen salmon?

Absolutely! Just be sure to thaw the salmon completely before marinating and cooking for even results.

What type of air fryer works best?

While basket-style air fryers tend to give the crispiest results, any model will work just fine. Just keep an eye on your cooking time as it may vary slightly.

Can I bake instead of air frying?

Yes! Preheat your oven to 400°F (200°C) and bake the salmon on a lined baking sheet for 12–15 minutes, then toss with the sauce before serving.

Final Thoughts

There you have it, my dear friends! A delightful recipe that’s not only quick and easy but also packed with flavors that will make your heart sing. The Air Fryer Honey Garlic Salmon is perfect for any occasion, bringing a touch of magic to your dinner table. So, gather your ingredients, roll up your sleeves, and let’s make a meal that’s sure to impress! And when you do, don’t forget to share your culinary creations with me—I can’t wait to see your beautiful dishes! Happy cooking!

Air Fryer Honey Garlic Salmon — Quick, Crispy & So Delicious!

Prep Time 10 minutes
Cook Time 10 minutes
Total Time 20 minutes
Servings 2 servings
Calories 350
Enjoy a quick and flavorful salmon dish with a sweet and savory honey garlic glaze, cooked to crispy perfection in the air fryer.

Ingredients

Main Ingredients

  • 2 fillets salmon fillets
  • 2 tablespoons honey
  • 2 tablespoons soy sauce
  • 2 cloves garlic, minced
  • 1 tablespoon olive oil
  • 1 teaspoon salt
  • 0.5 teaspoon black pepper
  • 1 teaspoon sesame seeds (optional)
  • chopped green onions for garnish (optional) green onions (for garnish)

Instructions 

  • Whisk honey, soy sauce, garlic, olive oil, salt, and pepper.
  • Marinate salmon for 15-30 minutes.
  • Preheat air fryer to 400°F (200°C).
  • Remove salmon from marinade and air fry skin side down for 8-10 minutes.
  • Optional: Sprinkle sesame seeds in last minute. Garnish with green onions and serve.

Notes

For extra flavor, marinate longer or add a squeeze of lemon before serving.
Calories: 350kcal
Cost: $15
Course: Main Course
Cuisine: American
Keyword: Salmon

Loved this recipe? Save it to your favorite Pinterest board so you can easily find it later! It’s the perfect way to keep all your sweet ideas in one place. ✨

Beautifully cooked salmon fillet displaying a caramelized honey garlic coating, with a blurred cozy background.

Why Roast Potatoes Are the Ultimate Comfort Food

Ah, roast potatoes—those golden, crispy bites of heaven that can elevate any meal from ordinary to extraordinary. There’s something magical about a perfectly roasted potato: their crunchy exterior and fluffy interior seem to say, “Welcome home!” Whether you’re serving them along with a roast chicken, a hearty beef stew, or just enjoying them on their own with a sprinkle of salt, these little gems have a way of making everything feel just right. As someone who has spent countless evenings experimenting with various recipes in my cozy Seattle kitchen, I can assure you that this recipe for the Best Roast Potatoes will make your heart sing and your taste buds dance with joy.

Ingredients You’ll Need

To whip up these delightful roast potatoes, you’ll need the following:

  • 2 pounds of potatoes (Yukon Gold or Maris Piper work beautifully)
  • 4 tablespoons of olive oil
  • 2 teaspoons of sea salt
  • 1 teaspoon of black pepper
  • 2 cloves of garlic (optional, but why not?)
  • Fresh rosemary or thyme (optional, for that extra kick of flavor)

The Potatoes: Choosing the Best Varieties

Close-up of perfectly roasted potatoes showcasing their crisp texture and rich color.

When it comes to roast potatoes, not all spuds are created equal. My personal favorites are Yukon Gold and Maris Piper. Yukon Gold potatoes are creamy with a naturally buttery flavor, making them perfect for roasting. Maris Piper potatoes are known for their fluffy texture that develops a delicious crispness when roasted. Both varieties will deliver outstanding results. Just make sure to cut them into evenly sized chunks to ensure they cook uniformly. Nobody wants one potato that’s crispy and another that’s mushy, right?

Step-by-Step Instructions for Perfect Roast Potatoes

Now, let’s dive into the fun part—making these delicious potatoes! Follow these simple steps, and you’ll have crispy, golden roast potatoes that will impress everyone at the dinner table.

Step 1: Preheat Your Oven

First things first, preheat your oven to a sizzling 425°F (220°C). A hot oven is crucial for achieving that perfect golden crust!

Step 2: Prepare the Potatoes

Peel your potatoes and cut them into evenly sized chunks—about 1 to 2 inches should do the trick. This ensures that they cook evenly.

Step 3: Boil the Potatoes

Place your potato chunks in a large pot of salted water. Bring it to a boil and cook for about 10 minutes until they’re just tender but not falling apart. This initial boiling step is key to getting that fluffy interior!

Step 4: Drain and Steam Dry

After boiling, drain the potatoes and let them steam dry for a few minutes. This step helps to remove excess moisture, which is essential for achieving that crispy texture.

Step 5: Heat the Oil

While your potatoes are drying, grab a large roasting pan and place it in the oven for about 5 minutes with the olive oil. Heating the oil beforehand will help create a crispy exterior as soon as the potatoes hit the pan.

Step 6: Toss the Potatoes in Oil

Once the oil is hot, carefully add the drained potatoes to the pan. Toss them to coat in the oil, making sure they’re well-covered. This is where you can also add any optional ingredients like minced garlic or fresh herbs.

Step 7: Season and Roast

Sprinkle the potatoes with sea salt and black pepper. Roast them in the oven for about 40-50 minutes, turning them occasionally to ensure even browning. You want them to be golden brown and crispy all over!

Step 8: Serve and Enjoy

Once they’re perfectly roasted, remove them from the oven and let them cool for a few minutes before serving. Trust me, the aroma will have everyone flocking to the table!

Tips for the Best Roast Potatoes

Here are some of my favorite tips to ensure your roast potatoes come out perfectly every time:

  • Don’t skip the boiling: This crucial step helps to create that desired fluffy texture inside.
  • Cut evenly: Make sure your potato pieces are uniform in size to ensure they cook at the same rate.
  • Use a hot oven: Preheating the oven and the oil ensures immediate crispness.
  • Resist the urge to overcrowd: Give your potatoes plenty of space in the pan so they roast rather than steam.

Variations to Try

Feel free to mix things up! Here are some variations that can add a unique twist to your roast potatoes:

  • Spicy Kick: Add a pinch of cayenne pepper or smoked paprika for a bit of heat.
  • Herb Infusion: Experiment with different herbs like sage, oregano, or dill for diverse flavor profiles.
  • Citrus Zing: A little lemon zest added before serving can brighten up the dish beautifully.

Storage and Freezing Tips

Leftover roast potatoes? No problem! Here’s how to store them for later:

  • In the fridge: Store your leftovers in an airtight container for up to 4 days. They may lose some crispness, but they’re still delicious.
  • Freezing: You can freeze these potatoes for up to 3 months. Just let them cool completely, then freeze in a single layer on a baking sheet before transferring to a freezer bag.

FAQs About Roast Potatoes

Can I use different types of potatoes for this recipe?
Yes! While Yukon Gold and Maris Piper are my favorites, russet potatoes can work as well. Just keep in mind that they may have a different texture.

What can I do if my potatoes are not crispy?
If your potatoes aren’t crispy, make sure you’re using enough oil and that your oven is hot enough. A little extra time in the oven can also help.

Can I prepare these in advance?
While I recommend roasting them fresh for the best texture, you can prep the potatoes by peeling and cutting them ahead of time. Just store them in water to prevent browning until you’re ready to cook.

Troubleshooting Common Issues

If you run into issues while cooking, don’t fret! Here are some common problems and how to solve them:

  • Potatoes are mushy: This usually means they were overcooked during the boiling stage. Aim for tender but firm when you drain them.
  • Too much oil: If your potatoes are swimming in oil, you’ve added too much! A light coating is all you need.
  • Not enough flavor: Make sure to season well before roasting. You can always adjust the seasoning after they’re cooked, but it’s best to start with a good base.

Final Thoughts

There you have it! The Best Roast Potatoes that not only taste incredible but are also super easy to make. Cooking should feel like a warm hug, and these potatoes embody that cozy feeling perfectly. So, gather your loved ones, whip up a batch of these crispy delights, and watch as they disappear from the table faster than you can say “roast potatoes!” Whether you’re enjoying a quiet dinner at home or hosting friends, these potatoes will undoubtedly become a staple in your recipe repertoire. Happy cooking, my friends! May your potatoes always be perfectly roasted.

Best Roast Potatoes

Prep Time 10 minutes
Cook Time 45 minutes
Total Time 55 minutes
Servings 4 servings
Calories 250
Golden, crispy roast potatoes perfect as a side dish for any meal.

Ingredients

Potatoes

  • 2 pounds potatoes (yukon gold or maris piper)
  • 4 tablespoons olive oil
  • 2 teaspoons sea salt
  • 1 teaspoon black pepper
  • 2 cloves garlic (optional) (minced)

fresh rosemary or thyme (optional)

Instructions 

  • Preheat oven to 425°F (220°C). Peel and cut potatoes into chunks.
  • Boil potatoes in salted water for 10 minutes, then drain and steam dry.
  • Heat olive oil in a roasting pan in the oven for 5 minutes, then add potatoes and toss.
  • Sprinkle with salt, pepper, and herbs or garlic if using. Roast for 40-50 minutes until crispy.
  • Let cool briefly before serving.

Notes

For extra crispiness, toss potatoes in a little cornstarch before roasting.
Calories: 250kcal
Cost: $15
Course: Side Dish
Cuisine: British
Keyword: potatoes

Loved this recipe? Save it to your favorite Pinterest board so you can easily find it later! It’s the perfect way to keep all your sweet ideas in one place. ✨

Deliciously roasted Yukon Gold potatoes, glistening with olive oil and sprinkled with herbs.

The Ultimate Peach Crumble Pie: A Slice of Summer Bliss

Welcome to a culinary adventure that celebrates the delightful essence of summer in every bite! If you’re ready to dive into the warm, comforting world of peach crumble pie, you’re in the right place. This recipe is not just any peach pie; it’s a magical blend of juicy, ripe peaches and a buttery, crumbly topping that will have everyone swooning at the dinner table. Let’s transform your kitchen into a haven of deliciousness!

Why You’ll Love This Recipe

Here are five reasons this peach crumble pie will become your go-to summer dessert:

  • Irresistible Flavor: The combination of sweet peaches with warm spices creates a symphony of flavors that dance on your taste buds.
  • Texture Perfection: The contrast between the juicy filling and the crispy crumble topping makes each bite a delightful experience.
  • Versatile Ingredients: You can easily swap fresh peaches for frozen ones or even mix in other fruits for a unique twist.
  • Easy to Make: With simple steps and straightforward ingredients, this pie is perfect for both novice and experienced bakers.
  • Perfect for Sharing: Bring this pie to gatherings or family dinners, and watch it disappear—everyone will be asking for seconds!

Ingredient Breakdown

Let’s dive into the ingredients that make this peach crumble pie so irresistible. Here’s what you’ll need:

  • Fresh Peaches: 5 cups (about 8–10), peeled and sliced – Sweet, juicy peaches are the star of this pie. You can use frozen peaches if fresh ones aren’t available.
  • Granulated Sugar: ½ cup (100g) – To sweeten the filling. You can adjust the amount based on the sweetness of your peaches.
  • Cornstarch: 2 tablespoons – Helps thicken the filling, giving it a perfect consistency.
  • Lemon Juice: 2 teaspoons – Adds brightness and balances the sweetness of the peaches.
  • Ground Cinnamon: 1 teaspoon – Infuses warmth and depth into the filling.
  • Ground Nutmeg: ¼ teaspoon – A pinch of nutmeg enhances the flavor beautifully.
  • Salt: ¼ teaspoon – Enhances all the flavors.
  • Pie Crust: 1 single 9-inch crust (store-bought or homemade) – Use your favorite crust recipe, or a quality store-bought option works too.
  • All-Purpose Flour: 1 cup + 2 tablespoons (135g) – For the crumble topping.
  • Light Brown Sugar: ½ cup (100g), packed – Adds a rich, caramel-like sweetness to the crumble.
  • Unsalted Butter: 6 tablespoons (85g), melted – For a rich, buttery flavor in the topping.
  • Egg Wash: 1 large egg + 1 tablespoon water – Gives the crust a beautiful golden finish.

Directions: Step-by-Step Guide

Side view of a delicious peach crumble pie, highlighting the crumbly topping and fresh peaches inside.

Follow these simple steps to create your peach crumble pie:

  1. Preheat the oven: Set your oven to 425°F (220°C) to prepare for baking.
  2. Prepare the pie crust: Roll out your pie crust and fit it into a 9-inch pie plate. Crimp the edges and refrigerate while you prepare the filling.
  3. Mix the peach filling: In a large mixing bowl, combine the sliced peaches, sugar, cornstarch, lemon juice, cinnamon, nutmeg, and salt. Toss to coat the peaches evenly.
  4. Make the crumble topping: In another bowl, combine flour, brown sugar, granulated sugar, cinnamon, and salt. Stir in melted butter until clumps form.
  5. Assemble the pie: Spoon the peach filling into the chilled crust, leaving behind any excess juice. Sprinkle the crumble mixture evenly over the filling.
  6. Brush the crust: In a small bowl, beat the egg with water and brush it over the edges of the pie crust for a golden finish.
  7. Bake: Bake in the preheated oven for 15 minutes. Then lower the temperature to 350°F (175°C) and bake for an additional 45–50 minutes until the crust is golden and the filling is bubbly.
  8. Cool and slice: Allow the pie to cool for at least 3 hours before slicing to let the filling set.

Pro Tips for Peach Crumble Pie

To elevate your peach crumble pie, consider these expert tips:

  • Use ripe peaches: Choose peaches that are slightly soft to the touch for the best flavor.
  • Adjust sweetness: Taste your peaches and adjust the sugar accordingly; some may be sweeter than others.
  • Experiment with spices: Feel free to add other spices like ginger or allspice for a unique flavor profile.
  • Chill the crust: Always chill your pie crust before baking to prevent shrinkage.
  • Don’t skip the egg wash: This crucial step gives your crust that beautiful golden color.
  • Serve warm: This pie is best enjoyed warm with a scoop of vanilla ice cream!
  • Cover edges: If the edges of your crust brown too quickly, cover them with foil during baking.
  • Let it rest: Allowing the pie to cool completely helps the filling set and makes slicing easier.

Common Mistakes and Troubleshooting

Even the best bakers can encounter issues. Here are some common mistakes and how to avoid them:

  • Watery filling: Make sure to drain excess juice from the peaches before adding to the crust.
  • Burnt crust: If your crust is browning too quickly, reduce the oven temperature and cover the edges with foil.
  • Crumb topping too dry: If your topping is too dry, add a bit more melted butter until it clumps together.
  • Overbaking: Keep an eye on your pie; it should be golden brown and bubbling, but not burnt.

Variations to Try

Mix it up with these fun variations:

  • Mixed Fruit Crumble: Combine peaches with berries or apples for a fruity explosion.
  • Nutty Crumble: Add chopped nuts like pecans or almonds to the crumble for extra crunch.
  • Spiced Twist: Incorporate ginger or cardamom into the filling for a spicy kick.
  • Vegan Option: Substitute butter with coconut oil and use a flax egg for a dairy-free version.

Storage and Make-Ahead Instructions

If you’re planning ahead, here’s how to store your peach crumble pie:

  • Room Temperature: Store uncovered at room temperature for up to 2 days.
  • Refrigeration: Cover and refrigerate for up to 5 days. Reheat in the oven before serving.
  • Freezing: Freeze slices in airtight containers for up to 3 months. Thaw in the refrigerator before reheating.

Frequently Asked Questions

Let’s address some common questions about making peach crumble pie:

  • Can I use frozen peaches? Yes! Thaw and drain them before using to avoid excess liquid.
  • What’s the best way to slice the pie? Use a sharp knife and let it cool completely to get clean slices.
  • Can I make this pie ahead of time? Absolutely! It can be made a day or two in advance and stored in the fridge.
  • What’s the difference between a crumble and a crisp? A crumble typically has a topping made of flour, sugar, and butter, while a crisp includes oats for a heartier texture.
  • How do I know when the pie is done? The pie is done when the crust is golden and the filling bubbles vigorously.
  • Can I substitute the granulated sugar? Yes, you can use coconut sugar or another sweetener of your choice.
  • What should I serve with peach crumble pie? It pairs wonderfully with vanilla ice cream, whipped cream, or a dollop of yogurt.
  • Is this recipe adaptable for other fruits? Absolutely! You can use this crumble topping with almost any fruit!

Nutritional Tips and Dietary Adaptations

This pie can be adapted to fit various dietary needs:

  • Lower Sugar: Reduce the sugar in the filling or use natural sweeteners like honey or maple syrup.
  • Gluten-Free: Use a gluten-free pie crust and flour for the crumble topping.
  • Vegan: Replace butter with coconut oil and use a flax egg for the egg wash.

Essential Equipment Recommendations

To make this recipe, you’ll need:

  • 9-inch pie plate: A sturdy dish to hold your delicious pie.
  • Mixing bowls: For preparing your filling and crumble.
  • Whisk: For mixing the egg wash and dry ingredients smoothly.
  • Sharp knife: For slicing those beautiful peaches and serving the pie.

Serving Suggestions

To elevate your peach crumble pie experience, consider serving it with:

  • Vanilla Ice Cream: A classic pairing that adds creaminess to the warm pie.
  • Whipped Cream: Light and fluffy topping for an elegant touch.
  • Caramel Sauce: Drizzle over slices for added sweetness.
  • Fresh Mint: A sprinkle of mint leaves for a refreshing garnish.

Conclusion: Your Summer Staple Awaits

There you have it! The ultimate peach crumble pie recipe that marries simplicity with flavor. With every slice, you’re not just serving dessert—you’re sharing a story of summer, warmth, and love. So gather your ingredients, channel your inner chef, and whip up this stunning pie that’s sure to be a hit at any gathering. Remember, cooking is about joy, connection, and a sprinkle of magic. Enjoy every bite, and happy baking!

The Ultimate Guide to Making the Best Peach Crumble Pie

Prep Time 20 minutes
Cook Time 1 hour
Total Time 1 hour 20 minutes
Servings 8 pieces
Calories 350
Enjoy a delicious homemade peach crumble pie with a flaky crust and sweet, spiced peach filling topped with a buttery crumble.

Ingredients

Peach Filling

  • 5 cups peeled and sliced peaches
  • 0.5 cup granulated sugar
  • 2 tablespoons cornstarch
  • 2 teaspoons lemon juice
  • 1 teaspoon ground cinnamon
  • 0.25 teaspoon ground nutmeg
  • 0.25 teaspoon salt

Pie Crust

  • 1 single 9-inch pie crust (store-bought or homemade)

Crumble Topping

  • 1.35 cups all-purpose flour
  • 0.5 cup light brown sugar
  • 0.5 cup granulated sugar
  • 0.25 teaspoon ground cinnamon
  • pinch salt
  • 6 tablespoons unsalted butter (melted)
  • 1 large egg (for egg wash)
  • 1 tablespoon water (for egg wash)

Instructions 

  • Preheat oven to 425°F (220°C). Roll out crust, place in pie dish, and refrigerate.
  • Mix peaches with sugar, cornstarch, lemon juice, cinnamon, nutmeg, and salt.
  • Prepare crumble by combining flour, sugars, cinnamon, salt, and melted butter.
  • Fill crust with peach mixture, sprinkle crumble on top, brush edges with egg wash.
  • Bake at 425°F for 15 minutes, then reduce to 350°F and bake 45–50 minutes until golden and bubbling.
  • Cool for at least 3 hours before slicing to set the filling.

Notes

Chill the pie before serving for best results.
Calories: 350kcal
Cost: $15
Course: Dessert
Cuisine: American
Keyword: peach