Author

Ava

Browsing

Why This Dish is a Must-Try

Picture this: a busy weeknight, the clock is ticking, and you’re craving something that tastes like it came straight from a high-end restaurant. Enter Honey Garlic Glazed Salmon, a dish that not only meets those expectations but exceeds them in flavor, ease, and satisfaction. This salmon recipe is an absolute game-changer, transforming simple ingredients into a stunning meal that will have your family and friends asking for your secret. And the best part? You can whip it up in less than 30 minutes!

What makes this recipe truly shine is the perfect balance of sweetness from the honey, the umami from the soy sauce, and the aromatic punch from fresh garlic and ginger. You’ll find that every bite is a delightful journey of flavors that dance on your palate, making it hard to believe you made this at home. Plus, it’s versatile enough to pair with your favorite sides, whether that’s fluffy jasmine rice, sautéed greens, or a refreshing salad. Let’s dive into the details of this scrumptious dish!

Ingredient Breakdown

Before we get into the nitty-gritty of how to prepare this delicious salmon, let’s take a moment to appreciate the ingredients that make it all happen. Each component plays a vital role in creating that mouthwatering glaze that you’ll want to drizzle over everything. Here’s what you’ll need:

  • Salmon Fillets: Choose fresh, high-quality salmon fillets for the best flavor. You can use skin-on or skinless, depending on your preference.
  • Honey: This natural sweetener is key for that sticky glaze. It adds a touch of sweetness that perfectly balances the savory notes of soy sauce.
  • Soy Sauce: A staple in many Asian dishes, it lends a rich umami flavor. Feel free to use low-sodium soy sauce if you’re watching your salt intake.
  • Garlic: Freshly minced garlic is a must for that aromatic punch. It infuses the dish with a warm, savory depth.
  • Ginger: Fresh ginger brings a zesty warmth that complements the other flavors beautifully.
  • Olive Oil: A touch of olive oil helps with cooking and enhances the richness of the salmon.
  • Sesame Oil: This adds a nutty flavor that elevates the dish, rounding out the glaze.
  • Black Pepper: A sprinkle of freshly ground black pepper adds just the right amount of spice.
  • Garnishes: Chopped green onions and sesame seeds not only add a burst of color but also a delightful crunch.

Step-by-Step Instructions

A beautifully plated salmon fillet with a shiny honey garlic glaze, served with a soft-focus background.

Now that we’ve gathered our ingredients, it’s time to get cooking! Follow these simple steps, and you’ll have a plate of Honey Garlic Glazed Salmon ready to impress.

  1. Prepare the Marinade: In a medium-sized bowl, whisk together the honey, soy sauce, minced garlic, minced ginger, olive oil, sesame oil, and black pepper until well combined. This glaze is where the magic happens, so make sure everything is mixed thoroughly.

  2. Marinate the Salmon: Place your salmon fillets in a shallow dish or a resealable plastic bag. Pour the marinade over the salmon, ensuring each piece is generously coated. For optimal flavor, let it marinate for at least 30 minutes. If you have more time, longer is better!

  3. Preheat the Oven: While the salmon is marinating, preheat your oven to 375°F (190°C). This will ensure your fish cooks evenly.

  4. Prepare the Baking Sheet: Line a baking sheet with parchment paper for easy cleanup. This non-stick surface will help the salmon bake beautifully without sticking.

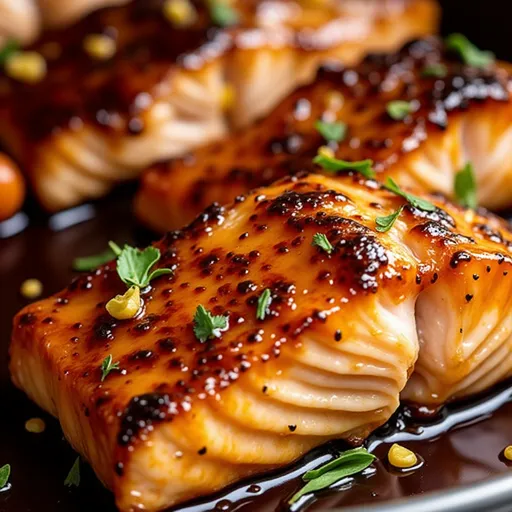
  5. Bake the Salmon: Once the oven is ready, place the marinated salmon fillets on the prepared baking sheet. Bake for 15-20 minutes, or until the salmon flakes easily with a fork and reaches an internal temperature of 145°F (63°C). The glaze should caramelize slightly, creating a delicious crust.

  6. Finish and Serve: Remove the salmon from the oven and drizzle with any remaining marinade for an extra burst of flavor. Garnish with chopped green onions and sesame seeds before serving to make it visually stunning!

Make-Ahead Tips

Want to enjoy this amazing dish without the last-minute rush? You can prepare the marinade in advance! Whisk together the honey, soy sauce, ginger, and garlic, and store it in an airtight container in the refrigerator for up to three days. When you’re ready to cook, just marinate the salmon, and you’re all set!

Expert Tips for Success

To ensure your Honey Garlic Glazed Salmon comes out perfectly every time, keep these expert tips in mind:

  • Don’t Overcook: Salmon can go from perfectly flaky to dry quickly, so keep an eye on it. Start checking for doneness at the 15-minute mark.
  • Use Fresh Ingredients: Fresh garlic and ginger make a world of difference in flavor. If you can, avoid the jarred versions!
  • Garnish Generously: The green onions and sesame seeds not only enhance the visual appeal but also add texture and flavor. Don’t skimp on them!
  • Rest the Salmon: Let the salmon rest for a few minutes after baking. This helps the juices redistribute, making each bite tender and juicy.

Serving Suggestions

Now that you have your delicious salmon ready, let’s talk about how to serve it. Here are some of my favorite pairings that complement this dish beautifully:

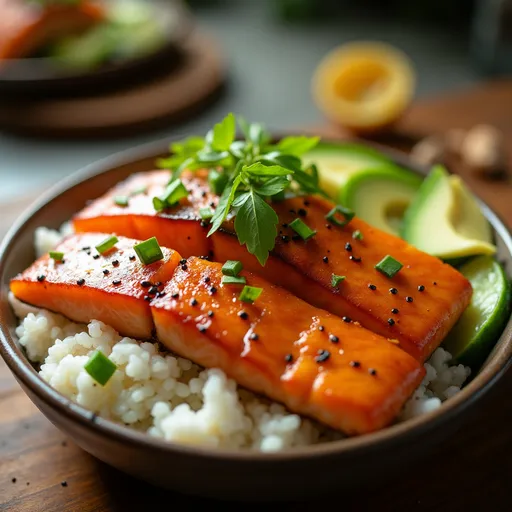
  • Fluffy Rice: Serve the salmon over a bed of jasmine or basmati rice to soak up that delectable glaze.
  • Steamed Vegetables: Bright, crunchy veggies like broccoli, green beans, or snap peas add a fresh contrast.
  • Salad: A light, tangy salad with a citrus vinaigrette can balance the richness of the salmon.
  • Noodles: Pair it with soba noodles tossed in sesame oil for an Asian-inspired feast.

Storage and Freezing

Have leftovers? No problem! Store any uneaten salmon in an airtight container in the refrigerator for up to two days. The glaze will thicken as it cools, so when reheating, add a splash of water or lemon juice to bring back that sticky consistency.

If you want to freeze your salmon, wrap it tightly in plastic wrap and then foil, or place it in a freezer-safe container. It will keep well for up to one month. When you’re ready to enjoy it again, thaw it overnight in the fridge and reheat gently on the stovetop.

Variations and Substitutions

This recipe is wonderfully adaptable, so feel free to switch things up based on your preferences or what you have on hand:

  • Spicy Kick: Add a teaspoon of sriracha or red pepper flakes to the marinade for a spicy twist.
  • Citrus Infusion: Squeeze in some fresh lemon or lime juice for a zesty brightness.
  • Different Proteins: This glaze works beautifully with chicken or tofu. Just adjust the cooking time accordingly.
  • Gluten-Free Option: Substitute soy sauce with tamari or coconut aminos.

Frequently Asked Questions

Can I use frozen salmon?
Yes, just be sure to thaw it completely and pat it dry before marinating. This will help the glaze stick better.

Can I make this on the stovetop?
Absolutely! You can sear the salmon in a skillet over medium heat for about 4-5 minutes per side, basting with the glaze.

How do I know when the salmon is done?
The salmon should flake easily with a fork and reach an internal temperature of 145°F (63°C).

Can I use skinless salmon fillets?
Yes, but keep in mind that skin-on fillets tend to be crispier.

Wrap Up

There you have it! A delectable Honey Garlic Glazed Salmon that’s not just a dish but an experience. Easy to make, bursting with flavor, and perfect for any occasion, this recipe is sure to become a staple in your kitchen. So gather your ingredients, embrace the cooking process, and enjoy the magic of homemade meals that bring people together. I can’t wait for you to try this—trust me, it will steal the show at dinner!

Honey Garlic Glazed Salmon, Better Than Takeout

Prep Time 10 minutes
Cook Time 20 minutes
Total Time 30 minutes
Servings 4 servings
Calories 350
This flavorful salmon recipe is quick to prepare and perfect for a satisfying dinner, with a sweet and savory glaze that rivals takeout.

Ingredients

Main ingredients

  • 4 fillets salmon fillets
  • 1/4 cup honey
  • 1/4 cup soy sauce
  • 3 cloves garlic, minced
  • 1 tablespoon fresh ginger, minced
  • 1 tablespoon olive oil
  • 1 tablespoon sesame oil
  • 1 teaspoon black pepper
  • 1 tablespoon green onions, chopped (for garnish)
  • sesame seeds sesame seeds (for garnish)

Instructions 

  • Whisk honey, soy sauce, garlic, ginger, oils, and pepper in a bowl.
  • Marinate salmon in the mixture for at least 30 minutes.
  • Preheat oven to 375°F (190°C). Line a baking sheet with parchment.
  • Arrange salmon on the sheet and bake for 15-20 minutes.
  • Drizzle with remaining marinade, garnish with green onions and sesame seeds, then serve.

Notes

For extra flavor, broil for 2 minutes after baking.
Calories: 350kcal
Cost: $15
Course: Main Course
Cuisine: Asian
Keyword: Salmon

Loved this recipe? Save it to your favorite Pinterest board so you can easily find it later! It’s the perfect way to keep all your sweet ideas in one place. ✨

Eye-level shot of a succulent honey garlic glazed salmon dish, featuring vibrant colors and textures.

Why You’ll Love This Recipe

There’s something undeniably magical about a bowl of homemade chicken soup, especially when it’s packed with hearty potatoes and vibrant vegetables. This Comforting Chicken Soup with Potatoes is a nostalgic dish that wraps you in warmth and comfort, like a cozy blanket on a chilly evening. Growing up, chicken soup wasn’t just food; it was a hug in a bowl, a remedy for everything from the sniffles to the rainy-day blues. This recipe captures that same warmth, making it perfect for when you need a little love on your plate.

Picture this: the aroma of sautéed onions and garlic wafting through your kitchen, the sound of simmering broth bubbling away, and the anticipation of a meal that brings everyone together. It’s a simple yet satisfying dish that’s easy to prepare, and it’s adaptable enough to fit whatever you have on hand. Plus, it’s a fantastic way to sneak in those veggies!

Ingredients You’ll Need

To create this heartwarming soup, you’ll need the following ingredients:

  • 1 lb chicken breast, diced
  • 4 medium potatoes, peeled and cubed
  • 2 carrots, sliced
  • 1 onion, chopped
  • 3 cloves garlic, minced
  • 6 cups chicken broth
  • 1 teaspoon dried thyme
  • 1 bay leaf
  • Salt and pepper to taste
  • 2 tablespoons olive oil
  • Fresh parsley for garnish

Step-by-Step Cooking Instructions

Delicious chicken soup featuring diced chicken, cubed potatoes, and fresh parsley, captured in warm light.

Step 1: Sauté the Base

Begin by heating the olive oil in a large pot over medium heat. Once shimmering, add the chopped onion and minced garlic. Sauté until the onion turns translucent, which should take about 3-5 minutes. This initial step is crucial as it builds the flavor foundation of your soup.

Step 2: Brown the Chicken

Next, add the diced chicken breast to the pot. Cook until the chicken is lightly browned on all sides, about 5-7 minutes. This step not only adds depth of flavor but also ensures your chicken is juicy and tender.

Step 3: Add Vegetables and Seasonings

Now, stir in the sliced carrots, cubed potatoes, dried thyme, bay leaf, salt, and pepper. Give everything a good stir, allowing the vegetables to mingle with the chicken and absorb the aromatic flavors. It’s a colorful medley that’s sure to make your kitchen smell divine!

Step 4: Pour in the Broth

Pour in the chicken broth, bringing the mixture to a boil. This is where the magic happens! As it heats up, all those flavors will start to bloom. Once boiling, reduce the heat to low and let it simmer for about 20-25 minutes, or until the potatoes are tender. You’ll want to keep an eye on it, stirring occasionally to prevent it from sticking.

Step 5: Final Touches

After the potatoes are cooked through, remove the bay leaf and adjust the seasoning if needed. If you’re feeling adventurous, a squeeze of lemon juice or a splash of hot sauce can elevate the flavors even more. Serve hot, garnished with fresh parsley for a pop of color and freshness.

Tips for Cooking Success

Here are some handy tips to ensure your chicken soup turns out perfectly:

  • Uniform Vegetable Size: When chopping your vegetables, aim for uniform sizes. This ensures even cooking and helps everything reach that tender state at the same time.
  • Don’t Rush the Sauté: Taking the time to properly sauté your onions and garlic will add a rich depth of flavor to your soup.
  • Season Gradually: Taste as you go! Adjusting the seasoning gradually allows you to achieve the perfect balance of flavors.

Variations to Try

This recipe is wonderfully adaptable, so feel free to get creative! Here are some variations you can try:

  • Add Greens: Toss in some spinach or kale during the last few minutes of cooking for an extra nutrient boost.
  • Swap Proteins: If you’re not a fan of chicken, this recipe works well with turkey, or even a plant-based protein like chickpeas.
  • Spice It Up: Add a pinch of red pepper flakes for a kick or some fresh herbs like dill or basil for a different flavor profile.

Substitutions You Can Make

Not everything in life goes as planned, and that’s okay! Here are some substitutions if you find yourself missing an ingredient:

  • Chicken Broth: Swap it out for vegetable broth for a lighter soup or use homemade stock for richer flavor.
  • Potatoes: If you prefer, sweet potatoes can add a delightful sweetness and a different texture to your soup.
  • Olive Oil: Butter or coconut oil can be used in place of olive oil for a different flavor base.

Storage and Freezing Tips

One of the best things about this soup is that it stores beautifully! Here’s how to keep it fresh:

  • Refrigerating: Store leftover soup in an airtight container in the fridge for up to 4 days. The flavors will deepen as they meld together!
  • Freezing: To freeze, let the soup cool completely, then transfer it to freezer-safe containers. It can be stored for up to 3 months. Just remember that potatoes can change in texture when thawed, so they may be a bit softer.
  • Reheating: Reheat on the stovetop over medium-low heat, stirring often, or microwave in 1-minute intervals, stirring in between.

FAQs About This Recipe

Can I use frozen chicken?

Yes! If you’re using frozen chicken, just make sure to cook it thoroughly before adding the other ingredients. You may need to increase the cooking time a bit.

How can I make this soup thicker?

If you prefer a thicker soup, you can mash a few of the potato cubes against the side of the pot to create a creamier texture. Alternatively, you can stir in a slurry of cornstarch and water.

What if I don’t have fresh herbs?

No worries! Dried herbs work just fine. Just remember that dried herbs are more concentrated, so use about one-third of the amount you would use for fresh herbs.

Estimated Nutrition Information

This comforting soup is not only delicious but also nourishing! While the exact nutrition can vary based on specific ingredients and portion sizes, a serving of this Comforting Chicken Soup with Potatoes provides a hearty dose of protein, fiber, and essential nutrients, making it a wholesome choice for dinner.

Conclusion

There’s a reason this Comforting Chicken Soup with Potatoes is a classic. It’s simple, nourishing, and has the power to turn any ordinary day into something special. Whether you’re looking to warm up on a cold night, soothe a sniffle, or just savor the comforting embrace of a home-cooked meal, this soup has you covered. So grab your apron, gather your loved ones, and let’s make some magic happen in the kitchen! Enjoy every spoonful, and remember—good food is all about sharing and creating memories together.

Comforting Chicken Soup with Potatoes

Prep Time 10 minutes
Cook Time 25 minutes
Total Time 35 minutes
Servings 4 servings
Calories 350
A warm and hearty chicken soup packed with potatoes and vegetables, perfect for comforting meals.

Ingredients

Protein

  • 1 lb chicken breast, diced

Vegetables

  • 4 medium potatoes, peeled and cubed
  • 2 carrots carrots, sliced
  • 1 onion onion, chopped
  • 3 cloves garlic, minced

Broth

  • 6 cups chicken broth
  • 1 teaspoon dried thyme
  • 1 bay leaf bay leaf
  • to taste salt and pepper salt and pepper
  • 2 tablespoons olive oil

Garnish

  • as needed fresh parsley for garnish

Instructions 

  • Heat olive oil in a large pot over medium heat.
  • Sauté onion and garlic until translucent, then add chicken and cook until lightly browned.
  • Add carrots, potatoes, thyme, bay leaf, salt, and pepper; pour in broth and bring to a boil.
  • Reduce heat and simmer for 20-25 minutes until potatoes are tender. Remove bay leaf.
  • Serve hot, garnished with fresh parsley.

Notes

Feel free to add more herbs or adjust seasoning to taste.
Calories: 350kcal
Cost: $15
Course: Soup
Cuisine: home
Keyword: Chicken, potatoes

Loved this recipe? Save it to your favorite Pinterest board so you can easily find it later! It’s the perfect way to keep all your sweet ideas in one place. ✨

An inviting bowl of chicken soup highlighting tender chicken, potatoes, and vibrant vegetables.

Welcome to the Cheesy Wonderland of Three Cheese Manicotti

Ah, manicotti! Just saying the word makes my heart flutter and my stomach rumble. If you’ve been searching for a recipe that wraps creamy goodness in tender pasta shells, you’re in the right place. In this guide, we’re diving deep into the world of Three Cheese Manicotti, where the rich flavors of ricotta, mozzarella, and Parmesan come together to create an unforgettable meal that will have everyone asking for seconds.

This isn’t just any cheesy pasta; this is comfort food at its finest. Whether you’re planning a cozy family dinner or a gathering with friends, this dish has a way of making everyone feel at home. Let’s roll up our sleeves and get started on creating this culinary masterpiece together!

Why You’ll Love This Recipe

  • Easy to Prepare: With just a handful of ingredients and a few simple steps, you can create a meal that looks and tastes like it came from a five-star restaurant.
  • Kid-Approved: My kids can’t resist the combination of cheese and pasta! This recipe is perfect for picky eaters who need a little coaxing to try new dishes.
  • Make-Ahead Convenience: You can prepare the manicotti in advance, making it a fantastic choice for busy weeknights or entertaining.
  • Flavor Explosion: The blend of three cheeses provides a rich and creamy filling that keeps everyone coming back for more.
  • Customizable: Feel free to get creative! You can add your favorite herbs or proteins for a personal touch.

Ingredients and Why They Matter

Let’s talk about the stars of this dish: the ingredients. Here’s what you’ll need to create your Three Cheese Manicotti:

  • 8 ounces manicotti shells: The perfect vessel for our cheesy filling. Look for high-quality pasta shells, as they hold up beautifully during baking.
  • 4 cups mozzarella cheese: Shredded for easy melting, this cheese provides that gooey goodness we all crave.
  • 2 cups ricotta cheese: Creamy and rich, ricotta adds a luxurious texture to the filling. You can opt for whole milk or part-skim, depending on your preference.
  • 1 cup Parmesan cheese: Grated for a sharp, nutty flavor that elevates the cheesy filling.
  • 1 tablespoon garlic: Minced, to add depth and a hint of warmth to the dish.
  • 1 large egg: This helps bind the filling together, ensuring it stays put in each manicotti shell.
  • 2 tablespoons dried basil: For a pop of flavor that complements the cheeses beautifully.
  • 1 jar (26 ounces) pasta sauce: Use your favorite marinara sauce—store-bought or homemade—to coat the manicotti.

How to Make It: Step-by-Step Guide

Side view of Three Cheese Manicotti showcasing the gooey cheese filling and rich pasta sauce.

Ready to embark on this cheesy journey? Here’s how to bring your Three Cheese Manicotti to life:

  1. Preheat your oven to 350°F (175°C) and lightly grease a 9×13-inch baking dish.
  2. In a large pot, bring lightly salted water to a boil. Add the manicotti and cook for 8 to 10 minutes until al dente; then drain. (Pro tip: Drizzle with oil to prevent sticking!)
  3. In a mixing bowl, combine 3 cups of mozzarella, ricotta, Parmesan, minced garlic, egg, and dried basil. Mix until well blended.
  4. Stuff each manicotti shell with the cheese mixture. This part can get a little messy, but that’s half the fun!
  5. Spread 2 cups of pasta sauce over the bottom of your baking dish. Arrange the stuffed manicotti on top, then cover with the remaining sauce. Sprinkle with the remaining mozzarella cheese.
  6. Bake in the preheated oven for 25-30 minutes, or until the cheese is melted and bubbly. The aroma will make your kitchen feel like an Italian trattoria!

Pro Tips for Perfect Manicotti

  • Don’t Overcook the Pasta: Keep an eye on the cooking time. Overcooked shells can fall apart when you try to stuff them.
  • Extra Sauce is Key: Don’t be shy with the pasta sauce! It keeps the manicotti moist and adds flavor.
  • Experiment with Fillings: Feel free to add sautéed spinach, cooked sausage, or roasted vegetables to the cheese mixture for added flavor and nutrition.
  • Let it Rest: Allow the manicotti to sit for a few minutes after baking. It helps the filling set and makes serving easier.
  • Use Fresh Herbs: If you have fresh basil or parsley, sprinkle it on top before serving for a fresh burst of flavor.

Common Mistakes and Troubleshooting

What Could Go Wrong?

Even the best of us have kitchen mishaps. Here are some common mistakes to avoid:

  • Sauce Drought: If your manicotti seems dry, it’s likely you didn’t use enough sauce. Remember, pasta loves sauce!
  • Stuffing Woes: If you find it hard to stuff the shells, try using a piping bag or a zip-top bag with the corner snipped off.
  • Cheese Overflow: For overflowing cheese while baking, ensure you’re not overstuffing the shells. Less is more here!
  • Sticking Together: To prevent sticking, ensure each manicotti shell is well-coated with sauce before baking.

Delicious Variations to Try

Once you’ve mastered the classic Three Cheese Manicotti, why not mix it up? Here are some fun variations:

  • Four-Cheese Manicotti: Add provolone or gouda for even more cheesy goodness.
  • Meat-Lover’s Delight: Incorporate cooked ground beef or Italian sausage into the cheese filling.
  • Veggie-Packed: Mix in sautéed mushrooms, zucchini, or spinach for a nutritious twist.
  • Spicy Kick: Add crushed red pepper flakes or diced jalapeños to the cheese mixture for a heat boost.

Storage and Make-Ahead Instructions

This Three Cheese Manicotti is a great make-ahead option! Here’s how to store and prepare it in advance:

  • Make-Ahead: Prepare the manicotti and assemble it in the baking dish, but don’t bake it. Cover tightly with plastic wrap and refrigerate for up to 24 hours.
  • Freezing: You can also freeze the assembled manicotti. Wrap tightly in foil and store in the freezer for up to three months. When ready to bake, thaw overnight in the fridge before cooking.
  • Storage: Leftover manicotti can be stored in an airtight container in the fridge for up to 3 days. Reheat in the oven or microwave before serving.

Frequently Asked Questions

  • Can I use fresh pasta instead of dried manicotti? Yes, but you may need to adjust the cooking time since fresh pasta cooks faster.
  • What’s the best way to stuff manicotti? A piping bag makes it easier to fill the shells without making a mess.
  • Can I make this gluten-free? Absolutely! Substitute with gluten-free manicotti shells and ensure your sauce is gluten-free.
  • How do I prevent the filling from leaking out during baking? Ensure the shells are stuffed but not overfilled, and use plenty of sauce to seal everything in.
  • What kind of sauce works best? A classic marinara sauce is perfect, but feel free to experiment with alfredo or pesto for a twist!
  • How can I make this dish healthier? Use part-skim cheeses and add vegetables to the filling for added nutrients.
  • Is it necessary to bake the manicotti? Baking helps meld the flavors and achieve that bubbly, cheesy top, but you can serve it right after stuffing if you’re in a hurry.
  • How can I elevate this dish for a dinner party? Top with fresh herbs, a drizzle of high-quality olive oil, or serve alongside a crisp salad for a complete meal.

Nutritional Tips and Dietary Adaptations

If you’re looking to make this dish a bit lighter without sacrificing flavor, here are some tips:

  • Use Low-Fat Cheese: Opt for low-fat ricotta or mozzarella to cut down on calories and fat.
  • Add Veggies: Incorporate spinach, kale, or roasted red peppers to boost fiber and vitamins.
  • Whole Wheat Pasta: Consider using whole wheat manicotti shells to increase the fiber content.

Equipment Recommendations

To make your cooking experience smoother, here’s what I recommend having on hand:

  • Large Pot: For boiling the manicotti shells.
  • Mixing Bowl: To combine your delicious cheese filling.
  • Baking Dish: A 9×13-inch dish is ideal for this recipe.
  • Measuring Cups and Spoons: Precision is key in cooking!
  • Piping Bag: This is optional but makes stuffing the shells much easier.

Serving Suggestions

Now that your Three Cheese Manicotti is baked to perfection, how should you serve it? Here are some ideas:

  • With a Side Salad: A crisp green salad with a light vinaigrette pairs beautifully with the richness of the manicotti.
  • Garlic Bread: Because carbs are life, serve with warm garlic bread for a complete Italian meal.
  • Wine Pairing: A glass of Chianti or a crisp Pinot Grigio complements the cheesy flavors nicely.

Conclusion: Your Cheesy Adventure Awaits!

And there you have it, my dear culinary explorers! Your guide to creating the ultimate Three Cheese Manicotti is complete. I hope you feel inspired to dive into this delightful recipe and make it your own. Remember, the kitchen is a place of joy and creativity, and every dish is an opportunity to bring a little magic into your life. So gather your loved ones, whip up this cheesy delight, and enjoy every moment spent around the table. Happy cooking!

Three Cheese Manicotti

Prep Time 15 minutes
Cook Time 30 minutes
Total Time 45 minutes
Servings 6 servings
Calories 600
A delicious baked pasta dish featuring three types of cheese, perfect for a comforting family dinner.

Ingredients

Pasta

  • 8 ounces manicotti shells
  • 4 cups mozzarella cheese, (shredded and divided)
  • 2 cups ricotta cheese
  • 1 cup Parmesan cheese, (grated)
  • 1 tablespoon garlic, (minced)
  • 1 large egg
  • 2 tablespoons dried basil
  • 1 jar (26 ounces) pasta sauce

Instructions 

  • Preheat oven to 350°F (175°C). Grease a 9x13-inch baking dish.
  • Cook manicotti shells in boiling salted water for 8-10 minutes, then drain and set aside.
  • Mix 3 cups mozzarella, ricotta, Parmesan, garlic, egg, and basil. Stuff shells with mixture.
  • Spread 2 cups sauce in dish, arrange stuffed shells, cover with remaining sauce, and top with remaining mozzarella.
  • Bake for 25-30 minutes until cheese is melted and bubbly.

Notes

For a richer flavor, let the dish rest for 5 minutes before serving.
Calories: 600kcal
Cost: $15
Course: Main Course
Cuisine: Italian
Keyword: cheese

Why You’ll Love This Nourishing Bread

There’s something magical about the smell of baking banana bread wafting through your home, isn’t there? It’s like a cozy hug from the inside out. This Healthy Banana Bread recipe is not just a delightful treat; it’s a wholesome experience that brings comfort and nostalgia with every slice. Whether you’re looking for a quick breakfast option or a sweet snack to enjoy during the day, this banana bread hits all the right notes. It’s simple, satisfying, and brimming with the goodness of ripe bananas and wholesome ingredients.

As a self-proclaimed banana bread enthusiast, I can tell you that this recipe has earned its spot in my kitchen. Whenever I have overripe bananas sitting on my counter, I know it’s time to whip up this delightful loaf. Each bite is moist, tender, and infused with just the right amount of sweetness, making it a crowd-pleaser for family and friends alike. Plus, it’s incredibly versatile—you can add your favorite mix-ins to personalize it just the way you like.

Ingredients That Shine

Before we dive into the magic of baking, let’s gather our ingredients. Here’s what you’ll need for this banana bread:

  • ⅓ cup (75 grams) melted coconut oil, extra-virgin olive oil, or vegetable oil
  • ½ cup (168 grams) honey or maple syrup
  • 2 large eggs
  • 1 cup (225 grams) mashed ripe bananas (about 2½ medium or 2 large)
  • ¼ cup (56 grams) milk of choice or water
  • 1 teaspoon baking soda
  • 1 teaspoon vanilla extract
  • ½ teaspoon salt
  • ½ teaspoon ground cinnamon, plus more for sprinkling
  • 1¾ cups (220 grams) white whole wheat flour or regular whole wheat flour
  • Optional: ½ cup mix-ins like chopped walnuts, pecans, chocolate chips, raisins, dried fruit, or banana slices

These ingredients are not only nutritious but also come together to create a loaf that’s bursting with flavor. The coconut oil adds a subtle tropical twist, while the honey or maple syrup sweetens things up naturally. And let’s not forget about the bananas—the star of the show!

Step-by-Step Directions

A fresh loaf of healthy banana bread on a wooden board, with soft shadows and a cozy background.

Ready to bake? Let’s get started! Follow these simple steps to create your own loaf of banana bread:

  1. Preheat the Oven: Set your oven to 325°F (165°C) and grease a 9×5-inch loaf pan with a bit of oil or cooking spray. This will help your bread slide out easily once it’s baked.
  2. Mix the Wet Ingredients: In a large mixing bowl, whisk together the melted oil and honey until well combined. Add the eggs and beat them in thoroughly. Then, mix in the mashed bananas and milk until smooth and creamy.
  3. Add the Dry Ingredients: Stir in the baking soda, vanilla extract, salt, and ground cinnamon. Make sure everything is well incorporated.
  4. Fold in the Flour: Switch to a spoon and gently fold in the whole wheat flour until just combined. It’s okay if there are a few lumps—overmixing can lead to a dense loaf!
  5. Add Mix-Ins: If you’re using any mix-ins, like nuts or chocolate chips, gently fold them into the batter now.
  6. Pour and Sprinkle: Pour the batter into the prepared loaf pan. For a decorative touch, sprinkle a little extra cinnamon on top. If you’re feeling adventurous, you can run a knife through the batter to create a swirl effect.
  7. Bake to Perfection: Place the loaf in the preheated oven and bake for 55-60 minutes. Keep an eye on it, and check for doneness by inserting a toothpick into the center; it should come out clean.
  8. Cool and Slice: Once baked, let the bread cool in the pan for about 10 minutes. Then, carefully transfer it to a wire rack to cool completely before slicing.

Nutritional Highlights

While I can’t provide specific nutritional values for this recipe, I can assure you that this banana bread is a healthier alternative to many store-bought options. With wholesome ingredients like whole wheat flour and natural sweeteners, it’s a treat that you can feel good about enjoying. Plus, the addition of bananas not only adds sweetness but also provides potassium and fiber, making this bread a nourishing option for breakfast or an afternoon snack.

Tips for Perfect Banana Bread

To ensure your banana bread turns out perfectly every time, keep these tips in mind:

  • Use Ripe Bananas: The riper the bananas, the better! Look for bananas that are heavily speckled or even browning. They’ll add the most flavor and sweetness to your bread.
  • Don’t Overmix: When combining the flour with the wet ingredients, mix just until combined. Overmixing can lead to a tough loaf.
  • Experiment with Add-Ins: Feel free to get creative with mix-ins! Chopped nuts, dark chocolate chips, or even shredded coconut can elevate your banana bread experience.
  • Check for Doneness: Ovens can vary, so keep an eye on your bread as it bakes. If the top is browning too quickly, you can tent it with foil to prevent burning.

Variations to Try

If you’re looking to switch things up, here are a few variations you can try:

  • Chocolate Chip Banana Bread: Add ½ cup of dark chocolate chips for a decadent twist.
  • Nutty Banana Bread: Fold in a mix of walnuts and pecans for extra crunch and flavor.
  • Dried Fruit Delight: Incorporate chopped dried apricots or cranberries for a fruity surprise in each bite.
  • Cinnamon Swirl: Add a cinnamon-sugar swirl by mixing a tablespoon of sugar with a teaspoon of cinnamon, then swirling it into the batter before baking.

Substitutions You Can Make

If you don’t have all the ingredients on hand, don’t worry! Here are some easy substitutions:

  • Oil: You can use melted butter or any neutral oil in place of coconut oil.
  • Sweeteners: If you prefer, you can use agave syrup or brown sugar instead of honey or maple syrup.
  • Flour: If you’re out of whole wheat flour, all-purpose flour works just fine. For a gluten-free option, try almond flour or a gluten-free blend.

Storage and Freezing Tips

To keep your banana bread fresh and delicious:

  • Storing: Keep the bread in an airtight container at room temperature for up to 3 days. If you want to keep it longer, store it in the fridge for up to a week.
  • Freezing: You can freeze banana bread for up to 3 months. Just wrap it tightly in plastic wrap, then place it in a freezer-safe bag. When you’re ready to enjoy it, thaw it at room temperature or pop slices in the toaster for a quick warm-up.

FAQs About Banana Bread

Let’s address some frequent questions about our beloved banana bread:

  • Can I use frozen bananas? Absolutely! Just thaw them, drain any excess liquid, and mash them up before adding to the batter.
  • Why is my banana bread dense? This can happen if you overmix the batter or if your bananas weren’t ripe enough. Make sure to mix just until combined!
  • Can I make mini loaves? Yes! This recipe works great for mini loaf pans; just reduce the baking time to about 25-30 minutes.

Troubleshooting Common Issues

If you encounter any hiccups while making your banana bread, consider these solutions:

  • If the bread sinks in the middle: This may be due to underbaking or not having enough structure from the flour. Ensure you measure ingredients accurately.
  • If it’s too dry: This could be from overbaking. Make sure to check for doneness early to avoid drying it out.
  • If the top is burning: If the top of your bread is browning too quickly, cover it with foil during the last 15-20 minutes of baking.

Final Thoughts

This Healthy Banana Bread recipe not only satisfies your taste buds but also fills your home with warmth and love. It’s a little piece of comfort that can brighten up your day, whether you enjoy it fresh out of the oven or toasted with a pat of butter. So, gather those overripe bananas, preheat your oven, and let’s create something wonderful together. I can’t wait for you to experience the joy of baking this banana bread as much as I do. Happy baking, friends!

Healthy Banana Bread

Prep Time 10 minutes
Cook Time 1 hour
Total Time 1 hour 10 minutes
Servings 8 slices
Calories 250
A moist and wholesome banana bread perfect for a quick snack or breakfast, combining natural sweetness with whole wheat goodness.

Ingredients

Wet ingredients

  • 75 grams melted coconut oil, extra-virgin olive oil, or vegetable oil
  • 168 grams honey or maple syrup
  • 2 large eggs
  • 225 grams mashed ripe bananas (about 2½ medium or 2 large bananas)
  • 56 grams milk of choice or water

Dry ingredients

  • 1 teaspoon baking soda
  • 1 teaspoon vanilla extract
  • ½ teaspoon salt
  • ½ teaspoon ground cinnamon (plus more for sprinkling)
  • 220 grams white whole wheat flour or regular whole wheat flour

Optional mix-ins

  • ½ cup chopped walnuts, pecans, chocolate chips, raisins, dried fruit, or banana slices (optional)

Instructions 

  • Preheat oven to 325°F (165°C) and grease a 9x5-inch loaf pan.
  • Whisk melted oil and honey, add eggs, then stir in bananas and milk.
  • Mix in baking soda, vanilla, salt, and cinnamon. Fold in flour and optional mix-ins.
  • Pour batter into pan, sprinkle with cinnamon, and swirl with a knife.
  • Bake for 55-60 minutes until a toothpick comes out clean. Cool before slicing.

Notes

For extra flavor, sprinkle cinnamon on top before baking.
Calories: 250kcal
Cost: $10
Course: Breakfast, Snack
Cuisine: American
Keyword: Banana, healthy, Whole Wheat

Loved this recipe? Save it to your favorite Pinterest board so you can easily find it later! It’s the perfect way to keep all your sweet ideas in one place. ✨

Detailed view of healthy banana bread, highlighting its texture and ingredients, with warm natural lighting.

Why You’ll Fall in Love with This Dish

Ah, the beauty of a home-cooked meal! There’s something truly magical about gathering around the table with loved ones and sharing a hearty dish that warms the soul. This Creamy Paprika Chicken with Herb Potatoes and Fluffy Rice does just that. It’s not just a dinner; it’s an experience that evokes warmth, nostalgia, and comfort. Imagine a busy weeknight winding down, and you’re in your kitchen, the rich aroma of paprika wafting through the air, enticing everyone to come and sit at the dinner table.

This recipe is a delightful blend of creamy, savory chicken, perfectly roasted herb-infused potatoes, and fluffy rice that all come together to create a satisfying meal. Not only is it quick to prepare, but it also packs a flavor punch that will make your taste buds dance. Plus, who doesn’t love a dish that can make leftovers taste just as good the next day? Let’s dive into the details that will make this recipe your new favorite!

Ingredients You’ll Need

Gathering the ingredients is half the fun! Here’s what you will need:

  • 4 boneless, skinless chicken breasts
  • 2 tablespoons paprika
  • Salt and pepper to taste
  • 2 tablespoons olive oil
  • 1 cup heavy cream
  • 1 cup chicken broth
  • 1 teaspoon garlic powder
  • 1 teaspoon onion powder
  • 1 tablespoon chopped fresh parsley
  • 1 pound baby potatoes, halved
  • 2 tablespoons butter
  • 1 teaspoon dried thyme
  • 1 cup rice
  • 2 cups water

Step-by-Step Instructions

Delicious creamy paprika chicken garnished with fresh parsley alongside baby potatoes and rice.

Now that you have your ingredients, let’s roll up our sleeves and get cooking!

1. Preheat the Oven

First things first—let’s get that oven warming up! Preheat your oven to 400°F (200°C). This will ensure your herb potatoes roast perfectly while you prepare the chicken.

2. Season the Chicken

In a small bowl, combine the paprika, salt, and pepper. Season the chicken breasts generously with this mixture. This simple step will infuse the chicken with a rich flavor that’s simply irresistible.

3. Sear the Chicken

In a large skillet, heat the olive oil over medium heat. Once hot, add the seasoned chicken breasts. Cook until they are golden brown on both sides, about 5 minutes per side. Once cooked, remove the chicken from the skillet and set it aside. This quick sear will lock in all those juices and flavors!

4. Make the Creamy Sauce

In the same skillet, lower the heat and add the heavy cream and chicken broth. Stir in the garlic powder and onion powder. Bring this mixture to a gentle simmer, stirring until well combined. The cream will create a luscious sauce that will coat the chicken beautifully.

5. Return the Chicken

Now, return the golden chicken breasts to the skillet. Allow them to simmer in the creamy sauce for about 10-15 minutes, or until they are cooked through and the sauce has thickened. Trust me, your kitchen will smell heavenly at this point!

6. Roast the Herb Potatoes

While the chicken simmers, let’s work on those herb potatoes. In a baking dish, toss the halved baby potatoes with butter, dried thyme, salt, and pepper. Make sure they are well coated with all those flavors. Bake them in the preheated oven for about 25-30 minutes, or until they are tender and golden brown.

7. Cook the Fluffy Rice

In a separate pot, bring 2 cups of water to a boil. Add the rice and a pinch of salt, then reduce the heat to low, cover, and simmer for about 15-20 minutes until the rice is fluffy and has absorbed all the water.

8. Serve and Enjoy!

It’s time to plate up! Serve the creamy paprika chicken over the fluffy rice, with those delicious herb potatoes on the side. Garnish with a sprinkle of chopped parsley for a fresh finish. Your family and friends will be in for a treat!

Tips for Success

To ensure your dish turns out perfect every time, keep these tips in mind:

  • Marinate for More Flavor: If you have a little extra time, marinate the chicken in olive oil, paprika, and thyme for 30 minutes before cooking. This will deepen the flavors.
  • Choose the Right Potatoes: Baby potatoes are ideal for roasting due to their tender texture. However, you can substitute with Yukon Gold or fingerling potatoes for equally delicious results.
  • Paprika Matters: For the best flavor, opt for sweet Hungarian paprika. If you like a smoky taste, consider using smoked paprika in its place.
  • Heavy Cream Alternatives: If you’re looking for a lighter option, half-and-half or full-fat coconut milk can work beautifully.

Flavor Variations

Looking to switch things up? Here are some delicious variations to consider:

  • Add Vegetables: Stir in some fresh spinach, sautéed mushrooms, or sliced bell peppers into the chicken for a colorful and nutritious boost.
  • Spice It Up: If you enjoy a kick, add a pinch of cayenne or some red pepper flakes to the sauce for a spicy twist.
  • Swap the Protein: Feel free to substitute chicken with turkey breast, pork tenderloin, or even shrimp for a different take on the dish.
  • Experiment with Herbs: Try using rosemary, oregano, or basil for a different herbal profile.

Storage and Freezing Tips

Planning to make this delightful dish ahead of time? Here’s how to store it:

  • Refrigerator: Store the chicken, potatoes, and rice in separate airtight containers. They will keep well for up to 3 days.
  • Freezer: The creamy chicken and rice can be frozen for up to 2 months. Be sure to defrost overnight in the refrigerator before reheating.
  • Reheating: Warm gently on the stovetop or in the microwave. Adding a splash of water or cream can help revive the sauce’s creaminess.

Frequently Asked Questions

Here are some common questions you may have:

Can I use chicken thighs instead of breasts?

Absolutely! Boneless, skinless chicken thighs are juicy and tender, making them a great alternative for this recipe.

How do I prevent the cream sauce from curdling?

Keep the heat low once you add the cream. Stir continuously and avoid letting the sauce come to a full boil to maintain a silky texture.

Can I make this dish low-carb?

Yes! Serve the creamy paprika chicken over cauliflower rice instead of regular rice for a low-carb option.

What’s the best way to reheat without drying out the chicken?

Reheat gently on the stove over low heat, stirring occasionally. Adding a splash of cream or broth can help keep the chicken moist.

Is it possible to prepare everything in advance?

Definitely! You can prepare the chicken and potatoes ahead of time and store them separately. Just reheat before serving and cook fresh rice for the best texture.

Conclusion

This Creamy Paprika Chicken with Herb Potatoes and Fluffy Rice is more than just a meal; it’s a warm hug on a plate and a chance to bring family and friends together. Whether you’re enjoying it on a cozy weeknight or serving it at a gathering, it’s bound to impress and delight. So, roll up your sleeves, gather your loved ones, and let the magic of cooking transform your evening into something truly special. Happy cooking, friends!

Creamy Paprika Chicken with Herb Potatoes and Fluffy Rice

Prep Time 15 minutes
Cook Time 45 minutes
Total Time 1 hour
Servings 4 servings
Calories 650
A flavorful and comforting dish featuring tender paprika-seasoned chicken served with herb roasted potatoes and fluffy rice.

Ingredients

Protein

  • 4 pieces boneless, skinless chicken breasts
  • 2 tablespoons paprika
  • salt and pepper to taste salt and pepper
  • 2 tablespoons olive oil
  • 1 cup heavy cream
  • 1 cup chicken broth
  • 1 teaspoon garlic powder
  • 1 teaspoon onion powder
  • 1 tablespoon chopped fresh parsley

Vegetables

  • 1 pound baby potatoes, halved
  • 2 tablespoons butter
  • 1 teaspoon dried thyme

Carbohydrate

  • 1 cup rice
  • 2 cups water

Instructions 

  • Preheat oven to 400°F (200°C). Season chicken with paprika, salt, and pepper.
  • Cook chicken in skillet with olive oil until golden, then set aside. Simmer sauce with cream, broth, garlic, and onion powder.
  • Return chicken to sauce and cook for 10-15 minutes. Toss potatoes with butter, thyme, salt, and pepper, then bake for 25-30 minutes.
  • Cook rice in boiling water for 15-20 minutes until fluffy. Serve chicken over rice with potatoes on the side, garnished with parsley.

Notes

For extra flavor, add a squeeze of lemon before serving.
Calories: 650kcal
Cost: $15
Course: Main Course
Cuisine: international
Keyword: Chicken, Paprika, potatoes, Rice

Loved this recipe? Save it to your favorite Pinterest board so you can easily find it later! It’s the perfect way to keep all your sweet ideas in one place. ✨

Plate of creamy paprika chicken with a side of golden herb potatoes and white rice.

Why This Banana Cream Pie Will Steal Your Heart

Welcome to a slice of heaven! If you’ve ever dreamt of a dessert that’s creamy, dreamy, and downright delicious, you’re in the right place. This Banana Cream Pie is not just any pie; it’s a nostalgic journey back to my childhood kitchen in Oregon, where the air was filled with the sweet aroma of baking desserts. This pie has a beautiful balance of flavors and textures, from the buttery crust to the velvety custard and the tender bananas. Let’s dive into why this recipe is a must-try!

Why You’ll Love This Recipe

  • Quick and Easy: With straightforward steps, you’ll have this pie ready to chill in no time, making it perfect for unexpected guests or a cozy dessert night.
  • Comforting Flavors: The combination of banana and vanilla custard brings back those warm feelings of home, making each bite feel like a hug from the past.
  • Versatile Dessert: Perfect for any occasion—whether it’s a summer barbecue, a holiday feast, or a simple weeknight treat!
  • Make-Ahead Friendly: This pie is ideal for preparing a day in advance, so you can focus on enjoying your time with loved ones.
  • Customizable: Feel free to experiment with toppings or variations to make this pie your own!

Key Ingredients

Here’s what you need to create this delightful pie:

  • 1 pre-baked 9-inch pie crust: You can opt for homemade or store-bought, but I highly recommend a buttery, flaky crust for the best flavor.
  • 2 ripe bananas, sliced: Choose bananas that are perfectly ripe for the sweetest flavor and best texture.
  • ⅔ cup granulated sugar: This adds just the right amount of sweetness to the custard.
  • ¼ cup cornstarch: Essential for thickening the custard into that creamy texture we all love.
  • ¼ teaspoon salt: A pinch of salt enhances the flavors beautifully.
  • 2 cups evaporated milk: This gives the custard a rich and creamy consistency.
  • 3 egg yolks, beaten: They help to create a smooth custard base.
  • 2 tablespoons unsalted butter: Adds richness and flavor to the custard.
  • 1½ teaspoons vanilla extract: For that lovely aromatic flavor that pairs perfectly with bananas.
  • Whipped topping, for garnish: A fluffy cloud of cream is the perfect finishing touch, but feel free to make your own whipped cream for an extra special touch!

How to Make Banana Cream Pie

Side view of a banana cream pie showcasing layers of cream and banana slices.

Let’s get into the fun part—making this delicious pie!

  • In a medium saucepan, whisk together sugar, cornstarch, and salt.
  • Gradually whisk in the evaporated milk over medium heat, stirring constantly until the mixture thickens and begins to bubble.
  • Remove from the heat and slowly whisk in the beaten egg yolks.
  • Return to the heat and cook for 2 more minutes, stirring continuously.
  • Remove from heat, then stir in butter and vanilla until smooth.
  • Let the custard cool slightly, then pour it into the prepared pie crust.
  • Layer sliced bananas on top and chill for at least 3 hours.
  • Before serving, top with whipped topping and extra banana slices if desired.

Expert Tips for the Perfect Pie

  • Choosing Bananas: Look for bananas with some brown spots for maximum sweetness and flavor in your pie.
  • Pre-bake Your Crust: Make sure your pie crust is fully baked and cooled for the best texture.
  • Whisk Constantly: When cooking the custard, constant stirring ensures a smooth consistency and prevents lumps.
  • Cool Completely: Allow the custard to cool before adding bananas to prevent them from browning too quickly.
  • Chill Time: The longer you chill the pie, the better the flavors meld. Overnight chilling is ideal!
  • Use a Tart Pan: For a fancier version, try using a tart pan with a removable bottom for easy serving.
  • Make it a Layered Delight: Consider adding layers of whipped cream in between the custard and bananas for extra creaminess.
  • Experiment with Flavors: Swap vanilla extract for almond extract for a nutty twist!

Common Mistakes and Troubleshooting

Even the best of us have kitchen blunders! Here are some common mistakes to avoid:

  • Clumpy Custard: If your custard is lumpy, it likely wasn’t whisked enough while cooking. Just strain it through a fine sieve before pouring into the crust.
  • Bananas Browning Too Fast: To keep bananas fresh longer, toss them in a little lemon juice before layering on the pie.
  • Overcooked Custard: If your custard thickens too much, it can become grainy. Keep a close eye on it while cooking and remove from heat as soon as it bubbles.

Delicious Variations

Feel free to mix things up! Here are some fun variations to try:

  • Chocolate Banana Cream Pie: Add chocolate pudding mixed with the custard for a decadent twist.
  • Peanut Butter Banana Cream Pie: Fold in some creamy peanut butter to the custard for a nutty flavor.
  • Berry Banana Cream Pie: Layer fresh berries with the bananas for a beautiful and flavorful addition.
  • Caramel Banana Cream Pie: Drizzle caramel sauce over the bananas before adding the whipped cream for extra sweetness.

Storage and Make-Ahead Instructions

This pie is perfect for making ahead of time:

  • Storing: Keep the pie covered in the refrigerator for up to 3 days. The bananas may brown slightly, but the flavor will still be delightful.
  • Make-Ahead: You can prepare the custard a day in advance and assemble the pie just before serving for the freshest taste.

Frequently Asked Questions

Here are some questions you might have while making this banana cream pie:

  • Can I use fresh whipped cream instead of whipped topping? Absolutely! Fresh whipped cream adds a lovely homemade touch.
  • What can I substitute for evaporated milk? You can use whole milk or a dairy-free alternative like coconut milk for a different flavor.
  • Can I freeze banana cream pie? Freezing isn’t recommended because bananas can turn mushy, but you can freeze the custard separately.
  • How do I prevent my crust from getting soggy? Blind bake your crust and let it cool completely before adding the custard.
  • How can I make this pie gluten-free? Use a gluten-free pie crust to easily adapt this recipe!
  • Can I add other fruits? Yes! Feel free to layer in strawberries or blueberries for added flavor.
  • How long should I chill the pie? At least 3 hours, but overnight is best for optimal flavor and texture.
  • Why is my custard not thickening? Ensure you’re cooking it at the right temperature and whisking constantly to activate the cornstarch.

Nutrition Tips and Dietary Adaptations

This banana cream pie can be adapted for various dietary needs:

  • Lower Sugar: Substitute with a sugar alternative like stevia or monk fruit for a lower-calorie option.
  • Dairy-Free: Use coconut milk in place of evaporated milk and a dairy-free whipped topping.
  • Gluten-Free: Simply use a gluten-free pie crust for a safe treat.

Equipment Recommendations

Here’s what I recommend having on hand to make this pie:

  • Medium Saucepan: Essential for cooking the custard to perfection.
  • Whisk: A good whisk is crucial for achieving that smooth custard.
  • Pie Dish: A 9-inch pie dish works best, but feel free to use a tart pan for a twist!
  • Mixing Bowls: You’ll need a few of these for measuring and mixing ingredients.

Serving Suggestions

When it comes time to serve, consider these ideas:

  • Garnish: Top with extra banana slices and a sprinkle of graham cracker crumbs for a crunchy texture.
  • Pair with Coffee: This pie pairs beautifully with a cup of coffee or tea, making it a perfect dessert for gatherings.
  • Ice Cream Side: Serve with a scoop of vanilla ice cream for a delightful contrast in temperature and texture.

Conclusion

There you have it—an easy and delicious Banana Cream Pie that will surely impress! This recipe isn’t just about the end product; it’s about the memories you’ll create while making it. So gather your loved ones, roll up your sleeves, and let’s make some kitchen magic together. Remember, every pie is a story waiting to be shared, and I can’t wait to hear how yours turns out. Happy baking!

Banana Cream Pie

Prep Time 20 minutes
Cook Time 15 minutes
Total Time 35 minutes
Servings 8 pieces
Calories 350
A delicious and creamy banana pie with a smooth custard filling and fresh banana slices, perfect for dessert.

Ingredients

Crust

  • 1 pre-baked 9-inch pie crust

Filling

  • 2 ripe bananas bananas, sliced
  • 0.67 cup granulated sugar
  • 0.25 cup cornstarch
  • 0.25 teaspoon salt
  • 2 cups evaporated milk
  • 3 egg yolks beaten egg yolks
  • 2 tablespoons unsalted butter
  • 1.5 teaspoons vanilla extract

Garnish

  • Whipped topping Whipped topping, for garnish

Instructions 

  • Whisk sugar, cornstarch, and salt in a saucepan.
  • Gradually add evaporated milk, cook until thickened and bubbling.
  • Whisk in beaten egg yolks, cook 2 minutes, then remove from heat.
  • Stir in butter and vanilla, pour into crust, layer bananas, and chill for 3 hours.
  • Top with whipped topping before serving.

Notes

Use ripe bananas for best flavor and chill the pie thoroughly before serving.
Calories: 350kcal
Cost: $15
Course: Dessert
Cuisine: American
Keyword: Banana

Why You’ll Love These Salmon Bites

If you’re searching for a recipe that not only satisfies your taste buds but also serves as a conversation starter, look no further than these Crispy Honey Garlic Salmon Bites. This dish is the perfect blend of sweet and savory, with salmon bites that are crispy on the outside and tender on the inside. They’re not just a meal; they’re an experience, a moment of joy that brings people together.

Growing up, I often found myself in the kitchen, experimenting with flavors and textures, trying to recreate those magical moments from my childhood. Every time I take a bite of these salmon bites, I’m reminded of my mother’s cooking—how she would whisk together ingredients to create something extraordinary out of the ordinary. And let me tell you, this recipe is just as nostalgic as it is delicious!

Overview of Ingredients

The beauty of this dish lies in its simplicity. With just a handful of ingredients, you’ll create a meal that’s bursting with flavor. Here’s what you’ll need:

  • 1 pound salmon fillet: Fresh, skin removed, and cut into bite-sized pieces.
  • 1/4 cup honey: Adds that perfect touch of sweetness.
  • 2 tablespoons soy sauce: Provides a savory depth to the glaze.
  • 3 cloves garlic: Minced for a fragrant punch.
  • 1 tablespoon olive oil: For cooking and adding richness.
  • 1 teaspoon ginger: Grated for a subtle warmth.
  • 1/2 teaspoon black pepper: To season.
  • 1/2 teaspoon salt: Essential for enhancing all flavors.
  • 1/4 cup cornstarch: Key for achieving that coveted crispy coating.
  • 2 tablespoons chopped green onions: For garnish.
  • Sesame seeds: For added texture and visual appeal.

Step-by-Step Instructions

Golden-brown salmon pieces drizzled with honey glaze, displayed on a rustic table with blurred background.

Now that you have your ingredients prepped, let’s dive into making these delightful salmon bites!

  1. Prepare the Marinade: In a medium bowl, whisk together the honey, soy sauce, minced garlic, olive oil, grated ginger, black pepper, and salt until well combined.
  2. Marinate the Salmon: Add the salmon bites to the bowl of marinade, gently tossing to coat. Allow them to sit for 15-20 minutes to absorb those delicious flavors.
  3. Coat the Salmon: In a separate bowl, toss the marinated salmon pieces in cornstarch until they are well coated. This step is crucial as it ensures that your bites come out crispy and golden.
  4. Heat the Skillet: Heat a non-stick skillet over medium-high heat and add a little olive oil to coat the bottom.
  5. Cook the Salmon: Once the skillet is hot, carefully add the salmon bites in a single layer. Cook for 3-4 minutes on each side until they turn golden brown and crispy.
  6. Drain and Serve: Remove the salmon bites from the skillet and place them on a paper towel to absorb any excess oil. Garnish with chopped green onions and sesame seeds before serving.

Recipe Tips

To make sure your dish turns out perfectly every time, here are some tips:

  • Choose Fresh Salmon: Fresh salmon will yield the best texture and flavor. If you’re using frozen salmon, be sure to thaw it fully before cooking.
  • Don’t Rush the Marinade: Allowing the salmon to marinate for at least 15-20 minutes will enhance the flavors significantly.
  • Watch the Cooking Time: Salmon cooks quickly! Keep an eye on it to prevent overcooking, which can lead to dryness.
  • Use a Non-Stick Skillet: This ensures that the salmon bites don’t stick to the pan and helps achieve that crispy exterior.

Variations and Substitutions

If you’re feeling adventurous or need to cater to dietary restrictions, here are some variations and substitutions you can consider:

  • Spicy Kick: Add a teaspoon of sriracha or red pepper flakes to the marinade for a spicy twist.
  • Different Proteins: While salmon is the star of this recipe, you can substitute it with firm white fish like cod or halibut.
  • Gluten-Free Option: Use tamari instead of soy sauce and ensure your cornstarch is gluten-free.
  • Vegetarian Version: Replace the salmon with tofu for a plant-based alternative. Just be sure to press the tofu to remove excess moisture!

Serving Suggestions

These crispy bites are incredibly versatile. Here are a few ideas for what to serve alongside them:

  • Steamed Rice or Quinoa: The perfect base to soak up that delicious honey garlic glaze.
  • Roasted Vegetables: Broccoli, bell peppers, or carrots make for a colorful and nutritious side.
  • Fresh Salad: A light salad with a tangy vinaigrette would complement the richness of the salmon bites.
  • Seafood Tacos: Use them as filling for soft tacos with avocado and a squeeze of lime.

Storage and Freezing

If you happen to have leftovers (though I doubt it!), here’s how to store them:

  • Refrigeration: Store the salmon bites in an airtight container in the refrigerator for up to 3 days. Reheat in a skillet to maintain crispiness.
  • Freezing: You can freeze the cooked salmon bites for up to 2 months. To reheat, bake at 375°F (190°C) until heated through.

Frequently Asked Questions

Here are some common questions and answers that might help you:

  • Can I make this recipe in advance? While the salmon bites are best served fresh, you can prepare the marinade and coat the salmon pieces ahead of time. Just cook them right before serving!
  • What if I don’t have cornstarch? All-purpose flour can work as a substitute, but for the best crispiness, I recommend sticking with cornstarch.
  • Can I bake these instead of frying? Absolutely! Preheat your oven to 400°F (200°C) and bake the coated salmon bites for 10-12 minutes until crispy.

Troubleshooting

If you encounter any hiccups while cooking, here are some solutions:

  • Salmon Isn’t Crispy: Ensure your oil is hot before adding the salmon, and don’t overcrowd the pan.
  • Too Sweet: If you find the glaze is too sweet for your liking, add a splash more soy sauce or a squeeze of lemon juice to balance it out.

Conclusion

Cooking should be a joyous experience, and these Crispy Honey Garlic Salmon Bites perfectly embody that philosophy. As you gather around the table with family and friends, watch as their faces light up with delight, and enjoy the magic of good food bringing people together. Whether for a casual dinner or a special occasion, these bites are sure to be a hit! So grab your apron, unleash your inner chef, and let’s create something unforgettable. Happy cooking!

Crispy Honey Garlic Salmon Bites – A Quick, Flavorful Delight

Prep Time 20 minutes
Cook Time 10 minutes
Total Time 30 minutes
Servings 4 servings
Calories 250
Enjoy these crispy, flavorful salmon bites glazed with honey and garlic, perfect for a quick appetizer or main dish.

Ingredients

Main

  • 1 pound salmon fillet, skin removed and cut into bite-sized pieces
  • 1/4 cup honey
  • 2 tablespoons soy sauce
  • 3 cloves garlic, minced
  • 1 tablespoon olive oil
  • 1 teaspoon ginger, grated
  • 1/2 teaspoon black pepper
  • 1/2 teaspoon salt
  • 1/4 cup cornstarch
  • 2 tablespoons chopped green onions (for garnish)
  • sesame seeds (for garnish)

Instructions 

  • Mix honey, soy sauce, garlic, olive oil, ginger, black pepper, and salt to make marinade.
  • Marinate salmon bites for 15-20 minutes.
  • Toss marinated salmon in cornstarch until coated.
  • Cook salmon in a hot skillet for 3-4 minutes per side until crispy.
  • Drain on paper towels, then garnish with green onions and sesame seeds before serving.

Notes

Serve immediately for best crispiness.
Calories: 250kcal
Cost: $15
Course: Appetizer
Cuisine: American
Keyword: Salmon

Loved this recipe? Save it to your favorite Pinterest board so you can easily find it later! It’s the perfect way to keep all your sweet ideas in one place. ✨

Appetizing salmon bites glistening with honey sauce, surrounded by a soft, cozy kitchen ambiance.

Why You’ll Love This Dish

When it comes to comfort food, few dishes can hold a candle to a rich, cheesy pasta bake. My Garlic Parmesan Chicken Pasta Bake is not just a meal; it’s an experience—a warm embrace on a plate that effortlessly combines simplicity with show-stopping flavors. You know that feeling when you walk into a room and the aroma hits you like a wave of nostalgia? This dish does that. It has a way of making your kitchen feel like home, inviting friends and family to gather around the table, and sparking joy in every bite. Whether it’s a cozy family dinner or a gathering with friends, this pasta bake is destined to impress!

The Magic of Garlic and Parmesan

Let’s talk about the star players in this dish: garlic and parmesan. The pungent aroma of sautéed garlic mingling with the nutty richness of parmesan creates a symphony of flavors that is simply irresistible. Garlic, with its robust character, not only enhances the taste but also fills your kitchen with a warm, inviting scent that beckons everyone to come closer. And the parmesan? Well, it’s the fairy dust that transforms this pasta bake from ordinary to extraordinary. Together, they create a creamy, decadent sauce that wraps around every piece of pasta, chicken, and broccoli, ensuring no bite is left behind.

Ingredients You’ll Need

Warm Garlic Parmesan Chicken Pasta Bake in a dish, topped with melted cheese and parsley.

Here’s what you’ll need to whip up this delightful Garlic Parmesan Chicken Pasta Bake:

  • 8 oz penne pasta
  • 2 cups cooked chicken, shredded
  • 2 cups broccoli florets
  • 3 cups garlic parmesan sauce
  • 1 cup shredded mozzarella cheese
  • 1/2 cup grated parmesan cheese
  • 2 cloves garlic, minced
  • 1 tsp Italian seasoning
  • Salt and pepper to taste
  • 2 tbsp olive oil
  • Fresh parsley for garnish

Steps to Create Your Pasta Bake

Ready to embark on this culinary adventure? Let’s get cooking!

  1. Preheat the Oven: Begin by preheating your oven to 375°F (190°C). This is essential for ensuring your pasta bake cooks evenly and develops that beautifully golden top.
  2. Cook the Pasta: In a large pot, cook the penne pasta according to the package instructions until it reaches al dente perfection. You want it firm enough to hold its shape during baking. Once cooked, drain the pasta and set it aside.
  3. Sauté the Garlic: In a large skillet, heat the olive oil over medium heat. Add the minced garlic and sauté until it becomes fragrant—just a minute or two. Be careful not to let it burn, as that can lead to a bitter taste.
  4. Add Chicken and Broccoli: Toss in the cooked chicken and broccoli florets, stirring until everything is heated through. The vibrant green of the broccoli not only adds a pop of color but also a nutritious crunch that complements the creamy sauce.
  5. Mix It All Together: In a large mixing bowl, combine the cooked pasta, chicken, broccoli, garlic parmesan sauce, Italian seasoning, salt, and pepper. Mix well to ensure every ingredient is coated in that luscious sauce.
  6. Transfer to Baking Dish: Pour the mixture into a greased 9×13 inch baking dish. Spread it out evenly, ensuring all the pasta and chicken are well distributed.
  7. Add Cheese: Top your pasta bake with a generous layer of shredded mozzarella and grated parmesan cheese. This is where the magic happens; the cheese melts into gooey perfection while forming a golden crust on top.
  8. Bake: Place your baking dish in the preheated oven and bake for 25-30 minutes, or until the cheese is bubbling and golden brown. Keep an eye on it—every oven behaves a bit differently!
  9. Cool and Garnish: Once out of the oven, let it cool for a few minutes. This will help the sauce set slightly, making it easier to serve. Garnish with fresh parsley for a vibrant touch before digging in.

Tips for Perfecting Your Pasta Bake

While this recipe is incredibly straightforward, a few tips can elevate your dish:

  • Don’t Overcook the Pasta: Remember, it will continue to cook in the oven, so pulling it out while it’s al dente is key.
  • Use Leftover Chicken: This recipe is a fantastic way to use up leftover rotisserie chicken or any cooked chicken you have on hand.
  • Make It Creamy: For an extra creamy bake, consider stirring in a little cream cheese or sour cream into the garlic parmesan sauce.
  • Spice It Up: If you like a bit of heat, add some red pepper flakes or diced jalapeños to the mix for a spicy kick.

Variations to Try

If you’re feeling adventurous, here are some fun twists on this Garlic Parmesan Chicken Pasta Bake:

  • Vegetable Medley: Swap in your favorite vegetables like bell peppers, spinach, or zucchini for a colorful and nutritious boost.
  • Different Cheeses: Experiment with different cheeses like gouda, cheddar, or even feta for unique flavor profiles.
  • Herb Infusion: Add fresh herbs like basil or thyme for a fresh, aromatic touch that pairs beautifully with the garlic and cheese.

Storing and Freezing

If you happen to have leftovers (which is rare in my house), here’s how to store them:

  • Refrigeration: Allow the pasta bake to cool completely before transferring it to an airtight container. It will keep in the fridge for up to 3-4 days.
  • Freezing: To freeze, cover the baking dish tightly with foil or plastic wrap before placing it in the freezer. It can be stored for up to 2-3 months. When you’re ready to enjoy it again, thaw it overnight in the refrigerator and reheat in the oven.

FAQs

Got questions? I’ve got answers! Here are some common queries:

  • Can I use a different type of pasta? Absolutely! Any pasta shape works, but keep in mind that cooking times may vary.
  • Is this dish gluten-free? You can easily make this gluten-free by using gluten-free pasta and ensuring your sauces are gluten-free as well.
  • Can I prepare this ahead of time? Yes! You can assemble the dish a day ahead, cover it, and store it in the fridge until you’re ready to bake.

Wrap Up

There you have it! A Garlic Parmesan Chicken Pasta Bake that’s not only simple to make but also a guaranteed crowd-pleaser. Whether it’s a weeknight dinner or a special occasion, this dish brings warmth, flavor, and a bit of magic to your table. So gather your loved ones, share a laugh, and enjoy every cheesy, garlicky bite. Trust me, once you serve this, you’ll be known as the pasta bake magician in your circle!

So, are you ready to dive into this delicious adventure? I can’t wait for you to try it and hear how it turns out in your kitchen. Happy cooking!

Garlic Parmesan Chicken Pasta Bake Recipe to Impress Guests at Your Next Gathering

Prep Time 15 minutes
Cook Time 30 minutes
Total Time 45 minutes
Servings 6 servings
Calories 650
This flavorful baked pasta combines tender chicken, broccoli, and a rich garlic parmesan sauce, topped with melted cheese—perfect for entertaining.

Ingredients

Pasta

  • 8 oz penne pasta
  • 2 cups cooked chicken, shredded
  • 2 cups broccoli florets
  • 3 cups garlic parmesan sauce
  • 1 cup shredded mozzarella cheese
  • 1/2 cup grated parmesan cheese
  • 2 cloves garlic, minced
  • 1 tsp italian seasoning
  • to taste salt and pepper
  • 2 tbsp olive oil
  • for garnish fresh parsley

Instructions 

  • Preheat oven to 375°F (190°C). Cook pasta until al dente, drain.
  • Sauté minced garlic in olive oil, add chicken and broccoli, cook until heated.
  • Mix pasta, chicken, broccoli, sauce, seasoning, salt, and pepper in a bowl.
  • Transfer to a greased baking dish, top with cheeses, and bake 25-30 minutes.
  • Garnish with parsley before serving.

Notes

For a creamier texture, add a splash of milk or cream to the sauce.
Calories: 650kcal
Cost: $15
Course: Main Course
Cuisine: Italian
Keyword: pasta

Loved this recipe? Save it to your favorite Pinterest board so you can easily find it later! It’s the perfect way to keep all your sweet ideas in one place. ✨

Freshly baked pasta casserole with chicken, broccoli, and a golden cheesy crust.

Welcome to my kitchen, where magic happens with just a few simple ingredients! If you’re looking for a dessert that combines the sweetness of pineapple with the comforting familiarity of cake mix, look no further than this easy pineapple dump cake. This recipe is so simple that even your oven might wonder how it got so deliciously good with so little effort. Whether you’re preparing for a family gathering or a cozy night in, this cake is sure to impress.

The beauty of a pineapple dump cake lies in its ease and versatility. With just four main ingredients, you can create a dessert that’s not only quick but also bursting with flavor. By the time you’ve poured your first scoop, your guests will be asking for the recipe. So, grab your apron, and let’s dive into the delightful world of pineapple dump cake!

Why You’ll Love This Recipe

  • Simplicity at Its Best: This cake requires minimal prep time—just mix, dump, and bake! What could be easier?
  • Perfect for Any Occasion: Whether it’s a last-minute gathering or a planned celebration, this cake fits right in.
  • Deliciously Versatile: Feel free to mix in other fruits or spices. From peaches to coconut, the sky’s the limit!
  • Comforting Flavor: The combination of sweet pineapple and buttery cake mix creates a warm, inviting flavor that feels like home.
  • Great Leftovers: This cake stays moist for days, making it a perfect make-ahead dessert!

What You’ll Need

Before we get started, let’s gather our ingredients. This cake is all about simplicity, but that doesn’t mean we can’t jazz it up a bit! Here’s what you’ll need:

  • 1 can (20 oz) crushed pineapple, with juice: The star of the show! This adds moisture and sweetness.
  • 1 box (15.25 oz) white cake mix: This is what makes it a dump cake. You can use yellow cake mix for a richer flavor.
  • 1/2 cup salted butter, melted: Adds richness and helps create that golden crust.
  • 1/2 cup brown sugar: A little extra sweetness that complements the pineapple beautifully.

How to Make Pineapple Dump Cake

Ready to bring this pineapple delight to life? Let’s get cooking! Follow these simple steps:

  1. Preheat your oven to 350°F (175°C). Grease a 9×13-inch baking dish lightly.
  2. Pour the crushed pineapple with juice into the prepared dish and spread it evenly.
  3. Sprinkle brown sugar over the pineapple without stirring. This will create a delicious caramelized layer as it bakes.
  4. Evenly sprinkle the dry cake mix over the top. No mixing is needed—just let it do its thing!
  5. Drizzle the melted butter over the cake mix as evenly as possible. This will help create a golden crust.
  6. Bake for 1 hour, until the top is golden and the edges are bubbly.
  7. Let cool for 10-15 minutes before serving. You can serve it warm with ice cream for that extra touch of magic!

Pro Tips for the Best Pineapple Dump Cake

Side angle of a pineapple dump cake topped with a shiny glaze, revealing its layers.
  • Maximize Flavor: Try adding a teaspoon of vanilla extract or almond extract to elevate the flavor profile.
  • Fruit Options: Experiment with other fruits like peaches or cherries for a twist on classic flavor.
  • Layer It Up: For a more decadent version, layer in some shredded coconut or chopped nuts.
  • Don’t Skip the Juice: Be sure to include the juice from the pineapple—it’s what keeps the cake moist!
  • Watch the Baking Time: Every oven is different; keep an eye on your cake to avoid over-baking.
  • Serve Warm: This cake is best enjoyed warm right out of the oven, especially with a scoop of vanilla ice cream!
  • Make It Ahead: You can prepare this cake a day in advance—just reheat it in the oven before serving.
  • Storage Tips: Store leftovers in an airtight container in the fridge for up to 5 days.

Common Mistakes and Troubleshooting

Even the best of us have kitchen mishaps. Here are some common mistakes to avoid and how to fix them:

  • Overmixing the Cake Mix: This can lead to a dense cake. Just sprinkle it over the pineapple without stirring!
  • Not Enough Moisture: If the cake seems dry, ensure you’re using the juice from the pineapple.
  • Burnt Edges: If you notice the edges browning too quickly, cover the dish with foil during the last 15 minutes of baking.
  • Missing Flavor: Don’t forget to incorporate spices like cinnamon or nutmeg for added depth.

Delicious Variations to Try

Feeling adventurous? Here are some variations to keep your pineapple dump cake exciting:

  • Pineapple and Coconut: Add shredded coconut to the pineapple layer for a tropical twist.
  • Chocolate Chip Delight: Sprinkle chocolate chips on top of the cake mix for a rich, indulgent treat.
  • Berry Blast: Mix in some fresh blueberries or strawberries for a fruity flavor explosion.
  • Nutty Crunch: Add chopped pecans or walnuts for a delightful crunch in every bite.

Storage and Make-Ahead Instructions

This cake is not only easy to make, but it also stores well! Here’s how to keep it fresh:

  • Room Temperature: Store covered at room temperature for up to 2 days.
  • Refrigeration: For longer storage, keep it in an airtight container in the fridge for up to 5 days.
  • Freezing: You can freeze the cake for up to 3 months. Just ensure it’s well-wrapped to prevent freezer burn.
  • Reheating: To serve leftovers, reheat in the oven at 350°F until warmed through or microwave individual slices.

FAQs about Pineapple Dump Cake

Got questions? I’ve got answers! Here are some frequently asked questions about this delightful dessert:

  • Can I use fresh pineapple instead of canned? Yes! Just be sure to add a bit of extra juice to keep it moist.
  • Is this recipe gluten-free? You can easily use a gluten-free cake mix to make this dessert gluten-free.
  • How do I make it vegan? Substitute the butter with a plant-based alternative and use a vegan cake mix.
  • Can I make this cake in a different pan? Absolutely! Just adjust the baking time as necessary for different sizes.
  • What can I serve with this cake? It pairs beautifully with vanilla ice cream, whipped cream, or fresh fruit.
  • Can I double the recipe? Yes! Just use a larger pan and keep an eye on the baking time.
  • What if I don’t have brown sugar? You can substitute with white sugar or a combination of white sugar and a bit of molasses.
  • How should I store leftovers? Store in an airtight container in the fridge or at room temperature for a day.

Nutrition Tips and Dietary Adaptations

This cake is a treat, but if you’re watching your diet, here are some tips:

  • Lower Sugar Options: Use a sugar-free cake mix and reduce the brown sugar to lower the overall sugar content.
  • Healthier Fats: Substitute the butter with unsweetened applesauce or Greek yogurt for a lighter version.
  • Portion Control: Serve in small portions to enjoy the flavors without overindulging.

Equipment Recommendations

To make this recipe, you’ll need:

  • 9×13-inch baking dish: The perfect size for this dump cake.
  • Mixing bowl: For combining your ingredients.
  • Measuring cups: Accurate measurements lead to delicious results!

Serving Suggestions

Once your cake is baked and cooled, it’s time to serve! Here are some suggestions:

  • Serve Warm: This cake is best enjoyed warm, straight from the oven.
  • Pair with Ice Cream: A scoop of vanilla ice cream adds a delightful creaminess to the warm cake.
  • Top with Whipped Cream: For a lighter option, a dollop of whipped cream is a perfect finish.
  • Garnish with Fresh Fruit: A few slices of fresh pineapple or berries add a beautiful touch.

So there you have it—your ultimate guide to making the most delightful pineapple dump cake! With its comforting flavors and simple preparation, it’s sure to become your new favorite dessert. Remember, cooking is all about having fun and making memories, so don’t hesitate to put your twist on this recipe. Happy baking, and may your kitchen be filled with love and laughter!

Easy Pineapple Dump Cake

Prep Time 10 minutes
Cook Time 1 hour
Total Time 1 hour 10 minutes
Servings 8 pieces
Calories 350
A simple and delicious dessert combining pineapple, cake mix, and butter for a quick treat.

Ingredients

Canned Goods

  • 1 can crushed pineapple, with juice

Baking Mix

  • 1 box white cake mix

Dairy & Fats

  • 1/2 cup salted butter, melted

Sweeteners

  • 1/2 cup brown sugar

Instructions 

  • Preheat oven to 350°F (175°C). Grease a 9×13-inch dish.
  • Spread pineapple with juice in the dish. Sprinkle brown sugar over it.
  • Top with dry cake mix evenly. Drizzle melted butter over the top.
  • Bake for 60 minutes until golden and bubbly. Cool slightly before serving.

Notes

This dessert is best served warm with a scoop of ice cream.
Calories: 350kcal
Cost: $10
Course: Dessert
Cuisine: American
Keyword: pineapple

Why You’ll Love This Recipe

If you’re searching for a dinner recipe that combines ease, flavor, and nutrition, look no further than the heavenly Honey Garlic Glazed Salmon Bowls. These bowls are more than just a meal; they are an experience—a delicious dance of sweet and savory flavors that will have you dreaming of them long after the last bite. Imagine perfectly seared salmon, coated in a glossy honey garlic sauce that caramelizes beautifully, served over fluffy rice and vibrant vegetables. It’s a bowl of comfort that’s quick enough for a busy weeknight but impressive enough to serve at a dinner party.

Plus, salmon is a powerhouse of nutrients, packed with omega-3 fatty acids that are great for your heart and brain. The honey garlic sauce adds a delightful sweetness, while the veggies are a colorful, crunchy addition that contributes to a well-rounded meal. This recipe is flexible, inviting you to personalize it with your favorite toppings. Ready to dive in? Let’s get cooking!

Ingredients You’ll Need

Here’s what you’ll need to whip up these delightful salmon bowls:

  • 4 salmon fillets (skin on or off, whichever you prefer)
  • 2 tablespoons olive oil or butter
  • 3 tablespoons honey
  • 3 cloves garlic, minced
  • 2 tablespoons soy sauce (or tamari for a gluten-free option)
  • 1 tablespoon lemon juice (or rice vinegar for a different twist)
  • 1 teaspoon cornstarch + 1 tablespoon water (optional, for thickening)
  • 3 cups cooked rice (white, jasmine, or brown—your choice!)
  • Optional bowl toppings:
  • sliced cucumber
  • shredded carrots
  • avocado
  • green onions
  • sesame seeds
  • edamame

How to Make Honey Garlic Glazed Salmon Bowls

Eye-level view of a salmon bowl with honey garlic glaze, topped with vegetables and served on a textured plate.

Now that you have your ingredients ready, let’s jump into the cooking process! Follow these steps to create your own flavor-packed bowls:

Step 1: Make the Sauce

In a small bowl, whisk together the honey, soy sauce, minced garlic, and lemon juice. This simple mixture is the star of the dish, bringing a sweet and savory punch that perfectly complements the salmon. Set this sauce aside—your kitchen is soon going to smell heavenly!

Step 2: Sear the Salmon

Heat the olive oil or butter in a skillet over medium-high heat. While it’s heating, season the salmon fillets lightly with salt and pepper. Place the salmon in the pan, skin-side down first (if you’re using skin-on fillets), and cook for about 3–4 minutes on each side until golden brown and mostly cooked through. This step is crucial for achieving that perfect sear that adds depth to the flavor.

Step 3: Add the Sauce

Once the salmon is beautifully seared, reduce the heat to medium and pour the honey garlic sauce directly into the skillet. Allow it to bubble and thicken while spooning the sauce over the salmon as it cooks. If you prefer a thicker sauce, mix the cornstarch with water to create a slurry, and add it to the pan. Stir until the sauce becomes glossy and sticky—this is where the magic happens!

Step 4: Prepare the Bowls

While your salmon is finishing up, it’s time to prepare the bowls. Divide the warm cooked rice among your serving bowls. Arrange your choice of veggies—think crunchy cucumber, vibrant carrots, and creamy avocado—around the rice. This adds not only flavor but also a beautiful color contrast to your dish.

Step 5: Top with Salmon

Place a glazed salmon fillet on top of each bowl of rice and veggies. Drizzle any remaining honey garlic sauce over everything for an extra flavor boost. Don’t be shy—this is where the goodness lies!

Step 6: Finish & Serve

Garnish your bowls with sesame seeds or sliced green onions for a pop of freshness and crunch. And just like that, your delicious, nourishing bowls are ready to be enjoyed. Dig in and savor every bite!

Tips for Perfect Bowls

Here are some practical tips to ensure your Honey Garlic Glazed Salmon Bowls turn out perfectly:

  • Fresh Salmon is Key: Whenever possible, opt for fresh salmon instead of frozen. It often has a better texture and flavor, but if frozen is all you have, that works too!
  • Don’t Overcook the Salmon: Keep an eye on your salmon while it cooks. It should flake easily with a fork but remain moist and tender inside.
  • Customize Your Sauce: Feel free to adjust the sweetness or saltiness of the sauce to your liking. If you prefer a spicier kick, add a dash of red pepper flakes or sriracha.
  • Meal Prep Friendly: This recipe is great for meal prep! Cook extra salmon and rice, and pack them with veggies for quick lunches throughout the week.

Variations and Substitutions

One of the best things about this recipe is its versatility! Here are some ideas to mix things up:

  • Protein Swap: Not a fan of salmon? Try chicken, shrimp, or tofu! Just adjust the cooking time accordingly.
  • Grain Options: If rice isn’t your thing, consider quinoa, farro, or even cauliflower rice for a low-carb option.
  • Vegetable Medley: Use whatever vegetables you have on hand! Bell peppers, broccoli, or snap peas would all be fantastic additions.

Storage and Freezing

If you have leftovers (which might be unlikely because they’re so good!), store the salmon bowls in an airtight container in the refrigerator for up to 3 days. To reheat, warm gently in the microwave or on the stovetop over low heat until heated through. If you plan to freeze the salmon, I recommend freezing the cooked salmon separately from the rice and veggies to maintain texture. When ready to eat, thaw in the fridge overnight and reheat as desired.

Frequently Asked Questions

Can I use frozen salmon?
Yes! Just thaw it in the fridge overnight before cooking. You’ll want to pat it dry to ensure a nice sear.

What can I substitute for soy sauce?
Tamari is an excellent gluten-free option, or you can use coconut aminos for a lighter flavor.

How can I make this recipe spicy?
Add some sriracha or chili paste to the sauce, or sprinkle red pepper flakes over the finished bowls for a kick!

Troubleshooting Common Issues

If things don’t go as planned, don’t worry! Here are some common issues and how to fix them:

  • Salmon Sticking to the Pan: Make sure your skillet is adequately preheated and that you’re using enough oil or butter. If it’s still sticking, let it cook a bit longer before trying to flip.
  • Sauce Too Thin: If your sauce isn’t thickening, make sure you’ve added the cornstarch slurry and give it a few minutes to bubble. If it’s still not thickening, try adding a bit more cornstarch mixed with water.

Ready to Create Your Own Bowl?

Now that you have all the tools and knowledge to craft your Honey Garlic Glazed Salmon Bowls, I can’t wait for you to give it a try! This recipe is not just about the delicious flavors; it’s about the joy of cooking and sharing a meal that feels like a warm hug. Whether you’re making it for yourself, your family, or friends, I hope it brings a smile to your face and warmth to your heart. If you try this recipe, I’d love to hear how it turns out! Did you add your special twist? Don’t forget to save this recipe for later and share the love on social media. Happy cooking!

Honey Garlic Glazed Salmon Bowls

Prep Time 10 minutes
Cook Time 15 minutes
Total Time 25 minutes
Servings 4 servings
Calories 520
Enjoy a flavorful and healthy bowl featuring tender salmon glazed with honey garlic sauce, served over rice with fresh vegetables.

Ingredients

Salmon

  • 4 fillets salmon fillets (skin on or off)
  • 2 tablespoons olive oil or butter
  • 3 tablespoons honey
  • 3 cloves garlic, minced
  • 2 tablespoons soy sauce (or tamari)
  • 1 tablespoon lemon juice (or rice vinegar)
  • 1 teaspoon cornstarch + 1 tablespoon water (optional, for thickening) (for thickening)
  • 3 cups cooked rice (white, jasmine, or brown)
  • optional toppings sliced cucumber, shredded carrots, avocado, green onions, sesame seeds, edamame (for garnish and toppings)

Instructions 

  • Whisk honey, soy sauce, garlic, and lemon juice to make the sauce. Set aside.
  • Heat oil in a skillet over medium-high heat. Season salmon lightly, then cook 3-4 minutes per side until golden.
  • Pour sauce into skillet, simmer until thickened. Add cornstarch slurry if desired for extra thickness.
  • Divide rice into bowls, arrange vegetables around rice, then top with salmon and drizzle with sauce.
  • Garnish with sesame seeds or green onions. Serve immediately and enjoy!

Notes

Use fresh salmon for best flavor. Adjust toppings to your preference.
Calories: 520kcal
Cost: $15
Course: Main Course
Cuisine: fusion
Keyword: Salmon

Loved this recipe? Save it to your favorite Pinterest board so you can easily find it later! It’s the perfect way to keep all your sweet ideas in one place. ✨

Delicious honey garlic glazed salmon served over cooked rice, garnished with fresh cucumbers and greens.