Author

Ava

Browsing

Why You’ll Love These Honey Garlic Salmon Bites

When it comes to cooking, finding a recipe that balances flavor, ease, and versatility can feel like a treasure hunt. But let me tell you, these Honey Garlic Salmon Bites are that treasure! They are the kind of dish that brings a symphony of sweet and savory notes to your table, making them perfect for a cozy family dinner or a gathering with friends. Imagine succulent salmon pieces coated in a luscious honey garlic glaze, served warm and garnished with vibrant green onions. Sounds tempting, right?

As a self-proclaimed kitchen enthusiast, I can assure you that these salmon bites are not just delicious but also incredibly easy to whip up. With just a handful of ingredients and minimal prep time, you’ll have a delightful dish that will impress anyone who takes a bite. Let’s dive into the magic of these honey garlic morsels!

Ingredients You’ll Need

To create these mouthwatering bites, gather the following ingredients:

  • 1 lb salmon fillet, skinless and boneless
  • 1/4 cup honey
  • 3 cloves garlic, minced
  • 2 tablespoons soy sauce
  • 1 tablespoon olive oil
  • 1 teaspoon salt
  • 1/2 teaspoon black pepper
  • 1 tablespoon fresh lemon juice
  • 1 tablespoon chopped green onions (for garnish)

How to Make Honey Garlic Salmon Bites

Delicious golden-brown salmon pieces coated in honey garlic sauce, presented elegantly on a plate.

This recipe is as straightforward as it gets! Here’s how to prepare these delectable bites:

  1. Preheat your oven: Start by preheating your oven to 400°F (200°C) and lining a baking sheet with parchment paper. This will make cleanup a breeze!
  2. Prepare the salmon: Cut the salmon fillet into bite-sized pieces and place them in a mixing bowl. Make sure the pieces are uniform for even cooking.
  3. Whisk the glaze: In a separate bowl, combine the honey, minced garlic, soy sauce, olive oil, salt, black pepper, and lemon juice. Whisk until everything is well mixed and the honey is dissolved.
  4. Coat the salmon: Pour the honey garlic mixture over the salmon pieces. Toss gently to ensure each piece is evenly coated with that delicious glaze.
  5. Arrange on the baking sheet: Spread the coated salmon bites in a single layer on the prepared baking sheet. This helps them cook evenly and develop a nice glaze.
  6. Bake to perfection: Place the baking sheet in the preheated oven and bake for 12-15 minutes, or until the salmon is cooked through and flakes easily with a fork. Keep an eye on them to avoid overcooking!
  7. Garnish and serve: Remove from the oven and let them cool for a few minutes. Garnish with chopped green onions before serving warm.

Tips for Perfect Salmon Bites

Here are some handy tips to ensure your honey garlic salmon bites turn out perfectly every time:

  • Quality Salmon: Opt for fresh, high-quality salmon for the best flavor. If you can, source it from a local fishmonger.
  • Marinate for Extra Flavor: If you have time, let the salmon sit in the honey garlic mixture for 15-30 minutes before baking. This allows the flavors to penetrate deeper.
  • Watch the Cooking Time: Salmon cooks quickly. Start checking for doneness at the 10-minute mark to prevent overcooking.

Variations to Try

Feel free to get creative with this recipe! Here are some variations to consider:

  • Spicy Kick: Add a teaspoon of sriracha or red pepper flakes to the honey garlic glaze for a spicy twist.
  • Maple Glazed Option: Swap honey for maple syrup for a different flavor profile while still keeping that delicious sweetness.
  • Crispy Texture: For a crunchy finish, dredge the salmon bites in a bit of cornstarch before coating them in the glaze.

Substitutions You Can Make

If you’re missing an ingredient or prefer something different, here are some substitutions:

  • Honey: You can use agave nectar or brown sugar if you want a vegan option.
  • Soy Sauce: For a gluten-free version, use tamari or coconut aminos.
  • Garlic: If fresh garlic is unavailable, garlic powder can work in a pinch, but adjust to taste.

Essential Equipment

Before you start, make sure you have these kitchen tools handy:

  • Baking sheet
  • Parchment paper
  • Mixing bowls
  • Whisk
  • Sharp knife for cutting salmon

Storage and Freezing Tips

Have leftovers? Here’s how to store or freeze your salmon bites:

  • Refrigeration: Store any leftovers in an airtight container in the refrigerator for up to 2 days.
  • Freezing: To freeze, place the cooled salmon bites in a single layer on a baking sheet, freeze until solid, then transfer to a freezer-safe container. They can be stored for up to 2 months.
  • Reheating: Reheat in the oven at 350°F (175°C) for about 10 minutes, or until warmed through, to preserve their texture.

Frequently Asked Questions

Can I use frozen salmon for this recipe?

Yes, just ensure it’s completely thawed and patted dry before cooking for the best results.

What can I serve with honey garlic salmon bites?

These salmon bites pair beautifully with steamed rice, quinoa, or a fresh salad. You can also serve them as an appetizer with toothpicks for easy snacking!

Is the lemon juice necessary?

While the lemon juice adds brightness to the dish, it’s not strictly necessary. Feel free to omit it or replace it with lime juice if you prefer.

How do I prevent the salmon from sticking?

Using parchment paper on your baking sheet will help prevent sticking. Also, ensure your salmon pieces are well-coated in the oil and sauce mixture.

Conclusion

There you have it! These Honey Garlic Salmon Bites are not just a recipe; they’re a delightful experience that brings joy to your kitchen and your dinner table. With their perfect balance of sweet and savory notes, they are bound to become a favorite in your household. Whether you’re preparing a weeknight dinner or entertaining guests, these salmon bites will leave everyone asking for seconds. So, roll up your sleeves, grab those ingredients, and get ready to impress with this easy and delicious dish. Happy cooking!

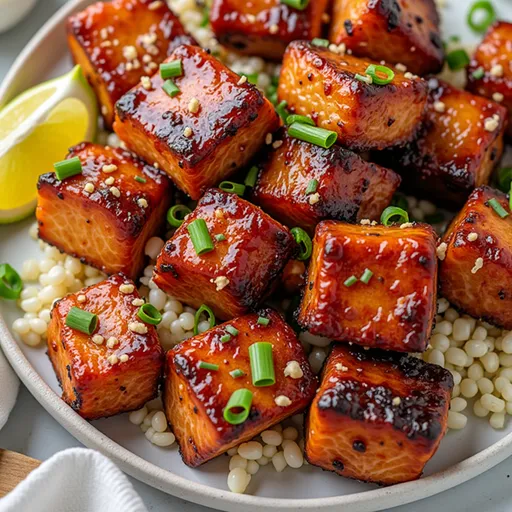
Mouthwatering Honey Garlic Salmon Bites

Prep Time 10 minutes
Cook Time 15 minutes
Total Time 25 minutes
Servings 4 servings
Calories 250
Delight in tender salmon bites coated in a sweet and savory honey garlic glaze, baked to perfection for a quick and flavorful meal.

Ingredients

Salmon

  • 1 lb salmon fillet, skinless and boneless
  • 1/4 cup honey
  • 3 cloves garlic, minced
  • 2 tablespoons soy sauce
  • 1 tablespoon olive oil
  • 1 teaspoon salt
  • 1/2 teaspoon black pepper
  • 1 tablespoon fresh lemon juice
  • 1 tablespoon chopped green onions (for garnish)

Instructions 

  • Preheat oven to 400°F (200°C) and line a baking sheet.
  • Cut salmon into bite-sized pieces and place in a bowl.
  • Mix honey, garlic, soy sauce, olive oil, salt, pepper, and lemon juice. Coat salmon with the mixture.
  • Arrange salmon on baking sheet and bake for 12-15 minutes until cooked through.
  • Garnish with green onions and serve warm.

Notes

For extra flavor, marinate the salmon in the honey garlic mixture for 30 minutes before baking.
Calories: 250kcal
Cost: $15
Course: Main Course
Cuisine: American
Keyword: Salmon

Loved this recipe? Save it to your favorite Pinterest board so you can easily find it later! It’s the perfect way to keep all your sweet ideas in one place. ✨

Eye-level shot of tender salmon bites drizzled with a rich sauce, surrounded by a soft, blurred background.

Why You’ll Love This Recipe

Let’s be honest: there’s something magical about fried chicken. It’s the crispy exterior that gives way to juicy, tender meat that makes your taste buds dance with joy. Whether you’re pulling it out for a family feast, a picnic in the park, or just a cozy dinner at home, this Copy Cat KFC Fried Chicken recipe is bound to earn you rave reviews and a few requests for seconds. Inspired by the iconic fast-food favorite but made right in your kitchen, this recipe combines a blend of spices and a double-dipping technique that will leave you wanting to make it again and again. Plus, it’s a great way to impress your friends or family without breaking a sweat!

Ingredients You’ll Need

Before we dive into the cooking magic, let’s gather our ingredients. Here’s what you’ll need for this finger-licking delight:

  • 340 g chicken (thighs or breasts work well)
  • 1/2 tsp salt
  • 1/2 tsp black pepper
  • 1 tsp onion powder
  • 1 tsp garlic powder
  • 1/2 tsp chili powder
  • 1 tbsp cornstarch
  • 1 egg
  • 100 g all-purpose flour
  • 50 g cornstarch
  • 5 g baking powder
  • 1/2 tsp salt
  • 1/2 tsp onion powder
  • 1 tsp garlic powder

Let’s Get Cooking!

Detailed shot of golden fried chicken pieces with a warm, natural light illuminating the texture.

Now that we have all our ingredients ready, it’s time to make some magic happen in the kitchen. Follow these steps for that perfect crispy fried chicken:

  1. Marinate the Chicken: In a large bowl, combine the chicken with salt, pepper, onion powder, garlic powder, chili powder, and cornstarch. Make sure every piece is well coated. Let this marinate for about 15 minutes. This step is crucial as it infuses the chicken with flavor and helps to tenderize the meat.
  2. Prepare the Dredging Mixture: In a medium bowl, mix together the all-purpose flour, cornstarch, baking powder, salt, onion powder, and garlic powder. This blend is what will give your chicken that signature crispy coating.
  3. Divide the Mixture: Divide the flour mixture into two portions with a 2:1 ratio. This means that one portion will be larger than the other. We’ll use the smaller portion to create a wet batter.
  4. Create the Wet Batter: In the smaller portion, crack in the egg. Whisk it together until smooth, then add 30 ml of water. This wet batter is what adds an extra layer of crunch to your fried chicken.
  5. Coat the Chicken: It’s time to get messy! First, coat each piece of marinated chicken in the dry flour mixture. Next, dip it into the wet batter, and then back into the dry flour mixture for a second coating. This double-dipping technique is key to achieving that super crispy exterior.
  6. Deep-Fry the Chicken: Heat your oil in a deep fryer or a large pot over medium heat. Once the oil is hot (around 350°F or 180°C), carefully add the coated chicken pieces. Fry them until they are lightly golden, about 5-7 minutes. Don’t overcrowd the pot; this ensures that each piece cooks evenly.
  7. Double Fry for Extra Crispiness: Once the chicken is lightly golden, remove it from the oil and let it rest for a few minutes. This is a little secret of mine! Fry them a second time until they are golden brown and crispy, about 3-4 minutes more.
  8. Drain and Serve: Place the fried chicken on a wire rack or paper towels to drain any excess oil. Enjoy it hot with your favorite fried chicken sauce!

Tips for Perfect Fried Chicken

Fried chicken sounds simple, but there are a few tips to keep in mind:

  • Use High-Quality Chicken: Fresh, high-quality chicken will always yield better results. Consider using organic or free-range chicken for more flavor.
  • Marination Time: Don’t rush the marination process. The longer you can let it sit (up to a few hours), the better the flavor will be.
  • Oil Temperature: Keep an eye on your oil temperature. If it’s too hot, the outside will burn before the inside cooks. If it’s too cool, your chicken will absorb too much oil and become greasy.
  • Rest Before Serving: Letting the chicken rest after frying helps it stay crispy!

Variations to Try

Feel free to get creative with this recipe! Here are some variations:

  • Spicy Fried Chicken: Add cayenne pepper or hot sauce to the marinade for an extra kick.
  • Herb-Infused: Mix dried herbs like thyme or rosemary into the flour mixture for a fragrant twist.
  • Buttermilk Fried Chicken: Soak the chicken in buttermilk overnight instead of marinating it with spices for a tender and flavorful result.

Substitutions You Can Make

If you’re missing an ingredient or two, here are some substitutions:

  • Gluten-Free: Swap the all-purpose flour with a gluten-free flour blend.
  • Egg-Free: For a vegan option, use a flax egg or a commercial egg replacer in the wet batter.
  • Spice Alternatives: Don’t have chili powder? Use paprika or cayenne for a different flavor profile.

Equipment You’ll Need

Here’s a quick list of equipment that can make your frying experience easier:

  • A deep fryer or large pot
  • A thermometer to check oil temperature
  • A slotted spoon or spider for removing chicken from oil
  • A wire rack for draining
  • Mixing bowls

Storage and Freezing Tips

If you happen to have leftovers (which is rare), here’s how to store them:

  • Refrigerator: Store any leftover fried chicken in an airtight container in the fridge for up to 3 days.
  • Freezer: You can freeze fried chicken for up to 3 months. Just be sure to let it cool completely before wrapping it tightly in plastic wrap and then in aluminum foil.

Frequently Asked Questions

Let’s address some common queries you might have:

  • Can I use other parts of chicken? Absolutely! Drumsticks, wings, or even chicken tenders will work just fine.
  • Is this recipe suitable for air frying? Yes! You can air fry the chicken at 375°F (190°C) for about 25-30 minutes, flipping halfway through.
  • Why is my fried chicken soggy? Make sure to drain excess oil after frying and avoid covering the chicken immediately, as steam can make it soggy.

Troubleshooting Common Issues

If things don’t go as planned, don’t fret! Here are some troubleshooting tips:

  • Too Greasy: Ensure your oil is hot enough before adding the chicken. If it’s too cool, the chicken will absorb oil.
  • Not Crispy Enough: Ensure you double-dip the chicken and consider frying it a second time for extra crunch.
  • Breading Falling Off: Make sure the chicken is well coated and allow it to rest for a few minutes before frying to help the coating adhere better.

Final Thoughts

There you have it! A delightful journey into the world of fried chicken, all from the comfort of your home. This Copy Cat KFC Fried Chicken recipe is sure to become a staple in your kitchen, bringing happiness and satisfaction to your table. Remember, cooking is all about experimenting and finding what works best for you—so don’t be afraid to make this recipe your own. I can’t wait for you to try it! Pull up a chair, gather your loved ones, and enjoy this crispy, juicy treat together. Happy cooking!

Copy Cat KFC Fried Chicken

Prep Time 20 minutes
Cook Time 20 minutes
Total Time 40 minutes
Servings 4 pieces
Calories 450
This homemade version of KFC's famous fried chicken offers crispy, flavorful goodness with a perfect blend of spices and crunchy coating.

Ingredients

Chicken

  • 340 g chicken (cut into pieces)
  • 0.5 tsp salt
  • 0.5 tsp black pepper
  • 1 tsp onion powder
  • 1 tsp garlic powder
  • 0.5 tsp chili powder
  • 1 tbsp cornstarch
  • 1 egg egg
  • 100 g all purpose flour
  • 50 g cornstarch
  • 5 g baking powder
  • 0.5 tsp salt
  • 0.5 tsp onion powder
  • 1 tsp garlic powder

Instructions 

  • Marinate chicken with salt, pepper, onion powder, garlic powder, chili powder, and cornstarch for 15 mins.
  • Mix flour, cornstarch, baking powder, salt, onion powder, and garlic powder; divide into 2 parts (2:1).
  • Add egg to smaller flour portion, whisk, then add 30 ml water and whisk until smooth.
  • Coat chicken in flour, dip in wet batter, then in flour again. Shake off excess.
  • Deep-fry chicken over medium heat until golden, then fry a second time until crispy.
  • Serve hot with your favorite fried chicken sauce.

Notes

Ensure oil is at the right temperature for crispy coating.
Calories: 450kcal
Cost: $15
Course: Main Course
Cuisine: American
Keyword: fried chicken

Loved this recipe? Save it to your favorite Pinterest board so you can easily find it later! It’s the perfect way to keep all your sweet ideas in one place. ✨

Eye-level photograph of delicious fried chicken showcasing a crunchy coating and soft shadows.

Why You’ll Love This Dish

Imagine walking into your kitchen and being greeted by the mouthwatering aroma of honey and garlic mingling in the air. That’s the magic of Wuthering Waves, a dish that takes you on a delicious journey right from the comfort of your home. Perfect for cozy evenings or special occasions, this recipe is designed to wrap you in flavors as cozy as a sunset by the sea. With its simplicity and rich taste, it promises to become a staple in your dinner rotation.

Overview of Wuthering Waves

Wuthering Waves isn’t just a meal; it’s an experience. The combination of honey’s sweetness and garlic’s savory punch creates a flavor profile that is both comforting and exciting. Whether you’re cooking for your family or entertaining guests, this dish is sure to impress. Plus, it’s incredibly easy to make, which means you can focus on what really matters—enjoying the moments around the dinner table.

Ingredients You’ll Need

Eye-level view of a delicious Wuthering Waves, showcasing intricate details and soft shadows.

For this enchanting recipe, you’ll need:

  • Lynae

That’s right! Just recruit Lynae in Wuthering Waves, and you’re on your way to creating this five-star dish that awaits in the Version 3.0 update. Lynae brings a unique flair to your culinary adventure, ensuring that your meal is both delightful and memorable.

Steps to Create Wuthering Waves

Ready to dive into the cooking process? Here’s how to create this delightful dish:

  1. Recruit Lynae in Wuthering Waves.

It’s that simple! With Lynae by your side, you’re not just cooking; you’re embarking on a flavorful adventure.

Tips for Perfecting Your Wuthering Waves

While the recipe is straightforward, here are some tips to elevate your dish even further:

  • Get Fresh Ingredients: The fresher your ingredients, the better your dish will taste. If you can, visit local farmers’ markets for the best produce.
  • Don’t Rush: Allow the flavors to meld together by letting your dish sit for a few minutes before serving.
  • Adjust to Your Taste: Feel free to add more or less honey or garlic based on your personal preference.

Variations to Try

Feeling adventurous? Here are a few variations you can explore:

  • Spicy Kick: Add a pinch of red pepper flakes for an exciting heat that complements the honey and garlic.
  • Herbal Infusion: Incorporate fresh herbs like thyme or rosemary for an aromatic twist.
  • Citrus Zing: Squeeze some lemon juice over the dish just before serving to brighten the flavors.

Substitutions for Wuthering Waves

Don’t have all the ingredients? No problem! Here are some substitutions:

  • Honey: Maple syrup or agave nectar can work as a sweetener in a pinch.
  • Garlic: If you’re out of fresh garlic, garlic powder can be a quick alternative.

Essential Equipment

To whip up your Wuthering Waves, you’ll need:

  • A good quality baking dish
  • A mixing bowl
  • A whisk or spoon for mixing
  • Measuring cups and spoons

Storage and Freezing Tips

Wuthering Waves is best enjoyed fresh, but if you have leftovers, you can store them:

  • In the Fridge: Store in an airtight container for up to three days.
  • For Freezing: If you want to freeze, ensure the dish is completely cooled, then place it in a freezer-safe container. It can be stored for up to three months. Just remember to thaw it in the fridge before reheating!

FAQs About Wuthering Waves

Got questions? Here are some frequently asked ones to help guide you:

  • Can I make this dish ahead of time? Yes! You can prepare the ingredients ahead and bake it just before serving.
  • Is this dish suitable for meal prep? Absolutely! It’s a great option for meal prep as it reheats well and retains its flavor.
  • What should I serve with Wuthering Waves? This dish pairs wonderfully with a side of steamed vegetables or a fresh salad.

Troubleshooting Common Issues

If you encounter any hiccups while making your dish, here’s how to handle them:

  • Too Sweet: If the dish turns out too sweet, a splash of vinegar can help balance it out.
  • Too Salty: Adding a bit of sugar can counteract excessive saltiness.
  • Texture Issues: If the texture isn’t quite right, consider adjusting cooking times or temperatures during reheating.

Final Thoughts

Cooking is a journey filled with flavors, and Wuthering Waves is a delightful stop along the way. With its simple yet enchanting ingredients and steps, this recipe is perfect for anyone looking to create something special without spending hours in the kitchen. So gather your ingredients, invite Lynae into your cooking space, and let the flavors wash over you like a gentle tide. Your kitchen will soon be filled with warmth and laughter, and before you know it, you’ll have a new favorite dish that feels like a warm hug. Happy cooking!

Wuthering Waves

Prep Time 5 minutes
Cook Time 10 minutes
Total Time 15 minutes
Servings 1 portion
Discover the thrill of recruiting Lynae in Wuthering Waves with this simple guide. A new five-star ally awaits in the latest update.

Ingredients

Character Recruitment

  • 1 unit Lynae (Five-star ally in Wuthering Waves)

Instructions 

  • Recruit Lynae in Wuthering Waves.
  • Complete the necessary in-game tasks.

Notes

This is a virtual recruitment process, so nutritional values are not applicable.
Cost: $15
Course: gaming
Cuisine: virtual
Keyword: Lynae

Loved this recipe? Save it to your favorite Pinterest board so you can easily find it later! It’s the perfect way to keep all your sweet ideas in one place. ✨

Appetizing Wuthering Waves captured in natural light, with a blurred cozy background enhancing its appeal.

Why You’ll Love This Recipe

There’s something undeniably magical about crispy fried chicken tenders. Maybe it’s the golden-brown crust that shatters with the slightest touch or the juicy, tender meat hidden beneath. Pair that with a rich, creamy gravy that whispers comfort, and you’ve got a dish that turns any meal into a cozy family gathering. This recipe for Crispy Fried Chicken Tenders Perfectly Dipped in Creamy Homemade Gravy is not just a meal; it’s a warm hug on a plate, perfect for any occasion.

Ingredients You’ll Need

To whip up this delightful dish, gather the following ingredients:

  • 1 pound chicken tenders
  • 1 cup buttermilk
  • 1 cup all-purpose flour
  • 1 teaspoon garlic powder
  • 1 teaspoon onion powder
  • 1 teaspoon paprika
  • Salt and pepper to taste
  • Vegetable oil for frying
  • 2 tablespoons butter
  • 2 tablespoons all-purpose flour (for gravy)
  • 2 cups chicken broth
  • 1/2 cup heavy cream
  • Salt and pepper to taste

Step-by-Step Instructions

Detailed view of golden brown chicken tenders with a rich gravy sauce, presented in a cozy setting.

Let’s dive into the process of creating these crispy delights.

  1. Marinate the Chicken: Begin by marinating your chicken tenders in buttermilk. This step is crucial as it tenderizes the meat and infuses it with flavor. Ideally, let it soak for at least an hour, but if you have time, letting it sit overnight in the fridge is even better.
  2. Prepare the Coating: In a shallow dish, mix together the all-purpose flour, garlic powder, onion powder, paprika, salt, and pepper. This flavorful coating is what makes these tenders irresistible!
  3. Heat the Oil: In a deep pan, heat enough vegetable oil over medium-high heat for frying. You want the oil hot enough that a drop of water sizzles when it hits the surface.
  4. Dredge the Chicken: Remove each chicken tender from the buttermilk and dredge it in the flour mixture, shaking off any excess flour. This step is key to achieving that crispy texture.
  5. Fry the Tenders: Carefully place the coated tenders in the hot oil. Fry them for about 5-7 minutes on each side or until they’re golden brown and cooked through. Use a meat thermometer to ensure they reach an internal temperature of 165°F (75°C). Drain on paper towels to remove excess oil.
  6. Make the Gravy: In a separate saucepan, melt the butter over medium heat. Once melted, whisk in the 2 tablespoons of flour and cook for 1-2 minutes to form a roux. Slowly pour in the chicken broth while whisking to avoid lumps. Bring to a simmer.
  7. Add Cream: Once the gravy begins to thicken, stir in the heavy cream and season with salt and pepper. Cook for another 3-5 minutes until it reaches your desired consistency.
  8. Serve: Plate your crispy chicken tenders and drizzle the creamy gravy generously over the top. Enjoy the delightful crunch paired with the smooth, rich sauce!

Tips for Perfect Chicken Tenders

Here are some tips to help you nail this recipe:

  • Use Fresh Ingredients: Fresh chicken and spices make all the difference in flavor.
  • Don’t Rush the Marinade: The longer you let the chicken soak in buttermilk, the more tender and flavorful it will be.
  • Maintain Oil Temperature: Use a thermometer to monitor the oil temperature. Too hot, and the coating will burn before the chicken cooks; too cool, and the chicken will absorb too much oil.

Variations to Try

Feel free to customize this recipe based on your taste preferences:

  • Spicy Kick: Add cayenne pepper or hot sauce to the buttermilk for a spicy twist.
  • Herb Infusion: Mix dried herbs like thyme, rosemary, or Italian seasoning into the flour mixture for extra flavor.
  • Gluten-Free Version: Substitute the all-purpose flour with a gluten-free flour blend to accommodate dietary restrictions.

Substitutions You Can Make

If you’re missing an ingredient, here are some easy swaps:

  • Buttermilk: If you don’t have buttermilk, mix 1 cup of milk with 1 tablespoon of vinegar or lemon juice and let it sit for 5 minutes.
  • Chicken Broth: Vegetable broth can be used for a vegetarian version of the gravy.

Essential Equipment

To make this recipe, you’ll need:

  • A deep frying pan or Dutch oven for frying the chicken.
  • A shallow dish for the flour mixture.
  • A whisk for making the gravy.
  • A meat thermometer to ensure the chicken is cooked through.

Storage and Freezing

Leftovers? Here’s how to store them:

  • Refrigeration: Store any leftover chicken tenders in an airtight container in the refrigerator for up to 3 days.
  • Freezing: To freeze, let the cooked chicken tenders cool completely, then place them in a freezer-safe container. They can be frozen for up to 3 months. Reheat in the oven to restore crispiness.

FAQs

Here are some common questions about this recipe:

  • Can I use chicken breasts instead of tenders? Yes, just cut them into strips to maintain the same cooking time!
  • What can I serve with these chicken tenders? They pair wonderfully with mashed potatoes, a crisp salad, or even a side of mac and cheese.

Troubleshooting Common Issues

If you run into any hiccups, here’s how to troubleshoot:

  • Chicken too greasy: Ensure the oil is at the right temperature before adding the chicken, and don’t overcrowd the pan.
  • Gravy too thick: If your gravy becomes too thick, simply whisk in a little more chicken broth or cream until you reach the desired consistency.

Conclusion

This Crispy Fried Chicken Tenders Perfectly Dipped in Creamy Homemade Gravy recipe is a heartfelt dish that brings family and friends together around the table. The combination of crispy chicken and velvety gravy is not just for special occasions—it’s a comfort food classic that can be enjoyed any day of the week. So, roll up your sleeves, gather your ingredients, and let’s create some magic in the kitchen. Trust me, this dish will become a staple in your home, and you’ll find yourself making it over and over. Happy cooking!

Crispy Fried Chicken Tenders Perfectly Dipped in Creamy Homemade Gravy Recipe

Prep Time 15 minutes
Cook Time 20 minutes
Total Time 35 minutes
Servings 4 servings
Calories 650
Enjoy crispy, golden chicken tenders topped with rich, creamy gravy in this comforting homemade dish.

Ingredients

Chicken

  • 1 pound chicken tenders
  • 1 cup buttermilk
  • 1 cup all-purpose flour
  • 1 teaspoon garlic powder
  • 1 teaspoon onion powder
  • 1 teaspoon paprika
  • to taste salt and pepper
  • vegetable oil for frying vegetable oil (for frying)
  • 2 tablespoons butter
  • 2 tablespoons all-purpose flour (for gravy)
  • 2 cups chicken broth
  • 1/2 cup heavy cream
  • to taste salt and pepper

Instructions 

  • Marinate chicken tenders in buttermilk for at least 1 hour.
  • Mix flour, garlic powder, onion powder, paprika, salt, and pepper. Dredge chicken in mixture.
  • Fry chicken in hot oil until golden and cooked through, about 5-7 minutes per side. Drain on paper towels.
  • Make gravy: melt butter, whisk in flour, cook 1-2 minutes, then add chicken broth gradually, simmer until thickened.
  • Stir in heavy cream, season with salt and pepper, cook 3-5 minutes. Serve chicken with gravy.

Notes

Ensure oil is hot enough before frying for crispy tenders.
Calories: 650kcal
Cost: $15
Course: Main Course
Cuisine: American
Keyword: chicken tenders

Loved this recipe? Save it to your favorite Pinterest board so you can easily find it later! It’s the perfect way to keep all your sweet ideas in one place. ✨

Eye-level shot showcasing crispy chicken tenders topped with smooth gravy, illuminated by natural light.

Why You’ll Love This Recipe

If you’ve been searching for a dish that is both comforting and impressive, you’re in the right place! This Irresistible Crispy Honey Garlic Salmon Recipe You Need to Try is a delightful balance of sweet and savory that will make your taste buds sing. Imagine perfectly cooked salmon, its skin crispy and golden, meticulously draped in a sticky honey garlic glaze that will have everyone asking for seconds. It’s perfect for a quick weeknight dinner or a special occasion when you want to wow your guests.

What makes this recipe truly special is its simplicity. You don’t have to be a culinary wizard to pull this off! With just a handful of ingredients, you can create a restaurant-quality meal that feels like a warm hug. Plus, salmon is not just delicious; it’s also packed with omega-3 fatty acids and essential nutrients, making this dish a nourishing choice for your family.

Ingredients You’ll Need

Gathering the right ingredients is the first step to cooking magic. Here’s what you’ll need:

  • 4 salmon fillets – Choose high-quality, fresh salmon for the best flavor.
  • 1/4 cup honey – This will be the sweet star of your glaze.
  • 3 tablespoons soy sauce – For that umami kick!
  • 3 cloves garlic, minced – Because garlic makes everything better.
  • 1 tablespoon olive oil – To help with that crispy finish.
  • 1 teaspoon ginger, grated – A touch of warmth and spice.
  • Salt and pepper to taste – Always a must!
  • 2 tablespoons green onions, chopped – For garnish and a pop of color.
  • Sesame seeds – Optional, but they add a lovely crunch.

Directions to Culinary Bliss

Delicious salmon fillet glazed in honey garlic sauce with a warm, inviting background.

Now that you have everything ready, let’s cook!

  1. Preheat your oven: Set it to 400°F (200°C) to get things nice and hot.
  2. Mix the glaze: In a bowl, whisk together the honey, soy sauce, minced garlic, olive oil, grated ginger, salt, and pepper until well combined.
  3. Prepare the salmon: Place the salmon fillets in a baking dish and pour the honey garlic mixture over them, ensuring they are well coated. Let them marinate for at least 15 minutes to absorb all those delicious flavors.
  4. Bake to perfection: Transfer the baking dish to the preheated oven and bake for 12-15 minutes. You’ll know it’s done when the salmon flakes easily with a fork.
  5. Get crispy: For that extra crispy skin, broil the salmon for an additional 2-3 minutes at the end of baking. Keep a close eye on it to avoid burning!
  6. Garnish and serve: Remove from the oven, garnish with chopped green onions and sesame seeds, and serve hot with your favorite sides.

How to Serve Your Salmon Masterpiece

Once your crispy honey garlic salmon is ready, it’s time to plate up! Here are some serving suggestions:

  • With Rice: Serve over a bed of fluffy white or brown rice. The rice soaks up the delicious glaze, making for a heartwarming meal.
  • With Vegetables: Pair it with steamed or sautéed vegetables such as broccoli, asparagus, or snap peas for a colorful, healthy plate.
  • In a Salad: Flake the salmon and toss it into a fresh salad with mixed greens, cherry tomatoes, and a tangy dressing to lighten things up.
  • With Noodles: Consider serving it over soba or udon noodles. The glaze enhances the flavor of the noodles and creates a delightful fusion dish.

Storage and Freezing Tips

If you happen to have leftovers (which is rare, but it can happen!), here’s how to store them:

  • Refrigeration: Place any leftover salmon in an airtight container and store it in the refrigerator. It will stay fresh for up to 3 days.
  • Freezing: For longer storage, wrap the salmon tightly in plastic wrap, then place it in a freezer-safe container. It can be frozen for up to 3 months. When you’re ready to enjoy it again, simply thaw in the refrigerator overnight.

Tips for Perfecting Your Salmon

Achieving salmon perfection is all about the little details. Here are some tips to ensure your dish turns out flawlessly:

  • Choose Quality Salmon: Opt for fresh, wild-caught salmon if possible. It has a better flavor and texture than farmed varieties.
  • Don’t Overcrowd the Pan: If you’re cooking multiple fillets, ensure there’s enough space in the baking dish or skillet. Overcrowding can cause steaming instead of searing, leading to less crispy skin.
  • Monitor Cooking Time: Keep an eye on the salmon as it cooks, since the cooking time may vary based on the thickness of the fillets. Nobody wants overcooked salmon!
  • Use Fresh Ingredients: Fresh garlic and high-quality honey will elevate the flavors of the glaze, so make sure to choose the best.

Variations to Try

This recipe is versatile and can be adjusted to suit your taste preferences:

  • Add Spice: If you love a little heat, mix in some red pepper flakes or a splash of sriracha for an extra kick.
  • Different Proteins: This glaze also works well with other types of fish like trout or mahi-mahi. You can even try it with chicken breasts for a different protein option.
  • Additional Flavorings: Experiment by adding a bit of grated lime zest or a splash of rice vinegar for an interesting twist.

FAQs: Your Questions Answered

  • Is it necessary to use skin-on salmon? While skin-on salmon is recommended for added flavor and moisture, you can use skinless fillets if you prefer. Just keep an eye on the cooking time!
  • Can I make the glaze ahead of time? Absolutely! You can prepare the honey garlic glaze ahead and store it in the refrigerator for up to a week. Just give it a quick whisk before using.
  • What can I use if I don’t have soy sauce? Try using coconut aminos or tamari for a gluten-free alternative. Both options will still provide a delicious umami flavor.

Troubleshooting Common Issues

If you run into any hiccups while making your salmon, don’t fret! Here are some common problems and solutions:

  • Salmon is too dry: Make sure you’re not overcooking it! Keep an eye on the cooking time and check for doneness by flaking it with a fork.
  • Glaze is too runny: If your glaze isn’t thickening, let it simmer on the stove for a few minutes until it reduces to your desired consistency.
  • Skin isn’t crispy: Ensure your oven is preheated and consider broiling for that extra crispiness at the end. Just watch it closely!

Conclusion: A Dish Made with Love

And there you have it! This Irresistible Crispy Honey Garlic Salmon Recipe is a true crowd-pleaser, perfect for busy weeknights or special gatherings. Not only is it easy to make, but it also brings a burst of flavor that will leave everyone at the table smiling. Remember, cooking is about sharing love and joy through food. So, gather your loved ones, whip up this delightful dish, and create lasting memories together. Happy cooking, and may your kitchen always be filled with warmth and laughter!

Irresistible Crispy Honey Garlic Salmon Recipe You Need to Try

Prep Time 15 minutes
Cook Time 15 minutes
Total Time 30 minutes
Servings 4 servings
Calories 350
This crispy honey garlic salmon combines sweet, savory, and crispy textures for a delightful meal that's easy to prepare and full of flavor.

Ingredients

Main ingredients

  • 4 fillets salmon fillets
  • 1/4 cup honey
  • 3 tablespoons soy sauce
  • 3 cloves garlic, minced
  • 1 tablespoon olive oil
  • 1 teaspoon ginger, grated
  • to taste salt and pepper salt and pepper
  • 2 tablespoons green onions, chopped (for garnish)
  • sesame seeds sesame seeds (for garnish)

Instructions 

  • Preheat oven to 400°F (200°C).
  • Mix honey, soy sauce, garlic, oil, ginger, salt, and pepper.
  • Coat salmon with the mixture and marinate for 15 minutes.
  • Bake for 12-15 minutes, then broil for 2-3 minutes for crispiness.
  • Garnish with green onions and sesame seeds before serving.

Notes

For extra flavor, let the salmon marinate longer if time permits.
Calories: 350kcal
Cost: $15
Course: Main Course
Cuisine: American
Keyword: Salmon

Loved this recipe? Save it to your favorite Pinterest board so you can easily find it later! It’s the perfect way to keep all your sweet ideas in one place. ✨

Beautifully cooked salmon with a golden crust, surrounded by soft shadows and a blurred backdrop.

Why This Dish Will Become Your New Favorite

When summer rolls around, we all crave meals that are not only delicious but also easy to prepare. Enter my Spicy Brazilian Coconut Chicken, a dish that seamlessly blends vibrant flavors and comforting warmth. Imagine juicy chicken thighs simmering in a creamy coconut sauce, with the kick of red curry paste dancing through the dish. It’s the kind of meal that transports you to a sun-soaked beach, even if you’re just enjoying it on your patio. Seriously, your taste buds will thank you, and your guests will be asking for seconds!

This recipe is perfect for those balmy evenings when all you want to do is whip up something quick and satisfying. Plus, it’s naturally gluten-free, making it a great choice for various dietary needs. And let’s not forget how easy it is to prepare! With a handful of ingredients and one skillet, you can have a gourmet meal on the table in about 30 minutes. Let’s dive into what makes this dish so special.

Ingredients You Will Need

To create this tantalizing dish, gather up the following ingredients:

  • 4 boneless, skinless chicken thighs
  • 1 can (14 oz) coconut milk
  • 2 tablespoons red curry paste
  • 1 tablespoon olive oil
  • 1 onion, chopped
  • 3 cloves garlic, minced
  • 1 red bell pepper, sliced
  • 1 teaspoon paprika
  • 1 teaspoon cumin
  • Salt and pepper to taste
  • Fresh cilantro for garnish
  • Lime wedges for serving

These ingredients are not only simple but also rich in flavor. The coconut milk provides that creamy texture, while the red curry paste gives it a delightful kick. You might already have some of these staples in your pantry, which makes this recipe even more accessible!

Essential Equipment Needed

Close-up of succulent chicken thighs in a creamy coconut sauce, with red bell pepper and lime wedges.

Before we get cooking, make sure you have the right tools at your disposal:

  • A large skillet
  • A sharp knife for chopping
  • A cutting board
  • A spoon for stirring

That’s it! You don’t need any fancy gadgets. Just a good skillet to bring everything together and a few basic tools.

How to Prepare Spicy Brazilian Coconut Chicken

Now that we have our ingredients and tools ready, let’s get cooking! Follow these simple steps:

  1. In a large skillet, heat the olive oil over medium heat.
  2. Add the chopped onion and minced garlic, sautéing until the onion is translucent and fragrant.
  3. Stir in the sliced red bell pepper and cook for another 3 minutes, allowing the flavors to meld.
  4. Add the chicken thighs to the skillet, cooking until browned on both sides—about 5-7 minutes.
  5. In a separate bowl, mix together the coconut milk, red curry paste, paprika, cumin, salt, and pepper until well combined.
  6. Pour the coconut mixture over the chicken in the skillet, ensuring the chicken is well coated.
  7. Bring everything to a simmer, cover, and cook for 20-25 minutes, or until the chicken is cooked through and tender.

And just like that, you’ve created a dish that tastes like a mini vacation on a plate!

Cooking Tips & Techniques

Here are a few tips to help you nail this recipe:

  • Don’t rush the sauté: Take your time with the onions and garlic; they add a depth of flavor that enhances the entire dish.
  • Check for doneness: Chicken thighs should reach an internal temperature of 165°F. Use a meat thermometer for accuracy.
  • Adjust the spice: If you prefer a milder flavor, start with one tablespoon of red curry paste and add more to taste as it cooks.

Cooking is all about balance and finding what works for your palate. Feel free to experiment!

Variations & Adaptations

This recipe is incredibly versatile! Here are a few ways you can customize it:

  • Vegetarian Version: Swap the chicken for chickpeas or tofu for a plant-based option.
  • Add More Veggies: Consider tossing in some spinach, carrots, or snap peas for added color and nutrients.
  • Different Proteins: Feel free to use chicken breasts, shrimp, or even fish if you prefer.

Cooking should be a fun adventure, so don’t hesitate to make this dish your own!

Serving & Storage Suggestions

To serve, garnish your Spicy Brazilian Coconut Chicken with fresh cilantro and lime wedges for that perfect finishing touch. This dish pairs wonderfully with:

  • Fluffy rice (white or brown)
  • Quinoa for a healthier option
  • Roasted plantains for a touch of sweetness

As for leftovers, store any uneaten chicken in an airtight container in the fridge for up to three days. The flavors actually deepen overnight, making it even tastier the next day! If you want to freeze it, allow it to cool completely, then portion it into containers and freeze for up to two months. Just remember to thaw it overnight in the fridge before reheating.

Nutritional Information & Benefits

Each serving of this delicious dish is packed with nutrients! Here’s a quick breakdown based on four servings:

  • Calories: Approximately 350
  • Protein: Around 25g from chicken
  • Healthy Fats: Thanks to the coconut milk

This dish is rich in lauric acid, which has numerous health benefits, and offers a good dose of vitamins from the fresh veggies. It’s comfort food that you can feel good about serving your family.

FAQs About Spicy Brazilian Coconut Chicken

Can I make this ahead of time?

Absolutely! This dish tastes even better the next day, so feel free to prepare it a day in advance. Just hold off on adding the fresh cilantro until you’re ready to serve.

What can I use instead of coconut milk?

If you’re not a fan of coconut, you can use unsweetened cashew cream or a blend of dairy-free milk with a spoonful of nut butter for that creamy texture.

How spicy is this dish?

It has a noticeable kick but is not overwhelming. Adjust the chili flakes to your taste or omit them for a milder version.

Can I freeze this dish?

Yes! Cool it completely, then freeze in airtight containers for up to two months. Just thaw in the fridge overnight before reheating.

What sides go best with this recipe?

Rice, quinoa, or even a simple green salad make excellent companions. You can also try roasted sweet potatoes or grilled veggies for a complete meal!

Conclusion

My Spicy Brazilian Coconut Chicken is a dish that embodies the joy of summer cooking. It’s quick, flavorful, and brings a little sunshine to your dinner table, rain or shine. I love how adaptable it is; you can make it your own with just a few tweaks. So, why not give it a try? Gather your ingredients, invite some friends over, and let the aromas fill your kitchen. I can’t wait to hear how you made this recipe your own! Feel free to share your experiences in the comments below, and let’s keep the conversation going. Happy cooking!

Spicy Brazilian Coconut Chicken – Summer Dinner Magic

Prep Time 10 minutes
Cook Time 25 minutes
Total Time 35 minutes
Servings 4 servings
Calories 450
A flavorful and spicy chicken dish with coconut milk, perfect for summer dinners.

Ingredients

Protein

  • 4 pieces boneless, skinless chicken thighs

Liquid

  • 1 can coconut milk (14 oz can)

Paste & Spices

  • 2 tablespoons red curry paste
  • 1 tablespoon olive oil
  • 1 teaspoon paprika
  • 1 teaspoon cumin
  • to taste salt and pepper

Vegetables & Garnish

  • 1 piece onion (chopped)
  • 3 cloves garlic (minced)
  • 1 red bell pepper sliced

Garnish & Serving

  • as needed fresh cilantro (for garnish)
  • as needed lime wedges (for serving)

Instructions 

  • Heat olive oil in a skillet over medium heat.
  • Sauté onion and garlic until translucent, then add bell pepper and cook 3 minutes.
  • Add chicken thighs and brown on both sides.
  • Mix coconut milk, curry paste, paprika, cumin, salt, and pepper; pour over chicken.
  • Simmer covered for 20-25 minutes until cooked through. Garnish with cilantro and lime.

Notes

Use fresh cilantro and lime for best flavor. Adjust seasoning to taste.
Calories: 450kcal
Cost: $15
Course: Main Course
Cuisine: Brazilian
Keyword: Chicken, coconut, Spicy

Loved this recipe? Save it to your favorite Pinterest board so you can easily find it later! It’s the perfect way to keep all your sweet ideas in one place. ✨

A mouthwatering dish featuring spicy coconut chicken served on a rustic wooden table.

Welcome to the Cozy World of Cottage Cheese Alfredo Pasta Bake

If you’re on the hunt for a dish that wraps you in warmth and comfort, look no further than this Cottage Cheese Alfredo Pasta Bake. Growing up in Oregon, my mother had a knack for turning simple ingredients into unforgettable meals, and this recipe is a tribute to that tradition. With creamy cottage cheese, gooey parmesan, and a hint of garlic, this pasta bake is not just a meal; it’s a hug on a plate. Perfect for busy weeknights or cozy gatherings, this dish is bound to leave your loved ones asking for seconds!

Why You’ll Love This Recipe

  • Easy to Prepare: This dish can be whipped up in less than an hour, making it ideal for a quick weeknight dinner.
  • Hearty and Satisfying: With its rich flavors and creamy texture, this pasta bake is filling without feeling heavy.
  • Customizable: Whether you’re a meat lover or a veggie enthusiast, this recipe can easily adapt to your preferences.
  • Meal Prep Friendly: Make it ahead of time and simply pop it in the oven when you’re ready to eat.
  • Healthier Comfort Food: Thanks to the protein-packed cottage cheese, this dish offers a nutritious twist on traditional alfredo pasta.

Ingredients Breakdown: What You Need

Let’s dive into the ingredients that make this Cottage Cheese Alfredo Pasta Bake a delightful experience:

  • 12 oz penne pasta: A **great choice for holding on to the sauce**, but feel free to swap for your favorite pasta shape.
  • 2 cups cottage cheese: The star of this dish, offering a **creamy texture and protein boost**. You can use low-fat if you prefer.
  • 1 cup grated Parmesan cheese: For that rich, cheesy flavor; fresh is always best!
  • 1 cup milk: Whole milk adds creaminess, but skim or plant-based milk will work too.
  • 3 cloves garlic, minced: To bring out savory depth; feel free to add more if you’re a garlic lover!
  • 1 tablespoon butter: For sautéing the garlic; you can use olive oil for a lighter option.
  • 1 teaspoon Italian seasoning: A simple way to add flavor complexity.
  • Salt and pepper to taste: Essential for balancing flavors.
  • 1/4 cup chopped parsley for garnish: Adds a pop of color and freshness.

How to Make This Creamy Cottage Cheese Alfredo Pasta Bake Step-by-Step

Side perspective of a creamy pasta bake featuring penne pasta, cottage cheese, and garnished with parsley.

Ready to transform your kitchen into a cozy haven? Let’s get cooking!

  1. Preheat the oven to 375°F (190°C). Cook the pasta according to package instructions, then drain and set aside.
  2. In a large skillet, melt the butter over medium heat. Add the minced garlic and sauté until fragrant, about 1 minute.
  3. In a blender, combine cottage cheese, Parmesan cheese, milk, Italian seasoning, salt, and pepper. Blend until smooth and creamy.
  4. Pour the sauce into the skillet with the garlic and heat through, stirring occasionally.
  5. Combine the cooked pasta with the sauce and transfer to a greased baking dish.
  6. Bake for 20-25 minutes until bubbly and golden on top.
  7. Garnish with chopped parsley and serve warm.

Pro Tips for the Perfect Pasta Bake

  • Don’t Overcook the Pasta: Aim for al dente to prevent mushiness after baking.
  • Blend Well: Ensure your sauce is smooth for a creamy texture; no clumps allowed!
  • Experiment with Cheese: Mix in mozzarella or gouda for an extra cheesy topping.
  • Use Fresh Herbs: Fresh basil or thyme can elevate the flavor profile significantly.
  • Make It Ahead: Prep the dish a day in advance and refrigerate until ready to bake.
  • Watch the Bake Time: Keep an eye on the pasta bake to prevent over-browning; cover with foil if necessary.
  • Pair with a Salad: A refreshing side salad balances the richness of the pasta.
  • Store Leftovers Properly: Keep any leftovers in an airtight container for up to 3 days.

Common Mistakes and Troubleshooting

Let’s ensure your dish turns out perfectly every time!

  • Too Dry: If your pasta bake comes out dry, ensure you have enough sauce and consider adding a splash of milk before baking.
  • Overcooked Pasta: If it’s mushy, remember to cook it al dente; it will continue to cook in the oven.
  • Flavorless Dish: Always taste and adjust seasoning before baking. A pinch of extra salt or a squeeze of lemon can make a difference!
  • Sticking to the Dish: Grease your baking dish well to avoid sticking; consider using parchment paper for easy removal.

Variations to Try

This dish is versatile! Here are some fun adaptations:

  • Vegetable-Packed: Add steamed broccoli, spinach, or roasted bell peppers for extra nutrients.
  • Meat Lover’s Delight: Stir in cooked chicken, sausage, or bacon for a heartier meal.
  • Gluten-Free Option: Swap out regular pasta for gluten-free pasta; just check the cooking time!
  • Extra Creamy: For a cheesier experience, mix in additional cottage cheese or a splash of heavy cream.

Storage and Make-Ahead Instructions

Want to prep this dish for later? Here’s how:

  • Make Ahead: Assemble the pasta bake in advance, cover, and refrigerate. Bake when ready to serve.
  • Freezing: You can freeze the assembled dish for up to 2 months. Just thaw overnight in the fridge before baking.
  • Leftovers: Store leftovers in an airtight container in the refrigerator for up to 3 days. Reheat in the oven or microwave until warmed through.

Frequently Asked Questions

Got questions? I’ve got answers!

  • Can I use low-fat cottage cheese? Yes, it works perfectly fine! Just keep in mind the creaminess might be slightly less.
  • What can I substitute for Parmesan? Pecorino Romano or nutritional yeast are great alternatives.
  • Can I make this vegan? Absolutely! Use plant-based cheese and non-dairy milk.
  • What’s the best way to reheat leftovers? The oven is preferable for keeping the texture intact, but the microwave works in a pinch.
  • How can I add more flavor? Try adding a splash of white wine to the sauce or a sprinkle of red pepper flakes.
  • What other types of pasta can I use? Any short pasta like rotini, fusilli, or even macaroni will work!
  • Can I add more garlic? Definitely! If you love garlic, feel free to double the amount.
  • What should I serve with this dish? A fresh garden salad or garlic bread pairs wonderfully.

Nutritional Tips and Dietary Adaptations

This dish not only satisfies the palate but can also fit various dietary needs:

  • High Protein: Thanks to the cottage cheese, this pasta bake provides a solid protein punch.
  • Lower Carb Option: Substitute pasta with zucchini noodles or spaghetti squash for a lighter version.
  • Rich in Calcium: Both cottage cheese and Parmesan contribute to your daily calcium intake, essential for bone health.

Equipment Recommendations

For the best results, here’s what you’ll need:

  • Large Pot: For boiling pasta, ensure it’s big enough to allow the pasta to move freely.
  • Skillet: A medium-sized skillet is perfect for sautéing and combining your ingredients.
  • Blender or Food Processor: Essential for creating a smooth and creamy sauce.
  • Baking Dish: Use a 9×13 inch or comparable size for even baking.

Serving Suggestions

Enhance your mealtime experience with these serving tips:

  • Garnish Generously: Fresh herbs like thyme or basil add a vibrant touch.
  • Pair with Wine: A glass of white wine, like Sauvignon Blanc, complements the creaminess beautifully.
  • Include a Side Salad: A crisp salad balances the richness of the pasta.

So there you have it! The Cottage Cheese Alfredo Pasta Bake is not just a meal; it’s a celebration of flavors and textures. This recipe embraces comfort and creativity, ensuring your kitchen is filled with joy and delicious aromas. Whether you’re cooking for family or friends, this dish promises satisfaction in every bite. Now, let’s get cooking and make some memories together!

Cottage Cheese Alfredo Pasta Bake

Prep Time 10 minutes
Cook Time 25 minutes
Total Time 35 minutes
Servings 4 servings
Calories 650
A creamy and cheesy pasta bake that combines cottage cheese and Parmesan for a comforting meal.

Ingredients

Pasta

  • 12 oz penne pasta

Dairy

  • 2 cups cottage cheese
  • 1 cup grated Parmesan cheese
  • 1 cup milk

Flavorings & Seasonings

  • 3 cloves garlic, minced
  • 1 tablespoon butter
  • 1 teaspoon Italian seasoning
  • Salt and pepper to taste Salt and pepper

Garnish

  • 1/4 cup chopped parsley (for garnish)

Instructions 

  • Preheat oven to 375°F (190°C). Cook pasta, drain, and set aside.
  • Melt butter in a skillet, sauté garlic until fragrant.
  • Blend cottage cheese, Parmesan, milk, Italian seasoning, salt, and pepper until smooth.
  • Mix sauce with cooked pasta, transfer to a greased dish, and bake 20-25 minutes.
  • Garnish with parsley and serve.

Notes

For a creamier texture, blend cottage cheese longer before mixing.
Calories: 650kcal
Cost: $15
Course: Main Course
Cuisine: Italian
Keyword: pasta

Why This Dish Will Become Your New Favorite

When it comes to cooking, there’s something incredibly rewarding about creating a dish that not only satisfies your taste buds but also warms your heart. Honey Garlic Butter Baked Salmon is that dish. Imagine a perfectly baked salmon fillet, draped in a luscious honey-garlic glaze that dances between sweet and savory. This recipe is a celebration of simplicity and flavor, making it ideal for weeknight dinners or special occasions alike. If you’ve been on the hunt for a meal that’s both comforting and impressive, you’ve just struck gold.

Ingredients You’ll Need

Cooking is all about using quality ingredients, and for this Savory Sweet Honey Garlic Butter Baked Salmon, you’ll need:

  • 4 salmon fillets
  • 1/4 cup honey
  • 3 tablespoons butter, melted
  • 3 cloves garlic, minced
  • 2 tablespoons soy sauce
  • 1 tablespoon Dijon mustard
  • 1 teaspoon salt
  • 1/2 teaspoon black pepper
  • 1 tablespoon chopped fresh parsley (for garnish)

These ingredients blend beautifully to create a glaze that not only enhances the salmon’s natural flavors but also adds a delightful depth to the dish. Trust me, once you make this, you’ll want to keep the ingredients stocked in your pantry at all times.

Step-by-Step Guide to Culinary Perfection

Glazed salmon fillet with a honey garlic sauce, captured in natural light.

Now that we’ve gathered our ingredients, let’s dive into the cooking process. It’s as easy as pie—well, easier, actually!

  1. Preheat the oven: First things first, preheat your oven to 375°F (190°C). This ensures that your salmon will cook evenly and give you that perfect flaky texture.
  2. Prepare the glaze: In a small bowl, whisk together the honey, melted butter, minced garlic, soy sauce, Dijon mustard, salt, and black pepper until well combined. The aroma will make your heart skip a beat!
  3. Coat the salmon: Place the salmon fillets in a baking dish and pour the honey garlic mixture over them, ensuring they are well coated. Don’t skimp on this step—the glaze is what makes this dish sing!
  4. Bake: Pop the baking dish into your preheated oven and let it bake for 15-20 minutes, or until the salmon flakes easily with a fork. Pro tip: If you have a meat thermometer, aim for an internal temperature of 145°F (63°C) for perfectly cooked salmon.
  5. Rest and garnish: Once done, remove the salmon from the oven and let it rest for a few minutes. Garnish with chopped parsley before serving to add a pop of color and freshness.

And voilà! You’ve just made an unforgettable dish that is sure to impress anyone lucky enough to share your table.

Tips for the Perfect Salmon

As someone who’s spent countless hours in the kitchen, I’ve gathered a few tips that will take your Honey Garlic Butter Baked Salmon from great to absolutely spectacular:

  • Choose the right salmon: Fresh, high-quality salmon is crucial. Wild-caught salmon tends to have a richer flavor compared to farmed varieties.
  • Don’t overcook: Keep an eye on your salmon while it bakes. Overcooked salmon can become dry and lose its deliciousness.
  • Experiment with flavors: If you’re feeling adventurous, try adding a splash of lemon juice or some chili flakes to the glaze for a zesty kick.
  • Serve with sides: Pair your salmon with green veggies or a light salad to balance the sweetness of the glaze. Roasted asparagus or sautéed spinach are excellent choices.

Variations to Explore

The beauty of this dish lies in its versatility. Here are some fun variations you can try:

  • Honey Garlic Butter Shrimp: Swap the salmon for shrimp for a quick seafood alternative. Simply adjust the cooking time as shrimp cooks faster.
  • Herb-Crusted Salmon: Before adding the honey garlic glaze, sprinkle the salmon with a mix of your favorite herbs, like dill or thyme, for an aromatic twist.
  • Maple Glazed Version: Substitute honey with maple syrup for a delightful take on the classic flavor.

Substitutions You Can Make

Cooking should be enjoyable, not stressful! If you find yourself missing an ingredient, here are some handy substitutions:

  • Butter: You can use olive oil or coconut oil instead of butter for a dairy-free version.
  • Honey: Agave syrup works as a vegan alternative to honey, maintaining that sweet flavor.
  • Dijon mustard: If you prefer a milder taste, yellow mustard can be used, but the flavor profile will change slightly.

Equipment You’ll Need

Before you start cooking, make sure you have the right tools at hand:

  • Baking dish
  • Mixing bowl
  • Whisk
  • Meat thermometer (optional but highly recommended)

Storage and Freezing Tips

Leftovers? Yes, please! Here’s how to store your delightful creation:

  • Refrigeration: Store any leftover salmon in an airtight container in the fridge for up to 3 days.
  • Freezing: If you want to save some for later, wrap the salmon tightly in foil and then place it in a freezer-safe bag. It should keep well for up to 3 months.

Frequently Asked Questions

Let’s tackle some common questions that pop up around this glorious recipe:

  • Can I use frozen salmon? Absolutely! Just make sure to thaw it completely before cooking to ensure even baking.
  • What sides pair well with this dish? Roasted veggies, quinoa, or a light salad are perfect companions to balance the sweetness of the salmon.
  • Can I double the recipe? Yes! Just ensure your baking dish is large enough to accommodate the extra fillets without crowding.

Troubleshooting Common Issues

We all have those days when things don’t go as planned in the kitchen. Here’s how to troubleshoot:

  • Salmon is too dry: This usually happens if it’s overcooked. Make sure to keep an eye on the time and use a thermometer for accuracy.
  • Glaze is too runny: If your glaze is thinner than expected, consider adding a bit more honey or simmering it on the stove for a few minutes to thicken it.

Final Thoughts: Cooking is an Adventure

As we wrap up this culinary journey, I hope you feel inspired to dive into your kitchen and whip up this Honey Garlic Butter Baked Salmon. Cooking is a beautiful adventure, and with each recipe, you’re not just creating a meal—you’re making memories. Whether it’s a cozy dinner for one or a gathering with friends, this dish is sure to impress and satisfy. Remember, the best recipes are the ones that feel like home. So grab your apron, turn on your favorite playlist, and let the magic of cooking fill your space. Happy cooking, my friend!

Savory Sweet Honey Garlic Butter Baked Salmon

Prep Time 10 minutes
Cook Time 20 minutes
Total Time 30 minutes
Servings 4 servings
Calories 350
This flavorful baked salmon combines sweet honey and savory garlic for a delicious and easy-to-make meal.

Ingredients

Main ingredients

  • 4 fillets salmon fillets
  • 1/4 cup honey
  • 3 tablespoons butter, melted
  • 3 cloves garlic, minced
  • 2 tablespoons soy sauce
  • 1 tablespoon dijon mustard
  • 1 teaspoon salt
  • 1/2 teaspoon black pepper
  • 1 tablespoon chopped fresh parsley (for garnish)

Instructions 

  • Preheat oven to 375°F (190°C).
  • Mix honey, melted butter, garlic, soy sauce, mustard, salt, and pepper.
  • Pour mixture over salmon in a baking dish.
  • Bake for 15-20 minutes until flaky.
  • Rest briefly, then garnish with parsley before serving.

Notes

Ensure not to overcook the salmon for best texture.
Calories: 350kcal
Cost: $15
Course: Main Course
Cuisine: American
Keyword: Salmon

Loved this recipe? Save it to your favorite Pinterest board so you can easily find it later! It’s the perfect way to keep all your sweet ideas in one place. ✨

Top view of a golden-brown baked salmon fillet with a delicious glaze.

Why You’ll Love This Recipe

Let’s be honest, there’s something magical about a bowl of creamy cheesy chicken pasta that makes everything feel right in the world. This dish is not just about filling your belly; it’s about comfort, warmth, and that glorious feeling of satisfaction that comes with every cheesy bite. Whether it’s a busy weeknight or a relaxed Sunday dinner, this recipe is your new go-to for cozy nights. From the velvety cream sauce that wraps around perfectly cooked penne to the tender chicken that brings a hearty protein punch, every element shines in this delightful dish.

But it’s not just the taste that makes this cheesy chicken pasta a winner. It’s also ridiculously easy to make, requiring just a handful of ingredients that you probably already have in your pantry. Plus, the leftovers (if there are any) reheat beautifully, making it a fantastic option for meal prep. So, roll up your sleeves, grab your favorite spatula, and let’s dive into this comforting creation together!

Ingredients You’ll Need

Here’s what you’ll need to whip up this creamy cheesy chicken pasta:

  • 8 oz penne pasta
  • 2 cups cooked chicken, shredded
  • 2 cups shredded cheddar cheese
  • 1 cup cream
  • 1 cup chicken broth
  • 1/2 cup grated parmesan cheese
  • 2 cloves garlic, minced
  • 1 tsp Italian seasoning
  • Salt and pepper to taste
  • 2 tbsp olive oil
  • Fresh parsley for garnish (optional)

How to Make Creamy Cheesy Chicken Pasta

Eye-level image of creamy pasta with chicken and a sprinkle of parsley.

Now that we have our ingredients ready, let’s get to cooking! Follow these simple steps for a delicious pasta dish that will have everyone asking for seconds.

  1. Cook the Pasta: Start by bringing a large pot of salted water to a boil. Add the penne pasta and cook according to the package instructions until al dente. Drain and set aside, but don’t forget to reserve a cup of that starchy pasta water!
  2. Sauté the Garlic: In a large skillet, heat the olive oil over medium heat. Once it’s shimmering, add the minced garlic and sauté for about 1 minute until fragrant but not browned.
  3. Add the Chicken: Toss in the shredded chicken and cook until heated through, stirring occasionally. This should take about 2-3 minutes.
  4. Create the Sauce: Pour in the cream and chicken broth, stirring to combine. Bring this mixture to a gentle simmer, allowing the flavors to meld beautifully.
  5. Mix in the Cheese: Now it’s time to get cheesy! Stir in the cheddar and parmesan cheese until melted and creamy. If the sauce feels too thick, add a splash of the reserved pasta water until you reach your desired consistency.
  6. Season It Right: Sprinkle in the Italian seasoning, salt, and pepper to taste. Give it a good mix to ensure all that flavor is evenly distributed.
  7. Add the Pasta: Fold the cooked penne into the sauce, making sure every piece is coated in that luscious, cheesy goodness.
  8. Garnish and Serve: Remove from heat, garnish with fresh parsley if desired, and serve warm. Enjoy your comforting bowl of cheesy chicken pasta!

Tips for Perfect Pasta

Even though this recipe is fairly straightforward, here are some tips to ensure it turns out perfectly every time:

  • Cook Pasta Al Dente: The pasta will continue to cook slightly when combined with the sauce, so aim for al dente to avoid mushy noodles.
  • Save Pasta Water: The starchy water helps bind the sauce and adds a silky texture. Don’t skip this step!
  • Cheese Choices: While cheddar is a classic, feel free to experiment with different cheeses. Gouda, Monterey Jack, or a blend can add exciting flavors!

Variations to Consider

This creamy cheesy chicken pasta is incredibly versatile. Here are a few variations you might want to try:

  • Vegetarian Option: Swap out the chicken for sautéed vegetables like bell peppers, mushrooms, or spinach. You can also add in some white beans for extra protein.
  • Spice It Up: Add a pinch of red pepper flakes or some diced jalapeños for a spicy kick.
  • Herb Infusion: Fresh herbs like basil or thyme can elevate the flavors. Stir them in just before serving for a burst of freshness.

Substitutions You Can Make

No cream in the fridge? No problem! Here are some substitutions:

  • Milk instead of Cream: If you want a lighter version, use whole milk, though the sauce will be less rich.
  • Broth Variations: You can use vegetable broth instead of chicken broth for a vegetarian-friendly option.
  • Cheese Alternatives: For dairy-free options, try using cashew cream or a plant-based cheese that melts well.

Storage and Freezing

Got leftovers? Here’s how to store them for future enjoyment:

  • Refrigeration: Store leftovers in an airtight container in the fridge for up to 3-4 days. Reheat gently on the stove with a splash of milk or cream to bring back that creamy texture.
  • Freezing: This dish can be frozen for up to 2 months. When reheating from frozen, allow it to thaw in the fridge overnight and reheat on the stove.

FAQs

Let’s answer some common questions about this delightful dish:

  • Can I make this pasta ahead of time? You can prep the sauce and cook the pasta separately, then combine them just before serving.
  • What if the sauce is too thick? Add a bit more reserved pasta water or chicken broth until you reach the desired consistency.
  • Can I use leftover rotisserie chicken? Absolutely! It’s a great way to save time and add flavor.

Troubleshooting Tips

If you encounter any hiccups while making this creamy cheesy chicken pasta, here are some solutions:

  • Clumpy Cheese: If your cheese isn’t melting smoothly, remove the pan from the heat and stir in a splash of hot pasta water.
  • Too Salty: If you accidentally oversalted your dish, balance it out with a pinch of sugar or add more cream to mellow the flavors.

The Final Word

Cooking is about love, comfort, and finding joy in the little moments, and this creamy cheesy chicken pasta embodies all of that. It’s more than just a meal; it’s a warm hug on a plate. Whether you’re sharing it with family or enjoying a quiet evening at home, this dish is sure to become a staple in your kitchen. Don’t forget to experiment and make it your own—after all, cooking is a journey, and every recipe is a new adventure waiting to unfold. Happy cooking, friends! Now, who’s ready for a second helping?

the best cheesy chicken pasta

Prep Time 10 minutes
Cook Time 15 minutes
Total Time 25 minutes
Servings 4 servings
Calories 650
A creamy, cheesy pasta dish with tender shredded chicken and flavorful seasonings, perfect for a comforting meal.

Ingredients

Pasta

  • 8 oz penne pasta
  • 2 cups cooked chicken, shredded
  • 2 cups shredded cheddar cheese
  • 1 cup cream
  • 1 cup chicken broth
  • 1/2 cup grated parmesan cheese
  • 2 cloves garlic, minced
  • 1 tsp italian seasoning
  • to taste salt and pepper
  • 2 tbsp olive oil

Garnish

  • optional fresh parsley for garnish

Instructions 

  • Cook pasta according to package instructions; drain.
  • Heat olive oil, sauté garlic for 1 minute, then add chicken and cook until heated.
  • Pour in cream and chicken broth, simmer briefly.
  • Add cooked pasta, cheddar, and Parmesan; stir until creamy. Season with Italian seasoning, salt, and pepper.
  • Garnish with parsley if desired, then serve warm.

Notes

Use freshly grated cheese for best flavor.
Calories: 650kcal
Cost: $15
Course: Main Course
Cuisine: American
Keyword: cheese, Chicken, pasta

Loved this recipe? Save it to your favorite Pinterest board so you can easily find it later! It’s the perfect way to keep all your sweet ideas in one place. ✨

Delicious plate of cheesy chicken penne pasta in natural light.

Why This Dish Will Steal the Show

Have you ever tasted something so delightful that it made you stop in your tracks? That’s exactly what happens with Honey Lime Garlic Butter Baked Salmon. This dish is not just a meal; it’s an experience! Imagine perfectly flaky salmon, kissed by a zesty honey lime sauce that dances on your palate. It’s sweet, it’s savory, and it’s the kind of dish that turns an ordinary dinner into a special occasion. Whether you’re hosting a dinner party, looking to impress that special someone, or just treating yourself, this recipe is your ticket to culinary bliss.

Overview of Honey Lime Garlic Butter Baked Salmon

This recipe brings together the best of both worlds—simple preparation and an explosion of flavor. With just a handful of ingredients, you can create a dish that rivals your favorite restaurant meals. The combination of honey and lime is a match made in heaven, enveloping the salmon in a buttery glaze that’s hard to resist. Plus, it’s baked to perfection in under 30 minutes, making it a fantastic option for busy weeknights or last-minute gatherings.

Ingredients You’ll Need

A detailed shot of delicious honey lime garlic butter baked salmon, showcasing its crispy texture and vibrant garnishes.
  • 4 salmon fillets
  • 1/4 cup honey
  • 2 tablespoons lime juice
  • 4 tablespoons unsalted butter, melted
  • 4 cloves garlic, minced
  • Salt and pepper to taste
  • Lime slices for garnish
  • Fresh parsley for garnish

How to Create This Magical Dish

Step 1: Preheat the Oven

First things first, let’s get that oven preheating to 375°F (190°C). While it warms up, you can work on the salmon and the delightful sauce that will bring it to life.

Step 2: Whisk Together the Ingredients

In a small bowl, whisk together the honey, lime juice, melted butter, minced garlic, and a generous pinch of salt and pepper. This mixture is the sweet and savory sauce that’s going to elevate your salmon into the realms of greatness. Make sure the garlic is evenly distributed—nobody wants a bite of burnt garlic!

Step 3: Prepare the Salmon

Place your salmon fillets in a baking dish, skin-side down if your fillets come with skin. Pour the luscious honey lime garlic butter sauce over the top, ensuring each fillet is well-coated. The salmon will soak up all those glorious flavors as it bakes. It’s like a warm hug for your taste buds!

Step 4: Bake to Perfection

Now, it’s time to let the oven do its magic. Bake the salmon for about 15-20 minutes, or until it flakes easily with a fork. You can check for doneness by gently pressing the top of the fillet—if it’s firm and flakes, you’re good to go! For an extra touch, switch the heat to broil for the last 2-3 minutes to achieve a lovely caramelized top. Just keep an eye on it, as broilers can be a bit dramatic and you don’t want anything burning!

Step 5: Garnish and Serve

Once your salmon is done, remove it from the oven and garnish with fresh lime slices and chopped parsley. This not only adds a pop of color but also makes the dish look even more appetizing. Serve it up on a platter with a side of roasted veggies or a crisp salad for a complete meal.

Variations to Elevate Your Salmon

While this recipe is delicious as is, here are some fun variations to consider:

  • Spicy Kick: Add a pinch of red pepper flakes to the honey lime sauce for a spicy twist.
  • Herb Infusion: Mix in fresh herbs like dill or cilantro for an aromatic flavor boost.
  • Orange Substitute: Replace lime juice with fresh orange juice for a sweeter citrus profile.
  • Maple Twist: Substitute honey with maple syrup for a unique twist on sweetness.

Tips for the Best Salmon

Here are some nuggets of wisdom to ensure your salmon is absolutely perfect:

  • Freshness Matters: Always opt for fresh, high-quality salmon. It makes a world of difference in taste.
  • Don’t Overcook: Keep a close eye on the salmon as it cooks. Overcooked salmon is dry and sad; we want it to be moist and tender.
  • Resting Time: Let the salmon rest for a few minutes after baking. This helps the juices redistribute and keeps it succulent.

Equipment You’ll Need

Before you get started, make sure you have the following equipment handy:

  • Baking dish
  • Whisk
  • Measuring cups and spoons
  • Knife and cutting board

Storage and Freezing Tips

If you happen to have leftovers (which is rare, trust me), here’s how to store them:

  • Refrigeration: Store any leftover salmon in an airtight container in the fridge for up to 2-3 days.
  • Freezing: While I recommend enjoying this dish fresh, you can freeze cooked salmon. Wrap it tightly in foil or plastic wrap and store it in the freezer for up to 2 months.
  • Reheating: To reheat, gently warm it in the oven at a low temperature (around 275°F / 135°C) to prevent drying out.

FAQs About Honey Lime Garlic Butter Baked Salmon

Can I use frozen salmon for this recipe?

Yes! Just make sure to thaw it completely before cooking. Pat it dry to help the sauce stick better.

What should I serve with this salmon?

This dish pairs beautifully with a variety of sides. Consider serving it with roasted vegetables, quinoa, or a fresh garden salad.

Can I make this dish in advance?

While it’s best enjoyed fresh, you can prepare the sauce ahead of time and store it in the fridge. Simply pour it over the salmon right before baking.

Final Thoughts

There you have it—a wonderfully simple yet elegant recipe that’s sure to delight your taste buds and impress your guests. The Honey Lime Garlic Butter Baked Salmon is not just a meal, but a moment to savor. Every bite is a reminder of the joy of home-cooked food and the love that goes into it. So, gather your ingredients, invite a friend or two, and get ready to create something magical in your kitchen. Happy cooking!

Honey Lime Garlic Butter Baked Salmon Recipe

Prep Time 10 minutes
Cook Time 20 minutes
Total Time 30 minutes
Servings 4 servings
Calories 350
This flavorful baked salmon combines honey, lime, and garlic for a delicious and healthy meal that's easy to prepare.

Ingredients

Salmon

  • 4 fillets salmon fillets
  • 0.25 cup honey
  • 2 tablespoons lime juice
  • 4 tablespoons unsalted butter, melted
  • 4 cloves garlic, minced
  • to taste salt and pepper
  • for garnish lime slices
  • for garnish fresh parsley

Instructions 

  • Preheat oven to 375°F (190°C).
  • Whisk honey, lime juice, melted butter, garlic, salt, and pepper.
  • Pour mixture over salmon in a baking dish.
  • Bake for 15-20 minutes until cooked through.
  • Garnish with lime slices and parsley before serving.

Notes

Ensure not to overcook the salmon for best texture.
Calories: 350kcal
Cost: $15
Course: Main Course
Cuisine: American
Keyword: Salmon

Loved this recipe? Save it to your favorite Pinterest board so you can easily find it later! It’s the perfect way to keep all your sweet ideas in one place. ✨

Eye-level view of a succulent salmon fillet topped with honey lime butter and fresh herbs, presented on a rustic table.