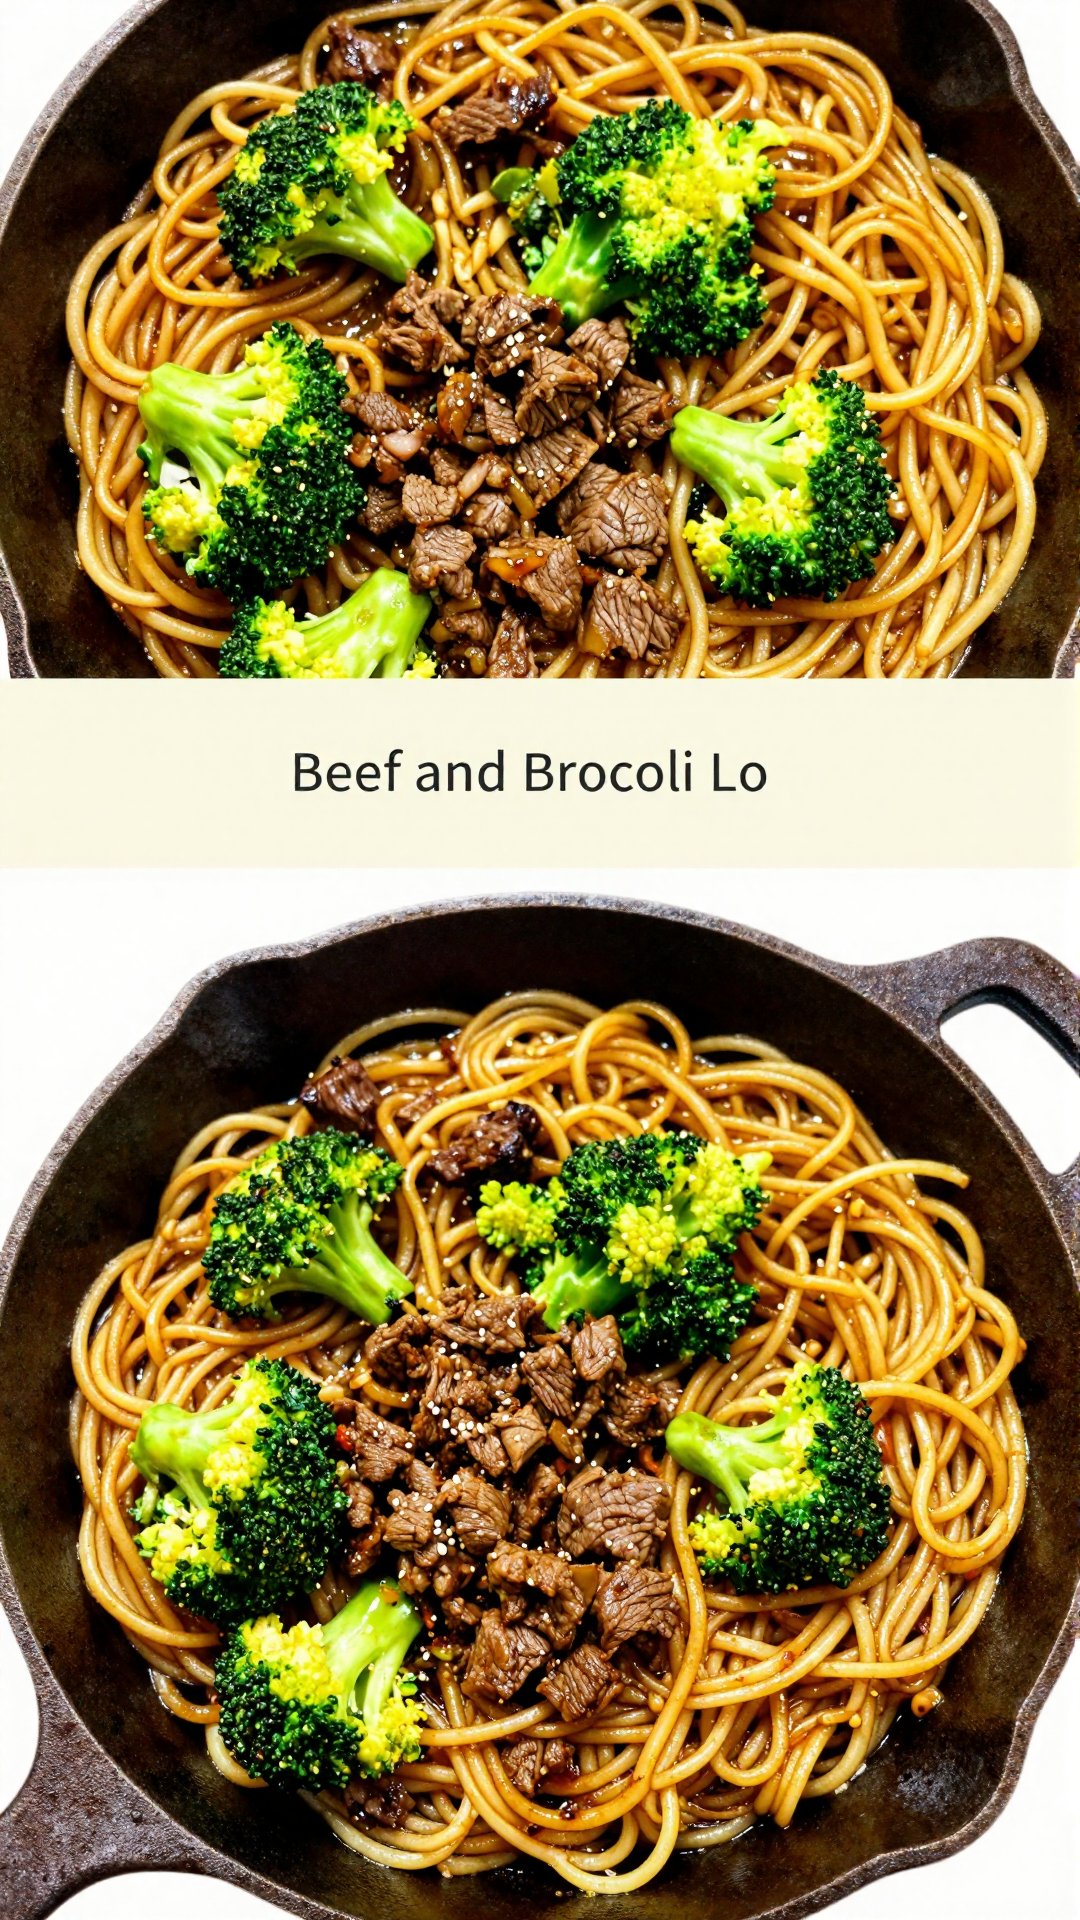
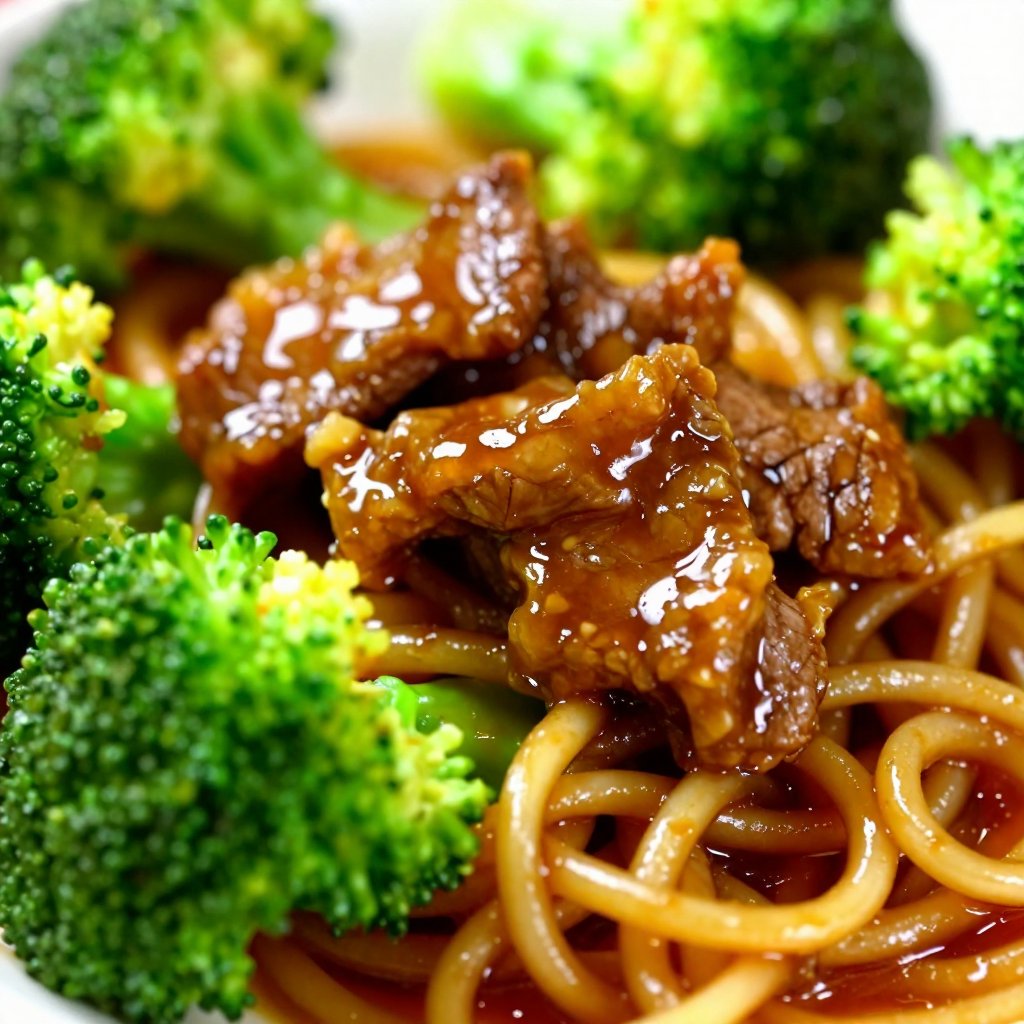
Author

Ava

Browsing

My name’s Ava, and if you’ve stumbled upon my kitchen, you’re probably here for one thing—the kind of recipes that make people pause mid-bite and say, ‘Wow.’ Today, we’re diving headfirst into a culinary adventure that marries the comforting flavors of Indian cuisine with a fun, vegetarian twist. Get ready for Halloumi Makhani – a dish so good, it might just become your new weeknight obsession. This isn’t just another recipe; it’s a warm hug in a bowl, bursting with creamy tomato goodness and the delightful squeak of perfectly cooked halloumi.

I grew up in a small town in Oregon, where the smell of fresh bread and roasted vegetables often drifted out of my mother’s kitchen window. Cooking wasn’t just something we did to eat—it was how we celebrated, comforted, and connected. I was the kid who would rather stir a pot of chili than go ride my bike, and by the time I was twelve, I could whip up a pie from scratch that made my grandmother proud. Now, living in Seattle, I’m excited to share this Halloumi Makhani recipe with you. It’s a fusion of flavors that’s both comforting and exciting!

Why You’ll Love This Halloumi Makhani

This recipe is more than just a meal; it’s an experience. It’s about taking familiar flavors and giving them a fresh, exciting spin. Here’s why I think you’ll fall in love with this creamy, dreamy dish:

  • Quick and Easy: Ready in under 30 minutes, perfect for busy weeknights.
  • Vegetarian Delight: A satisfying meat-free alternative to classic butter chicken.
  • Incredible Flavor: The creamy tomato sauce, infused with aromatic spices, is simply irresistible.
  • Halloumi Magic: The salty, squeaky halloumi adds a delightful texture contrast that keeps you coming back for more.
  • Versatile: Pairs perfectly with rice, naan, or even roasted vegetables.

I believe the best recipes aren’t always the fanciest—they’re the ones that feel like a warm hug, the ones you make over and over because they just work. This Halloumi Makhani is one of those recipes. Trust me, once you try it, you’ll understand why I’m so excited to share it with you!

The Key to a Great Makhani: The Sauce

The heart and soul of any Makhani dish is, without a doubt, the sauce. This is where the magic happens, where the flavors meld together to create something truly special. The richness of the tomatoes, the warmth of the spices, and the luxurious creaminess all come together to form a symphony of taste. When you add the right balance of ingredients, the result is a sauce that’s both comforting and complex.

In this recipe, we’re using passierte Tomaten (tomato passata) as the base, which provides a smooth, concentrated tomato flavor. The spices – Kreuzkümmel (cumin), Korianderpulver (coriander powder), Garam Masala, and Paprika – are carefully chosen to complement each other and create a warm, aromatic profile. A touch of sugar balances the acidity of the tomatoes, while the Sahne (cream) adds a velvety richness that’s simply divine. This sahne sauce is so good, you might just want to eat it with a spoon!

Ingredients for Halloumi Makhani

  • 250 g Halloumi-Käse (in Würfel geschnitten): The star of the show!
  • 2 EL Öl (Pflanzenöl oder Ghee): For sautéing and frying.
  • 1 große Zwiebel (fein gewürfelt): Adds sweetness and depth of flavor.
  • 2-3 Zehen Knoblauch (fein gehackt): Essential for that aromatic kick.
  • 1 TL frisch geriebener Ingwer: Adds warmth and a hint of spice.
  • 1 TL Kreuzkümmel: Earthy and aromatic.
  • 1 TL Korianderpulver: Adds a citrusy, warm note.
  • 0.5 TL Garam Masala: A blend of warming spices.
  • 1 TL Paprika: Adds color and a touch of sweetness.
  • 400 g passierte Tomaten: The base of our creamy sauce.
  • 200 ml Sahne: For that luxurious creaminess.
  • 1 TL Zucker (optional): To balance the acidity of the tomatoes.
  • Salz und Pfeffer (nach Geschmack): To season to perfection.
  • frischer Koriander (zum Garnieren): For a fresh, vibrant finish.
Recipe Image

Step-by-Step: Making Halloumi Makhani

Alright, let’s get cooking! Follow these simple steps, and you’ll have a delicious Halloumi Makhani on the table in no time.

  1. Prepare the Halloumi: “Schritt ich” involves cutting the Halloumi in about 2 cm große Würfel (cubes). In a hot pan with some oil, fry the halloumi until golden brown. Set aside.
  2. Sauté the Aromatics: In the same pan, sauté the diced onion over medium heat until softened and fragrant. This usually takes about 5-7 minutes.
  3. Add Garlic and Ginger: Add the finely chopped garlic and ginger and sauté for about 1 minute, until fragrant.
  4. Bloom the Spices: Add all the spices (cumin, coriander powder, Garam Masala, paprika) and toast briefly to intensify their aromas. This should only take about 30 seconds to a minute. Be careful not to burn them!
  5. Simmer the Sauce: Add the passierte Tomaten (tomato passata) and simmer for about 10 minutes, until the sauce thickens slightly.
  6. Add Cream: Reduce the heat to low and slowly stir in the Sahne (cream), stirring continuously to prevent curdling.
  7. Combine and Simmer: Gently add the fried halloumi to the sauce and simmer for another 5 minutes. This allows the halloumi to absorb the flavors of the sauce.
  8. Season and Garnish: Season with salt, pepper, and a pinch of sugar, if desired. Garnish with fresh cilantro and serve.

Pro Tips for Perfect Halloumi Makhani

Here are a few extra tips to ensure your Halloumi Makhani turns out absolutely perfect:

  • Don’t Overcook the Halloumi: Halloumi can become rubbery if overcooked. Aim for a golden-brown exterior and a slightly softened interior.
  • Use Fresh Spices: Freshly ground spices will always deliver the best flavor.
  • Simmer Gently: Simmering the sauce gently allows the flavors to meld together beautifully.
  • Taste as You Go: Adjust the seasoning to your liking. Don’t be afraid to add a little extra spice or cream.
  • Garnish Generously: Fresh cilantro adds a burst of freshness that complements the richness of the sauce.

Common Mistakes to Avoid

Even the best cooks make mistakes. Here are a few common pitfalls to avoid when making Halloumi Makhani:

  • Burning the Spices: Toasting the spices is essential for developing their flavor, but be careful not to burn them. Keep the heat low and stir constantly.
  • Curdling the Cream: Adding cold cream to a hot sauce can cause it to curdle. Make sure the cream is at room temperature and add it slowly, stirring constantly.
  • Overcooking the Halloumi: As mentioned earlier, overcooked halloumi can become rubbery. Keep a close eye on it and remove it from the heat as soon as it’s golden brown.
  • Not Seasoning Properly: Seasoning is key to bringing out the flavors of the dish. Taste as you go and adjust the seasoning to your liking.

Remember that infamous triple-layer cake that collapsed right before a dinner party? Well, even I have my kitchen mishaps! But the beauty of cooking is that every ‘oops’ moment is just an invitation to try again—this time with a little more patience and maybe a pinch more salt. The die aromen that come from the spices will make this dish a delight, so don’t be afraid to experiment!

Variations on Halloumi Makhani

One of the best things about cooking is the ability to customize recipes to your own taste. Here are a few variations on Halloumi Makhani that you might enjoy:

  • Add Vegetables: Toss in some roasted vegetables like bell peppers, zucchini, or eggplant for added flavor and nutrition.
  • Make it Spicy: Add a pinch of chili flakes or a chopped green chili for a spicy kick.
  • Use Different Cheese: While halloumi is the star of this dish, you can also use paneer or even feta cheese.
  • Coconut Milk: Substitute coconut milk for cream for a dairy-free version.
  • Smoked Paprika: Use smoked paprika for a smoky flavor.

Storing and Reheating Halloumi Makhani

If you have any leftovers (which is unlikely!), you can store them in an airtight container in the refrigerator for up to 3 days. To reheat, simply warm it up in a pan over medium heat, stirring occasionally, or microwave until heated through. You might need to add a splash of water or cream to loosen the sauce if it has thickened too much.

Frequently Asked Questions (FAQ)

  • Can I make this recipe ahead of time? Yes, you can make the sauce ahead of time and store it in the refrigerator for up to 2 days. Add the halloumi just before serving.
  • Can I freeze Halloumi Makhani? While you can freeze it, the texture of the halloumi might change slightly. It’s best enjoyed fresh.
  • Is this recipe gluten-free? Yes, this recipe is naturally gluten-free.
  • Can I use a different type of tomato? Yes, you can use crushed tomatoes or diced tomatoes instead of passierte Tomaten. Just make sure to simmer the sauce for a little longer to allow it to thicken.
  • What is Garam Masala? Garam Masala is a blend of warming spices commonly used in Indian cuisine. You can find it in most supermarkets or online.

Serving Suggestions for Halloumi Makhani

Dieses Halloumi Makhani is incredibly versatile and pairs well with a variety of sides. Here are a few of my favorite serving suggestions:

  • Rice: Serve it with fluffy basmati rice for a classic combination.
  • Naan: Warm naan bread is perfect for scooping up the creamy sauce.
  • Roasted Vegetables: Serve it alongside roasted vegetables like broccoli, cauliflower, or carrots.
  • Quinoa: For a healthier option, serve it with quinoa.
  • Salad: A simple green salad adds a refreshing contrast to the richness of the dish.

Ultimately, the goal is to trust your senses. If it smells amazing and makes you smile, you’re probably on the right track. This Halloumi Makhani is more than just a recipe; it’s a celebration of flavors, a fusion aus cultures, zu einem delicious and comforting meal. Sie es genießen! The combination of die reichhaltigen, creamy sauce and the slightly salty halloumi works perfekt auf each other creating das sowohl a satisfying and flavorful meal that is also einfach zuzubereiten. Das gericht zu einem unvergesslichen Geschmackserlebnis macht. It nimmt die best of both worlds and turns it into eine wunderbare dish und macht it accessible to everyone. I hope sie die same joy in making and eating this as I do. Dieses Halloumi is going to be a new staple. Und sie will love it.

Halloumi Makhani

Prep Time 15 minutes
Cook Time 25 minutes
Total Time 40 minutes
Servings 4 people
Calories 450
A delicious vegetarian curry featuring pan-fried halloumi cheese simmered in a creamy and flavorful tomato-based makhani sauce. This dish is quick to prepare and perfect for a satisfying weeknight meal.

Ingredients

Ingredients

  • 250 g Halloumi-Käse (in Würfel geschnitten)
  • 2 EL Öl (Pflanzenöl oder Ghee)
  • 1 große Zwiebel (fein gewürfelt)
  • 2-3 Zehen Knoblauch (fein gehackt)
  • 1 TL frisch geriebener Ingwer
  • 1 TL Kreuzkümmel
  • 1 TL Korianderpulver
  • 0.5 TL Garam Masala
  • 1 TL Paprika
  • 400 g passierte Tomaten
  • 200 ml Sahne
  • 1 TL Zucker (optional)
  • Salz und Pfeffer (nach Geschmack)
  • frischer Koriander (zum Garnieren)

Instructions 

  • Fry halloumi until golden brown. Set aside.
  • Sauté onion until softened.
  • Add garlic and ginger; cook for 1 minute.
  • Add spices and toast briefly.
  • Add tomato sauce and simmer for 10 minutes.
  • Reduce heat, stir in cream slowly.
  • Add halloumi and simmer for 5 minutes.
  • Season with salt, pepper, and sugar. Garnish with coriander and serve.

Notes

For a richer flavor, use ghee instead of vegetable oil. Adjust the amount of spices to your preference.
Calories: 450kcal
Cost: $18
Course: Main Course
Cuisine: Indian
Keyword: Halloumi
pin

My name’s Ava, and welcome back to my kitchen! Today, we’re whipping up something truly special: a High Protein Banana Bread that’s as good for you as it is delicious. If you’ve been searching for a guilt-free way to enjoy your favorite comfort food, you’re in the right place. This recipe is a game-changer, combining the nostalgic warmth of classic banana bread with a protein boost that will keep you energized and satisfied. Let’s dive in!

I remember when I first started experimenting with protein baking. My initial attempts were… let’s just say they were dense enough to double as paperweights. But after countless trials (and a few epic fails), I finally cracked the code. This high protein banana bread is the result of all that hard work, and I promise, it’s worth every minute of baking time. It’s a delightful blend of moist, flavorful banana bread with the added benefits of protein, making it perfect for a post-workout snack, a healthy breakfast, or even a guilt-free dessert. So, grab your apron, and let’s get baking!

Why You’ll Love This High Protein Banana Bread

This isn’t just another banana bread recipe; it’s a healthier, more satisfying twist on a classic. Here’s why you’ll fall in love with it:

  • Healthy Indulgence: It’s a sweet treat that doesn’t compromise your health goals. It’s packed with protein and wholesome ingredients, so you can indulge without the guilt.
  • Perfectly Moist and Fluffy: No one wants dry banana bread. This recipe ensures a perfectly moist and tender crumb every time.
  • Easy to Make: With simple steps and readily available ingredients, this recipe is perfect for both novice and experienced bakers.
  • Customizable: Feel free to add your favorite mix-ins, from nuts and seeds to chocolate chips and dried fruit.
  • Great for Meal Prep: Bake a loaf on Sunday and enjoy healthy slices throughout the week. It’s perfect for breakfast, snacks, or a quick dessert.

This recipe is designed to be your new go-to for a delicious and nutritious treat. The added protein makes it a more balanced and satisfying option compared to traditional banana bread recipes. If you’re looking for a way to increase your protein intake while enjoying a classic baked good, this high protein banana bread is the perfect solution. It’s a win-win!

Ingredients You’ll Need

  • 3 large ripe bananas, mashed (about 1½ cups): The riper, the better! Overripe bananas add sweetness and moisture.
  • 2 large eggs: They provide structure and richness.
  • ½ cup plain Greek yogurt (nonfat or 2%): Adds moisture and a protein boost.
  • ¼ cup honey or maple syrup: Sweetens the bread naturally.
  • 1 teaspoon vanilla extract: Enhances the overall flavor.
  • 2 tablespoons coconut oil, melted (or any neutral oil): Adds moisture and a subtle flavor.
  • 1½ cups whole wheat flour (or all-purpose flour): Provides the base structure.
  • ½ cup vanilla protein powder (whey, plant-based, or collagen): The star of the show! Choose your favorite protein powder.
  • 1 teaspoon baking soda: Helps the bread rise.
  • ½ teaspoon baking powder: Gives the bread a light and fluffy texture.
  • 1 teaspoon cinnamon: Adds warmth and spice.
  • ¼ teaspoon salt: Balances the sweetness and enhances the other flavors.
  • ½ cup chopped walnuts or pecans: Adds crunch and nutty flavor.
  • ⅓ cup dark chocolate chips: Because who doesn’t love chocolate?
  • 2 tablespoons chia seeds or flaxseeds: Adds a boost of fiber and healthy fats.
Recipe Image

Let’s Bake: Step-by-Step Instructions

Now for the fun part! Follow these simple steps to create your own delicious high protein banana bread.

  1. Preheat and Prep: Preheat your oven to 350°F (175°C). Grease a 9×5-inch loaf pan with cooking spray or line it with parchment paper. This ensures the bread doesn’t stick and makes for easy removal.
  2. Wet Mixture Magic: In a large bowl, mash the ripe bananas until smooth. Add eggs, Greek yogurt, honey, vanilla extract, and melted coconut oil. Whisk until well combined and creamy. This is the foundation of your moist and flavorful banana bread.
  3. Dry Ingredients Dance: In a separate bowl, whisk together the whole wheat flour, protein powder, baking soda, baking powder, cinnamon, and salt. Make sure there are no lumps in the protein powder. Nobody wants a gritty bite!
  4. Combine with Care: Gently fold the dry ingredients into the wet ingredients using a spatula. Mix until just combined—don’t overmix! A few small lumps are perfectly fine. This keeps your banana bread tender and fluffy. Overmixing can lead to a tough texture, and we definitely don’t want that.
  5. Add Your Favorites: If using nuts, chocolate chips, or seeds, fold them in now. Save a few chocolate chips to sprinkle on top for that bakery-style look. It’s all about the presentation!
  6. Bake to Perfection: Pour the batter into your prepared loaf pan and smooth the top. Bake for 50-60 minutes, or until a toothpick inserted into the center comes out clean or with just a few moist crumbs. Every oven is different, so keep an eye on it.
  7. Cool and Enjoy: Let the bread cool in the pan for 10 minutes, then transfer to a wire rack to cool completely. I know it’s tempting, but letting it cool makes slicing so much easier! Plus, the flavors meld together even more as it cools.

Pro Tips for the Best Banana Bread

Want to take your banana bread to the next level? Here are a few pro tips I’ve learned over the years:

  • Use Ripe Bananas: The riper, the better. Overripe bananas are sweeter and easier to mash, resulting in a moister bread. If you don’t have overripe bananas, you can roast them in the oven to bring out their sweetness.
  • Don’t Overmix: Overmixing develops the gluten in the flour, leading to a tough bread. Mix until just combined.
  • Measure Accurately: Baking is a science, so accurate measurements are key. Use a kitchen scale for best results, especially when measuring flour.
  • Check for Doneness: Use a toothpick to check for doneness. If it comes out clean or with just a few moist crumbs, the bread is ready.
  • Cool Completely: Let the bread cool completely before slicing. This prevents it from crumbling and allows the flavors to meld together.

Common Mistakes to Avoid

Even the most experienced bakers make mistakes. Here are a few common pitfalls to watch out for:

  • Using Underripe Bananas: This results in a less sweet and less moist bread.
  • Overmixing the Batter: This leads to a tough and dense bread.
  • Baking at the Wrong Temperature: This can result in a bread that is either underbaked or overbaked.
  • Not Measuring Ingredients Accurately: This can throw off the entire recipe.
  • Opening the Oven Door Too Often: This can cause the bread to collapse.

Variations to Try

One of the best things about banana bread is how versatile it is. Here are a few variations to try:

  • Chocolate Chip Banana Bread: Add more chocolate chips for an extra decadent treat.
  • Nutty Banana Bread: Use a variety of nuts, such as walnuts, pecans, and almonds.
  • Spiced Banana Bread: Add a pinch of nutmeg, cloves, or allspice for a warm and cozy flavor.
  • Vegan Banana Bread: Substitute the eggs with flax eggs and use plant-based yogurt and protein powder.
  • Gluten-Free Banana Bread: Use a gluten-free flour blend.

How to Store Your High Protein Banana Bread

To keep your banana bread fresh and delicious, follow these storage tips:

  • Room Temperature: Store in an airtight container for up to 3 days.
  • Refrigerator: Store in an airtight container for up to a week.
  • Freezer: Wrap tightly in plastic wrap and store in a freezer bag for up to 2 months. Thaw overnight in the refrigerator before serving.

Frequently Asked Questions (FAQ)

Got questions? I’ve got answers!

  • Can I use a different type of protein powder?: Yes, you can use any type of protein powder you like, such as whey, casein, soy, or plant-based. Just be aware that different protein powders may affect the texture and flavor of the bread.
  • Can I use a different type of flour?: Yes, you can use all-purpose flour, gluten-free flour, or even almond flour. Keep in mind that different flours may affect the texture of the bread.
  • Can I reduce the amount of sugar?: Yes, you can reduce the amount of honey or maple syrup, or use a sugar substitute.
  • Can I add other ingredients?: Absolutely! Feel free to add your favorite mix-ins, such as dried fruit, nuts, or spices.
  • Why is my banana bread dry?: This could be due to overbaking, using too much flour, or not using enough ripe bananas.

Serving Suggestions

Here are a few ways to enjoy your high protein banana bread:

  • Plain: Enjoy a slice on its own for a simple and satisfying snack.
  • With a Spread: Top with peanut butter, almond butter, or cream cheese.
  • Toasted: Toast a slice for a warm and crispy treat.
  • With Yogurt and Fruit: Crumble a slice over yogurt and top with fresh fruit.
  • As Dessert: Serve with a scoop of ice cream or a dollop of whipped cream.

And there you have it – my ultimate high protein banana bread recipe! I hope you love it as much as I do. Remember, cooking is all about experimenting and having fun, so don’t be afraid to get creative and make this recipe your own. Happy baking!

High Protein Banana Bread Recipe

Prep Time 15 minutes
Cook Time 1 hour
Total Time 1 hour 15 minutes
Servings 12 slices
Calories 220
Enjoy a healthier twist on classic banana bread with this high-protein version. Packed with flavor and nutrients, it's perfect for a guilt-free treat or post-workout snack.

Ingredients

Ingredients

  • 3 large ripe bananas (mashed (about 1½ cups))
  • 2 large eggs
  • 0.5 cup plain Greek yogurt (nonfat or 2%)
  • 0.25 cup honey or maple syrup
  • 1 teaspoon vanilla extract
  • 2 tablespoons coconut oil (melted (or any neutral oil))
  • 1.5 cups whole wheat flour (or all-purpose flour)
  • 0.5 cup vanilla protein powder (whey, plant-based, or collagen)
  • 1 teaspoon baking soda
  • 0.5 teaspoon baking powder
  • 1 teaspoon cinnamon
  • 0.25 teaspoon salt
  • 0.5 cup chopped walnuts or pecans
  • 0.33 cup dark chocolate chips
  • 2 tablespoons chia seeds or flaxseeds

Instructions 

  • Preheat oven to 350°F (175°C). Grease a 9×5-inch loaf pan.
  • Mash bananas, add eggs, yogurt, honey, vanilla, and oil. Whisk until combined.
  • Whisk flour, protein powder, baking soda, baking powder, cinnamon, and salt.
  • Fold dry ingredients into wet. Mix until just combined.
  • Fold in nuts, chocolate chips, or seeds. Save some for topping.
  • Pour batter into pan and bake for 50-60 minutes.
  • Cool in pan for 10 minutes, then transfer to a wire rack.

Notes

For a richer flavor, use browned butter instead of coconut oil.
Calories: 220kcal
Cost: $8
Course: Breakfast, Snack
Cuisine: American
Keyword: Banana
pin

My name’s Ava, and welcome back to my kitchen! Today, we’re diving headfirst into comfort food territory with a recipe that’s not only incredibly delicious but also ridiculously easy to make. Get ready to meet your new weeknight hero: Ooey-Gooey Cheesy Garlic Chicken Wraps. If you’re anything like me, you crave those meals that are both satisfying and quick to prepare, especially after a long day. These wraps are exactly that—a warm, cheesy hug in every bite.

I remember the first time I made something similar to this. It was a chaotic Tuesday, I was running late, and my stomach was rumbling louder than my car’s engine. Scrounging through the fridge, I found some leftover chicken, a lonely clove of garlic, and a mountain of cheese. A few minutes later, I was happily munching on a makeshift wrap that tasted like pure magic. That’s how this recipe was born – from a moment of hungry desperation and a desire for something comforting. And let me tell you, it’s been a family favorite ever since. Whether you are looking for a quick lunch or an easy dinner, these cheesy garlic chicken wraps are the perfect choice.

Why You’ll Love This Recipe

Let’s be honest, sometimes all you need is something warm, cheesy, and utterly delicious to make everything better. These cheesy garlic chicken wraps are the answer. But why will you absolutely adore them? Let me count the ways:

  • Quick & Easy: From start to finish, you can have these wraps on the table in under 30 minutes. Perfect for those busy weeknights!
  • Ultimate Comfort Food: The combination of garlic, chicken, and melted cheese is a match made in heaven. It’s like a warm hug for your taste buds.
  • Customizable: Feel free to swap out ingredients based on what you have on hand. Use different cheeses, add veggies, or spice things up with a dash of hot sauce.
  • Kid-Friendly: Even the pickiest eaters will devour these wraps. The cheesy, savory flavor is a surefire hit with kids of all ages.
  • Leftover-Friendly: Got leftover chicken? This is the perfect way to use it up! No need to let that delicious chicken go to waste.

Ingredients You’ll Need

  • Chicken breast (cooked, diced): The star of the show! You can use leftover rotisserie chicken, grilled chicken, or even canned chicken in a pinch.
  • Garlic (minced): Adds that unmistakable garlicky goodness. Freshly minced is best, but jarred minced garlic works too.
  • Olive oil: For sautéing the garlic and adding richness. You can substitute with butter if you prefer.
  • Shredded mozzarella cheese: For that stretchy, melty, cheesy pull.
  • Shredded cheddar cheese: Adds a sharp, tangy flavor that complements the mozzarella perfectly.
  • Flour tortillas (medium): The vessel for all that deliciousness! Use your favorite brand of flour tortillas. You can also use gluten-free tortillas if needed.
  • Butter: For toasting the wraps to golden perfection.
  • Parsley (chopped, optional): Adds a pop of freshness and color.
  • Salt and black pepper: To season everything just right.
Recipe Image

How to Make Cheesy Garlic Chicken Wraps: Step-by-Step

Alright, let’s get cooking! Here’s how to make these amazing cheesy garlic chicken wraps:

  1. Prepare the Chicken: Start by cooking the chicken if you have not already. Season it lightly with salt and pepper and either bake, sauté, or grill until done. Dice into small bite-sized pieces and set aside. This ensures that every bite of these wraps is packed with flavor and that the texture is just right.
  2. Sauté the Garlic: In a pan over medium heat, warm the olive oil. Add the minced garlic and sauté just until golden and fragrant, around thirty seconds to one minute. Be careful not to burn the garlic, as it can become bitter. Add the diced chicken to the pan and toss it with the garlic oil to infuse flavor evenly.
  3. Add the Cheese: Remove from heat and stir in both cheeses while the chicken is still hot. This helps the cheese start melting before it goes into the wrap. The goal is to get that ooey-gooey consistency that makes these wraps so irresistible.
  4. Assemble the Wraps: Lay a tortilla flat and spoon a generous portion of the cheesy garlic chicken mixture into the center. Fold in the sides and roll it tightly like a burrito. Make sure to tuck in the sides well so that the filling doesn’t spill out while cooking.
  5. Toast the Wraps: In a skillet, melt the butter over medium heat. Place the wraps seam-side down and press gently. Cook each side for two to three minutes or until golden brown and crispy. Flip carefully to avoid spilling any filling. The butter helps to create a beautiful golden crust that adds a delightful crunch to each bite.
  6. Rest and Serve: Once all wraps are cooked, remove from the skillet and let them rest for one to two minutes before slicing. This allows the cheese to set slightly, making them easier to handle.
  7. Garnish and Enjoy: Sprinkle chopped parsley over the top if desired, and serve warm. The parsley adds a pop of freshness and color that elevates the dish.

Pro Tips for Perfect Wraps

Want to take your cheesy garlic chicken wraps to the next level? Here are a few pro tips to keep in mind:

  • Don’t Overcook the Garlic: Burnt garlic is bitter and can ruin the flavor of the entire dish. Sauté it gently until it’s just fragrant and golden.
  • Use High-Quality Cheese: The better the cheese, the better the flavor. Opt for freshly shredded cheese instead of pre-shredded for the best melting and taste.
  • Warm the Tortillas: Warming the tortillas slightly before filling them makes them more pliable and less likely to tear. You can warm them in a dry skillet or in the microwave for a few seconds.
  • Don’t Overfill the Wraps: Overfilling the wraps can make them difficult to roll and prone to bursting. Use a generous but reasonable amount of filling.
  • Press Gently While Cooking: Pressing the wraps gently in the skillet helps them to brown evenly and seals the edges, preventing the filling from spilling out.

Common Mistakes to Avoid

We all make mistakes in the kitchen, but here are a few common pitfalls to watch out for when making these wraps:

  • Burning the Garlic: As mentioned earlier, burnt garlic is a no-no. Keep a close eye on it while sautéing.
  • Using Cold Chicken: Cold chicken can make the cheese mixture cool down too quickly, preventing it from melting properly. Make sure the chicken is warm when you add the cheese.
  • Overcooking the Wraps: Overcooking the wraps can make the tortillas dry and brittle. Cook them until they’re golden brown and crispy, but not burnt.
  • Skipping the Resting Period: Letting the wraps rest for a minute or two after cooking allows the cheese to set and prevents them from being too messy to handle.

Variations to Try

One of the best things about this recipe is how versatile it is. Here are a few variations to try:

  • Spicy Chicken Wraps: Add a pinch of red pepper flakes or a dash of hot sauce to the chicken mixture for a kick of heat.
  • Veggie-Loaded Wraps: Add sautéed veggies like bell peppers, onions, and mushrooms to the chicken mixture for a healthier twist.
  • BBQ Chicken Wraps: Use BBQ sauce instead of olive oil and garlic to sauté the chicken for a smoky, tangy flavor.
  • Pesto Chicken Wraps: Add a spoonful of pesto to the chicken mixture for a burst of fresh, herby flavor.
  • Cream Cheese Chicken Wraps: Add a dollop of cream cheese to the chicken mixture for extra creaminess.

How to Store Leftovers

If you happen to have any leftovers (which is unlikely, because they’re so delicious), here’s how to store them:

  • Refrigerate: Store leftover wraps in an airtight container in the refrigerator for up to 3 days.
  • Reheat: Reheat the wraps in a skillet over medium heat or in the microwave until warmed through. They may not be as crispy as when they were freshly made, but they’ll still be delicious.

Frequently Asked Questions (FAQ)

Got questions? I’ve got answers! Here are some common questions about these cheesy garlic chicken wraps:

  • Can I use pre-cooked chicken?: Absolutely! Pre-cooked chicken is a great time-saver. Just make sure it’s warmed through before adding the cheese.
  • Can I use different cheeses?: Of course! Feel free to experiment with different cheeses like provolone, Monterey Jack, or pepper jack.
  • Can I make these ahead of time?: You can prepare the chicken and cheese mixture ahead of time and store it in the refrigerator. When you’re ready to eat, simply assemble the wraps and cook them.
  • Can I freeze these wraps?: I don’t recommend freezing these wraps, as the tortillas can become soggy when thawed.
  • Are these wraps gluten-free?: Not as written, but you can easily make them gluten-free by using gluten-free tortillas.

Serving Suggestions

These cheesy garlic chicken wraps are delicious on their own, but here are a few serving suggestions to make them a complete meal:

  • Side Salad: Serve with a simple side salad for a light and refreshing meal.
  • Soup: Pair with a bowl of tomato soup or chicken noodle soup for a comforting and satisfying meal.
  • French Fries: Serve with a side of crispy French fries for a classic comfort food combination.
  • Coleslaw: Add a scoop of coleslaw for a crunchy and tangy side dish.

So there you have it – Ooey-Gooey Cheesy Garlic Chicken Wraps that are sure to become a family favorite. I hope you love this recipe as much as I do. Happy cooking, and I’ll see you in the next recipe!

Ooey-Gooey Cheesy Garlic Chicken Wraps You’ll Devour

Prep Time 10 minutes
Cook Time 15 minutes
Total Time 25 minutes
Servings 4 wraps
Calories 450
These cheesy garlic chicken wraps are a quick and easy meal that's packed with flavor. Perfect for a weeknight dinner or a satisfying lunch!

Ingredients

Ingredients

  • 2 cups Chicken breast (cooked, diced) (cooked and diced)
  • 2 cloves Garlic (minced) (minced)
  • 1 tablespoon Olive oil
  • 1 cup Shredded mozzarella cheese
  • 1 cup Shredded cheddar cheese
  • 4 Flour tortillas (medium) (medium)
  • 2 tablespoons Butter
  • to taste Parsley (chopped, optional) (chopped, optional)
  • to taste Salt and black pepper

Instructions 

  • Cook and dice the chicken, seasoning with salt and pepper.
  • Sauté garlic in olive oil until fragrant. Add chicken and toss.
  • Remove from heat and stir in mozzarella and cheddar cheese.
  • Lay tortilla flat, spoon in chicken mixture, fold sides, and roll tightly.
  • Melt butter in skillet, cook wraps seam-side down until golden brown and crispy.
  • Let wraps rest for 1-2 minutes before slicing.
  • Sprinkle with parsley and serve warm.

Notes

For extra flavor, add a pinch of red pepper flakes to the chicken mixture.
Calories: 450kcal
Cost: $12
Course: Main Course
Cuisine: American
Keyword: Chicken
pin

Hey there! Ava here, welcoming you to my kitchen and the aroma of what’s about to become your new weeknight obsession: Easy One-Pan Chicken & Rice Casserole. I remember the first time I made something like this – a frantic Tuesday evening, a fridge full of odds and ends, and a craving for something comforting. What emerged was a dish so satisfying, so flavorful, that it became a regular in our rotation. This isn’t just a recipe; it’s a solution for those days when you want a home-cooked meal without the fuss.

Growing up, casseroles were a staple. They were the embodiment of Mom’s love, a warm hug on a plate. But let’s be honest, some casseroles can be a little… bland. That’s why I’ve taken the classic chicken and rice casserole and injected it with a serious dose of flavor. We’re talking creamy textures, perfectly cooked rice, and chicken so tender it practically melts in your mouth. All in one pan! Think of it as your favorite comfort food, elevated.

Why You’ll Love This Chicken and Rice Casserole

This isn’t just another recipe; it’s a game-changer. Here’s why you’ll be making this easy one-pan chicken and rice casserole again and again:

  • Minimal Cleanup: Everything cooks in one pan. Yes, you read that right. Fewer dishes mean more time to relax.
  • Bold Flavors: Dijon mustard, fresh herbs, and a hint of red pepper flakes create a symphony of flavors that will tantalize your taste buds.
  • Customizable: Swap out the veggies, change the cheese, use different herbs – make it your own!
  • Comfort Food: There’s something inherently comforting about a creamy, cheesy casserole. It’s like a warm hug on a plate.
  • Quick and Easy: Perfect for busy weeknights when you need a satisfying meal on the table in under an hour.

I love that this chicken rice casserole is so versatile. You can easily adapt it to what you have on hand. And it’s a great way to use up leftover vegetables. Plus, the creamy texture and bold flavors make it a real crowd-pleaser. I promise, even the pickiest eaters will ask for seconds!

Ingredients for the Ultimate One-Pan Chicken & Rice Casserole

Here’s what you’ll need to create this masterpiece. Don’t worry if you don’t have everything on hand; I’ll give you some substitution ideas later on.

  • 4 pieces chicken thighs or breasts (bone-in for extra moisture or boneless for quicker cooking)
  • 1 cup long-grain white rice (absorbs the creamy sauce beautifully)
  • 2 cups chicken broth (use low-sodium for better control of saltiness)
  • 1 medium onion (finely chopped)
  • 2 cloves garlic (minced)
  • 2 tablespoons olive oil (for searing chicken)
  • 1 cup heavy cream (or half-and-half)
  • 1/2 cup Parmesan cheese (for a golden crust when baked)
  • 1 tablespoon Dijon mustard (adds a hint of sharpness)
  • 2 tablespoons fresh herbs (thyme, parsley to sprinkle in)
  • 1 cup frozen peas (or diced carrots)
  • 1 teaspoon red pepper flakes (for a slight kick)
Recipe Image

Step-by-Step: Making Your Chicken & Rice Casserole

Alright, let’s get cooking! Here’s how to bring this one-pan wonder to life. Don’t be intimidated; it’s easier than you think.

  1. Sear the Chicken: Heat the olive oil in a large oven-safe skillet over medium-high heat. Season the chicken with salt and pepper. Sear the chicken until golden brown on both sides. This step is crucial for adding flavor and sealing in the juices. Remove the chicken from the pan and set aside.
  2. Sauté Aromatics: Add the chopped onion to the skillet and cook until softened, about 5 minutes. Add the minced garlic and cook for another minute until fragrant. Be careful not to burn the garlic!
  3. Add Rice and Broth: Stir in the rice and chicken broth. Bring to a simmer, scraping up any browned bits from the bottom of the pan. This adds depth of flavor to the casserole.
  4. Assemble the Casserole: Place the seared chicken on top of the rice mixture. Cover the skillet with a lid or foil and transfer to a preheated oven at 375°F (190°C).
  5. Bake: Bake for 30-40 minutes, or until the rice is cooked through and the chicken is cooked to an internal temperature of 165°F (74°C).
  6. Add Cream and Cheese: Remove the casserole from the oven. Stir in the heavy cream, Parmesan cheese, Dijon mustard, fresh herbs, red pepper flakes, and frozen peas.
  7. Broil (Optional): For a golden, bubbly top, broil the casserole for 2-3 minutes, watching carefully to prevent burning.
  8. Rest and Serve: Let the casserole rest for 5-10 minutes before serving. This allows the flavors to meld together and the sauce to thicken slightly.

Pro Tips for the Best Chicken Rice Casserole

Want to take your casserole to the next level? Here are a few of my favorite tricks:

  • Use Bone-In Chicken: For extra moisture and flavor, use bone-in, skin-on chicken thighs. The bones add richness to the broth, and the skin crisps up beautifully.
  • Don’t Skip the Searing: Searing the chicken is essential for developing a deep, savory flavor. It also helps to seal in the juices, preventing the chicken from drying out during baking.
  • Use Low-Sodium Broth: This allows you to control the saltiness of the casserole. You can always add more salt to taste, but it’s harder to remove it.
  • Toast the Rice: Before adding the broth, toast the rice in the skillet for a few minutes. This enhances the nutty flavor of the rice.
  • Fresh Herbs are Key: Fresh herbs add a bright, vibrant flavor that elevates the casserole. If you don’t have fresh herbs on hand, you can use dried herbs, but use half the amount.

Common Mistakes to Avoid

We all make mistakes in the kitchen, but here are a few to watch out for when making this casserole:

  • Overcooking the Rice: The rice should be tender but not mushy. Check it periodically during baking and adjust the cooking time as needed.
  • Burning the Garlic: Burnt garlic tastes bitter and can ruin the entire dish. Cook the garlic over low heat and watch it carefully.
  • Using Too Much Salt: Taste as you go and adjust the seasoning accordingly. Remember, you can always add more salt, but you can’t take it away.
  • Skipping the Resting Time: Letting the casserole rest for a few minutes before serving allows the flavors to meld together and the sauce to thicken.

Variations: Make It Your Own!

One of the best things about this recipe is how easy it is to customize. Here are a few ideas to get you started:

  • Vegetables: Swap out the peas for diced carrots, broccoli florets, or sliced mushrooms.
  • Cheese: Use cheddar, mozzarella, or Gruyere instead of Parmesan.
  • Protein: Substitute the chicken with sausage, shrimp, or tofu.
  • Spice: Add a pinch of cayenne pepper for extra heat.
  • Creamy Base: Use cream of mushroom soup or cream of chicken soup instead of heavy cream.

Don’t be afraid to experiment and get creative! This casserole is a blank canvas, waiting for your personal touch.

Storing and Reheating Your Casserole

Got leftovers? Lucky you! Here’s how to store and reheat your casserole:

  • Storing: Let the casserole cool completely before storing it in an airtight container in the refrigerator for up to 3 days.
  • Reheating: Reheat the casserole in the oven at 350°F (175°C) until heated through, about 20-30 minutes. You can also microwave individual portions for a quick and easy lunch.

I actually think this casserole tastes even better the next day, after the flavors have had a chance to meld together even more.

Frequently Asked Questions (FAQ)

Got questions? I’ve got answers! Here are some of the most common questions I get about this recipe:

  • Can I use brown rice?: Yes, but you’ll need to adjust the cooking time and amount of liquid. Brown rice takes longer to cook and requires more liquid than white rice.
  • Can I make this casserole ahead of time?: Yes, you can assemble the casserole ahead of time and store it in the refrigerator for up to 24 hours. Add a few extra minutes to the baking time.
  • Can I freeze this casserole?: Yes, but the texture may change slightly after freezing. Wrap the casserole tightly in plastic wrap and foil and freeze for up to 2 months. Thaw completely before baking.
  • Can I use chicken tenders?: Yes, you can use chicken tenders cut into bite-sized pieces. Reduce the cooking time accordingly.

Serving Suggestions

This casserole is a complete meal on its own, but here are a few ideas for sides to round out your dinner:

  • Side Salad: A simple green salad with a light vinaigrette provides a refreshing contrast to the richness of the casserole.
  • Steamed Vegetables: Steamed broccoli, green beans, or asparagus are healthy and delicious additions to the meal.
  • Crusty Bread: Serve with a slice of crusty bread for soaking up the creamy sauce.

Ultimately, this Easy One-Pan Chicken & Rice Casserole is more than just a recipe; it’s an invitation to create memories in your kitchen. So grab your ingredients, put on some music, and let’s make something unforgettable together. The chicken and the rice will thank you!

Easy One-Pan Chicken & Rice Casserole with Creamy, Bold Flavors

Prep Time 15 minutes
Cook Time 45 minutes
Total Time 1 hour
Servings 6 servings
Calories 450
This easy one-pan chicken and rice casserole is packed with creamy, bold flavors. It's a comforting and satisfying meal perfect for a weeknight dinner.

Ingredients

Ingredients

  • 4 pieces chicken thighs or breasts (bone-in for extra moisture or boneless for quicker cooking)
  • 1 cup long-grain white rice (absorbs the creamy sauce beautifully)
  • 2 cups chicken broth (use low-sodium for better control of saltiness)
  • 1 medium onion (finely chopped)
  • 2 cloves garlic (minced)
  • 2 tablespoons olive oil (for searing chicken)
  • 1 cup heavy cream (or half-and-half)
  • 0.5 cup Parmesan cheese (for a golden crust when baked)
  • 1 tablespoon Dijon mustard (adds a hint of sharpness)
  • 2 tablespoons fresh herbs (thyme, parsley to sprinkle in)
  • 1 cup frozen peas (or diced carrots)
  • 1 teaspoon red pepper flakes (for a slight kick)

Notes

For extra flavor, try browning the chicken in the pan before adding the other ingredients.
Calories: 450kcal
Cost: $18
Course: Main Course
Cuisine: American
Keyword: Chicken
pin

Parmesan Crusted Chicken Sheet Pan Dinner: A Weeknight Wonder

Hey there, friend! Ava here, back from my Seattle kitchen to share something that’s become a staple in our household: Parmesan Crusted Chicken Sheet Pan Dinner. If you’re anything like me, weeknights are a whirlwind of activities, and the last thing you want is a complicated meal that leaves you with a mountain of dishes. That’s where this recipe comes in – it’s quick, easy, and utterly delicious. Imagine juicy, tender chicken coated in a crispy Parmesan crust, roasted alongside perfectly cooked vegetables. It’s a symphony of flavors and textures, all on one glorious sheet pan.

I remember one particularly hectic Tuesday when I was juggling a work deadline, a kid’s soccer practice, and a looming grocery run. I needed something fast and satisfying, and this recipe saved the day. It’s now a regular in our rotation, and I’m so excited to share it with you!

Why You’ll Love This Parmesan Crusted Chicken Sheet Pan Dinner

Seriously, what’s not to love? This isn’t just a meal; it’s a weeknight game-changer. Here’s why you’ll be adding this to your regular rotation:

  • Quick and Easy Clean Up: The best part? Minimal dishes! Everything cooks on one sheet pan, making clean up a breeze. After a long day, that’s a huge win in my book.
  • Healthy and Balanced: Packed with protein and veggies, this meal is as nutritious as it is delicious. Feel good about what you’re feeding your family (and yourself!).
  • Customizable: Don’t have broccoli? No problem! Swap in your favorite vegetables. This recipe is incredibly versatile and easy to adapt to your tastes.
  • Flavor Explosion: The Parmesan crust on the chicken is simply irresistible. It adds a savory, cheesy crunch that elevates the whole dish.

This recipe is so simple, you can even get the kids involved. My little one loves helping me dredge the chicken in the Parmesan mixture – it’s a fun and tasty activity we can do together. It’s about minutes of prep, and then the oven does the rest of the work.

Ingredients: The Building Blocks of Deliciousness

Here’s what you’ll need to create this magic:

  • 1.5 lbs boneless, skinless chicken breasts, cut into 1-inch thick pieces
  • 1 lb broccoli florets
  • 1 red bell pepper, chopped
  • 1/4 cup olive oil
  • 1/2 cup grated Parmesan cheese
  • 1/4 cup panko bread crumbs
  • 1 teaspoon garlic powder
  • 1/2 teaspoon dried oregano
  • 1/4 teaspoon salt
  • 1/4 teaspoon black pepper
Recipe Image

Step-by-Step: Creating Your Sheet Pan Masterpiece

Alright, let’s get cooking! Follow these simple steps to create a delicious and satisfying meal:

  1. Preheat and Prep: Preheat oven to 400°F (200°C). Line a large baking sheet with parchment paper. This makes clean up even easier.
  2. Toss the Veggies: In a large bowl, toss broccoli florets and red bell pepper with 2 tablespoons of olive oil. Spread in a single layer on the prepared baking sheet.
  3. Parmesan Mixture: In a separate bowl, combine Parmesan cheese, panko bread crumbs, garlic powder, oregano, salt, and pepper. This is where the magic happens!
  4. Coat the Chicken: Drizzle the remaining 2 tablespoons of olive oil over the chicken pieces. Then, dredge each piece in the Parmesan mixture, pressing to coat. Make sure each piece is well-coated.
  5. Arrange and Bake: Arrange the coated chicken pieces on the baking sheet with the vegetables. Make sure everything is in a single layer for even cooking. Bake for 20-25 minutes, or until the chicken is cooked through and the vegetables are tender.
  6. Serve Immediately: Enjoy the fruits (or rather, vegetables and chicken!) of your labor.

And that’s it! You’ve created a delicious and healthy meal that’s perfect for any weeknight. If you have the potatoes already prepped, it’s even faster!

Pro Tips for Sheet Pan Perfection

Want to take your sheet pan dinner to the next level? Here are a few of my favorite pro tips:

  • Even Cooking: Make sure the chicken and vegetables are in a single layer on the sheet pan. Overcrowding can lead to steaming instead of roasting.
  • Don’t Overcook: Keep an eye on the chicken to prevent it from drying out. Use a meat thermometer to ensure it reaches an internal temperature of 165°F (74°C).
  • Veggies First: If you’re using root vegetables like potatoes or carrots, give them a head start by roasting them for 10-15 minutes before adding the chicken.
  • Crispy Chicken: For extra crispy chicken, broil for the last 2-3 minutes of cooking time. Just be sure to watch it closely to prevent burning!

I find that using high-quality Parmesan cheese makes a big difference in the flavor of the crust. It’s worth splurging on the good stuff!

Common Mistakes (and How to Avoid Them)

We all make mistakes in the kitchen – it’s part of the learning process! Here are a few common pitfalls to avoid when making this recipe:

  • Overcrowding the Pan: As mentioned before, overcrowding can lead to soggy vegetables and unevenly cooked chicken. Use two sheet pans if necessary.
  • Not Seasoning Enough: Don’t be shy with the salt and pepper! Seasoning is key to bringing out the flavors of the chicken and vegetables.
  • Using the Wrong Vegetables: Some vegetables, like leafy greens, don’t roast well. Stick to heartier vegetables like broccoli, bell peppers, and Brussels sprouts.
  • Forgetting the Parchment Paper: Trust me, you don’t want to skip this step. Parchment paper makes clean up so much easier and prevents the chicken from sticking to the pan.

I once forgot to line my sheet pan with parchment paper, and it took me forever to scrub off the stuck-on chicken and vegetables. Lesson learned!

Variations: Make It Your Own!

The beauty of this recipe is its versatility. Feel free to experiment and make it your own! Here are a few ideas to get you started:

  • Different Vegetables: Swap in your favorite vegetables like Brussels sprouts, carrots, zucchini, or asparagus.
  • Spice It Up: Add a pinch of red pepper flakes to the Parmesan mixture for a little heat.
  • Lemon Herb Chicken: Add lemon zest and fresh herbs like thyme or rosemary to the Parmesan mixture for a bright, flavorful twist.
  • Honey Garlic Glaze: Drizzle a honey garlic glaze over the chicken and vegetables during the last few minutes of cooking for a sweet and savory finish.

I love adding a squeeze of lemon juice over the finished dish for a burst of freshness. It really brightens up the flavors!

Storage: Keeping the Goodness Fresh

If you have any leftovers (which is rare in my house!), store them in an airtight container in the refrigerator for up to 3 days. Reheat in the oven or microwave until warmed through.

This is a great meal to prep ahead of time. You can chop the vegetables and mix the Parmesan coating in advance, then assemble and bake when you’re ready to eat.

Frequently Asked Questions (FAQ)

Got questions? I’ve got answers! Here are a few common questions about this recipe:

  • Can I use frozen vegetables? Yes, you can use frozen vegetables, but be sure to thaw them and pat them dry before roasting. This will prevent them from becoming soggy.
  • Can I use chicken thighs instead of chicken breasts? Absolutely! Chicken thighs are a great option for this recipe. They tend to be more flavorful and stay moist during roasting.
  • Can I make this recipe ahead of time? Yes, you can prep the vegetables and Parmesan coating in advance. Store them separately in the refrigerator and assemble just before baking.
  • What if my chicken is browning too quickly? If your chicken is browning too quickly, tent the sheet pan with foil to prevent burning.

If you have any other questions, feel free to leave a comment below! I’m always happy to help.

Serving Suggestions: Completing the Meal

This Parmesan Crusted Chicken Sheet Pan Dinner is a complete meal on its own, but here are a few ideas to round it out:

  • Side Salad: A simple green salad with a light vinaigrette is a perfect complement to this dish.
  • Quinoa or Rice: Serve over a bed of quinoa or rice for a heartier meal.
  • Crusty Bread: Don’t forget the crusty bread for soaking up all those delicious pan juices!

I often serve this with a side of roasted garlic aioli for dipping. It’s a simple addition that adds a ton of flavor.

So there you have it – my go-to Parmesan Crusted Chicken Sheet Pan Dinner recipe. I hope you love it as much as we do! Remember, cooking is all about experimenting and having fun. Don’t be afraid to try new things and make this recipe your own. Happy cooking!

This recipe is a lifesaver and I hope you and your family enjoys it as much as mine does! One pan chicken and green beans with parmesan crust will be a family favorite in no time!

Parmesan Crusted Chicken Sheet Pan Dinner

Prep Time 15 minutes
Cook Time 25 minutes
Total Time 40 minutes
Servings 4 servings
Calories 450
A quick and easy sheet pan dinner featuring parmesan crusted chicken and roasted vegetables. Perfect for a weeknight meal!

Ingredients

Chicken

  • 1.5 lbs boneless, skinless chicken breasts (cut into 1-inch thick pieces)

Vegetables

  • 1 lb broccoli florets
  • 1 red bell pepper (chopped)

Parmesan Crust

  • 1/4 cup olive oil
  • 1/2 cup grated Parmesan cheese
  • 1/4 cup panko bread crumbs
  • 1 teaspoon garlic powder
  • 1/2 teaspoon dried oregano
  • 1/4 teaspoon salt
  • 1/4 teaspoon black pepper

Instructions 

  • Preheat oven to 400°F (200°C). Line a large baking sheet with parchment paper.
  • Toss broccoli and bell pepper with 2 tablespoons olive oil. Spread on baking sheet.
  • Combine Parmesan, panko, garlic powder, oregano, salt, and pepper in a bowl.
  • Drizzle remaining olive oil over chicken. Dredge in Parmesan mixture.
  • Arrange chicken on baking sheet with vegetables.
  • Bake for 20-25 minutes, or until chicken is cooked and vegetables are tender.
  • Serve immediately.

Notes

For extra flavor, marinate the chicken in Italian dressing for 30 minutes before coating with the Parmesan mixture.
Calories: 450kcal
Cost: $18
Course: Main Course
Cuisine: American
Keyword: Chicken
pin

Hey there, friend! Ava here, welcoming you into my cozy Seattle kitchen. Today, we’re baking up a storm with a recipe that’s close to my heart (and my muscles!) – High Protein Banana Bread. If you’re anything like me, you crave those comforting baked goods but also want to keep things healthy. This recipe is the perfect marriage of those two worlds. It’s moist, delicious, and packed with protein to keep you feeling satisfied. Trust me; this isn’t your grandma’s banana bread (though, Grandma would probably love it too!).

I’ve always been a fan of banana bread. It reminds me of my childhood in Oregon, where my mom would bake loaves on rainy afternoons. But I wanted to create a modern version that fits my active lifestyle. Something that’s just sweet enough, incredibly easy to make, and gives me that extra boost of protein. And that’s how this high protein banana bread recipe was born. It’s become a staple in my house, and I’m so excited to share it with you!

Why You’ll Love This High Protein Banana Bread

Okay, let’s get real. There are a million banana bread recipes out there. So, why should you choose this one? Well, let me tell you:

  • It’s Packed with Protein: We’re talking serious protein power here, thanks to the addition of Greek yogurt and protein powder. Perfect for a post-workout snack or a satisfying breakfast.
  • It’s Incredibly Moist: No dry, crumbly banana bread here! The combination of ripe bananas and Greek yogurt keeps it incredibly moist and delicious.
  • It’s Easy to Make: Seriously, this recipe is foolproof. It comes together in minutes with just a few simple ingredients.
  • It’s Customizable: Want to add some chocolate chips? Go for it! Prefer walnuts? Absolutely! This recipe is a blank canvas for your creativity.
  • It’s the Perfect Pick-Me-Up: Need a little boost to get you through the afternoon? A slice of this banana bread with a cup of coffee is the perfect pick me up.

This high protein banana bread recipe is a game-changer. It’s the kind of recipe that makes you feel good about what you’re eating without sacrificing flavor. This recipe is a winner, whether you’re a seasoned baker or just starting out.

Ingredients You’ll Need

Alright, let’s talk ingredients. Here’s what you’ll need to whip up this amazing high protein banana bread:

  • 3 medium ripe bananas (mashed, about 1¼ cups)
  • 2 eggs
  • ½ cup plain Greek yogurt (or dairy-free alternative)
  • ¼ cup maple syrup or honey (optional for added sweetness)
  • 1 teaspoon vanilla extract
  • 1 cup oat flour (or almond flour for low-carb option)
  • ½ cup vanilla or unflavored protein powder
  • 1 teaspoon baking soda
  • ½ teaspoon baking powder
  • ½ teaspoon cinnamon
  • ¼ teaspoon salt
  • Optional add-ins: ¼ cup chopped walnuts, dark chocolate chips, or seeds
Recipe Image

Step-by-Step: Baking Your High Protein Banana Bread

Ready to get baking? Here’s how to make this incredible bread recipe:

  1. Preheat and Prep: Preheat your oven to 350°F (175°C). Line a loaf pan with parchment paper or grease it well with oil or cooking spray. This ensures your bread doesn’t stick and makes for easy cleanup.
  2. Mash and Mix: In a large bowl, mash the ripe bananas with a fork. Add the eggs, Greek yogurt, maple syrup (if using), and vanilla extract. Whisk until smooth and combined. It’s important to get those bananas nice and mashed for the best texture.
  3. Combine Dry Ingredients: In a separate bowl, mix oat flour, protein powder, baking soda, baking powder, cinnamon, and salt. Gradually stir the dry mixture into the wet ingredients until just combined. Be careful not to overmix!
  4. Add Your Mix-Ins: If using, gently fold in any optional add-ins like nuts, chocolate chips, or seeds. This is where you can really customize the recipe to your liking.
  5. Bake to Perfection: Pour the batter into the prepared loaf pan and smooth the top. Bake for 40–50 minutes, or until a toothpick inserted into the center comes out clean. Every oven is different, so keep an eye on it!
  6. Cool and Serve: Allow the bread to cool in the pan for 10 minutes, then transfer to a wire rack to cool completely. Slice and serve. I know it’s tempting, but letting it cool completely makes it easier to slice.

And there you have it! A delicious, high-protein banana bread that’s perfect for any occasion. I promise, it’s worth the wait!

Pro Tips for the Best Banana Bread

Want to take your banana bread to the next level? Here are a few pro tips I’ve learned over the years:

  • Use Ripe Bananas: The riper, the better! Overripe bananas are sweeter and easier to mash, giving your bread the best flavor and texture. Look for bananas with plenty of brown spots.
  • Don’t Overmix: Overmixing can lead to a tough bread. Mix the wet and dry ingredients until just combined. A few lumps are okay!
  • Measure Accurately: Baking is a science, so accurate measurements are key. Use measuring cups and spoons for the best results.
  • Test for Doneness: Use a toothpick to check if the bread is done. Insert it into the center; if it comes out clean, it’s ready.
  • Let it Cool: I know it’s tempting to dive in right away, but letting the bread cool completely before slicing makes it easier to handle and prevents it from crumbling.

Common Mistakes to Avoid

We all make mistakes in the kitchen, but here are a few common pitfalls to avoid when making banana bread:

  • Using Underripe Bananas: This will result in a bread that’s not sweet enough and has a starchy flavor.
  • Overbaking: This can lead to a dry, crumbly bread. Keep an eye on it and test for doneness frequently.
  • Not Greasing the Pan: This can cause the bread to stick and be difficult to remove.
  • Adding Too Many Mix-Ins: While mix-ins are great, adding too many can weigh the bread down and prevent it from baking evenly.

Variations to Try

Want to mix things up? Here are a few delicious variations to try with this recipe:

  • Chocolate Chip Banana Bread: Add ½ cup of dark chocolate chips to the batter for a decadent treat.
  • Walnut Banana Bread: Add ¼ cup of chopped walnuts for a nutty crunch.
  • Cinnamon Swirl Banana Bread: Swirl a mixture of cinnamon and sugar into the batter before baking for a beautiful and flavorful twist.
  • Peanut Butter Banana Bread: Add ¼ cup of peanut butter to the batter for a creamy, nutty flavor.
  • Almond Flour Banana Bread: For a low-carb option, use almond flour instead of oat flour.

Feel free to experiment and create your own unique variations! The possibilities are endless.

How to Store Your Banana Bread

To keep your banana bread fresh and delicious, follow these storage tips:

  • Room Temperature: Store the bread in an airtight container at room temperature for up to 3 days.
  • Refrigerator: For longer storage, store the bread in an airtight container in the refrigerator for up to a week.
  • Freezer: Wrap the bread tightly in plastic wrap and store it in the freezer for up to 2 months. Thaw overnight in the refrigerator before serving.

Proper storage will help maintain the bread’s moisture and flavor.

Frequently Asked Questions

Got questions? I’ve got answers! Here are some common questions about this high protein banana bread recipe:

  • Can I use a different type of protein powder? Yes, you can use any type of protein powder you like. Whey, casein, soy, or plant-based protein powders all work well.
  • Can I use a different type of flour? Yes, you can substitute the oat flour with almond flour for a low-carb option or whole wheat flour for a more nutritious bread.
  • Can I make this recipe vegan? Yes, you can substitute the eggs with flax eggs (1 tablespoon of flaxseed meal mixed with 3 tablespoons of water per egg) and use a dairy-free Greek yogurt alternative.
  • How many calories are in a slice? The calorie count will vary depending on the ingredients you use. However, per slice, this high protein banana bread is a relatively healthy treat.

Serving Suggestions

Here are a few ways to enjoy your delicious high protein banana bread:

  • Plain: A simple slice of banana bread is perfect on its own.
  • With Butter: Spread a little butter on a slice for extra richness.
  • With Nut Butter: Top a slice with your favorite nut butter for a protein-packed snack.
  • With Yogurt: Serve a slice with a dollop of Greek yogurt and some fresh fruit for a balanced breakfast.
  • Grilled: Grill a slice of banana bread for a warm, toasty treat.

Enjoy it with your morning coffee, as an afternoon snack, or even as a light dessert. It’s perfect for any time of day!

So, there you have it! My go-to High Protein Banana Bread recipe. I hope you love it as much as I do. Happy baking, friends!

High Protein Banana Bread Recipe: Delicious and Easy

Prep Time 15 minutes
Cook Time 50 minutes
Total Time 1 hour 5 minutes
Servings 10 slices
Calories 180
Enjoy a healthy and delicious twist on classic banana bread with this high-protein recipe. It's easy to make and perfect for a nutritious breakfast or snack.

Ingredients

Ingredients

  • 3 medium ripe bananas (mashed, about 1¼ cups)
  • 2 eggs
  • 0.5 cup plain Greek yogurt (or dairy-free alternative)
  • 0.25 cup maple syrup or honey (optional for added sweetness)
  • 1 teaspoon vanilla extract
  • 1 cup oat flour (or almond flour for low-carb option)
  • 0.5 cup vanilla or unflavored protein powder
  • 1 teaspoon baking soda
  • 0.5 teaspoon baking powder
  • 0.5 teaspoon cinnamon
  • 0.25 teaspoon salt
  • 0.25 cup chopped walnuts, dark chocolate chips, or seeds (Optional add-ins)

Instructions 

  • Preheat oven to 350°F (175°C). Line a loaf pan.
  • Mash bananas, add eggs, yogurt, syrup (if using), and vanilla. Whisk until smooth.
  • Mix oat flour, protein powder, baking soda, baking powder, cinnamon, and salt. Stir into wet ingredients.
  • Fold in optional add-ins.
  • Pour batter into pan and bake for 40–50 minutes, or until a toothpick comes out clean.
  • Cool in pan for 10 minutes, then transfer to a wire rack to cool completely. Slice and serve.

Notes

For a richer flavor, use overripe bananas.
Calories: 180kcal
Cost: $8
Course: Breakfast, Snack
Cuisine: American
Keyword: Banana
pin

Apple Cinnamon Cottage Cheese Bake: A Hug in a Dish

My name’s Ava, and if you’ve stumbled upon my kitchen, you’re probably here for one thing—the kind of recipes that make people pause mid-bite and say, ‘Wow.’ This Apple Cinnamon Cottage Cheese Bake is exactly that. It’s a breakfast (or dessert!) that feels like a warm hug, smells divine, and is secretly packed with protein. I grew up in a small town in Oregon, where cooking wasn’t just something we did to eat—it was how we celebrated, comforted, and connected. This bake reminds me of those cozy mornings.

These days, I’m 34 and living in Seattle, where my kitchen has become my favorite corner of the world. I believe the best recipes aren’t always the fanciest—they’re the ones that feel like a warm hug, the ones you make over and over because they just work. This recipe *works*. It’s simple, satisfying, and endlessly adaptable. Think of it as your new go-to when you need something comforting and delicious.

Why You’ll Love This Apple Cinnamon Cottage Cheese Bake

Okay, let’s be real. Some healthy breakfasts feel like a chore. This isn’t one of them. Here’s why you’ll be making this Apple Cinnamon Cottage Cheese Bake on repeat:

  • High Protein Powerhouse: Seriously, this bake is loaded with protein thanks to the cottage cheese and eggs. It will keep you full and energized for hours, making it a fantastic choice for those busy mornings or post-workout fuel.
  • Easy Peasy: We’re talking minimal effort, maximum flavor. You just whisk everything together, pour it into a dish, and bake. No fancy techniques required!
  • Customizable: Want to swap out the apples for berries? Go for it! Need a dairy-free version? I’ve got you covered (more on that later). This recipe is your canvas.
  • Deliciously Comforting: The combination of cinnamon, apples, and creamy cottage cheese is pure comfort food. It’s like a warm hug in a dish, perfect for chilly mornings or cozy evenings.
  • Sneaky Healthy: It tastes indulgent, but it’s actually packed with good-for-you ingredients. It’s a win-win!

This recipe is a blend of comfort food classics, modern twists, and just enough adventure to keep things exciting. I share them because I want you to have a little magic in your kitchen too—meals that bring people together, that become your ‘go-to,’ that make someone you love ask for seconds.

Ingredients for Your Apple Cinnamon Cottage Cheese Bake

Let’s gather our ingredients. The beauty of this recipe is that most of these are probably already in your pantry!

  • 2 cups cottage cheese
  • 3 large eggs
  • 1 large apple, peeled and finely diced
  • 1/2 cup rolled oats or almond flour
  • 1/4 cup maple syrup or honey
  • 1 1/2 tsp ground cinnamon
  • 1 tsp vanilla extract
  • 1 tsp baking powder
Recipe Image

Step-by-Step: Baking Your Cottage Cheese Masterpiece

Alright, apron on, let’s get baking! Here’s how to transform those simple ingredients into a golden, delicious Apple Cinnamon Cottage Cheese Bake.

  1. Preheat and Prep: Preheat oven to 350°F (175°C) and grease a 9×9-inch baking dish. This prevents sticking and makes cleanup a breeze.
  2. Whisk the Base: In a large bowl, whisk together the cottage cheese, eggs, maple syrup (or honey), and vanilla extract. Make sure everything is well combined for a smooth and creamy base.
  3. Add the Dry Ingredients: Stir in the rolled oats (or almond flour), cinnamon, and baking powder. If you’re using almond flour, the texture will be slightly denser.
  4. Fold in the Apples: Gently fold in the diced apples. This ensures they are evenly distributed throughout the bake.
  5. Pour and Spread: Pour the mixture into the prepared baking dish and spread it evenly.
  6. Bake to Perfection: Bake for 35-40 minutes, or until the top is golden brown and a toothpick inserted into the center comes out clean. The bake should be set but still slightly moist.
  7. Cool and Serve: Let the bake cool slightly before slicing and serving. This allows it to firm up a bit and prevents it from falling apart.

And that’s it! You’ve just created a delicious and healthy Apple Cinnamon Cottage Cheese Bake. Enjoy!

Pro Tips for the Perfect Cottage Cheese Bake

Want to take your Apple Cinnamon Cottage Cheese Bake from good to *amazing*? Here are a few pro tips I’ve learned along the way:

  • Drain the Cottage Cheese (Optional): If your cottage cheese seems particularly watery, you can drain it slightly before using. This will prevent the bake from becoming too soggy.
  • Don’t Overbake: Overbaking will result in a dry, rubbery bake. Keep a close eye on it and remove it from the oven as soon as a toothpick comes out clean.
  • Let it Cool: I know it’s tempting to dig in right away, but letting the bake cool slightly allows it to set and develop its flavors.
  • Spice it Up: Add a pinch of nutmeg or cardamom along with the cinnamon for an extra layer of warmth and flavor.
  • Toast the Oats (or Almond Flour): Toasting the oats or almond flour before adding them to the mixture will enhance their nutty flavor and add a bit of texture.

Common Mistakes (and How to Avoid Them)

Even the best bakers make mistakes sometimes! Here are a few common pitfalls to watch out for when making your Apple Cinnamon Cottage Cheese Bake:

  • Using the Wrong Size Baking Dish: Using a baking dish that’s too large will result in a thin, flat bake. Stick to a 9×9-inch dish for the best results.
  • Not Greasing the Dish Properly: This can cause the bake to stick to the bottom and make it difficult to remove. Be sure to grease the dish thoroughly with butter or cooking spray.
  • Overmixing the Batter: Overmixing can develop the gluten in the oats (or almond flour), resulting in a tough bake. Mix just until the ingredients are combined.
  • Not Letting it Cool: As mentioned before, letting the bake cool slightly is crucial for allowing it to set and develop its flavors.

Variations to Keep Things Interesting

One of the best things about this recipe is how easily you can customize it to your liking. Here are a few variations to get you started:

  • Berry Blast: Swap out the apples for a cup of mixed berries (fresh or frozen).
  • Chocolate Chip Delight: Add 1/2 cup of chocolate chips to the batter for a decadent treat.
  • Nutty Goodness: Add 1/4 cup of chopped nuts (walnuts, pecans, or almonds) for added crunch and flavor.
  • Pumpkin Spice Perfection: Replace the cinnamon with pumpkin pie spice and add 1/2 cup of pumpkin puree for a fall-inspired bake.
  • Lemon Zest Zing: Add the zest of one lemon to the batter for a bright and citrusy flavor.

If you’re looking for a gluten free and high protein breakfast that is easy to make, this recipe is for you! You can substitute the rolled oats for almond flour.

Storage Instructions

Got leftovers? Lucky you! Here’s how to store your Apple Cinnamon Cottage Cheese Bake:

  • Refrigerator: Store the bake in an airtight container in the refrigerator for up to 3-4 days.
  • Freezer: For longer storage, you can freeze the bake. Wrap individual slices tightly in plastic wrap and then place them in a freezer-safe bag or container. Frozen bake will last for up to 2 months. Let thaw in the fridge overnight before reheating.

Frequently Asked Questions (FAQ)

Still have questions? I’ve got answers!

  • Can I use low-fat cottage cheese? Yes, you can, but keep in mind that it may affect the texture of the bake. It might be slightly less creamy.
  • Can I use a different sweetener? Absolutely! Honey, agave nectar, or even a sugar substitute will work. Just adjust the amount to your liking.
  • Can I make this dairy-free? Yes! Use a dairy-free cottage cheese alternative and substitute the eggs with flax eggs (1 tablespoon of ground flaxseed mixed with 3 tablespoons of water per egg).
  • Can I add protein powder? Yes, you can add a scoop of your favorite protein powder to the batter. Just be sure to adjust the liquid accordingly, as protein powder can sometimes make the bake dry.
  • Can I make this ahead of time? Yes! You can assemble the bake the night before and store it in the refrigerator. Just add a few extra minutes to the baking time.

Serving Suggestions: Elevate Your Bake

While this Apple Cinnamon Cottage Cheese Bake is delicious on its own, here are a few serving suggestions to take it to the next level:

  • A Dollop of Yogurt: Top each slice with a dollop of Greek yogurt or whipped cream for added creaminess.
  • A Drizzle of Maple Syrup: A drizzle of maple syrup or honey adds a touch of extra sweetness.
  • Fresh Fruit: Serve with a side of fresh berries, sliced bananas, or chopped apples.
  • Toasted Nuts: Sprinkle with toasted nuts for added crunch and flavor.
  • A Scoop of Ice Cream: For a truly decadent treat, serve warm with a scoop of vanilla ice cream.

This apple cinnamon cottage cheese bake is a delicious and healthy way to start your day, or end it with a tasty dessert! If you’re looking for easy breakfast ideas on the go healthy, breakfast meals with eggs, or even a kid breakfast idea, this fits the bill. It’s also great if you need high easy protein meals or breakfast for dinner ideas healthy. It really is an easy healthy breakfast protein option that’s also a simple quick breakfast. You could even consider it a high protein cottage cheese cinnamon roll bread alternative, and it’s certainly one of the best high protein meals to go.

So whether you’re cooking for your family, impressing friends, or just treating yourself, I’m here to help you find your next favorite dish. Pull up a chair, grab a spatula, and let’s make something unforgettable together. Enjoy!

Apple Cinnamon Cottage Cheese Bake

Prep Time 10 minutes
Cook Time 40 minutes
Total Time 50 minutes
Servings 6 servings
Calories 180
A delicious and healthy bake featuring cottage cheese, apples, and cinnamon. Perfect for breakfast or a light dessert!

Ingredients

Ingredients

  • 2 cups cottage cheese
  • 3 large eggs
  • 1 large apple (peeled and finely diced)
  • 1/2 cup rolled oats or almond flour
  • 1/4 cup maple syrup or honey
  • 1.5 tsp ground cinnamon
  • 1 tsp vanilla extract
  • 1 tsp baking powder

Instructions 

  • Preheat oven to 350°F (175°C) and grease a 9x9-inch baking dish.
  • Whisk cottage cheese, eggs, maple syrup, and vanilla in a bowl.
  • Stir in oats (or almond flour), cinnamon, and baking powder.
  • Fold in diced apples.
  • Pour into baking dish and spread evenly.
  • Bake for 35-40 minutes until golden and toothpick comes out clean.
  • Let cool slightly before slicing and serving.

Notes

For a richer flavor, add a sprinkle of nutmeg or cardamom.
Calories: 180kcal
Cost: $8
Course: Breakfast, Dessert
Cuisine: American
Keyword: apple, cottage cheese
pin

Easy Hobo Casserole with Ground Beef: A Simple, Hearty Hug in a Dish

Hey there, friend! Ava here, back in my Seattle kitchen, and today we’re diving headfirst into a dish that’s pure comfort: Easy Hobo Casserole with Ground Beef. This isn’t just any casserole; it’s a warm, inviting, and utterly satisfying meal that brings back memories of cozy nights and happy bellies. Think of it as a culinary time machine, transporting you straight to simpler, tastier times. It’s the kind of dish that makes you want to curl up on the couch with a good book and forget about the world for a little while.

Growing up, casseroles were a staple in our household. My mom had a knack for throwing together whatever we had on hand and turning it into a masterpiece. This hobo casserole is inspired by those resourceful, delicious meals. It’s a forgiving, adaptable, and incredibly easy recipe that’s perfect for busy weeknights or lazy weekends when you want something hearty without spending hours in the kitchen.

So, grab your apron, and let’s get started! Trust me, this is one recipe you’ll want to make again and again.

Why You’ll Love This Hobo Casserole with Ground Beef

Seriously, what’s not to love? This casserole is the ultimate comfort food, packed with flavor and incredibly easy to make. But let’s break it down:

  • Simple Ingredients: You probably already have most of these ingredients in your pantry and fridge. It’s a great way to use up what you have on hand.
  • Quick and Easy: From prep to table, this casserole comes together in under an hour. Perfect for those hectic weeknights.
  • Customizable: Feel free to swap out ingredients to suit your taste. Want to add some veggies? Go for it! More on variations later.
  • Hearty and Filling: This casserole is packed with protein, carbs, and cheese – everything you need for a satisfying meal.
  • Kid-Friendly: Even the pickiest eaters will love this casserole. It’s a surefire way to get everyone to eat their vegetables (or at least the potatoes!).
  • Perfect for Leftovers: This casserole tastes even better the next day. Make a big batch and enjoy it for lunch or dinner.

It’s a simple, hearty meal that truly delivers on flavor and convenience. Casserole ground beef is a fantastic way to enjoy a balanced meal with minimal fuss.

Ingredients for Your Hobo Casserole Ground Beef

Here’s what you’ll need to create this masterpiece:

  • 1 lb ground beef: The star of the show! Look for lean ground beef to avoid excess grease.
  • 1 tablespoon olive oil: For sautéing the beef and veggies.
  • 1 medium onion, chopped: Adds flavor and depth.
  • 2 cloves garlic, minced: Because everything is better with garlic!
  • 4-5 medium potatoes, thinly sliced: Russet potatoes work best, but Yukon Gold are also delicious.
  • 1 1/2 cups shredded cheddar cheese: For that cheesy goodness.
  • 1/2 cup grated Parmesan cheese: Adds a nutty, savory flavor.
  • 1 teaspoon dried Italian seasoning: A classic blend of herbs that complements the beef and potatoes.
  • 1/2 teaspoon paprika: Adds a touch of smokiness and color.
  • Salt and pepper to taste: Season generously!
  • 1/2 cup beef broth or water: Keeps the potatoes moist while baking.
  • 1/4 cup milk (optional, for creaminess): Adds a touch of richness.
  • Fresh parsley for garnish (optional): Adds a pop of color and freshness.
Recipe Image

How to Make Hobo Casserole Ground Beef: Step-by-Step

Alright, let’s get cooking! Here’s how to bring this delicious hobo casserole to life:

  1. Prep Time: Preheat your oven to 375°F (190°C) and grease a 9×13-inch baking dish with cooking spray or olive oil. This prevents sticking and makes cleanup a breeze.
  2. Brown the Beef: In a large skillet, heat the olive oil over medium heat. Add the ground beef and cook, breaking it apart with a spoon, until browned and cooked through (about 5-7 minutes). Drain any excess fat if needed. Nobody wants a greasy casserole!
  3. Sauté the Aromatics: Add the chopped onion and minced garlic to the skillet with the beef. Cook for another 3-4 minutes until the onion becomes soft and translucent. This step builds a flavorful base for the entire dish.
  4. Layer It Up: Layer the thinly sliced potatoes on top of the ground beef in the prepared baking dish. First, spread the cooked ground beef mixture evenly in the bottom of the dish. Then, arrange the potatoes on top, seasoning them with salt, pepper, Italian seasoning, and paprika. Make sure to season each layer for maximum flavor.
  5. Cheese Please!: Sprinkle the shredded cheddar and grated Parmesan cheese over the potatoes. Don’t be shy – the cheese is what makes this casserole extra comforting.
  6. Add Moisture: Pour the beef broth (or water) around the edges of the casserole to keep the potatoes moist while baking. Optionally, drizzle with milk for extra creaminess. This prevents the potatoes from drying out and ensures they cook evenly.
  7. Bake to Perfection: Cover the casserole with aluminum foil and bake for 30 minutes. After 30 minutes, remove the foil and bake for an additional 15-20 minutes, or until the potatoes are tender and the cheese is bubbly and golden. The foil helps to steam the potatoes initially, then removing it allows the cheese to brown beautifully.
  8. Garnish and Serve: Garnish with fresh parsley if desired and serve hot! A sprinkle of fresh herbs adds a pop of color and freshness to the rich casserole.

And that’s it! You’ve just created a comforting, delicious hobo casserole that’s sure to become a family favorite. Beef and cheese are a match made in heaven, and this recipe proves it.

Pro Tips for the Best Hobo Casserole

Want to take your hobo casserole to the next level? Here are a few pro tips to keep in mind:

  • Thinly Slice the Potatoes: This is crucial for even cooking. Use a mandoline or a sharp knife to get them thin and uniform.
  • Season Each Layer: Don’t just season the top layer. Season the beef, the potatoes, and the cheese for maximum flavor.
  • Don’t Overcook the Beef: Overcooked ground beef can be dry and tough. Cook it until it’s just browned and cooked through.
  • Use Good Quality Cheese: The cheese is a key ingredient in this casserole, so use the best quality you can afford.
  • Let it Rest: After baking, let the casserole rest for 5-10 minutes before serving. This allows the flavors to meld together and makes it easier to slice.

These tips will help you create a hobo casserole that’s truly unforgettable. It’s a simple hearty dish, but with a few tweaks, you can make it exceptional.

Common Mistakes to Avoid

Even the simplest recipes can have pitfalls. Here are a few common mistakes to avoid when making hobo casserole:

  • Using Thickly Sliced Potatoes: This is the biggest mistake! Thick potatoes take longer to cook and can result in a casserole with uneven texture.
  • Not Draining the Beef: Excess grease can make the casserole heavy and greasy. Drain the beef thoroughly after browning.
  • Overbaking the Casserole: Overbaking can dry out the potatoes and make the cheese hard. Keep an eye on it and remove it from the oven when the potatoes are tender and the cheese is golden.
  • Skipping the Broth/Water: This is essential for keeping the potatoes moist. Don’t skip this step!
  • Not Seasoning Enough: Seasoning is key to flavor. Don’t be afraid to add salt, pepper, and other spices to your liking.

Avoiding these mistakes will ensure that your hobo casserole turns out perfectly every time. It’s easy to make, but paying attention to these details makes all the difference.

Hobo Casserole Variations: Make It Your Own!

One of the best things about this hobo casserole is how adaptable it is. Here are a few variations to try:

  • Add Vegetables: Add sliced bell peppers, mushrooms, or zucchini to the beef mixture for extra nutrients and flavor.
  • Use Different Cheeses: Try using a blend of cheddar, Monterey Jack, and Colby cheese for a different flavor profile.
  • Spice It Up: Add a pinch of red pepper flakes or a dash of hot sauce to the beef mixture for a spicy kick.
  • Add Beans: Add a can of drained and rinsed kidney beans or black beans to the beef mixture for extra protein and fiber.
  • Use Sweet Potatoes: Swap out the russet potatoes for sweet potatoes for a sweeter, more nutritious casserole.
  • Make it Vegetarian: Skip the ground beef and use lentils or crumbled tofu instead.

These variations are just a starting point. Feel free to get creative and experiment with different ingredients to create your own signature hobo casserole. You can adjust the recipe to make it perfect for your taste.

Storing and Reheating Your Hobo Casserole

Got leftovers? Lucky you! Here’s how to store and reheat your hobo casserole:

  • Storing: Let the casserole cool completely before storing it in an airtight container in the refrigerator. It will keep for up to 3-4 days.
  • Reheating: Preheat your oven to 350°F (175°C). Cover the casserole with foil and bake for 15-20 minutes, or until heated through. You can also reheat individual portions in the microwave.

This casserole is just as delicious the next day, making it a great option for meal prepping. A simple hearty meal that keeps on giving!

Frequently Asked Questions About Hobo Casserole

Got questions? I’ve got answers!

  • Can I use frozen potatoes? Yes, you can use frozen sliced potatoes, but they may not cook as evenly as fresh potatoes. Make sure to thaw them slightly before using.
  • Can I make this casserole ahead of time? Yes, you can assemble the casserole ahead of time and store it in the refrigerator for up to 24 hours. Just add a few extra minutes to the baking time.
  • Can I freeze this casserole? Yes, you can freeze this casserole, but the texture of the potatoes may change slightly. Wrap it tightly in plastic wrap and aluminum foil and freeze for up to 2-3 months. Thaw it in the refrigerator overnight before baking.
  • Can I use ground turkey instead of ground beef? Absolutely! Ground turkey is a great substitute for ground beef.
  • What can I serve with this casserole? This casserole is a complete meal on its own, but it also pairs well with a simple side salad or some steamed vegetables.

Hopefully, these FAQs have answered any questions you may have. If not, feel free to ask in the comments below!

Serving Suggestions: Complete the Meal

While this hobo casserole is fantastic on its own, here are a few serving suggestions to round out the meal:

  • Side Salad: A simple green salad with a light vinaigrette adds a refreshing contrast to the richness of the casserole.
  • Steamed Vegetables: Steamed broccoli, green beans, or asparagus are healthy and delicious additions to the meal.
  • Crusty Bread: Serve with a side of crusty bread for soaking up all the delicious juices.
  • Coleslaw: A classic coleslaw adds a creamy, tangy element to the meal.
  • Corn on the Cob: If it’s summer, corn on the cob is a perfect side dish.

These serving suggestions will help you create a complete and satisfying meal that everyone will love. This hobo casserole ground beef recipe is perfect for any occasion, making it a must-try for your next family dinner. This is a perfect for fast dinners and is one of beef recipes easy to make.

If you want to try some variations on ground beef, you can also check out this hamburger-patty or turkey-burgers.

Hobo Casserole Ground Beef

Prep Time 20 minutes
Cook Time 45 minutes
Total Time 1 hour 5 minutes
Servings 6 servings
Calories 450
A hearty and comforting Hobo Casserole featuring ground beef, potatoes, and plenty of cheese. This easy-to-make dish is perfect for a family dinner.

Ingredients

Ingredients

  • 1 lb ground beef
  • 1 tablespoon olive oil
  • 1 medium onion, chopped
  • 2 cloves garlic, minced
  • 4-5 medium potatoes, thinly sliced
  • 1.5 cups shredded cheddar cheese
  • 0.5 cup grated Parmesan cheese
  • 1 teaspoon dried Italian seasoning
  • 0.5 teaspoon paprika
  • Salt and pepper to taste
  • 0.5 cup beef broth or water
  • 0.25 cup milk (optional, for creaminess) (optional)
  • Fresh parsley for garnish (optional) (optional)

Instructions 

  • Preheat oven to 375°F (190°C) and grease a 9x13-inch baking dish.
  • Cook ground beef in olive oil until browned. Drain excess fat.
  • Add onion and garlic to the skillet and cook until softened.
  • Layer potatoes over the ground beef in the baking dish. Season with salt, pepper, Italian seasoning, and paprika.
  • Sprinkle cheddar and Parmesan cheese over the beef. Pour beef broth around the edges. Drizzle with milk (optional).
  • Cover with foil and bake for 30 minutes. Remove foil and bake for 15-20 minutes until potatoes are tender and cheese is golden.
  • Garnish with parsley and serve hot.

Notes

For a richer flavor, use a combination of different cheeses. You can also add other vegetables like bell peppers or mushrooms.
Calories: 450kcal
Cost: $18
Course: Main Course
Cuisine: American
Keyword: ground beef
pin

Crispy Gnocchi With Spinach And Feta: A Weeknight Wonder

Hey there, friend! Ava here, back with a recipe that’s going to revolutionize your weeknight dinner routine. Remember those nights when you’re staring into the fridge, wondering what magic you can conjure up with the limited ingredients you have? Well, say hello to Crispy Gnocchi with Spinach and Feta – a dish that’s quick, easy, and bursting with flavor. This isn’t just a meal; it’s an experience, a warm hug on a plate. I want you to feel like you’re cooking alongside me, sharing stories and creating something delicious together.

This recipe is inspired by my love for simple, wholesome ingredients and the desire to create meals that are both satisfying and nourishing. It’s the kind of dish that makes you feel good from the inside out, and it’s perfect for busy weeknights when you don’t have a lot of time to spend in the kitchen. It’s also pretty versatile; feel free to swap out the spinach for kale or add some sun-dried tomatoes for an extra burst of flavor.

Why You’ll Absolutely Love This Crispy Gnocchi Recipe

Okay, let’s get real. Why should you try this recipe? Here’s the lowdown:

  • Quick & Easy: Ready in under 30 minutes. Seriously!
  • Flavor Bomb: The combination of crispy gnocchi, wilted spinach, and salty feta is simply divine.
  • Versatile: Easily customizable with your favorite veggies and cheeses.
  • Comfort Food: It’s like a warm hug on a plate. Need I say more?
  • Crowd-Pleaser: Even picky eaters will love this dish.

This recipe is more than just a list of ingredients and instructions; it’s an invitation to create something special. I want you to feel confident in the kitchen, to experiment with flavors, and to trust your instincts. So, let’s get started!

Gather Your Ingredients

Here’s what you’ll need to whip up this delicious dish:

  • ‘1 pound gnocchi’
  • ‘2 tablespoons olive oil’
  • ‘4 cups fresh spinach (About 120 g.)’
  • ‘4 ounces feta cheese, crumbled (About 115 g.)’
  • ‘2 cloves garlic, minced’
  • ‘Salt (To taste.)’
  • ‘Black pepper (To taste.)’
  • ‘1 teaspoon red pepper flakes (Optional, for heat.)’
Recipe Image

Let’s Get Cooking: Step-by-Step Instructions

Alright, apron on? Music playing? Let’s do this!

  1. Boil the Gnocchi: Bring a large pot of salted water to a boil. Add the gnocchi and cook according to package instructions until they float to the surface, usually about 2-3 minutes. Use a slotted spoon to remove the gnocchi and set them aside to drain.
  2. Crisp the Gnocchi: In a large frying pan, heat the olive oil over medium-high heat. Once hot, add the cooked gnocchi and cook undisturbed for about 2-3 minutes until they become golden brown and crispy on one side. This is where the magic happens! Don’t overcrowd the pan; work in batches if necessary to ensure even browning. We’re aiming for that perfect protein char.
  3. Flip and Crisp Some More: Gently stir the gnocchi and cook for another 2-3 minutes, ensuring they get crispy on all sides. The goal is to get each piece perfectly golden and slightly crunchy.
  4. Add Garlic: Reduce the heat to medium and add the minced garlic to the pan. Sauté for about 1 minute until fragrant, being careful not to burn it. Burnt garlic is a big no-no!
  5. Wilt the Spinach: Add the fresh spinach to the pan, stirring gently until it wilts, which takes about 2-3 minutes. Don’t worry if it seems like a lot of spinach at first; it will shrink down as it cooks.
  6. Season: Season the mixture with salt, black pepper, and red pepper flakes (if using). Taste and adjust the seasonings as needed.
  7. Add Feta: Stir in the crumbled feta cheese, allowing it to combine with the other ingredients. The feta will melt slightly, creating a creamy and flavorful sauce.
  8. Serve Immediately: Serve immediately on plates. Garnish with extra feta and a drizzle of olive oil, if desired.

Pro Tips for Perfect Crispy Gnocchi

Want to take your gnocchi game to the next level? Here are a few of my best tips:

  • Don’t Overcrowd the Pan: This is crucial for achieving that perfect crisp. Work in batches if necessary.
  • Use a Non-Stick Pan: This will prevent the gnocchi from sticking and ensure even browning.
  • Don’t Stir Too Much: Let the gnocchi sit undisturbed for a few minutes on each side to develop a nice crust.
  • Pat the Gnocchi Dry: After boiling, pat the gnocchi dry with paper towels to remove excess moisture. This will help them crisp up better in the pan.
  • Use High-Quality Olive Oil: The flavor of the olive oil will shine through in this dish, so use the best you can afford.

Common Mistakes to Avoid

We all make mistakes in the kitchen, but here are a few to watch out for when making crispy gnocchi:

  • Overcooking the Gnocchi: Overcooked gnocchi will be mushy and won’t crisp up properly. Cook them until they float to the surface, then remove them immediately.
  • Burning the Garlic: Burnt garlic is bitter and will ruin the flavor of the dish. Keep a close eye on it and sauté it over medium heat until fragrant.
  • Adding Too Much Spinach at Once: Adding too much spinach at once will lower the temperature of the pan and prevent the gnocchi from crisping up. Add it in batches, allowing it to wilt before adding more.
  • Not Seasoning Properly: Seasoning is key to bringing out the flavors of the dish. Don’t be afraid to add salt, pepper, and red pepper flakes to taste.

Remember, cooking is all about experimentation. Don’t be afraid to try new things and adjust the recipe to your liking. I want you to feel like you’re in control of your kitchen, creating meals that are both delicious and satisfying.

Variations to Spice Things Up

Want to get creative? Here are a few variations to try:

  • Add Sun-Dried Tomatoes: Sun-dried tomatoes add a burst of intense flavor and a chewy texture to the dish.
  • Use Kale Instead of Spinach: Kale is a heartier green that holds up well to cooking.
  • Add Pesto: Stir in a spoonful of pesto at the end for a burst of fresh, herbaceous flavor.
  • Use Different Cheeses: Try using goat cheese, Parmesan cheese, or ricotta cheese instead of feta.
  • Add Protein: Add cooked chicken, sausage, or shrimp to make it a more substantial meal.
  • Spice It Up: Add a pinch of cayenne pepper or a drizzle of hot sauce for extra heat.

The possibilities are endless! Feel free to experiment with different flavors and ingredients to create your own unique version of this dish. That dough bloom is a great way to make your own version.

Storing and Reheating Leftovers

Got leftovers? Here’s how to store and reheat them:

  • Storage: Store leftovers in an airtight container in the refrigerator for up to 3 days.
  • Reheating: Reheat leftovers in a skillet over medium heat until heated through. You can also reheat them in the microwave, but they may not be as crispy.

Leftovers are great for lunch the next day, or you can use them as a filling for omelets or frittatas.

Frequently Asked Questions (FAQ)

Got questions? I’ve got answers!

  • Can I use store bought gnocchi? Absolutely! Store-bought gnocchi works perfectly in this recipe. I often use store bought gnocchi when I’m short on time.
  • Can I use frozen spinach? Yes, but be sure to thaw it completely and squeeze out any excess moisture before adding it to the pan.
  • Can I make this recipe ahead of time? You can boil the gnocchi ahead of time, but I recommend cooking the rest of the dish right before serving for the best flavor and texture.
  • Is this recipe gluten-free? No, traditional gnocchi is made with wheat flour. However, you can find gluten-free gnocchi at most grocery stores.
  • Can I add other vegetables? Absolutely! Feel free to add your favorite vegetables, such as bell peppers, zucchini, or mushrooms.

If you have any other questions, feel free to leave a comment below. I’m always happy to help!

Serving Suggestions

This dish is delicious on its own, but here are a few serving suggestions to make it a complete meal:

  • Serve with a side salad for a light and refreshing meal.
  • Serve with a crusty bread for dipping in the sauce.
  • Top with a fried egg for a protein-packed breakfast or brunch.
  • Serve as a side dish with grilled chicken or fish.

No matter how you choose to serve it, I’m sure you’ll love this crispy gnocchi with spinach and feta. It’s a dish that’s sure to become a family favorite. When you make this, the pan will have a great look and the olive oil will help crisp things up.

The Magic of Gnocchi With Spinach And Feta

Ultimately, this recipe is more than just a set of instructions; it’s an invitation to create something special. It’s a reminder that cooking can be fun, easy, and incredibly rewarding. So, gather your ingredients, put on your apron, and let’s make some magic together. The first bite is always the best!

I want you to walk away from this recipe feeling confident, inspired, and ready to tackle any culinary challenge. Because that’s what cooking is all about: taking risks, learning from your mistakes, and creating something that brings joy to yourself and others. And let me tell you, this crispy gnocchi with spinach and feta is guaranteed to bring a smile to your face. It’s a great Feta Recipes, Gnocchi Recipes and Spinach And Feta option, and is a great Abendessen Rezepte, Receitas Vegetarianas and Pasta Recipes option. It will be a great Spinach, Family Dinner and Healthy Dinner.

So, what are you waiting for? Get in the kitchen and start cooking! And don’t forget to share your creations with me on social media. I can’t wait to see what you come up with! Happy cooking, friends!

Crispy Gnocchi With Spinach And Feta

Prep Time 5 minutes
Cook Time 15 minutes
Total Time 20 minutes
Servings 4 people
Calories 350
Enjoy crispy gnocchi combined with fresh spinach and salty feta cheese for a quick and delicious meal. This dish is easy to prepare and perfect for a weeknight dinner.

Ingredients

Ingredients

  • 1 pound gnocchi
  • 2 tablespoons olive oil
  • 4 cups fresh spinach (About 120 g.)
  • 4 ounces feta cheese, crumbled (About 115 g.)
  • 2 cloves garlic, minced
  • Salt (To taste.)
  • Black pepper (To taste.)
  • 1 teaspoon red pepper flakes (Optional, for heat.)

Instructions 

  • Boil gnocchi until they float, then drain.
  • Heat olive oil, add gnocchi, and cook until golden brown on one side (2-3 minutes).
  • Stir and cook gnocchi until crispy on all sides (2-3 minutes).
  • Reduce heat, add garlic, and sauté until fragrant (about 1 minute).
  • Add spinach and stir until wilted (2-3 minutes).
  • Season with salt, pepper, and red pepper flakes (if using). Remove from heat.
  • Stir in feta cheese and serve immediately.

Notes

For extra flavor, add a squeeze of lemon juice before serving.
Calories: 350kcal
Cost: $12
Course: Main Course
Cuisine: Italian
Keyword: Gnocchi
pin

Hey there, friend! Ava here, back in my Seattle kitchen, ready to share a recipe that’s been bringing warmth and smiles to my dinner table for years. If you’re on the hunt for a dish that’s both comforting and bursting with flavor, look no further. Today, we’re diving into the world of Savory Chicken Bhuna, a delightful Indian curry that’s easier to make than you might think. Trust me, even if you’re a beginner in the kitchen, this recipe will make you feel like a seasoned pro.

Growing up in Oregon, my mom always had a knack for creating dishes that felt like a warm hug. This Chicken Bhuna reminds me of those cozy evenings, filled with laughter and the aroma of spices wafting through the air. I’ve tweaked and perfected this recipe over the years, adding my own little twists to make it extra special. So, grab your apron, and let’s get cooking!

Why You’ll Love This Chicken Bhuna

Okay, let’s be real. There are a million chicken curry recipes out there. So, why should you choose this one? Here’s the deal:

  • Unbelievable Flavor: The combination of aromatic spices like turmeric, cumin, coriander, and garam masala creates a symphony of flavors that will dance on your taste buds.
  • Easy to Make: Don’t let the list of ingredients intimidate you. This recipe is straightforward and perfect for a weeknight dinner.
  • Customizable Spice Level: Whether you like it mild or fiery, you can easily adjust the amount of chili powder and green chilies to suit your preference.
  • Comfort Food at Its Finest: This dish is hearty, satisfying, and perfect for chilly evenings. It’s like a warm blanket for your soul.
  • Perfect for Meal Prep: Chicken Bhuna tastes even better the next day, making it an excellent option for meal prepping.

Seriously, this isn’t just a chicken curry; it’s an experience. It’s the kind of dish that makes you want to curl up on the couch with a bowl and a good book. And who doesn’t need a little more of that in their life?

Ingredients You’ll Need

Alright, let’s talk ingredients. Don’t worry if it seems like a lot; most of these are pantry staples, and the rest are easily found at your local grocery store. Here’s what you’ll need to create this magic:

  • 4 pieces Chicken Thighs: Tender and juicy, these thighs absorb flavors beautifully for a rich dish.
  • 4 cloves Garlic: An aromatic base that enhances flavor; omit if sensitive.
  • 1 piece Green Chili: Deseeded and chopped; adjust to taste for desired spice levels.
  • 2 tbsp Fresh Ginger: Chopped; essential for authenticity.
  • 2 pieces Onions: Diced; a core flavor component that sweetens and thickens the sauce.
  • 1 tsp Turmeric Powder: Imparts color and earthy flavor.
  • 2 tsp Chili Powder: Adds a kick of heat.
  • 2 tsp Ground Cumin: Brings warmth to the dish.
  • 2 tsp Ground Coriander: Complements cumin for depth.
  • 1 tsp Garam Masala: A crucial spice blend that adds complexity.
  • 5 pieces Tomatoes: Chopped; the backbone of the sauce.
  • 1/2 tsp Lemon Juice: Brightens the flavors with a tangy zing.
  • 1 tbsp Fresh Coriander: Chopped; adds a refreshing finish.
  • 3 tbsp Vegetable Oil: Essential for sautéing.
  • Salt: Enhances and balances flavors; adjust to taste.
  • 100 ml Water: Thins the sauce; adjust based on thickness desired.
Recipe Image

Step-by-Step Guide to Making Chicken Bhuna

Ready to turn these ingredients into a mouthwatering Chicken Bhuna? Follow these simple steps, and you’ll be enjoying a delicious meal in no time.

  1. Prep Your Ingredients: Dice the onions, chop the garlic, ginger, green chili, tomatoes, and fresh coriander. Measure out all your spices and keep them within easy reach.
  2. Sauté the Aromatics: Heat the vegetable oil in a large pan or Dutch oven over medium heat. Add the diced onions and sauté until they turn golden brown, about 5-7 minutes. Then, add the chopped garlic, ginger, and green chili. Sauté for another minute until fragrant. This garlic ginger base is crucial for the overall flavor.
  3. Add the Spices: Stir in the turmeric powder, chili powder, ground cumin, ground coriander, and salt. Cook for about a minute, stirring constantly, until the spices release their aroma. Be careful not to burn them.
  4. Cook the Tomatoes: Add the chopped tomatoes to the pan. Cook, stirring occasionally, until the tomatoes break down and form a thick sauce, about 8-10 minutes. If you find that the mixture is sticking to the bottom of the pan, add a splash of water. This is where the sauce really starts to come together.
  5. Add the Chicken: Add the chicken thighs to the pan and coat them well with the tomato-spice mixture. Cook for about 5-7 minutes, turning the chicken occasionally, until it’s browned on all sides.
  6. Simmer to Perfection: Pour in the water, bring the mixture to a simmer, then reduce the heat to low. Cover the pan and let it simmer for about 20-25 minutes, or until the chicken is cooked through and tender. Stir occasionally to prevent sticking.
  7. Finish with Flair: Stir in the garam masala and lemon juice. Garnish with fresh coriander. Serve hot with rice, naan, or roti.

Pro Tips for the Best Chicken Bhuna

Want to take your Chicken Bhuna to the next level? Here are a few pro tips that I’ve learned over the years:

  • Use Fresh Spices: Freshly ground spices have a more potent flavor than pre-ground ones. If you have the time, grind your own spices for the best results.
  • Marinate the Chicken: For even more flavor, marinate the chicken in a mixture of yogurt, ginger-garlic paste, and spices for at least 30 minutes before cooking.
  • Don’t Rush the Onions: Sautéing the onions until they’re golden brown is crucial for developing the flavor of the sauce. Don’t skip this step!
  • Adjust the Spice Level: Add more or less chili powder and green chilies to suit your taste. Remember, you can always add more spice, but you can’t take it away!
  • Use High-Quality Tomatoes: The quality of your tomatoes will greatly affect the flavor of the sauce. Use ripe, juicy tomatoes for the best results.

Common Mistakes to Avoid

We all make mistakes in the kitchen, but knowing what to avoid can save you a lot of time and frustration. Here are a few common mistakes to watch out for when making Chicken Bhuna:

  • Burning the Spices: Spices can burn easily, especially if they’re cooked over high heat. Keep the heat low and stir the spices constantly to prevent them from burning.
  • Not Cooking the Tomatoes Enough: The tomatoes need to cook down and form a thick sauce before you add the chicken. If you don’t cook them enough, the sauce will be watery.
  • Overcooking the Chicken: Overcooked chicken can be dry and tough. Cook the chicken until it’s just cooked through and tender.
  • Using Too Much Water: Adding too much water will dilute the flavor of the sauce. Add just enough water to thin the sauce to your desired consistency.
  • Forgetting the Garam Masala: Garam masala is a crucial spice blend that adds complexity to the dish. Don’t forget to add it at the end!

Variations to Try

Want to mix things up a bit? Here are a few variations you can try:

  • Chicken Breast Bhuna: Swap the chicken thighs for chicken breasts. Just be careful not to overcook them.
  • Vegetable Bhuna: Replace the chicken with vegetables like potatoes, cauliflower, and peas for a vegetarian option.
  • Spicy Bhuna: Add more green chilies or a pinch of cayenne pepper for extra heat.
  • Creamy Bhuna: Stir in a dollop of cream or yogurt at the end for a richer, creamier sauce.
  • Coconut Bhuna: Add a splash of coconut milk for a touch of sweetness and creaminess.

How to Store and Reheat Chicken Bhuna

Got leftovers? Lucky you! Chicken Bhuna tastes even better the next day. Here’s how to store and reheat it:

  • Storage: Store the leftover Chicken Bhuna in an airtight container in the refrigerator for up to 3-4 days. Make sure the chicken bhuna is completely cooled before refrigerating. You can store it in an airtight container for up to four days in the refrigerator.
  • Reheating: Reheat the Chicken Bhuna in a saucepan over medium heat, stirring occasionally, until heated through. You can also reheat it in the microwave. If the sauce is too thick, add a splash of water.
  • Freezing: Yes, you can freeze chicken bhuna! Allow it to cool completely, then transfer it to an airtight container or freezer bag. Freeze for up to 2-3 months. When ready to eat, thaw overnight in the refrigerator and reheat as directed above.

Frequently Asked Questions (FAQ)

Got questions? I’ve got answers! Here are a few frequently asked questions about Chicken Bhuna:

  • Can I make this recipe ahead of time? Absolutely! Chicken Bhuna is a great make-ahead dish. In fact, the flavors meld together even more when it sits overnight.
  • Can I use boneless, skinless chicken thighs? Yes, you can. Just adjust the cooking time accordingly.
  • Can I make this recipe in a slow cooker? Yes, you can. Add all the ingredients to a slow cooker and cook on low for 6-8 hours, or on high for 3-4 hours.
  • What if I don’t have garam masala? If you don’t have garam masala, you can make your own by combining equal parts of ground cumin, coriander, cardamom, black pepper, and cinnamon.
  • Is Chicken Bhuna gluten-free? Yes, this recipe is naturally gluten-free. Just make sure to serve it with gluten-free sides like rice or gluten-free roti.

Serving Suggestions

Chicken Bhuna is delicious on its own, but it’s even better when served with the right accompaniments. Here are a few serving suggestions:

  • Rice: Serve with basmati rice, brown rice, or jeera rice.
  • Naan or Roti: Serve with warm naan or roti for dipping into the sauce.
  • Salad: Serve with a simple green salad or a cucumber-tomato salad.
  • Raita: Serve with raita (a yogurt-based condiment) to cool down the spice.
  • Pickles: Serve with Indian pickles for a tangy, spicy kick.

And there you have it! My Savory Chicken Bhuna recipe, ready for you to try in your own kitchen. I hope this dish brings as much joy and warmth to your table as it has to mine. Happy cooking, friends! And remember, if you re making it for the first time, don’t be afraid to experiment and adjust the flavors to your liking. This delightful dish is a perfect example of comfort food that is sure to please. The chicken thighs, when cooked properly, make it incredibly tender and juicy. So, if you’re looking for an easy Indian curry recipe, this is it! Enjoy!

Savory Chicken Bhuna: Enjoy This Cozy Indian Delight

Prep Time 15 minutes
Cook Time 45 minutes
Total Time 1 hour
Servings 4 people
Calories 450
Savor the rich and aromatic flavors of Chicken Bhuna, a classic Indian dish. This recipe features tender chicken thighs simmered in a spiced tomato-based sauce, perfect for a comforting meal.

Ingredients

Ingredients

  • 4 pieces Chicken Thighs (Tender and juicy, these thighs absorb flavors beautifully for a rich dish.)
  • 4 cloves Garlic (An aromatic base that enhances flavor; omit if sensitive.)
  • 1 piece Green Chili (Deseeded and chopped; adjust to taste for desired spice levels.)
  • 2 tbsp Fresh Ginger (Chopped; essential for authenticity.)
  • 2 pieces Onions (Diced; a core flavor component that sweetens and thickens the sauce.)
  • 1 tsp Turmeric Powder (Imparts color and earthy flavor.)
  • 2 tsp Chili Powder (Adds a kick of heat.)
  • 2 tsp Ground Cumin (Brings warmth to the dish.)
  • 2 tsp Ground Coriander (Complements cumin for depth.)
  • 1 tsp Garam Masala (A crucial spice blend that adds complexity.)
  • 5 pieces Tomatoes (Chopped; the backbone of the sauce.)
  • 0.5 tsp Lemon Juice (Brightens the flavors with a tangy zing.)
  • 1 tbsp Fresh Coriander (Chopped; adds a refreshing finish.)
  • 3 tbsp Vegetable Oil (Essential for sautéing.)
  • to taste Salt (Enhances and balances flavors; adjust to taste.)
  • 100 ml Water (Thins the sauce; adjust based on thickness desired.)

Notes

For a richer flavor, marinate the chicken in yogurt and spices for at least 30 minutes before cooking.
Calories: 450kcal
Cost: $12
Course: Main Course
Cuisine: Indian
Keyword: Chicken
pin