Author

Ava

Browsing

Hey there, friend! Ava here, back with another recipe that’s going to make your weeknights a whole lot easier and a whole lot tastier. If you’re anything like me, you love a good home-cooked meal, but sometimes the thought of all the pots and pans involved can be… daunting. That’s why I’m absolutely head-over-heels for this Easy One-Pan Chicken and Potatoes with Gravy recipe. It’s the kind of dish that fills your kitchen with the most incredible aromas, brings everyone to the table with smiles, and leaves you with minimal cleanup. Seriously, what’s not to love?

Growing up, my momma always had a way of making simple meals feel special. This recipe is a nod to those comforting dinners, but with a modern twist. We’re talking juicy, flavorful chicken, perfectly roasted potatoes, and a luscious gravy that you’ll want to drizzle on everything. And the best part? It all comes together in one pan. Let’s get cooking!

Why You’ll Love This One-Pan Chicken and Potatoes

Okay, let’s get real. There are a million chicken recipes out there, so why should you try this one? Well, let me tell you, this isn’t just any old chicken dish. This is a flavor explosion wrapped in a cozy, comforting blanket of deliciousness. Here’s why you’ll be obsessed:

  • Easy Cleanup: One pan means fewer dishes. Enough said.
  • Flavor Packed: The combination of herbs, spices, and pan drippings creates a symphony of flavors.
  • Comfort Food at Its Finest: This recipe is the definition of comfort food, perfect for a chilly evening or a Sunday supper.
  • Customizable: Feel free to swap out veggies, herbs, or spices to suit your taste.
  • Perfect for Weeknights: Quick to prep and easy to cook, this meal is ready in under an hour.

Ingredients You’ll Need

Alright, let’s gather our ingredients. Don’t worry, you probably already have most of these in your pantry. If not, a quick trip to the store and you’ll be ready to go!

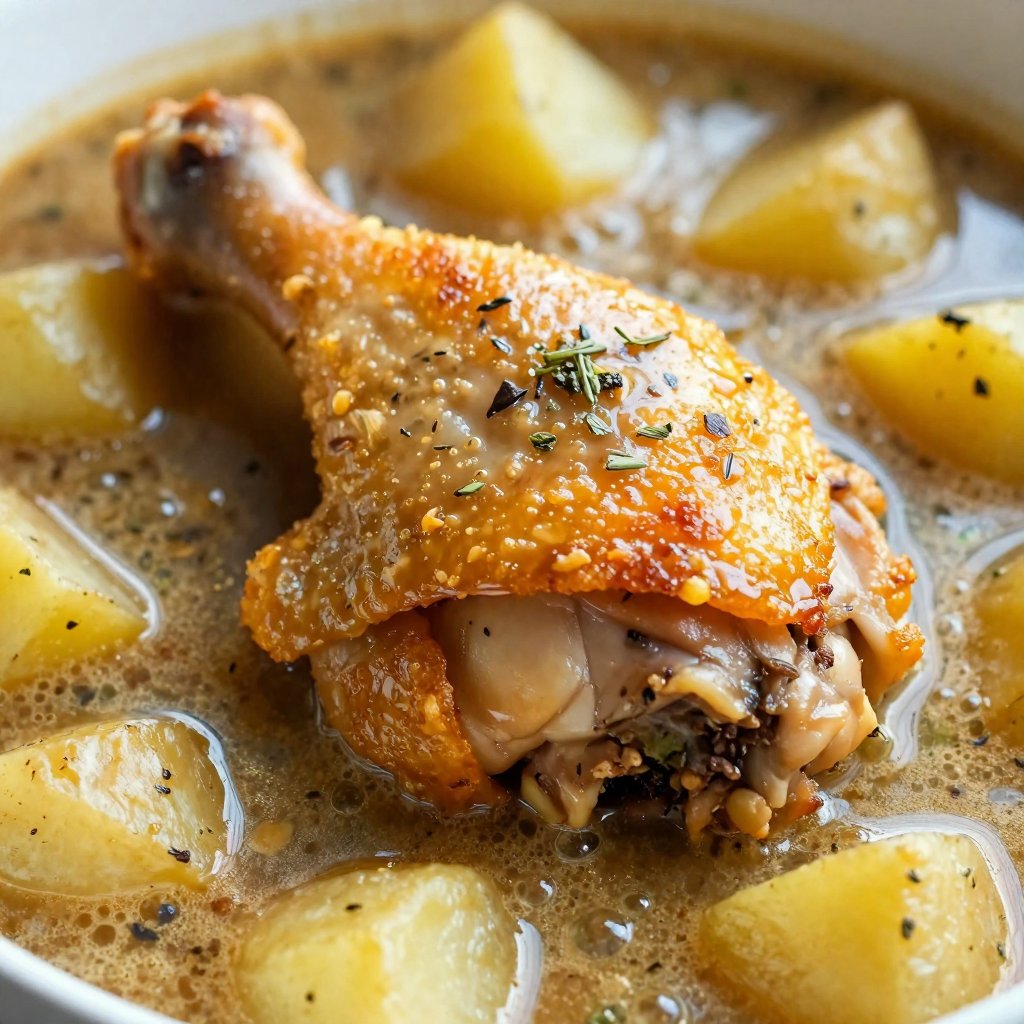
  • ‘6 bone-in, skin-on chicken thighs’
  • ‘1.5 pounds baby potatoes, halved’
  • ‘2 tablespoons olive oil’
  • ‘3 cloves garlic, minced’
  • ‘1 teaspoon onion powder’
  • ‘1 teaspoon garlic powder’
  • ‘1 teaspoon dried thyme’
  • ‘1/2 teaspoon dried rosemary’
  • ‘1 teaspoon salt’
  • ‘1/2 teaspoon black pepper’
  • ‘2 tablespoons butter’
  • ‘2 tablespoons all-purpose flour’
  • ‘1 cup chicken broth’
Recipe Image

How To Make One-Pan Chicken and Potatoes: Step-by-Step

This is where the magic happens! Don’t be intimidated by the steps; I promise it’s easier than it looks. We are going to start by preheating the oven to make sure it is ready for the chicken. Follow along, and you’ll have a delicious meal on the table in no time.

Step 1: Prep the Oven

Preheat your oven to 400°F (200°C). This ensures that the chicken and potatoes cook evenly and get that beautiful golden-brown color.

Step 2: Season the Chicken

Pat the chicken thighs dry with paper towels. This helps the skin get nice and crispy. In a bowl, mix olive oil, salt, pepper, onion powder, garlic powder, thyme, and rosemary. Rub this mixture all over the chicken thighs, making sure they’re well coated.

Step 3: Arrange in the Pan

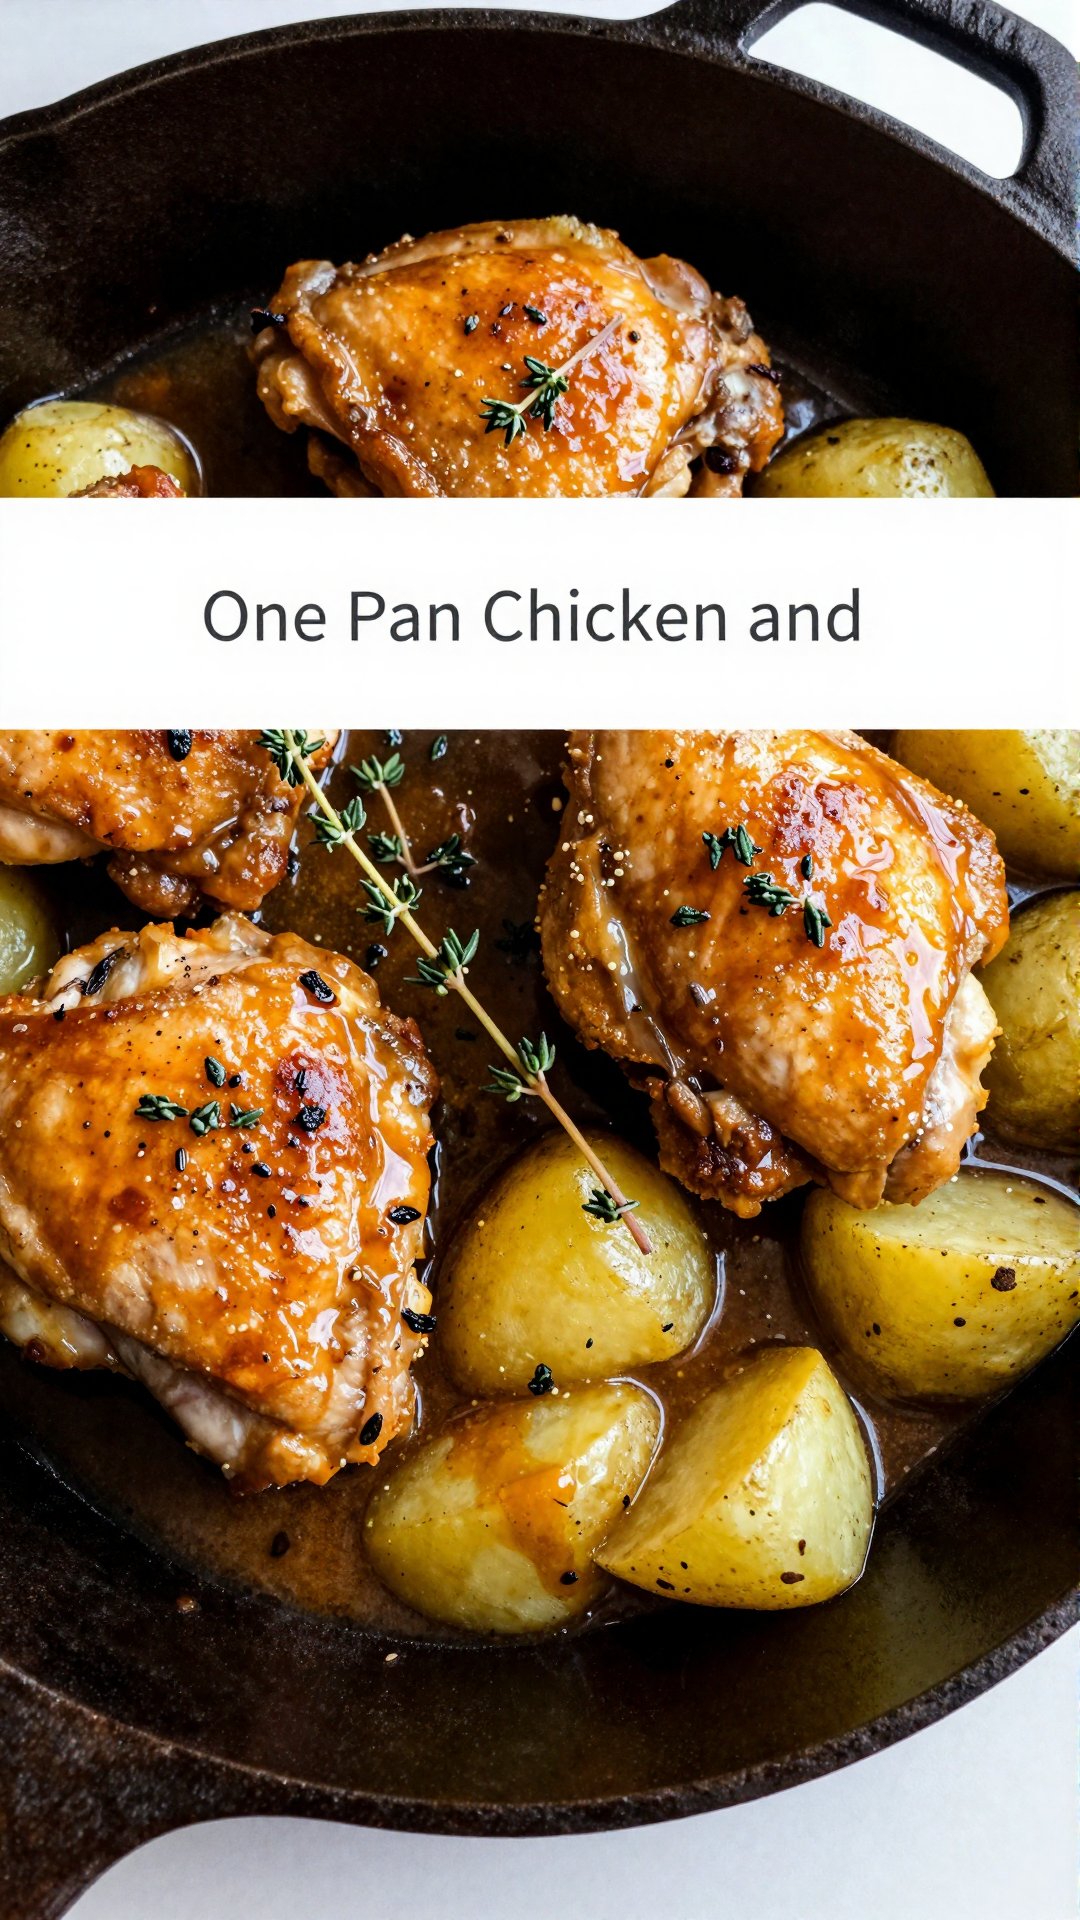
Place the seasoned chicken in a large oven-safe skillet or dish. I prefer using a cast-iron skillet because it distributes the heat evenly, but any large skillet will do. Arrange the halved baby potatoes around the chicken. Drizzle with the remaining olive oil and toss to coat. You want the potatoes to be nice and happy in their oily, herby bath.

Step 4: Roast to Perfection

Roast in the preheated oven for 40–45 minutes, or until the chicken is 165°F internally and the potatoes are tender. Use a meat thermometer to check the chicken’s internal temperature. Nobody wants undercooked chicken!

Step 5: Make the Gravy

Once the chicken and potatoes are cooked, remove them from the pan and set aside. Place the skillet on the stovetop over medium heat. Add butter to the drippings in the pan. Once the butter is melted, add flour and whisk to create a roux. Cook for 1–2 minutes, stirring constantly. This is the base of our delicious homemade gravy.

Step 6: Simmer the Gravy

Slowly whisk in chicken broth, making sure to break up any lumps. Simmer until the gravy thickens, about 5–7 minutes. Keep stirring to prevent it from sticking to the bottom of the pan. You’ll know it’s ready when it coats the back of a spoon.

Step 7: Serve and Enjoy

Return the chicken and potatoes to the pan, nestling them in the gravy. Alternatively, you can serve the gravy over the chicken and potatoes on individual plates. Garnish with fresh parsley if desired. Serve immediately and watch everyone’s faces light up!

Pro Tips for the Best One-Pan Chicken and Potatoes

Want to take this recipe from good to absolutely amazing? Here are a few of my favorite pro tips:

  • Use Bone-In, Skin-On Chicken: This type of chicken is more flavorful and stays juicier during cooking. Plus, the skin gets wonderfully crispy!
  • Don’t Overcrowd the Pan: Make sure there’s enough space between the chicken and potatoes so they can roast properly. If necessary, use two pans.
  • Season Generously: Don’t be shy with the herbs and spices. They’re what give this dish its amazing flavor.
  • Let it Rest: Allow the chicken to rest for 5-10 minutes before serving. This helps the juices redistribute, resulting in a more tender and flavorful bird.
  • Use a Meat Thermometer: The best way to ensure your chicken is cooked through is to use a meat thermometer. Insert it into the thickest part of the thigh, avoiding the bone.

Common Mistakes to Avoid

We all make mistakes in the kitchen, it’s just part of the learning process! Here are a few common pitfalls to watch out for when making this recipe:

  • Undercooking the Chicken: Always use a meat thermometer to ensure the chicken reaches an internal temperature of 165°F.
  • Overcrowding the Pan: This can lead to steamed, rather than roasted, chicken and potatoes.
  • Not Drying the Chicken: Patting the chicken dry before seasoning helps the skin get crispy.
  • Burning the Gravy: Keep a close eye on the gravy while it’s simmering, stirring frequently to prevent it from sticking to the bottom of the pan.
  • Using Cold Chicken Broth: Using room temperature or warm chicken broth helps the gravy thicken more quickly and evenly.

Variations to Try

One of the things I love most about this recipe is how versatile it is! Feel free to experiment with different ingredients and flavors to create your own signature dish. Here are a few ideas to get you started:

  • Lemon Herb Chicken and Potatoes: Add lemon slices and fresh herbs like rosemary and thyme to the pan for a bright, flavorful twist.
  • Spicy Chicken and Potatoes: Add a pinch of red pepper flakes or a dash of hot sauce to the seasoning mixture for a little kick.
  • Mediterranean Chicken and Potatoes: Incorporate Mediterranean Diet Food List approved ingredients. Use Kalamata olives, feta cheese, and oregano for a Mediterranean-inspired version.
  • Root Vegetable Medley: Swap out the baby potatoes for a mix of root vegetables like carrots, parsnips, and sweet potatoes.
  • Creamy Garlic Gravy: Add a splash of heavy cream and a clove of minced garlic to the gravy for a richer, more decadent sauce.

How to Store and Reheat Leftovers

If you happen to have any leftovers (which is rare in my house!), here’s how to store and reheat them:

  • Storage: Store the chicken and potatoes in an airtight container in the refrigerator for up to 3-4 days.
  • Reheating: Reheat in the oven at 350°F (175°C) for 15-20 minutes, or until heated through. You can also reheat in the microwave, but the chicken skin may not be as crispy.
  • Gravy: Store the gravy separately in an airtight container in the refrigerator. Reheat gently on the stovetop, adding a splash of chicken broth if needed to thin it out.

Frequently Asked Questions (FAQ)

Got questions? I’ve got answers! Here are some of the most common questions I get about this recipe:

  • Can I use chicken breasts instead of thighs?: Yes, but keep in mind that chicken breasts tend to dry out more easily. Reduce the cooking time and use a meat thermometer to ensure they don’t overcook.
  • Can I use frozen potatoes?: Fresh potatoes are best for this recipe, but you can use frozen in a pinch. Just make sure to thaw them completely before adding them to the pan.
  • Can I make this recipe ahead of time?: You can prep the chicken and potatoes ahead of time and store them in the refrigerator. However, I recommend cooking the gravy fresh for the best flavor.
  • What if my gravy is too thick?: Add a little more chicken broth until it reaches your desired consistency.
  • What if my gravy is too thin?: Simmer the gravy for a few more minutes, allowing it to reduce and thicken. You can also whisk in a cornstarch slurry (1 tablespoon cornstarch mixed with 2 tablespoons cold water) to help it thicken.

Serving Suggestions

This One-Pan Chicken and Potatoes with Gravy is a complete meal on its own, but if you’re looking to round it out, here are a few serving suggestions:

  • Green Salad: A simple green salad with a vinaigrette dressing adds a refreshing contrast to the richness of the chicken and potatoes.
  • Steamed Vegetables: Steamed broccoli, green beans, or asparagus are all great options.
  • Crusty Bread: Serve with a side of crusty bread for soaking up all that delicious gravy.
  • Cranberry Sauce: A dollop of cranberry sauce adds a touch of sweetness and tartness that complements the savory flavors of the dish.

And there you have it, my friend! A simple, delicious, and comforting One-Pan Chicken and Potatoes with Gravy recipe that’s sure to become a family favorite. Give this recipe a try, and let me know what you think in the comments below. Happy cooking!

One-Pan Chicken and Potatoes with Gravy

Prep Time 15 minutes
Cook Time 45 minutes
Total Time 1 hour
Servings 6 servings
Calories 450
A comforting and easy one-pan meal featuring juicy chicken thighs and tender potatoes, all smothered in a delicious homemade gravy. Perfect for a weeknight dinner!

Ingredients

Chicken and Potatoes

  • 6 bone-in, skin-on chicken thighs
  • 1.5 pounds baby potatoes, halved
  • 2 tablespoons olive oil

Seasoning

  • 3 cloves garlic, minced
  • 1 teaspoon onion powder
  • 1 teaspoon garlic powder
  • 1 teaspoon dried thyme
  • 1/2 teaspoon dried rosemary
  • 1 teaspoon salt
  • 1/2 teaspoon black pepper

Gravy

  • 2 tablespoons butter
  • 2 tablespoons all-purpose flour
  • 1 cup chicken broth

Instructions 

  • Preheat oven to 400°F (200°C).
  • Pat chicken dry and rub with olive oil, salt, pepper, onion powder, garlic powder, thyme, and rosemary.
  • Place chicken in skillet. Arrange potatoes around them. Drizzle with remaining olive oil.
  • Roast for 40–45 minutes, or until chicken is 165°F internally and potatoes are tender. Remove chicken and potatoes from pan.
  • Place pan on stovetop over medium heat. Add butter and flour to the drippings. Whisk to create a roux and cook for 1–2 minutes.
  • Slowly whisk in chicken broth and simmer until gravy thickens.
  • Return chicken and potatoes to pan or serve gravy over top. Garnish with parsley if desired.

Notes

For extra crispy potatoes, parboil them for 5 minutes before roasting.
Calories: 450kcal
Cost: $18
Course: dinner
Cuisine: American
Keyword: Chicken
pin

Lemon Pepper Chicken Broccoli Orzo: A Symphony in One Pan

Hey there, friend! Ava here, back in my Seattle kitchen, and today I’m beyond excited to share one of my absolute go-to recipes: Lemon Pepper Chicken Broccoli Orzo. This isn’t just a meal; it’s a hug in a bowl, a burst of sunshine on a cloudy day, and proof that healthy can be outrageously delicious. If you’re anything like me, you’re always on the lookout for dinners that are quick, easy, and satisfying. Well, look no further! This one-pan wonder checks all the boxes, and then some.

Growing up, my mom had this incredible knack for turning simple ingredients into something magical. This recipe is my attempt to channel that same kitchen wizardry. It’s inspired by those cozy weeknight dinners, but with a modern twist that’ll have everyone at the table asking for seconds. Trust me, even the pickiest eaters will be converted by the bright, zesty flavors and the perfectly cooked orzo.

Why You’ll Absolutely Love This Lemon Pepper Chicken Broccoli Orzo

Okay, let’s get real. Why should you spend your precious time making this dish? Here’s the lowdown:

  • One-Pan Wonder: Fewer dishes? Yes, please! This entire meal comes together in a single skillet.
  • Quick & Easy: From prep to plate in under 30 minutes. Perfect for busy weeknights.
  • Healthy & Delicious: Packed with lean protein, fresh veggies, and wholesome grains.
  • Flavor Explosion: The lemon pepper seasoning combined with the creamy orzo is simply irresistible.
  • Customizable: Easily adaptable to your taste preferences and dietary needs.

Seriously, this recipe is a game-changer. It’s the kind of meal you’ll find yourself making again and again, not just because it’s easy, but because it’s genuinely crave-worthy.

The Star-Studded Cast: Ingredients You’ll Need

Before we dive into the cooking process, let’s gather our ingredients. Here’s what you’ll need to create this culinary masterpiece:

  • 1 pound boneless, skinless chicken breasts, cut into bite-sized pieces
  • 1 teaspoon fresh cracked black pepper
  • 1 teaspoon grated lemon zest
  • 1 ½ teaspoons kosher salt
  • 2 tablespoons olive oil
  • 1 medium yellow onion, diced
  • 2 cloves garlic, minced
  • 1 cup orzo pasta
  • 2 cups low-sodium chicken broth
  • 2 cups small broccoli florets
  • 1 tablespoon unsalted butter
  • 2 tablespoons lemon juice
  • ⅓ cup grated Parmesan cheese
  • Fresh parsley, chopped, for garnish
Recipe Image

Let’s Get Cooking: Step-by-Step Instructions

Alright, apron on? Let’s do this! Follow these simple steps, and you’ll be enjoying a delicious Lemon Pepper Chicken Broccoli Orzo in no time.

  1. Season the Chicken: Toss chicken pieces with black pepper, half the lemon zest, and ½ teaspoon salt until evenly coated. This ensures every bite is bursting with flavor.
  2. Sear the Chicken: Heat olive oil in a large skillet over medium-high heat. Add chicken and cook for 5 minutes, stirring occasionally, until lightly browned. Remove chicken to a plate and set aside. We’re not looking to fully cook the chicken here, just to get a nice sear.
  3. Sauté the Aromatics: Add onion to skillet and cook for 3 minutes, stirring frequently, until softened. Incorporate garlic and cook for 30 seconds until fragrant. This is where the magic starts to happen!
  4. Toast the Orzo: Stir orzo into onion mixture and cook for 1 minute, allowing pasta to lightly toast. Toasting the orzo adds a nutty depth of flavor.
  5. Simmer to Perfection: Pour in chicken broth and remaining salt. Return chicken to skillet and bring mixture to a boil. Reduce heat to medium-low and cover. Simmer for 8 minutes.
  6. Add the Broccoli: Uncover skillet and stir in fresh broccoli florets. Cover again and cook for 3–4 minutes, until broccoli is crisp-tender and orzo is al dente. We want the broccoli to have a little bite, not be mushy.
  7. Finish with Flavor: Fold in butter, lemon juice, Parmesan cheese, and remaining lemon zest. Stir until melted and creamy. Taste and adjust salt or pepper as needed. This is where you can really personalize the dish to your liking. If you want extra lemon, add a splash more lemon juice at the end.
  8. Serve & Enjoy: Transfer skillet contents to serving bowls and garnish with fresh parsley.

Pro Tips for Lemon Pepper Chicken Broccoli Orzo Perfection

Want to take your Lemon Pepper Chicken Broccoli Orzo to the next level? Here are a few of my tried-and-true tips:

  • Use Fresh Ingredients: Freshly cracked black pepper and lemon zest make a huge difference in flavor.
  • Don’t Overcook the Orzo: Cook the orzo until it’s al dente, meaning it still has a slight bite. Overcooked orzo will be mushy.
  • Adjust Seasoning: Taste as you go and adjust the salt, pepper, and lemon juice to your liking.
  • Broccoli Size Matters: Make sure your broccoli florets are roughly the same size so they cook evenly.
  • Don’t Skip the Resting Time: Letting the dish sit for a few minutes after cooking allows the flavors to meld together.

Common Mistakes to Avoid

Even the best cooks make mistakes (remember my triple-layer cake disaster?). Here are a few common pitfalls to watch out for when making this recipe:

  • Overcooking the Chicken: Chicken can become dry and rubbery if overcooked. Be sure to sear it quickly and let it finish cooking in the broth.
  • Burning the Garlic: Burnt garlic is bitter and unpleasant. Cook it for just 30 seconds until fragrant.
  • Using Too Much Broth: Adding too much broth can result in a soupy dish. Stick to the recommended amount.
  • Not Seasoning Properly: Seasoning is key to bringing out the flavors in this dish. Don’t be afraid to add salt, pepper, and lemon juice to taste.

Lemon Pepper Chicken Broccoli Orzo Variations: Make It Your Own!

One of the things I love most about this recipe is how easily it can be customized. Here are a few ideas to get you started:

  • Add More Veggies: Feel free to add other vegetables like bell peppers, mushrooms, or spinach.
  • Swap the Protein: Use shrimp, sausage, or tofu instead of chicken.
  • Spice It Up: Add a pinch of red pepper flakes for a little heat.
  • Make It Creamier: Stir in a dollop of cream cheese or mascarpone cheese for extra creaminess.
  • Add Herbs: Experiment with different herbs like thyme, rosemary, or oregano.

Storing and Reheating Your Lemon Pepper Chicken Broccoli Orzo

Got leftovers? Lucky you! Here’s how to store and reheat this dish:

  • Storing: Store leftovers in an airtight container in the refrigerator for up to 3 days.
  • Reheating: Reheat in a skillet over medium heat, adding a splash of chicken broth or water if needed to prevent sticking. You can also reheat in the microwave.

This dish is just as delicious the next day, making it perfect for meal prepping!

Frequently Asked Questions (FAQ)

Got questions? I’ve got answers! Here are a few of the most common questions I get about this recipe:

  • Can I use frozen broccoli? Yes, you can use frozen broccoli. Just thaw it before adding it to the skillet.
  • Can I make this recipe ahead of time? You can prep the ingredients ahead of time, but I recommend cooking the dish fresh for the best results.
  • Can I use a different type of pasta? Yes, you can use other small pasta shapes like ditalini or small shells.
  • Is this recipe gluten-free? No, this recipe is not gluten-free because it contains orzo pasta. However, you can substitute gluten-free orzo or rice to make it gluten-free.
  • Can I make this recipe dairy-free? Yes, you can omit the Parmesan cheese and use a dairy-free butter substitute to make this recipe dairy-free.

Serving Suggestions: Complete the Meal

Looking for ways to round out your meal? Here are a few serving suggestions:

  • Side Salad: A simple green salad with a light vinaigrette is the perfect complement to this dish.
  • Crusty Bread: Serve with a side of crusty bread for soaking up the delicious sauce.
  • Roasted Vegetables: Add a side of roasted vegetables like asparagus or Brussels sprouts.
  • Garlic Bread: Who can resist garlic bread? It’s the perfect accompaniment to any pasta dish.

The Heart of the Dish: Why This Recipe Matters

More than just a recipe, this Lemon Pepper Chicken Broccoli Orzo is about creating moments. It’s about gathering around the table with loved ones, sharing a meal, and making memories. It’s about finding joy in simple ingredients and the satisfaction of creating something delicious from scratch. This chicken and broccoli recipe is more than just a skillet meal; it’s a symbol of connection, comfort, and the magic that happens when good food brings people together.

So, go ahead, give this recipe a try. I promise, you won’t be disappointed. And who knows, it might just become your new favorite weeknight dinner. Happy cooking, friends! And remember, even if you have a few “oops” moments along the way, that’s just part of the fun. Embrace the chaos, trust your senses, and most importantly, enjoy the process. Because at the end of the day, the best meals are the ones made with love.

If you try this, let me know what you think! I’d love to hear about your experiences and any variations you come up with. You can find me on Instagram (@AvasKitchenAdventures) or leave a comment below. Until next time, happy cooking!

Lemon Pepper Chicken Broccoli Orzo

Prep Time 10 minutes
Cook Time 25 minutes
Total Time 35 minutes
Servings 4 people
Calories 450
A flavorful and easy one-pan meal featuring tender chicken, broccoli, and orzo pasta in a zesty lemon pepper sauce. Perfect for a quick and satisfying weeknight dinner.

Ingredients

Chicken & Seasoning

  • 1 pound boneless, skinless chicken breasts (cut into bite-sized pieces)
  • 1 teaspoon fresh cracked black pepper
  • 1 teaspoon grated lemon zest
  • 1.5 teaspoons kosher salt

Orzo & Vegetables

  • 2 tablespoons olive oil
  • 1 medium yellow onion (diced)
  • 2 cloves garlic (minced)
  • 1 cup orzo pasta
  • 2 cups low-sodium chicken broth
  • 2 cups small broccoli florets
  • 1 tablespoon unsalted butter
  • 2 tablespoons lemon juice
  • 0.333 cup grated Parmesan cheese
  • Fresh parsley (chopped, for garnish)

Instructions 

  • Toss chicken with pepper, half the lemon zest, and ½ teaspoon salt.
  • Heat olive oil in skillet. Add chicken and cook until browned. Remove chicken.
  • Add onion to skillet and cook until softened. Incorporate garlic and cook until fragrant.
  • Stir orzo into onion mixture and cook for 1 minute.
  • Pour in chicken broth and remaining salt. Return chicken to skillet and bring to a boil. Simmer for 8 minutes.
  • Stir in broccoli florets. Cook until broccoli is crisp-tender and orzo is al dente.
  • Fold in butter, lemon juice, Parmesan cheese, and remaining lemon zest. Stir until melted and creamy. Adjust seasoning.
  • Garnish with fresh parsley.

Notes

For a creamier sauce, add a splash of heavy cream at the end.
Calories: 450kcal
Cost: $18
Course: Main Course
Cuisine: Italian-American
Keyword: Chicken
pin

Hey there! Ava here, welcoming you into my cozy Seattle kitchen. Today, we’re diving into a recipe that’s become a staple in my home—Baked Eggs with Cottage Cheese. This isn’t just any egg dish; it’s a creamy, protein-packed delight that’s incredibly simple to make. Think of it as a warm hug on a plate, perfect for those mornings when you crave something comforting yet healthy.

Growing up in Oregon, my mom always had a knack for transforming simple ingredients into something extraordinary. This recipe reminds me of those days—wholesome, fuss-free, and utterly satisfying. It’s the kind of dish that makes you feel good from the inside out, and I can’t wait to share it with you.

Whether you’re looking for a quick breakfast, a light lunch, or a satisfying snack, these baked eggs with cottage cheese are a fantastic option. Let’s get started, shall we?

Why You’ll Love This Baked Eggs with Cottage Cheese Recipe

Seriously, what’s not to love? This recipe is a winner for so many reasons. It’s quick, easy, and packed with nutrients. But beyond that, it’s just plain delicious. Here’s a few more reasons why you’ll be making this dish on repeat:

  • Quick & Easy: Ready in under 30 minutes, perfect for busy mornings or a speedy weeknight meal.
  • High Protein: Packed with protein from both the eggs and cottage cheese, keeping you full and satisfied. Ideal for those seeking High Protien Meal Ideas.
  • Low Carb: A great option for those following a low-carb lifestyle or looking for Low Carb Recipes With Eggs.
  • Versatile: Easily customizable with your favorite veggies, cheeses, and spices.
  • Healthy & Delicious: A guilt-free way to enjoy a creamy, flavorful dish. Makes a perfect Healthy Dinner High Protein Low Carb option.
  • Texture: The combination of the baked eggs creating a soft base with the creamy texture of the cottage cheese is divine.

I especially love it because it feels like a treat without being unhealthy. It’s the kind of meal that makes you feel good about what you’re eating, and that’s always a win in my book.

Ingredients for Baked Eggs with Cottage Cheese

Here’s what you’ll need to whip up this delightful dish. Don’t worry; the list is short and sweet!

  • 4 large eggs
  • ½ cup cottage cheese
  • ¼ cup shredded cheddar or mozzarella (optional)
  • ¼ teaspoon salt
  • ¼ teaspoon black pepper
  • ¼ teaspoon garlic powder
  • chives or green onions, cherry tomatoes (halved – optional)
Recipe Image

How to Make Baked Eggs with Cottage Cheese: Step-by-Step

Alright, let’s get cooking! Here’s how to make these delicious baked eggs with cottage cheese:

  1. Preheat the Oven: Preheat your oven to 375°F (190°C). Lightly grease a small baking dish or ramekins with butter or cooking spray to prevent sticking. This ensures the eggs don’t adhere to the sides, making cleanup a breeze.
  2. Combine Ingredients: In a mixing bowl, whisk the eggs until smooth. Stir in the cottage cheese, salt, black pepper, and garlic powder. Mix well until everything is evenly combined. Make sure the cottage cheese is well distributed to give a creamy texture to the final product.
  3. Add Veggies (Optional): If using cherry tomatoes, fold them into the egg mixture. Pour the mixture into the greased baking dish, ensuring an even distribution. Sprinkle shredded cheese on top if you prefer an extra cheesy dish.
  4. Bake: Place the baking dish in the preheated oven and bake for 20–25 minutes, or until the eggs are fully set and slightly golden on top. A toothpick inserted in the center should come out clean. The baking time can vary depending on your oven, so keep an eye on it.
  5. Garnish & Serve: Once baked, remove the dish from the oven and let it sit for a couple of minutes. Sprinkle chopped chives or green onions on top for a fresh finish. Serve warm with a side of toast, avocado, or fresh greens.

And there you have it! A simple, delicious, and satisfying meal that’s ready to enjoy.

Pro Tips for Perfect Baked Eggs

Want to take your baked eggs to the next level? Here are a few pro tips that I’ve learned over the years:

  • Use Room Temperature Eggs: Using eggs at room temperature can help them cook more evenly and result in a fluffier texture.
  • Don’t Overbake: Overbaking can lead to dry, rubbery eggs. Keep a close eye on them and remove them from the oven as soon as they’re set.
  • Grease the Dish Well: A well-greased baking dish is essential to prevent sticking. I prefer using butter for added flavor, but cooking spray works just as well.
  • Add a Splash of Cream: For an extra creamy texture, add a tablespoon of heavy cream or milk to the egg mixture before baking.
  • Experiment with Cheese: Feel free to try different types of cheese, such as feta, Gruyère, or Parmesan, for a unique flavor twist.

These little tweaks can make a big difference in the final result, so don’t be afraid to experiment and find what works best for you.

Common Mistakes to Avoid

We all make mistakes in the kitchen—it’s part of the learning process! Here are a few common pitfalls to watch out for when making baked eggs with cottage cheese:

  • Forgetting to Grease the Dish: This is a crucial step to prevent the eggs from sticking and making cleanup a nightmare.
  • Overmixing the Eggs: Overmixing can result in tough eggs. Whisk them gently until just combined.
  • Using Too Much Cottage Cheese: While cottage cheese adds a lovely creaminess, using too much can make the eggs watery. Stick to the recommended amount.
  • Baking at Too High a Temperature: Baking at a high temperature can cause the eggs to cook too quickly and become dry. Stick to 375°F (190°C) for best results.

Remember, every mistake is a learning opportunity. Don’t get discouraged—just try again, and you’ll get it right!

Variations to Try

One of the best things about this recipe is how easily you can customize it to suit your taste. Here are a few variations to inspire you:

  • Mediterranean Style: Add chopped sun-dried tomatoes, Kalamata olives, and feta cheese to the egg mixture for a Mediterranean twist.
  • Spicy Southwest: Incorporate diced jalapeños, black beans, corn, and a sprinkle of chili powder for a spicy kick.
  • Veggie Lovers: Add your favorite chopped veggies, such as spinach, mushrooms, bell peppers, or zucchini, for a nutrient-packed meal.
  • Italian Herbs: Enhance the flavor with a mix of Italian herbs like basil, oregano, and thyme.
  • Breakfast sausage: Add cooked and crumbled breakfast sausage.

Feel free to get creative and experiment with different ingredients to create your own signature version of this dish.

How to Store and Reheat Baked Eggs

If you have leftovers (which is rare in my house!), here’s how to store and reheat them:

  • Storage: Allow the baked eggs to cool completely before transferring them to an airtight container. Store in the refrigerator for up to 3 days.
  • Reheating: To reheat, you can microwave the eggs for 1-2 minutes, or until heated through. Alternatively, you can reheat them in the oven at 350°F (175°C) for about 10-15 minutes.

Keep in mind that reheated eggs may not be as creamy as freshly baked ones, but they’ll still be delicious. Make sure to check out To Go Breakfast Ideas For Adults if you are looking for more ideas.

Frequently Asked Questions (FAQ)

Got questions? I’ve got answers! Here are some common questions about making baked eggs with cottage cheese:

  • Can I use low-fat cottage cheese?: Yes, you can use low-fat cottage cheese if you prefer. It will still add creaminess, but the texture may be slightly different.
  • Can I make this recipe ahead of time?: While you can prepare the egg mixture ahead of time, it’s best to bake it fresh for the best texture.
  • Can I freeze baked eggs with cottage cheese?: I don’t recommend freezing this dish, as the texture can become watery and unappealing after thawing.
  • Can I use different types of cheese?: Absolutely! Feel free to experiment with your favorite cheeses, such as cheddar, mozzarella, feta, or Gruyère.
  • Is this recipe gluten-free?: Yes, this recipe is naturally gluten-free. Just be sure to serve it with gluten-free sides if needed.

If you have any other questions, feel free to ask in the comments below!

Serving Suggestions

These baked eggs with cottage cheese are delicious on their own, but here are a few serving suggestions to make them even more enjoyable:

  • Toast: Serve with a side of whole-grain toast, sourdough, or English muffins for dipping.
  • Avocado: Add sliced avocado for a creamy, healthy fat boost.
  • Fresh Greens: Serve with a side salad of mixed greens, cherry tomatoes, and a light vinaigrette.
  • Salsa: Top with your favorite salsa for a zesty, flavorful kick.
  • Fruit Salad: Pair with a bowl of fresh fruit for a balanced and satisfying meal.

I often enjoy mine with a side of crispy bacon or a sprinkle of Everything Bagel seasoning for added flavor. The possibilities are endless!

And there you have it—my go-to recipe for Baked Eggs with Cottage Cheese. It’s simple, delicious, and packed with goodness. I hope you enjoy it as much as I do! If you try this recipe, be sure to leave a comment below and let me know what you think. Happy cooking!

This dish is a great option for those looking for Easy Breakfast Ideas Healthy Eggs, a Macro Breakfast Recipes, High Protein Cottage Cheese Eggs, or Healthy High Protein Meals Breakfast. It also works well with Clean Protein Breakfast.

Baked Eggs with Cottage Cheese

Prep Time 5 minutes
Cook Time 25 minutes
Total Time 30 minutes
Servings 2 servings
Calories 250
Enjoy a simple and delicious baked egg dish with creamy cottage cheese. This recipe is perfect for a quick breakfast or brunch.

Ingredients

Ingredients

  • 4 large eggs
  • 0.5 cup cottage cheese
  • 0.25 cup shredded cheddar or mozzarella (optional)
  • 0.25 teaspoon salt
  • 0.25 teaspoon black pepper
  • 0.25 teaspoon garlic powder
  • chives or green onions, cherry tomatoes (halved)

Instructions 

  • Preheat oven to 375°F (190°C). Grease a baking dish.
  • Whisk eggs, cottage cheese, salt, pepper, and garlic powder.
  • Fold in tomatoes. Pour into dish. Sprinkle cheese on top (optional).
  • Bake for 20–25 minutes, until set.
  • Let sit for a few minutes. Sprinkle chives or green onions. Serve warm.

Notes

Add your favorite herbs or spices for extra flavor.
Calories: 250kcal
Cost: $5
Course: Breakfast, Brunch
Cuisine: American
Keyword: Eggs
pin

Hey there, friend! Ava here, back from my Seattle kitchen with a dish that’s become a total staple in our house: One Pan Garlic Parmesan Chicken Pasta. If you’re anything like me, weeknights are a whirlwind. Between work, errands, and trying to squeeze in a little ‘me’ time, the last thing I want is to spend hours slaving over a complicated dinner. That’s where this recipe swoops in to save the day. Imagine tender chicken, perfectly cooked pasta, and a creamy, dreamy garlic parmesan sauce, all made in just one pan. Yep, you heard that right – minimal cleanup and maximum flavor. This isn’t just a meal; it’s a hug in a bowl. Let’s get cooking!

Why You’ll Love This One Pan Garlic Parmesan Chicken Pasta

Okay, let’s get real for a second. There are a million chicken pasta recipes out there, so why should you try this one? Well, let me tell you, this recipe is a game-changer. It’s all about making life easier without sacrificing a single ounce of deliciousness. Here’s why you’re going to fall head-over-heels for this one-pan wonder:

  • One Pan Magic: Seriously, folks, the cleanup is a breeze. Everything cooks together in one skillet, which means fewer dishes and more time to relax.
  • Ready in Under 30 Minutes: From start to finish, you’re looking at about half an hour. Perfect for those nights when you’re short on time but still want a home-cooked meal.
  • Incredibly Flavorful: The garlic parmesan sauce is rich, creamy, and utterly addictive. It coats every strand of pasta and every bite of chicken, creating a symphony of flavors that will have everyone asking for seconds.
  • Customizable: Feel free to add your favorite veggies, switch up the pasta, or adjust the seasoning to your liking. This recipe is a blank canvas for your culinary creativity.
  • Family-Friendly: Even the pickiest eaters will devour this dish. It’s comforting, familiar, and just plain good.

I’ve made this recipe more times than I can count, and it always delivers. It’s the kind of meal that makes you feel good from the inside out. So, are you ready to experience the magic of one-pan cooking? Let’s dive in!

Ingredients for One Pan Garlic Parmesan Chicken Pasta

Alright, let’s gather our ingredients. The best part about this recipe is that you probably already have most of these items in your pantry and fridge. Here’s what you’ll need:

  • 4 boneless, skinless chicken breasts (about 680g): The star of the show! Make sure they’re of even thickness for consistent cooking.
  • 8 oz (225g) penne or rotini pasta: I love using penne or rotini because they grab onto the sauce beautifully, but feel free to use your favorite short pasta shape.
  • 4 cloves fresh garlic, minced: Fresh garlic is essential for that authentic garlic parmesan flavor. Don’t skimp on it!
  • 2 cups low-sodium chicken broth (480ml): Using low-sodium broth allows you to control the saltiness of the dish.
  • 1 cup heavy cream (240ml): This is what makes the sauce incredibly rich and creamy. If you’re looking to lighten things up, you can use half-and-half, but the texture won’t be quite as luxurious.
  • 1 cup freshly grated Parmesan cheese (100g): Freshly grated parmesan is a must! The pre-shredded stuff just doesn’t melt as well or have the same flavor.
  • 2 tbsp olive oil (30ml): For sautéing the chicken and garlic.
  • 2 cups fresh spinach (optional, about 60g): I love adding spinach for a pop of color and extra nutrients, but it’s totally optional.
Recipe Image

How to Make One Pan Garlic Parmesan Chicken Pasta: Step-by-Step

Okay, let’s get cooking! Here’s a step-by-step guide to creating this delicious one-pan wonder. Don’t worry, it’s super simple and straightforward.

  1. Sear the Chicken: Heat olive oil in a large skillet over medium heat. Season chicken with salt and pepper. Cook for about 6 minutes per side until golden brown; remove from pan and let rest. This step is crucial for getting that nice, caramelized crust on the chicken.
  2. Sauté the Garlic: In the same skillet, sauté minced garlic for about 1 minute until fragrant. Be careful not to burn the garlic, as it can become bitter. The aroma should be intoxicating!
  3. Cook the Pasta: Add pasta and chicken broth; bring to a boil, cover, and simmer for about 10 minutes until pasta is al dente. Stir occasionally to prevent sticking. The pasta will absorb the broth, creating a flavorful base for the sauce.
  4. Create the Sauce: Lower heat and stir in heavy cream and Parmesan cheese until well combined. The sauce should be smooth, creamy, and utterly irresistible.
  5. Combine Everything: Slice the rested chicken and return to the skillet along with spinach if using; toss gently to coat with sauce. Make sure the chicken is heated through and the spinach is wilted.
  6. Serve and Enjoy: Serve warm, garnished with extra Parmesan if desired. A sprinkle of fresh parsley or a pinch of red pepper flakes would also be delicious.

Pro Tips for the Best Garlic Parmesan Chicken Pasta

Want to take your One Pan Garlic Parmesan Chicken Pasta to the next level? Here are a few pro tips that I’ve learned over the years:

  • Use a Good Quality Skillet: A heavy-bottomed skillet will ensure even cooking and prevent hot spots. I love using a cast-iron skillet for this recipe.
  • Don’t Overcook the Chicken: Overcooked chicken is dry and tough. Use a meat thermometer to ensure it’s cooked to 165°F (74°C).
  • Grate Your Own Parmesan: Pre-shredded parmesan often contains cellulose, which can prevent it from melting properly. Freshly grated parmesan will create a smoother, creamier sauce.
  • Adjust the Sauce to Your Liking: If you prefer a thicker sauce, simmer it for a few extra minutes to reduce it. If you want a thinner sauce, add a splash more chicken broth or heavy cream.
  • Add a Pinch of Red Pepper Flakes: For a little heat, add a pinch of red pepper flakes to the sauce. It adds a subtle kick that complements the richness of the parmesan and garlic.
  • Season Generously: Don’t be afraid to season with salt and pepper throughout the cooking process. Taste as you go and adjust the seasoning to your liking.

These tips might seem small, but they can make a big difference in the final result. Trust me, a little extra effort goes a long way!

Common Mistakes to Avoid

Even the best cooks make mistakes sometimes. Here are a few common pitfalls to avoid when making One Pan Garlic Parmesan Chicken Pasta:

  • Burning the Garlic: Burnt garlic is bitter and can ruin the flavor of the entire dish. Sauté the garlic over low heat and watch it carefully.
  • Overcooking the Pasta: Overcooked pasta is mushy and unpleasant. Cook the pasta until it’s al dente, meaning it’s still slightly firm to the bite.
  • Using Cold Chicken: Cold chicken can lower the temperature of the sauce and prevent it from thickening properly. Let the chicken come to room temperature before adding it to the skillet.
  • Adding Too Much Salt: Parmesan cheese is already quite salty, so be careful not to over-salt the dish. Taste as you go and adjust the seasoning accordingly.
  • Forgetting to Stir: Stirring the pasta occasionally will prevent it from sticking to the bottom of the skillet.

Variations and Add-Ins

One of the best things about this recipe is how easy it is to customize. Here are a few variations and add-ins to try:

  • Add Vegetables: Broccoli, bell peppers, mushrooms, and sun-dried tomatoes all work well in this dish. Add them to the skillet along with the garlic.
  • Use Different Protein: Swap the chicken for shrimp, sausage, or tofu.
  • Make it Spicy: Add a pinch of red pepper flakes or a dash of hot sauce to the sauce.
  • Add Herbs: Fresh basil, parsley, or oregano would be delicious additions.
  • Use Different Cheese: Try using a blend of parmesan and romano cheese for a more complex flavor.
  • Creamy Garlic Chicken Pasta: For an even creamier dish, add a dollop of cream cheese to the sauce.
  • Chicken Parmesan Pasta: Bread the chicken before searing it for a true chicken parmesan pasta experience.
  • Garlic Parmesan Chicken: Serve the garlic parmesan chicken over rice or mashed potatoes instead of pasta.
  • Chicken Spaghetti Recipes: Use spaghetti instead of penne or rotini for a fun twist.
  • Ground Beef Pasta: Brown some ground beef and add it to the skillet along with the garlic for a heartier meal.

Don’t be afraid to get creative and experiment with different flavors and ingredients. The possibilities are endless!

How to Store and Reheat Leftovers

If you happen to have any leftovers (which is rare in my house!), here’s how to store and reheat them:

  • Storage: Store the leftovers in an airtight container in the refrigerator for up to 3 days.
  • Reheating: Reheat the pasta in a skillet over medium heat, adding a splash of chicken broth or water to prevent it from drying out. You can also reheat it in the microwave, but the texture won’t be quite as good.

Frequently Asked Questions (FAQ)

Got questions? I’ve got answers! Here are some of the most common questions I get about this recipe:

  • Can I use frozen chicken?: Yes, but make sure to thaw it completely before cooking.
  • Can I use milk instead of heavy cream?: You can, but the sauce won’t be as creamy. I recommend using half-and-half for a better result.
  • Can I make this recipe ahead of time?: Yes, you can make it ahead of time and reheat it when you’re ready to serve. Just be aware that the pasta may absorb some of the sauce as it sits.
  • Can I freeze this recipe?: I don’t recommend freezing it, as the pasta and sauce may become mushy when thawed.
  • Is this recipe gluten-free?: No, but you can use gluten-free pasta to make it gluten-free.

If you have any other questions, feel free to ask in the comments below. I’m always happy to help!

Serving Suggestions

Looking for some serving inspiration? Here are a few ideas:

  • Serve with a side salad and some crusty bread for a complete meal.
  • Garnish with fresh parsley, basil, or a sprinkle of red pepper flakes.
  • Pair with a glass of white wine, such as Pinot Grigio or Sauvignon Blanc.
  • Serve as a main course for a casual dinner party.

And there you have it – my One Pan Garlic Parmesan Chicken Pasta recipe! I hope you love it as much as my family does. If you try it, be sure to let me know in the comments below. Happy cooking!

One Pan Garlic Parmesan Chicken Pasta

Prep Time 10 minutes
Cook Time 25 minutes
Total Time 35 minutes
Servings 6 servings
Calories 550
This one-pan garlic parmesan chicken pasta is a quick and easy weeknight meal. It's packed with flavor and requires minimal cleanup!

Ingredients

Ingredients

  • 4 boneless, skinless chicken breasts (about 680g)
  • 8 oz penne or rotini pasta (225g)
  • 4 cloves fresh garlic (minced)
  • 2 cups low-sodium chicken broth (480ml)
  • 1 cup heavy cream (240ml)
  • 1 cup freshly grated Parmesan cheese (100g)
  • 2 tbsp olive oil (30ml)
  • 2 cups fresh spinach (optional, about 60g)

Instructions 

  • Heat olive oil, cook chicken until golden brown; remove from pan.
  • Sauté minced garlic until fragrant.
  • Add pasta and chicken broth; simmer until pasta is al dente.
  • Lower heat, stir in heavy cream and Parmesan cheese.
  • Slice chicken, return to skillet with spinach; toss gently.
  • Serve warm, garnish with extra Parmesan if desired.

Notes

Adjust the amount of Parmesan cheese to your liking.
Calories: 550kcal
Cost: $18
Course: Main Course
Cuisine: Italian
Keyword: Chicken
pin

Ultimate Cheesy Ground Beef Melt Recipe: A Kitchen Adventure

My name’s Ava, and welcome to my corner of the internet where comfort food reigns supreme! Today, we’re diving headfirst into a recipe that’s close to my heart—the Ultimate Cheesy Ground Beef Melt. If you grew up like me, where a simple sandwich could solve almost any problem, then prepare to be transported back to those cozy, carefree days. This isn’t just any melt; it’s a symphony of savory ground beef, perfectly seasoned, embraced by a tidal wave of gooey, melted cheese, all nestled between slices of golden-brown, buttery bread. Trust me; this cheesy ground beef melt is about to become your new go-to comfort food.

I remember one particularly gloomy Seattle afternoon, rain drumming against the windows, when I had a serious craving for something warm and satisfying. Left with some ground beef and a mountain of cheese, inspiration struck. A few experiments later, the Ultimate Cheesy Ground Beef Melt was born. It’s the kind of recipe that makes you feel like you’ve wrapped yourself in a warm blanket, a culinary hug if you will. And the best part? It’s incredibly easy to whip up, even on the busiest weeknights. So, pull up a chair, grab a spatula, and let’s get melting!

Why You’ll Love This Cheesy Ground Beef Melt

Okay, let’s get real. Why should you spend your precious time making this particular ground beef melt recipe? Well, besides the fact that it’s ridiculously delicious, here are a few compelling reasons:

  • Comfort Food Perfection: This is comfort food at its finest. The combination of savory ground beef and melted cheese is simply irresistible.
  • Quick and Easy: Ready in under 30 minutes, this recipe is perfect for busy weeknights when you need a satisfying meal fast.
  • Simple Ingredients: You probably already have most of these ingredients in your pantry and fridge. No need for a special trip to the grocery store!
  • Customizable: Feel free to get creative with your cheese, spices, and bread. This recipe is a blank canvas for your culinary imagination.
  • Kid-Friendly: Even the pickiest eaters will devour this cheesy ground beef melt. It’s a guaranteed crowd-pleaser.

Honestly, this dish is the ultimate cheesy indulgence. Every bite delivers a comforting crunch followed by an explosion of savory, cheesy goodness. What’s not to love?

Ingredients for the Ultimate Cheesy Ground Beef Melt

Before we start, let’s gather our ingredients. Here’s what you’ll need to create this masterpiece:

  • 1 pound ground beef
  • 4 slices thick-cut bread
  • 1 cup shredded cheddar cheese
  • 1 cup shredded mozzarella cheese
  • ½ teaspoon salt
  • ¼ teaspoon black pepper
  • ½ teaspoon garlic powder
  • ½ teaspoon onion powder
  • 2 tablespoons butter (softened)
  • 1 tablespoon chopped fresh parsley (optional)
Recipe Image

Step-by-Step: Making the Ultimate Cheesy Ground Beef Melt

Alright, let’s get cooking! Follow these simple steps to create the ultimate cheesy ground beef melt:

  1. Cook the Ground Beef: Heat a skillet over medium-high heat and cook the ground beef until fully browned, about 7–9 minutes. Drain any excess fat. This step is crucial for getting that rich, savory flavor.
  2. Season the Beef: Lower the heat to medium and season the beef with salt, pepper, garlic powder, and onion powder. Stir to combine and cook for 1 more minute. Don’t be shy with the seasonings – they make all the difference!
  3. Butter the Bread: While the beef is cooking, butter one side of each bread slice. Softened butter is key for even browning.
  4. Assemble the Melt: On a clean surface, place one slice of bread buttered-side down. Layer with cheddar cheese, the seasoned ground beef, then mozzarella cheese. Top with the second slice, buttered-side up. The order of the cheese layers helps create that perfect melt.
  5. Toast the Sandwich: Heat a clean skillet over medium heat. Toast the sandwich for 3–4 minutes per side, pressing lightly with a spatula, until golden brown and the cheese is melted and gooey. Patience is key here – don’t rush the toasting process.
  6. Serve and Enjoy: Remove from heat, let it rest for a minute, then slice in half and serve warm. Garnish with fresh parsley, if desired, for a pop of color and flavor.

And there you have it! A perfectly toasted, cheesy ground beef melt ready to devour. This recipe is perfect for a quick lunch or a satisfying dinner.

Pro Tips for the Perfect Cheesy Ground Beef Melt

Want to take your cheesy ground beef melt to the next level? Here are a few of my favorite pro tips:

  • Use High-Quality Cheese: Opt for good quality cheddar and mozzarella cheese for the best flavor and melt. Pre-shredded cheese often contains cellulose, which can inhibit melting. Shred your own for optimal results.
  • Don’t Overcrowd the Pan: If you’re making multiple melts, cook them in batches to avoid overcrowding the pan. This ensures even browning and melting.
  • Press Gently: Use a spatula to gently press down on the sandwich while it’s toasting. This helps the cheese melt evenly and creates a crispy crust.
  • Let it Rest: Allowing the melt to rest for a minute before slicing helps the cheese set slightly, preventing it from oozing out everywhere.
  • Get Creative with Toppings: Add sliced tomatoes, caramelized onions, or sautéed mushrooms to the ground beef for extra flavor and texture.

These little tweaks can make a big difference in the final result. Experiment and find what works best for you!

Common Mistakes to Avoid

Even the simplest recipes can go awry if you’re not careful. Here are a few common mistakes to avoid when making your cheesy ground beef melt:

  • Using Cold Butter: Make sure your butter is softened before spreading it on the bread. Cold butter can tear the bread and result in uneven browning.
  • Overcooking the Beef: Overcooked ground beef can become dry and tough. Cook it just until it’s fully browned, then drain any excess fat.
  • Using Too Much Cheese: While it’s tempting to load up on the cheese, using too much can make the melt greasy and difficult to handle. Stick to the recommended amounts.
  • Rushing the Toasting Process: Toasting the sandwich over high heat can result in a burnt exterior and unmelted cheese. Be patient and toast it over medium heat for even browning and melting.
  • Ignoring Seasoning: Don’t forget to season the ground beef properly. Salt, pepper, garlic powder, and onion powder are essential for adding flavor.

Avoiding these mistakes will help you achieve cheesy ground beef melt perfection every time.

Variations to Try

One of the best things about this recipe is how easily you can customize it to your liking. Here are a few variations to inspire you:

  • Spicy Melt: Add a pinch of red pepper flakes or a dash of hot sauce to the ground beef for a spicy kick.
  • Italian Melt: Use Italian seasoning instead of garlic and onion powder, and add some sliced pepperoni or salami to the filling.
  • BBQ Melt: Mix some BBQ sauce into the ground beef for a smoky, tangy flavor. Top with crispy fried onions for extra crunch.
  • Veggie Melt: Add some sautéed bell peppers, onions, and mushrooms to the ground beef for a veggie-packed melt.
  • Different Cheeses: Experiment with different types of cheese, such as provolone, Gruyère, or pepper jack, for a unique flavor profile.

The possibilities are endless! Feel free to get creative and come up with your own unique variations.

How to Store Leftovers

If you happen to have any leftovers (though I doubt you will!), here’s how to store them properly:

  • Refrigerate: Wrap the leftover melt tightly in plastic wrap or store it in an airtight container in the refrigerator for up to 3 days.
  • Reheat: To reheat, you can toast the melt in a skillet over low heat until heated through and the cheese is melted. You can also microwave it, but the bread may become soggy.

Keep in mind that the melt will be best enjoyed fresh, but leftovers can still be a delicious snack or quick meal.

Frequently Asked Questions (FAQ)

Here are some common questions about making the ultimate cheesy ground beef melt:

  • Can I use a different type of bread?: Absolutely! Sourdough, rye, or even Texas toast would work well.
  • Can I use ground turkey instead of ground beef?: Yes, ground turkey is a great substitute. Just make sure to adjust the cooking time as needed. You could even use a turkey-burgers or turkey-burger-recipe as a base.
  • Can I make this ahead of time?: You can cook the ground beef ahead of time and store it in the refrigerator. Assemble the melt just before toasting.
  • Can I freeze the melt?: I don’t recommend freezing the melt, as the bread and cheese may become soggy when thawed.
  • How do I prevent the bread from burning?: Toast the melt over medium heat and keep a close eye on it. If the bread is browning too quickly, lower the heat.

Serving Suggestions

This cheesy ground beef melt is delicious on its own, but here are a few serving suggestions to complete your meal:

  • Side Salad: A simple green salad with a light vinaigrette is a refreshing contrast to the richness of the melt.
  • Tomato Soup: Pair the melt with a bowl of creamy tomato soup for the ultimate comfort food combo.
  • French Fries or Onion Rings: Crispy fries or onion rings are always a crowd-pleasing side dish.
  • Coleslaw: A tangy coleslaw adds a nice crunch and acidity to balance out the richness of the melt.
  • Pickles: Serve with a side of dill pickles or pickle spears for a briny, refreshing bite.

No matter how you choose to serve it, this ultimate cheesy ground beef melt is sure to be a hit! The ultimate cheesy ground beef, the beef is cooked to perfection, the cheese and ground beef compliment each other perfectly and you can whip up this delicious dish in no time. The ultimate cheesy ground beef melt is here for you to try today. This recipe is perfect for those who love a comforting crunch with gooey cheese. This beef melt is the perfect meal. The beef melt is perfect for the entire family. This dish is perfect for those with little time. This dish is ready to go when you are. It’s everything you’ve been looking for in a ground beef recipe. You’re going to love this ultimate cheesy ground beef melt. This is the best ground beef melt is in the world. You can customize this recipe to your liking.

Ultimate Cheesy Ground Beef Melt

Prep Time 5 minutes
Cook Time 15 minutes
Total Time 20 minutes
Servings 2 sandwiches
Calories 650
Indulge in the ultimate comfort food with this cheesy ground beef melt. A savory and satisfying sandwich perfect for a quick and delicious meal.

Ingredients

Ingredients

  • 1 pound ground beef
  • 4 slices thick-cut bread
  • 1 cup shredded cheddar cheese
  • 1 cup shredded mozzarella cheese
  • 0.5 teaspoon salt
  • 0.25 teaspoon black pepper
  • 0.5 teaspoon garlic powder
  • 0.5 teaspoon onion powder
  • 2 tablespoons butter (softened)
  • 1 tablespoon chopped fresh parsley (optional)

Instructions 

  • Heat skillet over medium-high heat, cook beef until browned (7-9 mins). Drain fat.
  • Lower heat, season beef with salt, pepper, garlic powder, and onion powder. Stir and cook for 1 minute.
  • Butter one side of each bread slice.
  • Place bread buttered-side down, layer with cheddar, beef, then mozzarella. Top with second slice, buttered-side up.
  • Heat clean skillet over medium heat. Toast sandwich for 3-4 minutes per side, pressing lightly, until golden brown and cheese is melted.
  • Remove from heat, let it rest for a minute, then slice and serve warm.

Notes

For an extra crispy melt, use a panini press or weight down the sandwich while toasting.
Calories: 650kcal
Cost: $12
Course: Main Course
Cuisine: American
Keyword: ground beef
pin

Hey there, friend! Ava here, back in my Seattle kitchen, and today we’re diving into a recipe that’s a staple in my house: Lemon Garlic Chicken. Whether you’re juggling work, kids, or just life in general, this dish is a lifesaver. It’s quick, it’s easy, and it’s packed with flavor that’ll make your taste buds sing. Plus, it’s a fantastic way to get a high-protein dinner on the table without spending hours in the kitchen.

I remember one particularly hectic week when I was testing out different recipes for a friend’s restaurant opening. I needed something reliable, something that wouldn’t take forever but would still be delicious and satisfying. Enter this lemon garlic chicken recipe. It was so good, I made it three times that week! And now, I’m sharing it with you.

Why You’ll Love This Lemon Garlic Chicken

Okay, let’s get real. Why should you spend your precious time making this recipe? Here’s the lowdown:

  • One-Pan Wonder: Fewer dishes mean more time for you. This sheet pan version is the definition of easy cleanup.
  • Flavor Explosion: The combination of zesty lemon and savory garlic is simply irresistible. It’s the perfect balance of bright and comforting.
  • Versatile: You can customize this recipe to your heart’s content. Swap out the veggies, add different spices, or use chicken thighs instead of breasts. It’s all up to you.
  • Healthy & Delicious: Packed with protein and nutrients, this is a meal you can feel good about serving your family (or enjoying all by yourself!).
  • Perfect for Meal Prep: Make a big batch on Sunday and enjoy it throughout the week. It reheats beautifully!

Seriously, this lemon garlic chicken is a game-changer. It’s the kind of meal that makes you feel like you’ve got your life together, even when you don’t. And trust me, we all have those days!

Ingredients You’ll Need

Here’s what you’ll need to whip up this magic:

  • 1.5 lbs boneless, skinless chicken breasts, cut into 1-inch pieces
  • 1 lb baby potatoes, quartered
  • 1 head of broccoli, cut into florets
  • 4 cloves garlic, minced
  • 1/4 cup olive oil
  • 1/4 cup lemon juice
  • 1 tablespoon lemon zest
  • 1 teaspoon dried oregano
  • 1/2 teaspoon salt
  • 1/4 teaspoon black pepper
  • Optional: red pepper flakes
Recipe Image

Let’s Get Cooking: Step-by-Step Instructions

Alright, let’s get down to business. Here’s how to make this incredible lemon garlic chicken:

  1. Preheat the Oven: Start by preheating your oven to 400°F (200°C). This ensures everything cooks evenly and gets that perfect golden-brown color.
  2. Make the Magic Marinade: In a large bowl, whisk together olive oil, lemon juice, lemon zest, minced garlic, oregano, salt, and pepper (and red pepper flakes, if using). This lemon garlic marinade is where all the flavor comes from, so don’t skimp on the ingredients!
  3. Combine Everything: Add the chicken, potatoes, and broccoli to the bowl and toss to coat evenly. Make sure every piece is covered in that glorious marinade. The better the coating, the better the flavor!
  4. Spread and Bake: Spread the mixture in a single layer on a large baking sheet. Avoid overcrowding the pan, or the veggies will steam instead of roast. If necessary, use two baking sheets. Bake for 25-30 minutes, or until chicken is cooked through and potatoes are tender. The internal temperature of the chicken should reach 165°F (74°C).
  5. Serve and Enjoy: Serve immediately and bask in the deliciousness of your creation. You can garnish with extra lemon zest or fresh parsley for an extra pop of flavor.

Pro Tips for the Best Lemon Garlic Chicken

Want to take your lemon garlic chicken to the next level? Here are a few pro tips I’ve learned over the years:

  • Use Fresh Garlic: While jarred garlic is convenient, fresh garlic has a much more potent and vibrant flavor. Trust me, it makes a difference.
  • Don’t Overcrowd the Pan: Overcrowding will cause the veggies to steam instead of roast. Use two baking sheets if needed, ensuring everything gets crispy.
  • Marinate for Extra Flavor: If you have time, marinate the chicken for at least 30 minutes (or even overnight) in the refrigerator. The longer it marinates, the more flavorful it will be.
  • Use Chicken Thighs: For even more flavor and moisture, substitute chicken thighs for chicken breasts. They are more forgiving and stay juicier during baking.
  • Add a Touch of Heat: A pinch of red pepper flakes adds a subtle kick that complements the lemon and garlic beautifully.

These tips will help you create a truly unforgettable lemon garlic chicken dish. Remember, cooking is all about experimenting and finding what works best for you!

Common Mistakes to Avoid

Even the best cooks make mistakes, but here are a few common pitfalls to avoid when making this recipe:

  • Overcooking the Chicken: Dry chicken is a sad chicken. Use a meat thermometer to ensure it reaches 165°F (74°C) without overcooking.
  • Not Using Enough Lemon: Lemon is the star of this dish, so don’t be shy with the lemon juice and zest.
  • Skipping the Marinade: The marinade is crucial for infusing the chicken with flavor. Don’t skip this step!
  • Ignoring Doneness of Potatoes: Ensure the potatoes are tender before removing from the oven. If they need more time, cover the chicken with foil to prevent it from drying out.

Variations to Spice Things Up

Want to get creative? Here are a few variations to try:

  • Lemon Herb Chicken: Add fresh herbs like rosemary, thyme, or parsley to the marinade for an extra layer of flavor.
  • Honey Garlic Chicken: Add a tablespoon of honey to the marinade for a touch of sweetness.
  • Spicy Lemon Garlic Chicken: Add a teaspoon of chili powder or a dash of hot sauce to the marinade for a spicy kick.
  • Mediterranean Lemon Garlic Chicken: Add chopped Kalamata olives, feta cheese, and sun-dried tomatoes to the sheet pan for a Mediterranean twist.
  • Lemon Garlic Chicken and Asparagus: Swap out the broccoli for asparagus for a seasonal variation.

How to Store Leftovers

Got leftovers? Lucky you! Here’s how to store them:

  • Refrigerate: Store leftovers in an airtight container in the refrigerator for up to 3-4 days.
  • Reheat: Reheat in the oven at 350°F (175°C) or in the microwave until heated through.

Leftovers are great in salads, wraps, or as a quick and easy lunch!

Frequently Asked Questions (FAQ)

Got questions? I’ve got answers!

  • Can I use frozen chicken?: Yes, but make sure to thaw it completely before marinating.
  • Can I use different vegetables?: Absolutely! Feel free to substitute your favorite veggies, like bell peppers, zucchini, or carrots.
  • Can I make this ahead of time?: Yes! You can prepare the marinade and chop the veggies ahead of time. Store them separately in the refrigerator until you’re ready to cook.
  • Can I use chicken thighs instead of chicken breasts?: Of course! Chicken thighs are a great option for extra flavor and moisture.

Serving Suggestions

This lemon garlic chicken is delicious on its own, but here are a few serving suggestions to complete your meal:

  • Serve with a side of quinoa or rice: These grains are a great way to soak up the delicious lemon garlic sauce.
  • Serve with a fresh salad: A light and refreshing salad complements the richness of the chicken.
  • Serve with crusty bread: Perfect for dipping into the sauce!

And there you have it! My go-to Lemon Garlic Chicken recipe that’s perfect for any night of the week. I hope you love it as much as I do! Now go ahead and give it a try – and don’t forget to share your creations with me. Happy cooking!

So, there you have it. This lemon garlic chicken recipe is a winner. It’s a meal that brings people together, that becomes your ‘go-to,’ that makes someone you love ask for seconds. And that, my friends, is what cooking is all about. I’m so glad you stopped by my kitchen today, and I can’t wait to see what delicious things you create. Happy cooking!

When you try this recipe, remember that this recipe for lemon garlic chicken is meant to be shared and enjoyed. You can change the veggies, the spices, or even the type of the chicken. It’s all about making it your own. So, don’t be afraid to experiment and add the flavors you love.

I’m always here to help, so if you have any questions or need some extra guidance, just let me know. I’m excited for you to try this chicken and broccoli sheet pan recipe and make it a part of your own kitchen story. Enjoy!

The marinade is key to getting the flavors just right. If you have the time, let the chicken marinate in the refrigerator for at least 30 minutes, or even overnight. This will help the chicken absorb all the delicious lemon garlic flavors.

This lemon garlic chicken sheet pan recipe is a great way to get a healthy and delicious meal on the table quickly. It’s perfect for busy weeknights, and it’s also a crowd-pleaser. So, give it a try, and let me know what you think!

You’ll love how easy it is to make this one pan chicken broccoli potatoes dinner. The garlic chicken recipe is simple, and the flavors are amazing. The potatoes and broccoli roast perfectly alongside the chicken, creating a complete and satisfying meal.

I’m telling you, this recipe is a game-changer. It’s the kind of meal that makes you feel like you’ve got your life together, even when you don’t. And trust me, we all have those days!

So, go ahead and give this lemon garlic chicken sheet pan recipe a try. I’m confident that it will become a new favorite in your kitchen. Happy cooking!

Remember, if you don’t have chicken breasts, you can always use chicken thighs. They are more forgiving and stay juicier during baking. The choice is yours!

This lemon garlic chicken is so much more than just a meal; it’s an experience. It’s the aroma that fills your kitchen, the sizzle of the chicken in the oven, and the joy of sharing a delicious meal with loved ones. It’s these moments that make cooking so special.

And that’s why I love sharing my recipes with you. I want to help you create those special moments in your own kitchen. So, whether you’re a seasoned cook or just starting out, I hope this lemon garlic chicken recipe inspires you to get creative and have fun in the kitchen.

Lemon Garlic Chicken with Potatoes & Broccoli

Prep Time 15 minutes
Cook Time 30 minutes
Total Time 45 minutes
Servings 4 people
Calories 450
A flavorful and healthy sheet pan dinner featuring lemon garlic chicken, tender potatoes, and broccoli. This high-protein recipe is easy to prepare and perfect for a weeknight meal.

Ingredients

Ingredients

  • 1.5 lbs boneless, skinless chicken breasts (cut into 1-inch pieces)
  • 1 lb baby potatoes (quartered)
  • 1 head broccoli (cut into florets)
  • 4 cloves garlic (minced)
  • 1/4 cup olive oil
  • 1/4 cup lemon juice
  • 1 tablespoon lemon zest
  • 1 teaspoon dried oregano
  • 1/2 teaspoon salt
  • 1/4 teaspoon black pepper
  • red pepper flakes (Optional)

Instructions 

  • Preheat oven to 400°F (200°C).
  • Whisk together olive oil, lemon juice, lemon zest, garlic, oregano, salt, and pepper in a large bowl.
  • Add chicken, potatoes, and broccoli to the bowl and toss to coat.
  • Spread the mixture on a large baking sheet in a single layer.
  • Bake for 25-30 minutes, or until chicken is cooked through and potatoes are tender.
  • Serve immediately.

Notes

For extra flavor, marinate the chicken for at least 30 minutes before cooking.
Calories: 450kcal
Cost: $18
Course: dinner
Cuisine: Mediterranean
Keyword: Chicken
pin

Hey there, kitchen adventurers! Ava here, and if you’re anything like me, you’re always on the lookout for that one dish that’s quick, satisfying, and guaranteed to bring smiles to the dinner table. Well, look no further! These Cheesy Ground Beef Quesadillas are about to become your new best friend. I’m talking melty cheese, savory ground beef, and a crispy tortilla all coming together in perfect harmony. Remember those nights growing up when my mom would whip up something simple, yet utterly comforting? This recipe is a love letter to those memories, a reminder that the best meals are often the easiest.

Living in Seattle, life can get pretty hectic. Between work, errands, and the occasional rainy day adventure, sometimes the last thing I want to do is spend hours slaving away in the kitchen. That’s why I’m obsessed with recipes that deliver big flavor with minimal effort. And trust me, this one does exactly that. It’s perfect for busy weeknights, lazy weekends, or even a fun get-together with friends. So, grab your skillet and let’s get cooking!

Why You’ll Love This Cheesy Ground Beef Quesadillas Recipe

Seriously, what’s not to love? But let me break it down for you:

  • Quick & Easy: From start to finish, you’re looking at about 20 minutes. Yes, you read that right!
  • Family-Friendly: Even the pickiest eaters will devour these. I promise!
  • Customizable: Add your favorite toppings, swap out the cheese, make it spicy – the possibilities are endless.
  • Budget-Friendly: Ground beef is an economical choice, making this a wallet-friendly meal.
  • Perfect for Leftovers: Got leftover ground beef? Quesadilla time!

These cheesy ground beef quesadillas are truly a lifesaver. You can make them with just a few ingredients that you probably already have in your pantry. These cheesy ground beef quesadillas are a fantastic option for those nights when you need something quick, easy, and delicious. They are so good the whole family will enjoy them!

Cheesy Ground Beef Quesadillas Ingredients

  • 1 tablespoon olive oil
  • 1 pound ground beef
  • 1 small onion, finely chopped
  • 2 cloves garlic, minced
  • 1 teaspoon chili powder
  • 1/2 teaspoon ground cumin
  • 1/2 teaspoon paprika
  • 1/2 teaspoon salt
  • 1/4 teaspoon black pepper
  • 1/4 cup tomato sauce
  • 1 1/2 cups shredded cheddar cheese
  • 1 cup shredded Monterey Jack cheese
  • 6 large flour tortillas
  • Butter or oil for frying
Recipe Image

How to Make Cheesy Ground Beef Quesadillas: Step-by-Step

Alright, let’s get down to business. Here’s how to whip up these cheesy delights:

  1. Brown the Beef: Heat olive oil in a skillet over medium heat. Add ground beef and cook until browned; drain excess fat. Nobody wants greasy quesadillas!
  2. Sauté the Aromatics: Stir in chopped onion and cook until softened. Add garlic and seasonings, mixing well with tomato sauce; simmer for 3-4 minutes. This is where the magic happens! The aroma alone will have your mouth watering.
  3. Assemble the Quesadillas: Lay out tortillas, sprinkle cheese on one half, add beef mixture, top with more cheese, and fold. Don’t be shy with the cheese – it’s what makes them extra gooey and delicious.
  4. Cook to Golden Perfection: Cook each quesadilla in a skillet over medium heat with butter or oil for 2-3 minutes per side until golden brown. Press down gently with a spatula to ensure even cooking and maximum crispiness. Getting that crispy tortilla is key!
  5. Serve & Enjoy: Slice into wedges and serve warm with your choice of sour cream, salsa, or guacamole. I personally love a dollop of sour cream and a sprinkle of fresh cilantro.

And there you have it! Easy peasy, right? With just a few simple steps, you’ve created a meal that’s sure to impress. And cook with love, that’s my motto!

Pro Tips for the Best Cheesy Ground Beef Quesadillas

Want to take your quesadilla game to the next level? Here are a few of my tried-and-true tips:

  • Use Quality Ingredients: Freshly shredded cheese melts better and tastes amazing.
  • Don’t Overcrowd the Pan: Cook the quesadillas one or two at a time to ensure even browning.
  • Press Down Gently: This helps the cheese melt evenly and the tortilla crisp up.
  • Experiment with Spices: Add a pinch of cayenne pepper for a kick, or a dash of smoked paprika for a smoky flavor.
  • Warm Your Tortillas: A slightly warmed tortilla is more pliable and less likely to tear when folding.

Common Mistakes to Avoid

We all make mistakes, but here are a few to watch out for:

  • Overfilling the Quesadillas: Too much filling can make them difficult to fold and cook evenly.
  • Using Too Much Oil: Excess oil can make the quesadillas greasy.
  • Cooking on Too High Heat: This can burn the tortilla before the cheese melts.
  • Skipping the Seasoning: Don’t be afraid to season your ground beef generously.

I’ve definitely been guilty of overfilling a quesadilla or two in my day! That’s why I always say, practice makes perfect. And remember, even if it’s not perfect, it’s still delicious!

Cheesy Ground Beef Quesadillas Variations

The beauty of this recipe is that it’s incredibly versatile. Here are a few ideas to get your creative juices flowing:

  • Spicy Quesadillas: Add diced jalapeños or a dash of hot sauce to the beef mixture.
  • Veggie Quesadillas: Add sautéed bell peppers, onions, or mushrooms.
  • Black Bean Quesadillas: Mix in a can of drained and rinsed black beans.
  • Chicken Quesadillas: Substitute ground beef with shredded cooked chicken.
  • Breakfast Quesadillas: Add scrambled eggs and crumbled bacon for a breakfast treat.

How to Store and Reheat Leftover Quesadillas

Got leftovers? Lucky you! Here’s how to store and reheat them:

  • Storage: Store cooled quesadillas in an airtight container in the refrigerator for up to 3 days.
  • Reheating: Reheat in a skillet over medium heat until warmed through and crispy, or in the microwave for a quick fix.

Frequently Asked Questions (FAQ)

Got questions? I’ve got answers!

  • Can I use different types of cheese? Absolutely! Pepper jack, Colby jack, or even a sprinkle of cotija cheese would be delicious.
  • Can I make these ahead of time? Yes, you can assemble the quesadillas ahead of time and store them in the refrigerator until ready to cook.
  • Can I freeze these? Yes, you can freeze cooked quesadillas. Wrap them individually in plastic wrap and store them in a freezer bag for up to 2 months. Reheat in a skillet or oven.
  • What kind of tortillas should I use? I prefer large flour tortillas, but you can use corn tortillas for a gluten-free option.

Serving Suggestions for Cheesy Ground Beef Quesadillas

These cheesy ground beef quesadillas are delicious on their own, but here are a few serving suggestions to complete your meal:

  • Sour Cream & Salsa: A classic combination that never disappoints.
  • Guacamole: Creamy, flavorful, and oh-so-delicious.
  • Pico de Gallo: Fresh and vibrant, this adds a burst of flavor.
  • Mexican Rice & Beans: A hearty side dish to round out the meal.
  • Side Salad: A light and refreshing complement to the rich quesadillas.

So there you have it! My go-to recipe for Easy Cheesy Ground Beef Quesadillas. I hope you love them as much as my family and I do. Remember, cooking should be fun and stress-free. Don’t be afraid to experiment, get creative, and most importantly, enjoy the process. Happy cooking, friends!

And remember to check out my other recipes too! Like this delicious hamburger-patty recipe!

Cheesy Ground Beef Quesadillas

Prep Time 10 minutes
Cook Time 15 minutes
Total Time 25 minutes
Servings 6 quesadillas
Calories 450
These cheesy ground beef quesadillas are a quick and easy meal perfect for a weeknight dinner. Filled with savory ground beef, melted cheese, and flavorful spices, they're sure to be a family favorite!

Ingredients

Ingredients

  • 1 tablespoon olive oil
  • 1 pound ground beef
  • 1 small onion, finely chopped
  • 2 cloves garlic, minced
  • 1 teaspoon chili powder
  • 0.5 teaspoon ground cumin
  • 0.5 teaspoon paprika
  • 0.5 teaspoon salt
  • 0.25 teaspoon black pepper
  • 0.25 cup tomato sauce
  • 1.5 cups shredded cheddar cheese
  • 1 cup shredded Monterey Jack cheese
  • 6 large flour tortillas
  • Butter or oil for frying

Instructions 

  • Heat olive oil in a skillet over medium heat. Add ground beef and cook until browned; drain excess fat.
  • Stir in chopped onion and cook until softened. Add garlic and seasonings, mixing well with tomato sauce; simmer for 3-4 minutes.
  • Lay out tortillas, sprinkle cheese on one half, add beef mixture, top with more cheese, and fold.
  • Cook each quesadilla in a skillet over medium heat with butter or oil for 2-3 minutes per side until golden brown.
  • Slice into wedges and serve warm with your choice of sour cream, salsa, or guacamole.

Notes

For extra flavor, add a pinch of cayenne pepper to the beef mixture.
Calories: 450kcal
Cost: $12
Course: Main Course
Cuisine: Mexican
Keyword: ground beef
pin

Hey there, friends! Ava here, back in my Seattle kitchen, and today I’m sharing one of my absolute ‘go-to’ recipes when I need something quick, healthy, and ridiculously tasty: 15-Minute Buffalo Chickpea Wraps. If you’re anything like me, you’re always on the lookout for easy weeknight dinners or a satisfying lunch that doesn’t require hours in the kitchen. Well, look no further, because this recipe is about to become your new best friend. Think of it as a high protein veggie sandwich, but way more exciting!

I remember the first time I made these. It was one of those days where I was staring blankly into the fridge, willing something magical to appear. All I had was a can of chickpeas, some sad-looking lettuce, and a bottle of buffalo hot sauce. Inspiration struck, and within minutes, I was devouring the most amazing wrap of my life. And now, I’m sharing my best vegetarian lunch idea with you!

Why You’ll Love This Recipe

Seriously, what’s not to love? This Buffalo Chickpea Salad Wrap is:

  • Quick & Easy: Seriously, 15 minutes is all you need!
  • Plant-Based Protein Powerhouse: Chickpeas are packed with protein and fiber, keeping you full and satisfied. It’s a great high protein non meat meal option.
  • Bursting with Flavor: The combination of creamy, spicy, and crunchy is simply irresistible.
  • Perfect for Meal Prep: Make a batch on Sunday and enjoy these wraps all week long. They make the best vegetarian lunch for busy days!
  • Customizable: Easily adapt this recipe to your liking with different toppings and variations.
  • Gluten-Free Friendly: Just use gluten-free wraps!

These wraps are truly versatile and the perfect meal for any occasion. They are a great option for those looking for easy delicious vegetarian dinners.

Ingredients You’ll Need

  • 1 (15 oz) can chickpeas, drained and rinsed
  • 2 tablespoons vegan mayonnaise or Greek yogurt
  • 2 tablespoons Buffalo hot sauce
  • 1 tablespoon fresh lemon juice
  • 1 celery stalk, finely diced
  • 1 small carrot, grated
  • 2 tablespoons red onion, finely diced
  • 1 tablespoon chopped fresh parsley
  • 1/4 teaspoon garlic powder
  • 1/4 teaspoon smoked paprika
  • Salt and freshly ground black pepper, to taste
  • 4 large flour tortillas or whole wheat wraps
  • 1 cup shredded lettuce
  • 1/2 cup diced tomatoes
  • 1/2 cup shredded cheddar cheese or vegan cheese (optional)
  • 1/4 cup ranch or blue cheese dressing (optional, for drizzling)
Recipe Image

How to Make Buffalo Chickpea Wraps: Step-by-Step

Making these wraps is so easy, it’s almost embarrassing. But hey, I’m all about simple and delicious!

  1. Mash the Chickpeas: In a medium mixing bowl, use a fork or potato masher to mash the chickpeas, leaving some chunks for texture. This adds a nice bite to the filling.
  2. Mix the Salad: Add vegan mayonnaise or Greek yogurt, Buffalo hot sauce, lemon juice, celery, grated carrot, red onion, parsley, garlic powder, smoked paprika, salt, and pepper to the chickpeas and stir until thoroughly combined. Give it a taste and adjust the seasoning as needed.
  3. Assemble the Wraps: Arrange tortillas flat on a clean surface. Evenly distribute shredded lettuce, diced tomatoes, and cheese if using onto each wrap.
  4. Add the Chickpea Filling: Spoon the Buffalo chickpea salad evenly over the fillings on each tortilla. Drizzle with ranch or blue cheese dressing if desired.
  5. Roll ‘Em Up: Tightly roll each tortilla, folding in the sides as you go, to enclose the filling.
  6. Serve: Slice each wrap in half for serving, or wrap in foil for an on-the-go meal.

Pro Tips for the Best Buffalo Chickpea Wraps

Want to take your wraps to the next level? Here are a few of my favorite tips:

  • Don’t Over-Mash: Leaving some chunks of chickpeas adds texture and prevents the filling from becoming mushy.
  • Use High-Quality Buffalo Hot Sauce: The flavor of the hot sauce will really shine through, so choose one you love. I’m partial to Frank’s RedHot, but feel free to experiment.
  • Add a Touch of Sweetness: A drizzle of maple syrup or a pinch of brown sugar can balance the heat of the buffalo sauce.
  • Toast the Wraps: For a warm and crispy wrap, lightly toast the tortillas in a dry skillet or on a grill pan before adding the filling.
  • Get Creative with Toppings: Add avocado slices, sprouts, or pickled onions for extra flavor and texture.

Common Mistakes to Avoid

Even though this recipe is super simple, here are a few pitfalls to watch out for:

  • Overfilling the Wraps: Resist the urge to pile on too much filling, or your wraps will be impossible to roll.
  • Using Soggy Lettuce: Make sure your lettuce is completely dry before adding it to the wraps, or they’ll get soggy.
  • Skipping the Seasoning: Don’t be afraid to season the chickpea salad generously with salt, pepper, and garlic powder. These flavors are key to a delicious wrap.
  • Not Tightly Rolling: Roll the wraps tightly to prevent them from falling apart.

Buffalo Chickpea Wrap Variations

One of the things I love most about this recipe is how easy it is to customize. Here are a few variations to try:

  • Spicy Buffalo Chickpea Wraps: Add a pinch of cayenne pepper or a dash of your favorite hot sauce to the chickpea salad for an extra kick.
  • Cool and Creamy Buffalo Chickpea Wraps: Mix in some mashed avocado or a dollop of sour cream for a cooling effect.
  • Mediterranean Buffalo Chickpea Wraps: Add crumbled feta cheese, Kalamata olives, and a drizzle of olive oil for a Mediterranean twist.
  • BBQ Buffalo Chickpea Wraps: Swap the buffalo hot sauce for BBQ sauce and add some smoked paprika for a smoky flavor.
  • Air Fryer Buffalo Chickpea Wraps: After assembling, lightly brush the wraps with oil and air fry at 375°F (190°C) for 5-7 minutes, or until golden brown and crispy.

If you are looking for spicy vegetarian food, adding extra hot sauce is always a win!

How to Store Buffalo Chickpea Wraps

These wraps are best enjoyed fresh, but they can be stored in the refrigerator for up to 2 days. Wrap them tightly in plastic wrap or foil to prevent them from drying out.

  • Make-Ahead Tip: Prepare the buffalo chickpea salad ahead of time and store it in an airtight container in the refrigerator. Assemble the wraps just before serving.

Serving Suggestions

These wraps are a complete meal on their own, but they also pair well with:

  • Side Salad: A simple green salad or a cucumber and tomato salad.
  • Sweet Potato Fries: For a satisfying and comforting meal.
  • Coleslaw: The creamy coleslaw complements the spiciness of the buffalo sauce.
  • Soup: A light vegetable soup or a creamy tomato soup.

They are perfect for lunch or dinner, and satisfying any craving.

Frequently Asked Questions (FAQ)

Got questions? I’ve got answers!

  • Can I use canned beans other than chickpeas? While chickpeas are the star of this show, you can experiment with other beans like cannellini beans or kidney beans. Just be sure to adjust the seasoning accordingly.
  • Can I make this recipe vegan? Absolutely! Just use vegan mayonnaise or Greek yogurt and vegan cheese.
  • Can I make this recipe gluten-free? Yes! Use gluten-free tortillas or serve the buffalo chickpea salad over lettuce cups.
  • Can I add other vegetables to the chickpea salad? Of course! Feel free to add diced bell peppers, corn, or black beans for extra flavor and nutrition.
  • How can I make this recipe less spicy? Reduce the amount of buffalo hot sauce or add a dollop of sour cream or yogurt to the chickpea salad to cool it down.

Final Thoughts

So there you have it—my go to, super-easy, 15-Minute Buffalo Chickpea Wraps recipe! I hope you love it as much as I do. It’s the perfect solution for busy weeknights, quick lunches, and anytime you’re craving something healthy and delicious. This recipe truly helps show how healthy meals with chickpeas can be fun and delicious.

If you try this recipe, be sure to let me know in the comments below! And don’t forget to tag me in your photos on social media. I love seeing your creations!

Happy cooking, friends! And remember, every ‘oops’ moment is just an invitation to try again—this time with a little more patience and maybe a pinch more salt. So go ahead, get creative in the kitchen, and make something unforgettable! These salad wraps are sure to impress.

15-Minute Buffalo Chickpea Wraps

Prep Time 10 minutes
Cook Time 5 minutes
Total Time 15 minutes
Servings 4 wraps
Calories 350
Quick and easy Buffalo Chickpea Wraps are perfect for a fast lunch or dinner. Packed with flavor and plant-based protein, these wraps are a delicious and healthy option.

Ingredients

Buffalo Chickpea Salad

  • 15 oz chickpeas (drained and rinsed)
  • 2 tablespoons vegan mayonnaise (or Greek yogurt)
  • 2 tablespoons Buffalo hot sauce
  • 1 tablespoon fresh lemon juice
  • 1 stalk celery (finely diced)
  • 1 small carrot (grated)
  • 2 tablespoons red onion (finely diced)
  • 1 tablespoon fresh parsley (chopped)
  • 1/4 teaspoon garlic powder
  • 1/4 teaspoon smoked paprika
  • to taste Salt and freshly ground black pepper

Wraps

  • 4 large flour tortillas (or whole wheat wraps)
  • 1 cup shredded lettuce
  • 1/2 cup diced tomatoes
  • 1/2 cup shredded cheddar cheese (or vegan cheese (optional))
  • 1/4 cup ranch or blue cheese dressing (optional, for drizzling)

Instructions 

  • Mash chickpeas in a bowl, leaving some chunks.
  • Add mayonnaise, hot sauce, lemon juice, celery, carrot, onion, parsley, garlic powder, paprika, salt, and pepper; stir well.
  • Arrange tortillas flat; add lettuce, tomatoes, and cheese (if using).
  • Spoon chickpea salad over fillings; drizzle with dressing (if desired).
  • Roll tortillas tightly, folding in sides.
  • Slice in half or wrap in foil to serve.

Notes

Adjust the amount of hot sauce to your preferred spice level.
Calories: 350kcal
Cost: $8
Course: dinner, Lunch
Cuisine: American
Keyword: chickpeas
pin

Hey there, friend! Ava here, back in my Seattle kitchen, where the magic (and occasionally the smoke alarm) happens. Today, we’re diving into a recipe that’s become a staple in my house—Broccoli Chickpea Pasta with Garlic Olive Oil. It’s the kind of dish that’s both incredibly satisfying and good for you, a total win-win in my book. Think of it as a comforting bowl of goodness that comes together faster than you can say ‘pasta night’!

I remember the first time I made this. I was craving something healthy but didn’t want to spend hours in the kitchen. I rummaged through my pantry and fridge and this beauty was born. Now, it’s a regular on our weekly menu.

Why You’ll Love This Broccoli Chickpea Pasta

Let’s be real, we all have those busy weeknights when cooking feels like a chore. That’s where this recipe shines. Here’s why I think you’ll absolutely adore it:

  • Quick & Easy: Seriously, this dish is ready in under 30 minutes. Perfect for those ‘hangry’ moments.
  • Healthy & Nutritious: Packed with fiber, vitamins, and plant-based protein, it’s a meal you can feel good about.
  • Flavorful & Delicious: The garlic olive oil sauce is simple yet bursting with flavor. The broccoli and chickpeas add a delightful texture and heartiness.
  • Versatile: You can easily customize this recipe to your liking with different veggies, cheeses, or spices.
  • Budget-Friendly: Made with pantry staples, it’s an affordable meal option that doesn’t compromise on taste.

If you’re looking for an easy meal ideas vegetarian, this chickpea pasta with broccoli is a great option!

Broccoli Chickpea Pasta with Garlic Olive Oil Recipe

Alright, let’s get cooking! Here’s what you’ll need to make this delightful dish:

Ingredients

  • 250g Pasta (penne, rotini, or fusilli)
  • 300g Broccoli Florets (fresh or frozen)
  • 1 can (400g) Chickpeas, drained & rinsed
  • 4–5 cloves Garlic, minced
  • 60ml Olive Oil
  • ¼ teaspoon Red Pepper Flakes
  • 60ml Vegetable Broth
  • 1 tablespoon Lemon Juice
  • 30g Grated Parmesan Cheese (optional)
  • Salt & Black Pepper to taste
Recipe Image

How to Make Broccoli Chickpea Pasta: Step-by-Step

Ready to transform simple ingredients into a culinary masterpiece? Follow these easy steps:

  1. Cook the Pasta: Cook the pasta al dente in a pot of boiling water, reserving ½ cup of pasta water before draining. Don’t skip reserving the pasta water; it’s liquid gold for creating a creamy sauce!
  2. Sauté the Aromatics: Heat olive oil in a large pan. Sauté minced garlic and red pepper flakes for about a minute until fragrant. Be careful not to burn the garlic; nobody likes bitter garlic!
  3. Cook the Broccoli: Add broccoli florets to the pan and cook for 5–7 minutes until tender-crisp. If using frozen broccoli, no need to thaw it first.
  4. Add Chickpeas and Simmer: Introduce chickpeas, vegetable broth, and lemon juice to the pan. Simmer for 2-3 minutes, allowing the flavors to meld together beautifully.
  5. Combine and Toss: Mix the drained pasta into the pan, tossing well to coat. Add reserved pasta water if the sauce is too thick. This is where the magic happens! The pasta water helps create a luscious, emulsified sauce.
  6. Season and Serve: Season with salt and pepper to taste. Sprinkle with parmesan cheese if using. Serve warm and enjoy your comforting bowl of chickpea pasta!

Pasta made from chickpeas is a great way to add extra protein to your pasta dishes! This recipe is also great for those looking for dinner recipes easy vegetarian.

Pro Tips for the Best Broccoli Chickpea Pasta

Want to take your Broccoli Chickpea Pasta to the next level? Here are a few of my favorite pro tips:

  • Don’t Overcook the Pasta: Al dente pasta is key for the best texture. It should have a slight bite to it.
  • Use Fresh Garlic: Freshly minced garlic makes a huge difference in flavor. Avoid using pre-minced garlic if possible.
  • Toast the Red Pepper Flakes: Sautéing the red pepper flakes in olive oil releases their flavor and adds a subtle kick.
  • Reserve Enough Pasta Water: Pasta water is starchy and helps bind the sauce to the pasta. Don’t be shy with it!
  • Taste and Adjust: Taste the sauce as you go and adjust the seasoning as needed. A little extra lemon juice or red pepper flakes can make a big difference.

Common Mistakes to Avoid

Even the simplest recipes can have their pitfalls. Here are a few common mistakes to watch out for:

  • Burning the Garlic: Burnt garlic is bitter and can ruin the whole dish. Keep the heat low and watch it carefully.
  • Overcooking the Broccoli: Nobody likes mushy broccoli. Cook it until it’s tender-crisp.
  • Not Salting the Pasta Water: Salting the pasta water is essential for flavoring the pasta from the inside out.
  • Using Too Much Oil: Too much olive oil can make the dish greasy. Use just enough to coat the ingredients.
  • Forgetting the Lemon Juice: Lemon juice brightens up the flavors and adds a touch of acidity. Don’t skip it!

Broccoli Chickpea Pasta Variations

The beauty of this recipe is its versatility. Here are a few variations to try:

  • Add More Veggies: Sautéed spinach, bell peppers, or zucchini would be delicious additions.
  • Spice It Up: Add a pinch of cayenne pepper or a dash of hot sauce for extra heat.
  • Make It Creamy: Stir in a dollop of ricotta cheese or a splash of heavy cream for a creamier sauce.
  • Add Protein: Grilled chicken, shrimp, or Italian sausage would be great additions.
  • Use Different Herbs: Fresh basil, parsley, or oregano would add a lovely aroma and flavor.

You can easily make it gluten free by using gluten free pasta.

How to Store Leftover Pasta

Got leftovers? Lucky you! Here’s how to store them properly:

  • Refrigerate: Store leftover pasta in an airtight container in the refrigerator for up to 3-4 days.
  • Reheat: Reheat the pasta in a pan over medium heat, adding a splash of water or broth to prevent it from drying out. You can also microwave it, but it may not be as good as reheating it on the stovetop.
  • Freezing: While you can freeze this pasta, the texture of the broccoli may change. If you do freeze it, store it in an airtight container for up to 2 months. Thaw it in the refrigerator overnight before reheating.

Frequently Asked Questions (FAQ)

Got questions? I’ve got answers!

  • Can I use frozen broccoli?: Absolutely! Just add it directly to the pan without thawing.
  • Can I make this vegan?: Yes, simply omit the parmesan cheese or use a vegan parmesan alternative.
  • Can I add other vegetables?: Of course! Feel free to add any veggies you like.
  • Can I use different types of pasta?: Yes, any short pasta shape will work well.
  • How can I make this spicier?: Add more red pepper flakes or a pinch of cayenne pepper.

Serving Suggestions

This Broccoli Chickpea Pasta is delicious on its own, but here are a few serving suggestions to make it even better:

  • Side Salad: Serve with a simple green salad with a light vinaigrette.
  • Garlic Bread: A slice of crusty garlic bread is always a welcome addition.
  • Roasted Vegetables: Serve alongside roasted vegetables like carrots or Brussels sprouts.
  • Protein: Add grilled chicken, shrimp, or tofu for a more substantial meal.

I hope you enjoy this recipe as much as I do! It’s a comforting bowl that always brings a smile to my face. Happy cooking!

This recipe is great if you are looking for high fiber pasta recipe or kid healthy dinner. The combination of garlic olive oil, broccoli chickpea and pasta make it a savory healthy recipes!

Broccoli Chickpea Pasta with Garlic Olive Oil

Prep Time 10 minutes
Cook Time 20 minutes
Total Time 30 minutes
Servings 4 people
Calories 350
A simple and flavorful pasta dish featuring broccoli, chickpeas, and a fragrant garlic olive oil sauce. This recipe is quick, easy, and perfect for a weeknight meal.

Ingredients

Pasta

  • 250 g Pasta (penne, rotini, or fusilli)

Vegetables

  • 300 g Broccoli Florets (fresh or frozen)
  • 400 g Chickpeas (drained & rinsed)

Flavorings

  • 4 cloves Garlic (minced)
  • 60 ml Olive Oil
  • 0.25 teaspoon Red Pepper Flakes
  • 60 ml Vegetable Broth
  • 1 tablespoon Lemon Juice
  • 30 g Grated Parmesan Cheese (optional)
  • to taste Salt & Black Pepper

Instructions 

  • Cook pasta al dente, reserving ½ cup pasta water.
  • Heat olive oil, sauté garlic and red pepper flakes for 1 minute.
  • Add broccoli, cook 5-7 minutes until tender-crisp.
  • Add chickpeas, broth, and lemon juice. Simmer 2-3 minutes.
  • Mix pasta into the pan, add pasta water if needed.
  • Season with salt and pepper, add parmesan if using. Serve warm.

Notes

Adjust the amount of red pepper flakes to your spice preference.
Calories: 350kcal
Cost: $8
Course: Main Course
Cuisine: Italian
Keyword: pasta
pin

Hey there! Ava here, back in my Seattle kitchen and ready to share a recipe that’s become a weeknight staple in my house: Air Fryer Chicken Breasts with Vegetables. If you’re anything like me, you’re always on the lookout for healthy, delicious, and quick meals. Well, look no further! This recipe delivers on all fronts, giving you perfectly cooked chicken and tender-crisp vegetables in under 30 minutes. It’s so easy, even on those chaotic evenings, you can still whip up something amazing.

I remember the first time I tried making chicken breasts in the air fryer. I was skeptical, to say the least. I’d always struggled to get them just right in the oven – either they were dry and bland or undercooked. But the air fryer? It was a game-changer! The chicken comes out incredibly juicy and flavorful, and the vegetables are perfectly roasted without becoming mushy. Plus, cleanup is a breeze, which is always a win in my book.

Why You’ll Love This Air Fryer Chicken and Vegetables Recipe

This recipe isn’t just about convenience; it’s about creating a meal that’s both nutritious and satisfying. Here’s why I think you’ll absolutely love it:

  • Quick and Easy: From prep to plate, this meal is ready in about 30 minutes. Perfect for busy weeknights.
  • Healthy and Nutritious: Packed with lean protein and a rainbow of vegetables, it’s a guilt-free way to enjoy a delicious dinner.
  • Customizable: You can easily swap out the vegetables based on what you have on hand or what’s in season.
  • Juicy Chicken: The air fryer seals in the moisture, resulting in chicken breasts that are tender and flavorful.
  • Minimal Cleanup: The air fryer basket is easy to clean, leaving you with more time to relax and enjoy your meal.

I’ve tweaked and perfected this recipe over many trials, and I’m so excited to share it with you. It’s one of those recipes that just works, no matter what. So, let’s get cooking!

Ingredients for Air Fryer Chicken Breasts with Vegetables

Before we dive into the cooking process, let’s gather our ingredients. Remember, preparing and measuring everything beforehand will make the whole process smoother and more enjoyable.

  • 2 large chicken breasts (boneless and skinless)
  • 1 zucchini (sliced into half-moons)
  • 1 red bell pepper (sliced)
  • 1 yellow bell pepper (sliced)
  • 1 cup broccoli florets
  • ½ red onion (sliced)
  • 2 tablespoons olive oil
  • 1 teaspoon garlic powder
  • 1 teaspoon paprika
  • ½ teaspoon dried oregano
  • ½ teaspoon dried thyme
  • ¾ teaspoon sea salt
  • ½ teaspoon black pepper
  • Fresh parsley or cilantro (chopped, for garnish)
  • Lemon wedges (for serving)

A few notes on the ingredients:

  • Chicken breasts: Chicken breasts cook best when similar in size.
  • Vegetables: Use firm vegetables so they roast instead of steaming.
  • Olive oil: Olive oil enhances flavor while keeping the dish light.
Recipe Image

How to Make Air Fryer Chicken Breasts with Vegetables: Step-by-Step

Alright, let’s get started! Follow these steps for perfectly cooked air fryer chicken breasts with vegetables. This recipe is so straightforward, even if you’re new to air frying, you’ll nail it!

  1. Prepare the Chicken: Pat the chicken breasts dry with paper towels. This helps them get nice and golden brown in the air fryer.
  2. Chop the Vegetables: Slice the zucchini, bell peppers, and red onion. Cut the broccoli into florets.
  3. Season Everything: In a large bowl, toss the vegetables with olive oil, garlic powder, paprika, oregano, thyme, salt, and pepper. Make sure everything is evenly coated.
  4. Arrange in the Air Fryer: Place the seasoned vegetables in the air fryer basket in a single layer. If needed, cook in batches to avoid overcrowding.
  5. Add the Chicken: Place the chicken breasts on top of the vegetables.
  6. Air Fry: Cook at 380°F (190°C) for 15-20 minutes, or until the chicken is cooked through and the vegetables are tender-crisp. The internal temperature of the chicken should reach 165°F (74°C).
  7. Rest and Serve: Let the chicken rest for 5 minutes before slicing. Garnish with fresh parsley or cilantro and serve with lemon wedges.

And that’s it! You’ve just made a delicious and healthy air fryer chicken and vegetable meal. I told you it was easy!

Pro Tips for the Best Air Fryer Chicken Breasts

Here are a few extra tips to ensure your air fryer chicken breasts turn out perfect every time:

  • Don’t Overcrowd: Overcrowding the air fryer basket can lead to uneven cooking. Cook in batches if necessary to ensure everything gets crispy.
  • Preheat the Air Fryer: While not always necessary, preheating your air fryer can help the chicken and vegetables cook more evenly.
  • Use a Meat Thermometer: The best way to ensure your chicken is cooked through is to use a meat thermometer. Insert it into the thickest part of the chicken to check the internal temperature.
  • Season Generously: Don’t be shy with the seasonings! This is what gives the chicken and vegetables their flavor.
  • Flip Halfway Through: For even cooking, flip the chicken and vegetables halfway through the cooking time.

These simple tips will elevate your air fryer chicken and vegetable game to the next level. Trust me, it’s worth the extra effort!

Common Mistakes to Avoid When Air Frying Chicken Breasts

We all make mistakes in the kitchen, but knowing what to avoid can save you from a culinary disaster. Here are a few common mistakes to watch out for when air frying chicken breasts:

  • Dry Chicken: Overcooking is the biggest culprit for dry chicken. Use a meat thermometer and don’t exceed the recommended cooking time.
  • Bland Flavor: Not seasoning adequately can result in bland chicken and vegetables. Be generous with your spices and herbs.
  • Soggy Vegetables: Overcrowding the air fryer can cause the vegetables to steam instead of roast. Cook in batches to avoid this.
  • Uneven Cooking: Not flipping the chicken and vegetables halfway through can result in uneven cooking.
  • Not Letting the Chicken Rest: Cutting into the chicken immediately after cooking can cause the juices to run out, resulting in drier chicken. Let it rest for 5 minutes before slicing.

Learning from these mistakes will help you perfect this recipe and create consistently delicious meals.

Variations to Try with Your Air Fryer Chicken and Vegetables

One of the best things about this recipe is how versatile it is. Feel free to experiment with different vegetables, seasonings, and sauces to create your own unique version. Here are a few ideas to get you started:

  • Different Vegetables: Try adding bell peppers, mushrooms, carrots, asparagus, or sweet potatoes.
  • Spice It Up: Add a pinch of red pepper flakes or a dash of hot sauce for a little heat.
  • Lemon Herb: Use lemon zest, fresh herbs like rosemary and thyme, and a squeeze of lemon juice for a bright and flavorful twist.
  • Mediterranean: Add olives, feta cheese, and a drizzle of olive oil for a Mediterranean-inspired meal.
  • Teriyaki: Marinate the chicken in teriyaki sauce before air frying for an Asian-inspired dish.

Don’t be afraid to get creative and experiment with different flavors and combinations. The possibilities are endless!

How to Store and Reheat Air Fryer Chicken and Vegetables

If you have leftovers (which is rare in my house, but it happens!), here’s how to store and reheat them:

  • Storage: Store the cooked chicken and vegetables in an airtight container in the refrigerator for up to 3-4 days.
  • Reheating: To reheat, you can use the air fryer (my preferred method), the oven, or the microwave.
  • Air Fryer: Preheat your air fryer to 350°F (175°C) and reheat for 5-7 minutes, or until heated through.
  • Oven: Preheat your oven to 350°F (175°C) and reheat for 10-15 minutes, or until heated through.
  • Microwave: Reheat in the microwave for 1-2 minutes, or until heated through. Be careful not to overheat, as the chicken can become dry.

Reheating in the air fryer helps to maintain the crispy texture of the vegetables, while the oven is a good option for larger portions. The microwave is the quickest option, but it can sometimes make the chicken a bit rubbery.

Frequently Asked Questions About Air Fryer Chicken Breasts and Vegetables

Got questions? I’ve got answers! Here are some of the most common questions I get about making air fryer chicken breasts with vegetables:

  • Can I use frozen chicken breasts? Yes, but you’ll need to thaw them completely before cooking. Pat them dry before seasoning to ensure they get crispy.
  • Can I use bone-in chicken breasts? Yes, but you’ll need to adjust the cooking time. Bone-in chicken breasts typically take longer to cook than boneless ones.
  • Can I add more vegetables? Absolutely! Feel free to add any vegetables you like. Just make sure to cut them into similar sizes so they cook evenly.
  • Do I need to preheat the air fryer? While not always necessary, preheating can help the chicken and vegetables cook more evenly.
  • How do I know when the chicken is cooked through? The best way to check is to use a meat thermometer. The internal temperature of the chicken should reach 165°F (74°C).

If you have any other questions, feel free to leave them in the comments below! I’m always happy to help.

Serving Suggestions for Your Air Fryer Chicken and Vegetables

This air fryer chicken and vegetables dish is delicious on its own, but here are a few ideas to take it to the next level:

  • Lemon Wedges: A squeeze of fresh lemon juice brightens up the flavors and adds a zesty touch.
  • Fresh Herbs: Garnish with fresh parsley, cilantro, or basil for added flavor and visual appeal.
  • Dipping Sauces: Serve with your favorite dipping sauces, such as ranch dressing, honey mustard, or barbecue sauce.
  • Side Dishes: Pair with a side of quinoa, rice, or a simple salad for a complete meal.
  • Garlic Bread: Serve with warm garlic bread to soak up all the delicious juices.

Whether you’re looking for healthy dinner ideas with veggies, healthy eating dinner recipes, or just a quick and easy meal, thisair fryer chicken and vegetable recipe is sure to become a new favorite. It’s one of the chicken healthy recipes clean eating that I use often. With just a few simple ingredients and minimal effort, you can create a super healthy food that’s both delicious and nutritious. It’s chicken vegetable perfection!

So, there you have it! My go-to air fryer chicken breasts with vegetables recipe. I hope you love it as much as I do. Remember, cooking is all about having fun and experimenting, so don’t be afraid to put your own spin on this recipe. And most of all, enjoy the process and the delicious food you create. Happy cooking!

Until next time, happy cooking! And remember, every meal is an opportunity to create a little magic in your kitchen.

Air Fryer Chicken Breasts with Vegetables

Prep Time 15 minutes
Cook Time 20 minutes
Total Time 35 minutes
Servings 2 people
Calories 450
Juicy and healthy chicken breasts with roasted vegetables, ready in minutes using an air fryer. A quick and easy weeknight meal!

Ingredients

Ingredients

  • 2 large chicken breasts (boneless and skinless, similar in size)
  • 1 zucchini (sliced into half-moons)
  • 1 red bell pepper (sliced)
  • 1 yellow bell pepper (sliced)
  • 1 cup broccoli florets
  • 0.5 red onion (sliced)
  • 2 tablespoons olive oil
  • 1 teaspoon garlic powder
  • 1 teaspoon paprika
  • 0.5 teaspoon dried oregano
  • 0.5 teaspoon dried thyme
  • 0.75 teaspoon sea salt
  • 0.5 teaspoon black pepper
  • Fresh parsley or cilantro (chopped, for garnish)
  • Lemon wedges (for serving)

Instructions 

  • Prepare and measure all ingredients.
  • Follow these steps for perfectly cooked air fryer chicken breasts with vegetables.

Notes

Use firm vegetables so they roast instead of steaming. Olive oil enhances flavor while keeping the dish light.
Calories: 450kcal
Cost: $18
Course: Main Course
Cuisine: American
Keyword: Chicken
pin