Tasty Street Corn Chicken Bowl – Alrightwithme: A Seattle Kitchen Story
Hey there, friends! Ava here, back from my little corner of Seattle with a recipe that’s been on repeat in my kitchen lately: the Street Corn Chicken Bowl. If you’ve ever found yourself craving something that’s both comforting and bursting with flavor, you’re in the right place. This isn’t just a meal; it’s a celebration of fresh ingredients, bold spices, and the joy of creating something delicious. Growing up, my mom always said the best meals are the ones you can share, and this bowl is definitely one of those. So, grab your apron, and let’s get cooking!
Why You’ll Absolutely Love This Street Corn Chicken Bowl
Okay, let’s be real. There are a million recipes out there, so why should this one be your next culinary adventure? Well, let me tell you why this Street Corn Chicken Bowl has won a permanent spot on my dinner rotation:
- Flavor Fiesta: This bowl is a vibrant explosion of flavors. The sweetness of the corn perfectly balances the smoky chicken, while the creamy sour cream and tangy lime juice tie everything together.
- Easy Peasy: Even on the busiest weeknights, this recipe comes together in a snap. Most of the ingredients are pantry staples, and the cooking process is straightforward.
- Customizable Goodness: Want to add some extra heat? Throw in some jalapeños. Feeling like something lighter? Load up on the greens. This recipe is a blank canvas for your culinary creativity.
- Crowd-Pleaser: Whether you’re cooking for one or feeding a crowd, this Street Corn Chicken Bowl is always a hit. It’s perfect for family dinners, casual get-togethers, or even meal prepping for the week.
Plus, it’s a fantastic way to use up leftover grilled corn from your summer BBQ. Trust me, once you try this bowl, you’ll be hooked!
The Star Ingredients: What You’ll Need
Here’s a breakdown of the ingredients you’ll need to create this masterpiece. Don’t worry, I’ll also share some tips on substitutions and variations along the way:
- 4 boneless, skinless chicken thighs: The chicken forms the protein base of our bowl. Thighs are preferred for their tenderness and flavor.
- 1 tbsp freshly squeezed lime juice: The lime juice adds a zesty kick and helps tenderize the chicken.
- 1 tbsp avocado oil: Avocado oil has a high smoke point and neutral flavor, perfect for searing the chicken.
- 1 tsp chili powder: Chili powder provides a warm, smoky flavor.
- 1 tsp ground cumin: Cumin adds an earthy depth to the spice blend.
- 1/2 tsp garlic powder or 2 cloves garlic, minced: Garlic is a must for that savory umami flavor.
- 1/2 tsp salt: Salt enhances all the other flavors.
- 1/4 tsp ground black pepper: Pepper adds a touch of spice.
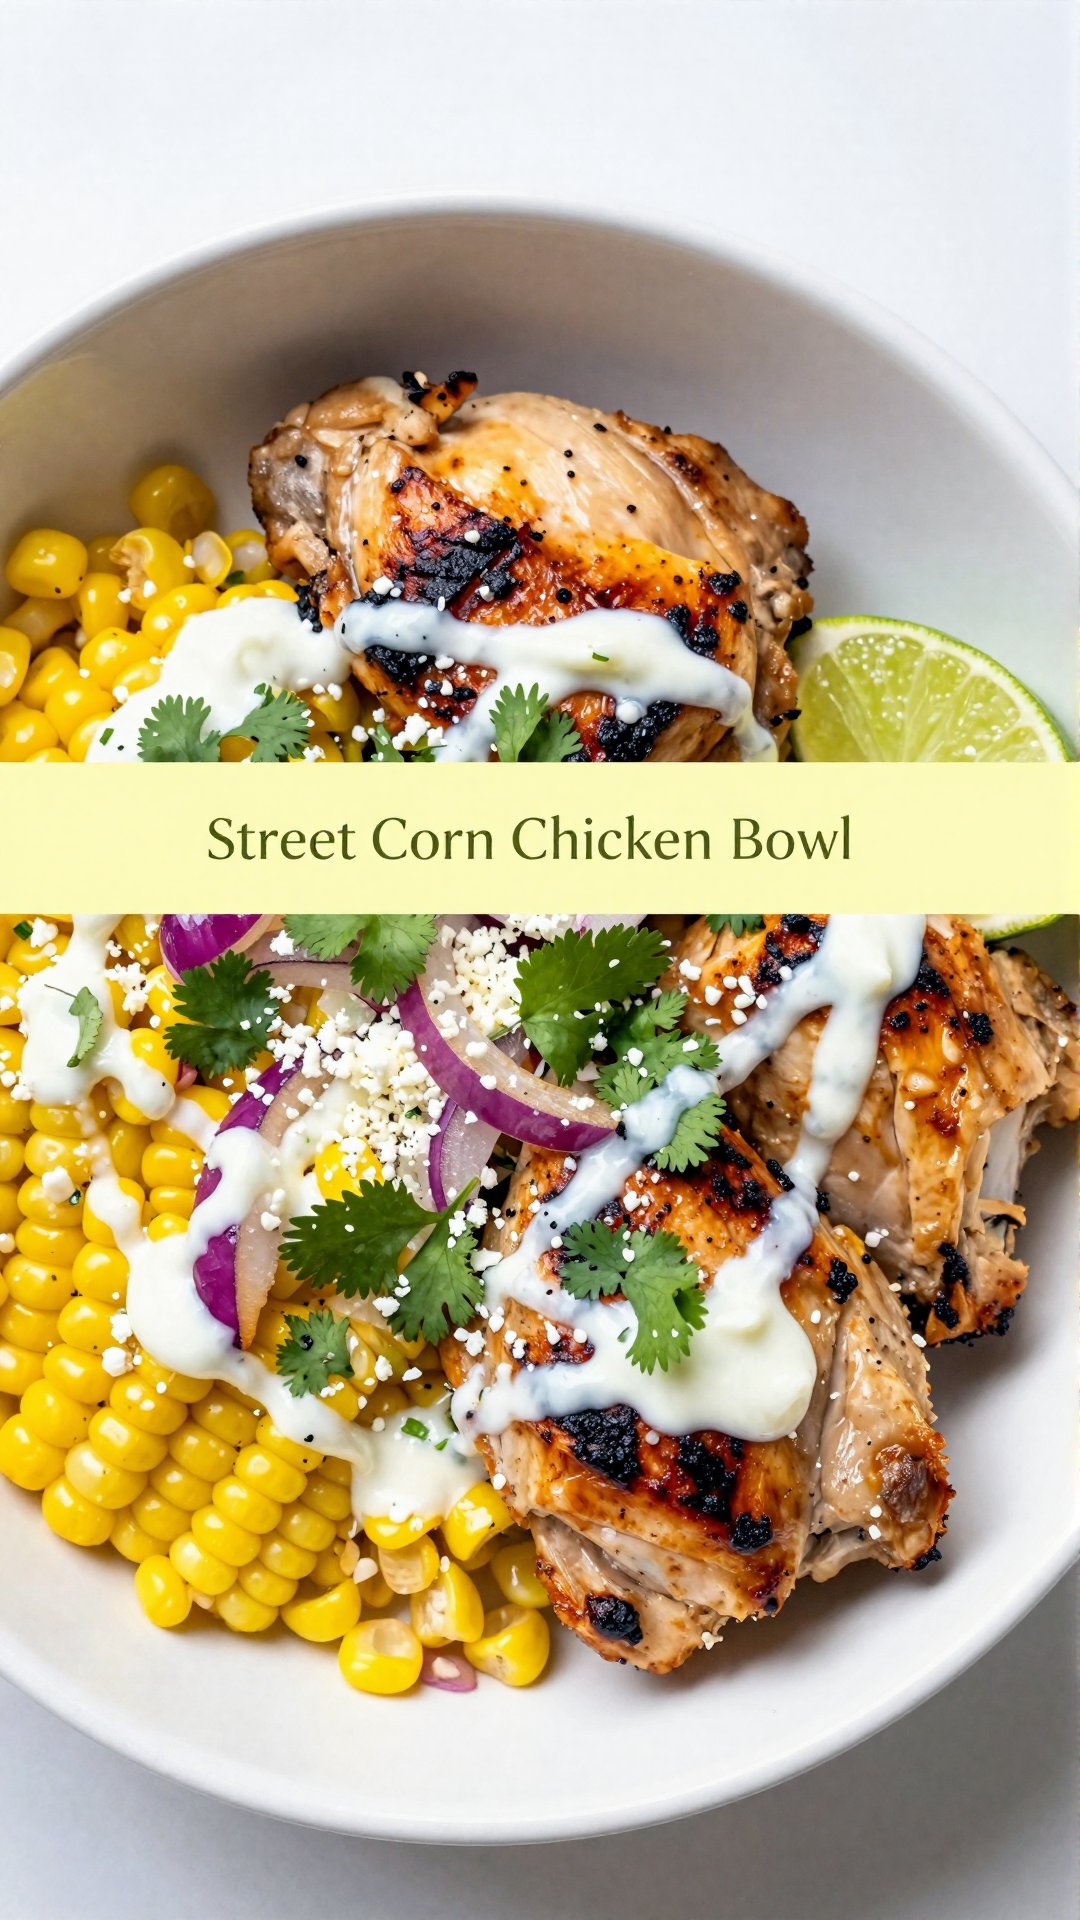
- 1 cup sweet corn kernels (grilled or sautéed from frozen): The sweet corn is the star of the show, bringing a burst of summery sweetness.
- 1/4 cup sliced red onion: Red onion adds a sharp, pungent bite.
- 1/2 cup sour cream, separated: Sour cream adds a creamy tanginess.
- 2 tbsp mayonnaise: Mayonnaise contributes to the creaminess and richness of the corn mixture.
- 1/2 cup crumbled cotija cheese, extra for topping: Cotija cheese is a salty, crumbly Mexican cheese that adds a delightful salty bite.
- 1 tsp chili powder: A little extra chili powder for the corn mixture.
- Salt and pepper, as needed: Season to taste.
- 1 tbsp lime juice (to taste): More lime juice to brighten the corn mixture.
- 3 cups prepared rice: Rice forms the base of the bowl.
- Fresh cilantro leaves, for garnish: Cilantro adds a fresh, herbaceous note.
- Lime wedges (from 1 lime): Extra lime wedges for squeezing over the bowl.
- Reserved sour cream and cotija cheese, for garnish: Because you can never have too much!

Step-by-Step: Bringing the Street Corn Chicken Bowl to Life
Alright, let’s get down to the nitty-gritty. Here’s how to assemble this flavor-packed bowl:
- Marinate the Chicken: In a bowl, combine the chicken thighs with lime juice, avocado oil, chili powder, cumin, garlic powder, salt, and pepper. Mix well and let it marinate for at least 15 minutes (or up to a few hours in the fridge). This step infuses the chicken with incredible flavor.
- Cook the Chicken: Heat a skillet over medium-high heat. Add the marinated chicken and cook for about 5-7 minutes per side, or until cooked through and slightly charred. Let the chicken rest for a few minutes before slicing it into bite-sized pieces.
- Prepare the Street Corn Mixture: In a bowl, combine the sweet corn kernels, red onion, 1/4 cup of sour cream, mayonnaise, cotija cheese, chili powder, lime juice, salt, and pepper. Mix well. Taste and adjust seasonings as needed. This is where the magic happens.
- Assemble the Bowls: Divide the prepared rice among bowls. Top with the sliced chicken and the street corn mixture.
- Garnish and Serve: Garnish with fresh cilantro leaves, lime wedges, reserved sour cream, and extra cotija cheese. Serve immediately and enjoy!
Pro Tips for Street Corn Chicken Bowl Perfection
Want to take your Street Corn Chicken Bowl to the next level? Here are a few pro tips I’ve learned along the way:
- Grill the Corn: Grilling the corn adds a smoky char that elevates the flavor. If you don’t have a grill, you can sauté the corn in a skillet with a little butter.
- Don’t Overcook the Chicken: Overcooked chicken is dry and tough. Use a meat thermometer to ensure the chicken reaches an internal temperature of 165°F.
- Taste as You Go: Seasoning is key. Taste the corn mixture and chicken as you go, and adjust the seasonings to your liking.
- Warm the Rice: Nobody likes cold rice. Make sure the rice is warm before assembling the bowls.
- Fresh is Best: Use fresh ingredients whenever possible. Fresh lime juice, cilantro, and corn will make a big difference in the overall flavor.
Common Mistakes (and How to Avoid Them)
We all make mistakes in the kitchen, but here are a few common ones to watch out for when making this Street Corn Chicken Bowl:
- Forgetting to Marinate the Chicken: Marinating the chicken is crucial for flavor and tenderness. Don’t skip this step!
- Overcooking the Chicken: As mentioned earlier, overcooked chicken is a no-no. Use a meat thermometer to ensure it’s cooked perfectly.
- Not Seasoning Properly: Under-seasoning can result in a bland bowl. Taste and adjust the seasonings as needed.
- Using Canned Corn: While canned corn can work in a pinch, fresh or frozen corn is always better.
- Skipping the Garnish: The garnish adds a pop of freshness and visual appeal. Don’t skip it!
Variations: Spice It Up or Tone It Down
The beauty of this Street Corn Chicken Bowl is that it’s incredibly versatile. Here are a few variations to try:
- Spicy Version: Add some diced jalapeños to the corn mixture or sprinkle some cayenne pepper on the chicken for extra heat.
- Veggie Version: Swap the chicken for grilled tofu or black beans for a vegetarian option.
- Low-Carb Version: Use cauliflower rice instead of regular rice.
- Deconstructed Salad: Serve the chicken and corn mixture over a bed of mixed greens for a lighter option.
- Taco Night Transformation: Use the chicken and corn mixture as a filling for tacos or quesadillas.
Storage Instructions: Keeping the Flavors Fresh
If you have leftovers (which is rare!), here’s how to store them:
- Store the components separately: Store the rice, chicken, and corn mixture in separate airtight containers in the refrigerator. This will prevent the rice from becoming soggy.
- Use within 3-4 days: Leftovers are best consumed within 3-4 days.
- Reheat gently: Reheat the chicken and rice in the microwave or in a skillet over low heat. Avoid overheating, as this can dry out the chicken.
- Add fresh toppings: When reheating, add fresh cilantro, lime wedges, and sour cream to brighten up the flavors.
Frequently Asked Questions (FAQ)
Got questions? I’ve got answers! Here are some common questions about this Street Corn Chicken Bowl:
- Can I use frozen corn? Absolutely! Frozen corn works great in this recipe. Just make sure to thaw it before using.
- Can I make this ahead of time? Yes, you can prepare the chicken and corn mixture ahead of time and store them in the refrigerator. Assemble the bowls just before serving.
- What kind of rice should I use? Any kind of rice will work, but I prefer using jasmine rice or brown rice.
- Can I use Greek yogurt instead of sour cream? Yes, Greek yogurt is a great substitute for sour cream. It will add a similar tanginess with a bit more protein.
- Can I grill the chicken instead of cooking it in a skillet? Absolutely! Grilling the chicken will add a smoky flavor that’s delicious.
Serving Suggestions: Completing the Meal
This Street Corn Chicken Bowl is delicious on its own, but here are a few serving suggestions to make it a complete meal:
- Serve with a side of black beans: Black beans add extra protein and fiber.
- Add a dollop of guacamole: Guacamole adds a creamy richness.
- Serve with tortilla chips: Tortilla chips are perfect for scooping up any leftover corn mixture.
- Offer a variety of toppings: Set out a toppings bar with extra cilantro, lime wedges, jalapeños, and cotija cheese.
- Pair with a refreshing drink: A margarita or a cold beer is the perfect accompaniment to this flavorful bowl.
So there you have it, friends! My go-to Street Corn Chicken Bowl recipe. I hope you give it a try and that it becomes a regular in your kitchen, just like it has in mine. Happy cooking!
Tasty Street Corn Chicken Bowl - Alrightwithme
Ingredients
Chicken Marinade
- 4 boneless, skinless chicken thighs
- 1 tbsp freshly squeezed lime juice
- 1 tbsp avocado oil
- 1 tsp chili powder
- 1 tsp ground cumin
- 0.5 tsp garlic powder (or 2 cloves garlic, minced)
- 0.5 tsp salt
- 0.25 tsp ground black pepper
Bowl Ingredients
- 1 cup sweet corn kernels (grilled or sautéed from frozen)
- 0.25 cup sliced red onion
- 0.5 cup sour cream (separated)
- 2 tbsp mayonnaise
- 0.5 cup crumbled cotija cheese (extra for topping)
- 1 tsp chili powder
- Salt and pepper (as needed)
- 1 tbsp lime juice (to taste)
- 3 cups prepared rice
- Fresh cilantro leaves (for garnish)
- 1 lime Lime wedges (from 1 lime)
- Reserved sour cream and cotija cheese (for garnish)
Notes