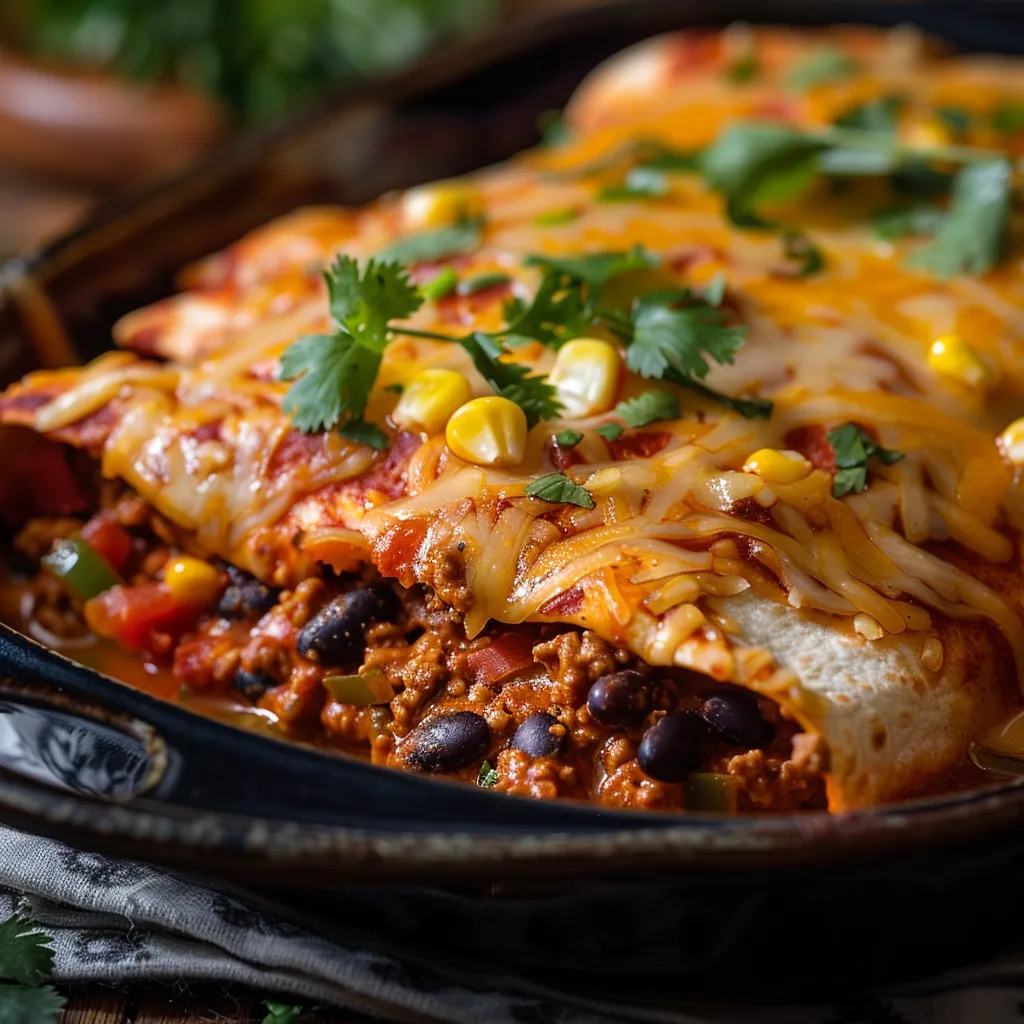
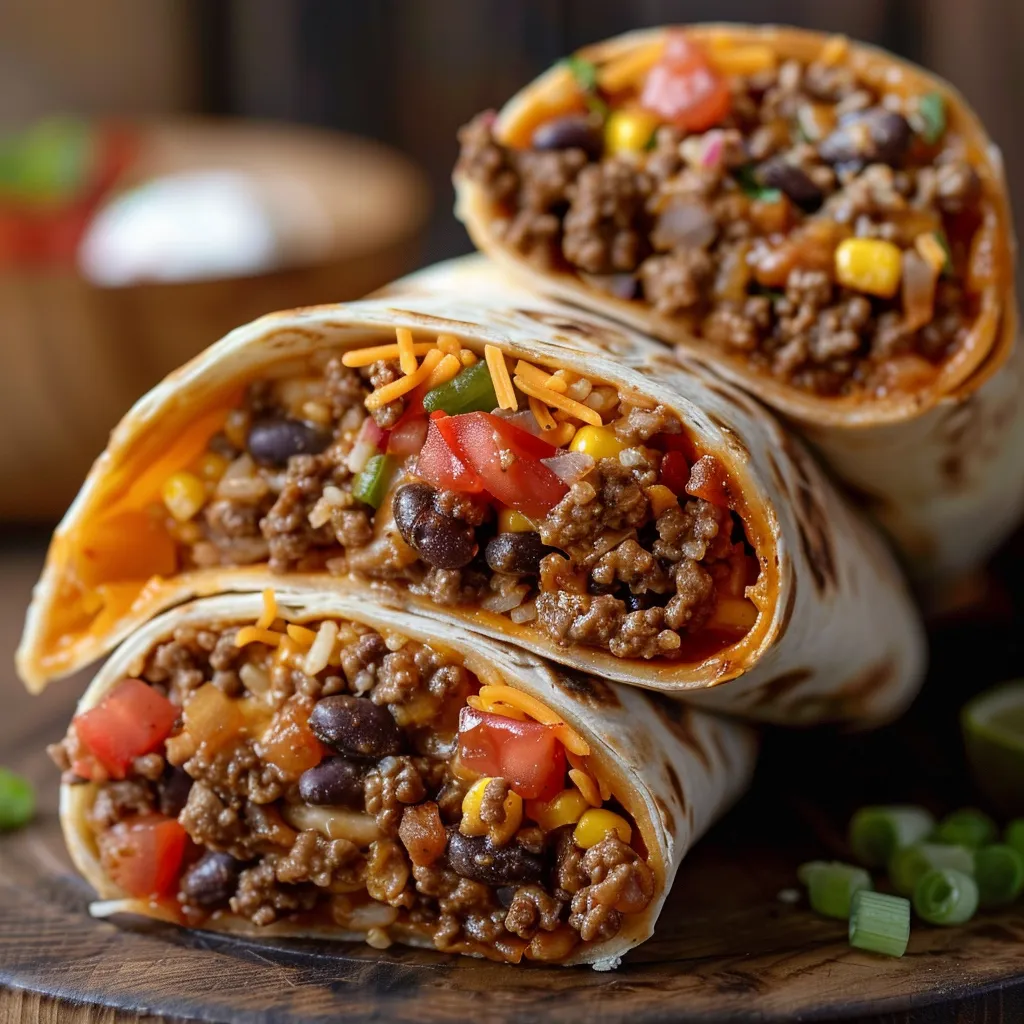
Author

Ava

Browsing

Discover the Joy of Sweet Potato Salad

Welcome to a delightful journey in the kitchen! If you’re here, chances are you’re ready to experience a recipe that’s not just good, but extraordinary. This Sweet Potato Salad is a vibrant blend of flavors and textures that’s perfect for any occasion. With roasted sweet potatoes, crisp arugula, and a zesty orange-lemon dressing, this salad is a celebration of everything that’s delicious about wholesome cooking. Let’s dive into the magic of this dish, which is destined to become a new favorite at your table!

Why You’ll Love This Recipe

Let’s talk about the reasons this salad will win your heart:

  • Flavor Explosion: The combination of sweet and savory ingredients creates a dish that’s bursting with flavor—each bite keeps you coming back for more.
  • Nutritious Goodness: Loaded with vitamins, fiber, and healthy fats, this salad is as good for you as it is delicious.
  • Versatile Dish: Whether as a side for a holiday feast or a light lunch, this sweet potato salad fits any occasion perfectly!
  • Quick and Easy: With just a few simple steps, you can whip up this salad in no time—ideal for busy weeknights or unexpected guests.
  • Make-Ahead Magic: This salad tastes even better after a day in the fridge, making it perfect for meal prep!

Ingredient Breakdown

A colorful salad featuring roasted sweet potatoes, green arugula, and orange dressing, garnished with nuts and cheese.

Ready to gather your ingredients? Here’s everything you’ll need to create this stunning salad:

  • Arugula: The peppery crunch adds a lovely contrast to the sweetness of the potatoes. If you’re not a fan, baby spinach is a great alternative!
  • Sweet Potatoes: These are the star of the show! Choose firm, unblemished potatoes for the best texture. You can roast them with a drizzle of olive oil and a sprinkle of salt.
  • Granny Smith Apples: Their tartness balances the sweetness of the potatoes. If you prefer, honeycrisp or Fuji apples are also delicious options.
  • Maple-Ginger Candied Pecans: These add a delightful crunch and a hint of sweetness. To make them, toss pecans with maple syrup and ginger, then roast until fragrant.
  • Feta Cheese: The creamy, tangy bite of feta complements the other ingredients beautifully. For a dairy-free version, try using nutritional yeast for a cheesy flavor.
  • Dried Cranberries: These little gems bring a pop of sweetness and chewiness. Feel free to substitute with raisins or cherries if preferred.
  • Orange-Lemon Dressing: A bright dressing made with fresh citrus juice, olive oil, honey, and a dash of mustard ties everything together. You can easily adjust the acidity to your taste.

How to Make Sweet Potato Salad

Let’s get cooking! Here’s a step-by-step guide to whip up this delicious salad:

Step 1: Roast the Sweet Potatoes

Preheat your oven to 400°F (200°C). Peel and cube your sweet potatoes, then toss them in olive oil, salt, and pepper. Spread them evenly on a baking sheet and roast for about 25-30 minutes, or until golden and tender. Keep an eye on them to prevent burning!

Step 2: Prepare the Dressing

While the potatoes are roasting, combine the juice of one orange and one lemon in a bowl. Add 1/4 cup of olive oil, 1 tablespoon of honey, and a dash of Dijon mustard. Whisk until emulsified and season with salt and pepper to taste.

Step 3: Mix the Salad

In a large bowl, combine the arugula, roasted sweet potatoes, thinly sliced Granny Smith apples, candied pecans, dried cranberries, and crumbled feta. Drizzle generously with the dressing and toss gently to coat.

Step 4: Serve and Enjoy!

This sweet potato salad can be served warm or chilled. If you’re making it ahead of time, just wait to add the dressing until you’re ready to serve to keep the arugula crisp.

Pro Tips for the Perfect Salad

To elevate your sweet potato salad experience, keep these expert tips in mind:

  • Don’t Overcrowd the Pan: When roasting sweet potatoes, give them enough space to caramelize without steaming.
  • Let the Potatoes Cool: Allow them to cool slightly before mixing with the greens to prevent wilting.
  • Customize the Dressing: Feel free to experiment with different vinegars or herbs in your dressing for added flavor.
  • Balance the Sweetness: If using sweeter apples, consider reducing the honey in the dressing to maintain balance.
  • Add Protein: For a heartier meal, grilled chicken or chickpeas can be a wonderful addition to this salad.
  • Fresh Herbs: Toss in some fresh herbs like cilantro or mint to give an extra layer of freshness.
  • Store Properly: Keep the salad in an airtight container in the fridge for up to three days for the best freshness.

Common Mistakes and Troubleshooting

Every great recipe has its challenges. Here are a few common pitfalls and how to avoid them:

  • Undercooked Sweet Potatoes: If your potatoes are crunchy, they likely need more roasting time. Taste them and adjust as necessary.
  • Too Much Dressing: If your salad ends up soggy, start with a small amount of dressing and add more as needed.
  • Overcooked Greens: If you’re serving warm, add arugula at the last minute to keep it fresh and vibrant.

Sweet Potato Salad Variations

Feeling adventurous? Here are some fun twists on the classic recipe:

  • Southwestern Style: Add black beans, corn, and avocado to give it a southwestern flair.
  • Greek Inspiration: Substitute olives and red onion for a Mediterranean twist.
  • Protein-Packed: Incorporate grilled chicken or quinoa for a satisfying main dish.
  • Spicy Kick: Toss in some jalapeños or chili flakes to give your salad a bit of heat.

Storage and Make-Ahead Instructions

This sweet potato salad is perfect for meal prep! Here’s how to store it properly:

  • Refrigeration: Store in an airtight container in the fridge for up to three days. Note that the arugula may wilt over time.
  • Make-Ahead: You can roast the sweet potatoes and prepare the dressing a day in advance. Just combine everything right before serving.
  • Freezing Not Recommended: This salad is best enjoyed fresh, so avoid freezing to maintain texture and flavor.

Frequently Asked Questions

Here are some common queries about this sweet potato salad:

  • Can I use other types of potatoes? Yes! While sweet potatoes are delicious, you can use regular potatoes for a different flavor profile.
  • Is this salad gluten-free? Absolutely! All ingredients are gluten-free, making it a great option for those with dietary restrictions.
  • How can I make this salad vegan? Simply omit the feta cheese and use maple syrup in the dressing for sweetness.
  • Can I add more vegetables? Certainly! Feel free to include roasted bell peppers or zucchini for added texture and nutrients.
  • How do I keep the apples from browning? Toss them in a bit of lemon juice before adding to the salad.
  • What can I serve with this salad? It pairs beautifully with grilled meats or as a standalone dish for lunch.
  • Can I modify the dressing? Absolutely! Experiment with different herbs or oils to create your perfect flavor.
  • Is this salad suitable for meal prep? Yes, it’s perfect for meal prep! Just add the dressing right before serving to keep the greens fresh.

Nutritional Tips and Dietary Adaptations

Want to make this salad even healthier? Here are some tips:

  • Increase Fiber: Add more veggies or legumes like chickpeas or black beans to boost fiber content.
  • Reduce Sugar: Use a natural sweetener like agave or reduce the amount of honey in the dressing to lower sugar levels.
  • Healthy Fats: Consider adding avocado for extra healthy fats that also make the salad creamier.

Equipment Recommendations

Here’s what you might need to make this salad:

  • Roasting Pan: A sturdy roasting pan is essential for roasting your sweet potatoes evenly.
  • Mixing Bowls: Use a large bowl for mixing your ingredients and a smaller one for the dressing.
  • Whisk: A whisk helps to emulsify the dressing for a smooth consistency.

Serving Suggestions

Ready to dig in? Here are some ideas on how to serve this delicious sweet potato salad:

  • As a Side Dish: Perfect alongside grilled chicken or fish for a balanced meal.
  • For Lunch: Serve it on its own or with a slice of crusty bread for a satisfying lunch.
  • At Gatherings: Bring this salad to potlucks or holiday dinners and watch it disappear!

Bring the Magic to Your Kitchen

And there you have it! A sweet potato salad that’s not just a recipe, but a celebration of flavor and nourishment. I hope you’re as excited to make it as I am to share it with you. Remember, cooking is about joy and connection—so gather your loved ones, whip up this fabulous salad, and enjoy the magic together. Happy cooking!

Sweet Potato Salad

Prep Time 15 minutes
Cook Time 30 minutes
Total Time 45 minutes
Servings 4 servings
Calories 350
A vibrant and flavorful salad combining roasted sweet potatoes, crisp apples, and crunchy pecans, all coated in a bright citrus dressing.

Ingredients

Vegetables

  • 2 medium sweet potatoes (roasted and cubed)

Fruits

  • 2 medium granny smith apples (thin sliced)

Nuts & Dried Fruits

  • 0.5 cup maple-ginger candied pecans
  • 0.25 cup dried cranberries (sweetened)

Dairy

  • 0.25 cup feta (crumbled)

Dressing

  • 0.25 cup orange-lemon dressing

Instructions 

  • Roast sweet potatoes until tender, then cube.
  • Thinly slice granny smith apples.
  • Combine arugula, roasted sweet potatoes, apples, pecans, cranberries, and feta in a bowl.
  • Drizzle with orange-lemon dressing and toss gently.
  • Serve immediately or chill before serving.

Notes

For added protein, consider adding grilled chicken.
Calories: 350kcal
Cost: $15
Course: Salad
Keyword: sweet potato

Loved this recipe? Save it to your favorite Pinterest board so you can easily find it later! It’s the perfect way to keep all your sweet ideas in one place. ✨

A detailed shot of a sweet potato salad filled with bright ingredients, beautifully arranged and well-lit.

Welcome to Your New Favorite Comfort Food

If you’re anything like me, the hustle and bustle of life often leaves little time for elaborate meals, but that doesn’t mean we can’t enjoy a delicious dinner! That’s where the magic of the Hamburger Green Bean Casserole comes in. This recipe is a nostalgic nod to cozy family dinners, combining savory ground beef with tender green beans and creamy mushroom soup, topped with a delightful crunch of French fried onions. It’s not just a meal; it’s a warm embrace from your kitchen, perfect for weeknights or special gatherings.

In this article, we’re diving deep into everything you need to know to create this cozy bean casserole that will have your family asking for seconds. So grab your apron, and let’s make some magic happen!

Why You’ll Love This Recipe

  • Quick and Easy: This ground beef casserole can be whipped up in under an hour, making it perfect for busy weeknights.
  • Comforting and Satisfying: The combination of beef, beans, and creamy soup creates a hearty meal that feels like a warm hug.
  • Versatile Ingredients: Use canned, frozen, or fresh green beans based on what you have on hand, making this recipe adaptable to your pantry.
  • Kid-Friendly: The crunchy topping and creamy filling are sure to delight even the pickiest eaters in your family.
  • Make-Ahead Convenience: This casserole can be prepared in advance and baked when you’re ready, perfect for busy evenings.

Ingredient Breakdown

Delicious Hamburger Green Bean Casserole in a baking dish with rich, creamy texture.

Let’s take a closer look at what you’ll need to create this delicious casserole:

  • 1 lb ground beef: The star of the dish, providing hearty protein and rich flavor.
  • 3 cups green beans: Choose from canned, frozen, or fresh. If using fresh, blanch them for the best texture.
  • 1 can (10.5 oz) cream of mushroom soup: This is the creamy base that ties everything together.
  • 1/2 cup milk: Helps to thin the soup, making the mixture creamy and dreamy.
  • 1 tbsp soy sauce: Adds a depth of flavor that elevates the dish.
  • 1/2 tsp garlic powder: For a hint of aromatic goodness.
  • 1/2 tsp onion powder: Enhances the savory notes in the casserole.
  • Salt and pepper to taste: Essential for balancing flavors.
  • 1 1/2 cups French fried onions: These provide the perfect crispy topping that everyone loves!

Pro Tips for a Perfect Casserole

  • Brown the Beef Well: Make sure to cook the ground beef until it’s browned to enhance the flavor.
  • Don’t Skip the Seasoning: Season each layer of your casserole; it makes a world of difference!
  • Mix Ingredients Thoroughly: Ensure that the green beans and beef are evenly coated with the soup mixture for consistent flavor.
  • Experiment with Toppings: Try adding cheese on top before the final bake for an extra layer of flavor.
  • Use Quality Ingredients: Fresh or high-quality canned ingredients yield the best results.
  • Let it Rest: Allow the casserole to cool for a few minutes before serving; it helps the flavors meld together.
  • Add a Dash of Spice: If you like a bit of heat, consider adding crushed red pepper flakes or a dash of hot sauce to the mix.
  • Try Different Vegetables: Mix in other veggies like corn or bell peppers for added color and nutrition.

Common Mistakes and Troubleshooting

Even the best of us can have a hiccup in the kitchen. Here are some common pitfalls and how to avoid them:

  • Dry Casserole: Ensure there’s enough liquid (soup and milk) in the mixture; this prevents dryness.
  • Overcooked Toppings: Watch the French fried onions while baking; they can become too dark if left in too long.
  • Uneven Cooking: Spread the mixture evenly in the casserole dish for uniform baking.
  • Too Much Salt: If your casserole is overly salty, balance it out with a bit of sugar or additional vegetables.

Delicious Variations to Try

Want to switch things up a bit? Here are some fun variations to explore:

  • Cheesy Hamburger Green Bean Casserole: Add shredded cheddar cheese to the top before baking for an ooey-gooey twist.
  • Italian Style: Incorporate Italian seasoning and substitute the green beans with spinach or zucchini for a Mediterranean flair.
  • Southwestern Flavor: Use taco seasoning, black beans, and corn instead of green beans for a spicy kick.
  • Vegetarian Delight: Substitute ground beef with lentils or a meat alternative and use vegetable broth to keep it vegetarian-friendly.

Storage and Make-Ahead Instructions

This casserole is perfect for making ahead or storing leftovers:

  • Make-Ahead: Assemble the casserole in advance, cover tightly, and refrigerate for up to 24 hours before baking.
  • Storing Leftovers: Store leftover casserole in an airtight container in the fridge for up to 3-4 days.
  • Freezing: You can freeze the unbaked casserole for up to 3 months. Thaw overnight in the fridge and bake as directed.
  • Reheating: Reheat individual portions in the microwave or the entire casserole in the oven at 350°F until warmed through.

Comprehensive FAQ

Got questions? Here are some common queries about our Hamburger Green Bean Casserole:

  • Can I use fresh green beans instead of canned? Absolutely! Just blanch them for a few minutes before adding to the casserole.
  • What can I substitute for cream of mushroom soup? You can use cream of chicken soup or make a homemade version with butter, flour, and broth.
  • Can I make this dish dairy-free? Yes! Use a dairy-free milk alternative and look for dairy-free cream soups.
  • How do I know when the casserole is done? The casserole should be bubbly around the edges and the topping golden brown.
  • Can I add other vegetables? Definitely! Feel free to get creative with your favorite veggies.
  • What should I serve with this casserole? A simple side salad or some crusty bread pairs beautifully with this dish.
  • Is this casserole freezer-friendly? Yes! Just make sure to store it in a freezer-safe container.
  • How long does it take to cook from frozen? If baking from frozen, increase the cooking time to about 1 hour.

Nutritional Tips and Dietary Adaptations

This casserole can easily be adapted to fit various dietary needs:

  • Low-Carb Version: Substitute green beans for cauliflower rice for a low-carb meal.
  • Gluten-Free: Ensure your cream of mushroom soup is gluten-free, or make your own from scratch.
  • Increased Fiber: Incorporate lentils or additional beans to boost fiber content.
  • Lower Fat: Use lean ground turkey instead of beef to reduce fat content.

Equipment Recommendations

Before you get started, make sure you have the right tools:

  • Skillet: A good non-stick skillet will help you brown the beef perfectly.
  • Casserole Dish: A 9×13 inch dish is ideal for baking this casserole.
  • Mixing Bowl: A large bowl for combining all the ingredients.
  • Measuring Cups and Spoons: Essential for accurate ingredient measurements.

Serving Suggestions

This comforting casserole is delicious on its own, but here are a few ideas to elevate your meal:

  • Fresh Herbs: Sprinkle chopped parsley or chives on top for a burst of freshness.
  • Side Salad: A crisp green salad with vinaigrette balances the richness of the casserole.
  • Crusty Bread: Serve with warm, crusty bread to soak up every bit of the creamy goodness.
  • Fruit Salad: A light fruit salad can be a refreshing side dish to complement the flavors.

Wrapping Up

So there you have it—the Hamburger Green Bean Casserole that’s more than just a dish; it’s a celebration of comfort, family, and delicious flavors. With its simplicity and heartwarming qualities, this recipe is destined to become a staple in your home. I can’t wait for you to try it and watch as your loved ones savor every bite. Remember, cooking is about creating moments, so enjoy the process, and happy cooking!

Hamburger Green Bean Casserole

Prep Time 10 minutes
Cook Time 35 minutes
Total Time 45 minutes
Servings 6 servings
Calories 450
A comforting and easy-to-make casserole combining ground beef, green beans, and crispy fried onions for a delicious family meal.

Ingredients

Meat and Vegetables

  • 1 lb ground beef
  • 3 cups green beans (canned, frozen, or fresh)
  • 1 can (10.5 oz) cream of mushroom soup
  • 1/2 cup milk
  • 1 tbsp soy sauce
  • 1/2 tsp garlic powder
  • 1/2 tsp onion powder
  • to taste salt and pepper salt and pepper
  • 1 1/2 cups french fried onions

Instructions 

  • Preheat oven to 350°F (175°C).
  • Cook ground beef until browned; drain excess grease.
  • Mix beef, green beans, soup, milk, soy sauce, garlic, onion, salt, and pepper.
  • Pour into a greased 9x13-inch dish and bake for 25–30 minutes.
  • Top with fried onions and bake for 5–10 minutes until crispy.

Notes

For extra flavor, add a dash of pepper or your favorite herbs.
Calories: 450kcal
Cost: $15
Course: Main Course
Cuisine: American
Keyword: Beef, Casserole, green beans

Loved this recipe? Save it to your favorite Pinterest board so you can easily find it later! It’s the perfect way to keep all your sweet ideas in one place. ✨

A cozy plate of Hamburger Green Bean Casserole, showcasing green beans and ground beef.

Unleashing the Magic of Sourdough: Your Ultimate Guide to Baking Bread and Beyond

Welcome to the wonderful world of sourdough! If you’ve ever been curious about how to make this delicious, crusty bread at home, or if you’re looking for creative ways to use your sourdough discard, you’ve come to the right place. In this comprehensive guide, we’ll explore everything you need to know about crafting the perfect sourdough bread and transforming your kitchen into a haven of flavor and comfort. Get ready to dive into a world where flour, water, and a little patience create something truly magical!

Why You’ll Love This Recipe

  • Simple Ingredients: You only need a handful of basic ingredients: flour, water, salt, and your sourdough starter. Easy peasy!
  • Unique Flavor: The fermentation process gives sourdough its distinctive tang and depth of flavor, making it stand out from regular bread.
  • Health Benefits: Sourdough is easier to digest, contains beneficial bacteria, and has a lower glycemic index compared to conventional bread.
  • Versatile Uses: From sandwiches to toast, or even as a base for amazing pizzas, the possibilities with sourdough are endless.
  • Culinary Adventure: Baking sourdough can be both an art and a science, providing a rewarding challenge that many home bakers adore.

Ingredients You Will Need

Warm, golden-brown sourdough bread with visible texture and soft shadows.

Before we jump into the baking process, let’s gather all the necessary ingredients for your sourdough adventure:

  • All-Purpose Flour: A versatile flour that works great for sourdough. You can also experiment with whole wheat or bread flour.
  • Water: Use filtered or bottled water if possible, as chlorine in tap water can hinder the fermentation process.
  • Sourdough Starter: Your magic potion! Ensure it is active and bubbly before using it in your dough.
  • Salt: A crucial ingredient that enhances flavor and controls fermentation. Sea salt or kosher salt works best.

How to Make Sourdough Bread: Step-by-Step Instructions

Ready to bake? Let’s get started with a detailed step-by-step process to create your own sourdough bread.

Step 1: Feed Your Sourdough Starter

Make sure your sourdough starter is active before you begin. Feed it about 4-8 hours before you plan to mix your dough, and it should be bubbly and rise well.

Step 2: Mix the Dough

In a large bowl, combine:

  • 500g of flour
  • 350g of water
  • 100g of active sourdough starter
  • 10g of salt

Mix until there are no dry bits of flour left. The dough will be shaggy and sticky.

Step 3: Autolyse

Let the dough rest for 30 minutes to an hour. This resting period allows the flour to absorb the water and start gluten development.

Step 4: Add Salt

Sprinkle the salt over the dough and incorporate it by squeezing it through your fingers. This helps in developing gluten strength.

Step 5: Bulk Fermentation

Cover the bowl with a damp cloth and let it rise at room temperature for 4-6 hours, or until it has doubled in size. During this time, perform a series of stretch and folds every 30 minutes for the first 2 hours.

Step 6: Shape the Dough

Once the dough has risen, gently turn it out onto a lightly floured surface. Shape it into a round or oval loaf, depending on your baking vessel.

Step 7: Final Proof

Place the shaped dough into a floured proofing basket or bowl and cover it. Let it proof for 1-2 hours at room temperature or overnight in the fridge for a more developed flavor.

Step 8: Preheat the Oven

Preheat your oven to 450°F (232°C) for at least 30 minutes. If you’re using a Dutch oven, place it inside to heat up as well.

Step 9: Bake

Carefully transfer your dough into the hot Dutch oven, score the top with a sharp knife, cover, and bake for 30 minutes. Remove the lid and bake for an additional 15-20 minutes, or until the crust is deep golden brown.

Step 10: Cool

Let the bread cool on a wire rack for at least an hour before slicing. This helps to set the crumb and enhance flavor.

Pro Tips for Perfect Sourdough

  • Temperature Matters: A warmer environment (around 75°F/24°C) is ideal for fermentation. If your kitchen is cold, consider using the oven light to provide warmth.
  • Hydration Level: Adjust the water in your dough based on the flour you’re using. Whole grain flours may require more moisture.
  • Practice Patience: Sourdough baking is an art that requires patience; don’t rush the fermentation process!
  • Experiment with Flour: Try incorporating different flours like rye or spelt to create unique flavors and textures.
  • Use a Kitchen Scale: For consistent results, measure your ingredients by weight rather than volume.
  • Don’t Skip the Autolyse: This step is crucial for gluten development and improves the overall texture of your bread.
  • Keep It Covered: Always cover your dough during proofing to prevent it from drying out.
  • Embrace the Crust: A good crust is a sign of well-baked bread! Don’t be afraid of that beautiful deep color.
  • Experiment with Scoring: Different scoring patterns can affect the final presentation of your loaf; feel free to get creative!

Common Mistakes and Troubleshooting

Even experienced bakers can face challenges when making sourdough. Here are some common pitfalls and how to avoid them:

  • Dense Bread: If your bread is too dense, it might be due to insufficient fermentation. Ensure your starter is active and give the dough enough time to rise.
  • Flat Loaf: A flat loaf may indicate over-proofing. Keep an eye on the dough and shape it before it has fully risen.
  • Hard Crust: If your crust is too hard, consider lowering the oven temperature slightly or adding steam during the first part of baking.
  • Underbaked Center: If the bread is doughy in the middle, ensure you’re baking it long enough and at the right temperature.

Variations to Try

Once you’ve mastered the basic sourdough recipe, feel free to get creative! Here are some variations to consider:

  • Herb & Garlic Sourdough: Incorporate fresh herbs like rosemary or thyme and minced garlic into the dough for an aromatic twist.
  • Cheese Sourdough: Add shredded cheese (like cheddar or feta) to the dough for a savory flavor that pairs beautifully with soups.
  • Fruit and Nut Sourdough: Fold in dried fruits like cranberries or apricots and nuts such as walnuts or pecans for a delightful texture and taste.
  • Sweet Sourdough: Experiment with adding honey, cinnamon, or even chocolate chips for a dessert-style bread.

Storage and Make-Ahead Instructions

Once your bread is baked and cooled, store it properly to maintain freshness:

  • Room Temperature: Keep your sourdough bread wrapped in a clean kitchen towel or in a bread box for up to 3 days.
  • Freezing: To extend its shelf life, slice the bread and wrap it tightly in plastic wrap and foil before freezing. It can be stored for up to 3 months.
  • Reviving Stale Bread: If your bread becomes stale, spritz it lightly with water and bake it in a 350°F (175°C) oven for 5-10 minutes to refresh.

Frequently Asked Questions

Here are some common questions about sourdough baking:

  • Why is my sourdough bread so sour? The sourness comes from the lactic acid bacteria in your starter. If it’s too sour, try feeding your starter more often or adjusting the fermentation time.
  • Can I use all-purpose flour instead of bread flour? Yes, you can! Just keep in mind that the texture and rise may vary slightly.
  • How do I know if my dough has risen enough? A good test is the “poke test.” If the indentation from your finger gently springs back, it’s ready.
  • What’s the best way to maintain my sourdough starter? Regular feedings and keeping it at room temperature are key. Avoid letting it go too long without feeding.
  • Can I bake sourdough bread in a regular loaf pan? Absolutely! Just remember that the shape and crust may differ from a free-form loaf.
  • How do I tell when my bread is done baking? The bread should sound hollow when tapped on the bottom and have a deep golden crust.
  • What if my starter isn’t rising? Ensure it’s being fed regularly, and check that it’s kept in a warm environment.
  • Can I make sourdough bread without a Dutch oven? Yes! You can use a baking stone or a heavy baking sheet; just be sure to add steam to the oven to create a good crust.

Nutritional Tips and Dietary Adaptations

Sourdough can be a healthier option compared to conventional bread due to its fermentation process. Here are some tips for making it even more nutritious:

  • Whole Grain Options: Incorporate whole grain flours for added fiber and nutrients.
  • Gluten-Free Sourdough: Use a gluten-free starter and gluten-free flour blends to create a gluten-free sourdough.
  • Lower-Carb Version: Experiment with almond flour or coconut flour for a lower-carb alternative.

Essential Equipment for Sourdough Baking

Having the right tools can make your sourdough experience smoother:

  • Digital Kitchen Scale: For precise measurements, which are crucial in baking.
  • Dutch Oven: Ideal for creating steam and achieving a perfect crust.
  • Baking Stone: Helps mimic a traditional baking environment for better heat retention.
  • Bench Scraper: Useful for shaping and handling your dough.
  • Proofing Basket: Helps to shape and hold the dough during its final rise.

Serving Suggestions

Sourdough bread is incredibly versatile and pairs well with a variety of dishes. Here are some delightful serving suggestions:

  • With Soups: Serve warm slices alongside your favorite soups for a comforting meal.
  • As Toast: Top with avocado, eggs, or spreads for a delicious breakfast or snack.
  • For Sandwiches: Use sourdough for gourmet sandwiches, pairing with meats, cheeses, and fresh veggies.
  • With Dips: Cut into cubes and serve with dips like hummus or spinach-artichoke dip.

In conclusion, baking sourdough is a journey of discovery and creativity. With this guide at your side, you are well-equipped to create beautiful loaves that not only nourish your body but also warm your heart. Embrace the process, enjoy the aroma that fills your kitchen, and share the magic of homemade sourdough with loved ones. Happy baking!

Sourdough Bread and sourdough discard Recipes

Prep Time 15 minutes
Cook Time 30 minutes
Total Time 45 minutes
Servings 8 slices
Calories 150
Discover simple and delicious ways to use sourdough discard and bake fresh sourdough bread at home.

Ingredients

Main

  • 1 cup sourdough starter (active and bubbly)
  • 3 cups all-purpose flour
  • 1.75 cups water (lukewarm)
  • 1.5 teaspoons salt

Instructions 

  • Mix sourdough starter, flour, water, and salt until a dough forms.
  • Let the dough rise in a warm place for 4-6 hours or until doubled in size.
  • Shape the dough into a loaf and place in a greased pan.
  • Bake at 450°F (230°C) for 30 minutes until golden brown.
  • Allow to cool before slicing and serving.

Notes

Use active sourdough starter for best results.
Calories: 150kcal
Cost: $15
Course: Bread, Breakfast
Cuisine: American
Keyword: discard, sourdough

Loved this recipe? Save it to your favorite Pinterest board so you can easily find it later! It’s the perfect way to keep all your sweet ideas in one place. ✨

Eye-level shot of freshly baked sourdough bread highlighting its artisanal quality.

Ah, Thanksgiving! That magical time of year when families gather, laughter fills the air, and the aroma of comfort food wafts through every home. For many, no holiday feast is complete without the classic green bean casserole. This recipe, inspired by cherished traditions and a sprinkle of modern flair, promises to bring back warm memories and create new ones around your dinner table. Let’s dive into why this Campbell’s Green Bean Casserole holds a special place in our hearts—and more importantly, how to make it shine!

Why You’ll Love This Recipe

  • Quick and Easy: Ready in under 30 minutes, this recipe is perfect for busy holiday cooking.
  • Comfort Food Classic: Creamy, savory, and topped with crispy fried onions, it’s a crowd-pleaser.
  • Versatile Ingredients: Simple pantry staples come together for an unforgettable dish.
  • Make-Ahead Friendly: Prepare it ahead of time to ease your holiday stress.
  • Customizable: Add your personal touch with variations that suit your taste.

Ingredients You’ll Need

To create this green bean casserole, gather the following ingredients:

  • 2 cans (14.5 oz each) green beans, drained
  • 1 can (10.5 oz) condensed cream of mushroom soup
  • 1/2 cup milk (2% or whole)
  • 1 teaspoon soy sauce
  • 1/4 teaspoon black pepper
  • 1 1/3 cups French fried onions

Feel free to make substitutions based on your pantry or dietary needs:

  • Green Beans: Fresh green beans can be used for a more vibrant texture, just blanch them before adding.
  • Cream of Mushroom Soup: Substitute with cream of celery or a homemade white sauce for a twist.
  • Milk: Swap for plant-based milk to make it dairy-free without sacrificing creaminess.
  • Fried Onions: Try using crispy bacon or panko breadcrumbs for a different crunch.

How to Make It

Detailed view of a baked green bean casserole showing its rich texture and golden crust.

Now, let’s get cooking! Follow these simple steps to create your delicious green bean casserole:

Step 1: Preheat the Oven

Preheat your oven to 350°F (175°C). This ensures your casserole cooks evenly and thoroughly.

Step 2: Mix the Ingredients

In a large mixing bowl, combine the drained green beans, cream of mushroom soup, milk, soy sauce, and black pepper. Stir until everything is well mixed.

Step 3: Add Crunch

Fold in 2/3 cup of the French fried onions, adding that crispy element that makes this dish so special.

Step 4: Transfer and Bake

Pour the mixture into a 1 1/2-quart casserole dish and bake in the preheated oven for 25 minutes or until hot and bubbly.

Step 5: Top and Finish Baking

Remove the casserole from the oven and stir. Top with the remaining French fried onions and return to the oven for an additional 5-10 minutes, or until the onions are golden brown and crispy.

Step 6: Cool and Serve

Let the casserole cool slightly before serving. This helps it set and makes it easier to serve.

Pro Tips for Perfection

  • Don’t Overcook the Beans: For the best texture, use fresh or frozen beans and avoid overcooking them before baking.
  • Layer Flavors: Consider adding sautéed garlic or shallots for an extra flavor boost.
  • Garnish Wisely: Fresh herbs like parsley or thyme can brighten the dish just before serving.
  • Make It Ahead: Assemble the casserole a day in advance, cover it, and refrigerate. Just pop it in the oven when ready!
  • Gluten-Free Option: Use gluten-free fried onions and check your soup for a gluten-free label.
  • Adjust the Creaminess: If you prefer a creamier casserole, add extra milk or a dollop of sour cream.
  • Experiment with Cheese: Adding shredded cheddar or mozzarella on top can create a delightful cheesy crust!
  • Use Fresh Ingredients: Fresh green beans provide a crunch that canned beans can’t match.

Common Mistakes and Troubleshooting

Even the best of us have kitchen mishaps! Here’s how to avoid common mistakes:

  • Too Watery: Ensure to drain the green beans and don’t add too much milk; you want a creamy consistency, not soup.
  • Burnt Onions: Keep an eye on the casserole towards the end of baking to prevent the fried onions from burning.
  • Flavorless: Don’t skip the seasoning! Soy sauce and pepper are crucial for depth of flavor.

Variations to Try

Spice things up with these creative variations:

  • Cheesy Spin: Stir in 1 cup of shredded cheddar cheese for a cheesy twist.
  • Spicy Kick: Add a dash of cayenne pepper or some diced jalapeños for heat.
  • Mushroom Lovers: Mix in sautéed mushrooms for extra umami flavor.
  • Herbed Delight: Incorporate fresh herbs like thyme or rosemary for a fragrant touch.

Storage and Make-Ahead Instructions

This green bean casserole can be made ahead and stored:

  • Refrigerator: Store leftovers in an airtight container for up to 3 days.
  • Freezer: Assemble the casserole without baking, cover tightly, and freeze for up to 2 months. Thaw overnight in the fridge before baking.
  • Reheating: Reheat in the oven at 350°F (175°C) until heated through, about 20 minutes.

Frequently Asked Questions

Got questions? I’ve got answers!

  • Can I use fresh green beans? Absolutely! Just blanch them first for the best texture.
  • How do I make it gluten-free? Use gluten-free fried onions and ensure your soup is gluten-free.
  • Can I make this in an air fryer? Yes, air fry the casserole at 320°F for about 20 minutes for a crispy top.
  • How do I enhance the flavor? Consider adding sautéed onions or garlic, or a sprinkle of cheese on top.
  • Can I prepare this ahead of time? Yes! Assemble the casserole in advance and refrigerate until ready to bake.
  • What can I serve it with? This casserole pairs well with turkey, ham, or vegetarian main dishes.
  • Is it possible to double the recipe? Definitely! Just use a larger dish and adjust the baking time as needed.
  • How should I store leftovers? Store in an airtight container in the fridge for up to 3 days.

Nutritional Tips and Dietary Adaptations

This green bean casserole can be adapted for various dietary needs:

  • Low-Calorie Option: Use low-fat milk and reduce the amount of fried onions.
  • Vegan Version: Replace cream of mushroom soup with a plant-based alternative and use non-dairy milk.
  • Low-Carb Adaptation: Swap out the fried onions for a sprinkle of crushed pork rinds for a crunchy topping.

Essential Equipment Recommendations

To make your cooking process smooth, here are some essentials:

  • Casserole Dish: A 1 1/2-quart dish is perfect for this recipe.
  • Mixing Bowl: A large bowl for combining all your ingredients.
  • Spatula: For easy mixing and transferring.
  • Measuring Cups and Spoons: Accurate measurements are key to a successful casserole.

Serving Suggestions

Your green bean casserole deserves the spotlight but pairs beautifully with:

  • Roast Turkey: A classic pairing for Thanksgiving.
  • Honey-Glazed Ham: The sweetness complements the savory casserole.
  • Vegetarian Dishes: Serve alongside stuffed peppers or quinoa salad for a lighter meal.
  • Mashed Potatoes: Because no Thanksgiving plate is complete without them!

So there you have it! This Campbell’s Green Bean Casserole recipe not only brings back fond memories but also invites you to create new ones. Whether you’re hosting a holiday feast or just looking for a comforting side dish, this recipe is sure to impress. Now, grab your apron, gather your loved ones, and let’s make some culinary magic happen!

Campbell’s Green Bean Casserole – The Ultimate Thanksgiving Classic!

Prep Time 10 minutes
Cook Time 30 minutes
Total Time 40 minutes
Servings 6 servings
Calories 250
A timeless holiday side dish featuring green beans, creamy mushroom soup, and crispy fried onions, perfect for Thanksgiving.

Ingredients

Canned Goods

  • 2 cans green beans, drained
  • 1 can condensed cream of mushroom soup
  • 1/2 cup milk
  • 1 teaspoon soy sauce
  • 1/4 teaspoon black pepper
  • 1 1/3 cups french fried onions

Instructions 

  • Preheat oven to 350°F (175°C).
  • Mix green beans, mushroom soup, milk, soy sauce, and pepper.
  • Stir in 2/3 cup of fried onions and transfer to a casserole dish.
  • Bake for 25 minutes, then stir and top with remaining onions.
  • Bake for another 5-10 minutes until golden, then serve.

Notes

Use fresh fried onions for best crunch.
Calories: 250kcal
Cost: $15
Course: Side Dish
Cuisine: American
Keyword: green beans

Loved this recipe? Save it to your favorite Pinterest board so you can easily find it later! It’s the perfect way to keep all your sweet ideas in one place. ✨

Eye-level photograph of a green bean casserole adorned with French fried onions, freshly baked.

The Ultimate Comfort: Discovering the Magic of Crockpot Mac & Cheese

Hey there, fellow food lovers! If you’ve ever had one of those busy days where cooking feels like a Herculean task, then you’re in for a treat. Let me introduce you to the delightful world of Crockpot Mac & Cheese—a dish that brings warmth, comfort, and a whole lot of cheesy goodness to your table. This isn’t just any mac and cheese; it’s a creamy, dreamy crockpot magic that transforms simple ingredients into a dish so delicious, your family will be asking for seconds—and maybe even thirds!

With every bite, you’ll remember that cooking doesn’t have to be complicated. You can create a masterpiece that melts into your heart and hugs your soul. So grab your crockpot and let’s dive into this culinary adventure!

Why You’ll Fall in Love with This Recipe

Let’s talk about why this crockpot mac and cheese is your new best friend:

  • Effortless Cooking: Simply toss your ingredients in the crockpot and let it do the magic. Perfect for busy weeknights!
  • Comfort Food Classic: This dish is a nostalgic reminder of childhood dinners, bringing back memories of cozy family gatherings.
  • Customizable: Feel free to play with ingredients! Add veggies, proteins, or different cheeses to make it your own.
  • Minimal Cleanup: One pot means fewer dishes and more time to enjoy with family and friends.
  • Perfect for Meal Prep: Make a big batch and store leftovers for an easy lunch or dinner later in the week.

All About the Ingredients

A bowl of cheesy macaroni, featuring melted cheddar and soft pasta.

Now that we’re all excited about the magic of crockpot mac and cheese, let’s break down the ingredients you’ll need:

  • Macaroni Pasta: 2 cups of elbow macaroni is the classic choice, but feel free to swap in your favorite pasta shape.
  • Water: 4 cups, to cook the pasta to perfection.
  • Salt: Just a teaspoon to enhance the flavors.
  • Shredded Cheddar Cheese: 2 cups, because what’s mac and cheese without a generous helping of cheese?
  • Milk: 1 cup of your choice—whole, 2%, or even plant-based milk for a dairy-free option.
  • Garlic Powder: 1/2 teaspoon for a subtle aromatic flavor.
  • Onion Powder: 1/2 teaspoon to add depth.
  • Black Pepper: A sprinkle (1/4 teaspoon) for a touch of heat.
  • Butter: 1/4 cup, cubed, to create that rich, creamy texture.

For substitutions, you can use gluten-free pasta or low-fat cheese if you’re looking to lighten things up. Just remember that the type of cheese you choose can dramatically change the flavor profile!

Making the Magic Happen: Step-by-Step Instructions

Ready to create your own bowl of perfection? Follow these simple steps:

  1. In your crockpot, combine the 2 cups of macaroni pasta, 4 cups of water, and 1 teaspoon of salt.
  2. Stir in the 1/2 teaspoon each of garlic powder and onion powder, along with 1/4 teaspoon of black pepper.
  3. Add the cubed butter to the mixture. This will help create that creamy texture we all crave.
  4. Cover and cook on high for 2 to 3 hours or on low for 4 to 5 hours, until the pasta is tender but not mushy.
  5. Once cooked, stir in the 1 cup of milk and 2 cups of shredded cheddar cheese until it melts into a creamy delight.
  6. Serve warm and enjoy the simple but oh-so-delicious mac and cheese!

Expert Tips for the Best Results

Want to elevate your crockpot mac and cheese to legendary status? Check out these pro tips:

  • Use Freshly Shredded Cheese: Pre-shredded cheese contains anti-caking agents that can affect the creaminess. Shred your own for the best results!
  • Don’t Skip the Butter: It’s essential for achieving that rich, creamy texture—trust me, it makes a world of difference.
  • Stir Occasionally: If you can, give the mixture a gentle stir halfway through cooking to ensure even melting and prevent sticking.
  • Experiment with Cheeses: Try mixing cheddar with Gruyere or mozzarella for a unique flavor twist.
  • Add Some Spice: A pinch of cayenne or smoked paprika can add an unexpected kick that elevates the dish.
  • Incorporate Veggies: Consider adding steamed broccoli or sautéed mushrooms for a healthier twist.
  • Make It Meaty: Stir in cooked bacon or shredded chicken for a heartier meal.
  • Adjust for Creaminess: If you prefer a creamier mac, increase the milk or cheese slightly.

Avoiding Common Mistakes

Every great cook has made a few blunders along the way. Here are some common mistakes to avoid:

  • Overcooking the Pasta: Keep an eye on the cooking time; overcooked pasta can become mushy and unappetizing.
  • Skipping the Salt: Salt enhances flavors, so don’t skip it in the cooking process!
  • Using Low-Quality Cheese: Cheap cheese can lead to a less flavorful dish; invest in good-quality cheese for the best taste.

Delicious Variations to Try

Feeling adventurous? Here are some fun variations to switch up your mac and cheese crockpot magic:

  • Buffalo Chicken Mac & Cheese: Stir in shredded rotisserie chicken and buffalo sauce for a spicy kick.
  • Vegetable Medley: Toss in your favorite veggies like spinach, peas, or roasted red peppers for added nutrition.
  • BBQ Mac: Mix in pulled pork and a touch of BBQ sauce for a smoky flavor.
  • Truffle Mac & Cheese: Drizzle with truffle oil before serving for a gourmet touch.

Storage & Make-Ahead Instructions

This dish is perfect for meal prep! Here’s how to store your crockpot mac and cheese:

  • Refrigerate: Store leftovers in an airtight container in the fridge for up to 4 days.
  • Freeze: To freeze, let it cool completely, then transfer to a freezer-safe container. It can be stored for up to 3 months.
  • Reheating: For best results, reheat in the microwave or on the stovetop, adding a splash of milk to restore creaminess.

Frequently Asked Questions

Let’s tackle some common questions about this beloved dish:

  • Can I use gluten-free pasta? Absolutely! Just keep an eye on the cooking time, as gluten-free pasta can cook faster.
  • Can I make this ahead of time? Yes, you can prepare the ingredients and store them in the fridge overnight before cooking the next day.
  • What’s the best cheese to use? Cheddar is classic, but feel free to mix it up with mozzarella, gouda, or pepper jack for added flavor.
  • How do I make it creamier? Increase the amount of cheese or milk for a richer texture.
  • Can I add proteins? Yes! Cooked chicken, bacon, or even crab can be delicious additions.
  • Is there a vegetarian option? Of course! Just skip the meat and add more veggies.
  • What’s the cooking time for different crockpots? Cooking times may vary based on your crockpot’s heat settings; keep an eye on it.
  • Can I double the recipe? Definitely! Just ensure your crockpot has enough capacity to accommodate the larger batch.

Nutrition Tips and Dietary Adaptations

If you’re looking for healthier options, consider the following:

  • Reduce Calories: Use low-fat cheese and milk to cut down on calories without sacrificing flavor.
  • Achieve Balance: Add in veggies for added fiber and nutrients.
  • Go Dairy-Free: Substitute with plant-based cheese and milk for a creamy yet dairy-free dish.

Equipment Recommendations

To make the most of your crockpot mac and cheese, here’s what you’ll need:

  • Crockpot: A reliable slow cooker is key. Choose one with a ceramic insert for even cooking.
  • Measuring Cups and Spoons: Essential for precise ingredient measurement.
  • Wooden Spoon: Perfect for stirring and serving your delicious creation.

Serving Suggestions

This mac and cheese pairs wonderfully with:

  • Garlic Bread: For that ultimate comfort food experience.
  • Green Salad: A fresh salad balances the richness of the mac and cheese.
  • Roasted Vegetables: Add some color and nutrition to your meal.

So there you have it! A crockpot mac and cheese recipe that not only saves you time but also fills your home with the warm, inviting aroma of comfort food. Whether you’re cooking for family or looking for a cozy meal after a long day, this dish is sure to be a hit. Remember, cooking is about joy and creativity, so don’t be afraid to make it your own. Happy cooking, friends!

Simple Mac & Cheese Crockpot Magic Recipe for Busy Days

Prep Time 10 minutes
Cook Time 3 hours
Total Time 3 hours 10 minutes
Servings 4 servings
Calories 650
This easy crockpot mac & cheese is perfect for busy days, delivering creamy, cheesy comfort with minimal effort.

Ingredients

Main ingredients

  • 2 cups macaroni pasta
  • 4 cups water
  • 1 teaspoon salt
  • 2 cups shredded cheddar cheese
  • 1 cup milk
  • 1/2 teaspoon garlic powder
  • 1/2 teaspoon onion powder
  • 1/4 teaspoon black pepper
  • 1/4 cup butter, cubed

Instructions 

  • Combine pasta, water, and salt in the crockpot.
  • Add garlic powder, onion powder, and black pepper; stir.
  • Add butter cubes; cover and cook on high 2-3 hours or low 4-5 hours.
  • Stir in milk and cheese until melted and creamy.
  • Serve warm and enjoy!

Notes

This recipe is perfect for quick, comforting meals with minimal cleanup.
Calories: 650kcal
Cost: $10
Course: Main Course
Cuisine: American
Keyword: Mac & Cheese

Loved this recipe? Save it to your favorite Pinterest board so you can easily find it later! It’s the perfect way to keep all your sweet ideas in one place. ✨

An inviting serving of Mac & Cheese, showcasing rich textures and colors.

Welcome to Comfort in a Casserole: Your Ultimate Green Bean Casserole Guide

Ah, the green bean casserole! This dish has graced our family tables for generations, often bringing with it a wave of nostalgia and warmth. It’s more than just a side dish; it’s a celebration of togetherness, laughter, and those cozy gatherings that linger in our memories. Today, I’m excited to share my twist on this classic recipe that not only makes it easier but also adds a sprinkle of magic to your kitchen. Let’s dive into the heartwarming world of homemade green bean casserole, where every bite tells a story.

Why You’ll Love This Recipe

With the holidays around the corner or simply a family dinner in the works, this green bean casserole is a must-have. Here’s why:

  • Quick & Easy: With just a handful of ingredients and simple steps, you can whip up this comforting dish in under an hour, perfect for busy weeknights!
  • Family Favorite: This recipe has been passed down through my family, and it’s guaranteed to bring smiles to the dinner table. Expect requests for seconds!
  • Customizable: Want to make it your own? I’ll show you how to swap ingredients or add your personal touch, ensuring every bite is uniquely yours.
  • Healthier Twist: By using fresh ingredients and making your own sauce, you can feel good about serving this dish to loved ones.
  • Make-Ahead Friendly: Perfect for holiday gatherings, you can prepare it in advance and simply pop it in the oven when you’re ready to serve.

Ingredients Breakdown

Eye-level shot of creamy green bean casserole, showcasing fresh green beans and a golden crust.

Let’s get into the nitty-gritty of what you’ll need for this delightful green bean casserole:

  • Fresh Green Beans: 1 pound, trimmed and ready to shine. Feel free to substitute with frozen green beans for convenience.
  • Sour Cream: 1 cup, this adds a creamy texture. Greek yogurt can be a healthier alternative!
  • Cream of Mushroom Soup: 1 can (10.5 oz). If you’re feeling adventurous, I’ll share a homemade version later!
  • Fried Onions: 1 cup for that crunchy topping—use store-bought or make your own for an extra kick.
  • Spices: 1 teaspoon each of garlic powder and onion powder, plus salt and pepper to taste for flavor enhancement.
  • Cheddar Cheese: 1/2 cup shredded (optional), because who doesn’t love a little cheesy goodness?

How to Make Your Green Bean Casserole

Ready to bring this recipe to life? Here’s a step-by-step guide:

  • Preheat the oven: Set it to 350°F (175°C) to ensure a perfectly baked casserole.
  • Blanch the green beans: Boil them for 3-4 minutes, then drain and set aside. This keeps them bright green and tender-crisp.
  • Mix the sauce: In a large bowl, combine sour cream, cream of mushroom soup, garlic powder, onion powder, salt, and pepper. Stir until smooth.
  • Add the beans: Fold the blanched green beans into the sauce mixture, ensuring they’re well coated.
  • Transfer to baking dish: Pour the mixture into a greased 9×13 inch baking dish, spreading it evenly.
  • Top it off: Sprinkle the fried onions (and cheese, if using) over the top for that irresistible crunch.
  • Bake: Place in the oven and bake for 25-30 minutes until bubbly and golden brown.
  • Cool & Serve: Let it cool for a few minutes before serving, allowing the flavors to settle.

Pro Tips for the Best Green Bean Casserole

Here are some expert insights to ensure your casserole is top-notch:

  • Use fresh beans: Fresh green beans not only taste better but also provide a lovely texture compared to canned beans.
  • Customize your toppings: Swap the fried onions for crispy bacon or crushed crackers for a different flavor profile.
  • Don’t skip the blanching: This step keeps your beans vibrant and helps them retain their crunch.
  • Make it gluten-free: Use gluten-free cream of mushroom soup and check that your fried onions are gluten-free.
  • Check for seasoning: Always taste the mixture before baking to ensure it’s seasoned to your liking.
  • Experiment with cheese: Try different cheeses like mozzarella or pepper jack for a unique twist!
  • Make it vegan: Substitute cream of mushroom soup with a plant-based version and use cashew cream instead of sour cream.
  • Scale the recipe: Easily adjust the quantities to feed a smaller or larger crowd without losing the magic.

Common Mistakes & Troubleshooting

Even the best of us can have a mishap in the kitchen. Here’s how to avoid common pitfalls:

  • Overcooked green beans: Be careful not to over-blanch; they should still have a bit of crunch when you mix them with the sauce.
  • Too runny casserole: If your casserole is too watery, try adding more fried onions or letting it bake a little longer.
  • Burnt toppings: If your onions start to brown too much, cover the casserole with foil until the last few minutes of baking.
  • Flavorless sauce: Always taste and adjust seasoning before baking for a flavorful finish.

Variations to Try

Feeling adventurous? Here are some delicious variations to consider:

  • Mushroom Lovers: Add sautéed mushrooms for an extra layer of flavor.
  • Italian Twist: Mix in Italian seasoning and top with mozzarella cheese for a cheesy herb delight.
  • Spicy Kick: Incorporate diced jalapeños or a dash of hot sauce for a spicy version.
  • Cheesy Broccoli Casserole: Add steamed broccoli for a colorful veggie boost.

Storage and Make-Ahead Instructions

Want to prepare this dish in advance? Here’s how:

  • Refrigerate: Store leftovers in an airtight container in the fridge for up to 4 days.
  • Freeze: This casserole freezes well! Just assemble (without baking) and freeze for up to 2 months. Thaw overnight in the fridge before baking.
  • Reheat: To reheat, bake in a preheated oven at 350°F (175°C) for about 20-25 minutes until heated through.

Frequently Asked Questions

Let’s address some common queries about this beloved casserole:

  • Can I use canned green beans? Yes, but fresh or frozen beans yield the best texture and flavor.
  • How can I make it ahead of time? Assemble the casserole and refrigerate it overnight before baking.
  • What can I use instead of cream of mushroom soup? You can make a homemade sauce or use a different cream soup like chicken or celery.
  • Is this recipe gluten-free? It can be made gluten-free by using gluten-free soup and fried onions.
  • Can I add meat to this casserole? Absolutely! Cooked chicken or bacon can add a delicious heartiness.
  • How long can leftovers last? Leftovers can be stored in the fridge for about 4 days.
  • Can I make this casserole vegan? Yes! Use plant-based cream soup and sour cream alternatives.
  • What’s the best way to reheat it? Bake at 350°F until warmed through, covering with foil if necessary to prevent burning.

Nutritional Tips and Dietary Adaptations

Want to keep it on the healthier side? Here are a few tips:

  • Low-fat options: Use low-fat sour cream and reduced-fat cheese to cut down on calories.
  • Increase veggies: Add more vegetables like carrots or bell peppers for added nutrition and color.
  • Portion control: Serve in smaller portions to enjoy the flavors without overindulging.

Essential Equipment for Your Casserole

Ensure a smooth cooking experience with these kitchen essentials:

  • Large Pot: For blanching your green beans efficiently.
  • Mixing Bowl: A big enough bowl for combining the sauce and beans.
  • Baking Dish: A 9×13 inch dish is perfect for this casserole.
  • Spatula: For mixing and spreading the casserole evenly.

Serving Suggestions

Now that your casserole is ready, how can you make the meal even more special? Here are some ideas:

  • Pair with Roasted Meats: This casserole is a perfect side to roast chicken or turkey.
  • Serve with Fresh Bread: A crusty loaf or dinner rolls can complement the creamy casserole beautifully.
  • Add a Salad: A light, crisp salad can balance the richness of the casserole.

And there you have it! A comprehensive guide to making the ultimate green bean casserole that’s not just a recipe but a heartfelt addition to your family gatherings. So, gather your ingredients, invite some loved ones over, and let’s create some wonderful memories around the dinner table. Happy cooking!

Homemade green bean casserole

Prep Time 10 minutes
Cook Time 30 minutes
Total Time 40 minutes
Servings 6 servings
Calories 250
A classic comfort food, this green bean casserole combines fresh green beans with creamy mushroom sauce and crispy onions for a delicious side dish.

Ingredients

Green Beans

  • 1 pound fresh green beans, trimmed
  • 1 cup sour cream
  • 1 can (10.5 oz) cream of mushroom soup
  • 1 cup fried onions
  • 1 teaspoon garlic powder
  • 1 teaspoon onion powder
  • to taste salt and pepper
  • 1/2 cup shredded cheddar cheese (optional)

Instructions 

  • Preheat oven to 350°F (175°C).
  • Blanch green beans in boiling water for 3-4 minutes, then drain.
  • Mix sour cream, mushroom soup, garlic powder, onion powder, salt, and pepper.
  • Add green beans to mixture and combine. Transfer to a greased baking dish.
  • Top with fried onions and cheese if desired, then bake for 25-30 minutes.

Notes

For extra flavor, add a dash of hot sauce or herbs.
Calories: 250kcal
Cost: $15
Course: Side Dish
Cuisine: American
Keyword: green beans

Loved this recipe? Save it to your favorite Pinterest board so you can easily find it later! It’s the perfect way to keep all your sweet ideas in one place. ✨

Delicious green bean casserole in a white dish, highlighted by warm lighting and rich textures.

Welcome to Your New Favorite Recipe: Sweet Potato Tortillas

Hey there, kitchen adventurer! If you’ve landed on this page, you’re probably as excited about sweet potatoes as I am. These little gems are not just delicious; they bring a cozy, comforting vibe to any meal. Today, I’m thrilled to share my take on sweet potato tortillas—a recipe that’s not only easy to make but also packs a flavorful punch. Whether you’re looking for a gluten-free option or just a new twist on your standard tortillas, you’re in the right place!

Why You’ll Love This Recipe

Let’s dive into what makes these sweet potato tortillas so special. Here are five compelling reasons to keep this recipe close at hand:

  • Versatile base: Use these tortillas for tacos, wraps, quesadillas, or even as a side dish. The possibilities are endless!
  • Nutritious goodness: Sweet potatoes are rich in vitamins A and C, making these tortillas a healthy alternative to traditional flour tortillas.
  • Gluten-free and vegan: Perfect for those with dietary restrictions, these tortillas cater to gluten-free and vegan needs while still being delicious.
  • Quick and easy: With just a few simple ingredients and minimal prep time, you can whip up a batch in no time.
  • Kid-approved: Trust me, kids love the sweet flavor and soft texture. They’re a sneaky way to get more veggies into their diet!

Ingredient Breakdown

Delicious sweet potato tortillas displayed on a light-colored surface with a blurred kitchen background.

Before we roll up our sleeves and get cooking, let’s talk about what we need for this magical recipe. Here’s the lineup:

  • 1 cup cooked and mashed sweet potatoes: This is the star of our show! Feel free to use fresh, frozen, or even canned sweet potatoes—whatever you have on hand.
  • 1 cup all-purpose flour (or whole wheat flour): This serves as the binding agent. For a gluten-free option, substitute with your favorite gluten-free flour blend.
  • 1/2 teaspoon salt: A pinch of salt enhances the flavors of the sweet potatoes.
  • 1/2 teaspoon baking powder: This helps the tortillas puff up a bit during cooking.
  • 1 tablespoon olive oil (optional): A touch of oil adds richness and flavor, but you can skip it if you prefer a lighter option.
  • Water: Add as needed to get the right dough consistency.

How to Make Sweet Potato Tortillas: Step-by-Step

Now that we have our ingredients ready, let’s get down to business! Here’s how to make your delicious sweet potato tortillas:

  1. In a large bowl, combine the mashed sweet potatoes, flour, salt, and baking powder.
  2. Mix until a dough forms. If the dough is too dry, add water a little at a time until it reaches a workable consistency.
  3. Divide the dough into small balls (about the size of a golf ball).
  4. On a floured surface, roll out each ball into a thin tortilla shape.
  5. Heat a skillet over medium-high heat and cook each tortilla for about 1-2 minutes on each side, or until lightly browned.
  6. Remove from the skillet and keep warm in a cloth until all tortillas are cooked.
  7. Serve warm with your favorite toppings or fillings!

Pro Tips for Perfect Sweet Potato Tortillas

To ensure your tortillas turn out perfectly every time, consider these expert tips:

  • Choose the right sweet potatoes: Look for firm, smooth sweet potatoes without any blemishes for the best flavor.
  • Don’t overmix: Mix until just combined to keep your tortillas tender.
  • Adjust the thickness: If you prefer thicker tortillas, don’t roll them out too thin. Just remember that cooking time may vary.
  • Use parchment paper: When rolling out the tortillas, place them between sheets of parchment paper to prevent sticking.
  • Keep it warm: Store cooked tortillas in a cloth or a tortilla warmer to keep them soft and pliable.
  • Experiment with spices: Add cumin or chili powder to the dough for an extra kick of flavor!
  • Make ahead: These tortillas can be made in advance and stored in the fridge or freezer for quick meals.
  • Try different flours: If you want to experiment, try using almond flour or chickpea flour for a unique flavor and texture.

Common Mistakes and Troubleshooting

Even the best cooks make mistakes. Here are some common pitfalls and how to avoid them:

  • Dough too sticky: If your dough is sticky, add a bit more flour, one tablespoon at a time, until it’s manageable.
  • Dough too dry: If your dough is dry and crumbly, add water gradually until it holds together.
  • Tortillas break easily: If they crack or break when cooked, try rolling them out a bit thicker or adjusting the cooking time.
  • Uneven cooking: Ensure your skillet is preheated evenly to avoid hot spots that can burn the tortillas.

Variations to Try

Feeling adventurous? Here are some variations to switch things up:

  • Spinach Sweet Potato Tortillas: Add finely chopped spinach to the dough for a nutritious boost.
  • Herbed Sweet Potato Tortillas: Mix in dried herbs like oregano or basil for a fragrant twist.
  • Spicy Sweet Potato Tortillas: Incorporate diced jalapeños or a dash of cayenne pepper for a spicy kick!
  • Cheesy Sweet Potato Tortillas: Add shredded cheese to the dough for a cheesy, savory flavor.

Storage and Make-Ahead Instructions

Want to make these tortillas ahead of time? Here’s how to store them:

  • Refrigeration: Store cooked tortillas in an airtight container in the fridge for up to 5 days.
  • Freezing: Place parchment paper between tortillas, wrap them tightly, and freeze for up to 3 months.
  • Reheating: Reheat tortillas on a skillet or in the microwave for a few seconds until warmed through.

Frequently Asked Questions

Here are some common questions I get about sweet potato tortillas:

  • Can I use other types of potatoes? Absolutely! While sweet potatoes give a unique flavor, regular potatoes can work too.
  • Are these tortillas gluten-free? Yes, if you use gluten-free flour, these tortillas can be completely gluten-free!
  • Can I make these ahead of time? Yes! They can be stored in the fridge or freezer for later use.
  • What dishes can I use these tortillas for? Think tacos, wraps, quesadillas, or even as a side for chili!
  • How do I know when they’re cooked? They should be lightly browned and slightly puffed up when done.
  • Can I add other flavors to the dough? Definitely! Feel free to experiment with spices and herbs to suit your taste.
  • What’s the best way to store leftovers? Keep them in an airtight container in the fridge for up to 5 days or freeze them for later.
  • Can I use whole wheat flour instead of all-purpose flour? Yes, whole wheat flour works well and adds a nutty flavor!

Nutrition Tips and Dietary Adaptations

These sweet potato tortillas not only taste great but they also come with some impressive nutritional benefits:

  • Rich in vitamins: Sweet potatoes are loaded with vitamin A, which is great for your skin and eyes.
  • Fiber-packed: They contain dietary fiber that aids digestion and keeps you feeling full.
  • Low in calories: Compared to traditional tortillas, these are a lighter option for your meals.
  • Dairy-free option: By using plant-based fats, you can keep this recipe dairy-free!

Equipment Recommendations

To make your tortilla-making experience smoother, here are some helpful tools:

  • Mixing bowl: A large bowl for combining ingredients.
  • Rolling pin: Essential for rolling out your tortillas to the perfect thickness.
  • Skillet: A good non-stick skillet ensures even cooking.
  • Parchment paper: Handy for rolling and storing your tortillas without sticking.

Serving Suggestions

Now that you have your delicious sweet potato tortillas ready, here are some ideas on how to serve them:

  • Classic Tacos: Fill them with grilled chicken, fresh veggies, and your favorite salsa.
  • Breakfast Wraps: Stuff with scrambled eggs, avocado, and cheese for a hearty breakfast.
  • Veggie Quesadillas: Layer with cheese and sautéed veggies, then grill until crispy.
  • Soups and Stews: Serve them as a side to your favorite chili or stew for a comforting meal.

Conclusion: Your Kitchen Adventure Awaits

There you have it, my dear cooking enthusiast! Sweet potato tortillas are not just a recipe; they’re a gateway to new culinary adventures. Whether you enjoy them as a side, a wrap, or the main event, these tortillas are sure to impress. So gather your ingredients, roll up your sleeves, and let’s make something delicious together. Happy cooking!

Sweet Potato Tortillas

Prep Time 10 minutes
Cook Time 10 minutes
Total Time 20 minutes
Servings 4 pieces
Calories 150
This sweet potato tortillas recipe combines cooked mashed sweet potatoes with flour and seasonings to create soft, flavorful tortillas perfect for wraps or sides.

Ingredients

Main

  • 1 cup cooked and mashed sweet potatoes
  • 1 cup all-purpose flour ((or whole wheat flour))
  • 0.5 teaspoon salt
  • 0.5 teaspoon baking powder
  • 1 tablespoon olive oil ((optional))
  • water as needed water

Instructions 

  • Mix mashed sweet potatoes, flour, salt, and baking powder until a dough forms.
  • Add water gradually until the dough is workable.
  • Divide dough into small balls and roll into thin tortillas.
  • Cook each tortilla on a hot skillet for 1-2 minutes per side.
  • Remove and keep warm until serving.

Notes

Use fresh sweet potatoes for best flavor.
Calories: 150kcal
Cost: $10
Course: Main Course
Cuisine: fusion
Keyword: sweet potato

Loved this recipe? Save it to your favorite Pinterest board so you can easily find it later! It’s the perfect way to keep all your sweet ideas in one place. ✨

Warm, inviting sweet potato tortillas topped with fresh herbs, shot in natural light.

Welcome to the Heart of Comfort Food: Your New Go-To Green Bean Casserole

Ah, the aroma of a freshly baked casserole wafting through the kitchen—there’s nothing quite like it! This Green Bean Casserole is not just a dish; it’s a tradition, a celebration, and a comforting hug on a plate. Whether you’re gathering with family for the holidays or just want to elevate a weeknight dinner, this recipe is the one that will make everyone pause mid-bite and say, ‘Wow!’ With its creamy texture, crispy onions, and vibrant green beans, it’s truly irresistible. Let’s dive into the magic of this classic dish that has graced countless tables and created countless memories.

Why You’ll Love This Green Bean Casserole

This isn’t just any casserole; it’s a dish that brings warmth and joy to every occasion. Here are a few reasons why this recipe will become a staple in your kitchen:

  • Easy to Make: With just a handful of ingredients, you can whip this up in no time—perfect for busy weeknights or holiday feasts!
  • Comforting Flavor: The combination of creamy mushroom soup and crispy fried onions creates a flavor profile that feels like home.
  • Versatile Dish: Great for Thanksgiving, Christmas, or any family gathering, this casserole adapts beautifully to any occasion.
  • Make-Ahead Friendly: Prepare it in advance and pop it in the oven right before serving, so you can enjoy the company instead of spending all your time in the kitchen.
  • Kid-Approved: This dish appeals to all ages, making it an easy way to get everyone to eat their veggies!

Ingredient Breakdown: What You’ll Need

Delicious green bean casserole in a white dish, showcasing its rich texture and golden topping.

Let’s talk about the ingredients that come together to create this heavenly casserole. Here’s what you’ll need:

  • Green Beans: 2 cans (14.5 oz each), drained. You can also use fresh or frozen green beans if you prefer a fresher taste.
  • Cream of Mushroom Soup: 1 can (10.5 oz). This is the creamy base that holds everything together. You can substitute with cream of celery or make your own if you’re feeling adventurous!
  • Milk: 1/2 cup. Use regular milk or a plant-based alternative for a dairy-free version.
  • French Fried Onions: 1 1/2 cups. These add the perfect crunch! Feel free to use gluten-free options if necessary.
  • Soy Sauce: 1/2 teaspoon. This adds a lovely umami flavor; just be cautious of the salt levels in your casserole.
  • Salt and Pepper: To taste. Season it to your liking!

Instructions: How to Craft the Perfect Casserole

Ready to roll up your sleeves? Here’s how to bring your casserole to life:

  1. Preheat the oven to 350°F (175°C).
  2. In a large mixing bowl, combine the drained green beans, cream of mushroom soup, milk, soy sauce, and salt and pepper.
  3. Stir in 1 cup of the French fried onions, making sure they’re well distributed.
  4. Transfer the mixture to a 1.5-quart casserole dish, spreading it evenly.
  5. Bake in the preheated oven for 25 minutes.
  6. Remove from the oven and top with the remaining 1/2 cup of French fried onions.
  7. Return to the oven and bake for an additional 5-10 minutes, until the onions are golden brown and crispy.
  8. Serve warm and enjoy the compliments!

Pro Tips for Casserole Success

Want to ensure your casserole is the talk of the table? Here are some expert insights:

  • Choose Fresh Ingredients: Whenever possible, opt for fresh green beans instead of canned for a vibrant flavor and crisp texture.
  • Customize It: Add sautéed mushrooms or even some shredded cheese for an extra layer of flavor!
  • Don’t Overbake: Keep an eye on the casserole during the last minutes to avoid sogginess in the beans or burning the onions.
  • Use a Deep Dish: This allows for even cooking and prevents any overflow during baking.
  • Let It Rest: Allow the casserole to sit for a few minutes after baking. This helps the flavors meld together beautifully.

Common Mistakes and Troubleshooting

Even the best cooks can run into hiccups. Here’s how to avoid some common pitfalls:

  • Soggy Beans: If using frozen green beans, thaw them and pat dry before adding to the casserole to avoid excess moisture.
  • Too Salty: If your soup is already salty, taste before adding additional salt; you can always add more later!
  • Burnt Onions: If you notice the onions browning too quickly, cover the casserole with foil for part of the baking time.

Delicious Variations to Try

Feel like switching things up? Here are some fun variations:

  • Cheesy Green Bean Casserole: Add 1 cup of shredded cheddar cheese to the mixture before baking for a rich, cheesy twist.
  • Spicy Kick: Incorporate diced jalapeños or a splash of hot sauce for a spicy version that will please your adventurous eaters.
  • Vegetarian Delight: Use vegetable broth in place of the soy sauce and opt for vegetable cream soup to keep it meat-free.
  • Nutty Crunch: Sprinkle chopped pecans or slivered almonds on top along with the fried onions for an added crunch and nutty flavor.

Storage and Make-Ahead Instructions

Planning ahead? Here’s how to keep your casserole fresh:

  • Make Ahead: Assemble the casserole a day in advance, cover it tightly, and store it in the refrigerator. Just bake it when you’re ready to serve!
  • Storing Leftovers: Keep any leftovers in an airtight container in the fridge for up to 3 days. Reheat in the oven for best results.
  • Freezing: This casserole can be frozen before baking. Just thaw it in the fridge overnight before baking as directed.

Frequently Asked Questions

Got questions? I’ve got answers!

  • Can you make this casserole ahead of time? Yes! You can assemble it and refrigerate or freeze it until you’re ready to bake.
  • Can you use fresh green beans? Absolutely! Fresh green beans will give you a wonderful texture and flavor.
  • What can I use instead of cream of mushroom soup? Cream of celery soup or a homemade creamy sauce can work well as substitutes.
  • Is this casserole gluten-free? It can be! Use gluten-free French fried onions and check your soup labels.
  • How long can I store leftovers? Leftovers can be stored in the refrigerator for up to 3 days.
  • Can I add meat to this casserole? Yes, diced cooked chicken or ham can be added for a heartier version.
  • What’s the best way to reheat the casserole? Reheat in the oven at 350°F until warmed through for the best texture.
  • Can I use another type of onion instead of fried onions? Yes! Sautéed onions can be a great alternative for those looking for a less crunchy texture.

Nutritional Tips and Dietary Adaptations

Want to make this dish healthier? Here are some tips:

  • Reduce Calories: Use low-fat cream of mushroom soup and skim milk to cut down on calories without sacrificing flavor.
  • Vegan Option: Substitute the cream of mushroom soup with a plant-based cream and use almond or soy milk.
  • Low Sodium: Choose low-sodium versions of the soup and soy sauce to keep the dish heart-healthy.

Essential Equipment for Casserole Success

Before you start, make sure you have the right tools:

  • Casserole Dish: A 1.5-quart dish works perfectly for this recipe.
  • Mixing Bowl: A large bowl for combining your ingredients.
  • Measuring Cups and Spoons: Essential for accurate measurements and consistent results.
  • Spatula: To mix and serve your delicious creation!

Serving Suggestions

Wondering what to pair with your casserole? Here are some delightful suggestions:

  • Roasted Turkey: A classic pairing for the holidays and a perfect complement to this dish.
  • Garlic Mashed Potatoes: Creamy potatoes will balance the textures beautifully.
  • Homemade Dinner Rolls: Soft rolls are perfect for soaking up any leftover sauce!

So there you have it—the ultimate Green Bean Casserole recipe that not only tastes incredible but also evokes the warmth of home and tradition. I hope you find joy in every step of making this dish, and may it become a beloved favorite in your household. Now, grab your apron, gather your ingredients, and let’s create some kitchen magic together!

Green Bean Casserole Recipe: Easiest Holiday Side Ever!

Prep Time 10 minutes
Cook Time 30 minutes
Total Time 40 minutes
Servings 6 servings
Calories 180
A quick and delicious holiday side dish featuring green beans, creamy mushroom soup, and crispy fried onions.

Ingredients

Green Beans

  • 2 cans green beans, drained
  • 1 can cream of mushroom soup
  • 1/2 cup milk
  • 1 1/2 cups french fried onions
  • 1/2 teaspoon soy sauce
  • to taste salt and pepper

Instructions 

  • Preheat oven to 350°F (175°C).
  • Mix green beans, mushroom soup, milk, soy sauce, salt, and pepper.
  • Stir in 1 cup of fried onions and transfer to a casserole dish.
  • Bake for 25 minutes, then top with remaining onions and bake 5-10 more minutes.

Notes

For extra crunch, add more fried onions on top before serving.
Calories: 180kcal
Cost: $10
Course: Side Dish
Cuisine: American
Keyword: green beans

Loved this recipe? Save it to your favorite Pinterest board so you can easily find it later! It’s the perfect way to keep all your sweet ideas in one place. ✨

Appetizing green bean casserole served warm, highlighting the vibrant green beans and crunchy onions.

Unlock the Magic of Sweet Potatoes: A Comforting Culinary Adventure

Welcome, friend! If you’re here, it’s likely because you’re ready to dive into a recipe that warms both the heart and the tummy. Today, we’re exploring the delightful world of Walnut Maple Roasted Sweet Potatoes. This dish isn’t just about cooking; it’s about creating a moment of joy, a dash of comfort, and a sprinkle of magic in your kitchen. So grab your apron, and let’s get started!

Why You’ll Love This Recipe

There’s something truly special about roasted sweet potatoes. They’re not just a side dish; they’re a celebration of flavor and texture. Here’s why this recipe will capture your heart:

  • Sweet and Savory Harmony: The combination of maple syrup and earthy walnuts creates a perfect balance that dances on your palate.
  • Simple Ingredients: With just a handful of pantry staples, you’ll whip up a dish that’s impressive yet easy.
  • Versatile Side Dish: Whether it’s a holiday feast or a casual weeknight dinner, these sweet potatoes shine in any setting.
  • Nutritious Goodness: Sweet potatoes are packed with vitamins, fiber, and antioxidants, making this dish both delicious and health-conscious.
  • Make-Ahead Friendly: Prep in advance and simply roast when it’s time to eat. Ideal for busy schedules!

Ingredients You’ll Need

Delicious sweet potato cubes topped with walnuts, captured in warm natural light.

Let’s gather our ingredients! Here’s what you’ll need:

  • 4 medium sweet potatoes: Peeled and cubed for that perfect bite.
  • 1/4 cup olive oil: This will help in creating that lovely caramelization.
  • 1/4 cup pure maple syrup: The star of this dish, adding sweetness and depth.
  • 1 teaspoon cinnamon: For a warm and comforting flavor.
  • 1/2 teaspoon salt: To enhance all those wonderful flavors.
  • 1 cup walnuts: Chopped, for that delightful crunch.
  • Fresh parsley (optional): A sprinkle for garnish, adding a touch of color.

Pro Tips for Perfecting Your Sweet Potatoes

Want to elevate your dish even further? Here are some insider tips:

  • Cut Evenly: Ensure your sweet potatoes are cubed uniformly for even roasting.
  • Try Different Oils: If you prefer, swap olive oil for melted coconut oil for a tropical twist.
  • Experiment with Spices: Add nutmeg or allspice for a more complex flavor profile.
  • Don’t Overcrowd the Pan: Space is key! This allows for proper roasting and caramelization.
  • Check for Doneness: Sweet potatoes are done when they are fork-tender and lightly browned.
  • Use Parchment Paper: Line your baking sheet for easy cleanup and a crispier finish.
  • Mix it Up: Feel free to add other nuts or dried fruits for added texture and flavor.
  • Garnish Wisely: A squeeze of lemon juice or a dollop of yogurt can brighten the dish beautifully.

Common Mistakes & Troubleshooting

Even the best of us can stumble in the kitchen. Here are some common pitfalls and how to avoid them:

  • Overcooking: Keep an eye on your potatoes; they can turn mushy if left too long.
  • Undercooking: If they’re not tender after the suggested time, give them a few more minutes in the oven.
  • Too Sweet?: If the sweetness is overwhelming, balance it with a sprinkle of salt or a squeeze of lemon.
  • Nut Allergies?: Substitute nuts with seeds like pumpkin or sunflower for a similar crunch without the allergens.

Variations to Try

Feel like mixing things up? Here are some fun variations to consider:

  • Maple-Balsamic Glaze: Swap maple syrup for balsamic vinegar for a tangy twist.
  • Coconut Crunch: Add shredded coconut and reduce the walnuts for a tropical vibe.
  • Spicy Sweet Potatoes: Toss in some cayenne or chili powder for a spicy kick.
  • Herbed Delight: Mix in fresh thyme or rosemary for an aromatic touch.

Storage & Make-Ahead Instructions

Got leftovers? Here’s how to store your delicious creation:

  • Refrigerate: Store in an airtight container for up to 4 days.
  • Freezing: Freeze for up to 3 months. Just ensure they’re in a freezer-safe bag.
  • Reheating: Reheat in the oven for the best texture, or use the microwave for a quicker option.

Frequently Asked Questions

Let’s address some common questions you might have:

  • Can I use other types of potatoes? Absolutely! But keep in mind that texture and flavor will vary.
  • Is this recipe gluten-free? Yes! All ingredients are naturally gluten-free.
  • What can I serve this with? These sweet potatoes pair wonderfully with grilled meats, salads, or as part of a holiday feast.
  • Can I make this vegan? Yes! Just ensure your maple syrup is pure and you can omit any non-vegan toppings.
  • What’s the best way to peel sweet potatoes? A sharp vegetable peeler works best; just be sure to wash them thoroughly first!
  • How do I know when they’re done? They should be fork-tender and slightly caramelized on the edges.
  • Can I double the recipe? Definitely! Just make sure to use a large enough baking sheet.
  • What if I don’t have walnuts? Feel free to substitute with pecans, almonds, or omit nuts entirely.

Nutritional Information & Dietary Adaptations

Sweet potatoes are not just delicious; they’re also incredibly good for you! Here’s a quick rundown:

  • Rich in Vitamins: They’re high in Vitamin A, which is great for your vision and immune system.
  • High in Fiber: Promotes a healthy gut and aids digestion.
  • Low in Calories: A wonderful option for those looking to maintain a healthy diet.
  • Dietary Adaptations: This dish can easily be made paleo, vegan, or gluten-free!

Equipment Recommendations

Before you kick off your cooking journey, here’s a quick list of essentials:

  • Large Baking Sheet: For roasting your sweet potatoes evenly.
  • Mixing Bowl: To toss your ingredients together.
  • Sharp Knife: For cutting and prepping your sweet potatoes.
  • Measuring Cups and Spoons: To ensure accuracy in your recipe.

Serving Suggestions

Now that your sweet potatoes are ready, let’s talk about how to serve them:

  • Warm and Cozy: Serve directly from the oven for the best flavor.
  • Garnish: A sprinkle of fresh parsley adds color and freshness.
  • Pairing: They’re lovely alongside roasted meats, in salads, or even as a savory breakfast option.

There you have it! A complete guide to making Walnut Maple Roasted Sweet Potatoes that will surely impress. Remember, cooking is about enjoying the process, so don’t stress too much—just have fun and trust your instincts. I can’t wait for you to experience the warmth and joy this dish brings to your table. Happy cooking, and may your kitchen always be filled with love and laughter!

Walnut Maple Roasted Sweet Potatoes Recipe PDF

Prep Time 10 minutes
Cook Time 35 minutes
Total Time 45 minutes
Servings 4 servings
Calories 250
Enjoy a delicious and healthy side dish featuring roasted sweet potatoes glazed with maple syrup and topped with crunchy walnuts.

Ingredients

Sweet Potatoes

  • 4 medium sweet potatoes, peeled and cubed
  • 1/4 cup olive oil
  • 1/4 cup pure maple syrup
  • 1 teaspoon cinnamon
  • 1/2 teaspoon salt
  • 1 cup walnuts, chopped
  • fresh parsley for garnish (optional)

Instructions 

  • Preheat oven to 400°F (200°C).
  • Toss sweet potatoes with olive oil, maple syrup, cinnamon, and salt. Spread on a baking sheet.
  • Roast for 25 minutes, then sprinkle walnuts and toss. Roast for another 10-15 minutes.
  • Let cool slightly, garnish with parsley if desired, and serve.

Notes

For extra flavor, add a sprinkle of fresh herbs before serving.
Calories: 250kcal
Cost: $15
Course: Side Dish
Cuisine: American
Keyword: Sweet Potatoes

Loved this recipe? Save it to your favorite Pinterest board so you can easily find it later! It’s the perfect way to keep all your sweet ideas in one place. ✨

Walnut Maple Roasted Sweet Potatoes on a plate, showcasing rich textures and colors.

Welcome to the World of Sweet Potato Taco Bowls!

Hey there, culinary adventurer! If you’ve found your way to this cozy corner of the internet, you’re likely on the hunt for a dish that’s not only delicious but also packed with nutrients. Well, my friend, you’re in for a treat! Today, we’re diving into the scrumptious realm of Sweet Potato Taco Bowls—a vibrant, colorful dish that feels like a warm hug after a long day. This meal is easy to whip up, making it the perfect weeknight dinner that the whole family will adore.

Imagine roasted sweet potatoes mingling with black beans, corn, and a medley of spices, all tucked into a cozy bowl and topped with creamy avocado and a zesty lime squeeze. It’s a flavor fiesta that’s sure to impress!

Why You’ll Love This Recipe

Let’s talk about what makes these Sweet Potato Taco Bowls a must-try:

  • Health Benefits: Sweet potatoes are loaded with vitamins A and C, fiber, and antioxidants, making this bowl not just delicious but nourishing.
  • Easy to Make: With a prep time of just 10 minutes and a cook time of 30 minutes, you can have a wholesome meal ready in no time.
  • Customizable: This recipe is versatile—feel free to swap ingredients based on your pantry or dietary needs.
  • Meal Prep Friendly: These bowls are perfect for meal prepping; just store components separately and assemble when you’re ready!
  • Family-Friendly: Kids love building their own bowls, making dinner feel like a fun adventure.

Ingredient Breakdown

A vibrant Sweet Potato Taco Bowl filled with quinoa, black beans, and corn, illuminated by natural light.

Before we dive into the cooking, let’s gather our ingredients. Here’s what you’ll need for our Sweet Potato Taco Bowls:

  • 2 medium sweet potatoes: Peeled and diced. These are the star of our show!
  • 1 tablespoon olive oil: For roasting. You could also use avocado oil for a different flavor.
  • 1 teaspoon chili powder: Adds that lovely warmth and depth.
  • 1 teaspoon cumin: A must-have for that authentic taco flavor.
  • 1/2 teaspoon garlic powder: Because garlic makes everything better.
  • 1 can black beans: Rinsed and drained, these provide a hearty protein boost.
  • 1 cup corn: Fresh, frozen, or canned—whatever you have on hand.
  • 1 cup diced tomatoes: Fresh or canned works great.
  • 1 avocado: Diced, for that creamy goodness.
  • 1 cup cooked quinoa or brown rice: This will be our base.
  • Salt and pepper to taste: Essential for seasoning.
  • Fresh cilantro: For garnish—because it’s pretty and fresh!
  • Lime wedges: A squeeze of lime brings everything together.

Let’s Get Cooking!

Now that we have everything ready, let’s dive into the cooking process. Follow these simple steps to create your Sweet Potato Taco Bowls:

  1. Preheat your oven to 400°F (200°C).
  2. In a large bowl, toss the diced sweet potatoes with olive oil, chili powder, cumin, garlic powder, salt, and pepper.
  3. Spread the seasoned sweet potatoes on a baking sheet and roast in the oven for 25-30 minutes, or until tender and slightly crispy.
  4. While the sweet potatoes are roasting, prepare the quinoa or brown rice according to package instructions.
  5. In a separate pot, heat the black beans and corn over medium heat until warm.
  6. Once the sweet potatoes are done, assemble the taco bowls by layering quinoa or rice, black beans, corn, roasted sweet potatoes, and diced tomatoes in bowls.
  7. Top each bowl with diced avocado, fresh cilantro, and a squeeze of lime juice.
  8. Serve immediately and enjoy your healthy weeknight dinner!

Pro Tips for Taco Bowl Perfection

Want to elevate your Sweet Potato Taco Bowls to the next level? Here are some pro tips:

  • Roast Smart: Ensure you don’t overcrowd the baking sheet. This helps the sweet potatoes crisp up nicely.
  • Flavor Boost: Add a pinch of smoked paprika for a smoky flavor that takes these bowls to new heights.
  • Protein Power: For added protein, consider grilled chicken or sautéed shrimp.
  • Fresh Toppings: Elevate your bowls with homemade pico de gallo or a dollop of sour cream.
  • Texture Matters: Add some crunchy tortilla chips on top for a delightful texture contrast.
  • Spice It Up: If you like a kick, throw in some diced jalapeños or a drizzle of hot sauce.
  • Season Well: Don’t forget to taste as you go! Adjust the seasoning of each component to your liking.
  • Make It Vegan: Substitute black beans with lentils and use a plant-based yogurt as a topping.

Common Mistakes and Troubleshooting

Even the best of us can hit a snag in the kitchen. Here are some common mistakes and how to avoid them:

  • Overcooked Sweet Potatoes: Keep an eye on your sweet potatoes. They should be tender but not mushy.
  • Too Much Spice: If your taco seasoning is too spicy, balance it out with a dollop of sour cream or avocado.
  • Dry Bowls: If your bowls feel dry, add an extra squeeze of lime or a splash of broth.
  • Uneven Cooking: Stir the sweet potatoes halfway through roasting to ensure even cooking and browning.

Variations to Try

Feeling adventurous? Here are some fun variations to shake things up:

  • Southwestern Style: Add black olives and top with a spicy chipotle sauce.
  • Breakfast Bowls: Top with a fried egg and avocado for a hearty breakfast version.
  • Asian-Inspired: Swap sweet potatoes for roasted cauliflower, and top with sesame seeds and green onions.
  • Greek Twist: Use feta cheese and olives instead of traditional toppings for a Mediterranean flair.

Storage and Make-Ahead Instructions

Want to prep these bowls in advance? Here’s how to store and reheat:

  • Make Ahead: You can roast the sweet potatoes and prepare the quinoa a day in advance. Store them in airtight containers in the fridge.
  • Storage: Store assembled bowls in the refrigerator for up to 3 days. Keep avocado and fresh toppings separate until serving.
  • Reheat: Reheat the sweet potatoes and quinoa in the microwave or on the stovetop. Add fresh toppings right before serving.

Frequently Asked Questions

Got questions? I’ve got answers! Here are some FAQs about Sweet Potato Taco Bowls:

  • Can I make this recipe vegan? Absolutely! Just substitute any animal products with plant-based alternatives.
  • What can I use instead of sweet potatoes? Butternut squash or regular potatoes work well in this recipe.
  • Can I freeze the taco bowls? Yes, you can freeze the components separately. Thaw and reheat before serving.
  • How can I make these bowls spicier? Add jalapeños or a dash of cayenne pepper to the sweet potato mixture.
  • What toppings do you recommend? I love fresh salsa, guacamole, and a sprinkle of cheese! Get creative!
  • How long does it take to cook? Approximately 40 minutes, including prep and cooking time.
  • Can I use different beans? Yes! Feel free to swap black beans for pinto beans or chickpeas.
  • What is the best way to serve these? Serve immediately while warm for the best experience!

Nutritional Benefits and Dietary Adaptations

These Sweet Potato Taco Bowls not only taste great but are also packed with nutrients:

  • High in Fiber: Sweet potatoes and black beans contribute to your daily fiber intake.
  • Rich in Vitamins: A and C from sweet potatoes help boost your immune system.
  • Low-Calorie Option: This dish is guilt-free and can fit into a balanced diet.

Equipment Recommendations

Before you start cooking, make sure you have the right tools:

  • Sheet Pan: For roasting the sweet potatoes to perfection.
  • Large Mixing Bowl: To toss your ingredients together.
  • Pot or Rice Cooker: For cooking quinoa or brown rice.
  • Measuring Cups and Spoons: Essential for accurate ingredient measurements.

Serving Suggestions

Ready to serve? Here are some ideas to make your Taco Bowls even more exciting:

  • Pair with a Salad: Serve alongside a fresh green salad for added crunch.
  • Complement with a Drink: A refreshing limeade or iced tea pairs beautifully.
  • Garnish Generously: Don’t skimp on the garnishes; they add flavor and visual appeal.

So there you have it, folks! A comprehensive guide to crafting the most delightful Sweet Potato Taco Bowls that will make your taste buds dance. Whether you’re cooking for yourself or hosting a gathering, these bowls are sure to impress. Now, gather your ingredients, roll up your sleeves, and let’s create some kitchen magic together!

Sweet Potato Taco Bowls | Easy, Healthy Weeknight Dinner!

Prep Time 10 minutes
Cook Time 30 minutes
Total Time 40 minutes
Servings 4 servings
Calories 450
Enjoy a vibrant and nutritious dinner with these easy-to-make sweet potato taco bowls, perfect for a healthy weeknight meal.

Ingredients

Vegetables

  • 2 medium sweet potatoes, peeled and diced
  • 1 tablespoon olive oil
  • 1 teaspoon chili powder
  • 1 teaspoon cumin
  • 0.5 teaspoon garlic powder
  • 1 can black beans, rinsed and drained
  • 1 cup corn (fresh, frozen, or canned)
  • 1 cup diced tomatoes (fresh or canned)
  • 1 avocado diced avocado
  • 1 cup cooked quinoa or brown rice
  • to taste salt and pepper
  • for garnish fresh cilantro
  • for serving lime wedges

Instructions 

  • Preheat oven to 400°F (200°C). Toss sweet potatoes with olive oil, chili powder, cumin, garlic powder, salt, and pepper. Roast for 25-30 minutes.
  • Cook quinoa or rice according to package instructions. Heat black beans and corn until warm.
  • Assemble bowls with quinoa, black beans, corn, roasted sweet potatoes, and tomatoes. Top with avocado, cilantro, and lime.

Notes

Feel free to customize with your favorite toppings or add hot sauce for extra flavor.
Calories: 450kcal
Cost: $15
Course: Main Course
Cuisine: Mexican
Keyword: sweet potato

Loved this recipe? Save it to your favorite Pinterest board so you can easily find it later! It’s the perfect way to keep all your sweet ideas in one place. ✨

Eye-level shot of a mouthwatering Sweet Potato Taco Bowl with soft textures and a cozy background.