Author

Ava

Browsing

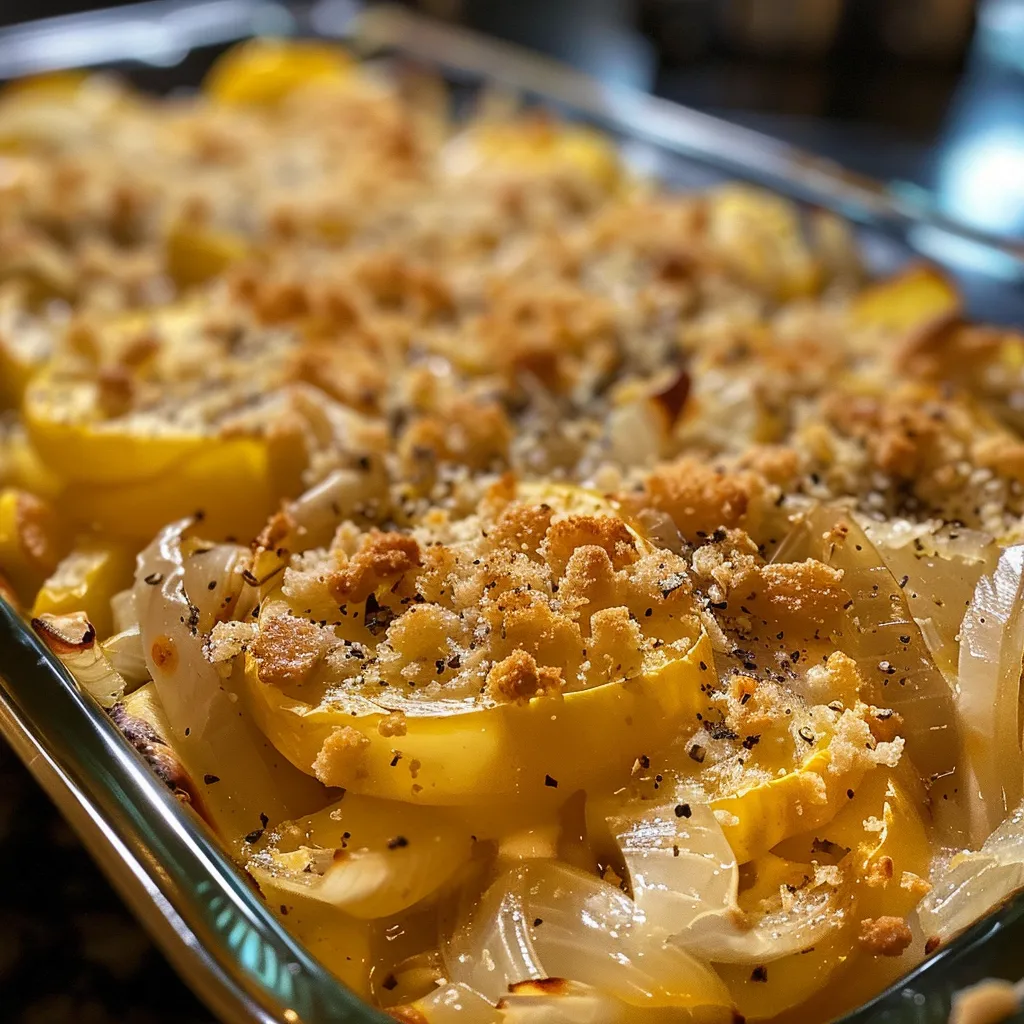
Welcome to Your New Favorite Comfort Food: Slow Cooker Beef and Potato Au Gratin

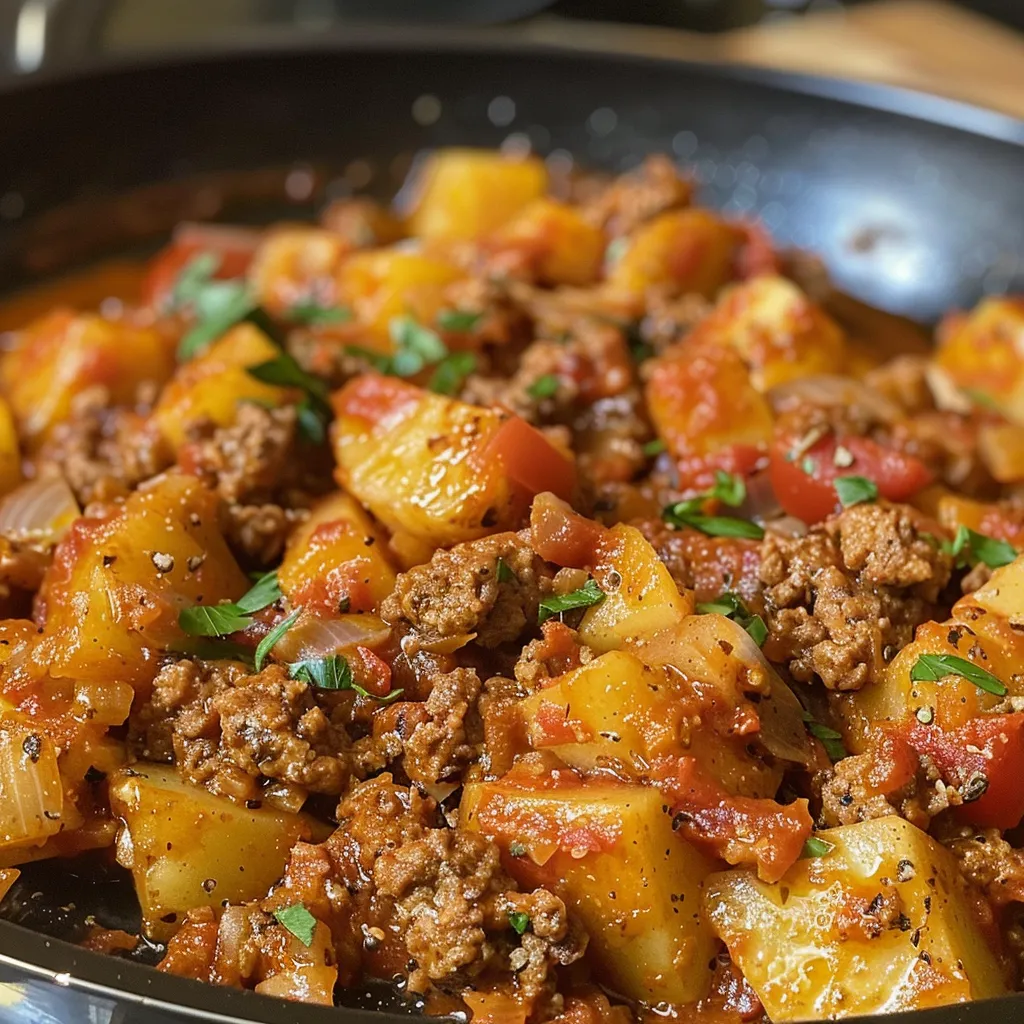
Indulging in a hearty bowl of Slow Cooker Beef and Potato Au Gratin is like wrapping yourself in a cozy blanket on a chilly day. This dish combines savory ground beef, creamy potatoes, and melting cheese for a soul-warming meal that keeps everyone coming back for more. Join me as we delve into this delightful recipe that brings back memories of my childhood kitchen in Oregon, where every meal was a celebration.

Why You’ll Love This Recipe

Here are just a few reasons this beef and potato gratin will become a staple in your home:

  • Effortless preparation: Simply layer ingredients in the slow cooker and let it work its magic.
  • Rich flavors: The combination of ground beef, cheese, and spices creates a dish that’s bursting with flavor.
  • Comfort food at its finest: Perfect for family gatherings or cozy nights in.
  • Versatile meal: Pair it with a salad for a complete dinner or serve it alone for a filling meal.
  • Leftover friendly: This dish is even better the next day, making it a great option for meal prep.

Ingredients Breakdown

Let’s gather our ingredients! Here’s what you’ll need:

  • 2 pounds ground beef: Opt for lean ground beef to keep it healthy.
  • 1 small onion (finely chopped): For a touch of sweetness and depth.
  • 1 tablespoon minced garlic: Because garlic makes everything better!
  • 2 teaspoons Italian seasoning blend: Adds an aromatic kick.
  • 1 teaspoon paprika: For a hint of warmth and color.
  • Salt and black pepper (to taste): Essential for enhancing flavors.
  • 2 tablespoons unsalted butter: To create a luscious roux.
  • 2 tablespoons all-purpose flour: For thickening our creamy sauce.
  • 2 cups beef broth: The foundation of our rich sauce.
  • 1 cup half and half: For that creamy texture.
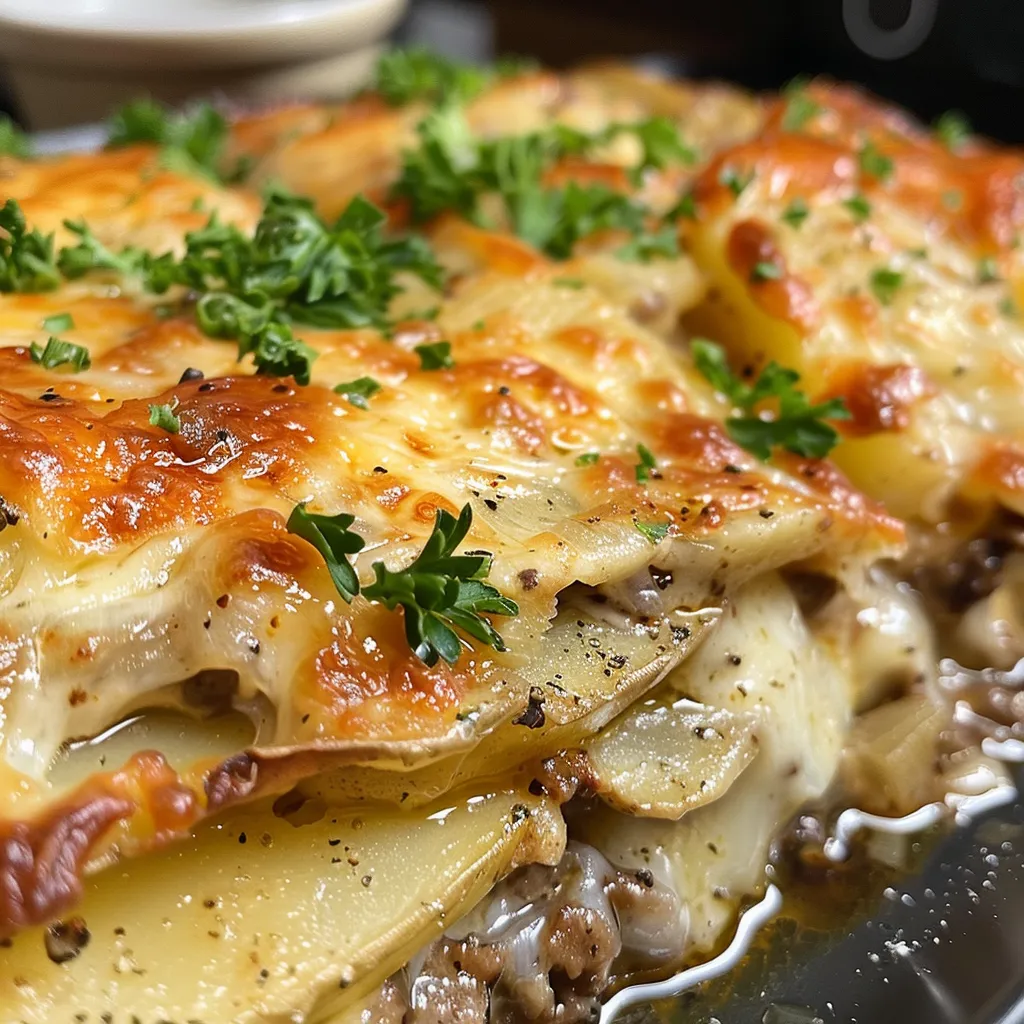
  • 4 to 5 medium russet potatoes (peeled and thinly sliced): The star of the show!
  • 1 1/2 cups shredded cheddar cheese: For a sharp, melty topping.
  • 1 1/2 cups shredded mozzarella cheese: For gooey goodness.
  • Fresh chopped parsley or sliced green onions (for garnish): A pop of color and freshness.

Pro Tips for Perfecting Your Au Gratin

Juicy slow cooker beef au gratin featuring layers of thinly sliced potatoes and a golden cheese crust.

Let’s take your cooking to the next level with these expert insights:

  • Slice evenly: Ensure your potatoes are sliced uniformly to cook evenly.
  • Layer wisely: Alternate layers of meat, potatoes, and cheese for balanced flavor.
  • Don’t rush the roux: Cook your flour and butter long enough to remove the raw taste.
  • Season as you go: Taste your layers and adjust seasoning for depth.
  • Let it rest: Allow the dish to sit after cooking for a few minutes for easy serving.
  • Experiment with cheese: Mix in your favorite cheeses for a unique twist.
  • Add veggies: Sneak in some spinach or mushrooms for added nutrition.
  • Use a liner: Consider using a slow cooker liner for easy cleanup.

Common Mistakes and Troubleshooting

Even the best chefs can have hiccups! Here are some common issues and how to solve them:

  • Watery au gratin: Make sure to properly drain excess fat from the beef and avoid overcooking the potatoes.
  • Overcooked potatoes: Keep an eye on cooking time; once tender, it’s time to serve!
  • Cheese clumping: Mix cheeses in a bowl before layering to prevent clumping.

Delicious Variations

Feel free to get creative with these adaptations:

  • Vegetarian version: Swap ground beef for lentils or mushrooms.
  • Spicy twist: Add jalapeños or hot sauce for a kick.
  • Herb-infused: Incorporate fresh herbs like thyme or rosemary for an aromatic touch.
  • Different cheese blend: Try gouda or pepper jack for a unique flavor profile.

Storage and Make-Ahead Instructions

This dish is perfect for meal prep! Here’s how to store and reheat:

  • Refrigeration: Store leftovers in an airtight container for up to 3 days.
  • Freezing: Freeze in portions for up to 3 months; just thaw overnight before reheating.
  • Reheating: Warm in the microwave or oven until heated through.

Frequently Asked Questions

Here are some common queries about this comforting dish:

  • Can I make this ahead of time?: Yes, assemble and refrigerate the night before cooking.
  • Why are my au gratin potatoes watery?: Ensure you drain excess fat from the beef and don’t overcook the potatoes.
  • What are the best potatoes for au gratin?: Russet potatoes work wonderfully due to their starch content.
  • Can I use a different meat in this recipe?: Absolutely! Ground turkey or chicken are great alternatives.
  • Is it possible to make this dish gluten-free?: Yes, use gluten-free flour for the roux.
  • Can I use fresh herbs?: Definitely! Fresh herbs can elevate the flavor.
  • How do I know when it’s done?: The potatoes should be tender and the sauce bubbly.
  • Is there a way to make it spicier?: Add red pepper flakes or a dash of cayenne for heat.

Nutritional Tips and Dietary Adaptations

If you’re looking to make this dish healthier, consider these adjustments:

  • Lean proteins: Opt for lean ground beef to reduce fat content.
  • Low-fat dairy: Use low-fat half-and-half or cheese alternatives.
  • Boost veggies: Incorporate more vegetables to increase fiber.

Equipment Recommendations

Here’s what you’ll need to make this dish:

  • Slow cooker: A reliable slow cooker is essential for this recipe.
  • Sharp knife: For slicing those potatoes evenly.
  • Cutting board: A sturdy surface for your prep work.
  • Skillet: For browning the meat and sautéing the onions.
  • Measuring cups and spoons: Precision is key in cooking!

Serving Suggestions

To complement your Slow Cooker Beef and Potato Au Gratin, consider these pairings:

  • Fresh salad: A light, crisp salad balances the richness of the gratin.
  • Garlic bread: Perfect for soaking up any leftover creamy sauce.
  • Roasted vegetables: Adds color and vitamins to your plate.

So there you have it! Your guide to creating the ultimate Slow Cooker Beef and Potato Au Gratin. I hope you find joy in making this dish, just like I do. Now, let’s gather those ingredients and start cooking—you’re just a few layers away from a meal that will steal your heart!

Slow Cooker Beef and Potato Au Gratin

Prep Time 20 minutes
Cook Time 4 hours
Total Time 4 hours 20 minutes
Servings 6 servings
Calories 650
A hearty and cheesy slow cooker dish combining tender beef, potatoes, and rich cheeses for a comforting meal.

Ingredients

Meat and Dairy

  • 2 pounds ground beef
  • 1 small onion (finely chopped)
  • 1 tablespoon minced garlic
  • 1.5 cups shredded cheddar cheese
  • 1.5 cups shredded mozzarella cheese
  • 2 tablespoons unsalted butter
  • 2 tablespoons all purpose flour
  • 2 cups beef broth
  • 1 cup half and half
  • 4.5 medium russet potatoes (peeled and thinly sliced)

Instructions 

  • Prepare the slow cooker with nonstick spray. Cook beef and onions until browned, then add garlic and seasonings.
  • Melt butter in a saucepan, stir in flour to make a roux, then whisk in beef broth and half and half until thickened.
  • Layer potatoes in the slow cooker, top with beef mixture, then sprinkle with cheeses. Repeat layers and finish with cheese.
  • Pour sauce over layered ingredients, cover, and cook on low for 4-5 hours until potatoes are tender and sauce is bubbly.
  • Let sit for a few minutes, garnish with parsley or green onions if desired, then serve.

Notes

For a richer flavor, use aged cheddar and fresh herbs.
Calories: 650kcal
Cost: $15
Course: Main Course
Cuisine: American
Keyword: Beef, cheese, potatoes

Welcome to the World of Comfort Food

Oh, the joy of a cozy, home-cooked meal! If you’re anything like me, the mere thought of a creamy yellow squash casserole brings back warm memories of family gatherings and lazy Sunday afternoons. This dish is more than just food; it’s a warm hug on a plate, perfect for sharing with loved ones or simply indulging in after a long day. Today, let’s dive into the magic of this comforting recipe and discover why it’s destined to become a staple in your kitchen.

Why You’ll Love This Creamy Yellow Squash Casserole

This creamy yellow squash casserole is not just easy to make; it’s a delightful blend of flavors and textures that will have everyone asking for seconds. Here are just a few reasons why this dish deserves a spot in your recipe book:

  • Comforting flavors: The rich combination of cheddar cheese and buttery Ritz crackers creates a savory, satisfying experience.
  • Quick and easy: With just a handful of ingredients and minimal prep time, this casserole is perfect for weeknight dinners.
  • Versatile dish: Serve it as a side or make it the star of your meal—this casserole fits right in at any gathering.
  • Great for leftovers: It reheats beautifully, making it an excellent choice for meal prep.
  • Kid-friendly: Even the pickiest eaters will love this dish, making it perfect for family dinners.

Gathering Your Ingredients

Let’s talk ingredients. This creamy yellow squash casserole requires only a few essentials, many of which you might already have in your pantry. Here’s what you’ll need:

  • 2 tablespoons butter: For sautéing and adding richness.
  • 4 cups yellow squash, sliced: The star of the dish, providing a tender base.
  • 1 medium onion, chopped: For flavor and depth.
  • 2 large eggs: To bind everything together.
  • 1 cup cheddar cheese, grated: A must for that creamy, cheesy goodness.
  • 1 cup milk: For moisture and creaminess.
  • 1/4 teaspoon cayenne pepper (optional): For a little kick.
  • 1/2 teaspoon kosher salt: To enhance flavors.
  • 1/2 teaspoon black pepper, ground: For seasoning.
  • 1 sleeve of Ritz crackers: The golden topping that adds a delightful crunch.

Pro Tips for the Perfect Casserole

Side view of a delicious yellow squash casserole on a plate, showing layers and textures.

Now that we have our ingredients ready, let’s ensure your casserole turns out perfectly every time. Here are some expert insights:

  • Freshness matters: Always choose fresh, firm yellow squash for the best texture and flavor.
  • Don’t skip the sauté: Sautéing the onions first enhances their sweetness and deepens the flavor profile of the casserole.
  • Mix it up: Feel free to experiment with different cheeses, such as mozzarella or pepper jack, for a unique twist.
  • Layer wisely: For an even bake, layer the squash evenly in the dish to ensure all pieces cook through.
  • Rest before serving: Let the casserole sit for about 10 minutes after baking to firm up, making it easier to slice and serve.
  • Use full-fat ingredients: For the creamiest results, opt for full-fat milk and cheese.
  • Season generously: Don’t be shy with the salt and pepper; they really bring the dish to life.
  • Cover while baking: If you notice the top browning too quickly, cover with foil to prevent burning.

Avoiding Common Mistakes

Even the best of us can make a misstep in the kitchen. Here are some common mistakes to watch out for, and how to troubleshoot them:

  • Overcooking the squash: Aim for tender slices, but don’t let them become mushy. They should still hold their shape.
  • Too much liquid: If your casserole turns out soupy, reduce the milk slightly next time or drain excess liquid from the squash.
  • Bland flavor: Always taste as you go and adjust seasoning to your preference.
  • Inadequate baking time: Make sure to bake until the top is golden and bubbly for the best texture.

Delicious Variations to Try

One of the best parts of cooking is the ability to customize. Here are some variations to keep things fresh:

  • Cheesy Spinach Variation: Incorporate a couple of cups of fresh spinach into the mix for added nutrients and flavor.
  • Mexican-Inspired: Add some diced tomatoes and jalapeños for a zesty twist.
  • Herbed Delight: Mix in fresh herbs like thyme or basil for an aromatic boost.
  • Meaty Option: Stir in cooked and crumbled sausage or bacon for a heartier meal.

Storage and Make-Ahead Instructions

This casserole is perfect for meal prep! Here’s how to store and reheat it:

  • Refrigerator: Store leftovers in an airtight container for up to 4 days.
  • Freezer: Freeze portions in freezer-safe containers for up to 3 months. Thaw in the refrigerator before reheating.
  • Reheating: Warm in the oven at 350°F until heated through, or microwave individual servings until hot.

Frequently Asked Questions

Got questions? I’ve got answers! Here are some common queries about this recipe:

  • Can I use zucchini instead of yellow squash? Absolutely! Zucchini works wonderfully in this recipe.
  • What can I substitute for eggs? Try using flaxseed meal mixed with water or unsweetened applesauce as a binder.
  • Can I make this casserole gluten-free? Yes, substitute the Ritz crackers with gluten-free crackers.
  • How spicy is this casserole? The cayenne is optional, so you can adjust according to your spice preference.
  • Can I add other vegetables? Of course! Bell peppers and mushrooms are great additions.
  • What’s the best way to serve it? It pairs beautifully with grilled chicken or a fresh garden salad.
  • How do I make it vegan? Use plant-based cheese, non-dairy milk, and a vegan egg substitute.
  • Is it suitable for freezing? Yes, it freezes well for convenient meals later!

Nutritional Insights and Dietary Adaptations

This creamy yellow squash casserole can fit into various dietary preferences:

  • Low-carb option: Skip the crackers and use a topping of crushed pork rinds or almond flour.
  • Dairy-free version: Substitute the cheese with a dairy-free alternative and use almond milk.
  • High-protein twist: Add cooked quinoa or lentils to boost the protein content.

Essential Equipment for Success

Before you dive into making this casserole, ensure you have the right tools on hand:

  • 9×13 inch baking dish: Perfect size for this casserole.
  • Large skillet: For sautéing the squash and onions.
  • Mixing bowls: To combine the ingredients.
  • Oven mitts: To protect your hands when taking the hot dish out of the oven.

Serving Suggestions to Elevate Your Meal

Presentation matters! Here are some ideas to serve your creamy yellow squash casserole:

  • Garnish with fresh herbs: A sprinkle of parsley or chives adds a fresh touch.
  • Pair with a crisp salad: A light arugula salad balances the richness of the casserole beautifully.
  • Serve with crusty bread: A side of rustic bread is perfect for soaking up the creamy goodness.

Join the Culinary Adventure!

As you prepare this creamy yellow squash casserole, remember that cooking is about connecting with yourself and those you love. Embrace the process, make it your own, and share it with those who matter most. Whether it’s a family dinner or a cozy night in, this dish is sure to make memories. So preheat that oven, gather your ingredients, and let’s create something delicious together!

Creamy Yellow Squash Casserole with Ritz Crackers - theamazingfood

Prep Time 10 minutes
Cook Time 30 minutes
Total Time 40 minutes
Servings 6 servings
Calories 350
A delicious and creamy yellow squash casserole topped with crunchy Ritz crackers, perfect for a comforting family meal.

Ingredients

Dairy

  • 2 tablespoons butter
  • 4 cups yellow squash, sliced
  • 1 medium onion, chopped
  • 2 large eggs
  • 1 cup cheddar cheese, grated
  • 1 cup milk
  • 2 tablespoons butter
  • 0.25 teaspoon cayenne pepper (optional)
  • 0.5 teaspoon kosher salt
  • 0.5 teaspoon black pepper, ground

Ritz Crackers

  • 1 sleeve Ritz crackers

Instructions 

  • Preheat oven to 375°F (190°C).
  • Melt 2 tablespoons butter and sauté chopped onion until translucent.
  • In a bowl, whisk eggs, milk, grated cheese, cayenne, salt, and pepper. Add cooked onions and sliced squash, mix well.
  • Pour mixture into a greased baking dish. Top with crushed Ritz crackers and dot with remaining butter.
  • Bake for 30 minutes until golden and bubbly. Serve warm.

Notes

For a healthier version, reduce cheese and butter slightly.
Calories: 350kcal
Cost: $12
Course: Side Dish
Cuisine: American
Keyword: Yellow Squash

Welcome to the Ultimate Cheesy Hashbrown Casserole Experience!

If you’re on a quest for the perfect comfort food, look no further! This Cheesy Hashbrown Casserole combines creamy, cheesy goodness with the satisfying crunch of golden-brown hashbrowns. Whether you’re hosting a family gathering, bringing a dish to a potluck, or just indulging in a late-night craving, this casserole is sure to impress and fill your heart with warmth. Let’s dive into why this dish is a must-have in your recipe arsenal!

Why You’ll Love This Recipe

Here are just a few reasons why this casserole will become your new go-to:

  • Easy Preparation: With minimal ingredients and straightforward steps, you can whip this up in no time.
  • Versatile Dish: Perfect as a side for brunch, lunch, or dinner, it complements any protein beautifully.
  • Crowd-Pleaser: This cheesy delight is guaranteed to impress your family and friends, leaving them asking for seconds.
  • Make-Ahead Friendly: Prepare it in advance, pop it in the oven when needed, and enjoy stress-free entertaining.
  • Customizable: Add your favorite ingredients to make it uniquely yours—think crispy bacon, sautéed veggies, or different cheeses!

Ingredients You’ll Need

Gathering your ingredients is the first step to creating this cheesy masterpiece. Here’s what you’ll need:

  • 1 bag (32 oz) Frozen Hash Browns: Thawed, either cubed or shredded depending on your preference.
  • 2 cups Sour Cream: For that creamy texture and tangy flavor.
  • 1 small Onion: Finely chopped, because who doesn’t love the savory flavor of onions?
  • 1 can Cream Of Chicken Soup: This adds depth and richness to the dish.
  • 2 cups Shredded Cheddar Cheese: Divided for layering; feel free to mix with other cheeses like Monterey Jack or Gouda!
  • 1/4 cup Butter: Melted, to create a luscious, golden top.
  • 1 teaspoon Salt: Essential for enhancing all the flavors.
  • 1/4 teaspoon Black Pepper: A pinch of spice to elevate the dish.

Instructions to Create Cheesy Perfection

Side view of a bubbling hashbrown casserole topped with melted cheese.

Ready to make some magic? Follow these simple steps:

  1. Preheat your oven to 350°F. Lightly grease a 13×9 pan and set it aside.
  2. In a large bowl, combine the hash browns, sour cream, onion, cream of chicken soup, 1 ½ cups cheddar cheese, butter, salt, and black pepper. Mix well and taste for any additional seasoning.
  3. Spread the mixture into the prepared pan and bake uncovered for 45 minutes.
  4. Remove from the oven and top with the remaining ½ cup of cheese. Bake for an additional 10 minutes, or until the cheese is golden and bubbly.

Pro Tips for the Perfect Casserole

To ensure your dish comes out perfectly every time, keep these expert insights in mind:

  • Thaw Your Hashbrowns: Make sure to thaw your frozen hashbrowns completely for even cooking.
  • Mix It Up: Feel free to swap the cream of chicken soup with a cream of mushroom soup for a vegetarian version.
  • Cheese Choices: Experiment with different cheeses like pepper jack for a spicy kick or feta for a tangy twist.
  • Perfect Texture: For a crispy topping, consider broiling the casserole for the last few minutes of baking.
  • Make it Ahead: Assemble the casserole a day in advance, store it in the fridge, and bake when ready to serve.
  • Don’t Rush the Baking: Ensure the casserole is bubbling at the edges to guarantee it’s heated through.
  • Add Veggies: Incorporate broccoli or spinach for a delightful and colorful twist.
  • Use Fresh Ingredients: Freshly grated cheese melts better than pre-shredded, which often contains anti-caking agents.

Avoid These Common Mistakes

Even the best cooks can run into hiccups! Here are some common pitfalls to watch out for:

  • Overmixing: Stir just until combined; overmixing can lead to a gummy texture.
  • Not Enough Cheese: Always add the right amount of cheese for that gooey, cheesy goodness.
  • Skipping the Grease: Don’t forget to grease your pan—no one wants to deal with stuck casserole!
  • Baking Time: Keep an eye on the casserole; ovens can vary, and you don’t want to overbake.

Delicious Variations to Try

Feeling adventurous? Here are some variations to give your casserole a personal touch:

  • Loaded Hashbrown Casserole: Add crispy bacon and green onions for a loaded twist.
  • Vegetable Medley: Mix in sautéed bell peppers, mushrooms, or spinach to boost the nutrition.
  • Italian Style: Use Italian seasoning and add diced tomatoes for a Mediterranean flavor.
  • Spicy Southwest: Incorporate diced jalapeños and pepper jack cheese for a spicy kick.

Storage & Make-Ahead Instructions

This casserole is not only great fresh but also stores wonderfully:

  • Refrigerator: Store leftovers in an airtight container for up to 3-4 days.
  • Freezer: You can freeze the unbaked casserole for up to 2 months. Thaw overnight in the fridge before baking.
  • Reheating: Reheat in the oven at 350°F until warmed through, about 20-30 minutes.

Comprehensive FAQ

Got questions? Here are some frequently asked ones about the Cheesy Hashbrown Casserole:

  • Can I use fresh potatoes instead of frozen? Yes, you can! Just grate them and quickly soak them to remove excess starch.
  • What can I substitute for sour cream? Greek yogurt is a fantastic alternative that adds a similar creaminess.
  • Can I make this casserole vegan? Absolutely! Use plant-based cream soup and dairy-free cheese.
  • How can I make this dish spicier? Add diced jalapeños or a sprinkle of cayenne pepper for a spicy kick.
  • Is there a gluten-free version? Yes, make sure your cream soup is gluten-free or make a homemade version.
  • Can I make this in a slow cooker? Yes! Cook on low for 4-6 hours for a delightful slow-cooked version.
  • What’s the best way to serve leftovers? Top with a fried egg for a hearty breakfast!
  • How do I know when it’s done? The casserole should be golden and bubbly, with an internal temperature of at least 165°F.

Nutritional Tips and Dietary Adaptations

Looking to make this dish healthier? Here are some tips:

  • Reduce Calories: Substitute half the sour cream with Greek yogurt or cottage cheese.
  • Increase Fiber: Add black beans or corn to boost the nutritional value.
  • Low-Fat Options: Use reduced-fat cheese and cream soups for a lighter version.
  • Vegetarian Delight: Keep it meat-free and load it with veggies for a colorful dish.

Equipment Recommendations

To successfully create this cheesy delight, here’s what you’ll need:

  • Mixing Bowl: A large bowl for combining ingredients.
  • 13×9 Baking Dish: Essential for perfectly baking the casserole.
  • Spatula: For mixing and spreading the casserole evenly.
  • Oven Mitts: Always a must for safe handling of hot dishes!

Serving Suggestions

This casserole shines on its own, but pairing it with the right sides can elevate your meal:

  • Fresh Salad: A crisp green salad balances the richness of the casserole.
  • Grilled Meats: Serve alongside grilled chicken or steak for a filling dinner.
  • Chilled Beverages: A refreshing iced tea or lemonade complements the warmth of the dish perfectly.

Conclusion: Your New Favorite Dish Awaits!

So there you have it! This Cheesy Hashbrown Casserole is not just a recipe; it’s an invitation to gather around the table and share in the joy of good food. Whether it’s a cozy family dinner or a festive celebration, this dish will surely steal the show. Remember, cooking is about experimenting and finding what makes your taste buds dance. So, roll up your sleeves, get cooking, and enjoy every delicious bite! Happy cooking, my friends!

Cheesy Hashbrown Potato Casserole

Prep Time 10 minutes
Cook Time 55 minutes
Total Time 1 hour 5 minutes
Servings 8 servings
Calories 450
A creamy, cheesy hashbrown casserole that's perfect for family dinners or potlucks. Easy to prepare and full of comforting flavors.

Ingredients

Main

  • 32 oz Frozen Hash Browns, thawed (cubed or shredded)
  • 2 cups Sour Cream
  • 1 small Onion, finely chopped
  • 1 can Cream Of Chicken Soup
  • 2 cups Shredded Cheddar Cheese, divided
  • 1/4 cup Butter, melted
  • 1 teaspoon Salt
  • 1/4 teaspoon Black Pepper

Instructions 

  • Preheat oven to 350°F (175°C). Grease a 13×9 inch pan.
  • Mix potatoes, sour cream, onion, cream soup, 1 ½ cups cheese, melted butter, salt, and pepper.
  • Spread mixture into prepared pan and bake for 45 minutes.
  • Top with remaining ½ cup cheese and bake for 10 more minutes until bubbly.

Notes

For a crispier top, broil for an additional 2 minutes before serving.
Calories: 450kcal
Cost: $15
Course: Side Dish
Cuisine: American
Keyword: Hash Browns

Welcome to Your New Favorite Quick Meal

If you’re looking for a dish that brings your family together, look no further! My Simple Ground Turkey Skillet Dinner is the answer to your weeknight dinner dilemmas. It’s a one-pan wonder that fills your home with the **aroma** of savory spices and colorful veggies, all while being quick to whip up. This recipe not only satisfies hungry bellies but also makes cooking feel like a warm hug after a long day. Let’s dive into why this dish is a must-try!

Why You’ll Love This Recipe

  • Quick and Easy: With minimal prep and cook time, this dish is perfect for busy weeknights when you need a meal on the table in about 30 minutes.
  • One-Pan Convenience: Say goodbye to the mountain of dishes. Everything cooks together, making cleanup a breeze.
  • Nutritious and Delicious: Packed with lean protein from ground turkey and a medley of colorful vegetables, this dish is as healthy as it is flavorful.
  • Customizable: Easily adapt the recipe with whatever veggies you have on hand or switch up the spices to suit your taste.
  • Family-Friendly: The balanced flavors and vibrant colors make it appealing to both kids and adults, ensuring everyone asks for seconds!

Essential Ingredients

Let’s break down what you’ll need to create this delightful dish:

  • 1 lb lean ground turkey: A healthy protein that cooks quickly and absorbs flavors beautifully.
  • 1 cup bell peppers: Use a mix of colors for a pop of brightness—red, yellow, and green all work well.
  • 1 medium onion, diced: Adds sweetness and depth to the dish.
  • 3 cloves garlic, minced: Because who can resist the smell of garlic cooking?
  • 1 medium zucchini, sliced thinly: This vegetable adds a lovely texture and is low in calories.
  • 2 tsp cumin: For that warm, earthy flavor that ties everything together.
  • 1 tsp paprika: Adds a subtle smokiness to the dish.
  • 1 cup low-sodium chicken broth: Keeps the dish moist and flavorful without too much salt.
  • 2 tbsp low-sodium soy sauce: A splash of umami that enhances the overall taste.
  • 1 tbsp extra virgin olive oil: For sautéing the veggies and turkey, adding richness without overpowering the flavors.

Let’s Make It Together

Juicy ground turkey dish with bell peppers and zucchini in a frying pan.

Ready to get cooking? Here’s how to whip up this Simple Ground Turkey Skillet Dinner:

  1. Prepare your vegetables by chopping the bell peppers, zucchini, and onion into bite-sized pieces and mincing the garlic.
  2. Heat the olive oil in a large skillet over medium heat. Sauté the diced onion until translucent, about 3-4 minutes.
  3. Add the ground turkey to the skillet, breaking it apart as it cooks until browned, which should take about 5-7 minutes.
  4. Stir in the bell peppers, zucchini, and minced garlic; cook until tender yet vibrant, around 3-5 minutes.
  5. Pour in the chicken broth and soy sauce, then add the cumin and paprika. Mix well to combine all the flavors.
  6. Reduce heat and let simmer for about 5 minutes, allowing flavors to meld together.
  7. Taste and adjust seasoning if needed before serving.

Perfecting the Cooking Process

Here are some tips to ensure your skillet dinner is a success:

  • Don’t Overcook the Turkey: Aim for a golden brown color without drying it out. Ground turkey cooks quickly!
  • Fresh Ingredients Matter: Use the freshest vegetables you can find for the best flavor and nutrition.
  • Adjust the Spice Levels: If you like a kick, feel free to add red pepper flakes or a splash of hot sauce.
  • Mix and Match Veggies: This dish is highly adaptable! Try adding corn, spinach, or even mushrooms based on your preference.
  • Serve with a Side: Pair with crusty bread or a fresh salad to round out the meal.

Common Mistakes and Troubleshooting

Even the best cooks have their off days! Here are some common pitfalls and how to avoid them:

  • Turkey Sticking to the Pan: Make sure your skillet is adequately heated and well-oiled before adding the turkey.
  • Overcooked Vegetables: Keep an eye on your veggies; they should be tender but still vibrant. You want them to retain some crunch!
  • Too Much Liquid: If there’s excess liquid at the end, increase the heat to help it evaporate before serving.
  • Bland Flavor: Always taste your dish as you cook! Adjust seasonings as needed to ensure every bite is packed with flavor.

Variations to Try

Feeling adventurous? Here are some delicious twists on the original recipe:

  • Southwestern Style: Add black beans, corn, and a sprinkle of chili powder for a southwestern flare.
  • Italian Inspiration: Stir in a jar of marinara sauce and serve over pasta or rice.
  • Asian Fusion: Swap the soy sauce for teriyaki sauce and add sesame seeds and green onions for a unique flavor.
  • Vegetarian Version: Replace turkey with crumbled tempeh or lentils for a plant-based alternative.

Storage and Make-Ahead Instructions

This dish is perfect for meal prepping! Here’s how to store and reheat:

  • Refrigerate: Store in an airtight container in the fridge for up to 3 days.
  • Freeze: Freeze in a container for up to 3 months. Thaw overnight in the fridge before reheating.
  • Reheat: Warm in the microwave or on the stovetop, adding a splash of chicken broth if it seems dry.

Frequently Asked Questions

Got questions? Here are some common ones:

  • Can I use chicken instead of turkey? Absolutely! Chicken works just as well in this recipe.
  • What can I serve with this dish? Pair it with rice, quinoa, or a simple green salad for a complete meal.
  • How long does it take to cook ground turkey? Typically, about 5-7 minutes until it’s no longer pink.
  • Can I make this dish vegetarian? Yes! Substitute the ground turkey with your favorite beans or lentils.
  • What if I don’t have cumin? You can use chili powder or even curry powder for a different flavor profile.
  • Is this dish gluten-free? Yes, as long as you use gluten-free soy sauce.
  • Can I add more vegetables? Definitely! Feel free to add your favorites or whatever you have on hand.
  • How do I make it spicier? Add red pepper flakes or a dash of hot sauce to kick it up a notch!

Nutritional Tips and Dietary Adaptations

This Simple Ground Turkey Skillet Dinner can easily fit into a variety of dietary needs:

  • High Protein: Perfect for those looking to up their protein intake without excess fat.
  • Low Carb Option: Serve over cauliflower rice or skip the grains altogether for a low-carb meal.
  • Vegetable Power: The more veggies, the better! They add fiber and nutrients to your meal.

Equipment Recommendations

To make your cooking experience smooth and enjoyable, consider having these tools ready:

  • Non-Stick Skillet: A good quality non-stick skillet makes cooking and cleanup easier.
  • Chef’s Knife: A sharp knife is essential for efficiently chopping your vegetables.
  • Cutting Board: A sturdy cutting board helps keep your workspace organized.

Serving Suggestions

Here are some ideas for what to serve alongside your skillet dinner:

  • Fresh Salad: A simple mixed greens salad with a light vinaigrette balances the richness of the dish.
  • Crusty Bread: Perfect for soaking up any leftover juices on your plate.
  • Rice or Quinoa: These grains complement the meal and add additional fiber.

Conclusion: Your Next Family Favorite Awaits

And there you have it! My Simple Ground Turkey Skillet Dinner is not just a recipe; it’s a way to bring warmth and love into your home. With its delightful combination of flavors and easy prep, it’s bound to become a staple in your kitchen. So, grab your spatula and get cooking—your family is going to love you for it! Happy cooking, friends!

Simple Ground Turkey Skillet Dinner

Prep Time 10 minutes
Cook Time 15 minutes
Total Time 25 minutes
Servings 4 servings
Calories 350
A quick and healthy ground turkey skillet packed with vegetables and flavorful spices, perfect for a nutritious weeknight meal.

Ingredients

Meat

  • 1 lb lean ground turkey
  • 1 cup bell peppers (mixed colors), chopped
  • 1 medium onion, diced
  • 3 cloves garlic, minced
  • 1 medium zucchini, sliced thinly
  • 2 tsp cumin
  • 1 tsp paprika
  • 1 cup low-sodium chicken broth
  • 2 tbsp low-sodium soy sauce
  • 1 tbsp extra virgin olive oil

Instructions 

  • Chop vegetables and mince garlic.
  • Heat olive oil and sauté onion until translucent.
  • Add ground turkey; cook until browned.
  • Stir in bell peppers, zucchini, and garlic; cook until tender.
  • Pour in broth and soy sauce, add cumin and paprika; simmer 5 minutes.

Notes

Feel free to add more vegetables or adjust seasonings to taste.
Calories: 350kcal
Cost: $15
Course: Main Course
Cuisine: American
Keyword: ground turkey

Welcome to the Heart of Comfort: The Sweet Potato Casserole That Makes Every Bite Feel Like Home

There’s something truly magical about sweet potato casserole. It’s a dish that evokes memories of family gatherings, holiday celebrations, and cozy evenings spent curled up with loved ones. Picture this: a warm, creamy base of sweet potatoes topped with a crunchy pecan streusel, golden and glistening under the soft glow of candlelight. This recipe isn’t just a side dish; it’s a hug on a plate, perfect for Thanksgiving, Christmas, or any day that could use a sprinkle of love and comfort.

But why stop at just ‘good’ when we can make it unforgettable? This Southern sweet potato casserole recipe is crafted to elevate your dining experience to the next level. Get ready to impress your family and friends with a dish that’s not only delicious but also packed with warmth and nostalgia.

Why You’ll Love This Recipe

  • Comforting flavors: The combination of sweet potatoes, brown sugar, and spices creates a symphony of flavors that will evoke memories of home-cooked meals.
  • Easy to make: Even if you’re a novice in the kitchen, this recipe is straightforward and requires minimal prep time.
  • Perfect for gatherings: This dish serves a crowd, making it ideal for holidays, potlucks, or family dinners.
  • Customizable options: With a variety of ingredient substitutions and variations, you can easily tailor this casserole to fit dietary needs.
  • Make-ahead friendly: Prepare it in advance to save time on busy days, allowing you to enjoy your company stress-free.

Ingredient Breakdown: What You Need

This recipe features a delightful blend of simple ingredients that you might already have on hand. Let’s dive into what you’ll need:

  • 4 cups sweet potatoes: You can use fresh, roasted sweet potatoes or canned sweet potato puree if you’re short on time.
  • 1/2 cup unsalted butter (melted): This adds richness; margarine can be used as a substitute.
  • 1 cup brown sugar: Light or dark brown sugar works well—opt for dark for a deeper flavor.
  • 2 large eggs (at room temperature): They help bind the casserole together.
  • 1/2 cup milk: Dairy-free alternatives like almond or oat milk can be swapped in for a lighter version.
  • 1 tsp vanilla extract: This brings out the sweetness and enhances the flavor profile.
  • 1 tsp cinnamon: Freshly grated cinnamon adds an aromatic depth to the dish.
  • 1/2 tsp nutmeg: A pinch of nutmeg complements the sweet potatoes beautifully.
  • 1/2 tsp salt: Balances the sweetness and enhances overall flavor.
  • 1 cup chopped pecans (toasted): Toasting the pecans intensifies their flavor.
  • 1/2 cup all-purpose flour: For the topping, you can substitute with whole wheat flour for added nutrition.
  • 1/2 cup brown sugar (light or dark): This is for the topping, adding that irresistible crunch.
  • 1/4 cup unsalted butter (melted): Drizzled over the topping for added richness.

Pro Tips for Perfecting Your Casserole

Side view of a creamy sweet potato casserole with a crunchy topping.

To ensure your sweet potato casserole turns out as delicious as possible, keep these expert tips in mind:

  • Choose the right sweet potatoes: Look for firm, smooth-skinned sweet potatoes for the best flavor and texture.
  • Don’t skip the toasting: Toasting the pecans enhances their flavor and adds a lovely crunch to the topping.
  • Mix until just combined: Overmixing can lead to a dense casserole. Stir until ingredients are just blended.
  • Use room temperature eggs: They incorporate better into the mixture, providing a smoother consistency.
  • Season your mixture: Adjust salt and spices to your taste for a truly personalized dish.
  • Let it cool slightly before serving: This allows the casserole to set, making it easier to serve.
  • Experiment with spices: Add a dash of ginger or allspice for a unique twist.
  • Save some pecans for garnish: Sprinkle some toasted pecans on top just before serving for added texture.

Common Mistakes to Avoid

Even the best cooks can stumble! Here are a few pitfalls to watch out for:

  • Using cold ingredients: Make sure your eggs and milk are at room temperature for proper mixing.
  • Not tasting as you go: Adjust sweetness and seasoning as needed to suit your palate.
  • Skipping the resting period: Allowing the casserole to sit for a few minutes allows the flavors to meld beautifully.
  • Overbaking: Keep an eye on it to prevent a dry texture—remove it when it’s just set.

Delicious Variations to Try

Feeling adventurous? Here are some scrumptious variations to shake things up:

  • Sweet Potato Casserole with Marshmallows: Top with mini marshmallows for a classic touch that adds sweetness and flair.
  • Pecan Pie Sweet Potato Casserole: Incorporate a layer of pecan pie filling for a rich, indulgent twist.
  • Maple Glazed Sweet Potato Casserole: Replace brown sugar with maple syrup for an earthy sweetness.
  • Spicy Sweet Potato Casserole: Add a pinch of cayenne or chili powder to the mix for a delightful kick.

Make-Ahead and Storage Instructions

This casserole is perfect for preparing in advance! Here’s how:

  • Make-ahead: Assemble the casserole up to a day in advance, cover, and refrigerate. Bake before serving!
  • Storage: Store leftovers in an airtight container in the fridge for up to 3-4 days.
  • Freezing: You can freeze the uncooked casserole for up to 2 months. Thaw overnight in the fridge before baking.

FAQs About Sweet Potato Casserole

Got questions? I’ve got answers! Here are some frequently asked questions about this delightful dish:

  • Can I use canned sweet potatoes? Yes, canned sweet potato puree works just fine in this recipe.
  • Is this casserole gluten-free? You can make it gluten-free by using a gluten-free flour substitute.
  • Can I prepare this in advance? Absolutely! See the make-ahead section above for details.
  • What can I substitute for pecans? Walnuts or almonds can be great alternatives if you prefer.
  • How do I make it less sweet? Reduce the amount of brown sugar and add a touch more cinnamon for flavor.
  • Can I add other ingredients? Feel free to experiment with flavors—adding orange zest or dried cranberries can be delightful!
  • How do I know when it’s done? The casserole should be set in the center and lightly browned on top.
  • Can I use sweet potato puree? Yes, just ensure it’s well-mixed to avoid lumps.

Nutritional Tips and Dietary Adaptations

This sweet potato casserole can be adjusted to fit your dietary preferences:

  • Low-calorie option: Use less sugar and replace butter with a light olive oil.
  • Vegan adaptation: Swap eggs for flax eggs and use plant-based milk and butter.
  • Lower-carb version: Substitute sweet potatoes with cauliflower mash for a unique twist.

Essential Equipment for Success

Having the right tools makes all the difference. Here’s what you’ll need:

  • Mixing bowls: A large bowl for mixing the sweet potato filling and a smaller one for the topping.
  • Whisk: To blend the ingredients smoothly.
  • Baking dish: A 9×13 inch dish is ideal for even cooking.
  • Measuring cups and spoons: Accurate measurements are key to perfecting this dish.

Serving Suggestions: What to Pair with Your Casserole

This casserole is versatile and pairs beautifully with a variety of dishes:

  • Roasted Turkey: A classic pairing for a Thanksgiving feast.
  • Glazed Ham: The sweetness of the casserole complements savory meats wonderfully.
  • Green Bean Almondine: The freshness of green beans balances the richness of the casserole.
  • Fresh Salad: A crisp salad adds a refreshing contrast to the warm casserole.

Conclusion: A Dish to Remember

There you have it! This Southern sweet potato casserole is more than just a recipe; it’s a celebration of flavor, comfort, and connection. Whether you’re cooking for a holiday, a family gathering, or just treating yourself to something special, this dish will surely become a favorite in your home. So, roll up your sleeves, grab those sweet potatoes, and let’s create something truly unforgettable together. Happy cooking, my friends!

Irresistibly Indulgent Southern Sweet Potato Casserole Recipe

Prep Time 15 minutes
Cook Time 45 minutes
Total Time 1 hour
Servings 8 servings
Calories 350
A rich and comforting sweet potato casserole with a buttery pecan topping, perfect for holiday gatherings or cozy dinners.

Ingredients

Sweet Potatoes

  • 4 cups sweet potatoes (Substitution: Canned sweet potato puree works in a pinch.)
  • 0.5 cup unsalted butter (melted)
  • 1 cup brown sugar (Substitution: Light or dark brown sugar can be used interchangeably.)
  • 2 large eggs (at room temperature)
  • 0.5 cup milk (Substitution: Almond or oat milk for a dairy-free version.)
  • 1 tsp vanilla extract
  • 1 tsp cinnamon (freshly grated for best flavor)
  • 0.5 tsp nutmeg (freshly grated for best flavor)
  • 0.5 tsp salt (a pinch)
  • 1 cup chopped pecans (toasted for enhanced flavor)
  • 0.5 cup all-purpose flour (Substitution: Whole wheat flour for a denser texture.)
  • 0.5 cup brown sugar (light or dark to suit your preference.)
  • 0.25 cup unsalted butter (melted)

Instructions 

  • Preheat oven to 350°F (175°C).
  • Mix cooked sweet potatoes, melted butter, brown sugar, eggs, milk, vanilla, cinnamon, nutmeg, and salt until smooth.
  • Pour mixture into a greased baking dish.
  • Combine chopped pecans, flour, brown sugar, and melted butter to make topping; sprinkle over casserole.
  • Bake for 45 minutes until golden and bubbly.

Notes

For extra flavor, toast the pecans before adding.
Calories: 350kcal
Cost: $15
Course: Dessert
Cuisine: Southern
Keyword: sweet potato

Welcome to the Magic of Scalloped Potatoes

Ah, scalloped potatoes! Just saying the name conjures up warm memories of family dinners, laughter echoing in the kitchen, and a delightful aroma wafting through the air. If you’ve found your way here, you’re likely looking for a recipe that not only satisfies your cravings but also brings a little magic to your table. In this comprehensive guide, I’ll share with you my beloved creamy scalloped potatoes recipe—a dish that transforms humble ingredients into a comforting masterpiece. With layers of tender potatoes blanketed in a rich, creamy sauce, this is more than just a side dish; it’s a celebration of flavor and texture that will have everyone asking for seconds.

Whether you’re preparing for a holiday feast, a cozy weeknight dinner, or just want to impress your family with a classic comfort food, these scalloped potatoes are sure to steal the show. Get ready to discover the secrets behind making the perfect scalloped potatoes, including tips, variations, and everything else you need to know to create a dish that feels like a warm hug. Let’s dive in!

Why You’ll Love This Recipe

  • Unmatched Comfort Food: There’s nothing quite like the warm, creamy texture of scalloped potatoes that envelops you with every bite.
  • Easy to Make: This recipe simplifies the process of creating a gourmet dish that looks and tastes like it took hours to prepare.
  • Versatile Dish: Pair these scalloped potatoes with virtually any main course, from roasted chicken to grilled steak, making it an ideal side for any occasion.
  • Customizable Ingredients: With options for substitutions and variations, this recipe allows you to tailor the flavors to your liking.
  • Perfect for Meal Prep: You can make these potatoes ahead of time, making them a convenient option for busy weeks or gatherings.

Ingredients for Creamy Scalloped Potatoes

Let’s break down the ingredients you’ll need to create this delightful dish:

  • 5 pounds Yukon Gold potatoes: These potatoes are ideal due to their creamy texture and buttery flavor. You can substitute with Russets for a fluffier outcome.
  • 2 tablespoons unsalted butter: For sautéing garlic and enriching the sauce.
  • 2 cloves garlic (minced): Adds a fragrant touch that elevates the dish.
  • 1 tablespoon all-purpose flour: This helps thicken the creamy sauce.
  • 1 cup heavy cream (or whole milk): For that luscious, rich sauce. Half-and-half can be used in a pinch for a lighter option.
  • 1/2 cup Parmesan cheese (optional): Adds a delightful nutty flavor; feel free to leave it out if you prefer.
  • 1 teaspoon fresh thyme: A little herbaceousness to complement the richness of the dish.
  • 1/2 teaspoon kosher salt: Enhances flavors; adjust to taste.
  • 1/2 teaspoon black pepper: For a touch of warmth.

Tools You’ll Need

Side profile of baked scalloped potatoes in a dish, showcasing creamy layers.

Before we get cooking, gather these essential tools:

  • Mandolin or Sharp Knife: For slicing the potatoes thinly and evenly.
  • Large Pot: To prepare the creamy sauce.
  • Baking Dish: A medium-sized dish works best for this recipe.
  • Whisk: For mixing the cream sauce smoothly.
  • Aluminum Foil: To cover the dish while baking.

How to Make Creamy Scalloped Potatoes

Now, let’s whip up these delicious scalloped potatoes. Follow these simple steps:

  • Preheat your oven to 400°F (200°C) and lightly grease a medium-sized baking dish.
  • Slice the Potatoes: Thinly slice the Yukon Gold potatoes using a mandolin or a sharp knife. Aim for about 1/8-inch thickness for even cooking.
  • Make the Cream Sauce: In a large pot over medium heat, melt the butter and sauté the minced garlic until fragrant (about 1-2 minutes). Stir in the flour, creating a roux, and cook for another 2 minutes.
  • Whisk in the Heavy Cream: Gradually add the heavy cream, whisking continuously until the sauce thickens (about 5 minutes). Season with salt, pepper, and thyme.
  • Combine Potatoes with Sauce: In a large bowl, mix the sliced potatoes with the creamy sauce, ensuring each slice is well-coated.
  • Layer in Baking Dish: Arrange the potato slices upright in the greased baking dish. Pour any remaining sauce over them and sprinkle with Parmesan cheese if desired.
  • Bake: Cover the dish with aluminum foil and bake for 30 minutes. Remove the foil and bake uncovered for an additional 30 minutes or until golden brown and bubbly.

Pro Tips for Perfect Scalloped Potatoes

To take your scalloped potatoes from good to great, here are some expert tips:

  • Uniform Slices: Make sure your potato slices are uniform in thickness to ensure even cooking.
  • Thicken the Sauce: If you prefer a thicker sauce, allow it to simmer longer before adding the potatoes.
  • Layering Techniques: Alternate layers of potatoes and sauce for a more flavorful dish.
  • Cheese Variations: Experiment with different cheeses like Gruyère or cheddar for added depth of flavor.
  • Herb Infusions: Try adding rosemary or sage for a different herbal note.
  • Cover with Foil: Keep the dish covered in the initial baking phase to prevent over-browning.
  • Let it Rest: Allow the dish to sit for about 10 minutes after baking for easier serving.
  • Try Sweet Potatoes: For a twist, substitute half the Yukon Golds with sweet potatoes for a unique flavor.

Common Mistakes and Troubleshooting

Even the best of us can make mistakes in the kitchen! Here are some common hiccups and how to avoid them:

  • Overcooked Potatoes: If you slice them too thin, they may fall apart. Aim for 1/8-inch slices for the best texture.
  • Too Runny Sauce: If your sauce is too thin, allow it to simmer longer before adding the potatoes to achieve the right consistency.
  • Undercooked Potatoes: Ensure to bake long enough, especially if your potato slices are thicker than recommended.
  • Burnt Top: If the top is browning too quickly, cover it with foil during the last minutes of baking.

Variations on Creamy Scalloped Potatoes

Feeling adventurous? Here are some fun variations to consider:

  • Loaded Scalloped Potatoes: Add cooked bacon bits and chopped green onions for a loaded baked potato vibe.
  • Vegetable Medley: Mix in thinly sliced carrots or zucchini for added nutrients and color.
  • Spicy Kick: Incorporate diced jalapeños or sprinkle with cayenne for a spicy twist.
  • Vegan Version: Substitute heavy cream with coconut milk and use vegan cheese for a dairy-free option.

Storage and Make-Ahead Instructions

If you’re planning ahead or have leftovers, here’s how to store and reheat your scalloped potatoes:

  • Make-Ahead: Prepare the dish up to the baking step, cover tightly, and refrigerate for up to 24 hours. When ready to bake, add an additional 10-15 minutes to the baking time.
  • Storing Leftovers: Allow the dish to cool completely, then transfer to an airtight container and refrigerate for up to 3 days.
  • Reheating: Reheat in the oven at 350°F (175°C) for 20-25 minutes until heated through, or in the microwave for a quick option.

Frequently Asked Questions (FAQs)

Here are some common questions and answers about creamy scalloped potatoes:

  • Can I make scalloped potatoes ahead of time? Yes! You can prepare them a day in advance and bake them just before serving.
  • How do I store leftovers? Store them in an airtight container in the refrigerator for up to 3 days.
  • Can I freeze scalloped potatoes? Yes, but the texture may change. If freezing, it’s best to do so before baking.
  • What type of potatoes are best? Yukon Gold potatoes are recommended for their creamy texture, but Russets are also great for a fluffier result.
  • Can I add meat to the dish? Absolutely! Cooked chicken, bacon, or ham can be delicious additions.
  • How do I make it spicier? Add diced jalapeños or a sprinkle of cayenne pepper for a kick.
  • Is it necessary to cover while baking? Covering helps cook the potatoes evenly without burning the top. Remove the foil for the last 30 minutes for browning.
  • Can I use non-dairy milk? Yes, almond or oat milk can be used, but it may affect the creaminess of the sauce.

Nutritional Tips and Dietary Adaptations

For those watching their diet, here are some tips to adapt this recipe:

  • Low-Fat Option: Use half-and-half or reduced-fat milk instead of heavy cream.
  • Gluten-Free: Substitute the all-purpose flour with cornstarch to thicken the sauce.
  • Vegetarian-Friendly: This recipe is naturally vegetarian but can be made vegan with dairy-free alternatives.
  • Portion Control: Serve smaller portions with a side salad to balance the meal.

Equipment Recommendations

Having the right tools can make a big difference. Here are my top picks:

  • Mandolin Slicer: For evenly sliced potatoes, a mandolin is a game-changer.
  • Heavy-Bottomed Pot: Ideal for making a smooth and creamy sauce without burning.
  • 9×13 Baking Dish: A standard size for scalloped potatoes, perfect for even cooking.

Serving Suggestions

To elevate your meal, consider these serving ideas:

  • Pair with Protein: Serve alongside roasted chicken, steak, or grilled fish for a complete dinner.
  • Complement with Greens: A crisp green salad or steamed vegetables balances the richness of the potatoes.
  • Garnish with Fresh Herbs: A sprinkle of chopped parsley or green onions adds freshness and color.

Conclusion

There you have it, my friends! A definitive guide to crafting the most delicious and creamy scalloped potatoes that will undoubtedly steal the show at your next meal. With this recipe at your fingertips, you’ll be ready to create a dish that not only fills bellies but warms hearts. Remember, cooking is about exploration and joy, so don’t hesitate to make this recipe your own. Happy cooking, and may your kitchen always be filled with love and laughter!

Creamy Scalloped Potatoes

Prep Time 15 minutes
Cook Time 1 hour
Total Time 1 hour 15 minutes
Servings 6 servings
Calories 350
A rich and creamy side dish featuring tender Yukon gold potatoes baked to perfection with garlic, cheese, and herbs.

Ingredients

Main

  • 5 pounds Yukon gold potatoes
  • 2 tablespoons unsalted butter
  • 2 cloves garlic (minced)
  • 1 tablespoon all-purpose flour
  • 1 cup heavy cream (or whole milk)
  • 1/2 cup Parmesan cheese (optional)
  • 1 teaspoon fresh thyme
  • 1/2 teaspoon kosher salt
  • 1/2 teaspoon black pepper

Instructions 

  • Preheat oven to 400°F and grease a baking dish.
  • Slice potatoes thinly and set aside.
  • Melt butter, sauté garlic, stir in flour, then whisk in cream until thickened.
  • Mix potatoes with sauce, layer in dish, top with cheese if desired.
  • Cover with foil, bake 30 mins, uncover and bake 30 mins until golden.

Notes

For extra flavor, add a pinch of nutmeg or paprika before baking.
Calories: 350kcal
Cost: $15
Course: Side Dish
Cuisine: American
Keyword: potatoes

Why Ground Beef Enchiladas Are a Must-Try

Ground beef enchiladas are more than just a meal; they evoke memories of family gatherings and cozy nights at home. This recipe is packed with flavor and love, and it’s sure to become a staple in your kitchen. If you’re looking for something delicious that brings everyone together, you’ve found it! Let’s dive into why you’ll love this recipe and how to make it a hit at your table.

What Makes This Recipe Special?

There’s something magical about ground beef enchiladas that makes them a crowd-pleaser. Here are just a few reasons why you’ll adore this dish:

  • Easy to Prepare: Quick to assemble, these enchiladas can be on your table in under an hour, making them perfect for busy weeknights.
  • Flavor Explosion: The combination of spices and zesty enchilada sauce creates an unforgettable flavor that will leave everyone guessing your secret.
  • Customizable: Feel free to swap ingredients based on your preferences. You can use different proteins or add veggies to the mix!
  • Family Favorite: Kids and adults alike love the cheesy goodness and hearty meat wrapped in soft tortillas.
  • Perfect for Meal Prep: These enchiladas reheat beautifully, making them ideal for leftovers or meal prep for the week.

Essential Ingredients

Let’s gather what you need to make these delicious enchiladas. Here’s the ingredient list and some helpful substitutions:

  • 1 lb lean ground beef: You can substitute turkey or shredded chicken for a lighter option.
  • 8 flour or corn tortillas: Corn tortillas are more traditional, but flour tortillas work well if you prefer them.
  • 2 cups enchilada sauce: Store-bought is convenient, but homemade enchilada sauce can elevate the dish!
  • 1 cup shredded cheddar or Monterey Jack cheese: Feel free to mix cheeses for a more complex flavor.
  • 1 medium onion, diced: You can use green onions for a milder taste.
  • 2 cloves garlic, minced: Fresh garlic adds depth, but you can use garlic powder in a pinch.
  • 1 tsp cumin: A key spice that enhances the beef flavor.
  • 1 tsp chili powder: Adjust to taste depending on how spicy you like your enchiladas.
  • Sour cream (for topping): Optional, but it adds a creamy, tangy finish.

Let’s Make Ground Beef Enchiladas!

Side view of delicious ground beef enchiladas in vibrant enchilada sauce.

Are you ready to create a dish that will impress your family and friends? Follow these simple steps:

  • Preheat your oven to 375°F (190°C).
  • In a skillet over medium heat, brown the ground beef with diced onions until translucent (about 5-7 minutes).
  • Add minced garlic, cumin, and chili powder; sauté for another minute to release the flavors.
  • Spoon the beef mixture onto each tortilla, roll tightly, and place seam-side down in a greased baking dish.
  • Pour enchilada sauce over the tortillas and sprinkle with cheese.
  • Bake uncovered for 20-25 minutes until bubbly and golden.

Pro Tips for Success

Want to ensure your enchiladas turn out perfectly? Here are some expert insights:

  • Don’t Overfill: Make sure to not overstuff your tortillas. A modest amount of filling will prevent them from falling apart.
  • Use Fresh Ingredients: Fresh spices and high-quality meat make a noticeable difference in flavor.
  • Let Them Rest: Allow the enchiladas to sit for a few minutes after baking. This helps them set and makes serving easier.
  • Experiment with Toppings: Try adding toppings like diced tomatoes, cilantro, or jalapeños for an extra kick.
  • Mix It Up: Feel free to incorporate black beans, corn, or bell peppers into the filling for added texture and nutrition.
  • Gluten-Free Option: Use corn tortillas and ensure your sauce is gluten-free to accommodate dietary restrictions.
  • Make-Ahead: You can assemble the enchiladas a day in advance. Just cover and refrigerate until you’re ready to bake.
  • Check for Doneness: Ensure the cheese is melted and bubbly to know they’re ready!

Common Mistakes to Avoid

Even the best chefs have off days! Here’s how to steer clear of some common pitfalls:

  • Skipping the Sauce: Don’t skip pouring sauce over the enchiladas before baking. It keeps them moist and flavorful.
  • Using Cold Tortillas: Warm tortillas are easier to roll and less likely to crack.
  • Not Browning the Meat: Browning the beef enhances flavor through the Maillard reaction—don’t skip this step!
  • Overcooking: Keep an eye on your enchiladas in the oven to avoid drying them out.

Delicious Variations to Try

Want to switch things up? Here are four tasty variations to consider:

  • Vegetarian Enchiladas: Substitute ground beef with sautéed mushrooms, spinach, and black beans for a hearty vegetarian option.
  • Cheesy Chicken Enchiladas: Use shredded rotisserie chicken and add a layer of cream cheese to the filling for extra creaminess.
  • Breakfast Enchiladas: Fill tortillas with scrambled eggs, cheese, and diced bell peppers for a delightful brunch dish.
  • Spicy Beef Enchiladas: Add diced jalapeños or a splash of hot sauce to the beef mixture for a spicy kick!

Storage and Make-Ahead Instructions

Preparing meals in advance can save you time and stress. Here’s how to store and reheat your enchiladas:

  • Refrigeration: Store leftovers in an airtight container for up to 4 days. Reheat in the oven or microwave until warmed through.
  • Freezing: You can freeze assembled but unbaked enchiladas. Wrap tightly in foil and freeze for up to 3 months. Bake from frozen, adding extra time to the cooking process.
  • Make-Ahead: Assemble your enchiladas a day in advance and store in the fridge. Just pour the sauce and cheese on top before baking.

Frequently Asked Questions

Here are some common questions about making ground beef enchiladas:

  • Can I make enchiladas ahead of time? Yes! You can assemble and refrigerate or freeze them for later.
  • What can I substitute for ground beef? Ground turkey, shredded chicken, or even lentils for a vegetarian option work wonderfully.
  • How do I make my enchiladas spicier? Add diced jalapeños or use a spicier enchilada sauce.
  • Can I use whole wheat tortillas? Absolutely! Whole wheat tortillas are a great healthier alternative.
  • What’s the best way to reheat enchiladas? Reheat in the oven at 350°F (175°C) until heated through, about 15-20 minutes.
  • Can I use homemade enchilada sauce? Yes! Homemade sauce can enhance the flavor of your enchiladas.
  • How long do leftovers last? Store leftovers in the fridge for up to 4 days.
  • What sides go well with enchiladas? Serve with a side of Mexican rice, refried beans, or a fresh salad.

Nutritional Tips and Dietary Adaptations

Looking to make your enchiladas healthier? Here are some tips:

  • Lean Proteins: Opt for lean ground beef or turkey to cut down on fat.
  • Whole Grains: Use whole wheat tortillas for added fiber.
  • Load Up on Veggies: Add more vegetables to the filling to increase nutrients and fiber.
  • Low-Fat Dairy: Use low-fat cheese or sour cream to reduce calories without sacrificing flavor.

Recommended Equipment

For the best results, here’s a list of equipment you might find helpful:

  • Skillet: A good non-stick skillet is essential for browning your beef and sautéing vegetables.
  • Baking Dish: Use a 9×13 inch baking dish to hold all those delicious enchiladas.
  • Measuring Cups and Spoons: Accurate measurements ensure the best flavor.
  • Spatula: A sturdy spatula will help you roll and transfer your enchiladas with ease.
  • Whisk: Handy for mixing up sauces or beating eggs in variations of the enchilada recipe.

Serving Suggestions

To elevate your enchiladas, consider these serving ideas:

  • Garnish: Top with fresh cilantro, sliced avocado, or a dollop of sour cream.
  • Accompaniments: Serve with a side of Mexican rice, black beans, or a fresh garden salad.
  • Drinks: Pair with a refreshing beverage like iced tea, margaritas, or a zesty salsa.

Conclusion

Ground beef enchiladas are not just a recipe; they are a way to bring family and friends together around the table. With their comforting flavors and endless customization options, they are sure to become a favorite in your household. So gather your ingredients, roll up your sleeves, and let’s create something truly magical in the kitchen. Happy cooking!

Ground Beef Enchiladas

Prep Time 10 minutes
Cook Time 25 minutes
Total Time 35 minutes
Servings 4 servings
Calories 450
Delicious and hearty ground beef enchiladas perfect for a quick weeknight dinner.

Ingredients

Meat and Dairy

  • 1 lb lean ground beef
  • 1 cup shredded cheddar or Monterey Jack cheese
  • 1 medium onion, diced
  • 2 cloves garlic, minced

Instructions 

  • Preheat oven to 375°F (190°C).
  • Cook beef and onions until translucent (5-7 min).
  • Add garlic, cumin, chili powder; sauté 1 min.
  • Fill tortillas with beef mixture, roll, and place in baking dish.
  • Pour enchilada sauce, sprinkle cheese, and bake 20-25 min.

Notes

Use store-bought enchilada sauce for convenience.
Calories: 450kcal
Cost: $15
Course: Main Course
Cuisine: Mexican
Keyword: Beef

Welcome to a Cozy Culinary Adventure

Hey there, friend! If you’ve wandered into my kitchen, you’re probably craving something warm, hearty, and downright delicious. Today, we’re whipping up a dish that exemplifies comfort—Easy Ground Turkey with Potatoes. This recipe is a delightful one-pan wonder that’s perfect for busy weeknights or leisurely weekends. With tender potatoes and savory ground turkey, this meal is sure to have everyone asking for seconds!

Why You’ll Love This Recipe

This isn’t just another dinner recipe; it’s a celebration of flavors and simplicity. Here are a few reasons why this dish will become a staple in your home:

  • Quick and Easy: Made in one pan, this recipe minimizes cleanup time, allowing you to spend more time enjoying your meal.
  • Nutritious Comfort: Packed with lean protein from ground turkey and wholesome carbohydrates from potatoes, this dish is both satisfying and nourishing.
  • Versatile Ingredients: You can easily swap out ingredients based on what you have on hand or your dietary preferences, making it adaptable for everyone.
  • Flavorful Depth: The combination of herbs and spices brings out the best in both the turkey and potatoes, creating a dish full of rich flavors.
  • Family-Friendly: With its mild taste and comforting texture, this dish is perfect for picky eaters and food lovers alike!

Ingredients You’ll Need

Ready to gather your ingredients? Here’s what you’ll need for this easy ground turkey with potatoes recipe, along with some great substitution options:

  • 1 lb ground turkey: A lean protein that cooks quickly and absorbs flavors beautifully. You can substitute with ground chicken or even lean beef if preferred.
  • 3–4 medium potatoes, diced: The heartiness of the potatoes adds a wonderful texture. If you’re looking for alternatives, sweet potatoes work well too!
  • 1 small onion, diced: Adds sweetness and depth. You can use shallots for a milder flavor or even leeks for a more gourmet touch.
  • 2 cloves garlic, minced: Fresh garlic infuses the dish with a lovely aroma. In a pinch, garlic powder can be used (about 1 tsp).
  • 1 cup tomato sauce: Provides moisture and flavor. You can swap in crushed tomatoes or even a can of diced tomatoes for a chunkier texture.
  • ½ cup water: Helps to create a saucy consistency; adjust depending on how saucy you like your dish.
  • 1 tbsp olive oil: Used for sautéing. Feel free to use avocado oil or any preferred cooking oil.
  • 1 tsp dried oregano: A key herb that pairs beautifully with turkey. Fresh oregano can also be used—just double the quantity.
  • 1 tsp dried basil: Adds a hint of sweetness; fresh basil can substitute here too!
  • 1 tsp dried parsley: For a fresh finish, though you can skip it if you don’t have any on hand.
  • 1 tsp salt (or to taste): Essential for flavor; adjust to your dietary needs.
  • ½ tsp black pepper: For a touch of heat; feel free to add more if you like it spicy!
  • ½ tsp onion powder: Enhances the onion flavor; omit if using fresh onion.

How to Make Easy Ground Turkey with Potatoes

Juicy ground turkey with diced potatoes and herbs in a colorful plate.

Let’s dive into the cooking process! Trust me, it’s as simple as it gets:

  1. In a large skillet over medium-high heat, cook the ground turkey until browned, breaking it apart with a spatula. Season with salt, pepper, garlic powder, chili powder, and oregano. Remove from skillet and set aside.
  2. In the same skillet, heat olive oil. Add the diced potatoes and cook for 5–10 minutes, stirring occasionally, until browned and starting to soften.
  3. Return the turkey to the skillet. Add the tomato sauce, water, minced garlic, oregano, basil, parsley, salt, pepper, and onion powder. Stir well to combine all the ingredients evenly.
  4. Cover the skillet and let the mixture simmer for about 5 minutes, or until the potatoes are tender and the flavors have melded together.
  5. Taste the dish and adjust seasonings if needed. Serve warm on its own or over rice or vegetables for a complete meal.

Pro Tips for Success

Want to elevate your cooking game? Here are some expert insights:

  • Uniform potato sizing: Ensure that your potato pieces are evenly sized for consistent cooking.
  • Don’t rush the browning: Allow the turkey to brown properly before adding other ingredients; it enhances the flavor.
  • Experiment with spices: Feel free to add cayenne pepper or paprika for a spicy kick!
  • Use fresh herbs: If you have them, fresh herbs can elevate the flavor significantly.
  • Make it a meal: Serve over rice, quinoa, or greens to round out your dinner.
  • Storage Savvy: Store leftovers in an airtight container in the fridge for up to 3 days.
  • Double the recipe: This dish freezes well, so consider making a larger batch for easy meals later.
  • Perfect for meal prep: Portion out your servings for quick lunch options throughout the week.

Common Mistakes and Troubleshooting

Even the best cooks can run into a few hiccups. Here’s how to avoid common pitfalls:

  • Overcooking the turkey: Keep an eye on it! Overcooked turkey can become dry. Aim for a golden brown color.
  • Undercooking the potatoes: If they’re not tender after simmering, give them a few more minutes. Covering the skillet helps trap steam.
  • Too much liquid: If the dish becomes too saucy, remove the lid and let it simmer uncovered for a few minutes.
  • Not seasoning enough: Taste as you go! Adjusting seasonings during cooking is key for flavor.

Delicious Variations to Try

Ready to switch things up? Here are some fun variations:

  • Spicy Turkey and Sweet Potatoes: Swap regular potatoes for sweet potatoes and add a dash of cayenne.
  • Italian Twist: Add diced bell peppers and top with mozzarella cheese before serving.
  • Vegetarian Delight: Substitute ground turkey with lentils or plant-based crumbles for a meatless version.
  • Curry Infusion: Stir in some curry powder and coconut milk for a delightful twist on flavors.

Storage and Make-Ahead Instructions

This dish is perfect for meal prep! Here’s how to store and reheat:

  • Refrigeration: Store leftovers in an airtight container for up to 3 days.
  • Freezing: This dish freezes well. Portion it into freezer-safe containers for up to 3 months.
  • Reheating: Thaw overnight in the fridge, then reheat in a skillet over low heat until warmed through, adding a splash of water if needed.

FAQs About Easy Ground Turkey with Potatoes

Got questions? I’ve got answers! Here are some frequently asked questions:

  • Can I use frozen ground turkey? Yes! Just thaw it in the fridge before cooking.
  • What if I don’t have tomato sauce? You can use diced tomatoes or even a jar of marinara sauce.
  • Is this dish gluten-free? Yes! All ingredients listed are gluten-free.
  • Can I add more vegetables? Absolutely! Zucchini, carrots, or peas would be great additions.
  • How can I make this dish spicier? Consider adding chili flakes or a splash of hot sauce when cooking.
  • Is ground turkey healthy? Yes! It’s a leaner alternative to beef and packed with protein.
  • Can I cook this in a slow cooker? Yes! Brown the turkey first, then combine everything in the slow cooker for 4-6 hours on low.
  • What should I serve with this dish? It’s fantastic on its own, but pairs beautifully with a side salad or crusty bread.

Nutritional Tips and Dietary Adaptations

Looking for ways to make this dish fit your dietary needs? Here are some tips:

  • Low-carb option: Substitute potatoes with cauliflower for a keto-friendly meal.
  • Higher fiber: Add black beans or chickpeas for added fiber and protein.
  • Low-sodium: Use low-sodium tomato sauce and adjust salt to taste.
  • Vegetarian: As mentioned, replace turkey with lentils or a meat substitute for a delicious vegetarian option.

Equipment Recommendations

To make this dish, you’ll need:

  • Large skillet: A good quality skillet ensures even cooking and browning.
  • Spatula: For breaking apart the turkey and stirring the ingredients.
  • Measuring cups and spoons: To accurately measure your ingredients.
  • Knife and cutting board: Essential for chopping your vegetables.

Serving Suggestions

How you serve this dish can elevate the experience! Here are a few ideas:

  • Garnish: Top with fresh parsley or a dollop of sour cream for added creaminess.
  • Side Dishes: Pair with a simple green salad or steamed vegetables for a balanced meal.
  • Presentation: Serve in bowls for a cozy feel, or plated elegantly for a special occasion.

Conclusion

And there you have it! A heartwarming, easy ground turkey with potatoes recipe that’s sure to become a favorite in your home. Cooking doesn’t have to be complicated to be delicious. So gather your ingredients, pour yourself a glass of something nice, and let’s make some magic in the kitchen. Remember, it’s all about enjoying the process and sharing with those you love. Happy cooking!

Easy Ground Turkey with Potatoes Recipe

Prep Time 10 minutes
Cook Time 20 minutes
Total Time 30 minutes
Servings 4 servings
Calories 350
A quick and hearty dish combining ground turkey and potatoes, perfect for a satisfying meal.

Ingredients

Meat

  • 1 lb ground turkey
  • 3–4 medium potatoes, diced
  • 1 small onion, diced
  • 2 cloves garlic, minced
  • 1 cup tomato sauce
  • ½ cup water
  • 1 tbsp olive oil
  • 1 tsp dried oregano
  • 1 tsp dried basil
  • 1 tsp dried parsley
  • 1 tsp salt (or to taste)
  • ½ tsp black pepper
  • ½ tsp onion powder

Instructions 

  • Cook ground turkey in a skillet until browned; season and set aside.
  • In the same skillet, cook diced potatoes in olive oil until browned and tender.
  • Return turkey to skillet, add tomato sauce, water, garlic, herbs, and seasonings; stir to combine.
  • Simmer covered for 5 minutes until potatoes are cooked through.
  • Adjust seasonings if needed and serve warm.

Notes

You can serve this dish over rice or vegetables for added variety.
Calories: 350kcal
Cost: $12
Course: Main Course
Cuisine: American
Keyword: ground turkey, potatoes

Welcome to the World of Comfort Food: A Spicy Cheddar Corn Casserole Journey

If you’re looking for a recipe that combines warmth, nostalgia, and a little kick, you’ve come to the right place! My Spicy Cheddar Corn Casserole is not just another dish; it’s a heartfelt embrace served right from my kitchen to yours. Growing up in Oregon, the kitchen was always alive with laughter, aromas, and the magic of homemade meals. Today, I bring that spirit alive with this easy yet impressive corn casserole that’s sure to make your taste buds dance.

This recipe is a delightful twist on the classic corn casserole. It’s creamy, cheesy, and has just the right amount of heat from jalapeños, making it the perfect side dish for gatherings or a cozy night in. Let’s dive deep into why you will love this dish and how you can make it your own!

Why You’ll Love This Recipe

  • Ultimate Comfort Food: This casserole is creamy and cheesy, providing the kind of warmth that feels like a hug on a plate.
  • Perfect for Any Occasion: Whether it’s Thanksgiving, a summer BBQ, or a cozy family dinner, this dish fits right in.
  • Quick and Easy: With just a few ingredients and minimal prep time, you can whip this up in no time!
  • Customizable: Want to make it gluten-free or vegetarian? I’ll share how to adapt this recipe to suit your needs.
  • Family Favorite: Trust me, everyone will be asking for seconds (or thirds!) of this crowd-pleaser.

Ingredients for Spicy Cheddar Corn Casserole

Here’s what you’ll need to make this fabulous dish:

  • 12 oz corn: Frozen or fresh, just cook it according to package directions.
  • 4 oz cream cheese: Make sure it’s at room temperature for easy mixing.
  • 1 tbsp milk: This keeps the casserole creamy.
  • 4 oz sharp cheddar cheese: Shredded for that melty, gooey goodness.
  • 2 jalapeños: Seeded and diced for that spicy kick.
  • 1/2 tsp salt: To enhance all those delicious flavors.
  • 1/4 tsp pepper: A dash for extra seasoning.
  • 1/4 tsp garlic powder: Because garlic makes everything better!

Step-by-Step Instructions

A serving of Spicy Cheddar Corn Casserole topped with melted cheese and jalapenos.

Ready to get cooking? Let’s walk through the process of making this Spicy Cheddar Corn Casserole.

  1. Preheat your oven to 375°F (190°C).
  2. In a mixing bowl, combine the cream cheese, milk, shredded cheddar cheese, and diced jalapeños. Stir until well mixed and creamy.
  3. Steam the corn according to the package directions, then add it to the mixing bowl. Mix well to combine all the ingredients.
  4. Transfer the mixture to a casserole dish and spread it evenly.
  5. Bake for about 20 minutes, or until the casserole is bubbling and golden on top.
  6. Serve hot and watch everyone enjoy!

Pro Tips for the Perfect Casserole

  • Use fresh ingredients: Fresh corn and high-quality cheese will elevate the flavor.
  • Let the cream cheese soften: This ensures a smooth mixture without lumps.
  • Experiment with spices: If you’re feeling adventurous, add a pinch of cayenne for an extra kick.
  • Adjust the jalapeños: If you prefer milder flavors, you can reduce the number of jalapeños or remove the seeds.
  • Make it gluten-free: This recipe is naturally gluten-free, but always double-check your ingredients!
  • Try adding a breadcrumb topping: For a crunchy texture, sprinkle some breadcrumbs on top before baking.
  • Pair with proteins: This casserole pairs beautifully with grilled chicken or pork.
  • Use a slow cooker: For a hands-off option, you can cook this in a slow cooker on low for 3-4 hours.

Common Mistakes and Troubleshooting

Even the best cooks have their off days! Here are some common pitfalls and how to avoid them:

  • Too dry: If your casserole turns out dry, it may have baked too long. Keep an eye on it as it cooks!
  • Lumpy texture: Ensure your cream cheese is fully softened before mixing to avoid lumps.
  • Not spicy enough: If you love heat, don’t hesitate to add more jalapeños or even a dash of hot sauce!
  • Sticking to the dish: Grease your casserole dish well to prevent sticking.

Variations to Try

Want to switch things up? Here are some fun variations you can try:

  • Vegetarian Delight: Skip the jalapeños and add in some sautéed bell peppers for sweetness.
  • Cheesy Broccoli Corn Casserole: Mix in some steamed broccoli florets for added nutrition and flavor.
  • Mexican Style: Add black beans, corn, and diced tomatoes along with taco seasoning for a Tex-Mex twist.
  • Sweet Corn Pudding: Substitute half of the corn with sweet corn for a sweeter, pudding-like texture.

Storage and Make-Ahead Instructions

This casserole is a great make-ahead dish! Here’s how to store it:

  • Refrigerate: Store leftovers in an airtight container for up to 3 days.
  • Freeze: You can freeze the casserole before baking. Just thaw in the fridge overnight and bake as directed.
  • Reheat: To reheat, pop it back in the oven at 350°F (175°C) until warmed through.

Frequently Asked Questions

  • Can I use canned corn? Yes! Canned corn works perfectly, just drain it well before adding.
  • Is this casserole gluten-free? Absolutely! Just be sure to check your ingredient labels.
  • Can I make this ahead of time? Yes! Prepare it a day in advance and bake it just before serving.
  • How can I spice it up? Add diced green chilies or a splash of hot sauce to the mix!
  • What can I serve with this casserole? It pairs well with grilled meats, salads, or other sides like mashed potatoes.
  • Can I use different cheeses? Definitely! Pepper jack or mozzarella can add a nice twist.
  • What if my casserole is too watery? Make sure to drain excess liquid from the corn and mix well before baking.
  • Can I use low-fat cream cheese? Yes, but be aware that it may change the creamy texture slightly.

Nutritional Tips and Dietary Adaptations

This casserole can easily fit into various dietary needs:

  • Low-Carb Version: Swap corn for cauliflower rice for a low-carb alternative.
  • Vegan Option: Use vegan cream cheese and cheese substitutes to make it plant-based.
  • Lower-Calorie Option: Use reduced-fat cheese and cream cheese to cut down on calories.

Recommended Equipment

To make your cooking experience seamless, here are a few essential tools:

  • Casserole Dish: A good quality dish ensures even baking.
  • Mixing Bowls: Use medium and large bowls for mixing ingredients.
  • Measuring Cups and Spoons: Accurate measurements make a difference in baking!

Serving Suggestions

This casserole is versatile and can be paired with so many dishes. Here are a few ideas:

  • Grilled Chicken: The spice of the casserole complements grilled chicken beautifully.
  • Salads: Serve with a fresh green salad for a balanced meal.
  • Steaks: A hearty steak pairs perfectly with the creamy texture of the casserole.

Conclusion

There you have it—my Spicy Cheddar Corn Casserole that brings warmth and comfort to your table. Cooking is about experimenting and finding joy in the process, so don’t hesitate to make this your own. Remember, the best recipes are the ones that create lasting memories. I can’t wait for you to try this dish and hear all about the smiles it brings to your loved ones! Pull up a chair, grab your spatula, and let’s create something magical together.

Spicy Cheddar Corn Casserole

Prep Time 10 minutes
Cook Time 20 minutes
Total Time 30 minutes
Servings 4 servings
Calories 350
A flavorful and spicy casserole combining sweet corn, sharp cheddar, and jalapenos for a comforting dish with a kick.

Ingredients

Main

  • 12 oz corn (Cooked or microwaved)
  • 4 oz cream cheese (Room temperature)
  • 1 tbsp milk
  • 4 oz sharp cheddar cheese (Shredded)
  • 2 jalapenos jalapenos (Seeded and diced)
  • 1/2 tsp salt
  • 1/4 tsp pepper
  • 1/4 tsp garlic powder

Instructions 

  • Preheat oven to 375°F (190°C).
  • Mix cream cheese, milk, cheddar, and jalapenos in a bowl.
  • Steam corn and add to the mixture, then combine well.
  • Transfer to a casserole dish and bake for 20 minutes until bubbling.

Notes

Adjust jalapenos for desired spice level.
Calories: 350kcal
Cost: $15
Course: Side Dish
Cuisine: American
Keyword: Cheddar, corn, Spicy

Welcome to Your New Favorite Comfort Food

If you’ve ever found yourself in need of a warm hug on a plate, you’re in for a treat. Today, we’re diving into the realm of homey goodness with my Cheesy Broccoli Rice Casserole. This dish is a delightful blend of tender broccoli, creamy cheese, and fluffy rice, all baked together into a comforting casserole that’s perfect for busy weeknights or when you want to impress your family with minimal effort. It’s one of those recipes that makes you feel right at home, no matter where you are.

Why You’ll Love This Recipe

What makes this Cheesy Broccoli Rice Casserole stand out? Let’s break it down:

  • Quick and Easy: With just a handful of ingredients and minimal prep time, this casserole comes together in a snap, making it ideal for those busy evenings.
  • One-Pot Wonder: Everything cooks in one dish, which means fewer dishes to wash and more time to spend with loved ones.
  • Comfort in Every Bite: The creamy texture and cheesy flavor provide that nostalgic comfort we all crave, reminiscent of family gatherings and cozy nights in.
  • Customizable: You can easily adapt this recipe based on what you have at home, whether it’s swapping out the broccoli for spinach or adding your favorite protein.
  • Kid-Friendly: This dish is a great way to sneak in some veggies, and its cheesy goodness is sure to please even the pickiest eaters.

Ingredient Breakdown

Let’s take a closer look at what you’ll need for this delicious casserole, along with some potential substitutions:

  • 2 cups cooked rice: Any type of cooked rice works, but I recommend long-grain for its fluffy texture. You can also use quinoa for a healthier twist!
  • 3 cups broccoli florets: Fresh is fabulous, but frozen works just as well—just make sure to thaw and drain them first.
  • 1 can cream of mushroom soup (10.5 oz): This is the creamy base. If you prefer, you can make your own or use cream of chicken or even a homemade white sauce.
  • 1 cup shredded cheddar cheese: Who doesn’t love cheese? Feel free to mix it up with mozzarella or pepper jack for an extra kick.
  • 1/2 cup milk: This adds creaminess. Consider using almond milk for a dairy-free option.
  • 1/2 tsp garlic powder: A must for flavor. Fresh garlic works too—just adjust to taste.
  • 1/4 tsp black pepper: A dash of spice to elevate the flavors.

Step-by-Step Cooking Instructions

Side view of cheesy broccoli rice casserole, highlighting broccoli florets and cheese.

Now that we’ve covered the ingredients, let’s get cooking! Follow these simple steps to create your Cheesy Broccoli Rice Casserole:

  1. Preheat your oven to 375°F (190°C). Grease a 9×13-inch baking dish to prevent sticking.
  2. In a large mixing bowl, combine the cooked rice, chopped broccoli, cream of mushroom soup, milk, garlic powder, and black pepper. Mix until everything is well incorporated.
  3. Transfer the mixture to the prepared baking dish, spreading it out evenly. Sprinkle the shredded cheddar cheese generously on top.
  4. Bake for 25-30 minutes, or until the cheese is melted and bubbly. Keep an eye on it—this is where the magic happens!
  5. Let the casserole cool for 5 minutes before serving. This allows the flavors to meld beautifully.

Pro Tips for the Perfect Casserole

Want to take your casserole from great to absolutely unforgettable? Here are some expert insights:

  • Even Cooking: Ensure that your broccoli is cut into uniform pieces for even cooking.
  • Don’t Overcook: If using fresh broccoli, steam it lightly before adding to the mixture to keep it vibrant and crisp.
  • Cheese Choices: Experiment with different cheeses for varied flavors—try adding gouda or provolone for a smoky twist.
  • Make it Ahead: Prep the casserole in advance and store it in the fridge until you’re ready to bake. Just add an extra 10 minutes to the baking time.
  • Freezing: This casserole freezes beautifully! Just cover tightly and it will keep for about 2 months. Thaw overnight in the fridge before baking.
  • Spice it Up: Add red pepper flakes or hot sauce to the mix for a spicy kick!
  • Herbal Touch: Fresh herbs like thyme or parsley can elevate the flavor profile significantly.
  • Serving Size: This dish is hearty, so a little goes a long way. Perfect for family dinners!

Common Mistakes and Troubleshooting

Even the best cooks have their off days. Here are some common pitfalls and how to avoid them:

  • Too Dry: If your casserole comes out a bit dry, it means it may have baked too long. Keep an eye on the time and check for doneness.
  • Cheese Not Melting: Make sure you’re using a good quality cheese and spreading it evenly on top for the best melt.
  • Uneven Flavor: If it tastes bland, it’s likely that the seasoning needs a boost—don’t be afraid to taste and adjust!

Delicious Variations

If you’re feeling adventurous, try these delightful twists on the classic recipe:

  • Mexican Style: Add black beans, corn, and taco seasoning for a southwestern flair.
  • Chicken Broccoli Casserole: Stir in cooked, shredded chicken for a protein-packed meal.
  • Vegan Version: Replace the cream of mushroom soup with a homemade cashew cream and use nutritional yeast instead of cheese for a cheesy flavor.
  • Seafood Twist: Add cooked shrimp or crab for a coastal experience that’s rich in flavor.

Storage and Make-Ahead Instructions

This casserole is not just for one meal! Here’s how to store and prepare it for later:

  • Refrigeration: Store leftovers in an airtight container in the fridge for up to 3 days.
  • Freezing: Freeze in a tightly sealed dish for up to 2 months. Thaw overnight in the fridge before reheating.
  • Reheating: Warm in the oven at 350°F (175°C) until heated through, about 15-20 minutes.

Frequently Asked Questions

Here are some common questions about this recipe:

  • Can I use brown rice? Yes! Just be sure to adjust the cooking time as brown rice takes longer to cook.
  • What can I serve with it? This casserole pairs wonderfully with a side salad or crusty bread.
  • Can I make this gluten-free? Absolutely! Use gluten-free cream of mushroom soup and check your rice for gluten-free certification.
  • How do I know when it’s done? Look for a bubbly, golden top and ensure the broccoli is tender.
  • Can I double the recipe? Yes! Just use a larger baking dish and extend the baking time slightly.
  • How spicy is it? The base recipe is mild, but you can easily add spices to kick it up a notch!
  • Can I skip the cheese? You can, but it will change the creamy texture. Consider adding more sauce instead.
  • Is it kid-friendly? Definitely! This casserole is great for picky eaters due to its cheesy goodness.

Nutritional Tips and Dietary Adaptations

Here are some tips to make this dish fit various dietary needs:

  • Low-Calorie Option: Swap out cream of mushroom soup for a homemade low-fat version.
  • Dairy-Free: Use almond milk and nutritional yeast instead of cheese.
  • Protein Boost: Add quinoa or lentils for a hearty, protein-rich option.

Equipment Recommendations

To make this Cheesy Broccoli Rice Casserole, you’ll need a few key pieces of equipment:

  • Mixing Bowl: A large bowl for combining your ingredients.
  • Baking Dish: A 9×13-inch dish works perfectly for this recipe.
  • Oven Mitts: Don’t forget these for safe handling of your hot dish!

Serving Suggestions

When it comes time to serve, consider these delightful pairings:

  • Simple Green Salad: A fresh salad with a light vinaigrette balances the richness of the casserole.
  • Garlic Bread: Soft, buttery garlic bread makes for a comforting side that complements the flavors.
  • Fruit Salad: A refreshing fruit salad adds a burst of sweetness to your meal.

Conclusion: Create Your Own Cozy Experience

There you have it—a comprehensive guide to making the ultimate Cheesy Broccoli Rice Casserole! This dish isn’t just about feeding your family; it’s about creating moments of joy, laughter, and connection around the dinner table. So grab your apron, invite a friend (or keep it all to yourself), and let’s make some magic happen in the kitchen. Remember, every time you whip up this casserole, you’re not just following a recipe; you’re crafting memories that will last a lifetime. Happy cooking!

Cheesy Broccoli Rice Casserole

Prep Time 10 minutes
Cook Time 30 minutes
Total Time 40 minutes
Servings 6 servings
Calories 450
A comforting and cheesy casserole combining rice, broccoli, and a creamy mushroom sauce, perfect for a quick family dinner.

Ingredients

Main ingredients

  • 2 cups cooked rice
  • 3 cups broccoli florets (chopped)
  • 1 can cream of mushroom soup (10.5 oz)
  • 1 cup shredded cheddar cheese
  • 1/2 cup milk
  • 1/2 tsp garlic powder
  • 1/4 tsp black pepper

Instructions 

  • Preheat oven to 375°F (190°C). Grease a 9x13-inch baking dish.
  • Mix cooked rice, broccoli, mushroom soup, milk, garlic powder, and black pepper in a bowl.
  • Transfer to baking dish and sprinkle with cheddar cheese.
  • Bake for 25-30 minutes until cheese melts and bubbles.
  • Let cool for 5 minutes before serving.

Notes

You can add extra cheese or breadcrumbs on top for added crunch.
Calories: 450kcal
Cost: $15
Course: Main Course
Cuisine: American
Keyword: Broccoli, cheese, Rice