Author

Ava

Browsing

Welcome to the Heart of Comfort Food: Your New Favorite Casserole

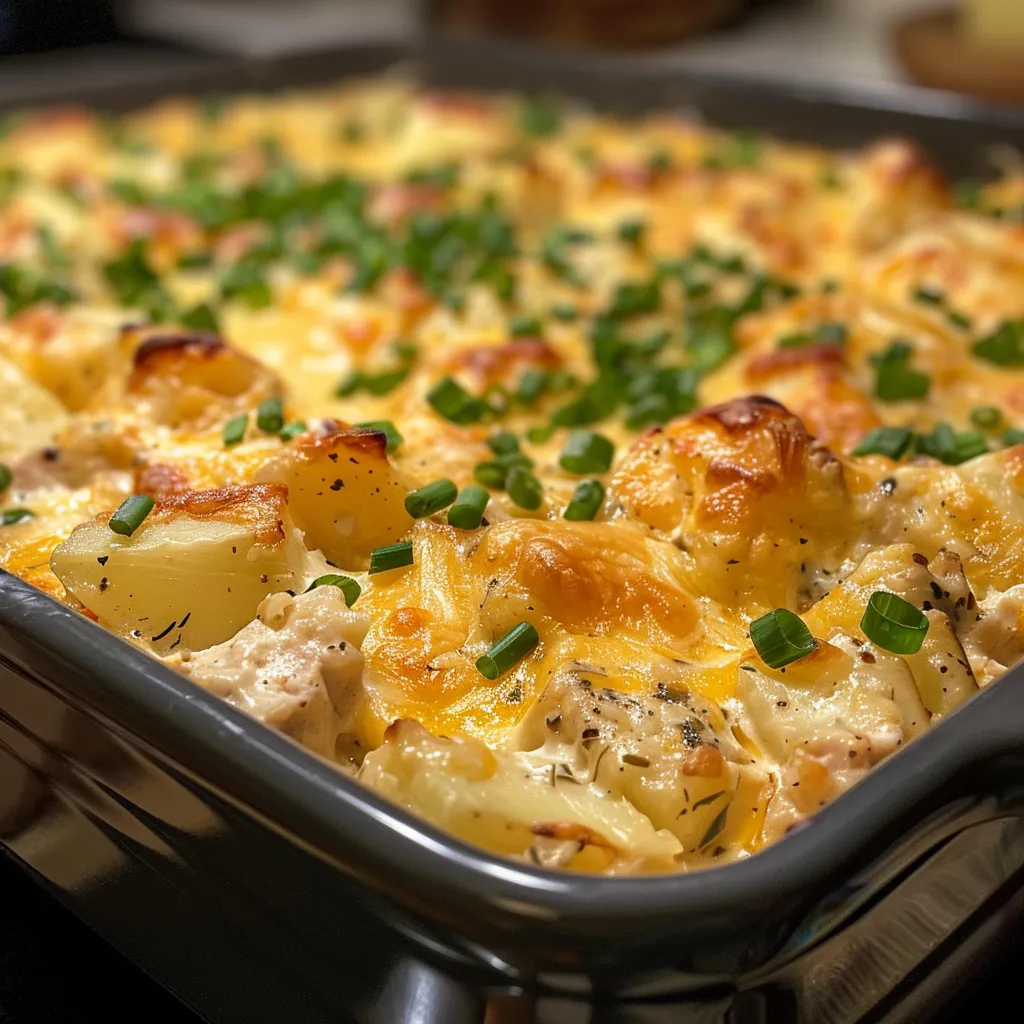
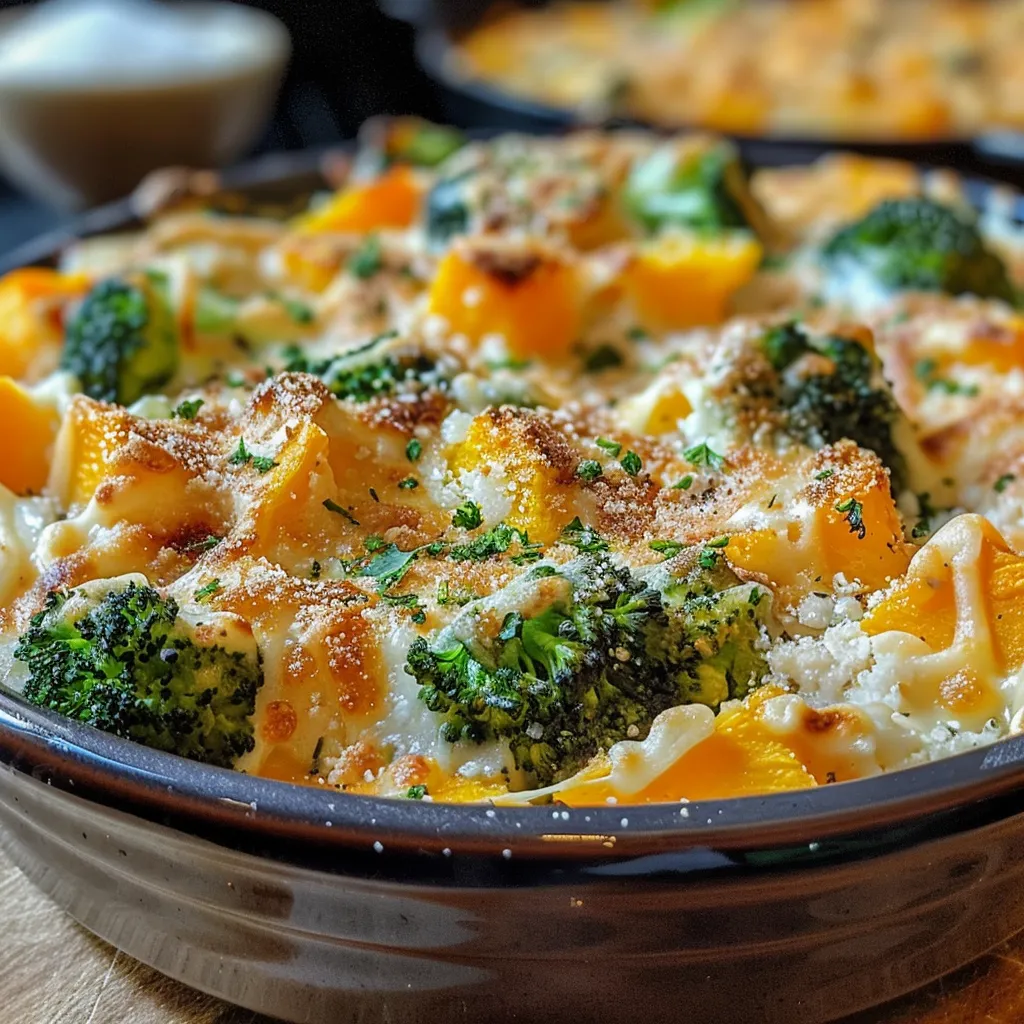
Gather around, friends! If you’re looking for a dish that wraps you in warmth and nostalgia, then you’ve stumbled upon the perfect recipe. Today, we’re diving into the comforting world of Broccoli and Butternut Squash Casserole. This creamy, cheesy delight is not just a side dish; it’s a celebration of flavors that will make your taste buds dance and your heart sing. Whether it’s a cozy dinner at home or a gathering with friends, this casserole is sure to impress.

Let’s be honest: we all have those days when we crave something hearty and satisfying. This casserole, loaded with vibrant vegetables and rich cheeses, is your answer! It’s the kind of dish that makes people pause mid-bite, look up, and say, ‘Wow, what’s in this?’ The secret? A perfect balance of textures and flavors that come together in a magical way.

Why You’ll Love This Recipe

  • Health Benefits: Packed with broccoli and butternut squash, this casserole is a nutrient powerhouse, providing vitamins A and C along with fiber to keep you feeling great.
  • Comforting Flavors: The creamy cheese combined with the natural sweetness of squash creates a delicious contrast that warms your soul.
  • Easy to Make: With simple steps and readily available ingredients, this recipe is perfect for both novice cooks and seasoned chefs.
  • Make-Ahead Friendly: Prepare it in advance and pop it in the oven when you’re ready to serve, making it a stress-free addition to any meal.
  • Versatile Dish: This casserole pairs beautifully with almost any main course, from roasted chicken to grilled fish, or simply enjoyed on its own!

Ingredients You’ll Need

Let’s gather our ingredients! Here’s what you’ll need for this wonderful casserole:

  • 1 medium butternut squash: Peeled and cubed, this adds sweetness and a lovely texture.
  • 2 cups broccoli florets: Fresh or frozen, they provide crunch and nutrients.
  • 2 tablespoons olive oil: For roasting and enhancing flavor.
  • Salt and pepper, to taste: Essential for seasoning.
  • 1 cup shredded cheddar cheese: The star of the show for that gooey, cheesy goodness.
  • 1/2 cup grated Parmesan cheese: Adds a sharp flavor that complements the cheddar.
  • 1 cup heavy cream: For that rich, creamy texture.
  • 1 teaspoon garlic powder: A hint of garlic elevates the dish.
  • 1 teaspoon onion powder: A subtle sweetness that rounds out the flavors.

How to Make Broccoli and Butternut Squash Casserole

A flavorful broccoli and butternut squash casserole in a baking dish, garnished with cheese.

Ready to get cooking? Let’s transform these ingredients into a delicious masterpiece!

Step 1: Preheat the Oven

First things first: preheat your oven to 400°F (200°C). This ensures the casserole cooks evenly and achieves that perfect golden top.

Step 2: Roast the Vegetables

In a large mixing bowl, toss the cubed butternut squash and broccoli florets with olive oil, salt, and pepper. Spread them out in a single layer on a baking sheet and roast for 20-25 minutes, or until tender and slightly browned.

Step 3: Prepare the Cheesy Sauce

While the vegetables are roasting, heat the heavy cream in a medium saucepan over medium heat. Stir in the garlic powder, onion powder, and both cheeses. Cook until melted and smooth, creating a luscious sauce.

Step 4: Combine and Bake

Once the veggies are ready, transfer them to a greased baking dish. Pour the cheesy sauce over the top and mix gently to combine. Return the casserole to the oven for an additional 10 minutes, or until bubbly and golden.

Step 5: Enjoy!

Let the casserole cool slightly before serving. This dish is best enjoyed with family and friends who appreciate comfort food as much as you do. Dive in, and enjoy every creamy, cheesy bite!

Pro Tips for Perfection

  • Use fresh produce: Fresh butternut squash and broccoli make a noticeable difference in flavor and texture.
  • Don’t rush the roasting: Allow the vegetables to caramelize, which enhances their natural sweetness.
  • Experiment with cheeses: Try adding mozzarella or gouda for a different flavor profile.
  • Customize your herbs: Fresh herbs like thyme or rosemary can add a lovely depth to the dish.
  • Make it gluten-free: Ensure that any packaged ingredients like cheese are labeled gluten-free.
  • Spice it up: A pinch of cayenne pepper can add a delightful kick!
  • Storage tips: Store leftovers in an airtight container in the fridge for up to three days.
  • Reheating: Reheat in a covered dish at 350°F (175°C) until warmed through.

Common Mistakes and Troubleshooting

Even the best cooks have their off days! Here are some common pitfalls to avoid:

  • Overcooking the vegetables: Keep an eye on your squash and broccoli to ensure they don’t become mushy.
  • Too much salt: Always taste your dish while cooking to avoid over-seasoning.
  • Not enough cheese: This is a cheesy casserole, so be generous!
  • Skipping the cooling step: Allowing it to cool slightly helps the casserole set and makes serving easier.

Variations to Try

If you’re feeling adventurous, consider these delicious variations:

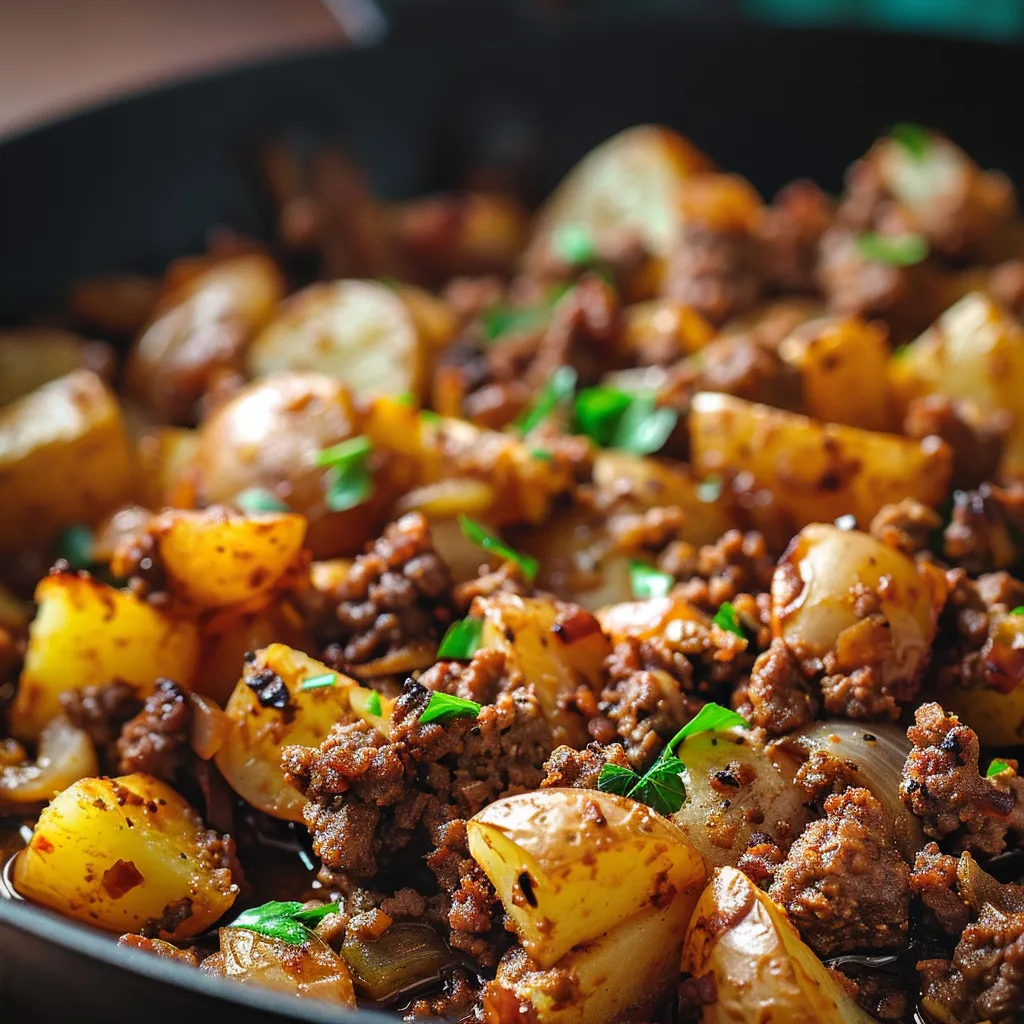
  • Meat Lovers: Add cooked crumbled bacon or sausage for a hearty twist.
  • Vegan Delight: Substitute heavy cream with coconut milk and use vegan cheese for a plant-based option.
  • Spicy Version: Incorporate diced jalapeños or a sprinkle of red pepper flakes for some heat.
  • Quinoa Boost: Mix in cooked quinoa for added protein and texture.

Storage and Make-Ahead Instructions

This casserole is perfect for meal prep! Here’s how to store and prepare it in advance:

  • Make-Ahead: Assemble the casserole up to a day before and store it covered in the refrigerator. Bake it the next day without needing to thaw.
  • Freezing: You can freeze the unbaked casserole for up to three months. Just thaw in the fridge before baking.
  • Leftover Storage: Keep leftovers in an airtight container in the fridge for up to three days. Reheat as needed.

Frequently Asked Questions

  • Can I use frozen vegetables? Yes, frozen broccoli works great! Just thaw and drain excess water before mixing.
  • What can I serve with this casserole? It pairs beautifully with grilled chicken, fish, or a fresh side salad.
  • Is this casserole gluten-free? Yes, just ensure that your cheese and any additional ingredients are gluten-free.
  • Can I make this casserole vegan? Absolutely! Substitute heavy cream with a plant-based alternative and use vegan cheese.
  • How do I know when it’s done? The casserole should be bubbly and golden on top when it’s finished baking.
  • Can I add other vegetables? Definitely! Feel free to add carrots, cauliflower, or bell peppers for extra color and nutrition.
  • What’s the best way to reheat leftovers? Reheat in the oven covered with foil to prevent drying out.
  • How long does this casserole last in the fridge? It should stay fresh for about three days when stored properly.

Nutrition Tips and Dietary Adaptations

This casserole not only warms the heart but also provides a well-rounded nutritional profile. To tailor it to your dietary needs:

  • Low-Carb: Swap butternut squash with zucchini for a lower-carb alternative.
  • High-Protein: Add shredded chicken or chickpeas to boost protein content.
  • Dairy-Free: Use almond or oat milk in place of heavy cream and dairy-free cheese.

Equipment Recommendations

To make your cooking experience seamless, here are some handy tools:

  • Sharp Knife: For easy peeling and cubing of butternut squash.
  • Large Baking Sheet: To roast your vegetables evenly.
  • Medium Saucepan: For preparing your creamy cheese sauce.
  • Greased Baking Dish: Ensure your casserole doesn’t stick, making for an easier cleanup!

Serving Suggestions

Gather your loved ones around the table, and serve this delightful casserole hot. Here are a few ideas to elevate your meal:

  • Garnish: A sprinkle of fresh parsley or chives adds a touch of color and freshness.
  • Pair with Bread: Serve alongside crusty bread or dinner rolls for a complete meal.
  • Complement with Salad: A light green salad balances the richness of the casserole.

Conclusion: A Casserole to Remember

So there you have it! Your new go-to recipe for Broccoli and Butternut Squash Casserole. It’s a dish that not only nourishes the body but also warms the heart, perfect for any occasion. Remember, cooking is all about experimenting and finding what you love. I can’t wait to hear how this casserole becomes a staple in your kitchen. Happy cooking, my friends! Let’s create some magic together!

Broccoli and Butternut Squash Casserole

Prep Time 10 minutes
Cook Time 35 minutes
Total Time 45 minutes
Servings 4 servings
Calories 350
A creamy, cheesy casserole combining roasted butternut squash and broccoli for a comforting vegetarian dish.

Ingredients

Vegetables

  • 1 medium butternut squash, peeled and cubed
  • 2 cups broccoli florets
  • 2 tablespoons olive oil
  • Salt and pepper Salt and pepper, to taste
  • 1 cup shredded cheddar cheese
  • 1/2 cup grated Parmesan cheese
  • 1 cup heavy cream
  • 1 teaspoon garlic powder
  • 1 teaspoon onion powder

Instructions 

  • Preheat oven to 400°F (200°C). Toss vegetables in olive oil, salt, and pepper, then roast for 20-25 minutes.
  • Heat heavy cream in a saucepan over medium heat. Stir in cheeses, garlic powder, and onion powder until melted.
  • Transfer roasted vegetables to a greased dish, pour cheese sauce over, and bake for 10 minutes until bubbly.
  • Let cool slightly before serving. Enjoy your cheesy vegetable casserole!

Notes

For a richer flavor, sprinkle extra cheese on top before baking.
Calories: 350kcal
Cost: $15
Course: Main Course
Keyword: baked, cheesy, vegetable

Welcome to the Heart of My Kitchen

Hey there, friend! If you’ve wandered into my kitchen, chances are you’re here for something special. Today, we’re diving into a dish that’s not only a family favorite but also a heartwarming classic—my Hearty Beef Pasta. This recipe is like a warm hug on a plate, perfect for those cozy nights when you want to gather around the table and savor every bite. Whether you’re cooking for a family dinner or a casual get-together with friends, this beef pasta will surely impress. So roll up your sleeves, grab your favorite spatula, and let’s get cooking!

Why You’ll Love This Recipe

  • Comforting & Satisfying: Each bite is packed with rich flavors that warm the soul, making it ideal for chilly evenings.
  • Quick & Easy: With just a few ingredients and simple steps, you can whip this dish up in no time, perfect for busy weeknights.
  • One-Pan Wonder: Fewer dishes mean more time to enjoy your meal and less cleanup—who doesn’t love that?
  • Customizable: Feel free to add your favorite veggies or spices—this recipe is a great base to get creative!
  • Family-Friendly: Even the pickiest eaters will be asking for seconds, making it a guaranteed hit at the dinner table.

Essential Ingredients for Hearty Beef Pasta

Before we dive into the cooking process, let’s gather our ingredients. Here’s what you’ll need:

  • 1 lb lean ground beef: This is the star of the show, providing that rich, savory flavor.
  • 12 oz spaghetti or penne pasta: Choose your favorite shape! The pasta will soak up all that delicious sauce.
  • 2 tbsp olive oil: For sautéing the beef and adding a lovely richness.
  • 4 cloves garlic, minced: Because garlic makes everything better, right?
  • 28 oz canned crushed tomatoes: This is where the magic happens, creating a luscious sauce.
  • 1 tsp dried oregano: A classic herb that complements the beef beautifully.
  • 1 tsp dried basil: Adds a hint of sweetness and aromatic goodness.
  • 1 tsp dried thyme: Another layer of flavor that elevates the dish.
  • Salt and pepper to taste: Essential for balancing flavors.
  • ½ cup grated Parmesan cheese (for topping): Because what’s pasta without cheese?

How to Make Hearty Beef Pasta

Side view of a hearty beef pasta dish with shredded cheese and sauces.

Ready to get cooking? Here’s a step-by-step guide to bring this dish to life:

  1. Sauté the Beef: In a large skillet over medium heat, add the olive oil. Once hot, add the ground beef and cook until browned, breaking it up as it cooks.
  2. Add Garlic: Stir in the minced garlic and sauté for about one minute until fragrant.
  3. Incorporate Tomatoes: Pour in the crushed tomatoes along with their juices. Add the oregano, basil, thyme, salt, and pepper. Let it simmer for 15-20 minutes, allowing all those flavors to meld together.
  4. Cook the Pasta: In another pot, boil salted water and cook the pasta according to package instructions until al dente. Drain and reserve some pasta water.
  5. Combine Everything: Add the cooked pasta to the skillet with the beef sauce. Toss gently; add reserved pasta water if needed for desired consistency.
  6. Serve It Up: Plate generously and top with freshly grated Parmesan cheese. Enjoy your masterpiece!

Pro Tips for Perfecting Your Beef Pasta

  • Don’t Overcook the Pasta: Aim for al dente! This gives the pasta a perfect bite and helps it hold up in the sauce.
  • Season Well: Taste as you go. Adjust salt and pepper according to your preference to enhance the flavors.
  • Add a Splash of Wine: For an adult twist, add a splash of red wine to the sauce while it simmers for extra depth.
  • Fresh Herbs: If you have fresh herbs on hand, sprinkle them in just before serving for a burst of freshness.
  • Leftover Magic: This beef pasta makes fantastic leftovers! The flavors deepen as they sit, making tomorrow’s lunch even better.
  • Cheese Variations: Experiment with different cheeses! Try mozzarella for a gooey texture or feta for a tangy kick.
  • Vegetable Boost: Sneak in some veggies like spinach or bell peppers for added nutrition without sacrificing taste.
  • Hot Sauce: If you like a little heat, drizzle some hot sauce over the top before serving.

Common Mistakes and Troubleshooting

Even the best cooks have their off days, so here’s how to avoid some common pitfalls:

  • Beef Not Browning: Make sure your skillet is hot enough before adding the beef to achieve that nice sear.
  • Too Dry? If the pasta seems dry after mixing, add a bit of the reserved pasta water to loosen it up.
  • Flavor Lacking? Always taste your sauce before serving. A pinch more salt or a sprinkle of herbs can make a world of difference.
  • Overcooked Pasta: If you accidentally overcook the pasta, don’t panic! Toss it with a bit of olive oil to prevent sticking.

Variations to Try

Want to mix things up? Here are a few delicious variations to consider:

  • Beef and Broccoli Pasta: Add steamed broccoli florets to the pasta for a colorful and nutritious twist.
  • Spicy Beef Pasta: Mix in some crushed red pepper flakes or diced jalapeños for a spicy kick.
  • Italian Sausage Addition: Swap half of the ground beef for Italian sausage for a flavor-packed punch.
  • Vegetarian Version: Replace beef with lentils or mushrooms for a hearty vegetarian alternative.

Storage & Make-Ahead Instructions

This dish is great for meal prep! Here’s how to store and reheat:

  • Refrigerate: Store leftover beef pasta in an airtight container in the fridge for up to 3 days.
  • Freeze: You can freeze the beef pasta for up to 3 months. Just ensure it’s cooled completely before transferring to a freezer-safe container.
  • Reheat: To reheat, warm it gently on the stovetop over low heat, adding a splash of water or broth to keep it moist.
  • Make-Ahead: You can prepare the sauce a day in advance and store it in the fridge. Just cook the pasta fresh when you’re ready to serve.

Frequently Asked Questions

Got questions? I’ve got answers! Here are some of the most common:

  • Can I use a different type of meat? Absolutely! Ground turkey or chicken works well, or even diced steak for a heartier option.
  • What can I serve with beef pasta? A fresh salad, garlic bread, or roasted vegetables make excellent sides.
  • Can I make this dish gluten-free? Yes! Use gluten-free pasta, and check sauce ingredients for any hidden gluten.
  • Is this recipe kid-friendly? Definitely! It’s mild, comforting, and kids love it.
  • How do I prevent the pasta from sticking together? Make sure to stir the pasta occasionally while it cooks and toss it with a bit of olive oil after draining.
  • Can I add cheese to the sauce? Yes! Stir in some cream cheese or mozzarella for a richer sauce.
  • What’s the best way to reheat leftovers? Gently on the stove over low heat, adding a little water or broth to keep it moist.
  • Can I add vegetables to this recipe? Absolutely! Feel free to incorporate your favorites, like spinach or bell peppers.

Nutritional Tips and Dietary Adaptations

If you’re looking to make this recipe healthier or fit specific dietary needs, here are some tips:

  • Lean Meat: Opt for lean ground beef (90% or higher) to reduce fat without sacrificing flavor.
  • Whole Grain Pasta: Swap regular pasta for whole grain or legume-based pasta for extra fiber and nutrients.
  • Skip the Cheese: You can omit the cheese or use a dairy-free alternative if you’re lactose intolerant.
  • Incorporate More Veggies: Load up on vegetables to boost the nutritional content and add vibrant colors to your dish.

Essential Equipment You’ll Need

To make this hearty beef pasta, here’s what you should have on hand:

  • Large Skillet: A good-quality skillet is essential for browning the beef and making the sauce.
  • Pot for Pasta: A large pot to boil the pasta and ensure it cooks evenly.
  • Wooden Spoon: Perfect for stirring and breaking up the beef as it cooks.
  • Measuring Cups and Spoons: Accurate measurements ensure perfect seasoning and consistency.
  • Colander: For draining the pasta without losing any precious noodles.

Serving Suggestions

Your Hearty Beef Pasta is ready to shine! Here are some ideas for how to serve:

  • Garnish: Top with fresh basil or parsley for a pop of color and freshness.
  • Pair with Wine: A glass of red wine like Chianti or a light white wine can complement the flavors beautifully.
  • Side Dishes: Serve alongside a crisp green salad or some garlic bread for a complete meal.
  • Make it a Feast: Prepare a dessert like chocolate mousse or a fruit tart to impress your guests.

Wrapping It All Up

There you have it! My Hearty Beef Pasta recipe is a delicious way to bring warmth and comfort to your dining table. It’s more than just a meal; it’s a moment to gather, share stories, and enjoy the simple pleasures of cooking and eating together. I hope this dish becomes one of your go-to recipes, just like it has for me. So go on, make it, share it, and enjoy every single bite. Happy cooking, my friend!

Beef Pasta

Prep Time 10 minutes
Cook Time 25 minutes
Total Time 35 minutes
Servings 4 servings
Calories 650
A hearty and flavorful beef pasta dish that's easy to prepare and perfect for a satisfying meal.

Ingredients

Meat

  • 1 lb lean ground beef

Pasta

  • 12 oz spaghetti or penne pasta

Oil

  • 2 tbsp olive oil

Garlic

  • 4 cloves garlic, minced

Tomatoes

  • 28 oz canned crushed tomatoes

Herbs & Seasonings

  • 1 tsp dried oregano
  • 1 tsp dried basil
  • 1 tsp dried thyme

Salt & Pepper

  • to taste Salt and pepper

Cheese

  • ½ cup grated Parmesan cheese (for topping)

Instructions 

  • Sauté the beef in olive oil until browned.
  • Add minced garlic and cook for one minute.
  • Pour in crushed tomatoes, add herbs, salt, and pepper. Simmer 15-20 minutes.
  • Cook pasta in salted boiling water until al dente. Drain and set aside.
  • Combine pasta with beef sauce, add reserved pasta water if needed.
  • Serve topped with grated Parmesan cheese.

Notes

For a richer flavor, let the sauce simmer longer.
Calories: 650kcal
Cost: $15
Course: Main Course
Cuisine: Italian
Keyword: Beef, pasta

Welcome to Your New Favorite Sweet Potato Casserole Recipe!

Ah, sweet potato casserole—a dish that feels like a warm hug after a long day, a staple for family gatherings, and a holiday classic that never fails to bring joy to the table. In my cozy kitchen in Seattle, this recipe has become a beloved favorite that I whip up whenever I want to impress guests or simply indulge in some comfort food. Not only is it creamy and delicious, but it also brings a touch of nostalgia with every bite. So, grab your apron and let’s dive into the magic of sweet potatoes!

Why You’ll Love This Recipe

  • Comforting flavors: The blend of sweet potatoes, brown sugar, and spices creates a dish that warms your soul, perfect for chilly evenings.
  • Easy to make: With just a handful of ingredients, you’ll be surprised at how simple it is to create this delightful casserole.
  • Make-ahead friendly: Prepare it in advance, store it in the fridge, and pop it in the oven right before serving—perfect for busy holiday meals!
  • Customizable: Whether you prefer a marshmallow topping or a crunchy pecan crust, this recipe allows for creative variations.
  • Health benefits: Sweet potatoes are rich in vitamins and fiber, making this casserole not only delicious but also nutritious!

All About the Ingredients

Let’s talk ingredients! The foundation of this sweet potato casserole is simple yet versatile. Here’s what you’ll need:

  • 3 pounds sweet potatoes: Peeled and cut into 1-inch cubes. These root veggies are the star of the show!
  • ½ cup packed brown sugar: This adds the sweetness that balances the natural earthiness of the sweet potatoes.
  • ⅓ cup melted butter: For richness and that lovely creamy texture.
  • 1 teaspoon vanilla extract: A dash of vanilla brings out the sweetness beautifully.
  • ½ teaspoon cinnamon: A warm spice that complements the sweet potatoes perfectly.
  • ½ teaspoon salt: Enhances the flavors of the dish.
  • ¼ teaspoon nutmeg: Just a pinch for a nutty undertone.
  • ¼ cup butter (melted): For the topping to achieve that golden crunch.
  • ⅓ cup brown sugar: Another layer of sweetness for the topping!
  • 2 tablespoons flour: Helps bind the topping ingredients together.
  • 1 ¼ cups chopped pecans: For that delightful crunch and nutty flavor.

Pro Tips for Sweet Potato Casserole Success

Side angle of a mouth-watering sweet potato casserole with a golden, crunchy topping.

Before you start, here are some expert insights to ensure your casserole turns out perfectly:

  • Choose fresh sweet potatoes: Look for firm, smooth-skinned sweet potatoes without any bruises or soft spots.
  • Don’t overboil: Cook the sweet potatoes just until fork-tender to avoid a watery casserole.
  • Mix well: Make sure to thoroughly mix the filling ingredients to achieve a creamy consistency.
  • Topping variations: Feel free to add crushed graham crackers or oats for a different texture in your topping.
  • Experiment with spices: Try adding a pinch of ginger or allspice for an extra kick of flavor!
  • Check for doneness: Bake until the topping is golden brown and the casserole is bubbling around the edges for the best results.
  • Let it rest: Allow the casserole to cool for a few minutes before serving; it helps the flavors meld together.
  • Store leftovers properly: Refrigerate any leftovers in an airtight container and consume within 3-4 days.

Common Mistakes and Troubleshooting

Even the best of us can run into hiccups while cooking. Here are some common mistakes to watch out for:

  • Overcooking sweet potatoes: This can lead to a mushy texture. Cook just until fork-tender.
  • Not mashing enough: Ensure the sweet potatoes are well-mashed for a smooth filling.
  • Forgetting to grease the dish: Always grease your baking dish to prevent sticking!
  • Uneven baking: Rotate the dish halfway through baking for even cooking.
  • Too much topping: Balance the topping to filling ratio for the best flavor and texture.

Delicious Variations to Try

This sweet potato casserole is a classic, but that doesn’t mean you can’t get creative! Here are some fun variations:

  • Marshmallow Delight: Top with mini marshmallows instead of pecans for that classic sweet potato casserole vibe.
  • Maple Pecan: Substitute maple syrup for brown sugar and add maple-flavored pecans for a twist.
  • Coconut Cream: Mix shredded coconut into the topping for a tropical flair.
  • Savory Twist: Add sautéed onions and garlic to the sweet potato filling for a savory version.

Make-Ahead and Storage Instructions

This sweet potato casserole is perfect for preparing ahead of time. Here’s how:

  • Make-ahead: Prepare the casserole up to the baking step, cover it tightly, and store it in the fridge for up to 2 days.
  • Freezing: You can freeze the unbaked casserole for up to 2 months. Just thaw it in the fridge overnight before baking.
  • Storage: Keep any leftovers in an airtight container in the fridge for up to 4 days. Reheat in the oven or microwave.

Your Sweet Potato Casserole Questions Answered

Here are some frequently asked questions to help you along the way:

  • Can I use canned sweet potatoes? Yes! Just drain and rinse them, then proceed with the recipe.
  • Is this casserole gluten-free? Yes, if you use gluten-free flour for the topping.
  • How can I make this dairy-free? Substitute the butter with coconut oil and use a dairy-free milk in the filling.
  • Can I add other toppings? Absolutely! Crushed graham crackers or oats work wonderfully.
  • How long do I bake it? Bake for 25-30 minutes or until bubbly and golden.
  • What’s the best way to reheat? Reheat in the oven at 350°F until warmed through for the best texture.
  • Can I double the recipe? Yes! Just use a larger baking dish and adjust the baking time as needed.
  • What’s the nutritional information? Each serving is rich in vitamins A and C, fiber, and antioxidants from the sweet potatoes!

Nutritional Tips and Dietary Adaptations

Sweet potatoes are not only delicious but also packed with nutrients. Here are some insights:

  • Rich in vitamins: Sweet potatoes are an excellent source of vitamins A (for vision and immune function) and C (for skin health and immunity).
  • High in fiber: They provide dietary fiber, aiding digestion and promoting a healthy gut.
  • Low on the glycemic index: This means they won’t spike your blood sugar, making them a healthier carbohydrate option.
  • Customizable for dietary needs: Easily adaptable for gluten-free, dairy-free, or vegan diets with simple ingredient swaps.

Essential Equipment for Making Casserole

To make your sweet potato casserole, you’ll need a few key pieces of equipment:

  • Large pot: For boiling sweet potatoes.
  • Baking dish: A 9×13 inch dish is ideal for this recipe.
  • Mixing bowls: You’ll need a large one for the filling and a medium one for the topping.
  • Potato masher or mixer: To mash your sweet potatoes to perfection.
  • Measuring cups and spoons: For accurate ingredient measurements.

Serving Suggestions for Your Casserole

This sweet potato casserole pairs beautifully with a variety of dishes:

  • Roasted turkey: A classic pairing for holiday meals.
  • Glazed ham: The sweetness complements savory meats perfectly.
  • Green bean casserole: For a traditional holiday spread, serve alongside.
  • Simple salad: A fresh green salad balances the richness of the casserole.

Final Thoughts

With its creamy texture and delightful flavors, this sweet potato casserole will quickly become a staple in your kitchen. Each bite is a reminder of home, warmth, and the joy of gathering around the table with loved ones. Whether you’re celebrating a special occasion or just looking for a comforting dish, this recipe is sure to impress. So, roll up your sleeves, embrace the magic of cooking, and enjoy the deliciousness that is sweet potato casserole!

Sweet Potato Casserole

Prep Time 15 minutes
Cook Time 30 minutes
Total Time 45 minutes
Servings 8 servings
Calories 350
A comforting and flavorful dish perfect for holiday gatherings, combining tender sweet potatoes with a crunchy pecan topping.

Ingredients

Sweet Potatoes

  • 3 pounds sweet potatoes (peeled and cut into 1-inch cubes)
  • 0.5 cup packed brown sugar
  • 0.33 cup melted butter
  • 1 teaspoon vanilla extract
  • 0.5 teaspoon cinnamon
  • 0.5 teaspoon salt
  • 0.25 teaspoon nutmeg
  • 0.25 cup butter (melted)
  • 0.33 cup brown sugar
  • 2 tablespoons flour
  • 1.25 cups chopped pecans

Instructions 

  • Preheat oven to 350°F (175°C). Grease a 9x13 dish.
  • Cook sweet potatoes in boiling water for 15 minutes, then drain.
  • Mash sweet potatoes with remaining ingredients and spread in dish.
  • Mix pecan topping ingredients and sprinkle over casserole.
  • Bake for 25-30 minutes until bubbly and pecans toasted.

Notes

For extra flavor, add a pinch of nutmeg or cinnamon on top before baking.
Calories: 350kcal
Cost: $15
Course: Side Dish
Cuisine: American
Keyword: Sweet Potatoes

Welcome to the Cozy World of Chicken Potato Casserole

Hey there, friend! If you’ve wandered into my kitchen, you’re probably in search of a dish that warms your heart and your belly. Let me tell you about the ultimate comfort food: Chicken Potato Casserole. This delightful dish is not only packed with tender chicken and creamy layers but also a cheesy goodness that’ll have everyone asking for seconds. Whether you’re cooking for a family gathering or a cozy night in, this is the kind of recipe that brings everyone together.

As someone who has spent countless hours in the kitchen, I can confidently say that this Chicken Potato Casserole is a showstopper. It’s simple enough to whip up on a weeknight, yet delicious enough to impress your friends at dinner parties. Let’s dive into why you’ll love making this casserole.

Why You’ll Love This Recipe

  • Quick and Easy Prep: With just a handful of ingredients and minimal prep time, this casserole is perfect for busy weeknights.
  • Comfort Food Champion: The creamy, cheesy layers will wrap you in warmth and nostalgia, reminding you of home-cooked meals.
  • Versatile Dish: You can customize it with different veggies or spices, making it your own!
  • Leftovers Galore: This casserole makes fantastic leftovers, perfect for lunch the next day.
  • Family Favorite: Kids and adults alike will love this dish, making it a crowd-pleaser at any meal.

Ingredient Breakdown

Let’s talk about the magic ingredients that make this casserole a hit:

  • Chicken: I recommend using boneless, skinless chicken breasts or thighs, cut into bite-sized pieces for even cooking.
  • Potatoes: Use about 4 medium, peeled and diced potatoes. They provide the hearty base that balances the creaminess.
  • Cheddar Cheese: Shredded sharp cheddar adds a tangy flavor that elevates the dish.
  • Sour Cream and Milk: These creamy ingredients help create that luscious texture that makes every bite melt in your mouth.
  • Cream of Chicken Soup: This adds depth and richness, but feel free to substitute with homemade if you’re feeling adventurous!
  • Onion and Garlic: Sautéed until fragrant, they add a lovely aromatic quality.
  • Spices: Paprika, salt, and pepper enhance the flavors beautifully.
  • Olive Oil: For sautéing the onions and garlic.
  • Garnish: Optional green onions or fresh parsley add a pop of color and freshness.

Pro Tips for Perfection

Side view of a baked chicken and potato casserole in a dish, garnished with parsley.

Let me share some expert insights to ensure your casserole turns out flawlessly:

  • Uniform Potato Size: Cut your potatoes into similar sizes so they cook evenly.
  • Don’t Overcook the Chicken: Since the chicken will bake in the oven, it only needs to be lightly browned, not fully cooked.
  • Layering Matters: Mix the ingredients well to ensure every bite is packed with flavor.
  • Cover for Moisture: Cover the casserole with foil while baking to keep it moist.
  • Broil for a Crunch: For extra crispy cheese, broil for a couple of minutes at the end.
  • Rest Before Serving: Let the casserole sit for about 5-10 minutes after baking to set before serving.
  • Cheese Variations: Experiment with different cheese blends like Monterey Jack or Pepper Jack for a spicy twist.
  • Add Veggies: Feel free to throw in peas, corn, or broccoli for added nutrition and flavor.

Avoiding Common Mistakes

Every great cook has had their fair share of mishaps. Here are some common mistakes to avoid:

  • Overcooking the Casserole: Monitor closely towards the end of the baking time to prevent drying out.
  • Skipping the Sauté: Don’t skip sautéing the onions and garlic; it makes a world of difference in flavor.
  • Using Cold Ingredients: Bring your sour cream and milk to room temperature for better mixing.

Delicious Variations to Try

Feeling adventurous? Here are some delicious variations to take your casserole to the next level:

  • Southwestern Chicken Potato Casserole: Add black beans, corn, and a sprinkle of taco seasoning for a zesty twist.
  • Buffalo Chicken Style: Mix in some buffalo sauce for a spicy kick and top with blue cheese crumbles.
  • Italian-Inspired: Incorporate marinara sauce and Italian herbs for a delightful twist.
  • Vegetarian Version: Swap out the chicken for hearty vegetables like mushrooms and zucchini.

Storage and Make-Ahead Instructions

This casserole is perfect for make-ahead meals! Here’s how to store and prep it:

  • Make-Ahead: Assemble the casserole a day in advance, cover tightly, and refrigerate. Bake it fresh when you’re ready!
  • Storage: Store leftovers in an airtight container in the fridge for up to 3 days.
  • Freezing: You can freeze the unbaked casserole for up to 2 months. Just thaw overnight in the fridge before baking.

Frequently Asked Questions

Got questions? I’ve got answers! Here’s a quick FAQ section to help you out:

  • Can I use frozen chicken? Yes, just ensure it’s fully thawed before cooking for even results.
  • What if I don’t have cream of chicken soup? You can use cream of mushroom or make a homemade version!
  • Can I add more cheese? Absolutely! Who doesn’t love extra cheese?
  • How do I know when it’s done baking? When the cheese is bubbly and the potatoes are fork-tender, it’s ready!
  • Can I make it dairy-free? Yes! Substitute with dairy-free sour cream, milk, and cheese.
  • What sides pair well with this casserole? A simple side salad or steamed vegetables make great companions.
  • Can I use sweet potatoes instead? Sure! Just adjust the baking time as sweet potatoes may cook faster.
  • How can I spice it up? Add jalapeños or crushed red pepper flakes for a bit of heat!

Nutrition Tips and Dietary Adaptations

This casserole can be a balanced meal when paired with veggies. Here are some tips for a healthier version:

  • Lean Protein: Opt for skinless chicken or even turkey for a lighter dish.
  • Whole Grains: Consider substituting half of the potatoes with quinoa for added fiber.
  • Low-Calorie Options: Use low-fat cheese and sour cream to reduce calories.

Essential Equipment Recommendations

Let’s make sure you have the right tools to succeed:

  • 9×13-inch Baking Dish: Perfect for a standard casserole size.
  • Large Skillet: For sautéing your onions and garlic to perfection.
  • Mixing Bowls: You’ll need at least two for combining ingredients.
  • Sharp Knife: For easy chopping of chicken and veggies.

Serving Suggestions

Now that your casserole is ready, here’s how to serve it:

  • Garnish: Sprinkle with fresh chopped parsley or green onions for a pop of color.
  • Side Salads: A light green salad drizzled with vinaigrette complements the richness.
  • Crusty Bread: Serve with warm, crusty bread for a complete meal experience.

Final Thoughts

There you have it! A Chicken Potato Casserole that not only warms the soul but also fills your home with inviting aromas. I hope you give this recipe a try and make it your own. Remember, cooking is all about experimenting and enjoying the process. So, roll up those sleeves, gather your ingredients, and let’s create some magic in the kitchen together. Happy cooking!

Chicken Potato Casserole

Prep Time 15 minutes
Cook Time 1 hour
Total Time 1 hour 15 minutes
Servings 6 servings
Calories 650
A hearty and cheesy chicken and potato casserole perfect for a comforting family dinner.

Ingredients

Protein

  • 1.5 lbs boneless, skinless chicken breasts or thighs, cut into bite-sized pieces

Vegetables

  • 4 cups peeled and diced potatoes (about 4 medium potatoes)

Dairy

  • 1 cup shredded cheddar cheese
  • ½ cup sour cream
  • ½ cup milk

Canned Goods

  • 1 can 10.5 oz cream of chicken soup

Seasonings & Oils

  • 1 small onion, finely chopped
  • 2 cloves garlic, minced
  • 1 tsp paprika
  • 1 tsp salt
  • ½ tsp black pepper
  • 2 tbsp olive oil

Garnish

  • optional chopped green onions or fresh parsley for garnish

Instructions 

  • Preheat oven to 375°F (190°C) and grease a 9x13-inch dish.
  • Sauté onions and garlic in olive oil until fragrant, 2–3 minutes.
  • Add chicken and cook until lightly browned, 5–6 minutes.
  • Mix potatoes, chicken, sautéed aromatics, soup, sour cream, milk, paprika, salt, and pepper; transfer to dish.
  • Bake covered for 45 minutes, then uncover, add cheese, and bake 15 more minutes until bubbly and potatoes are tender.

Notes

For extra flavor, sprinkle chopped green onions or parsley before serving.
Calories: 650kcal
Cost: $15
Course: Main Course
Cuisine: American
Keyword: Casserole, Chicken, potatoes

Welcome to the Magic of Teriyaki Ground Beef Stir-Fry!

Hey there, friend! If you’ve found your way to my little corner of the internet, you’re likely on the hunt for something truly special to whip up in your kitchen. Well, you’re in for a treat! Today, I’m excited to share my go-to Teriyaki Ground Beef Stir-Fry recipe. This dish isn’t just another meal; it’s a comforting embrace on a plate, bursting with flavors that dance together in perfect harmony. With a savory blend of ground beef, vibrant veggies, and a touch of sweetness, it’s bound to become a weeknight favorite!

As someone who spent countless hours in the kitchen growing up, I can assure you that this stir-fry recipe is not only delicious but also incredibly easy to make. In less than thirty minutes, you can have a wholesome meal on the table that’ll make everyone at your dinner table pause mid-bite and exclaim, “Wow!” So, let’s dive into the magic that is teriyaki ground beef and transform your weeknight dinners into delightful culinary experiences.

Why You’ll Love This Recipe

This Teriyaki Ground Beef Stir-Fry isn’t just delicious; it’s also packed with benefits that make it a must-try. Here are a few reasons why you’ll cherish this recipe:

  • Quick and Easy: With a total cooking time of under 30 minutes, this dish is perfect for busy weeknights when you want something fast yet flavorful.
  • Customizable: Feel free to swap out veggies or proteins! You can use ground turkey or chicken, and mix in your favorite seasonal vegetables.
  • Healthier Option: Packed with protein and fiber, it’s a nutritious choice that doesn’t skimp on taste.
  • Meal Prep Friendly: This dish is perfect for meal prepping, allowing you to enjoy delicious leftovers throughout the week.
  • Family-Friendly: Even picky eaters will fall in love with the sweet and savory flavors. It’s a surefire way to get kids excited about dinner!

Ingredients Breakdown

Let’s gather our ingredients! Here’s what you’ll need for this delightful stir-fry along with some handy substitutions:

  • 1 pound ground beef: A hearty source of protein. For a lighter fare, consider using ground turkey or chicken.
  • 1 tablespoon vegetable oil: Ideal for sautéing. You can also use olive oil or avocado oil for a different flavor profile.
  • 1 small onion, diced: Adds sweetness and depth; substitute with shallots for a milder flavor.
  • 2 cloves garlic, minced: For that aromatic punch. If you’re a garlic lover, feel free to add more!
  • 1 cup bell peppers, sliced (any color): Adds color and crunch. Swap with zucchini or snap peas for variety.
  • 1 cup broccoli florets: A nutritious addition; cauliflower can be used as an alternative.
  • 1/4 cup soy sauce: The star of our teriyaki sauce. Use tamari or coconut aminos for a gluten-free version.
  • 2 tablespoons brown sugar: Balances the salty soy sauce. Honey or maple syrup works well too!
  • 1 tablespoon rice vinegar: Adds a tangy note; apple cider vinegar is a good substitute.
  • 1 tablespoon cornstarch: For thickening the sauce; you can also use arrowroot powder.
  • 1/4 cup water: Helps to achieve the right sauce consistency.
  • 1 teaspoon sesame oil: A finishing touch that adds rich flavor; feel free to skip if you’re out!
  • 2 green onions, sliced (for garnish): Fresh and vibrant, they add a lovely finish to the dish.
  • Cooked rice or noodles (for serving): Serve this stir-fry over your choice of rice, quinoa, or noodles!

Cooking Instructions: Step-by-Step

Juicy Teriyaki Ground Beef Stir-Fry featuring bell peppers and broccoli.

Ready to stir up some joy? Let’s get cooking!

  1. Prepare your ingredients by washing and slicing the bell peppers, cutting the broccoli into small florets, dicing the onion, and mincing the garlic.
  2. In a large skillet, heat the vegetable oil over medium-high heat. Add the diced onion and sauté for about 2-3 minutes until soft and translucent. Then, add the minced garlic and ground beef, cooking until browned and fully cooked, about 5-7 minutes. Drain excess fat if necessary.
  3. Add the sliced bell peppers and broccoli florets to the skillet and cook for an additional 3-4 minutes until the vegetables are tender-crisp.
  4. In a small bowl, whisk together the soy sauce, brown sugar, rice vinegar, cornstarch, and water until smooth. Pour this mixture over the cooked beef and vegetables in the skillet, stirring well to combine. Cook for another 2-3 minutes until the sauce thickens.
  5. Drizzle the sesame oil over the stir-fry and mix well. Serve the stir-fry over cooked rice or noodles and garnish with sliced green onions.

Pro Tips for the Perfect Stir-Fry

To elevate your stir-fry game, here are some expert tips to keep in mind:

  • Prep Ahead: Chop your vegetables and prep the sauce beforehand for a quick cooking experience.
  • High Heat: Use high heat to achieve that delicious stir-fry sear. It helps lock in flavors and gives your veggies a nice crunch.
  • Don’t Overcrowd: Cook in batches if necessary. Overcrowding the pan can lead to steaming rather than stir-frying.
  • Fresh Ingredients: Use the freshest ingredients you can find for maximum flavor and nutrients.
  • Flavor Boost: Experiment with adding ginger or chili paste for a little kick!
  • Perfect Timing: Keep an eye on cooking times; you want your veggies to be tender-crisp, not mushy.
  • Thickening Trick: If your sauce isn’t thickening as desired, add a bit more cornstarch mixed with water.
  • Garnish Wisely: Fresh herbs or sesame seeds can add an extra layer of flavor and beautiful presentation.

Common Mistakes and Troubleshooting

Even the best cooks make mistakes sometimes! Here are some common pitfalls and how to avoid them:

  • Soggy Vegetables: To prevent sogginess, make sure to cook your vegetables quickly over high heat.
  • Too Saucy: If you find your stir-fry is too saucy, you can cook it a bit longer to reduce the sauce or add more cornstarch mixed with water.
  • Flavorless Dish: Always taste your food! Adjust seasonings as needed before serving.

Delicious Variations

Feel like switching things up? Here are some fun variations to this classic dish:

  • Spicy Teriyaki: Add red pepper flakes or sriracha for a spicy kick.
  • Vegetable-Heavy: Load up on more veggies like snap peas, carrots, or mushrooms for extra nutrition.
  • Teriyaki Meatballs: Form the ground beef into meatballs and bake, then toss in the teriyaki sauce.
  • Asian Noodle Bowl: Serve over rice noodles instead of traditional rice for a fun twist.

Storage and Make-Ahead Instructions

Planning to enjoy this dish over several days? Here’s how to store it properly:

  • Storage: Keep leftovers in an airtight container in the fridge for up to 3 days.
  • Freezing: This stir-fry freezes well! Store in a freezer-safe container for up to 3 months. Thaw in the fridge overnight before reheating.
  • Make-Ahead: Prepare the sauce and chop the veggies the day before for an even quicker cooking process!

Frequently Asked Questions

Got questions? I’ve got answers! Here are some common inquiries about this recipe:

  • Can I use frozen vegetables? Absolutely! Just add them to the skillet frozen and cook a bit longer until heated through.
  • What can I substitute for soy sauce? Tamari or coconut aminos are great alternatives for a gluten-free option.
  • Can I make this dish vegan? Yes! Substitute the beef with plant-based ground meat and use a vegan soy sauce.
  • How do I make it less sweet? Reduce the amount of brown sugar or use a sugar alternative.
  • Can I add more vegetables? Yes, feel free to load it up with your favorites!
  • What should I serve with this dish? It pairs wonderfully with rice, quinoa, or even on its own for a lighter meal.
  • Is this dish suitable for meal prep? Definitely! It stores well and is perfect for lunches throughout the week.
  • How can I make it spicier? Add chili paste or sliced jalapeños to the stir-fry for heat.

Nutrition Tips and Dietary Adaptations

This dish can easily be tailored to fit various dietary needs:

  • Low-Carb: Serve over cauliflower rice instead of traditional rice.
  • Paleo-Friendly: Use coconut aminos in place of soy sauce and avoid sugar.
  • Gluten-Free: Ensure all ingredients are gluten-free, including the soy sauce.

Equipment Recommendations

To make your cooking experience smooth, here are some handy tools:

  • Large Skillet: A non-stick skillet or wok is ideal for stir-frying.
  • Cutting Board: A sturdy board for chopping veggies.
  • Chef’s Knife: A good-quality knife will make prep work quick and easy.
  • Whisk: For mixing the sauce ingredients.

Serving Suggestions

Now that your stir-fry is ready, let’s talk about how to serve it:

  • Over Rice: A classic choice! Use jasmine or brown rice for a heartier option.
  • Noodle Bowl: Serve over soba or rice noodles for a delightful twist.
  • Garnish: Top with sesame seeds or chopped cilantro for added flavor and presentation.

There you have it! A comprehensive guide to making my beloved Teriyaki Ground Beef Stir-Fry. I hope you enjoy every moment spent in the kitchen creating this dish as much as I do. Remember, cooking is all about love and connection—so gather your loved ones and share the joy of a home-cooked meal. Happy cooking!

Teriyaki Ground Beef Stir-Fry

Prep Time 10 minutes
Cook Time 15 minutes
Total Time 25 minutes
Servings 4 servings
Calories 450
A quick and flavorful stir-fry combining ground beef and colorful vegetables in a savory teriyaki sauce.

Ingredients

Meat and Oil

  • 1 pound ground beef
  • 1 tablespoon vegetable oil

Vegetables

  • 1 small onion, diced
  • 2 cloves garlic, minced
  • 1 cup bell peppers, sliced
  • 1 cup broccoli florets

Sauce and Seasonings

  • 1/4 cup soy sauce
  • 2 tablespoons brown sugar
  • 1 tablespoon rice vinegar
  • 1 tablespoon cornstarch
  • 1/4 cup water
  • 1 teaspoon sesame oil

Garnish and Serve

  • 2 green onions sliced (for garnish)

Cooked rice or noodles

Instructions 

  • Wash and slice bell peppers, cut broccoli into florets, dice onion, and mince garlic.
  • Heat oil in a skillet, sauté onion for 2-3 minutes, add garlic and beef, cook until browned, about 5-7 minutes.
  • Add bell peppers and broccoli, cook for 3-4 minutes until tender-crisp.
  • Mix soy sauce, sugar, vinegar, cornstarch, and water; pour over beef and vegetables, cook until thickened, 2-3 minutes.
  • Drizzle sesame oil, garnish with green onions, and serve over rice or noodles.

Notes

For extra flavor, marinate the beef in some soy sauce before cooking.
Calories: 450kcal
Cost: $12
Course: Main Course
Cuisine: Asian
Keyword: Beef

Discover the Magic of Slow-Cooked Crockpot Au Gratin Potatoes

Welcome to my cozy kitchen! Today, we’re diving into a dish that wraps you in warmth and comfort: Crockpot Au Gratin Potatoes. Picture this: creamy, cheesy potatoes layered to perfection, melting away with every bite. This isn’t just a recipe; it’s an experience, one that brings friends and family together around the dinner table. With the ease of a slow cooker, this dish transforms simple ingredients into a hearty meal that everyone will love. So, pull up a chair, and let’s get started!

Why You’ll Love This Recipe

There are countless reasons to adore this crock pot au gratin potatoes recipe, but here are my top five:

  • Effortless Preparation: Just layer, pour, and let the slow cooker do its magic. Perfect for busy weeknights!
  • Comfort Food at Its Best: Creamy, cheesy, and oh-so-delicious, this dish is the epitome of comfort food.
  • Customizable Ingredients: Use what you have on hand! Swap in different cheeses or add your favorite veggies for a twist.
  • Great for Gatherings: This recipe makes enough to feed a crowd, making it ideal for potlucks or family dinners.
  • Leftover Heaven: Enjoy the creamy goodness the next day, whether reheated or repurposed into a new dish!

Ingredients You’ll Need

Let’s break down the essential ingredients for our crock pot potatoes au gratin. Each item plays a vital role in building layers of flavor and texture.

  • 5 cups gold potatoes: Peeled and thinly sliced. Gold potatoes are creamy and hold their shape well.
  • Salt and pepper: Essential for seasoning. Adjust to your taste!
  • 4 tablespoons unsalted butter: Adds richness and depth to the cheese sauce.
  • 1/2 teaspoon garlic powder: A hint of garlic elevates the flavor profile.
  • 1/2 teaspoon onion powder: For a subtle sweetness and complexity.
  • 1/4 cup all-purpose flour: This helps thicken the cheese sauce.
  • 1-1/2 cups milk: Whole milk works best for a creamy result.
  • 1/2 cup sour cream: Full-fat sour cream adds tanginess and richness.
  • 1-1/2 cups Cheddar cheese: Sharp or extra-sharp cheese melts beautifully, bringing that classic flavor.
  • Fresh parsley or chives: Optional garnish for a touch of color and freshness.

How to Make Crockpot Au Gratin Potatoes

Side view of a dish of rich and cheesy Crockpot Au Gratin Potatoes.

Now, let’s dive into the steps to create this delicious au gratin potatoes dish. Trust me, it’s easier than you think!

  • Prepare the slow cooker: Use a Crock-Pot liner or spray your slow cooker with cooking spray to prevent sticking.
  • Slice the potatoes: Wash, peel, and thinly slice your potatoes to about 1/8-inch thick. A mandolin slicer works wonders!
  • Make the cheese sauce: In a nonstick pot, melt butter over low heat. Add garlic powder, onion powder, salt, and pepper; sauté for one minute until fragrant. Gradually whisk in the flour, then slowly pour in the milk, stirring constantly until smooth and thickened.
  • Combine: Remove from heat and stir in sour cream and cheese until melted. Add sliced potatoes, mixing gently to coat.
  • Crockpot magic: Transfer the mixture to the slow cooker, pressing it down evenly. Place paper towels on top (this keeps it crispy), then cover and cook on high for 2-1/2 to 4-1/2 hours, checking occasionally.
  • Finishing touches: Once tender, stir gently and garnish with parsley or chives. For extra crispiness, cook uncovered for an additional 15-20 minutes.

Pro Tips for Perfect Crockpot Au Gratin Potatoes

Want to elevate your cooking game? Here are some expert tips to ensure your slow cooker potatoes au gratin are a hit:

  • Use a mandolin slicer: This tool ensures uniform thickness for even cooking.
  • Don’t rush the sauce: Allow your cheese sauce to thicken properly; this will enhance the creaminess.
  • Swap in different cheeses: Experiment with Gruyère, Monterey Jack, or even a touch of blue cheese for a unique flavor.
  • Incorporate vegetables: Consider adding sautéed mushrooms, spinach, or broccoli for a nutritional boost.
  • Adjust the cooking time: Every slow cooker is different—keep an eye on your dish to avoid overcooking.
  • Layer your potatoes: For a more visually appealing dish, alternate layers of potatoes and cheese sauce.
  • Double the recipe: If you’re feeding a crowd, this dish is easily doubled!
  • Garnish generously: Fresh herbs not only add flavor but also make the dish pop visually.

Common Mistakes and Troubleshooting

Even the best chefs can hit a snag now and then. Here are some common pitfalls and how to avoid them:

  • Overcooking: Keep an eye on the cooking time; every slow cooker behaves differently.
  • Too watery: If your dish turns out watery, it may be due to excess moisture in the potatoes. Be sure to use dry potatoes and remove the paper towels halfway through cooking.
  • Cheese clumping: To avoid this, add cheese gradually and stir consistently when making the sauce.
  • Undercooked potatoes: If your potatoes are still hard after the cooking time, give them a bit more time in the slow cooker.

Variations to Try

Once you’ve mastered the basic recipe, why not mix it up? Here are a few variations to consider:

  • Loaded Baked Potato Style: Add crispy bacon bits and green onions for a loaded twist.
  • Italian Influence: Incorporate Italian seasoning and swap cheddar for mozzarella and Parmesan.
  • Spicy Kick: Add jalapeños or red pepper flakes for a spicy version.
  • Vegan Option: Use plant-based milk, vegan butter, and cheese alternatives for a delicious vegan dish.

Storage and Make-Ahead Instructions

Want to prepare your au gratin potatoes in advance? Here’s how to store and reheat them:

  • Make-Ahead: Assemble the potatoes and cheese sauce, then refrigerate for up to 24 hours before cooking.
  • Storing leftovers: Store in an airtight container in the fridge for up to 3 days.
  • Reheating: Microwave individual portions or reheat in the oven at 350°F (175°C) until warmed through.

Frequently Asked Questions

Got questions? I’ve got answers! Here are some common queries about crock pot au gratin potatoes:

  • Can I use red potatoes?
    Yes, but gold potatoes or Yukon Gold are preferred for their creaminess.
  • How can I make it gluten-free?
    Substitute all-purpose flour with a gluten-free flour blend.
  • Can I add meat?
    Absolutely! Cooked ham or chicken can make this dish heartier.
  • What if my sauce is too thick?
    Stir in a little more milk to reach your desired consistency.
  • Is it possible to freeze the leftovers?
    Yes, but texture may change slightly upon reheating.
  • How do I keep it from getting mushy?
    Ensure potatoes are sliced evenly and don’t overcook.
  • Can I use pre-packaged shredded cheese?
    Yes, but fresh cheese melts better!
  • What can I serve with this dish?
    It pairs wonderfully with roasted meats or a fresh salad.

Nutritional Tips and Dietary Adaptations

Want to make this dish fit your dietary needs? Here are some tips:

  • Lower fat: Use low-fat milk and cheese, and skip the sour cream.
  • Vegan and dairy-free: Opt for plant-based cheese and yogurt alternatives.
  • High-protein option: Add beans or lentils to the mix for an added protein boost.

Equipment Recommendations

Here are some tools that will make your cooking experience smoother:

  • Crock-Pot or slow cooker: A good quality model ensures even cooking.
  • Mandolin slicer: For perfectly sliced potatoes every time.
  • Nonstick pot: For making the cheese sauce without sticking.

Serving Suggestions

Serving this dish is just as important as making it! Here are a few ideas:

  • With roasted meats: Serve alongside roasted chicken or pork for a complete meal.
  • Garnish beautifully: A sprinkle of fresh herbs goes a long way in presentation.
  • Pair with a fresh salad: A crisp salad balances the creamy richness of the potatoes.

Conclusion: A Dish to Remember

And there you have it—my unforgettable crockpot au gratin potatoes recipe! This dish is more than just food; it’s an invitation to gather, celebrate, and create memories. Whether you’re enjoying it on a cozy night in or serving it at a gathering, these potatoes are sure to impress. So, roll up your sleeves, get cooking, and let the magic unfold in your kitchen. Happy cooking, my friend!

Crockpot Au Gratin Potatoes

Prep Time 20 minutes
Cook Time 3 hours
Total Time 3 hours 20 minutes
Servings 6 servings
Calories 350
A creamy, cheesy potato dish cooked slowly in a Crock-Pot, perfect for a comforting meal or side dish.

Ingredients

Potatoes

  • 5 cups gold potatoes (peeled and thinly sliced) (see note 1)
  • Salt and pepper Salt and pepper
  • 4 tablespoons unsalted butter
  • 1/2 teaspoon garlic powder
  • 1/2 teaspoon onion powder
  • 1/4 cup all-purpose flour
  • 1.5 cups milk (recommend whole milk)
  • 1/2 cup sour cream (full-fat recommended)
  • 1.5 cups Cheddar cheese (sharp or extra-sharp)
  • Fresh parsley or chives Fresh parsley (or chives) (optional, for topping)

Instructions 

  • Spray slow cooker with cooking spray and prepare potatoes.
  • Melt butter, add spices, whisk in flour, then gradually add milk, boiling until thickened. Remove from heat and stir in sour cream and cheese.
  • Mix sliced potatoes into cheese sauce, then transfer to slow cooker. Cover with paper towels and cook on high for 2.5 to 4.5 hours.
  • Once tender, remove lid, stir gently, and cook uncovered for 15–20 minutes for crispier top. Garnish with parsley or chives before serving.

Notes

Check potatoes halfway through cooking to prevent burning and adjust time as needed based on your slow cooker.
Calories: 350kcal
Cost: $15
Course: Side Dish
Cuisine: American
Keyword: potatoes

Welcome to a Flavor Explosion: Honey Garlic Chicken That Steals the Show

Hey there, fellow food lovers! If you’ve found your way into my kitchen today, get ready to embark on a culinary adventure with a dish that’ll make your taste buds dance—the Honey Garlic Chicken. This isn’t just another chicken recipe; it’s a sweet and savory hug that wraps around your soul and fills your home with the aromatic scent of sautéed garlic and luscious honey. Whether you’re whipping up a weeknight dinner or impressing guests at your next gathering, this dish is bound to steal the show.

In this guide, we’ll explore everything you need to know about making the most succulent, tender chicken tossed in a rich, glossy sauce that mingles perfectly with boiled rice. So, grab your apron, and let’s dive into the magic of Honey Garlic Chicken.

Why You’ll Love This Recipe

  • Quick and Easy: Ready in just 30 minutes, making it perfect for those busy weeknights.
  • Flavor-Packed: The harmony of sweet honey and savory garlic creates a taste explosion that everyone loves.
  • Versatile: Perfectly pairs with rice, noodles, or crisp vegetables, allowing for endless serving possibilities.
  • Family-Friendly: A dish that appeals to both kids and adults, ensuring everyone at the table is happy.
  • Make-Ahead Friendly: Prepare the chicken and sauce in advance, making dinner-time a breeze.

Ingredient Breakdown

Glazed chicken thighs garnished with fresh herbs on a rustic surface.

Let’s gather our ingredients for this delightful dish. You might be surprised at how simple they are, but trust me—each one plays a crucial role in creating that irresistible flavor.

  • Chicken Thighs: I recommend using 8 boneless, skinless chicken thighs for their juicy texture. If you prefer chicken breasts, they work too, but thighs are my go-to for tenderness.
  • Cornstarch: This helps create a crispy exterior when searing the chicken. If you don’t have cornstarch, flour can be a substitute.
  • Vegetable Oil and Butter: The combination gives the chicken a golden crust and rich flavor. Feel free to use olive oil if that’s what you have on hand.
  • Garlic: Four cloves, minced to perfection, is where the magic happens. Garlic powder can work in a pinch but nothing beats fresh garlic.
  • Honey: A third of a cup of this liquid gold adds that beautiful sweetness. Use raw honey if you can for a richer flavor.
  • Chicken Stock: A third of a cup keeps the sauce flavorful and moist. Low-sodium is best for better control over saltiness.
  • Rice Vinegar and Soy Sauce: These add a tangy depth to the sauce. You can substitute rice vinegar with apple cider vinegar if needed.
  • Chili Flakes: Just half a teaspoon provides a subtle kick. Omit if you prefer a milder dish!
  • Fresh Parsley: A tablespoon of finely chopped parsley adds a touch of color and freshness. Basil or green onions can also be great alternatives.

Pro Tips for Perfect Honey Garlic Chicken

  • Don’t overcrowd the pan: When searing the chicken, give each piece enough space to develop that delicious crust.
  • Let it rest: Allow the chicken to rest for a few minutes after cooking to seal in those juices.
  • Adjust the sweetness: If you like it sweeter, add a bit more honey; for a tangier sauce, increase the vinegar.
  • Use a non-stick skillet: This prevents the chicken from sticking and makes for easier clean-up.
  • Whisk the cornstarch slurry well: A lump-free mixture ensures a smooth sauce.
  • Garnish generously: A sprinkle of parsley right before serving elevates the dish visually and flavor-wise.
  • Serve hot: This dish is best enjoyed fresh off the stove!
  • Pair with sides: Consider serving with steamed broccoli or a fresh salad to balance the meal.

Common Mistakes and Troubleshooting

Even the best chefs can have a hiccup in the kitchen. Here are some common pitfalls and how to avoid them:

  • Overcooked Chicken: If your chicken is dry, reduce the cooking time. It should be golden brown and just cooked through.
  • Too Thick Sauce: If the sauce thickens too much, whisk in a little more chicken stock until you reach your desired consistency.
  • Not Enough Flavor: Taste as you go! Adjust the honey, soy sauce, and vinegar to suit your palate.
  • Burnt Garlic: If your garlic turns bitter, remove it from the heat as soon as it becomes fragrant.

Variations of Honey Garlic Chicken

If you’re feeling adventurous, here are some delicious twists on the classic recipe:

  • Honey Garlic Chicken Stir-Fry: Add bell peppers, broccoli, and carrots for a colorful stir-fry.
  • Spicy Honey Garlic Chicken: Incorporate sriracha or cayenne pepper for an extra kick.
  • Honey Garlic Chicken Tacos: Shred the cooked chicken and serve in corn tortillas with fresh toppings.
  • Honey Garlic Chicken Bowls: Serve over quinoa or brown rice with steamed vegetables for a wholesome meal.

Storage and Make-Ahead Instructions

This recipe is perfect for meal prep:

  • Refrigerate: Store leftovers in an airtight container in the fridge for up to 3 days.
  • Freeze: You can freeze the cooked chicken and sauce for up to 2 months. Thaw in the fridge before reheating.
  • Make Ahead: Prepare the chicken and sauce a day in advance and store them separately. Just reheat and combine before serving.

Comprehensive FAQ

  • Can I use chicken breasts instead of thighs? Yes, but be careful not to overcook them as they can dry out quickly.
  • Can I make this recipe gluten-free? Absolutely! Use tamari instead of soy sauce.
  • What can I serve with honey garlic chicken? It pairs wonderfully with rice, noodles, or a side of vegetables.
  • How can I make the sauce spicier? Add more chili flakes or a dash of hot sauce to the mix.
  • Is it possible to use frozen chicken? Yes, but make sure to thaw it completely before cooking for even results.
  • How do I store leftovers? Keep them in an airtight container in the refrigerator for up to 3 days.
  • Can I double the recipe? Yes, just ensure your skillet is large enough to accommodate all the chicken.
  • What’s the best way to reheat leftovers? Gently reheat in a skillet over medium heat, adding a splash of water or chicken stock to keep it moist.

Nutrition Tips and Dietary Adaptations

Keeping your meals delicious and nutritious is key! Here are some dietary adaptations:

  • Low-Carb Version: Serve with cauliflower rice instead of traditional rice for a low-carb option.
  • Dairy-Free: Simply omit the butter or use a dairy-free alternative.
  • Paleo-Friendly: Stick with natural sweeteners like honey and avoid soy sauce for a compliant meal.
  • Keto-Friendly: Replace honey with a keto-approved sweetener like erythritol or stevia.

Equipment Recommendations

Here’s what you’ll need to make this recipe:

  • Large Skillet: A good quality skillet is essential for even cooking.
  • Whisk: Use a whisk to ensure your sauce is lump-free.
  • Measuring Cups and Spoons: Accurate measurements result in consistent flavors.
  • Cutting Board and Knife: For prepping your chicken and garlic efficiently.

Serving Suggestions

Serving Honey Garlic Chicken can be as simple or elaborate as you wish:

  • Over Rice: Serve on a bed of fluffy boiled rice to soak up that delicious sauce.
  • With Vegetables: Complement the dish with steamed broccoli or a fresh side salad for balance.
  • In a Wrap: Use tortillas to make wraps filled with honey garlic chicken and fresh veggies.
  • As Part of a Feast: Make it the star of a larger meal featuring other Asian-inspired dishes.

Conclusion

And there you have it! A comprehensive guide to crafting the perfect Honey Garlic Chicken that’s sure to impress and satisfy. I hope you find joy in every bite, just as I do when I whip up this comforting dish in my kitchen. Remember, cooking is about exploration and creativity—so don’t hesitate to make this recipe your own. Happy cooking, friends, and may your meals always be filled with love and laughter!

Honey Garlic Chicken

Prep Time 10 minutes
Cook Time 15 minutes
Total Time 25 minutes
Servings 4 servings
Calories 450
A flavorful and easy-to-make honey garlic chicken dish perfect for weeknights. Served over rice, it combines sweet, savory, and spicy elements for a satisfying meal.

Ingredients

Chicken

  • 8 pieces boneless, skinless chicken thighs
  • 2 tbsp cornstarch
  • 0.5 tsp salt
  • 0.5 tsp pepper
  • 2 tbsp vegetable oil
  • 1 tbsp unsalted butter
  • 4 cloves garlic, minced
  • 1/3 cup honey
  • 1/3 cup chicken stock
  • 1 tbsp rice vinegar
  • 1 tbsp light soy sauce
  • 1 tbsp fresh parsley, finely chopped
  • 0.5 tsp chili flakes
  • boiled rice for serving boiled rice

Instructions 

  • Trim and cut chicken into pieces. Toss with salt, pepper, and cornstarch.
  • Mix honey, chicken stock, vinegar, soy sauce, and garlic. Whisk cornstarch with water and set aside.
  • Cook chicken in oil and butter until golden and cooked through. Remove from skillet.
  • Pour sauce into skillet, simmer, then add slurry to thicken. Return chicken and coat.
  • Stir in parsley and chili flakes. Serve over boiled rice.

Notes

Adjust chili flakes to taste for spiciness.
Calories: 450kcal
Cost: $15
Course: Main Course
Cuisine: Asian
Keyword: Chicken

Loved this recipe? Save it to your favorite Pinterest board so you can easily find it later! It’s the perfect way to keep all your sweet ideas in one place. ✨

Delicious Honey Garlic Chicken served with boiled rice, showcasing its texture.

Welcome to the World of Roasted Garlic Potatoes au Gratin

Ah, the warm embrace of comfort food—it’s like a cozy blanket on a chilly evening, isn’t it? If you’re looking to impress your family or friends with a dish that’s not only delicious but also a true crowd-pleaser, you’ve landed in the right spot! Today, we’re diving into the magic of Roasted Garlic Potatoes au Gratin. This creamy, cheesy delight is perfect for gatherings, cozy nights in, or simply when you want to indulge in something truly special. Get ready for a recipe that will have everyone coming back for seconds!

Why You’ll Love This Recipe

Let’s talk about why this dish deserves a spot on your dinner table:

  • Flavor Explosion: The rich, nutty taste of roasted garlic pairs beautifully with creamy potatoes, creating a flavor sensation that’s hard to resist.
  • Easy to Prepare: With straightforward steps, you’ll find this recipe approachable, even if you’re just starting your culinary journey.
  • Impressive Presentation: A bubbling, golden-brown top that looks stunning makes this dish perfect for dinner parties or festive occasions.
  • Customizable: Whether you want to switch up the cheese or add herbs, this recipe allows for plenty of personal tweaks.
  • Leftover Friendly: If you happen to have any leftovers (which is rare!), they reheat beautifully and make for a comforting lunch the next day.

Ingredients You’ll Need

Gathering quality ingredients is key to creating a dish that dazzles. Here’s what you’ll need:

  • 8-9 medium starchy potatoes (about 1.2kg), thinly sliced: Look for Russets or Yukon Golds for the best texture.
  • 1 large head garlic, cut the top off: Roasting garlic transforms its flavor into something sweet and mellow.
  • 1 cup (250 ml) heavy cream: This is what gives the gratin its luxurious texture.
  • 1/4 cup (60 ml) whole milk: Helps lighten the cream while keeping it rich.
  • 1 tablespoon unsalted butter, plus more for greasing the baking dish: Adds richness and flavor.
  • 1 tsp fresh thyme leaves (or 1/3 tsp dried thyme): Fresh herbs elevate the dish beautifully.
  • 1/4 tsp nutmeg: A pinch of nutmeg enhances the creaminess.
  • 1/2 cup (40g) grated parmesan cheese, divided: Adds a salty, nutty flavor.
  • 2 cups (about 220g) shredded Gruyère or mozzarella cheese: Choose Gruyère for a more complex flavor or mozzarella for a milder taste.
  • Salt and pepper to taste: Essential for bringing all the flavors together.
  • Fresh chives, for garnish: A pop of color and freshness.

How to Make Roasted Garlic Potatoes au Gratin

A close-up view of creamy potato au gratin dish with crispy cheese crust and garlic.

Let’s get cooking! Follow these simple steps to create your own masterpiece:

  1. Preheat your oven: Start by preheating your oven to 375°F (190°C) to set the stage for deliciousness.
  2. Roast the garlic: Cut the top off the head of garlic to expose the cloves. Place it on a piece of aluminum foil, drizzle with olive oil, and sprinkle a pinch of salt. Wrap it tightly and roast for about 30 minutes, or until soft and golden.
  3. Prepare the baking dish: Grease a 9×13-inch (23×33 cm) baking dish with butter and set it aside.
  4. Slice the potatoes: Peel and thinly slice the potatoes, ideally using a mandoline for even slices.
  5. Layer the potatoes: Arrange the sliced potatoes upright in layers within the baking dish; this not only looks stunning but also ensures even cooking.
  6. Make the creamy sauce: In a saucepan over medium heat, combine heavy cream, milk, butter, half of the grated parmesan, thyme, nutmeg, salt, and pepper. Heat until well combined, but don’t let it boil.
  7. Incorporate the roasted garlic: Once roasted, squeeze the garlic cloves out of their skins and mash into a paste. Stir this into the cream mixture until fully combined.
  8. Assemble the gratin: Pour the creamy mixture over the layered potatoes, ensuring they are evenly coated. Cover the dish tightly with foil.
  9. Bake: Place in the oven and bake for 1 hour and 15 minutes.
  10. Add more cheese: After the initial baking time, remove the foil, sprinkle the remaining cheese on top, and return to the oven uncovered for an additional 15 minutes or until the cheese is bubbling and golden brown.
  11. Cool and garnish: Once baked, let it cool for a few minutes, then garnish with fresh chives before serving.

Pro Tips for Perfect Roasted Garlic Potatoes au Gratin

Want to take your dish to the next level? Check out these expert tips!

  • Choose the right potatoes: Starchy potatoes like Russets create the best texture, while waxy potatoes hold their shape but can be less creamy.
  • Don’t skimp on the cream: For the ultimate indulgence, use heavy cream instead of milk. Trust me, it’s worth it!
  • Layering is key: Make sure to layer the potatoes snugly; this helps with even cooking and flavor distribution.
  • Experiment with cheeses: Feel free to mix and match your favorite cheeses to create a unique flavor profile.
  • Let it rest: After baking, allow your gratin to rest for at least 10 minutes before serving. This helps the layers set and makes serving easier.
  • Garnish generously: Fresh herbs like chives or parsley add a burst of color and fresh flavor to your dish.
  • Broil for a crispy top: If you love a crunchy top, broil for an extra 2-3 minutes after baking—just keep an eye on it!
  • Make it ahead: Prepare the dish up to the baking step, cover with foil, and refrigerate for up to 24 hours before baking.
  • Freeze leftovers: If you have any leftovers (and that’s a big ‘if’), they freeze well. Just reheat in the oven when you’re ready to enjoy again!
  • Adjust seasoning to taste: Always taste as you go! Adjust the salt and pepper as needed to suit your palate.

Common Mistakes and Troubleshooting

Even the best chefs face challenges! Here are some common pitfalls and how to avoid them:

  • Potatoes not cooking through: Ensure your slices are evenly cut and thin. A mandoline can help!
  • Gratin too watery: Avoid boiling the cream mixture; heat gently to combine ingredients.
  • Cheese burning on top: If you notice the cheese browning too quickly, cover with foil and continue baking.
  • Garlic flavor too strong: If you’re not a huge garlic fan, reduce the amount of garlic or roast it less for a milder taste.

Variations to Try

Want to mix things up? Here are some delightful variations to consider:

  • Herb-infused: Add fresh herbs like rosemary or oregano for an aromatic twist.
  • Spicy kick: Incorporate diced jalapeños or a pinch of cayenne pepper for a layered heat.
  • Vegetable medley: Swap out some potatoes for thinly sliced zucchini or sweet potatoes for added flavor and nutrition.
  • Smoky flavor: Add smoked cheese or a touch of smoked paprika to give your gratin a rich, smoky undertone.

Storage and Make-Ahead Instructions

Want to prepare in advance? Here’s how to store and make the most of your gratin:

  • Refrigerate: Store any leftovers in an airtight container in the fridge for up to 3 days.
  • Freeze: You can freeze portions in an airtight container for up to 3 months. Just reheat in the oven when you’re ready to enjoy!
  • Make ahead: Assemble the gratin a day in advance, cover tightly with foil, and refrigerate. Bake when needed, adding an extra 10-15 minutes to the cooking time.

Frequently Asked Questions

You’ve got questions; we’ve got answers! Here are some common queries about Roasted Garlic Potatoes au Gratin:

  • Can I use other types of cheese? Yes! Feel free to experiment with your favorite cheeses, but remember that different cheeses melt differently.
  • What’s the best way to reheat leftovers? Reheat in the oven at 350°F (175°C) until warmed through for the best texture.
  • Can I make this gluten-free? Absolutely! This recipe is naturally gluten-free as long as you ensure the cheese and cream are gluten-free.
  • How can I make this dish vegan? Substitute potatoes with cashew cream or coconut cream, and use dairy-free cheese alternatives.
  • What if I don’t have fresh thyme? Dried thyme works perfectly; just use about one-third of the amount.
  • Can I add meat? Yes! Cooked bacon or sausage can add a delightful twist to this dish.
  • How do I know when it’s done? The gratin is done when the potatoes are fork-tender and the cheese is golden and bubbly.
  • Can I double the recipe? Yes! Just make sure to use a larger baking dish and adjust the baking time as needed.

Nutritional Tips and Dietary Adaptations

Cooking with health in mind? Here are some tips to adapt this dish:

  • Lower fat options: Use low-fat milk instead of cream or incorporate more vegetables to reduce calories.
  • Increase fiber: Add in a layer of spinach or kale for added nutrition without sacrificing flavor.
  • Cut down on carbs: Substitute half of the potatoes with cauliflower for a lower-carb version.

Equipment Recommendations

Here’s what you’ll need to successfully create this dish:

  • Mandoline slicer: For even potato slices that cook uniformly.
  • Baking dish: A deep 9×13-inch dish is ideal for layering.
  • Aluminum foil: Essential for covering the dish while it bakes to keep the moisture in.
  • Sharp knife: For cutting and slicing garlic and herbs easily.

Serving Suggestions

Ready to serve? Consider these delightful pairings:

  • Green salad: A fresh green salad with a light vinaigrette balances the richness of the gratin.
  • Grilled meats: Serve alongside grilled chicken or steak for a hearty meal.
  • Roasted vegetables: Complement your gratin with a side of seasonal roasted veggies for color and nutrition.

Conclusion

There you have it—your ultimate guide to mastering the art of Roasted Garlic Potatoes au Gratin. This dish is more than just a recipe; it’s an invitation to create memories, share laughter, and enjoy delicious food with the people you love. So roll up your sleeves, get those potatoes ready, and let your kitchen come alive with the comforting aroma of garlic and cheese. Happy cooking, my friend, and may your meals always bring a little magic to the table!

Roasted Garlic Potatoes au Gratin

Prep Time 20 minutes
Cook Time 1 hour 15 minutes
Total Time 1 hour 35 minutes
Servings 6 servings
Calories 450
A rich and creamy potato gratin infused with roasted garlic and topped with melted cheese, perfect for comforting meals.

Ingredients

Potatoes

  • 8-9 medium starchy potatoes (about 1.2kg, thinly sliced)
  • 1 large head garlic (cut the top off)
  • 1 cup heavy cream (double cream)
  • 1/4 cup whole milk
  • 1 tablespoon unsalted butter (plus more for greasing)
  • 1 tsp fresh thyme leaves (or 1/3 tsp dried thyme)
  • 1/4 tsp nutmeg
  • 1/2 cup grated parmesan cheese (divided)
  • 2 cups shredded Gruyère or mozzarella cheese
  • to taste Salt and pepper
  • for garnish Fresh chives

Instructions 

  • Roast garlic: cut off the top, wrap in foil with oil and salt, roast at 375°F (190°C) for 30 mins.
  • Peel and thinly slice potatoes. Grease a 9x13-inch dish and layer potatoes upright.
  • Heat cream, milk, butter, half of parmesan, thyme, nutmeg, salt, and pepper until combined. Squeeze roasted garlic into mixture.
  • Pour mixture over potatoes, cover with foil, and bake at 375°F (190°C) for 75 mins. Remove foil, top with cheese, and bake 15 mins until golden.

Notes

Ensure potatoes are evenly layered for uniform cooking.
Calories: 450kcal
Cost: $15
Course: Side Dish
Cuisine: French
Keyword: cheese, garlic, potatoes

Welcome to Your New Favorite One-Pan Meal!

Hey there, friend! If you’ve stumbled into my kitchen today, you’re in for a treat. Let’s talk about a dish that feels like a warm hug after a long day—a Healthy Chicken and Vegetables Skillet. This recipe is not just about throwing together some ingredients; it’s about creating a meal that brings joy, nourishment, and a splash of color to your dinner table. Packed with vibrant vegetables and tender chicken, this dish is your go-to for a cozy, nutritious meal that everyone will love!

Why You’ll Love This Recipe

Let me share why this skillet dish will become a staple in your home:

  • Quick and Easy: With a total cook time of just 30 minutes, this meal is perfect for busy weeknights when you want something wholesome without the fuss.
  • One-Pan Wonder: Say goodbye to a mountain of dishes! This recipe is all about minimal cleanup while still delivering maximum flavor.
  • Flavorful and Colorful: The combination of chicken and vibrant veggies creates a feast for both the eyes and the palate.
  • Versatile Ingredients: Feel free to swap in your favorite vegetables or proteins—this dish adapts to whatever you have on hand!
  • Meal Prep Friendly: Perfect for leftovers! Make a big batch and enjoy it throughout the week, whether as is or transformed into something new.

Gathering Your Ingredients

A vibrant, healthy skillet dish featuring chicken, assorted vegetables, and garnished with parsley.

Let’s get cooking! Here’s what you’ll need:

  • 1 lb boneless, skinless chicken breast: Cut into bite-sized pieces for quick cooking.
  • 2 tablespoons olive oil: For that rich, savory flavor.
  • 1 bell pepper: Any color will do—red, yellow, or green for a pop of color!
  • 1 zucchini: Adds a lovely crunch.
  • 1 cup broccoli florets: Packed with nutrients and a beautiful green hue.
  • 2 cloves garlic: Minced for a fragrant base.
  • 1 teaspoon dried oregano: For an herby touch.
  • 1 teaspoon paprika: Adds a delightful warmth.
  • Salt and pepper to taste: Essential for seasoning.
  • 1 cup low-sodium chicken broth: To keep everything moist and flavorful.
  • Fresh parsley: For garnish—because we eat with our eyes first!

How to Make Your Skillet Meal

Ready to create some magic? Here’s how:

  1. Heat the olive oil in a large skillet over medium heat.
  2. Add the chicken pieces and season with salt, pepper, oregano, and paprika. Cook until browned, about 5-7 minutes.
  3. Stir in the minced garlic and cook for an additional minute until fragrant.
  4. Add the bell pepper, zucchini, and broccoli. Cook for about 5 minutes, stirring occasionally, until the vegetables are tender.
  5. Pour in the chicken broth and bring to a simmer. Cook for another 5 minutes until the chicken is cooked through and the sauce has slightly thickened.
  6. Remove from heat, garnish with fresh parsley, and serve warm.

Pro Tips for Success

To ensure your chicken and vegetables skillet turns out perfectly, consider these expert insights:

  • Prep Ahead: Chop your vegetables and chicken in advance to save time during cooking.
  • Don’t Overcrowd the Pan: If your skillet is too full, the chicken won’t brown properly. Cook in batches if necessary.
  • Use Fresh Ingredients: Fresh vegetables enhance flavor and texture, so try to use them when possible.
  • Adjust the Seasoning: Taste as you go! Don’t hesitate to add more spices or herbs based on your preference.
  • Cooking Time Variations: If you’re using larger pieces of chicken, you may need to adjust the cooking time to ensure it’s thoroughly cooked.
  • Keep it Colorful: Aim for a mix of colorful vegetables to make the dish visually appealing and nutritious.
  • Experiment with Sauces: A splash of balsamic vinegar or a squeeze of lemon juice can brighten up the flavors.
  • Rest Before Serving: Let the dish sit for a couple of minutes before serving to allow the flavors to meld.

Common Mistakes and Troubleshooting

Even seasoned cooks can run into a few hiccups! Here are some common mistakes and how to troubleshoot:

  • Chicken is Dry: Ensure you don’t overcook the chicken. It should be juicy and tender when done.
  • Vegetables are Soggy: Avoid cooking them for too long; they should be crisp-tender.
  • Not Enough Flavor: Always season properly—salt and herbs make all the difference!
  • Too Much Liquid: If you find your skillet is too soupy, let it simmer longer to reduce the broth.

Delicious Variations to Try

This recipe is a fantastic base, and you can customize it in so many ways:

  • Protein Swap: Substitute chicken with shrimp, tofu, or even ground turkey for a different flavor profile.
  • Veggie Mix: Feel free to swap in seasonal vegetables like asparagus, carrots, or even sweet potatoes.
  • Spice It Up: Add a pinch of red pepper flakes for a bit of heat, or include more exotic spices like cumin or coriander.
  • Herb Infusion: Fresh herbs like basil or thyme can elevate the dish even more—add them at the end for a burst of freshness.

Storage and Make-Ahead Instructions

This dish is perfect for meal prep! Here’s how to store and reheat it:

  • Storing: Keep leftovers in an airtight container in the fridge for up to 4 days. Reheat gently on the stove or in the microwave.
  • Freezing: You can freeze the cooked skillet meal for up to 3 months. Thaw overnight in the fridge before reheating.
  • Make-Ahead: Prep the chicken and chop the vegetables a day in advance to reduce cooking time.

Frequently Asked Questions

Got questions? I’ve got answers! Here are some common queries about this dish:

  • Can I use frozen vegetables? Yes, frozen veggies work well, but they might release more water, so adjust the cooking time accordingly.
  • What can I serve with this dish? This skillet pairs beautifully with rice, quinoa, or even a hearty bread to soak up the delicious sauce.
  • Is this recipe gluten-free? Absolutely! Just make sure your chicken broth is gluten-free.
  • How can I make this dish spicier? Add fresh jalapeños or a dash of hot sauce while cooking.
  • Can I add beans for extra protein? Definitely! Chickpeas or black beans are great additions that complement the dish.
  • What if I don’t have chicken broth? You can substitute with vegetable broth or even water in a pinch.
  • How do I know when the chicken is done? The internal temperature should reach 165°F (75°C). Use a meat thermometer for accuracy.
  • Can I make this vegetarian? Sure! Just skip the chicken and add more veggies or tofu for protein.

Nutritional Insights and Dietary Adaptations

This Healthy Chicken and Vegetables Skillet is not just delicious; it’s also packed with nutrients:

  • High in Protein: Chicken breast is a lean source of protein, essential for muscle health.
  • Rich in Vitamins: The colorful vegetables provide a variety of vitamins and minerals.
  • Low in Calories: This dish is a great option for those looking to maintain a healthy lifestyle without sacrificing flavor.
  • Diet-Friendly: Easily adaptable for paleo, keto, and gluten-free diets!

Essential Equipment for This Recipe

To make your cooking experience as smooth as possible, here are some recommended tools:

  • Large Skillet: A sturdy non-stick skillet is ideal for even cooking and easy cleanup.
  • Cutting Board: A good quality cutting board makes prep work safe and efficient.
  • Sharp Knife: A sharp knife is essential for chopping veggies and chicken with ease.
  • Meat Thermometer: To ensure your chicken is cooked to perfection.

Serving Suggestions for Your Skillet Delight

Now that your masterpiece is ready, let’s talk about how to serve it:

  • Garnish: A sprinkle of fresh parsley or a squeeze of lemon can brighten the dish.
  • Side Dishes: Consider serving it over a bed of fluffy rice, with a side salad, or some crusty bread for a complete meal.
  • Wine Pairings: A light white wine, like Sauvignon Blanc, complements the flavors wonderfully.

Conclusion: Bringing It All Together

And there you have it! A Healthy Chicken and Vegetables Skillet that’s not just a meal but an experience—a way to connect with yourself and those you love over a nourishing and delicious dish. Remember, cooking is about joy and creativity, so don’t hesitate to make this recipe your own. I can’t wait to hear how yours turns out! Pull up a chair, grab a spoon, and let’s make some unforgettable memories together in the kitchen!

Healthy Chicken and Vegetables Skillet

Prep Time 10 minutes
Cook Time 20 minutes
Total Time 30 minutes
Servings 4 servings
Calories 350
A quick and nutritious skillet recipe combining tender chicken with colorful vegetables, perfect for a wholesome meal.

Ingredients

Protein

  • 1 lb boneless, skinless chicken breast (cut into bite-sized pieces)

Oil

  • 2 tablespoons olive oil

Vegetables

  • 1 chopped bell pepper
  • 1 sliced zucchini
  • 1 cup broccoli florets

Aromatics and Spices

  • 2 cloves garlic, minced
  • 1 teaspoon dried oregano
  • 1 teaspoon paprika
  • to taste salt and pepper

Liquids

  • 1 cup low-sodium chicken broth

Garnish

  • fresh parsley for garnish

Instructions 

  • Heat olive oil in a skillet over medium heat.
  • Add chicken, season with salt, pepper, oregano, and paprika; cook until browned, 5-7 minutes.
  • Add garlic; cook 1 minute until fragrant.
  • Stir in bell pepper, zucchini, and broccoli; cook 5 minutes until tender.
  • Pour in chicken broth; simmer 5 minutes until cooked through and slightly thickened. Garnish with parsley and serve.

Notes

Feel free to add more vegetables or adjust seasonings to taste.
Calories: 350kcal
Cost: $15
Course: Main Course
Cuisine: Healthy
Keyword: Chicken, vegetables

Loved this recipe? Save it to your favorite Pinterest board so you can easily find it later! It’s the perfect way to keep all your sweet ideas in one place. ✨

A mouthwatering skillet of sautéed chicken chunks with fresh vegetables, beautifully presented.

Welcome to Your New Comfort Food Favorite!

Gather around, friends! Today, we’re diving into the heart of home cooking with a dish that brings smiles and full bellies: Broccoli Rice Casserole. This isn’t just any casserole—this is a warm hug in a baking dish, a blend of tender broccoli and creamy cheese sauce that makes dinner feel like a cozy family gathering. Whether you’re prepping for a potluck, a holiday feast, or just a weeknight dinner, this recipe is your ticket to culinary success. Ready to transform your kitchen into a haven of deliciousness? Let’s get cooking!

Why You’ll Love This Recipe

Here are just a few reasons this Broccoli Rice Casserole is bound to become a staple in your home:

  • Kid-Approved Flavor: With its cheesy goodness and tender broccoli, even the pickiest eaters will be asking for seconds.
  • Quick and Easy: Perfect for busy weeknights, this dish comes together in about 15 minutes of prep and bakes while you relax.
  • Make-Ahead Magic: Prepare it in advance and pop it in the fridge—just bake when you’re ready to enjoy!
  • Versatile Base: This casserole serves as a delightful side or a hearty main dish, pairing well with almost anything.
  • Leftover Love: Enjoy the comforting flavors the next day—this casserole tastes even better after a night in the fridge!

Your Shopping List

Here’s what you’ll need to whip up this delicious casserole:

  • 3 cups cooked rice (about 1 cup uncooked)—the cozy base.
  • 1 (16 oz.) package frozen broccoli florets—easy and convenient!
  • 1 small onion, finely chopped—for that aromatic foundation.
  • 1 (10 3/4 oz.) can cream of mushroom soup—the creamy magic!
  • 1/2 cup milk—to enhance the creaminess.
  • 1 teaspoon salt—to bring all the flavors together.
  • 1/2 teaspoon black pepper—a touch of warmth.
  • 1/4 teaspoon garlic powder—for an added depth of flavor.
  • 1/4 teaspoon paprika—just a hint of smokiness.
  • 2 cups shredded mild or medium cheddar cheese—divided, because more cheese is always better!

Let’s Cook Together

Side view of a baked broccoli rice casserole, showing layers of broccoli and cheese.

Ready to bring this casserole to life? Here’s how:

  1. Prep the Broccoli: Thaw your frozen broccoli and warm it in the microwave for about 5 minutes. Drain very well and cut any large florets into smaller, bite-sized pieces—this makes for easier eating!
  2. Mix It Up: In a large bowl, combine the warm cooked rice, chopped onion, cream of mushroom soup, milk, salt, pepper, garlic powder, paprika, and 1 cup of the shredded cheddar. Give it a good stir until everything is well mixed. Fold in the broccoli gently.
  3. Get Baking: Spoon the mixture into a greased 9×13-inch baking dish. Top with the remaining 1 cup of shredded cheddar cheese for that perfect, cheesy topping.
  4. Oven Time: Bake at 350°F for 35-40 minutes, until bubbly and the cheese is just beginning to get some golden brown spots. Your house is about to smell amazing!
  5. Optional Prep Ahead: You can prepare the casserole ahead of time. Just assemble it in the dish, cover it, and refrigerate. When you’re ready to bake, just add an extra 15-30 minutes to the baking time. Cover loosely with foil if the cheese starts to brown too much.

Pro Tips for Casserole Success

Want to elevate your casserole game? Here are some expert tips to ensure it’s a hit every time:

  • Fresh Ingredients: If you have fresh broccoli on hand, feel free to use that instead of frozen—just steam it lightly before mixing it in!
  • Cheese Varieties: Experiment with different cheeses like gouda or pepper jack for a fun twist on flavors.
  • Texture Matters: For a crunchy topping, sprinkle some crushed crackers or breadcrumbs mixed with melted butter on top before baking.
  • Herb It Up: Fresh herbs like thyme or parsley can add a lovely freshness to the dish—just fold them in with the broccoli.
  • Protein Boost: Add cooked chicken or ham for a heartier meal that packs a protein punch.
  • Watch the Bake: Keep an eye on the casserole in the oven; ovens can vary in temperature, and you don’t want it to over-brown.
  • Resting Time: Let the casserole sit for about 10 minutes after baking; this helps it set up nicely for serving.
  • Custom Spice: Feel free to add a pinch of red pepper flakes for a little heat if you’re feeling adventurous!

Common Mistakes and Troubleshooting

Even the best cooks have their moments! Here’s how to avoid some common pitfalls:

  • Watery Casserole: Make sure to drain the broccoli well; excess water can lead to a soggy casserole.
  • Overcooked Rice: If you’re using leftover rice, ensure it’s not overcooked or mushy before mixing it in.
  • Uneven Cheese Distribution: Stir the cheese into the mixture rather than just layering it on top to ensure every bite is cheesy goodness.
  • Burnt Edges: If the edges start browning too quickly, cover the casserole loosely with foil.

Delicious Variations

Want to switch things up? Here are some tasty variations to try:

  • Mexican Style: Add black beans, corn, and diced tomatoes, and top with pepper jack cheese for a southwestern twist.
  • Italian Flair: Mix in cooked Italian sausage and top with mozzarella cheese and Italian herbs for a delicious Italian spin.
  • Vegetable Medley: Swap out some of the broccoli for other veggies like cauliflower or bell peppers for a colorful dish.
  • Gluten-Free Option: Use a gluten-free cream soup and serve with gluten-free breadcrumbs on top for crunch.

Storage and Make-Ahead Instructions

This casserole is a dream for meal prep! Here’s how to store it:

  • Refrigerate: Store leftovers in an airtight container in the fridge for up to 3-4 days.
  • Freezing: You can freeze the unbaked casserole for up to 3 months. Just thaw it overnight in the fridge before baking.
  • Reheat: Warm up leftovers in the oven at 350°F until heated through, about 20-25 minutes.

Comprehensive FAQ

Still have questions? Let’s tackle some common inquiries about this casserole:

  • Can I use brown rice? Absolutely! Just make sure it’s fully cooked before mixing.
  • What if I don’t have cream of mushroom soup? You can substitute with cream of chicken soup or make a homemade white sauce.
  • Can I make this casserole vegan? Yes! Use plant-based cheese and a vegan cream soup for a delicious vegan option.
  • How do I add more flavor? Consider sautéing the onions in butter before mixing them in for extra depth.
  • Is this casserole gluten-free? You can easily make it gluten-free by using gluten-free cream soup and breadcrumbs.
  • Can I double the recipe? Definitely! Just use a larger baking dish and adjust the baking time as needed.
  • What’s the best way to reheat leftovers? Reheat in the oven for a crispy topping, or microwave for a quick fix.
  • Can I add different vegetables? Yes! Feel free to add your favorite vegetables like carrots or spinach.

Nutrition Tips and Dietary Adaptations

Want to make this dish a bit healthier? Here are some ideas:

  • Lower Fat: Use low-fat cheese and milk for a lighter version.
  • Increase Fiber: Add a can of drained beans or lentils to boost fiber content.
  • Reduce Sodium: Opt for low-sodium soup and season to taste with herbs.
  • Plant-Based Option: Substitute dairy ingredients with plant-based alternatives for a vegan-friendly dish.

Equipment Recommendations

Here’s what you’ll need to make this casserole:

  • 9×13-inch Baking Dish: Perfect for this size casserole.
  • Large Mixing Bowl: For combining all the ingredients.
  • Microwave-Safe Bowl: For thawing and warming broccoli.
  • Measuring Cups and Spoons: Essential for precise ingredient measurement.

Serving Suggestions

How to serve this comforting dish? Here are some ideas:

  • With a Salad: Pair with a fresh green salad for a balanced meal.
  • As a Main Dish: Serve it alongside crusty bread for a filling dinner.
  • Garnish: Top with fresh herbs like parsley or chives for a pop of color.
  • With a Side: A light soup can complement this casserole beautifully.

So there you have it, my friends! The Broccoli Rice Casserole That Makes Dinner Feel Like Home is not just a recipe—it’s a celebration of comfort, flavor, and togetherness. I hope you enjoy making it as much as I do! Happy cooking, and remember: every meal is a chance to create magic in your kitchen!

Broccoli-Rice Casserole

Prep Time 10 minutes
Cook Time 40 minutes
Total Time 50 minutes
Servings 6 servings
Calories 450
A comforting baked casserole combining rice, broccoli, and cheesy goodness, perfect for a family dinner.

Ingredients

Rice and Broccoli

  • 3 cups cooked rice (about 1 cup uncooked)
  • 1 package frozen broccoli florets (16 oz.)
  • 1 small onion, finely chopped
  • 1 can cream of mushroom soup (10 3/4 oz.)
  • 0.5 cup milk
  • 1 tsp salt
  • 0.5 tsp black pepper
  • 0.25 tsp garlic powder
  • 0.25 tsp paprika
  • 2 cups shredded cheddar cheese, divided

Instructions 

  • Thaw and drain broccoli, then cut into bite-sized pieces.
  • Mix cooked rice, onion, mushroom soup, milk, salt, pepper, garlic powder, paprika, and 1 cup cheese; fold in broccoli.
  • Transfer to a greased 9x13-inch dish, top with remaining cheese.
  • Bake at 350°F (175°C) for 35-40 minutes until bubbly and golden.
  • For make-ahead, assemble, refrigerate, and bake longer (60-75 min), covering if cheese browns too quickly.

Notes

You can use frozen chopped broccoli instead of florets if preferred.
Calories: 450kcal
Cost: $15
Course: Main Course
Keyword: Broccoli, cheese, Rice