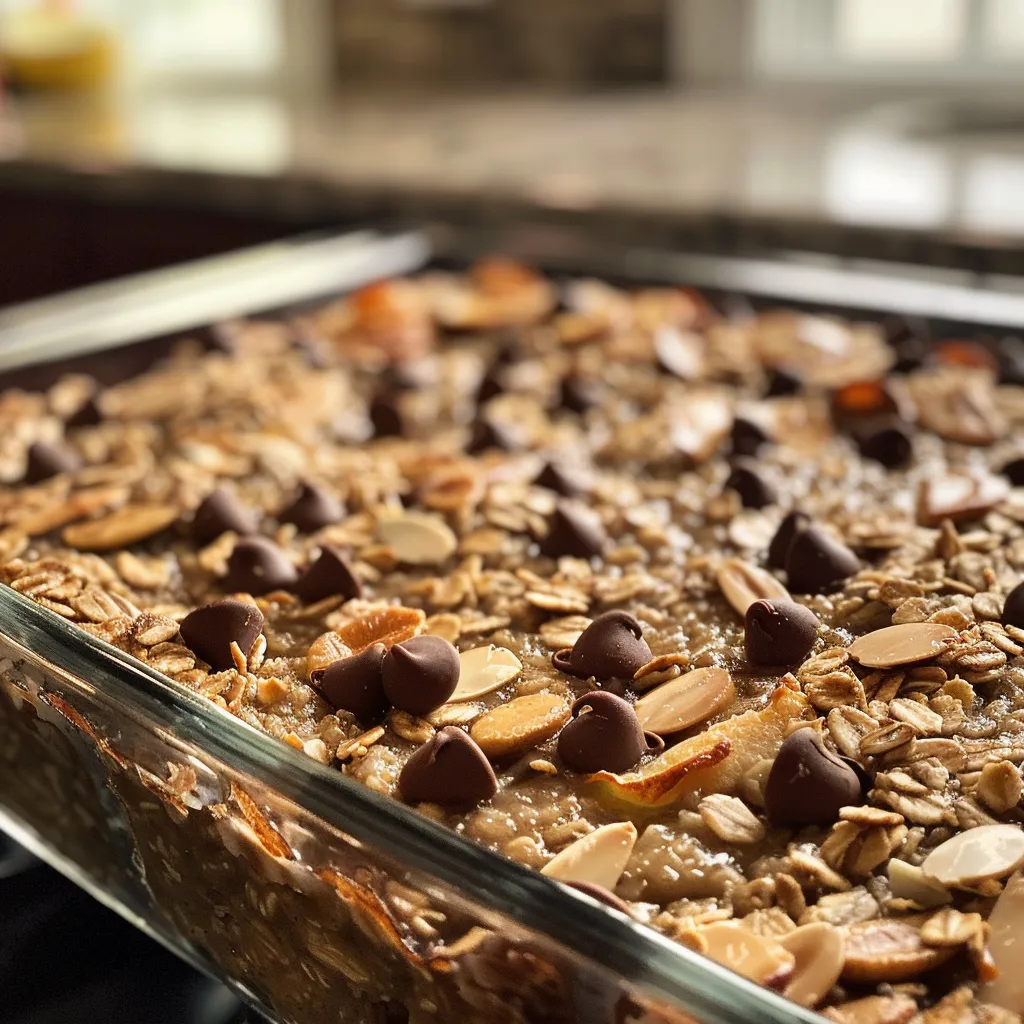
Author

Ava

Browsing

Welcome to Your New Favorite Dish

Hey there, kitchen adventurer! If you’re here, it’s likely because you’re ready to spice things up with a dish that’s as comforting as it is exciting. Allow me to introduce you to my go-to recipe: Hot Honey Beef Bowls. This meal isn’t just a blend of hot and sweet; it’s a beautiful tapestry of flavors and textures that will make your taste buds dance. With lean ground beef, creamy cottage cheese, and roasted sweet potatoes, this dish is a celebration of hearty ingredients that come together for a satisfying meal any night of the week!

Why You’ll Love This Recipe

Let’s dive into the magic of this dish! Here are just a few reasons why you’ll adore these Hot Honey Beef Bowls:

  • Flavor Explosion: The combination of spicy hot honey and savory beef is simply irresistible.
  • Health-Conscious Choice: Packed with lean protein and nutrient-rich sweet potatoes, this dish supports your wellness goals without sacrificing flavor.
  • Easy Prep: With a straightforward recipe and minimal ingredients, you’ll have dinner on the table in no time!
  • Customizable: You can easily swap ingredients to suit your taste or dietary needs, making it versatile for any table.
  • Make Ahead: Perfect for meal prep—these bowls store beautifully and taste even better the next day!

Ingredient Breakdown

Let’s talk about what you’ll need to create this masterpiece. Here’s the full list of ingredients along with some handy substitutions:

  • 2 tbsp hot honey: Adds a sweet and spicy kick. If you don’t have hot honey, mix regular honey with a dash of hot sauce.
  • 250 g lean beef mince: I prefer 5% fat for the best balance of flavor and health. You can substitute with ground turkey or chicken if you want a lighter option.
  • Half a pack of taco seasoning (approx 2 tbsp): This adds depth and flavor. Feel free to use homemade seasoning or adjust to your spice preference.
  • 200 g cottage cheese: A creamy addition that also boosts protein. Greek yogurt works as a great alternative!
  • 500 g sweet potato: Sweet potatoes provide a comforting base. You can swap in regular potatoes or cauliflower for a lower-carb option.
  • 200 g tenderstem broccoli: This adds a lovely crunch. Broccoli florets or green beans are good substitutes.
  • 1 medium avocado: Rich and creamy, it adds healthy fats. If you’re not an avocado fan, try a dollop of guacamole instead!
  • 1 tsp salt: Essential for flavor. Adjust to your taste!
  • 1 tsp smoked paprika: This deepens the flavor profile. Regular paprika can be used if you don’t have smoked.
  • Olive oil spray: For roasting the sweet potatoes. You can use regular olive oil as well.

How to Make Hot Honey Beef Bowls

Juicy beef mince mixed with honey sauce, sweet potato, broccoli, and avocado in a bowl.

Ready to get cooking? Here’s how to bring this dish to life:

  1. Preheat your oven to 400°F (200°C).
  2. Peel the sweet potatoes, then chop them into bite-size chunks. Toss them in a bowl with a little olive oil, along with the salt and smoked paprika.
  3. Spread the sweet potatoes on a baking sheet and roast for about 25-30 minutes, or until they are tender and golden brown.
  4. In a medium pan over medium heat, cook the ground beef until browned. Drain any excess fat.
  5. Add the taco seasoning to the beef, stirring well to combine. Cook for an additional 3-5 minutes, allowing the flavors to meld.
  6. While the beef is cooking, steam or sauté the tenderstem broccoli until bright green and tender.
  7. Assemble your bowls: start with a base of roasted sweet potatoes, top with seasoned beef, add a generous scoop of cottage cheese, some broccoli, and finish with sliced avocado.
  8. Drizzle the hot honey over everything and enjoy!

Pro Tips for Perfect Bowls

Want to elevate your bowls even further? Check out these expert tips:

  • Balance the Flavors: If you find the hot honey too sweet, add a squeeze of lime juice to balance it out.
  • Texture Matters: For added crunch, consider tossing some roasted nuts or seeds on top.
  • Batch Cooking: Prepare extra sweet potatoes and beef to store for quick lunches throughout the week.
  • Fresh Herbs: A sprinkle of fresh cilantro or parsley adds a burst of freshness.
  • Experiment with Heat: Adjust the amount of hot honey to suit your spice tolerance—feel free to go bold!
  • Meal Prep Friendly: Store components separately to keep everything fresh longer.
  • Grains Galore: Serve over a bed of quinoa or brown rice for an extra hearty meal.
  • Mix It Up: Try adding other veggies like bell peppers or corn for more color and nutrients.

Common Mistakes and Troubleshooting

Even the best cooks have their off days! Here are some common pitfalls and how to avoid them:

  • Overcooking Sweet Potatoes: Keep an eye on them! You want them tender, but not mushy.
  • Dry Beef: Ensure you don’t overcook the beef to keep it juicy. Ground beef should be cooked until just browned.
  • Too Much Heat: If the hot honey is overpowering, balance it with creamy toppings like cottage cheese or avocado.
  • Forget the Seasoning: Don’t skip the taco seasoning—it adds essential depth to the beef!

Variations to Try

Feel free to make this recipe your own! Here are some creative variations:

  • Vegetarian Option: Substitute ground beef with lentils or chickpeas, and keep all the other ingredients the same.
  • Spicy Kick: Add diced jalapeños or a sprinkle of cayenne pepper to the beef for an extra kick.
  • Asian Fusion: Use teriyaki sauce instead of hot honey and serve with bok choy instead of broccoli.
  • Gluten-Free: All the ingredients are naturally gluten-free, but always check labels for packaged items!

Storage and Make-Ahead Instructions

Want to enjoy these bowls throughout the week? Here’s how to store them:

  • Refrigerator: Store assembled bowls in airtight containers for up to 3 days.
  • Freezer-Friendly: Components freeze well. Store beef and sweet potatoes separately for up to 3 months.
  • Reheating: Microwave on medium power until heated through. Add fresh avocado just before serving for the best flavor.

Frequently Asked Questions

Got questions? I’ve got answers! Here are some FAQs about Hot Honey Beef Bowls:

  • Can I use ground turkey instead of beef? Absolutely! Ground turkey is a great substitute for a leaner option.
  • Is this recipe gluten-free? Yes, all ingredients are gluten-free! Just be sure to check any packaged items like taco seasoning.
  • How can I make this dish spicier? Add more hot honey or a dash of your favorite hot sauce to the beef.
  • Can I add other vegetables? Definitely! Feel free to mix in any of your favorite veggies.
  • What can I substitute for cottage cheese? Greek yogurt or a vegan alternative works well.
  • How long do leftovers last? Leftovers can be kept in the fridge for up to 3 days.
  • Can I skip the hot honey? Sure! You can use regular honey or a sweet chili sauce.
  • What should I serve with these bowls? They’re delicious on their own, but you can serve them with a side salad or some crispy tortilla chips!

Nutritional Tips and Dietary Adaptations

Keeping your meals healthy? Here are some nutritional insights:

  • Protein-Packed: With lean beef and cottage cheese, these bowls are rich in protein, keeping you full longer.
  • Fiber-Rich: Sweet potatoes and broccoli provide fiber, supporting digestive health.
  • Healthy Fats: Avocado adds beneficial fats that help absorb nutrients and keep your heart healthy.

Equipment Recommendations

Before you start, make sure you have the right tools:

  • Baking Sheet: For roasting sweet potatoes.
  • Medium Pan: For cooking the beef.
  • Mixing Bowl: To toss sweet potatoes with oil and seasoning.
  • Measuring Cups and Spoons: Essential for accurate ingredient measurements.

Serving Suggestions

Want to impress your guests? Here are some serving ideas:

  • Garnish with Fresh Herbs: A sprinkle of cilantro or parsley adds a beautiful touch.
  • Drizzle with Extra Hot Honey: For those who love it spicy, an extra drizzle of hot honey before serving is a game changer!
  • Pair with a Refreshing Drink: A cold glass of lemonade or iced tea complements the flavors perfectly.

Conclusion: Time to Cook!

Now that you have all the tools and knowledge needed, it’s time to make these Hot Honey Beef Bowls a part of your culinary repertoire. Whether you’re cooking for a crowd or just treating yourself, this recipe promises warmth, flavor, and comfort. Remember, cooking is a journey—so trust your instincts, have fun, and make this dish your own. Happy cooking, and don’t forget to share your creations with me!

Hot Honey Beef Bowls Recipe

Prep Time 10 minutes
Cook Time 30 minutes
Total Time 40 minutes
Servings 4 servings
Calories 650
A flavorful and easy-to-make bowl combining spicy honey, lean beef, and roasted sweet potatoes for a satisfying meal.

Ingredients

Sauces and seasonings

  • 2 tbsp hot honey
  • 250 g lean beef mince (5% fat)
  • 2 tbsp taco seasoning (half a pack)

Dairy

  • 200 g cottage cheese

Vegetables

  • 500 g sweet potato
  • 200 g tenderstem broccoli
  • 1 medium avocado
  • 1 tsp salt
  • 1 tsp smoked paprika
  • Olive oil spray

Instructions 

  • Peel the sweet potatoes, then chop into bite-size chunks. Toss them in a bowl with olive oil, salt, and smoked paprika.

Notes

Roast the sweet potatoes until tender and cook the beef with taco seasoning for added flavor.
Calories: 650kcal
Cost: $15
Course: Main Course
Cuisine: American
Keyword: Beef, honey, sweet potato

Welcome to Comfort: The Jiffy Corn Casserole That Feels Like Home on a Plate

Ah, the sweet aroma of baked corn casserole wafting through the kitchen—it’s like a warm hug on a chilly day. If you’re looking for that perfect dish that combines deliciously sweet and subtly savory flavors, you’ve come to the right place. This Jiffy Corn Casserole is the ultimate comfort food that not only fills your belly but also warms your heart. Let’s dive into why this recipe is a must-try, perfect for family gatherings, potlucks, or even a cozy night in.

Why You’ll Love This Recipe

This Jiffy Corn Casserole is not just easy to make; it’s packed with flavor and nostalgia. Here are some benefits that will have you saying “wow” with every bite:

  • Quick and Simple: With just a handful of ingredients and minimal prep time, you can whip up this delightful dish in no time.
  • Comfort Food Classic: It embodies all the elements of comfort food—rich, creamy, and incredibly satisfying.
  • Perfect for Any Occasion: Whether it’s a holiday feast or a weekend BBQ, this casserole fits right in.
  • Kid-Friendly: The slightly sweet flavor makes it a hit with the little ones, ensuring there are no leftovers!
  • Versatile: You can easily customize it with your favorite ingredients or spices to make it your own.

Ingredient Breakdown

Let’s take a closer look at the ingredients that make this Jiffy Corn Casserole shine:

  • Creamed Corn: Adds a rich, creamy texture. If you’re looking for a healthier option, try using low-fat versions.
  • Whole Kernel Corn: This adds a delightful texture. You can substitute it with frozen corn if fresh isn’t available.
  • Corn Muffin Mix (Jiffy): The star of the dish! It provides sweetness and fluffiness. If you prefer homemade, you can make your own cornbread mix.
  • Sour Cream: Ensures the casserole is creamy and rich. Greek yogurt can be a great substitute for a lighter version.
  • Butter: Adds flavor and moisture. You can replace it with olive oil for a healthier twist.
  • Honey: This provides a touch of sweetness. Maple syrup can be a delicious alternative.
  • Egg: Acts as a binder. If you’re vegan, you could use a flaxseed egg instead.
  • Salt and Pepper: Essential for flavor. Don’t skip these!

Pro Tips for the Perfect Corn Casserole

A side view of a delicious Jiffy corn casserole, featuring a golden crust and visible kernels of corn.

To elevate your Jiffy Corn Casserole to the next level, here are some expert insights:

  • Mix it Gently: When combining wet and dry ingredients, mix until just combined for a fluffy texture.
  • Don’t Overbake: Keep an eye on your casserole as it bakes. You want it golden on top but still moist inside.
  • Let it Rest: Allow the casserole to sit for 10 minutes before serving. This helps it set up nicely.
  • Experiment with Add-ins: Feel free to add jalapeños for a spicy kick or cheese for extra creaminess.
  • Use Fresh Ingredients: Whenever possible, opt for fresh corn when in season for the best flavor.
  • Grease Your Dish Well: This prevents sticking and ensures easy serving.
  • Check for Doneness: Insert a toothpick in the center; it should come out clean when the casserole is done.
  • Serve Warm: This dish is best enjoyed warm; reheat leftovers in the oven for the best texture.

Common Mistakes and Troubleshooting

Even the best of us have made a mistake in the kitchen. Here’s how to avoid common pitfalls:

  • Overmixing: This can lead to a dense casserole. Mix just enough to combine.
  • Not Preheating the Oven: Always preheat! This ensures even cooking.
  • Skipping the Grease: Always grease your baking dish to prevent sticking.
  • Ignoring Texture: If your casserole is too dry, consider adding more sour cream or a splash of milk next time.
  • Not Letting it Rest: Give it time to set before slicing; it will hold its shape better.

Variations to Try

Ready to shake things up? Here are some variations to make this recipe your own:

  • Cheesy Corn Casserole: Stir in a cup of shredded cheddar cheese for a rich, cheesy flavor.
  • Spicy Jalapeño Corn Casserole: Add diced jalapeños for a spicy twist that packs a punch.
  • Herbed Corn Casserole: Mix in fresh herbs like thyme or parsley for a fresh flavor.
  • Veggie-Loaded Corn Casserole: Toss in some finely chopped bell peppers or zucchini for added nutrients.

Storage and Make-Ahead Instructions

This casserole can be made ahead of time and stored for later use:

  • Make Ahead: Prepare the casserole and store it unbaked in the fridge for up to 24 hours. Just pop it in the oven when ready to bake!
  • Storing Leftovers: Keep leftovers in an airtight container in the fridge for up to 4 days.
  • Reheating: Reheat in the oven at 350°F until warmed through, about 20 minutes.
  • Freezing: This casserole freezes well! Just make sure to wrap it tightly in foil before freezing for up to 3 months.

Frequently Asked Questions

Got questions? I’ve got answers! Here are some common queries about the Jiffy Corn Casserole:

  • Can I use a different type of corn? Yes! Feel free to substitute fresh, frozen, or canned corn.
  • Is this casserole gluten-free? Yes, if you use a gluten-free corn muffin mix.
  • What can I serve with this casserole? It pairs well with grilled meats, salads, or as part of a larger buffet.
  • Can I make it vegan? Absolutely! Substitute the egg with a flaxseed egg and the sour cream with a dairy-free alternative.
  • How long does it take to bake? Bake for 45-50 minutes or until golden brown.
  • What if my casserole is too dry? Consider adding more sour cream or even a splash of milk next time.
  • How do I know when it’s done? A toothpick inserted in the center should come out clean.
  • Can I add other ingredients? Yes! Feel free to customize with your favorite spices or vegetables.

Nutrition Tips and Dietary Adaptations

This casserole can be a part of a balanced diet with a few tweaks:

  • Watch Your Portions: While delicious, it’s still a treat. Enjoy it in moderation.
  • Boost Nutrients: Add more veggies to up the nutritional value.
  • Low-Fat Alternatives: Use low-fat sour cream and butter to reduce calories.
  • Gluten-Free Options: Use gluten-free cornbread mix for a safe option.

Equipment Recommendations

Here’s what you’ll need to make your Jiffy Corn Casserole:

  • Mixing Bowls: For combining all your ingredients.
  • Measuring Cups and Spoons: Precision is key!
  • 8×8 Inch Baking Dish: Perfect for this casserole size.
  • Whisk: For mixing ingredients smoothly.
  • Oven Mitts: Safety first when retrieving your delicious creation!

Serving Suggestions

Now that your Jiffy Corn Casserole is ready, here are some serving ideas:

  • Garnish with Fresh Herbs: A sprinkle of chopped parsley or cilantro adds a fresh touch.
  • Serve with a Side Salad: A crisp green salad pairs perfectly for balance.
  • Offer Hot Sauce: For those who love a kick, hot sauce on the side is a great option.
  • Pair with Grilled Chicken: This casserole complements grilled meats beautifully.

So there you have it! The definitive guide to making the Jiffy Corn Casserole that feels like home on a plate. I hope you find as much joy in making it as I do, and that it becomes a staple in your kitchen. Remember, cooking is about love and connection, so gather your loved ones, share a meal, and make some memories. Happy cooking!

Best Jiffy Corn Casserole Honey Recipe

Prep Time 10 minutes
Cook Time 45 minutes
Total Time 55 minutes
Servings 8 servings
Calories 250
A deliciously sweet and savory corn casserole perfect for family dinners or holiday gatherings.

Ingredients

Canned Goods

  • 1 can creamed corn
  • 1 can whole kernel corn, drained

Baking Mix

  • 1 package corn muffin mix (like Jiffy)

Dairy & Eggs

  • 1/2 cup sour cream
  • 1/2 cup butter, melted
  • 1/4 cup honey
  • 1 large egg, beaten
  • 1/4 teaspoon salt
  • 1/4 teaspoon black pepper

Instructions 

  • Preheat oven to 350°F (175°C) and grease an 8x8 inch baking dish.
  • Mix creamed corn and drained whole kernel corn in a bowl.
  • Fold in corn muffin mix, then stir in sour cream, melted butter, honey, egg, salt, and pepper.
  • Pour batter into prepared dish and bake for 45 minutes until golden.

Notes

For a sweeter flavor, drizzle additional honey before serving.
Calories: 250kcal
Cost: $15
Course: Side Dish
Cuisine: American
Keyword: Casserole, corn, honey

Welcome to Your New Favorite Comfort Dish

Ah, the vegetable casserole—a dish that holds the promise of warmth and home-cooked nostalgia. Packed with creamy goodness, vibrant veggies, and a cheesy crunch, it’s no wonder this bake has earned a spot in many hearts (and stomachs). Today, I’m thrilled to share with you a recipe that will not only nourish your body but also wrap you in a comforting hug with every bite. Let’s dive into the delightful world of vegetable casseroles, where every ingredient is chosen with love and care.

Why You’ll Love This Recipe

This vegetable casserole is more than just a dish; it’s an experience! Here are five reasons to get excited:

  • Comforting Warmth: Each bite feels like a warm hug, making it perfect for family gatherings or cozy nights in.
  • Easy to Customize: With a variety of veggies and add-ins, you can make this casserole your own—it’s a canvas for your culinary creativity!
  • Healthy and Hearty: Packed with nutritious ingredients, this dish is a great way to sneak more veggies into your meals without sacrificing flavor.
  • Leftover Friendly: This casserole tastes even better the next day, making it the perfect meal prep option for busy weeks ahead.
  • Kid Approved: With a cheesy top and creamy filling, it’s a delightful contrast that even the pickiest eaters will enjoy.

Ingredient Breakdown: What You’ll Need

Let’s gather the ingredients for our vegetable casserole! Here’s what you need:

  • 1 small yellow onion, finely diced: Adds sweetness and depth to the dish.
  • 1 tablespoon butter: For sautéing the onions to golden perfection.
  • 10.5 oz condensed cream of mushroom soup: This creamy base is a testament to comfort food.
  • ½ cup milk: To make the casserole rich and creamy.
  • ½ cup sour cream: Adds a delightful tanginess that brightens the flavors.
  • 8 oz shredded cheddar cheese, divided: Because who doesn’t love ooey-gooey cheese?
  • 2 heaping cups frozen broccoli: A nutritious star of the show!
  • 3 cups frozen mixed vegetables: A colorful mix that adds texture and flavor.
  • 2 large eggs, whisked: Helps bind everything together.
  • 2 cups cooked white long grain rice: A hearty base that makes this dish filling.
  • ½ teaspoon garlic salt: For that extra flavor kick.
  • ½ teaspoon salt: A must for enhancing all the flavors.
  • ½ teaspoon mustard powder: Adds depth and a little zing.
  • ½ teaspoon Italian seasoning: For a hint of aromatic herbs.
  • ¼ teaspoon black pepper: Just the right amount of heat.
  • 1 cup Ritz crackers, crushed (about ¾ sleeve): For a crunchy topping that contrasts beautifully with the creamy filling.
  • 2 tablespoons melted butter: To mix with the crackers for that golden brown finish.
  • 2 tablespoons fresh parsley, finely chopped: For a dash of freshness and color.

Pro Tips for the Best Casserole

Side angle of a hearty vegetable casserole showcasing broccoli and mixed vegetables.

Before we jump into the instructions, here are some expert insights to elevate your dish:

  • Use fresh veggies: If you have seasonal vegetables on hand, feel free to swap them in—zucchini, bell peppers, or even spinach work beautifully.
  • Mix up the cheese: While cheddar is classic, try mixing in mozzarella or even a sharp Gruyère for a different flavor profile.
  • Make it vegan: Substitute the cream of mushroom soup with a plant-based version, use cashew cream instead of sour cream, and swap eggs with flaxseed meal.
  • Layer the flavors: Sauté your onions until they’re golden brown for deeper flavor.
  • Don’t skip the resting time: Allow the casserole to sit for a few minutes after baking to set up nicely.
  • Experiment with herbs: Fresh herbs like thyme or rosemary can add a delightful contrast to the dish.
  • Test for doneness: Make sure the edges are bubbly and the cheese is melted and golden.
  • Top with extra crunch: For added texture, mix in some toasted nuts or seeds with the cracker topping.

Common Mistakes and Troubleshooting

Even the most experienced cooks can run into hiccups! Here’s how to troubleshoot:

  • Too dry? Add a splash more milk or broth to keep the casserole moist.
  • Texture issues? Ensure you don’t overcook the vegetables before adding them to the casserole.
  • Not enough flavor? Adjust seasonings to your taste; a little more salt or a squeeze of lemon can do wonders.
  • Browning too quickly? If your casserole is browning too fast, cover it with foil for part of the baking time.

Delicious Variations to Try

Feeling adventurous? Here are some fun variations to keep things exciting:

  • Mexican style: Add black beans, corn, and salsa for a fiesta in a dish!
  • Italian twist: Incorporate marinara sauce and Italian herbs for a pasta bake vibe.
  • Breakfast casserole: Mix in cooked breakfast sausage or bacon for a hearty brunch option.
  • Chili cheese casserole: Stir in a can of chili for a spicy upgrade, topped with Fritos instead of crackers.

Storage and Make-Ahead Instructions

Want to prepare this dish ahead of time? Here’s how to store and reheat:

  • Make-ahead: Assemble the casserole a day in advance, cover it tightly, and refrigerate until you’re ready to bake.
  • Freezing: This casserole freezes well! Just cover tightly with foil and freeze for up to 3 months. Thaw in the fridge before baking.
  • Reheating: To reheat, bake at 350°F (175°C) until heated through, about 20-30 minutes.

Frequently Asked Questions

Let’s address some common queries!

  • Can I use fresh vegetables instead of frozen? Absolutely! Just adjust the cooking time accordingly.
  • What can I substitute for cream of mushroom soup? You can use homemade cream sauce or a different cream soup like cream of chicken.
  • How do I make this gluten-free? Use gluten-free crackers and ensure your soup is gluten-free.
  • Can I add protein to this dish? Yes! Cooked chicken, turkey, or even chickpeas work great.
  • Is there a vegan option? Definitely! Replace dairy with plant-based alternatives as mentioned earlier.
  • How do I prevent sogginess? Make sure to drain any excess liquid from the vegetables before mixing.
  • Can I make this in a slow cooker? Yes! Combine ingredients and cook on low for 4-6 hours.
  • What sides go well with this casserole? A simple green salad or garlic bread complements the dish beautifully.

Nutritional Tips and Dietary Adaptations

This casserole can be tailored to fit various diets:

  • Low-carb: Substitute rice with cauliflower rice for a lower carb count.
  • High-protein: Add cooked lentils or beans for an extra protein boost.
  • Dairy-free: Use plant-based cheese and cream alternatives.

Essential Equipment Recommendations

Before you start cooking, here’s what you’ll need:

  • 9×13-inch casserole dish: Perfect for baking and serving.
  • Large pot: For sautéing your onions and mixing the ingredients.
  • Mixing bowls: Handy for combining ingredients before layering.
  • Cooking spray or butter: To grease your baking dish.

Serving Suggestions: How to Enjoy Your Casserole

Now that your casserole is baked to perfection, let’s talk about serving!

  • Garnish: A sprinkle of fresh parsley or chives adds a pop of color and flavor.
  • Pair it: Serve it alongside a crisp green salad or warm crusty bread.
  • Leftovers: This dish keeps well in the fridge, making it an easy lunch option for the week.

Wrap Up: Your New Go-To Recipe

There you have it—your new favorite vegetable casserole recipe that balances comfort with nutrition. Whether you’re cooking for family, impressing friends, or treating yourself, this dish is sure to deliver smiles and satisfaction. Now, go grab your apron, and let’s make something magical happen in your kitchen! Remember, every meal is an opportunity to connect and celebrate. Happy cooking!

Vegetable Casserole

Prep Time 15 minutes
Cook Time 30 minutes
Total Time 45 minutes
Servings 6 servings
Calories 650
A hearty and cheesy vegetable casserole perfect for a comforting family meal.

Ingredients

Dairy and Vegetables

  • 1 small yellow onion, finely diced
  • 1 tablespoon butter
  • 10.5 oz condensed cream of mushroom soup
  • ½ cup milk
  • ½ cup sour cream
  • 8 oz shredded cheddar cheese, divided
  • 2 cups frozen broccoli
  • 3 cups frozen mixed vegetables
  • 2 large eggs, whisked
  • 2 cups cooked white long grain rice
  • ½ teaspoon garlic salt
  • ½ teaspoon salt
  • ½ teaspoon mustard powder
  • ½ teaspoon Italian seasoning
  • ¼ teaspoon black pepper

Crust topping

  • 1 cup Ritz crackers, crushed (about ¾ sleeve)
  • 2 tablespoons melted butter
  • 2 tablespoons fresh parsley, finely chopped

Instructions 

  • Preheat oven to 350°F (175°C) and grease a 9x13-inch dish.
  • Cook onions in butter until softened, then stir in soup, milk, sour cream, seasonings, and 1 cup cheese; heat through.
  • Add vegetables, eggs, and rice; mix well, transfer to dish, and top with remaining cheese.
  • Cover with foil and bake for 20 minutes, then uncover, sprinkle with crushed crackers mixed with melted butter and parsley, and bake 10 more minutes.

Notes

For a crunchier topping, bake uncovered a few extra minutes until golden brown.
Calories: 650kcal
Cost: $15
Course: Main Course
Cuisine: American
Keyword: vegetables

Why This Cheesy Cream Cheese Corn Casserole Will Steal the Show

Dive into the warm, comforting world of Cheesy Cream Cheese Corn Casserole, a dish that’s not just about satisfying hunger but creating memories around the dinner table. If you grew up enjoying family gatherings where every bite was met with smiles and laughter, this casserole will bring you right back. Blending sweet and savory flavors, it’s the perfect side for every occasion—from summer barbecues to cozy winter nights. Let’s explore why this recipe is a must-try!

Why You’ll Love This Recipe

This casserole isn’t just delicious; it’s an experience! Here are five reasons why you’ll adore it:

  • Comforting Flavors: The combination of sweet creamed corn and rich cream cheese creates a dish that feels like a warm hug on a chilly day.
  • Quick and Easy: With just a few simple steps, you can whip up this casserole in under an hour, making it perfect for weeknight dinners.
  • Versatile Side Dish: Perfect for pairing with everything from roasted chicken to grilled steak, it complements a variety of main dishes beautifully.
  • Customizable: Whether you want to add some heat with jalapeños or swap in different cheeses, this recipe is flexible enough to adapt to your tastes.
  • Leftovers? Yes, Please!: This casserole keeps well, so you can enjoy the deliciousness for days to come!

Ingredients and Why They Work

Let’s break down the star players in this casserole:

  • Whole Kernel Corn: Provides a sweet crunch that contrasts beautifully with the creamy texture.
  • Creamed Corn: Adds moisture and sweetness, making the casserole decadently rich.
  • Cream Cheese: Ensures a creamy, luscious mouthfeel that binds all the flavors together.
  • Melted Butter: Enhances flavor and richness, while also helping with that golden top.
  • Shredded Cheddar Cheese: A classic choice for its sharp, tangy flavor that complements the sweetness of the corn.
  • Sour Cream: Adds a tangy depth that balances the richness of the cheese.
  • Garlic Powder: Infuses a subtle savory note without overpowering the dish.
  • Salt and Pepper: Essential seasonings that enhance all the flavors.

Step-by-Step: How to Make Cheesy Cream Cheese Corn Casserole

A detailed image of cheesy cream cheese corn casserole with visible corn kernels and a creamy texture.

Step 1: Prepare the Casserole Mixture

In a large bowl, combine:

  • 2 cans (15 oz each) whole kernel corn, drained
  • 1 can (15 oz) creamed corn
  • 8 oz cream cheese, softened
  • 1/2 cup melted butter
  • 1 cup shredded cheddar cheese
  • 1/2 cup sour cream
  • 1/2 teaspoon garlic powder
  • Salt and pepper, to taste

Mix well until all ingredients are fully combined and smooth.

Step 2: Bake

Pour the mixture into a greased 9×13-inch baking dish. Bake at 350°F (175°C) for 30-35 minutes, or until the casserole is hot and bubbly, with a golden top.

Step 3: Serve and Enjoy

Once baked, let it cool slightly before serving warm alongside your favorite main dish.

Pro Tips for the Perfect Casserole

  • Mixing Consistency: Ensure the cream cheese is well-softened to avoid lumps in your mixture for a smooth texture.
  • Cheese Variations: Experiment with different cheeses like Monterey Jack or Pepper Jack for a unique twist.
  • Add Some Spice: Toss in some diced jalapeños or a sprinkle of cayenne pepper if you like a little heat.
  • Don’t Skip the Resting Time: Allowing the casserole to cool slightly before serving will help it set up and enhance the flavors.
  • Top It Off: For a crunchy topping, sprinkle some crushed cornflakes or breadcrumbs mixed with melted butter before baking.
  • Make It Ahead: Prepare the mixture the night before, store it in the fridge, and bake it fresh when you’re ready to serve.
  • Storage Wisdom: Store leftovers in an airtight container in the fridge for up to 4 days or freeze for up to 3 months.
  • Reheating Tips: Reheat in the oven at 350°F until warmed through to maintain the best texture.

Common Mistakes and Troubleshooting

Here are some pitfalls to avoid for a flawless casserole:

  • Overmixing: Avoid overmixing the ingredients to prevent a dense casserole. Stir until just combined.
  • Underbaking: Make sure to bake until the top is golden and bubbly; underbaking can lead to a runny texture.
  • Forgotten Seasoning: Don’t forget to taste and adjust the seasoning before baking; bland food is a missed opportunity!
  • Choosing the Wrong Dish: Use a glass or ceramic dish for even cooking and easy visibility.

Delicious Variations for Your Casserole

Feel free to get creative with these tasty twists:

  • Mexican Fiesta: Add black beans, corn, and diced tomatoes for a southwestern flair.
  • Italian Twist: Stir in some Italian herbs and top with mozzarella cheese.
  • Loaded Baked Potato: Mix in chopped cooked bacon and green onions for a loaded baked potato vibe.
  • Sweet Corn Muffin Casserole: Fold in a box of Jiffy corn muffin mix for a sweeter, cornbread-like texture.

Storage and Make-Ahead Instructions

This casserole is perfect for meal prep! Here’s how to handle it:

  • Refrigeration: Store any leftovers in an airtight container in the fridge for up to 4 days.
  • Freezing: You can freeze the casserole before baking. Assemble it in a freezer-safe dish, cover tightly, and freeze for up to 3 months.
  • Thawing and Reheating: Thaw overnight in the fridge. Bake at 350°F for about 40 minutes until heated through.

Frequently Asked Questions

  • Can I use frozen corn instead of canned corn? Yes! Just thaw and drain before using.
  • What can I substitute for cream cheese? Neufchâtel cheese or a dairy-free cream cheese alternative works great.
  • Can I make this casserole gluten-free? Absolutely! Just ensure your ingredients (like your corn muffin mix) are gluten-free.
  • How do I know when the casserole is done? Look for a golden top and bubbly edges; it should be hot throughout.
  • Can I add more cheese? Yes! Feel free to load it up with your favorite cheeses for a gooey experience.
  • What’s the best way to reheat leftovers? Reheat in the oven for the best texture, or in the microwave if you’re short on time.
  • How can I make it spicier? Add diced jalapeños or cayenne pepper to kick up the heat.
  • Is this casserole suitable for potlucks? Definitely! It’s a crowd-pleaser and travels well.

Nutrition Tips and Dietary Adaptations

This casserole can be adjusted to fit various dietary needs:

  • Low-Fat Option: Use reduced-fat cream cheese and sour cream to cut calories without sacrificing flavor.
  • Dairy-Free: Choose vegan cream cheese and dairy-free cheese alternatives.
  • High-Protein: Stir in some cooked, shredded chicken or beans for a protein boost.

Equipment Recommendations

For this recipe, you’ll need:

  • 9×13-inch Baking Dish: Ideal for even baking.
  • Mixing Bowl: A large bowl for combining all your delicious ingredients.
  • Wooden Spoon or Spatula: For mixing and serving.

Serving Suggestions

This Cheesy Cream Cheese Corn Casserole pairs beautifully with:

  • Roasted Chicken
  • Grilled Steak
  • Barbecue Ribs
  • Vegetarian Chili

So, are you ready to bring a little magic to your kitchen? This casserole is more than just a side dish; it’s an experience that will fill your home with warmth and joy. Happy cooking!

Cheesy Cream Cheese Corn Casserole

Prep Time 10 minutes
Cook Time 35 minutes
Total Time 45 minutes
Servings 8 servings
Calories 350
A creamy, cheesy casserole perfect as a side dish for any gathering or family meal.

Ingredients

Canned Corn

  • 2 cups whole kernel corn, drained
  • 1 cup creamed corn
  • 8 oz cream cheese, softened
  • 1/2 cup melted butter
  • 1 cup shredded cheddar cheese
  • 1/2 cup sour cream
  • 1/2 teaspoon garlic powder
  • to taste Salt and pepper

Instructions 

  • Combine all ingredients in a large bowl and mix until smooth.
  • Pour mixture into a greased 9x13-inch baking dish.
  • Bake at 350°F (175°C) for 30-35 minutes until hot and bubbly.
  • Serve warm as a side dish.

Notes

You can add chopped green onions for extra flavor.
Calories: 350kcal
Cost: $12
Course: Side Dish
Cuisine: American
Keyword: cheese, corn

Welcome to My Kitchen: The Ultimate Comfort Dish

Hey there, fellow food enthusiasts! If you’ve landed here, you’re probably on a quest for a dish that not only fills your belly but warms your heart. Today, we’re diving into the world of comfort food with my go-to slow-cooker broccoli casserole. This recipe is a delightful blend of creamy goodness and sharp cheddar, making it the perfect companion for weeknight dinners or special gatherings. Let’s embark on this flavorful journey together and discover why this dish is destined to become a staple in your kitchen.

Why You’ll Love This Recipe

Before we roll up our sleeves and get cooking, let me share a few reasons why you’re going to adore this casserole:

  • Effortless Preparation: Simply toss your ingredients into the slow cooker and let it work its magic—no fuss, no mess!
  • Comforting Flavors: The combination of broccoli, cheese, and creamy soup creates a hug-in-a-bowl experience that you and your family will love.
  • Versatile Side Dish: This casserole pairs beautifully with a range of main dishes, from roasted chicken to grilled steaks.
  • Make-Ahead Friendly: You can prep it in advance, making it an ideal choice for busy weeknights or holiday feasts.
  • Kid-Approved: Even the pickiest eaters can’t resist this deliciously cheesy dish!

Gather Your Ingredients

Here’s what you’ll need to whip up this savory delight:

  • 6 cups frozen chopped broccoli: Partially thawed for perfect texture.
  • 1 can (10-3/4 ounces) condensed cream of celery soup: This adds creaminess and flavor depth.
  • 1 1/2 cups shredded sharp cheddar cheese: Divided into two portions for layering.
  • 1/4 cup chopped onion: For that aromatic base.
  • 1/2 teaspoon Worcestershire sauce: A secret ingredient for umami richness.
  • 1/4 teaspoon pepper: To season and enhance the flavors.
  • 1 cup crushed butter-flavored crackers: About 25 crackers, for a crunchy topping.
  • 2 tablespoons butter: Dot on top for a rich, golden crust.

Pro Tips for Success

Side view of a slow cooker filled with a cheesy broccoli casserole dish.

Now that we have our ingredients, let’s make sure you nail this recipe with some expert insights:

  • Don’t Skip Thawing: Partially thawing the broccoli ensures even cooking and prevents excess water.
  • Cheese Choice Matters: Use sharp cheddar for a bold flavor that complements the broccoli beautifully.
  • Layer Wisely: Layer the casserole correctly to achieve that perfect crust on top.
  • Monitor Cooking Time: Every slow cooker is different! Check for doneness around the 2-hour mark.
  • Experiment with Spices: Feel free to add a pinch of garlic powder or a dash of hot sauce for an extra kick.
  • Use Fresh Broccoli: If you prefer, you can substitute fresh broccoli; just blanch it briefly before adding it to the mix.
  • Make it Your Own: This recipe is flexible! Try adding cooked chicken or bacon for a heartier meal.
  • Keep an Eye on the Topping: If your topping isn’t browning as desired, remove the lid for the last 15 minutes to crisp it up.

Common Mistakes and Troubleshooting

Even the best of us can face a few hiccups in the kitchen. Here are some common mistakes and how to avoid them:

  • Overcooking the Broccoli: If you cook too long, the broccoli may turn mushy. Aim for tender, not soggy!
  • Too Much Liquid: Make sure to not add extra liquids unless necessary; the soup provides ample moisture.
  • Skipping the Butter: Don’t skip the butter on top; it’s essential for that rich, golden crust!
  • Ignoring the Cheese: Adding cheese too early can make it greasy. Wait until the end to sprinkle it on!

Delicious Variations to Try

Looking to mix things up? Here are some variations to inspire your creativity:

  • Protein-Packed: Add cooked chicken or turkey for a heartier casserole that’s perfect for a main dish.
  • Veggie Boost: Toss in some diced bell peppers or mushrooms for an added veggie punch.
  • Spicy Kick: Add diced jalapeños or a splash of hot sauce for a zesty twist.
  • Cheesy Delight: Swap out the cheddar for Monterey Jack or pepper jack for a different flavor profile.

Storage and Make-Ahead Instructions

This casserole is not just a hit at the dinner table; it’s also excellent for meal prep. Here’s how to store and reheat it:

  • Refrigerator: Store leftovers in an airtight container for up to 4 days.
  • Freezer Friendly: You can freeze the casserole before cooking it. Just thaw it overnight in the refrigerator before cooking.
  • Reheat in the Oven: For best results, reheat in a 350°F oven until warmed through, about 20 minutes.
  • Microwave Option: If you’re in a hurry, microwave individual portions for 2-3 minutes, stirring halfway.

Frequently Asked Questions

Got questions? I’ve got answers! Here are some FAQs about this delightful casserole:

  • Can I bake this casserole instead of using a slow cooker? Yes! Bake it at 350°F for about 30-40 minutes, or until bubbly.
  • Is there a gluten-free option? Absolutely! Use gluten-free crackers and cream soup.
  • Can I make this without condensed soup? Yes, you can use a homemade white sauce as a substitute.
  • What can I serve with this casserole? It pairs well with baked chicken, ham, or a fresh salad.
  • How do I know when it’s done? The casserole should be bubbly, and the broccoli tender.
  • Can I add other vegetables? Yes! Feel free to add carrots or cauliflower to the mix!
  • What’s the best way to store leftovers? In an airtight container in the refrigerator for up to 4 days.
  • Is this casserole healthy? It can be! Use low-fat cheese and soup to lighten it up.

Nutritional Tips and Dietary Adaptations

Looking to make this dish healthier? Here are some tips to consider:

  • Low-Fat Alternatives: Use low-fat cheese and soup to cut down on calories.
  • Incorporate Whole Grains: Swap butter-flavored crackers for whole-grain varieties.
  • Vegetarian Option: Make it vegetarian by using vegetable broth instead of chicken broth if you add any.

Equipment Recommendations

For this recipe, you’ll need:

  • 3-quart slow cooker: Perfect for this casserole size.
  • Mixing bowl: For combining your ingredients.
  • Measuring cups and spoons: To ensure accurate ingredient ratios.
  • Spatula: For mixing and serving.

Serving Suggestions

This casserole is versatile and pairs well with a variety of dishes. Here are some serving suggestions:

  • Grilled Chicken: The perfect protein to complement the cheesy goodness.
  • Roasted Vegetables: Add some colorful veggies on the side for a balanced meal.
  • Fresh Salad: A light salad can provide a refreshing contrast to the rich casserole.

Conclusion: A Casserole to Remember

And there you have it, my dear friends! A cozy, comforting slow-cooker broccoli casserole that’s not just simple to make but also a joy to share. I hope you’ll find as much magic in this dish as I have over the years. Remember, cooking is all about experimenting and finding joy in the kitchen. So gather your loved ones, serve up this delicious casserole, and watch as they savor every bite. Happy cooking!

Slow-Cooker Broccoli Casserole Recipe

Prep Time 10 minutes
Cook Time 2 hours 30 minutes
Total Time 2 hours 40 minutes
Servings 6 servings
Calories 250
A creamy, cheesy broccoli casserole cooked effortlessly in a slow cooker, perfect as a comforting side dish.

Ingredients

Main

  • 6 cups frozen chopped broccoli, partially thawed
  • 1 can (10-3/4 ounces) condensed cream of celery soup, undiluted
  • 1.5 cups shredded sharp cheddar cheese, divided
  • 0.25 cup chopped onion
  • 0.5 teaspoon Worcestershire sauce
  • 0.25 teaspoon pepper
  • 1 cup crushed butter-flavored crackers (about 25 crackers)
  • 2 tablespoons butter

Instructions 

  • Mix broccoli, soup, 1 cup cheese, onion, Worcestershire, and pepper in a bowl.
  • Grease slow cooker and pour mixture inside.
  • Sprinkle crushed crackers over top and dot with small pieces of butter.
  • Cook on high for 2.5 to 3 hours until tender.
  • Sprinkle remaining cheese over casserole and cook uncovered for 10 minutes until melted.
  • Serve warm once cheese is melted and bubbly.

Notes

For a richer flavor, add a dash of garlic powder or paprika.
Calories: 250kcal
Cost: $15
Course: Side Dish
Keyword: Broccoli

Welcome to Your New Favorite Comfort Dish

Hey there, friend! If you’ve found your way to this cozy corner of the internet, chances are you’re looking for a dish that’s not just filling but also downright heartwarming. Well, you’re in for a treat! My Ground Turkey Pasta Bake is about to become your go-to recipe for family dinners, potlucks, or even a simple weeknight meal. This delightful blend of ground turkey, pasta, and gooey cheese is like a hug in a casserole dish, and I promise you’ll have people asking for seconds!

Let’s dive into why this turkey pasta bake is a must-try, and I’ll guide you through every step of the process. From the ingredients to variations and troubleshooting tips, we’re covering it all!

Why You’ll Love This Recipe

  • Quick and Easy: This dish comes together in under an hour, making it perfect for busy weeknights.
  • Healthier Option: Ground turkey is a leaner alternative to beef, offering you a healthy, protein-packed meal.
  • Customizable: Feel free to swap in your favorite veggies or pasta shapes to make it your own!
  • Kid-Friendly: With flavors that are sure to please even the pickiest eaters, this dish is a hit with kids and adults alike.
  • One Dish Wonder: Minimal cleanup required since everything cooks in one pan—less time scrubbing and more time enjoying!

Ingredients Breakdown

Before we get cooking, let’s gather our ingredients. Here’s what you’ll need:

  • 1 pound ground turkey
  • 12 ounces pasta of choice (I love using penne or rotini)
  • 2 cups marinara sauce
  • 1 cup shredded mozzarella cheese
  • 1/2 cup grated Parmesan cheese
  • 1 teaspoon garlic powder
  • 1 teaspoon onion powder
  • 1 teaspoon Italian seasoning
  • Salt and pepper to taste

Now, if you want to mix things up, here are some substitutions you can consider:

  • Ground Turkey: You can use ground chicken or lean beef if you prefer.
  • Pasta: Gluten-free pasta works great, or you could even use zucchini noodles for a low-carb option.
  • Cheese: Swap mozzarella for cheddar or gouda for a different flavor profile.
  • Marinara Sauce: Homemade sauce or store-bought? You choose! Just ensure it’s a brand you love.

Let’s Cook It Together!

Side angle of a casserole filled with pasta, ground turkey, and marinara sauce.

Now that we have our ingredients ready, it’s time to whip up this delicious dish. Follow these steps:

  • Preheat your oven to 375°F (190°C).
  • Cook the pasta according to package instructions until al dente. Drain and set aside.
  • In a large skillet, brown the ground turkey over medium heat, breaking it apart with a spoon.
  • Add the marinara sauce, garlic powder, onion powder, Italian seasoning, salt, and pepper to the skillet with the turkey. Stir to combine.
  • Add the cooked pasta to the skillet and mix until all ingredients are well incorporated.
  • Transfer the mixture to a baking dish and top with mozzarella and Parmesan cheese.
  • Bake in the preheated oven for 20-25 minutes, or until the cheese is bubbly and golden.

Pro Tips for the Perfect Pasta Bake

To ensure your Ground Turkey Pasta Bake turns out just right, keep these tips in mind:

  • Don’t Overcook the Pasta: Aim for al dente since it will continue to cook in the oven.
  • Mix Well: Ensure the pasta is thoroughly mixed with the sauce and turkey for even flavor distribution.
  • Cheese Layering: Consider adding cheese both in the middle and on top for extra gooeyness.
  • Adding Veggies: Toss in some spinach, mushrooms, or bell peppers to boost the nutritional value.
  • Leftover Love: This dish tastes even better the next day, so don’t hesitate to make extra!

Common Mistakes & Troubleshooting

No one’s perfect, and that includes cooking! Here are some common pitfalls and how to avoid them:

  • Too Dry: If your pasta bake seems dry, try adding a splash of broth or more marinara sauce before baking.
  • Undercooked Turkey: Make sure the turkey is fully cooked (internal temp should reach 165°F) before combining with other ingredients.
  • Burnt Cheese: If your cheese is browning too quickly, cover the dish with foil for the first half of the baking time.

Delicious Variations to Try

If you’re feeling adventurous, why not switch things up? Here are some fun variations of the base recipe:

  • Spicy Kick: Add red pepper flakes or diced jalapeños to the turkey mixture for some heat.
  • Vegetarian Delight: Substitute ground turkey with lentils or black beans for a plant-based version.
  • Cheesy Broccoli: Throw in some steamed broccoli for added nutrition and crunch.
  • Mexican Twist: Use taco seasoning instead of Italian spices and top with cheddar cheese for a fiesta flavor!

Storage and Make-Ahead Instructions

This dish is perfect for meal prep! Here’s how to store and reheat:

  • Refrigerator: Store leftovers in an airtight container for up to 4 days.
  • Freezer: Freeze in a freezer-safe container for up to 3 months. Thaw in the refrigerator overnight before reheating.
  • Reheating: Warm in the oven at 350°F (175°C) until heated through or microwave individual servings.

FAQ

Now, let’s tackle some common questions you might have about this recipe:

  • Can I use other types of meat for this recipe? Absolutely! Ground beef or chicken works well, but ensure to adjust the cooking time if needed.
  • How do I make this dish vegetarian-friendly? Substitute the turkey with lentils, chickpeas, or a meat alternative.
  • Can I make this pasta bake ahead of time? Yes! Assemble the dish, cover it, and refrigerate overnight. Just bake it when you’re ready!
  • What’s the best type of pasta to use? Any pasta works, but I recommend shapes that hold sauce well, like penne or fusilli.
  • Can I add more cheese? Always! Feel free to add as much cheese as your heart desires—more cheese equals more happiness!
  • Is this dish gluten-free? Yes, just use gluten-free pasta and ensure your marinara sauce is gluten-free as well.
  • What sides pair well with this dish? A fresh green salad or garlic bread complements this pasta bake beautifully.
  • How can I make this dish spicier? Add crushed red pepper flakes or diced jalapeños to the turkey mixture for an extra kick.

Nutritional Tips & Dietary Adaptations

This dish is quite versatile when it comes to nutrition. Here are some tips:

  • Lean Protein: Ground turkey is a great source of protein with less fat than beef.
  • Whole Grain Pasta: Opt for whole grain or legume-based pasta for added fiber and nutrients.
  • Adding Veggies: Don’t hesitate to add more vegetables to enhance the nutritional profile—think spinach, zucchini, or bell peppers!

Equipment Recommendations

To make this recipe a breeze, here’s what you’ll need:

  • Large Skillet: For browning the turkey and mixing in the sauce.
  • Baking Dish: A 9×13 inch dish works perfectly for this recipe.
  • Pot for Pasta: A large pot to cook your pasta to that perfect al dente texture.

Serving Suggestions

Once your Ground Turkey Pasta Bake is out of the oven, it’s time to serve! Here are some ideas:

  • Garnish: Fresh basil or parsley makes for a colorful and flavorful garnish.
  • Side Dishes: Serve with a crisp green salad or some garlic bread for a complete meal.
  • Leftover Magic: Reheat and enjoy it for lunch the next day—it tastes even better!

Conclusion: Let’s Make Magic Together

And there you have it! A cozy, satisfying Ground Turkey Pasta Bake that’s sure to steal hearts and fill bellies. I hope you enjoy making this dish as much as I do. Remember, cooking is all about love and creativity, so don’t be afraid to put your own spin on it! Whether you’re sharing it with family or enjoying it solo, I know it will become a staple in your home. Happy cooking, my friend!

Ground Turkey Pasta Bake: Easy Comfort Food for Everyone

Prep Time 10 minutes
Cook Time 25 minutes
Total Time 35 minutes
Servings 4 servings
Calories 650
A hearty and delicious baked pasta dish featuring lean ground turkey and melty cheese, perfect for a comforting family meal.

Ingredients

Meat and Pasta

  • 1 pound ground turkey
  • 12 ounces pasta of choice
  • 2 cups marinara sauce
  • 1 cup shredded mozzarella cheese
  • 0.5 cup grated Parmesan cheese
  • 1 teaspoon garlic powder
  • 1 teaspoon onion powder
  • 1 teaspoon Italian seasoning
  • to taste Salt and pepper

Instructions 

  • Preheat oven to 375°F (190°C).
  • Cook pasta until al dente, drain, and set aside.
  • Brown turkey in a skillet; add marinara, garlic, onion, Italian seasoning, salt, and pepper.
  • Mix cooked pasta into the skillet, then transfer to a baking dish and top with cheeses.
  • Bake for 20-25 minutes until cheese is bubbly and golden.

Notes

You can substitute whole wheat pasta for added fiber or adjust cheese quantities to taste.
Calories: 650kcal
Cost: $15
Course: Main Course
Cuisine: American
Keyword: bake, pasta, Turkey

The Magic of Crockpot Corn Casserole

Welcome to the heart of my kitchen, where I’ll whisk you away on a flavorful journey with my beloved Crockpot Corn Casserole! This dish isn’t just a recipe; it’s an experience that brings warmth and comfort, reminiscent of cozy family gatherings and joyful celebrations. With its sweet and savory notes, this casserole is a perfect side dish that will have everyone asking for seconds. Plus, it’s incredibly easy to make—just toss everything in the crockpot and let it do its magic!

Why You’ll Love This Recipe

Let me share a few reasons why this crockpot corn casserole will become your new favorite:

  • Effortless Preparation: Just mix the ingredients and let the crockpot handle the rest. Perfect for busy days!
  • Comforting Flavors: The combination of sweet corn, creamy textures, and a hint of honey creates a deliciously balanced dish.
  • Versatile Side Dish: Ideal for Thanksgiving, potlucks, or any family dinner—this casserole fits right in!
  • Customizable: With easy variations, you can make this dish your own and cater to different tastes.
  • Make-Ahead Friendly: Prepare it in advance and simply heat it up before serving—easy peasy!

Ingredients Breakdown

Let’s get down to the nitty-gritty—here’s what you’ll need for this delightful corn casserole:

  • 2 boxes (8.5 oz each) corn muffin mix: This is the base. Feel free to swap in gluten-free muffin mix if needed!
  • 2 cans (14.75 oz each) creamed sweet corn: Adds creaminess and sweetness. You can substitute with homemade creamed corn if you’re feeling adventurous!
  • 2 cans (15 oz each) whole kernel corn, drained: For texture. You can also use frozen corn; just thaw it beforehand.
  • 1/4 cup salted butter, melted: Essential for richness. If you’re dairy-free, use a plant-based butter instead.
  • 2 large eggs, beaten: Helps bind everything together. For a vegan option, use flax eggs!
  • 1 cup milk: Dairy or non-dairy milk will work beautifully here.
  • 1/3 cup honey or sugar: Sweetens up the dish; you can adjust to your taste!
  • 1 cup (8 oz) sour cream: Adds a tangy creaminess. Greek yogurt is a tasty alternative.

Pro Tips for Perfecting Your Casserole

Side view of a creamy corn casserole filled with kernels, displayed in a white crockpot.

Here are some tips to ensure your crockpot corn casserole comes out perfectly:

  • Layer Wisely: Start with the wet ingredients at the bottom for even cooking.
  • Don’t Overmix: Combine the ingredients until just mixed; overmixing can lead to a dense casserole.
  • Check for Doneness: Cook time may vary, so check that the center is set before serving.
  • Top It Off: Add shredded cheese on the top during the last 30 minutes for a melty finish.
  • Use a Liner: A slow cooker liner can make cleanup a breeze!
  • Keep It Warm: If serving later, switch the crockpot to warm to keep it toasty without overcooking.
  • Garnish with Fresh Herbs: A sprinkle of chives or parsley can elevate your dish visually and flavor-wise.
  • Experiment with Spices: A dash of chili powder or smoked paprika adds a delightful kick!

Avoiding Common Mistakes

Even experienced cooks can stumble, so here are some common pitfalls to avoid:

  • Skipping the Drain: Make sure to drain your whole kernel corn; excess liquid can make the casserole soggy.
  • Not Prepping Your Crockpot: Always spray your crockpot insert with non-stick spray for easy removal.
  • Ignoring Cook Times: Each slow cooker is different. Always check for doneness a little early to avoid overcooking.

Delicious Variations to Try

Feeling adventurous? Here are a few fun twists on the classic corn casserole:

  • Mexican-Style: Stir in diced green chiles and top with jalapeños for a spicy kick!
  • Cheesy Corn Casserole: Mix in a cup of shredded cheddar cheese for extra creaminess and flavor.
  • Herbed Corn Casserole: Add fresh herbs like thyme or rosemary for an aromatic touch.
  • Sweet and Savory: Incorporate crumbled bacon or diced ham for a heartier dish.

Storage and Make-Ahead Instructions

This casserole is fantastic for meal prep! Here’s how to store and reheat:

  • Refrigerate: Store leftovers in an airtight container in the fridge for up to 4 days.
  • Freeze: You can freeze the casserole before cooking. Just thaw overnight in the fridge before cooking.
  • Reheat: Warm it up in the microwave or crockpot until heated through, adding a splash of milk if it’s too thick.

Frequently Asked Questions

Let’s tackle some common queries about this crockpot corn casserole:

  • Can I use frozen corn? Yes, just ensure it’s thawed before adding!
  • How do I know when it’s done? The center should be set and not jiggly.
  • Can I make this recipe vegan? Absolutely! Use flax eggs, plant-based butter, and yogurt.
  • What can I serve with corn casserole? It pairs wonderfully with grilled meats, salads, or as part of a holiday feast.
  • Can I add other vegetables? Yes! Stir in diced bell peppers or zucchini for added nutrition.
  • Does it freeze well? Yes, freeze before cooking for best results.
  • What if I don’t have sour cream? Greek yogurt or buttermilk can be great substitutes.
  • How long does it take to cook? Generally, 4-6 hours on low or 2-3 hours on high.

Nutritional Tips and Dietary Adaptations

Making this dish a little healthier is always a good idea. Here are some tips:

  • Whole Grains: Use whole grain corn muffin mix for added fiber.
  • Reduce Sugar: Cut down on honey or sugar if you prefer a less sweet dish.
  • Low-Fat Options: Opt for low-fat sour cream and milk for a lighter version.

Essential Equipment for Success

Before you start cooking, make sure you have the right tools:

  • Crockpot: A reliable slow cooker is key to achieving that perfect texture.
  • Mixing Bowls: For combining ingredients effortlessly.
  • Measuring Cups and Spoons: Precision is important in baking!
  • Spatula: To scrape down the sides and mix thoroughly.

Serving Suggestions

Now that your crockpot corn casserole is ready, here are a few ideas on how to serve it:

  • Family Style: Serve straight from the crockpot for a casual, inviting meal.
  • Garnished: Top with fresh herbs or crumbled bacon for a pop of color and flavor.
  • Side Dish: Pair it with roasted chicken, grilled steak, or a fresh salad for a balanced meal.

Final Thoughts

This Crockpot Corn Casserole is more than just a side dish; it’s a little piece of home that brings people together. With its comforting flavors and easy preparation, it’s bound to become a staple in your kitchen, just like it is in mine. So gather your ingredients, flip on that crockpot, and let the deliciousness unfold. Happy cooking!

Tasty Crockpot Corn Casserole

Prep Time 10 minutes
Cook Time 2 hours
Total Time 2 hours 10 minutes
Servings 8 servings
Calories 350
A delicious and easy-to-make corn casserole perfect for family dinners or potlucks. This recipe combines sweet corn, muffin mix, and a hint of honey for a flavorful side dish.

Ingredients

Dried Mixes

  • 17 oz corn muffin mix
  • 29.4 oz creamed sweet corn
  • 15 oz whole kernel corn, drained
  • 0.25 cup salted butter, melted
  • 2 large eggs, beaten
  • 1 cup milk
  • 0.33 cup honey or sugar
  • 1 cup sour cream

Instructions 

  • Mix all ingredients in a large bowl until well combined.
  • Pour the mixture into a greased crockpot.
  • Cook on low for 2 hours or until set and golden on top.
  • Let it rest for 5 minutes before serving.

Notes

For a richer flavor, add a sprinkle of cheese on top before serving.
Calories: 350kcal
Cost: $12
Course: Side Dish
Cuisine: American
Keyword: Casserole, corn

Welcome to Your New Favorite Comfort Food: Slow Cooker Beef and Potato Au Gratin

Indulging in a hearty bowl of Slow Cooker Beef and Potato Au Gratin is like wrapping yourself in a cozy blanket on a chilly day. This dish combines savory ground beef, creamy potatoes, and melting cheese for a soul-warming meal that keeps everyone coming back for more. Join me as we delve into this delightful recipe that brings back memories of my childhood kitchen in Oregon, where every meal was a celebration.

Why You’ll Love This Recipe

Here are just a few reasons this beef and potato gratin will become a staple in your home:

  • Effortless preparation: Simply layer ingredients in the slow cooker and let it work its magic.
  • Rich flavors: The combination of ground beef, cheese, and spices creates a dish that’s bursting with flavor.
  • Comfort food at its finest: Perfect for family gatherings or cozy nights in.
  • Versatile meal: Pair it with a salad for a complete dinner or serve it alone for a filling meal.
  • Leftover friendly: This dish is even better the next day, making it a great option for meal prep.

Ingredients Breakdown

Let’s gather our ingredients! Here’s what you’ll need:

  • 2 pounds ground beef: Opt for lean ground beef to keep it healthy.
  • 1 small onion (finely chopped): For a touch of sweetness and depth.
  • 1 tablespoon minced garlic: Because garlic makes everything better!
  • 2 teaspoons Italian seasoning blend: Adds an aromatic kick.
  • 1 teaspoon paprika: For a hint of warmth and color.
  • Salt and black pepper (to taste): Essential for enhancing flavors.
  • 2 tablespoons unsalted butter: To create a luscious roux.
  • 2 tablespoons all-purpose flour: For thickening our creamy sauce.
  • 2 cups beef broth: The foundation of our rich sauce.
  • 1 cup half and half: For that creamy texture.
  • 4 to 5 medium russet potatoes (peeled and thinly sliced): The star of the show!
  • 1 1/2 cups shredded cheddar cheese: For a sharp, melty topping.
  • 1 1/2 cups shredded mozzarella cheese: For gooey goodness.
  • Fresh chopped parsley or sliced green onions (for garnish): A pop of color and freshness.

Pro Tips for Perfecting Your Au Gratin

Juicy slow cooker beef au gratin featuring layers of thinly sliced potatoes and a golden cheese crust.

Let’s take your cooking to the next level with these expert insights:

  • Slice evenly: Ensure your potatoes are sliced uniformly to cook evenly.
  • Layer wisely: Alternate layers of meat, potatoes, and cheese for balanced flavor.
  • Don’t rush the roux: Cook your flour and butter long enough to remove the raw taste.
  • Season as you go: Taste your layers and adjust seasoning for depth.
  • Let it rest: Allow the dish to sit after cooking for a few minutes for easy serving.
  • Experiment with cheese: Mix in your favorite cheeses for a unique twist.
  • Add veggies: Sneak in some spinach or mushrooms for added nutrition.
  • Use a liner: Consider using a slow cooker liner for easy cleanup.

Common Mistakes and Troubleshooting

Even the best chefs can have hiccups! Here are some common issues and how to solve them:

  • Watery au gratin: Make sure to properly drain excess fat from the beef and avoid overcooking the potatoes.
  • Overcooked potatoes: Keep an eye on cooking time; once tender, it’s time to serve!
  • Cheese clumping: Mix cheeses in a bowl before layering to prevent clumping.

Delicious Variations

Feel free to get creative with these adaptations:

  • Vegetarian version: Swap ground beef for lentils or mushrooms.
  • Spicy twist: Add jalapeños or hot sauce for a kick.
  • Herb-infused: Incorporate fresh herbs like thyme or rosemary for an aromatic touch.
  • Different cheese blend: Try gouda or pepper jack for a unique flavor profile.

Storage and Make-Ahead Instructions

This dish is perfect for meal prep! Here’s how to store and reheat:

  • Refrigeration: Store leftovers in an airtight container for up to 3 days.
  • Freezing: Freeze in portions for up to 3 months; just thaw overnight before reheating.
  • Reheating: Warm in the microwave or oven until heated through.

Frequently Asked Questions

Here are some common queries about this comforting dish:

  • Can I make this ahead of time?: Yes, assemble and refrigerate the night before cooking.
  • Why are my au gratin potatoes watery?: Ensure you drain excess fat from the beef and don’t overcook the potatoes.
  • What are the best potatoes for au gratin?: Russet potatoes work wonderfully due to their starch content.
  • Can I use a different meat in this recipe?: Absolutely! Ground turkey or chicken are great alternatives.
  • Is it possible to make this dish gluten-free?: Yes, use gluten-free flour for the roux.
  • Can I use fresh herbs?: Definitely! Fresh herbs can elevate the flavor.
  • How do I know when it’s done?: The potatoes should be tender and the sauce bubbly.
  • Is there a way to make it spicier?: Add red pepper flakes or a dash of cayenne for heat.

Nutritional Tips and Dietary Adaptations

If you’re looking to make this dish healthier, consider these adjustments:

  • Lean proteins: Opt for lean ground beef to reduce fat content.
  • Low-fat dairy: Use low-fat half-and-half or cheese alternatives.
  • Boost veggies: Incorporate more vegetables to increase fiber.

Equipment Recommendations

Here’s what you’ll need to make this dish:

  • Slow cooker: A reliable slow cooker is essential for this recipe.
  • Sharp knife: For slicing those potatoes evenly.
  • Cutting board: A sturdy surface for your prep work.
  • Skillet: For browning the meat and sautéing the onions.
  • Measuring cups and spoons: Precision is key in cooking!

Serving Suggestions

To complement your Slow Cooker Beef and Potato Au Gratin, consider these pairings:

  • Fresh salad: A light, crisp salad balances the richness of the gratin.
  • Garlic bread: Perfect for soaking up any leftover creamy sauce.
  • Roasted vegetables: Adds color and vitamins to your plate.

So there you have it! Your guide to creating the ultimate Slow Cooker Beef and Potato Au Gratin. I hope you find joy in making this dish, just like I do. Now, let’s gather those ingredients and start cooking—you’re just a few layers away from a meal that will steal your heart!

Slow Cooker Beef and Potato Au Gratin

Prep Time 20 minutes
Cook Time 4 hours
Total Time 4 hours 20 minutes
Servings 6 servings
Calories 650
A hearty and cheesy slow cooker dish combining tender beef, potatoes, and rich cheeses for a comforting meal.

Ingredients

Meat and Dairy

  • 2 pounds ground beef
  • 1 small onion (finely chopped)
  • 1 tablespoon minced garlic
  • 1.5 cups shredded cheddar cheese
  • 1.5 cups shredded mozzarella cheese
  • 2 tablespoons unsalted butter
  • 2 tablespoons all purpose flour
  • 2 cups beef broth
  • 1 cup half and half
  • 4.5 medium russet potatoes (peeled and thinly sliced)

Instructions 

  • Prepare the slow cooker with nonstick spray. Cook beef and onions until browned, then add garlic and seasonings.
  • Melt butter in a saucepan, stir in flour to make a roux, then whisk in beef broth and half and half until thickened.
  • Layer potatoes in the slow cooker, top with beef mixture, then sprinkle with cheeses. Repeat layers and finish with cheese.
  • Pour sauce over layered ingredients, cover, and cook on low for 4-5 hours until potatoes are tender and sauce is bubbly.
  • Let sit for a few minutes, garnish with parsley or green onions if desired, then serve.

Notes

For a richer flavor, use aged cheddar and fresh herbs.
Calories: 650kcal
Cost: $15
Course: Main Course
Cuisine: American
Keyword: Beef, cheese, potatoes

Welcome to the World of Comfort Food

Oh, the joy of a cozy, home-cooked meal! If you’re anything like me, the mere thought of a creamy yellow squash casserole brings back warm memories of family gatherings and lazy Sunday afternoons. This dish is more than just food; it’s a warm hug on a plate, perfect for sharing with loved ones or simply indulging in after a long day. Today, let’s dive into the magic of this comforting recipe and discover why it’s destined to become a staple in your kitchen.

Why You’ll Love This Creamy Yellow Squash Casserole

This creamy yellow squash casserole is not just easy to make; it’s a delightful blend of flavors and textures that will have everyone asking for seconds. Here are just a few reasons why this dish deserves a spot in your recipe book:

  • Comforting flavors: The rich combination of cheddar cheese and buttery Ritz crackers creates a savory, satisfying experience.
  • Quick and easy: With just a handful of ingredients and minimal prep time, this casserole is perfect for weeknight dinners.
  • Versatile dish: Serve it as a side or make it the star of your meal—this casserole fits right in at any gathering.
  • Great for leftovers: It reheats beautifully, making it an excellent choice for meal prep.
  • Kid-friendly: Even the pickiest eaters will love this dish, making it perfect for family dinners.

Gathering Your Ingredients

Let’s talk ingredients. This creamy yellow squash casserole requires only a few essentials, many of which you might already have in your pantry. Here’s what you’ll need:

  • 2 tablespoons butter: For sautéing and adding richness.
  • 4 cups yellow squash, sliced: The star of the dish, providing a tender base.
  • 1 medium onion, chopped: For flavor and depth.
  • 2 large eggs: To bind everything together.
  • 1 cup cheddar cheese, grated: A must for that creamy, cheesy goodness.
  • 1 cup milk: For moisture and creaminess.
  • 1/4 teaspoon cayenne pepper (optional): For a little kick.
  • 1/2 teaspoon kosher salt: To enhance flavors.
  • 1/2 teaspoon black pepper, ground: For seasoning.
  • 1 sleeve of Ritz crackers: The golden topping that adds a delightful crunch.

Pro Tips for the Perfect Casserole

Side view of a delicious yellow squash casserole on a plate, showing layers and textures.

Now that we have our ingredients ready, let’s ensure your casserole turns out perfectly every time. Here are some expert insights:

  • Freshness matters: Always choose fresh, firm yellow squash for the best texture and flavor.
  • Don’t skip the sauté: Sautéing the onions first enhances their sweetness and deepens the flavor profile of the casserole.
  • Mix it up: Feel free to experiment with different cheeses, such as mozzarella or pepper jack, for a unique twist.
  • Layer wisely: For an even bake, layer the squash evenly in the dish to ensure all pieces cook through.
  • Rest before serving: Let the casserole sit for about 10 minutes after baking to firm up, making it easier to slice and serve.
  • Use full-fat ingredients: For the creamiest results, opt for full-fat milk and cheese.
  • Season generously: Don’t be shy with the salt and pepper; they really bring the dish to life.
  • Cover while baking: If you notice the top browning too quickly, cover with foil to prevent burning.

Avoiding Common Mistakes

Even the best of us can make a misstep in the kitchen. Here are some common mistakes to watch out for, and how to troubleshoot them:

  • Overcooking the squash: Aim for tender slices, but don’t let them become mushy. They should still hold their shape.
  • Too much liquid: If your casserole turns out soupy, reduce the milk slightly next time or drain excess liquid from the squash.
  • Bland flavor: Always taste as you go and adjust seasoning to your preference.
  • Inadequate baking time: Make sure to bake until the top is golden and bubbly for the best texture.

Delicious Variations to Try

One of the best parts of cooking is the ability to customize. Here are some variations to keep things fresh:

  • Cheesy Spinach Variation: Incorporate a couple of cups of fresh spinach into the mix for added nutrients and flavor.
  • Mexican-Inspired: Add some diced tomatoes and jalapeños for a zesty twist.
  • Herbed Delight: Mix in fresh herbs like thyme or basil for an aromatic boost.
  • Meaty Option: Stir in cooked and crumbled sausage or bacon for a heartier meal.

Storage and Make-Ahead Instructions

This casserole is perfect for meal prep! Here’s how to store and reheat it:

  • Refrigerator: Store leftovers in an airtight container for up to 4 days.
  • Freezer: Freeze portions in freezer-safe containers for up to 3 months. Thaw in the refrigerator before reheating.
  • Reheating: Warm in the oven at 350°F until heated through, or microwave individual servings until hot.

Frequently Asked Questions

Got questions? I’ve got answers! Here are some common queries about this recipe:

  • Can I use zucchini instead of yellow squash? Absolutely! Zucchini works wonderfully in this recipe.
  • What can I substitute for eggs? Try using flaxseed meal mixed with water or unsweetened applesauce as a binder.
  • Can I make this casserole gluten-free? Yes, substitute the Ritz crackers with gluten-free crackers.
  • How spicy is this casserole? The cayenne is optional, so you can adjust according to your spice preference.
  • Can I add other vegetables? Of course! Bell peppers and mushrooms are great additions.
  • What’s the best way to serve it? It pairs beautifully with grilled chicken or a fresh garden salad.
  • How do I make it vegan? Use plant-based cheese, non-dairy milk, and a vegan egg substitute.
  • Is it suitable for freezing? Yes, it freezes well for convenient meals later!

Nutritional Insights and Dietary Adaptations

This creamy yellow squash casserole can fit into various dietary preferences:

  • Low-carb option: Skip the crackers and use a topping of crushed pork rinds or almond flour.
  • Dairy-free version: Substitute the cheese with a dairy-free alternative and use almond milk.
  • High-protein twist: Add cooked quinoa or lentils to boost the protein content.

Essential Equipment for Success

Before you dive into making this casserole, ensure you have the right tools on hand:

  • 9×13 inch baking dish: Perfect size for this casserole.
  • Large skillet: For sautéing the squash and onions.
  • Mixing bowls: To combine the ingredients.
  • Oven mitts: To protect your hands when taking the hot dish out of the oven.

Serving Suggestions to Elevate Your Meal

Presentation matters! Here are some ideas to serve your creamy yellow squash casserole:

  • Garnish with fresh herbs: A sprinkle of parsley or chives adds a fresh touch.
  • Pair with a crisp salad: A light arugula salad balances the richness of the casserole beautifully.
  • Serve with crusty bread: A side of rustic bread is perfect for soaking up the creamy goodness.

Join the Culinary Adventure!

As you prepare this creamy yellow squash casserole, remember that cooking is about connecting with yourself and those you love. Embrace the process, make it your own, and share it with those who matter most. Whether it’s a family dinner or a cozy night in, this dish is sure to make memories. So preheat that oven, gather your ingredients, and let’s create something delicious together!

Creamy Yellow Squash Casserole with Ritz Crackers - theamazingfood

Prep Time 10 minutes
Cook Time 30 minutes
Total Time 40 minutes
Servings 6 servings
Calories 350
A delicious and creamy yellow squash casserole topped with crunchy Ritz crackers, perfect for a comforting family meal.

Ingredients

Dairy

  • 2 tablespoons butter
  • 4 cups yellow squash, sliced
  • 1 medium onion, chopped
  • 2 large eggs
  • 1 cup cheddar cheese, grated
  • 1 cup milk
  • 2 tablespoons butter
  • 0.25 teaspoon cayenne pepper (optional)
  • 0.5 teaspoon kosher salt
  • 0.5 teaspoon black pepper, ground

Ritz Crackers

  • 1 sleeve Ritz crackers

Instructions 

  • Preheat oven to 375°F (190°C).
  • Melt 2 tablespoons butter and sauté chopped onion until translucent.
  • In a bowl, whisk eggs, milk, grated cheese, cayenne, salt, and pepper. Add cooked onions and sliced squash, mix well.
  • Pour mixture into a greased baking dish. Top with crushed Ritz crackers and dot with remaining butter.
  • Bake for 30 minutes until golden and bubbly. Serve warm.

Notes

For a healthier version, reduce cheese and butter slightly.
Calories: 350kcal
Cost: $12
Course: Side Dish
Cuisine: American
Keyword: Yellow Squash

Welcome to the Ultimate Cheesy Hashbrown Casserole Experience!

If you’re on a quest for the perfect comfort food, look no further! This Cheesy Hashbrown Casserole combines creamy, cheesy goodness with the satisfying crunch of golden-brown hashbrowns. Whether you’re hosting a family gathering, bringing a dish to a potluck, or just indulging in a late-night craving, this casserole is sure to impress and fill your heart with warmth. Let’s dive into why this dish is a must-have in your recipe arsenal!

Why You’ll Love This Recipe

Here are just a few reasons why this casserole will become your new go-to:

  • Easy Preparation: With minimal ingredients and straightforward steps, you can whip this up in no time.
  • Versatile Dish: Perfect as a side for brunch, lunch, or dinner, it complements any protein beautifully.
  • Crowd-Pleaser: This cheesy delight is guaranteed to impress your family and friends, leaving them asking for seconds.
  • Make-Ahead Friendly: Prepare it in advance, pop it in the oven when needed, and enjoy stress-free entertaining.
  • Customizable: Add your favorite ingredients to make it uniquely yours—think crispy bacon, sautéed veggies, or different cheeses!

Ingredients You’ll Need

Gathering your ingredients is the first step to creating this cheesy masterpiece. Here’s what you’ll need:

  • 1 bag (32 oz) Frozen Hash Browns: Thawed, either cubed or shredded depending on your preference.
  • 2 cups Sour Cream: For that creamy texture and tangy flavor.
  • 1 small Onion: Finely chopped, because who doesn’t love the savory flavor of onions?
  • 1 can Cream Of Chicken Soup: This adds depth and richness to the dish.
  • 2 cups Shredded Cheddar Cheese: Divided for layering; feel free to mix with other cheeses like Monterey Jack or Gouda!
  • 1/4 cup Butter: Melted, to create a luscious, golden top.
  • 1 teaspoon Salt: Essential for enhancing all the flavors.
  • 1/4 teaspoon Black Pepper: A pinch of spice to elevate the dish.

Instructions to Create Cheesy Perfection

Side view of a bubbling hashbrown casserole topped with melted cheese.

Ready to make some magic? Follow these simple steps:

  1. Preheat your oven to 350°F. Lightly grease a 13×9 pan and set it aside.
  2. In a large bowl, combine the hash browns, sour cream, onion, cream of chicken soup, 1 ½ cups cheddar cheese, butter, salt, and black pepper. Mix well and taste for any additional seasoning.
  3. Spread the mixture into the prepared pan and bake uncovered for 45 minutes.
  4. Remove from the oven and top with the remaining ½ cup of cheese. Bake for an additional 10 minutes, or until the cheese is golden and bubbly.

Pro Tips for the Perfect Casserole

To ensure your dish comes out perfectly every time, keep these expert insights in mind:

  • Thaw Your Hashbrowns: Make sure to thaw your frozen hashbrowns completely for even cooking.
  • Mix It Up: Feel free to swap the cream of chicken soup with a cream of mushroom soup for a vegetarian version.
  • Cheese Choices: Experiment with different cheeses like pepper jack for a spicy kick or feta for a tangy twist.
  • Perfect Texture: For a crispy topping, consider broiling the casserole for the last few minutes of baking.
  • Make it Ahead: Assemble the casserole a day in advance, store it in the fridge, and bake when ready to serve.
  • Don’t Rush the Baking: Ensure the casserole is bubbling at the edges to guarantee it’s heated through.
  • Add Veggies: Incorporate broccoli or spinach for a delightful and colorful twist.
  • Use Fresh Ingredients: Freshly grated cheese melts better than pre-shredded, which often contains anti-caking agents.

Avoid These Common Mistakes

Even the best cooks can run into hiccups! Here are some common pitfalls to watch out for:

  • Overmixing: Stir just until combined; overmixing can lead to a gummy texture.
  • Not Enough Cheese: Always add the right amount of cheese for that gooey, cheesy goodness.
  • Skipping the Grease: Don’t forget to grease your pan—no one wants to deal with stuck casserole!
  • Baking Time: Keep an eye on the casserole; ovens can vary, and you don’t want to overbake.

Delicious Variations to Try

Feeling adventurous? Here are some variations to give your casserole a personal touch:

  • Loaded Hashbrown Casserole: Add crispy bacon and green onions for a loaded twist.
  • Vegetable Medley: Mix in sautéed bell peppers, mushrooms, or spinach to boost the nutrition.
  • Italian Style: Use Italian seasoning and add diced tomatoes for a Mediterranean flavor.
  • Spicy Southwest: Incorporate diced jalapeños and pepper jack cheese for a spicy kick.

Storage & Make-Ahead Instructions

This casserole is not only great fresh but also stores wonderfully:

  • Refrigerator: Store leftovers in an airtight container for up to 3-4 days.
  • Freezer: You can freeze the unbaked casserole for up to 2 months. Thaw overnight in the fridge before baking.
  • Reheating: Reheat in the oven at 350°F until warmed through, about 20-30 minutes.

Comprehensive FAQ

Got questions? Here are some frequently asked ones about the Cheesy Hashbrown Casserole:

  • Can I use fresh potatoes instead of frozen? Yes, you can! Just grate them and quickly soak them to remove excess starch.
  • What can I substitute for sour cream? Greek yogurt is a fantastic alternative that adds a similar creaminess.
  • Can I make this casserole vegan? Absolutely! Use plant-based cream soup and dairy-free cheese.
  • How can I make this dish spicier? Add diced jalapeños or a sprinkle of cayenne pepper for a spicy kick.
  • Is there a gluten-free version? Yes, make sure your cream soup is gluten-free or make a homemade version.
  • Can I make this in a slow cooker? Yes! Cook on low for 4-6 hours for a delightful slow-cooked version.
  • What’s the best way to serve leftovers? Top with a fried egg for a hearty breakfast!
  • How do I know when it’s done? The casserole should be golden and bubbly, with an internal temperature of at least 165°F.

Nutritional Tips and Dietary Adaptations

Looking to make this dish healthier? Here are some tips:

  • Reduce Calories: Substitute half the sour cream with Greek yogurt or cottage cheese.
  • Increase Fiber: Add black beans or corn to boost the nutritional value.
  • Low-Fat Options: Use reduced-fat cheese and cream soups for a lighter version.
  • Vegetarian Delight: Keep it meat-free and load it with veggies for a colorful dish.

Equipment Recommendations

To successfully create this cheesy delight, here’s what you’ll need:

  • Mixing Bowl: A large bowl for combining ingredients.
  • 13×9 Baking Dish: Essential for perfectly baking the casserole.
  • Spatula: For mixing and spreading the casserole evenly.
  • Oven Mitts: Always a must for safe handling of hot dishes!

Serving Suggestions

This casserole shines on its own, but pairing it with the right sides can elevate your meal:

  • Fresh Salad: A crisp green salad balances the richness of the casserole.
  • Grilled Meats: Serve alongside grilled chicken or steak for a filling dinner.
  • Chilled Beverages: A refreshing iced tea or lemonade complements the warmth of the dish perfectly.

Conclusion: Your New Favorite Dish Awaits!

So there you have it! This Cheesy Hashbrown Casserole is not just a recipe; it’s an invitation to gather around the table and share in the joy of good food. Whether it’s a cozy family dinner or a festive celebration, this dish will surely steal the show. Remember, cooking is about experimenting and finding what makes your taste buds dance. So, roll up your sleeves, get cooking, and enjoy every delicious bite! Happy cooking, my friends!

Cheesy Hashbrown Potato Casserole

Prep Time 10 minutes
Cook Time 55 minutes
Total Time 1 hour 5 minutes
Servings 8 servings
Calories 450
A creamy, cheesy hashbrown casserole that's perfect for family dinners or potlucks. Easy to prepare and full of comforting flavors.

Ingredients

Main

  • 32 oz Frozen Hash Browns, thawed (cubed or shredded)
  • 2 cups Sour Cream
  • 1 small Onion, finely chopped
  • 1 can Cream Of Chicken Soup
  • 2 cups Shredded Cheddar Cheese, divided
  • 1/4 cup Butter, melted
  • 1 teaspoon Salt
  • 1/4 teaspoon Black Pepper

Instructions 

  • Preheat oven to 350°F (175°C). Grease a 13×9 inch pan.
  • Mix potatoes, sour cream, onion, cream soup, 1 ½ cups cheese, melted butter, salt, and pepper.
  • Spread mixture into prepared pan and bake for 45 minutes.
  • Top with remaining ½ cup cheese and bake for 10 more minutes until bubbly.

Notes

For a crispier top, broil for an additional 2 minutes before serving.
Calories: 450kcal
Cost: $15
Course: Side Dish
Cuisine: American
Keyword: Hash Browns