Why You’ll Love These Air Fryer Salmon Bites
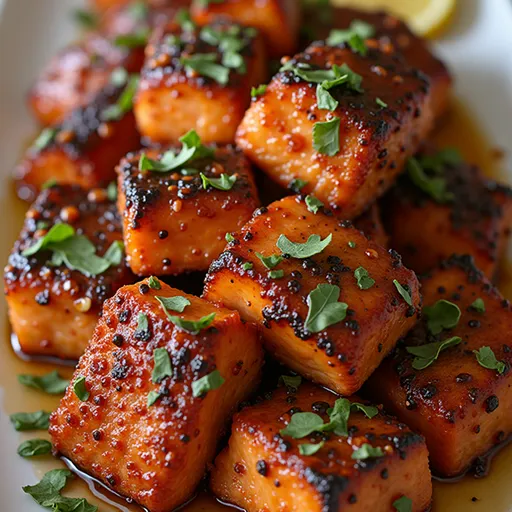
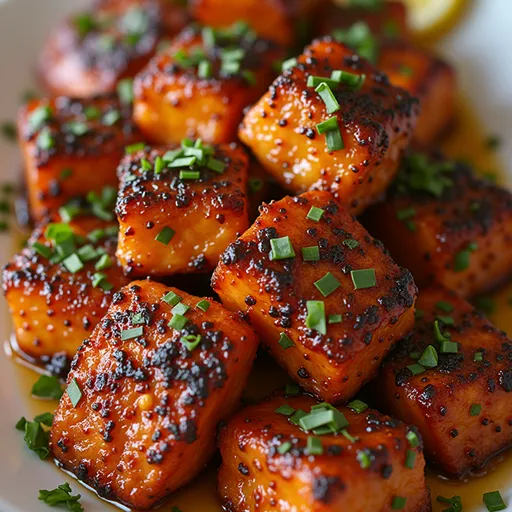
If you’re on a quest for a quick, delicious meal that’s perfect for any occasion, look no further than these Air Fryer Salmon Bites with Honey Soy Glaze. I’m telling you, these little nuggets of joy will not only satisfy your taste buds but also have you dancing in your kitchen with delight! Imagine tender, flaky salmon coated in a sweet and savory glaze that caramelizes to perfection in the air fryer. It’s a game changer for busy weeknights or when you want to impress guests without spending hours in the kitchen.
What makes this recipe even more magical is its versatility. Whether you’re serving it as an appetizer, a main dish, or a fun snack during movie night, these salmon bites fit the bill. Plus, they’re packed with flavor, thanks to a fabulous blend of honey, soy sauce, and spices that elevate the natural richness of the salmon. And here’s a secret: they’re super easy to whip up, making them a go-to in my household!
What Goes In
Before we dive into the cooking details, let’s take a look at the simple ingredients that make these salmon bites sing:
- 1 pound salmon fillet (skinless and boneless)
- 2 tablespoons honey
- 2 tablespoons soy sauce
- 1 teaspoon garlic powder
- 1 teaspoon ginger powder
- 1 teaspoon black pepper
- 1 teaspoon paprika
- 1 tablespoon olive oil
- 1 tablespoon sesame seeds (optional)
- Chopped green onions for garnish (optional)
Cook’s Kit

Before you get started, make sure you have the following kitchen essentials on hand:
- Air fryer: The star of the show!
- Sharp knife: For cutting the salmon into bite-sized pieces.
- Mixing bowls: One for the glaze and one for tossing the salmon.
- Whisk or fork: To combine the glaze ingredients smoothly.
- Measuring spoons: For accuracy in your ingredients.
Make Air Fryer Salmon Bites with Honey Soy Glaze: A Simple Method
Step 1: Prep the Salmon
Start by cutting your salmon fillet into bite-sized pieces, aiming for uniform cubes about 1 inch in size. This ensures that they cook evenly and gives you those delicious, crispy edges we all love.
Step 2: Whisk the Glaze
In a small bowl, whisk together the honey, soy sauce, garlic powder, ginger powder, black pepper, and paprika until fully combined. This glaze is the magic potion that will coat your salmon bites in flavor. If you’re feeling adventurous, consider adding a dash of sriracha for a spicy kick!
Step 3: Marinate the Salmon
In a larger mixing bowl, toss the salmon bites with the olive oil and the honey soy glaze until they’re well coated. If time allows, let them marinate for about 10-15 minutes. This step really helps to infuse the flavors deeply, making each bite even more delightful.
Step 4: Preheat the Air Fryer
While your salmon is marinating, preheat your air fryer to 375°F (190°C). Preheating is crucial to achieving that perfect crispiness!
Step 5: Air Fry the Salmon Bites
Place the marinated salmon bites in the air fryer basket in a single layer, making sure not to overcrowd them. This allows hot air to circulate around each piece, ensuring they cook evenly. Air fry for 8-10 minutes, shaking or flipping halfway through to promote even cooking. You’ll know they’re done when they’re opaque and flake easily with a fork.
Step 6: Garnish and Serve
For a lovely finishing touch, sprinkle sesame seeds over the salmon bites during the last 2 minutes of cooking for an added crunch. Once done, garnish with chopped green onions if desired, and serve immediately. Trust me; they won’t last long!
Better Choices & Swaps
Cooking is all about experimenting, so feel free to make these salmon bites your own:
- Fish Alternatives: While salmon is delectable, you can also try this recipe with other fish like tuna or tilapia.
- Honey Substitutes: If you’re looking for a healthier option, maple syrup works beautifully in this glaze.
- Gluten-Free Options: Use tamari instead of soy sauce to keep it gluten-free.
- Veggies Add-In: Toss in some sliced bell peppers or zucchini with the salmon for a complete meal in one basket!
Common Errors (and Fixes)
Even the best of us can have a hiccup in the kitchen. Here are some common pitfalls and how to avoid them:
- Overcooked Salmon: Keep an eye on the cooking time. Salmon can go from perfectly cooked to dry quickly!
- Sticky Glaze: If your glaze isn’t coating the salmon well, you might need to add a little more olive oil or honey.
- Undercooked Bites: Ensure your bites are cut evenly to avoid some pieces being undercooked while others are done.
Storing, Freezing & Reheating
These salmon bites are best enjoyed fresh, but you can store leftovers in an airtight container in the refrigerator for up to 2 days. To reheat, simply pop them back in the air fryer at 350°F for about 3-4 minutes until warmed through and crispy again. Freezing is not recommended due to texture changes, but if you must, freeze the cooked bites on a baking sheet until solid, then transfer to a freezer bag. Reheat gently to avoid overcooking.
FAQs
Can I use frozen salmon for this recipe?
Yes! Just make sure to fully thaw and pat the salmon dry before cutting and marinating. Excess moisture can prevent the glaze from adhering well.
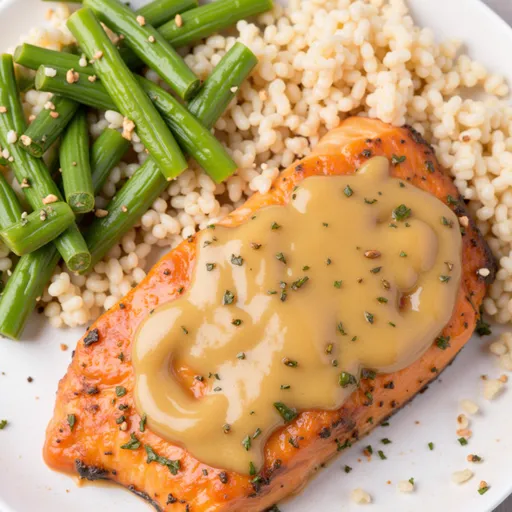
What side dishes pair well with these salmon bites?
Light, fresh sides like steamed veggies, jasmine rice, or a crisp salad complement the richness of the salmon beautifully.
Can I add spice to the glaze?
Absolutely! A pinch of crushed red pepper flakes or some freshly grated chili can add a nice kick to balance the sweetness of the honey.
Is it necessary to remove the skin from the salmon?
Removing the skin helps the bites crisp up better and makes them easier to eat in bite-sized pieces. However, if you prefer leaving the skin on, just be aware it may soften during cooking.
Cook This Next
If you’re looking for more delicious air fryer recipes, why not try my Air Fryer Chicken Wings or Air Fryer Mushrooms? They’re both crowd-pleasers!
The Takeaway
In just a few easy steps, you can create these irresistible Air Fryer Salmon Bites with Honey Soy Glaze that are bound to become a favorite in your home. Perfectly spiced and irresistibly tender, they bring that warm, comforting feeling to your table. Whether you’re cooking for yourself, your family, or entertaining friends, these bites are sure to impress. So what are you waiting for? Pull out that air fryer and let’s make some magic happen in your kitchen today!

Air Fryer Salmon Bites with Honey Soy Glaze - Spiced and Baked
Ingredients
Salmon
- 1 pound salmon fillet, skinless and boneless
- 2 tablespoons honey
- 2 tablespoons soy sauce
- 1 teaspoon garlic powder
- 1 teaspoon ginger powder
- 1 teaspoon black pepper
- 1 teaspoon paprika
- 1 tablespoon olive oil
- 1 tablespoon sesame seeds (optional)
- chopped green onions for garnish (optional) chopped green onions (for garnish)
Instructions
- Preheat the air fryer to 375°F (190°C).
- Cut the salmon into bite-sized pieces and toss with olive oil.
- Mix honey, soy sauce, garlic powder, ginger powder, black pepper, and paprika; coat salmon with this glaze.
- Place salmon bites in the air fryer basket in a single layer and cook for 8-10 minutes.
- Optional: Sprinkle sesame seeds during the last 2 minutes. Garnish with green onions and serve.
Notes
Loved this recipe? Save it to your favorite Pinterest board so you can easily find it later! It’s the perfect way to keep all your sweet ideas in one place. ✨