Author

Ava

Browsing

Why You’ll Love This Recipe

Welcome to a culinary adventure that will brighten your day and elevate your dinner table! If you’ve ever craved a dish that delivers both flavor and ease, look no further than this Air Fryer Lemon Garlic Herb Salmon. This recipe is not just about cooking; it’s about savoring the essence of fresh ingredients and the joy of creating a meal that feels like a warm hug on a plate. The combination of zesty lemon, fragrant garlic, and vibrant herbs creates a symphony of flavors that dance on your palate, making every bite a delightful experience.

What’s even better? This dish is as simple as it is delicious. The air fryer makes cooking salmon a breeze, yielding perfectly cooked fillets with a crispy exterior and tender inside in just minutes. Whether you’re looking for a quick weeknight dinner or something special for a gathering, this salmon dish fits the bill. Plus, it’s healthy, packed with omega-3 fatty acids, and pairs beautifully with a variety of sides—think roasted vegetables, quinoa, or a fresh salad. Let’s dive into the magic of this recipe!

Ingredients Needed for Lemon Garlic Herb Salmon

Here’s what you’ll need to create this delightful dish:

  • 4 salmon fillets (about 6 oz each)
  • 2 tablespoons olive oil
  • 3 tablespoons fresh lemon juice
  • 2 cloves garlic (minced)
  • 2 tablespoons fresh herbs (dill, parsley, or basil, finely chopped)
  • 1 teaspoon salt (to taste)
  • 1/2 teaspoon black pepper
  • lemon zest (optional, for extra flavor)
  • lemon wedges (for serving)

How to Make Air Fryer Lemon Garlic Herb Salmon

Delicious air-fried salmon fillet drizzled with lemon juice and sprinkled with minced garlic and fresh herbs.

Now that you have your ingredients ready, let’s get cooking! Follow these simple steps to create your own delicious air-fried salmon:

  1. Marinate the Salmon: In a bowl, whisk together the olive oil, fresh lemon juice, minced garlic, and your choice of chopped herbs. Season the mixture with salt and black pepper. This marinade is the secret to infusing your salmon with vibrant flavor. Place the salmon fillets in a shallow dish and pour the marinade over them, ensuring each fillet is well-coated. Cover and let it marinate in the refrigerator for a minimum of 30 minutes (up to 2 hours) to allow those flavors to meld.
  2. Preheat the Air Fryer: Preheat your air fryer to 400°F (200°C) for optimal cooking. This step is crucial—it ensures that the salmon starts cooking immediately, resulting in that perfect crispy texture.
  3. Prepare the Basket: Lightly grease the air fryer basket with olive oil or a non-stick cooking spray. This will prevent the salmon from sticking and make cleanup a breeze.
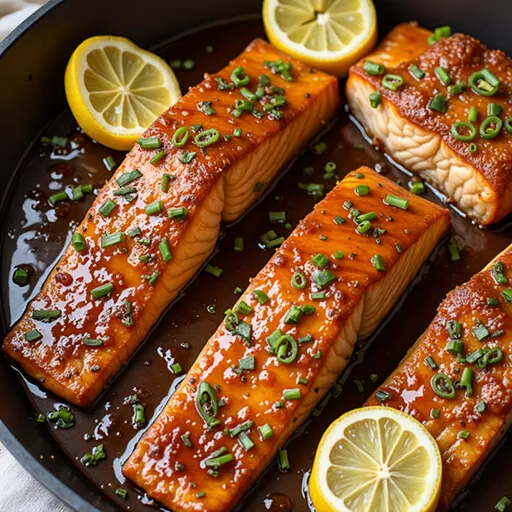
  4. Cook the Salmon: Carefully place the marinated salmon fillets in the air fryer basket, ensuring they aren’t overcrowded. Cook for about 7-10 minutes, depending on the thickness of the fillets. The salmon is done when it reaches an internal temperature of 145°F (63°C) and flakes easily with a fork. There’s no need to flip the salmon during cooking—the air circulation does all the work!
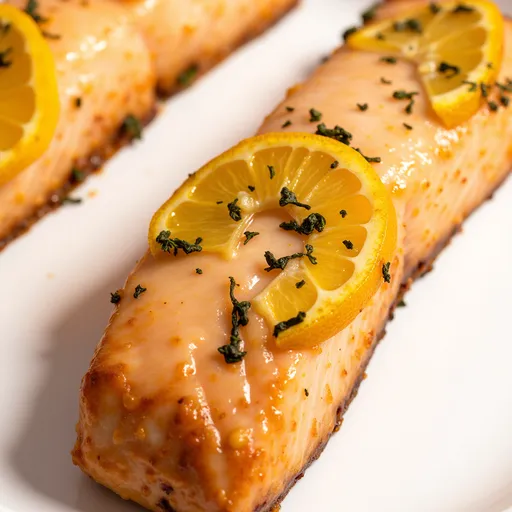
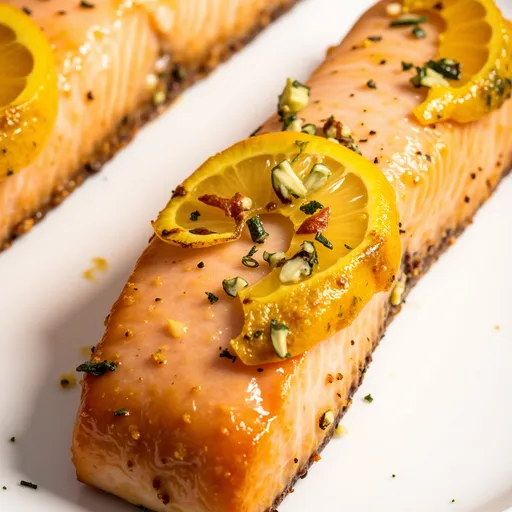
  5. Rest and Serve: Once cooked, remove the salmon from the air fryer and let it rest for a few minutes. This step allows the juices to redistribute, ensuring each bite is tender and moist. Serve with a sprinkle of fresh herbs and lemon wedges on the side for that extra pop of flavor.

Tips for Perfectly Cooked Salmon

Here are a few tips to help you achieve the best results:

  • Choose Fresh Ingredients: The quality of your ingredients matters! Fresh salmon, vibrant herbs, and juicy lemons will elevate your dish.
  • Don’t Skip the Marinade: Allowing the salmon to marinate is crucial for flavor. If you have time, longer marinades lead to deeper flavor.
  • Check Temperature: Use a meat thermometer to ensure your salmon is perfectly cooked. Aim for 145°F (63°C) for the best texture.
  • Let it Rest: Resting your salmon after cooking keeps it juicy. Trust me, this small step makes a big difference!

Variations and Substitutions

While this recipe is delicious as-is, feel free to get creative! Here are some variations you can try:

  • Herb Swaps: Experiment with different herbs! Thyme, tarragon, or cilantro can add unique flavors to your salmon.
  • Spice it Up: Add a pinch of red pepper flakes for a bit of heat or some smoked paprika for a deeper flavor profile.
  • Different Marinades: Try swapping the lemon juice for lime or orange juice for a citrus twist. You can also add honey for a touch of sweetness!

Equipment You’ll Need

To whip up this delightful salmon dish, you’ll need:

  • An air fryer (obviously!)
  • A mixing bowl for the marinade
  • A whisk or fork for mixing
  • A shallow dish or resealable bag for marinating
  • A meat thermometer to check for doneness

Storage and Freezing

If you have leftovers (which is unlikely because it’s so good), here’s how to store them:

  • Refrigerator: Store leftover salmon in an airtight container in the fridge for up to 3 days. Reheat gently in the air fryer or microwave, but be careful not to overcook it during reheating.
  • Freezer: You can freeze cooked salmon for up to 3 months. Wrap it tightly in plastic wrap and then foil for best results. When ready to eat, thaw in the refrigerator overnight and reheat as desired.

FAQs

Here are some common questions I receive about this recipe:

  • Can I make this recipe without an air fryer? Absolutely! You can bake the salmon in a conventional oven preheated to 400°F (200°C) for about 12-15 minutes, or until cooked through.
  • What herbs work best? Fresh dill, parsley, and basil are excellent choices, but feel free to experiment with your favorites!
  • Do I need to flip the salmon? In most air fryers, it’s not necessary to flip the salmon. The air circulation cooks it evenly.
  • Can I use bottled lemon juice? While fresh lemon juice is preferred for its flavor, bottled lemon juice can work in a pinch.

Troubleshooting

If you encounter any issues while making this recipe, here are some troubleshooting tips:

  • Salmon Sticking to the Basket: Make sure to grease the basket adequately or use parchment paper liners designed for air fryers.
  • Overcooked Salmon: Keep an eye on the cooking time and check the internal temperature with a meat thermometer to prevent overcooking.
  • Dry Salmon: Ensure you marinate the salmon adequately and let it rest after cooking to keep it moist.

Serving Suggestions

This lemon garlic herb salmon pairs beautifully with a variety of side dishes. Here are some of my favorites:

  • Light Salads: A fresh green salad or a Mediterranean quinoa salad complements the citrus flavors wonderfully.
  • Vegetables: Steamed or roasted vegetables, like asparagus, broccoli, or Brussels sprouts, are perfect for a wholesome meal.
  • Grains: Serve it over a bed of quinoa, rice, or even cauliflower rice for a low-carb option.

When you’re ready to impress your family or friends, this Air Fryer Lemon Garlic Herb Salmon is your go-to recipe. It’s simple, flavorful, and sure to become a favorite in your kitchen!

Conclusion

Cooking is a journey, and I’m so glad you’re on this one with me! This Air Fryer Lemon Garlic Herb Salmon is more than just a meal; it’s an opportunity to gather around the table, enjoy great food, and share laughter with loved ones. I hope this recipe brings a little sunshine into your kitchen and inspires you to create more delicious memories. So, roll up your sleeves, give it a try, and let me know how it turns out! Happy cooking!

Air Fryer Lemon Garlic Herb Salmon

Prep Time 10 minutes
Cook Time 10 minutes
Total Time 20 minutes
Servings 4 fillets
Calories 350
This flavorful salmon recipe is quick to prepare and perfect for a healthy, delicious meal using your air fryer.

Ingredients

Salmon

  • 2 tablespoons olive oil
  • 3 tablespoons fresh lemon juice
  • 2 cloves garlic (minced)
  • 2 tablespoons fresh herbs (dill, parsley, or basil, finely chopped)
  • 1 teaspoon salt (to taste)
  • 0.5 teaspoon black pepper
  • lemon zest (optional, for extra flavor) lemon zest (optional)
  • lemon wedges (for serving) lemon wedges (for serving)

Instructions 

  • Whisk together olive oil, lemon juice, minced garlic, herbs, salt, and pepper. Marinate salmon for 30 minutes.
  • Preheat air fryer to 400°F (200°C). Lightly grease the basket.
  • Place marinated salmon in the basket and cook for 7-10 minutes until flaky.
  • Remove and let rest for a few minutes. Serve with lemon wedges and herbs.

Notes

For extra flavor, add lemon zest before cooking.
Calories: 350kcal
Cost: $15
Course: Main Course
Cuisine: American
Keyword: Salmon

Loved this recipe? Save it to your favorite Pinterest board so you can easily find it later! It’s the perfect way to keep all your sweet ideas in one place. ✨

A vibrant, golden-brown salmon fillet garnished with lemon wedges and fresh herbs, captured in natural light.

Why You’ll Love This Recipe

If you’re anything like me, there are moments when you crave something that wraps you in warmth, comfort, and a touch of culinary magic. Imagine this: golden-brown, crispy garlic bread topped with creamy Chicken Alfredo and bubbling melty cheese. It’s not just a meal; it’s an experience that brings everyone to the table, forks at the ready, eager for a bite. This recipe for Irresistible Chicken Alfredo Garlic Bread is perfect for cozy nights in, casual gatherings with friends, or even a quick weeknight dinner that feels special.

With its delightful balance of flavors and textures, this dish is a wonderful fusion of classic comfort food and a bit of Italian flair. Plus, it’s incredibly simple to make, allowing you to spend less time in the kitchen and more time enjoying the company of your loved ones. Let’s dive into this cozy culinary adventure together!

Ingredients You’ll Need

Let’s gather our ingredients, shall we? Here’s what you’ll need for this mouthwatering creation:

  • 1 loaf of French bread
  • 2 cups cooked chicken, shredded
  • 1 cup Alfredo sauce
  • 2 cups shredded mozzarella cheese
  • 4 tablespoons butter, softened
  • 4 cloves garlic, minced
  • 1 teaspoon Italian seasoning
  • Salt and pepper to taste
  • Fresh parsley, chopped (for garnish)

Steps to Culinary Bliss

A loaf of garlic bread filled with shredded chicken and Alfredo sauce, beautifully lit.

Now that we have our ingredients, let’s roll up our sleeves and get started!

  1. Preheat Your Oven: Begin by preheating your oven to 375°F (190°C). This step is crucial for achieving that perfect crispy texture on our garlic bread.
  2. Mix the Chicken and Alfredo Sauce: In a medium bowl, combine the shredded chicken and Alfredo sauce. Stir until everything is evenly coated. This creamy mixture is going to be the star of our dish!
  3. Prepare the Garlic Butter: In a separate bowl, mix the softened butter, minced garlic, Italian seasoning, salt, and pepper. This garlic butter will infuse our bread with incredible flavor.
  4. Slice the Bread: Carefully slice the French bread in half lengthwise. This will create a beautiful canvas for our delicious toppings.
  5. Spread the Garlic Butter: Using a spatula or a butter knife, spread the garlic butter mixture evenly on each half of the bread. Don’t be shy—make sure you cover every nook and cranny!
  6. Add the Chicken Mixture: Spoon the chicken and Alfredo mixture onto the garlic buttered bread, spreading it evenly. You want to ensure that each bite is packed with flavor.
  7. Top with Cheese: Generously sprinkle the shredded mozzarella cheese over the chicken mixture. This is where the magic happens—the cheese will become bubbly and golden as it bakes.
  8. Bake to Perfection: Place the prepared bread on a baking sheet and pop it in the oven. Bake for 15-20 minutes, or until the cheese is melted and bubbly. Your kitchen will soon be filled with an aroma that will have everyone eagerly awaiting dinner!
  9. Cool and Garnish: Once it’s done, remove the bread from the oven and let it cool for a few minutes. Then, slice it into manageable pieces and garnish with chopped fresh parsley for a pop of color and freshness.

Tips for Success

To ensure your Chicken Alfredo Garlic Bread turns out perfectly, here are a few tips:

  • Use Quality Ingredients: The better the ingredients, the better the final product. Opt for a good quality Alfredo sauce or even make your own if you have the time.
  • Don’t Overbake: Keep an eye on the bread as it bakes. You want the cheese to melt and bubble, not burn!
  • Experiment with Cheese: While mozzarella is a classic choice, feel free to mix it up with other cheeses like provolone or even a sprinkle of parmesan for extra flavor.

Variations to Try

One of the best parts about cooking is making a recipe your own. Here are some fun variations you might consider:

  • Add Veggies: Toss in some sautéed spinach or roasted bell peppers for an extra layer of flavor and nutrition.
  • Spice It Up: If you like a kick, sprinkle some red pepper flakes over the top before baking, or add some diced jalapeños to the chicken mixture.
  • Switch the Protein: Swap the chicken for shredded rotisserie turkey or even cooked sausage for a different twist.

Substitutions You Can Make

No worries if you’re missing an ingredient or two! Here are some easy substitutions:

  • French Bread: If you don’t have French bread, sourdough or ciabatta will work beautifully as well.
  • Alfredo Sauce: You can use store-bought Alfredo or homemade. If you want a lighter version, try using a white sauce or even a garlic butter sauce.
  • Cheese: If mozzarella isn’t available, try using cheddar or a cheese blend for a different flavor profile.

Equipment You’ll Need

Before you start cooking, make sure you have the following equipment handy:

  • Baking sheet
  • Medium mixing bowls
  • Spatula or butter knife
  • Oven mitts

Storage and Freezing

This Chicken Alfredo Garlic Bread is best enjoyed fresh, but if you have leftovers (which is rare in my house!), here’s how to store them:

  • Storage: Place any leftovers in an airtight container in the refrigerator for up to 3 days.
  • Freezing: You can freeze the unbaked garlic bread for up to 3 months. Wrap it tightly in plastic wrap and then place it in a freezer bag. When ready to bake, simply add a few extra minutes to the baking time.

FAQs

Here are some common questions you might have:

  • Can I make this ahead of time? Yes! You can prepare the chicken and garlic butter ahead of time and assemble the bread just before baking.
  • What if I don’t like garlic? If garlic isn’t your thing, you can reduce the amount used or even skip it altogether. The dish will still be delicious!
  • Is this recipe kid-friendly? Absolutely! Kids love cheesy, creamy flavors, and this dish will surely be a hit at the dinner table.

Troubleshooting Common Issues

If you run into any hiccups while making this dish, here are some solutions:

  • Cheese Doesn’t Melt: Ensure your oven is properly preheated. If it still won’t melt, you can place it under the broiler for a minute—but watch it closely!
  • Garlic Butter Is Too Strong: If you find the garlic flavor too intense, try using roasted garlic instead for a milder taste.

Wrapping Up This Culinary Adventure

There you have it—an irresistible Chicken Alfredo Garlic Bread recipe that’s not only delicious but also brings people together. I hope this dish becomes a staple in your kitchen, just like it has in mine. Whether it’s for a family dinner or a cozy night in, it’s sure to impress. So gather your loved ones, indulge in the creamy goodness, and enjoy every mouthful of this delightful creation. Happy cooking, my friends!
Remember, there’s always room for a little magic in your kitchen. Until next time, keep those spatulas stirring!

Irresistible Chicken Alfredo Garlic Bread Recipe You Need to Try

Prep Time 10 minutes
Cook Time 20 minutes
Total Time 30 minutes
Servings 4 servings
Calories 850
This cheesy, flavorful Chicken Alfredo Garlic Bread combines tender shredded chicken, creamy Alfredo sauce, and melted mozzarella on toasted garlic bread—perfect for a comforting meal.

Ingredients

Bread

  • 1 loaf French bread
  • 2 cups cooked chicken, shredded
  • 1 cup alfredo sauce
  • 2 cups shredded mozzarella cheese
  • 4 tablespoons butter, softened
  • 4 cloves garlic, minced
  • 1 teaspoon italian seasoning
  • to taste salt and pepper
  • for garnish fresh parsley, chopped

Instructions 

  • Preheat oven to 375°F (190°C).
  • Mix shredded chicken with Alfredo sauce.
  • Spread garlic butter on halved French bread.
  • Spread chicken mixture on bread, top with mozzarella.
  • Bake for 15-20 minutes until cheese melts. Garnish with parsley.

Notes

For extra flavor, add a sprinkle of red pepper flakes before baking.
Calories: 850kcal
Cost: $15
Course: Main Course
Cuisine: American
Keyword: cheesy, Chicken, garlic bread

Loved this recipe? Save it to your favorite Pinterest board so you can easily find it later! It’s the perfect way to keep all your sweet ideas in one place. ✨

Gourmet Chicken Alfredo Garlic Bread featuring golden cheese and fresh parsley.

Why You’ll Love Air Fryer Salmon Bites

Let’s be honest: who doesn’t love a dish that’s both delicious and quick to prepare? Air Fryer Salmon Bites are the epitome of easy gourmet cooking, perfect for any occasion—be it a cozy family dinner or a fancy gathering with friends. These little gems are not just packed with flavor; they also deliver a satisfying crunch on the outside while remaining tender and flaky on the inside. It’s like having a fancy restaurant-quality dish right in your own kitchen!

One of the best parts about these salmon bites is their versatility. You can serve them in a multitude of ways: nestled in tacos, over a bed of rice, tossed into a vibrant salad, or enjoyed as a stand-alone appetizer. Plus, they’re gluten-free and a healthy dinner option, making them a win-win for everyone at the table!

Essential Tools for Success

Before we dive into the recipe, let’s gather the right tools to make your cooking experience seamless and enjoyable. Having the right tools not only enhances your efficiency in the kitchen but also ensures that your Air Fryer Salmon Bites come out perfectly every time.

Essential Kitchen Tools

Appetizing Air Fryer Salmon Bites displayed on a plate with lemon wedges.
  • Air Fryer: The star of the show! Make sure it’s pre-heated and ready to go.
  • Mixing Bowl: A good-sized bowl is essential for mixing the seasonings and coating the salmon.
  • Measuring Spoons: For accurate seasoning, especially when it comes to spices.
  • Spatula or Tongs: To handle the salmon bites safely as you transfer them in and out of the air fryer.
  • Cutting Board and Knife: To cut the salmon into perfectly bite-sized pieces.

Why These Tools Matter

The right tools make all the difference in your cooking experience. An air fryer will give you that crispy texture without the need for excessive oil, while a good mixing bowl allows for thorough coating of your salmon. Accurate measuring spoons ensure that your bites are seasoned just right, and using a spatula or tongs helps maintain their shape as you cook. Investing in these tools will make your culinary adventures much smoother!

Ingredients for the Perfect Salmon Bites

Now that we have our tools ready, let’s talk about the ingredients. For this recipe, you’ll need:

  • 1 pound fresh salmon, cut into bite-sized pieces
  • 2 tablespoons olive oil
  • 1 teaspoon garlic powder
  • 1 teaspoon paprika
  • 1 teaspoon dried oregano
  • Salt and pepper to taste
  • Fresh lemon wedges (for serving)
  • Chopped fresh parsley (for garnish)

This simple list of ingredients highlights the beauty of cooking with fresh produce and spices. You’ll be amazed at how just a few basic ingredients can come together to create a flavorful dish that’s sure to impress!

How to Make Irresistible Air Fryer Salmon Bites

Let’s get to the fun part—cooking! Follow these steps, and you’ll have a delectable dish on your table in no time.

Step 1: Preheat the Air Fryer

Start by preheating your air fryer to 400°F (200°C). This ensures that your salmon bites will cook evenly and get that crispy texture we all love.

Step 2: Prepare the Seasoning Mix

In a mixing bowl, combine the olive oil, garlic powder, paprika, oregano, salt, and pepper. This aromatic blend is what gives our salmon bites that irresistible flavor. Feel free to adjust the spices based on your taste preferences—maybe a little more paprika for heat or a sprinkle of lemon zest for brightness!

Step 3: Coat the Salmon

Add the bite-sized pieces of salmon to the bowl and gently toss them until they’re evenly coated with the seasoning mix. You want every piece to be fully enveloped in that delicious flavor!

Step 4: Air Fry the Salmon Bites

Carefully place the seasoned salmon bites in a single layer in the air fryer basket. Make sure not to overcrowd them; you want proper air circulation to get that crispy finish. Cook them in the air fryer for about 8-10 minutes, or until they are cooked through and flake easily with a fork.

Step 5: Serve and Enjoy

Once done, remove the salmon bites from the air fryer and serve them hot! Squeeze fresh lemon juice over the top for a zesty kick and garnish with chopped parsley for a pop of color. These bites are best enjoyed immediately, but trust me—they won’t last long!

Serving Suggestions

These Air Fryer Salmon Bites are incredibly versatile, making them a great addition to any meal. Here are a few ideas on how to serve them:

With Rice

Serve your salmon bites over a fluffy bed of rice—white, brown, or even cauliflower rice for a low-carb option. Add a side of steamed veggies, and you’ve got a balanced meal!

In Tacos

For a fun twist, layer your salmon bites in warm corn tortillas, topped with avocado, cabbage slaw, and a drizzle of lime crema. Taco night just got an upgrade!

On a Salad

Make a refreshing salad by adding your salmon bites to a bed of greens, cucumbers, and cherry tomatoes. Drizzle with a light vinaigrette for a healthy, satisfying meal.

With Vegetables

Pair your bites with roasted or grilled vegetables for a hearty side dish. The combination of flavors will make your taste buds dance!

As Appetizers

These salmon bites make a fantastic appetizer for parties. Serve them with toothpicks and a tangy dipping sauce, and watch them disappear!

Tips for Perfect Air Fryer Salmon Bites

To ensure your salmon bites turn out perfect every time, keep these tips in mind:

  • Don’t Overcrowd the Basket: Give each piece enough space in the air fryer for even cooking and maximum crispiness.
  • Adjust Cooking Time: Depending on the size of your salmon pieces, you may need to adjust the cooking time slightly. Always check for doneness!
  • Use Fresh Ingredients: Fresh salmon and herbs will elevate the flavor of your dish. Opt for quality ingredients whenever possible.

Variations and Substitutions

Feel free to get creative with this recipe! Here are a few variations and substitutions you can try:

  • Different Proteins: If salmon isn’t your thing, try this recipe with shrimp or chicken bites. Just adjust cooking times accordingly.
  • Spice It Up: Add a pinch of cayenne pepper or chili flakes to the seasoning mix for an extra kick.
  • Herb Alternatives: Swap out oregano for dill or thyme for a different flavor profile.

Storage and Freezing

If you happen to have leftovers (which is rare!), here’s how to store them:

Refrigerator Storage

Store any leftover salmon bites in an airtight container in the refrigerator for up to 3 days. Reheat in the air fryer for a few minutes to regain that crispy texture.

Freezing Air Fryer Salmon Bites

To freeze, let the cooked salmon bites cool completely, then place them in an airtight container or freezer bag. They can be frozen for up to 3 months. Thaw in the refrigerator before reheating.

Frequently Asked Questions

How do I make Air Fryer Salmon Bites crispy?

The key to crispy bites is ensuring they are not overcrowded in the air fryer and using enough olive oil while coating them. A preheated air fryer is essential, too!

Can I use frozen salmon for Air Fryer Salmon Bites?

Yes! Just make sure to thaw it completely before cutting and seasoning. Frozen salmon may require a slightly longer cooking time.

What should I serve with Air Fryer Salmon Bites?

These bites pair well with rice, salads, or inside tacos for a delicious meal option. You can also serve them with a variety of dipping sauces for extra flavor.

How do I know when my salmon is done cooking?

Salmon is typically done when it flakes easily with a fork. You can also check that it reaches an internal temperature of 145°F (63°C).

Conclusion

And there you have it! A simple yet delightful recipe for Air Fryer Salmon Bites that will become a staple in your kitchen. These flavorful bites are perfect for any occasion, and I can guarantee they will leave your guests asking for seconds. So gather your ingredients, fire up that air fryer, and enjoy the magic of cooking with fresh ingredients. Happy cooking, my friends! Don’t forget to share your creations with me—I can’t wait to see how your salmon bites turn out!

Irresistible Air Fryer Salmon Bites: Quick and Delicious for Any Night!

Prep Time 5 minutes
Cook Time 10 minutes
Total Time 15 minutes
Servings 4 servings
Calories 250
Enjoy tender, flavorful salmon bites cooked to perfection in the air fryer, perfect for a quick and healthy meal.

Ingredients

Main

  • 1 pound fresh salmon, cut into bite-sized pieces
  • 2 tablespoons olive oil
  • 1 teaspoon garlic powder
  • 1 teaspoon paprika
  • 1 teaspoon dried oregano
  • to taste N/A salt and pepper
  • for serving N/A fresh lemon wedges
  • for garnish N/A chopped fresh parsley

Instructions 

  • Preheat the air fryer to 400°F (200°C).
  • Mix olive oil, garlic powder, paprika, oregano, salt, and pepper in a bowl.
  • Toss salmon pieces in the seasoning mixture to coat evenly.
  • Arrange salmon bites in a single layer in the air fryer basket.
  • Cook for 8-10 minutes until flaky and cooked through.
  • Serve with lemon wedges and garnish with parsley.

Notes

Use fresh salmon for best flavor and texture.
Calories: 250kcal
Cost: $15
Course: Main Course
Cuisine: American
Keyword: Salmon

Loved this recipe? Save it to your favorite Pinterest board so you can easily find it later! It’s the perfect way to keep all your sweet ideas in one place. ✨

Freshly cooked salmon bites with a crispy texture, captured in warm lighting.

Why You’ll Love These Duchess Potatoes

When it comes to side dishes that can elevate any meal, Garlic Parmesan Duchess Potatoes are in a league of their own. Imagine this: fluffy, creamy mashed potatoes transformed into golden swirls that look as delightful as they taste. These aren’t just potatoes; they’re an experience. Whether you’re hosting a fancy dinner party, celebrating a holiday, or just looking to impress someone special, these duchess potatoes are sure to steal the spotlight on your table.

What makes them special? It’s all about the balance of flavors—rich, buttery goodness meets the savory warmth of garlic and the nutty bite of Parmesan cheese. Each bite is a hug for your taste buds, and honestly, who doesn’t need a little extra joy in their life? Plus, they’re surprisingly easy to make, even if they look like something straight out of a gourmet kitchen. Trust me, once you whip these up, they’ll become a staple in your cooking arsenal.

Ingredients You’ll Need

Let’s gather our ingredients. Here’s what you’ll need to create these creamy, dreamy duchess potatoes:

  • 2 pounds russet potatoes, peeled and cut into chunks
  • 4 cloves garlic, minced
  • 1/2 cup grated Parmesan cheese
  • 1/4 cup unsalted butter, softened
  • 1/2 cup heavy cream
  • Salt and pepper to taste
  • 1 large egg
  • 1 egg yolk
  • Fresh parsley, chopped (for garnish)

Each ingredient plays a crucial role in achieving that perfect balance of flavor and texture. The russet potatoes give a fluffy base, while the garlic and cheese add depth and richness. And don’t skimp on the butter; it’s what makes these potatoes so luscious!

How to Make Garlic Parmesan Duchess Potatoes

A plate of Duchess Potatoes, beautifully browned and topped with Parmesan, showcasing delicate textures and warm colors.

Now that we have our ingredients ready, let’s get cooking! Follow these simple steps to create your delicious duchess potatoes:

  1. Preheat the oven: Set your oven to 400°F (200°C). This step is crucial for getting that beautiful golden finish on your potatoes.
  2. Boil the potatoes: In a large pot, bring salted water to a boil. Add the potato chunks and cook until tender, about 15-20 minutes. You want them soft enough to mash easily.
  3. Drain and return: Once tender, drain the potatoes and return them to the pot. This allows any excess moisture to evaporate, ensuring your mixture stays creamy and not watery.
  4. Mix in the good stuff: Add the minced garlic, butter, heavy cream, Parmesan cheese, salt, and pepper to the potatoes. Mash everything together until smooth and creamy. No lumps allowed!
  5. Egg it up: Stir in the egg and egg yolk until fully incorporated. This will help bind the mixture together and give it a lovely golden color when baked.
  6. Pipe it out: Transfer the potato mixture to a piping bag fitted with a large star tip. This is where the magic happens—pipe the mixture onto a baking sheet lined with parchment paper in decorative swirls or mounds. Get creative!
  7. Bake to perfection: Bake in the preheated oven for 20-25 minutes, or until the tops are golden brown and slightly crispy. Your kitchen will smell heavenly!
  8. Garnish and serve: Once out of the oven, garnish with chopped parsley before serving. These duchess potatoes are best enjoyed fresh but can hold their own for a little while on the table.

Tips & Tricks for Perfect Duchess Potatoes

Now that you know how to whip up these dreamy duchess potatoes, here are some tips to ensure they turn out perfect every time:

  • Choose the right potatoes: Russet potatoes are ideal for this recipe due to their starchy nature, which creates that fluffy texture.
  • Don’t overmix: When mashing, be gentle. Overmixing can lead to gummy potatoes, and nobody wants that!
  • Make-ahead option: You can prepare the potato mixture ahead of time and pipe it onto the baking sheet. Just cover and chill in the refrigerator. When ready to bake, pop them into the oven straight from the fridge, adding a few extra minutes to the baking time.
  • Experiment with flavors: Feel free to add other spices or herbs to the mixture, like chives or rosemary, for an extra flavor boost!

What to Serve with Duchess Potatoes

These duchess potatoes are incredibly versatile and can accompany a variety of main dishes. Here are some ideas:

  • Steak: Pair them with a juicy grilled steak and a rich red wine sauce for an elegant dinner.
  • Roasted chicken: The creaminess of the potatoes complements the savory flavors of herb-roasted chicken beautifully.
  • Fish: Serve alongside seared salmon or baked cod for a light yet satisfying meal.
  • Vegetables: Don’t forget a crisp vegetable side! Roasted asparagus or garlicky green beans make excellent companions.

Make-Ahead and Storage

If you’re planning a big meal or want to save time, these duchess potatoes can be made ahead of time. Here’s how:

To make ahead: Prepare the potato mixture, pipe it onto a baking sheet, and cover. Refrigerate for up to 24 hours before baking. When you’re ready to serve, simply bake them as directed. They can also be frozen, but I recommend baking them first before freezing for the best texture.

To store: Leftover baked duchess potatoes can be stored in an airtight container in the refrigerator for up to 3 days. Reheat them in the oven for that fresh-out-of-the-oven taste!

Nutrition Information

Each serving of these delicious duchess potatoes is not only satisfying but also packed with flavor. While they may not be the lightest dish on the table, they are certainly a treat worth indulging in. Here’s a rough estimate of the nutrition per serving:

  • Calories: 250
  • Fat: 15g
  • Carbohydrates: 30g
  • Protein: 5g

Keep in mind that the nutritional content can vary based on serving size and specific ingredients used.

Common Questions About Duchess Potatoes

Can I use a different type of potato?

While russet potatoes are recommended for their fluffy texture, Yukon gold potatoes can also work. Just keep in mind they might be a bit creamier.

Can I make them vegan?

Absolutely! Substitute the butter with vegan butter, heavy cream with coconut cream, and skip the egg. You can still achieve a delicious result!

What if I don’t have a piping bag?

No worries! You can simply spoon the potato mixture onto the baking sheet if you don’t have a piping bag. They won’t be as fancy but will still taste amazing!

Conclusion

There you have it! A delightful, creamy, and elegant dish that’s sure to impress your family and friends. Garlic Parmesan Duchess Potatoes are the perfect blend of comfort and sophistication, transforming any meal into a celebration. So next time you’re planning a dinner, don’t forget to add these magical potatoes to your menu. They’re more than just a side dish—they’re a warm embrace on a plate, one that invites you to savor every bite. Now, grab your ingredients and let’s whip up some joy in the kitchen!

Garlic Parmesan Duchess Potatoes Recipe

Prep Time 15 minutes
Cook Time 25 minutes
Total Time 40 minutes
Servings 6 servings
Calories 250
Elevate your side dish with these creamy, cheesy, and garlicky Duchess potatoes, perfect for special occasions or a comforting dinner.

Ingredients

Main

  • 2 pounds russet potatoes, peeled and cut into chunks
  • 4 cloves garlic, minced
  • 1/2 cup grated parmesan cheese
  • 1/4 cup unsalted butter, softened
  • 1/2 cup heavy cream
  • salt and pepper to taste
  • 1 large egg
  • fresh parsley, chopped (for garnish)

Instructions 

  • Boil potatoes until tender, then drain and mash with garlic, butter, cream, Parmesan, salt, and pepper.
  • Mix in egg and yolk, then pipe onto a baking sheet.
  • Bake at 400°F (200°C) for 20-25 minutes until golden.
  • Garnish with chopped parsley before serving.

Notes

For extra flavor, add a pinch of nutmeg or a sprinkle of additional Parmesan on top before baking.
Calories: 250kcal
Cost: $15
Course: Side Dish
Cuisine: American
Keyword: potatoes

Loved this recipe? Save it to your favorite Pinterest board so you can easily find it later! It’s the perfect way to keep all your sweet ideas in one place. ✨

Gourmet Garlic Parmesan Duchess Potatoes presented in an elegant manner, highlighted by soft lighting and appetizing details.

Welcome to my kitchen! If you’re here, it’s probably because you’re ready to dive into a delightful dish that feels like a warm hug on a plate. Today, we’re making Classic Baked Manicotti—a recipe that’s been a staple in my home and will surely become a favorite in yours. With creamy ricotta, gooey mozzarella, and a rich marinara sauce, this dish is not just a meal; it’s a comforting experience that brings people together. So, let’s roll up our sleeves and create some magic!

Why You’ll Love This Recipe

  • Family Favorite: This baked manicotti is a hit with everyone—from picky eaters to gourmet enthusiasts. Expect seconds!
  • Comfort Food Bliss: Each bite is filled with creamy cheese and savory sauce, perfect for cozy nights in.
  • Easy to Prepare: With straightforward steps, you’ll have a hearty meal ready with minimal fuss.
  • Customizable: Want to add more veggies or switch up the cheese? This recipe is flexible and allows for creativity!
  • Make Ahead: Prepare it in advance and pop it in the oven when you’re ready to eat, making meal planning a breeze.

Ingredient Breakdown

Let’s gather our ingredients! Here’s what you’ll need to create this delicious dish:

  • 12 manicotti pasta shells: The star of the show! If you can’t find manicotti, large jumbo shells work just as well.
  • 3 cups ricotta cheese: This creamy cheese is essential for that rich filling. You can also use cottage cheese as a lighter alternative.
  • 1 ½ cups shredded mozzarella cheese (divided): Gooey and melty, mozzarella makes everything better. Feel free to use a mix of mozzarella and provolone for a twist!
  • ¾ cup grated parmesan cheese (divided): Adds a nutty flavor and a nice crust when baked.
  • 1 large egg: This binds everything together in the filling.
  • 2 tablespoons chopped fresh parsley: For a pop of color and freshness. Basil or spinach can also be great substitutes!
  • 2 cloves garlic (minced): Because garlic makes everything taste better, right?
  • ½ teaspoon salt and ¼ teaspoon black pepper: Essential seasonings to enhance the flavors.
  • 4 cups marinara sauce: Store-bought or homemade—whatever makes your heart happy!
  • 1 tablespoon olive oil: Just a bit to grease the baking dish.

How to Make Homemade Manicotti

Ready to assemble this beauty? Here’s how to make it step by step:

  1. Preheat your oven to 375°F. Lightly grease a 9×13-inch baking dish with olive oil.
  2. Cook the manicotti shells in a large pot of salted boiling water according to package directions until al dente. Drain and place on a parchment-lined tray to prevent sticking.
  3. In a mixing bowl, combine ricotta, 1 cup mozzarella, ½ cup parmesan, egg, parsley, garlic, salt, and black pepper. Mix well until smooth and creamy.
  4. Spread 1 cup of marinara sauce on the bottom of the prepared baking dish.
  5. Fill each manicotti shell with the cheese mixture using a spoon or piping bag.
  6. Place the stuffed shells in the dish over the sauce, arranging them in a single layer.
  7. Pour the remaining marinara sauce evenly over the shells.
  8. Sprinkle the top with the remaining mozzarella and parmesan cheese.
  9. Cover the dish tightly with foil and bake for 30 minutes.
  10. Uncover and bake for an additional 15 minutes, or until the cheese is bubbly and slightly golden.
  11. Let the manicotti cool for 5 to 10 minutes before serving. Garnish with extra parsley if desired.

Pro Tips for Perfect Manicotti

Delicious baked manicotti pasta shells, stuffed with ricotta cheese and melted mozzarella.
  • Prevent Sticking: To avoid the noodles sticking together, lightly coat them with olive oil after boiling.
  • Flavor Boost: Add a pinch of Italian seasoning to the cheese filling for an extra flavor kick.
  • Don’t Overfill: When stuffing the shells, it’s better to fill them modestly to prevent overflow during baking.
  • Let it Rest: Allow the manicotti to sit for a few minutes after baking for easier serving.
  • Experiment with Cheeses: Mix in some goat cheese or feta for a tangy twist!
  • Use Fresh Herbs: Fresh basil or oregano can elevate the flavor profile significantly.
  • Make it Ahead: Prepare the manicotti and refrigerate it before baking for up to 24 hours.
  • Freeze it: This dish freezes beautifully—just thaw and bake when you’re ready to enjoy!

Common Mistakes and Troubleshooting

Cooking is all about learning from our experiences! Here are a few common pitfalls and how to avoid them:

  • Overcooked Shells: Make sure the shells are al dente before filling, as they will continue to cook in the oven.
  • Dry Filling: If your cheese mixture feels too dry, add a splash of cream or more egg to help it stay moist.
  • Too Much Sauce: Balance is key! If you pour too much sauce, it can make the dish soggy. Stick to the measurements for the best results.
  • Burnt Cheese: Cover with foil during the first part of baking to prevent the cheese from burning.

Delicious Variations

Feel free to get creative! Here are some variations to try:

  • Vegetable Manicotti: Add sautéed spinach, mushrooms, or zucchini to the cheese filling for added nutrition.
  • Meat-Lover’s Manicotti: Mix in cooked ground beef or sausage into the cheese filling for a hearty twist.
  • Spicy Manicotti: Incorporate red pepper flakes or diced jalapeños into the sauce for a spicy kick!
  • Cheesy White Sauce Manicotti: Swap marinara with a creamy white sauce for a different flavor profile.

Storage and Make-Ahead Instructions

This baked manicotti is perfect for meal prep! Here’s how to store it:

  • Refrigerate: Store leftovers in an airtight container for up to 3 days.
  • Freeze: Freeze unbaked manicotti for up to 3 months. Just thaw and bake when ready!
  • Reheat: Warm in the oven at 350°F until heated through, about 20-25 minutes.

FAQs About Baked Manicotti

  • Can I use other types of pasta? Yes, you can use jumbo shells or even lasagna noodles cut into pieces.
  • How can I spice up the marinara sauce? Add fresh herbs, sautéed onions, or a splash of red wine to enhance the flavor.
  • What can I serve with manicotti? A fresh salad, garlic bread, or roasted vegetables complement this dish beautifully.
  • Can I make manicotti vegan? Absolutely! Substitute ricotta with tofu or cashew cheese and use vegan cheese alternatives.
  • How long does it take to bake? Approximately 45 minutes total—30 minutes covered and 15 uncovered.
  • Is this recipe gluten-free? You can use gluten-free manicotti shells to make it suitable for gluten-free diets.
  • What’s the best way to reheat leftovers? The oven works best to keep the cheese from becoming rubbery. Reheat at 350°F.
  • Can I add meat to the filling? Certainly! Ground beef, turkey, or chicken can be integrated into the cheese mixture.

Nutrition Tips and Dietary Adaptations

Cooking is about balance! Here are some nutrition tips:

  • Increase Fiber: Add chopped veggies like spinach or kale to the cheese filling for extra fiber and vitamins.
  • Lower Fat: Use part-skim ricotta and mozzarella to reduce fat without sacrificing flavor.
  • Boost Protein: Add cooked quinoa or lentils to the filling for a protein-packed meal.

Equipment Recommendations

Here’s what you’ll need:

  • Large Pot: For boiling the pasta shells.
  • Mixing Bowl: To combine your cheese filling.
  • Baking Dish: A 9×13-inch dish works perfectly for this recipe.
  • Spoon or Piping Bag: For stuffing the manicotti shells with the cheese mixture.

Serving Suggestions

To make your meal even more special:

  • Garnish: Fresh basil or chopped parsley on top adds a lovely touch.
  • Pair with Wine: A nice Chianti or Merlot complements the flavors beautifully.
  • Side Dishes: Consider a light arugula salad or roasted garlic bread.

Cooking is an adventure, and I’m thrilled you’re on this journey with me. I hope this Classic Baked Manicotti becomes a beloved addition to your recipe repertoire, just as it has in mine. Remember, every time you step into the kitchen, you’re creating memories. So, pull up a chair, grab that spatula, and let’s make something unforgettable together!

Classic Baked Manicotti

Prep Time 20 minutes
Cook Time 45 minutes
Total Time 1 hour 5 minutes
Servings 6 servings
Calories 450
A delicious Italian-inspired baked pasta dish featuring cheesy stuffed manicotti shells baked in marinara sauce.

Ingredients

Pasta

  • 12 pieces manicotti pasta shells
  • 3 cups ricotta cheese
  • 1.5 cups shredded mozzarella cheese (divided)
  • 0.75 cup grated parmesan cheese (divided)
  • 1 large egg
  • 2 tablespoons chopped fresh parsley
  • 2 cloves garlic (minced)
  • 0.5 teaspoon salt
  • 0.25 teaspoon black pepper
  • 4 cups marinara sauce
  • 1 tablespoon olive oil

Instructions 

  • Preheat oven to 375°F (190°C). Grease a 9x13-inch dish with olive oil.
  • Cook manicotti shells until al dente, drain, and set aside.
  • Mix ricotta, 1 cup mozzarella, ½ cup parmesan, egg, parsley, garlic, salt, and pepper.
  • Spread 1 cup marinara in dish, fill shells with cheese mixture, and place in dish.
  • Top with remaining marinara, mozzarella, and parmesan. Cover and bake 30 mins, then uncover and bake 15 mins.

Notes

Let the manicotti rest for 5-10 minutes before serving for best results.
Calories: 450kcal
Cost: $15
Course: Main Course
Cuisine: Italian
Keyword: baked, cheese, pasta

Why You’ll Love This Recipe

Ah, the beauty of cooking lies in the magic of flavors coming together in perfect harmony. Honey Garlic Glazed Salmon is a prime example of this culinary alchemy. Imagine a succulent piece of salmon, tender and flaky, enveloped in a rich, glossy glaze that’s both sweet and savory. It’s the kind of dish that can transform an ordinary weeknight dinner into a delightful feast, or impress guests at your next gathering. Not only is this recipe delicious, but it’s also incredibly easy to make, allowing you to whip up a gourmet meal without breaking a sweat. Plus, it requires just a few pantry staples, making it a fantastic go-to recipe when you’re short on time or ingredients.

Behind the Recipe

This recipe has a little story of its own. On a rainy afternoon, craving something warm and comforting, I rummaged through my kitchen and discovered a jar of honey and a few garlic cloves. Inspired, I decided to experiment with a simple salmon fillet I had in the fridge. The result? A dish that not only filled my belly but also warmed my heart. The combination of honey and garlic is a classic pairing that transcends cultures, showcasing the universal appeal of sweet and savory flavors. This dish reminds me of the cozy nights spent in my mom’s kitchen, where simple ingredients were transformed into something extraordinary with just a pinch of love.

Recipe Origin or Trivia

Succulent salmon fillet drizzled with honey garlic sauce, surrounded by a blurred, cozy background.

Honey and garlic have been used in various cuisines around the world, often celebrated for their bold flavors and health benefits. Honey has been a staple in cooking for centuries, known not just for its sweetness but also for its antibacterial properties. Garlic, on the other hand, adds depth and warmth, enriching dishes with its aromatic essence. Together, they create a glaze that’s both enticing and versatile. This recipe is a blend of different culinary traditions, making it perfect for any table, whether you’re aiming for an Asian-inspired dinner or a Mediterranean feast.

Why You’ll Keep Coming Back

There are countless reasons to fall in love with Honey Garlic Glazed Salmon:

  • Versatile: Pair it with rice, quinoa, or a fresh salad. The possibilities are endless!
  • Quick and Easy: From prep to plate in just 20 minutes, making it perfect for busy nights.
  • Customizable: Adjust the sweetness or spice level to suit your palate. Want more heat? Add a pinch of chili flakes!
  • Healthy: Salmon is rich in omega-3 fatty acids, making this dish not just delicious but nutritious too.
  • Impressive: With minimal effort, you’ll serve a dish that looks and tastes like it came from a fine dining restaurant.

Chef’s Pro Tips for Perfect Results

To ensure your Honey Garlic Glazed Salmon turns out perfectly every time, follow these expert tips:

  • Choose the Right Salmon: Opt for skin-on fillets for extra moisture and flavor. Wild-caught salmon is often more flavorful than farmed.
  • Don’t Overcook: Salmon is best when cooked just until it flakes easily with a fork. Aim for an internal temperature of 145°F (63°C).
  • Let it Rest: Allow the salmon to sit for a few minutes after baking to let the juices redistribute.
  • Garnish with Green Onions: A sprinkle of chopped green onions adds a fresh burst of flavor and a pop of color.
  • Experiment with Glaze: Feel free to tweak the glaze ingredients; adding a splash of lime juice or a dash of sesame oil can elevate the dish even further.

Kitchen Tools You’ll Need

Having the right tools can make a world of difference. For this recipe, you’ll need:

  • Nonstick Skillet or Baking Dish: For easy cooking and cleanup.
  • Mixing Bowl: To whisk together the glaze ingredients.
  • Fish Spatula: Ideal for flipping the salmon without breaking it apart.
  • Measuring Cups and Spoons: To ensure perfect measurements.

Ingredients in Honey Garlic Glazed Salmon

Gather the following ingredients to create this mouthwatering dish:

  • 4 salmon fillets
  • 1/4 cup honey
  • 2 tablespoons soy sauce
  • 3 cloves garlic, minced
  • 1 tablespoon olive oil
  • 1 teaspoon fresh ginger, grated
  • Salt and pepper to taste
  • Chopped green onions for garnish

Ingredient Substitutions

Don’t have everything on hand? No problem! Here are some substitutions:

  • Honey: Maple syrup or agave nectar can work in a pinch.
  • Soy Sauce: Use tamari for a gluten-free option or coconut aminos for a lighter alternative.
  • Fresh Ginger: Ground ginger can substitute in a pinch, though the flavor won’t be quite the same.

Ingredient Spotlight

Let’s take a closer look at the star ingredients:

  • Salmon: A fantastic source of protein and omega-3 fatty acids, salmon not only nourishes your body but also delights your taste buds.
  • Honey: This natural sweetener brings a rich, caramelized flavor to the dish, enhancing the overall taste.
  • Garlic: Known for its bold flavor and health benefits, garlic is a must-have in this glaze.

Instructions for Making Honey Garlic Glazed Salmon

Ready to create your masterpiece? Follow these simple steps:

  1. Preheat your oven to 400°F (200°C).
  2. In a small bowl, whisk together honey, soy sauce, minced garlic, olive oil, and grated ginger until well combined.
  3. Season the salmon fillets with salt and pepper on both sides.
  4. Place the salmon fillets in a baking dish and pour the honey garlic mixture over them, ensuring they are well coated.
  5. Bake in the preheated oven for 12-15 minutes, or until the salmon flakes easily with a fork.
  6. Remove from the oven and drizzle any remaining glaze from the baking dish over the salmon.
  7. Garnish with chopped green onions before serving.

Texture & Flavor Secrets

The magic of this dish lies in the contrasting textures and flavors. The exterior of the salmon becomes beautifully caramelized from the honey glaze, while the inside remains moist and tender. The garlic adds a depth of flavor that complements the richness of the fish, while the ginger provides a warm, zesty kick. Together, these elements create a dish that is not only delicious but also visually stunning.

Cooking Tips & Tricks

To enhance your cooking experience, consider these additional tips:

  • Preheat your oven well to ensure even cooking.
  • Use a meat thermometer to check for doneness.
  • If you prefer a charred finish, broil the salmon for the last 2 minutes of cooking.

What to Avoid

Avoid these common pitfalls to ensure your dish is a success:

  • Don’t overcrowd the baking dish; this can lead to steaming rather than baking.
  • Avoid cooking the salmon at too high a temperature to prevent it from drying out.
  • Don’t skip resting the salmon after cooking—it allows the flavors to settle.

Nutrition Facts

This dish is not only delightful to your palate but also kind to your body. Here’s a quick nutritional breakdown per serving:

  • Calories: 350
  • Protein: 34g
  • Fat: 15g
  • Carbohydrates: 18g

Preparation Time

This recipe is quick to prepare:

  • Prep Time: 10 minutes
  • Cook Time: 12-15 minutes
  • Total Time: 20-25 minutes

Make-Ahead and Storage Tips

This recipe is excellent for meal prep! To make ahead:

  • Prepare the glaze in advance and marinate the salmon for up to 2 hours.
  • Store leftovers in an airtight container in the fridge for up to 3 days.
  • To freeze, wrap each fillet individually and store for up to 2 months. Reheat gently in a skillet with a splash of water to maintain moisture.

How to Serve Honey Garlic Glazed Salmon

Presentation is key! Here are some serving ideas:

  • Serve over fluffy jasmine rice or quinoa for a hearty meal.
  • Pair with steamed vegetables, like broccoli or green beans, for a balanced plate.
  • For a light option, serve on a bed of mixed greens with a drizzle of sesame dressing.

Creative Leftover Transformations

Don’t let any delicious salmon go to waste! Here are some ideas for using leftovers:

  • Flake the salmon into a salad for a nutritious lunch.
  • Incorporate into tacos with fresh salsa and avocado.
  • Add to a grain bowl with roasted veggies for a quick dinner.

Additional Tips

To elevate your dish further, consider these ideas:

  • Experiment with herbs like cilantro or parsley for fresh flavor.
  • Add a sprinkle of sesame seeds for crunch.
  • Serve with a wedge of lemon for an extra zing!

Make It a Showstopper

Want to impress? Elevate your presentation by:

  • Drizzling the glaze artistically on the plate.
  • Garnishing with microgreens or edible flowers for a pop of color.
  • Serving alongside colorful roasted vegetables, creating a vibrant meal.

Variations to Try

Feel free to get creative with this recipe:

  • Spicy Honey Garlic Salmon: Add chili paste or crushed red pepper to the glaze for an extra kick.
  • Maple Garlic Salmon: Swap honey for maple syrup for a different sweetness.
  • Herbed Salmon: Add fresh herbs like thyme or dill to the glaze for added flavor.

FAQs

Here are some common questions about this recipe:

Can I bake this instead of pan-searing?

Absolutely! Baking is a great way to achieve that caramelized glaze without the fuss.

Is it okay to use frozen salmon?

Yes, just ensure it is fully thawed and patted dry before cooking.

What side dishes pair well?

Consider steamed broccoli, jasmine rice, or a crisp garden salad for the perfect complement.

Can I use this glaze on other proteins?

Definitely! Chicken, tofu, or shrimp work wonderfully with this glaze.

How do I keep the salmon from sticking?

Preheating your pan well and using enough oil will help prevent sticking.

Does the glaze store well?

Yes, it lasts up to a week in the fridge in a sealed container.

Can I make this gluten-free?

Simply swap soy sauce for tamari or coconut aminos.

How do I know when the salmon is done?

It should flake easily with a fork and have an internal temperature of 145°F.

What’s the best honey to use?

A mild, floral honey works best—avoid strong or bitter varieties.

Can I meal prep this?

Yes! Cook the salmon, refrigerate, and reheat gently throughout the week.

Conclusion

Honey Garlic Glazed Salmon isn’t just a meal; it’s a delightful experience that brings together simplicity and elegance in every bite. With minimal ingredients and maximum flavor, this recipe has earned its place in the hearts (and stomachs) of many. Whether you’re cooking for a special occasion or just a quiet night at home, this dish is bound to make you feel like a culinary superstar. So, gather your ingredients and get cooking—you won’t regret it! And don’t forget to share your creations with me; I can’t wait to see how you make this recipe your own!

Honey Garlic Glazed Salmon

Prep Time 10 minutes
Cook Time 15 minutes
Total Time 25 minutes
Servings 4 servings
Calories 350
A delicious and easy-to-make salmon dish with a sweet and savory honey garlic glaze, perfect for a quick dinner.

Ingredients

Main ingredients

  • 4 fillets salmon fillets
  • 1/4 cup honey
  • 2 tablespoons soy sauce
  • 3 cloves garlic, minced
  • 1 tablespoon olive oil
  • 1 teaspoon fresh ginger, grated
  • to taste salt and pepper salt and pepper
  • for garnish green onions chopped green onions

Instructions 

  • Preheat oven to 400°F (200°C).
  • Mix honey, soy sauce, garlic, olive oil, and ginger.
  • Season salmon with salt and pepper, then coat with the glaze.
  • Bake for 12-15 minutes until flaky.
  • Drizzle remaining glaze and garnish with green onions.

Notes

Serve with steamed rice or vegetables for a complete meal.
Calories: 350kcal
Cost: $15
Course: Main Course
Cuisine: American
Keyword: Salmon

Loved this recipe? Save it to your favorite Pinterest board so you can easily find it later! It’s the perfect way to keep all your sweet ideas in one place. ✨

Glazed salmon highlighting its texture, served with vibrant green onion garnish under warm lighting.

Why You’ll Fall in Love with This Dish

There’s something magical about a steaming bowl of ramen, isn’t there? It’s not just a dish; it’s an experience that wraps you in warmth and flavor. This Korean Ramen is a delightful blend of spice and comfort, making it the perfect dish for cozy nights in or even those late-night cravings that can sneak up on you. Imagine slurping up chewy noodles in a rich, savory broth, with hints of gochujang that tickle your taste buds. Whether you’re seeking a quick dinner solution or a dish that feels like a warm hug, this ramen has got you covered.

Gather Your Ingredients

Let’s talk about what you’ll need to create this heavenly bowl of Korean ramen. The ingredients are simple yet flavorful, striking that perfect balance that keeps you coming back for more. Here’s your shopping list:

  • 2 packs instant ramen noodles
  • 4 cups water
  • 1 tablespoon gochujang (Korean chili paste)
  • 1 tablespoon soy sauce
  • 1 teaspoon sesame oil
  • 1/2 teaspoon garlic powder
  • 1/2 cup sliced green onions
  • 1/2 cup chopped spinach
  • 1 boiled egg (optional)
  • Sesame seeds for garnish

With these ingredients in your kitchen, you’re just a few steps away from a bowl of bliss!

How to Make Your Soul-Warming Korean Ramen

Delicious Korean ramen featuring noodles, egg, and fresh vegetables under natural light.

Alright, my friend, let’s dive into the magic of making this ramen. The process is straightforward and packed with flavor. Here’s how you do it:

Step-by-Step Instructions

  1. In a pot, bring 4 cups of water to a boil.
  2. Add the instant ramen noodles and cook according to package instructions, usually about 3-4 minutes.
  3. In a small bowl, mix gochujang, soy sauce, sesame oil, and garlic powder to create the sauce.
  4. Once the noodles are cooked, reduce the heat and stir in the sauce mixture until well combined.
  5. Add the sliced green onions and chopped spinach, cooking for an additional 1-2 minutes until the spinach wilts.
  6. If desired, slice the boiled egg in half and place on top of the ramen.
  7. Serve hot, garnished with sesame seeds.

And just like that, you have a bowl of Korean ramen that’s not only delicious but also filled with love and warmth!

Tips for Perfecting Your Ramen

Cooking is all about experimenting, and ramen is no exception. Here are some tips to elevate your dish:

  • Use Quality Noodles: While instant noodles are convenient, consider using fresh or homemade noodles for a more authentic texture.
  • Customize Your Broth: Feel free to add more spices or even a dash of chicken stock for an extra depth of flavor.
  • Don’t Rush the Spinach: Allow the spinach to wilt perfectly; it adds a lovely texture and nutritional boost to your bowl.
  • Top with Fresh Ingredients: Add fresh herbs or vegetables right before serving for that bright, fresh taste.

Variations to Try

This recipe is versatile and can be tailored to your preferences. Here are some ideas:

  • Spicy Kick: Add sliced fresh chilies or a drizzle of chili oil for an extra layer of heat.
  • Protein Power: Consider adding tofu, shrimp, or even beef for a heartier meal.
  • Veggie Boost: Load up your ramen with additional vegetables like mushrooms, carrots, or bell peppers.

Substitutions You Can Make

Not all ingredients are set in stone! If you’re missing something, here are some substitutions:

  • Gochujang: If you can’t find gochujang, try sriracha or a mix of chili powder and a touch of honey.
  • Soy Sauce: Tamari or coconut aminos make great gluten-free alternatives.
  • Spinach: Kale or bok choy can be used as a nutritious alternative.

Essential Equipment

To whip up this delicious ramen, you’ll need a few kitchen staples:

  • A medium-sized pot for boiling
  • A mixing bowl for your sauce
  • A cutting board and knife for chopping
  • A ladle for serving

Storing and Freezing Your Ramen

If you happen to have leftovers (which is unlikely because it’s that good!), here’s how to store them:

  • Refrigeration: Store leftover ramen in an airtight container in the fridge for up to 2 days. Just be aware that the noodles may get a bit mushy.
  • Freezing: While I recommend eating it fresh, you can freeze the broth. Just reheat it when you’re ready to enjoy!

FAQs About Korean Ramen

Got questions? I’ve got answers! Here are some common queries related to our beloved ramen:

  • Can I use regular pasta instead of ramen? Absolutely! While it won’t have the same texture, it can still be delicious.
  • Is this recipe vegan? To make it vegan, simply omit the egg and use vegetable broth instead of water.
  • How can I make this dish gluten-free? Use gluten-free ramen noodles and tamari instead of soy sauce.

Troubleshooting Tips

If things don’t go as planned, don’t worry! Here are some tips:

  • Too Spicy? If you’ve gone a bit overboard with the gochujang, stir in a teaspoon of sugar or honey to balance out the heat.
  • Too Salty? Add a splash of water or low-sodium broth to tone it down.
  • Overcooked Noodles? If your noodles turn mushy, try to cook them for a shorter time next time and add them to the broth just to heat through.

Final Thoughts on Your Ramen Journey

This Korean Ramen is not just a meal; it’s a comforting ritual that brings joy to every slurp. The beauty of cooking is that it allows you to share moments with those you love, making memories over a bowl of steaming goodness. So whether you’re huddled on the couch on a rainy day or hosting a cozy dinner party, this ramen is sure to impress. Don’t forget to gather your friends and family around the table—because food is best enjoyed together. Grab your chopsticks, dig in, and let the flavors transport you to a cozy Korean kitchen. Happy cooking!

Korean Ramen - Flavor Scroll

Prep Time 5 minutes
Cook Time 10 minutes
Total Time 15 minutes
Servings 2 servings
Calories 350
A quick and flavorful Korean-inspired ramen recipe with spicy gochujang and fresh greens.

Ingredients

Noodles and Broth

  • 2 packs instant ramen noodles
  • 4 cups water

Sauce Mixture

  • 1 tablespoon gochujang (korean chili paste)
  • 1 tablespoon soy sauce
  • 1 teaspoon sesame oil
  • 1/2 teaspoon garlic powder

Vegetables and Garnish

  • 1/2 cup sliced green onions
  • 1/2 cup chopped spinach
  • 1 optional boiled egg (sliced in half)

Garnish

  • to taste sesame seeds (for garnish)

Instructions 

  • Bring 4 cups of water to a boil.
  • Add noodles and cook for 3-4 minutes.
  • Mix gochujang, soy sauce, sesame oil, and garlic powder to make the sauce.
  • Stir the sauce into cooked noodles, then add green onions and spinach; cook 1-2 minutes.
  • Top with sliced boiled egg and sesame seeds, then serve hot.

Notes

Feel free to add more vegetables or spice for extra flavor.
Calories: 350kcal
Cost: $4
Course: Main Course
Cuisine: Korean
Keyword: quick, ramen, Spicy

Loved this recipe? Save it to your favorite Pinterest board so you can easily find it later! It’s the perfect way to keep all your sweet ideas in one place. ✨

Eye-level shot of Korean ramen topped with green onions and sesame seeds.

Why You’ll Love This Air Fryer BBQ Salmon

If you’re on a quest for a quick, flavorful dinner that feels like a hug from the inside out, then let me introduce you to the delightful world of Air Fryer BBQ Salmon with Homemade Rub. This dish is a culinary adventure waiting to happen! The air fryer transforms ordinary salmon fillets into a masterpiece of flavor, with a crispy exterior and tender, flaky interior. Plus, it’s so easy to whip up that you might just find yourself making it on repeat.

Imagine the tantalizing aroma of smoked paprika mingling with garlic powder as it wafts through your kitchen, making your mouth water in anticipation. This recipe is not just about cooking; it’s about creating a moment—a moment of joy, of comfort, of satisfaction that only a well-cooked piece of salmon can bring. So, grab your apron and let’s dive into this delicious dish!

Ingredients You’ll Need

To embark on this flavorful journey, you’ll need the following ingredients:

  • 2 (6-ounce) salmon fillets, skin on or off
  • 1 tablespoon olive oil
  • 1/2 teaspoon smoked paprika
  • 1/2 teaspoon garlic powder
  • 1/4 teaspoon onion powder
  • 1/4 teaspoon black pepper
  • 1/4 teaspoon salt
  • 1/4 cup of your favorite BBQ sauce
  • Fresh parsley, chopped, for garnish (optional)

Let’s Get Cooking!

Deliciously cooked salmon fillets with a BBQ glaze, displayed on a wooden surface.

Now that you have your ingredients lined up, let’s break down the steps to create this mouthwatering dish:

  1. Pat the salmon fillets dry with paper towels—this step is crucial for achieving that golden, crispy exterior.
  2. In a small bowl, mix together the smoked paprika, garlic powder, onion powder, black pepper, and salt to create your homemade rub. This blend is where the magic begins!
  3. Brush each salmon fillet with olive oil, then generously sprinkle the homemade rub over both sides, pressing gently to adhere. Don’t be shy; this is where the flavor really packs a punch!
  4. Preheat your air fryer to 375°F (190°C) for about 3-5 minutes. Preheating ensures even cooking and helps achieve that perfect texture.
  5. Place the salmon fillets in the air fryer basket in a single layer, making sure they are not overlapping. Give each piece enough space to breathe!
  6. Air fry for 8-10 minutes, flipping halfway through if desired, until the salmon reaches an internal temperature of 145°F (63°C) and flakes easily with a fork. Cooking times may vary depending on the thickness of your salmon. Don’t be afraid to check!
  7. During the last 2-3 minutes of cooking, brush the salmon fillets with BBQ sauce, allowing it to caramelize slightly. This step adds a beautiful glaze and an extra layer of flavor.
  8. Carefully remove the salmon from the air fryer and garnish with fresh chopped parsley if desired.
  9. Serve immediately with your favorite side dish, such as grilled corn or a fresh salad.

Tips for Perfect Air Fryer BBQ Salmon

While this recipe is straightforward, here are a few tips to ensure you achieve the best results:

  • Choose quality salmon: Fresh, wild-caught salmon is ideal for flavor and texture. Look for fillets that are vibrant in color and free of any brown spots.
  • Don’t skip the drying step: Patting the salmon fillets dry helps them crisp up nicely in the air fryer.
  • Adjust cooking time: If your fillets are thicker than 1-inch, you may need to increase the cooking time by a couple of minutes. Always use a meat thermometer to check for doneness.

Variations to Explore

If you’re feeling adventurous, why not try some variations? Here are a few ideas:

  • Spicy Kick: Add a pinch of cayenne pepper to the rub for a bit of heat.
  • Herb Infusion: Mix in some dried herbs like thyme or rosemary to the rub for an aromatic twist.
  • Different Sauces: Experiment with different BBQ sauces—honey BBQ or spicy chipotle can add a whole new flavor profile!

Substitutions You Can Make

Sometimes, life throws curveballs, and you might not have all the ingredients. Here are some substitutions that work beautifully:

  • Olive Oil: Avocado oil or canola oil can be used in place of olive oil.
  • BBQ Sauce: Homemade BBQ sauce or even teriyaki sauce can be a delightful alternative.
  • Spices: If you don’t have smoked paprika, regular paprika will do—just be aware it won’t have the same smoky flavor.

Essential Equipment

To create this delicious dish, you’ll need:

  • An air fryer (of course!)
  • A small bowl for mixing the rub
  • A brush for applying the olive oil and BBQ sauce
  • A meat thermometer to ensure perfect doneness

Storage and Freezing

If you find yourself with leftovers (which might be unlikely because it’s so delicious!), here’s how to store them:

  • In the fridge: Store cooked salmon in an airtight container for up to 3 days. Reheat in the air fryer or microwave until warmed through.
  • Freezing: You can freeze cooked salmon for up to 2 months. Wrap it tightly in plastic wrap and then place it in a freezer-safe container. To reheat, thaw overnight in the fridge and warm in the air fryer.

FAQs About Air Fryer BBQ Salmon

Let’s address some common questions:

  • Can I use frozen salmon?
    Yes, but be sure to thaw it completely before cooking for even results.
  • What sides go well with BBQ salmon?
    Grilled corn, a fresh salad, or roasted vegetables are perfect pairings!
  • How can I tell if the salmon is fully cooked?
    The internal temperature should reach 145°F (63°C), and it should flake easily with a fork.

Troubleshooting Tips

If your results aren’t what you expected, here are some troubleshooting tips:

  • Salmon not crispy: Make sure the fillets are patted dry and not overcrowded in the air fryer.
  • BBQ sauce not caramelizing: Brush it on during the last few minutes of cooking to allow it to stick and caramelize properly.

Conclusion

And there you have it—a flavorful adventure that’s not just about feeding the body but nourishing the soul. This Air Fryer BBQ Salmon with Homemade Rub is not just a meal; it’s an experience that brings joy and warmth to your dinner table. So whether you’re cooking for your family, hosting friends, or simply treating yourself, this dish will undoubtedly impress and satisfy. Pull up a chair, dig in, and enjoy the magic of a well-cooked salmon that’s bursting with flavor. Happy cooking, my friends!

Air Fryer BBQ Salmon with Homemade Rub

Prep Time 10 minutes
Cook Time 10 minutes
Total Time 20 minutes
Servings 2 servings
Calories 350
Enjoy tender, flavorful salmon cooked to perfection in your air fryer, topped with a smoky homemade rub and sweet BBQ glaze.

Ingredients

Salmon Fillets

  • 2 ounces salmon fillets, skin on or off
  • 1 tablespoon olive oil
  • 0.5 teaspoon smoked paprika
  • 0.5 teaspoon garlic powder
  • 0.25 teaspoon onion powder
  • 0.25 teaspoon black pepper
  • 0.25 teaspoon salt
  • 0.25 cup bbq sauce (favorite variety)
  • to taste fresh parsley, chopped (for garnish)

Instructions 

  • Pat salmon dry, then mix spices to make the rub.
  • Brush salmon with olive oil and apply the rub evenly.
  • Preheat air fryer to 375°F (190°C). Cook salmon for 8-10 minutes.
  • During the last 2-3 minutes, brush with BBQ sauce to caramelize.
  • Remove, garnish with parsley, and serve immediately.

Notes

Ensure salmon reaches an internal temperature of 145°F (63°C) for safety.
Calories: 350kcal
Cost: $15
Course: Main Course
Cuisine: American
Keyword: Salmon

Loved this recipe? Save it to your favorite Pinterest board so you can easily find it later! It’s the perfect way to keep all your sweet ideas in one place. ✨

Juicy BBQ salmon in a cozy setting, highlighting textures and colors.

Why You’ll Love This Recipe

When the weather turns chilly and the days grow shorter, nothing warms the soul quite like a plate of Creamy Garlic Chicken. Imagine tender chicken, perfectly seared until golden brown, simmering in a luscious sauce that envelops your taste buds like a cozy blanket. This dish isn’t just food; it’s a little piece of home that you can whip up on a busy weeknight or serve at a gathering with friends. With a handful of simple ingredients—think garlic, cream, and herbs—you can create a meal that tastes like it came straight from a gourmet bistro without the fuss. And let’s be honest, who doesn’t want to impress their loved ones with minimal effort?

In my kitchen, this recipe has become a staple, a comforting reminder of my roots. Each time I make it, I’m transported back to my childhood, where the aroma of garlic sizzling in olive oil would send my family scurrying to the table. So, grab your apron, and let’s embark on this whimsical journey to flavor town together!

What You’ll Need for Creamy Garlic Chicken

To recreate this delightful dish, you’ll need the following ingredients:

  • 2 boneless, skinless chicken breasts
  • 3 tablespoons olive oil
  • 4 cloves garlic, minced
  • 1 cup heavy cream
  • 1 cup chicken broth
  • 1 teaspoon dried Italian herbs
  • Salt and pepper to taste
  • Fresh parsley for garnish

These ingredients are not just staples; they’re the magic that transforms simple chicken into a dish that can make anyone swoon. The heavy cream adds richness, while the garlic infuses a warmth that’s simply irresistible.

How to Make Creamy Garlic Chicken (Short & Sweet)

Mouthwatering creamy garlic chicken dish featuring a rich sauce, captured in warm natural light.

Making this dish is a breeze. Here’s how to bring the magic to life:

  1. Heat olive oil in a large skillet over medium heat.
  2. Season the chicken breasts with salt and pepper, then add them to the skillet.
  3. Cook the chicken for about 5-7 minutes on each side until golden brown and cooked through. Remove from skillet and set aside.
  4. In the same skillet, add minced garlic and sauté for 1 minute until fragrant.
  5. Pour in the chicken broth and bring to a simmer, scraping the bottom of the skillet to deglaze.
  6. Stir in the heavy cream and Italian herbs, and let the sauce simmer for 3-4 minutes until slightly thickened.
  7. Return the chicken to the skillet, coating it with the creamy sauce. Cook for an additional 2 minutes.
  8. Garnish with fresh parsley before serving.

And just like that, you have a delicious meal ready to serve!

Gentle Garlic Caramelization Prevents Bitterness

One of the secrets to achieving a beautifully balanced sauce lies in the way you treat your garlic. Sautéing it gently until fragrant allows the natural sweetness to emerge, avoiding the bitterness that can arise from burning. Keep an eye on it as it cooks; you’re aiming for that perfect golden hue that signals it’s ready to mingle with your other ingredients.

Pro Tips & Easy Twists for Creamy Garlic Chicken

As someone who believes in the magic of cooking, I’m here to share some pro tips that can elevate your Creamy Garlic Chicken:

  • Use fresh garlic: While minced garlic from a jar is convenient, nothing beats the fresh stuff. It packs a more robust flavor that will shine in your sauce.
  • Experiment with herbs: Feel free to mix up the dried Italian herbs with fresh herbs like thyme, rosemary, or even a sprinkle of red pepper flakes for a little heat.
  • Make it a one-pan wonder: Consider adding some vegetables like spinach, mushrooms, or broccoli right into the skillet with the chicken. They’ll soak up that creamy goodness and add a pop of color to your plate.
  • Serve it up: This dish pairs beautifully with mashed potatoes, rice, or even a light salad to balance the richness of the sauce.

Silky Sauce Comes from Slow Thickening

One of the hallmarks of a great creamy sauce is its texture. To achieve that silky smoothness, patience is key. Allow the sauce to simmer gently, which helps the flavors meld together beautifully. If it thickens too much, simply loosen it with a splash of broth or cream—don’t be afraid to adjust it to your liking.

How to Store Leftovers

Leftovers? Yes, please! If you find yourself with extra Creamy Garlic Chicken, you’re in for a treat. Store any leftovers in an airtight container in the refrigerator for up to three days. Just remember to reheat gently to maintain that luscious texture—nobody wants a grainy sauce!

Make-Ahead, Freezing, and Reheating Strategy

If you’re planning ahead, this dish can be made in advance and stored in the freezer for up to three months. To freeze, let it cool completely, then transfer to a freezer-safe container. When you’re ready to enjoy, thaw it in the refrigerator overnight before reheating on the stovetop with a splash of cream or broth to restore its creamy consistency.

Frequently Asked Questions (FAQ)

Can I use chicken thighs instead of breasts?

Absolutely! Boneless, skinless chicken thighs are a fantastic alternative. They’re juicy and flavorful, and they’ll work beautifully in this recipe.

How do I make it gluten-free?

To make this dish gluten-free, simply use gluten-free chicken broth and ensure any added ingredients, like bouillon, are gluten-free as well.

Can I make it lighter on dairy?

If you’re looking to reduce the dairy, consider substituting half-and-half or evaporated milk for the heavy cream. Just be cautious with the heat to prevent curdling.

What should I serve with it?

This creamy chicken pairs wonderfully with mashed potatoes, rice pilaf, or even a side of roasted vegetables for a well-rounded meal.

Conclusion

Creating a dish like Creamy Garlic Chicken doesn’t just fill your stomach; it fills your heart. It’s the kind of recipe that invites conversation and laughter around the dinner table, evoking memories of home-cooked meals and family gatherings. So whether you’re cooking for family, friends, or just treating yourself, this recipe is sure to become a beloved favorite. Pull up a chair and let’s make something magical together—one delicious bite at a time!

Creamy Garlic Chicken - Quick Recipes

Prep Time 10 minutes
Cook Time 15 minutes
Total Time 25 minutes
Servings 4 servings
Calories 450
A delicious and creamy garlic chicken dish that's quick to prepare and perfect for a satisfying meal.

Ingredients

Protein

  • 2 pieces boneless, skinless chicken breasts

Oil

  • 3 tablespoons olive oil

Garlic

  • 4 cloves garlic, minced

Cream

  • 1 cup heavy cream

Broth

  • 1 cup chicken broth

Herbs

  • 1 teaspoon dried Italian herbs

Seasoning

  • to taste salt and pepper

Garnish

  • for garnish fresh parsley

Instructions 

  • Heat olive oil in a skillet over medium heat.
  • Season chicken with salt and pepper, cook 5-7 mins per side, then set aside.
  • Sauté minced garlic in the same skillet for 1 min.
  • Add chicken broth, simmer, then stir in cream and herbs; cook 3-4 mins.
  • Return chicken to skillet, coat with sauce, cook 2 mins, garnish with parsley.

Notes

For a richer flavor, let the sauce simmer longer to thicken.
Calories: 450kcal
Cost: $15
Course: Main Course
Cuisine: American
Keyword: Chicken, creamy, garlic

Loved this recipe? Save it to your favorite Pinterest board so you can easily find it later! It’s the perfect way to keep all your sweet ideas in one place. ✨

A tempting plate of creamy garlic chicken, highlighting the texture of the sauce and tender chicken.

Why You’ll Fall in Love with This Coffee Caramel Cake

Imagine this: it’s a cozy afternoon, and the scent of freshly brewed coffee wafts through your kitchen, mingling with the sweet aroma of caramel. Sounds heavenly, right? That’s precisely what you can expect when you make my Sensational Coffee Caramel Cake That Melts In Your Mouth. This cake isn’t just a dessert; it’s an experience—a warm hug in cake form that will transform your ordinary day into something extraordinary.

This delightful creation features layers of moist cake infused with rich coffee flavor, all topped with a luscious caramel sauce that drips down the sides, creating a gooey masterpiece. Each bite is a celebration of flavor, making it a perfect treat for coffee lovers and dessert enthusiasts alike. You might just find yourself sneaking back for seconds—maybe even thirds!

Ingredients You’ll Need

To whip up this indulgent dessert, you’ll need some pantry staples and a few special ingredients. Here’s what you’ll gather:

  • 2 cups all-purpose flour
  • 1 ½ cups granulated sugar
  • ½ cup unsalted butter, softened
  • 1 cup brewed coffee, cooled
  • 1 cup buttermilk
  • 3 large eggs
  • 1 tablespoon vanilla extract
  • 1 teaspoon baking powder
  • 1 teaspoon baking soda
  • ½ teaspoon salt
  • 1 cup caramel sauce
  • 1 cup heavy cream
  • 1 tablespoon instant coffee granules
  • Chocolate shavings (for garnish)

Step-by-Step Instructions to Make Your Cake

Now that you have all your ingredients ready, let’s get baking! Follow these simple steps to create your very own Sensational Coffee Caramel Cake.

  1. Preheat the Oven: Start by preheating your oven to 350°F (175°C). Grease and flour two 9-inch round cake pans to prevent any sticking.
  2. Cream the Butter and Sugar: In a large mixing bowl, cream together the softened butter and sugar until the mixture is light and fluffy. This step is crucial for a soft cake texture!
  3. Add Eggs and Vanilla: Add the eggs one at a time, mixing well after each addition. Stir in the vanilla extract to add a touch of warmth to your batter.
  4. Mix Dry Ingredients: In a separate bowl, combine the flour, baking powder, baking soda, and salt. This ensures your leavening agents are evenly distributed throughout your cake.
  5. Combine Wet and Dry: Gradually add the dry ingredients to the butter mixture, alternating with the brewed coffee and buttermilk. Mix until just combined; overmixing can lead to a dense cake.
  6. Pour and Bake: Pour the batter evenly into the prepared cake pans. Bake for 25-30 minutes, or until a toothpick inserted into the center comes out clean.
  7. Cool the Cakes: Once baked, allow the cakes to cool in the pans for about 10 minutes before transferring them to a wire rack to cool completely.
  8. Prepare the Coffee Cream: In a medium saucepan, heat the heavy cream over medium heat until it simmers. Stir in the instant coffee granules until dissolved, creating a rich coffee-infused cream.
  9. Assemble the Cake: When the cakes are completely cool, place one layer on a serving plate and spread a generous layer of caramel sauce on top. Then, place the second cake layer on top and pour the creamy coffee mixture over it.
  10. Finish with Caramel and Garnish: Drizzle additional caramel sauce over the top and garnish with chocolate shavings for that extra touch of indulgence.

Expert Tips for the Perfect Cake

Before you dive headfirst into this delicious cake, here are some expert tips to ensure your baking journey is smooth sailing:

  • Room Temperature Ingredients: Make sure your butter and eggs are at room temperature for the best texture.
  • Quality Coffee: For a more pronounced coffee flavor, consider using a high-quality espresso instead of regular brewed coffee.
  • Avoid Overmixing: Mix until just combined; a few lumps are perfectly fine!
  • Watch the Caramel Sauce: Keep an eye on your caramel sauce to avoid it becoming too hard. It should be thick but pourable.
  • Poking Holes: Poking holes in the cake after baking allows the caramel to soak in, enhancing the gooeyness throughout!

Delicious Variations to Try

While this cake is already a showstopper, you can easily customize it to suit your taste:

  • Dairy-Free: Substitute heavy cream with coconut cream and use dairy-free butter for a delightful alternative.
  • Gluten-Free: Swap all-purpose flour for a gluten-free flour blend to accommodate dietary needs.
  • Nuts for Crunch: Add chopped walnuts or pecans to the batter for an added layer of flavor and texture.
  • Chocolate Twist: Fold in chocolate chips or cocoa powder for a mocha-inspired version that coffee lovers will adore.
  • Spice It Up: Incorporate a pinch of cinnamon or cayenne pepper for a subtle kick that contrasts beautifully with the sweetness.

What to Serve with Your Cake

This cake is delightful on its own, but pairing it with the right accompaniments can elevate your dessert experience:

  • Vanilla Bean Ice Cream: The creamy, cold ice cream complements the warm cake perfectly.
  • Rich Chocolate Mousse: Its deep chocolate flavor creates a lovely contrast to the coffee caramel.
  • Espresso: A bold cup of espresso enhances the coffee notes in the cake, providing a delightful caffeine kick.
  • Whipped Cream: A dollop of freshly whipped cream adds a light, airy finish to each slice.
  • Seasonal Berries: Fresh raspberries or strawberries introduce a tartness to balance the sweetness.

How to Store and Freeze Your Cake

Leftover cake? No problem! Here’s how to keep your creation fresh:

  • Room Temperature: Store the cake covered at room temperature, and it will stay delicious for up to 3 days.
  • Refrigerator: If you prefer, refrigerate the cake for up to a week; just ensure it’s tightly covered.
  • Freezing: Wrap individual slices in plastic wrap and foil for up to 3 months. Reheat in the microwave for a few seconds when you’re ready to enjoy!

Frequently Asked Questions

Here are some common questions you might have while making this cake:

  • What type of coffee is best for this recipe? I recommend using a bold brewed coffee or espresso for a richer flavor.
  • How should I store leftover cake? Cover it at room temperature for 3 days or refrigerate for up to a week. Reheat in the microwave to restore gooeyness!
  • Can I freeze Coffee Caramel Cake? Absolutely! Wrap slices tightly and freeze for up to 3 months. Just reheat before enjoying!
  • Why did my caramel sauce turn grainy? This can happen if the sugar crystallizes. Avoid stirring too much while heating; gently swirl the pan instead.

In Conclusion

Now that you have all the secrets to creating my Sensational Coffee Caramel Cake That Melts In Your Mouth, it’s time to get baking! This cake is more than just a dessert; it’s a way to share love and warmth with family and friends. Whether you’re celebrating a special occasion or just treating yourself, each slice promises to bring a little magic into your day. So grab your apron, turn on your favorite playlist, and let’s make something unforgettable together!