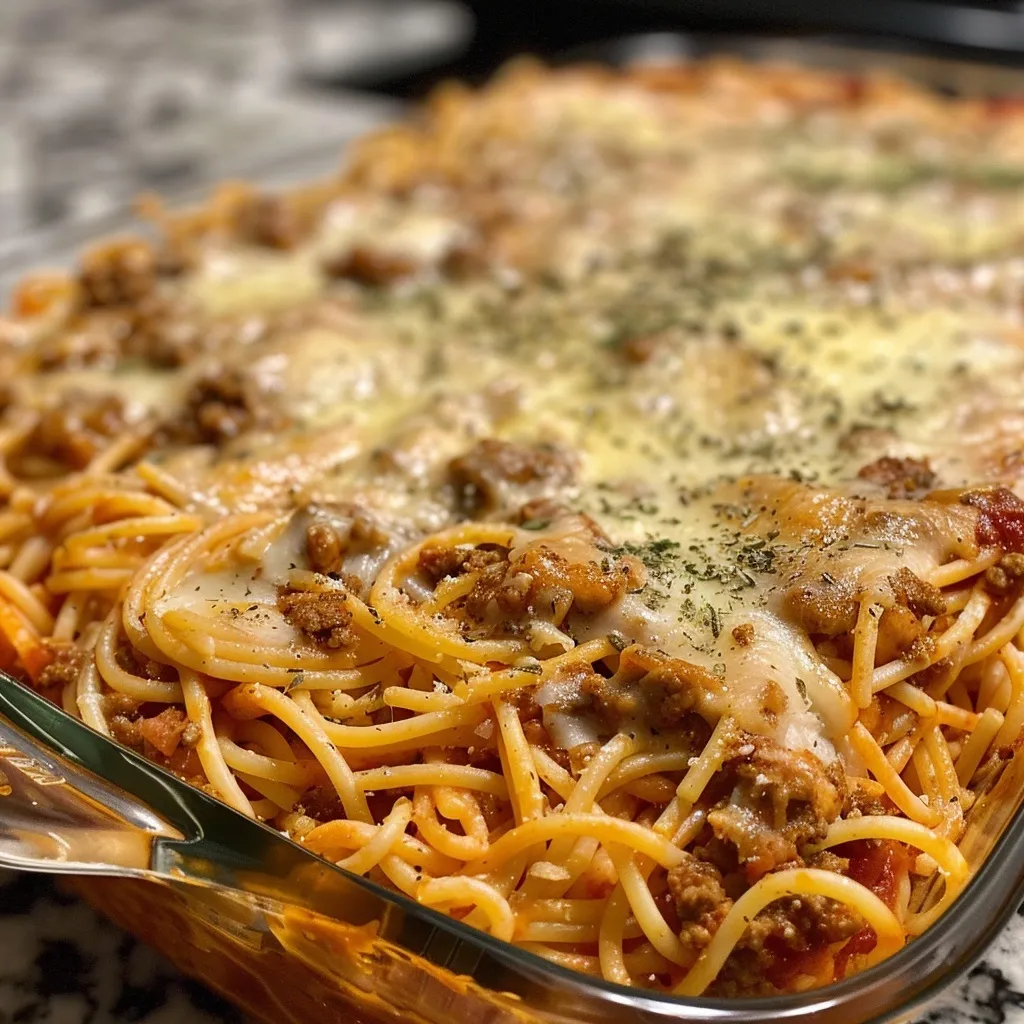
Author

Ava

Browsing

Why You’ll Love This Dish

Welcome to a culinary adventure that brings together the rich flavors of salmon and the delightful sweetness of honey in a way that will make your taste buds dance with joy! These Air Fryer Honey Garlic Salmon Bites are the kind of dish that makes dinner feel like a celebration—because who doesn’t love crispy, juicy salmon coated in a sticky, sweet glaze? Whether you’re whipping up a quick weeknight meal or impressing guests at a casual gathering, this recipe checks all the boxes: it’s easy, flavorful, and utterly satisfying.

Imagine biting into a perfectly cooked salmon cube, its exterior crispy and golden, while the honey garlic sauce seeps into every nook and cranny, providing a burst of flavor that’s both sweet and savory. And the best part? It all comes together in just about 20 minutes! So, grab your apron and let’s make some magic happen in the kitchen!

Ingredients You’ll Need

Before we dive into the cooking process, let’s gather our ingredients. Here’s what you’ll need to create these delectable bites:

  • 1 lb salmon fillets, skinless, cut into 1-inch cubes
  • 2 tbsp cornstarch
  • 1 tbsp olive oil (plus extra for sauce)
  • ½ tsp salt
  • ¼ tsp black pepper
  • 2 tbsp soy sauce (or tamari for gluten-free)
  • 3 tbsp honey (or maple syrup)
  • 3 cloves garlic, minced
  • 1 tsp ginger, grated (optional)
  • 2 tbsp water
  • Sesame seeds, for garnish
  • Green onions, chopped, for garnish

Cooking Directions

Delicious salmon bites, glistening with honey garlic sauce, showcased on a rustic table.

Now that we have everything prepped, let’s get cooking! Follow these simple steps to create your Air Fryer Honey Garlic Salmon Bites:

  1. First, pat the salmon cubes dry with a paper towel. This helps achieve that crispy exterior we all love!
  2. In a mixing bowl, toss the salmon pieces with cornstarch, olive oil, salt, and pepper until they are well-coated.
  3. Preheat your air fryer to 400°F (200°C). This step is crucial for ensuring that your salmon cooks evenly.
  4. Once preheated, arrange the salmon cubes in a single layer in the air fryer basket. Make sure they’re not crowded; this allows for proper air circulation.
  5. Cook the salmon for 8-10 minutes, shaking the basket halfway through to ensure even cooking. You want them golden and crispy!
  6. While the salmon cooks, grab a small saucepan and heat a tablespoon of olive oil over medium heat. Add the minced garlic and grated ginger (if using) and sauté for about 30 seconds until fragrant.
  7. Next, stir in the soy sauce, honey, and water. Let this simmer for 2-3 minutes until the sauce thickens slightly. You’ll know it’s ready when it coats the back of a spoon.
  8. Once the salmon is done, transfer it to a bowl and pour the honey garlic sauce over it. Gently toss to coat every piece.
  9. Finally, garnish with sesame seeds and chopped green onions before serving. Enjoy your delicious creation!

Servings and Timing

This delightful recipe serves about 4 people, making it perfect for a family dinner or a small gathering. With just 10 minutes of prep time and another 10 minutes of cooking, you can have a gourmet meal on the table in 20 minutes flat. Talk about a win!

Variations to Spice Things Up

If you’re feeling adventurous, there are plenty of ways to customize your Honey Garlic Salmon Bites:

  • Spicy Kick: Add a teaspoon of sriracha or chili flakes to the honey garlic sauce for a delightful heat.
  • Maple Magic: Swap honey for maple syrup for a different, yet equally delicious sweetness.
  • Herbal Infusion: Toss in some chopped fresh herbs like cilantro or basil for an aromatic touch.

Storage and Reheating Tips

Got leftovers? No problem! Here’s how to store and reheat your salmon bites:

  • Store leftover salmon in an airtight container in the refrigerator for up to 3 days.
  • To reheat, place the salmon back in the air fryer at 350°F (175°C) for 3-4 minutes. This method helps keep the salmon crispy!
  • Avoid microwaving, as this can lead to overcooking and a less desirable texture.

FAQs: Your Questions Answered

Can I use frozen salmon?

Yes, but make sure to thaw it completely and pat it dry before coating with cornstarch.

Can I bake these instead of air frying?

Absolutely! Preheat your oven to 400°F (200°C) and bake for about 12-15 minutes, then toss with the sauce.

What sides go best with these salmon bites?

They pair wonderfully with steamed rice, roasted vegetables, or a crisp cucumber salad for a refreshing contrast.

How do I keep the salmon crispy after adding sauce?

To maintain that crunch, toss the salmon with the sauce right before serving. This keeps the coating from getting soggy.

Can I make the sauce ahead of time?

Yes! You can store the sauce in the fridge for up to 3 days. Just warm it up before tossing with the salmon.

Conclusion

There you have it—your go-to recipe for Air Fryer Honey Garlic Salmon Bites that will have everyone at your table asking for seconds! With just a handful of ingredients and a quick cooking time, these bites are not only a crowd-pleaser but also a fantastic way to incorporate healthy seafood into your diet. Whether you enjoy them as a main course or as a tasty appetizer, they’re sure to steal the show. So, pull up a chair, pour yourself a glass of something refreshing, and savor the deliciousness you just created. Happy cooking!

Air Fryer Honey Garlic Salmon Bites

Prep Time 10 minutes
Cook Time 10 minutes
Total Time 20 minutes
Servings 4 servings
Calories 290
Deliciously tender salmon bites glazed with honey and garlic, cooked to perfection in the air fryer for a quick and healthy meal.

Ingredients

Salmon

  • 1 lb salmon fillets, skinless, cut into 1-inch cubes
  • 2 tbsp cornstarch
  • 1 tbsp olive oil (plus extra for sauce)
  • ½ tsp salt
  • ¼ tsp black pepper
  • 2 tbsp soy sauce (or tamari for gluten-free)
  • 3 tbsp honey (or maple syrup)
  • 3 cloves garlic, minced
  • 1 tsp ginger, grated (optional)
  • 2 tbsp water

Garnishes

  • sesame seeds, for garnish
  • green onions, chopped, for garnish

Instructions 

  • Pat salmon dry; toss with cornstarch, olive oil, salt, and pepper.
  • Preheat air fryer to 400°F (200°C). Arrange salmon in a single layer; cook 8–10 minutes, shaking halfway.
  • Heat olive oil in a small saucepan over medium heat. Sauté garlic and ginger for 30 seconds.
  • Stir in soy sauce, honey, and water; simmer 2–3 minutes until slightly thickened.
  • Transfer cooked salmon to a bowl; pour sauce over and toss to coat. Garnish with sesame seeds and green onions.

Notes

Serve immediately for best flavor and texture.
Calories: 290kcal
Cost: $15
Course: Main Course
Cuisine: American
Keyword: Salmon

Loved this recipe? Save it to your favorite Pinterest board so you can easily find it later! It’s the perfect way to keep all your sweet ideas in one place. ✨

Eye-level shot of crispy salmon cubes in a rich honey garlic glaze, with a softly blurred background.

Why You’ll Love These Festive Treats

As the holiday season approaches, our kitchens transform into the heart of the home, filled with warmth, laughter, and the delicious aroma of festive foods. If you’re searching for an effortless yet impressive dish to share at your Christmas gatherings, look no further than these delightful Christmas Party Cranberry Tortilla Pinwheels. They’re not only visually stunning but are also bursting with flavors that capture the essence of the season. Each bite is a creamy, tangy, and slightly sweet escape that will leave your guests asking for more.

What makes these pinwheels truly special is how quickly and easily they come together. With just a handful of ingredients, you can create a dish that feels both gourmet and comforting, making it perfect for any holiday occasion—from festive brunches to evening soirées. Plus, they’re no-bake, which means you can spend more time celebrating and less time slaving away in the kitchen!

Where Did This Recipe Come From?

My love for creating bite-sized delights started in my mother’s kitchen. She always had a knack for improvisation, turning whatever we had on hand into something magical. I remember one particular holiday when she whipped up a version of these pinwheels using leftovers from our Thanksgiving feast. The combination of turkey, cream cheese, and cranberries was a revelation. Inspired by that memory, I crafted my own spin on her creation, adapting it for Christmas gatherings. It’s become a staple in my home, and I hope it becomes a cherished recipe in yours as well.

What Ingredients Make Up These Pinwheels?

Delicious Cranberry Tortilla Pinwheels with colorful ingredients, displayed attractively.

Here’s what you’ll need to whip up these tasty treats:

  • 4 large flour tortillas
  • 8 oz cream cheese, softened
  • 1/2 cup dried cranberries, chopped
  • 1/2 cup cooked turkey or chicken, shredded (optional)
  • 1/4 cup green onions, chopped
  • 1/4 cup pecans or walnuts, chopped (optional)
  • 1/4 teaspoon cinnamon
  • Salt and pepper to taste

These ingredients come together to create a delightful mix of textures and flavors, perfect for the holiday season. The cream cheese provides a rich base, while the cranberries add a pop of sweetness and a splash of color.

How to Make Your Own Festive Pinwheels

Ready to get started? Follow these simple steps to create your Christmas Party Cranberry Tortilla Pinwheels:

  1. In a mixing bowl, combine the softened cream cheese, chopped dried cranberries, shredded turkey or chicken (if using), green onions, chopped nuts (if using), cinnamon, salt, and pepper. Mix well until all ingredients are evenly incorporated.
  2. Lay one tortilla flat on a clean surface. Spread a generous layer of the cranberry mixture evenly over the tortilla, leaving a small margin around the edges.
  3. Starting from one edge, carefully roll the tortilla tightly into a log shape. Repeat this process with the remaining tortillas and filling.
  4. Once all tortillas are rolled, wrap each log in plastic wrap and refrigerate for at least 1 hour to firm up.
  5. After chilling, remove the plastic wrap and slice each tortilla log into 1-inch thick pinwheels.
  6. Arrange the pinwheels on a serving platter and serve immediately, or store in the refrigerator until ready to serve.

And just like that, you have an impressive dish that’s sure to be a hit! The best part? They can be made ahead of time, leaving you free to enjoy the festivities.

Serving Suggestions

These pinwheels are incredibly versatile and can be served in various ways:

  • As part of a beautiful holiday platter alongside cheeses, crackers, and fresh fruit.
  • With a side of your favorite dipping sauce, like a tangy yogurt dip or a sweet chili sauce.
  • Piled high on a buffet table for guests to help themselves.
  • Perfect for pairing with glasses of sparkling cider or wine.

Whether you’re hosting a large gathering or an intimate brunch, these pinwheels will add a festive flair to your table.

Tips for Making the Best Pinwheels

To ensure your pinwheels turn out perfectly every time, keep these tips in mind:

  • Soften the Cream Cheese: Make sure your cream cheese is at room temperature for easy spreading.
  • Don’t Overfill: While it’s tempting to pile on the filling, a little goes a long way. Too much filling can make rolling difficult.
  • Chill Before Slicing: Chilling the rolled tortillas helps them hold their shape when you slice them.
  • Experiment with Flavors: Feel free to customize the filling! Add in some herbs, swap cranberries for other dried fruits, or even sprinkle in some cheese for extra flavor.

Variations to Try

These festive pinwheels can be easily adapted to suit different tastes and dietary preferences. Here are a few variations to consider:

  • Vegetarian Version: Omit the turkey and substitute with more veggies, like bell peppers or shredded carrots.
  • Spicy Kick: Add a pinch of cayenne pepper or some diced jalapeños to the filling for a zesty twist.
  • Herbaceous Delight: Incorporate fresh herbs such as dill or chives for an extra layer of flavor.

Storage and Freezing Tips

If you find yourself with leftovers (though I doubt it!), here’s how to store them:

  • Refrigerate: Store pinwheels in an airtight container in the refrigerator for up to 2 days.
  • Freezing: While these are best enjoyed fresh, you can freeze the uncut logs for up to a month. Just make sure to wrap them tightly in plastic wrap and aluminum foil. Thaw in the fridge before slicing.

FAQs about Your Pinwheel Adventure

Can I use corn tortillas instead of flour?

Flour tortillas work best because they are softer and easier to roll without cracking. However, if you prefer corn tortillas, be sure to warm them slightly to make them pliable.

What can I substitute for cream cheese?

If cream cheese isn’t your thing, try using whipped feta or a tangy goat cheese for a unique flavor twist.

How long do these stay fresh?

These pinwheels will last in the refrigerator for up to 2 days if stored properly in an airtight container.

Can I make these ahead of time?

Absolutely! They can be made 24 hours in advance and stored in the fridge until you’re ready to serve.

Troubleshooting Common Issues

If you encounter any hiccups while making your pinwheels, here’s how to solve them:

  • Filling is too thick: If your mixture feels stiff, add a splash of milk or yogurt until it reaches a creamy consistency.
  • Pinwheels are falling apart: Ensure you chill them long enough before slicing. This will help them hold their shape better.
  • Too much filling spills out: Remember to spread the mixture evenly and avoid overfilling to prevent this.

Conclusion: A Slice of Holiday Magic

These Christmas Party Cranberry Tortilla Pinwheels are more than just a recipe; they’re a symbol of the joy that comes from sharing good food with loved ones. They embody the spirit of the holiday season—colorful, delightful, and easy to make. So as you gather with family and friends this year, let these pinwheels be a part of your celebration, sparking joy and conversation around the table. Here’s to many more magical moments in the kitchen and around the dinner table. Happy cooking, and may your holidays be filled with love and laughter!

Christmas Party Cranberry Tortilla Pinwheels

Prep Time 15 minutes
Total Time 15 minutes
Servings 8 pieces
Calories 150
Festive and flavorful, these cranberry tortilla pinwheels are perfect for holiday gatherings.

Ingredients

Tortillas

  • 4 large flour tortillas
  • 8 oz cream cheese, softened
  • 0.5 cup dried cranberries, chopped
  • 0.5 cup cooked turkey or chicken, shredded ((optional))
  • 0.25 cup green onions, chopped
  • 0.25 cup pecans or walnuts, chopped ((optional))
  • 0.25 teaspoon cinnamon
  • to taste salt and pepper

Instructions 

  • Mix cream cheese, cranberries, turkey (if using), green onions, nuts (if using), cinnamon, salt, and pepper.
  • Spread filling evenly over each tortilla.
  • Roll each tortilla tightly into a log.
  • Wrap logs in plastic and refrigerate for 1 hour.
  • Slice into 1-inch pinwheels and serve.

Notes

Chill the rolls well for best slicing.
Calories: 150kcal
Cost: $15
Course: Appetizer
Cuisine: American
Keyword: cranberry

Loved this recipe? Save it to your favorite Pinterest board so you can easily find it later! It’s the perfect way to keep all your sweet ideas in one place. ✨

A serving of festive Cranberry Tortilla Pinwheels, showcasing their vibrant layers.

Welcome to Your New Favorite Comfort Food: Slow Cooker Lasagna

There’s something about lasagna that feels like coming home. It’s a dish steeped in tradition, comfort, and warmth. But let’s be honest—who has the time to layer sheets of pasta, sauce, and cheese while juggling a busy schedule? Enter the magic of the slow cooker! This slow cooker lasagna recipe brings you all the rich flavors and gooey textures without the fuss. Perfect for family gatherings or a cozy dinner for one, this dish will have you feeling right at home in no time.

Why You’ll Love This Recipe

  • Effortless preparation: With minimal hands-on time, you can toss everything in your slow cooker and let it work its magic while you unwind.
  • Rich layers of flavor: The slow cooking process melds the ingredients beautifully, creating a flavor profile that’s downright delightful.
  • Feed a crowd: This recipe yields enough to serve a family or a group of friends, making it perfect for gatherings.
  • Make-ahead friendly: You can prep it the night before and let it cook while you’re busy with your day.
  • Customizable: With a few simple swaps, you can adjust the recipe to fit your tastes or dietary needs.

Ingredient Breakdown

Let’s dive into the ingredients that make this slow cooker lasagna a crowd-pleaser. Each component is thoughtfully chosen to create the perfect balance of flavors and textures.

  • Ground beef: Extra-lean ground beef is perfect for this recipe. Feel free to substitute it with ground turkey or plant-based meat for a lighter option.
  • Tomato sauce: We recommend using jarred sauces like Classico sweet basil marinara for convenience. If you’re feeling adventurous, homemade tomato sauce is a great alternative.
  • Lasagna noodles: Uncooked noodles work best in the slow cooker, soaking up all those delicious juices as they cook.
  • Ricotta cheese: This creamy element adds richness. You can substitute with cottage cheese for a lighter version.
  • Shredded mozzarella: The classic melty topping. For a twist, try using a blend of mozzarella and provolone.
  • Fresh herbs: Parsley or basil not only add flavor but also brighten up the dish visually.
  • Water: A crucial component for ensuring the noodles cook evenly without drying out.

Pro Tips for Perfect Slow Cooker Lasagna

Appetizing shot of a finished crockpot lasagna displaying rich tomato sauce and melted cheese.
  • Layering matters: Alternate your layers for a more balanced flavor. Start with a layer of sauce, then noodles, followed by ricotta and mozzarella.
  • Let it rest: After cooking, let the lasagna sit for about 15 minutes before serving. This helps it set and makes slicing easier.
  • Adjust cooking time: Depending on your slow cooker, cooking times may vary. Keep an eye on it—high settings could cook faster than expected.
  • Herb it up: Don’t skip the fresh herbs! They elevate the dish and add a pop of color.
  • Experiment with flavors: Add sautéed spinach or mushrooms to the layers for an extra nutritional boost.
  • Use parchment paper: If you’re worried about sticking, place a layer of parchment paper at the bottom of the slow cooker before adding the sauce.
  • Keep it moist: If the lasagna looks dry before serving, add a splash of water around the edges to steam it a little more.
  • Perfect for leftovers: This dish tastes even better the next day, so don’t hesitate to make a big batch!

Common Mistakes and Troubleshooting

Even the best of us can have hiccups in the kitchen. Here are some common pitfalls and how to avoid them:

  • Dry noodles: Ensure you add enough sauce and water. The noodles need moisture to cook properly—think of them as little sponges soaking up flavor.
  • Uneven layers: Be mindful of how you layer your ingredients. Aim for even distribution to ensure every bite is packed with flavor.
  • Overcooked meat: If you’re using lean ground beef, be careful not to overcook it before adding it to the slow cooker. It should be just browned.
  • Too much cheese: While cheese is delicious, too much can make the dish greasy. Stick to the recommended amounts for the best texture.

Variations on the Classic Recipe

One of the best things about lasagna is its adaptability. Here are some fun twists to try:

  • Vegetarian lasagna: Swap the beef for sautéed vegetables like zucchini, bell peppers, or mushrooms.
  • Spinach and cheese lasagna: Add layers of fresh spinach and ricotta for a deliciously creamy texture.
  • Mexican-style lasagna: Use salsa instead of tomato sauce and layer with black beans and corn for a zesty twist.
  • Gluten-free lasagna: Substitute traditional noodles with gluten-free pasta. Be sure to adjust cooking times accordingly.

Storage and Make-Ahead Instructions

This slow cooker lasagna makes for fantastic leftovers! Here’s how to store and reheat it:

  • Refrigerator: Store in an airtight container for up to 3 days. Reheat in the microwave or in the oven until heated through.
  • Freezing: You can freeze leftovers for up to 3 months. Thaw in the refrigerator overnight before reheating.
  • Make-ahead: Prepare the layers the night before and assemble in the slow cooker in the morning. Set it on low for 6 hours, and you’ll come home to a delicious meal!

Frequently Asked Questions

Got questions? I’ve got answers! Here are some common queries about making slow cooker lasagna:

  • Can I use cooked noodles? Yes, but you may need to adjust the cooking time since they won’t absorb as much moisture.
  • How long does it take to cook? On high, expect about 3 hours; on low, about 6 hours.
  • Can I make this in advance? Absolutely! Prep the ingredients the night before and cook it in the morning.
  • What’s the best way to serve it? Let it sit for a few minutes after cooking for easier slicing. Serve with a side salad for a complete meal.
  • Can I add vegetables? Yes, layer in your favorite vegetables for added flavor and nutrition.
  • What if I don’t have ricotta? Cottage cheese makes a great substitute and works well in this recipe!
  • How do I prevent sticking? Use nonstick cooking spray and consider using parchment paper for added protection.
  • Can I use different cheeses? Definitely! Feel free to experiment with provolone, gouda, or even a sprinkle of feta on top.

Nutritional Tips and Dietary Adaptations

For those watching their diet or looking for healthier alternatives, consider these adaptations:

  • Lower fat: Use turkey or chicken instead of ground beef and opt for low-fat cheese.
  • Vegan option: Swap all dairy for plant-based cheeses and use lentils or mushrooms as the meat alternative.
  • Low-carb version: Replace the noodles with zucchini or eggplant slices for a gluten-free, low-carb dinner.

Equipment Recommendations

To make your cooking experience as smooth as possible, here’s what you’ll need:

  • Slow cooker: A standard 6-quart slow cooker works perfectly for this recipe.
  • Large skillet: For browning the meat and sautéing the onions and garlic.
  • Measuring cups and spoons: Accurate measurements lead to the best results.
  • Spatula: Great for layering and mixing ingredients.

Serving Suggestions

This slow cooker lasagna is sure to impress! Serve it with:

  • Garlic bread: Perfect for sopping up all that delicious sauce.
  • Side salad: A fresh green salad complements the richness of the lasagna.
  • Wine pairing: A nice red wine, like Chianti, will enhance the flavors beautifully.

So there you have it—your guide to creating the coziest, most comforting slow cooker lasagna that feels like home. It’s time to pull up a chair, grab a fork, and dive into this delicious dish that not only nourishes the body but also warms the soul. Happy cooking!

Simple Crockpot Lasagna

Prep Time 15 minutes
Cook Time 3 hours
Total Time 3 hours 15 minutes
Servings 6 servings
Calories 650
A delicious and easy-to-make lasagna cooked in a slow cooker, perfect for a comforting family meal.

Ingredients

nonstick cooking spray

  • 1 lb extra-lean ground beef
  • 1 yellow onion yellow onion, chopped
  • 2 cloves garlic, minced
  • 0.5 tsp salt
  • 0.5 tsp black pepper
  • 2 jars (22 fl oz each) tomato sauce (such as Classico sweet basil marinara)
  • 0.5 cup water
  • 1 lb uncooked lasagna noodles
  • 1 tub (16.8 oz) ricotta cheese
  • 2 cups shredded mozzarella cheese
  • fresh parsley or basil, chopped fresh parsley or basil (for garnish)

Instructions 

  • Brown ground beef in a skillet, add onion and garlic, then stir in one jar of tomato sauce. Remove from heat.
  • Spray slow cooker with nonstick spray, add a thin layer of meat sauce at the bottom.
  • Layer uncooked noodles, dollops of ricotta, mozzarella, and meat sauce. Repeat layers until full, then top with remaining sauce and cheese.
  • Pour water around the edges, cover, and cook on high for 3 hours or low for 6 hours. Rest briefly before serving, garnished with herbs.

Notes

Using fresh herbs enhances flavor; ensure noodles are submerged in water for even cooking.
Calories: 650kcal
Cost: $15
Course: Main Course
Cuisine: Italian
Keyword: lasagna

Why You’ll Love This Dish

If you’re looking for a simple yet impressive dish that combines the best of both worlds—sweet and savory—then look no further than this Honey Garlic Salmon in Foil. This recipe is not just a meal; it’s a culinary experience that transforms the humble salmon fillet into a star, worthy of a five-star dining experience right in your own kitchen. With just a handful of ingredients and minimal prep time, this dish is perfect for busy weeknights or special occasions when you want to impress without the stress.

The magic lies in the combination of honey and garlic, which creates a delightful glaze that caramelizes beautifully as the salmon bakes. Not only is it delicious, but it’s also a healthy option that fits seamlessly into a balanced diet. Plus, the clean-up is a breeze thanks to the foil packets! So, let’s dive into making this sweet and savory adventure.

Ingredients You’ll Need

Gathering the right ingredients is the first step to culinary success. For this sumptuous Honey Garlic Salmon in Foil, you will need:

  • 4 salmon fillets
  • 1/4 cup honey
  • 1/4 cup soy sauce
  • 3 cloves garlic, minced
  • 1 tablespoon olive oil
  • 1 teaspoon ginger, grated
  • Salt and pepper to taste
  • Lemon slices (for garnish)
  • Fresh parsley (for garnish)

How to Prepare This Delightful Dish

Delicious Honey Garlic Salmon in foil with a glossy glaze, beautifully lit with soft shadows.

Now that you’re all set with the ingredients, let’s get cooking! The steps are simple, and soon enough, the aroma of honey and garlic will fill your kitchen, inviting everyone to gather around the table.

Step-by-Step Instructions

  1. Preheat your oven to 375°F (190°C). This initial step ensures that your salmon cooks evenly and thoroughly.
  2. In a small bowl, whisk together the honey, soy sauce, minced garlic, olive oil, grated ginger, salt, and pepper. This mixture is where the magic begins, transforming the salmon into a flavor-packed delight.
  3. Place each salmon fillet on a piece of aluminum foil. Make sure the pieces are large enough to wrap around the fillets completely.
  4. Spoon the honey garlic mixture evenly over each fillet, ensuring they are well-coated for maximum flavor.
  5. Fold the sides of the foil over the salmon to create a sealed packet. This step is crucial as it helps to lock in moisture and flavor while cooking.
  6. Place the foil packets on a baking sheet and bake in the preheated oven for 15-20 minutes, or until the salmon is cooked through and flakes easily with a fork.
  7. Remove from the oven and carefully open the packets. Watch out for the hot steam!
  8. Garnish with lemon slices and fresh parsley before serving. A little color goes a long way in making your dish visually appealing.

Tips for Perfectly Baked Salmon

While this recipe is straightforward, a few tips can elevate your dish to restaurant-quality:

  • Don’t Overcook: Salmon is best when it’s just cooked through. Keep an eye on it in the oven—cooking times can vary slightly based on the thickness of your fillets.
  • Fresh Ingredients: Whenever possible, use fresh garlic and ginger. They provide a vibrant flavor that powdered alternatives just can’t match.
  • Seal it Tight: Ensure your foil packets are sealed well to keep all the juices in. This helps create a steam effect that keeps the salmon moist.
  • Check for Doneness: Salmon is done when it reaches an internal temperature of 145°F (63°C). If you don’t have a thermometer, look for the salmon to flake easily with a fork.

Variations to Try

One of the best parts about cooking is experimenting! Here are a few variations to consider:

  • Add Vegetables: Toss in some sliced bell peppers, zucchini, or asparagus into the foil packets to create a one-pan meal.
  • Spicy Twist: Add a dash of red pepper flakes to the honey garlic mixture for a spicy kick that pairs beautifully with the sweetness of the honey.
  • Citrus Zing: Substitute orange juice for half of the soy sauce for a refreshing citrus flavor.

Substitutions You Can Make

Don’t have everything on hand? No problem! Here are some substitutions you can make without sacrificing flavor:

  • Maple Syrup: If you’re out of honey, maple syrup works wonderfully as a sweetener.
  • Tamari: For a gluten-free option, substitute regular soy sauce with tamari.
  • Fresh Herbs: If parsley isn’t available, use cilantro or green onions for a fresh garnish.

Equipment You’ll Need

To make this Honey Garlic Salmon in Foil, you’ll need a few kitchen essentials:

  • Aluminum foil (or parchment paper for a healthier option)
  • A baking sheet
  • A small bowl for mixing
  • A whisk or fork for mixing
  • A spatula for serving

Storage and Freezing Tips

This dish is best enjoyed fresh, but you can store leftovers if you have any:

  • Refrigeration: Store leftover salmon in an airtight container in the refrigerator for up to 3 days.
  • Freezing: You can freeze cooked salmon for up to 3 months. Wrap it tightly in plastic wrap and aluminum foil to prevent freezer burn.
  • Reheating: To reheat, place the salmon in a preheated oven at 350°F (175°C) for about 10-15 minutes, or until heated through.

Frequently Asked Questions

Can I use other types of fish?

Absolutely! This honey garlic sauce works well with other fish like tilapia, cod, or even chicken if you’re in the mood for something different.

What should I serve with this salmon?

This dish pairs wonderfully with a side of steamed rice, quinoa, or a fresh green salad. Roasted vegetables or mashed potatoes also make fantastic companions.

Can I cook this on the grill?

Yes! Grill the foil packets over medium heat for about 10-15 minutes. Just make sure to keep an eye on it to avoid burning.

Troubleshooting Common Issues

If things don’t go as planned, here are some tips to troubleshoot:

  • Fish Sticking to the Foil: Make sure to use enough oil in your mixture and be generous with the foil size to create a good seal.
  • Too Much Liquid: If your salmon releases too much liquid, try cooking it uncovered for the last few minutes to allow excess moisture to evaporate.

Conclusion

As you can see, making Honey Garlic Salmon in Foil is not just about following a recipe; it’s about creating a delightful dish that brings warmth and comfort to your table. Whether you’re cooking for family, friends, or just treating yourself, this recipe is sure to impress and satisfy. With its perfect blend of sweet and savory flavors, it’s a meal that’s bound to become a favorite in your home. So, roll up your sleeves, grab those ingredients, and let’s make some magic happen in your kitchen. Happy cooking!

Honey Garlic Salmon in Foil

Prep Time 10 minutes
Cook Time 20 minutes
Total Time 30 minutes
Servings 4 servings
Calories 350
Enjoy tender, flavorful salmon baked with a sweet and savory honey garlic glaze, wrapped in foil for easy cleanup.

Ingredients

Salmon

  • 4 fillets salmon fillets
  • 0.25 cup honey
  • 0.25 cup soy sauce
  • 3 cloves garlic, minced
  • 1 tablespoon olive oil
  • 1 teaspoon ginger, grated
  • to taste salt and pepper
  • lemon slices lemon slices (for garnish)
  • fresh parsley fresh parsley (for garnish)

Instructions 

  • Preheat oven to 375°F (190°C).
  • Mix honey, soy sauce, garlic, oil, ginger, salt, and pepper.
  • Place salmon on foil, spoon sauce over, and seal.
  • Bake for 15-20 minutes, then open foil and garnish.

Notes

Use fresh lemon and parsley for best flavor.
Calories: 350kcal
Cost: $15
Course: Main Course
Cuisine: American
Keyword: Salmon

Loved this recipe? Save it to your favorite Pinterest board so you can easily find it later! It’s the perfect way to keep all your sweet ideas in one place. ✨

A plate of Honey Garlic Salmon in foil featuring minced garlic and herbs, displayed in natural light.

Welcome to Your New Favorite Comfort Food: Stuffed Manicotti

If you’re looking for a dish that feels like a warm hug on a chilly evening, you’ve landed in the right spot. Stuffed manicotti is not just a meal; it’s an experience—a delightful blend of creamy ricotta, gooey mozzarella, and rich marinara sauce, all wrapped in delicate pasta shells. What’s more? You can whip this up in just 30 minutes! So, pull up a chair, and let’s dive into the magic of making stuffed manicotti that will have your loved ones asking for seconds.

Why You’ll Love This Recipe

  • Quick and Easy: In just 30 minutes, you can serve a restaurant-quality dish right from your kitchen.
  • Delicious Comfort: The combination of cheesy filling and savory marinara sauce will remind you of home-cooked meals from your childhood.
  • Customizable: This recipe is a blank canvas! Swap in your favorite ingredients to make it truly your own.
  • Perfect for Meal Prep: Make a big batch and store some for later—this dish keeps well in the refrigerator or freezer.
  • Vegetarian Delight: This stuffed manicotti is a hearty, impressive vegetarian option that even meat lovers will adore.

Gather Your Ingredients

Before we get started, let’s take a look at what you’ll need to create your scrumptious stuffed manicotti:

  • 12 manicotti shells: Cook them al dente for the best texture.
  • 2 cups ricotta cheese: Full-fat ricotta gives the best flavor and creaminess.
  • 2 cups shredded mozzarella: Reserve 1 cup for topping the dish.
  • ½ cup grated Parmesan cheese: Freshly grated for maximum flavor.
  • 2 large eggs: Helps bind the filling together.
  • 2 tbsp fresh parsley: Finely chopped, for a pop of freshness.
  • 1 tsp salt: Adjust to taste.
  • ½ tsp black pepper: Freshly ground for best flavor.
  • ½ tsp garlic powder: Optional, but adds a nice depth of flavor.
  • 3 cups marinara sauce: Use homemade or store-bought for convenience.
  • 1 tbsp olive oil: For greasing the baking dish.

Step-by-Step Instructions

Close-up of baked manicotti filled with ricotta and topped with mozzarella.

Ready to get cooking? Here’s how to make your stuffed manicotti:

  • Step 1: Cook the Manicotti Shells: Bring a large pot of salted water to a boil. Add the manicotti shells and cook just until al dente (about 7–8 minutes). Drain and rinse under cold water to stop cooking. Lay flat on a baking sheet to prevent sticking.
  • Step 2: Prepare the Cheese Filling: In a large bowl, combine the ricotta, 1 cup mozzarella, Parmesan, eggs, parsley, salt, pepper, and garlic powder. Mix until smooth and creamy, ensuring it’s thick enough to hold its shape when piped.
  • Step 3: Fill the Manicotti Shells: Spoon the cheese mixture into a piping bag or a resealable plastic bag with a corner cut off. Carefully pipe the mixture into each cooked manicotti shell until full.
  • Step 4: Assemble the Dish: Preheat your oven to 375°F (190°C). Grease a 9×13-inch baking dish with olive oil. Spread 1 cup of marinara sauce on the bottom of the dish. Arrange the filled manicotti in a single layer. Pour the remaining sauce over the shells and sprinkle with the remaining mozzarella.
  • Step 5: Bake the Manicotti: Cover the dish with aluminum foil and bake for 25 minutes. Remove the foil and bake uncovered for an additional 10–15 minutes until the cheese is golden and bubbly. Let rest for 10 minutes before serving.

Expert Tips for Perfect Manicotti

  • Use Fresh Ingredients: Fresh herbs and high-quality cheeses elevate the dish significantly.
  • Don’t Overcook the Pasta: Al dente shells hold their shape better when baked.
  • Piping Made Easy: Use a piping bag for a clean, hassle-free filling process.
  • Layering is Key: Ensure each shell is fully covered with marinara to prevent drying out.
  • Rest Before Serving: Letting the dish rest allows the flavors to meld beautifully.
  • Experiment with Cheese: Try adding different cheeses like goat cheese or fontina for unique flavors.
  • Play with Marinara: A homemade marinara sauce can take this dish to another level; don’t hesitate to try it!
  • Garnish for Flair: A sprinkle of fresh basil or more Parmesan before serving adds a lovely touch.

Common Mistakes and Troubleshooting

Even the best chefs have their share of mishaps. Here are some common pitfalls and how to avoid them:

  • Filling too loosely: Make sure your cheese mixture is thick enough to stay inside the shells.
  • Pasta shells breaking: Handle them gently; overcooking can make them fragile.
  • Too much sauce: Balance is key—too much sauce can make the dish soggy.
  • Underbaking: Ensure the cheese is bubbly and golden for the best texture.

Delicious Variations to Try

If you’re looking to switch things up, here are some tasty variations to consider:

  • Meat Lover’s Manicotti: Add cooked ground beef or sausage to the cheese filling for a heartier version.
  • Spinach and Ricotta: Incorporate sautéed spinach into the cheese mixture for added nutrition and flavor.
  • Mushroom Medley: Mix in sautéed mushrooms for an earthy twist.
  • Spicy Kick: Add red pepper flakes to the filling for a little heat.

Storing and Make-Ahead Instructions

This stuffed manicotti is perfect for meal prep! Here’s how to store and reheat:

  • Refrigerator: Store leftovers in an airtight container for up to 3 days.
  • Freezer: You can freeze baked manicotti for up to 3 months. Just make sure to wrap it tightly.
  • Reheating: Thaw overnight in the refrigerator and reheat in a 350°F (175°C) oven until warmed through.
  • Make-Ahead: Assemble the dish ahead of time, cover tightly, and refrigerate. Bake just before serving.

Frequently Asked Questions

  • Can I use gluten-free manicotti? Absolutely! There are great gluten-free pasta options available.
  • What can I substitute for ricotta? Cottage cheese works well, or you can try a vegan ricotta for a dairy-free option.
  • Can I prepare the filling in advance? Yes, you can make the filling a day ahead and store it in the refrigerator.
  • Is it okay to add vegetables? Definitely! Roasted zucchini or bell peppers can add a nice touch.
  • What if I don’t have a piping bag? A resealable plastic bag with a corner cut off works just as well!
  • How can I make this dish spicier? Add jalapeños or crushed red pepper flakes to the filling or sauce.
  • Can I make this with store-bought sauce? Yes! For convenience, store-bought marinara works beautifully.
  • How do I know when it’s done baking? The cheese should be golden and bubbly, and a knife should come out hot when inserted into the middle.

Nutritional Tips and Dietary Adaptations

This dish can be adapted to fit various dietary needs:

  • Low-Fat Option: Use low-fat ricotta and mozzarella for a lighter dish.
  • Vegan Version: Substitute ricotta with tofu-based vegan ricotta and use nutritional yeast for a cheesy flavor.
  • Gluten-Free: Opt for gluten-free manicotti shells for a safe alternative.
  • Low-Carb: Try zucchini noodles instead of pasta for a lower-carb meal.

Essential Equipment You’ll Need

Before you start cooking, make sure you have the following:

  • Large Pot: For boiling the pasta shells.
  • Baking Dish: A 9×13-inch dish is ideal for this recipe.
  • Mixing Bowls: For preparing the cheese filling.
  • Piping Bag: Or a resealable bag for easy filling of the shells.
  • Aluminum Foil: To cover the dish while baking.

Serving Suggestions

To make your meal even more special, consider these serving ideas:

  • With a Side Salad: A fresh green salad pairs wonderfully for a light balance.
  • Garlic Bread: Serve with warm, crusty garlic bread for a classic combination.
  • Wine Pairing: A nice Chianti or a crisp Sauvignon Blanc complements the flavors beautifully.
  • Fresh Herbs: Garnish with additional parsley or basil for a fresh finish.

Conclusion

Your journey into the world of stuffed manicotti doesn’t just end here—it begins! With this recipe, you’re not only creating a delicious meal but crafting memories that will last a lifetime. So, roll up your sleeves, gather your loved ones, and get ready to enjoy this comforting dish that brings everyone home to the table. Happy cooking!

30-Minute Healthy Stuffed Manicotti

Prep Time 15 minutes
Cook Time 35 minutes
Total Time 50 minutes
Servings 6 servings
Calories 450
A quick and nutritious twist on classic stuffed manicotti, perfect for a wholesome weeknight dinner.

Ingredients

Pasta

  • 12 pieces manicotti shells, cooked al dente
  • 2 cups ricotta cheese, full-fat preferred
  • 2 cups shredded mozzarella, divided (1 cup for filling, 1 cup for topping)
  • ½ cup grated Parmesan cheese, freshly grated
  • 2 large eggs, lightly beaten
  • 2 tbsp fresh parsley, finely chopped
  • 1 tsp salt, to taste
  • ½ tsp black pepper, freshly ground
  • ½ tsp garlic powder, optional
  • 3 cups marinara sauce, homemade or store-bought
  • 1 tbsp olive oil, for greasing the baking dish

Instructions 

  • Cook the manicotti shells until al dente, then drain and rinse with cold water.
  • Mix ricotta, 1 cup mozzarella, Parmesan, eggs, parsley, salt, pepper, and garlic powder to make the filling.
  • Pipe the cheese mixture into each shell and arrange in a greased baking dish. Cover with marinara sauce and sprinkle remaining mozzarella.
  • Bake at 375°F (190°C) for 25 minutes covered, then uncover and bake for 10-15 minutes until bubbly and golden. Rest 10 minutes before serving.

Notes

For a lighter option, use part-skim cheese and low-sodium sauce.
Calories: 450kcal
Cost: $15
Course: Main Course
Cuisine: Italian
Keyword: manicotti

Why You’ll Fall in Love with This Recipe

When it comes to hosting gatherings, there’s a certain magic in serving dishes that not only taste divine but also look like they belong in a fancy restaurant. Enter my Honey Garlic Salmon Bites Recipe! These little morsels of joy are the perfect appetizer that will have your guests raving and asking for the recipe before they even finish their first bite. With a delightful balance of sweet honey, zesty garlic, and tender salmon, this dish captures the essence of gourmet dining in a simple and approachable way. Plus, they’re packed with protein, making them a healthy choice for any occasion.

Growing up, my family often celebrated special occasions with a feast that brought everyone together. I remember standing on a stool beside my mom, eagerly watching her create magic in the kitchen. Now, as I whip up these honey garlic salmon bites, I’m reminded of those cherished moments and the joy of sharing good food with loved ones. So, let’s roll up our sleeves and get ready to create something unforgettable!

Ingredients You’ll Need

Before we dive into the cooking process, let’s gather our ingredients. The beauty of this salmon bites recipe lies in its simplicity. Here’s what you’ll need:

  • 1 lb fresh salmon, skin removed and cut into bite-sized pieces
  • 1/4 cup honey
  • 3 cloves garlic, minced
  • 2 tablespoons soy sauce
  • 1 tablespoon olive oil
  • 1 teaspoon fresh ginger, grated
  • Salt and pepper, to taste
  • Sesame seeds, for garnish
  • Chopped green onions, for garnish

Steps to Create These Delectable Bites

A plate of succulent Honey Garlic Salmon Bites with a glossy glaze and soft shadows.

Now that we have all our ingredients ready, let’s embark on this culinary adventure. Follow these easy steps, and you’ll have a plate of tantalizing salmon bites ready to impress:

  1. In a large mixing bowl, whisk together the honey, minced garlic, soy sauce, olive oil, grated ginger, and a sprinkle of salt and pepper. This marinade is the heart of the dish, bursting with flavor!
  2. Add the salmon pieces to the marinade, ensuring each bite is well-coated. I like to give them a gentle toss with my hands—it’s a bit messy, but trust me, it’s worth it. Let the salmon marinate for at least 30 minutes. You can even let it sit in the fridge for a few hours if you want to amp up those flavors.
  3. Preheat your oven to 400°F (200°C) if you’re baking, or heat a grill pan over medium-high heat if you prefer grilling. Either method works beautifully!
  4. If baking, line a baking sheet with parchment paper. This makes cleanup a breeze and prevents sticking. If grilling, lightly grease your grill pan with a bit of olive oil.
  5. Arrange the marinated salmon bites on the baking sheet or grill pan, making sure they’re spaced out so they can cook evenly.
  6. Bake for 10-12 minutes in the oven, or grill for about 3-4 minutes on each side. You’ll know they’re ready when the salmon flakes easily with a fork and has a lovely golden hue.
  7. Once cooked, remove from heat and sprinkle with sesame seeds and chopped green onions for a pop of color and flavor!
  8. Serve warm as a gourmet appetizer and watch your guests swoon!

Tips for Perfect Salmon Bites

As with any recipe, a few tips can elevate your dish from good to spectacular:

  • Choose Fresh Salmon: Fresh salmon is key to achieving that melt-in-your-mouth texture. If you can, buy from a reputable fishmonger or the seafood section of your grocery store.
  • Marinate Longer: If time allows, marinate your salmon bites longer. The flavors will deepen and enhance the dish!
  • Don’t Overcook: Salmon is best when it’s just cooked through. Keep an eye on your cooking time to prevent dryness.

Variations to Try

If you’re feeling adventurous, here are some fun variations to put your own spin on these salmon bites:

  • Add Spice: For those who love a kick, add a teaspoon of sriracha or chili flakes to the marinade.
  • Experiment with Citrus: A splash of lemon or lime juice in the marinade can add a refreshing zing!
  • Switch Up the Garnishes: Try toasted almonds or crushed peanuts for a different textural element.

Substitutions to Consider

Don’t have everything on hand? No problem! Here are some substitutions you can make:

  • Honey: Maple syrup or agave nectar can work well as alternatives for a vegan option.
  • Soy Sauce: For a gluten-free version, use tamari or coconut aminos instead.
  • Fresh Ginger: Ground ginger can be used in a pinch, but fresh will always yield the best flavor.

Essential Equipment

To make your cooking experience smoother, here’s a quick list of equipment you’ll need:

  • Mixing bowl
  • Whisk
  • Baking sheet or grill pan
  • Parchment paper (for baking)
  • Spatula

Storage and Freezing Tips

If you happen to have leftovers (which is rare, trust me!), here’s how to store them:

  • Refrigeration: Store in an airtight container in the fridge for up to 2 days.
  • Freezing: These bites can be frozen for up to a month. Just make sure to cool them completely before transferring to a freezer-safe bag.
  • Reheating: To reheat, bake in a preheated oven at 350°F (175°C) for about 10 minutes, until warmed through.

FAQs About Honey Garlic Salmon Bites

Here are some frequently asked questions to help you navigate this recipe:

  • Can I use frozen salmon? Yes, just make sure it’s fully thawed and pat it dry before marinating.
  • Can I double the recipe? Absolutely! This is a great dish for larger gatherings.
  • What should I serve with the salmon bites? They pair beautifully with a simple salad, steamed veggies, or even a side of rice for a more filling meal.

Troubleshooting Common Issues

If things don’t go as planned, here are some common issues and how to fix them:

  • Salmon is too dry: This usually means it was overcooked. Next time, check it earlier, as salmon continues to cook even after you take it off the heat.
  • Marinade isn’t flavorful enough: If your marinade lacks depth, try adding more garlic or a splash of citrus juice. Taste it before adding the salmon!

Conclusion: A Dish to Remember

There you have it—my Honey Garlic Salmon Bites Recipe that will surely steal the show at your next gathering! Whether you’re looking to impress guests or simply treat yourself to something special, these savory bites are bound to be a hit. They embody everything I love about cooking: the joy of bringing people together, the thrill of creating something delicious, and the warm memories made around the dinner table. So, grab that spatula, get cooking, and let the magic happen in your kitchen. Trust me, once you make these, they’ll become your go-to gourmet appetizer, and who knows? You might just find yourself whipping them up for every occasion! Happy cooking!

Honey Garlic Salmon Bites Recipe

Prep Time 10 minutes
Cook Time 12 minutes
Total Time 22 minutes
Servings 4 servings
Calories 250
Delight in these tender salmon bites glazed with honey and garlic, perfect as a gourmet appetizer.

Ingredients

Main

  • 1 lb fresh salmon, skin removed and cut into bite-sized pieces
  • 1/4 cup honey
  • 3 cloves garlic, minced
  • 2 tablespoons soy sauce
  • 1 tablespoon olive oil
  • 1 teaspoon fresh ginger, grated
  • to taste salt and pepper
  • for garnish sesame seeds
  • for garnish chopped green onions

Instructions 

  • Whisk honey, garlic, soy sauce, olive oil, ginger, salt, and pepper.
  • Marinate salmon for at least 30 minutes.
  • Preheat oven to 400°F (200°C) or heat grill pan.
  • Cook salmon: bake 10-12 mins or grill 3-4 mins per side.
  • Garnish with sesame seeds and green onions before serving.

Notes

Serve warm for best flavor.
Calories: 250kcal
Cost: $15
Course: Appetizer
Cuisine: fusion
Keyword: Salmon

Loved this recipe? Save it to your favorite Pinterest board so you can easily find it later! It’s the perfect way to keep all your sweet ideas in one place. ✨

Appetizing Honey Garlic Salmon Bites presented on a rustic wooden surface, highlighting textures.

Why This Dish Will Be Your New Favorite

There’s something undeniably comforting about a plate of creamy beef pasta. It’s like a warm hug on a chilly evening, inviting you in with its rich, velvety sauce and hearty ingredients. Picture this: a long day at work, and all you want is to come home to a meal that doesn’t just fill your stomach but warms your soul. That’s exactly what this Creamy Beef Pasta for Cozy Nights delivers. It’s simple, quick, and utterly satisfying—making it perfect for those busy weeknights or when you just want a taste of home.

Imagine twirling your fork around a generous portion of fettuccine or penne, each bite coated in a decadent sauce that combines the savory essence of ground beef with the creaminess of heavy cream and the sharp tang of Parmesan. And let’s not forget the aromatic garlic and onion that create a base of flavor that’s hard to resist. This recipe isn’t just a meal; it’s a moment to pause, enjoy, and share with loved ones. So let’s dive into the details of making this delicious dish.

Ingredients for Creamy Beef Pasta

Gathering the right ingredients is key to achieving that perfect flavor balance in this dish. Here’s what you’ll need:

  • 8 oz pasta: I recommend fettuccine or penne for their texture and sauce-hugging capabilities.
  • 1 lb ground beef: Choose lean ground beef for a satisfying yet not-too-greasy bite.
  • 1 small onion: Diced, to add sweetness and depth to your sauce.
  • 2 cloves garlic: Minced, because let’s face it, garlic makes everything better!
  • 1 cup heavy cream: For that luscious creaminess.
  • 1/2 cup beef broth: To enhance the flavors and give a rich base.
  • 1 cup grated Parmesan cheese: Freshly grated is always best for maximum flavor.
  • 1 tsp Italian seasoning: A blend of herbs that brings everything together.
  • Salt and pepper: Essential for seasoning to taste.
  • 2 tbsp olive oil: For sautéing the onions and garlic.
  • Fresh parsley: For garnish, adding a pop of color and freshness to your dish.

How to Make Creamy Beef Pasta

Detailed view of a bowl of creamy beef pasta, showcasing the rich sauce and ingredients.

Now that you have your ingredients, let’s walk through the steps to create this comforting masterpiece:

  1. Cook the pasta: Begin by bringing a large pot of salted water to a boil. Add your pasta and cook according to the package instructions until al dente. Drain and set aside, but don’t forget to save about a cup of that pasta water—it’s liquid gold for your sauce!
  2. Sauté the onion and garlic: In a large skillet, heat the olive oil over medium heat. Add the diced onion and minced garlic, cooking until they soften and become fragrant, about 3-5 minutes. Try not to eat them straight from the pan because they smell divine!
  3. Brown the beef: Next, add the ground beef to the skillet. Using a spatula, break it apart and cook until browned and fully cooked through, around 5-7 minutes. If there’s excess fat, feel free to drain it off for a cleaner finish.
  4. Add the creamy goodness: Stir in the heavy cream, beef broth, Italian seasoning, salt, and pepper. Bring the mixture to a gentle simmer and let it cook for about 5 minutes, allowing the sauce to thicken slightly.
  5. Toss in the pasta: Add the cooked pasta to the skillet and toss everything together, ensuring each piece is well coated in that dreamy creamy sauce.
  6. Finish with cheese: Stir in the grated Parmesan cheese until it’s melted and beautifully combined with the sauce. Adjust seasoning if necessary.
  7. Serve and enjoy: Plate your creamy beef pasta and garnish with fresh parsley for a touch of color and flavor. Serve hot and watch as everyone digs in with delight!

Perfecting the Cooking Process

Cooking is an art, and like any good artist, you want to perfect your craft. Here are a few tips to ensure your creamy beef pasta turns out just right:

  • Don’t overcook the pasta: Aim for al dente, as it will continue to cook slightly when you toss it with the sauce.
  • Use fresh ingredients: Fresh garlic, onions, and Parmesan cheese can elevate the dish significantly.
  • Adjust the creaminess: If you prefer a lighter sauce, substitute half-and-half for the heavy cream or add a bit more beef broth.

Add Your Touch

This recipe is a blank canvas, ready for your personal flair. Here are some creative variations you might consider:

  • Vegetable Add-ins: Toss in some fresh spinach, sautéed mushrooms, or bell peppers for added nutrition and flavor.
  • Protein Swaps: Try using ground turkey or chicken for a lighter option that still packs a punch.
  • Spicy Kick: For those who like a little heat, sprinkle in some red pepper flakes or add diced jalapeños to the mix.

Storing & Reheating

Leftovers can be just as delightful as the first serving. Here’s how to store and reheat your creamy beef pasta:

  • Storing: Place any leftovers in an airtight container and store in the refrigerator for up to three days.
  • Freezing: You can also freeze the pasta, but I recommend doing so before adding the cheese for the best texture. It can last up to 2 months in the freezer.
  • Reheating: To reheat, warm it on the stovetop over medium heat, adding a splash of cream or broth to restore the sauce’s creaminess.

Chef’s Helpful Tips

Before you dive in, here are some extra tips from my kitchen to yours:

  • Flavor Building: Always taste your sauce as you go. A little extra seasoning can make a big difference!
  • Parmesan Substitute: If you’re in a pinch, Pecorino Romano or even a sprinkle of cheddar can work, though the flavor will change slightly.
  • Fresh Herbs: Consider adding fresh basil or thyme at the end for a burst of color and flavor.

FAQs

Got questions? I’ve got answers! Here are some common queries about this dish:

  • Can I make this ahead of time? Yes! You can prepare the sauce and cook the pasta separately. Just combine when you’re ready to serve.
  • What can I substitute for ground beef? Ground turkey, chicken, or even plant-based alternatives work well in this recipe.
  • How long does it take to prepare? From start to finish, you can have this delicious meal ready in just 30 minutes!

Troubleshooting

Even the best cooks have their off days. Here’s how to troubleshoot some common issues:

  • Too thick sauce: Add a splash more beef broth or cream to loosen it up.
  • Not enough flavor: A pinch more salt, pepper, or Italian seasoning can work wonders.
  • Clumpy cheese: If the cheese doesn’t melt smoothly, lower the heat and stir continuously to achieve a creamy consistency.

Conclusion

So there you have it, the magic of Creamy Beef Pasta for Cozy Nights! This dish is not just a meal; it’s an experience—one that brings comfort and warmth to your dinner table. With simple ingredients and easy steps, you can create a wholesome dish that will have your family asking for seconds. Don’t forget to personalize it with your favorite veggies or spices to make it truly your own. Here’s to cozy nights and delicious bites—happy cooking!

Creamy Beef Pasta for Cozy Nights

Prep Time 10 minutes
Cook Time 15 minutes
Total Time 25 minutes
Servings 4 servings
Calories 650
A comforting and creamy pasta dish perfect for cozy evenings, combining tender beef, rich sauce, and cheesy goodness.

Ingredients

Pasta

  • 8 oz pasta (fettuccine or penne)
  • 1 lb ground beef
  • 1 small onion, diced
  • 2 cloves garlic, minced
  • 1 cup heavy cream
  • 1/2 cup beef broth
  • 1 cup grated parmesan cheese
  • 1 tsp italian seasoning
  • to taste salt and pepper
  • 2 tbsp olive oil
  • for garnish fresh parsley

Instructions 

  • Cook pasta until al dente, then drain and set aside.
  • Heat olive oil, sauté onion and garlic until softened.
  • Add ground beef, cook until browned, then drain excess fat.
  • Stir in heavy cream, beef broth, Italian seasoning, salt, and pepper; simmer for 5 minutes.
  • Add cooked pasta, toss to coat, then stir in Parmesan cheese. Garnish with parsley and serve.

Notes

For a richer flavor, let the sauce simmer longer before adding pasta.
Calories: 650kcal
Cost: $15
Course: Main Course
Cuisine: Italian
Keyword: Beef, creamy, pasta

Loved this recipe? Save it to your favorite Pinterest board so you can easily find it later! It’s the perfect way to keep all your sweet ideas in one place. ✨

Eye-level image of delicious creamy beef pasta, featuring soft shadows and vibrant colors.

Why You’ll Fall for This Recipe

Picture this: a busy weeknight, the clock is ticking, and the last thing you want to do is spend hours in the kitchen. But then, you remember—Air Fryer Honey Garlic Salmon is on the menu. This dish is not just quick; it’s a delightful dance of sweet and savory flavors that will make your taste buds sing and your kitchen feel like a warm hug. With the air fryer doing most of the work, you’ll have a delicious meal on the table in no time, leaving you free to enjoy the evening—perhaps with a glass of wine or a good book.

Overview of Air Frying

Air frying has taken the cooking world by storm, and for good reason! It’s a healthier alternative to traditional frying, allowing you to achieve that crispy texture we all love while using significantly less oil. Not to mention, it locks in flavors beautifully, making dishes like our honey garlic salmon not just healthy but also mouthwateringly delicious. The air fryer circulates hot air around the food, yielding a delightful crunch without the greasy aftermath.

Ingredients for Air Fryer Honey Garlic Salmon

Juicy salmon fillets drizzled with honey garlic sauce, garnished with green onions.

Let’s gather our ingredients, shall we? Here’s what you’ll need:

  • 4 salmon fillets
  • 2 tablespoons honey
  • 2 tablespoons soy sauce
  • 2 cloves garlic, minced
  • 1 tablespoon olive oil
  • Salt and pepper to taste
  • Lemon wedges for serving
  • Chopped green onions for garnish (optional)

Each ingredient plays a crucial role in creating that perfect balance of sweet and savory. The salmon itself is rich in omega-3 fatty acids, making this dish not only tasty but also a healthy choice for your family.

Preparation Steps

Prepping the Salmon

First things first—let’s prep our salmon! If you’re using frozen fillets, make sure they are fully thawed before you start marinating. This ensures even cooking and helps the flavors seep into the fish. You can choose whether to cook the salmon with the skin on or off; I prefer skin-on for added moisture and texture.

Making the Honey Garlic Marinade

Now, let’s whip up that glorious marinade that will elevate our salmon to new heights. In a small mixing bowl, combine:

  • 2 tablespoons of honey
  • 2 tablespoons of soy sauce
  • 2 cloves of minced garlic
  • 1 tablespoon of olive oil
  • Salt and pepper to taste

Whisk these ingredients together until they are well blended. The honey will give a lovely sweetness that balances the savory soy sauce and the punchy garlic. Feel free to adjust the garlic based on your preference; if you’re a garlic lover like me, you might want to add an extra clove or two!

Cooking the Salmon

Equipment

To make this dish, you’ll need:

  • An air fryer
  • A small bowl for the marinade
  • A shallow dish for marinating the salmon
  • A whisk or fork
  • A cooking spray or brush for the air fryer basket

Instructions

Ready to bring this dish to life? Here’s how:

  1. In a small bowl, whisk together the honey, soy sauce, minced garlic, olive oil, salt, and pepper.
  2. Place the salmon fillets in a shallow dish and pour the honey garlic mixture over them. Make sure each fillet gets a generous coating. Marinate for at least 15 minutes (or longer if you have the time—up to an hour is great!).
  3. Preheat your air fryer to 400°F (200°C). This is a crucial step to get that perfect crispiness.
  4. Lightly spray the air fryer basket with cooking spray. This helps prevent sticking and ensures easy cleanup later on.
  5. Carefully place the marinated salmon fillets in the basket, skin-side down. Be sure not to overcrowd them; give them space to breathe!
  6. Cook the salmon for 8-10 minutes, or until the internal temperature reaches 145°F (63°C) and the fish flakes easily with a fork. The cooking time may vary slightly based on the thickness of your fillets.
  7. Once cooked, remove the salmon from the air fryer and let it rest for a few minutes before serving.

Serve your beautiful salmon fillets with a squeeze of fresh lemon juice and garnish with chopped green onions if desired. This dish pairs wonderfully with steamed veggies or a light salad for a complete meal.

Tips for Perfect Air Fryer Honey Garlic Salmon

Every cook has their tricks, and I’m here to share a few of mine:

  • Don’t rush the marinating: The longer you let the salmon soak in the marinade, the more flavorful it will be. If you can, marinate it for up to an hour.
  • Check the temperature: Invest in a good meat thermometer to ensure your salmon is perfectly cooked. Overcooked salmon can be dry, and nobody wants that!
  • Experiment with flavors: Feel free to add a pinch of red pepper flakes for some heat, or a splash of ginger for a zingy twist.

Possible Variations

One of the best things about this recipe is its versatility. Here are a few variations to consider:

  • Maple Garlic Salmon: Swap out honey for maple syrup for a different kind of sweetness.
  • Citrus Twist: Add orange juice or zest to the marinade for a bright, refreshing flavor.
  • Herb-Infused: Stir in some chopped fresh herbs like cilantro or parsley for a fresh finish.

Storage and Freezing

If you happen to have leftovers (which I doubt because it’s that good), here’s how to store them:

  • Refrigerate: Place any uneaten salmon in an airtight container and store it in the fridge for up to 3 days.
  • Freeze: For longer storage, wrap the cooked salmon tightly in plastic wrap and aluminum foil, or place it in a freezer-safe bag. It can last up to 3 months in the freezer. Just thaw it in the fridge overnight before reheating.

FAQs About Air Fryer Honey Garlic Salmon

Can I use frozen salmon fillets?

Yes, just make sure to thaw them completely before marinating and cooking.

How do I know when the salmon is done?

The internal temperature should reach 145°F (63°C), and the salmon should flake easily with a fork.

Can I cook other proteins in the air fryer?

Absolutely! This honey garlic marinade works wonderfully with chicken and shrimp as well.

Troubleshooting Common Issues

Even the best cooks face challenges. Here are a few common issues and how to tackle them:

  • Salmon sticking to the basket: Ensure you coat the air fryer basket with cooking spray before placing the salmon inside.
  • Overcooked salmon: Keep an eye on the cooking time and use a thermometer to avoid drying out the fish.
  • Flavor not intense enough: If you find the flavors lacking, consider marinating longer or adding a touch more garlic or soy sauce to the mix.

Conclusion

And there you have it! Air Fryer Honey Garlic Salmon is not just a recipe; it’s a culinary experience that brings joy and flavor to your table. With its simple preparation and delightful taste, this dish is sure to become a favorite in your home. Whether you serve it for a special occasion or a casual weeknight dinner, it’s bound to impress. So, roll up your sleeves, grab those ingredients, and let’s get cooking together. Here’s to delicious meals and cherished moments around the dinner table—happy cooking!

Air Fryer Honey Garlic Salmon: A Quick & Healthy Recipe

Prep Time 15 minutes
Cook Time 10 minutes
Total Time 25 minutes
Servings 4 servings
Calories 350
This delicious and healthy salmon recipe is quick to prepare using an air fryer, perfect for a nutritious weeknight dinner.

Ingredients

Salmon

  • 4 fillets salmon fillets
  • 2 tablespoons honey
  • 2 tablespoons soy sauce
  • 2 cloves garlic, minced
  • 1 tablespoon olive oil
  • to taste salt and pepper
  • for serving lemon wedges
  • optional chopped green onions

Instructions 

  • Whisk honey, soy sauce, garlic, olive oil, salt, and pepper in a bowl.
  • Marinate salmon in the mixture for at least 15 minutes.
  • Preheat air fryer to 400°F (200°C). Lightly spray basket.
  • Place salmon skin-side down in the basket and cook for 8-10 minutes.
  • Let rest briefly, then serve with lemon wedges and green onions if desired.

Notes

Ensure the salmon reaches an internal temperature of 145°F (63°C) for safety.
Calories: 350kcal
Cost: $15
Course: Main Course
Cuisine: American
Keyword: Salmon

Loved this recipe? Save it to your favorite Pinterest board so you can easily find it later! It’s the perfect way to keep all your sweet ideas in one place. ✨

A beautifully plated air fryer honey garlic salmon with lemon wedges and soft shadows.

Why You’ll Love This Recipe

Ah, ratatouille! Just the word sends you spiraling into a world of vibrant vegetables, delicious aromas, and that comforting feeling of home-cooked goodness. But hold on! Today, we’re taking this classic French dish and giving it a fun twist—welcome to the land of Whimsical Ratatouille Swirls! This dish is not just a feast for the stomach; it’s a visual delight that dances on your plate and brings a touch of magic to your dinner table.

Picture this: colorful spirals of zucchini, eggplant, and bell pepper nestling in a flaky puff pastry, all topped with creamy ricotta and a sprinkle of Parmesan cheese. It’s a perfect dish to impress your dinner guests or indulge in on a cozy night in. Plus, it’s simple enough to whip up on a weeknight while still feeling like a fancy restaurant meal. If you’re ready to elevate your cooking game, keep reading!

Ingredients You’ll Need

Here’s what you’ll need to create these delightful swirls:

  • 1 medium zucchini, thinly sliced
  • 1 medium yellow squash, thinly sliced
  • 1 medium eggplant, thinly sliced
  • 1 red bell pepper, thinly sliced
  • 1 cup cherry tomatoes, halved
  • 2 tablespoons olive oil
  • 1 teaspoon dried thyme
  • 1 teaspoon dried oregano
  • Salt and pepper to taste
  • 1 sheet puff pastry, thawed
  • 1/2 cup ricotta cheese
  • 1/4 cup grated Parmesan cheese
  • Fresh basil leaves for garnish

Step-by-Step Instructions

Artistic presentation of Ratatouille swirls with vibrant vegetables and soft ricotta cheese on a puff pastry base.

Now that you have your ingredients ready, let’s get cooking! Follow these easy steps to create your Whimsical Ratatouille Swirls:

  1. Preheat the oven: Start by setting your oven to 375°F (190°C). This step is crucial because a hot oven will give your pastry that golden, flaky texture we all crave.
  2. Prepare the vegetables: In a large bowl, combine the sliced zucchini, yellow squash, eggplant, red bell pepper, and halved cherry tomatoes. Drizzle with olive oil and sprinkle in the dried thyme, oregano, salt, and pepper. Toss everything together until the veggies are evenly coated. Trust me, your kitchen will smell divine!
  3. Roll out the pastry: On a lightly floured surface, roll out your thawed puff pastry. Cut it into rectangles, roughly 3 inches by 5 inches. Don’t stress about making them perfect; a little imperfection adds character!
  4. Spread the ricotta: Take each rectangle and spread a thin layer of ricotta cheese on it, leaving a small border around the edges for the pastry to seal.
  5. Arrange the veggies: Now comes the fun part! Arrange the seasoned vegetables in a whimsical swirl pattern on top of the ricotta cheese. Let your creativity shine—there’s no wrong way to do this!
  6. Add the cheese: Sprinkle a generous amount of grated Parmesan cheese over the colorful vegetable swirls. This will add a beautiful, savory finish to your dish.
  7. Create the swirls: Starting from one end of the pastry, carefully roll it up into a spiral shape, tucking the edges in as you go to keep all those lovely fillings inside.
  8. Prepare for baking: Place your swirls on a baking sheet lined with parchment paper. This will prevent them from sticking and make for easy cleanup!
  9. Bake: Slide the baking sheet into the preheated oven and bake for 25-30 minutes, or until the pastry is golden brown and puffed. Keep an eye on them—this is the moment when your kitchen will be filled with irresistible aromas!
  10. Garnish and serve: Once they’re out of the oven, let your Whimsical Ratatouille Swirls cool for a few minutes. Then, garnish with fresh basil leaves for that extra pop of flavor and color. Serve warm and watch as your family and friends swoon over this delightful dish!

Tips for Perfect Swirls

Here are some handy tips to ensure your ratatouille swirls turn out perfectly every time:

  • Even slicing: Try to slice your vegetables as evenly as possible to ensure they cook at the same rate.
  • Season generously: Don’t be shy with the herbs and seasoning! This dish thrives on flavor.
  • Keep the pastry cold: If your puff pastry gets too warm, it may not puff up as nicely. Keep it chilled until you’re ready to use it.

Variations to Try

Feel free to get creative with your Whimsical Ratatouille Swirls! Here are some fun variations:

  • Cheese lovers unite: Add more cheese options, such as goat cheese or feta, for a tangy twist.
  • Herb infusion: Experiment with fresh herbs like thyme, rosemary, or even a hint of mint for a fresh flavor boost.
  • Vegan version: Substitute the ricotta with tofu or cashew cream and use a dairy-free puff pastry.

Substitutions

If you’re missing some ingredients, don’t fret! Here are a few substitutions you can make:

  • Eggplant: Zucchini can stand in for eggplant if you prefer!
  • Ricotta: Cream cheese or cottage cheese can be used in place of ricotta for a different texture.
  • Puff pastry: If you don’t have puff pastry on hand, a tortilla or phyllo dough can work in a pinch.

Equipment You’ll Need

Before you start, make sure you have these essential kitchen tools:

  • Baking sheet
  • Parchment paper
  • Knife and cutting board
  • Mixing bowl
  • Rolling pin

Storage and Freezing

If you happen to have leftovers (which is rare, but it can happen!), here’s how to store them:

  • Refrigeration: Store the swirls in an airtight container in the fridge for up to 3 days. Reheat in the oven for a few minutes to regain that crispy texture.
  • Freezing: You can freeze the unbaked swirls for up to a month. Just assemble them, place them on a baking sheet to freeze, then transfer to a freezer bag. When you’re ready to bake, there’s no need to thaw—just add a few extra minutes to the baking time!

FAQs About Ratatouille Swirls

Let’s tackle some common questions:

  • Can I use other vegetables? Absolutely! Feel free to add or substitute any vegetables you love. Just keep in mind the cooking times.
  • What can I serve with these swirls? They pair wonderfully with a light salad, or you could even serve them as a side to grilled chicken or fish.
  • How do I know when they’re done? Look for a golden brown color and a puffy texture. You can also poke a vegetable with a fork to check for tenderness.

Troubleshooting Common Issues

If things don’t go as planned, here are solutions to common ratatouille swirl mishaps:

  • Pastry not puffing: Make sure your oven is preheated, and the pastry is cold when it goes in to ensure it puffs up nicely.
  • Vegetables too soggy: Make sure to remove excess moisture from the vegetables after washing, and avoid overcrowding them when seasoning.

Final Thoughts

Cooking is all about love, creativity, and having fun in the kitchen. With these Whimsical Ratatouille Swirls, you’re not just making a meal; you’re crafting a beautiful dish that tells a story with every bite. So go ahead, gather your ingredients, roll up your sleeves, and let’s whip up some magic together!

Whether you’re cooking for family, friends, or just indulging in a well-deserved treat for yourself, this recipe is bound to become a beloved favorite in your home. Happy cooking!

Whimsical Ratatouille Swirls

Prep Time 20 minutes
Cook Time 30 minutes
Total Time 50 minutes
Servings 4 servings
Calories 250
A delightful appetizer featuring colorful vegetables rolled into flaky puff pastry spirals, perfect for impressing guests.

Ingredients

Vegetables

  • 1 medium zucchini (thinly sliced)
  • 1 medium yellow squash (thinly sliced)
  • 1 medium eggplant (thinly sliced)
  • 1 red bell pepper red bell pepper (thinly sliced)
  • 1 cup cherry tomatoes (halved)
  • 2 tablespoons olive oil
  • 1 teaspoon dried thyme
  • 1 teaspoon dried oregano
  • to taste salt and pepper salt and pepper
  • 1 sheet puff pastry (thawed)
  • 1/2 cup ricotta cheese
  • 1/4 cup grated parmesan cheese
  • for garnish fresh basil leaves (for garnish)

Instructions 

  • Preheat oven to 375°F (190°C).
  • Combine vegetables with oil, thyme, oregano, salt, and pepper; toss to coat.
  • Cut puff pastry into rectangles, spread with ricotta, then arrange vegetables in a swirl pattern.
  • Sprinkle Parmesan, roll into spirals, place on baking sheet, and bake 25-30 minutes.
  • Garnish with basil leaves, serve warm.

Notes

Use a sharp knife to thinly slice vegetables for best presentation.
Calories: 250kcal
Cost: $15
Course: Appetizer
Cuisine: French
Keyword: vegetables

Loved this recipe? Save it to your favorite Pinterest board so you can easily find it later! It’s the perfect way to keep all your sweet ideas in one place. ✨

Detailed shot of a whimsical Ratatouille dish, with fresh ingredients like cherry tomatoes and basil garnish.

Why You’ll Love This Dish

There’s something truly magical about the aroma of Honey Garlic Butter Baked Salmon wafting through the kitchen, isn’t there? It’s the kind of dish that feels like a warm hug, bringing back memories of family dinners and cozy gatherings. The marriage of sweet honey, savory garlic, and rich butter creates a glaze that elevates humble salmon fillets into a culinary masterpiece. Not only is this recipe quick and easy, but it’s also a fantastic way to impress guests or simply treat yourself to a delightful meal. With just a handful of ingredients and a mere 25 minutes, you can bring a touch of gourmet dining into your home.

Ingredients for Honey Garlic Butter Baked Salmon

Let’s gather our ingredients and get ready for some kitchen fun! Here’s what you’ll need:

  • 4 salmon fillets
  • 1/4 cup honey
  • 1/4 cup unsalted butter
  • 4 cloves garlic, minced
  • 2 tablespoons soy sauce
  • 1 tablespoon lemon juice
  • Salt and pepper to taste
  • Chopped parsley for garnish

These ingredients are not only simple but also easily accessible. You might even have most of them in your pantry already. So grab your apron, and let’s get cooking!

Step-by-Step Instructions for Honey Garlic Butter Baked Salmon

A beautifully plated salmon fillet drizzled with honey garlic butter.

Ready to dive into the cooking process? Follow these easy steps to create your new favorite salmon dish:

  1. Preheat the Oven: Start by preheating your oven to 375°F (190°C). This ensures that your salmon will cook evenly and perfectly.
  2. Melt the Butter: In a small saucepan, melt the unsalted butter over low heat. Keep an eye on it to prevent burning!
  3. Add Garlic: Once the butter is melted, add the minced garlic and sauté for 1-2 minutes until fragrant. Your kitchen will start to smell heavenly at this point!
  4. Prepare the Glaze: Stir in the honey, soy sauce, and lemon juice. Cook for another 1-2 minutes, then remove from heat. This glaze is where the magic happens—sweet, savory, and oh-so-delicious!
  5. Season the Salmon: Take your salmon fillets and place them in a baking dish. Season lightly with salt and pepper. This step enhances the natural flavors of the fish.
  6. Glaze the Fillets: Pour the honey garlic butter mixture generously over the salmon fillets, ensuring they are well coated. You want every bite to be bursting with flavor!
  7. Bake the Salmon: Place the baking dish in the preheated oven and bake for 15-20 minutes, or until the salmon flakes easily with a fork. Keep an eye on it to avoid overcooking!
  8. Garnish and Serve: Once baked, remove the salmon from the oven and garnish with chopped parsley. Serve immediately and enjoy every delicious bite!

How to Store and Freeze Leftovers

If you happen to have any leftovers (which is rare when this dish is around!), you can store them in an airtight container in the fridge for up to 3 days. Reheat gently in the oven or microwave to maintain that delicious moisture. If you want to freeze the salmon, wrap the cooled fillets tightly in plastic wrap or aluminum foil, then place them in a freezer-safe bag. They can be frozen for up to 3 months. Just remember to thaw overnight in the fridge before reheating!

Expert Tips for Perfect Baked Salmon

To ensure your Honey Garlic Butter Baked Salmon turns out perfect every time, consider these tips:

  • Choose Quality Salmon: Opt for fresh, wild-caught salmon for the best flavor and texture. It makes a significant difference!
  • Watch the Baking Time: Salmon can dry out if overcooked, so keep an eye on it. Aim for a flaky texture while ensuring it’s just cooked through.
  • Baste for Extra Flavor: Baste the salmon with the pan juices halfway through baking. This keeps it moist and enhances the honey garlic flavor.
  • Broil for a Caramelized Finish: For an even better finish, switch to the broil setting for the last 2-3 minutes. Just watch closely to prevent burning!

Delicious Variations to Try

Feeling adventurous? Here are some variations you can try to elevate your salmon dish:

  • Dairy-Free Version: Substitute olive oil for butter for a lighter, dairy-free glaze that doesn’t skimp on flavor.
  • Add a Spicy Kick: A pinch of cayenne pepper or red pepper flakes can add a delightful heat to the glaze.
  • Herb-Infused Glaze: Toss in fresh herbs like dill or thyme into the glaze for an aromatic boost.
  • Citrus Twist: Swap out lemon juice for orange juice for a sweet citrus twist that pairs beautifully with salmon.
  • Maple Glaze: Use maple syrup instead of honey for a unique flavor profile that’s equally delicious.

What to Serve with Honey Garlic Butter Baked Salmon

This dish pairs beautifully with a variety of sides. Here are some suggestions to create a well-rounded meal:

  • Creamy Mashed Potatoes: The rich, velvety texture complements the salmon perfectly.
  • Roasted Asparagus: A vibrant side that adds freshness and color.
  • Cucumber Salad: Light and refreshing, this salad balances out the richness of the glaze.
  • Quinoa Pilaf: A nutty addition that soaks up the delicious salmon juices.
  • Garlic Bread: Who can resist warm, buttery garlic bread alongside salmon?

For drinks, a chilled glass of Chardonnay pairs beautifully, enhancing the buttery notes of the salmon.

Make Ahead Options

If you’re a meal prep enthusiast, you’ll love this! You can prepare the honey garlic butter sauce up to 3 days in advance and store it in an airtight container in the refrigerator. You can also season the salmon fillets and place them in the baking dish, covering it tightly with plastic wrap or foil. This can be done up to 24 hours ahead of when you plan to cook. When you’re ready, simply preheat the oven, brush the sauce over the salmon, and bake as directed. It’s a great time-saver for busy weeknights!

FAQs About Honey Garlic Butter Baked Salmon

Here are some commonly asked questions to guide you:

  • What type of salmon is best for this recipe? Fresh, wild-caught salmon typically has the best flavor and texture. If that’s unavailable, go for high-quality farmed salmon.
  • How long can I store leftover salmon in the fridge? Leftover salmon can be stored in an airtight container in the refrigerator for up to 3 days.
  • Can I use frozen salmon? Yes! Just ensure to thaw it properly in the refrigerator before cooking for the best results.

Troubleshooting Common Issues

If you encounter any hiccups while cooking, here are some common issues and how to resolve them:

  • Salmon is Dry: This usually happens due to overcooking. Keep an eye on the time and check for flakiness.
  • Glaze is Too Sweet: Feel free to reduce the honey if you prefer a less sweet taste. You can also balance it with a bit more soy sauce.
  • Burning Under the Broiler: Always stay close when broiling. It can go from perfectly caramelized to burnt in seconds!

Conclusion

With this Honey Garlic Butter Baked Salmon recipe, you’ve just unlocked the secret to a delightful dish that’s sure to impress. The combination of sweet and savory flavors, along with the ease of preparation, makes this dish a go-to for any occasion. Whether you’re looking to impress guests or need a quick yet satisfying weeknight dinner, this salmon will steal your heart—and your taste buds! So don your apron, get cooking, and enjoy every delicious moment in your kitchen. Happy cooking, my friends!

Honey Garlic Butter Baked Salmon

Prep Time 10 minutes
Cook Time 20 minutes
Total Time 30 minutes
Servings 4 servings
Calories 350
A delicious and easy baked salmon recipe glazed with honey, garlic, and butter, perfect for a quick dinner.

Ingredients

Salmon

  • 4 fillets salmon fillets
  • 1/4 cup honey
  • 1/4 cup unsalted butter
  • 4 cloves garlic, minced
  • 2 tablespoons soy sauce
  • 1 tablespoon lemon juice
  • to taste salt and pepper salt and pepper
  • chopped parsley for garnish chopped parsley

Instructions 

  • Preheat oven to 375°F (190°C).
  • Melt butter, sauté garlic for 1-2 mins, then add honey, soy, lemon juice.
  • Season salmon with salt and pepper, place in baking dish.
  • Pour sauce over salmon, bake 15-20 mins until flaky.
  • Garnish with parsley before serving.

Notes

For extra flavor, marinate the salmon in the sauce for 30 minutes before baking.
Calories: 350kcal
Cost: $15
Course: Main Course
Cuisine: American
Keyword: Salmon

Loved this recipe? Save it to your favorite Pinterest board so you can easily find it later! It’s the perfect way to keep all your sweet ideas in one place. ✨

Golden-brown baked salmon topped with minced garlic and herbs.