Why You’ll Love This Dish
When it comes to comfort food, few dishes can hold a candle to a rich, cheesy pasta bake. My Garlic Parmesan Chicken Pasta Bake is not just a meal; it’s an experience—a warm embrace on a plate that effortlessly combines simplicity with show-stopping flavors. You know that feeling when you walk into a room and the aroma hits you like a wave of nostalgia? This dish does that. It has a way of making your kitchen feel like home, inviting friends and family to gather around the table, and sparking joy in every bite. Whether it’s a cozy family dinner or a gathering with friends, this pasta bake is destined to impress!
The Magic of Garlic and Parmesan
Let’s talk about the star players in this dish: garlic and parmesan. The pungent aroma of sautéed garlic mingling with the nutty richness of parmesan creates a symphony of flavors that is simply irresistible. Garlic, with its robust character, not only enhances the taste but also fills your kitchen with a warm, inviting scent that beckons everyone to come closer. And the parmesan? Well, it’s the fairy dust that transforms this pasta bake from ordinary to extraordinary. Together, they create a creamy, decadent sauce that wraps around every piece of pasta, chicken, and broccoli, ensuring no bite is left behind.
Ingredients You’ll Need
Here’s what you’ll need to whip up this delightful Garlic Parmesan Chicken Pasta Bake:
- 8 oz penne pasta
- 2 cups cooked chicken, shredded
- 2 cups broccoli florets
- 3 cups garlic parmesan sauce
- 1 cup shredded mozzarella cheese
- 1/2 cup grated parmesan cheese
- 2 cloves garlic, minced
- 1 tsp Italian seasoning
- Salt and pepper to taste
- 2 tbsp olive oil
- Fresh parsley for garnish
Steps to Create Your Pasta Bake
Ready to embark on this culinary adventure? Let’s get cooking!
- Preheat the Oven: Begin by preheating your oven to 375°F (190°C). This is essential for ensuring your pasta bake cooks evenly and develops that beautifully golden top.
- Cook the Pasta: In a large pot, cook the penne pasta according to the package instructions until it reaches al dente perfection. You want it firm enough to hold its shape during baking. Once cooked, drain the pasta and set it aside.
- Sauté the Garlic: In a large skillet, heat the olive oil over medium heat. Add the minced garlic and sauté until it becomes fragrant—just a minute or two. Be careful not to let it burn, as that can lead to a bitter taste.
- Add Chicken and Broccoli: Toss in the cooked chicken and broccoli florets, stirring until everything is heated through. The vibrant green of the broccoli not only adds a pop of color but also a nutritious crunch that complements the creamy sauce.
- Mix It All Together: In a large mixing bowl, combine the cooked pasta, chicken, broccoli, garlic parmesan sauce, Italian seasoning, salt, and pepper. Mix well to ensure every ingredient is coated in that luscious sauce.
- Transfer to Baking Dish: Pour the mixture into a greased 9×13 inch baking dish. Spread it out evenly, ensuring all the pasta and chicken are well distributed.
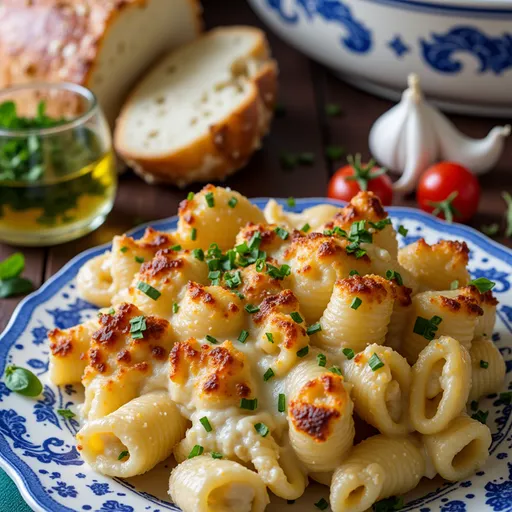
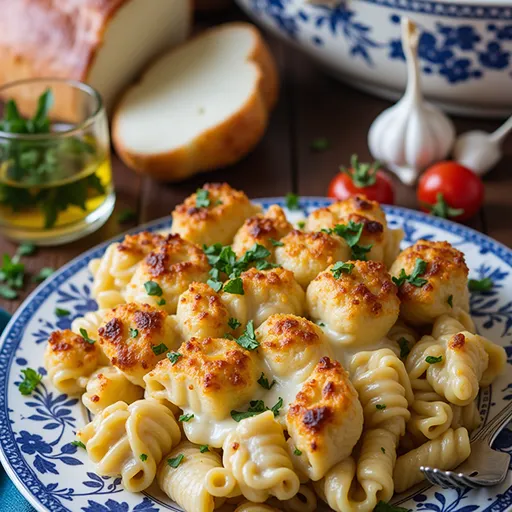
- Add Cheese: Top your pasta bake with a generous layer of shredded mozzarella and grated parmesan cheese. This is where the magic happens; the cheese melts into gooey perfection while forming a golden crust on top.
- Bake: Place your baking dish in the preheated oven and bake for 25-30 minutes, or until the cheese is bubbling and golden brown. Keep an eye on it—every oven behaves a bit differently!
- Cool and Garnish: Once out of the oven, let it cool for a few minutes. This will help the sauce set slightly, making it easier to serve. Garnish with fresh parsley for a vibrant touch before digging in.
Tips for Perfecting Your Pasta Bake
While this recipe is incredibly straightforward, a few tips can elevate your dish:
- Don’t Overcook the Pasta: Remember, it will continue to cook in the oven, so pulling it out while it’s al dente is key.
- Use Leftover Chicken: This recipe is a fantastic way to use up leftover rotisserie chicken or any cooked chicken you have on hand.
- Make It Creamy: For an extra creamy bake, consider stirring in a little cream cheese or sour cream into the garlic parmesan sauce.
- Spice It Up: If you like a bit of heat, add some red pepper flakes or diced jalapeños to the mix for a spicy kick.
Variations to Try
If you’re feeling adventurous, here are some fun twists on this Garlic Parmesan Chicken Pasta Bake:
- Vegetable Medley: Swap in your favorite vegetables like bell peppers, spinach, or zucchini for a colorful and nutritious boost.
- Different Cheeses: Experiment with different cheeses like gouda, cheddar, or even feta for unique flavor profiles.
- Herb Infusion: Add fresh herbs like basil or thyme for a fresh, aromatic touch that pairs beautifully with the garlic and cheese.
Storing and Freezing
If you happen to have leftovers (which is rare in my house), here’s how to store them:
- Refrigeration: Allow the pasta bake to cool completely before transferring it to an airtight container. It will keep in the fridge for up to 3-4 days.
- Freezing: To freeze, cover the baking dish tightly with foil or plastic wrap before placing it in the freezer. It can be stored for up to 2-3 months. When you’re ready to enjoy it again, thaw it overnight in the refrigerator and reheat in the oven.
FAQs
Got questions? I’ve got answers! Here are some common queries:
- Can I use a different type of pasta? Absolutely! Any pasta shape works, but keep in mind that cooking times may vary.
- Is this dish gluten-free? You can easily make this gluten-free by using gluten-free pasta and ensuring your sauces are gluten-free as well.
- Can I prepare this ahead of time? Yes! You can assemble the dish a day ahead, cover it, and store it in the fridge until you’re ready to bake.
Wrap Up
There you have it! A Garlic Parmesan Chicken Pasta Bake that’s not only simple to make but also a guaranteed crowd-pleaser. Whether it’s a weeknight dinner or a special occasion, this dish brings warmth, flavor, and a bit of magic to your table. So gather your loved ones, share a laugh, and enjoy every cheesy, garlicky bite. Trust me, once you serve this, you’ll be known as the pasta bake magician in your circle!
So, are you ready to dive into this delicious adventure? I can’t wait for you to try it and hear how it turns out in your kitchen. Happy cooking!
Garlic Parmesan Chicken Pasta Bake Recipe to Impress Guests at Your Next Gathering
Ingredients
Pasta
- 8 oz penne pasta
- 2 cups cooked chicken, shredded
- 2 cups broccoli florets
- 3 cups garlic parmesan sauce
- 1 cup shredded mozzarella cheese
- 1/2 cup grated parmesan cheese
- 2 cloves garlic, minced
- 1 tsp italian seasoning
- to taste salt and pepper
- 2 tbsp olive oil
- for garnish fresh parsley
Instructions
- Preheat oven to 375°F (190°C). Cook pasta until al dente, drain.
- Sauté minced garlic in olive oil, add chicken and broccoli, cook until heated.
- Mix pasta, chicken, broccoli, sauce, seasoning, salt, and pepper in a bowl.
- Transfer to a greased baking dish, top with cheeses, and bake 25-30 minutes.
- Garnish with parsley before serving.
Notes
Loved this recipe? Save it to your favorite Pinterest board so you can easily find it later! It’s the perfect way to keep all your sweet ideas in one place. ✨