
Why You’ll Love This Recipe
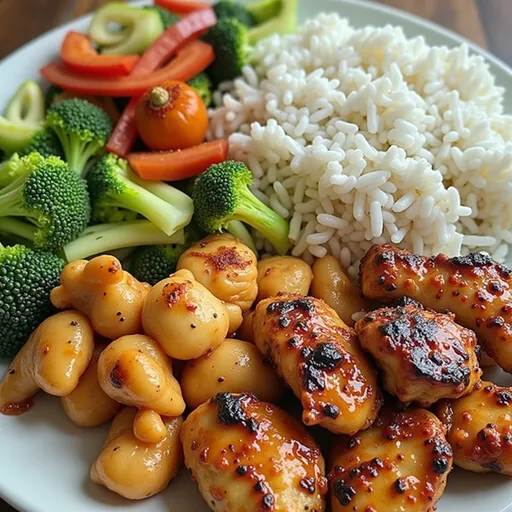
Welcome to a culinary adventure that’s as vibrant and exciting as a summer festival! My Spicy Chicken & Veggie Rice Plate is not just a meal; it’s an experience that wraps you in warmth and flavor. Imagine sitting down to a colorful plate filled with tender chicken, crunchy veggies, and fluffy rice, all drizzled with a spicy sauce that dances on your taste buds. This dish is a celebration of flavors, textures, and memories, making it perfect for any occasion—from a quick weeknight dinner to a laid-back weekend get-together with friends. Trust me, once you try this, it will become your go-to recipe when you want to impress without the stress!
Ingredient Highlights
Before we dive into the cooking, let’s take a moment to appreciate the star ingredients that make this dish shine:
- Chicken Breast: The protein powerhouse of our plate, chicken breast is lean and cooks up beautifully, soaking up all those delicious flavors.
- Vibrant Veggies: Bell pepper, zucchini, and broccoli not only add color but also bring a satisfying crunch and a wealth of nutrients to the table.
- Rice: A fluffy base that absorbs all the delicious juices from the chicken and sauce, making every bite a delight.
- Sriracha: This spicy sauce adds just the right kick. Adjust it to your taste—more if you love heat, less if you prefer a milder flavor.
How to Make Spicy Chicken & Veggie Rice Plate

Now that you know what makes this dish so special, let’s get our hands dirty and cook! The recipe is simple, and with a little love, you’ll have a plate that feels like a warm hug.
Ingredients:
Here’s what you’ll need:
- 2 cups cooked rice
- 1 lb chicken breast, diced
- 1 bell pepper, sliced
- 1 zucchini, sliced
- 1 cup broccoli florets
- 2 tablespoons olive oil
- 2 tablespoons soy sauce
- 1 tablespoon sriracha (adjust to taste)
- 2 cloves garlic, minced
- 1 teaspoon ginger, minced
- Salt and pepper to taste
- Green onions, for garnish
Directions:
Follow these steps, and you’ll be savoring your Spicy Chicken & Veggie Rice Plate in no time:
- Heat the olive oil in a large skillet over medium-high heat. The oil should shimmer but not smoke!
- Add the minced garlic and ginger to the skillet. Sauté for about 1 minute until fragrant—this is where the magic begins!
- Add the diced chicken to the skillet. Season generously with salt and pepper, and cook until browned and cooked through, about 5-7 minutes. Make sure the chicken gets a nice golden color!
- Next, toss in the sliced bell pepper, zucchini, and broccoli. Stir occasionally, allowing the veggies to cook for another 5 minutes until they’re tender but still crisp. We want them to keep their vibrant color!
- In a small bowl, mix together the soy sauce and sriracha, then pour this spicy goodness over the chicken and veggies. Stir to coat everything evenly, ensuring each bite is packed with flavor.
- Serve your spicy chicken and veggies over a generous bed of cooked rice. Don’t forget to garnish with sliced green onions for that fresh touch!
How to Serve This Delightful Dish
Your Spicy Chicken & Veggie Rice Plate is ready to be enjoyed! Serve it warm, and watch as everyone digs in with delight. This dish pairs wonderfully with a refreshing drink, like iced tea or a light beer, making it a perfect choice for casual gatherings. If you’re feeling fancy, a squeeze of lime over the top can elevate the flavors even more!
Storage and Freezing Tips
Got leftovers? No problem! Here’s how you can store your delicious creation:
- Refrigeration: Place any leftover chicken and veggie mix in an airtight container. It will stay fresh in the fridge for about 2-3 days. When you’re ready to enjoy again, simply reheat in the microwave or on the stovetop until warmed through.
- Freezing: For longer storage, you can freeze the chicken and veggies separately from the rice. This way, you can pull it out on a busy day and enjoy a quick meal. Just make sure to use freezer-safe containers!
Tips to Perfect Your Dish
Cooking is all about experimenting and finding what works for you! Here are some tips to take your Spicy Chicken & Veggie Rice Plate to the next level:
- For even more flavor, marinate the chicken in soy sauce, ginger, and garlic for at least 30 minutes before cooking. This will enhance the taste!
- Feel free to swap out the veggies based on what you have on hand—carrots, snap peas, or even asparagus work beautifully.
- Not into spicy food? Reduce the sriracha or replace it with a milder sauce like teriyaki for a different flavor profile.
Variations to Try
This recipe is versatile, and there are so many ways to make it your own!
- Protein Swaps: Use shrimp, tofu, or even beef for a different protein option. Just adjust the cooking time accordingly.
- Grain Choices: Instead of white rice, try brown rice, quinoa, or cauliflower rice for a healthier twist.
- Herb Infusion: Add fresh herbs like cilantro or basil for a fresh burst of flavor right before serving.
FAQs About This Recipe
Here are some frequently asked questions that might come to mind:
- Can I use brown rice instead of white rice? Absolutely! Brown rice is a nutritious alternative. Just be sure to cook it beforehand, as it takes longer than white rice.
- What can I add for extra protein? Adding beans or lentils is a fantastic way to boost protein and fiber content. You could also top it with a fried egg for a delicious twist!
- Is this recipe suitable for meal prep? Yes! This dish stores well and makes for great lunches throughout the week. Just keep the rice separate if you’re storing it for a few days.
Troubleshooting Common Issues
Cooking can sometimes be unpredictable, but don’t worry! Here are some common issues and how to fix them:
- Chicken Too Dry: Make sure to not overcook the chicken. It should be tender and juicy. If it does get dry, a splash of chicken broth can help rehydrate it when reheating.
- Veggies Overcooked: Keep a watchful eye on your veggies. They should be tender yet crisp. If they start to brown too much, reduce the heat and stir more frequently.
Final Thoughts and Invitation
There you have it—a complete guide to creating your own Spicy Chicken & Veggie Rice Plate! This dish isn’t just about eating; it’s about sharing stories, laughter, and a moment of joy around the dinner table. I hope it brings as much delight to your home as it does to mine. Now it’s your turn to give it a try! Pull out your apron, turn up your favorite tunes, and let’s make something magical together. Don’t forget to share your creations with me—I can’t wait to see how your plate turns out! Happy cooking!
Spicy Chicken & Veggie Rice Plate
Ingredients
Cooked Rice
- 2 cups cooked rice
Protein
- 1 lb chicken breast, diced
Vegetables
- 1 bell pepper bell pepper, sliced
- 1 zucchini zucchini, sliced
- 1 cup broccoli florets
Sauces & Seasonings
- 2 tablespoons soy sauce
- 1 tablespoon sriracha (adjust to taste)
- 2 cloves garlic, minced
- 1 teaspoon ginger, minced
- to taste salt and pepper
- green onions for garnish green onions
Instructions
- Heat olive oil in a skillet over medium-high heat.
- Sauté garlic and ginger for 1 minute, then add diced chicken, season with salt and pepper, and cook until browned, about 5-7 minutes.
- Add bell pepper, zucchini, and broccoli; cook for 5 minutes until tender.
- Mix soy sauce and sriracha, pour over chicken and vegetables, stirring to coat.
- Serve over rice, garnish with green onions.
Notes
Loved this recipe? Save it to your favorite Pinterest board so you can easily find it later! It’s the perfect way to keep all your sweet ideas in one place. ✨


")


