Author

Ava

Browsing

Why You’ll Love This Recipe

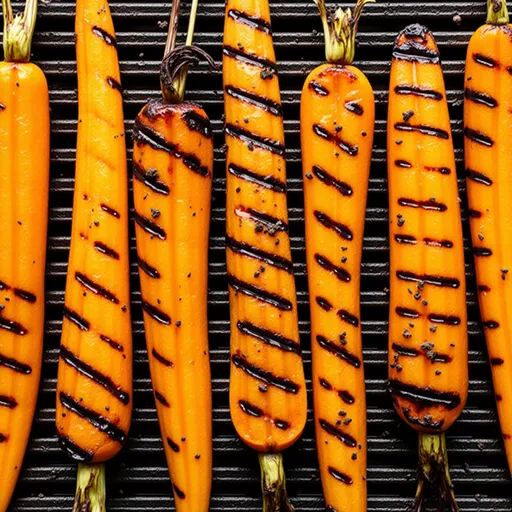
When it comes to side dishes, there’s something truly magical about how a simple vegetable can transform a meal. Enter the grilled mint and lemon carrots—a dish that’s bursting with flavor and color. Imagine sitting around the dinner table, and as you serve these vibrant carrots, guests pause mid-bite, captivated by the zesty aroma wafting through the air. These carrots are not just a side dish; they’re a celebration of fresh ingredients and simple cooking techniques that elevate any meal.

Growing up, I remember the thrill of firing up the grill in the warm summer evenings, when the air was filled with laughter and the smell of good food. These grilled mint and lemon carrots take me back to those moments, where every bite is a reminder of the joy of cooking and sharing. So, whether you’re hosting a summer barbecue or just looking to jazz up a weeknight dinner, this recipe is your ticket to culinary bliss.

Grilled Mint and Lemon Carrots Recipe

Ingredients

Vibrant grilled carrots with mint and lemon displayed on a wooden surface.
  • 1 pound baby carrots
  • 2 tablespoons olive oil
  • 1 lemon (zested and juiced)
  • 1/4 cup fresh mint leaves, chopped
  • Salt and pepper to taste

Instructions

  1. Preheat the grill to medium-high heat.
  2. In a bowl, combine the baby carrots, olive oil, lemon zest, lemon juice, salt, and pepper. Toss to coat evenly.
  3. Place the carrots on a grill basket or directly on the grill grates.
  4. Grill the carrots for about 10-15 minutes, turning occasionally until they are tender and have grill marks.
  5. Remove the carrots from the grill and toss with the chopped mint.
  6. Serve warm as a side dish.

Tips for Perfect Grilled Carrots

Grilling can be a bit of an art, but with these helpful tips, you’ll be a grill master in no time:

  • Choose the Right Carrots: Opt for firm, bright baby carrots with smooth skin. If using larger carrots, slice them into uniform pieces to ensure even cooking.
  • Zest Wisely: When zesting the lemon, be sure to only grate the yellow part of the peel. The white pith can be bitter, so stick to the vibrant outer layer for a burst of flavor.
  • Grill Marks: For those beautiful grill marks, resist the urge to move the carrots around too much. Let them sit and sizzle until those marks are set.
  • Minty Freshness: Fresh mint makes a world of difference in this recipe. If you can’t find fresh mint, a sprinkle of dried mint can work in a pinch but will have a different flavor profile.

Variations to Try

One of the best things about this recipe is its versatility. Here are a few variations to consider:

  • Add a Kick: Want to spice things up? Add a pinch of red pepper flakes or a dash of cayenne pepper to the olive oil mixture before grilling.
  • Honey Sweetness: Drizzle a little honey over the carrots before grilling for a touch of sweetness that complements the lemon beautifully.
  • Herb Swap: While mint is delightful, you can also experiment with other herbs like parsley or basil for a different flavor twist.

Substitutions

If you’re missing an ingredient or two, don’t fret! Here are some substitutions that work well:

  • Carrots: If you can’t find baby carrots, regular carrots sliced into sticks or rounds will work just as well.
  • Olive Oil: Feel free to swap olive oil for avocado oil or melted coconut oil for a different flavor profile.
  • Mint: In a pinch, fresh cilantro or dill can provide a fresh twist to this dish.

Equipment You’ll Need

While this recipe is simple, having the right tools can make your cooking experience even smoother:

  • Grill: Whether it’s a charcoal or gas grill, either will do the trick.
  • Grill Basket: This is handy if you’re grilling smaller veggies that might fall through the grates.
  • Bowl: A mixing bowl for tossing the carrots with the marinade.

Storage and Freezing

If you happen to have leftovers (which is rare, trust me!), here’s how to store them:

  • Refrigeration: Store grilled carrots in an airtight container in the fridge for up to 3 days. They can be enjoyed cold as a snack, or reheated in the microwave or on the grill.
  • Freezing: Although grilled carrots can be frozen, the texture may change. If you choose to freeze them, place them in a single layer on a baking sheet until frozen, then transfer to a freezer bag for up to 3 months.

FAQs

Can I use regular carrots instead of baby carrots?
Absolutely! Just cut them into uniform sticks or rounds for even grilling.

How can I tell when the carrots are done?
When the carrots are tender and have nice grill marks, they’re ready to be tossed with mint and served!

What can I serve with grilled mint and lemon carrots?
This dish pairs beautifully with grilled meats, seafood, or even as a topping in salads.

Troubleshooting Common Issues

Sometimes, things don’t go as planned in the kitchen. Here are a few common issues and how to solve them:

  • Carrots are too crunchy: If your carrots aren’t tender enough, they may need more time on the grill. Check them every few minutes until they reach the desired tenderness.
  • Burned parts: If your carrots burn before they are cooked through, lower the grill temperature and try grilling them on indirect heat.

Conclusion

Grilled mint and lemon carrots are more than just a side dish; they’re an experience that invites everyone to gather around the table. With their vibrant colors and refreshing flavors, they’re sure to steal the show at any meal. As you bring this dish to life in your kitchen, remember that cooking is about joy, creativity, and sharing love through food. So, grab your ingredients, fire up the grill, and let these carrots add a splash of magic to your dining experience. Happy cooking, my friends! And don’t forget to share your thoughts and variations in the comments below. I can’t wait to hear how these carrots make their way into your hearts and homes!

Grilled Mint and Lemon Carrots

Prep Time 10 minutes
Cook Time 15 minutes
Total Time 25 minutes
Servings 4 servings
Calories 150
A fresh and flavorful side dish featuring tender carrots grilled with lemon and topped with mint.

Ingredients

Main

  • 1 pound baby carrots
  • 2 tablespoons olive oil
  • 1 lemon lemon (zested and juiced)
  • 1/4 cup fresh mint leaves, chopped
  • to taste salt and pepper

Instructions 

  • Preheat the grill to medium-high heat.
  • Combine carrots, olive oil, lemon zest, lemon juice, salt, and pepper; toss to coat.
  • Grill carrots for 10-15 minutes, turning until tender and grill marks appear.
  • Remove from grill and toss with chopped mint.
  • Serve warm as a side dish.

Notes

For extra flavor, add a drizzle of honey or sprinkle with additional herbs.
Calories: 150kcal
Cost: $12
Course: Side Dish
Cuisine: Mediterranean
Keyword: Carrots

Loved this recipe? Save it to your favorite Pinterest board so you can easily find it later! It’s the perfect way to keep all your sweet ideas in one place. ✨

Appetizing grilled mint and lemon baby carrots with soft shadows under natural light.

Why You’ll Love These Sweet and Savory Bites

If you’re like me and constantly on the lookout for meals that feel like a warm hug and taste like a dream, then these Air Fryer Honey Garlic Salmon Bites are about to become your new kitchen obsession. Imagine this: you come home after a long day, and the thought of cooking seems daunting. But wait! With just a pound of salmon and a handful of pantry staples, you can whip up a dish that not only satisfies your cravings but also impresses anyone lucky enough to share your table.

These little nuggets of joy are a perfect balance of sweet and savory, enhanced by the rich umami of soy sauce and the aromatic warmth of garlic and ginger. Plus, they’re cooked in an air fryer, giving them that delightful crispiness without the need for deep frying. So, get ready to dive into a recipe that’s not just quick and easy, but also bursting with flavor!

What Makes These Salmon Bites So Special?

Let’s talk about the star of the show—salmon. Not only is it incredibly versatile, but it’s also packed with omega-3 fatty acids, which are fantastic for heart health and brain function. This recipe showcases salmon in a way that makes it approachable and appealing, even to those who may not be seafood enthusiasts. The honey garlic glaze complements the natural flavors of the fish beautifully, creating a dish that’s as comforting as it is delicious.

Here’s why these salmon bites stand out:

  • Quick to Prepare: With a total cook time of less than 20 minutes, they are perfect for weeknight dinners.
  • Healthy and Nutritious: Salmon is a great source of protein and healthy fats, making this dish both satisfying and good for you.
  • Customizable: You can easily switch up the seasonings or add your favorite herbs to personalize the flavor.
  • Great for Sharing: These bite-sized pieces are perfect for serving at gatherings or simply enjoying with family.

Why You Should Try This Recipe!

A delicious arrangement of air-fried salmon pieces coated in honey garlic sauce, presented with a soft-focus background.

Aside from being incredibly delicious, the Air Fryer Honey Garlic Salmon Bites are a testament to how cooking can be fun and rewarding. They allow you to experiment with flavors while keeping things simple. Plus, the air fryer makes the cooking process a breeze, giving you crispy results with minimal effort.

This dish is also a fantastic introduction to cooking with seafood. If you’re new to the culinary world or just looking to expand your repertoire, this recipe is a fantastic starting point. The fact that it comes together so quickly means you’ll gain confidence in the kitchen, and who knows? You might just become the go-to fish chef in your circle!

The Recipe Breakdown

Ingredients You’ll Need:

  • 1 lb salmon fillet, skinless and boneless
  • 2 tablespoons honey
  • 2 tablespoons soy sauce
  • 2 cloves garlic, minced
  • 1 teaspoon ginger, grated
  • 1 tablespoon olive oil
  • Salt and pepper to taste
  • Chopped green onions for garnish (optional)

Step-by-Step Instructions:

  1. Begin by cutting the salmon fillet into bite-sized pieces. Aim for uniform pieces for even cooking—about 1-inch cubes work perfectly.
  2. In a mixing bowl, combine the honey, soy sauce, minced garlic, grated ginger, and olive oil. This is your marinade, and it’s going to infuse the salmon with delicious flavor.
  3. Add the salmon pieces to the marinade, gently tossing them to ensure each piece is well coated. Let them marinate for about 15-30 minutes. This step is crucial as it allows the flavors to penetrate the fish.
  4. Preheat your air fryer to 400°F (200°C). This ensures that the salmon gets that perfect crispy exterior.
  5. Once preheated, place the marinated salmon bites in the air fryer basket in a single layer. Avoid overcrowding to allow hot air to circulate effectively.
  6. Air fry the salmon bites for 8-10 minutes, flipping them halfway through. They should be cooked through and slightly crispy on the outside.
  7. Remove the salmon bites from the air fryer and garnish with chopped green onions if desired. Serve them immediately and enjoy your creation!

How to Store and Reheat Leftover Salmon Bites

If you find yourself with any leftover salmon bites (which is rare in my house!), store them in an airtight container in the refrigerator. They should be good for 2-3 days. To reheat, simply pop them back into the air fryer for 3-4 minutes at 350°F. This will help restore that crispy texture!

Can You Freeze These Salmon Bites?

Absolutely! You can freeze the cooked salmon bites. Just place them on a baking sheet lined with parchment paper and freeze until solid. Once frozen, transfer them to an airtight container or a zip-top bag for longer storage. They make for a great meal prep option, ready to be enjoyed on a busy night.

Jazz’s Tips for the Perfect Air Fryer Salmon Bites:

  • Choose Quality Salmon: Opt for wild-caught salmon if possible. It has a richer flavor and is generally healthier.
  • Don’t Overcrowd the Air Fryer: Give each piece some breathing room for even cooking and crispiness.
  • Adjust Cooking Time: Depending on your air fryer model and the size of your salmon pieces, cooking times might vary slightly. Keep an eye on them!
  • Experiment with Flavors: Feel free to add a splash of lime juice or a sprinkle of sesame seeds to the marinade for an exciting twist.

Variations to Try

One of the best things about cooking is the ability to switch things up. Here are some fun variations to consider:

  • Spicy Honey Garlic: Add a pinch of red pepper flakes or a dash of sriracha to the marinade for a spicy kick.
  • Lemon Herb: Swap out the soy sauce for lemon juice and add fresh herbs like dill or parsley to the mix.
  • Maple Glazed: Replace honey with maple syrup for a different sweet flavor profile.

Substitutions

Don’t have all the ingredients on hand? No problem! Here are some easy substitutions:

  • Instead of honey, you can use agave syrup or brown sugar.
  • Soy sauce can be replaced with tamari for a gluten-free option.
  • If you don’t have fresh ginger, ground ginger will work in a pinch—just use a little less.

Equipment You’ll Need

To make these delightful bites, you’ll need:

  • An air fryer (any brand will do, but I love my model for its even cooking and easy cleanup).
  • A sharp knife and cutting board for preparing the salmon.
  • A mixing bowl for combining the marinade.
  • A spatula or tongs for flipping the salmon bites during cooking.

FAQs

Can I use frozen salmon for this recipe?
Yes, but make sure to thaw it completely before marinating and cooking.

Is this recipe suitable for meal prep?
Absolutely! These salmon bites are perfect for meal prep. Just store them in an airtight container, and they’ll keep well in the fridge or freezer.

Troubleshooting

If your salmon bites aren’t as crispy as you’d like:

  • Make sure they’re spread out in a single layer in the air fryer.
  • Consider reducing the marinade slightly to avoid excess moisture.
  • Check if your air fryer needs a longer cooking time; every model is a little different!

Conclusion

There you have it—your new go-to comfort dish, the Air Fryer Honey Garlic Salmon Bites! This recipe is perfect for impressing dinner guests, satisfying family cravings, or simply treating yourself to something special. I hope you give this recipe a try and find as much joy in making and sharing it as I do. Cooking is all about connection, and with each bite of these delicious salmon bites, you’re sure to create a little magic in your kitchen. So, roll up your sleeves, grab your ingredients, and let’s make some culinary memories together!

Air Fryer Honey Garlic Salmon Bites — Jazz Leaf

Prep Time 10 minutes
Cook Time 10 minutes
Total Time 20 minutes
Servings 4 servings
Calories 250
Enjoy tender, flavorful salmon bites glazed with honey and garlic, cooked to perfection in the air fryer.

Ingredients

Salmon

  • 1 lb salmon fillet, skinless and boneless
  • 2 tablespoons honey
  • 2 tablespoons soy sauce
  • 2 cloves garlic, minced
  • 1 teaspoon ginger, grated
  • 1 tablespoon olive oil
  • to taste salt and pepper (for seasoning)
  • chopped green onions for garnish (optional)

Instructions 

  • Cut salmon into bite-sized pieces and season with salt and pepper.
  • Mix honey, soy sauce, garlic, ginger, and olive oil to make marinade.
  • Marinate salmon for 15-30 minutes.
  • Preheat air fryer to 400°F (200°C). Place salmon in basket.
  • Air fry for 8-10 minutes, flipping halfway, until cooked and crispy.
  • Garnish with green onions and serve immediately.

Notes

For extra flavor, brush with additional honey during cooking.
Calories: 250kcal
Cost: $15
Course: Main Course
Cuisine: American
Keyword: Salmon

Loved this recipe? Save it to your favorite Pinterest board so you can easily find it later! It’s the perfect way to keep all your sweet ideas in one place. ✨

Mouthwatering honey garlic salmon bites on a plate, showcasing a shiny finish and fresh green onion garnish in warm lighting.

Why You’ll Love This Dish

Picture this: a warm summer evening, laughter dancing in the air, and a table set with colorful dishes that beckon for attention. Among them, a bowl of Creamy Chicken Caesar Pasta Salad stands out—not just for its creamy texture and vibrant colors, but for the way it brings everyone together. This recipe is more than a simple mix of ingredients; it’s a heartfelt dish that speaks of comfort and joy, perfect for any gathering. Whether you’re hosting a backyard barbecue or enjoying a cozy family dinner, this pasta salad is bound to steal the show.

What makes this salad so irresistible? It’s a delightful fusion of a classic Caesar salad and hearty pasta, creating a dish that feels like a warm hug in a bowl. The combination of tender rotini, juicy chicken, crisp romaine, and the creamy tang of Caesar dressing makes each bite a burst of flavor. Plus, it’s quick to prepare, making it ideal for busy weeknights or last-minute gatherings. Let’s dive into the details that make this dish a must-try!

Ingredients for a Perfect Pasta Salad

Gathering the right ingredients is essential for creating a truly delectable Chicken Caesar Pasta Salad. Here’s what you’ll need:

  • 8 oz rotini pasta: This spiral-shaped pasta is perfect for holding onto the creamy dressing.
  • 2 cups cooked chicken, diced: Feel free to use leftover chicken or a store-bought rotisserie chicken for convenience.
  • 1 cup romaine lettuce, chopped: Adds a fresh, crunchy texture to the salad.
  • 1/2 cup cherry tomatoes, halved: For a burst of sweetness that complements the savory flavors.
  • 1/4 cup grated parmesan cheese: A must-have for that authentic Caesar taste.
  • 1/2 cup Caesar dressing: You can use store-bought or make your own for a personal touch.
  • Salt and pepper to taste: Essential for enhancing the flavors.
  • Optional: Croutons for topping: A crunchy addition that elevates the texture.

How to Make Creamy Chicken Caesar Pasta Salad

A vibrant pasta salad featuring rotini, chicken, lettuce, and tomatoes, all coated in creamy Caesar dressing.

Now that we have our ingredients ready, let’s get cooking! This recipe is straightforward and quick, so you’ll be enjoying your delicious creation in no time.

  1. Start by cooking the rotini pasta according to the package instructions. Make sure to add a pinch of salt to the boiling water for flavor. Once cooked to al dente perfection, drain and rinse the pasta under cold water to halt the cooking process.
  2. In a large mixing bowl, combine the cooled pasta, diced chicken, chopped romaine lettuce, and halved cherry tomatoes. This is where the magic begins; the colors and textures come together beautifully!
  3. Add the Caesar dressing to the bowl and toss everything until it’s evenly coated. Don’t be shy—make sure every nook and cranny is dressed!
  4. Next, stir in the grated parmesan cheese and season with salt and pepper to taste. This step is crucial for enhancing the flavors, so taste as you go.
  5. If you’re feeling a bit fancy, top your salad with croutons for that extra crunch. It’s the finishing touch that makes a difference!
  6. Serve your salad chilled or at room temperature, and watch as your friends and family rave about it.

Tips for the Best Chicken Caesar Pasta Salad

To ensure your Chicken Pasta Salad turns out perfectly every time, here are some expert tips:

  • Cook the pasta al dente: This helps prevent mushiness and keeps the pasta firm when combined with the dressing.
  • Toss gently: When mixing the salad, be gentle to avoid breaking up the pasta or lettuce.
  • Chill before serving: Allowing the salad to sit in the refrigerator for about 30 minutes can help the flavors meld together.

Variations to Try

This salad is wonderfully versatile! Here are some fun variations to customize your Chicken Caesar Pasta Salad:

  • Gluten-free option: Substitute traditional rotini with gluten-free pasta made from brown rice or chickpeas.
  • Vegetarian delight: Omit the chicken and add chickpeas or grilled tofu for a protein-packed alternative.
  • Extra veggies: Toss in diced bell peppers, cucumbers, or even broccoli florets for added crunch and nutrition.
  • Spicy kick: Add red pepper flakes or diced jalapeños to the dressing for a zesty twist.
  • Herb infusion: Incorporate fresh herbs like basil, parsley, or cilantro for a vibrant flavor boost.

Storage and Freezing Tips

Planning to make this salad ahead of time? Here’s how to store it:

  • Refrigerate: Store your Chicken Caesar Pasta Salad in an airtight container for 2-3 days. To keep the lettuce crisp, consider keeping the dressing separate until ready to serve.
  • Freezing: While it’s best enjoyed fresh, you can freeze the salad (without dressing) for up to one month. Thaw it overnight in the fridge, then add fresh dressing before serving.

What to Serve with Your Salad

This Chicken Caesar Pasta Salad pairs beautifully with various sides and drinks. Here are some ideas to complete your meal:

  • Garlic bread: The buttery, garlicky goodness is perfect for soaking up leftover dressing.
  • Grilled shrimp skewers: Lightly seasoned shrimp add a smoky flavor that complements the salad.
  • Caprese salad: Fresh tomatoes and basil provide a refreshing contrast to the creamy pasta dish.
  • Watermelon feta salad: The sweetness of watermelon with salty feta creates a delightful balance.

Frequently Asked Questions

Here are some common questions about making this delightful pasta salad:

  • Can I use a different type of pasta? Absolutely! Feel free to experiment with your favorite pasta shapes.
  • How can I make this dish dairy-free? Substitute the Parmesan cheese with nutritional yeast and use a dairy-free dressing.
  • What can I do if my salad is dry? If your salad seems dry after storage, add a splash of water or more dressing to revive it.

Conclusion

There you have it—your new go-to recipe for Creamy Chicken Caesar Pasta Salad. With its delightful combination of flavors and textures, this dish is sure to impress everyone at your next gathering. Remember, cooking is all about joy and creativity, so feel free to make this recipe your own. Enjoy every bite, and don’t forget to share the love (and the salad) with your friends and family. Happy cooking, and may your kitchen always be filled with warmth and laughter!

Making Creamy Chicken Caesar Pasta Salad Feels Simple

Prep Time 10 minutes
Cook Time 10 minutes
Total Time 20 minutes
Servings 4 servings
Calories 550
A quick and delicious pasta salad combining tender chicken, crisp lettuce, and a creamy Caesar dressing for a satisfying meal.

Ingredients

Pasta

  • 8 oz rotini pasta

Protein

  • 2 cups cooked chicken, diced

Vegetables

  • 1 cup romaine lettuce, chopped
  • 1/2 cup cherry tomatoes, halved

Dairy & Cheese

  • 1/4 cup grated parmesan cheese

Dressing

  • 1/2 cup caesar dressing

Seasonings

  • to taste salt and pepper

Optional Toppings

  • optional croutons for topping

Instructions 

  • Cook the rotini pasta according to package instructions, then drain and rinse under cold water.
  • In a large bowl, combine the cooked pasta, diced chicken, chopped lettuce, and halved cherry tomatoes.
  • Add the Caesar dressing and toss until evenly coated.
  • Stir in Parmesan cheese and season with salt and pepper.
  • If desired, top with croutons and serve chilled or at room temperature.

Notes

Chill the salad for best flavor, and adjust seasonings as needed.
Calories: 550kcal
Cost: $15
Course: Salad
Cuisine: American
Keyword: Caesar, Chicken, pasta

Loved this recipe? Save it to your favorite Pinterest board so you can easily find it later! It’s the perfect way to keep all your sweet ideas in one place. ✨

Detailed shot of a delicious pasta salad showcasing chicken, fresh vegetables, and a sprinkle of Parmesan in natural lighting.

Welcome to Comfort Food Paradise!

When it comes to comfort food, few dishes can rival the heartwarming embrace of chicken manicotti. This delightful Italian classic combines tender pasta shells stuffed with a creamy, savory filling, topped with rich marinara sauce and melted cheese. It’s a dish that’s not only satisfying but also brings people together around the table, making it perfect for family dinners or gatherings with friends. Allow me to take you on a culinary journey where we’ll explore the ins and outs of making the most delicious chicken and cheese manicotti that will leave everyone asking for seconds!

Why You’ll Love This Recipe

  • Comforting flavors: The blend of cheese, chicken, and marinara sauce creates a rich flavor profile that warms your soul.
  • Customizable ingredients: You can easily swap ingredients based on your preferences, making it a versatile meal for any occasion.
  • Quick preparation time: With simple steps, you can have this dish ready to bake in under an hour!
  • Perfect for meal prep: Make a batch ahead of time and store it in the refrigerator for a quick dinner later in the week.
  • Impressive presentation: With its vibrant colors and cheesy topping, this dish is sure to impress your guests!

Ingredient Breakdown

Let’s dive into the ingredients that will bring our chicken manicotti to life. Here’s what you’ll need:

  • 10 Manicotti noodles: Cooked according to package directions until al dente for the best texture.
  • 1 cup ricotta: Adds creaminess and a mild flavor that balances the dish.
  • 1/2 cup cottage cheese: For extra creaminess and a slightly tangy taste.
  • 1 tsp garlic powder: A must for enhancing flavor.
  • 1 tsp onion powder: Complements the garlic and adds depth to the filling.
  • 1/2 tsp dried basil: Provides a hint of freshness.
  • 1/2 tsp dried thyme: Adds a warm, earthy flavor.
  • 2 cups shredded chicken: Rotisserie chicken works wonderfully here for convenience.
  • 2 cups Bertolli Parmegiano-Reggiano Marinara: A rich sauce that ties everything together.
  • 3/4 cup mozzarella cheese: For that gooey, melty top.
  • Fresh parsley for garnish: Adds a pop of color and freshness.

Feel free to mix and match ingredients based on your pantry. For instance, you can substitute ricotta with mascarpone for a richer filling or add sautéed spinach for a burst of color and nutrition.

Pro Tips for Perfect Chicken Manicotti

Side view of a plate filled with Chicken Manicotti, garnished with parsley.
  • Cook the noodles al dente: This ensures they hold their shape when stuffed and baked.
  • Use a food processor: It makes blending the filling quick and ensures a smooth mixture.
  • Fill with a piping bag: This method makes stuffing the manicotti shells neat and easy.
  • Let the filling cool: If the filling is too hot, it might break the noodles when you stuff them.
  • Layer sauce generously: Don’t skimp on the marinara sauce; it keeps the manicotti moist while baking.
  • Cover with foil: To avoid over-browning, cover the dish with foil for the first part of baking.
  • Rest before serving: Letting it sit for a few minutes allows the flavors to meld beautifully.
  • Experiment with spices: Add a pinch of red pepper flakes for some heat!
  • Use fresh herbs: A sprinkle of fresh basil or oregano before serving elevates the dish.
  • Pair with a salad: A light green salad complements the richness of the manicotti perfectly.

Common Mistakes and Troubleshooting

Even the best of us can make mistakes in the kitchen! Here’s how to avoid common pitfalls:

  • Overcooking the noodles: This can lead to a mushy filling. Cook them just until al dente.
  • Not enough sauce: If the dish is too dry, it can become unappetizing. Be generous with your marinara.
  • Filling too hot: Allow the filling to cool slightly to avoid breaking the pasta.
  • Using too much filling: Stuff the shells gently; overstuffing can lead to messiness.
  • Forgetting to cover while baking: This can result in a burnt top. Use foil until the last 10 minutes of baking.

Variations to Try

Want to switch things up? Here are some variations to consider:

  • Spinach and Feta Manicotti: Swap shredded chicken for fresh spinach and crumbled feta for a vegetarian option.
  • Buffalo Chicken Manicotti: Stir in some buffalo sauce into the chicken filling for a spicy twist.
  • Italian Sausage Manicotti: Replace chicken with cooked Italian sausage for a heartier dish.
  • Mexican Style Manicotti: Use shredded chicken mixed with taco seasoning, black beans, and corn for a fun twist!

Storage and Make-Ahead Instructions

This chicken manicotti can be made ahead of time for busy nights! Here’s how:

  • Make-Ahead: You can prepare the entire dish, cover it tightly, and store it in the refrigerator for up to 24 hours before baking.
  • Freezing: Assemble the manicotti and freeze before baking for up to 3 months. Thaw in the refrigerator overnight before baking.
  • Leftovers: Store any leftovers in an airtight container in the refrigerator for up to 3 days. Reheat in the oven or microwave until warmed through.

Frequently Asked Questions

  • Can I use whole wheat or gluten-free manicotti? Yes, both options work well and can be substituted for traditional manicotti noodles.
  • What can I use instead of chicken? You can use shredded turkey, sautéed mushrooms, or a mix of roasted vegetables for a vegetarian dish.
  • Can I use store-bought marinara? Absolutely! Just make sure to choose a high-quality brand for the best flavor.
  • How do I know when the manicotti is done baking? When the cheese is melted and bubbly, and the dish is heated through, it’s ready!
  • Is this dish freezer-friendly? Yes, you can freeze it before baking or after. Just be sure to thaw it completely before reheating.
  • What can I serve with chicken manicotti? Garlic bread and a fresh salad pair beautifully with this dish.
  • Can I add more cheese? Definitely! Feel free to sprinkle more mozzarella or even parmesan on top before baking.
  • How long does it take to bake? Bake at 350°F for 15-20 minutes until heated through and cheese is melted.

Nutrition Tips and Dietary Adaptations

This chicken manicotti can easily be adapted to fit various dietary needs:

  • Low-calorie version: Use low-fat cheese and lean chicken to reduce calories.
  • Gluten-free option: Substitute traditional manicotti with gluten-free pasta.
  • Vegetarian option: Replace chicken with vegetables or beans for a nutritious twist.
  • Dairy-free adaptation: Use plant-based cheese and ricotta alternatives for a dairy-free meal.

Essential Equipment Recommendations

Here’s what you’ll need to create your chicken manicotti:

  • Large pot: For boiling the manicotti noodles.
  • Food processor: To blend the filling ingredients smoothly.
  • Baking dish: A 11 x 7 inch glass dish works perfectly for this recipe.
  • Piping bag or ziplock bag: For easy stuffing of the manicotti shells.

Serving Suggestions

To complete your meal, consider serving chicken manicotti with:

  • A fresh garden salad: Tossed greens with vinaigrette add a refreshing crunch.
  • Garlic bread: Perfect for soaking up any leftover marinara sauce.
  • Roasted vegetables: Seasonal veggies drizzled with olive oil make a nutritious side.
  • Wine pairing: A light red wine, like Pinot Noir, complements the flavors beautifully.

In Conclusion

With its comforting flavors and easy preparation, this chicken and cheese manicotti recipe is sure to become a staple in your kitchen. Whether you’re feeding a crowd or just looking for a cozy night in, this dish brings warmth and joy to the table. So gather your ingredients, roll up your sleeves, and get ready to create a meal that feels just like home. Happy cooking!

Chicken and Cheese Manicotti

Prep Time 15 minutes
Cook Time 20 minutes
Total Time 35 minutes
Servings 4 servings
Calories 550
A delicious baked pasta dish filled with a flavorful chicken and cheese mixture, topped with marinara and melted cheese.

Ingredients

Pasta

  • 10 pieces Manicotti noodles (cooked according to package directions)
  • 1 cup ricotta
  • 0.5 cup cottage cheese
  • 1 tsp garlic powder
  • 1 tsp onion powder
  • 0.5 tsp dried basil
  • 0.5 tsp dried thyme
  • 2 cups shredded chicken
  • 2 cups Bertolli Parmegiano-Reggiano Marinara
  • 0.75 cup mozzarella cheese

Garnish

  • fresh parsley (for garnish)

Instructions 

  • Cook noodles according to package directions.
  • Combine ricotta, cottage cheese, garlic, onion, basil, thyme, and chicken in a food processor until fully mixed.
  • Spoon mixture into a plastic bag, snip the corner, and pipe into cooked noodles.
  • Place filled noodles in a baking dish, cover with marinara, top with cheese, and bake at 350°F for 15-20 minutes.
  • Garnish with fresh parsley and serve.

Notes

Ensure noodles are fully cooked before filling.
Calories: 550kcal
Cost: $15
Course: Main Course
Cuisine: Italian
Keyword: Chicken, manicotti

Why This Recipe Stands Out

Let me take you on a little culinary journey with my Honey Garlic Grilled Salmon recipe. This dish isn’t just a meal; it’s an experience. Picture yourself on a warm summer evening, the sun setting, and the smell of something utterly divine wafting through the air. You’ve got a beautifully grilled salmon fillet, glistening with a sweet and savory glaze that beckons you to dive in. Why does this recipe resonate so deeply? Because it perfectly balances the rich flavors of salmon with the delightful sweetness of honey and the robust kick of garlic. It’s a dish designed to impress but simple enough to whip up on a busy weeknight.

Ingredients You’ll Need

Before we embark on this delicious adventure, let’s gather our ingredients. Here’s what you’ll need for my Honey Garlic Grilled Salmon:

  • 4 salmon fillets
  • 1/4 cup honey
  • 1/4 cup soy sauce
  • 3 cloves garlic, minced
  • 1 tablespoon olive oil
  • 1 teaspoon black pepper
  • 1 tablespoon lemon juice
  • Chopped green onions for garnish

Each of these ingredients plays a crucial role in creating the flavorful base for our salmon. The honey brings a lovely sweetness, while the soy sauce adds depth. Garlic? It’s the little spark that ties everything together.

Ingredient Substitutions

Beautifully grilled salmon fillet drizzled with honey garlic sauce and illuminated by natural light.

Sometimes, you might find yourself short on a few ingredients. Fear not! Here are some substitutions you can make without compromising the dish:

  • Honey: Agave syrup or maple syrup can serve as excellent alternatives.
  • Soy Sauce: If you’re looking for a gluten-free option, use tamari or coconut aminos.
  • Olive Oil: Canola or avocado oil will work just as well.
  • Garlic: If fresh isn’t available, garlic powder can be used, but adjust the amount to taste.

Cooking is all about creativity, so don’t hesitate to mix it up!

How to Make It: Step-by-Step

Now that we have everything we need, let’s dive into the cooking process. It’s time to transform our ingredients into a dish that will leave your taste buds dancing!

Step 1: Preparing the Marinade

Start by whisking together the following in a bowl:

  • 1/4 cup honey
  • 1/4 cup soy sauce
  • 3 cloves of minced garlic
  • 1 tablespoon olive oil
  • 1 teaspoon black pepper
  • 1 tablespoon lemon juice

Mix until everything is combined nicely. The aroma? Oh, it’s heavenly! You might want to taste it to ensure it has the right balance of sweet and savory. Just a little sip won’t hurt!

Step 2: Marinating the Salmon

Place your salmon fillets in a shallow dish and pour the marinade over them. Make sure to coat each fillet evenly. Let it marinate for at least 30 minutes; this allows the flavors to seep into the fish. If you have time, marinating it for an hour or more will intensify the taste!

Step 3: Prepping the Grill

While the salmon is soaking up all that deliciousness, preheat your grill to medium-high heat. If you’re using a charcoal grill, aim for that perfect glowing ember stage. For gas grills, just let it preheat with the lid closed for about 10 minutes.

Step 4: Grilling the Salmon

Once your grill is hot and ready, carefully remove the salmon from the marinade (don’t discard the marinade just yet!). Place the fillets on the grill skin-side down. Grill for about 5-7 minutes on each side, or until the salmon is cooked through and flakes easily with a fork. If you’re worried about sticking, lightly oil the grill grates before placing the salmon.

As you grill, brush the salmon with the leftover marinade to enhance the flavor and to achieve a beautiful glaze. This step is what takes the salmon from ordinary to extraordinary!

Step 5: Resting and Serving

Once the salmon is done, remove it from the grill and let it rest for a few minutes. This step is crucial as it allows the juices to redistribute, making for a more moist and flavorful bite. Serve the grilled salmon garnished with chopped green onions for an added pop of color and flavor.

Recipe Variations & Tips

Want to mix things up? Here are a few twists you can put on this classic:

  • Add Spice: A sprinkle of red pepper flakes or a dash of sriracha in the marinade can give your salmon a delightful kick.
  • Herbed Twist: Incorporate fresh herbs like rosemary or thyme into the marinade for an herbal note.
  • Vegetable Kabobs: Grill some vegetable kabobs alongside your salmon for a complete, colorful meal. Think bell peppers, zucchini, and cherry tomatoes!

And here’s a tip: If you’re ever unsure about the doneness of your salmon, use a fork to check. If it flakes easily, it’s ready!

Serving and Storage

This Honey Garlic Grilled Salmon is perfect for any occasion—be it a weeknight dinner or a weekend barbecue with friends. Serve it alongside:

  • A fresh green salad
  • Roasted potatoes
  • Steamed asparagus
  • Quinoa or rice pilaf

Leftover salmon can be stored in an airtight container in the refrigerator for up to three days. You can enjoy it cold on a salad or gently reheat it in the oven to maintain its moisture. Pro Tip: Reheating in the oven at 350°F for about 10 minutes will keep the salmon tender.

Nutritional Information

This recipe not only pleases the palate but also provides a nutritious meal. Salmon is renowned for being rich in omega-3 fatty acids, which are fantastic for heart health. Each serving of this grilled delight is packed with protein and essential vitamins. Plus, the glaze adds a burst of flavor without overwhelming the nutrient profile. It’s a win-win!

Frequently Asked Questions

Can I use frozen salmon for this recipe?

Absolutely! Just make sure to thaw it completely before marinating and grilling. Pat it dry to help the marinade stick.

How long should I grill the salmon?

Grill for about 5-7 minutes per side. Keep an eye on it, as the time may vary depending on the thickness of your fillets.

Can I make the honey garlic glaze ahead of time?

Yes! You can prepare the glaze and store it in the refrigerator for up to three days. Just give it a good stir before using.

What should I serve with Honey Garlic Grilled Salmon?

This dish pairs beautifully with a variety of sides, such as roasted vegetables, a fresh green salad, or a simple rice or quinoa pilaf.

Can I use this glaze on other proteins?

Definitely! This honey garlic glaze works wonderfully on chicken, pork, or even tofu if you’re looking for a plant-based option.

Conclusion

And there you have it—the perfect recipe for Honey Garlic Grilled Salmon that’s sure to become a staple in your kitchen. Whether you’re cooking for family or hosting friends, this dish brings together the best of sweet and savory in a way that’s approachable and delightful. I hope you take this recipe and make it your own, adding your unique twist along the way. So, gather your ingredients, fire up that grill, and let the culinary magic unfold. Happy cooking, my friends!

Honey Garlic Grilled Salmon Recipe for a Delicious Dinner

Prep Time 10 minutes
Cook Time 15 minutes
Total Time 25 minutes
Servings 4 servings
Calories 350
Enjoy a flavorful and healthy grilled salmon glazed with honey and garlic, perfect for a satisfying dinner.

Ingredients

Salmon

  • 4 fillets salmon fillets
  • 0.25 cup honey
  • 0.25 cup soy sauce
  • 3 cloves garlic, minced
  • 1 tablespoon olive oil
  • 1 teaspoon black pepper
  • 1 tablespoon lemon juice

Garnish

  • chopped green onions green onions for garnish

Instructions 

  • Whisk honey, soy sauce, garlic, olive oil, black pepper, and lemon juice.
  • Preheat grill to medium-high.
  • Grill salmon 5-7 minutes per side until cooked.
  • Rest briefly, then serve garnished with green onions.

Notes

Marinate the salmon for at least 30 minutes for best flavor.
Calories: 350kcal
Cost: $15
Course: Main Course
Cuisine: American
Keyword: Salmon

Loved this recipe? Save it to your favorite Pinterest board so you can easily find it later! It’s the perfect way to keep all your sweet ideas in one place. ✨

Succulent grilled salmon with a shiny glaze, featuring garlic and honey, set against a blurred background.

Why You’ll Adore This Comfort Classic

When it comes to comfort food, few dishes can compete with the delightful combination of Sweet & Savory BBQ Chicken with Creamy Garlic Potatoes. This dish is not just a meal; it’s an experience, a moment where flavors meld together in perfect harmony, wrapping you in warmth and satisfaction. Imagine biting into succulent chicken glazed with a sweet and tangy BBQ sauce, paired with creamy garlic potatoes that melt in your mouth. It’s food that not only fills your belly but also warms your heart, evoking memories of family gatherings and lazy Sunday dinners.

Growing up, I often found myself in the kitchen, experimenting with flavors and ingredients, and this recipe is a lovely nod to those early culinary adventures. It’s a dish that brings everyone together, whether you’re celebrating a special occasion or simply enjoying a cozy night in. So, roll up your sleeves and let’s dive into the magic of this comforting meal!

Ingredients You’ll Need

Here’s what you’ll need to create this mouthwatering dish:

  • 4 boneless, skinless chicken breasts
  • 1 cup BBQ sauce (your favorite brand or homemade)
  • 2 tablespoons honey
  • 1 teaspoon garlic powder
  • 1 teaspoon smoked paprika
  • Salt and pepper to taste
  • 2 pounds potatoes, peeled and cubed
  • 1/2 cup heavy cream
  • 1/4 cup unsalted butter
  • 4 cloves garlic, minced
  • Fresh parsley for garnish

Let’s Get Cooking!

Tender BBQ chicken served alongside creamy garlic mashed potatoes, beautifully plated.

Follow these simple steps to whip up your Sweet & Savory BBQ Chicken with Creamy Garlic Potatoes:

  1. Preheat your oven: Set your oven to 375°F (190°C) to get it nice and warm while you prepare the chicken and potatoes.
  2. Prepare the BBQ mixture: In a medium bowl, mix together the BBQ sauce, honey, garlic powder, smoked paprika, salt, and pepper. This blend not only flavors the chicken but also creates a beautiful glaze as it cooks.
  3. Coat the chicken: Take the chicken breasts and generously coat them with the BBQ mixture. Make sure they’re well covered so that every bite is bursting with flavor. Place them in a baking dish.
  4. Bake the chicken: Pop the dish into the oven and bake for 25-30 minutes. You want the chicken to be cooked through, reaching an internal temperature of 165°F (75°C).
  5. Boil the potatoes: While the chicken is baking, place the cubed potatoes in a large pot of salted water. Bring it to a boil and let them cook until tender, about 15-20 minutes. You can check their doneness by poking them with a fork; they should be soft but not mushy.
  6. Make the creamy garlic sauce: In the same pot where you cooked the potatoes, add the butter and minced garlic. Sauté until fragrant, about 1-2 minutes. Then, pour in the heavy cream and stir to combine.
  7. Mash it up: Return the drained potatoes to the pot and mash them until creamy. Season with salt and pepper to taste. The goal here is to create a rich, velvety texture that complements the chicken beautifully.
  8. Rest and serve: Once the chicken is done baking, take it out of the oven and let it rest for a few minutes. This resting period helps the juices redistribute, ensuring your chicken is juicy and tender. Serve the BBQ chicken alongside the creamy garlic potatoes, garnished with fresh parsley for a pop of color.

Helpful Tips for Success

To ensure your dish turns out perfectly, here are some helpful tips:

  • For extra flavor, consider marinating the chicken in the BBQ mixture for a couple of hours before baking. This allows the flavors to penetrate the meat.
  • When mashing the potatoes, you can use a potato ricer for an ultra-smooth texture if you prefer.
  • Feel free to adjust the level of garlic in the potatoes based on your love for this aromatic ingredient!
  • For a bit of a kick, add a dash of cayenne pepper to the BBQ mixture.

Variations and Substitutions

This recipe is versatile and can be tailored to your preferences:

  • Chicken: If you prefer a different cut, chicken thighs work wonderfully as well, offering extra juiciness.
  • Potatoes: Swap out the standard potatoes for sweet potatoes for a delightful twist.
  • Vegan Option: For a plant-based version, use tofu or tempeh marinated in the BBQ sauce, and substitute the potatoes with cauliflower for a low-carb option.

Equipment You’ll Need

Having the right tools can make your cooking experience smoother. Here’s what you’ll need:

  • Baking dish
  • Medium bowl for mixing
  • Large pot for boiling potatoes
  • Potato masher or ricer
  • Meat thermometer (for checking the chicken’s doneness)

Storage and Freezing Instructions

If you happen to have leftovers (which is rare, trust me!), here’s how to store them:

  • Store any leftover chicken and potatoes in an airtight container in the refrigerator for up to 4 days.
  • To freeze, let the dish cool completely, then transfer to a freezer-safe container. It can be frozen for up to 3 months. Thaw overnight in the refrigerator before reheating.

Frequently Asked Questions

Can I use chicken breasts instead of thighs?
Absolutely! Chicken breasts are a great option, but make sure to monitor the cooking time, as they can dry out faster than thighs.

What kind of BBQ sauce should I use?
Your favorite store-bought BBQ sauce will work just fine, or you can make your own for a personal touch. The key is to choose one that you love — it will shine in the dish!

Can I prepare this ahead of time?
Yes! You can prepare the chicken and the potatoes ahead of time. Assemble everything and keep it in the fridge for up to 24 hours before baking.

Troubleshooting Common Issues

Here are some quick fixes for common problems you might encounter:

  • Chicken is dry: This can happen if it’s overcooked. Make sure to check the internal temperature with a meat thermometer.
  • Potatoes are lumpy: If you didn’t mash them enough, just add a bit more cream and give them another go with the masher.

In Conclusion

The Sweet & Savory BBQ Chicken with Creamy Garlic Potatoes recipe is not just a meal; it’s a comforting embrace that invites you to pause, savor, and enjoy the moment. Perfect for weeknight dinners, gatherings, or just when you need a hug in food form, this dish is sure to become a staple in your recipe rotation. So gather your loved ones, serve this delightful meal, and watch as smiles spread around your table. Happy cooking, my friends!

Sweet & Savory BBQ Chicken with Creamy Garlic Potatoes – A Comfort Food Classic

Prep Time 15 minutes
Cook Time 30 minutes
Total Time 45 minutes
Servings 4 servings
Calories 650
Enjoy tender BBQ chicken paired with creamy garlic potatoes in this hearty, flavorful dish perfect for any family dinner.

Ingredients

Protein

  • 4 pieces boneless, skinless chicken breasts
  • 1 cup bbq sauce
  • 2 tablespoons honey
  • 1 teaspoon garlic powder
  • 1 teaspoon smoked paprika
  • salt and pepper to taste salt and pepper

Vegetables

  • 2 pounds potatoes, peeled and cubed
  • 1/2 cup heavy cream
  • 1/4 cup unsalted butter
  • 4 cloves garlic, minced
  • salt and pepper to taste salt and pepper

Garnish

  • fresh parsley for garnish fresh parsley

Instructions 

  • Preheat oven to 375°F (190°C). Mix BBQ sauce, honey, garlic powder, smoked paprika, salt, and pepper. Coat chicken with mixture and bake for 25-30 minutes.
  • Boil potatoes in salted water until tender, about 15-20 minutes. Drain.
  • In the same pot, melt butter with minced garlic, add heavy cream, then mash potatoes until creamy. Season with salt and pepper.
  • Let chicken rest briefly, then serve with creamy garlic potatoes, garnished with parsley.

Notes

For extra flavor, marinate the chicken in the BBQ sauce mixture for a few hours before baking.
Calories: 650kcal
Cost: $15
Course: Main Course
Cuisine: American
Keyword: BBQ, Chicken, potatoes

Loved this recipe? Save it to your favorite Pinterest board so you can easily find it later! It’s the perfect way to keep all your sweet ideas in one place. ✨

A mouthwatering dish featuring BBQ chicken and creamy garlic potatoes on a rustic table.

Welcome to Your New Favorite Comfort Food: Chicken & Broccoli Alfredo

If you’re on the hunt for a meal that brings warmth and joy, look no further than this Chicken & Broccoli Alfredo. With tender chicken, vibrant broccoli, and a creamy sauce, this dish has everything you need for a cozy night in or an impressive dinner party. Plus, it’s simple enough to make on a busy weeknight! Let’s dive into why this recipe will be your go-to.

Why You’ll Love This Recipe

This Chicken & Broccoli Alfredo isn’t just delicious; it’s packed with reasons to love it. Here are just a few:

  • Comfort Food Classic: The rich, creamy sauce and tender pasta create a dish that feels like a warm hug on a plate.
  • Quick and Easy: With straightforward ingredients and simple steps, you’ll have dinner ready in no time.
  • Customizable: Add your favorite veggies or proteins to make it your own—mushrooms, peas, or even shrimp work beautifully!
  • Family-Friendly: Kids and adults alike will enjoy the delicious flavors, making it a perfect family meal.
  • Meal Prep Friendly: This dish stores well, perfect for leftovers or make-ahead meals.

Ingredients Breakdown

Let’s gather our ingredients for this magical dish! Here’s what you’ll need:

  • 8 ounces uncooked pasta: Choose your favorite type—fettuccine or penne work wonderfully.
  • 12 ounces frozen broccoli florets: Convenient and retains nutrients. You can use fresh if you prefer!
  • 2 cups cooked chicken: Shredded or diced. Leftover rotisserie chicken is a great shortcut.
  • 15 ounces alfredo sauce: Store-bought or homemade—whatever you have on hand.
  • 1/2 cup grated parmesan cheese: This adds a rich, cheesy flavor to the dish.
  • 1/2 teaspoon Italian seasoning: A lovely herby touch that complements the flavors.
  • 1/4 teaspoon garlic powder: Because garlic makes everything better!
  • 1/2 teaspoon salt: Enhances flavor; adjust to taste.
  • 1/2 teaspoon ground black pepper: Adds a little kick to the dish.
  • 2 cups shredded mozzarella cheese: For that glorious cheesy topping!

Pro Tips for Perfect Chicken & Broccoli Alfredo

Juicy Chicken Alfredo with broccoli, topped with melted cheese, served in a dish.

Want to elevate your cooking game? Here are my top tips:

  • Cook Pasta Al Dente: This keeps the pasta firm and prevents it from becoming mushy when mixed with the sauce.
  • Use Fresh Ingredients: Fresh garlic and herbs can brighten up the dish immensely.
  • Don’t Skip the Cheese: The combination of mozzarella and parmesan creates a rich, gooey texture that’s simply irresistible.
  • Broil for Extra Crispiness: A few minutes under the broiler at the end gives a beautifully browned top.
  • Season Gradually: Taste as you go; adjusting salt and pepper enhances the overall flavor.
  • Add a Splash of Lemon Juice: This brightens the dish and balances the richness of the sauce.
  • Make it Ahead: Assemble the casserole and store it in the fridge before baking for an easy weeknight dinner.
  • Play with Flavors: Experiment with different cheeses or spices to create a unique twist on this classic.

Common Mistakes to Avoid

We all have our off days in the kitchen, but let’s try to avoid these common pitfalls:

  • Overcooking the Pasta: This can lead to mushy noodles. Always follow the package instructions and taste-test!
  • Not Draining Properly: Make sure to drain the pasta and broccoli well to avoid a watery alfredo.
  • Skipping the Seasoning: A bland dish can ruin the experience. Don’t forget to season at every step.
  • Using Low-Quality Sauce: The alfredo sauce can make or break the dish. Choose a quality sauce for the best results.

Delicious Variations

Feeling adventurous? Here are some variations to try:

  • Shrimp Alfredo: Substitute cooked shrimp for chicken for a seafood twist.
  • Cajun Chicken Alfredo: Add Cajun seasoning for a spicy kick—perfect for those who love a little heat!
  • One-Pan Chicken & Broccoli Alfredo: Cook everything in one pan for a quicker cleanup.
  • Vegetarian Alfredo: Swap chicken for sautéed mushrooms or spinach for a meat-free version.

Storage and Make-Ahead Instructions

This Chicken & Broccoli Alfredo is perfect for leftovers! Here’s how to store it:

  • Refrigeration: Store in an airtight container for up to 3 days. Reheat in the microwave or oven.
  • Freezing: This dish can be frozen for up to 2 months. Make sure to cool completely before freezing.
  • Reheating Tips: Add a splash of milk while reheating to bring back that creamy texture.

Frequently Asked Questions

Got questions? I’ve got answers! Here are some common FAQs:

  • Can I use fresh broccoli instead of frozen? Yes! Just blanch it briefly before adding it to the pasta.
  • What type of pasta works best? Fettuccine is traditional, but penne or rotini are great alternatives!
  • Can I make this dish gluten-free? Absolutely! Just use gluten-free pasta and ensure your sauce is certified gluten-free.
  • How can I make this dish lighter? Use a lighter alfredo sauce or substitute half of the pasta with zucchini noodles.
  • Is this recipe kid-friendly? Definitely! Kids love creamy pastas, and the broccoli adds a nutritious touch.
  • Can I prepare it ahead of time? Yes! Assemble the ingredients and refrigerate until you’re ready to bake.
  • What can I serve with Chicken Alfredo? A simple green salad or garlic bread complements the dish beautifully.
  • How do I make my alfredo sauce thicker? Simmer it longer or add a bit of cornstarch mixed with water to thicken it up.

Nutrition Tips and Dietary Adaptations

Want to make this dish even healthier? Here are some tips:

  • Add More Veggies: Incorporate bell peppers, spinach, or zucchini to boost nutrients.
  • Whole Wheat Pasta: Opt for whole wheat or legume-based pasta for added fiber.
  • Low-Fat Dairy: Use low-fat cheese and a lighter version of alfredo sauce to reduce calories.

Equipment Recommendations

Here’s what you’ll need for this recipe:

  • Large Pot: For boiling pasta and broccoli.
  • 9×13-inch Baking Dish: Perfect for baking your casserole.
  • Mixing Bowl: For combining ingredients easily.
  • Colander: To drain the pasta and broccoli effectively.

Serving Suggestions

Serve this comforting dish with:

  • Garlic Bread: A classic pairing that can soak up the delicious sauce.
  • Caesar Salad: Fresh greens with a creamy dressing complement the richness of the alfredo.
  • Wine Pairing: A glass of Chardonnay or a light Pinot Noir pairs beautifully with creamy pasta.

Conclusion

And there you have it! A cozy Chicken & Broccoli Alfredo that’s bound to steal your heart and become a staple in your kitchen. With its creamy sauce, tender chicken, and vibrant broccoli, it’s a dish that promises comfort and satisfaction. Remember, cooking is about enjoying the process, so don’t hesitate to make this recipe your own! Happy cooking, friend!

Chicken & Broccoli Alfredo Recipe

Prep Time 10 minutes
Cook Time 30 minutes
Total Time 40 minutes
Servings 6 servings
Calories 650
A creamy and cheesy chicken and broccoli pasta bake that's easy to prepare and perfect for a comforting meal.

Ingredients

Pasta and Broccoli

  • 8 ounces uncooked pasta (about 16 ounces cooked)
  • 12 ounces frozen broccoli florets
  • 2 cups cooked chicken (cut or shredded)

Sauces and Cheese

  • 15 ounces alfredo sauce
  • 1/2 cup parmesan cheese (grated or shredded)
  • 1/2 teaspoon Italian seasoning
  • 1/4 teaspoon garlic powder
  • 1/2 teaspoon salt
  • 1/2 teaspoon ground black pepper
  • 2 cups mozzarella cheese (shredded)

Instructions 

  • Cook pasta in salted boiling water until just under al dente. Add broccoli for last 2 minutes, then drain.
  • Preheat oven to 350°F. Spread cooked pasta and broccoli in a casserole dish.
  • Mix cooked chicken, alfredo sauce, cheeses, and seasonings in a bowl. Spread over pasta and broccoli.
  • Top with shredded mozzarella and bake for 15-20 minutes until golden. Broil for 2-3 minutes for extra browning.
  • Remove from oven, serve warm, and enjoy!

Notes

For a lighter version, use less cheese or a low-fat sauce.
Calories: 650kcal
Cost: $15
Course: Main Course
Cuisine: Italian
Keyword: Broccoli, Chicken, pasta

Why You’ll Love These Meal Prep Bowls

Hey there, dear friends! If you’re like me and find joy in the kitchen, then let’s talk about a recipe that will quickly become your go-to for busy weekdays—the Honey Garlic Salmon Meal Prep Bowls. Picture this: tender, flaked salmon glazed in a sweet and savory honey garlic sauce, nestled alongside fluffy brown rice and vibrant vegetables. It’s a bowl of happiness that brings comfort and nourishment, perfectly crafted for those hectic days when you need a little magic in your lunch routine.

These bowls are not just easy to prepare; they’re packed with flavor, making them a delightful escape from the mundane. If meal prep has felt like a chore, I promise you, this recipe will reignite your love for it. It’s all about simplicity and joy, with a touch of that homemade goodness that makes everything better. So, let’s dive into this culinary adventure together!

The Story Behind the Recipe

Every good recipe comes with a story, doesn’t it? This one takes me back to my childhood, where cooking was a cherished family affair. My mother would often whip up something that filled our home with warmth and laughter, and this recipe is a modern nod to those heartwarming days. When I first experimented with honey and garlic, I was on a quest to create something that married simplicity and flavor—something that busy folks could easily whip up without sacrificing taste.

As I stood in my Seattle kitchen, a bottle of honey and a few cloves of garlic caught my eye. I remember thinking about how these humble ingredients could transform a regular piece of salmon into a dish that sings. And let me tell you, it worked wonders! The result was my beloved honey garlic sauce, and it has been a staple ever since.

Gathering Your A-Team: Simple Ingredients, Big Flavor

A vibrant Honey Garlic Salmon Meal Prep Bowl featuring juicy salmon, rice, and broccoli, photographed from eye level.

Before we jump into the cooking, let’s take a moment to talk about the star players of this recipe—the ingredients. Here’s what you’ll need to create these magical meal prep bowls:

  • 4 salmon fillets – The protein powerhouse that will keep you feeling full and satisfied.
  • 1/4 cup honey – The sweet star of our show, adding a beautiful glaze.
  • 1/4 cup soy sauce – For that savory depth of flavor.
  • 3 cloves garlic, minced – Because garlic makes everything better!
  • 1 tablespoon olive oil – For cooking up the salmon nicely.
  • 1 teaspoon sesame oil – A little drizzle adds a nutty aroma.
  • Salt and pepper to taste – Essential for enhancing the flavors.
  • 2 cups cooked brown rice – Our wholesome base that brings everything together.
  • 2 cups broccoli florets – Crisp-tender veggies that add color and nutrients.
  • 1 cup sliced bell peppers – Sweet and crunchy, they brighten up the bowl.
  • 1 tablespoon sesame seeds (optional) – For that extra crunch and flair.
  • Chopped green onions for garnish (optional) – A sprinkle of freshness at the end.

Let’s Get Cooking: Your Foolproof Guide to Perfection

Now that we have everything ready, it’s time to roll up our sleeves and get cooking! Here’s how to bring these meal prep bowls to life:

  1. In a bowl, whisk together the honey, soy sauce, minced garlic, olive oil, sesame oil, salt, and pepper to create a delicious marinade.
  2. Place the salmon fillets in a shallow dish and pour the marinade over them. Let them soak in all that goodness for at least 15 minutes.
  3. Preheat your oven to 400°F (200°C). Line a baking sheet with parchment paper for easy cleanup.
  4. Place the marinated salmon fillets on the prepared baking sheet and bake for 12-15 minutes, or until cooked through and flaky.
  5. While the salmon is baking, steam the broccoli florets and bell peppers until tender. This usually takes about 5-7 minutes.
  6. Once the salmon is done, remove it from the oven and let it cool slightly. Flake the salmon into large pieces with a fork.
  7. In your meal prep containers, divide the cooked brown rice, steamed broccoli, and bell peppers evenly.
  8. Top each container with the flaked salmon and drizzle any extra marinade over the top for that extra flavor boost.
  9. If you’re feeling fancy, sprinkle with sesame seeds and chopped green onions.
  10. Allow the meal prep bowls to cool before sealing and refrigerating for up to 4 days.

Building Your Beautiful Bowl

Now that you have your components ready, it’s time for the fun part—assembling your meal prep bowls! You can get creative here. I love to layer my ingredients, starting with the brown rice as a base. Then, I pile on the veggies, followed by the salmon, and finish it off with a drizzle of that irresistible honey garlic sauce. The colors and textures make it visually appealing and, trust me, your taste buds will thank you!

Make It Your Own: Delicious Twists & Swaps

If you’re anything like me, you might want to shake things up a bit. Here are some variations and substitutions to keep your meal prep exciting:

  • Switch Up the Protein: Not a fan of salmon? Try chicken thighs or tofu instead. They both pair beautifully with the honey garlic marinade.
  • Get Creative with Veggies: Use whatever vegetables you have on hand—zucchini, carrots, or snap peas would work great!
  • Spice It Up: Add a pinch of red pepper flakes to the marinade for a kick of heat.
  • Experiment with Grains: If brown rice isn’t your thing, quinoa or cauliflower rice are delicious alternatives.

Storage and Freezing: Your Meal Prep Lifesaver

One of the best parts about these meal prep bowls is how well they store. When properly sealed in airtight containers, they can stay fresh in the fridge for up to 4 days. I recommend reheating them gently in the microwave, but if you have time, let them sit at room temperature for a few minutes before heating to ensure even warming.

If you want to freeze them, it’s best to freeze the salmon and veggies separately from the rice, as the texture may change upon thawing. Just remember to use them within 2 months for the best taste.

Frequently Asked Questions

Let’s address some common questions I get about this recipe:

How can I tell when the salmon is cooked?

The salmon is ready when it flakes easily with a fork and is no longer translucent in the center. Aim for an internal temperature of 145°F (63°C) for perfect doneness.

Can I make the marinade ahead of time?

Absolutely! You can prepare the marinade a day in advance and store it in the fridge. Just give it a good stir before using it.

What if I don’t have honey?

If honey is not available, agave syrup or maple syrup can be used as a substitute, though the flavor will vary slightly.

Can I use frozen salmon?

Yes, you can use frozen salmon; just make sure to thaw it completely before marinating and cooking.

Tips for Success

Here are a few extra tips to ensure your meal prep bowls turn out perfectly:

  • Don’t skip the marinating step! It’s where the magic happens, allowing the salmon to soak up all those delicious flavors.
  • Keep an eye on the salmon while it bakes to avoid overcooking. It’s better to undercook slightly, as it will continue to cook a bit after being removed from the oven.
  • Feel free to add a splash of lemon juice over the finished bowls for an extra zing!

In Conclusion: A Bowl Full of Comfort

And there you have it, my friends! Your guide to creating these delightful Honey Garlic Salmon Meal Prep Bowls. Cooking doesn’t have to be complicated; it’s about nourishing yourself and your loved ones with meals that bring joy and comfort. I hope you find as much love in this recipe as I do, and that it becomes a cherished part of your meal prep routine.

So gather your ingredients, crank up your favorite tunes, and let’s make this magic happen in your kitchen! If you give it a try, I’d love to hear how it goes. Tag me on social media with your creations, and let’s share the joy of cooking together. Happy meal prepping! 🍽️

Honey Garlic Salmon Meal Prep Bowls : Easy & Flavorful

Prep Time 15 minutes
Cook Time 15 minutes
Total Time 30 minutes
Servings 4 bowls
Calories 450
Enjoy a delicious and healthy meal prep with tender baked salmon, steamed vegetables, and flavorful rice, all infused with honey and garlic.

Ingredients

Protein

  • 4 fillets salmon fillets
  • 1/4 cup honey
  • 1/4 cup soy sauce
  • 3 cloves garlic, minced
  • 1 tablespoon olive oil
  • 1 teaspoon sesame oil
  • to taste salt and pepper
  • 2 cups cooked brown rice
  • 2 cups broccoli florets
  • 1 cup sliced bell peppers
  • 1 tablespoon sesame seeds (optional)
  • chopped green onions for garnish (optional) green onions

Instructions 

  • Whisk honey, soy sauce, garlic, oils, salt, and pepper to make marinade.
  • Marinate salmon for at least 15 minutes, then bake at 400°F (200°C) for 12-15 minutes.
  • Steam broccoli and bell peppers until tender.
  • Assemble bowls with rice, vegetables, and flaked salmon; drizzle with marinade and garnish.

Notes

Store in airtight containers for up to 4 days.
Calories: 450kcal
Cost: $15
Course: Main Course
Cuisine: American
Keyword: Salmon

Loved this recipe? Save it to your favorite Pinterest board so you can easily find it later! It’s the perfect way to keep all your sweet ideas in one place. ✨

Detailed food photography of a Honey Garlic Salmon Meal Prep Bowl, capturing the textures of salmon and fresh ingredients.

Why You’ll Love This Chickpeas and Avocado Salad

Welcome to a delightful culinary adventure that’s about to brighten up your meal times! This Quick Chickpeas and Avocado Salad is not just a salad; it’s a burst of freshness that dances on your taste buds, making it the perfect dish for any occasion. Whether you’re whipping it up for lunch or serving it as a light dinner, this salad is quick, vibrant, and oh-so-satisfying. With its creamy avocado, protein-packed chickpeas, and juicy cherry tomatoes, it’s a dish that promises to please everyone at the table.

Imagine this: it’s a busy Tuesday evening, and you’re staring blankly at your fridge, trying to come up with something quick and delicious. Enter this salad. With just a handful of ingredients, you can create something that feels both nourishing and indulgent. Plus, it’s a wonderful way to incorporate plant-based eating into your routine without feeling deprived. You can make it your own with a little creativity, and I guarantee it will quickly become a staple in your culinary repertoire!

Ingredients for Your Chickpeas and Avocado Salad

To bring this dish to life, you’ll need the following:

  • 1 can chickpeas, drained and rinsed
  • 1 ripe avocado, diced
  • 1 cup cherry tomatoes, halved
  • 1/4 red onion, finely chopped
  • 1/4 cup fresh cilantro, chopped
  • 2 tablespoons olive oil
  • 1 tablespoon lime juice
  • Salt and pepper to taste

Quick and Simple Steps to Prepare

Freshly prepared Chickpeas and Avocado Salad, showcasing diced avocado and colorful ingredients.

Let’s dive into the preparation of this refreshing salad. It’s as simple as it is delicious!

  1. In a large bowl, combine the chickpeas, diced avocado, cherry tomatoes, red onion, and cilantro.
  2. In a small bowl, whisk together the olive oil, lime juice, salt, and pepper.
  3. Pour the dressing over the salad and gently toss to combine.
  4. Serve immediately or chill in the refrigerator for 15 minutes to enhance the flavors.

Tips for the Best Salad

Here are a few tips to ensure your Chickpeas and Avocado Salad turns out perfectly every time:

  • Choose ripe avocados: Make sure your avocado is perfectly ripe for the best creaminess. It should yield slightly when you press it gently.
  • Drain and rinse chickpeas: This step is crucial! Rinsing helps remove excess sodium and any canning liquid, enhancing the flavor of your salad.
  • Don’t skip the chill: Allowing the salad to chill for a bit lets the flavors meld beautifully, making each bite more delectable.

Flavor Variations to Try

This salad is wonderfully versatile! Here are some variations to keep things interesting:

  • Add some crunch: Toss in some chopped bell peppers, cucumber, or even a handful of toasted nuts for added texture.
  • Spice it up: A sprinkle of cumin or smoked paprika can add a lovely depth of flavor.
  • Mix in cheese: Crumbled feta or goat cheese can introduce a tangy creaminess that pairs beautifully with the other ingredients.

Substitutions You Can Make

If you find yourself missing an ingredient or two, don’t fret! Here are some substitutions that work well:

  • Canned chickpeas: If you have dried chickpeas, soak and cook them beforehand for a fresh touch.
  • Lime juice: Lemon juice can be used as a substitute if lime isn’t available.
  • Herbs: If cilantro isn’t your thing, fresh parsley or dill will add a different yet delightful flavor.

Essential Equipment

Before you get started, gather the following kitchen tools:

  • A large mixing bowl
  • A small whisk or fork for the dressing
  • A knife and cutting board for chopping
  • A measuring spoon for accuracy

Storage and Freezing Tips

This salad is best enjoyed fresh, but if you have leftovers, here’s how to store them:

  • Refrigerator: Keep in an airtight container for up to 2 days. The avocado may brown slightly, but it’ll still taste great!
  • Freezing: It’s not recommended to freeze this salad as the texture of the avocado and tomatoes will change once thawed.

Frequently Asked Questions

Here are some common questions about this delicious salad:

  • Can I make this salad ahead of time? While it’s best fresh, you can prepare the ingredients ahead and assemble just before serving.
  • Is this salad vegan? Absolutely! It’s entirely plant-based, making it a great choice for vegan dinners.
  • What can I serve with this salad? It pairs wonderfully with grilled chicken, fish, or can be served as a filling in wraps or pita bread.

Troubleshooting Common Issues

If you encounter any hiccups while making this salad, here’s how to address them:

  • Too mushy? If your avocado is overripe, add some extra crunch with nuts or seeds to balance the texture.
  • Not enough flavor? A splash more lime juice or a pinch of salt can elevate the flavors significantly.

Final Thoughts

This Quick Chickpeas and Avocado Salad truly embodies the spirit of fresh, simple cooking. It’s a beautiful way to bring together nutritious ingredients that not only nourish the body but also delight the palate. Whether you serve it as a side dish, a light lunch, or as part of a larger spread, it’s bound to impress.

Next time you’re in need of a quick meal that’s full of flavor and good-for-you ingredients, this salad is your answer. And remember, cooking is about experimenting and having fun—so don’t hesitate to make it your own! I can’t wait to hear how you customize this dish. So grab your ingredients, get chopping, and let the magic happen in your kitchen. Happy cooking!

Quick Chickpeas and Avocado Salad: Easy & Fresh Twist

Prep Time 10 minutes
Total Time 10 minutes
Servings 2 servings
Calories 350
A quick, healthy, and flavorful salad combining chickpeas, avocado, and fresh vegetables for a refreshing meal.

Ingredients

Main

  • 1 can chickpeas, drained and rinsed
  • 1 ripe avocado avocado, diced
  • 1 cup cherry tomatoes, halved
  • 1/4 red onion red onion, finely chopped
  • 1/4 cup fresh cilantro, chopped
  • 2 tablespoons olive oil
  • 1 tablespoon lime juice
  • to taste salt and pepper

Instructions 

  • Combine chickpeas, avocado, cherry tomatoes, red onion, and cilantro in a large bowl.
  • Whisk together olive oil, lime juice, salt, and pepper in a small bowl.
  • Pour dressing over the salad and toss gently.
  • Serve immediately or chill for 15 minutes.

Notes

For extra flavor, add a pinch of cumin or chili flakes.
Calories: 350kcal
Cost: $8
Course: Salad
Cuisine: fusion
Keyword: Avocado, chickpeas

Loved this recipe? Save it to your favorite Pinterest board so you can easily find it later! It’s the perfect way to keep all your sweet ideas in one place. ✨

Succulent salad featuring chickpeas, avocado, and red onion, beautifully arranged for serving.

Welcome to Your New Favorite Comfort Food: Baked Penne with Ricotta

If you’re looking for a dish that wraps you in warmth and satisfaction, you’ve come to the right place! This baked penne with ricotta is more than just a recipe—it’s a hug in a bowl, a family gathering staple, and a canvas for your culinary creativity. Growing up in my mother’s kitchen, I learned that cooking was about connection, celebration, and sometimes, a little magic. The aroma of baked pasta wafting through the house brings me right back to those cherished moments, and I can’t wait to share this cozy dish with you!

Why You’ll Love This Recipe

Here are just a few reasons why this baked penne with ricotta will become your go-to dish:

  • Easy to Prepare: With simple ingredients and straightforward steps, you can whip this up even on a busy weeknight.
  • Comforting and Creamy: The combination of ricotta cheese, marinara sauce, and baked pasta creates a rich and satisfying meal.
  • Customizable: Feel free to add your favorite vegetables or proteins to make it your own!
  • Perfect for Leftovers: This dish stays delicious for days, making it ideal for meal prep or a cozy dinner for one.
  • Family-Friendly: Kids and adults alike will love this dish, making it a hit at the dinner table!

Ingredients You’ll Need

Gather the following ingredients for your baked penne with ricotta:

  • 1 tablespoon finely chopped garlic
  • 1/4 teaspoon coarse salt
  • 16 ounces uncooked penne pasta
  • 28 ounces crushed tomatoes
  • 2 cups half-and-half cream
  • 3/4 cup parmesan cheese (finely grated, separated)
  • 1 cup ricotta cheese
  • Basil leaves for decoration

Feeling adventurous? Here are some suggested substitutions:

  • Pasta Type: While penne is perfect, feel free to use rigatoni or ziti for a fun twist!
  • Cream Alternatives: Swap out half-and-half for whole milk or a dairy-free alternative like almond milk for a lighter version.
  • Vegetable Add-Ins: Throw in sautéed spinach, mushrooms, or zucchini for extra nutrition and flavor.
  • Protein Boost: Add cooked ground turkey, chicken, or Italian sausage for a heartier meal.

Step-by-Step Instructions

Side view of a creamy ricotta pasta bake topped with basil leaves.

Ready to dive into this deliciousness? Follow these easy steps to make your baked penne with ricotta:

  1. Preheat your oven to 375°F (190°C).
  2. In a large pot, bring salted water to a boil and cook the penne pasta until al dente, about 8-10 minutes. Drain and set aside.
  3. In a large mixing bowl, combine the crushed tomatoes, half-and-half, garlic, and half of the grated parmesan cheese. Stir until well mixed.
  4. Add the cooked penne and ricotta cheese to the tomato mixture, mixing until everything is evenly coated.
  5. Transfer the mixture into a greased 9×13 inch baking dish. Top with the remaining parmesan cheese.
  6. Bake in the preheated oven for 25-30 minutes, or until golden and bubbling.
  7. Garnish with fresh basil leaves before serving.

Pro Tips for the Perfect Bake

Here are a few expert insights to elevate your baked penne with ricotta:

  • Don’t Overcook the Pasta: It should be slightly firm since it will continue cooking in the oven.
  • Layer Flavors: Consider adding layers of mozzarella cheese for a gooey, cheesy texture.
  • Let it Rest: Allow the dish to sit for 5-10 minutes after baking to set up, making it easier to serve.
  • Experiment with Herbs: Fresh herbs like oregano or thyme can enhance the flavor profile.
  • Use Quality Ingredients: The better the ingredients, the better the dish! Opt for high-quality ricotta and fresh tomatoes if possible.
  • Keep it Vegetarian: This dish is delightful as is, but you can easily make it more filling by adding roasted vegetables.
  • Serving Size: This recipe serves about 6, perfect for family dinners or meal prep for the week!
  • Add a Crunch: Top with breadcrumbs or crushed crackers before baking for a crispy topping.

Common Mistakes and Troubleshooting

Even the best of us have kitchen mishaps! Here’s how to avoid common pitfalls:

  • Too Dry: If your pasta bake turns out dry, next time add more cream or sauce to keep it moist.
  • Too Saucy: If it’s too saucy, try reducing the liquid ingredients slightly and baking longer.
  • Uneven Cooking: Ensure the pasta is evenly distributed in the baking dish for consistent cooking.
  • Burnt Topping: If the top is browning too quickly, cover it with foil during the last few minutes of baking.

Delicious Variations of Baked Penne with Ricotta

Here are some fun variations to try with your baked penne:

  • Vegetable Medley: Add roasted bell peppers, spinach, and artichokes for a colorful and nutritious twist.
  • Pesto Penne: Stir in some basil pesto for a fragrant, herby flavor.
  • Spicy Kick: Incorporate red pepper flakes or spicy sausage for a heat that’ll surprise your taste buds.
  • Cheesy Delight: Mix in different cheeses like gouda or mozzarella for a melty, gooey experience!

Storage and Make-Ahead Instructions

Planning ahead? Here’s how to store your baked penne with ricotta:

  • Refrigeration: Store leftovers in an airtight container in the fridge for up to 4 days.
  • Freezing: This dish freezes beautifully! Portion it into containers and freeze for up to 3 months.
  • Reheating: To reheat, thaw overnight in the fridge and warm in the oven at 350°F (175°C) until heated through.
  • Make-Ahead: Prepare the dish up to the baking step, cover, and refrigerate for up to 24 hours before baking.

Frequently Asked Questions

Got questions? I’ve got answers! Here are some FAQs about baked penne with ricotta:

  • Can I use store-bought marinara sauce? Absolutely! It’s a great time-saver, especially on busy nights.
  • Is this dish vegetarian? Yes, it’s a meat-free recipe, but feel free to add protein if desired.
  • Can I substitute cottage cheese for ricotta? Yes, cottage cheese works, but it will change the texture slightly.
  • How do I make this dish gluten-free? Use gluten-free pasta to make this dish gluten-free without compromising on flavor.
  • Can I add meat to this recipe? Definitely! Ground beef or sausage can be mixed in for a heartier meal.
  • What can I serve with this pasta bake? A simple green salad or garlic bread pairs perfectly!
  • How long does it take to bake? Baking time is about 25-30 minutes, but ovens vary, so keep an eye on it!
  • Can I reheat leftovers? Yes, simply pop it in the oven or microwave until warmed through.

Nutritional Tips and Dietary Adaptations

Let’s make this dish fit your dietary needs:

  • Low-Calorie Option: Use low-fat cheese and half the amount of cream for a lighter version.
  • Dairy-Free: Substitute ricotta with a nut-based cheese and use coconut cream instead of half-and-half.
  • Protein Boost: Add beans or lentils for extra protein while keeping it vegetarian.
  • Low-Carb Version: Try spiralized zucchini instead of pasta to reduce carbs significantly.

Essential Equipment for Success

Make your cooking experience smoother with these kitchen essentials:

  • Large Pot: For boiling your pasta, choose a pot large enough to prevent sticking.
  • Baking Dish: A 9×13-inch glass or ceramic baking dish is perfect for even cooking.
  • Mixing Bowls: Have a couple of large bowls handy for mixing ingredients.
  • Measuring Cups and Spoons: Precision is key in baking and cooking!

Serving Suggestions to Wow Your Guests

Make your meal unforgettable with these serving ideas:

  • Garnish with Fresh Herbs: A sprinkle of fresh basil or parsley adds color and flavor.
  • Serve with a Side Salad: A crisp salad balances the richness of the pasta.
  • Pair with Wine: A glass of red wine complements the flavors beautifully.
  • Add Garlic Bread: Serve with warm garlic bread for a classic combination.

Conclusion: Your New Go-To Recipe Awaits!

There you have it—a comprehensive guide to making the perfect baked penne with ricotta. I hope this recipe finds a special place in your kitchen, just like it has in mine. Cooking is about joy, creativity, and the memories we create around the table. So gather your loved ones, serve up this delightful dish, and watch as smiles spread across faces. Remember, it’s not just about the food; it’s about the love and laughter shared over it. Happy cooking! 🍽️

Quick Ricotta Pasta Bake

Prep Time 10 minutes
Cook Time 30 minutes
Total Time 40 minutes
Servings 4 servings
Calories 650
A creamy and comforting pasta bake featuring ricotta and tomatoes, perfect for a quick weeknight dinner.

Ingredients

Dried Pasta

  • 1 tablespoon finely chopped garlic
  • 0.25 teaspoon coarse salt
  • 16 ounces uncooked penne pasta
  • 28 ounces crushed tomatoes
  • 2 cups half-and-half cream
  • 3/4 cup parmesan cheese (finely grated, separated)
  • 1 cup ricotta cheese

Basil leaves for decoration

Instructions 

  • Cook the penne pasta according to package instructions until al dente, then drain.
  • In a large bowl, combine crushed tomatoes, garlic, half-and-half, ricotta, and half of the parmesan cheese.
  • Mix cooked pasta into the sauce mixture and transfer to a baking dish.
  • Sprinkle remaining parmesan cheese on top and bake at 375°F (190°C) for 20-25 minutes until bubbly and golden.
  • Garnish with basil leaves before serving.

Notes

For a richer flavor, let the baked pasta rest for 5 minutes before serving.
Calories: 650kcal
Cost: $12
Course: Main Course
Cuisine: Italian
Keyword: pasta