Author

Ava

Browsing

Why You’ll Love This Recipe

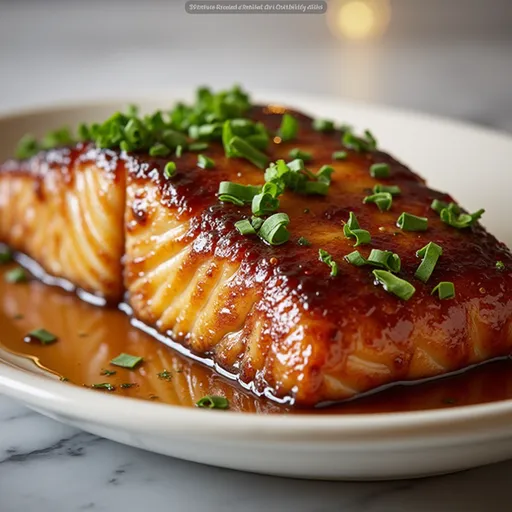
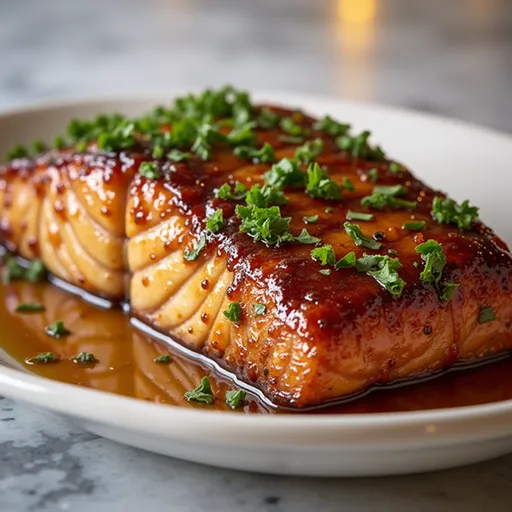
Ah, the magic of salmon! If you’ve ever had a piece of fish that made you close your eyes and savor each bite, then you know what I’m talking about. This Brown Sugar Honey Glazed Salmon is the epitome of sweet and savory bliss, and it has a way of turning a simple meal into something special. Imagine flaky salmon coated in a rich, caramelized glaze that’s sweet, tangy, and downright irresistible. This dish is not just a meal; it’s an experience that will make you want to dance in your kitchen (trust me, I’ve done it!).

Perfect for weeknight dinners and special occasions alike, this salmon recipe is a delightful blend of flavors that come together in under 20 minutes. Whether you’re a seasoned chef or a kitchen newbie, you’ll find this dish straightforward and rewarding. So, are you ready to bring a little magic into your kitchen? Let’s dive into the details!

Ingredients

To whip up this delicious treat, you’ll need the following ingredients:

  • 4 salmon fillets
  • 1/4 cup brown sugar
  • 1/4 cup honey
  • 2 tablespoons soy sauce
  • 1 tablespoon Dijon mustard
  • 1 tablespoon olive oil
  • 1 teaspoon garlic powder
  • Salt and pepper to taste
  • Lemon wedges for serving

These ingredients are not just a list; they’re the building blocks of flavor. The combination of brown sugar and honey creates a luscious glaze that caramelizes beautifully in the oven, while the Dijon mustard adds a zesty kick that balances the sweetness perfectly.

Directions

A beautifully presented salmon dish featuring a caramelized glaze and lemon wedges.

Ready to make some culinary magic? Here’s how to prepare your Brown Sugar Honey Glazed Salmon:

  1. Preheat the oven: Set your oven to 400°F (200°C) to get things nice and toasty.
  2. Mix the glaze: In a bowl, combine the brown sugar, honey, soy sauce, Dijon mustard, olive oil, garlic powder, salt, and pepper. Whisk until everything is well combined and you have a thick, sticky glaze.
  3. Prepare the salmon: Line a baking sheet with parchment paper (this makes for easy cleanup). Place your salmon fillets on the sheet, skin side down.
  4. Glaze the salmon: Generously brush the brown sugar honey glaze over the salmon fillets, ensuring they’re well coated.
  5. Bake: Pop the baking sheet in the preheated oven and bake for 12-15 minutes. The salmon is done when it flakes easily with a fork and has taken on a beautiful golden hue.
  6. Rest and serve: Remove the salmon from the oven and let it rest for a few minutes. Serve with lemon wedges for a fresh, zesty finish.

Servings and Timing

This recipe serves four, making it perfect for a family dinner or a cozy gathering with friends. With a total preparation and cooking time of just about 20 minutes, you’ll have a restaurant-quality dish on your table in no time. It’s the kind of recipe that makes you look like a culinary superstar without spending hours in the kitchen!

Variations

While the original recipe is a crowd-pleaser, there’s always room for a little creativity in the kitchen! Here are some fun variations to try:

  • Spicy Kick: Add a pinch of red pepper flakes to the glaze for a spicy twist that complements the sweetness.
  • Herb Infusion: Stir in some fresh herbs like dill or parsley into the glaze for a fresh and fragrant touch.
  • Different Proteins: This glaze works wonderfully on other firm fish like cod, halibut, or even chicken if you’re in the mood!
  • Maple Twist: Swap out honey for maple syrup for a unique flavor that’s equally delicious.

Storage/Reheating

Got leftovers? You can store any uneaten salmon in an airtight container in the refrigerator for up to 2 days. When you’re ready to enjoy it again, gently reheat in the oven at 350°F (175°C) for about 10 minutes to keep it tender and flavorful. If you want to take things a step further, you can freeze the cooked salmon for up to 3 months. Just make sure to wrap it tightly to avoid freezer burn!

FAQs

Can I use frozen salmon fillets?

Absolutely! Just be sure to fully thaw them and pat them dry before cooking to ensure even cooking and better glaze adhesion.

What type of salmon is best for this recipe?

Both Atlantic and Pacific salmon work well. Look for fillets that are even in thickness for uniform cooking.

Can I make the glaze ahead of time?

Yes! The glaze can be made up to 3 days in advance and stored in the refrigerator. Just warm it slightly before using.

What sides go well with glazed salmon?

This salmon pairs beautifully with steamed rice, roasted vegetables, mashed potatoes, or a fresh green salad for a complete meal.

Is this dish gluten-free?

Yes, it can be made gluten-free by using tamari or a certified gluten-free soy sauce.

Can I use skin-on salmon?

Yes, just place the salmon skin-side down in the baking dish. The skin will help retain moisture and can be removed after cooking if desired.

How do I know when the salmon is done?

The salmon is done when it flakes easily with a fork and has an internal temperature of 145°F (63°C).

Can I double the glaze?

Absolutely! Doubling the glaze is perfect if you prefer extra sauce for drizzling over rice or vegetables.

How can I make this dish dairy-free?

This recipe is naturally dairy-free as it contains no butter, milk, or cream!

Can I use this glaze on other fish?

Yes! It works well on other firm fish such as cod, halibut, or trout.

Tips for Perfect Salmon

To ensure your salmon turns out perfect every time, here are a few handy tips:

  • Quality Matters: Choose fresh, high-quality salmon fillets for the best flavor. Look for vibrant color and firm texture.
  • Don’t Overcook: Keep an eye on your salmon while it bakes. Overcooked salmon can become dry, so check for doneness a minute or two early.
  • Resting Time: Allow the salmon to rest for a few minutes after baking. This helps the juices redistribute, making it even more succulent!

Conclusion

In the world of cooking, few things bring joy quite like a beautifully glazed salmon. This Brown Sugar Honey Glazed Salmon Recipe is an absolute must-try, delivering a symphony of flavors that will leave you and your loved ones craving more. With its easy preparation and delightful taste, it’s bound to become a staple in your kitchen repertoire. So, grab those ingredients, put on your favorite tunes, and let’s get cooking! Here’s to creating unforgettable meals that feel like a warm hug. Happy cooking, my friends!

Brown Sugar Honey Glazed Salmon Recipe

Prep Time 10 minutes
Cook Time 15 minutes
Total Time 25 minutes
Servings 4 servings
Calories 350
This delicious salmon recipe features a sweet and savory glaze made with brown sugar and honey, perfect for a quick and flavorful dinner.

Ingredients

Salmon

  • 4 fillets salmon fillets
  • 1/4 cup brown sugar
  • 1/4 cup honey
  • 2 tablespoons soy sauce
  • 1 tablespoon dijon mustard
  • 1 tablespoon olive oil
  • 1 teaspoon garlic powder
  • to taste none salt and pepper
  • for serving none lemon wedges

Instructions 

  • Preheat oven to 400°F (200°C).
  • Mix brown sugar, honey, soy sauce, Dijon mustard, olive oil, garlic powder, salt, and pepper.
  • Place salmon on a lined baking sheet and brush with glaze.
  • Bake for 12-15 minutes until flaky.
  • Rest briefly, serve with lemon wedges.

Notes

Use fresh lemon for the best flavor.
Calories: 350kcal
Cost: $15
Course: Main Course
Cuisine: American
Keyword: Salmon

Loved this recipe? Save it to your favorite Pinterest board so you can easily find it later! It’s the perfect way to keep all your sweet ideas in one place. ✨

Eye-level shot of brown sugar honey glazed salmon on a plate with a cozy blurred background.

Why This Cheesy Pull Apart Bread Will Steal the Show

Picture this: the aroma of freshly baked bread wafting through your home, mingling with the scent of garlic and melted cheese. It’s a culinary hug that welcomes everyone to the table, and let me tell you, this Cheesy Pull Apart Christmas Bread is the star of any holiday gathering. Whether you’re hosting a festive dinner or simply indulging in a cozy night in, this delightful dish promises to evoke smiles and a few happy sighs.

This recipe is not just about the ingredients; it’s about the experience. You know, the kind where you gather around the table, pull apart those gooey, cheesy morsels, and feel a little magic in the air? Yes, it’s that kind of recipe. Plus, it’s embarrassingly easy to make! You could even have the kids help you roll the dough, turning your kitchen into a joyful hive of activity.

What You Need for This Cheesy Delight

Gathering the right ingredients is the first step to creating this mouthwatering bread. You’ll need:

  • 1 loaf of frozen bread dough (thawed)
  • 2 cups shredded mozzarella cheese
  • 1/2 cup grated parmesan cheese
  • 1/4 cup unsalted butter, melted
  • 3 cloves garlic, minced
  • 1 tablespoon dried Italian herbs (oregano, basil, thyme)
  • 1/4 teaspoon red pepper flakes (optional)
  • Salt and pepper to taste
  • Fresh parsley for garnish

With these ingredients on hand, you can create a dish that’s not just a feast for the eyes, but also a comforting treat that warms the heart.

How to Make Cheesy Pull Apart Christmas Bread

Delicious, fluffy pull-apart bread filled with gooey mozzarella, garnished with parsley.

Ready to dive into the magic of bread-making? Follow these simple steps, and soon you’ll have a glorious cheesy centerpiece:

  1. Preheat your oven to 350°F (175°C).
  2. Grease a bundt pan or a round baking dish. This ensures your bread comes out easily and doesn’t stick.
  3. Roll the thawed bread dough into small balls, about 1 inch in size. This is where the kids can really get involved—who doesn’t love rolling dough?
  4. In a mixing bowl, combine the mozzarella cheese, Parmesan cheese, minced garlic, Italian herbs, red pepper flakes (if using), salt, and pepper.
  5. Take each dough ball and dip it in the melted butter, then roll it in the cheese mixture, ensuring it’s well-coated. Don’t be shy with the cheese—this is where the magic happens!
  6. Layer the coated dough balls in the prepared bundt pan, stacking them as you go. It’s okay if they squeeze together a bit; they’ll rise beautifully.
  7. Pour any remaining melted butter over the top of the dough balls to ensure they bake up golden and crispy.
  8. Cover the pan with a kitchen towel and let it rise in a warm place for about 30-45 minutes, or until doubled in size. This is a perfect time to set the table or sip a warm drink.
  9. Bake in the preheated oven for 25-30 minutes, or until the top is golden brown and your kitchen smells heavenly.
  10. Remove from the oven and let it cool for a few minutes before inverting onto a serving plate. Garnish with fresh parsley for a pop of color.

And there you have it! A glorious centerpiece that’s as delicious as it is beautiful. Now, let’s dig deeper into some tips and variations to make this recipe uniquely yours.

Tips for Perfect Pull Apart Bread

To ensure your Cheesy Pull Apart Christmas Bread turns out perfectly every time, consider these handy tips:

  • Thaw the Dough Properly: Make sure to thaw the frozen bread dough in the fridge overnight or at room temperature for a few hours. Unevenly thawed dough can lead to inconsistent baking results.
  • Experiment with Cheeses: While mozzarella is a classic choice, don’t hesitate to mix in other cheeses like cheddar or gouda for an extra flavor punch.
  • Let it Rise: Don’t rush the rising process. Giving the dough enough time to rise ensures a fluffy texture.
  • Watch the Baking Time: Ovens can vary, so keep an eye on your bread during the last few minutes of baking to prevent over-browning.

Delicious Variations to Try

Feeling adventurous? Here are some fun variations to personalize your cheesy bread:

  • Herbed Cheese Delight: Add fresh herbs like rosemary or thyme to the cheese mixture for an aromatic twist.
  • Meat Lovers: Mix in small pieces of pepperoni, cooked sausage, or ham for a meaty version that will satisfy savory cravings.
  • Spicy Kick: If you love a bit of heat, increase the red pepper flakes or add diced jalapeños for an extra zing.
  • Sweet and Savory: For a unique flavor combination, drizzle a little honey over the finished bread before serving.

Substitutions You Can Make

Don’t have all the ingredients? No worries! Here are some substitutions that work well:

  • Butter Substitute: If you’re out of butter, you can use olive oil or a plant-based butter alternative.
  • Cheese Alternatives: Feel free to use any melty cheese you prefer, like fontina or Monterey Jack.
  • Herb Swap: If you don’t have dried Italian herbs, try using a pre-mixed Italian seasoning blend.

Essential Equipment

To make this cheesy goodness, you’ll need a few key pieces of equipment:

  • A bundt pan or round baking dish for shaping the bread.
  • A mixing bowl for combining the cheese and seasonings.
  • A rolling pin (optional) to help with dough shaping.
  • A pastry brush for applying that glorious melted butter.

Storage and Freezing Tips

If you happen to have leftovers (which is rare!), here’s how to store them:

  • Storage: Keep any leftover bread in an airtight container at room temperature for up to 2 days. Reheat in the oven to restore its crispy texture.
  • Freezing: You can freeze the unbaked dough balls after coating them in the cheese mixture. Just place them in a single layer on a baking sheet, freeze until solid, then transfer to a freezer bag. When you’re ready to bake, let them thaw and rise before baking as directed.

Frequently Asked Questions

Here are some common questions about this recipe:

  • Can I make this bread ahead of time? Yes! Prepare the dough and cheese mixture, then store it in the fridge overnight. Just let it rise before baking.
  • What can I serve with this bread? This delicious pull apart bread pairs beautifully with marinara sauce, pesto, or even a simple olive oil dip.
  • Can I use a different type of dough? Absolutely! If you’re feeling adventurous, try using pizza dough or even homemade bread dough for a twist.

Troubleshooting Common Issues

If you encounter any hiccups along the way, here are some troubleshooting tips:

  • My bread didn’t rise: Ensure your dough is thawed properly and give it enough time to rise in a warm environment.
  • It’s too dry: Make sure you’re coating the dough balls adequately in melted butter and cheese mixture.
  • Burnt on top: If the top of your bread is browning too quickly, cover it loosely with aluminum foil during the last few minutes of baking.

Gather Around and Enjoy!

Now that you have the recipe and all the tips to make the perfect Cheesy Pull Apart Christmas Bread, it’s time to gather your loved ones and enjoy every cheesy, gooey bite. This recipe is more than just food; it’s a way to create memories, laughter, and warmth in your home during the holiday season.

So, roll up your sleeves, grab that dough, and let’s make some magic happen in the kitchen! Trust me, this cheesy bread will become a beloved tradition that you’ll look forward to every year. Happy cooking, and may your kitchen be filled with love and laughter!

Cheesy Pull Apart Christmas Bread

Prep Time 15 minutes
Cook Time 30 minutes
Total Time 45 minutes
Servings 8 pieces
Calories 350
A delicious, cheesy bread perfect for holiday gatherings, featuring layers of melted cheese and herbs in a pull-apart style.

Ingredients

Dough

  • 1 loaf frozen bread dough (thawed)

Cheese

  • 2 cups shredded mozzarella cheese
  • 0.5 cup grated parmesan cheese

Other ingredients

  • 0.25 cup unsalted butter, melted
  • 3 cloves garlic, minced
  • 1 tablespoon dried Italian herbs
  • 0.25 teaspoon red pepper flakes (optional)
  • to taste salt and pepper
  • for garnish fresh parsley

Instructions 

  • Preheat oven to 350°F (175°C). Grease a bundt pan.
  • Form dough into 1-inch balls. Mix cheeses, garlic, herbs, red pepper, salt, and pepper.
  • Dip each dough ball in melted butter, then coat with cheese mixture.
  • Layer coated balls in pan, pour remaining butter on top, and let rise 30-45 mins.
  • Bake 25-30 mins until golden. Cool slightly, invert, and garnish with parsley.

Notes

Ensure dough is fully thawed for best results.
Calories: 350kcal
Cost: $15
Course: Appetizer
Cuisine: American
Keyword: cheese

Loved this recipe? Save it to your favorite Pinterest board so you can easily find it later! It’s the perfect way to keep all your sweet ideas in one place. ✨

A loaf of Christmas bread showing layers of cheese and herbs, warmly lit for a cozy look.

Welcome to Your New Favorite Comfort Food: Hearty Penne Pasta Bake

Ah, the humble yet magical penne pasta bake. If you’ve ever found yourself in a culinary rut, wondering what to whip up for a family dinner, this recipe is your golden ticket! Picture this: layers of perfectly cooked penne pasta, nestled in a savory sauce of ground beef, tangy tomatoes, and a delightful melty cheese crown. Trust me, it’s the kind of dish that not only fills the belly but also warms the heart.

Growing up in a small town in Oregon, meals like this were a staple in my house. They were the centerpiece of our family gatherings, the comfort food that soothed rough days and celebrated happy ones. Now, as an adult in Seattle, I carry that tradition into my kitchen, creating dishes that feel like home. So, let’s dive into this recipe and discover why it’s destined to be your go-to meal!

Why You’ll Love This Recipe

  • Quick and Easy: This recipe comes together in about 30 minutes, making it perfect for busy weeknights.
  • Family-Friendly: With a blend of flavors that appeal to both kids and adults, it’s guaranteed to please even the pickiest eaters.
  • Customizable: Feel free to swap in your favorite proteins or veggies, making it versatile for any dietary needs.
  • Make-Ahead Option: Prepare it in advance and simply bake when you’re ready to eat, perfect for meal prep!
  • Leftover Friendly: It reheats beautifully, ensuring delicious lunch leftovers to look forward to.

Ingredients Breakdown

Before we get cooking, let’s gather our ingredients. Here’s what you’ll need:

  • 1 pound penne pasta: This pasta shape holds the sauce beautifully, ensuring every bite is flavorful.
  • 1 pound ground beef: A great source of protein; feel free to substitute with ground turkey or even a meat alternative for a lighter option.
  • 1 large onion, chopped finely: Adds depth of flavor; shallots can be used for a milder taste.
  • 2 cloves garlic, minced: Because garlic makes everything better!
  • 1 (28-ounce) can crushed tomatoes: The base of our sauce, bringing in that rich, tangy flavor.
  • 1 teaspoon dried basil: A classic herb that enhances the dish’s aroma.
  • 1 teaspoon dried oregano: Adds a touch of earthiness.
  • 0.5 teaspoon salt: Essential for balancing flavors.
  • 0.25 teaspoon black pepper: A little spice goes a long way!
  • 1 cup shredded mozzarella cheese: The gooey topping that makes this dish irresistible.
  • 0.5 cup grated Parmesan cheese: For an extra layer of cheesy goodness.

How to Make This Hearty Penne Pasta Bake

Side perspective of a bubbling penne pasta bake with ground beef and cheese.

Ready to bring this dish to life? Follow these simple steps:

  1. Preheat your oven to 375 degrees Fahrenheit (190 Celsius).
  2. Cook the penne pasta according to the package instructions until al dente, about 10-12 minutes. Drain and set aside.
  3. In a large skillet, brown the ground beef over medium heat, breaking it up as it cooks. Drain any excess grease.
  4. Add the chopped onion and minced garlic to the skillet and cook for about 5 minutes until the onion is soft.
  5. Pour in the crushed tomatoes and add the dried basil, oregano, salt, and pepper. Stir and let it simmer for about 10 minutes.
  6. Gently add the cooked penne pasta to the skillet and stir to coat the pasta with the sauce.
  7. Pour the pasta mixture into a 9×13 inch baking dish and spread it out evenly.
  8. Sprinkle the shredded mozzarella cheese and grated Parmesan cheese on top.
  9. Bake in the preheated oven for about 20 to 25 minutes until the cheese is melted, golden, and bubbly.

Pro Tips for the Perfect Bake

  • Don’t Overcook the Pasta: Since it will bake further in the oven, aim for al dente.
  • Mix in Veggies: Add spinach, bell peppers, or mushrooms to the meat mixture for extra nutrition.
  • Texture Matters: For a crunchy topping, broil for an additional 2-3 minutes at the end of baking.
  • Cheese Choices: Experiment with different cheeses like cheddar or fontina for unique flavors.
  • Herb Infusion: Fresh herbs like basil or parsley can be sprinkled on top before serving for a burst of freshness.
  • Make it Spicy: Add red pepper flakes to the meat sauce for a little heat.
  • Use Leftover Meat: If you have leftover rotisserie chicken or meat, feel free to use it!
  • Layering Technique: Layer some cheese in the middle of the pasta for an even cheesier experience.

Common Mistakes and Troubleshooting

Even seasoned cooks can face hiccups in the kitchen. Here are some common mistakes and how to avoid them:

  • Dry Pasta Bake: If your bake comes out dry, ensure you have enough sauce. You can add a splash of water or broth before baking.
  • Undercooked Meat: Make sure your ground beef is browned thoroughly; you want it fully cooked before adding it to the pasta.
  • Too Much Cheese: While cheese is delightful, too much can make your bake greasy. Stick to the recommended amounts for the best texture.
  • Sticking to the Dish: Grease your baking dish well to ensure easy serving.

Variations to Try

Feeling adventurous? Here are some variations to keep things exciting!

  • Vegetarian Delight: Substitute the ground beef with lentils or mushrooms for a hearty vegetarian version.
  • Pesto Twist: Mix in some pesto with the tomato sauce for a fresh, herby flavor.
  • Seafood Surprise: Use shrimp or crab meat instead of beef for a coastal flair.
  • Cheesy Broccoli: Add steamed broccoli to the mix for a pop of color and nutrition.

Storage and Make-Ahead Instructions

This dish is not only delicious but also practical! Here’s how to store it:

  • Refrigeration: Store leftovers in an airtight container for up to 3 days.
  • Freezing: This pasta bake freezes well! Wrap tightly and store for up to 3 months. Thaw in the refrigerator overnight before reheating.
  • Make-Ahead: Assemble the dish a day in advance, cover, and refrigerate until ready to bake.

Frequently Asked Questions

Got questions? I’ve got answers! Here are some FAQs about this penne pasta bake:

  • Can I use a different type of pasta? Absolutely! Any short pasta will work, but keep an eye on the cooking time.
  • Is this recipe gluten-free? Yes, just substitute with gluten-free pasta.
  • Can I add more vegetables? Definitely! Spinach, zucchini, or bell peppers make great additions.
  • How do I know when it’s done baking? Look for bubbly cheese and a golden top to indicate it’s ready.
  • Can I make this dish in advance? Yes! You can prep it a day ahead and bake when you’re ready.
  • What should I serve with this dish? A fresh salad or some garlic bread pairs perfectly with this hearty bake.
  • Can I use fresh tomatoes instead of canned? Yes, just ensure they are well chopped and seasoned.
  • What’s the best way to reheat leftovers? Reheat in the oven at 350°F until warmed through, about 15-20 minutes.

Nutritional Tips and Dietary Adaptations

This hearty penne pasta bake can be adapted to suit various dietary needs:

  • Low-Carb Option: Substitute pasta with zucchini noodles (zoodles) for a lower-carb dish.
  • Dairy-Free: Use dairy-free cheese alternatives and swap ground beef with a plant-based meat substitute.
  • High-Protein: Add beans like black beans or chickpeas for an extra protein kick.

Essential Equipment

To make this recipe seamlessly, here’s what you’ll need:

  • Large Skillet: For browning the meat and mixing the sauce.
  • 9×13 Inch Baking Dish: Perfect for this pasta bake, providing ample space for all the delicious layers.
  • Colander: To drain the pasta effectively.
  • Wooden Spoon: For stirring up all those amazing flavors.

Serving Suggestions

Now that your penne pasta bake is ready, here are some delightful serving ideas:

  • Fresh Green Salad: A light salad with a tangy vinaigrette complements the richness of the bake.
  • Garlic Bread: Because who can say no to buttery, garlicky goodness?
  • Wine Pairing: A nice Chianti or a light Pinot Grigio can enhance your meal perfectly.

So, there you have it! A hearty penne pasta bake that’s not just a meal, but a comforting hug on a plate. Whether you’re cooking for family or treating yourself, this recipe is bound to become a cherished favorite. Pull up a chair, grab a fork, and enjoy the magic of home-cooked goodness!

Perfect Penne Pasta Bake

Prep Time 15 minutes
Cook Time 25 minutes
Total Time 40 minutes
Servings 6 servings
Calories 850
A hearty and cheesy baked pasta dish that's perfect for family dinners. Easy to prepare and full of flavor.

Ingredients

Pasta and Meat

  • 1 pound penne pasta
  • 1 pound ground beef
  • 1 large onion, chopped finely
  • 2 cloves garlic, minced
  • 1 can (28-ounce) crushed tomatoes
  • 1 teaspoon dried basil
  • 1 teaspoon dried oregano
  • 0.5 teaspoon salt
  • 0.25 teaspoon black pepper
  • 1 cup shredded mozzarella cheese
  • 0.5 cup grated Parmesan cheese

Instructions 

  • Preheat oven to 375°F (190°C). Cook pasta until al dente, then drain.
  • Brown ground beef with chopped onion and garlic. Add crushed tomatoes, basil, oregano, salt, and pepper; simmer 10 minutes.
  • Mix cooked pasta into the sauce. Transfer to a baking dish, top with cheeses, and bake for 20-25 minutes until bubbly and golden.

Notes

You can add chopped vegetables like bell peppers or spinach for extra nutrition.
Calories: 850kcal
Cost: $15
Course: Main Course
Cuisine: Italian
Keyword: pasta

Why You’ll Adore These Bowls

Let’s face it: life can get hectic, and when you’re juggling work, family, and everything in between, the last thing you want is to spend hours in the kitchen. Enter Honey Garlic Salmon Rice Bowls—the delightful fusion of sweet and savory that offers a comforting hug in a bowl. These bowls not only taste amazing but also come together in a flash, making them perfect for weeknight dinners or meal prep. With tender salmon glazed in a luscious honey-garlic sauce, fluffy rice, and vibrant steamed broccoli, this dish checks all the boxes for flavor, nutrition, and ease.

Ingredients You’ll Need

Gathering your ingredients is half the fun! Here’s what you’ll need to whip up these delightful bowls:

  • 2 salmon fillets
  • 2 tablespoons honey
  • 2 tablespoons soy sauce
  • 2 cloves garlic, minced
  • 1 tablespoon olive oil
  • 2 cups cooked rice
  • 1 cup steamed broccoli
  • Sesame seeds for garnish
  • Chopped green onions for garnish

These ingredients work harmoniously together to create a dish that’s not only delicious but also visually stunning. And let’s be real, who doesn’t love a meal that looks as good as it tastes?

Crafting Your Honey Garlic Salmon Rice Bowls

An appetizing honey garlic salmon bowl with rice, broccoli, and garnishes of sesame seeds and green onions.

Ready to dive into the cooking process? Let’s make magic happen!

  1. In a small bowl, mix together the honey, soy sauce, and minced garlic until well combined. This glaze is the secret to the delightful flavor of your salmon!
  2. Heat the olive oil in a skillet over medium heat. Once the oil is shimmering, it’s time to add the salmon.
  3. Place the salmon fillets in the skillet, skin-side down, and cook for about 4-5 minutes. This allows the skin to crisp up beautifully.
  4. Flip the salmon fillets gently, pouring the honey garlic mixture over them. Cook for another 3-4 minutes, basting the salmon with the sauce until it’s cooked through and flaky.
  5. Once cooked, remove the salmon from the skillet and let it rest for a minute. This step is crucial for keeping the fish juicy!
  6. In a bowl, layer the cooked rice, steamed broccoli, and top with your beautifully glazed honey garlic salmon.
  7. Finally, garnish with sesame seeds and chopped green onions before serving. Voilà! You’ve created a masterpiece.

Tips for the Perfect Bowls

To ensure your Honey Garlic Salmon Rice Bowls are nothing short of spectacular, here are some tips:

  • Quality Matters: Always choose fresh salmon fillets. Look for bright, clear flesh and avoid any fillets that have a dull appearance.
  • Watch the Heat: Cooking the salmon at medium heat allows for even cooking and prevents the glaze from burning.
  • Customize Your Veggies: While broccoli is a great addition, feel free to swap it out for your favorite vegetables like snap peas, bell peppers, or even sautéed spinach.
  • Feel Free to Experiment: Try adding a splash of lime juice or a sprinkle of chili flakes to the glaze for an extra kick!

Create Ahead for Convenience

If you’re a fan of meal prep, you’ll love how easy it is to make these bowls in advance:

  • Glaze Prep: Mix the honey garlic sauce up to three days in advance and store it in an airtight container in the fridge.
  • Rice Ready: Cook your rice ahead of time and refrigerate it for up to five days. Reheating rice is a breeze!
  • Veggie Power: Steam your broccoli or other veggies in advance, storing them separately until you’re ready to assemble.

When the time comes to enjoy your meal, simply reheat everything, sear the salmon with the glaze, and you’re good to go!

Serving Suggestions

To elevate your dining experience, think about pairing your Honey Garlic Salmon Rice Bowls with some delightful sides:

  • Crispy Wontons: These add a fantastic crunch that complements the tender salmon.
  • Fresh Salad: A light cucumber salad drizzled with sesame dressing can offer a refreshing contrast.
  • Lemon Cake: For dessert, a slice of lemon cake provides a sweet, tangy finish that balances the savory main course.

Don’t hesitate to get creative—your kitchen is your playground!

Storage and Freezing Tips

Leftovers? No problem! Here’s how to store your bowls:

  • Refrigeration: Store your leftover Honey Garlic Salmon Rice Bowls in an airtight container in the fridge for up to three days. Keeping the components separate is ideal to avoid sogginess.
  • Freezing: For longer storage, freeze the salmon and veggies separately in airtight containers for up to two months. When ready to enjoy, thaw overnight in the fridge and gently reheat.

By following these tips, you’ll be able to savor the deliciousness for days to come!

Variations & Substitutions

Don’t be afraid to switch things up! Here are some ideas to make this recipe your own:

  • Protein Swap: If salmon isn’t your thing, try this recipe with chicken or tofu for a different flavor profile.
  • Gluten-Free Option: Use tamari in place of soy sauce for a gluten-free version without sacrificing flavor.
  • Sweetener Alternatives: Maple syrup works wonderfully as a substitute for honey if you’re looking for a vegan option.

Remember, cooking is all about personal expression, so have fun experimenting!

FAQs About Honey Garlic Salmon Rice Bowls

Got questions? I’ve got answers:

  • How can I tell if my salmon is fresh? Look for fillets with bright, clear flesh and a clean, ocean-like smell.
  • Can I store leftovers, and for how long? Absolutely! Store them in an airtight container for up to 3-4 days.
  • Can I freeze the salmon bowls? Yes! Just separate the components and freeze them for up to 2 months.
  • What if my glaze isn’t thickening? Increase the heat slightly and continue to baste the salmon with the glaze as it cooks.

Troubleshooting Common Issues

Here are a few common hiccups you might encounter and how to fix them:

  • Glaze Not Caramelizing: If your glaze isn’t thickening, ensure you’re cooking it at the right temperature and continuously basting the salmon.
  • Salmon Overcooked: Keep an eye on your salmon as it cooks; it’s better to slightly undercook it as it continues to cook when resting.
  • Rice Too Sticky: If your rice turns out too sticky, try rinsing it before cooking next time to remove excess starch.

Cooking is a learning experience, so don’t stress if things don’t go perfectly the first time—just adjust and try again!

Conclusion: Your New Go-To Meal Awaits

There you have it! A scrumptious recipe for Honey Garlic Salmon Rice Bowls that blends sweetness and savoriness into a comforting dish you’ll want to make again and again. With easy prep, minimal ingredients, and the ability to customize it to your liking, this recipe is destined to become a staple in your kitchen. So what are you waiting for? Grab your ingredients, and let’s get cooking! Whether it’s a cozy dinner for yourself or a fun gathering with friends, these bowls will surely impress. Happy cooking, and may your kitchen be filled with the delightful aroma of honey and garlic!

Honey Garlic Salmon Rice Bowls

Prep Time 10 minutes
Cook Time 15 minutes
Total Time 25 minutes
Servings 2 servings
Calories 550
A delicious and easy-to-make bowl combining tender salmon, flavorful honey garlic sauce, rice, and vegetables for a satisfying meal.

Ingredients

Protein

  • 2 pieces salmon fillets
  • 2 tablespoons honey
  • 2 tablespoons soy sauce
  • 2 cloves garlic, minced
  • 1 tablespoon olive oil

Carbohydrates

  • 2 cups cooked rice

Vegetables

  • 1 cup steamed broccoli
  • sesame seeds sesame seeds for garnish
  • green onions chopped green onions for garnish

Instructions 

  • Mix honey, soy sauce, and minced garlic in a small bowl.
  • Heat olive oil in a skillet over medium heat.
  • Cook salmon fillets 4-5 minutes per side, then add sauce and cook 3-4 more minutes.
  • Rest salmon briefly, then assemble bowls with rice, broccoli, and salmon.
  • Garnish with sesame seeds and chopped green onions before serving.

Notes

For extra flavor, marinate the salmon in the sauce for 15 minutes before cooking.
Calories: 550kcal
Cost: $15
Course: Main Course
Cuisine: Asian
Keyword: Salmon

Loved this recipe? Save it to your favorite Pinterest board so you can easily find it later! It’s the perfect way to keep all your sweet ideas in one place. ✨

Detailed view of a honey garlic salmon rice bowl, showcasing salmon, rice, and bright green broccoli.

Why This Recipe Will Warm Your Heart

There’s something inherently comforting about a well-cooked pot of rice, especially when it’s infused with aromatic spices and fresh ingredients. This isn’t just any rice dish; it’s a nostalgic journey back to my childhood, where meals were made with love and every bite told a story. Today, I’m excited to share a delightful recipe that wraps you in nostalgia while also bringing warmth to your kitchen. Perfect for family dinners or a cozy night in, this dish will surely make you pause, take a deep breath, and savor the moment.

The Magic of Basmati Rice

Basmati rice is often hailed as the king of rice, and for good reason. With its long, slender grains and nutty aroma, it elevates any dish to a new level of deliciousness. When you cook basmati rice, it transforms into fluffy, separate grains that are nothing short of magical. This recipe harnesses that magic, combining it with spices that not only enhance the flavor but also evoke memories of home-cooked meals shared with loved ones.

Ingredients You’ll Need

A beautifully plated serving of seasoned rice with herbs, captured in soft natural light highlighting its fluffy grains.
  • 2 cups of basmati rice
  • 4 cups of water
  • 1 onion, finely chopped
  • 2 garlic cloves, minced
  • 1 teaspoon cumin seeds
  • 1 teaspoon turmeric powder
  • Salt to taste
  • 2 tablespoons olive oil
  • Fresh coriander for garnish

Each ingredient plays a crucial role in creating a dish that’s not only flavorful but also filled with warmth and comfort. The spices, especially cumin and turmeric, add depth and a beautiful golden hue to the rice. And let’s not forget the fresh coriander! It’s the final touch that brings everything together, adding a burst of freshness that’s simply irresistible.

Step-by-Step Instructions

Now that we’ve gathered our ingredients, let’s dive into the cooking process. Don’t worry if you’re not a seasoned chef; this recipe is straightforward and forgiving. Let’s get started!

  1. Rinse the Rice: Begin by rinsing the basmati rice under cold water until the water runs clear. This step is essential as it removes excess starch, preventing the rice from becoming gummy. Trust me, your patience will pay off!
  2. Sauté the Aromatics: In a large pot, heat the olive oil over medium heat. Add the finely chopped onion and sauté until it becomes translucent. The aroma of sautéing onions is one of the best parts of cooking, isn’t it?
  3. Add Garlic and Spices: Once the onions are ready, add the minced garlic and cumin seeds. Cook for an additional minute until fragrant. Your kitchen will start to smell divine!
  4. Mix in the Rice: Stir in the turmeric powder and the rinsed rice, mixing well to ensure that the rice is evenly coated with the spices. This step is crucial for flavor; every grain should be kissed by the spices!
  5. Bring to a Boil: Pour in the water and add salt to taste. Bring the mixture to a boil. This moment is where the magic begins to happen!
  6. Simmer: Once boiling, reduce the heat to low, cover the pot, and let it simmer for about 15-20 minutes or until the rice is cooked and all the water is absorbed. Avoid the temptation to lift the lid too soon; let the steam do its work!
  7. Fluff and Garnish: After the rice has finished cooking, fluff it with a fork and garnish with fresh coriander before serving. This final touch adds a burst of color and freshness that makes the dish pop!

Tips for Perfect Rice

  • Use Quality Basmati: The type of rice makes a difference! Invest in a good quality basmati rice for the best flavor and texture.
  • Don’t Skip the Rinsing: Rinsing your rice is key to achieving that fluffy texture. It’s a small step that makes a big difference!
  • Keep the Lid On: When simmering, resist the urge to peek. Keeping the lid on lets the steam cook the rice evenly.
  • Flavor Variations: Feel free to add vegetables or nuts during the cooking process for added texture and flavor. Peas, carrots, or even cashews work wonderfully!

Delicious Variations

This recipe is incredibly versatile! Here are a few variations to keep things exciting:

  • Herbed Rice: Add dried herbs like thyme or rosemary alongside the cumin for a fragrant twist.
  • Spicy Kick: Incorporate a pinch of red chili flakes or a diced chili pepper for some heat.
  • Lemon Zest: A bit of lemon zest added at the end can brighten up the flavors beautifully.

Substitutions to Consider

If you’re missing an ingredient or want to switch things up, here are some easy substitutions:

  • Olive Oil: Substitute with coconut oil for a different flavor profile.
  • Fresh Coriander: If you’re not a fan, parsley or green onions can be great alternatives.
  • Rice: While basmati is the star here, jasmine or long-grain rice can also work in a pinch.

Essential Equipment

To make this recipe, you’ll need:

  • A large pot or saucepan with a lid
  • A fine-mesh sieve for rinsing the rice
  • A fork for fluffing the rice

Storage and Freezing Tips

This rice dish stores beautifully! Here’s how to keep it fresh:

  • Refrigeration: Store any leftovers in an airtight container in the fridge for up to 4 days.
  • Freezing: You can freeze cooked rice for up to 3 months. Just thaw it overnight in the fridge before reheating.

Frequently Asked Questions

Let’s tackle some common questions about this dish:

  • Can I use brown basmati rice? Absolutely! Just remember that brown rice will require a longer cooking time and more water.
  • What can I serve with this rice? This dish pairs wonderfully with curries, grilled meats, or even a simple salad.
  • Can I make this in a rice cooker? Yes! Follow the same steps for sautéing the aromatics, then transfer everything to your rice cooker with the water and cook according to the manufacturer’s instructions.

Troubleshooting Common Issues

Even the best of us have kitchen mishaps. Here are some troubleshooting tips:

  • Rice Too Sticky: If your rice turns out sticky, it may not have been rinsed enough. Next time, rinse until the water runs clear!
  • Rice Under-Cooked: If the rice is still hard, add a splash more water, cover, and cook for a few more minutes.

Conclusion

As we wrap up this cozy recipe journey, I hope you feel inspired to recreate this comforting dish in your own kitchen. It’s not just about the food; it’s about the memories we create while cooking and sharing meals with loved ones. So gather your ingredients, turn on some music, and let the warmth of this basmati rice dish fill your home with love and nostalgia. Remember, every meal made with care is a chance to create a beautiful memory. Happy cooking, my friends!

Loved this recipe? Save it to your favorite Pinterest board so you can easily find it later! It’s the perfect way to keep all your sweet ideas in one place. ✨

An eye-level view of a cozy dish of basmati rice with vibrant herbs, illuminated by warm light and soft shadows.

Experience the Comfort of Homemade Cheese Manicotti

Welcome to my kitchen, where the aroma of homemade meals fills the air, and every dish tells a story. Today, we’re diving into a recipe that embodies warmth and nostalgia: cheese manicotti. If you’ve ever tasted this delightful dish, you know it’s more than just pasta—it’s a heartfelt embrace served on a plate. Imagine tender manicotti shells stuffed with a velvety ricotta filling, all bathed in a rich marinara sauce. Whether you’re preparing for a cozy family dinner or looking to impress guests, this recipe promises to deliver a culinary experience that feels like home.

In this guide, I’ll walk you through every step of creating a mouthwatering cheese manicotti. From ingredient breakdowns to expert tips, I want you to feel confident and excited to make this dish. So, grab your apron, and let’s make some magic happen in the kitchen!

Why You’ll Love This Recipe

There are countless reasons to fall in love with this cheese manicotti, and here are just a few:

  • Comfort food classic: This dish brings back memories of family gatherings and cozy nights in, making it the perfect choice for any occasion.
  • Impressive presentation: With its vibrant colors and delightful layers, cheese manicotti is sure to wow your dinner guests.
  • Customizable flavors: You can easily adapt the filling and sauce to suit your taste, whether you prefer a spicy kick or a delicate herbaceous flavor.
  • Make-ahead convenience: Prepare your manicotti in advance and simply bake when you’re ready to serve, saving you time without sacrificing flavor.
  • Vegetarian-friendly: This dish is hearty and satisfying, making it a great option for meatless meals.

Ingredient Breakdown

Before we dive into the cooking process, it’s essential to understand the ingredients that will bring your cheese manicotti to life. Here’s what you’ll need:

  • 12 pieces manicotti shells: Opt for larger shells to hold ample filling. Look for no-boil options to simplify prep.
  • 2 cups San Marzano pasta sauce: The rich, sweet flavor of San Marzano tomatoes elevates your dish. Feel free to use any good-quality tomato sauce you have on hand.
  • 15 oz ricotta cheese: This creamy cheese is essential for texture. You can substitute with cottage cheese if desired.
  • 2 large eggs: Beaten lightly, they help bind the filling together.
  • 1 tsp garlic powder: For a burst of flavor, or you can use fresh minced garlic for a more robust taste.
  • 1 tsp onion powder: Optional, but it adds a wonderful depth to the filling.
  • 2 cups mozzarella cheese: Reserve half for topping. Choose whole milk mozzarella for a creamier texture.
  • 1/2 cup parmesan cheese: Adds depth to the filling and pairs beautifully with marinara.
  • 1/4 cup fresh parsley: Chopped, or substitute with dried herbs for convenience.
  • 1/4 cup fresh basil: Chopped, this adds a fresh, aromatic touch.
  • Black pepper and salt: To taste, these enhance the overall flavor.

Pro Tips for Perfect Manicotti

Side view of golden-brown manicotti shells stuffed with cheese and herbs.

To ensure your manicotti turns out perfectly delicious, consider these expert insights:

  • Choose the right shells: If you can find them, go for no-boil manicotti shells. They save time and ensure perfect texture.
  • Mix filling thoroughly: Combine your ricotta, mozzarella, parmesan, and seasonings well to ensure every bite is packed with flavor.
  • Don’t overfill: When stuffing the shells, be careful not to overstuff. A generous tablespoon of filling per shell is typically perfect.
  • Invest in quality sauce: Using a rich, flavorful marinara sauce makes a world of difference in your finished dish.
  • Cover while baking: To prevent the top from browning too quickly, cover the manicotti with foil for the first half of baking.
  • Let it rest: Allow your manicotti to cool for a few minutes before serving. This helps the flavors meld beautifully.
  • Experiment with herbs: Don’t hesitate to add your favorite herbs to the filling for a personal touch.
  • Save leftovers: If you have any manicotti left, they make for a delicious next-day lunch!

Common Mistakes and Troubleshooting

Even the most seasoned cooks can face challenges! Here are some common mistakes and how to avoid them:

  • Shells cracking: Ensure your shells are cooked according to package instructions. If using no-boil shells, soak them in hot water briefly.
  • Filling spilling out: Stuff gently and allow a bit of space at the top of the shell. Overfilling can lead to messes!
  • Dry pasta: If your pasta seems dry after baking, cover with sauce before baking and keep it covered with foil initially.
  • Flavorless filling: Always taste your filling before stuffing. Adjust seasoning as needed to enhance the flavor.

Delicious Variations to Try

Once you’ve mastered the classic cheese manicotti, try these fun variations:

  • Spinach and Ricotta Manicotti: Add fresh or frozen spinach to your ricotta filling for a nutritious twist.
  • Mushroom and Herb Manicotti: Sauté mushrooms and mix them into the cheese filling for an earthy flavor.
  • Meat Lover’s Manicotti: Incorporate cooked ground beef or sausage into the filling for a hearty option.
  • Spicy Chipotle Manicotti: Mix in chipotle peppers or a dash of cayenne for a spicy kick.

Storage and Make-Ahead Instructions

This cheese manicotti is perfect for making ahead of time. Here’s how to store it:

  • In the refrigerator: You can prepare the manicotti up to two days in advance. Cover tightly with foil or plastic wrap.
  • Freezing: Assemble the manicotti and freeze before baking. They can last for up to three months in the freezer. Thaw overnight in the refrigerator before baking.
  • Reheating: To reheat, cover with foil and bake at 350°F for about 20 minutes until heated through.

Comprehensive FAQ

Here are some frequently asked questions to help you navigate your manicotti adventure:

  • Can I use other types of cheese? Absolutely! Feel free to mix and match your favorite cheeses for a unique flavor.
  • What can I serve with manicotti? A fresh salad and garlic bread pair beautifully with this dish.
  • How do I know when my manicotti is done baking? The cheese should be bubbly and golden brown, and the shells should be tender.
  • Can I make this dish vegan? Yes! Substitute ricotta with tofu or cashew cheese, use vegan egg replacements, and opt for dairy-free cheese.
  • What if I have leftover filling? Use it in stuffed peppers or mix it into a pasta sauce for a quick meal.
  • Can I make manicotti without sauce? You can bake them plain, but sauce enhances the flavor and prevents dryness.
  • How long can I keep leftovers? Store leftovers in the refrigerator for up to four days.
  • Is manicotti the same as cannelloni? They are similar, but manicotti shells are typically larger and have ridges.

Nutritional Tips and Dietary Adaptations

This dish can be adapted to fit various dietary needs:

  • Gluten-free: Use gluten-free pasta shells to make a delicious alternative.
  • Low-carb: Consider using zucchini noodles or eggplant slices in place of pasta.
  • Reduced-fat: Opt for low-fat cheeses and reduce the amount of cheese in the filling.
  • Protein-packed: Add cooked lentils or chickpeas to the cheese mixture for added protein.

Essential Equipment Recommendations

Before you start cooking, gather these essential items:

  • Large pot: For boiling manicotti shells if not using no-boil varieties.
  • 9×13 inch baking dish: Perfect for baking and serving your manicotti.
  • Mixing bowls: For combining your filling ingredients.
  • Spatula: Helpful for stuffing the shells and spreading sauce.

Serving Suggestions

When it’s time to serve, consider these delightful ideas:

  • Garnish: Top with fresh basil or parsley for a pop of color and freshness.
  • Pair with wine: A glass of Chianti or a crisp Italian white wine will complement the flavors beautifully.
  • Side dishes: Garlic bread, a simple green salad, or roasted vegetables make excellent companions.

Conclusion

There you have it—a comprehensive guide to making irresistible cheese manicotti right at home. This recipe is not just a meal; it’s an experience that brings joy and warmth to your table. Whether you’re making it for a family gathering or a quiet night in, I hope this dish fills your heart and your belly with happiness. Remember, cooking is all about love, creativity, and a pinch of adventure. So go ahead, embrace your inner chef, and create something magical today!

Mouthwatering Classic Cheese Manicotti You’ll Crave Tonight

Prep Time 15 minutes
Cook Time 30 minutes
Total Time 45 minutes
Servings 6 pieces
Calories 450
Enjoy this cheesy, flavorful manicotti baked to perfection, perfect for a comforting dinner.

Ingredients

Pasta Shells

  • 12 pieces Manicotti Shells (opt for larger shells)
  • 2 cups San Marzano Pasta Sauce (or any good tomato sauce)
  • 15 oz Ricotta Cheese (essentials for texture)
  • 2 large Eggs (beaten lightly)
  • 1 tsp Garlic Powder (or fresh garlic for more flavor)
  • 1 tsp Onion Powder (optional for a milder taste)
  • 2 cups Mozzarella Cheese (reserve half for topping)
  • 1/2 cup Parmesan Cheese (for the filling’s depth)
  • 1/4 cup Fresh Parsley (or dried herbs)
  • 1/4 cup Fresh Basil (or dried herbs)
  • to taste Black Pepper Black Pepper (for seasoning)
  • to taste Salt Salt (for seasoning)

Instructions 

  • Cook the manicotti shells according to package instructions, then drain and set aside.
  • Mix ricotta, Parmesan, parsley, basil, garlic powder, salt, pepper, and beaten eggs to create the filling.
  • Stuff each shell with the cheese mixture and place in a baking dish with sauce poured over.
  • Top with remaining mozzarella cheese and bake at 375°F (190°C) for 25-30 minutes until bubbly and golden.
  • Garnish with fresh basil before serving.

Notes

For a richer flavor, let the dish rest for 10 minutes before serving.
Calories: 450kcal
Cost: $15
Course: Main Course
Cuisine: Italian
Keyword: cheese, pasta

Why You’ll Love This Dish

Let me paint a picture for you: It’s a busy weeknight, the clock is ticking, and your stomach is grumbling. You want something that not only tastes fantastic but is also quick and easy to prepare. Enter my crispy honey garlic glazed salmon recipe. This dish is your culinary knight in shining armor, ready to swoop in and save dinner with its delightful blend of sweet and savory flavors.

Imagine tender salmon fillets, their skin perfectly crisped, topped with a luscious honey garlic glaze that caramelizes beautifully in the oven. Each bite is a bite of magic, where the rich flavor of the fish meets the sweet allure of honey and the aromatic kick of garlic. Trust me; this dish will have your loved ones asking for more!

Key Ingredients for the Recipe

Before we dive into the cooking process, let’s take a moment to appreciate the star players in our crispy honey garlic glazed salmon:

  • 4 salmon fillets: Choose skin-on fillets for that irresistible crispy texture. The skin locks in moisture and adds a delightful crunch.
  • 2 tablespoons honey: The sweet hero of our glaze, honey brings a natural sweetness that caramelizes beautifully.
  • 3 cloves garlic, minced: Fresh garlic infuses the dish with an aromatic depth that’s hard to resist.
  • 2 tablespoons soy sauce: A splash of soy sauce adds a savory umami punch, balancing the sweetness of the honey.
  • 1 tablespoon olive oil: Essential for cooking and adds a rich flavor to the salmon.
  • Salt and pepper to taste: Simple seasonings that enhance the flavors of the dish.
  • 1 tablespoon sesame seeds (optional): A sprinkle of these adds a lovely crunch and nutty flavor.
  • Chopped green onions for garnish (optional): A fresh touch that elevates the presentation and flavor.

Cooking Instructions

Glazed salmon with a shiny honey garlic coating, showcased on a rustic plate.

Ready to create some culinary magic? Let’s get started with the steps to make this mouthwatering crispy honey garlic glazed salmon:

  1. Preheat your oven to 400°F (200°C).
  2. In a small bowl, whisk together the honey, minced garlic, soy sauce, olive oil, salt, and pepper until well combined.
  3. Place the salmon fillets skin-side down on a baking sheet lined with parchment paper.
  4. Generously brush the honey garlic mixture over the salmon fillets, making sure they are well coated.
  5. Bake in the preheated oven for 12-15 minutes, or until the salmon is cooked through and flakes easily with a fork.
  6. For that extra crispy skin, turn on the broiler and broil the salmon for an additional 2-3 minutes at the end of baking.
  7. Remove from the oven and sprinkle with sesame seeds and chopped green onions if desired.
  8. Serve immediately and enjoy your crispy honey garlic glazed salmon!

Cooking Tips for Success

Even though this recipe is simple, a few tips can help you elevate your dish to restaurant quality:

  • Pat the salmon dry: Before seasoning, make sure to pat the salmon fillets dry with a paper towel. This helps achieve that coveted crispy skin.
  • Preheat your pan: If you’re using a skillet, ensure it’s hot before adding the salmon. A hot pan helps create the perfect sear.
  • Be mindful of cooking time: Keep an eye on your salmon while it cooks. You want it to reach an internal temperature of 145°F for perfect doneness.

Variations on the Recipe

One of the best aspects of this crispy honey garlic glazed salmon is its versatility. Here are some fun variations you can try:

  • Spicy Honey Garlic Salmon: Add a pinch of red pepper flakes or a splash of sriracha to your honey garlic mixture for a spicy kick.
  • Maple Garlic Glazed Salmon: Swap out honey for maple syrup for a different flavor profile that’s equally delicious.
  • Vegetable Additions: Toss some asparagus or broccoli on the baking sheet alongside the salmon for a complete meal.

Substitutions You Can Make

Running low on ingredients? No worries! Here are some substitutions that won’t compromise flavor:

  • Salmon: If salmon isn’t available, feel free to use trout, tilapia, or even chicken breasts.
  • Honey: Agave nectar or brown sugar can replace honey if you’re looking for a different sweetness.
  • Soy Sauce: Tamari sauce or coconut aminos work well for a gluten-free option.

Equipment Needed

Gathering the right tools can make your cooking experience smoother. Here’s what you’ll need:

  • Baking sheet
  • Parchment paper
  • Small mixing bowl
  • Whisk
  • Meat thermometer (optional, but helpful for checking doneness)

Storage and Freezing Tips

If you have leftovers (not likely, but just in case!), here’s how to store them:

  • Refrigeration: Store leftover salmon in an airtight container in the fridge for up to 3 days.
  • Freezing: You can freeze cooked salmon for up to 3 months. Just wrap it tightly in plastic wrap and then place it in a freezer-safe bag.

FAQs

Here are some frequently asked questions about this recipe:

  • Can I use skinless salmon fillets? Yes, you can, but the skin helps achieve that crispy texture, so keep that in mind.
  • What sides pair well with this dish? Steamed rice, quinoa, or a fresh salad complement the salmon beautifully.
  • How do I know when the salmon is done? The salmon should flake easily with a fork and have an internal temperature of 145°F.

Troubleshooting Common Issues

If you run into any hiccups while cooking, here are some solutions:

  • Salmon sticking to the pan: Make sure your pan is adequately oiled and preheated. Using a non-stick skillet can also help.
  • Skin not crispy: Ensure the salmon is dry before cooking and that you give it enough time under the broiler for that golden finish.

In Conclusion

This crispy honey garlic glazed salmon recipe is a true gem in my kitchen repertoire. It’s perfect for those busy weeknights when you want something delicious without spending hours slaving away in the kitchen. With its enticing flavors and beautiful presentation, this dish is sure to impress your family and friends. So, grab your ingredients, and get ready to whip up a meal that will have everyone coming back for seconds. Remember, cooking is all about joy and creativity, so don’t hesitate to make this recipe your own. Happy cooking!

crispy honey garlic glazed salmon recipe

Prep Time 10 minutes
Cook Time 15 minutes
Total Time 25 minutes
Servings 4 servings
Calories 350
This delicious salmon recipe features a sweet and savory honey garlic glaze with a crispy finish, perfect for a quick and flavorful meal.

Ingredients

Main ingredients

  • 4 fillets salmon fillets (skin-side down)
  • 2 tablespoons honey
  • 3 cloves garlic, minced
  • 2 tablespoons soy sauce
  • 1 tablespoon olive oil
  • to taste salt and pepper
  • 1 tablespoon sesame seeds (optional)
  • chopped green onions for garnish (optional)

Instructions 

  • Preheat oven to 400°F (200°C).
  • Mix honey, garlic, soy sauce, olive oil, salt, and pepper.
  • Place salmon on a baking sheet, brush with glaze.
  • Bake for 12-15 minutes, broil for 2-3 minutes for crispiness.
  • Garnish with sesame seeds and green onions, serve immediately.

Notes

For extra flavor, marinate the salmon in the glaze for 15 minutes before baking.
Calories: 350kcal
Cost: $15
Course: Main Course
Cuisine: American
Keyword: Salmon

Loved this recipe? Save it to your favorite Pinterest board so you can easily find it later! It’s the perfect way to keep all your sweet ideas in one place. ✨

Eye-level view of succulent honey garlic salmon, highlighted by warm natural light.

Why You’ll Fall in Love with This Recipe

Let’s talk about comfort food—the kind that wraps you in a warm hug and makes everything feel a little brighter. The Million Dollar Soup Velvet is precisely that. Imagine a bowl of rich, creamy goodness that not only warms your body but also nourishes your soul. This soup is like a cozy blanket on a chilly evening, and I can’t wait to share why it’s destined to become a staple in your kitchen.

First off, it’s incredibly versatile. Whether you’re serving it up on a weeknight after a long day or whipping it up for a weekend gathering, this soup can do it all. It’s perfect for chilly nights when all you crave is something warm and fulfilling. It’s also an excellent option for meal prepping because it freezes beautifully. Plus, who doesn’t want a dish that feels fancy enough to impress dinner guests while being simple enough to throw together on a busy night?

Now, let’s dive deeper into this magical recipe. You’ll need just a few ingredients—chicken and cheese—paired with a rich and creamy base. Sounds pretty straightforward, right? But it’s the way these elements come together that transforms them into something extraordinary. As you sip on this soup, you’ll find that each spoonful is a delightful experience, with flavors that dance on your palate. So, grab your apron, and let’s get started on this journey to soup perfection!

Ingredients for Million Dollar Soup Velvet

To make this creamy delight, here’s what you’ll need:

  • Chicken: Fresh, boneless, skinless chicken breasts or thighs work best.
  • Cheese: A blend of your favorite melty cheeses—think cheddar, cream cheese, or even a touch of Parmesan for that extra flavor kick.

How to Create Your Million Dollar Soup Velvet

An enticing bowl of velvety soup featuring chicken and cheese, presented with a blurred background.

Now that you have your ingredients, let’s break down the steps to create this velvety goodness:

  1. Prepare the Chicken: Start by cooking the chicken until it’s tender and juicy. You can poach it, grill it, or even sauté it in a pan with some olive oil and seasoning. Once cooked, shred the chicken into bite-sized pieces and set aside.
  2. Make the Base: In a large pot, melt some butter over medium heat. Add in diced onions and garlic, sautéing until they’re soft and fragrant. This step is crucial; it sets the flavor foundation for your soup.
  3. Add Creaminess: Pour in heavy cream (or half-and-half for a lighter version) and bring it to a gentle simmer. Stir in your choice of cheese, allowing it to melt into the cream, creating that luscious texture we all crave.
  4. Combine Ingredients: Add the shredded chicken back into the pot, along with any additional seasonings you love—think salt, pepper, and perhaps a sprinkle of Italian herbs for a flavor boost.
  5. Final Touches: Let everything simmer together for a few minutes, allowing the flavors to meld beautifully. If you want to elevate it even more, consider adding fresh herbs like parsley or chives right before serving.

Tips for Making the Perfect Soup

Here are some insider tips to ensure your soup turns out perfectly every time:

  • Use Quality Ingredients: The fresher your ingredients, the better your soup will taste. Don’t skimp on the cheese—after all, it’s the star of the show!
  • Don’t Rush the Sauté: Allowing the onions and garlic to soften properly will deepen the flavor, making your soup even more delicious.
  • Adjust Consistency: If you prefer a thicker soup, add a bit more cheese or a splash of cornstarch mixed with water to thicken it up. If it’s too thick, just add a little more broth or cream.

Variations to Try

This recipe is incredibly flexible. Here are some fun variations you might consider:

  • Add Veggies: Incorporate seasonal vegetables like carrots, celery, or spinach to boost nutrition and flavor.
  • Spice It Up: If you like a kick, add diced jalapeños or a dash of cayenne pepper to give it some heat.
  • Herb Infusion: Fresh herbs like thyme, dill, or rosemary can add an aromatic touch that elevates the dish.

Storage and Freezing Tips

Wondering how to store your leftovers? Here’s how to keep your soup fresh:

  • Refrigerate: Store in an airtight container in the fridge for up to 3 days. Reheat gently on the stove or in the microwave.
  • Freeze: This soup freezes beautifully! Pour it into freezer-safe containers, leaving some space for expansion, and it can last up to 3 months in the freezer. Just thaw overnight in the fridge before reheating.

Common FAQs

Got questions? I’ve got answers!

Can I use leftover rotisserie chicken?

Absolutely! Leftover rotisserie chicken is a fantastic shortcut and adds great flavor.

What if I want a dairy-free version?

You can substitute the cream with coconut milk or a dairy-free cream alternative, and use dairy-free cheese to maintain that creamy texture.

Can I make this soup in advance?

Yes! It’s an excellent make-ahead dish. Just store it in the fridge and reheat when you’re ready to enjoy.

Troubleshooting Tips

If things don’t go as planned, here’s how to troubleshoot:

  • Too Thick: If your soup is thicker than you’d like, add a splash more cream or broth until you reach your desired consistency.
  • Too Thin: If your soup is too watery, mix a bit of cornstarch with cold water and stir it into the pot. Let it simmer until it thickens.

Conclusion

There you have it—your guide to making the Million Dollar Soup Velvet! This recipe is more than just another meal; it’s a chance to bring warmth and comfort into your home, one bowl at a time. The beauty of cooking lies not just in the final dish but in the moments spent preparing it, surrounded by the people you love. So, whether you’re savoring every spoonful on your own or sharing it with friends and family, let this soup be a reminder of the joy that comes from good food and good company. Happy cooking, friend! May your kitchen be filled with love and laughter, and may this soup warm your heart just as it has warmed mine.

Million Dollar Soup Velvet

Prep Time 15 minutes
Cook Time 30 minutes
Total Time 45 minutes
Servings 4 servings
Calories 550
A rich and creamy soup that combines tender chicken and melted cheese for ultimate comfort.

Ingredients

Main

  • 2 cups chicken broth
  • 1 cup shredded cooked chicken
  • 1.5 cups cheddar cheese, shredded
  • 1 cup heavy cream
  • 2 tablespoons butter
  • 2 cloves garlic, minced
  • to taste salt and pepper

Instructions 

  • In a pot, melt butter and sauté garlic until fragrant.
  • Add chicken broth and bring to a simmer.
  • Stir in shredded chicken, heavy cream, and cheese; cook until cheese melts and soup is heated through.
  • Season with salt and pepper to taste.
  • Serve hot, garnished if desired.

Notes

Use freshly shredded cheese for best flavor.
Calories: 550kcal
Cost: $15
Course: Soup
Cuisine: American
Keyword: Chicken

Loved this recipe? Save it to your favorite Pinterest board so you can easily find it later! It’s the perfect way to keep all your sweet ideas in one place. ✨

A detailed view of a delicious looking million dollar soup, showcasing its smooth texture and warmth.

Why You’ll Fall for This Dish

If you’re on the lookout for a meal that’s not only nourishing but also comforting, let me introduce you to a recipe that has quickly become a staple in my kitchen: Quick Honey-Garlic Salmon Rice Bowls with Broccoli. Imagine this: tender, flaky salmon glazed in a sweet and savory honey-garlic sauce, perfectly complemented by fluffy rice and vibrant, crisp broccoli. It’s like a cozy embrace after a long day, all served up in a bowl. Whether you’re preparing a weeknight family dinner or meal prepping for the week ahead, this dish is quick to make, bursting with flavor, and oh-so-satisfying.

The Magic of Honey-Garlic Sauce

The star of the show in this recipe is undoubtedly the honey-garlic sauce. It’s an enchanting blend of sweet and savory that transforms simple ingredients into something truly special. The honey adds a rich sweetness that caramelizes beautifully on the salmon, while the soy sauce brings in a depth of umami that elevates the dish. Garlic provides the aromatic punch that ties everything together. Together, these elements create a glaze that not only enhances the salmon but also seeps into the rice, making every bite a delightful experience.

What’s in Each Bowl?

Deliciously plated honey garlic salmon served over rice with broccoli in natural lighting.

This recipe is all about balance—between flavors, textures, and nutrition. Here’s what you’ll need to whip up these delightful bowls:

  • 2 salmon fillets
  • 2 tablespoons honey
  • 2 tablespoons soy sauce
  • 2 cloves garlic, minced
  • 1 tablespoon olive oil
  • 2 cups cooked rice (I love using jasmine for its aroma)
  • 2 cups broccoli florets
  • Salt and pepper to taste
  • Sesame seeds for garnish (optional)
  • Green onions for garnish (optional)

Step-by-Step Deliciousness

Ready to get cooking? Here’s a straightforward guide to making these Honey-Garlic Salmon Rice Bowls.

Step 1: Create the Honey-Garlic Sauce

In a small bowl, mix together the honey, soy sauce, and minced garlic until well combined. This sauce is where the magic begins, so don’t skimp on mixing it up!

Step 2: Heat Things Up

Heat the olive oil in a skillet over medium heat. This is where the salmon will meet its delicious fate!

Step 3: Season the Salmon

While the oil is heating, season the salmon fillets generously with salt and pepper—this little step adds great flavor.

Step 4: Cook the Salmon

Place the salmon fillets in the skillet, skin-side down if you’re using skin-on salmon. Cook without moving them for about 4-5 minutes. This allows the skin to get crispy and the salmon to cook evenly.

Step 5: Flip and Glaze

Carefully flip the salmon fillets over and pour the honey-garlic sauce over the top. Let it cook for another 3-4 minutes, basting the fish with the sauce as it cooks. This will give your salmon that mouthwatering sticky glaze.

Step 6: Steam the Broccoli

While the salmon is finishing up, steam or blanch the broccoli florets until they are tender yet still bright green—this should take about 3-4 minutes. You want them to retain that lovely crunch.

Step 7: Assemble Your Bowls

Now it’s time to put everything together! In each bowl, place a generous serving of cooked rice, followed by your steamed broccoli. Top it all off with the glazed salmon fillet, drizzling any remaining sauce from the skillet over the top. For a little extra flair, sprinkle with sesame seeds and chopped green onions.

Tips for Success

Here are a few tips to ensure your Honey-Garlic Salmon Rice Bowls turn out perfectly:

  • Don’t Overcook the Salmon: Keep a close eye on the salmon while it’s cooking. Overcooked salmon can become dry and lose its delicate texture.
  • Adjust the Sweetness: If you prefer a less sweet sauce, feel free to reduce the honey a bit or add a splash of rice vinegar for tang.
  • Garnish Generously: Don’t skip the garnishes! Sesame seeds and green onions add not only flavor but also a lovely visual appeal.
  • Make Extra Sauce: If you love a saucy dish, consider doubling the honey-garlic sauce recipe. You can always drizzle more on your rice!

Variations to Keep It Exciting

This recipe is incredibly versatile, so feel free to switch things up based on your preferences or what you have on hand:

  • Change the Protein: Swap the salmon for chicken thighs or tofu for a different flavor profile.
  • Try Different Veggies: Broccoli is just the beginning! You can add bell peppers, snap peas, or even sautéed spinach for a pop of color.
  • Experiment with Grains: Instead of jasmine rice, try quinoa, brown rice, or even cauliflower rice for a low-carb option.

Storing and Freezing

If you happen to have leftovers (which is rare in my house), here’s how to store them:

  • Refrigerating: Store any uneaten portions in airtight containers in the fridge for up to 3 days. Reheat gently in the microwave or on the stovetop.
  • Freezing: Although I recommend enjoying these bowls fresh, you can freeze the cooked salmon and broccoli separately. Just make sure to thaw them properly before reheating.

FAQs: Your Questions Answered

Can I use frozen salmon fillets for this recipe?

Absolutely! Just be sure to thaw the salmon completely in the refrigerator before cooking to ensure even cooking and to prevent excess moisture from diluting the sauce.

What if I don’t have jasmine rice?

No problem! You can use basmati rice or even brown rice for a heartier option. Each brings a unique flavor that can complement the dish.

How can I make this dish spicier?

If you like some heat, consider adding a pinch of red pepper flakes to the honey-garlic sauce or drizzle some chili garlic sauce over the finished bowls.

Can I prep this recipe ahead of time?

Yes! You can prepare the rice and broccoli in advance and keep them refrigerated. Cook the salmon and glaze it just before serving for the best texture and flavor.

In Closing

Cooking is all about creating memories, and I hope this Quick Honey-Garlic Salmon Rice Bowl with Broccoli becomes a cherished recipe in your home. It’s a dish that not only nourishes the body but warms the heart, inviting family and friends to gather around the table. So, whether you’re celebrating a special occasion or simply enjoying a cozy night in, let this recipe guide you to deliciousness. I can’t wait for you to try it and share your experience—after all, cooking is better when it’s shared! Happy cooking, my friend!

How To Make Quick Honey-Garlic Salmon Rice Bowls With Broccoli

Prep Time 10 minutes
Cook Time 15 minutes
Total Time 25 minutes
Servings 2 servings
Calories 550
Enjoy a quick and flavorful salmon rice bowl with honey-garlic sauce and tender broccoli, perfect for a nutritious weeknight dinner.

Ingredients

Protein

  • 2 pieces salmon fillets
  • 2 tablespoons honey
  • 2 tablespoons soy sauce
  • 2 cloves garlic, minced
  • 1 tablespoon olive oil

Carbohydrates

  • 2 cups cooked rice

Vegetables

  • 2 cups broccoli florets
  • to taste salt and pepper
  • optional sesame seeds for garnish
  • optional green onions for garnish

Instructions 

  • Mix honey, soy sauce, and minced garlic to make the sauce.
  • Heat olive oil in a skillet over medium heat.
  • Season salmon with salt and pepper, cook skin side down for 4-5 mins, then flip and add sauce, cooking 3-4 mins.
  • Steam broccoli until tender, about 3-4 mins.
  • Assemble bowls with rice, broccoli, and salmon, drizzle with sauce, and garnish if desired.

Notes

Use fresh salmon for best flavor and adjust garnishes to taste.
Calories: 550kcal
Cost: $15
Course: Main Course
Cuisine: Asian
Keyword: Salmon

Loved this recipe? Save it to your favorite Pinterest board so you can easily find it later! It’s the perfect way to keep all your sweet ideas in one place. ✨

Eye-level shot of a colorful salmon rice bowl featuring honey garlic sauce and vibrant vegetables.

Welcome to the World of Comfort: Apple Crisp Coffee Cake

Picture this: a warm slice of coffee cake, the smell of apples and cinnamon wafting through your kitchen, and a cozy cup of coffee waiting to be enjoyed. That’s the magic of my Apple Crisp Coffee Cake. It’s a delightful blend of tender cake, tart apples, and a buttery streusel topping that makes every bite feel like a warm hug. Whether you’re hosting brunch, celebrating a birthday, or simply treating yourself, this cake is destined to steal hearts—and maybe a few bites, too. Join me on this delicious journey as we dive into the comforting world of apple crisp coffee cake!

Why You’ll Love This Recipe

  • Cozy Flavor: The combination of tart Granny Smith apples and warm spices creates a flavor profile that’s perfect for any season.
  • Easy to Make: With simple ingredients and straightforward steps, even novice bakers will find success in the kitchen.
  • Perfect for Any Occasion: Whether it’s for breakfast, dessert, or a cozy afternoon snack, this cake fits the bill.
  • Make-Ahead Friendly: You can prepare this cake in advance, making it an ideal choice for busy mornings or gatherings.
  • Customizable: With plenty of variations and substitutions, you can make this cake your own, ensuring it fits your taste buds perfectly.

Ingredient Breakdown

Let’s gather our ingredients and get to know what makes this coffee cake so special. Each component plays a vital role in creating that perfect texture and flavor.

  • All-Purpose Flour: Provides the structure for the cake. You can substitute with gluten-free flour if needed.
  • Baking Powder & Baking Soda: These are the leavening agents that give the cake its delightful rise.
  • Cinnamon: Adds warmth and spice—feel free to experiment with nutmeg or ginger for a twist.
  • Salt: Enhances all the flavors; don’t skip it!
  • Sugar: Granulated sugar sweetens the batter, while brown sugar adds moisture and depth to the topping.
  • Butter: Essential for richness! You can use unsalted butter for better control over flavor.
  • Sour Cream: Contributes to the cake’s tenderness and helps maintain moisture.
  • Eggs: Bind the ingredients together and provide structure.
  • Granny Smith Apples: The star of the show! Their tartness balances the sweetness of the cake.
  • Pecans: For crunch and nuttiness in the crumb topping—optional but highly recommended!

Pro Tips for Success

Side profile of a freshly baked Apple Crisp Coffee Cake showcasing its golden-brown crust and crumbly texture.

To ensure your coffee cake turns out perfectly, keep these tips in mind:

  • Room Temperature Ingredients: Make sure your butter, eggs, and sour cream are at room temperature for a smoother batter.
  • Don’t Overmix: When combining the wet and dry ingredients, mix just until incorporated to keep the cake tender.
  • Check for Doneness: Use a toothpick to test the center; it should come out clean or with a few moist crumbs.
  • Let It Cool: Allow the cake to cool in the pan for about 10 minutes before transferring it to a wire rack. This helps avoid a soggy bottom.
  • Streusel Consistency: Aim for a crumbly texture—if it’s too wet, add a touch more flour.
  • Garnish Wisely: A light dusting of powdered sugar or a drizzle of glaze adds a beautiful finishing touch.
  • Serving Temperature: This cake is delicious warm, but it’s equally enjoyable at room temperature.
  • Experiment!: Don’t hesitate to add raisins or swap in different nuts based on your preference.

Avoiding Common Mistakes

Even the best bakers encounter hiccups now and then. Here are some common mistakes to watch out for:

  • Overbaking: Keep an eye on the cake during the last few minutes. Every oven is different, so adjust the baking time as needed.
  • Skipping the Glaze: A simple glaze elevates your cake to bakery-quality. Don’t skip it!
  • Wrong Apple Choice: Using sweet apples can lead to an overly sweet cake. Stick with tart varieties for the best results.
  • Not Prepping the Pan: Always grease your baking pan well to prevent sticking.

Delicious Variations

This cake is a canvas for your creativity! Here are some variations to inspire your next bake:

  • Peach Crisp Coffee Cake: Swap out the apples for fresh peaches for a summer twist.
  • Nutty Caramel Apple Cake: Drizzle caramel sauce over the top for added sweetness and richness.
  • Spiced Apple Walnut Cake: Replace pecans with walnuts and add a pinch of cardamom for a unique flavor profile.
  • Gluten-Free Apple Crisp Cake: Substitute all-purpose flour with a 1:1 gluten-free flour blend.

Storage and Make-Ahead Instructions

Want to enjoy this cake throughout the week? Here’s how to store it:

  • Room Temperature: Store covered at room temperature for up to 3 days. It tastes best fresh but will still be delicious!
  • Refrigeration: If you want to keep it longer, wrap it tightly and refrigerate for up to a week. Just warm it in the microwave before serving.
  • Freezing: You can freeze the baked cake for up to 3 months. Wrap it well in plastic wrap and aluminum foil, then thaw in the fridge overnight before serving.

Comprehensive FAQ

Got questions? I’ve got answers! Here are some frequently asked questions about this recipe:

  • Can I use different types of apples? Absolutely! While Granny Smiths are ideal, feel free to experiment with Honeycrisp or Fuji for a sweeter flavor.
  • Can I make this cake ahead of time? Yes! You can prepare the batter and bake it the day before serving.
  • How do I know if the cake is done? Insert a toothpick in the center; it should come out clean or with a few moist crumbs.
  • What’s the best way to serve this cake? Enjoy it warm, at room temperature, or with a scoop of vanilla ice cream for a decadent dessert!
  • Can I substitute sour cream? Greek yogurt works well as a substitute and adds a nice tang.
  • Is it possible to make this vegan? Yes! Substitute eggs with flax eggs and use plant-based butter and yogurt.
  • How do I store leftovers? Keep it covered at room temperature for a few days or in the fridge for longer freshness.
  • Can I add more spices? Absolutely! Feel free to add nutmeg, allspice, or even a splash of vanilla extract for extra flavor.

Nutritional Tips and Dietary Adaptations

Want to keep it healthy? Here are some tips:

  • Reduce Sugar: You can cut back on the sugar by up to 1/2 cup without sacrificing flavor.
  • Add Whole Wheat Flour: Substitute half of the all-purpose flour with whole wheat flour for added fiber.
  • Use Applesauce: Replace some of the butter with unsweetened applesauce for a lower-fat option.

Equipment Recommendations

Before you dive into baking, make sure you have these essentials on hand:

  • 9×13-inch Baking Pan: A must-have for even baking and easy serving.
  • Mixing Bowls: A set of various sizes will make mixing ingredients a breeze.
  • Whisk: Perfect for combining dry ingredients and making the batter smooth.
  • Measuring Cups and Spoons: Accurate measurements are key to baking success!

Serving Suggestions

This coffee cake is versatile—here are some serving ideas to elevate your experience:

  • With Coffee: Pair with a fresh brew for the ultimate cozy breakfast or brunch.
  • With Whipped Cream: A dollop of sweet whipped cream adds a delightful touch.
  • With Ice Cream: Serve warm slices with a scoop of vanilla or caramel ice cream for a decadent dessert.
  • On Its Own: Sometimes, it’s best enjoyed simply as is—no frills needed!

Conclusion

There you have it! My Apple Crisp Coffee Cake is not just a recipe; it’s a celebration of flavor, comfort, and love. I hope you feel inspired to step into your kitchen and create this comforting treat. Remember, cooking is about joy, experimentation, and connection. So, gather your loved ones, share a slice, and create some unforgettable memories together. Happy baking, friends!

Apple Crisp Coffee Cake

Prep Time 20 minutes
Cook Time 45 minutes
Total Time 1 hour 5 minutes
Servings 8 pieces
Calories 350
A delicious layered coffee cake featuring fresh apples and a crunchy pecan topping, perfect for breakfast or dessert.

Ingredients

Batter

  • 2 cups all-purpose flour
  • 1 1/2 teaspoons baking powder
  • 1/2 teaspoon baking soda
  • 1/2 teaspoon cinnamon
  • 1/2 teaspoon salt
  • 1 1/2 cups sugar
  • 1/2 cup butter (melted)
  • 1 cup sour cream
  • 3 eggs eggs (lightly beaten)
  • 2 teaspoons vanilla extract

Apples

  • 2 medium Granny Smith apples (peeled, cored, finely diced)

Topping

  • 3/4 cup all-purpose flour
  • 3/4 cup packed light brown sugar
  • 1 cup chopped pecans
  • 1/2 teaspoon cinnamon
  • 1/4 teaspoon salt
  • 1/2 cup butter (melted)
  • 2/3 cup packed light brown sugar
  • 2 tablespoons apple cider
  • 2 tablespoons butter

Instructions 

  • Preheat oven to 350°F (175°C) and grease a 9x13-inch pan.
  • Mix dry ingredients for batter, then stir in melted butter, sour cream, eggs, and vanilla. Pour into pan.
  • Sprinkle diced apples over batter, then top with pecan mixture.
  • Bake for 40-45 minutes until a toothpick comes out clean.
  • Make glaze by melting butter, sugar, and apple cider; drizzle over warm cake before serving.

Notes

For extra flavor, serve with a scoop of vanilla ice cream.
Calories: 350kcal
Cost: $15
Course: Breakfast, Dessert
Cuisine: American
Keyword: apple, Coffee Cake