Author

Ava

Browsing

This post contains affiliate links. As an Amazon Associate, I earn from qualifying purchases. This comes at no extra cost to you.

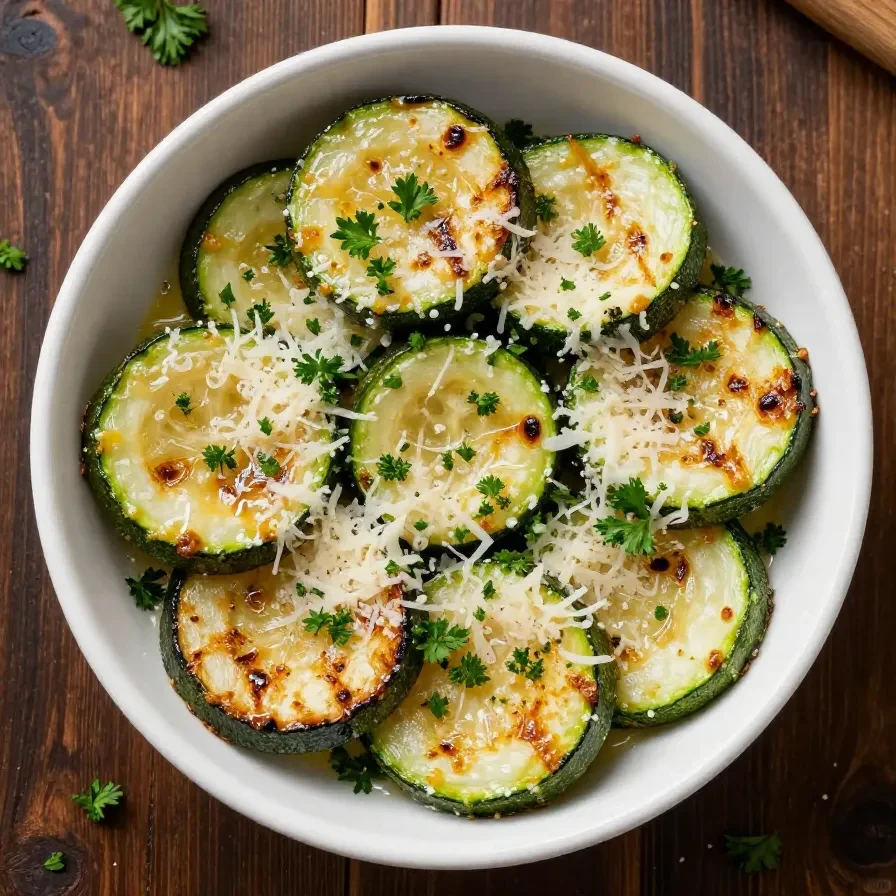
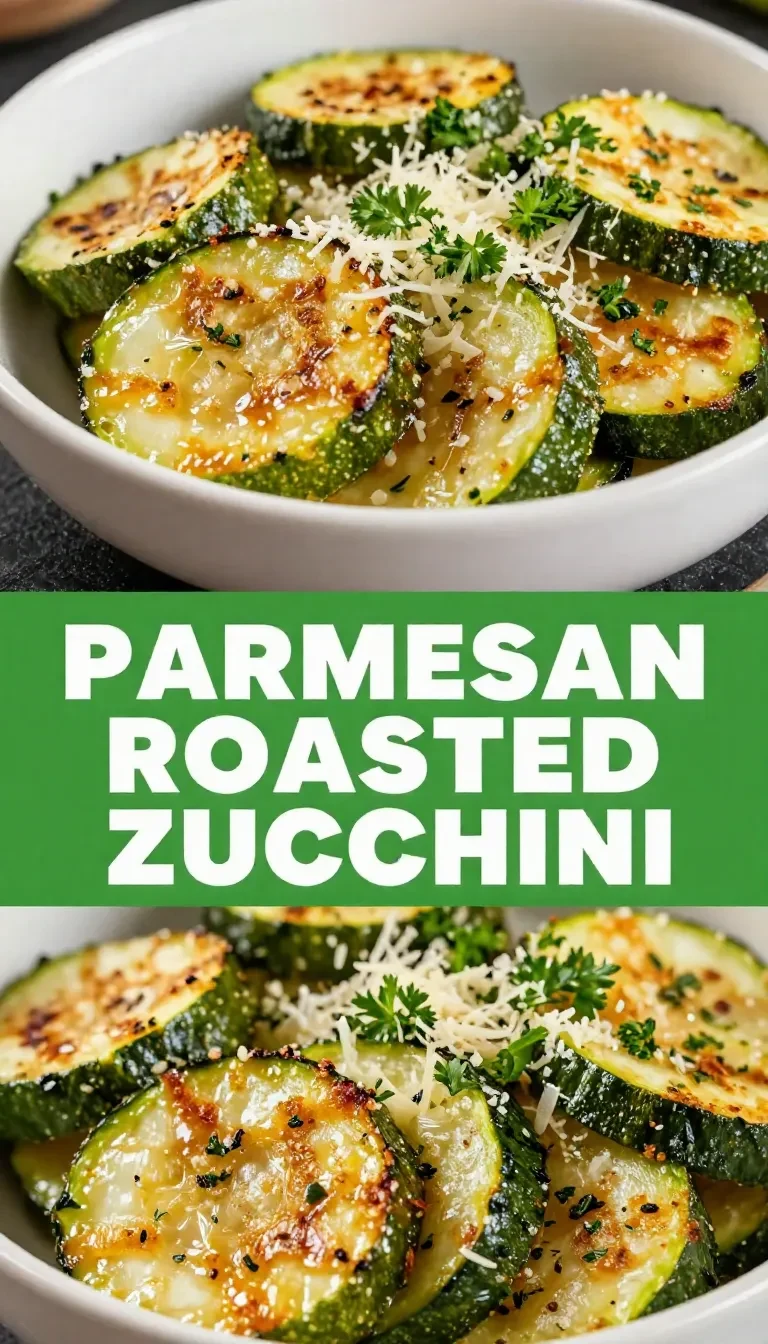
This Garlic Parmesan Roasted Zucchini is the perfect side dish to elevate your meals with its tender texture, savory garlic aroma, and golden, crispy Parmesan topping. It’s a simple yet flavorful way to make the most of fresh zucchini while adding a touch of elegance to your dinner table. With an easy prep process and a quick roasting time, this recipe is ideal for busy weeknights or casual gatherings alike.

Table of Contents

Why Garlic Parmesan Roasted Zucchini Will Save Your Weeknights

  • Quick and easy preparation: With only 10 minutes of prep time, this zucchini dish is great for weeknights when you’re short on time.
  • Minimal cleanup: Roasting everything on one baking sheet cuts down on dishes, making cleanup a breeze.
  • Versatile pairings: Garlic Parmesan Roasted Zucchini complements a variety of mains, such as grilled chicken, steak, or pasta dishes.
  • Healthy and flavorful: Packed with fresh zucchini and a touch of olive oil, this dish is a lighter side that doesn’t skimp on flavor.

Everything You Need for Garlic Parmesan Roasted Zucchini

The minced garlic is key to infusing the zucchini with savory depth, while the grated Parmesan creates a crispy, golden topping that adds irresistible texture.

How To Make Garlic Parmesan Roasted Zucchini Step by Step

  1. Preheat your oven to 400°F (200°C). Line a baking sheet with parchment paper or lightly grease it for easy cleanup.
  2. Wash and dry the zucchinis, then slice them into 1/4-inch thick rounds to ensure even cooking.
  3. In a large mixing bowl, combine olive oil, minced garlic, oregano, salt, and pepper. Stir until well mixed.
  4. Add the zucchini slices to the bowl and toss until all pieces are evenly coated with the garlic and olive oil mixture.
  5. Arrange the zucchini slices in a single layer on the prepared baking sheet to ensure they roast rather than steam.
  6. A close-up of garlic parmesan roasted zucchini slices arranged on a baking tray.

    Kitchen ApplianceBreville Smart Oven Air Fryer Pro

    A versatile countertop oven for roasting, baking, and air frying — perfect for recipes like this.

    View on Amazon →

    Essential CookwareNordic Ware Natural Aluminum Baking Sheet

    Durable and reliable baking sheet for roasting zucchini evenly.

    View on Amazon →

  7. Sprinkle the grated Parmesan cheese evenly over the zucchini slices for a flavorful and crispy finish.
  8. Bake in the preheated oven for 15-20 minutes, or until the zucchini becomes tender and the Parmesan cheese is golden and slightly crispy.
  9. Remove from the oven and allow to cool for a few minutes. Garnish with fresh parsley if desired and serve warm.

Tips for Meal Prep and Storage

Store any leftover Garlic Parmesan Roasted Zucchini in an airtight container in the refrigerator for up to 3 days. To reheat, spread the zucchini slices on a baking sheet and warm them in a 375°F oven for 5-7 minutes to regain their crispiness.

If freezing, place the cooled zucchini slices in a single layer in a freezer-safe bag or container, ensuring minimal air exposure. Thaw in the refrigerator overnight and reheat as directed above for optimal texture.

Looking for something similar? Try our one-pan garlic parmesan chicken and.

For more ideas, check out our garlic parmesan chicken and pasta:.

You might also enjoy our creamy garlic parmesan chicken pasta.

FAQ About Garlic Parmesan Roasted Zucchini

  • Can I use other herbs? Yes, you can swap oregano for Italian seasoning or add fresh thyme for variation.
  • Do I need to peel the zucchini? No, zucchini skin is tender and adds color and texture to the dish.
  • Can I make this dish ahead? You can slice and toss the zucchini with the seasoning up to 12 hours before roasting. Store in the refrigerator until ready to cook.

What To Serve With Garlic Parmesan Roasted Zucchini

  • Grilled steak: This dish pairs wonderfully with hearty proteins like tri-tip or ribeye.
  • Sides for salad: Serve alongside a crisp Caesar or mixed greens salad for a balanced meal.
  • Carb sides for dinner: Pair with garlic bread or roasted potatoes for a satisfying yet simple dinner plan.
  • Easy dinner recipes veggies: Add this recipe to a vegetable medley to make a vibrant side plate for larger gatherings.

Garlic Parmesan Roasted Zucchini

Prep Time 10 minutes
Cook Time 20 minutes
Total Time 30 minutes
Servings 4 servings
Calories 120
A simple and delicious side dish featuring roasted zucchini slices coated in garlic, olive oil, and Parmesan cheese.

Ingredients

Instructions 

  • Preheat your oven to 400°F (200°C). Line a baking sheet with parchment paper or lightly grease it.
  • Wash and dry the zucchinis, then slice them into 1/4-inch thick rounds.
  • In a large mixing bowl, combine olive oil, minced garlic, oregano, salt, and pepper. Stir until well mixed.
  • Add the zucchini slices to the bowl and toss until all pieces are evenly coated with the garlic and olive oil mixture.
  • Arrange the zucchini slices in a single layer on the prepared baking sheet.
  • Sprinkle the grated Parmesan cheese evenly over the zucchini slices.
  • Bake in the preheated oven for 15-20 minutes, or until the zucchini becomes tender and the Parmesan cheese is golden and slightly crispy.
  • Remove from the oven and allow to cool for a few minutes. Garnish with fresh parsley if desired and serve warm.

Notes

For extra flavor, try adding a pinch of red pepper flakes to the olive oil mixture.
Calories: 120kcal
Cost: $8
Course: Side Dish
Cuisine: American
Keyword: garlic, parmesan, zucchini
A close-up of garlic parmesan roasted zucchini slices arranged on a baking tray.

Loved this recipe? Save it to your favorite Pinterest board so you can easily find it later! ✨


Red White And Blue Fruit Kabobs Recipe

Red White And Blue Fruit Kabobs are a festive and visually striking treat that blends the juicy sweetness of strawberries and blueberries with the soft, airy texture of marshmallows. Perfect for patriotic holidays, these refreshing kabobs are easy to make and serve as a delightful snack for picnics or summer gatherings. Their vibrant colors and light sweetness make them an instant hit for both kids and adults alike.

Table of Contents

Why This Recipe Works

  • The red, white, and blue theme makes these kabobs perfect for patriotic holidays like Memorial Day or the Fourth of July.
  • With only four ingredients and no cooking required, this recipe is ideal for busy hosts or last-minute gatherings.
  • The kabobs offer an engaging activity for kids, who can help assemble them while learning about healthy snacking.
  • These kabobs can be served as appetizers, snacks, or even dessert, pairing beautifully with other summer foods.

Everything You Need for Red White And Blue Fruit Kabobs

  • 1 cup strawberries, hulled and halved
  • 1 cup blueberries
  • 1 cup large marshmallows
  • 12 wooden skewers

Strawberries and blueberries are the stars of these kabobs, providing vibrant color and natural sweetness. The marshmallows add a fluffy, playful texture that contrasts beautifully with the juicy fruit, making this dish irresistible.

How To Make Red White And Blue Fruit Kabobs Step by Step

  1. Wash the strawberries and blueberries thoroughly under cold water, then pat them dry with a paper towel.
  2. Hull and halve the strawberries so they are easier to skewer.
  3. Ensure the wooden skewers are clean and dry before assembling the kabobs.
  4. Thread the ingredients onto the skewers in the following order: strawberry, marshmallow, blueberry. Repeat this pattern until the skewer is filled, leaving a small space at each end for handling.
  5. Continue assembling the kabobs until all ingredients are used or all skewers are filled.
  6. Arrange the completed kabobs on a serving platter or tray and serve immediately.
Fruit kabobs with strawberries, bananas, and blueberries arranged in a red, white, and blue pattern.

Simple Ingredient Swaps

If strawberries or blueberries aren’t available, you can substitute raspberries or blackberries for a similar flavor and red-blue color scheme. Alternatively, melon cubes like cantaloupe or honeydew can replace marshmallows for a healthier option, adding a juicy, refreshing bite.

A Patriotic Inspiration

Red White And Blue Fruit Kabobs are inspired by the vibrant colors of the American flag, a staple of celebrations like Memorial Day and Independence Day. Though simple, the kabobs combine the universal appeal of fresh fruit and soft marshmallows to create a dish that’s both nostalgic and modern.

Avoid These Common Mistakes

  • Leave small gaps at the ends of each skewer for easy handling and presentation.
  • Always pat the fruit dry after washing to ensure it sticks securely to the skewers.
  • Cutting strawberries into halves ensures they are easy to skewer and bite-sized for guests.

Serving Ideas and Pairings

  • Pair with a creamy yogurt dip for an additional layer of flavor.
  • Serve alongside grilled burgers or hot dogs for a classic summer barbecue spread.
  • Add a platter of veggie sticks with hummus for a healthy side dish option.
  • Complement the kabobs with sparkling lemonade or fruit-infused water for a refreshing drink.


Red White And Blue Fruit Kabobs

Prep Time 15 minutes
Total Time 15 minutes
Servings 12 kabobs
Calories 120
These colorful fruit kabobs are a fun and healthy treat, perfect for patriotic celebrations or summer gatherings.

Ingredients

Instructions 

  • Wash the strawberries and blueberries thoroughly under cold water, then pat them dry with a paper towel.
  • Hull and halve the strawberries so they are easier to skewer.
  • Prepare the wooden skewers by ensuring they are clean and dry.
  • Thread the ingredients onto the skewers in the following order: strawberry, marshmallow, blueberry. Repeat this pattern until the skewer is filled, leaving a small space at each end for handling.
  • Continue assembling the kabobs until all ingredients are used or all skewers are filled.
  • Arrange the completed kabobs on a serving platter or tray and serve immediately.

Notes

Feel free to substitute other fruits like raspberries or blackberries for a different flavor combination.
Calories: 120kcal
Cost: $8
Course: Appetizer, Snack
Cuisine: American
Keyword: fruit kabobs, patriotic, red white and blue

Fruit kabobs with strawberries, bananas, and blueberries arranged in a red, white, and blue pattern.

Loved this recipe? Save it to your favorite Pinterest board so you can easily find it later! ✨

This post contains affiliate links. As an Amazon Associate, I earn from qualifying purchases. This comes at no extra cost to you.

This Red, White & Blueberry Caprese Salad blends juicy cherry tomatoes, sweet blueberries, and creamy mozzarella for a patriotic twist on an Italian classic. With fresh basil, balsamic glaze, and olive oil, its vibrant flavors and textures make it perfect for summer gatherings. Ready in just 10 minutes, this no-cook dish is fresh, colorful, and bursting with flavor.

Table of Contents

Why This Recipe Is Perfect

  • Quick and easy: This salad requires only 10 minutes of prep, making it ideal for last-minute gatherings or busy weeknights.
  • No cooking involved: With fresh, raw ingredients, this dish lets you skip the stove and enjoy summer flavors hassle-free.
  • Great for celebrations: The red, white, and blue presentation is festive, making it an excellent choice for 4th July food or Memorial Day gatherings.
  • Perfect for a crowd: With bold flavors and a stunning appearance, this salad is sure to stand out at picnics, potlucks, or dinner parties.

Everything You Need for Red, White & Blueberry Caprese Salad

The trio of cherry tomatoes, blueberries, and mozzarella creates a beautiful patriotic palette while balancing sweetness, acidity, and creaminess. Fresh basil leaves enhance the salad’s herbal notes, tying the flavors together with fragrant elegance.

How To Make Red, White & Blueberry Caprese Salad Step by Step

  1. Wash and dry the cherry tomatoes, blueberries, and basil leaves. Clean ingredients ensure the salad stays fresh and flavorful.
  2. Slice the cherry tomatoes in half and cut the mozzarella into small cubes or slices. Uniform cuts help the ingredients mix well and look polished.
  3. On a serving platter, layer the cherry tomatoes, blueberries, mozzarella, and basil leaves. Arrange them in a red, white, and blue pattern for festive flair.
  4. Drizzle the balsamic glaze and olive oil evenly over the salad. Make sure each layer gets a touch of the glaze and oil for balanced flavor.
    A vibrant plate of Red, White & Blueberry Caprese Salad with fresh mozzarella, basil, cherry tomatoes, and blueberries.

    Kitchen ApplianceBreville Sous Chef Food Processor

    Perfect for slicing mozzarella and chopping ingredients evenly for salads.

    View on Amazon →

    Essential CookwareOXO Good Grips Salad Spinner

    Ideal for washing and drying basil leaves and other greens quickly and efficiently.

    View on Amazon →

  5. Season with salt and freshly ground black pepper to taste. Adjust the seasoning based on your preference.
  6. Gently toss the salad to combine, or leave it layered for a stunning visual. Both choices work beautifully depending on the occasion.
  7. Serve immediately and enjoy! This salad tastes best fresh and won’t require refrigeration.

Common Questions

  • Can I use regular tomatoes instead of cherry or grape tomatoes? Yes, but chop them into bite-sized pieces to ensure consistent texture and presentation.
  • What if I don’t have balsamic glaze? Substitute with balsamic vinegar, but reduce the quantity slightly to avoid overpowering the flavors.
  • How do I store leftovers? Cover and refrigerate for up to one day, but note that fresh basil and mozzarella are best served immediately.

Expert Tips and Pro Shortcuts

  • Use pre-sliced mozzarella to save time and ensure evenly sized pieces for the salad.
  • Chill the blueberries and tomatoes in advance for a refreshing bite on hot summer days.
  • Add the basil leaves just before serving to keep them vibrant and prevent wilting.
  • If serving for a crowd, prepare the ingredients ahead but assemble the salad right before serving to maintain maximum freshness.

Serving Ideas and Pairings

  • Pair it with grilled chicken or shrimp for a protein-packed main course.
  • Serve alongside crusty baguette slices to soak up the balsamic glaze and olive oil.
  • Enjoy it with sparkling water or a chilled glass of white wine for a light, summery feel.
  • Include it in your picnic spread along with other fresh salad recipes for a well-rounded meal outdoors.

Easy Ingredient Swaps

  • Swap fresh mozzarella with burrata for an even creamier texture and richness.
  • Use strawberries in place of blueberries for a slightly tart and juicy variation.
  • Try arugula instead of basil leaves for a peppery twist that complements the sweetness of the fruit.

Red, White & Blueberry Caprese Salad

Prep Time 10 minutes
Total Time 10 minutes
Servings 4 servings
Calories 250
A vibrant and patriotic salad featuring red cherry tomatoes, white mozzarella, and blue blueberries, perfect for summer gatherings.

Ingredients

Instructions 

  • Wash and dry the cherry tomatoes, blueberries, and basil leaves.
  • Slice the cherry tomatoes in half and cut the fresh mozzarella into small cubes or slices.
  • On a serving platter or in a large bowl, layer the cherry tomatoes, blueberries, mozzarella, and basil leaves, arranging them for a visually appealing red, white, and blue pattern if desired.
  • Drizzle the balsamic glaze and olive oil evenly over the salad.
  • Season with salt and freshly ground black pepper to taste.
  • Gently toss the salad to combine, or leave it layered for presentation.
  • Serve immediately and enjoy!

Notes

For added flavor, you can use flavored balsamic glaze or add a sprinkle of crushed red pepper flakes.
Calories: 250kcal
Cost: $10
Course: Salad
Cuisine: American
Keyword: Caprese salad, patriotic salad, summer salad
A vibrant plate of Red, White & Blueberry Caprese Salad with fresh mozzarella, basil, cherry tomatoes, and blueberries.

Loved this recipe? Save it to your favorite Pinterest board so you can easily find it later! ✨


Slow Cooker Garlic Butter Beef Bites with Potatoes

The aroma of garlic butter melting into tender beef bites and baby potatoes is enough to make anyone’s mouth water. This slow cooker recipe is all about rich flavors and effortless cooking.

If you’re looking for a hearty, flavorful dish that practically cooks itself, this recipe is a must-try.

What makes slow cooker garlic butter beef bites with potatoes special?

  • The beef stew meat becomes incredibly tender after hours of slow cooking, soaking up every bit of seasoning and broth.
  • Baby potatoes cook to perfection, absorbing the garlic butter and beef juices for a melt-in-your-mouth experience.
  • The garlic butter sauce adds a rich, savory flavor that ties everything together beautifully.

Key ingredients that bring it all together

Beef stew meat is the star of this recipe, offering a hearty texture that becomes tender after hours in the slow cooker. The bite-sized pieces make it easy to serve and enjoy.

Unsalted butter creates the base for the garlic butter sauce, allowing the garlic and seasonings to shine without being overly salty. It’s the key to the dish’s rich flavor.

Baby potatoes are the perfect pairing, as their creamy texture complements the beef while soaking up the flavorful juices during cooking.

How to prepare slow cooker garlic butter beef bites with potatoes

Start by seasoning the beef stew meat in a large bowl. Combine it with salt, black pepper, onion powder, and smoked paprika, tossing until every piece is well coated.

Place the halved baby potatoes at the bottom of your slow cooker. Layer the seasoned beef on top, ensuring even distribution for consistent cooking.

In a small saucepan over medium heat, melt the unsalted butter. Add minced garlic and sauté for 1-2 minutes until fragrant, then stir in Worcestershire sauce and dried parsley.

A plate of slow cooker garlic butter beef bites served with golden roasted potatoes

Pour the garlic butter mixture over the beef and potatoes in the slow cooker. Add the beef broth, ensuring everything is well covered.

Cover the slow cooker and cook on low for 6-8 hours or high for 3-4 hours. The beef will become tender, and the potatoes will cook through perfectly.

Once done, gently stir everything together to combine the flavors before serving the dish hot.

Expert tips for the best results

  • For extra flavor, consider browning the beef in a skillet before adding it to the slow cooker. This step is optional but adds depth to the dish.
  • Cut the baby potatoes evenly to ensure they cook at the same rate. Uneven pieces may result in some being undercooked.
  • If you prefer a thicker sauce, remove some of the liquid after cooking and reduce it on the stove before pouring it back over the dish.

What to serve with slow cooker garlic butter beef bites with potatoes

A simple green salad with a light vinaigrette adds a fresh contrast to the rich flavors of this dish.

Crusty bread or dinner rolls are perfect for soaking up the extra garlic butter sauce.

For a complete meal, serve with steamed green beans or roasted asparagus as a vegetable side.


Slow Cooker Garlic Butter Beef Bites with Potatoes

Prep Time 20 minutes
Cook Time 8 hours
Total Time 8 hours 20 minutes
Servings 6 servings
Calories 450
A delicious and hearty slow cooker meal featuring tender beef bites and baby potatoes in a garlic butter sauce.

Ingredients

  • 2 pound beef stew meat (cut into bite-sized pieces)
  • 1 pound baby potatoes (halved)
  • 1/2 cup unsalted butter
  • 6 clove garlic (minced)
  • 1 tablespoon dried parsley
  • 1 tablespoon Worcestershire sauce
  • 1 teaspoon salt
  • 1/2 teaspoon black pepper
  • 1/2 teaspoon onion powder
  • 1/2 teaspoon smoked paprika
  • 1 cup beef broth

Instructions 

  • In a large bowl, combine the beef stew meat, salt, black pepper, onion powder, and smoked paprika. Toss to coat the meat evenly.
  • Place the halved baby potatoes at the bottom of the slow cooker.
  • Add the seasoned beef on top of the potatoes.
  • In a small saucepan over medium heat, melt the butter. Once melted, add the minced garlic and sauté for about 1-2 minutes until fragrant.
  • Stir in the Worcestershire sauce and dried parsley into the garlic butter mixture.
  • Pour the garlic butter mixture over the beef and potatoes in the slow cooker.
  • Pour the beef broth over everything in the slow cooker.
  • Cover and cook on low for 6-8 hours or on high for 3-4 hours, until the beef is tender and the potatoes are cooked through.
  • Once cooked, stir gently to combine and serve hot.

Notes

For extra flavor, consider adding fresh herbs or vegetables of your choice.
Calories: 450kcal
Cost: $20
Course: Main Course
Cuisine: American
Keyword: Beef, potatoes, slow cooker

A plate of slow cooker garlic butter beef bites served with golden roasted potatoes

Loved this recipe? Save it to your favorite Pinterest board so you can easily find it later! ✨


Easy Savory Smash Burger Bowl Recipe

Imagine the juicy flavors of a classic burger, but served in a bowl that’s packed with fresh veggies, rice, and a creamy drizzle of sauce. This easy savory smash burger bowl is a quick and satisfying dinner option.

Perfect for busy weeknights, this dish brings together everything you love about burgers in a convenient and customizable format.

Why this easy savory smash burger bowl stands out

  • Juicy smashed beef patties bring the classic burger flavor to every bite.
  • A fresh mix of cherry tomatoes, shredded lettuce, and pickles adds crunch and brightness.
  • The creamy sauce ties everything together with a tangy, savory kick.

Key ingredients that make this dish shine

The ground beef is the star of this dish, so using an 80/20 blend ensures the patties are juicy and flavorful. The fat content makes a big difference in creating the perfect sear.

The sauce, made with mayonnaise, mustard, ketchup, and Worcestershire sauce, adds a bold and tangy layer that complements the burger patties beautifully. It’s simple yet packed with flavor.

Cooked rice serves as the base, soaking up all the juices from the smashed patties and sauce. You can use white or brown rice depending on your preference.

How to prepare this easy savory smash burger bowl

Start by heating olive oil in a large skillet over medium-high heat. While the skillet heats up, form your ground beef into four evenly sized balls for even cooking.

Once the skillet is hot, place the beef balls in the pan, leaving space between each one. Use a spatula to smash them down into thin patties, about 1/2 inch thick, to create that classic sear.

Season the patties with salt and pepper, then cook for 3-4 minutes on one side until browned. Flip them carefully and cook for another 2-3 minutes to your desired doneness.

While the patties cook, prepare the bowls by dividing the cooked rice among four serving bowls. Add shredded lettuce, halved cherry tomatoes, diced pickles, shredded cheddar cheese, and diced red onion on top of the rice for a fresh and colorful base.

A delicious savory smash burger bowl filled with lettuce, tomatoes, and burger patties.

Once the patties are done, place one on top of each prepared bowl. In a small bowl, whisk together mayonnaise, mustard, ketchup, and Worcestershire sauce to create the sauce.

Drizzle the sauce generously over each bowl and serve immediately for best results. The combination of warm patties and fresh toppings makes this dish irresistible.

How to store and reheat leftovers

Store any leftovers in an airtight container in the refrigerator for up to 3 days. Keep the sauce separate to prevent the ingredients from becoming soggy.

Reheat the burger patties in a skillet or microwave, and assemble the bowls fresh for the best texture and flavor.

Expert tips for perfect results

  • Use a sturdy spatula to smash the patties evenly and create a crispy, caramelized crust.
  • Prep all your toppings in advance to make assembly quick and easy once the patties are cooked.
  • For a spicier kick, add a dash of hot sauce to the sauce mixture or sprinkle chili flakes over the bowl.

Ingredient substitutions

If you prefer, you can substitute ground turkey or chicken for the beef, though the flavor will be slightly lighter. Be sure to adjust the cooking time accordingly.

For a lower-carb option, swap out the rice for cauliflower rice or shredded lettuce as the base of the bowl.


Easy Savory Smash Burger Bowl Recipe

Prep Time 10 minutes
Cook Time 15 minutes
Total Time 25 minutes
Servings 4 servings
Calories 600
A delicious and easy-to-make smash burger bowl topped with fresh ingredients and a savory sauce.

Ingredients

  • 1 pound ground beef (80/20 blend)
  • salt (to taste)
  • pepper (to taste)
  • 1 tablespoon olive oil
  • 1 cup cooked rice (white or brown)
  • 1 cup cherry tomatoes (halved)
  • 1 cup shredded lettuce
  • 1/2 cup diced pickles
  • 1/2 cup shredded cheddar cheese
  • 1/4 cup diced red onion
  • 1/4 cup mayonnaise
  • 1 tablespoon mustard
  • 1 tablespoon ketchup
  • 1 teaspoon Worcestershire sauce

Instructions 

  • In a large skillet, heat the olive oil over medium-high heat.
  • While the skillet is heating, form the ground beef into 4 equal balls.
  • Once the skillet is hot, place the beef balls in the skillet, spacing them apart.
  • Using a spatula, smash each beef ball down to form a patty, about 1/2 inch thick.
  • Season the patties generously with salt and pepper.
  • Cook for about 3-4 minutes on one side until browned, then flip and cook for an additional 2-3 minutes until the desired doneness is reached.
  • While the patties are cooking, prepare the bowls by dividing the cooked rice among 4 bowls.
  • Top each bowl of rice with shredded lettuce, halved cherry tomatoes, diced pickles, shredded cheddar cheese, and diced red onion.
  • Once the patties are done, place a smashed burger on top of each bowl.
  • In a small bowl, mix together the mayonnaise, mustard, ketchup, and Worcestershire sauce to create a sauce.
  • Drizzle the sauce over each burger bowl and serve immediately.

Notes

Feel free to customize the toppings based on your preferences.
Calories: 600kcal
Cost: $15
Course: Main Course
Cuisine: American
Keyword: burger bowl

A delicious savory smash burger bowl filled with lettuce, tomatoes, and burger patties.

Loved this recipe? Save it to your favorite Pinterest board so you can easily find it later! ✨

Imagine a skillet bubbling gently, filled with tender chicken and fluffy rice, all coated in a rich, savory cream sauce. This Creamy Smothered Chicken And Rice offers a truly satisfying aroma that fills your kitchen.

It’s a complete meal where every component melds together, promising a hearty and fulfilling experience with each spoonful.

The Allure of Creamy Smothered Chicken And Rice

This Creamy Smothered Chicken And Rice stands out as a fulfilling meal, straightforward to prepare and deeply satisfying, much like an easy one-pot chicken and rice dish. It combines simple ingredients for rich texture and flavor, perfect for quick big family dinners.

The dish features succulent pieces of chicken and perfectly cooked rice, enveloped in a rich, velvety sauce. This combination ensures a flavorful bite, distinguishing it from many other chicken with rice preparations.

It offers a balanced profile of savory notes from chicken and broth, herbaceous undertones from thyme, and a subtle sweetness from onions and peas. This harmonious blend makes it a memorable choice for winter home cooked meals and warm dinner ideas for cold nights.

Essential Components for a Flavorful Dish

The success of Creamy Smothered Chicken And Rice lies in the thoughtful selection and preparation of its core ingredients. Each component plays a vital role in building the dish’s signature taste and texture.

Boneless, skinless chicken thighs are central to this dish, providing succulent texture and deep flavor that stands up to the rich sauce. Cutting them into 1-inch pieces ensures they cook evenly and integrate seamlessly into the rice mixture.

Heavy cream and grated Parmesan cheese are the stars of the creamy sauce, delivering luxurious richness and savory depth, reminiscent of a creamy tomato chicken breast recipe. The cream forms a smooth base, while Parmesan melts to thicken the sauce, creating a luscious coating for the chicken and rice.

Uncooked long-grain white rice is ideal, absorbing savory chicken broth and cream while maintaining distinct, fluffy texture. Briefly toasting the rice enhances its nutty flavor and helps prevent it from becoming overly sticky.

Fresh yellow onion and minced garlic lay the aromatic foundation, providing a sweet and pungent base. Frozen peas add a pop of color and sweetness, complementing the rich sauce and offering textural contrast.

Crafting Your Creamy Smothered Chicken And Rice

Preparing Creamy Smothered Chicken And Rice involves building layers of flavor in a single skillet. This method ensures all components cook together harmoniously for a satisfying meal.

Begin by heating olive oil in a large skillet or Dutch oven over medium-high heat. Add the chicken thighs, cut into 1-inch pieces, and cook until browned on all sides, about 5-7 minutes. Remove chicken from the skillet and set aside.

Next, add the chopped yellow onion to the same skillet, utilizing the flavorful drippings. Cook the onion until it softens, about 5 minutes, then stir in the minced garlic and cook for another minute until fragrant.

Stir in the uncooked long-grain white rice, dried thyme, salt, and pepper to taste. Cook for about 2 minutes, stirring frequently, to lightly toast the rice, developing its flavor and ensuring better texture.

Pour in the chicken broth and bring the mixture to a gentle simmer. Return the cooked chicken pieces to the skillet. Reduce heat to low, cover, and cook for 15-20 minutes, or until the rice is tender and most liquid has been absorbed, creating a hearty warm meal.

A close-up of a skillet filled with creamy smothered chicken and rice, garnished with fresh parsley.

Finally, stir in the heavy cream, Parmesan cheese, and frozen peas. Cook uncovered for 5-7 minutes, stirring occasionally, until the sauce has thickened to your desired consistency and peas are heated through. This step creates the creamy, luscious texture that defines the dish.

Taste the Creamy Smothered Chicken And Rice and adjust seasoning with additional salt and pepper if needed. Garnish with fresh chopped parsley, if desired, and serve immediately to enjoy this easy home dinner, a fantastic option for sunday food ideas dinners.

Ideal Pairings for Your Meal

Creamy Smothered Chicken And Rice is a complete meal on its own, but a few simple sides can enhance the dining experience.

A crisp green salad with a light vinaigrette provides a refreshing contrast to the richness of the dish.

Steamed green beans or roasted asparagus offer a simple, vibrant vegetable accompaniment that complements the creamy sauce.

Crusty bread is perfect for soaking up any extra creamy sauce from the skillet, ensuring no flavor goes to waste.

Adaptations for Your Pantry

While Creamy Smothered Chicken And Rice is crafted for optimal flavor, minor adjustments can be made. For those who might prefer a different profile, exploring dishes like a spicy Peri Peri chicken and rice offers a distinct experience.

If boneless, skinless chicken breasts are preferred, they can be used instead of thighs, though care should be taken not to overcook them.

For a lighter sauce, half-and-half can replace heavy cream, but expect a thinner consistency and less richness.

Although long-grain white rice is recommended, other types of rice like basmati or jasmine can be used, potentially affecting liquid absorption and cooking times.

Common Questions About Creamy Smothered Chicken And Rice

Here are answers to some common inquiries about preparing and serving this satisfying dish.

Q: Can I prepare Creamy Smothered Chicken And Rice ahead of time?

A: This dish is best enjoyed fresh, as rice can absorb too much liquid and become soft if stored too long. Leftovers can be refrigerated for up to 3 days and gently reheated with a splash of chicken broth or cream.

Q: What kind of skillet is best for this recipe?

A: A large, heavy-bottomed skillet or a Dutch oven is ideal for preparing Creamy Smothered Chicken And Rice. These provide even heat distribution, crucial for browning chicken and cooking rice without sticking, making it suitable for dinner for 12 people if you scale up.

Creamy Smothered Chicken And Rice

Prep Time 15 minutes
Cook Time 40 minutes
Total Time 55 minutes
Servings 4 servings
Calories 650
This comforting one-pan meal features tender chicken and fluffy rice simmered in a rich, creamy Parmesan sauce with a hint of thyme and sweet peas. It's a perfect weeknight dinner that's both satisfying and easy to make.

Ingredients

  • 2 tablespoons olive oil
  • 1.5 lbs boneless, skinless chicken thighs (cut into 1-inch pieces)
  • 1 large yellow onion (chopped)
  • 2 cloves garlic (minced)
  • 1 cup uncooked long-grain white rice
  • 2 cups chicken broth
  • 1 cup heavy cream
  • 1/2 cup grated Parmesan cheese
  • 1 cup frozen peas
  • 1 teaspoon dried thyme
  • salt and freshly ground black pepper (to taste)
  • fresh parsley (chopped, for garnish (optional))

Instructions 

  • Heat olive oil in a large skillet or Dutch oven over medium-high heat. Add chicken pieces and cook until browned on all sides, about 5-7 minutes. Remove chicken from skillet and set aside.
  • Add chopped onion to the same skillet and cook until softened, about 5 minutes. Add minced garlic and cook for another minute until fragrant.
  • Stir in the uncooked rice, dried thyme, salt, and pepper. Cook for 2 minutes, stirring frequently, to lightly toast the rice.
  • Pour in the chicken broth and bring to a simmer. Return the cooked chicken to the skillet. Reduce heat to low, cover, and cook for 15-20 minutes, or until rice is tender and most of the liquid has been absorbed.
  • Stir in the heavy cream, Parmesan cheese, and frozen peas. Cook uncovered for 5-7 minutes, stirring occasionally, until the sauce has thickened to your desired consistency and peas are heated through.
  • Taste and adjust seasoning with additional salt and pepper if needed. Garnish with fresh chopped parsley, if desired, and serve immediately.

Notes

For a richer flavor, you can use chicken stock instead of broth. If you prefer a thinner sauce, add a splash more chicken broth or cream at the end.
Calories: 650kcal
Cost: $15
Course: dinner, main dish
Cuisine: American, Comfort Food
Keyword: Chicken, creamy, one pan, Rice
A close-up of a skillet filled with creamy smothered chicken and rice, garnished with fresh parsley.

Loved this recipe? Save it to your favorite Pinterest board so you can easily find it later! ✨

Imagine the rich aroma of garlic and cream swirling together, promising a comforting meal with minimal cleanup. This one pot creamy garlic pasta delivers exactly that, transforming simple ingredients into a satisfying dish. It’s a straightforward approach to a beloved classic, perfect for any weeknight when you need something easy to cook for dinner.

The Undeniable Appeal of One Pot Creamy Garlic Pasta

This method of preparing one pot creamy garlic pasta stands out for its sheer convenience and the depth of flavor it achieves. It simplifies the cooking process without compromising on taste, making it an excellent choice for a quick and fulfilling meal.

  • Effortless preparation combines cooking the pasta and creating the luxurious sauce all in a single pot, significantly reducing the number of dishes to wash afterwards.
  • A rich, velvety sauce coats every strand of pasta, infused with deep garlic flavor that develops beautifully as everything simmers together.
  • It’s an incredibly versatile dish, easily adaptable for dinner ideas for 1 or scaled up for a larger gathering, proving to be a perfect easy college dinners option.

Essential Components of One Pot Creamy Garlic Pasta

The success of this simple garlic pasta relies on a few key ingredients that work together to create its signature taste and texture. Understanding their roles helps in appreciating the dish’s simplicity and depth.

Fresh garlic is undoubtedly the star, providing the aromatic foundation for the entire dish. When gently sautéed, its pungent notes mellow into a warm, inviting fragrance that permeates the creamy sauce.

Heavy cream is crucial for achieving that characteristic richness and smooth, velvety mouthfeel. It blends with the cooking liquid and pasta starches to form a luxurious sauce that clings beautifully to the pasta.

The choice of pasta also plays a role; long, thin strands like fettuccine or linguine are often preferred, but any pasta shape that can cook evenly in the liquid will work. Chicken or vegetable broth provides the necessary liquid for the pasta to cook in, infusing it with additional savory notes from the start.

Crafting Your One Pot Creamy Garlic Pasta

Preparing this one pot creamy garlic pasta is a straightforward process designed for efficiency and flavor. The beauty lies in cooking everything together, allowing the ingredients to meld into a cohesive, flavorful dish.

Begin by heating a large pot or Dutch oven over medium heat. Add a touch of olive oil or butter, then introduce minced garlic, letting it become fragrant for about a minute; this step builds the foundational flavor for your simple garlic pasta.

Next, pour in the chicken or vegetable broth and heavy cream. Add your chosen uncooked pasta directly to the pot, ensuring it is mostly submerged in the liquid. Bring the mixture to a gentle simmer, then reduce the heat to low.

A close-up shot of creamy garlic pasta in a single pot, garnished with fresh parsley.

Cover the pot and allow the pasta to cook, stirring occasionally to prevent sticking and ensure even cooking. The pasta will absorb the liquid, becoming tender and releasing its starches, which naturally thicken the sauce for your easy creamy garlic pasta.

Once the pasta is al dente and most of the liquid has been absorbed, remove the pot from the heat. Stir in a generous amount of grated Parmesan cheese until it melts into the sauce, making it even creamier. Season the one pot creamy garlic pasta with salt and black pepper to taste.

For a final touch, garnish with fresh parsley before serving. This one pot creamy garlic butter pasta is ready to enjoy, offering a complete meal in just one vessel, making it one of the best all recipes creamy garlic pasta options.

Expert Tips for Perfect One Pot Creamy Garlic Pasta

Achieving the best results with your one pot creamy garlic pasta involves a few simple considerations that enhance the overall experience. These tips ensure your dish is consistently flavorful and perfectly textured.

Always opt for fresh garlic cloves and mince them yourself rather than using pre-minced garlic. Fresh garlic offers a more vibrant and authentic flavor that truly elevates the dish.

Stir the pasta frequently during cooking, especially in the initial stages. This prevents the pasta from sticking to the bottom of the pot and ensures that each strand cooks evenly and absorbs the creamy liquid.

Monitor the sauce consistency as the pasta cooks; if it becomes too thick before the pasta is fully cooked, add a splash more broth or cream. Conversely, if it’s too thin, let it simmer uncovered for a few extra minutes at the end to allow it to reduce slightly.

Serving Suggestions for One Pot Creamy Garlic Pasta

This one pot creamy garlic pasta is a satisfying meal on its own, but pairing it with a few simple sides can create a more complete dining experience. These suggestions complement its rich flavors without overpowering them.

A crisp green salad with a light vinaigrette provides a refreshing contrast to the richness of the pasta, balancing the meal beautifully.

Crusty bread or garlic bread is ideal for soaking up any leftover creamy garlic sauce, ensuring no drop of flavor goes to waste.

Steamed asparagus or roasted broccoli adds a touch of green and extra nutrients, making this a well-rounded dinner ideas no meat option, or even a delightful lunch ideas pasta selection.

Ingredient Swaps for One Pot Creamy Garlic Pasta

While the original recipe for one pot creamy garlic pasta is designed for optimal flavor and texture, minor adjustments can be made to suit dietary preferences or what you have on hand. These swaps maintain the integrity of the dish while offering flexibility.

Vegetable broth can be used instead of chicken broth for a vegetarian version, ensuring this remains a versatile dinner ideas no meat recipe. For those interested in other pasta dishes, consider exploring a creamy garlic parmesan chicken pasta or a garlic parmesan chicken and pasta for different flavor profiles.

While heavy cream offers the richest result, half-and-half can be used for a slightly lighter sauce, though it may not be as thick. If you’re looking for something with a bit of a kick, a creamy Cajun shrimp pasta might be another excellent choice to consider.

One Pot Creamy Garlic Pasta

Prep Time 10 minutes
Cook Time 20 minutes
Total Time 30 minutes
Servings 4 servings
Calories 550
This incredibly easy one-pot creamy garlic pasta is perfect for a quick weeknight meal. All ingredients cook together in a single pot, resulting in a rich, flavorful sauce and perfectly tender pasta with minimal cleanup.

Ingredients

  • 12 oz fettuccine or spaghetti
  • 4 cup vegetable or chicken broth
  • 1 cup heavy cream
  • 6 cloves garlic (minced)
  • 1/2 cup grated Parmesan cheese (plus more for serving)
  • 2 tbsp olive oil
  • 1/2 tsp salt
  • 1/4 tsp black pepper
  • 1/4 cup fresh parsley (chopped, for garnish)
  • 2 cup fresh spinach (optional)

Instructions 

  • In a large pot or Dutch oven, combine the uncooked pasta, broth, heavy cream, minced garlic, olive oil, salt, and pepper.
  • Bring the mixture to a boil over medium-high heat, stirring occasionally to prevent the pasta from sticking.
  • Reduce heat to medium-low, cover, and simmer for 10-12 minutes, or until the pasta is al dente and most of the liquid has been absorbed, stirring occasionally.
  • Remove from heat. Stir in the grated Parmesan cheese and fresh spinach (if using) until the spinach wilts and the sauce is creamy.
  • Serve immediately, garnished with fresh chopped parsley and extra Parmesan cheese if desired.

Notes

For a richer flavor, you can add a tablespoon of butter along with the olive oil. Feel free to experiment with other herbs like basil or oregano. Leftovers can be stored in an airtight container in the refrigerator for up to 3 days.
Calories: 550kcal
Cost: $12
Course: main dish
Cuisine: Italian-American
Keyword: creamy, garlic, one-pot, pasta
A close-up shot of creamy garlic pasta in a single pot, garnished with fresh parsley.

Loved this recipe? Save it to your favorite Pinterest board so you can easily find it later! ✨

The aroma of simmering honey garlic sauce, rich with soy and ginger, fills the kitchen, promising a meal that is both satisfying and vibrant. This high-protein honey garlic shrimp recipe delivers a quick, flavorful dish perfect for any busy weeknight.

Succulent shrimp are coated in a sweet and savory garlic sauce, making it a delicious and healthy option. It is incredibly easy to prepare and cooks in under 10 minutes, offering a convenient solution for your weekly dinner menu ideas.

The Appeal of High-Protein Honey Garlic Shrimp

This high-protein honey garlic shrimp stands out as a superior meal choice for several reasons, making it a staple in many kitchens. It offers a swift preparation time, ensuring a wholesome dinner can be on the table even on the busiest evenings.

Beyond its speed, this dish provides a balanced nutritional profile, contributing not only significant protein but also essential nutrients, aligning with healthy eating principles. Its adaptability allows for easy modifications to suit various dietary needs, whether you are looking for gluten-free options or adjusting for specific macronutrient goals.

The dish highlights shrimp as a protein powerhouse, offering a lean and efficient way to meet your daily protein requirements. This makes it an excellent choice for those focusing on high protein meals with shrimp, including those following approaches like Weight Watchers recipes dinner or seeking Skinnytaste recipes.

Essential Ingredients for Flavorful High-Protein Honey Garlic Shrimp

The success of this high-protein honey garlic shrimp relies on a few key ingredients that contribute to its distinctive taste and texture. Central to the dish is one pound of large shrimp, which should be peeled and deveined for convenience and optimal cooking.

Shrimp serves as an excellent source of protein, cooking quickly and absorbing flavors beautifully. Ensuring the shrimp is thoroughly patted dry with paper towels is crucial, as this step promotes better searing and prevents a watery sauce.

The heart of the flavor comes from the honey garlic sauce, a harmonious blend of sweet and savory elements. Low-sodium soy sauce provides a deep umami base, while honey adds a touch of sweetness that balances the savory notes.

Freshly minced garlic and grated ginger infuse the sauce with aromatic depth, complemented by the bright tang of rice vinegar. A cornstarch slurry, made from cornstarch and water, is essential for thickening the sauce to achieve that desirable glossy consistency that coats the shrimp perfectly.

Finally, a tablespoon of olive oil or sesame oil is used for cooking the shrimp, adding a subtle richness. Optional red pepper flakes provide a gentle warmth, and fresh chopped green onions offer a vibrant garnish, enhancing both the appearance and a hint of fresh onion flavor.

Preparing Your High-Protein Honey Garlic Shrimp

Crafting this high-protein honey garlic shrimp begins with preparing your main ingredient. First, pat the shrimp dry thoroughly with paper towels; this crucial step helps them sear better and achieve a pleasant texture.

Next, in a small bowl, whisk together the honey, low-sodium soy sauce, minced garlic, rice vinegar, ginger, and the optional red pepper flakes. This creates the flavorful honey garlic sauce, which you will set aside for later use.

In a separate, very small bowl, prepare the cornstarch slurry by whisking together the cornstarch and water. This slurry will be used to thicken your sauce, so set it aside as well.

Now, heat the olive oil or sesame oil in a large skillet or wok over medium-high heat. Once the oil is shimmering, add the shrimp to the hot skillet, arranging them in a single layer.

Cook the shrimp for 1-2 minutes per side, just until they turn pink and opaque. It is important not to overcrowd the pan; cook the shrimp in batches if necessary to ensure even cooking and proper searing.

A close-up shot of succulent honey garlic shrimp served over a bed of fluffy white rice, garnished with fresh chopped green onions.

Once cooked, remove the shrimp from the skillet and set them aside on a plate. This prevents them from overcooking while you prepare the sauce.

Pour the prepared honey garlic sauce into the same skillet. Bring the sauce to a gentle simmer, taking a moment to scrape up any browned bits from the bottom of the pan; these bits add extra flavor to your sauce.

Give the cornstarch slurry another quick stir, then add it to the simmering sauce. Whisk continuously as you add the slurry; the sauce will begin to thicken quickly, usually within about 30 seconds to 1 minute, achieving a beautiful, glossy consistency.

Return the cooked shrimp to the skillet and toss them gently to coat completely with the thickened honey garlic sauce. Ensure every piece of shrimp is glistening with the flavorful sauce.

Remove the skillet from the heat immediately to prevent the shrimp from overcooking. Garnish your high-protein honey garlic shrimp with chopped green onions and serve hot with your preferred side dish, perhaps alongside a simple creamy Cajun shrimp pasta recipe for another meal, or with garlic butter steak and potatoes on a different night.

Storing and Reheating High-Protein Honey Garlic Shrimp

Leftover high-protein honey garlic shrimp can be stored in an airtight container in the refrigerator for up to 2-3 days. For best results, allow the dish to cool completely before transferring it to storage.

When reheating, gently warm the shrimp on the stovetop over low heat or in the microwave for short intervals. Be careful not to overcook the shrimp, as this can make them tough and rubbery.

Common Questions About High-Protein Honey Garlic Shrimp

Q: Can I make this high-protein honey garlic shrimp recipe gluten-free?

A: Yes, you can easily adapt this recipe to be gluten-free by substituting low-sodium soy sauce with tamari, which is a gluten-free alternative that offers a similar savory flavor profile.

Q: What if I only have frozen shrimp available for this high-protein shrimp meal?

A: Frozen shrimp works perfectly well for this recipe. Just ensure it is fully thawed and thoroughly patted dry with paper towels before cooking to prevent excess moisture and ensure proper searing.

Q: How can I adjust the spice level of this dish?

A: The spice level can be customized by adjusting the amount of red pepper flakes. For more heat, you can increase the quantity, or omit them entirely for a milder dish.

Serving Suggestions for High-Protein Honey Garlic Shrimp

This high-protein honey garlic shrimp pairs wonderfully with a variety of simple sides. Serve it over fluffy steamed white or brown rice to soak up all the flavorful sauce.

For a lower-carb option, consider serving it with quinoa or cauliflower rice, which also complement the sauce beautifully. Steamed or roasted vegetables like broccoli, asparagus, or green beans make an excellent addition, providing extra nutrients and texture, much like an one-pan garlic parmesan chicken and potatoes meal.

High-Protein Honey Garlic Shrimp

Prep Time 15 minutes
Cook Time 10 minutes
Total Time 25 minutes
Servings 4 servings
Calories 250
This quick and easy high-protein honey garlic shrimp recipe delivers a burst of sweet and savory flavor, perfect for a weeknight meal. Succulent shrimp are coated in a sticky, aromatic sauce and garnished with fresh green onions.

Ingredients

  • 1 lb large shrimp (peeled and deveined)
  • 2 tablespoons honey
  • 3 tablespoons low-sodium soy sauce
  • 2 cloves garlic (minced)
  • 1 tablespoon rice vinegar
  • 1/2 teaspoon fresh ginger (grated (or 1/4 teaspoon ground ginger))
  • 1 teaspoon cornstarch
  • 1 tablespoon water
  • 1 tablespoon olive oil or sesame oil
  • 1/4 teaspoon red pepper flakes (optional)
  • 2 tablespoons green onions (chopped, for garnish)

Instructions 

  • Pat the shrimp dry thoroughly with paper towels. This helps them sear better.
  • In a small bowl, whisk together the honey, soy sauce, minced garlic, rice vinegar, ginger, and optional red pepper flakes. Set aside.
  • In another very small bowl, whisk together the cornstarch and water to create a slurry. Set aside.
  • Heat the olive oil or sesame oil in a large skillet or wok over medium-high heat.
  • Add the shrimp to the hot skillet in a single layer. Cook for 1-2 minutes per side, until pink and opaque. Do not overcrowd the pan; cook in batches if necessary.
  • Remove the cooked shrimp from the skillet and set aside on a plate.
  • Pour the honey garlic sauce into the skillet. Bring to a gentle simmer, scraping up any browned bits from the bottom of the pan.
  • Stir the cornstarch slurry once more, then add it to the simmering sauce. Whisk continuously until the sauce thickens, about 30 seconds to 1 minute.
  • Return the cooked shrimp to the skillet and toss gently to coat completely with the thickened honey garlic sauce.
  • Remove from heat immediately. Garnish with chopped green onions and serve hot with your preferred side dish.

Notes

For extra spice, increase the red pepper flakes. Serve with rice, quinoa, or steamed vegetables for a complete meal. Ensure shrimp are thoroughly patted dry for best searing results.
Calories: 250kcal
Cost: $15
Course: main dish
Cuisine: Asian
Keyword: high protein, honey garlic, Quick Dinner, shrimp
A close-up shot of succulent honey garlic shrimp served over a bed of fluffy white rice, garnished with fresh chopped green onions.

Loved this recipe? Save it to your favorite Pinterest board so you can easily find it later! ✨

The enticing aroma of sautéed garlic and browning chicken fills the kitchen, a prelude to a satisfying meal. Soon, tender pasta will join a rich, smooth sauce, creating a wonderful dinner.

This creamy garlic parmesan chicken pasta promises a quick and satisfying family dinner. It brings together simple ingredients for a comforting experience.

What Makes This Creamy Garlic Parmesan Chicken Pasta a Weeknight Favorite?

This creamy garlic parmesan chicken pasta stands out as a top choice for busy evenings, offering a blend of convenience and flavor. It delivers a satisfying meal without demanding hours in the kitchen.

  • Effortless Preparation: This recipe streamlines the cooking process, allowing you to prepare a complete meal in under 40 minutes. It’s designed to be a fast and easy chicken recipe, perfect for when time is limited but a wholesome dinner is desired.
  • Velvety Sauce Texture: The heart of this dish is its rich, smooth sauce, created from heavy cream and grated parmesan cheese, infused with fragrant garlic. This luxurious coating ensures every bite of pasta and chicken is enveloped in a consistently creamy texture.
  • Versatile and Appealing: Featuring boneless, skinless chicken breasts and your choice of pasta like fettuccine or penne, this dish is adaptable and appeals to a wide range of tastes. For more Garlic Parmesan Chicken and Pasta inspiration, consider how simple ingredients create such a fulfilling experience.

Essential Ingredients for a Velvety Sauce

The foundation of this creamy garlic parmesan chicken pasta relies on a few key ingredients that build its signature flavor and texture. Understanding their roles helps in achieving the perfect balance for this dinner with chicken ideas.

Heavy cream is central to achieving the luxurious, thick consistency of the sauce. It provides the richness that coats the pasta and chicken so beautifully for this creamy garlic parmesan chicken pasta. Using full-fat heavy cream ensures the sauce has the desired body and smooth mouthfeel.

Grated parmesan cheese is another star, contributing a salty, nutty depth that complements the creaminess. This cheese melts into the sauce, adding a layer of savory flavor that is distinctly parmesan. It helps to thicken the sauce further while providing that classic cheesy finish.

Fresh garlic, minced and gently cooked, infuses the entire dish with its aromatic warmth without overpowering other flavors. Six cloves of garlic are used to ensure a noticeable, fragrant presence that is essential for a truly Creamy Garlic Parmesan Chicken and Pasta Recipe. It’s a simple addition that elevates the entire dish.

Crafting Your Creamy Garlic Parmesan Chicken Pasta

Preparing this creamy garlic parmesan chicken pasta involves a straightforward sequence of steps that ensure a perfectly cooked meal. Begin by bringing a large pot of salted water to a boil, preparing it for your chosen pasta, such as fettuccine, penne, or spaghetti. Once boiling, add the pasta and cook it according to package directions until it reaches an al dente texture, then drain it well and set it aside.

While the pasta is cooking, turn your attention to the chicken. Season the 1-inch pieces of boneless, skinless chicken breasts with 1/2 teaspoon of salt and 1/4 teaspoon of black pepper. This initial seasoning helps to build flavor from the start.

Next, heat 1 tablespoon of olive oil in a large skillet or Dutch oven over medium-high heat. Add the seasoned chicken pieces to the hot oil and cook them until they are golden brown and thoroughly cooked through, which typically takes about 5-7 minutes. Once cooked, remove the chicken from the skillet and set it aside, reserving any browned bits in the pan for the sauce.

Reduce the heat to medium in the same skillet and add 2 tablespoons of unsalted butter. As the butter melts, add the 6 cloves of minced garlic, cooking it for about 1 minute until it becomes fragrant, being careful not to let it burn. The aroma of the garlic is a key part of this creamy garlic parmesan chicken pasta for a quick family dinner.

Sprinkle 2 tablespoons of all-purpose flour over the garlic and butter, stirring constantly for 1 minute to create a roux. This roux acts as the thickening agent for your sauce, ensuring a smooth and consistent texture. It’s a crucial step for a rich sauce.

Gradually whisk in 2 cups of chicken broth, making sure to scrape up any browned bits from the bottom of the pan as you do. These bits add depth of flavor to the sauce. Bring the mixture to a simmer, then slowly whisk in 1 1/2 cups of heavy cream, continuing to simmer for 3-5 minutes, or until the sauce slightly thickens to your desired consistency.

A close-up shot of creamy garlic parmesan chicken pasta in a white bowl, garnished with fresh parsley.

Once the sauce has thickened, stir in 1 cup of grated parmesan cheese, along with the remaining 1/2 teaspoon of salt and 1/4 teaspoon of black pepper. Continue stirring until the cheese is completely melted and the sauce is smooth, creating that signature creamy garlic parmesan chicken pasta flavor. This step is where the sauce truly comes alive.

Finally, add the cooked chicken and the drained pasta back into the skillet with the sauce. Toss everything gently to ensure that the chicken and pasta are evenly coated in the rich, velvety sauce. For an even faster option, consider a one-pot creamy garlic pasta, though this method offers distinct flavor layers.

Serve the creamy garlic parmesan chicken pasta immediately, garnishing it with fresh chopped parsley and extra parmesan cheese if desired. This finishing touch adds a pop of color and a fresh note, completing your fast and easy chicken recipe.

Frequently Asked Questions About This Pasta Dinner

Addressing common questions can help ensure a successful preparation of this creamy garlic parmesan chicken pasta for a quick family dinner. Understanding specific aspects of the recipe can enhance your cooking experience.

Q: Can I use different types of pasta for this creamy garlic parmesan chicken pasta?
A: Yes, the recipe suggests using 12 ounces of pasta, and varieties like fettuccine, penne, or spaghetti work well. The key is to choose a pasta shape that can hold the creamy sauce effectively, ensuring every bite is coated.

Q: How can I ensure the sauce for this creamy chicken pasta remains smooth?
A: To achieve a smooth sauce, it is important to gradually whisk in the chicken broth and heavy cream after creating the roux with butter and flour. Continuously whisking as the sauce simmers helps prevent lumps and ensures the parmesan cheese melts seamlessly into the mixture.

Simple Substitutions for Your Creamy Chicken Pasta

While the creamy garlic parmesan chicken pasta recipe is designed for specific ingredients, minor adjustments can be made based on availability or preference. These small changes can help adapt the dish to your pantry.

If boneless, skinless chicken breasts are not available, boneless, skinless chicken thighs cut into 1-inch pieces can be used instead. Chicken thighs will offer a slightly richer flavor and can also be cooked until golden brown and cooked through.

For the garnish, if fresh parsley is not on hand, a small amount of dried parsley can be sprinkled over the top. While fresh parsley offers a brighter flavor and visual appeal, dried parsley can still contribute a subtle herbal note to the creamy garlic parmesan chicken pasta.

Storing and Reheating Your Creamy Pasta Dinner

Proper storage of your creamy garlic parmesan chicken pasta will help maintain its quality for future meals. Knowing how to store and reheat ensures the best experience.

Store any leftover creamy garlic parmesan chicken pasta in an airtight container in the refrigerator for up to 3-4 days. When reheating, gently warm the pasta in a skillet over medium-low heat, adding a splash of chicken broth or milk to loosen the sauce if it has thickened too much.

Creamy Garlic Parmesan Chicken Pasta for a Quick Family Dinner

Prep Time 15 minutes
Cook Time 25 minutes
Total Time 40 minutes
Servings 4 servings
Calories 750
This creamy garlic Parmesan chicken pasta is a perfect weeknight meal, combining tender chicken, al dente pasta, and a rich, savory sauce. It's quick to prepare and packed with flavor, making it a family favorite.

Ingredients

  • 1 pound boneless, skinless chicken breasts (cut into 1-inch pieces)
  • 1 teaspoon salt (divided)
  • 1/2 teaspoon black pepper (divided)
  • 1 tablespoon olive oil
  • 12 ounces pasta ((fettuccine, penne, or spaghetti work well))
  • 2 tablespoons unsalted butter
  • 6 cloves garlic (minced)
  • 2 tablespoons all-purpose flour
  • 2 cups chicken broth
  • 1 1/2 cups heavy cream
  • 1 cup grated Parmesan cheese (plus more for serving)
  • 1/4 cup fresh parsley (chopped (for garnish, optional))

Instructions 

  • Bring a large pot of salted water to a boil. Add the pasta and cook according to package directions until al dente. Drain well and set aside.
  • While the pasta cooks, season the chicken pieces with 1/2 teaspoon salt and 1/4 teaspoon black pepper.
  • Heat olive oil in a large skillet or Dutch oven over medium-high heat. Add the chicken and cook until golden brown and cooked through, about 5-7 minutes. Remove chicken from the skillet and set aside.
  • Reduce heat to medium. Add butter to the same skillet. Once melted, add the minced garlic and cook for about 1 minute until fragrant, being careful not to burn it.
  • Sprinkle the flour over the garlic and butter, stirring constantly for 1 minute to create a roux.
  • Gradually whisk in the chicken broth, scraping up any browned bits from the bottom of the pan. Bring to a simmer, then slowly whisk in the heavy cream. Continue to simmer for 3-5 minutes, or until the sauce slightly thickens.
  • Stir in the 1 cup of grated Parmesan cheese, remaining 1/2 teaspoon salt, and 1/4 teaspoon black pepper until the cheese is melted and the sauce is smooth.
  • Add the cooked chicken and drained pasta to the skillet with the sauce. Toss gently to coat everything evenly.
  • Serve immediately, garnished with fresh chopped parsley and extra Parmesan cheese, if desired.

Notes

For a spicier kick, add a pinch of red pepper flakes with the garlic. You can also substitute chicken thighs for breasts for a richer flavor. Leftovers store well in an airtight container in the refrigerator for up to 3 days.
Calories: 750kcal
Cost: $15
Course: dinner, main dish
Cuisine: American, Italian-American
Keyword: Chicken, creamy, garlic, parmesan, pasta, quick
A close-up shot of creamy garlic parmesan chicken pasta in a white bowl, garnished with fresh parsley.

Loved this recipe? Save it to your favorite Pinterest board so you can easily find it later! ✨

Imagine a hearty aroma filling your kitchen, promising a satisfying meal that brings everyone to the table. This Hobo Casserole Ground Beef Recipe Easy delivers just that, offering layers of savory ground beef, tender potatoes, and a rich, creamy sauce.

It is a straightforward, budget-friendly dish that simplifies dinner preparations, making it a perfect choice for those seeking easy comfort food without extensive effort.

What Makes This Hobo Casserole Ground Beef Recipe Easy a Weeknight Winner?

This Hobo Casserole Ground Beef Recipe Easy stands out as a reliable option for a satisfying meal due to several key attributes. It combines simple ingredients into a dish that is both hearty and flavorful, making it a staple in many kitchens.

  • Layers of thinly sliced potatoes and perfectly seasoned ground beef create a robust foundation for this easy casserole.
  • A creamy, savory sauce, made with condensed cream of mushroom soup and milk, binds all the components together, ensuring every bite is moist and flavorful.
  • The preparation process is designed for ease, allowing for a delicious beef dinner to come together with minimal fuss, ideal for fast dinners on busy evenings.

Essential Ingredients for Your Hobo Casserole

The success of this Hobo Casserole Ground Beef Recipe Easy relies on a few core ingredients that contribute to its classic flavor and texture. Understanding these components helps in preparing a consistently good beef casserole.

Ground beef forms the foundation of this dish, providing a rich, savory base. When selecting ground beef, consider the lean-to-fat ratio; a slightly higher fat content can add more flavor, though draining excess grease is crucial for a balanced dish. Properly browning the ground beef before combining it with other ingredients is key to developing a deep, robust flavor that enhances the entire beef dinner.

Potatoes are another vital component, offering a tender texture and absorbing the savory flavors of the beef and sauce. Using medium potatoes, peeled and thinly sliced, ensures they cook evenly and become perfectly tender within the casserole. This preparation method is common in many beef casserole recipes, providing a substantial and satisfying element.

Condensed cream of mushroom soup, combined with milk, creates the signature creamy sauce that envelops the other ingredients. This mixture contributes a savory depth and moisture, ensuring the hobo casserole remains moist and flavorful throughout baking. It’s a classic choice for easy casserole recipes, helping to create a cohesive and rich beef dish.

Preparing Your Hobo Casserole Ground Beef Recipe Easy

Creating this Hobo Casserole Ground Beef Recipe Easy involves a series of simple steps that lead to a satisfying beef dinner. Begin by preheating your oven to 375°F (190°C) and lightly greasing a 9×13 inch baking dish, preparing it for the layers to come.

Next, in a large skillet, brown the ground beef over medium-high heat until it is fully cooked, then drain off any excess grease. This step is crucial for developing the beef’s flavor and preventing a greasy casserole, a common practice in many beef recipes easy to prepare.

Add the chopped onion to the skillet with the browned beef and cook until the onion softens, which usually takes about 5-7 minutes. Season this beef and onion mixture generously with salt and black pepper to taste, ensuring a flavorful base for your easy comfort food.

In a separate medium bowl, whisk together the condensed cream of mushroom soup and milk until the mixture is smooth. This creamy sauce will be distributed throughout the casserole layers, adding moisture and a rich taste.

A close-up shot of a bubbling hot hobo casserole with ground beef, potatoes, and vegetables in a baking dish, ready to serve.

Arrange half of the thinly sliced potatoes in an even layer at the bottom of the prepared baking dish. This forms the first tender layer of your easy casserole.

Spread the beef and onion mixture evenly over this potato layer, ensuring good distribution of the savory beef. Then, pour half of the prepared soup mixture over the beef and onion, allowing it to begin seeping into the layers.

Arrange the remaining half of the thinly sliced potatoes over the soup mixture, creating the top potato layer. Finally, pour the remaining soup mixture evenly over this top layer of potatoes, ensuring everything is well-covered for even cooking.

Cover the baking dish tightly with aluminum foil to trap moisture during the initial baking phase. Bake the hobo casserole for 60 minutes, allowing the potatoes to begin softening.

Remove the foil and, if desired, sprinkle the shredded cheddar cheese evenly over the top for a bubbly, golden crust. Continue to bake uncovered for an additional 15-20 minutes, or until the potatoes are completely tender and the cheese is melted and bubbly.

Once baked, let the Hobo Casserole Ground Beef Recipe Easy stand for 5-10 minutes before serving. This brief resting period allows the casserole to set, making it easier to serve and ensuring all the flavors meld beautifully, delivering a truly satisfying beef dinner.

Simple Swaps for Your Hobo Casserole

While the Hobo Casserole Ground Beef Recipe Easy is excellent as written, minor adjustments can be made to suit different preferences. These small changes keep the essence of the beef casserole while offering a slight variation.

For instance, if shredded cheddar cheese is not preferred, other types of cheese like Monterey Jack or a Colby-Jack blend can be used for the topping. Alternatively, a different cream-based soup, such as cream of chicken soup, can be substituted for the cream of mushroom soup to slightly alter the flavor profile of this easy casserole.

Serving Suggestions for Hobo Casserole

The Hobo Casserole Ground Beef Recipe Easy is a complete meal on its own, but pairing it with simple sides can enhance the dining experience. These suggestions complement the rich flavors of the beef dinner.

A crisp green salad with a light vinaigrette offers a refreshing contrast to the hearty casserole.

Steamed green beans or broccoli provide a vibrant touch and additional nutrients alongside this easy comfort food.

A slice of crusty bread is perfect for soaking up any extra creamy sauce from the beef dishes.

Storing and Reheating Your Hobo Casserole

Proper storage ensures that any leftover Hobo Casserole Ground Beef Recipe Easy remains fresh and ready for another meal. This easy casserole makes for excellent leftovers, providing another fast dinner option.

Store any cooled leftovers in an airtight container in the refrigerator for up to 3-4 days. To reheat, cover the portion and warm it in the oven at 350°F (175°C) until heated through, or use a microwave for quicker reheating, stirring occasionally.

Hobo Casserole Ground Beef Recipe Easy

Prep Time 20 minutes
Cook Time 1 hour 20 minutes
Total Time 1 hour 40 minutes
Servings 6 servings
Calories 450
This easy Hobo Casserole features layers of seasoned ground beef, tender potatoes, and a creamy mushroom soup sauce, all baked to golden perfection. It's a comforting and hearty meal perfect for a family dinner.

Ingredients

  • 1 lb ground beef
  • 1 medium onion (chopped)
  • 4 medium potatoes (peeled and thinly sliced)
  • 1 can condensed cream of mushroom soup (10.75 oz)
  • 1/2 cup milk
  • 1/2 cup shredded cheddar cheese (optional, for topping)
  • salt and black pepper (to taste)
  • 1 tbsp vegetable oil (if needed for browning beef)

Instructions 

  • Preheat oven to 375°F (190°C). Lightly grease a 9x13 inch baking dish.
  • In a large skillet, brown the ground beef over medium-high heat. Drain off any excess grease.
  • Add the chopped onion to the skillet with the beef and cook until softened, about 5-7 minutes.
  • Season the beef and onion mixture with salt and pepper to taste.
  • In a medium bowl, whisk together the condensed cream of mushroom soup and milk until smooth.
  • Arrange half of the thinly sliced potatoes in an even layer at the bottom of the prepared baking dish.
  • Spread the beef and onion mixture evenly over the layer of potatoes.
  • Pour half of the soup mixture over the beef and onion.
  • Arrange the remaining half of the thinly sliced potatoes over the soup mixture.
  • Pour the remaining soup mixture evenly over the top layer of potatoes.
  • Cover the baking dish tightly with aluminum foil.
  • Bake for 60 minutes. Remove the foil and, if desired, sprinkle with shredded cheddar cheese.
  • Bake uncovered for an additional 15-20 minutes, or until potatoes are tender and cheese is melted and bubbly.
  • Let stand for 5-10 minutes before serving.

Notes

For a richer flavor, you can add a dash of Worcestershire sauce to the beef mixture. Feel free to experiment with different types of cheese for the topping, such as Monterey Jack or a Colby-Jack blend.
Calories: 450kcal
Cost: $12
Course: dinner, main dish
Cuisine: American, Comfort Food
Keyword: Casserole, easy, ground beef, Hobo
A close-up shot of a bubbling hot hobo casserole with ground beef, potatoes, and vegetables in a baking dish, ready to serve.

Loved this recipe? Save it to your favorite Pinterest board so you can easily find it later! ✨