Author

Ava

Browsing

This post contains affiliate links. As an Amazon Associate, I earn from qualifying purchases. This comes at no extra cost to you.


Savory Dumpling Ramen Bowl with Soft-Boiled Eggs and Fresh Greens

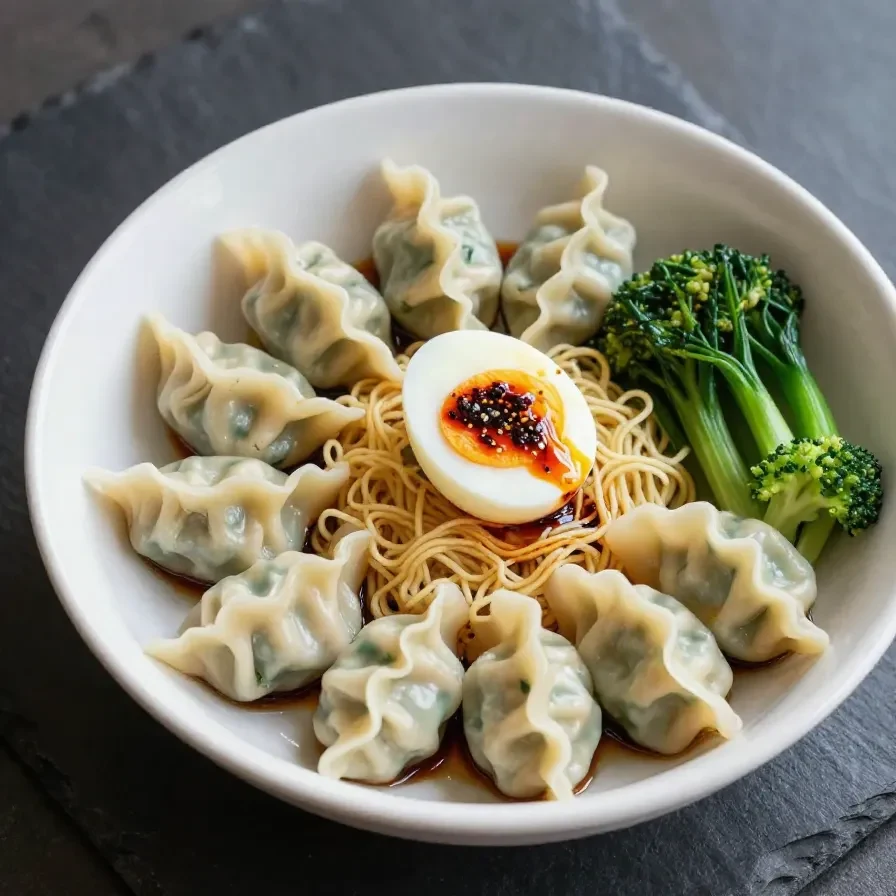
The savory dumpling ramen bowl with soft-boiled eggs and fresh greens delivers comforting warmth with its aromatic broth, tender dumplings, and perfectly wilted greens. The soft-boiled eggs add a rich creaminess, while sesame oil and garlic bring depth to every spoonful. This dish isn’t just a meal—it’s a flavorful escape that’s both satisfying and quick to prepare.

Table of Contents

Why You Need This Dish

  • This savory dumpling ramen bowl simplifies dinner without compromising on flavor. It’s a 30-minute recipe that feels like a luxurious, restaurant-worthy indulgence.
  • The combination of tender dumplings, rich broth, and soft-boiled eggs makes this dish hearty enough for cooler evenings. It’s comfort food that won’t weigh you down.
  • Fresh greens like baby spinach and bok choy add a boost of nutrition and vibrant color. It’s the perfect way to sneak in veggies without a second thought.
  • The recipe is flexible for busy weeknights, using halal and easy-to-access ingredients for a quick, satisfying meal. You’ll have everything you need to feel accomplished in the kitchen.

Ingredients You’ll Need

The halal chicken broth serves as the heart of this recipe, infusing every component with deep, savory flavors. Fresh ramen noodles ensure the final texture is chewy and satisfying, making each bite incredibly enjoyable.

You might also enjoy our easy savory smash burger bowl recipe.

Step-by-Step Guide

  1. In a large pot, bring the halal chicken broth to a boil over medium-high heat.
  2. Add the minced garlic and soy sauce to the boiling broth and let it simmer for 5 minutes. This step enhances the depth of the broth.
  3. While the broth is simmering, prepare the soft-boiled eggs. In a small pot, bring water to a boil, gently add the eggs, and boil for about 6-7 minutes for a soft center.
  4. Transfer the finished eggs to an ice bath to cool. Once cooled, peel and set aside for topping.
    A savory ramen bowl filled with dumplings, soft-boiled eggs, and fresh greens

    Instant Pot Duo 7-in-1 Electric Pressure Cooker

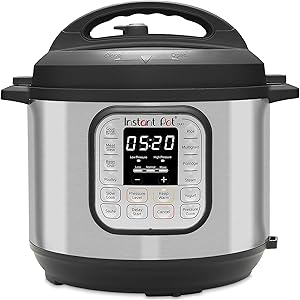
    Kitchen ApplianceInstant Pot Duo 7-in-1 Electric Pressure Cooker

    A versatile appliance that can make cooking broth and dumplings faster and easier

    View on Amazon →

    Lodge Cast Iron Skillet 12-inch

    Essential CookwareLodge Cast Iron Skillet 12-inch

    Perfect for searing and baking — this recipe needs even heat distribution

    View on Amazon →

  5. In the same pot of broth, add the chicken dumplings and cook for about 5-7 minutes, or until they are fully cooked and float to the top.
  6. Add the ramen noodles to the pot and cook according to package instructions, usually around 3-4 minutes. Stir occasionally to prevent sticking.
  7. In the last minute of cooking, add the chopped bok choy and baby spinach, stirring until just wilted. These greens add freshness and balance.
  8. Taste the broth and adjust seasoning with salt, pepper, and red pepper flakes if desired.
  9. Ladle the ramen and dumplings into bowls. Halve the soft-boiled eggs and place them on top for an elegant finish.
  10. Garnish with sliced green onions and sesame seeds if using, and drizzle with sesame oil before serving.

Common Mistakes to Avoid

  • Don’t overcook the eggs. Stick to the 6-7 minute range for the perfect soft-boiled texture.
  • Avoid adding the greens too early. They only need a minute to wilt, so add them at the very end for optimal freshness.
  • Skipping the ice bath for the eggs can make peeling them much harder. Take the extra step—it’s worth it!

Serving and Pairing Ideas

  • Pair this dish with steamed edamame for a simple appetizer.
  • A side of kimchi offers a tangy, spicy contrast to the savory broth.
  • Enjoy it with a fresh cucumber salad for a refreshing crunch alongside the warm flavors.
  • If you want more protein, serve with grilled halal chicken skewers on the side.

Expert Cooking Tips

  • To save time, pre-boil the eggs the night before and store them in the fridge until needed.
  • Always cook the dumplings directly in the broth to enrich their flavor. It makes a noticeable difference.
  • Use fresh ramen noodles whenever possible for a more authentic texture and taste.
  • Drizzle a few extra drops of sesame oil just before serving for an aromatic finish.

Easy Ingredient Swaps

  • If you don’t have bok choy, use napa cabbage or even kale. These add a similar texture and earthy flavor.
  • Swap the halal chicken dumplings for vegetable dumplings to make this dish vegetarian. The broth will still be rich and satisfying.
  • No sesame oil? Try toasted peanut oil for a nutty alternative that pairs well with the soy sauce.


Savory Dumpling Ramen Bowl with Soft-Boiled Eggs and Fresh Greens

Prep Time 15 minutes
Cook Time 20 minutes
Total Time 35 minutes
Servings 4 servings
Calories 450
A delicious and hearty ramen bowl featuring savory chicken dumplings, soft-boiled eggs, and fresh greens.

Ingredients

Instructions 

  • In a large pot, bring the halal chicken broth to a boil over medium-high heat.
  • Add the minced garlic and soy sauce to the boiling broth and let it simmer for 5 minutes.
  • While the broth is simmering, prepare the soft-boiled eggs. In a small pot, bring water to a boil, gently add the eggs, and boil for about 6-7 minutes for a soft center.
  • Once done, transfer the eggs to an ice bath to cool, then peel and set aside.
  • In the same pot of broth, add the chicken dumplings and let them cook for about 5-7 minutes, or until they are fully cooked and float to the top.
  • Add the ramen noodles to the pot and cook according to package instructions, usually around 3-4 minutes.
  • In the last minute of cooking, add the chopped bok choy and baby spinach to the pot, stirring until wilted.
  • Taste the broth and adjust seasoning with salt, pepper, and red pepper flakes if desired.
  • Ladle the ramen and dumplings into bowls, halving the soft-boiled eggs and placing them on top.
  • Garnish with sliced green onions and sesame seeds if using, and drizzle with sesame oil before serving.

Notes

Feel free to add other vegetables or proteins as desired.
Calories: 450kcal
Cost: $15
Course: Main Course
Cuisine: Asian
Keyword: dumplings, ramen, Soup

A savory ramen bowl filled with dumplings, soft-boiled eggs, and fresh greens

Loved this recipe? Save it to your favorite Pinterest board so you can easily find it later! ✨

This post contains affiliate links. As an Amazon Associate, I earn from qualifying purchases. This comes at no extra cost to you.

This Old-Fashioned Homemade Banana Pudding is the perfect combination of creamy vanilla custard, sweet slices of ripe bananas, and crunchy vanilla wafers. Each spoonful offers a delightful mix of smooth textures and comforting flavors that make it a nostalgic Southern dessert. Perfect for gatherings or weeknight treats, this pudding brings warmth and sweetness to any table.

Table of Contents

Why This Old-Fashioned Homemade Banana Pudding Is Perfect

  • This dish is quick and easy: ready in about 30 minutes, it saves you time without sacrificing flavor. The custard cooks on the stovetop, so there’s no heavy baking involved.
  • It uses simple ingredients: pantry staples like flour, sugar, and milk combine with fresh bananas to create something extraordinary. No need for exotic items—everything is already in your kitchen or local store.
  • The layered presentation makes it ideal for serving as an elegant dessert. Whether in a large dish or individual cups, the visual appeal is undeniable.
  • It is versatile for any occasion: perfect for potlucks, gatherings, or quiet nights at home. Serve chilled and topped with whipped cream or meringue for added sophistication.

Everything You Need for Old-Fashioned Homemade Banana Pudding

The ripe bananas are key to this recipe’s sweetness and texture, offering a natural creaminess that complements the pudding perfectly. Vanilla wafers add crunch and soak up the pudding, creating a soft, cake-like layer once chilled.

How To Make Old-Fashioned Homemade Banana Pudding Step by Step

  1. In a medium saucepan, combine the sugar, flour, and salt. Gradually whisk in the milk until smooth.
  2. Place the saucepan over medium heat and cook, stirring constantly, until the mixture thickens and starts to bubble, about 10 minutes.
  3. In a small bowl, lightly beat the egg yolks. Gradually whisk about 1/2 cup of the hot pudding mixture into the egg yolks to temper them.
  4. Pour the tempered egg mixture back into the saucepan with the rest of the pudding and whisk well. Continue to cook for another 2-3 minutes, stirring constantly, until the pudding is thick and creamy.
  5. A bowl of old-fashioned homemade banana pudding topped with whipped cream and vanilla wafers.

    KitchenAid Artisan Stand Mixer

    Kitchen ApplianceKitchenAid Artisan Stand Mixer

    Makes mixing and custard preparation effortless — a premium tool for home bakers.

    View on Amazon →

    Pyrex Glass Mixing Bowl Set

    Essential CookwarePyrex Glass Mixing Bowl Set

    Durable and versatile mixing bowls perfect for combining ingredients and tempering egg yolks.

    View on Amazon →

  6. Remove the saucepan from heat and stir in the vanilla extract. Allow the pudding to cool slightly.
  7. In a large serving dish or individual cups, assemble the banana pudding by layering vanilla wafers, banana slices, and pudding. Repeat layers until all ingredients are used, finishing with pudding on top.
  8. If desired, top the pudding with whipped cream or meringue for added texture and sweetness.
  9. Chill the banana pudding in the refrigerator for at least 2-3 hours before serving to allow the flavors to meld and the wafers to soften.

Frequently Asked Questions

  • Can I use skim milk instead of whole milk? Whole milk is recommended for its creaminess, but skim milk can work if you prefer a lighter pudding.
  • How long does banana pudding last in the refrigerator? Stored in an airtight container, it remains fresh for up to 3 days. After that, the bananas may start to brown.
  • Can I make this recipe ahead of time? Yes, the pudding tastes even better after chilling, so feel free to prepare it the day before serving.

Easy Ingredient Swaps and Substitutions

  • Dairy-free milk: Use almond or oat milk instead of whole milk if you prefer a dairy-free option. This may slightly alter the thickness of the custard.
  • Gluten-free wafers: Replace traditional vanilla wafers with gluten-free cookies to accommodate dietary restrictions without compromising layers.
  • Opt for honey as a natural sweetener for a slightly different flavor profile.

How to Store and Reheat Banana Pudding

Refrigerate leftover banana pudding in an airtight container for up to 3 days. If using whipped cream or meringue topping, add it just before serving to avoid sogginess. For reheating, gently warm the pudding over low heat on the stovetop, though serving it chilled is typically recommended.

To freeze, store the pudding in a freezer-safe container for up to 1 month. Note that the texture of the vanilla wafers may change upon thawing.

A Brief History of Banana Pudding

Banana pudding has evolved as a quintessential Southern dessert since the late 19th century. Inspired by traditional English trifles, it features layers of custard, bananas, and cookies, creating a perfect harmony of flavors.

Originally prepared with sponge cake, modern banana pudding recipes embrace vanilla wafers for simplicity and added crunch. Its widespread appeal reflects both Southern hospitality and the universal love for banana-based treats.

Old-Fashioned Homemade Banana Pudding

Prep Time 20 minutes
Cook Time 15 minutes
Total Time 35 minutes
Servings 8 servings
Calories 250
A classic Southern dessert featuring layers of creamy pudding, ripe bananas, and vanilla wafers.

Ingredients

Instructions 

  • In a medium saucepan, combine the sugar, flour, and salt. Gradually whisk in the milk until smooth.
  • Place the saucepan over medium heat and cook, stirring constantly, until the mixture thickens and starts to bubble, about 10 minutes.
  • In a small bowl, lightly beat the egg yolks. Gradually whisk about 1/2 cup of the hot pudding mixture into the egg yolks to temper them.
  • Pour the tempered egg mixture back into the saucepan with the rest of the pudding and whisk well. Continue to cook for another 2-3 minutes, stirring constantly, until the pudding is thick and creamy.
  • Remove the saucepan from heat and stir in the vanilla extract. Allow the pudding to cool slightly.
  • In a large serving dish or individual cups, assemble the banana pudding by layering vanilla wafers, banana slices, and pudding. Repeat layers until all ingredients are used, finishing with pudding on top.
  • If desired, top the pudding with whipped cream or meringue for added texture and sweetness.
  • Chill the banana pudding in the refrigerator for at least 2-3 hours before serving to allow the flavors to meld and the wafers to soften.

Notes

For best results, use ripe bananas and allow the pudding to chill thoroughly before serving.
Calories: 250kcal
Cost: $10
Course: Dessert
Cuisine: Southern
Keyword: banana pudding
A bowl of old-fashioned homemade banana pudding topped with whipped cream and vanilla wafers.

Loved this recipe? Save it to your favorite Pinterest board so you can easily find it later! ✨

This post contains affiliate links. As an Amazon Associate, I earn from qualifying purchases. This comes at no extra cost to you.

This Flag Fruit Pizza: A Patriotic Gluten-Free Dessert is a colorful and festive treat that combines a creamy base with fresh fruit toppings arranged to resemble the American flag. The crisp gluten-free crust pairs perfectly with the velvety cream cheese mixture, while the vibrant berries and ripe banana add a sweet and juicy finish. It’s an eye-catching way to celebrate holidays like the 4th of July, bringing flavor, fun, and flair to your table!

Table of Contents

Why This Flag Fruit Pizza Is Perfect for Any Celebration

  • This recipe is completely gluten-free, making it ideal for guests who need dietary accommodations. The pizza crust is versatile and works with store-bought versions or homemade preparations.
  • Icing-like cream cheese topping adds richness while balancing the sweetness of fresh fruits. The honey or maple syrup gives the perfect hint of natural sweetness without being overpowering.
  • The design mimics the American flag, making it perfect for patriotic events like 4th Of July gatherings. Guests of all ages will enjoy both the appearance and the delicious flavors of this dish.
  • This dish is quick to prepare and requires minimal clean-up, making it convenient for busy holiday schedules. You can assemble it ahead of time and refrigerate for an easy-to-serve dessert.

Everything You Need for Flag Fruit Pizza

The cream cheese is the base of this dessert, creating a rich and creamy layer for the fruits to adhere to. Fresh blueberries, raspberries, strawberries, and banana slices bring natural sweetness and vibrant colors to the final dish.

How To Make Flag Fruit Pizza Step by Step

  1. Preheat your oven to 375°F (190°C) and place the gluten-free pizza crust on a baking tray or pizza pan.
  2. Bake the crust for 8-10 minutes, or until slightly golden and firm. Let it cool completely before adding the toppings.
  3. In a medium mixing bowl, combine the softened cream cheese, honey or maple syrup, and vanilla extract. Mix until smooth and creamy.
  4. Spread the cream cheese mixture evenly over the cooled pizza crust, creating a smooth base for the fruit toppings.
  5. Arrange the blueberries in the top left corner of the pizza to create the ‘stars’ section of the flag.
  6. Place alternating rows of raspberries and banana slices across the remaining surface of the pizza to create the ‘stripes’ of the flag.
  7. Add sliced strawberries to fill in gaps or enhance the design as needed.
  8. Chill the assembled fruit pizza in the refrigerator for 10-15 minutes to set the cream cheese topping.
  9. Slice and serve your patriotic flag fruit pizza immediately or store in the refrigerator until ready to enjoy.
A gluten-free flag fruit pizza decorated with blueberries, strawberries, and bananas to resemble the American flag.

KitchenAid Artisan Stand Mixer

Kitchen ApplianceKitchenAid Artisan Stand Mixer

Makes mixing cream cheese and other ingredients effortless — a kitchen game-changer.

View on Amazon →

Nordic Ware Nonstick Pizza Pan

Essential CookwareNordic Ware Nonstick Pizza Pan

A durable nonstick pizza pan perfect for baking gluten-free crusts evenly.

View on Amazon →

Simple Swaps for Flag Fruit Pizza

  • If you’re out of cream cheese, swap it with dairy-free alternatives like cashew cream for a dairy-free flag pizza. This will slightly alter the texture but still keep the dish rich and smooth.
  • For added sweetness, use a flavored honey, such as lavender or orange blossom. It will infuse the dish with subtle floral or citrus notes.
  • Short on fresh fruit? Frozen berries can be used, but thaw them completely and pat dry to avoid excess moisture.

Common Mistakes to Avoid

  • Don’t skip cooling the crust completely after baking. A warm crust can cause the cream cheese base to melt and become runny.
  • Ensure the fruit is properly dried before arranging it on the pizza. Excess moisture can lead to soggy spots on the cream cheese layer.
  • Avoid over-baking the crust; too much time in the oven can make it tough and unappetizing. Stick to the recommended bake time of 8-10 minutes.

A Fun History Behind Flag Fruit Pizza

The idea of arranging food to resemble the American flag has existed for decades, often seen in desserts and salads for patriotic holidays. Flag fruit pizzas gained popularity as creative hosts sought ways to combine freshness, simplicity, and a festive flair in their dishes.

The gluten-free adaptation stems from the increasing need to accommodate dietary restrictions, allowing more people to enjoy this visually stunning and flavorful dessert.

You might also enjoy our decadent & easy 5-ingredient flourless.

How to Store Flag Fruit Pizza

To keep your flag fruit pizza fresh, store leftovers in an airtight container in the refrigerator for up to 2 days. The cream cheese layer may begin to soften over time, so it’s best to eat it shortly after preparing.

For more ideas, check out our decadent & easy 5-ingredient flourless.

If you want to make it in advance, prepare the crust and cream cheese layer but wait to arrange the fruits until closer to serving. This prevents the fruits from releasing juices and softening the base.

Looking for something similar? Try our 5-minute sugar-free dessert: 3 ingredients,.

Avoid freezing this dish, as the cream cheese and fresh fruits don’t hold up well to freezing and thawing, which can change the texture and appearance.

Flag Fruit Pizza: A Patriotic Gluten-Free Dessert

Prep Time 15 minutes
Cook Time 10 minutes
Total Time 25 minutes
Servings 8 servings
Calories 250
A festive and gluten-free dessert perfect for patriotic celebrations, featuring a colorful fruit design resembling the American flag.

Ingredients

Instructions 

  • Preheat your oven to 375°F (190°C) and place the gluten-free pizza crust on a baking tray or pizza pan.
  • Bake the crust for 8-10 minutes, or until slightly golden and firm. Let it cool completely before adding toppings.
  • In a medium mixing bowl, combine the softened cream cheese, honey or maple syrup, and vanilla extract. Mix until smooth and creamy.
  • Spread the cream cheese mixture evenly over the cooled pizza crust, creating a smooth base for the fruit toppings.
  • Arrange the blueberries in the top left corner of the pizza to create the ‘stars’ section of the flag.
  • Place alternating rows of raspberries and banana slices across the remaining surface of the pizza to create the ‘stripes’ of the flag.
  • Add sliced strawberries to fill in gaps or enhance the design as needed.
  • Chill the assembled fruit pizza in the refrigerator for 10-15 minutes to set the cream cheese topping.
  • Slice and serve your patriotic flag fruit pizza immediately or store in the refrigerator until ready to enjoy.

Notes

Feel free to substitute fruits based on availability or preference. For a dairy-free option, use a vegan cream cheese alternative.
Calories: 250kcal
Cost: $15
Course: Dessert
Cuisine: American
Keyword: fruit pizza, gluten-free, patriotic dessert
A gluten-free flag fruit pizza decorated with blueberries, strawberries, and bananas to resemble the American flag.

Loved this recipe? Save it to your favorite Pinterest board so you can easily find it later! ✨

This post contains affiliate links. As an Amazon Associate, I earn from qualifying purchases. This comes at no extra cost to you.


Sugar Cookie Flag Fruit Pizza Recipe

This Sugar Cookie Flag Fruit Pizza is a vibrant and patriotic dessert perfect for holidays like the Fourth of July. The buttery sugar cookie crust paired with creamy vanilla frosting and juicy fresh fruit creates a delightful combination of textures and flavors. Whether you’re celebrating with friends or family, this dish is sure to stand out on the dessert table.

Table of Contents

Why Sugar Cookie Flag Fruit Pizza Is Perfect for Your Celebration

  • Festive and patriotic: The flag design featuring fresh blueberries, strawberries, and pineapple offers a visually stunning centerpiece for patriotic holidays.
  • Easy to prepare: Using refrigerated sugar cookie dough saves time, while the straightforward assembly keeps things stress-free. Perfect for both beginner and experienced bakers.
  • Customizable: You can easily swap fruits based on preferences or seasonal availability without losing the spirit of the design.
  • Great for groups: With 12 servings, this dessert is ideal for potlucks, picnics, or family gatherings, ensuring there’s plenty to go around.

Everything You Need for Sugar Cookie Flag Fruit Pizza

The sugar cookie crust provides a buttery, sweet base that complements the creamy frosting beautifully. Fresh fruit not only adds vibrant colors but also balances the sweetness with natural juiciness.

How To Make Sugar Cookie Flag Fruit Pizza Step by Step

  1. Preheat your oven to 350°F (175°C).
  2. On a greased or parchment-lined baking sheet, roll out the sugar cookie dough into a large rectangle, approximately 1/4 inch thick. Alternatively, press the dough evenly into a rectangular baking pan.
  3. Bake the sugar cookie crust for 12-15 minutes or until lightly golden. Remove from the oven and let it cool completely.
  4. In a medium bowl, beat the softened cream cheese, powdered sugar, and vanilla extract until smooth and creamy.
  5. Spread the cream cheese mixture evenly over the cooled sugar cookie crust, creating a smooth base for your fruit toppings.
  6. Arrange the fruit to resemble a flag: use blueberries in the top left corner to represent stars, and alternate rows of sliced strawberries and pineapple or bananas to create the stripes.
  7. Chill the assembled fruit pizza in the refrigerator for at least 30 minutes to set.
  8. Slice into squares or rectangles and serve!

A sugar cookie fruit pizza decorated to resemble the American flag with strawberries, blueberries, and cream cheese frosting.

KitchenAid Artisan Stand Mixer

Kitchen ApplianceKitchenAid Artisan Stand Mixer

Makes mixing the cream cheese frosting smooth and effortless — a kitchen game-changer.

View on Amazon →

Nordic Ware Natural Aluminum Commercial Baker's Half Sheet

Essential CookwareNordic Ware Natural Aluminum Commercial Baker’s Half Sheet

A durable baking sheet perfect for rolling out and baking the sugar cookie crust evenly.

View on Amazon →

Ingredient Swaps and Substitutions

  • If you prefer, replace the diced pineapple with yellow kiwi for a tropical twist while maintaining the vibrant stripes.
  • Using mascarpone cheese instead of cream cheese will result in a lighter, slightly sweeter frosting.
  • Try gluten-free sugar cookie dough if anyone in your group follows a gluten-free diet.

Serving Ideas for Your Flag Fruit Pizza

  • Pair with lemonade or sparkling water for a refreshing summer beverage.
  • Serve alongside vanilla ice cream for a decadent twist on dessert.
  • Add small bowls of extra fruit toppings to let guests customize their slice.
  • Include it in a spread with savory snacks like our quick & easy cheese pizza for a balanced party menu.

Common Questions About This Recipe

  • Can I use homemade sugar cookie dough instead of pre-made? Yes, but ensure that the dough is evenly rolled out and baked to the same thickness for consistent results.
  • Can I use other fruits for the design? Absolutely! Fruits like raspberries and mangoes can be swapped in while still keeping the flag theme.
  • How long does this dessert stay fresh? The fruit pizza will stay fresh in the fridge for up to 3 days if stored in an airtight container.

Meal Prep, Storage, and Reheating Tips

To make Sugar Cookie Flag Fruit Pizza ahead of time, bake the sugar cookie crust and prepare the frosting up to one day in advance. Store the crust at room temperature and refrigerate the frosting until ready to assemble.

If you have leftovers, store them in the refrigerator covered with plastic wrap or in an airtight container. Avoid freezing as the frosting and fresh fruit may lose their texture upon thawing.

There’s no need to reheat this dessert; simply serve chilled straight from the refrigerator for the best taste and texture.


Sugar Cookie Flag Fruit Pizza

Prep Time 20 minutes
Cook Time 15 minutes
Total Time 35 minutes
Servings 12 servings
Calories 250
A festive and colorful dessert featuring a sugar cookie crust, creamy topping, and fresh fruit arranged to resemble a flag. Perfect for patriotic celebrations!

Ingredients

Instructions 

  • Preheat your oven to 350°F (175°C).
  • On a greased or parchment-lined baking sheet, roll out the sugar cookie dough into a large rectangle, approximately 1/4 inch thick. Alternatively, press the dough evenly into a rectangular baking pan.
  • Bake the sugar cookie crust for 12-15 minutes or until lightly golden. Remove from the oven and let it cool completely.
  • In a medium bowl, beat the softened cream cheese, powdered sugar, and vanilla extract until smooth and creamy.
  • Spread the cream cheese mixture evenly over the cooled sugar cookie crust, creating a smooth base for your fruit toppings.
  • Arrange the fruit to resemble a flag: use blueberries in the top left corner to represent stars, and alternate rows of sliced strawberries and pineapple or bananas to create the stripes.
  • Chill the assembled fruit pizza in the refrigerator for at least 30 minutes to set.
  • Slice into squares or rectangles and serve!

Notes

Feel free to substitute other fruits for additional colors or flavors. For example, raspberries can replace strawberries, or kiwi can be used instead of pineapple.
Calories: 250kcal
Cost: $12
Course: Dessert
Cuisine: American
Keyword: flag dessert, fruit pizza, patriotic dessert

A sugar cookie fruit pizza decorated to resemble the American flag with strawberries, blueberries, and cream cheese frosting.

Loved this recipe? Save it to your favorite Pinterest board so you can easily find it later! ✨

This post contains affiliate links. As an Amazon Associate, I earn from qualifying purchases. This comes at no extra cost to you.

This Easy Brownie Pizza Recipe combines the rich, fudgy texture of brownies with the fun and creativity of a customizable dessert pizza. Decorated with chocolate frosting and topped with marshmallows, chocolate chips, strawberries, and optional crushed nuts, every bite offers a delightful mix of flavors and textures. Perfect for parties or to satisfy a chocolate craving, this recipe is quick to make and guaranteed to impress your friends and family.

Table of Contents

Why This Easy Brownie Pizza Recipe Is Perfect for You

  • This recipe is both fun to assemble and quick to prepare, making it ideal for last-minute desserts or kids’ parties. The brownie base bakes in just 25 minutes, leaving plenty of time to decorate with toppings.
  • The dish is endlessly customizable, letting you tailor the toppings to suit your guests or your desires. Swap nuts for crushed cookies or add your favorite fruits for a personalized twist.
  • You don’t need any special bakeware—just a standard pizza pan or parchment paper—and a box of brownie mix does the heavy lifting. It’s an easy way to impress your crowd with minimal effort.
  • This recipe satisfies chocolate cravings without needing fancy techniques. The chocolate frosting, marshmallows, and chips ensure layers of decadent flavor in every single bite.

Everything You Need for Easy Brownie Pizza Recipe

The brownie mix is the foundation for this dessert, delivering its signature fudgy texture and richness. Chocolate frosting acts as “pizza sauce,” giving the dish its bold flavor profile while helping the toppings stick to the base.

How To Make Easy Brownie Pizza Recipe Step by Step

  1. Preheat your oven to the temperature specified on the brownie mix box.
  2. Prepare the brownie batter according to the instructions on the box. Make sure to mix thoroughly so there are no lumps, ensuring a smooth base.
  3. Grease a 12-inch pizza pan or line it with parchment paper to prevent sticking.
  4. Pour the brownie batter onto the prepared pizza pan and spread it evenly to create a thin layer.
    A homemade brownie pizza topped with colorful fruits and chocolate drizzle.

    KitchenAid Artisan Stand Mixer 5 Quart

    Kitchen ApplianceKitchenAid Artisan Stand Mixer 5 Quart

    Effortlessly mix brownie batter for a smooth and lump-free base.

    View on Amazon →

    Wilton Non-Stick Pizza Pan, 12-inch

    Essential CookwareWilton Non-Stick Pizza Pan, 12-inch

    Ideal for baking brownie pizzas with even heat distribution and easy cleanup.

    View on Amazon →

  5. Bake the brownie base in the preheated oven for the time stated on the box, or until a toothpick inserted into the center comes out clean.
  6. Let the brownie base cool completely on the pan before proceeding. A cooled base ensures the frosting spreads smoothly without melting.
  7. Spread the chocolate frosting evenly over the cooled brownie base to resemble pizza sauce.
  8. Sprinkle the mini marshmallows, chocolate chips, chopped strawberries, and crushed nuts (if using) evenly over the frosting as toppings.
  9. Slice the brownie pizza into wedges and serve immediately.

Where Dessert Pizza Got Its Inspiration

While dessert pizzas may seem modern, the idea of combining sweet toppings and baked dough dates back centuries. This concept evolved from fruit tarts and chocolate-laden flatbreads into fun creations like the Easy Brownie Pizza Recipe.

Today, dessert pizzas fuse the beloved shape of a pizza with the indulgence of classic treats. Recipes like this bring a playful twist to traditional baking, making them interactive and exciting to share.

Serving and Pairing Suggestions

  • Pair this brownie pizza with a scoop of vanilla ice cream to enhance its richness. The cold cream complements the warm, fudgy flavors perfectly.
  • Serve alongside our quick & easy cheese pizza for a savory start to your meal before diving into dessert.
  • Offer coffee or hot cocoa as beverages, as their bold flavors pair beautifully with chocolate.
  • For a lighter accompaniment, fruit salad provides a refreshing counterbalance to the dense brownie base.

Expert Tips and Pro Shortcuts

  • Line your pizza pan with parchment paper for easy removal and cleanup. It guarantees your brownie pizza stays intact during slicing.
  • Chill the frosting briefly before spreading it if your kitchen is warm. Firmer frosting is easier to handle and creates a neat “sauce” layer.
  • Customize toppings to match the season—use fresh peaches or raspberries in summer, or drizzle caramel for a fall theme.
  • If you’re short on time, prepare the brownie base a day ahead and store it covered. Decorate with fresh toppings just before serving for maximum freshness.

Common Mistakes to Avoid

  • Don’t spread frosting on a warm brownie base—it will melt and turn runny. Always let the base cool completely before decorating.
  • Overbaking the brownie base can make it too hard to cut. Stick to the baking time recommended on your box mix for a soft and chewy crust.
  • Avoid piling on too many toppings, as this can make slicing messy. Stick to a balanced amount for both visual appeal and easy serving.

Easy Brownie Pizza Recipe

Prep Time 10 minutes
Cook Time 25 minutes
Total Time 35 minutes
Servings 8 servings
Calories 350
A fun and delicious dessert combining brownies and pizza-style toppings.

Ingredients

Instructions 

  • Preheat your oven to the temperature specified on the brownie mix box.
  • Prepare the brownie batter according to the instructions on the box.
  • Grease a 12-inch pizza pan or line it with parchment paper.
  • Pour the brownie batter onto the prepared pizza pan and spread it evenly to create a thin layer.
  • Bake the brownie base in the preheated oven for the time stated on the box, or until a toothpick inserted into the center comes out clean.
  • Let the brownie base cool completely on the pan before proceeding.
  • Spread the chocolate frosting evenly over the cooled brownie base to resemble pizza sauce.
  • Sprinkle the mini marshmallows, chocolate chips, chopped strawberries, and crushed nuts (if using) evenly over the frosting as toppings.
  • Slice the brownie pizza into wedges and serve immediately.

Notes

Feel free to customize the toppings with your favorite candies or fruits.
Calories: 350kcal
Cost: $10
Course: Dessert
Cuisine: American
Keyword: brownie pizza
A homemade brownie pizza topped with colorful fruits and chocolate drizzle.

Loved this recipe? Save it to your favorite Pinterest board so you can easily find it later! ✨

This post contains affiliate links. As an Amazon Associate, I earn from qualifying purchases. This comes at no extra cost to you.


4th of July Fruit Pizza Recipe

4th of July Fruit Pizza is a festive dessert that pairs a soft sugar cookie crust with a creamy layer of sweetened cream cheese, topped with vibrant berries bursting with tangy-sweet flavor. Each slice showcases patriotic colors in red, white, and blue, making it perfect for Independence Day celebrations. This dish combines refreshing summer fruits with a buttery crust for a dessert that’s as beautiful as it is delicious.

Table of Contents

Why Make This 4th of July Fruit Pizza?

  • Easy and festive: This dish turns simple ingredients into a July 4th masterpiece with minimal effort. The decorative red, white, and blue design is perfect for patriotic celebrations.
  • Kid-friendly: The sugar cookie crust and sweet cream cheese layer make this a guaranteed hit for all ages. Kids especially enjoy helping arrange the colorful fruit toppings.
  • Versatile for gatherings: It’s just as suitable for backyard BBQs as it is for casual picnics, thanks to its portable design. Slice it up and serve it on the go!
  • Make-ahead convenience: Prepare this dessert in advance to save time on the big day. The flavors meld beautifully when chilled, and it keeps its vibrant look for hours.

Everything You Need for 4th of July Fruit Pizza

The refrigerated sugar cookie dough creates a soft yet sturdy crust, ideal for holding the creamy topping and fresh fruit. The apricot preserves add a subtle shine to the fruit, enhancing its visual appeal without overpowering the natural sweetness.

How To Make 4th of July Fruit Pizza Step by Step

  1. Preheat your oven to 350°F (175°C).
  2. Roll out the refrigerated sugar cookie dough onto a greased 12-inch pizza pan or baking sheet to form a large circle, about 1/4-inch thick.
  3. Bake the cookie base in the preheated oven for 12-15 minutes, or until lightly golden. Remove from the oven and let it cool completely.
  4. In a medium bowl, mix the softened cream cheese, granulated sugar, and vanilla extract until smooth and creamy.
  5. Spread the cream cheese mixture evenly over the cooled cookie base, leaving a small border around the edges.
  6. A festive 4th of July fruit pizza topped with strawberries, blueberries, and cream cheese frosting.

    KitchenAid Artisan Stand Mixer

    Kitchen ApplianceKitchenAid Artisan Stand Mixer

    Makes mixing cream cheese, sugar, and vanilla extract effortless, ensuring a smooth and creamy topping.

    View on Amazon →

    Wilton 12-Inch Nonstick Pizza Pan

    Essential CookwareWilton 12-Inch Nonstick Pizza Pan

    Ideal for baking the sugar cookie crust evenly and achieving a perfect circle shape.

    View on Amazon →

  7. Arrange the sliced strawberries, blueberries, raspberries, and diced kiwi (if using) in a decorative pattern on top of the cream cheese layer. Create a patriotic design, such as stripes and a corner of blueberries for the “stars” to resemble the American flag.
  8. In a small microwave-safe bowl, combine the apricot preserves and water. Microwave for 10-15 seconds, then stir until smooth.
  9. Using a pastry brush, lightly glaze the fruit with the apricot mixture to give it a shiny finish.
  10. Refrigerate the fruit pizza for at least 30 minutes before serving to allow it to set. Slice and enjoy!

Ingredient Swaps for a Personal Touch

  • Swap kiwi: If kiwi isn’t your favorite, try green grapes or sliced bananas for similar texture and color.
  • Alternative base: Use pre-made crescent roll dough instead of sugar cookie dough for a flakier, savory twist. Adjust bake time to 10-12 minutes.
  • Jam variation: Replace apricot preserves with raspberry or strawberry jam for a matching flavor profile with the fruit toppings.

Serving Ideas for 4th of July Fruit Pizza

  • Classic BBQ pairing: Serve alongside grilled burgers and hot dogs for a complete Independence Day spread.
  • Light and refreshing sides: Pair with a crisp cucumber salad or watermelon slices to balance out the sweetness.
  • Sweet drink combo: Enjoy with iced tea or lemonade to complement the tangy fruit flavors.
  • Party-friendly addition: Offer this dessert alongside finger foods like chips and sliders for a casual vibe.

Storage and Reheating Tips

Store leftover 4th of July fruit pizza in an airtight container in the fridge for up to 3 days. The cookie crust will remain soft while the cream cheese layer stays fresh and flavorful.

For longer storage, freeze the crust and cream cheese base separately for up to one month. Defrost in the fridge overnight and assemble with fresh toppings before serving.

You might also enjoy our quick & easy cheese pizza.

Reheating is unnecessary—enjoy this dish chilled for maximum flavor and texture!

Looking for something similar? Try our best homemade cheese pizza recipe:.

For more ideas, check out our the best homemade pizza dough.

Frequent Questions About This Recipe

  • Can I make this recipe gluten-free? Yes, substitute the sugar cookie dough with a gluten-free version and ensure all other ingredients are certified gluten-free.
  • How can I prevent the sugar cookie crust from sticking? Grease the pan thoroughly and use parchment paper to make removal easier.
  • Can I prepare this dessert the day before? Absolutely! Assemble and refrigerate it overnight, but wait to glaze the fruit until just before serving for the freshest look.


4th of July Fruit Pizza

Prep Time 20 minutes
Cook Time 15 minutes
Total Time 35 minutes
Servings 8 servings
Calories 320
A festive and delicious dessert featuring a sugar cookie base, creamy topping, and fresh fruit arranged in a patriotic design.

Ingredients

Instructions 

  • Preheat your oven to 350°F (175°C).
  • Roll out the refrigerated sugar cookie dough onto a greased 12-inch pizza pan or baking sheet to form a large circle, about 1/4-inch thick.
  • Bake the cookie base in the preheated oven for 12-15 minutes, or until lightly golden. Remove from the oven and let it cool completely.
  • In a medium bowl, mix the softened cream cheese, granulated sugar, and vanilla extract until smooth and creamy.
  • Spread the cream cheese mixture evenly over the cooled cookie base, leaving a small border around the edges.
  • Arrange the sliced strawberries, blueberries, raspberries, and diced kiwi (if using) in a decorative pattern on top of the cream cheese layer. Create a patriotic design, such as stripes and a corner of blueberries for the 'stars' to resemble the American flag.
  • In a small microwave-safe bowl, combine the apricot preserves and water. Microwave for 10-15 seconds, then stir until smooth.
  • Using a pastry brush, lightly glaze the fruit with the apricot mixture to give it a shiny finish.
  • Refrigerate the fruit pizza for at least 30 minutes before serving to allow it to set. Slice and enjoy!

Notes

You can substitute other fruits like blackberries or mango for a different flavor profile. Ensure the cookie base is completely cooled before adding the cream cheese layer.
Calories: 320kcal
Cost: $15
Course: Dessert
Cuisine: American
Keyword: 4th of July, fruit pizza, patriotic dessert

A festive 4th of July fruit pizza topped with strawberries, blueberries, and cream cheese frosting.

Loved this recipe? Save it to your favorite Pinterest board so you can easily find it later! ✨

This post contains affiliate links. As an Amazon Associate, I earn from qualifying purchases. This comes at no extra cost to you.

This Red White and Blue Poke Cake is a patriotic treat that combines a moist white cake with vibrant blue raspberry and strawberry gelatin bursting with flavor. The whipped topping adds a creamy finish, while optional fresh berries make it look as festive as it tastes. Perfectly chilled, it’s an eye-catching dessert for Fourth of July celebrations or any summer gathering.

Table of Contents

Why This Cake Is Perfect for the Holidays

  • This poke cake offers a stunning, patriotic color scheme that’s ideal for Fourth of July gatherings. The vibrant blue and red hues from the gelatin create a visual wow factor that’s unmatched by most desserts.
  • It’s incredibly easy to make, even on a busy holiday schedule. With a simple boxed cake mix and quick gelatin prep, you’ll have plenty of time to enjoy the festivities.
  • Serving this cake chilled makes it a refreshing treat for hot summer days. The cool gelatin layers and whipped topping are perfect for beating the heat.
  • Optional fresh berry garnishes make this dessert both festive and customizable. You can easily adjust the toppings to suit your personal style or the holiday theme.

Everything You Need for Red White and Blue Poke Cake

The gelatin is what gives this cake its iconic red and blue hues while infusing fruity flavors into every bite. Whipped topping provides a creamy, light contrast and ties together the patriotic theme.

How To Make Red White and Blue Poke Cake Step by Step

  1. Preheat your oven to the temperature specified on the cake mix box, and grease a 9×13-inch baking pan for easy removal later.
  2. Prepare the white cake mix as directed on the box and pour the batter into the prepared pan. Bake until a toothpick inserted in the center comes out clean, then let the cake cool completely.
  3. Using the handle of a wooden spoon or a skewer, poke holes all over the cooled cake. Be sure the holes go deep to allow the gelatin to fully infuse the cake.
  4. In a medium bowl, dissolve the blue raspberry gelatin in 1 cup of boiling water, stirring until completely dissolved. Let it cool slightly, then pour the gelatin mixture evenly over half of the cake, focusing on filling the holes.
  5. In a separate bowl, dissolve the strawberry gelatin in 1 cup of boiling water, stirring until fully dissolved. After a brief cooling period, pour the mixture over the other half of the cake, ensuring the holes absorb the liquid.
  6. Cover the cake with plastic wrap and refrigerate for at least 2 hours so the gelatin can set properly.
  7. A festive red, white, and blue poke cake topped with whipped cream and sprinkles, perfect for patriotic celebrations.

    KitchenAid Artisan Stand Mixer

    Kitchen ApplianceKitchenAid Artisan Stand Mixer

    Effortlessly mix cake batter and other recipes with this premium stand mixer.

    View on Amazon →

    Pyrex 3-Quart Glass Baking Dish

    Essential CookwarePyrex 3-Quart Glass Baking Dish

    A durable and versatile 9×13-inch baking dish perfect for poke cakes and other recipes.

    View on Amazon →

  8. Spread the thawed whipped topping evenly across the top of the chilled cake, smoothing it out for a clean look.
  9. Optional: Decorate the cake with fresh strawberries and blueberries arranged in a festive pattern to enhance the red, white, and blue theme.
  10. Slice and serve this chilled dessert to your guests. Enjoy the cool, fruity layers on a warm summer day!

Festive Serving Ideas For This Patriotic Cake

  • Pair this cake with a light lemonade or berry punch to complement its fruity flavors.
  • Serve alongside a tray of fresh fruit like watermelon and pineapple for a refreshing summer spread.
  • Use sparklers or small American flag toothpicks for an extra festive touch on top.
  • Offer it as part of a dessert lineup with cookies or bars that share the patriotic theme.

Simple Ingredient Swaps For Red White and Blue Poke Cake

  • If you don’t have blue raspberry gelatin, try replacing it with berry blue gelatin for a similar flavor and color.
  • Vanilla cake mix can be substituted for white cake mix, though the cake may have a slightly richer flavor.
  • Greek yogurt can replace whipped topping for a tangy and creamy alternative, perfect for those wanting a less sweet finish.

Avoid These Mistakes When Making Poke Cake

  • Don’t pour the gelatin mixture while it’s still too hot—it could melt the cake and create uneven layers. Let it cool slightly before pouring.
  • Ensure the holes reach deep into the cake to allow the gelatin to fully absorb. Shallow holes might result in bland spots without color or flavor.
  • Don’t skip the refrigeration step. The gelatin needs time to set and infuse for the best texture and taste.

The Origins Of This Colorful Dessert

Poke cakes became popular in the 1970s as a way to give classic sheet cakes a flavorful twist. By incorporating gelatin, bakers created vibrant colors and unique textures that made these desserts stand out.

This patriotic version, Red White and Blue Poke Cake, is a modern adaptation designed for Fourth of July celebrations. Its bright colors and refreshing taste have turned it into a staple for summer gatherings across the United States.

For more ideas, check out our decadent & easy 5-ingredient flourless.

You might also enjoy our decadent & easy 5-ingredient flourless.

Red White and Blue Poke Cake

Prep Time 20 minutes
Cook Time 30 minutes
Total Time 3 hours
Servings 12 servings
Calories 250
A festive and colorful dessert perfect for patriotic celebrations, featuring a moist white cake infused with blue raspberry and strawberry gelatin.

Ingredients

Instructions 

  • Preheat your oven to the temperature specified on the cake mix box and grease a 9x13-inch baking pan.
  • Prepare the white cake mix according to the box instructions and bake in the prepared pan. Let the cake cool completely after baking.
  • Using the handle of a wooden spoon or a skewer, poke holes all over the cooled cake, ensuring the holes reach deep into the cake.
  • In a medium bowl, dissolve the blue raspberry gelatin in 1 cup of boiling water, stirring until completely dissolved. Let it cool slightly and pour the mixture evenly over half of the cake, ensuring it fills the holes.
  • In a separate bowl, dissolve the strawberry gelatin in 1 cup of boiling water, stirring until completely dissolved. Let it cool slightly and pour the mixture evenly over the other half of the cake, ensuring it fills the holes.
  • Cover the cake with plastic wrap and refrigerate for at least 2 hours, allowing the gelatin to set.
  • Spread the whipped topping evenly over the top of the chilled cake, creating a smooth layer.
  • Optional: Decorate the cake with fresh strawberries and blueberries for a festive red, white, and blue look.
  • Slice and serve chilled. Enjoy this patriotic dessert!

Notes

You can substitute other gelatin flavors to match your preferred color scheme or theme.
Calories: 250kcal
Cost: $12
Course: Dessert
Cuisine: American
Keyword: patriotic dessert, poke cake, red white and blue
A festive red, white, and blue poke cake topped with whipped cream and sprinkles, perfect for patriotic celebrations.

Loved this recipe? Save it to your favorite Pinterest board so you can easily find it later! ✨

This post contains affiliate links. As an Amazon Associate, I earn from qualifying purchases. This comes at no extra cost to you.

Oreo Balls combine the crunch of finely crushed Oreo cookies with creamy, softened cream cheese and a lush chocolate coating that hardens to perfection. These bite-sized treats are indulgently rich and perfect for sharing—or savoring solo. With no baking required, they’re a wonderfully simple dessert that comes together in no time.

For more ideas, check out our easy oreo balls recipe: no-bake dessert!.

Close-up of homemade Oreo balls arranged on a white plate.

You might also enjoy our easy oreo balls recipe: no-bake dessert!.

Table of Contents

Why Oreo Balls Are Perfect

KitchenAid Artisan Stand Mixer

Kitchen ApplianceKitchenAid Artisan Stand Mixer

Perfect for crushing Oreos and mixing cream cheese — a versatile kitchen tool.

View on Amazon →

Wilton Chocolate Melting Pot

Essential CookwareWilton Chocolate Melting Pot

Effortlessly melt chocolate for dipping and coating — ideal for this recipe.

View on Amazon →

  • No baking required: This Oreo balls recipe is perfect for those who want a quick dessert without turning on the oven. It’s ideal for busy people looking to whip up something impressive yet low effort.
  • Oreo balls work well for parties, casual snacking, or even as edible gifts. Their compact size and rich ingredients make them feel indulgent without being overwhelming.
  • — **Specify list items**

    Oreo Balls

    Prep Time 30 minutes
    Total Time 45 minutes
    Servings 36 balls
    Calories 120
    Delicious no-bake Oreo balls coated in chocolate, perfect for any occasion.

    Ingredients

    Instructions 

    • Place the Oreo cookies into a food processor and pulse until they are finely crushed into crumbs.
    • Transfer the Oreo crumbs to a large mixing bowl and add the softened cream cheese.
    • Mix the crumbs and cream cheese together until fully combined, forming a smooth dough-like mixture.
    • Roll the mixture into small balls, about 1 inch in diameter, and place them on a baking sheet lined with parchment paper.
    • Chill the Oreo balls in the refrigerator for 30 minutes to firm up.
    • Melt the semi-sweet chocolate in a microwave-safe bowl or using a double boiler until smooth.
    • Dip each chilled Oreo ball into the melted chocolate, coating it completely, and place it back on the parchment-lined baking sheet.
    • Let the chocolate coating set by refrigerating the Oreo balls for another 15-20 minutes or until the chocolate is hardened.
    • Once fully set, serve the Oreo balls or store them in an airtight container in the refrigerator until ready to enjoy.

    Notes

    You can use white chocolate or dark chocolate as an alternative coating. Add sprinkles or crushed Oreos on top for decoration.
    Calories: 120kcal
    Cost: $10
    Course: Dessert
    Cuisine: American
    Keyword: chocolate, no-bake dessert, Oreo balls

    Close-up of homemade Oreo balls arranged on a white plate.

    Loved this recipe? Save it to your favorite Pinterest board so you can easily find it later! ✨

This post contains affiliate links. As an Amazon Associate, I earn from qualifying purchases. This comes at no extra cost to you.


No Bake Fireworks Oreo Cheesecake Bars

This No Bake Fireworks Oreo Cheesecake Bars recipe combines a creamy cheesecake filling, a rich Oreo crust, and festive sprinkles, making it the ultimate treat for your summer festivities. The no-bake aspect means you can avoid heating your kitchen, while still achieving a satisfying dessert with a smooth and indulgent texture. Celebrate 4th of July with this colorful and irresistibly sweet concoction that’s sure to impress your guests.

Table of Contents

Why Make This Dessert

  • No baking required: These Oreo cheesecake bars are perfect for hot summer days when turning on the oven is the last thing you want to do.
  • Festive and patriotic: With vibrant red, white, and blue sprinkles, this dessert captures the spirit of the 4th of July and makes any celebration more special.
  • Easy to make: The straightforward steps and simple ingredients make this recipe accessible even for beginner dessert makers.
  • Versatile for gatherings: Whether you’re hosting a barbecue or bringing a dish to a potluck, these bars are pre-portioned and ideal for feeding a crowd.

Ingredients List

The Oreos form the rich and crumbly crust, while the cream cheese creates a smooth and tangy filling that balances the sweetness of the powdered sugar. The festive sprinkles add not only a pop of color but a slight crunch that’s delightful in every bite.

Step-by-Step Instructions

  1. Line a 9×9 inch baking pan with parchment paper, leaving excess paper hanging over the sides to help lift the bars out later.
  2. In a food processor, pulse the Oreo cookies into fine crumbs. Mix the crumbs with melted butter until they resemble wet sand.
  3. Press the Oreo mixture evenly into the bottom of the prepared pan to create the crust. Chill in the refrigerator while you prepare the filling.
  4. Close-up of colorful Fireworks Oreo Cheesecake Bars on a white plate, topped with sprinkles.

    KitchenAid Artisan Stand Mixer 5 Quart

    Kitchen ApplianceKitchenAid Artisan Stand Mixer 5 Quart

    Effortlessly whip heavy cream and mix cheesecake batter for perfect texture.

    View on Amazon →

    Cuisinart 9x9 Inch Nonstick Square Baking Pan

    Essential CookwareCuisinart 9×9 Inch Nonstick Square Baking Pan

    Ideal for creating perfectly shaped cheesecake bars with easy cleanup.

    View on Amazon →

  5. In a large mixing bowl, beat the softened cream cheese, powdered sugar, and vanilla extract until smooth and creamy.
  6. In a separate bowl, whip the heavy whipping cream until stiff peaks form. Fold the whipped cream gently into the cream cheese mixture until fully combined.
  7. Add the red, white, and blue sprinkles to the cheesecake mixture, folding carefully to ensure they’re evenly distributed without overmixing.
  8. Spread the cheesecake filling over the chilled Oreo crust, smoothing the top with a spatula for even coverage.
  9. Sprinkle extra red, white, and blue sprinkles on top to decorate and give it a festive flair.
  10. Refrigerate the bars for at least 4 hours or until the cheesecake layer is firm and set.
  11. Once the bars are set, use the parchment paper overhang to lift them out of the pan. Slice into squares and serve, optionally topping with whipped cream for added elegance.

Expert Tips

  • To crush Oreos evenly, pulse them in a food processor rather than breaking them by hand for a fine and uniform texture.
  • Soften the cream cheese at room temperature before blending to avoid lumps in your cheesecake filling.
  • When folding the whipped cream into the cream cheese mixture, use gentle motions to maintain the airy texture.
  • If you don’t have a 9×9 pan, use an 8×8 pan for slightly thicker bars, but adjust chilling time to ensure firmness.

Patriotic Dish History

Patriotic-themed desserts have become a staple of American celebrations, particularly on the 4th of July, reflecting the country’s vibrant spirit through colorful dishes. The incorporation of red, white, and blue elements often symbolizes unity and pride, making these recipes timeless favorites for summer gatherings.

No bake desserts, like these Oreo cheesecake bars, emerged as popular options to beat the summer heat while still offering a festive and indulgent treat for patriotic occasions.

Serving and Pairing Ideas

  • Pair these bars with fresh fruit like strawberries and blueberries to amplify their patriotic theme.
  • Serve alongside iced lemonade or a sweet tea for a refreshing contrast to the creamy cheesecake texture.
  • Add a scoop of vanilla ice cream on the side to create an extra decadent dessert plate.
  • Include them in a dessert buffet featuring other no bake options, like our easy oreo balls recipe: no-bake dessert!, for variety without the fuss.

Common Mistakes to Avoid

  • Skipping the chilling time: Rushing this step can cause the bars to fall apart when slicing. Make sure to allow enough time for the cheesecake layer to set fully.
  • Overmixing the sprinkles: Stirring too much can cause the colors to bleed, resulting in a messy and less vibrant appearance.
  • Using cold cream cheese: If it’s not softened, the filling will be lumpy and difficult to spread evenly.


No Bake Fireworks Oreo Cheesecake Bars

Prep Time 20 minutes
Total Time 4 hours
Servings 12 servings
Calories 350
These festive no-bake cheesecake bars feature a creamy filling, Oreo crust, and colorful sprinkles, perfect for celebrations!

Ingredients

Instructions 

  • Line a 9x9 inch baking pan with parchment paper, leaving excess hanging over the sides for easy removal later.
  • In a food processor, pulse the Oreo cookies into fine crumbs. Combine the crumbs with melted butter and mix well until the texture resembles wet sand.
  • Press the Oreo mixture firmly and evenly into the bottom of the prepared pan to form the crust. Chill in the refrigerator while preparing the filling.
  • In a large mixing bowl, beat the softened cream cheese, powdered sugar, and vanilla extract together until smooth and creamy.
  • In a separate bowl, whip the heavy whipping cream until stiff peaks form. Gently fold the whipped cream into the cream cheese mixture until fully combined.
  • Carefully fold the red, white, and blue sprinkles into the cheesecake batter, ensuring they are evenly distributed.
  • Spread the cheesecake mixture evenly over the chilled Oreo crust, smoothing the top with a spatula.
  • Sprinkle additional red, white, and blue sprinkles over the top for decoration.
  • Refrigerate the bars for at least 4 hours, or until firm and set.
  • Once set, lift the bars out of the pan using the parchment paper overhang. Slice into squares and serve. Optionally, top with whipped cream for extra flair!

Notes

For best results, use full-fat cream cheese and chill the bars overnight for maximum firmness.
Calories: 350kcal
Cost: $15
Course: Dessert
Cuisine: American
Keyword: bars, cheesecake, fireworks, no-bake, Oreo

Close-up of colorful Fireworks Oreo Cheesecake Bars on a white plate, topped with sprinkles.

Loved this recipe? Save it to your favorite Pinterest board so you can easily find it later! ✨

This post contains affiliate links. As an Amazon Associate, I earn from qualifying purchases. This comes at no extra cost to you.

This Yogurt Unicorn Bark Toddler Kid Favorite is a magical mix of creamy yogurt swirled with vibrant colors and topped with sparkly sprinkles. Its crisp texture is perfect for little hands, making it a fun and interactive treat for kids. Whether as a playful snack or a whimsical dessert, this dish quickly turns snack-time into a delightful, frozen adventure.

Table of Contents

Why Yogurt Unicorn Bark Toddler Kid Favorite Works for Busy Parents

  • It’s quick to make, taking just 10 minutes to prepare, and uses simple ingredients you likely already have. The freezing process requires no babysitting, making it perfect for multitasking parents.
  • This recipe is customizable with allergy-friendly options like coconut-based yogurt or natural coloring. Even picky eaters can enjoy the cheerful swirls and crunchy toppings.
  • Making it together is a great bonding activity with your toddler. Kids love swirling the colors and adding sprinkles, creating moments of fun without the mess of baking.
  • The bark breaks into manageable, hand-sized pieces, making it easy for toddlers to grab and enjoy. It’s an engaging snack that supports sensory play and fine motor skills development.

Everything You Need for Yogurt Unicorn Bark Toddler Kid Favorite

Greek yogurt makes the bark creamy and nutritious, packed with protein to keep kids energized. The food coloring creates magical swirls, while rainbow sprinkles add playful crunch.

How To Make Yogurt Unicorn Bark Toddler Kid Favorite Step by Step

  1. Line a baking sheet or tray with parchment paper or wax paper to avoid sticking.
  2. Divide the yogurt evenly into three bowls. For added sweetness, mix honey or maple syrup into each bowl if desired.
  3. Add a couple of drops of pink food coloring to one bowl, blue to the second, and purple to the third. Stir until the colors are evenly distributed.
  4. Colorful yogurt bark shaped like a unicorn, a favorite treat for toddlers and kids.

    KitchenAid Artisan Stand Mixer 5 Quart

    Kitchen ApplianceKitchenAid Artisan Stand Mixer 5 Quart

    Ideal for mixing yogurt and sweeteners evenly — a premium tool for frequent bakers.

    View on Amazon →

    Nordic Ware Aluminum Baking Sheet

    Essential CookwareNordic Ware Aluminum Baking Sheet

    Durable and versatile baking sheet perfect for freezing yogurt bark evenly.

    View on Amazon →

  5. Using a spoon, dollop and swirl the colored yogurts onto the prepared baking sheet. Create fun patterns by gently blending the colors with a toothpick or the back of a spoon.
  6. Sprinkle rainbow sprinkles and edible glitter evenly over the yogurt swirls to decorate.
  7. Place the tray flat in the freezer and let it freeze for 2-3 hours, or until completely firm.
  8. Once frozen, break the bark into pieces using your hands or a knife. Aim for toddler-friendly sizes for easy handling.
  9. Serve immediately, or store in an airtight container in the freezer for up to a week.

Simple Ingredient Swaps for Yogurt Unicorn Bark

  • Swap Greek yogurt for coconut yogurt for a dairy-free alternative. It adds a hint of tropical flavor while keeping the creaminess intact.
  • Opt for natural food colorings derived from fruits and vegetables for a chemical-free option. Beet juice can replace pink, while spirulina gives a gentle greenish-blue hue.
  • Choose chia seeds instead of sprinkles for a nutrient boost. They add a satisfying crunch without the sugar.

Common Questions About Yogurt Unicorn Bark

  • Can I make this recipe without food coloring? Yes! You can skip the food coloring for an all-natural look or use fruit purees for gentle hues.
  • How do I store leftovers? Keep the bark in an airtight container in the freezer for up to one week to preserve freshness and texture.
  • Is this snack suitable for toddlers with lactose intolerance? Use dairy-free yogurt options like almond or soy-based yogurt for an equally creamy result.

Expert Tips for the Best Yogurt Unicorn Bark

  • Use gel food coloring over liquid for more vibrant shades that won’t water down the yogurt. It ensures the colors pop and hold their charm.
  • Freeze the tray on a flat surface to prevent uneven thickness in the bark. This helps create consistent pieces that break easily.
  • Let toddlers sprinkle the toppings themselves. It keeps them engaged and minimizes potential spills elsewhere.
  • Break the bark into smaller pieces while it’s still cold. Warm bark can crumble unevenly, creating a mess.

Yogurt Unicorn Bark Toddler Kid Favorite

Prep Time 10 minutes
Total Time 10 minutes
Servings 8 servings
Calories 120
A fun and colorful frozen treat made with Greek yogurt, perfect for toddlers and kids!

Ingredients

Instructions 

  • Line a baking sheet or tray with parchment paper or wax paper.
  • Divide the yogurt evenly into three bowls. If desired, mix honey or maple syrup into each bowl for added sweetness.
  • Add a couple of drops of pink food coloring to one bowl, blue food coloring to the second bowl, and purple food coloring to the third bowl. Stir each bowl until the color is evenly distributed.
  • Using a spoon, dollop and swirl the colored yogurts onto the prepared baking sheet. Create fun patterns by gently swirling the colors together with a toothpick or the back of a spoon.
  • Sprinkle the rainbow sprinkles and edible glitter evenly over the yogurt swirl.
  • Place the tray flat in the freezer and let it freeze for 2-3 hours, or until completely firm.
  • Once frozen, break the yogurt bark into pieces using your hands or a knife.
  • Serve immediately or store in an airtight container in the freezer for up to a week.

Notes

You can use any combination of food coloring to create your desired color palette. Adjust sweetness to taste by adding honey or maple syrup.
Calories: 120kcal
Cost: $8
Course: Dessert, Snack
Cuisine: American
Keyword: Frozen Treat, Kids Snack, Unicorn Bark
Colorful yogurt bark shaped like a unicorn, a favorite treat for toddlers and kids.

Loved this recipe? Save it to your favorite Pinterest board so you can easily find it later! ✨