Introduction
My name’s Ava, and if you’ve stumbled upon my kitchen, you’re probably here for one thing—the kind of recipes that make people pause mid-bite and say, “Wow.” I grew up in a small town in Oregon, where the smell of fresh bread and roasted vegetables often drifted out of my mother’s kitchen window. Cooking wasn’t just something we did to eat—it was how we gathered, showed care, and became a family. I was the kid who would rather stir a pot of chili than go ride my bike, and by the time I was twelve, I could whip up a pie from scratch that made my grandmother proud.
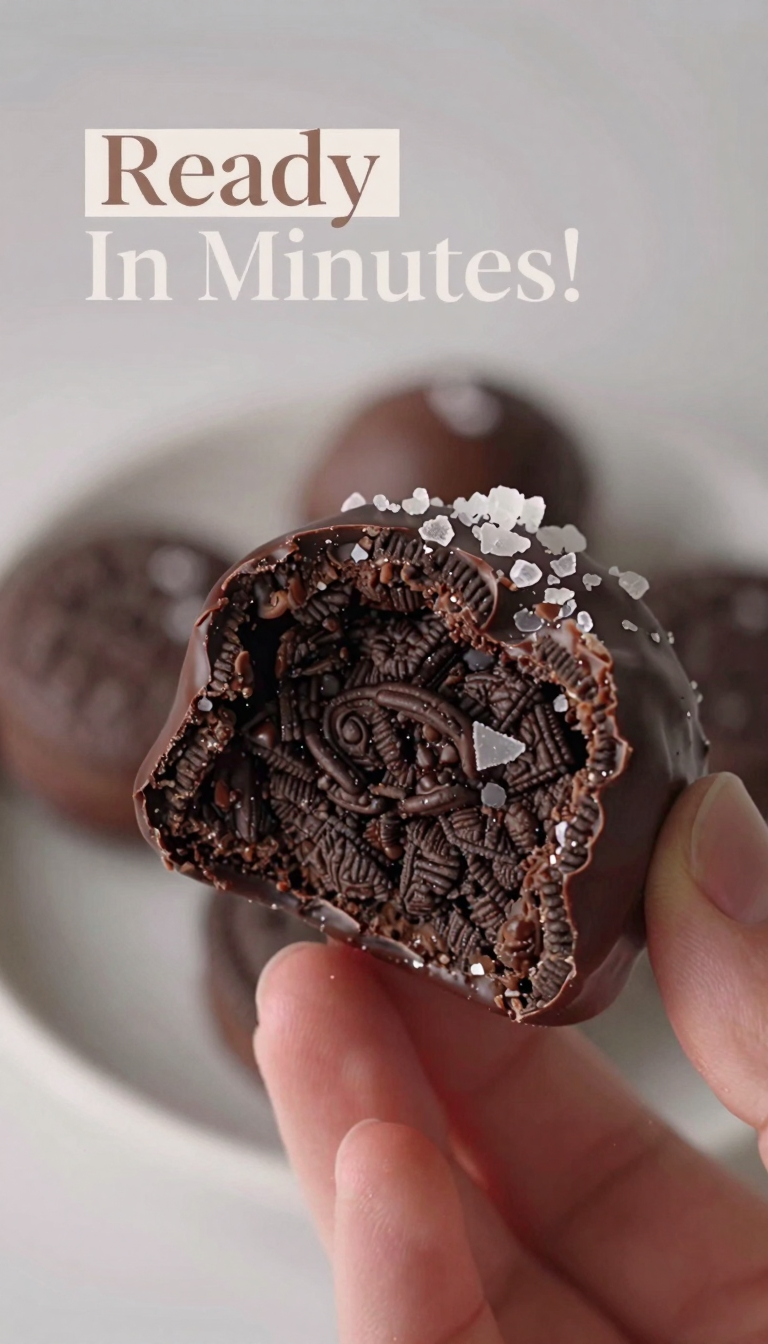
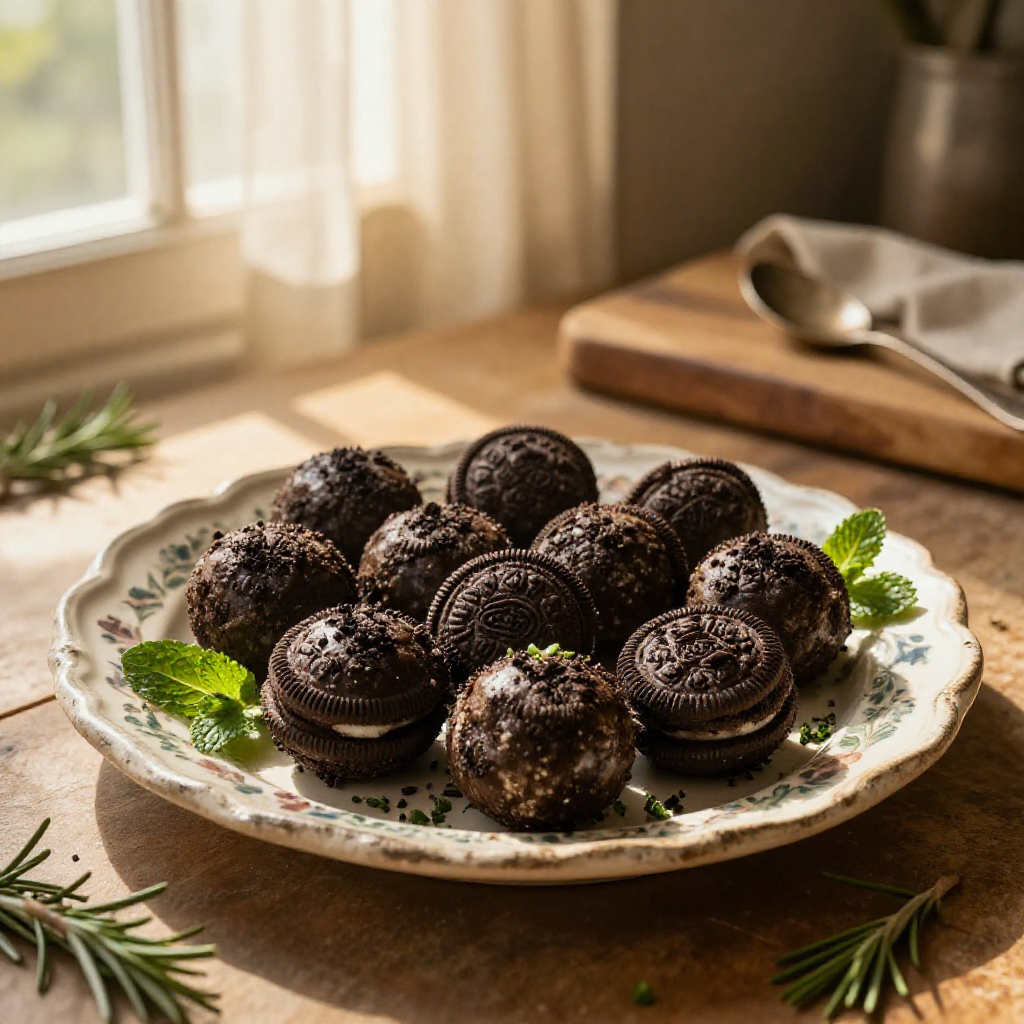
These days, I’m 34 and living in Seattle, where my kitchen has become my favorite corner of the world. I believe the best recipes aren’t always the fanciest—they’re the ones that feel like a familiar embrace, the ones you make over and over because they just work. I’m excited to share this Easy Oreo Balls recipe with you. It’s a no-bake wonder that requires minimal effort but delivers maximum flavor. Perfect for parties, potlucks, or just a quick treat when that craving hits. Plus, it’s a fantastic way to get the kids involved in the kitchen!
What I about this recipe is how adaptable it is—a blank canvas for your culinary creativity. Whether you’re a chocolate purist, a sprinkle enthusiast, or someone who likes to experiment with different flavors, these Oreo Balls are the perfect starting point. So, let’s get started and make something unforgettable together!
Table of Contents
- Why This Recipe Works
- Ingredients You’ll Need
- Step-by-Step Instructions
- Pro Tips
- Variations & Substitutions
- FAQ
- Final Thoughts
Why This Recipe Works
- No-Bake Simplicity: This recipe requires absolutely no baking! That means it’s quick, easy, and perfect for those hot summer days when you don’t want to turn on the oven. Plus, it’s another easy dessert to add to your repertoire.
- Minimal Ingredients: You only need a handful of ingredients, most of which you probably already have in your pantry. Oreos, butter, milk, and chocolate – that’s it!
- Crowd-Pleasing Flavor: The combination of crushed Oreos and creamy chocolate is a guaranteed hit with kids and adults alike. These Oreo Balls are always the first to disappear at any gathering.
Ingredients You’ll Need
- 30 (340g) regular Oreo cookies SEE NOTES FOR GLUTEN FREE
- 3 tablespoons (45g) unsalted butter, melted and cooled
- 2-5 tablespoons whole milk
- 8 ounces (225g) dark, semi-sweet, or white chocolate, chopped **
- 1 teaspoon vegetable oil (optional) ***
Notes:
- For a gluten-free version, use gluten-free Oreo cookies.
- The type of chocolate you use will greatly impact the overall taste. Experiment to find your favorite!
- Adding a teaspoon of vegetable oil to the melted chocolate helps create a smoother, more glossy coating.
Step-by-Step Instructions
- Prepare the Oreos: In the bowl of a food processor, add the Oreo cookies (including the filling). Pulse until the Oreos are finely crushed into crumbs. If you don’t have a food processor, you can place the Oreos in a large zip-top bag and crush them with a rolling pin.
- Combine Ingredients: In a large bowl, combine the crushed Oreo crumbs and melted butter. Mix well until the crumbs are evenly moistened. Start by adding 2 tablespoons of milk, and then add more, one tablespoon at a time, until the mixture comes together and forms a dough-like consistency. Be careful not to add too much milk, as the mixture should be moldable but not sticky.
- Form the Balls: Roll the Oreo mixture into 1-inch balls. Place the balls on a baking sheet lined with parchment paper. This will prevent them from sticking.
- Chill: Place the baking sheet with the Oreo balls in the freezer for at least 15 minutes. This step is crucial, as it helps the balls firm up and makes them easier to dip in chocolate.
- Melt the Chocolate: While the Oreo balls are chilling, melt the chocolate. You can do this in the microwave or on the stovetop using a double boiler. To melt in the microwave, place the chopped chocolate in a microwave-safe bowl and heat in 30-second intervals, stirring after each interval, until the chocolate is fully melted and smooth. To melt on the stovetop, fill a saucepan with about an inch of water and bring it to a simmer. Place a heat-safe bowl on top of the saucepan, making sure the bottom of the bowl doesn’t touch the water. Add the chopped chocolate to the bowl and stir occasionally until melted and smooth. If using, stir in the vegetable oil to create a smoother consistency.
- Dip the Oreo Balls: Remove the Oreo balls from the freezer. Using a fork or dipping tools, dip each ball into the melted chocolate, making sure it’s fully coated. Lift the ball out of the chocolate and gently tap the fork against the side of the bowl to remove any excess chocolate.
- Decorate (Optional): Place the dipped Oreo balls back on the parchment-lined baking sheet. While the chocolate is still wet, you can decorate them with sprinkles, crushed Oreo crumbs, sea salt, or any other toppings you like.
- Set: Place the baking sheet back in the refrigerator for about 15-20 minutes, or until the chocolate is fully set.
- Serve: Once the chocolate is set, remove the Oreo Balls from the refrigerator and serve. These can be stored in an airtight container in the refrigerator for up to a week. If you’re looking for other easy bar recipes, consider making easy bar recipes.
Pro Tips
- Don’t Overmix: When combining the Oreo crumbs with the butter and milk, be careful not to overmix. Overmixing can result in a dense, tough texture. Mix just until the ingredients are combined.
- Chill Time is Key: Chilling the Oreo balls before dipping them in chocolate is essential. This helps the balls hold their shape and prevents the chocolate from melting too quickly.
- Melt Chocolate Slowly: Whether you’re using the microwave or a double boiler, melt the chocolate slowly and carefully. Avoid overheating, as this can cause the chocolate to seize and become grainy. Stir frequently to ensure even melting.
- Use Quality Chocolate: The better the quality of the chocolate, the better the Oreo Balls will taste. Opt for a chocolate that you would enjoy eating on its own.
Variations & Substitutions
- Different Oreo Flavors: Get creative with different Oreo flavors! Use Golden Oreos, Mint Oreos, Peanut Butter Oreos, or any other flavor you like. Each flavor will give the Oreo Balls a unique twist.
- Chocolate Varieties: Experiment with different types of chocolate. Use milk chocolate, dark chocolate, white chocolate, or even flavored chocolate like mint or raspberry. You can also drizzle the finished Oreo Balls with a different color of melted chocolate for a decorative touch.
- Add-Ins: Mix in other ingredients with the Oreo crumbs for added flavor and texture. Try adding chopped nuts, shredded coconut, mini chocolate chips, or toffee bits.
- Coatings: Instead of dipping the Oreo Balls in melted chocolate, try rolling them in other coatings. Some options include crushed nuts, sprinkles, cocoa powder, powdered sugar, or finely shredded coconut.
- Extracts: Enhance the flavor of the Oreo mixture by adding a few drops of extract. Vanilla extract is a classic choice, but you can also try almond extract, peppermint extract, or orange extract.
If you’re in the mood for another simple cake, why not try making another simple cake?
FAQ
- Can I make these Oreo Balls ahead of time?
- Yes, you can make Oreo Balls ahead of time. They can be stored in an airtight container in the refrigerator for up to a week.
- Can I freeze Oreo Balls?
- Yes, you can freeze Oreo Balls. Place them in a freezer-safe container and freeze for up to 2-3 months. Thaw in the refrigerator before serving.
- My Oreo mixture is too dry. What should I do?
- If your Oreo mixture is too dry, add a little more milk, one tablespoon at a time, until the mixture comes together.
- My melted chocolate is too thick. What should I do?
- If your melted chocolate is too thick, stir in a teaspoon of vegetable oil or shortening to thin it out. Be careful not to add too much, as this can affect the taste and texture of the chocolate.
Final Thoughts
There you have it—an Easy Oreo Balls recipe that’s sure to become a new favorite in your kitchen! These no-bake treats are simple to make, endlessly adaptable, and always a crowd-pleaser. Whether you’re looking for a quick dessert for a party, a fun activity to do with the kids, or just a little something to satisfy your craving, these Oreo Balls are the perfect solution. So go ahead, give this recipe a try and experience the magic for yourself! And if you’re looking for more sweet treat recipes, be sure to check out these sweet treat recipes!
Oreo Balls Recipe
Ingredients
Oreo Balls
- 340 g Oreo cookies (SEE NOTES FOR GLUTEN FREE)
- 3 tablespoons unsalted butter (melted and cooled)
- 2-5 tablespoons whole milk
- 225 g dark, semi-sweet, or white chocolate (chopped)
- 1 teaspoon vegetable oil (optional)
Instructions
- Line a baking sheet with parchment paper.
- Grind Oreos in a food processor until fine crumbs.
- Add melted butter and 2 tablespoons of milk to Oreo crumbs. Pulse until moistened and sticks together, adding more milk if needed.
- Scoop 1 tablespoon portions and roll into smooth balls. Arrange on the baking sheet.
- Chill Oreo balls in the freezer for at least 15 minutes.
- Melt chocolate in the microwave or over a double boiler.
- Mix oil into the melted chocolate (optional).
- Drop one Oreo ball into the melted chocolate and toss to coat. Lift and shake off excess chocolate.
- Place the chocolate dipped Oreo ball back onto your parchment lined baking sheet. Top with sea salt or crushed Oreo crumbs.
- Chill the Oreo balls in the fridge or freezer until the chocolate is set. Keep stored in the fridge until ready to serve!
Notes
Loved this recipe? Save it to your favorite Pinterest board so you can easily find it later! ✨