Author

Ava

Browsing

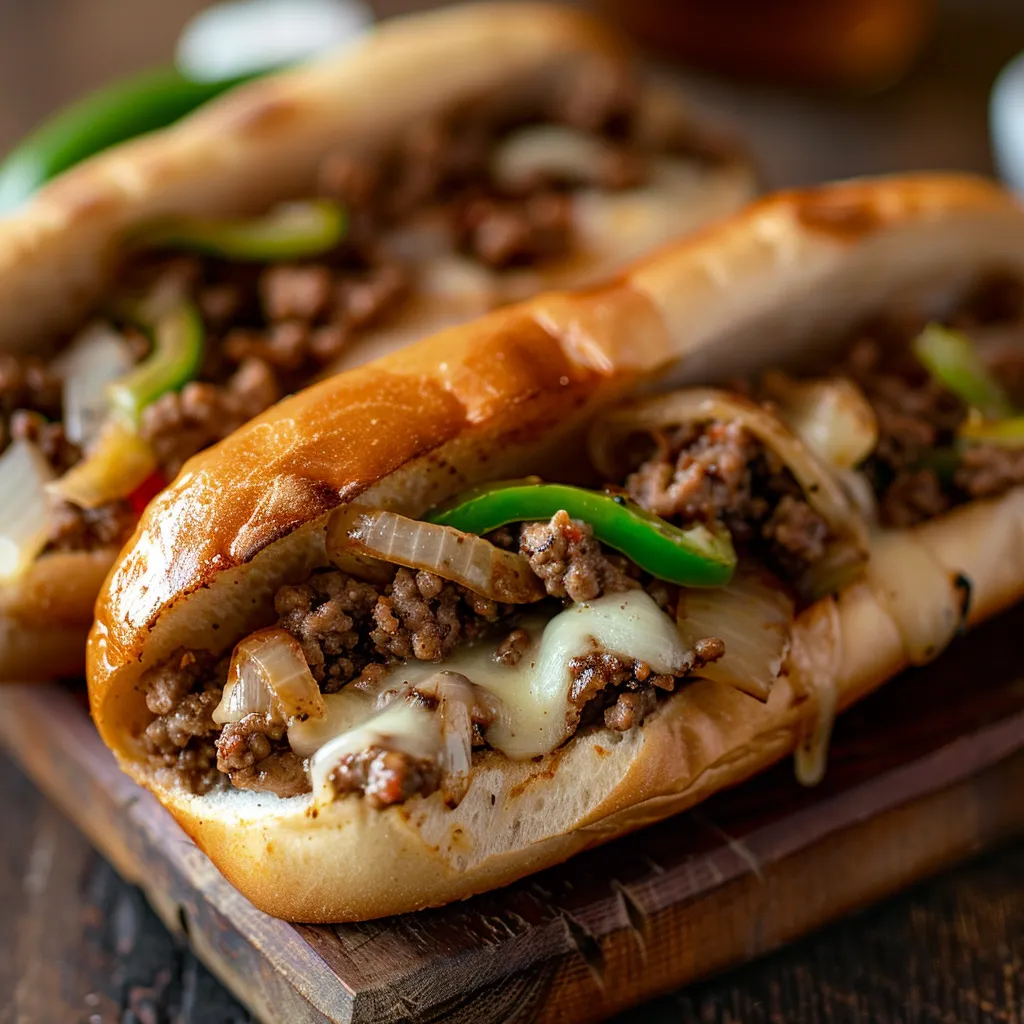
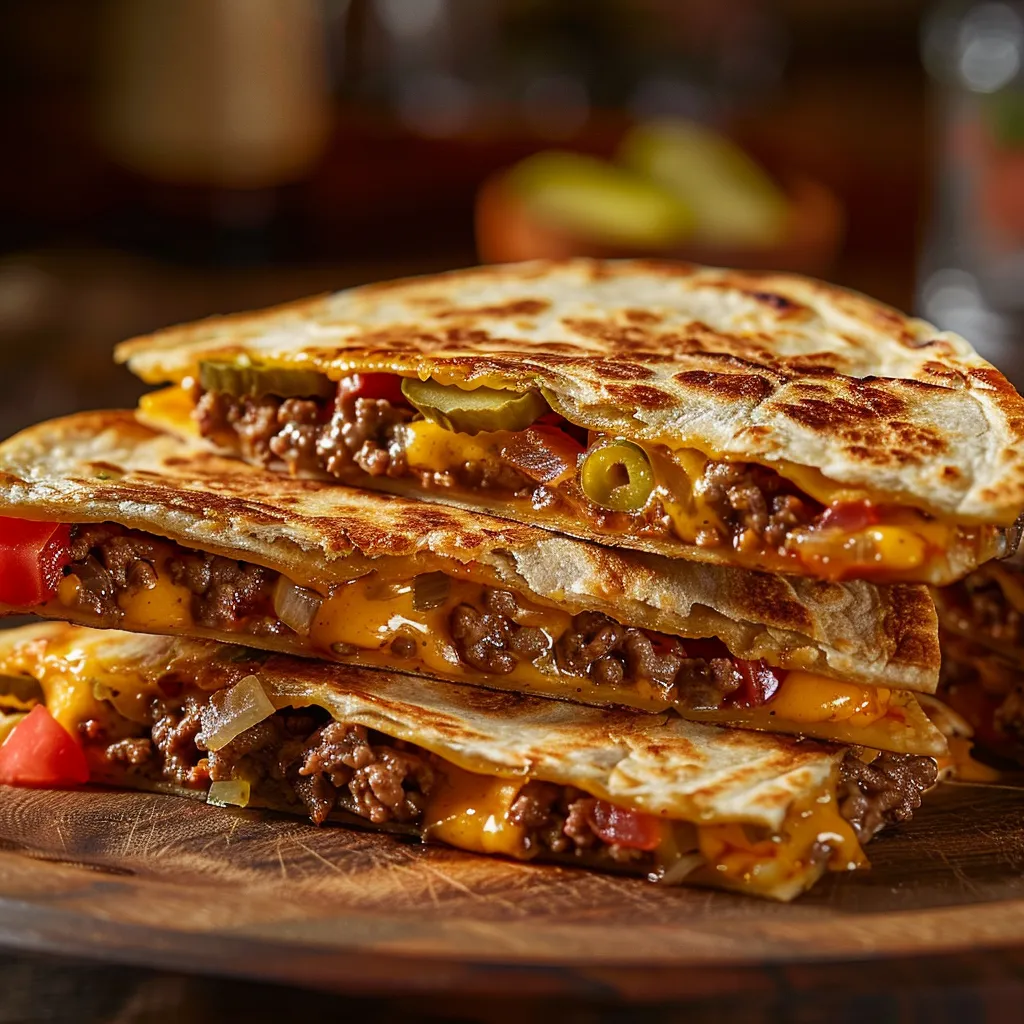
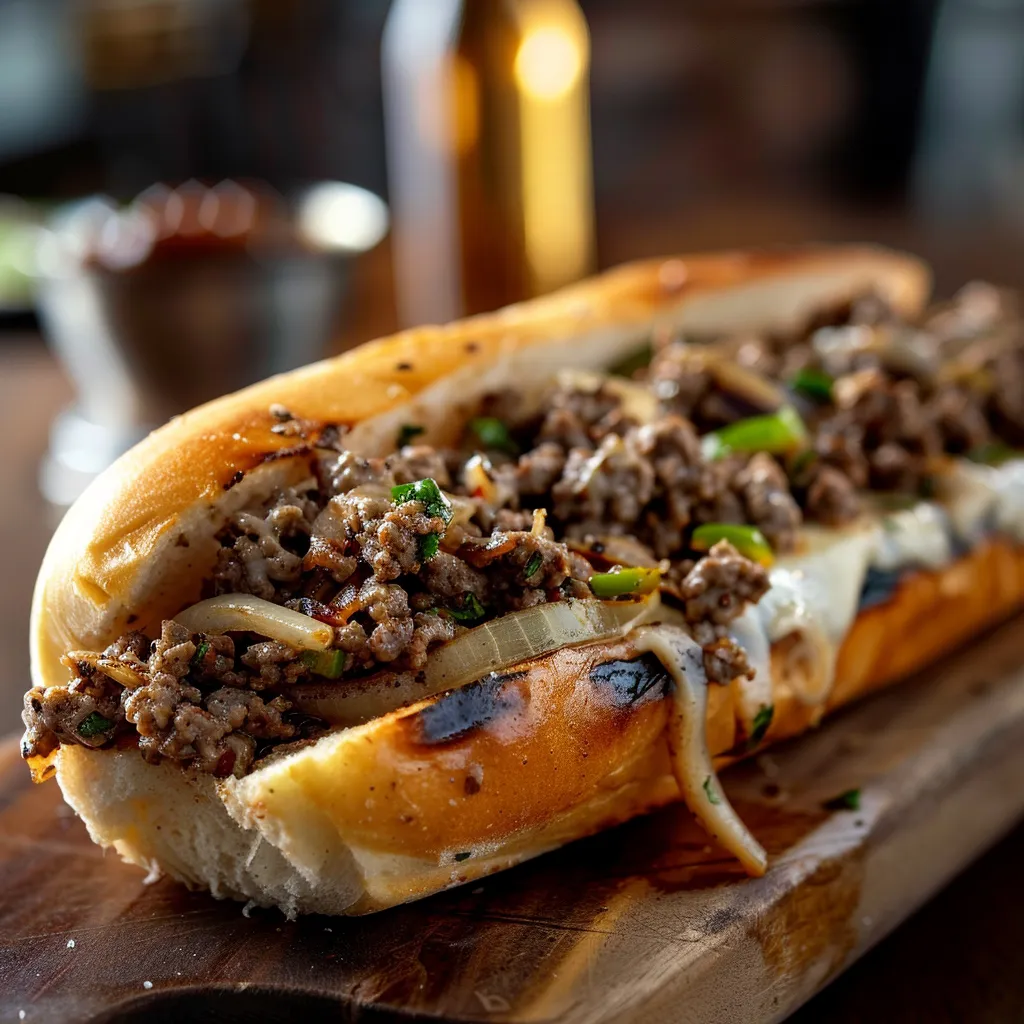
Savor the Magic: Ground Beef Philly Cheesesteaks That Bring Everyone to the Table

Welcome to my kitchen, where the aroma of sizzling ground beef and melting cheese creates an irresistible invitation to gather around the table! Today, we’re diving into a classic comfort food that’s perfect for family dinners, casual get-togethers, or simply a cozy night in. Get ready to experience the joy of making Ground Beef Philly Cheesesteaks that will have everyone asking for seconds.

Why You’ll Love This Recipe

Let’s be honest: who doesn’t love a good cheesesteak? The combination of juicy ground beef, sautéed veggies, and gooey provolone cheese all stuffed into a soft hoagie roll is nothing short of magic. But what makes this recipe truly special is its simplicity. You can whip it up in about 30 minutes, making it perfect for busy weeknights or when surprise guests drop by. Plus, it’s a family-friendly dish that even picky eaters will adore!

Preparation and Cooking Time

Eye-level shot of a hearty Ground Beef Philly Cheesesteak, showcasing the meat and vegetables inside a hoagie roll.
  • Preparation Time: 10 minutes
  • Cooking Time: 15 minutes
  • Total Time: 25 minutes

Ingredients

Here’s what you’ll need to create these delightful sandwiches:

  • 1 lb ground beef
  • 1 medium onion, sliced
  • 1 medium green bell pepper, sliced
  • 4 slices provolone cheese
  • 4 hoagie rolls
  • 2 tablespoons olive oil
  • Salt and pepper to taste
  • Optional: hot sauce or ketchup for serving

Step-by-Step Instructions

Now that we have our ingredients, let’s get cooking!

  1. Heat the Oil: In a large skillet, pour in the olive oil and heat it over medium heat. The oil should shimmer like a warm hug, ready to embrace our ingredients.
  2. Sauté the Veggies: Add the sliced onion and green bell pepper to the skillet. Sauté them for about 5-7 minutes until they’re softened and fragrant. The smell alone is enough to make your mouth water!
  3. Brown the Beef: Push the sautéed vegetables to one side of the skillet. Add the ground beef to the empty side. Using a spatula, break it apart and cook until it’s browned, about 5-6 minutes. Don’t forget to give it a sprinkle of salt and pepper to enhance the flavors.
  4. Mix It Up: Once the beef is fully cooked, stir it together with the veggies, allowing the flavors to meld beautifully. This is where the magic happens!
  5. Add the Cheese: Divide the beef and vegetable mixture into four portions. Top each portion with a slice of provolone cheese. Cover the skillet with a lid and let it sit for a couple of minutes until the cheese is beautifully melted. Trust me, this step is worth the wait!
  6. Prepare the Rolls: While the cheese is melting, slice the hoagie rolls lengthwise without cutting all the way through. This creates a perfect pocket for our delicious filling.
  7. Assemble the Sandwiches: Once the cheese has melted to perfection, spoon the cheesy beef mixture into each roll, allowing the gooey goodness to spill out just a little. It’s all about the indulgence!
  8. Serve Hot: Enjoy your cheesesteaks immediately, perhaps with a splash of hot sauce or a drizzle of ketchup if you like a little extra kick. Oh, and don’t forget to have napkins on hand—things might get a little messy in the best way possible!

How to Serve

These Ground Beef Philly Cheesesteaks are best enjoyed hot and fresh off the skillet. Pair them with a side of crispy fries or a simple salad for a complete meal. You could also serve them with an array of condiments—think spicy mustard, tangy pickles, or even a zesty homemade aioli. The choice is yours!

Additional Tips

  • Choosing the Right Meat: I recommend using ground beef with a bit of fat (like 80/20) for a juicier result. Leaner beef can dry out during cooking.
  • Vegetable Variations: Feel free to add mushrooms, jalapeños, or even spinach for a twist. Each adds a unique flavor and texture!
  • Cheese Choices: Provolone is traditional, but you can experiment with cheddar, mozzarella, or even a spicy pepper jack if you’re feeling adventurous!

Recipe Variation

If you’re looking to mix things up, consider trying a Philly Cheese Steak with Chicken. Simply substitute ground beef with ground chicken or shredded rotisserie chicken for a lighter version. You won’t lose the deliciousness, I promise!

Freezing and Storage

If you find yourself with leftovers (which is rare, but it happens!), you can store them for later. Here’s how:

  • In the Refrigerator: Store any leftover cheesesteak filling in an airtight container in the fridge for up to 3 days.
  • In the Freezer: The filling freezes well too! Place it in a freezer-safe container or bag, and it will keep for up to 3 months. When you’re ready to enjoy it again, simply thaw it in the refrigerator overnight and reheat on the stove.

Special Equipment

You don’t need any fancy gadgets for this recipe, just a good skillet and a spatula. But if you want to take your cheesesteaks to the next level, a griddle can be great for toasting the rolls and melting the cheese evenly.

Frequently Asked Questions

Can I substitute ground beef for another meat?

Absolutely! Ground turkey or chicken work well, or you can even use sautéed steak strips for a more traditional cheesesteak experience.

What’s the best way to keep my cheesesteaks from getting soggy?

To avoid soggy rolls, toast them lightly in the oven or on the griddle before filling. This creates a barrier that helps keep the filling from soaking through.

How can I make these cheesesteaks healthier?

Consider using lean ground beef, adding more vegetables like spinach or mushrooms, or opting for whole-grain hoagie rolls. You can also serve with a side salad instead of fries for a lighter meal.

Conclusion

There you have it—the ultimate guide to making Ground Beef Philly Cheesesteaks that will bring everyone to the table! With just a few simple ingredients and steps, you can create a meal that’s not only delicious but also filled with love and laughter. I hope this recipe becomes a favorite in your home, just as it has in mine. So pull up a chair, grab a sandwich, and enjoy the magic of cooking together. Happy eating!

Ground Beef Philly Cheesesteaks

Prep Time 10 minutes
Cook Time 15 minutes
Total Time 25 minutes
Servings 4 servings
Calories 650
A quick and hearty sandwich featuring seasoned ground beef, sautéed vegetables, and melted provolone cheese in a hoagie roll.

Ingredients

Meat

  • 1 lb ground beef
  • 1 medium medium onion, sliced
  • 1 medium medium green bell pepper, sliced

Cheese

  • 4 slices provolone cheese

Bread

  • 4 slices hoagie rolls
  • 2 tablespoons olive oil
  • to taste salt and pepper (for seasoning)
  • optional hot sauce or ketchup (for serving)

Instructions 

  • Heat olive oil in a skillet over medium heat.
  • Sauté onions and bell peppers until softened, about 5-7 minutes.
  • Add ground beef, cook until browned, then season with salt and pepper.
  • Mix beef with vegetables, top with cheese, and cover until melted.
  • Toast rolls if desired, fill with beef mixture, and serve with hot sauce or ketchup.

Notes

For extra flavor, add a splash of hot sauce or ketchup when serving.
Calories: 650kcal
Cost: $15
Course: Main Course
Cuisine: American
Keyword: Beef

Loved this recipe? Save it to your favorite Pinterest board so you can easily find it later! It’s the perfect way to keep all your sweet ideas in one place. ✨

Delicious Ground Beef Philly Cheesesteak, with soft shadows and a blurred, cozy background.

One-Pan Wonder: A Cozy Harvest Meal to Savor This Fall

As the leaves turn to shades of amber and the air becomes crisp, there’s something undeniably magical about fall cooking. It’s a time when we crave comfort food that warms our souls and fills our homes with fragrant aromas. Today, I’m excited to share with you a recipe that embodies the essence of the season: Harvest Sheet Pan Chicken Sausage & Veggies. This easy fall dinner is not only delicious but also incredibly simple to prepare, making it the perfect weeknight meal for busy families or anyone looking to savor the flavors of autumn.

Why You’ll Love This Fall Sheet Pan Dinner

Let’s talk about why this dish will become a staple in your kitchen. First off, it’s all about the simplicity. With just a handful of ingredients, you can create a colorful and nutritious meal that requires minimal cleanup. Everything cooks together on one sheet pan, allowing the flavors to meld and the vegetables to caramelize beautifully. The combination of savory chicken sausage, tender Brussels sprouts, and sweet butternut squash creates a delightful medley that’s sure to impress.

Plus, it’s versatile! Whether you’re cooking for one, whipping up a meal prep masterpiece, or feeding a crowd, this dish adapts to your needs. And did I mention how gorgeous it looks? Picture a vibrant array of roasted vegetables and golden sausage glistening on your table—who wouldn’t want to dig into that?

Ingredients for Harvest Sheet Pan Chicken Sausage & Veggies

An overhead view of a colorful harvest sheet pan dinner featuring sliced chicken sausage and various vegetables.

To get started on this comforting culinary adventure, you’ll need the following ingredients:

  • 1 pound chicken sausage, sliced
  • 2 cups Brussels sprouts, halved
  • 2 cups butternut squash, cubed
  • 1 red onion, sliced
  • 2 tablespoons olive oil
  • 1 teaspoon dried thyme
  • 1 teaspoon garlic powder
  • Salt and pepper to taste
  • Fresh parsley for garnish (optional)

Step-by-Step Instructions to Make the Perfect Sheet Pan Dinner

Now that we have our ingredients ready, let’s dive into the cooking process. This recipe is straightforward, making it perfect for both novice cooks and seasoned chefs.

  1. Preheat the oven: Begin by preheating your oven to 425°F (220°C). This high temperature helps to caramelize the vegetables and crisp up the sausage.
  2. Prepare the veggies: In a large mixing bowl, combine the halved Brussels sprouts, cubed butternut squash, and sliced red onion. These veggies not only add vibrant color but are also packed with nutrients.
  3. Add the sausage: Toss in the sliced chicken sausage—this is where the flavor party begins!
  4. Season it up: Drizzle everything with olive oil and sprinkle on the dried thyme, garlic powder, salt, and pepper. Use your hands to toss everything together, ensuring that each piece is well-coated with the seasoning.
  5. Spread on the sheet pan: Transfer the mixture onto a large sheet pan, spreading it out in a single layer. This is crucial for even cooking and browning.
  6. Bake: Place the sheet pan in the preheated oven and bake for 25-30 minutes. You’ll know it’s done when the vegetables are tender and the sausage is golden brown, filling your kitchen with an irresistible aroma.
  7. Garnish and serve: Once out of the oven, allow it to cool for a few minutes. If desired, sprinkle fresh parsley on top for a pop of color and freshness before serving warm.

Essential Kitchen Tools for Fall Sheet Pan Recipes

For this recipe, you’ll need a few basic kitchen tools:

  • Large Mixing Bowl: For tossing your ingredients.
  • Sheet Pan: A sturdy, rimmed baking sheet to catch all those wonderful juices.
  • Sharp Knife: To slice and dice your veggies and sausage.
  • Spatula: For serving up those delicious roasted goodies.

Vegetable Variations & Seasonal Swaps for Fall Dinner Inspiration

One of the best things about this recipe is its adaptability. If you have other veggies on hand or want to switch things up, feel free to customize! Here are some great substitutes:

  • Sweet Potatoes: Swap butternut squash for sweet potatoes for an even sweeter flavor.
  • Carrots or Parsnips: Add these root vegetables for extra sweetness and crunch.
  • Broccoli or Cauliflower: These can easily complement or replace Brussels sprouts.

Meal Prep & Storage Tips for Fall Meals for One

This recipe is a fantastic option for meal prepping! Here’s how you can make the most of it:

  • Storage: Leftovers can be stored in an airtight container in the refrigerator for up to 4 days.
  • Freezing: You can freeze the cooked dish for up to 3 months. Just let it cool completely before transferring it to a freezer-safe container.
  • Reheating: To reheat, simply pop it in the oven at 350°F (175°C) until warmed through, or microwave individual portions.

Common Mistakes to Avoid with Sheet Pan Dinners

While this recipe is pretty foolproof, here are some tips to ensure your sheet pan dinner turns out perfectly every time:

  • Overcrowding the Pan: Make sure there’s enough space between the ingredients. If they’re too close, they’ll steam instead of roast.
  • Not Preheating: Always preheat your oven. This helps achieve that delicious caramelization.
  • Skipping the Toss: Tossing the ingredients in oil and seasonings is essential for flavor. Don’t skip this step!

What to Serve with Chicken Sausage and Vegetables

This hearty meal is filling on its own, but if you’d like to add a little something extra, consider pairing it with:

  • Quinoa or Rice: A side of fluffy quinoa or brown rice can soak up the flavors beautifully.
  • Green Salad: A fresh arugula or spinach salad with a light vinaigrette adds a refreshing contrast.
  • Crusty Bread: Serve with warm, crusty bread to mop up those delicious juices!

Creative Ways to Reuse Leftovers

Leftover Harvest Sheet Pan Chicken Sausage & Veggies can be transformed into other delightful meals:

  • Wraps: Use the leftovers to fill a tortilla or wrap for a delicious lunch.
  • Hash: Sauté the leftovers in a pan with a couple of eggs for a hearty breakfast.
  • Soup: Add stock to the leftovers and blend for a creamy soup.

FAQs: Your Top Questions About Fall Sheet Pan Recipes Answered

Can I use other types of sausage? Absolutely! Turkey sausage or even plant-based sausages work wonderfully in this recipe.

Can I make this ahead? Yes! You can prep the ingredients the night before and simply toss them in the oven when you’re ready to cook.

Is this dish gluten-free? Yes, as long as your sausage is gluten-free, this meal is perfect for those with gluten sensitivities.

Can I double the recipe? Yes, but be sure to use two sheet pans to avoid overcrowding.

What if I don’t like Brussels sprouts? No worries! Substitute them with broccoli, cauliflower, or even green beans for a different twist.

Conclusion: A Weeknight Fall Dinner You’ll Make Again and Again

The Harvest Sheet Pan Chicken Sausage & Veggies recipe is the epitome of cozy fall cooking—simple, satisfying, and oh-so-delicious. It’s a dish that brings warmth to your table, perfect for those chilly evenings when all you want is comfort food that nourishes the body and soul. So, grab your apron, preheat that oven, and let’s make some magic happen in your kitchen. Don’t forget to share your creations with friends and family, and if you loved this recipe, be sure to check out my other favorites like One-Pan Wonder: A Cozy Chicken and Potatoes Recipe That Feels Like Home and A Wholesome Chicken Pasta Broccoli Dish That Tastes Like Home. Happy cooking!

Harvest Sheet Pan Chicken Sausage & Veggies – Easy Fall Dinner!

Prep Time 10 minutes
Cook Time 30 minutes
Total Time 40 minutes
Servings 4 servings
Calories 350
A simple and flavorful fall dinner featuring roasted chicken sausage and seasonal vegetables on a sheet pan.

Ingredients

Protein

  • 1 pound chicken sausage, sliced

Vegetables

  • 2 cups brussels sprouts, halved
  • 2 cups butternut squash, cubed
  • 1 red onion red onion, sliced

Other

  • 2 tablespoons olive oil
  • 1 teaspoon dried thyme
  • 1 teaspoon garlic powder
  • to taste salt and pepper salt and pepper
  • for garnish optional fresh parsley (for garnish)

Instructions 

  • Preheat oven to 425°F (220°C).
  • Combine vegetables and sausage in a bowl, then toss with olive oil, thyme, garlic powder, salt, and pepper.
  • Spread mixture on a sheet pan in a single layer.
  • Bake for 25-30 minutes until vegetables are tender and sausage is browned.
  • Garnish with parsley if desired and serve warm.

Notes

Feel free to customize with your favorite fall vegetables.
Calories: 350kcal
Cost: $15
Course: dinner
Cuisine: American
Keyword: Chicken Sausage, Fall, Sheet Pan

Loved this recipe? Save it to your favorite Pinterest board so you can easily find it later! It’s the perfect way to keep all your sweet ideas in one place. ✨

A delicious arrangement of roasted chicken sausage and vibrant fall vegetables on a rustic wooden surface.

Everyday Magic: Transforming Simple Dinners into Unforgettable Moments

Welcome to the cozy corner of my kitchen! If you’re searching for a recipe that’s not just delicious but also feels like a warm hug after a long day, you’ve landed in the right spot. Today, we’re diving into a dish that’s become a staple in my home: Simple Dinners Every Day. This is the kind of meal that transforms ordinary evenings into unforgettable moments, where the aroma wafts through your home, making everyone pause in anticipation.

This recipe is packed with flavor and simplicity, making it a favorite among families, busy professionals, and anyone else who appreciates a good meal without the fuss. So, grab your apron and let’s get cooking!

Why This Recipe Works

Cooking should be a joy, not a chore! That’s why this recipe hits all the right notes: it’s fast, flexible, budget-friendly, and family-friendly. With just a handful of ingredients and one pan, you can whip up a dinner that’s sure to impress. Plus, it’s freezer-friendly and perfect for meal prep, meaning you can stock your stash and reduce midweek chaos. What’s not to love?

The Ingredients You’ll Need

An appetizing meal displayed on a rustic table, showcasing fresh ingredients in vibrant colors, captured in warm natural light.

To create our Creamy Garlic Chicken Dinner, you’ll need the following ingredients:

  • Chicken breasts or thighs (whichever you prefer)
  • Heavy cream or a lighter alternative if you’re watching your calories
  • Garlic (fresh is best, but jarred will work in a pinch)
  • Chicken broth or stock
  • Butter
  • Parmesan cheese (because cheese makes everything better!)
  • Your choice of seasonings (I love using Italian herbs, salt, and pepper)
  • Fresh parsley for garnish

These ingredients are not just easy to find; they’re also versatile. If you have a family member who’s not a fan of garlic, fear not! You can easily tone it down or swap in some shallots for a milder flavor.

Steps to Prepare Your Creamy Garlic Chicken

Now, let’s get into the nitty-gritty of how to make creamy garlic chicken. Follow these steps for a dinner that will have everyone asking for seconds:

  1. Prep Your Chicken: Start by seasoning your chicken breasts or thighs with salt, pepper, and your choice of Italian herbs. Let them sit for about 15 minutes to absorb those flavors.
  2. Cook the Chicken: In a large skillet over medium heat, melt a tablespoon of butter. Once melted and bubbling, add your chicken. Cook for about 6-7 minutes on each side or until golden brown and cooked through. Remove from the skillet and set aside.
  3. Make the Sauce: In the same skillet, add a bit more butter if needed, and toss in the minced garlic. Sauté for about a minute until fragrant—watch it closely so it doesn’t burn! Add in the chicken broth and bring it to a simmer.
  4. Add Cream and Cheese: Once the broth is simmering, stir in the heavy cream and grated Parmesan cheese. Let it simmer for a few minutes until the sauce thickens. You want it to be creamy but not overly thick—think of the perfect coating for your chicken.
  5. Combine: Return the chicken to the skillet and coat it in that creamy goodness. Let it simmer for another 2-3 minutes, allowing the flavors to meld together.
  6. Serve: Plate your creamy garlic chicken over a bed of mashed potatoes or pasta, garnish with fresh parsley, and get ready for compliments!

Tips for the Perfect Dish

Cooking is a dance of flavors, and a few tips can help you become the star of the show:

  • Use Fresh Ingredients: Fresh garlic will elevate this dish to new heights. If you can, avoid pre-minced garlic.
  • Don’t Overcook the Chicken: Chicken can dry out quickly, so use a meat thermometer to check for doneness (165°F is your magic number!).
  • Customize the Sauce: Feel free to add in other ingredients like spinach, sun-dried tomatoes, or mushrooms for a twist. It’s all about what makes your taste buds sing!

Variations to Explore

One of the joys of cooking is experimenting, so let’s talk about some fun variations:

  • For a Lighter Version: Swap heavy cream for Greek yogurt or low-fat cream cheese for a lighter sauce.
  • Spicy Kick: Add red pepper flakes to the sauce for a delightful heat that complements the creamy elements.
  • Herbaceous Twist: Try adding fresh thyme or rosemary for a more aromatic dish.

Substitutions You Can Make

Not every kitchen has the same ingredients at hand, and that’s perfectly okay! Here are some substitutions you can make:

  • Chicken: Tofu or chickpeas can work well for a vegetarian option.
  • Heavy Cream: Coconut milk or a nut-based cream can replace heavy cream for dairy-free alternatives.
  • Parmesan: Nutritional yeast is a fantastic dairy-free substitute that adds a cheesy flavor without the dairy.

Storing and Freezing Your Creamy Garlic Chicken

Life gets busy, and leftovers can be a lifesaver! Here’s how to store and freeze:

  • Storage: Allow the chicken to cool completely, then transfer it to an airtight container. It will keep in the fridge for up to 3-4 days.
  • Freezing: For longer storage, freeze in a freezer-safe container for up to 3 months. To reheat, thaw in the fridge overnight and warm in a skillet over low heat.

FAQs About Creamy Garlic Chicken

Here are some common questions I get about this recipe:

  • Can I substitute the chicken for something else? Absolutely! As mentioned earlier, tofu or chickpeas make great replacements.
  • What’s the best way to serve this dish? While it’s delightful on its own, I love serving it over mashed potatoes or pasta. You could even pair it with roasted veggies for a complete meal.
  • How can I make this dish ahead of time? Prepare the sauce and chicken, then store them separately in the fridge. When you’re ready to eat, reheat and combine!

Final Thoughts

Cooking is all about creating memories and sharing love through food. With this Easy Creamy Garlic Chicken recipe, you’re not just making dinner—you’re crafting an experience that brings people together. Whether it’s a family gathering or a quiet dinner for one, this dish is sure to leave a lasting impression.

So, roll up your sleeves, enjoy the process, and remember: the kitchen is a place of magic! If you try this recipe, I’d love to hear how it turned out. Happy cooking, my friend! And don’t forget to check out my other recipes, like Cheesy Garlic Chicken Wraps or Simple Garlic Parmesan Chicken Pasta, for even more delicious ideas!

Simple Dinners Every Day

Prep Time 10 minutes
Cook Time 20 minutes
Total Time 30 minutes
Servings 4 people
Calories 550
Discover quick, budget-friendly, and family-friendly dinner ideas with minimal fuss and maximum flavor.

Ingredients

Main ingredients

  • 1 lb ground beef (or plant-based alternative)
  • 1 cup tomato sauce
  • 4 servings pasta (any type)
  • to taste salt and pepper (for seasoning)

Instructions 

  • Cook pasta according to package instructions.
  • Brown the ground beef in a skillet over medium heat.
  • Add tomato sauce to the beef and simmer for 5 minutes.
  • Drain pasta and combine with the sauce.
  • Season with salt and pepper to taste.

Notes

Use whole wheat pasta for added fiber and nutrients.
Calories: 550kcal
Cost: $15
Course: dinner
Keyword: easy

Loved this recipe? Save it to your favorite Pinterest board so you can easily find it later! It’s the perfect way to keep all your sweet ideas in one place. ✨

A cozy dinner setup featuring a delicious dish, presented with a blurred background and appealing textures.

Steak Bites & Potatoes: A Cozy Meal That Dances on Your Taste Buds

Welcome to my kitchen, where every meal tells a story and every recipe is a chance to create a little magic! If you’re in the mood for a dish that feels like a warm hug on a plate, then you’ve come to the right place. Today, I’m sharing my beloved recipe for Irresistible Garlic Butter Steak Bites & Potatoes. This dish is not just about satisfying hunger; it’s about savoring every bite and creating memories around the dinner table.

Imagine the smell of juicy steak searing in a hot skillet, mingling with the rich aroma of garlic and butter. It’s the kind of scent that makes your heart race and your stomach growl in anticipation. Pair that with crispy, golden baby potatoes, and you have a meal that’s sure to impress anyone—whether it’s a casual weeknight dinner or a special occasion. Are you ready to dive into this cozy culinary adventure? Let’s go!

Ingredients You’ll Need

  • 1 pound sirloin steak, cut into bite-sized pieces
  • 1 pound baby potatoes, halved
  • 4 tablespoons unsalted butter
  • 4 cloves garlic, minced
  • 1 teaspoon dried thyme
  • 1 teaspoon paprika
  • Salt and pepper to taste
  • Fresh parsley, chopped (for garnish)

How to Make Irresistible Garlic Butter Steak Bites & Potatoes

A delectable serving of steak bites sautéed in garlic butter with golden baby potatoes, captured in warm natural light.

Creating this delightful dish is easier than you might think! With just a handful of ingredients and a little love, you can whip up a meal that dances on your taste buds. Here’s how to do it:

Step 1: Prepping the Potatoes

Start by preheating your oven to 400°F (200°C). While it’s warming up, grab a large pot and fill it with salted water. Bring it to a boil, then toss in the halved baby potatoes. Cook them for about 10-12 minutes until they’re fork-tender. You want them soft enough to enjoy but firm enough to hold their shape when we sauté them later.

Once they’re ready, drain the potatoes and set them aside. This is where the magic begins!

Step 2: Sautéing the Potatoes

In a large skillet over medium-high heat, melt 2 tablespoons of unsalted butter. As it melts and begins to shimmer, add the cooked potatoes to the skillet, seasoning them with salt, pepper, and paprika. This is where the potatoes begin to transform into crispy little bites of heaven.

Sauté them for about 5-7 minutes, turning occasionally until they are golden and crispy. Once they reach that perfect crispiness, remove them from the skillet and set them aside. Trust me, they’ll be worth the wait!

Step 3: Searing the Steak Bites

Now, let’s bring the steak into the spotlight! In the same skillet (because who wants to wash extra dishes?), add the remaining 2 tablespoons of butter. Once melted, add the bite-sized pieces of sirloin steak, and season them with salt, pepper, and dried thyme. Sear the steak bites for 3-4 minutes until they’re nicely browned on all sides. The sizzling sound will be music to your ears!

Step 4: Creating the Garlic Butter Sauce

Once the steak is beautifully seared, add the minced garlic to the skillet. Cook it for an additional 1-2 minutes until the garlic is fragrant and just beginning to turn golden. This is where the kitchen transforms into a fragrant haven!

Now it’s time to bring it all together. Return the crispy potatoes to the skillet, tossing everything together to coat it in that irresistible garlic butter sauce. Your taste buds are about to have a party!

How to Serve Garlic Butter Steak Bites & Potatoes

Now that you have this beautiful dish ready, let’s think about presentation and serving suggestions. Here are a few creative ideas:

Garnishes

Don’t forget to elevate your dish with a sprinkle of chopped fresh parsley before serving. It adds a pop of color and freshness that complements the richness of the butter and steak.

Side Dishes

This dish is hearty on its own, but if you feel like adding a side, consider pairing it with:

  • A crisp green salad with a simple vinaigrette
  • Steamed asparagus or green beans
  • Warm dinner rolls for mopping up that delicious garlic butter

Creative Ways to Present

For a rustic touch, serve the steak bites and potatoes in a cast iron skillet. If you’re looking to impress, skewer the steak and potato pieces onto toothpicks for a fun appetizer at your next gathering. Or, for a fresh twist, serve it over a bed of wilted greens!

Make Ahead and Storage

One of the best things about this recipe is its versatility when it comes to leftovers. Here’s how to properly store them:

Storing Leftovers

Once your Garlic Butter Steak Bites & Potatoes have cooled to room temperature, transfer any leftovers to an airtight container. They’ll stay fresh in the fridge for up to three days. When you’re ready to enjoy them again, simply reheat!

Freezing

If you have a lot of leftovers and want to freeze them, place cooled portions in a single layer on a baking sheet to freeze individually first. Once frozen, transfer them to a freezer-safe bag or container. They’ll keep for up to two months. Just keep in mind that the potatoes may soften a bit upon thawing.

Reheating

The best way to reheat your leftovers is in a skillet over medium heat. Add a small dab of butter to recapture that luscious garlic flavor and re-crisp the potatoes. While a microwave is quick, the stovetop will yield a much better texture.

FAQs

Can I use a different cut of steak?

Absolutely! While sirloin is a classic choice, cuts like ribeye or strip steak will work beautifully as well. Just aim for well-marbled cuts for maximum tenderness and flavor.

How do I make sure the potatoes get crispy?

Patting the potatoes dry before cooking helps, as does giving them plenty of space in the skillet. Letting them sit undisturbed for a few minutes at a time allows a golden crust to develop.

What kind of skillet is best?

A large, heavy-bottomed skillet—like cast iron or stainless steel—delivers the best sear and even browning for both steak and potatoes.

Can I make this dairy-free?

Yes! You can swap in a vegan butter alternative or use all olive oil instead. The flavor profile will shift slightly, but it’ll still be delicious!

Should I peel the potatoes?

No peeling needed! Baby potatoes have thin skins that get wonderfully crispy and add extra flavor and nutrients to the dish.

Final Thoughts

There you have it! A cozy, mouthwatering recipe that’s not just a meal but an experience. My Irresistible Garlic Butter Steak Bites & Potatoes will make your taste buds dance with joy, and I hope it brings warmth and connection to your table just as it does to mine. Whether you’re cooking for family or impressing friends, this dish is sure to be a hit. So, grab your skillet, and let’s make some magic happen!

Happy cooking, and remember—every meal is a reason to celebrate. Enjoy your culinary adventure!

Irresistible Garlic Butter Steak Bites & Potatoes

Prep Time 15 minutes
Cook Time 20 minutes
Total Time 35 minutes
Servings 4 servings
Calories 650
A flavorful and easy-to-make dish featuring tender steak bites and crispy garlic butter potatoes, perfect for a satisfying meal.

Ingredients

Meat

  • 1 pound sirloin steak, cut into bite-sized pieces

Vegetables

  • 1 pound baby potatoes, halved

Dairy & Oils

  • 4 tablespoons unsalted butter

Garlic & Spices

  • 4 cloves garlic, minced
  • 1 teaspoon dried thyme
  • 1 teaspoon paprika
  • to taste salt and pepper

Garnish

  • fresh parsley, chopped parsley (for garnish)

Instructions 

  • Preheat oven to 400°F (200°C).
  • Cook potatoes in boiling salted water for 10-12 minutes, drain.
  • Sauté potatoes in 2 tbsp butter until golden, then set aside.
  • Cook steak bites in remaining butter with seasonings until browned, add garlic, then toss with potatoes.
  • Garnish with chopped parsley before serving.

Notes

Ensure not to overcook the steak for tender bites and adjust seasoning to taste.
Calories: 650kcal
Cost: $15
Course: Main Course
Cuisine: American
Keyword: garlic, potatoes, Steak

Loved this recipe? Save it to your favorite Pinterest board so you can easily find it later! It’s the perfect way to keep all your sweet ideas in one place. ✨

An eye-level shot showcasing tender steak bites and baby potatoes garnished with fresh parsley, featuring rich textures.

Bite-Sized Bliss: Why Smashburger Quesadillas Are My Go-To Comfort Food

Hey there, foodie friends! Let me take you on a delicious journey into the heart of comfort food with my all-time favorite creation: Smashburger Quesadillas. If you’ve ever found yourself torn between a craving for a juicy burger and the cheesy goodness of a quesadilla, you’re in for a treat. This recipe is not just a meal; it’s a celebration of flavors that hugs you back. Picture this: crispy tortillas enveloping seasoned beef, melty cheese, and a medley of toppings that make each bite an adventure. It’s like your favorite backyard barbecue just threw a party in your kitchen!

The Magic of Smashburger Quesadillas: A Comfort Food Revelation

Now, you might be wondering how this magical combination came to be. It all started one summer evening when my family was gathered for our beloved Burger Night. I was feeling adventurous, and with a six-year-old culinary critic (my niece Lila) in the house, I knew I had to bring my A-game. As she nibbled on her burger and declared it “kinda boring,” inspiration struck. Why not ditch the bun and give a tortilla a spin instead? That night, Smashburger Quesadillas were born, and they have since become a staple in my kitchen. They are quick, satisfying, and endlessly customizable, making them perfect for any occasion.

Your Grocery Lineup (Plus Chef-Approved Swaps!)

Mouthwatering Smashburger Quesadillas served on a plate, showcasing melted cheese and vibrant ingredients.

Before we dive into the cooking magic, let’s gather our ingredients. You won’t need a mile-long shopping list—just some quality basics and perhaps a few fun twists of your own:

  • 1 lb ground beef: Opt for an 80/20 fat ratio for that juicy texture. Feeling plant-based? Go for Impossible Meat or seasoned black beans.
  • 4 small flour tortillas: These are your edible canvas. Gluten-free? Almond flour tortillas crisp up beautifully, just handle them with care.
  • 1 cup shredded cheddar cheese: I love a blend of sharp cheddar for tang and American for that gooey goodness. Dairy-free? Try Violife or Daiya shreds.
  • 1/2 cup diced onions: For that extra crunch and flavor.
  • 1/2 cup diced tomatoes: Freshness alert!
  • 1/4 cup pickles, chopped: Because who doesn’t love a little zing?
  • 1 tablespoon mustard and 1 tablespoon ketchup: For that classic burger flavor.
  • Salt and pepper to taste: Always essential!
  • Cooking oil for frying: Just a bit to get that golden crispiness.

Let’s Get Cooking: Your Foolproof Roadmap

Now that we’ve got our ingredients, let’s roll up our sleeves and get cooking!

  1. Heat Things Up: In a skillet over medium-high heat, add a little cooking oil. You want just enough to coat the bottom and create that sizzle!
  2. Form and Smash: Divide your ground beef into small portions and form them into patties. Place them in the skillet and smash them down. Season generously with salt and pepper. Let them cook for about 2-3 minutes until they’re beautifully browned.
  3. Chop and Cool: Once browned, remove the patties and let them cool slightly before chopping them into smaller pieces. This is where the magic happens—the smaller bits will be easier to distribute in your quesadilla!
  4. Assemble Your Quesadilla: In the same skillet, place a tortilla and sprinkle half of the shredded cheese on one half. Layer on the chopped burger pieces, diced onions, tomatoes, and pickles.
  5. Drizzle and Fold: Add a drizzle of mustard and ketchup over the fillings, then fold the tortilla in half, embracing all that deliciousness!
  6. Cook Until Golden: Cook for 2-3 minutes on each side until the tortilla is golden brown and the cheese has melted, creating a perfect harmony of flavors.
  7. Slice and Serve: Once they’re cooked, slice the quesadillas into wedges and serve warm. Get ready for the compliments!

Plating Like a Pro (No Fancy Degree Required!)

Presentation can elevate any dish. For your Smashburger Quesadillas, consider these fun serving ideas:

  • Arrange the wedges in a sunburst pattern on a platter.
  • Serve with mini bowls of toppings for a customization station: think pickles, onions, and different sauces.
  • Pair with crispy waffle fries or a side salad for a complete meal.

Mix It Up! 5 Killer Twists

The great thing about Smashburger Quesadillas is their versatility. Here are some of my favorite variations to keep things exciting:

  • Breakfast Smash: Add scrambled eggs and crumbled bacon to the beef layer, maybe even a sprinkle of hash browns for those brunch vibes.
  • Spicy Fiesta: Mix in cooked chorizo with the beef and swap in pepper jack cheese for a kick!
  • Hawaiian Vibes: Toss in thin pineapple rings and brush the tortilla with teriyaki glaze for a sweet and savory delight.
  • Pizza Party: Use Italian sausage, mozzarella, and a dollop of marinara for dipping. Pizza lovers rejoice!
  • Lighten Up: Try ground turkey or chicken, and fold in grated zucchini for hidden veggies.

Lessons From the Quesadilla Trenches

Every recipe comes with its lessons, and I’ve had my fair share of quesadilla trials. Here are some tips to ensure your Smashburger Quesadillas turn out perfectly:

  • **Cast Iron is Key:** A cast-iron skillet gives you that unbeatable crispy texture. Non-stick works in a pinch, but cast iron is the way to go for browning.
  • **Rest Time Matters:** Letting your quesadillas rest for a minute or two after cooking helps the cheese set up, preventing the dreaded cheese avalanche when you cut into them.
  • **Double the Batch:** Trust me—one quesadilla is never enough! Make extra for lunch the next day or for late-night snacking.

Storage & Freezing: Keeping the Magic Alive

Leftovers? Yes, please! Here’s how to store and freeze your Smashburger Quesadillas:

  • Refrigeration: Store cooked quesadillas in an airtight container in the fridge for up to 3 days. Reheat in a skillet for the best results.
  • Freezing: These quesadillas freeze beautifully! Let them cool completely, then wrap tightly in foil or plastic wrap. They can be frozen for up to 1 month. To reheat, bake from frozen at 375°F until hot and crispy.

Frequently Asked Questions (FAQs)

Can I substitute the ground beef?

Absolutely! Ground turkey, chicken, or even plant-based alternatives like lentils or black beans work great.

What’s the best way to ensure my cheese melts?

Shred your own cheese! Pre-shredded varieties often have anti-caking agents that inhibit melting. Also, covering your skillet with a lid for a few moments can help.

How do I prevent my tortilla from ripping?

Make sure the beef side is fully crisped before flipping. Use two spatulas for support if needed.

Can I make these ahead of time?

Yes! You can prepare them in advance and reheat them in a skillet or air fryer for that crispy texture.

Final Thoughts: The Weeknight Winner You Didn’t Know You Needed

So there you have it—your complete guide to making Smashburger Quesadillas! This recipe brings together the best of both worlds: the comfort of a burger and the convenience of a quesadilla. It’s perfect for busy weeknights, casual get-togethers, or whenever you just want to treat yourself to something fantastic. The next time you’re standing in front of your fridge wondering what to whip up, remember this delightful mashup. With just a few ingredients, a skillet, and a little bit of love, you can create a meal that’s sure to wow your family and friends. So, grab that spatula, get smashing, and let the cheesy goodness begin! 🌮🔥🍔

Smashburger Quesadillas - Mini kitchen magic

Prep Time 10 minutes
Cook Time 15 minutes
Total Time 25 minutes
Servings 4 servings
Calories 650
A fun and flavorful twist on quesadillas featuring smashed burger patties, perfect for quick bites and satisfying cravings.

Ingredients

Meat

  • 1 lb ground beef
  • 4 small flour tortillas small flour tortillas
  • 1 cup shredded cheddar cheese
  • 0.5 cup diced onions
  • 0.5 cup diced tomatoes
  • 0.25 cup pickles, chopped
  • 1 tablespoon mustard
  • 1 tablespoon ketchup
  • to taste salt and pepper
  • for frying cooking oil

Instructions 

  • Cook beef patties in a skillet with oil, season with salt and pepper, then chop into pieces.
  • Place a tortilla in the skillet, sprinkle with cheese, add beef pieces, onions, tomatoes, pickles, then drizzle with mustard and ketchup. Fold in half.
  • Cook each side for 2-3 minutes until golden and cheese melts.
  • Repeat with remaining tortillas and fillings, then slice into wedges and serve warm.

Notes

Use a non-stick skillet for easier flipping and cleaning.
Calories: 650kcal
Cost: $15
Course: Main Course, Snack
Cuisine: American
Keyword: Beef, quesadilla

Loved this recipe? Save it to your favorite Pinterest board so you can easily find it later! It’s the perfect way to keep all your sweet ideas in one place. ✨

Deliciously layered Smashburger Quesadillas with a warm, inviting appearance and soft shadows.

Savoring Comfort: My Go-To Cheesy Ranch Potatoes and Smoked Sausage Recipe

Hey there! I’m so glad you’ve decided to join me in my cozy kitchen today. If you’re looking for a dish that wraps you in warmth and comfort, let me introduce you to my all-time favorite: Cheesy Ranch Potatoes and Smoked Sausage. This recipe is like a friendly hug on a plate—simple, satisfying, and bursting with flavor. So grab your apron, and let’s dive into this culinary adventure together!

Why You’ll Love This Cheesy Ranch Potatoes and Smoked Sausage Recipe

This dish is a glorious blend of creamy, cheesy goodness and the hearty, savory notes of smoked sausage, all nestled within tender, roasted potatoes. It’s perfect for those busy weeknights when you need something quick yet fulfilling. Plus, it’s a fantastic choice for family gatherings or potlucks—trust me, people will be asking for seconds!

What makes this recipe truly special is how adaptable it is; you can easily customize it with your favorite veggies or seasonings, making it your own masterpiece. The combination of the ranch seasoning with the melted cheddar cheese creates a flavor explosion that’s hard to resist. I mean, who can say no to cheesy potatoes?

Preparation and Cooking Time

Delicious dish of sliced smoked sausage and halved baby potatoes topped with melted cheese and herbs.
  • Preparation Time: 10 minutes
  • Cooking Time: 30-35 minutes
  • Total Time: 45 minutes

Ingredients

Here’s what you’ll need to whip up this delightful dish:

  • 1 pound smoked sausage, sliced
  • 4 cups baby potatoes, halved
  • 1 packet ranch seasoning mix
  • 1 cup shredded cheddar cheese
  • 2 tablespoons olive oil
  • Salt and pepper to taste
  • Chopped green onions for garnish (optional)

Step-by-Step Instructions

Prepare the Ingredients:

First things first, let’s get everything ready. Preheat your oven to 400°F (200°C). While that’s warming up, wash and halve your baby potatoes. I love using baby potatoes for this recipe because they cook evenly and have a lovely creamy texture when roasted. Slice your smoked sausage into bite-sized pieces—this will add a smoky flavor that complements the ranch seasoning beautifully.

Mix the Seasoning and Oil:

In a large mixing bowl, combine your halved potatoes, sliced sausage, olive oil, ranch seasoning mix, and a sprinkle of salt and pepper. Use your hands or a spatula to toss everything together until the potatoes and sausage are well coated in that delicious ranch goodness. The aroma will already start to fill your kitchen, and believe me, it’s magical!

Assemble the Dish:

Now it’s time to spread the mixture evenly on a baking sheet. Make sure the potatoes and sausage are in a single layer, allowing them to roast evenly. You want that golden-brown color and crispy edges that make each bite so irresistible.

Bake the Dish:

Pop the baking sheet into your preheated oven and let it bake for about 25-30 minutes. Halfway through, give it a good stir to ensure everything cooks evenly. You’ll know it’s ready when the potatoes are tender and beautifully golden. Oh, the sizzle and smell at this point will have your family flocking to the kitchen!

Serve and Enjoy:

Once the potatoes are perfectly roasted, pull them out of the oven and sprinkle a generous layer of shredded cheddar cheese over the top. Return the dish to the oven for an additional 5 minutes, or until the cheese is melty and bubbly. Finally, garnish with chopped green onions if you like a bit of freshness. Serve hot, and watch your loved ones dig in with delight!

How to Serve Cheesy Ranch Potatoes and Smoked Sausage

This dish is incredibly versatile! You can serve it as a main course or as a hearty side. It pairs wonderfully with a simple green salad or some steamed veggies for a balanced meal. I often enjoy it with a dollop of sour cream or a splash of hot sauce for a spicy kick. Either way, it’s sure to be a crowd-pleaser!

Additional Tips for Cheesy Ranch Potatoes and Smoked Sausage

  • Don’t Skip the Toss: Make sure everything is well-coated in oil and seasoning; this ensures every bite is packed with flavor.
  • Customize Your Ingredients: Feel free to swap out the sausage for chicken, turkey, or even a plant-based option. You can also add bell peppers, onions, or even broccoli to the mix for extra veggies!
  • Watch the Cheese: For an extra cheesy finish, try mixing in different cheeses like Monterey Jack or even pepper jack for a little heat.

Recipe Variations of Cheesy Ranch Potatoes and Smoked Sausage

If you’re feeling adventurous, here are some fun variations to try:

  • Southwestern Style: Add black beans, corn, and diced tomatoes, and swap the ranch seasoning for taco seasoning.
  • Breakfast Twist: Use breakfast sausage and add in scrambled eggs on top before serving for a hearty breakfast bake.
  • Italian Flair: Substitute Italian sausage and add marinara sauce just before serving for a pasta-inspired dish.

Freezing and Storage for Cheesy Ranch Potatoes and Smoked Sausage

If you have leftovers (which I doubt!), you can store them in an airtight container in the fridge for up to 3 days. Reheat in the oven or microwave until warmed through. You can also freeze this dish for up to 2 months. Just make sure to allow it to cool completely before transferring it to a freezer-safe container. To reheat, thaw overnight in the fridge and bake at 350°F (175°C) until heated through.

Special Equipment for Cheesy Ranch Potatoes and Smoked Sausage

You don’t need any fancy gadgets for this recipe! Just a good quality baking sheet and a mixing bowl will do the trick. However, a non-stick baking mat can help prevent sticking and make cleanup a breeze.

FAQ Section about Cheesy Ranch Potatoes and Smoked Sausage

Can I make this dish in advance?

Absolutely! You can prepare everything up to the baking step, cover it, and refrigerate it for up to 24 hours. Just pop it in the oven when you’re ready to bake!

What can I substitute for ranch seasoning?

If you don’t have ranch seasoning on hand, you can use a mix of dried herbs like dill, parsley, garlic powder, and onion powder. It won’t be exactly the same, but it will still taste great!

Is this recipe gluten-free?

Yes! As long as you use gluten-free smoked sausage and ranch seasoning, this recipe can be made gluten-free.

Conclusion

And there you have it—my favorite Cheesy Ranch Potatoes and Smoked Sausage recipe that’s sure to become a staple in your kitchen. Cooking should be a joyful experience, and I hope this dish brings you the same warmth and happiness it brings to my family. Remember, every meal is an opportunity to create memories, so gather your loved ones, share a meal, and savor every moment. Happy cooking, friends!

Cheesy Ranch Potatoes and Smoked Sausage

Prep Time 10 minutes
Cook Time 30 minutes
Total Time 40 minutes
Servings 4 servings
Calories 550
A flavorful and easy-to-make dish combining smoked sausage, tender potatoes, and cheesy ranch seasoning for a satisfying meal.

Ingredients

Main Ingredients

  • 1 pound smoked sausage, sliced
  • 4 cups baby potatoes, halved
  • 1 packet ranch seasoning mix
  • 1 cup shredded cheddar cheese
  • 2 tablespoons olive oil
  • to taste salt and pepper salt and pepper
  • chopped green onions for garnish (optional) green onions (for garnish)

Instructions 

  • Preheat oven to 400°F (200°C).
  • Mix potatoes, sausage, olive oil, ranch mix, salt, and pepper; spread on a baking sheet.
  • Bake for 25-30 minutes, stirring halfway.
  • Sprinkle cheese over top and bake 5 more minutes until melted.
  • Garnish with green onions if desired and serve hot.

Notes

For extra flavor, add a dash of hot sauce or your favorite herbs.
Calories: 550kcal
Cost: $15
Course: Main Course
Cuisine: American
Keyword: cheese, potatoes, sausage

Loved this recipe? Save it to your favorite Pinterest board so you can easily find it later! It’s the perfect way to keep all your sweet ideas in one place. ✨

Appetizing plate of cheesy ranch potatoes mixed with smoked sausage, beautifully presented with a blurred background.

One-Pan Wonder: The Sheet Pan Chicken Fajitas That Bring Joy to Busy Weeknights

Have you ever found yourself staring into the fridge, hoping for inspiration to strike while also feeling the weight of a busy week? I’ve been there, my friend! We all need a little magic in our kitchens, especially on those hectic weeknights when dinner needs to be delicious yet effortless. Enter the Sheet Pan Chicken Fajitas—the ultimate solution for a quick, vibrant, and satisfying meal that’ll have your family smiling and asking for seconds!

Imagine this: colorful bell peppers sizzling in the oven, the aroma of spices wafting through your home, and tender chicken that’s just bursting with flavor. It’s like a fiesta on a plate! This one-pan wonder not only cuts down on cleanup but also brings all the joyful flavors of traditional fajitas right to your table in just about 30 minutes. So, grab your apron, and let’s dive into this delightful recipe!

Why Sheet Pan Chicken Fajitas Are a Game-Changer

If you’ve ever made fajitas on the stovetop, you know the drill: sizzling chicken, tender vegetables, and a hot skillet. But the problem? It often turns into a juggling act, and the cleanup can feel like a chore! With sheet pan chicken fajitas, you get to skip the fuss and embrace the simplicity of a one-pan meal. Here’s why this method is a total game-changer:

  • Minimal Cleanup: Just one pan means fewer dishes to wash—an absolute win in my book!
  • Even Cooking: The oven provides consistent heat, ensuring that your chicken is perfectly cooked and your veggies are beautifully caramelized.
  • Perfect for Meal Prep: You can double the recipe and have leftovers that taste amazing throughout the week.
  • Hands-Off Cooking: While your fajitas are baking, you can prepare your favorite toppings or even whip up a quick guacamole!

Essential Ingredients for the Best Sheet Pan Fajitas

Warmly lit image featuring vibrant chicken fajitas on a sheet pan with tortillas and toppings.

Let’s talk about what makes these Sheet Pan Chicken Fajitas truly shine. The ingredients are simple but packed with flavor. Here’s what you’ll need:

  • 1 pound boneless, skinless chicken breasts, sliced
  • 1 red bell pepper, sliced
  • 1 yellow bell pepper, sliced
  • 1 red onion, sliced
  • 3 tablespoons olive oil
  • 2 teaspoons chili powder
  • 1 teaspoon cumin
  • 1 teaspoon garlic powder
  • 1 teaspoon onion powder
  • Salt and pepper to taste
  • Tortillas, for serving
  • Optional toppings: sour cream, avocado, cilantro, lime wedges

Each ingredient plays a crucial role. The chicken is tender and juicy, while the bell peppers and onions add a sweet crunch that balances the spices beautifully. And speaking of spices, our homemade seasoning blend is key to achieving that authentic fajita flavor!

Pro Tips for Restaurant-Quality Results

Ready to take your sheet pan chicken fajitas to the next level? Here are some pro tips I’ve picked up along the way:

  • Quality Ingredients: Fresh, vibrant veggies make all the difference. Choose firm bell peppers and crisp onions for maximum flavor and texture.
  • Don’t Overcrowd the Pan: Spreading the chicken and vegetables in a single layer ensures even cooking and that lovely caramelization.
  • Preheat Your Oven: Make sure your oven is fully preheated to 425°F (220°C) for optimal cooking results.
  • Custom Spice Levels: Feel free to adjust the spice levels! If you like a little kick, add a pinch of cayenne or some diced jalapeños to the mix.

Serving and Storage Guide

Once your Sheet Pan Chicken Fajitas are out of the oven and cooling slightly, it’s time to serve! Grab your warm tortillas and let everyone build their own fajitas. I love to lay out a spread of toppings that includes:

  • Sour cream for that creamy touch
  • Fresh avocado or guacamole for richness
  • Chopped cilantro for a burst of freshness
  • Lime wedges for a zesty finish

As for leftovers, simply store them in an airtight container in the fridge for up to three days. Reheat in the oven or microwave until heated through. And if you want to prep ahead, you can slice the chicken and vegetables up to 24 hours in advance and store them separately in the fridge.

Common Mistakes to Avoid

Even the best cooks can run into a few snags! Here are some common mistakes to avoid:

  • Overcooking the Chicken: Keep an eye on the clock! Chicken breasts are done when they reach an internal temperature of 165°F (74°C).
  • Using Soggy Vegetables: Make sure to slice your veggies uniformly for even cooking, and avoid overcrowding the pan.
  • Not Preheating the Oven: A preheated oven is crucial for achieving that perfect caramelization.

Easy Sheet Pan Chicken Fajitas Recipe

Ingredients

Now, let’s get to the good part—the recipe!

Instructions

  1. Preheat your oven to 425°F (220°C).
  2. In a large bowl, combine the sliced chicken, bell peppers, and onion.
  3. Drizzle with olive oil and sprinkle with chili powder, cumin, garlic powder, onion powder, salt, and pepper. Toss to coat evenly.
  4. Spread the mixture in a single layer on a sheet pan.
  5. Bake in the preheated oven for 20-25 minutes, until the chicken is cooked through and the vegetables are tender.
  6. Remove from the oven and let it cool slightly.
  7. Serve in warm tortillas and top with your favorite toppings.

Recipe FAQs

Can I make this recipe ahead of time?

Absolutely! You can prep all the ingredients up to 24 hours in advance. Just store them separately in the fridge until you’re ready to bake.

How can I prevent my vegetables from getting soggy?

Ensure your vegetables are cut uniformly and avoid overcrowding the pan. This allows them to roast rather than steam.

Can I use frozen peppers and onions?

While fresh is best, you can use frozen peppers and onions. Just be sure to thaw and pat them dry before adding them to the pan.

Can I make this recipe with shrimp instead of chicken?

Absolutely! Shrimp cooks faster than chicken, so reduce the baking time to about 8-10 minutes to prevent overcooking.

Wrap It Up!

Your kitchen is now filled with the enticing aroma of Sheet Pan Chicken Fajitas, and I can’t wait for you to dig in! This recipe isn’t just about feeding your family—it’s about creating moments of joy and connection around the dinner table. Whether you’re cooking for a crowd or just yourself, these fajitas are sure to become a favorite in your home.

As you gather around to enjoy this vibrant meal, remember that cooking is an adventure. Embrace the spills, the laughter, and the happy chaos of it all. I hope this dish brings a little warmth and magic into your week, just like it does in mine. Happy cooking, friends!

And if you’re looking for more delicious recipes, don’t miss my other favorites like Cheesy Garlic Chicken Wraps, Cozy Chicken and Potatoes, and Garlic Parmesan Chicken Pasta. Each recipe is crafted with love and a sprinkle of adventure!

Sheet Pan Chicken Fajitas

Prep Time 10 minutes
Cook Time 25 minutes
Total Time 35 minutes
Servings 4 servings
Calories 350
Enjoy flavorful and easy-to-make chicken fajitas baked on a sheet pan, perfect for a quick weeknight dinner.

Ingredients

Protein

  • 1 pound boneless, skinless chicken breasts, sliced

Vegetables

  • 1 red bell pepper, sliced red bell pepper
  • 1 yellow bell pepper, sliced yellow bell pepper
  • 1 red onion, sliced red onion

Seasonings & Oil

  • 3 tablespoons olive oil
  • 2 teaspoons chili powder
  • 1 teaspoon cumin
  • 1 teaspoon garlic powder
  • 1 teaspoon onion powder
  • to taste salt and pepper salt and pepper

For Serving

  • as needed tortillas tortillas
  • optional toppings sour cream, avocado, cilantro, lime wedges (for topping)

Instructions 

  • Preheat oven to 425°F (220°C).
  • Combine chicken, peppers, and onion; toss with oil and seasonings.
  • Spread on a sheet pan and bake for 20-25 minutes.
  • Let cool slightly, then serve in tortillas with toppings.

Notes

Use fresh ingredients for best flavor. Adjust seasonings to taste.
Calories: 350kcal
Cost: $15
Course: Main Course
Cuisine: Mexican
Keyword: Chicken, fajitas

Loved this recipe? Save it to your favorite Pinterest board so you can easily find it later! It’s the perfect way to keep all your sweet ideas in one place. ✨

Freshly cooked chicken fajitas with a mix of red and yellow bell peppers, served with tortillas.

Wrap Your Taste Buds in Comfort: Cheesy Garlic Chicken Delights Await!

Hello, dear friends! If you’re searching for a meal that feels like a warm embrace on a plate, look no further than these Cheesy Garlic Chicken Wraps. Imagine this: tender, shredded chicken mingling with creamy cheese and the intoxicating aroma of garlic, all snugly wrapped in a golden tortilla. It’s the kind of dish that makes you want to gather around the table and savor every bite. Let’s dive into this recipe that’s bound to become your new favorite comfort food!

Why You’ll Love These Cheesy Garlic Chicken Wraps

These wraps are absolute game-changers for busy weeknights or even lazy weekends. They come together in under 30 minutes, require minimal cleanup, and best of all—they’re packed with flavor! The combination of gooey mozzarella, creamy cream cheese, and zesty garlic creates a heavenly experience that will have your family begging for seconds. Plus, they’re versatile enough to adapt to picky eaters, making them perfect for meals for two picky eaters or even larger gatherings.

Ingredients for Cheesy Garlic Chicken Wraps

Delicious Cheesy Garlic Chicken Wraps showcasing ooey-gooey cheese and a warm tortilla, set against a blurred background.

Gathering the right ingredients is half the battle, and trust me, you probably have most of these in your pantry already. Here’s what you’ll need:

  • 2 cups cooked chicken, shredded
  • 1 cup shredded mozzarella cheese
  • 1/2 cup cream cheese, softened
  • 2 cloves garlic, minced
  • 1 teaspoon garlic powder
  • 1 teaspoon Italian seasoning
  • Salt and pepper to taste
  • 4 large flour tortillas
  • 1/4 cup chopped fresh parsley (for garnish)
  • Olive oil (for cooking)

Ingredient Substitutions

No worries if you’re low on something! Here are some easy swaps:

  • Use rotisserie chicken for a quicker option.
  • Swap mozzarella for cheddar or Monterey Jack if that’s what you have.
  • Greek yogurt can replace cream cheese for a lighter version.
  • Feel free to try whole wheat or gluten-free tortillas if you have dietary restrictions.

How to Make Cheesy Garlic Chicken Wraps

Step 1: Combine the Filling

In a large mixing bowl, combine the shredded chicken, mozzarella cheese, cream cheese, minced garlic, garlic powder, Italian seasoning, and a generous pinch of salt and pepper. Give it a good mix until everything is well incorporated. You want to see that beautiful, gooey mixture come together—trust me, it’s a sight to behold!

Step 2: Assemble the Wraps

Now, lay out your flour tortillas on a clean surface. Divide the cheesy chicken mixture evenly among the tortillas, placing it right in the center. Don’t be shy—this is where the magic happens! Fold the sides of the tortillas over the filling, then roll them up tightly from the bottom. You want those wraps snug and secure, ready for their sizzling debut.

Step 3: Cook the Wraps

Heat a large skillet over medium heat and add a drizzle of olive oil. Once the oil is shimmering, carefully place the wraps seam-side down in the skillet. Cook for 2-3 minutes on each side until they’re golden brown and crispy. You’ll hear that satisfying sizzle as they cook—music to any home cook’s ears! Once they’re done, remove them from the skillet and let them cool for a minute. This will help the cheese settle a bit, so it doesn’t ooze out when you slice them.

Tips for Perfect Cheesy Garlic Chicken Wraps

  • Don’t Overstuff: It’s tempting to pile on the filling, but less is more! About 1/3 cup of filling per wrap keeps everything together.
  • Warm Your Tortillas: A quick 10-second warm-up in the microwave makes them more pliable and easier to roll without cracking.
  • Use Fresh Garlic: Trust me, avoid the powdered stuff. Fresh garlic will elevate your wraps to a whole new level!
  • Get the Pan Hot: Preheating your skillet is crucial for that perfect golden sear.

Serving Suggestions

These wraps are delightful on their own, but a few simple sides can elevate your meal even further. Pair them with a crisp salad dressed with tangy vinaigrette, or serve alongside crispy tortilla chips and fresh salsa for a fun dippable experience. Roasted veggies or a side of sweet potato fries also complement these wraps beautifully. And let’s be honest, who wouldn’t enjoy a nice cold beer or a glass of sweet tea with this comforting dish?

Storage and Reheating

Now, let’s talk leftovers—if you have any! These wraps can be stored in an airtight container in the fridge for up to 2 days. When you’re ready to enjoy them again, skip the microwave if you can. Instead, warm them in a 350°F oven for about 10 minutes to restore that lovely crispy texture. If you’re in a rush, a hot skillet works wonders too—just flip them halfway through until heated through.

Nutritional Information

While I’m not a nutritionist, I can tell you that each wrap is a delightful balance of protein, carbohydrates, and cheesy goodness. Pair them with a large leafy green salad for an added nutritional boost. Plus, you control the ingredients, so feel free to lighten things up according to your preferences!

Frequently Asked Questions

Can I freeze these wraps?

Absolutely! These wraps freeze beautifully. Wrap them tightly in aluminum foil or plastic wrap before popping them in freezer bags. They’ll keep for up to 2 months. When you’re ready to enjoy, thaw overnight in the fridge, then reheat in the oven at 350°F for about 15 minutes. That cheese pull will still be worth the wait!

Can I make these wraps low-carb?

You bet! Swap regular tortillas for low-carb options or even use lettuce wraps for a refreshing twist. Adjust the filling by bumping up the chicken and cheese while reducing the cream cheese for a satisfying meal without the carbs.

How do I prevent soggy tortillas?

The key to avoiding soggy wraps is to spread the cream cheese filling first as a moisture barrier and ensure your chicken is not piping hot when you’re assembling. Let it cool a bit before wrapping.

Conclusion

And there you have it—Cheesy Garlic Chicken Wraps that are sure to become a staple in your kitchen. Each bite is a delightful mix of flavors and textures, and I guarantee they’ll have your family asking for them on repeat. Cooking should be fun, and these wraps are a testament to how simple ingredients can create something magical. So, pull up a chair, grab a spatula, and let’s make some delicious memories together. Happy cooking!

Cheesy Garlic Chicken Wraps: Your New Favorite Ooey-Gooey Comfort Food!

Prep Time 10 minutes
Cook Time 10 minutes
Total Time 20 minutes
Servings 4 servings
Calories 450
Indulge in these delicious cheesy garlic chicken wraps, packed with flavor and perfect for a quick, satisfying meal.

Ingredients

Protein

  • 2 cups cooked chicken, shredded
  • 1 cup shredded mozzarella cheese
  • 1/2 cup cream cheese, softened
  • 2 cloves garlic, minced
  • 1 teaspoon garlic powder
  • 1 teaspoon italian seasoning
  • to taste salt and pepper

Wraps

  • 4 large flour tortillas
  • 1/4 cup chopped fresh parsley (for garnish)
  • for cooking olive oil

Instructions 

  • Mix shredded chicken, mozzarella, cream cheese, garlic, seasonings, salt, and pepper.
  • Divide mixture onto tortillas, then fold and roll into wraps.
  • Heat oil in skillet, then cook wraps seam-side down for 2-3 minutes per side until golden.
  • Remove, cool slightly, slice, and garnish with parsley.
  • Serve warm and enjoy!

Notes

For extra flavor, add a dash of hot sauce or your favorite herbs.
Calories: 450kcal
Cost: $15
Course: Main Course
Cuisine: American
Keyword: cheese, Chicken, Wraps

Loved this recipe? Save it to your favorite Pinterest board so you can easily find it later! It’s the perfect way to keep all your sweet ideas in one place. ✨

A mouth-watering serving of Cheesy Garlic Chicken Wraps featuring chicken, mozzarella, and garlic, beautifully lit.

A Cozy Tater Tot Casserole That Will Steal Your Heart

Welcome to my kitchen, dear friends! Today, we’re diving into a dish that wraps you in a warm blanket of nostalgia—the ultimate Tater Tot Casserole. This isn’t just any casserole; it’s a hearty and comforting meal that brings back memories of family dinners, cozy evenings, and the simple joy of good food. If you’re craving a wholesome, satisfying meal that feels like a hug in a bowl, you’re in the right place. So, let’s roll up our sleeves and whip up this delicious Simple and Delicious Tater Tot Casserole Recipe!

Ingredients Overview

Before we get cooking, let’s take a quick peek at what you’ll need for this delightful casserole:

  • 1 pound ground beef
  • 1 can (15 oz) green beans, drained
  • 1 can (10.5 oz) cream of mushroom soup
  • 1 cup shredded cheddar cheese
  • 1 bag (32 oz) frozen tater tots
  • Salt and pepper to taste

See? Nothing too fancy here—just wholesome ingredients that come together to create a mouthwatering dish!

Step-by-Step Instructions

An appetizing Tater Tot Casserole with crispy tater tots on top, surrounded by a cozy kitchen backdrop.

Now that we’re all set, let’s get into the nitty-gritty of making this cozy casserole.

Step 1: Preheat the Oven

First things first, preheat your oven to 350°F (175°C). A properly heated oven is crucial for achieving that golden-brown, crispy topping we all love. While the oven warms up, let’s get our ingredients ready.

Step 2: Cook the Ground Beef

In a large skillet over medium heat, cook the ground beef until it’s beautifully browned. This should take about 7-10 minutes, and oh, the sizzle of the beef hitting the hot pan is music to my ears! Once it’s browned, drain off any excess fat to keep the dish from becoming too greasy. Add a sprinkle of salt and pepper while cooking to enhance the flavor.

Step 3: Combine the Ingredients

Once your beef is cooked to perfection, grab a mixing bowl and combine the beef, drained green beans, and cream of mushroom soup. Stir it all together until it’s a creamy, delicious mixture that makes your mouth water just looking at it. Don’t forget to taste and adjust the seasoning if necessary—maybe a bit more salt or pepper? Trust your taste buds!

Step 4: Spread in a Baking Dish

Lightly grease a 9×13 inch baking dish to prevent sticking, then spread the beef mixture evenly across the bottom. This is the foundation of our casserole, so even layering is key!

Step 5: Add the Cheese

Now for the best part—sprinkle that shredded cheddar cheese over the beef mixture. Use about one cup, and if you’re feeling adventurous, consider using a blend of cheeses for extra flavor. The melty goodness will make this dish even more irresistible!

Step 6: Arrange the Tater Tots

Take your frozen tater tots and arrange them in a single layer on top of the cheese. This is a great opportunity to get creative! You can arrange them in rows or a fun pattern, just make sure they’re not overlapping too much. We want each tot to get that crispy finish!

Step 7: Bake to Perfection

Place your casserole in the preheated oven and bake for 30-35 minutes. Keep an eye on it as the tater tots turn that gorgeous golden brown and the cheese melts into a gooey masterpiece. The aroma wafting through your kitchen will have everyone gathering around!

Step 8: Cool and Serve

Once it’s out of the oven, let the casserole cool for a few minutes. This helps the layers set, making it easier to serve. When ready, scoop out a generous portion, and watch as the cheese stretches with each serving. Isn’t that just delightful?

Variations and Customizations

One of the reasons I adore this Tater Tot Casserole is its versatility. Here are a few ways to make this dish uniquely yours:

  • Vegetable Additions: Want to sneak in some extra nutrients? Toss in some diced bell peppers, corn, or even some mushrooms before baking. You can never go wrong with more veggies!
  • Spice it Up: If you like a little heat, try adding some diced jalapeños or a sprinkle of cayenne pepper to the beef mixture.
  • Cheese Variations: Experiment with different types of cheese! Monterey Jack, mozzarella, or even pepper jack can add a fun twist.
  • Protein Swap: Not a fan of beef? Substitute with ground turkey, chicken, or even a meat alternative for a vegetarian version.

Tips for Perfect Tater Tot Casserole

Here are some tried-and-true tips to ensure your casserole turns out perfectly every time:

  • Don’t Skip the Drain: Be sure to drain the excess fat from the beef after cooking. This will keep your casserole from becoming too greasy.
  • Layering is Key: Make sure to layer your ingredients evenly for consistent cooking and flavor distribution.
  • Watch the Baking Time: Ovens can vary, so keep an eye on your casserole as it bakes. If the tater tots are browning too quickly, cover the dish loosely with foil.

Storage and Reheating

If you find yourself with leftovers (which is a big if, because it’s so good!), here’s how to store and reheat:

  • Storage: Allow the casserole to cool completely, then transfer it to an airtight container. It can be stored in the refrigerator for up to 3-4 days.
  • Freezing: You can freeze this casserole before baking it. Just assemble it in the baking dish, cover tightly, and freeze for up to 2 months. When you’re ready, bake it straight from the freezer, but add an extra 10-15 minutes to the cooking time.
  • Reheating: To reheat, simply pop it in a preheated oven at 350°F until heated through, about 20-25 minutes.

Frequently Asked Questions

Can I substitute the ground beef?

Absolutely! Ground turkey, chicken, or even a plant-based meat alternative works beautifully in this casserole.

What if I don’t have cream of mushroom soup?

No worries! You can use cream of chicken soup or even make a homemade cream sauce if you’re feeling adventurous.

Is this casserole kid-friendly?

Yes! Kids love the crispy tater tots and cheesy goodness. It’s a great way to sneak in some veggies too!

Final Thoughts

There you have it—a cozy Tater Tot Casserole that’s sure to become a family favorite! Whether you’re cooking for a crowd or just treating yourself to a comforting meal, this dish is always a winner. It’s simple, satisfying, and brings a sense of warmth to the dinner table. So, gather your loved ones, serve up generous portions, and enjoy the heartwarming flavors of this classic recipe.

Happy cooking, my friends! If you enjoyed this recipe, be sure to check out my wholesome chicken pasta recipe or my one-pan chicken and potatoes dish for more comfort food inspiration. Let’s make magic in the kitchen together!

Simple and Delicious Tater Tot Casserole Recipe

Prep Time 10 minutes
Cook Time 35 minutes
Total Time 45 minutes
Servings 6 servings
Calories 650
A comforting and easy-to-make casserole combining ground beef, green beans, creamy mushroom soup, cheese, and crispy tater tots.

Ingredients

Meat and Vegetables

  • 1 pound ground beef
  • 1 can (15 oz) green beans, drained
  • 1 can (10.5 oz) cream of mushroom soup

Cheese

  • 1 cup shredded cheddar cheese

Frozen Tater Tots

  • 1 bag (32 oz) frozen tater tots
  • to taste salt and pepper

Instructions 

  • Preheat oven to 350°F (175°C).
  • Cook ground beef until browned; drain excess fat.
  • Mix beef, green beans, soup, salt, and pepper.
  • Spread mixture in a greased 9x13 inch dish, top with cheese, then tater tots.
  • Bake for 30-35 minutes until golden and crispy.
  • Let cool briefly before serving.

Notes

For a healthier option, use low-fat cheese and reduce salt.
Calories: 650kcal
Cost: $15
Course: Main Course
Cuisine: American
Keyword: Tater Tots

Loved this recipe? Save it to your favorite Pinterest board so you can easily find it later! It’s the perfect way to keep all your sweet ideas in one place. ✨

A delicious Tater Tot Casserole displayed on a rustic table, featuring ground beef and green beans beneath a cheesy crust.

Cowboy Butter Chicken Linguine: A Whimsical Dinner in Under 30 Minutes

Ah, dinner time! That magical hour when the sun begins to set, and the kitchen fills with the comforting aromas of something delicious cooking away. If you’re like me, you know that after a long day, the last thing you want to do is spend hours in the kitchen. But what if I told you that you could whip up a delightful cowboy butter chicken linguine in just 30 minutes? Yes, you heard that right! This easy, comforting dish is perfect for busy nights when you need a taste of home without all the fuss.

Why You’ll Love Cowboy Butter Chicken Linguine

Let’s be honest: life can get hectic, and sometimes we just want a meal that feels special without requiring a culinary degree. This cowboy butter chicken linguine is just that! Picture this: tender chicken thighs coated in a creamy sauce that’s infused with the flavors of garlic, paprika, and a hint of heat from cayenne pepper. Add in juicy cherry tomatoes and fresh parsley, and you’ve got yourself a dinner that’s not just filling but also bursting with flavor.

This dish is versatile enough to cater to everyone at the table, whether you’re cooking for picky eaters or adventurous palates. The best part? It’s made with simple ingredients, making it a budget-friendly choice for those busy weeknights.

Cowboy Butter Chicken Linguine Ingredients

Mouthwatering cowboy butter chicken linguine garnished with parsley, shot from eye level.
  • 8 oz linguine
  • 2 tablespoons butter
  • 1 pound boneless, skinless chicken thighs, diced
  • 2 cloves garlic, minced
  • 1 teaspoon smoked paprika
  • 1 teaspoon onion powder
  • 1/2 teaspoon cayenne pepper
  • 1 cup heavy cream
  • 1 cup cherry tomatoes, halved
  • 1/2 cup fresh parsley, chopped
  • Salt and pepper to taste

How to Make Cowboy Butter Chicken Linguine

Ready to dive into this quick and delicious recipe? Let’s get cooking!

Step 1: Cook the Linguine

Start by bringing a large pot of salted water to a boil. Add your linguine and cook according to package instructions until al dente. This usually takes about 8-10 minutes. Once it’s perfectly tender, drain and set aside. Remember, don’t rinse the pasta! You want to keep that starch, which helps the sauce cling beautifully.

Step 2: Sauté the Chicken

In a large skillet, melt 2 tablespoons of butter over medium heat. The moment the butter starts to sizzle, it’s time to add the diced chicken thighs. Season them with smoked paprika, onion powder, cayenne pepper, salt, and pepper. Cook for about 5-7 minutes, stirring occasionally until the chicken is browned and cooked through. The smell of the spices and chicken sizzling will have your mouth watering!

Step 3: Add the Garlic

Once the chicken is cooked, stir in the minced garlic. Cook for an additional minute, just until the garlic becomes fragrant. Trust me, this is the part where your kitchen starts to feel like a cozy haven.

Step 4: Create the Sauce

Pour in the heavy cream, bringing the mixture to a gentle simmer. Let it bubble away for about 2-3 minutes until it thickens slightly. This is where the magic happens! The creamy sauce envelops the chicken, creating a luscious coating that’s perfect for the linguine.

Step 5: Combine with Pasta and Tomatoes

Now, toss in those cherry tomatoes and your cooked linguine. Gently mix everything together until the pasta is coated in that fabulous sauce. The juicy tomatoes will add a fresh burst of flavor that complements the richness beautifully.

Step 6: Finish with Fresh Parsley

Remove the skillet from heat and stir in the chopped fresh parsley. This adds a pop of color and freshness that brightens up the dish. And there you have it! Your cowboy butter chicken linguine is ready to be served. Plate it up, and watch as everyone gathers around the table, eager to dig in.

Tips for the Perfect Cowboy Butter Chicken Linguine

  • Use high-quality chicken: Opt for boneless, skinless chicken thighs as they’re juicier and more flavorful than breasts.
  • Don’t skip the spices: The smoked paprika and cayenne add depth and warmth to the dish. Adjust the cayenne to your spice preference!
  • Make it creamy: If you want an even creamier sauce, add a bit more heavy cream or a splash of pasta water to loosen it up.
  • Fresh herbs matter: Always use fresh parsley for the best flavor, but feel free to experiment with basil or cilantro if you have them on hand.

Variations and Substitutions

Cooking is all about creativity! If you want to switch things up, here are a few ideas:

  • Protein swaps: Try using shrimp or even tofu for a vegetarian option. Just adjust the cooking time accordingly.
  • Pasta choices: While linguine is perfect, any pasta like fettuccine or even whole wheat options will work.
  • Vegetable add-ins: Sauté some spinach or zucchini along with the chicken for a nutritious boost.

Storage & Freezing

If you have leftovers (though I doubt you will!), store them in an airtight container in the fridge for up to 3 days. Reheat gently on the stove or in the microwave, adding a splash of cream or broth to bring back that creamy texture.

For freezing, let the dish cool completely, then transfer to a freezer-safe container. It will keep for up to 2 months. To enjoy, thaw overnight in the fridge and reheat on the stove.

Frequently Asked Questions

Can I use chicken breasts instead of thighs?

Absolutely! Just remember that breasts can dry out quicker, so keep an eye on them while cooking.

What can I substitute for heavy cream?

If you’re looking for a lighter option, try half-and-half or a plant-based cream for a dairy-free version.

How do I make this dish spicier?

Feel free to increase the cayenne pepper or add a pinch of red pepper flakes for an extra kick!

Can I make this dish ahead of time?

While it’s best enjoyed fresh, you can prep the ingredients in advance and cook it just before serving.

Get Cooking!

So there you have it! A delightful cowboy butter chicken linguine that’s not only quick and easy but also a meal that brings everyone together, creating those cherished moments around the dinner table. Cooking doesn’t have to be complicated to be delicious, and this recipe is a perfect testament to that. Whether you’re cooking for your family or impressing friends, this dish is sure to leave a lasting impression.

Now, if you’re ready to make something unforgettable, grab your spatula and let’s get cooking! And who knows, this might just become your new go-to recipe when you need a little magic in your kitchen. Happy cooking!

For more delicious inspiration, check out my recipes like Wok This Way: The Easy Chicken Lo Mein Recipe That Brings Joy to Your Table or The Simple Garlic Parmesan Chicken Pasta That Always Brightens My Day.

Hungry for dinner now? This cowboy butter chicken linguine recipe is so super easy and ready in just 30 minutes… in 2025

Prep Time 10 minutes
Cook Time 20 minutes
Total Time 30 minutes
Servings 4 servings
Calories 650
A quick and flavorful chicken linguine dish with a spicy, creamy sauce, perfect for a satisfying dinner in under 30 minutes.

Ingredients

Pasta

  • 8 oz linguine
  • 2 tablespoons butter
  • 1 pound boneless, skinless chicken thighs, diced
  • 2 cloves garlic, minced
  • 1 teaspoon smoked paprika
  • 1 teaspoon onion powder
  • 1/2 teaspoon cayenne pepper
  • 1 cup heavy cream
  • 1 cup cherry tomatoes, halved
  • 1/2 cup fresh parsley, chopped
  • to taste salt and pepper

Instructions 

  • Cook linguine according to package; drain.
  • Melt butter in a skillet over medium heat.
  • Add chicken, season with spices, cook until browned, 5-7 mins.
  • Stir in garlic, cook 1 min.
  • Add cream, simmer 2-3 mins until thickened.
  • Mix in tomatoes and linguine, toss, then stir in parsley. Serve.

Notes

Adjust seasoning to taste and enjoy!
Calories: 650kcal
Cost: $15
Course: Main Course
Cuisine: American
Keyword: Chicken, pasta, quick

Loved this recipe? Save it to your favorite Pinterest board so you can easily find it later! It’s the perfect way to keep all your sweet ideas in one place. ✨

A vibrant bowl of cowboy butter chicken linguine featuring creamy sauce and fresh ingredients.