Author

Ava

Browsing

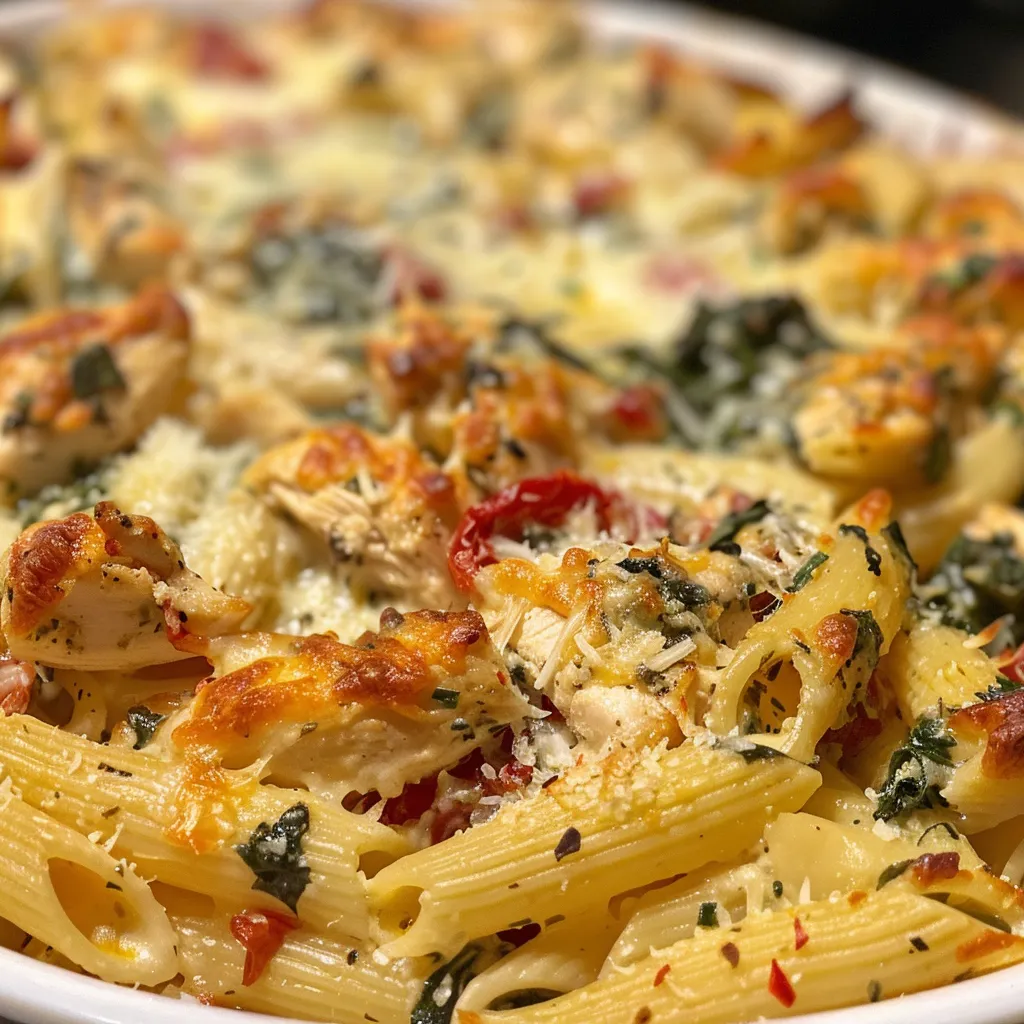
Discover the Magic of Tuscan Chicken Pasta Bake

Welcome to my kitchen, dear friend! If you’re here, it’s because you’re on the hunt for a recipe that doesn’t just fill bellies but warms hearts. Grab your apron and let’s dive into this delightful Tuscan Chicken Pasta Bake. Trust me, this dish is about to become your new favorite!

With the irresistible flavors of sun-dried tomatoes and creamy sauce, this pasta bake is perfect for family gatherings or a cozy night in. So, let’s get cooking!

Why You’ll Love This Recipe

  • Comforting Flavors: This recipe combines rich Tuscan flavors with creamy textures, making each bite feel like a warm hug.
  • Quick Preparation: In less than an hour, you can have this delicious meal ready to serve, perfect for weeknight dinners.
  • Family-Friendly: Kids and adults alike will love the combination of chicken and pasta, making it a great dish for the whole family.
  • Customizable: With simple ingredient swaps, you can make this recipe your own and cater to various dietary preferences.
  • Leftover Friendly: This dish reheats beautifully, so you can enjoy the leftovers as a quick lunch or dinner throughout the week.

Ingredients Breakdown

Let’s take a closer look at the star players in this Tuscan Chicken Pasta Bake:

  • Penne Pasta: 12 ounces (340 g) – You can substitute it with gluten-free pasta if needed.
  • Olive Oil: 1 tablespoon – This adds a lovely flavor and helps cook the chicken.
  • Chicken Breasts: 1 pound (450 g), cut into bite-sized pieces – Feel free to use rotisserie chicken for a quicker option.
  • Seasoning: Salt (1/2 teaspoon), black pepper (1/4 teaspoon), garlic powder (1/2 teaspoon) – Essential for flavoring the chicken.
  • Unsalted Butter: 3 tablespoons (42 g) – For a rich, creamy sauce.
  • Garlic: 3 cloves, minced – Because garlic makes everything better!
  • All-Purpose Flour: 3 tablespoons (24 g) – Helps thicken the sauce.
  • Chicken Broth: 2 cups (480 ml) – Adds depth to the sauce.
  • Heavy Cream: 1 cup (240 ml) – This makes the sauce luxuriously creamy.
  • Parmesan Cheese: 1 cup (100 g) – The perfect melty topping.
  • Italian Seasoning: 1 teaspoon – A blend of herbs that enhances the Tuscan flavor.
  • Sun-Dried Tomatoes: 1/2 cup (60 g), drained and chopped – Adds a sweet, tangy flavor.
  • Fresh Spinach: 3 cups (90 g) – For a pop of color and nutrition!
  • Shredded Mozzarella Cheese: 1 1/2 cups (150 g) – The gooey topping that makes this bake irresistible.
  • Extra Parmesan Cheese: 1/4 cup (25 g) – Because you can never have too much cheese!

How to Make Tuscan Chicken Pasta Bake

Side angle of a creamy pasta dish featuring chicken, spinach, and sun-dried tomatoes topped with melted mozzarella.

Are you ready to create this delicious masterpiece? Let’s get started!

  1. Preheat your oven to 375°F (190°C). Lightly grease a 9×13-inch baking dish.
  2. Cook the pasta in salted boiling water until just al dente, about 1 to 2 minutes less than package directions. Drain and set aside.
  3. In a large skillet over medium heat, heat the olive oil. Season the chicken with salt, pepper, and garlic powder. Cook for 5 to 6 minutes, stirring occasionally until golden and cooked through. Remove to a plate.
  4. In the same skillet, melt the butter. Add minced garlic and cook for 1 minute until fragrant. Stir in flour and cook for another minute.
  5. Gradually whisk in the chicken broth, then the heavy cream. Bring to a gentle simmer and cook until slightly thickened, about 3 to 4 minutes.
  6. Stir in Parmesan, Italian seasoning, sun-dried tomatoes, and spinach. Cook until the spinach wilts.
  7. Add the cooked pasta and chicken to the sauce, tossing to coat evenly. Transfer to the prepared baking dish.
  8. Sprinkle mozzarella and additional Parmesan over the top. Bake uncovered for 20 to 25 minutes until bubbly and golden.
  9. Let stand for 5 minutes before serving. Enjoy!

Pro Tips for Perfection

  • Don’t Overcook the Pasta: To avoid mushy pasta, cook it just short of al dente.
  • Use Fresh Ingredients: The fresher the ingredients, the more vibrant the flavors!
  • Experiment with Cheese: Try different cheeses like gouda or fontina for unique flavor twists.
  • Adjust the Creaminess: If you prefer a lighter dish, reduce the amount of heavy cream or substitute with half-and-half.
  • Make it Spicy: Add a pinch of red pepper flakes for a little heat.
  • Layer Flavors: Feel free to sauté onions or mushrooms along with the garlic for added depth.
  • Garnish Wisely: Fresh basil or parsley sprinkled on top before serving adds a fresh touch.
  • Check for Seasoning: Always taste your sauce before adding the pasta; adjust salt and pepper as needed.

Common Mistakes and Troubleshooting

  • Overbaking: Keep an eye on your pasta bake to prevent it from becoming dry.
  • Too Much Sauce: If the sauce is too runny, let it simmer longer to thicken.
  • Lack of Flavor: Don’t be shy with seasonings; taste and adjust as you go!
  • Undercooked Chicken: Ensure your chicken is cooked to an internal temperature of 165°F (74°C).

Variations on the Classic

Feel free to mix things up with these fun variations!

  • Vegetarian Version: Substitute chicken with roasted vegetables like zucchini, bell peppers, and eggplant.
  • Spicy Kick: Add diced jalapeños or a splash of your favorite hot sauce for heat.
  • Seafood Delight: Swap chicken for shrimp or scallops for a delightful ocean twist.
  • Whole Wheat Option: Use whole wheat pasta for a healthier alternative.

Storage and Make-Ahead Instructions

This Tuscan Chicken Pasta Bake is perfect for meal prep!

  • Refrigerate: Store leftovers in an airtight container in the fridge for up to 4 days.
  • Freeze: You can freeze the uncooked pasta bake for up to 3 months. Just assemble it and cover tightly before freezing.
  • Reheat: To reheat, thaw in the fridge overnight and bake at 350°F (175°C) until heated through.

Frequently Asked Questions

Here are some common questions I get about this recipe:

  • Can I use other types of pasta? Absolutely! Any pasta shape works, but ensure it’s similar in cooking time.
  • Is this recipe gluten-free? Yes, just swap out the regular pasta for a gluten-free option.
  • Can I make this in advance? Yes, you can prepare it a day ahead and bake it when ready to serve.
  • What can I serve with this dish? A simple side salad or garlic bread complements the meal perfectly.
  • Can I add more vegetables? Definitely! Broccoli, bell peppers, or peas would be great additions.
  • How do I know when it’s done? Look for bubbly, golden cheese on top and a gentle simmer in the sauce.
  • Is it okay to use frozen chicken? Yes, but ensure it’s fully thawed before cooking for even results.
  • What’s the best way to reheat leftovers? The oven is best for even reheating, but the microwave works in a pinch!

Nutrition Tips and Dietary Adaptations

This dish can be made healthier with a few simple adjustments:

  • Lean Protein: Use grilled chicken or turkey for a leaner option.
  • Low-Fat Dairy: Opt for low-fat cream and cheese to reduce calories.
  • Increase Fiber: Add legumes like chickpeas for added fiber and protein.

Equipment Recommendations

Here’s what you’ll need to whip up this delicious Tuscan Chicken Pasta Bake:

  • Large Skillet: For cooking chicken and making the sauce.
  • Baking Dish: A 9×13-inch dish is perfect for this recipe.
  • Pasta Pot: A large pot for boiling the pasta.

Serving Suggestions

To elevate your dining experience, consider these serving ideas:

  • Fresh Salad: A simple arugula salad with lemon vinaigrette adds a refreshing contrast.
  • Garlic Bread: Serve with warm, crusty garlic bread for a comforting touch.
  • Wine Pairing: A light Pinot Grigio complements the flavors beautifully.

Conclusion

And there you have it! This Tuscan Chicken Pasta Bake is not just a meal; it’s an experience—a way to bring loved ones together around the table. I hope this recipe inspires you to create something magical in your kitchen. Remember, cooking is about joy and sharing, so don’t hesitate to make it your own. Thank you for joining me on this culinary adventure. Now, go forth and bake something wonderful!

Tuscan Chicken Pasta Bake

Prep Time 15 minutes
Cook Time 30 minutes
Total Time 45 minutes
Servings 6 servings
Calories 650
A creamy, cheesy baked pasta dish with tender chicken, sun-dried tomatoes, and spinach, perfect for a comforting dinner.

Ingredients

For the pasta and chicken

  • 12 ounces penne pasta
  • 1 tablespoon olive oil
  • 1 pound boneless, skinless chicken breasts
  • 1/2 teaspoon salt
  • 1/4 teaspoon black pepper
  • 1/2 teaspoon garlic powder

For the sauce

  • 3 tablespoons unsalted butter
  • 3 cloves garlic, minced
  • 3 tablespoons all-purpose flour
  • 2 cups chicken broth
  • 1 cup heavy cream
  • 1 cup grated Parmesan cheese
  • 1 teaspoon Italian seasoning
  • 1/2 cup sun-dried tomatoes, drained and chopped
  • 3 cups fresh spinach

For topping

  • 1 1/2 cups shredded mozzarella cheese
  • 1/4 cup grated Parmesan cheese

Instructions 

  • Preheat oven to 375°F (190°C) and grease a 9×13-inch baking dish.
  • Cook pasta until al dente, drain, and set aside. Cook chicken with seasonings until golden, then remove.
  • Make sauce by melting butter, cooking garlic, then whisking in flour, broth, and cream. Add Parmesan, sun-dried tomatoes, and spinach; cook until spinach wilts.
  • Combine pasta and chicken with sauce, transfer to baking dish, top with cheeses, and bake for 20-25 minutes until bubbly and golden.
  • Let stand 5 minutes before serving.

Notes

For a lighter version, use less cheese or substitute with low-fat options.
Calories: 650kcal
Cost: $15
Course: Main Course
Cuisine: Italian
Keyword: bake, Chicken, pasta

Why You’ll Adore This Dish

If you’re looking for a meal that feels like a warm hug after a long day, let me introduce you to my Honey Garlic Salmon Rice Bowl. Imagine this: tender salmon fillets cooked to perfection, bathed in a sweet and savory honey garlic sauce, all served over fluffy jasmine rice with vibrant steamed broccoli. It’s a symphony of flavors and textures that can easily turn a mundane weeknight dinner into a special occasion.

Growing up, my family always gathered around the kitchen table, sharing stories and laughter over delicious meals. This recipe encapsulates that spirit of togetherness. It’s simple enough for a quick dinner but elevated enough to impress guests. Plus, it’s versatile! You can swap ingredients based on what you have on hand, making it a true weeknight hero.

Ingredients You’ll Need

Let’s gather our ingredients for this delightful dish. Here’s what you’ll need:

  • 2 salmon fillets (about 6 ounces each)
  • 1 cup jasmine rice
  • 2 tablespoons honey
  • 2 tablespoons soy sauce
  • 2 cloves garlic, minced
  • 1 tablespoon olive oil
  • 1 teaspoon sesame oil
  • 1 cup steamed broccoli (fresh or frozen)
  • 1 green onion, chopped
  • Sesame seeds for garnish

Step-by-Step Cooking Instructions

A delicious Honey Garlic Salmon Rice Bowl featuring salmon, rice, and garnishes in soft natural light.

Now that we have everything we need, let’s dive into the cooking process. Trust me, this Honey Garlic Salmon Rice Bowl is going to be your new favorite!

  1. Rinse the Rice: Start by rinsing the jasmine rice under cold water until the water runs clear. This step is crucial for removing excess starch, ensuring fluffy rice. Just imagine the clouds of fluffy goodness waiting for you!
  2. Cook the Rice: Prepare the rice according to the package instructions. Typically, it’s a 1:1 ratio of rice to water, but feel free to check the specific directions on your bag.
  3. Create the Sauce: While the rice is cooking, mix together the honey, soy sauce, and minced garlic in a small bowl. This sauce is the magic that brings everything together, so don’t be shy with your whisking!
  4. Heat the Pan: In a skillet, heat the olive oil over medium heat. Once it shimmers, it’s time to add the star of the show—our salmon fillets!
  5. Cook the Salmon: Place the salmon fillets skin-side down in the pan and let them cook for about 4-5 minutes. Resist the urge to move them around; they need that undisturbed time to form a lovely crust.
  6. Flip and Sauce: Carefully flip the salmon fillets and pour the honey garlic sauce over them. Cook for another 3-4 minutes, spooning the sauce over the top occasionally until the salmon is cooked through and the sauce is beautifully caramelized.
  7. Fluff the Rice: Once the rice is done, fluff it with a fork and stir in the sesame oil. This adds a nutty aroma that pairs perfectly with the other flavors.
  8. Assemble the Bowls: To put it all together, place a generous portion of rice at the bottom of each bowl. Top with the salmon, steamed broccoli, and finish with a sprinkle of chopped green onions and sesame seeds. Voila, dinner is served!

Tips for the Perfect Bowl

Here are a few tips to elevate your cooking experience:

  • Fresh Ingredients: Whenever possible, use fresh garlic and high-quality honey for the best flavor.
  • Cook to Your Preference: Salmon is best when slightly pink in the middle. If you prefer it more well-done, just extend the cooking time a couple of minutes.
  • Experiment with Vegetables: Broccoli is fantastic, but feel free to switch it up with snap peas, bell peppers, or even bok choy for a colorful twist!

Variations You Can Try

This recipe is wonderfully adaptable. Here are some variations to keep things exciting:

  • Chili Garlic Salmon: Add a teaspoon of chili flakes to the sauce for a spicy kick.
  • Citrus Twist: Incorporate the zest of a lemon or lime into the sauce for a refreshing brightness.
  • Grain Swap: Use quinoa or brown rice instead of jasmine rice for a different texture and flavor.

Substitutions for Dietary Needs

If you have specific dietary restrictions, here are some easy substitutions:

  • Gluten-Free: Replace soy sauce with tamari or coconut aminos.
  • Vegan Option: Substitute the salmon with tofu or chickpeas and use maple syrup instead of honey.
  • Low-Carb: Serve the salmon over cauliflower rice instead of jasmine rice for a lighter option.

Essential Equipment

Before you start cooking, make sure you have the following equipment handy:

  • Skillet: A non-stick skillet helps achieve that beautiful sear on the salmon.
  • Pot: For cooking the rice, a medium-sized pot with a lid is essential.
  • Mixing Bowl: To whisk together your honey garlic sauce.
  • Measuring Cups and Spoons: For precise ingredient measurements.

Storage and Freezing

Have leftovers? Here’s how to store this delicious dish:

  • Refrigerate: Store in an airtight container in the fridge for up to 3 days. Reheat in the microwave or on the stovetop.
  • Freeze: Cooked salmon can be frozen for up to 2 months. However, it’s best to cook the rice fresh for optimal texture.

Frequently Asked Questions

Here are some common questions about this recipe:

  • Can I use frozen salmon? Yes! Just make sure to thaw it completely before cooking.
  • What if I don’t have jasmine rice? No problem! You can use any type of rice you prefer, though cooking times may vary.
  • Can I double the recipe? Absolutely! This recipe scales well for larger gatherings—just be mindful of your cooking equipment!

Troubleshooting Tips

If you run into any issues while cooking, here are some troubleshooting tips:

  • Salmon Sticking to the Pan: Ensure your skillet is hot enough and use enough oil to prevent sticking.
  • Too Salty: If the sauce ends up too salty, add a splash of water or a bit more honey to balance it out.
  • Rice Not Cooking Properly: If your rice is still hard after the suggested cooking time, add a bit more water and continue cooking with the lid on.

Conclusion

And there you have it! My Honey Garlic Salmon Rice Bowl—a dish that’s sure to become a staple in your home. It’s not just about the ingredients; it’s about the memories you’ll create while cooking and sharing this meal with loved ones. Whether you’re treating yourself to a cozy night in or gathering friends for dinner, this recipe has got your back. So, roll up those sleeves, put on your favorite playlist, and let’s make some magic happen in the kitchen! Enjoy every bite and don’t forget to share your creations with me—I love seeing your culinary adventures!

Honey Garlic Salmon Rice Bowl

Prep Time 10 minutes
Cook Time 15 minutes
Total Time 25 minutes
Servings 2 servings
Calories 550
A flavorful and easy-to-make rice bowl featuring tender salmon glazed with honey garlic sauce, served with steamed broccoli and rice.

Ingredients

Protein

  • 2 pieces salmon fillets

Grains

  • 1 cup jasmine rice

Sauces & Condiments

  • 2 tablespoons honey
  • 2 tablespoons soy sauce
  • 2 cloves garlic, minced

Oils

  • 1 tablespoon olive oil
  • 1 teaspoon sesame oil

Vegetables

  • 1 cup steamed broccoli
  • 1 green onion chopped green onion
  • sesame seeds for garnish sesame seeds

Instructions 

  • Cook rice according to package instructions.
  • Mix honey, soy sauce, and minced garlic to make the sauce.
  • Cook salmon in olive oil 4-5 minutes per side, then add sauce and cook until caramelized.
  • Fluff rice with sesame oil. Assemble bowls with rice, salmon, broccoli, and garnish with green onions and sesame seeds.

Notes

For extra flavor, marinate the salmon briefly before cooking.
Calories: 550kcal
Cost: $15
Course: Main Course
Cuisine: Asian
Keyword: Salmon

Loved this recipe? Save it to your favorite Pinterest board so you can easily find it later! It’s the perfect way to keep all your sweet ideas in one place. ✨

Eye-level shot of a Honey Garlic Salmon Rice Bowl with vibrant ingredients and a blurred background.

Why You’ll Love This Dish

Picture this: it’s a chilly evening, and you’ve just come home after a long day. All you want is something warm and comforting to wrap your taste buds around. Enter my Ultimate Creamy Parmesan Chicken with Penne. This dish is like a big, cozy hug on a plate, combining tender chicken, al dente penne, and a rich, creamy sauce that will have you going back for seconds (and maybe thirds!).

This recipe is not just a meal; it’s an experience. It’s the kind of comfort food that makes everything feel right in the world, even if just for a moment. Plus, it’s incredibly easy to make, so whether you’re a busy college student looking for easy college dinners or a parent trying to whip up something quick and delicious, you’re in the right place!

Ingredients You’ll Need

To create this culinary masterpiece, gather the following ingredients:

  • 8 oz penne pasta
  • 2 boneless, skinless chicken breasts
  • 2 tablespoons olive oil
  • 1 cup heavy cream
  • 1 cup grated parmesan cheese
  • 2 cloves garlic, minced
  • 1 teaspoon Italian seasoning
  • Salt and pepper to taste
  • Fresh parsley, chopped (for garnish)

Getting Started: Cooking Steps

A delicious plate of creamy parmesan chicken and penne, garnished with fresh parsley.

Now that you have your ingredients lined up and ready to go, let’s dive into the cooking process!

  1. First things first, cook the penne pasta according to the package instructions. You want it al dente, so don’t forget to taste it a minute or two before the timer goes off. Once done, drain and set aside.
  2. While the pasta is cooking, take your chicken breasts and season them generously with salt and pepper. This simple step is crucial for flavor.
  3. In a large skillet, heat the olive oil over medium heat. Once hot, add the seasoned chicken breasts. Cook for about 6-7 minutes on each side until they are golden brown and cooked through. Once done, remove them from the skillet and let them rest for a few moments.
  4. In the same skillet, throw in the minced garlic and sauté for about a minute. You want it fragrant but not burnt—trust me, burnt garlic is not your friend!
  5. Now, pour in the heavy cream and bring it to a gentle simmer. This is where the magic starts to happen. Stir in the grated Parmesan cheese and Italian seasoning, mixing until the cheese is melted and the sauce is beautifully smooth.
  6. Next, slice the rested chicken and add it back into the creamy sauce, along with the cooked penne pasta. Toss everything together until well coated in that luscious sauce.
  7. Serve immediately, garnished with fresh parsley for a pop of color and freshness.

Tips for Success

To make sure your creamy Parmesan chicken turns out perfect every time, here are a few handy tips:

  • Don’t Rush the Sauce: Allow the cream to simmer gently. This will enhance its flavors and help it thicken properly.
  • Season Smart: Taste as you go! Adjust the salt and pepper to your liking.
  • Fresh Ingredients Matter: Whenever possible, use freshly grated Parmesan cheese rather than pre-grated. It melts better and has a richer flavor.

Variations to Try

Feeling adventurous? Here are some fun variations to customize your creamy chicken dish:

  • Add Vegetables: Toss in some spinach, sun-dried tomatoes, or peas for added nutrition and color.
  • Swap the Pasta: Don’t have penne? No problem! Any pasta shape will do—farfalle, fusilli, even spaghetti!
  • Spice It Up: For a little kick, add red pepper flakes or a pinch of cayenne pepper to the sauce.

Substitutions You Can Make

If you’re missing an ingredient or two, here are some substitutions you can try:

  • Chicken: Use boneless turkey breasts or even shrimp for a seafood twist!
  • Heavy Cream: Substitute with half-and-half or whole milk for a lighter version, but keep in mind the sauce may not be as creamy.
  • Italian Seasoning: If you don’t have this on hand, a mix of dried basil, oregano, and thyme works just as well.

Essential Equipment

Before you start cooking, make sure you have the following kitchen tools:

  • A large pot for boiling pasta
  • A large skillet for sautéing
  • A sharp knife and cutting board for slicing chicken
  • A wooden spoon for stirring

Storage and Freezing Tips

If you find yourself with leftovers (and trust me, you will want them!), here’s how to store them:

  • Refrigerate: Store leftovers in an airtight container in the fridge for up to 3 days.
  • Freeze: You can freeze the creamy chicken dish for up to 2 months. Just make sure to thaw it in the fridge overnight before reheating.

FAQs About This Recipe

Here are some common questions I get about this creamy delight:

  • Can I make this dish ahead of time? Absolutely! Just prepare as directed and reheat on the stove when ready to serve.
  • Is this recipe kid-friendly? Yes! Kids love the creamy sauce and the pasta. You can even get them involved in the cooking process!
  • What should I serve with this dish? A simple green salad or some garlic bread pairs wonderfully with this creamy pasta.

Troubleshooting Common Issues

If things don’t go as planned, here are some tips to save your dish:

  • Too Thick Sauce: If your sauce is too thick, simply add a splash of chicken broth or water to loosen it up.
  • Too Thin Sauce: If it’s too thin, let it simmer a bit longer to thicken up.
  • Overcooked Chicken: If you accidentally overcook the chicken, slice it thinly and toss it in the sauce—it’ll still be delicious!

Wrapping It Up

And there you have it—my Ultimate Creamy Parmesan Chicken with Penne, a dish that’s bound to become a new favorite in your household. Whether you’re enjoying it on a cozy night in or impressing friends at a dinner party, this recipe is sure to bring joy and comfort to your table.

So, grab your ingredients, throw on your favorite apron, and let’s create a little magic in the kitchen! Remember, cooking isn’t just about the food; it’s about the love and laughter that we share around the dinner table. Happy cooking, my friends!

Ultimate Creamy Parmesan Chicken with Penne – Easy Recipe Digital Download

Prep Time 10 minutes
Cook Time 20 minutes
Total Time 30 minutes
Servings 4 servings
Calories 650
This creamy Parmesan chicken with penne is a quick and delicious meal perfect for weeknights. Rich, cheesy, and satisfying, it combines tender chicken with a flavorful sauce.

Ingredients

Pasta

  • 8 oz penne pasta

Chicken

  • 2 pieces boneless, skinless chicken breasts

Oil

  • 2 tablespoons olive oil

Cream

  • 1 cup heavy cream

Cheese

  • 1 cup grated parmesan cheese

Garlic

  • 2 cloves garlic, minced

Seasoning

  • 1 teaspoon italian seasoning

Salt and Pepper

  • to taste salt and pepper

Garnish

  • for garnish fresh parsley, chopped

Instructions 

  • Cook the penne pasta according to package instructions. Drain and set aside.
  • Season chicken with salt and pepper. Cook in a skillet with olive oil for 6-7 minutes per side. Rest and slice.
  • Sauté minced garlic in the same skillet for 1 minute. Add heavy cream, Parmesan, and Italian seasoning. Simmer until smooth.
  • Add sliced chicken and cooked pasta to the sauce. Toss to coat and serve garnished with parsley.

Notes

For a lighter version, use half-and-half instead of heavy cream.
Calories: 650kcal
Cost: $15
Course: Main Course
Cuisine: Italian
Keyword: cheese, Chicken, pasta

Loved this recipe? Save it to your favorite Pinterest board so you can easily find it later! It’s the perfect way to keep all your sweet ideas in one place. ✨

Eye-level shot of creamy chicken with penne pasta, showcasing texture and ingredients.

Why You’ll Love This Delightful Dish

Imagine sinking your teeth into a bowl that not only satisfies your hunger but also dances on your taste buds with a symphony of sweet and savory notes. Honey Glazed Salmon Rice Bowls are just that—a delightful medley of flavors and textures that come together to create a comforting and nourishing meal. Whether you’re a busy parent looking for a quick dinner solution or someone who enjoys cooking after a long day, this recipe is a game-changer. It’s not just about eating; it’s about the joy of sharing a meal that warms the heart and brings loved ones together.

This dish comes together in under 30 minutes, making it perfect for those weeknights when the clock is ticking, and you still want to impress. The caramelized salmon, with its sweet honey glaze, pairs beautifully with the fluffy jasmine rice and vibrant vegetables. Plus, it’s versatile enough to accommodate various dietary preferences, which makes it a go-to option for family dinners.

A Sweet and Savory Symphony of Ingredients

Before we dive into the cooking process, let’s gather our ingredients. Here’s what you’ll need to create these scrumptious Honey Glazed Salmon Rice Bowls:

  • 2 salmon fillets – Fresh and high-quality salmon is key!
  • 2 tablespoons honey – For that sweet, sticky glaze.
  • 1 tablespoon soy sauce – Adds depth and umami flavor.
  • 1 teaspoon sesame oil – A hint of nuttiness.
  • 1 cup cooked jasmine rice – The perfect base for your bowl.
  • 1 cup steamed broccoli – For a crunchy, nutritious addition.
  • 1 carrot, julienned – A pop of color and sweetness.
  • 1 tablespoon sesame seeds – For a delightful crunch.
  • 2 green onions, chopped – A fresh herbaceous finish.
  • Salt and pepper to taste – To season your salmon.

How to Create Your Honey Glazed Salmon Rice Bowls

Delicious honey glazed salmon fillets served over jasmine rice with colorful vegetables.

Now that we have everything ready, let’s embark on this culinary adventure! Follow these simple steps to whip up a dish that will make your taste buds sing.

Step 1: Whisk the Honey Mixture

In a small bowl, combine the honey, soy sauce, sesame oil, and a pinch of salt and pepper. This sweet and savory glaze is what makes the salmon shine, so take a moment to whisk it well until everything is blended.

Step 2: Preheat Your Skillet

Next, heat a skillet over medium heat. It’s important to get the skillet nice and warm before adding the salmon to ensure a lovely caramelization. If you want to be sure it’s hot enough, a drop of water should sizzle when it hits the pan.

Step 3: Cook the Salmon

Once your skillet is ready, place the salmon fillets skin-side down. Carefully pour the honey mixture over the salmon, making sure it coats the fish evenly. Cook for about 4-5 minutes without moving it. This will allow the skin to crisp up nicely!

Step 4: Flip and Finish

After 4-5 minutes, gently flip the salmon using a spatula. Cook for an additional 4-5 minutes or until the salmon is cooked through and beautifully caramelized. The honey glaze will create a shiny crust that’s simply irresistible.

Step 5: Prepare Your Veggies

While the salmon is cooking, let’s multitask! Steam your broccoli until it’s bright green and tender yet still crisp. It usually takes about 4-5 minutes. At the same time, you can prepare your julienned carrots. They add a nice crunch and sweetness to the dish.

Step 6: Assemble the Bowls

Now, it’s time to bring everything together! In a bowl, layer a generous scoop of the cooked jasmine rice. Top it with the steamed broccoli and julienned carrots. Finally, place the glazed salmon on top of this beautiful veggie and rice bed.

Step 7: Garnish and Serve

Finish off your bowls by sprinkling them with sesame seeds and chopped green onions. These little touches not only add flavor but also make your meal look extra appealing. It’s all about the presentation!

Tips for Success

To ensure your Honey Glazed Salmon Rice Bowls turn out perfectly every time, keep these tips in mind:

  • Choose Fresh Salmon: Fresh ingredients make a significant difference. Opt for wild-caught if possible for better flavor.
  • Don’t Overcook: Keep an eye on the salmon to avoid drying it out. It should flake easily with a fork but still be moist.
  • Customize Your Veggies: Feel free to swap out the broccoli and carrots for your favorite vegetables like snap peas, bell peppers, or even zucchini.
  • Make it Ahead: You can prep the salmon and veggies ahead of time and cook them just before serving for a quick weeknight dinner.

Variations to Explore

If you’re feeling adventurous, here are a few variations that you can try with your Honey Glazed Salmon Rice Bowls:

  • Spicy Twist: Add some sriracha or chili flakes to the honey glaze for a spicy kick.
  • Different Grains: Swap jasmine rice for quinoa, brown rice, or even cauliflower rice for a low-carb option.
  • Fruit Additions: Fresh mango or pineapple chunks can add a refreshing sweetness that pairs wonderfully with the salmon.

Storage and Freezing

Leftovers are just as delicious! Here’s how to store and keep your Honey Glazed Salmon Rice Bowls fresh:

  • Refrigerate: Store any leftovers in an airtight container in the fridge for up to 2 days.
  • Freeze: To freeze, place the salmon and veggies in a freezer-safe container. They can last up to 2 months. Just be sure to reheat gently!

FAQs

Can I make Honey Glazed Salmon Rice Bowls ahead of time?

Absolutely! You can prep the salmon and veggies earlier in the day. Store them separately in the fridge and assemble the bowls when you’re ready to eat.

What can I serve with Honey Glazed Salmon Rice Bowls?

These bowls are delightful on their own, but you can pair them with a light salad, steamed veggies, or even a refreshing fruit salad.

Can I use other types of fish?

Yes! Feel free to experiment with other fish like trout or halibut. Just adjust the cooking time as needed.

How do I store leftovers from the Honey Glazed Salmon Rice Bowls?

Store any leftovers in an airtight container in the fridge for up to 2 days. Reheat gently to keep the salmon tender!

What if I don’t have sriracha?

No worries! You can use another hot sauce or even omit it if you prefer a milder flavor. Just adjust the amount to suit your taste.

Final Thoughts

Creating Honey Glazed Salmon Rice Bowls is more than just preparing a meal; it’s about bringing joy to your table and savoring each delightful bite. With its vibrant colors and bold flavors, this dish is bound to impress your family and friends. I hope you enjoy making it as much as I do! So, roll up your sleeves, put on your favorite apron, and let’s create some kitchen magic together. Don’t forget to share your beautiful bowls with us—we can’t wait to see your creations!

Honey Glazed Salmon Rice Bowls – Sweet, Savory & Perfectly Balanced!

Prep Time 10 minutes
Cook Time 10 minutes
Total Time 20 minutes
Servings 2 servings
Calories 450
Enjoy a delicious and balanced meal with tender salmon glazed in honey, served over jasmine rice and fresh vegetables.

Ingredients

Protein

  • 2 pieces salmon fillets

Sauces & Condiments

  • 2 tablespoons honey
  • 1 tablespoon soy sauce
  • 1 teaspoon sesame oil

Grains

  • 1 cup cooked jasmine rice

Vegetables

  • 1 cup steamed broccoli
  • 1 piece carrot, julienned

Garnishes

  • 1 tablespoon sesame seeds
  • 2 green onions chopped green onions
  • to taste salt and pepper

Instructions 

  • Mix honey, soy sauce, sesame oil, salt, and pepper.
  • Cook salmon in a skillet over medium heat, pour honey mixture, and cook 4-5 minutes each side.
  • Prepare rice and steam broccoli.
  • Layer rice, broccoli, and carrots in bowls, top with salmon.
  • Garnish with sesame seeds and green onions before serving.

Notes

For extra flavor, add a squeeze of lemon or lime.
Calories: 450kcal
Cost: $15
Course: Main Course
Cuisine: fusion
Keyword: Salmon

Loved this recipe? Save it to your favorite Pinterest board so you can easily find it later! It’s the perfect way to keep all your sweet ideas in one place. ✨

Appetizing bowl of honey glazed salmon, rice, and vibrant veggies under natural light.

Why You’ll Love These Bowls

In the hustle and bustle of everyday life, it’s easy to overlook the simple pleasures that bring us joy—like a warm, hearty meal that feels both nourishing and delightful. Enter my Easy & Healthy Chicken and Sweet Potato Bowls: a dish that is not just a feast for the eyes, but a comforting embrace for your taste buds. These bowls are the epitome of healthy comfort food, offering a delightful balance of tender chicken, roasted sweet potatoes, and vibrant greens. It’s a meal that hits all the right notes, whether you’re coming home from a long day or just looking for a way to impress your loved ones with a home-cooked delight.

Wholesome Goodness in Every Bite

Picture this: the sweet aroma of roasted sweet potatoes wafts through your kitchen, mingling with the savory scent of perfectly seasoned chicken. Each bowl is a colorful canvas, filled with the earthy sweetness of sweet potatoes, the satisfying protein of chicken, and a pop of green from sautéed spinach or kale. What I adore about this recipe is not just its flavors, but the ease with which it comes together. Even if you’re not a seasoned chef, this dish allows you to feel like one, making it a fantastic choice for both busy weeknights and leisurely weekend dinners.

The Power Plate: Gathering Your Ingredients

A close-up shot of a healthy bowl with grilled chicken, sweet potatoes, greens, and fresh avocado, beautifully arranged.

Before we dive into the cooking, let’s gather our ingredients. The beauty of this dish lies in its simplicity, so make sure to use quality ingredients to really capture those vibrant flavors. Here’s what you’ll need:

Ingredients

  • 2 boneless, skinless chicken breasts
  • 2 medium sweet potatoes, peeled and diced
  • 1 tablespoon olive oil
  • 1 teaspoon paprika
  • 1 teaspoon garlic powder
  • Salt and pepper to taste
  • 2 cups spinach or kale
  • 1 avocado, sliced (optional)
  • Lemon wedges for serving (optional)

The Method: Building Your Perfect Bowl

Now that we have everything ready, let’s get cooking! This is where the magic happens. Follow these steps, and you’ll have a plateful of deliciousness in no time.

Instructions

  1. Preheat your oven to 400°F (200°C). This is essential for achieving those crispy, caramelized edges on the sweet potatoes.
  2. In a bowl, toss the diced sweet potatoes with olive oil, paprika, garlic powder, salt, and pepper. Make sure each piece is well-coated for maximum flavor.
  3. Spread the sweet potatoes on a baking sheet in a single layer. Roast them for 25-30 minutes, or until they are tender and slightly crispy.
  4. While the sweet potatoes are roasting, season the chicken breasts with salt, pepper, and any additional spices you like—Italian herbs, for example, can add a lovely flavor.
  5. In a skillet over medium heat, cook the chicken for about 6-7 minutes on each side, or until fully cooked and no longer pink in the center. This ensures your chicken is juicy and flavorful.
  6. Remove the chicken from the skillet and let it rest for a few minutes before slicing it. This resting time allows the juices to redistribute, keeping your chicken moist.
  7. In the same skillet, add the spinach or kale and sauté until wilted. This only takes a couple of minutes and adds a lovely green vibrancy to your bowls.
  8. To assemble, divide the roasted sweet potatoes, sautéed greens, and sliced chicken among your bowls. If you’re feeling fancy, top with avocado slices and serve with lemon wedges on the side for an extra zing.

The Saucy Secret: Creamy Spiced Delight

While this dish is delicious on its own, a drizzle of sauce can elevate it to new heights. I recommend a simple creamy dressing made from Greek yogurt or mayonnaise, mixed with a squeeze of lemon juice and your favorite spices. This adds a delightful creaminess that ties all the flavors together beautifully.

Customizations and Meal Prep Tips

One of the best things about my chicken and sweet potato bowls is their versatility. Here are a few tips and suggestions to make this meal your own:

Tips

  • Protein Options: Feel free to swap the chicken for another lean protein, like turkey or even tofu for a plant-based option.
  • Vegetable Variety: You can use any greens you prefer. Arugula, Swiss chard, or even broccoli would work wonderfully.
  • Flavor Boosters: Adding spices like cumin or chili powder can give your dish an extra kick. Experiment to find your favorite flavor combinations!

Substitutions

  • Sweet Potatoes: If you don’t have sweet potatoes, regular potatoes or even butternut squash can work as a substitute.
  • Greens: If you’re not a fan of spinach or kale, try using bok choy or even zucchini for a different texture.

Equipment You’ll Need

Having the right tools can make cooking a breeze. Here’s what I recommend:

  • Baking sheet for roasting sweet potatoes
  • Skillet for cooking the chicken and sautéing the greens
  • Sharp knife for slicing the chicken
  • Mixing bowl for tossing the sweet potatoes with oil and spices

Storage and Freezing

If you’re planning to meal prep, these bowls store beautifully. Here’s how to keep them fresh:

  • Store each component separately in airtight containers in the refrigerator. This keeps the textures intact.
  • Assembled bowls can be kept in the fridge for up to 3 days. Just add the sauce right before serving!
  • If you want to freeze them, I recommend freezing the sweet potatoes and chicken separately. They can last up to 2 months in the freezer.

FAQs

Here are some common questions about this recipe:

Can I make this dish vegetarian?

Absolutely! Replace the chicken with chickpeas or a hearty bean mix for a protein-packed vegetarian option.

Can I use frozen sweet potatoes?

Yes, but you may need to adjust the roasting time as frozen veggies can release moisture. Just keep an eye on them!

What can I serve with these bowls?

These bowls are delicious on their own, but you could serve them with a side salad or some crusty bread for a more filling meal.

Troubleshooting

If you encounter any hiccups while making your bowls, here are a few tips:

  • If your sweet potatoes aren’t crisping up, try spreading them out more on the baking sheet to avoid steaming.
  • Overcooked chicken can dry out. Use a meat thermometer to check for doneness (165°F is the magic number)!

Wrap Up: A Bowl of Happiness Awaits

At the end of the day, cooking should be a joyful experience—one that fills your home with warmth and your heart with happiness. These Easy & Healthy Chicken and Sweet Potato Bowls are here to do just that. They’re perfect for any occasion, whether you’re looking for a quick weeknight dinner or a comforting meal to share with family. So, gather your ingredients, roll up your sleeves, and let’s create something magical in the kitchen together!

Easy & Healthy Chicken and Sweet Potato Bowls 🍠🐔

Prep Time 10 minutes
Cook Time 30 minutes
Total Time 40 minutes
Servings 4 servings
Calories 450
A nutritious and flavorful bowl combining roasted sweet potatoes, seasoned chicken, and sautéed greens, perfect for a healthy meal.

Ingredients

Protein

  • 2 pieces boneless, skinless chicken breasts

Vegetables

  • 2 medium sweet potatoes, peeled and diced
  • 2 cups spinach or kale

Seasonings & Oils

  • 1 tablespoon olive oil
  • 1 teaspoon paprika
  • 1 teaspoon garlic powder
  • to taste salt and pepper

Optional toppings

  • 1 avocado avocado, sliced
  • lemon wedges lemon wedges for serving

Instructions 

  • Preheat oven to 400°F (200°C). Toss sweet potatoes with olive oil, paprika, garlic powder, salt, and pepper; roast for 25-30 minutes.
  • Season chicken breasts with salt, pepper, and spices; cook in a skillet over medium heat for 6-7 minutes per side until cooked through.
  • Let chicken rest, then slice. Sauté greens in the same skillet until wilted.
  • Assemble bowls with roasted sweet potatoes, greens, and sliced chicken. Top with avocado and lemon wedges if desired.

Notes

Feel free to customize with your favorite greens or spices for added flavor.
Calories: 450kcal
Cost: $15
Course: Main Course
Cuisine: Healthy
Keyword: Chicken, sweet potato

Loved this recipe? Save it to your favorite Pinterest board so you can easily find it later! It’s the perfect way to keep all your sweet ideas in one place. ✨

A vibrant bowl filled with chicken, roasted sweet potatoes, leafy greens, and garnished with lemon, presented in natural light.

Welcome to my cozy corner of the internet, where today I’m excited to share a recipe that has become a staple in my kitchen: Apple Crisp Bars. If you’re looking for a dessert that combines the warm, comforting flavors of apple pie with the ease of a bar cookie, you’re in the right place. These bars are not only delicious but also incredibly simple to make, making them perfect for both gatherings and quiet nights at home.

In this guide, we’ll dive deep into everything you need to know about making these easy apple crisp bars, from ingredient breakdowns and expert tips to variations and storage suggestions. So, grab your apron, and let’s get baking!

Why You’ll Love This Recipe

  • Perfect for Sharing: These bars are cut into squares, making them a breeze to serve at parties or family gatherings.
  • Simple Ingredients: With just a handful of everyday ingredients, this recipe is accessible and affordable for everyone.
  • Seasonal Flavors: The combination of apples, cinnamon, and brown sugar captures the essence of fall and is perfect for cozy nights.
  • Make Ahead: You can prepare these bars ahead of time, making them a convenient option for busy days.
  • Versatile: Enjoy them warm with a scoop of vanilla ice cream, or cold with a drizzle of caramel sauce—there are endless possibilities!

Ingredients for Easy Apple Crisp Bars

Let’s break down the ingredients you’ll need to create these magical bars:

  • 1 cup all-purpose flour: This forms the base of our crust.
  • 1/2 cup granulated sugar: Sweetens the crust and adds a touch of magic.
  • 1/2 cup unsalted butter, cold and cubed: The secret to a flaky crust; keep it cold for the best texture.
  • 1/4 teaspoon salt: Enhances all the flavors.
  • 4 medium apples, peeled and diced: Use a mix of sweet and tart for the best flavor.
  • 1/3 cup brown sugar: Adds depth and richness to the filling.
  • 1 tablespoon lemon juice: Brightens the flavors and prevents browning.
  • 1 teaspoon ground cinnamon: The warm spice that ties everything together.
  • 1 tablespoon cornstarch: Helps thicken the apple filling.
  • 3/4 cup all-purpose flour: For the crisp topping.
  • 1/2 cup rolled oats: Adds texture and chewiness to the topping.
  • 1/3 cup brown sugar: For a sweet, crunchy topping.
  • 1/2 teaspoon ground cinnamon: Because more cinnamon is always a good idea!
  • 1/2 cup unsalted butter, cold and cubed: Keeps the topping crumbly and delicious.

Step-by-Step Directions for the Perfect Apple Crisp Bars

Now that we have our ingredients ready, let’s walk through the steps to make these delightful bars.

  1. Preheat your oven: Set the temperature to 375°F and let it fully preheat.
  2. Make the shortbread crust: In a mixing bowl, combine 1 cup of flour, 1/2 cup of granulated sugar, and salt. Cut in the cold butter until the mixture resembles coarse crumbs. Press this mixture evenly into an 8×8 inch baking pan.
  3. Prepare the apple filling: In another bowl, toss the diced apples with brown sugar, lemon juice, ground cinnamon, and cornstarch until well combined. Spread this apple mixture uniformly over the prepared crust.
  4. Make the crisp topping: In a separate bowl, combine 3/4 cup of flour, oats, brown sugar, and cinnamon. Cut in the cold butter until crumbly. Evenly distribute this topping over the apple filling.
  5. Bake to perfection: Place the pan in the preheated oven and bake for 35 minutes or until the topping is golden brown.

Expert Tips for Making Easy Apple Crisp Bars

Side view of delicious apple crisp bars showcasing layers of baked apples and crumble.
  • Choose the Right Apples: A blend of tart Granny Smith and sweet Honeycrisp apples works beautifully for a balanced flavor.
  • Don’t Skimp on the Butter: Cold butter is key to a flaky crust, so keep it chilled until you’re ready to use it.
  • Let Them Cool: Allow the bars to cool in the pan before cutting to ensure clean, neat squares.
  • Try Different Spices: Experiment with nutmeg or allspice in the filling for an extra layer of flavor.
  • Make It Gluten-Free: Substitute all-purpose flour with a gluten-free blend for a delicious alternative.
  • Add Nuts: For a crunchy twist, sprinkle some chopped walnuts or pecans on top of the crisp before baking.
  • Use a Food Processor: This can speed up mixing the crust and topping, ensuring even consistencies.
  • Adjust Sweetness: Depending on your apple variety, you may want to adjust the sugar in the filling to taste.
  • Experiment with Toppings: Serve your bars with whipped cream, yogurt, or a scoop of ice cream for an indulgent treat.

Common Mistakes and Troubleshooting

Even the best bakers have their off days! Here are a few common hiccups and how to troubleshoot them:

  • Crust Too Crumbly: If your crust doesn’t hold together, it may need a touch more butter or a bit of cold water.
  • Filling Too Watery: Make sure to toss the apples with cornstarch and let them sit for a few minutes to absorb excess moisture.
  • Topping Not Crisping: If your topping isn’t browning, it may need a few extra minutes in the oven—keep an eye on it!
  • Bars Falling Apart: Allow the bars to cool completely before cutting to help them hold their shape.

Variations of Apple Crisp Bars

If you’re feeling adventurous, here are some fun variations to try:

  • Peach Apple Crisp Bars: Swap out some of the apples for fresh peaches for a juicy twist.
  • Caramel Apple Crisp Bars: Drizzle some caramel sauce over the apple filling for added sweetness and decadence.
  • Maple Walnut Crisp Bars: Use maple syrup in the filling and sprinkle walnuts in the topping for a nutty flavor.
  • Chocolate Chip Apple Crisp Bars: Add a handful of chocolate chips to the apple filling for a delightful surprise.

Storage and Make-Ahead Instructions

You can make these apple crisp bars ahead of time and store them for later.

  • At Room Temperature: Store in an airtight container for up to 3 days.
  • In the Refrigerator: Keep them in the fridge for up to a week. Just make sure they’re covered to maintain freshness.
  • Freezing: You can freeze baked bars for up to 3 months. Just wrap them tightly in plastic wrap and then foil. Thaw in the fridge before serving.

Comprehensive FAQ

  • What kind of apples are best for apple crisp bars? A mix of sweet and tart apples, such as Granny Smith and Honeycrisp, provides the best flavor.
  • Can I use frozen apples? Yes, but make sure to thaw and drain them before using to avoid excess moisture.
  • Can I add other ingredients to the apple filling? Absolutely! Raisins or dried cranberries can add a nice touch.
  • How do I know when the bars are done baking? Look for a golden brown topping and bubbling filling around the edges.
  • Can I make these bars gluten-free? Yes! Just use a certified gluten-free flour blend.
  • Can I make them vegan? You can substitute the butter with coconut oil and use a flax egg instead of a regular egg.
  • How do I reheat leftovers? Warm them in the oven at 350°F for about 10 minutes or microwave for a few seconds.
  • Can I make these bars in advance? Yes! Prepare them a day ahead and store in the fridge until ready to serve.

Nutrition Tips and Dietary Adaptations

For those who are mindful of their nutrition, here are a few tips:

  • Reduce Sugar: You can reduce the sugar in the filling by using less brown sugar or opting for a sugar substitute.
  • Add Fiber: Incorporate whole grain oats for additional fiber and nutrients.
  • Portion Control: Cut smaller squares to enjoy the flavors without overindulging.
  • Boost Nutritional Value: Consider adding chopped nuts for healthy fats and protein.

Equipment Recommendations

To make these apple crisp bars, you’ll need some basic kitchen tools:

  • Mixing Bowls: A set of mixing bowls for combining ingredients.
  • Measuring Cups and Spoons: Accurate measurements are key for baking success!
  • Baking Pan: An 8×8 inch baking pan is perfect for these bars.
  • Rubber Spatula: Great for mixing and spreading your ingredients evenly.

Serving Suggestions

These apple crisp bars are delicious on their own, but here are a few ideas to make them even more special:

  • Ala Mode: Serve warm with a scoop of vanilla ice cream for a classic dessert experience.
  • With Caramel Drizzle: Drizzle warm caramel sauce over the top for a decadent touch.
  • Accompanied by Whipped Cream: A dollop of homemade whipped cream can elevate the flavor.
  • With a Cup of Tea: Enjoy these bars with a warm cup of tea for the perfect cozy afternoon treat.

There you have it! A comprehensive guide to making the best Apple Crisp Bars that will not only satisfy your sweet tooth but also bring warmth and comfort into your home. Remember, cooking is all about having fun and experimenting, so feel free to make this recipe your own. Happy baking, friends!

Delicious Apple Crisp Bars

Prep Time 20 minutes
Cook Time 35 minutes
Total Time 55 minutes
Servings 12 bars
Calories 250
Enjoy these irresistibly sweet and crunchy apple crisp bars, perfect for a quick dessert or snack.

Ingredients

Base Layer

  • 1 cup all-purpose flour
  • 1/2 cup granulated sugar
  • 1/2 cup unsalted butter, cold and cubed
  • 1/4 teaspoon salt

Apple Filling

  • 4 medium apples, peeled and diced
  • 1/3 cup brown sugar
  • 1 tablespoon lemon juice
  • 1 teaspoon ground cinnamon
  • 1 tablespoon cornstarch

Crisp Topping

  • 3/4 cup all-purpose flour
  • 1/2 cup rolled oats
  • 1/3 cup brown sugar
  • 1/2 teaspoon ground cinnamon
  • 1/2 cup unsalted butter, cold and cubed

Instructions 

  • Preheat oven to 375°F (190°C).
  • Mix flour, sugar, and salt; cut in butter until crumbly. Press into an 8x8 inch pan.
  • Toss apples with brown sugar, lemon juice, cinnamon, and cornstarch.
  • Spread apple mixture over base layer.
  • Combine topping ingredients; cut in butter until crumbly. Sprinkle over apples.
  • Bake for 35 minutes until golden brown.

Notes

For a crunchier topping, bake a few extra minutes until golden.
Calories: 250kcal
Cost: $12
Course: Dessert
Cuisine: American
Keyword: apple

Why You’ll Fall in Love with This Recipe

If you’ve ever found yourself yearning for a dish that’s not only quick to prepare but also explodes with flavor, then let me introduce you to my culinary treasure: Air Fryer Honey Garlic Salmon. Imagine a busy weeknight where you want to whip up something special without spending hours in the kitchen. This delightful dish is your answer! In just 10 minutes, you can prepare a salmon meal that feels like a warm hug and tastes like a gourmet experience.

Growing up, I had my fair share of salmon dinners that were less than thrilling, often bland and overcooked. But this recipe? Oh, it’s a game changer! The combination of sweet honey and savory garlic, all enveloping perfectly cooked salmon, is enough to make your taste buds dance. Plus, it’s a hit with picky eaters, making it an ideal choice for family dinners. Trust me, this dish is destined to become your go-to weeknight wonder!

Ingredients for Air Fryer Honey Garlic Salmon

  • 2 salmon fillets
  • 2 tablespoons honey
  • 2 cloves garlic, minced
  • 1 tablespoon soy sauce
  • 1 tablespoon olive oil
  • Salt and pepper to taste
  • Lemon wedges (for serving)
  • Chopped green onions (for garnish)

How to Prepare Air Fryer Honey Garlic Salmon

Air fryer salmon fillets drizzled with honey garlic sauce, showcasing a rich glaze and vibrant colors.

Step 1: Whisk Together the Marinade

Start by grabbing a medium-sized mixing bowl. In it, whisk together the honey, minced garlic, soy sauce, olive oil, salt, and pepper. The aroma that wafts up as you mix is just heavenly! This marinade packs a punch and is the heart of your dish, so make sure to get it perfectly combined.

Step 2: Preheat Your Air Fryer

While you’re mixing up the marinade, go ahead and preheat your air fryer to 400°F (200°C). Preheating is essential for ensuring your salmon cooks evenly and achieves that lovely crispy exterior we all crave.

Step 3: Marinate the Salmon

Now it’s time for the salmon to shine! Place your salmon fillets in a shallow dish and pour the honey garlic mixture over them, ensuring they are well coated. Let the salmon marinate for about 5 minutes. This short amount of time is perfect for allowing those flavors to seep into the fish without making it too soggy.

Step 4: Air Fry the Salmon

Once the salmon has marinated, it’s time to cook! Place the fillets, skin-side down, in the air fryer basket. Make sure they have enough space around them so the air can circulate freely. Air fry the salmon at 400°F (200°C) for 8-10 minutes. I recommend checking at the 8-minute mark; the salmon should flake easily with a fork when it’s done.

Step 5: Garnish and Serve

When the salmon is cooked to perfection, remove it from the air fryer and sprinkle it with chopped green onions for a pop of color and flavor. Serve your delicious air fryer honey garlic salmon with fresh lemon wedges on the side to squeeze over the top. This adds a lovely brightness to the dish that complements the sweet and savory notes beautifully!

Nutritional Information

This scrumptious meal not only delights the senses but also offers a wealth of nutritional benefits! Each serving of Air Fryer Honey Garlic Salmon contains a fantastic balance of protein and healthy fats. While exact values can vary based on the specific ingredients and portion sizes, you can expect your meal to be rich in omega-3 fatty acids, which are great for heart health!

Tips for Success

Adjust Cooking Time Based on Salmon Thickness

Keep in mind that the thickness of your salmon fillets can affect cooking time. Thicker pieces may require a few extra minutes, while thinner ones will cook faster. Always check for doneness by gently flaking the salmon with a fork.

Don’t Skip the Marinade Time

While 5 minutes is sufficient for this recipe, if you have extra time, letting the salmon marinate longer (up to 30 minutes) in the fridge can intensify the flavors even more.

Keep an Eye on the Air Fryer

Different air fryer models may vary in cooking times and temperatures. If this is your first time cooking salmon in your air fryer, keep a close eye on it to prevent overcooking.

Experiment with Leftover Marinade

Don’t let that delicious marinade go to waste! Brush any leftover marinade on the salmon just before serving for an extra burst of flavor. If you’re concerned about food safety, you can heat it in a saucepan for a minute or two to make it safe to consume.

Pair with Delicious Sides

Consider serving your honey garlic salmon with sides that complement the flavors, such as fluffy rice, steamed vegetables, or a crisp salad. These will not only elevate your meal but also create a beautiful presentation on your plate!

Variations of Air Fryer Honey Garlic Salmon

Add a Zesty Citrus Twist

For a refreshing twist, incorporate citrus into your marinade. A splash of fresh lemon juice or lime juice can add an exciting zing that brightens the dish!

Spice It Up

If you’re a fan of heat, add a pinch of red pepper flakes or a dash of sriracha to your marinade. This will create a delightful contrast to the sweetness of the honey.

Herbaceous Delight

Fresh herbs can elevate your salmon to the next level! Consider adding chopped fresh cilantro or parsley to your marinade for a burst of aroma and flavor.

Veggie Pairings for a Complete Meal

Don’t forget about the veggies! Toss seasonal vegetables like asparagus, bell peppers, or broccoli into the air fryer alongside your salmon. Drizzle them with olive oil and season with salt and pepper for a colorful, nutritious meal.

Try Different Proteins

If you’re in the mood for a change, why not swap salmon for chicken thighs or tofu? They both pair beautifully with the same honey garlic marinade. Just remember to adjust the cooking time accordingly!

Storage & Reheating Instructions

If you find yourself with leftover salmon, don’t worry; it stores beautifully! Allow the salmon to cool to room temperature before placing it in an airtight container. It will keep well in the fridge for about 3-4 days. For longer storage, consider freezing it! Wrap each piece tightly in plastic wrap, then place them in a freezer-safe bag, where they can last up to 3 months.

When it’s time to reheat, the air fryer is your best friend! Preheat it to 350°F (175°C) and heat the salmon for about 5-7 minutes until warmed through. This method helps to restore that crispy exterior while keeping the inside moist and flaky.

FAQs

Can I use frozen salmon for this recipe?

While fresh salmon is recommended for the best flavor and texture, you can use frozen salmon. Just make sure to thaw it completely before marinating and cooking.

What can I serve with honey garlic salmon?

This dish pairs wonderfully with a variety of sides! Try serving it with steamed vegetables, quinoa, or a light salad for a balanced meal.

Can I double the recipe?

Absolutely! Just ensure you have enough space in your air fryer to accommodate the additional fillets. You may need to cook in batches for even cooking.

Conclusion

There you have it: a deliciously simple yet impressive Air Fryer Honey Garlic Salmon recipe that’s perfect for any night of the week. With its sweet and savory flavors, it’s sure to become a beloved staple in your kitchen. Whether you’re cooking for your family or looking to impress friends, this dish is bound to leave a lasting impression. So gather your ingredients, fire up that air fryer, and get ready to savor a meal that feels like pure bliss on a plate. Happy cooking, my friend! I can’t wait to hear how your salmon turns out!

Air Fryer Honey Garlic Salmon: 10 Minutes to Pure Bliss

Prep Time 5 minutes
Cook Time 8 minutes
Total Time 13 minutes
Servings 2 servings
Calories 350
Enjoy tender, flavorful salmon cooked to perfection in your air fryer with a sweet and savory honey garlic glaze.

Ingredients

Salmon

  • 2 fillets salmon fillets
  • 2 tablespoons honey
  • 2 cloves garlic, minced
  • 1 tablespoon soy sauce
  • 1 tablespoon olive oil
  • to taste salt and pepper (for seasoning)
  • lemon wedges lemon wedges (for serving)
  • chopped green onions chopped green onions (for garnish)

Instructions 

  • Whisk honey, garlic, soy sauce, olive oil, salt, and pepper in a bowl.
  • Preheat air fryer to 400°F (200°C).
  • Coat salmon with the honey garlic mixture and marinate for 5 minutes.
  • Place salmon in air fryer basket, skin-side down, and cook for 8-10 minutes.
  • Garnish with green onions and serve with lemon wedges.

Notes

Ensure not to overcook the salmon for best results.
Calories: 350kcal
Cost: $15
Course: Main Course
Cuisine: American
Keyword: Salmon

Loved this recipe? Save it to your favorite Pinterest board so you can easily find it later! It’s the perfect way to keep all your sweet ideas in one place. ✨

A plate featuring two succulent salmon fillets topped with honey garlic sauce, set against a soft, blurred background.

Why This Dish Will Become Your New Favorite

Let’s face it—there’s something undeniably comforting about chicken dishes, especially when they’re enveloped in a creamy sauce that feels like a warm hug. Creamy Rosemary Dijon Butter Chicken is not just any chicken recipe; it’s the kind of dish that brings joy to your dinner table, transforming an ordinary night into something special. With a balance of rich flavors and a velvety texture, this recipe is perfect for family gatherings, cozy dinners with friends, or even a solo treat after a long day.

Imagine the aroma of sautéed onion and garlic wafting through your kitchen, mingling with the earthy scent of fresh rosemary and the tangy kick of Dijon mustard. Each bite of tender chicken is smothered in this delightful sauce, making it hard to resist asking for seconds. Plus, it’s incredibly easy to whip up in just about 30 minutes—perfect for busy weeknights!

Ingredients You’ll Need

Here’s what you’ll need to create this magical dish:

  • 4 boneless, skinless chicken breasts
  • 1 tablespoon olive oil
  • 2 tablespoons unsalted butter
  • 1 medium onion, finely chopped
  • 3 cloves garlic, minced
  • 1 cup chicken broth
  • 1 cup heavy cream
  • 2 tablespoons Dijon mustard
  • 2 teaspoons fresh rosemary, chopped
  • Salt and pepper to taste

Essential Tools and Equipment

A delicious chicken dish coated in creamy sauce, garnished with rosemary, captured in warm light.

Before you dive into cooking, make sure you have the following tools handy:

  • A large skillet or frying pan
  • A sharp knife for cutting the chicken
  • A cutting board
  • A wooden spoon or spatula for stirring
  • A measuring cup for the broth and cream
  • A whisk (optional, for mixing the sauce)

Step-by-Step Instructions

Step 1: Heat It Up

Start by heating the olive oil and 1 tablespoon of butter in your large skillet over medium heat. The butter should melt and bubble a bit, signaling that it’s ready for the chicken.

Step 2: Cook the Chicken

While the pan is heating up, season your chicken breasts generously with salt and pepper. This simple seasoning step is crucial for flavor throughout the dish. Once the skillet is hot, add the chicken breasts.

Cook them for about 6-7 minutes on each side until they’re golden brown and fully cooked through. The goal here is to develop a lovely crust that adds both flavor and texture. Once cooked, remove the chicken from the skillet and set it aside on a plate.

Step 3: Sauté the Aromatics

In the same skillet (don’t wipe it out; we want all those delicious browned bits), add the remaining tablespoon of butter. Toss in the chopped onion and sauté until it becomes translucent, which should take about 3-4 minutes. The onion will soak up all those fantastic flavors left behind by the chicken.

Step 4: Add Garlic

Next, add the minced garlic and stir it around for about a minute until it becomes fragrant. You’ll love how the aroma fills your kitchen!

Step 5: Create the Sauce

Pour in the chicken broth and bring it to a simmer. Take this moment to scrape up the bottom of the skillet—this is where the flavor magic happens! Stir in the heavy cream, Dijon mustard, and chopped rosemary. Let it simmer for about 3-5 minutes until the sauce thickens slightly.

Step 6: Return the Chicken

Now it’s time to bring the chicken back into the mix! Return the cooked chicken to the skillet, ensuring each piece is well-coated in that creamy sauce. Let everything simmer together for another 2-3 minutes so the chicken can soak up all that flavor.

Step 7: Serve and Enjoy!

Once done, serve your Creamy Rosemary Dijon Butter Chicken hot with your choice of sides. It pairs wonderfully with fluffy rice, roasted vegetables, or even buttery mashed potatoes. Don’t forget a crusty loaf of bread for mopping up that luscious sauce!

Tips for Perfecting Your Dish

To ensure that your chicken turns out perfectly every time, here are some handy tips:

  • Temperature Matters: Make sure your skillet is hot enough before adding the chicken. This will help achieve that golden crust we all crave.
  • Don’t Crowd the Pan: If you’re cooking for a crowd, do it in batches. Overcrowding can cause the chicken to steam instead of sear.
  • Room Temperature Cream: For a silky-smooth sauce, let your heavy cream sit at room temperature for a bit before adding it to the hot skillet.
  • Scrape the Fond: Those browned bits at the bottom of the pan are full of flavor—make sure to scrape them up when adding your broth!

Flavor Variations & Suggestions

While this recipe is downright delicious as is, don’t hesitate to play with flavors:

  • Mushrooms: Add sliced mushrooms when sautéing the onions for an earthy dimension.
  • Spinach: Toss in a handful of fresh spinach during the last few minutes of cooking for an added boost of color and nutrients.
  • Honey: A teaspoon of honey can add a delightful sweetness that complements the Dijon mustard beautifully.
  • Herb Swaps: Fresh thyme or tarragon can be used in place of rosemary for a different flavor profile.

Make-Ahead Options

This dish can be prepped in advance, which is perfect for those busy weeknights:

  • Cut and season the chicken up to 4 hours ahead of time. Keep it covered in the refrigerator until you’re ready to cook.
  • Chop the onion and garlic ahead of time and store them in airtight containers.
  • Prepare the sauce ingredients and have them ready to go for a quick assembly.

Storage & Reheating

If you have leftovers (which might be hard to believe!), store them in an airtight container in the refrigerator for up to 3 days. The flavors will continue to meld, making it even more delicious the next day! When you’re ready to reheat, do so on the stove over low heat, adding a splash of broth or cream if needed to loosen the sauce.

FAQs

Can I use chicken thighs instead of breasts?

Absolutely! Chicken thighs will add even more flavor and tenderness to the dish. Just adjust cooking time as needed, as thighs may take a bit longer to cook through.

My sauce is too thin. How do I fix it?

If your sauce is thinner than desired, let it simmer longer to reduce and thicken. You can also whisk in a tablespoon of cornstarch mixed with water to help thicken it quickly.

What if the sauce looks curdled?

This can happen if the cream was too cold when added to the hot skillet. To prevent this, always bring your cream to room temperature before use.

Conclusion: A Dish to Remember

In a world filled with countless recipes, Creamy Rosemary Dijon Butter Chicken stands out as a comforting classic that warms both the belly and the heart. With its rich flavors and creamy texture, this dish is sure to become a staple in your kitchen, bringing smiles and satisfaction to your dinner table. So, gather your loved ones, pour a glass of wine, and enjoy this delightful meal that’s as easy to make as it is to savor. Happy cooking!

Our Favorite Chicken Recipe For Dinner: Creamy Rosemary Dijon Butter Chicken

Prep Time 10 minutes
Cook Time 20 minutes
Total Time 30 minutes
Servings 4 servings
Calories 550
A flavorful and creamy chicken dish infused with rosemary and Dijon mustard, perfect for a satisfying dinner.

Ingredients

Chicken

  • 4 pieces boneless, skinless chicken breasts
  • 1 tablespoon olive oil
  • 2 tablespoons unsalted butter
  • 1 medium onion, finely chopped
  • 3 cloves garlic, minced
  • 1 cup chicken broth
  • 1 cup heavy cream
  • 2 tablespoons dijon mustard
  • 2 teaspoons fresh rosemary, chopped
  • to taste salt and pepper

Instructions 

  • Heat oil and 1 tbsp butter in a skillet over medium heat.
  • Season chicken with salt and pepper, cook 6-7 mins per side, then set aside.
  • Sauté onion in the same skillet until translucent, then add garlic and cook 1 min.
  • Pour in broth, simmer, then stir in cream, mustard, and rosemary. Cook until slightly thickened.
  • Return chicken to skillet, coat with sauce, and simmer 2-3 mins. Serve hot.

Notes

For extra flavor, garnish with fresh herbs or lemon.
Calories: 550kcal
Cost: $15
Course: dinner
Keyword: Chicken, creamy, Dijon, Rosemary

Loved this recipe? Save it to your favorite Pinterest board so you can easily find it later! It’s the perfect way to keep all your sweet ideas in one place. ✨

Eye-level shot of tender chicken breast in a creamy sauce, accented by fresh herbs.

Discover the Magic of Peach Cobbler Cookies

Welcome to my kitchen, where we’re about to embark on a delicious journey into the world of Peach Cobbler Cookies. These little bites of joy encapsulate the essence of summer, blending the sweetness of juicy peaches with warm spices reminiscent of grandma’s kitchen. Whether you’re baking for a gathering or treating yourself to a sweet indulgence, these cookies are sure to be a hit all summer long.

In this article, we’ll cover everything you need to know to create the perfect batch of Peach Cobbler Cookies, from ingredients to variations, and even some expert tips to elevate your baking game. So grab your apron, and let’s dive in!

Why You’ll Love This Recipe

  • Summer in Every Bite: These cookies capture the sweet and tangy essence of fresh peaches, making you feel like you’re enjoying a sun-soaked day at the orchard.
  • Perfect for Sharing: Whether it’s a family gathering or a picnic with friends, these cookies are a delightful treat that’s easy to share.
  • Customizable: With various variations and substitutions available, you can tailor these cookies to suit your taste or dietary needs.
  • Make-Ahead Friendly: The dough can be prepared in advance, allowing you to whip up fresh cookies whenever the mood strikes.
  • Comforting and Nostalgic: Each bite is a trip down memory lane, reminding you of warm summer evenings and cherished family moments.

Ingredient Breakdown

Let’s explore the ingredients that make these Peach Cobbler Cookies a standout:

  • Ripe Peaches: About 4 large peaches will add a juicy sweetness. If fresh peaches aren’t available, frozen peaches work just as well—just thaw them before using!
  • Butter: Use 1 cup of salted butter, softened to room temperature. This ensures a rich flavor and perfect texture.
  • Granulated and Brown Sugar: A combination of 1/4 cup granulated sugar and 1/2 cup brown sugar adds depth and moisture to the cookies.
  • Spices: Cinnamon and nutmeg create that warm, cozy flavor profile we crave in comfort food.
  • Flour: All-purpose flour is the backbone of the cookie dough, providing structure. Make sure to spoon and level it for accuracy.

Pro Tips for Perfect Cookies

Close-up of freshly baked peach cobbler cookies displaying juicy peach pieces.
  • Chill the Dough: After mixing, chill your dough for at least 30 minutes. This helps the cookies maintain their shape and prevents spreading.
  • Don’t Skip the Glaze: A simple glaze can elevate these cookies to a whole new level of deliciousness. Whisk together powdered sugar and milk for a sweet finish.
  • Use Parchment Paper: Line your baking sheets with parchment paper to prevent sticking and ensure even baking.
  • Test for Doneness: The cookies should appear slightly underbaked in the center. They’ll continue to cook as they cool on the baking sheet.
  • Customize Your Add-Ins: Feel free to add nuts, chocolate chips, or even a splash of your favorite liqueur for a unique twist!
  • Measure Accurately: Baking is a science! Use a kitchen scale for precise measurements, especially for flour.
  • Room Temperature Ingredients: Ensure your butter and eggs are at room temperature to help them combine better and create a smoother dough.
  • Experiment with Fruit: While peach is the star here, consider mixing in other fruits like blueberries or raspberries for a delightful combo.

Common Mistakes and Troubleshooting

Even the best bakers can run into issues. Here’s how to avoid common pitfalls:

  • Too Dry or Crumbly: This could be due to too much flour. Make sure to spoon and level your flour instead of scooping it directly from the bag.
  • Cookies Spread Too Much: If your cookies spread excessively, ensure the dough is properly chilled before baking.
  • Undercooked Centers: If your cookies are raw in the middle, they may need a couple more minutes in the oven—just keep an eye on them!
  • Flavorless Cookies: Always taste your dough before baking! Adjust spices and sweetness as needed.

Delicious Variations

Want to switch things up? Here are some variations to try:

  • Chocolate Chip Peach Cobbler Cookies: Add 1 cup of chocolate chips for a sweet and tart contrast.
  • Oatmeal Peach Cobbler Cookies: Incorporate 1 cup of rolled oats for added texture and health benefits.
  • Peach Crumble Cookies: Top with a buttery crumble topping before baking for an extra crunch.
  • Spiced Peach Cobbler Cookies: Enhance the spice profile by adding ginger or cardamom to the mix.

Storage and Make-Ahead Instructions

These cookies are best enjoyed fresh, but you can store them for later. Here’s how:

  • Room Temperature: Keep cookies in an airtight container for up to 3 days.
  • Refrigerator: For longer freshness, store in the fridge for up to a week.
  • Freezing: Freeze unbaked dough balls for up to 2 months. Thaw in the fridge overnight before baking.
  • Baked Cookies: Freeze baked cookies in a single layer, then transfer to an airtight container. They will last up to 3 months.

FAQs About Peach Cobbler Cookies

Let’s answer some common questions about these delightful treats:

  • Can I use canned peaches? Yes, but drain them well to avoid excess moisture.
  • Can I make these cookies gluten-free? Absolutely! Substitute with a gluten-free flour blend for a delicious alternative.
  • What can I serve with these cookies? Pair with vanilla ice cream or a dollop of whipped cream for a heavenly dessert.
  • How do I know when the cookies are done? Look for a golden edge and a slightly puffy center. They will set as they cool.
  • Can I add nuts? Yes! Chopped pecans or walnuts add a lovely crunch.
  • What’s the best way to store leftovers? Keep them in an airtight container to maintain freshness.
  • How long do these cookies last? Stored properly, they can last up to a week at room temperature or longer in the fridge.
  • Can I double the recipe? Definitely! Just ensure you have enough space on your baking sheets.

Nutritional Tips and Dietary Adaptations

These cookies can fit into various dietary needs:

  • Lower Sugar Option: Reduce the granulated sugar and replace with a natural sweetener like stevia.
  • Dairy-Free Version: Substitute butter with coconut oil or a dairy-free butter alternative.
  • Nut-Free Option: Omit any nuts and use nut-free alternatives if needed.
  • High-Protein Twist: Add protein powder to the cookie dough for a more filling treat.

Essential Equipment for Baking

Before you start, make sure you have the right tools:

  • Mixing Bowls: A set of different sizes for mixing and preparing ingredients.
  • Electric Mixer: For quickly creaming the butter and sugars together.
  • Baking Sheets: Ensure you have a few on hand, lined with parchment paper.
  • Cookie Scoop: A large scoop helps create evenly sized cookies.
  • Cooling Racks: For letting your cookies cool perfectly after baking.

Serving Suggestions

To enhance your Peach Cobbler Cookies experience, consider these serving ideas:

  • With Ice Cream: A scoop of vanilla ice cream on top transforms these cookies into a delightful dessert.
  • Drizzled with Honey: A drizzle of honey adds a floral sweetness that complements the peaches beautifully.
  • With Fresh Whipped Cream: Light and airy, whipped cream adds an elegant finish.
  • As a Gift: Package them in a cute box as a thoughtful gift for family and friends.

Final Thoughts

There you have it—a comprehensive guide to making the most delightful Peach Cobbler Cookies! I hope you feel inspired to gather your ingredients and create something magical in your kitchen. Remember, cooking is about enjoying the process and sharing love through food. So go ahead, bake up a batch, and savor the sweet taste of summer. Happy baking!

Peach Cobbler Cookies

Prep Time 30 minutes
Cook Time 20 minutes
Total Time 50 minutes
Servings 12 cookies
Calories 250
Delight in these soft cookies filled with fresh peach cobbler filling and topped with crumble and glaze for a perfect summer treat.

Ingredients

Peach Filling

  • 4 large ripe peaches, diced (about 4 cups)
  • 53 grams granulated sugar
  • 69 grams light brown sugar, packed
  • 3/4 tsp cinnamon
  • 1/4 tsp nutmeg
  • 1 tsp lemon juice
  • 2 tsp corn starch
  • 2 tsp water
  • 1/2 tsp vanilla extract

Cookie Dough

  • 226 grams salted butter, softened (1 cup)
  • 210 grams granulated sugar (1 cup)
  • 110 grams light brown sugar, packed
  • 1 and 1/2 tsp vanilla extract
  • 2 large eggs
  • 390 grams all-purpose flour, spooned & leveled
  • 1 tsp baking soda
  • 1 tsp baking powder
  • 1/4 tsp salt
  • 1 and 1/2 tsp cinnamon
  • 1/2 tsp nutmeg
  • 105 grams granulated sugar
  • 2 tsp cinnamon
  • 1/8 tsp nutmeg
  • 57 grams melted salted butter
  • 73 grams light brown sugar, packed
  • 73 grams all-purpose flour
  • 3/4 tsp cinnamon
  • 38 grams powdered sugar
  • 1/4 tsp vanilla extract
  • pinch cinnamon (to taste)
  • 15 to 30 mL milk (for glaze)

Instructions 

  • Cook diced peaches with sugars, lemon juice, cinnamon, and nutmeg for 6 minutes. Stir in cornstarch mixed with water, cook 1 minute, then add vanilla and cool.
  • Cream butter and sugars, add vanilla and eggs, then dry ingredients to form dough. Chill for 30 minutes.
  • Scoop dough into 55g balls, chill for at least 3 hours. Make crumble by melting butter, mixing with streusel ingredients, and baking until golden. Cool and break into pieces.
  • Preheat oven to 350°F. Roll dough balls in cinnamon sugar, bake 11-13 minutes, then shape into circles and indent centers. Cool slightly, then fill with peach filling, top with crumble, and drizzle glaze.

Notes

Chill dough thoroughly for best results and store cookies in the fridge for up to 5 days.
Calories: 250kcal
Cost: $15
Course: Dessert
Cuisine: American
Keyword: peach

Why You’ll Fall in Love with Honey Garlic Salmon

Picture this: it’s a busy weeknight, you’ve just finished a long day, and the last thing you want is to navigate through a complicated recipe. Enter my Irresistible Honey Garlic Salmon—a dish that’s as comforting as a warm hug on a chilly day. This recipe is a delightful blend of sweet honey, savory garlic, and tender salmon that cooks up in just 30 minutes. It’s a dish that not only satisfies your hunger but also brings a little magic to your dinner table.

What I adore about this honey garlic salmon is its simplicity. With just a handful of ingredients, you can create something that feels gourmet without spending hours in the kitchen. Trust me, once you try it, you’ll want to make it a regular in your weeknight dinner rotation. It’s the kind of meal that makes you pause and savor each bite, prompting those around you to ask for seconds (or thirds!).

Ingredients for Irresistible Honey Garlic Salmon

Before we dive into the cooking process, let’s gather our ingredients. You might just have most of them in your pantry!

  • 4 salmon fillets
  • 1/4 cup honey
  • 1/4 cup soy sauce
  • 2 cloves garlic, minced
  • 1 tablespoon olive oil
  • 1 teaspoon ground ginger
  • Salt and pepper to taste
  • Chopped green onions for garnish
  • Lemon wedges for serving

How to Make Honey Garlic Salmon

A beautifully cooked salmon fillet drizzled with honey garlic sauce, set against a blurred background.

Let’s get cooking! This recipe is straightforward, but I’ll walk you through each step to ensure your salmon turns out perfectly every time.

Step 1: Whisk Together the Sauce

In a small bowl, combine your honey, soy sauce, minced garlic, olive oil, and ground ginger. Whisk until the ingredients are well blended and slightly thickened. This sauce is the star of the show, so taste it! Feel free to adjust the sweetness or saltiness to your liking — perhaps an extra squeeze of lemon juice for a tangy kick?

Step 2: Prepare the Salmon

Season your salmon fillets with a sprinkle of salt and pepper on both sides. This simple step enhances the flavor of the fish and helps create a lovely crust during cooking.

Step 3: Sear the Salmon

Heat a large skillet over medium-high heat and add a drizzle of olive oil. Once the oil shimmers, carefully place the salmon fillets skin-side down in the skillet. Here’s a little tip: let them cook undisturbed for about 4-5 minutes. This is crucial for achieving that crispy skin we all love! You’ll know it’s time to flip when the edges start turning opaque.

Step 4: Pour on the Sauce

Now, flip the fillets over gently (I like to use tongs for this) and pour your honey garlic sauce over the salmon. Let it sizzle and cook for another 4-5 minutes, basting the salmon with the sauce as it cooks. You want the internal temperature to reach 145°F for perfectly flaky salmon. When it’s done, remove the skillet from heat and let the salmon rest for a few minutes.

Tips for the Best Honey Garlic Salmon Recipe

Here are my top tips to ensure your honey garlic salmon is nothing short of spectacular:

  • Pat the salmon dry: Before seasoning, use paper towels to blot the salmon dry. Moisture can prevent that perfect sear!
  • Use fresh ingredients: Fresh garlic and good-quality honey make a noticeable difference in flavor.
  • Don’t rush the sear: Let the salmon cook without moving it around too much to develop that crispy skin.
  • Experiment with flavors: Add red pepper flakes for a touch of heat or swap in some citrus zest for extra brightness.

Serving Suggestions for Honey Garlic Salmon

When it comes to pairing your honey garlic salmon, the options are endless! Here are some of my favorite serving ideas:

  • Over jasmine rice: The sweet and savory glaze seeps into the rice, making every bite heavenly.
  • With roasted vegetables: Try serving with roasted broccoli or green beans for a balanced meal.
  • On a salad: For a lighter option, serve the salmon on a bed of fresh greens with a drizzle of the sauce.
  • With crusty bread: Don’t forget a side of bread to soak up every last drop of that glorious sauce!

Variations of Honey Garlic Salmon

This recipe is incredibly versatile. Here are a few variations to keep things exciting:

  • Honey Mustard Salmon: Substitute half of the honey with Dijon mustard for a tangy twist.
  • Spicy Honey Garlic Salmon: Add sriracha or chili paste to the sauce for some heat.
  • Honey Garlic Glazed Shrimp: Swap out the salmon for shrimp and adjust the cooking time accordingly.

Storing and Reheating Honey Garlic Salmon

If you have leftovers (though I doubt you will), store the salmon in an airtight container in the refrigerator for up to 3 days. When reheating, do so gently to keep the salmon moist:

  • Oven: Preheat to 300°F and bake for about 10 minutes.
  • Microwave: Heat at 50% power in 30-second intervals, adding a splash of water to prevent dryness.

Honey Garlic Salmon Recipe FAQs

Here are some frequently asked questions about this delightful recipe:

  • Can I use frozen salmon? Absolutely! Just thaw it overnight in the fridge and pat it dry before cooking.
  • Is this recipe gluten-free? Yes, simply substitute soy sauce with coconut aminos or tamari.
  • How can I adjust the sweetness? Feel free to use less honey or add a splash of vinegar for balance.

Nutritional Information for Honey Garlic Salmon

Each serving of this honey garlic salmon contains approximately 320 calories, 14g of fat, 18g of carbs, and a whopping 29g of protein. Keep in mind that these numbers may vary based on the specific ingredients used.

Share Your Honey Garlic Salmon Experience

After trying this recipe, I’d love to hear how it turned out for you! Did you make any fun tweaks or variations? Drop a comment below to share your experience or any tips you’ve discovered along the way. Happy cooking!

In the end, this honey garlic salmon is more than just a meal; it’s a way to bring joy and comfort to your weeknight dinners. So, roll up your sleeves, grab those ingredients, and let’s create something wonderful together!

Irresistible Honey Garlic Salmon Ready in 30 Minutes

Prep Time 10 minutes
Cook Time 20 minutes
Total Time 30 minutes
Servings 4 servings
Calories 350
This quick and flavorful honey garlic salmon is perfect for a weeknight dinner, combining sweet, savory, and tangy flavors in just 30 minutes.

Ingredients

Main ingredients

  • 4 fillets salmon fillets
  • 1/4 cup honey
  • 1/4 cup soy sauce
  • 2 cloves garlic, minced
  • 1 tablespoon olive oil
  • 1 teaspoon ground ginger
  • to taste salt and pepper salt and pepper
  • for garnish green onions chopped green onions
  • for serving lemon wedges lemon wedges

Instructions 

  • Whisk honey, soy sauce, garlic, olive oil, and ginger in a bowl.
  • Season salmon with salt and pepper.
  • Cook salmon skin-side down in a hot skillet with oil for 4-5 minutes.
  • Flip salmon, pour sauce over, and cook 4-5 minutes, basting.
  • Rest briefly, then serve garnished with green onions and lemon wedges.

Notes

Ensure not to overcook the salmon for best texture.
Calories: 350kcal
Cost: $15
Course: Main Course
Cuisine: American
Keyword: Salmon

Loved this recipe? Save it to your favorite Pinterest board so you can easily find it later! It’s the perfect way to keep all your sweet ideas in one place. ✨

Eye-level shot of honey garlic salmon on a plate, showcasing its caramelized texture and garnishes.