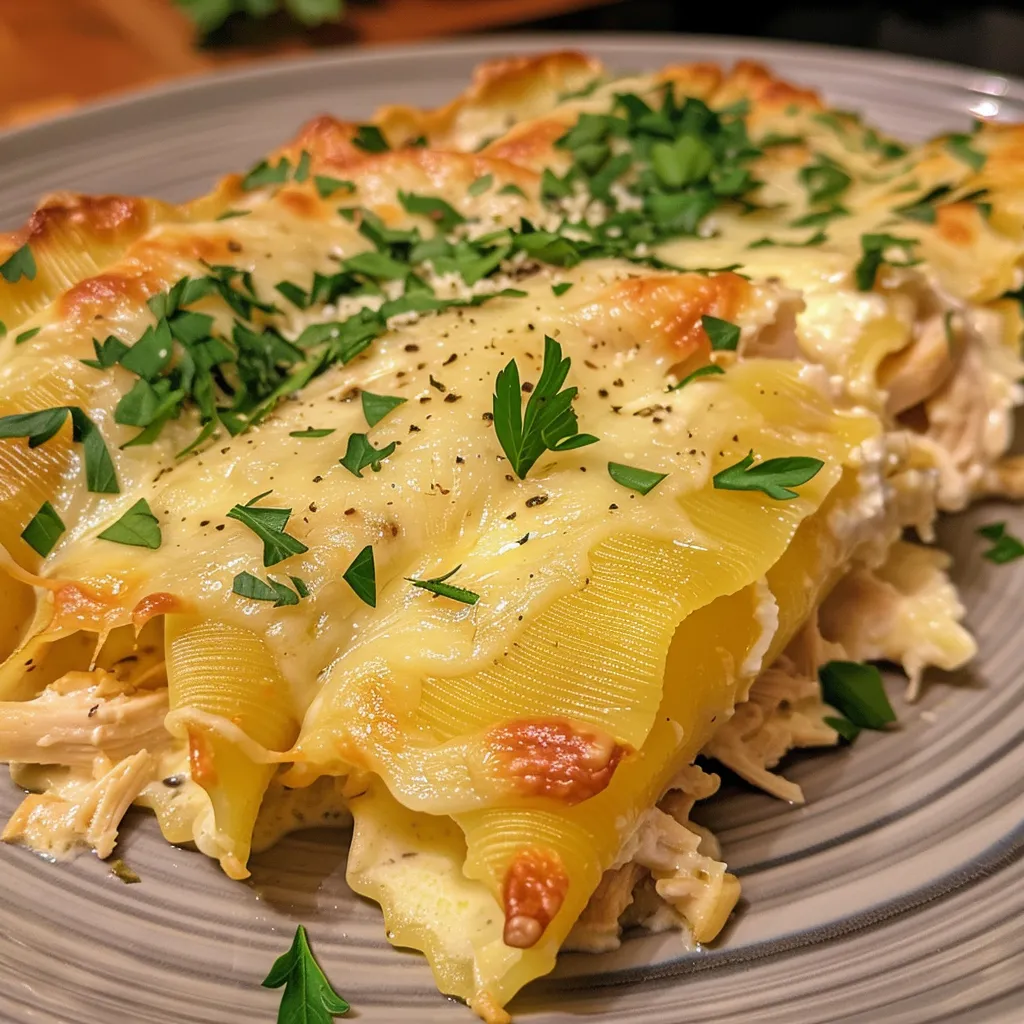
Author

Ava

Browsing

Why You’ll Fall in Love with This Dish

When it comes to cooking, there are few things as satisfying as pulling a perfectly cooked salmon fillet from the oven, glistening with a sweet and savory glaze. Honey-Garlic Roasted Salmon is not just a meal; it’s a delightful experience that embraces your senses. The moment you first taste the tender, flaky fish paired with the rich, sticky honey-garlic sauce, you’ll understand why this dish has become a staple in my kitchen. It’s the kind of recipe that effortlessly impresses guests while also being easy enough for a cozy weeknight dinner.

Imagine serving this to your loved ones or friends—eyes lighting up, forks pausing, and the room filled with the aromatic wafts of garlic and honey. Whether it’s a casual family dinner or a special occasion, this recipe is bound to become a crowd-pleaser. And let’s be honest, who doesn’t love a dish that looks as good as it tastes?

Essential Ingredients

To create this culinary masterpiece, you’ll need just a handful of simple yet flavorful ingredients. Here’s what you’ll need for Impress with Honey-Garlic Roasted Salmon Delight:

  • 4 salmon fillets: I recommend using fresh, skin-on fillets for the best flavor and texture.
  • 1/4 cup honey: Pure honey adds just the right amount of sweetness. Feel free to experiment with local varieties!
  • 3 cloves garlic, minced: Fresh garlic is a must for that robust flavor; skip the powdered stuff!
  • 2 tablespoons soy sauce: Low-sodium soy sauce works well to keep things balanced.
  • 1 tablespoon olive oil: Extra virgin olive oil adds richness to the marinade.
  • 1 teaspoon lemon juice: Freshly squeezed lemon juice brightens the dish beautifully.
  • Salt and pepper to taste: Simple seasonings that elevate the entire dish.
  • Chopped fresh parsley for garnish: A sprinkle of parsley adds a lovely touch of color and freshness.

Let’s Make it Together

A succulent piece of roasted salmon drizzled with honey-garlic sauce, with soft, blurred background.

Ready to dive into this delicious adventure? Follow these simple steps to create your own Honey-Garlic Roasted Salmon:

  1. Preheat your oven: Set it to 400°F (200°C) so it’s nice and hot when your salmon is ready.
  2. Whisk the marinade: In a small bowl, combine honey, minced garlic, soy sauce, olive oil, lemon juice, salt, and pepper. Whisk until smooth and fragrant. The aroma alone will make you want to dive right in!
  3. Marinate the salmon: Place the salmon fillets in a baking dish and pour the honey-garlic mixture over them. Make sure they’re well-coated for maximum flavor. Let them sit for about 15 minutes to soak up those delicious flavors.
  4. Bake the salmon: Pop the marinated salmon into the preheated oven and bake for 12-15 minutes or until it flakes easily with a fork. Keep an eye on it to avoid overcooking!
  5. Garnish and serve: Once out of the oven, sprinkle with chopped fresh parsley before serving. This adds that extra touch of vibrancy that makes the dish visually appealing.

Perfecting the Cooking Process

Cooking salmon can be daunting for some, but it doesn’t have to be! Here are a few tips to ensure your Honey-Garlic Roasted Salmon comes out perfectly every time:

  • Check the freshness: Always choose fresh, high-quality salmon. Wild-caught salmon usually has a richer flavor compared to farmed varieties.
  • Don’t skip the marination: Letting the salmon sit in the marinade for at least 15 minutes makes a world of difference. If you have more time, feel free to marinate it longer for an even deeper flavor.
  • Watch your cooking time: Salmon can go from perfectly cooked to overdone quickly. It’s best to check it a minute or two before the timer goes off.

Add Your Touch

One of the best parts about cooking is the ability to customize! Here are a few variations and substitutions you could try:

  • Different sweeteners: For a unique twist, swap honey for maple syrup or even agave nectar.
  • Herb variations: Experiment with different herbs like dill or cilantro for a fresh flavor.
  • Add some heat: If you like a little kick, consider adding a pinch of red pepper flakes to the marinade.
  • Vegetable sides: Pair your salmon with roasted asparagus, zucchini, or a fresh salad to round out the meal.

Storing & Reheating

If you happen to have leftovers (which is rare in my house), storing and reheating correctly will ensure you enjoy every last bite:

  • Storage: Place leftover salmon in an airtight container in the fridge for up to three days. It’s perfect for meal prep!
  • Reheating: Gently reheat in the oven at a low temperature until warmed through. This prevents the salmon from becoming dry.

Chef’s Helpful Tips

Here are some final tips to elevate your Honey-Garlic Roasted Salmon:

  • Experiment with sides: This dish pairs beautifully with a fluffy rice, quinoa, or even a light pasta salad.
  • Presentation matters: A well-plated dish can enhance the dining experience. Consider using colorful sides for a vibrant plate.
  • Don’t be shy with garnishing: Fresh herbs, sesame seeds, or even a drizzle of extra honey can take your dish to the next level.

FAQs

Here are some frequently asked questions about this delightful recipe:

  • Can I use frozen salmon? Yes! Just ensure it’s fully thawed before marinating and cooking.
  • What can I substitute for soy sauce? If you’re avoiding soy, you can use tamari or coconut aminos for a gluten-free option.
  • Can I make this dish on the grill? Absolutely! Just make sure to use a grill-safe pan or foil to hold the marinade and salmon together.

Troubleshooting

If you’re facing any hiccups, here are some common issues and solutions:

  • My salmon is overcooked: Next time, reduce the cooking time by a minute or two and check for doneness sooner.
  • It’s not flavorful enough: Allow the salmon to marinate longer next time, or increase the amount of garlic or honey in the marinade.

Conclusion

In conclusion, Honey-Garlic Roasted Salmon is the kind of dish that feels like a warm embrace—comforting, delicious, and utterly satisfying. With its simple yet effective ingredients and easy preparation, it’s an ideal choice for any occasion. Whether you’re cooking for family, entertaining guests, or simply treating yourself, this recipe will not disappoint. I can’t wait for you to try it and hear all about your experience. So, grab your apron and let’s get cooking—you’ve got a magical meal waiting just for you!

Impress with Honey-Garlic Roasted Salmon Delight

Prep Time 10 minutes
Cook Time 15 minutes
Total Time 25 minutes
Servings 4 servings
Calories 350
A deliciously sweet and savory roasted salmon dish that’s perfect for impressing guests or a special dinner at home.

Ingredients

Salmon

  • 4 fillets salmon fillets
  • 1/4 cup honey
  • 3 cloves garlic, minced
  • 2 tablespoons soy sauce
  • 1 tablespoon olive oil
  • 1 teaspoon lemon juice
  • to taste salt and pepper

Garnish

  • chopped fresh parsley (for garnish)

Instructions 

  • Preheat oven to 400°F (200°C).
  • Mix honey, garlic, soy sauce, olive oil, lemon juice, salt, and pepper.
  • Pour mixture over salmon in a baking dish.
  • Marinate for 15 minutes.
  • Bake for 12-15 minutes until flaky.
  • Garnish with parsley before serving.

Notes

For extra flavor, marinate longer or broil for a crispy top.
Calories: 350kcal
Cost: $15
Course: Main Course
Cuisine: American
Keyword: Salmon

Loved this recipe? Save it to your favorite Pinterest board so you can easily find it later! It’s the perfect way to keep all your sweet ideas in one place. ✨

Eye-level view of a perfectly cooked salmon fillet showing caramelized honey garlic topping and side vegetables.

Why This Lasagna Will Steal Your Heart

Is there anything more comforting than a steaming slice of homemade lasagna? The layers of pasta, rich sauce, and gooey cheese meld together to create a dish that embodies warmth, love, and family gatherings. My take on this classic Italian comfort food is a delightful blend of flavors and textures, featuring fresh herbs and a variety of cheeses that will make your taste buds sing.

Lasagna is that one dish that seems to bring everyone together. Whether it’s a chilly winter evening or a festive family reunion, this layered masterpiece always manages to create a cozy atmosphere. And the best part? It’s surprisingly straightforward to make, even for novice cooks! So, roll up your sleeves and let’s dive into the world of layered love.

Overview of Ingredients

Before we embark on our lasagna journey, let’s gather our ingredients. Here’s what you’ll need to create this delicious homemade lasagna:

  • 9 lasagna noodles
  • 1 pound ground beef
  • 2 cups ricotta cheese
  • 2 cups shredded mozzarella cheese
  • 1 cup grated parmesan cheese
  • 2 cups marinara sauce
  • 1 egg
  • 2 tablespoons fresh basil, chopped
  • 2 tablespoons fresh parsley, chopped
  • 1 teaspoon salt
  • 1/2 teaspoon black pepper
  • 1/2 teaspoon garlic powder
  • 1/2 teaspoon onion powder

These ingredients combine to create a symphony of flavors that will have your guests asking for seconds (or thirds!). Plus, you can easily adapt this recipe for vegetarian or vegan diets—just swap out the meat and cheese for your favorite plant-based alternatives!

Step-by-Step Instructions

A beautifully presented slice of lasagna with layers of cheese and herbs, set against a dark plate.

Let’s get to the good part—making the lasagna! Follow these steps, and soon you’ll have a bubbling dish that fills your kitchen with the aroma of home.

  1. Preheat your oven: Start by preheating your oven to 375°F (190°C). This ensures that your lasagna cooks evenly and the cheese gets perfectly bubbly.
  2. Cook the noodles: In a large pot of boiling salted water, cook the lasagna noodles according to the package instructions until they are al dente. Drain them and set aside. Don’t forget to toss them in a little olive oil to prevent sticking!
  3. Brown the beef: In a skillet over medium heat, brown the ground beef until it’s fully cooked. Drain any excess fat to keep your lasagna from becoming greasy.
  4. Mix the ricotta filling: In a mixing bowl, combine the ricotta cheese, egg, chopped basil, chopped parsley, salt, pepper, garlic powder, and onion powder. Stir until everything is well incorporated. This filling is creamy and packed with flavor!
  5. Layer the lasagna: In a 9×13 inch baking dish, spread a thin layer of marinara sauce on the bottom. Then, place 3 lasagna noodles over the sauce. On top of the noodles, spread half of the ricotta mixture, followed by half of the ground beef, and a third of the mozzarella cheese. Repeat this layering process with another 3 noodles, the remaining ricotta mixture, the remaining ground beef, and another third of the mozzarella cheese.
  6. Add the final layer: Top with the last 3 noodles, then spread the remaining marinara sauce over the top. Finish it off with the remaining mozzarella and Parmesan cheese. This final layer of cheese is what dreams are made of!
  7. Bake: Cover the dish with aluminum foil and bake for 25 minutes. Then, remove the foil and bake for an additional 15 minutes or until the cheese is bubbly and golden brown.
  8. Cool and serve: Once out of the oven, let the lasagna cool for about 10 minutes before slicing. This resting time allows the layers to set, making it easier to serve. Cut yourself a generous slice, serve it on a black plate for that Instagram-worthy moment, and enjoy!

Tips for the Perfect Lasagna

As with any recipe, a few tips can elevate your homemade lasagna from good to unforgettable:

  • Use fresh herbs: Fresh basil and parsley make a world of difference in flavor. Dried herbs can work in a pinch, but fresh herbs add a vibrancy that’s hard to replicate.
  • Let it cool: Allowing the lasagna to rest after baking not only makes it easier to cut, but it also enhances the flavors as they meld together.
  • Experiment with cheese: While mozzarella and ricotta are traditional, feel free to mix in a bit of fontina or gouda for a unique twist!

Variations to Try

Cooking is all about creativity! Here are some fun variations to put your own spin on this classic dish:

  • Vegetarian Lasagna: Substitute the ground beef with sautéed vegetables like zucchini, mushrooms, and spinach. You can also add layers of roasted vegetables for extra flavor.
  • Vegan Lasagna: Replace the cheeses with vegan alternatives and use lentils or mushrooms as a hearty filling instead of meat.
  • Spicy Kick: Add some crushed red pepper flakes or a layer of spicy sausage for those who love a little heat in their meals.

Equipment You’ll Need

To make this recipe a breeze, here’s a list of essential equipment:

  • Large pot for boiling noodles
  • Skillet for browning meat
  • Mixing bowls for combining ingredients
  • 9×13 inch baking dish
  • Aluminum foil for baking

How to Store and Freeze

Leftovers? No problem! Here’s how to store your delicious creation:

  • Refrigerating: Store leftover lasagna in an airtight container in the fridge for up to 4 days. Just reheat in the oven or microwave when you’re ready to indulge again.
  • Freezing: You can freeze lasagna before or after baking. If freezing before baking, assemble it in the dish, cover tightly with foil, and freeze for up to 3 months. When ready to bake, just add an extra 15-20 minutes to the cooking time. For baked lasagna, allow it to cool completely before wrapping and freezing.

Frequently Asked Questions

Here are some common questions that arise when making lasagna:

Can I use no-boil lasagna noodles?

Absolutely! No-boil noodles can save you time. Just make sure to add a bit more sauce to keep the layers moist.

What can I serve with lasagna?

A fresh salad, garlic bread, or a side of roasted vegetables pair beautifully with lasagna.

Can I make lasagna ahead of time?

Yes! You can prepare it a day in advance, store it in the refrigerator, and bake it just before serving.

Troubleshooting Common Issues

If you encounter any hiccups while making your lasagna, here are some troubleshooting tips:

  • Lasagna is too watery: Ensure you’re using the right amount of sauce and that your vegetables are well-drained if you’re using fresh ones. You can also bake it uncovered for the last few minutes to let excess moisture evaporate.
  • Cheese is not melting: If your cheese isn’t melting properly, try using a higher moisture content cheese or even adding a splash of milk to your sauce before baking.

Conclusion: A Slice of Home

Homemade lasagna is more than just a meal; it’s a tradition, a memory, and a way to show love to those around you. Whether you’re gathering with family or enjoying a quiet night in, this layered love will warm your heart and satisfy your cravings. So gather your ingredients, put on your favorite apron, and let’s create something magical together. Here’s to sharing recipes, love, and laughter—because that’s what cooking is all about!

Delicious Homemade Lasagna Recipe with Fresh Herbs and Melted Cheese on a Black Plate

Prep Time 20 minutes
Cook Time 40 minutes
Total Time 1 hour
Servings 8 servings
Calories 650
This hearty lasagna combines fresh herbs, rich cheeses, and savory meat for a comforting meal served on a sleek black plate.

Ingredients

Noodles

  • 9 pieces lasagna noodles
  • 1 pound ground beef
  • 2 cups ricotta cheese
  • 2 cups shredded mozzarella cheese
  • 1 cup grated parmesan cheese
  • 2 cups marinara sauce
  • 1 egg egg
  • 2 tablespoons fresh basil, chopped
  • 2 tablespoons fresh parsley, chopped
  • 1 teaspoon salt
  • 1/2 teaspoon black pepper
  • 1/2 teaspoon garlic powder
  • 1/2 teaspoon onion powder

Instructions 

  • Preheat oven to 375°F (190°C).
  • Cook noodles until al dente, drain, and set aside.
  • Brown ground beef, then drain excess fat.
  • Mix ricotta, egg, herbs, salt, pepper, garlic, and onion.
  • Layer sauce, noodles, ricotta, beef, and cheese in a dish. Repeat layers.
  • Bake covered 25 mins, then uncovered 15 mins until bubbly. Cool 10 mins before serving.

Notes

For best results, let the lasagna rest before slicing.
Calories: 650kcal
Cost: $15
Course: Main Course
Cuisine: Italian
Keyword: lasagna

Loved this recipe? Save it to your favorite Pinterest board so you can easily find it later! It’s the perfect way to keep all your sweet ideas in one place. ✨

Homemade lasagna with rich cheese and herbs displayed on a black plate under natural light.

Why You’ll Love This Recipe

There’s something truly magical about the combination of sweet and savory, especially when it comes to salmon. As someone who grew up surrounded by the enticing aromas of home-cooked meals, I can assure you that this Grilled Honey Garlic Salmon recipe is an absolute showstopper. It’s the kind of dish that will transform a casual weeknight dinner into a memorable feast. The first time I grilled it, I couldn’t believe how easy it was to make something so delicious. The rich flavors of honey and garlic beautifully infuse the salmon, creating a delightful balance that will leave your taste buds dancing.

This recipe is not just straightforward; it’s also versatile and health-conscious, making it perfect for busy families or anyone looking to enjoy a nutritious meal without spending hours in the kitchen. Plus, let’s be honest—who can resist a meal that’s as impressive as it is easy to prepare? So, pull up a chair, grab your apron, and let’s dive into the delicious world of grilled honey garlic salmon!

Ingredients for Grilled Honey Garlic Salmon

To whip up this delightful dish, you’ll need the following ingredients:

  • 4 salmon fillets
  • 1/4 cup honey
  • 1/4 cup soy sauce
  • 3 cloves garlic, minced
  • 1 tablespoon olive oil
  • 1 tablespoon lemon juice
  • Salt and pepper to taste
  • Chopped green onions for garnish (optional)

These ingredients come together to create a marinade that not only enhances the natural flavor of the salmon but also adds a sweet glaze that caramelizes beautifully on the grill.

How to Make Grilled Honey Garlic Salmon

Delicious grilled salmon with a golden brown crust, drizzled in a sweet and savory sauce.

Ready to embark on your grilling adventure? Follow these simple steps for a delicious outcome:

  1. Prepare the Marinade: In a bowl, whisk together the honey, soy sauce, minced garlic, olive oil, lemon juice, salt, and pepper until well combined.
  2. Marinate the Salmon: Place the salmon fillets in a shallow dish and pour the marinade over them, ensuring they are well coated. Let them marinate for at least 15 minutes—longer if you have the time. This allows the flavors to seep in.
  3. Preheat the Grill: Get your grill ready by preheating it to medium-high heat. A well-heated grill is essential for achieving that perfect char.
  4. Grill the Salmon: Remove the salmon from the marinade, reserving it for basting. Place the salmon fillets on the grill, skin side down, and cook for about 4-5 minutes on each side. Baste with the reserved marinade halfway through for extra flavor.
  5. Check for Doneness: The salmon is ready when it flakes easily with a fork and has a beautiful caramelized exterior.
  6. Rest and Serve: Remove the salmon from the grill and let it rest for a couple of minutes. This allows the juices to redistribute, making each bite even more succulent. Garnish with chopped green onions if desired, and enjoy!

Make Ahead Options

Want to make your weeknight dinner even easier? You can marinate the salmon up to 24 hours in advance, allowing the flavors to deepen and infuse. Simply prepare the marinade, add the salmon to a ziplock bag, seal it, and refrigerate. When you’re ready to cook, just take it out about 30 minutes before grilling. This makes it an ideal choice for busy evenings or last-minute gatherings.

How to Store and Freeze Grilled Honey Garlic Salmon

If you find yourself with leftovers (which is rare, but it happens!), here’s how to store them:

  • Fridge: Store leftover grilled honey garlic salmon in an airtight container for up to 3 days. This keeps the salmon fresh while retaining its delicious flavor.
  • Freezer: If you want to extend its life, wrap the salmon tightly in plastic wrap and aluminum foil, or place it in a freezer-safe bag. It can be frozen for up to 3 months. To reheat, thaw in the fridge overnight and warm in a preheated oven at 350°F for about 10-15 minutes.

What to Serve with Grilled Honey Garlic Salmon

This dish is incredibly versatile and pairs wonderfully with various sides. Here are a few ideas to consider:

  • Grilled Vegetables: Fresh seasonal veggies like zucchini, bell peppers, and asparagus complement the flavors beautifully.
  • Quinoa or Rice: A fluffy bed of quinoa or jasmine rice makes for a hearty addition, soaking up all those delicious juices.
  • Fresh Salad: A light salad with mixed greens, avocado, and a citrus vinaigrette adds a refreshing touch to your meal.

Expert Tips for the Best Grilled Honey Garlic Salmon

To ensure your grilled salmon turns out perfectly every time, keep these expert tips in mind:

  • Choose the Right Salmon: Opt for skin-on fillets as they hold together better on the grill and add healthy fats for flavor.
  • Oil the Grill: A well-oiled grill prevents sticking. Brush the grates with olive oil before placing the salmon on them.
  • Don’t Rush the Flip: Allow the salmon to cook undisturbed for a few minutes. If it’s sticking, it likely needs more time to develop that beautiful caramelization.

Variations to Elevate Your Dish

Want to put your personal twist on this recipe? Here are a few variations you can try:

  • Spicy Kick: Add a sprinkle of crushed red pepper or a dash of sriracha to the marinade for some heat.
  • Herb Infusion: Incorporate fresh herbs like dill or cilantro into the marinade for added freshness.
  • Citrus Bliss: Swap the lemon juice for lime juice or add some orange zest for a citrusy twist.

Frequently Asked Questions

Can I use frozen salmon for this recipe?

Yes, you can use frozen salmon! Just make sure to thaw it thoroughly in the refrigerator before marinating.

What if I don’t have soy sauce?

No worries! You can substitute coconut aminos or tamari for a gluten-free option.

How do I know when my salmon is done?

The salmon is cooked through when it flakes easily with a fork and has an opaque color throughout. A food thermometer should read 145°F in the thickest part of the fillet.

Can I grill salmon without a grill?

Absolutely! You can cook it in a grill pan on the stovetop or even bake it in the oven at 400°F for about 15-20 minutes.

Conclusion

Grilled Honey Garlic Salmon is more than just a meal; it’s an experience that brings warmth, flavor, and a touch of sweetness to your table. Whether you’re cooking for your family, impressing guests, or simply indulging in a comforting dish after a long day, this recipe is sure to become a favorite in your kitchen. So gather your ingredients, fire up the grill, and enjoy the delightful flavors of this sweet and savory salmon. Happy cooking, my friends!

Grilled Honey Garlic Salmon: Sweet & Savory Weeknight Dish

Prep Time 10 minutes
Cook Time 10 minutes
Total Time 20 minutes
Servings 4 servings
Calories 350
A quick and flavorful salmon dish featuring a sweet and savory marinade, perfect for weeknights.

Ingredients

Main ingredients

  • 4 fillets salmon fillets
  • 1/4 cup honey
  • 1/4 cup soy sauce
  • 3 cloves garlic, minced
  • 1 tablespoon olive oil
  • 1 tablespoon lemon juice
  • to taste salt and pepper
  • chopped green onions for garnish (optional) green onions (for garnish)

Instructions 

  • Whisk honey, soy sauce, garlic, olive oil, lemon juice, salt, and pepper.
  • Marinate salmon for at least 15 minutes.
  • Preheat grill to medium-high.
  • Grill salmon 4-5 minutes per side, basting with marinade.
  • Rest briefly, garnish with green onions if desired, and serve.

Notes

Ensure not to overcook the salmon for best texture.
Calories: 350kcal
Cost: $15
Course: Main Course
Cuisine: American
Keyword: Salmon

Loved this recipe? Save it to your favorite Pinterest board so you can easily find it later! It’s the perfect way to keep all your sweet ideas in one place. ✨

Juicy salmon fillet topped with honey garlic glaze and fresh green onions, shot in natural light.

Why You’ll Fall for These Crunchy Caesar Chicken Melts

There’s something about a good melt that just warms the heart, isn’t there? When I think of comfort food, gooey cheese, savory chicken, and a delightful crunch come to mind. And that’s exactly what these Crunchy Caesar Chicken Melts bring to the table—a symphony of flavors and textures that will make your taste buds dance with joy!

Picture this: it’s a chilly evening, and you’re looking for something easy yet satisfying to whip up for dinner. You’ve got some leftover rotisserie chicken lying around, and you’re wondering how to elevate it into a meal that feels special. Enter these melts—an irresistible twist on the classic Caesar salad that will have your family asking for seconds (and maybe even thirds!). Let’s dive into the magic of this recipe and discover why it’s destined to become a staple in your kitchen.

Ingredients That Make It All Happen

Before you embark on this culinary adventure, let’s gather our ingredients. Here’s what you’ll need:

  • 2 cups cooked chicken, shredded
  • 1/2 cup Caesar dressing
  • 1 cup grated parmesan cheese
  • 1 cup shredded mozzarella cheese
  • 1 cup crushed croutons
  • 4 large tortillas or pita bread
  • 1 tablespoon olive oil
  • Salt and pepper to taste
  • Fresh parsley for garnish

These ingredients are simple yet packed with flavor. The combination of creamy Caesar dressing with tender chicken and cheesy goodness is simply irresistible!

Steps to Melty Perfection

Deliciously layered Crunchy Caesar Chicken Melts served on a tortilla, showcasing melted cheese and fresh herbs.

Now that we’ve got our ingredients ready, let’s get cooking. Follow these straightforward steps to create your own Crunchy Caesar Chicken Melts:

  1. Preheat your oven to 400°F (200°C). This will ensure our melts are perfectly crisped up when they’re ready.
  2. In a large bowl, combine the shredded chicken, Caesar dressing, parmesan cheese, and a pinch of salt and pepper. Mix well until everything is evenly coated. This step is where the magic begins—each bite will be bursting with flavor!
  3. Lay out the tortillas or pita bread on a baking sheet. Lay them flat, ready to be loaded with deliciousness.
  4. Spread a generous amount of the chicken mixture onto each tortilla or pita. Don’t be shy here; the more, the merrier!
  5. Sprinkle mozzarella cheese and crushed croutons evenly over the chicken mixture on each tortilla. The croutons are the secret ingredient that adds that delightful crunch!
  6. Drizzle olive oil lightly over the tops of the melts. This will help achieve that golden, crispy finish that we all crave.
  7. Bake in the preheated oven for 10-12 minutes, or until the cheese is melted and bubbly. You’ll know they’re ready when your kitchen is filled with an irresistible aroma!
  8. Remove from the oven and let cool for a minute before slicing. Trust me, you’ll want to give them a moment to set.
  9. Garnish with fresh parsley and serve warm. This little touch of green not only adds color but also a fresh burst of flavor!

Why These Melts Are a Game Changer

These Crunchy Caesar Chicken Melts are not just any ordinary meal; they’re a delightful fusion of flavors and textures that will have your family raving. The creamy dressing, savory chicken, and the satisfying crunch of the croutons perfectly complement each other. Plus, they’re incredibly versatile—you can enjoy them for lunch, dinner, or even as a fun appetizer for game night.

Tips for the Perfect Melts

To ensure your melts turn out perfectly every time, here are a few insider tips:

  • Use Quality Ingredients: Fresh, high-quality Caesar dressing and cheeses make a world of difference in flavor.
  • Don’t Skip the Croutons: They add essential crunch. If you don’t have croutons, you can toast some bread cubes in the oven with a little olive oil and seasoning.
  • Experiment with Cheeses: While mozzarella and parmesan are classic choices, feel free to mix in some sharp cheddar or pepper jack for a kick!

Creative Variations to Try

Feeling adventurous? Here are some fun variations to take your melts to the next level:

  • BBQ Caesar Chicken Melts: Swap out the Caesar dressing for your favorite BBQ sauce for a smoky twist.
  • Buffalo Caesar Chicken Melts: Add a splash of buffalo sauce to the chicken mixture for a spicy kick.
  • Vegetarian Option: Replace the chicken with roasted vegetables or a mix of beans for a delicious vegetarian alternative.

Substitutions You Can Make

Don’t have everything on hand? No problem! Here are some easy substitutions:

  • Instead of tortillas, you can use whole grain bread or even lettuce wraps for a low-carb option.
  • If you’re out of croutons, crushed crackers or even nuts can add a nice crunch.
  • Swap the chicken for leftover turkey or even chickpeas for a hearty vegetarian option.

Essential Equipment for Success

Before you start, make sure you have the following equipment:

  • Baking sheet
  • Large mixing bowl
  • Spatula for spreading the mixture
  • Oven mitts for safety

Storage and Freezing Tips

If you find yourself with leftovers (though I doubt you will!), here’s how to store them:

To store, place the cooled melts in an airtight container and refrigerate for up to 3 days. When you’re ready to enjoy them again, simply reheat in the oven at 350°F (175°C) until warmed through.

If you want to freeze them, wrap each melt in plastic wrap and place them in a freezer-safe bag. They can be frozen for up to 2 months. Just be sure to thaw them in the refrigerator before reheating.

FAQs About Crunchy Caesar Chicken Melts

Can I make these ahead of time?
Absolutely! You can prepare the filling and spread it on the tortillas ahead of time. Just cover them and refrigerate until you’re ready to bake.

What can I serve with these melts?
They pair beautifully with a fresh salad or some roasted vegetables. You could even serve them with a side of homemade potato wedges for a heartier meal.

Troubleshooting Common Issues

If your melts don’t turn out quite right, don’t fret! Here are a couple of common pitfalls and how to avoid them:

  • Cheese Not Melting: Make sure your oven is fully preheated and check that you’re using cheese that melts well.
  • Too Soggy: If your melts are soggy, try baking them a little longer to crisp them up. You can also drain any excess liquid from the chicken mixture before spreading it on the tortillas.

Conclusion: Your New Favorite Comfort Food Awaits

There you have it—Crunchy Caesar Chicken Melts that are not only simple to make but also absolutely delightful to eat! With their irresistible blend of flavors and textures, they’re sure to become a household favorite. So gather your ingredients, preheat that oven, and let the aroma of cheesy goodness fill your kitchen. I promise, once you bite into these melts, you’ll understand why they’re destined to steal your heart. Happy cooking, my friends!

Crunchy Caesar Chicken Melts: A Tasty Twist You’ll Love!

Prep Time 10 minutes
Cook Time 12 minutes
Total Time 22 minutes
Servings 4 pieces
Calories 550
Enjoy these crispy, cheesy chicken melts with a flavorful Caesar twist, perfect for a quick and satisfying meal.

Ingredients

Chicken

  • 2 cups cooked chicken, shredded
  • 0.5 cup caesar dressing
  • 1 cup grated parmesan cheese
  • 1 cup shredded mozzarella cheese
  • 1 cup crushed croutons
  • 4 large tortillas or pita bread
  • 1 tablespoon olive oil
  • to taste salt and pepper
  • for garnish fresh parsley

Instructions 

  • Preheat oven to 400°F (200°C).
  • Mix shredded chicken, Caesar dressing, Parmesan, salt, and pepper.
  • Spread mixture on tortillas, top with mozzarella and croutons.
  • Drizzle with olive oil and bake 10-12 minutes until bubbly.
  • Let cool slightly, garnish with parsley, then serve.

Notes

For extra crunch, add more croutons or serve with a side salad.
Calories: 550kcal
Cost: $15
Course: Main Course
Cuisine: American
Keyword: Chicken

Loved this recipe? Save it to your favorite Pinterest board so you can easily find it later! It’s the perfect way to keep all your sweet ideas in one place. ✨

Appetizing Crunchy Caesar Chicken Melts featuring crispy edges, rich textures, and vibrant colors.

Why You’ll Love This Recipe

There’s something undeniably comforting about a meal that is quick to prepare yet bursting with flavor. Enter Baked Garlic Lemon Salmon in Foil—a cozy dish that feels like a warm hug on a plate! Imagine tender, flaky salmon infused with the vibrant zest of lemon and the aromatic kiss of garlic, all wrapped up in a neat little foil packet. It’s not just a recipe; it’s an experience that transforms any weeknight dinner into something special.

This dish is not only easy to whip up, but it also embodies the essence of home-cooked goodness that makes you feel connected to your loved ones. Whether you’re cooking for a family gathering or just treating yourself after a long day, this recipe promises to deliver satisfaction with every bite. Plus, it’s healthy and loaded with Omega-3s, making it a win-win for your taste buds and your body!

Ingredients You’ll Need

To create this culinary delight, gather the following ingredients:

  • 4 salmon fillets
  • 4 cloves garlic, minced
  • 2 tablespoons olive oil
  • 1 lemon, sliced
  • 1 teaspoon salt
  • 1/2 teaspoon black pepper
  • 1 tablespoon fresh parsley, chopped

How to Bring This Recipe to Life

A beautifully presented salmon dish in foil, highlighting garlic and lemon toppings.

Ready to dive into the cooking process? Let’s get those flavors dancing! Here’s how you can prepare this Baked Garlic Lemon Salmon in Foil:

  1. Preheat your oven to 375°F (190°C).
  2. Cut four pieces of aluminum foil, large enough to wrap each salmon fillet.
  3. In a small bowl, mix the minced garlic, olive oil, salt, and black pepper together until combined.
  4. Place each salmon fillet on a piece of foil and spread the garlic mixture evenly over the top of each fillet.
  5. Top each fillet with lemon slices and a sprinkle of chopped parsley, adding a pop of color and flavor.
  6. Fold the foil over the salmon to create a sealed packet, ensuring that no steam escapes during cooking.
  7. Place the foil packets on a baking sheet and bake for 15-20 minutes, or until the salmon is cooked through and flakes easily with a fork.
  8. Remove from the oven and carefully open the foil packets, being cautious of the steam that escapes. Serve the salmon warm with additional lemon wedges if desired.

Tips for Perfect Salmon

Every cook has their secrets, and here are a few of mine to ensure your salmon turns out perfectly:

  • Check for Freshness: Always choose fresh salmon that has a bright color and a clean smell. If you can, buy from a trusted fishmonger.
  • Don’t Overcook: The key to juicy salmon is to avoid overcooking. Keep an eye on the time and check for doneness a couple of minutes before the suggested time.
  • Use a Meat Thermometer: If you’re unsure, use a meat thermometer to check the internal temperature. It should read 145°F (63°C) for perfectly cooked salmon.

Flavor Variations

Feel free to get creative with this recipe! Here are some variations to consider:

  • Add Spice: If you love a little heat, sprinkle some red pepper flakes or a dash of cayenne pepper in the garlic mixture.
  • Herb Infusion: Swap in fresh dill or thyme for parsley for a different herbal note.
  • Honey Glaze: Drizzle some honey over the salmon before sealing the foil for a sweet twist that pairs beautifully with the lemon.

Substitutions to Consider

Can’t find a specific ingredient? No worries! Here are some substitutions:

  • Salmon: Any firm white fish, like cod or halibut, can work in place of salmon.
  • Olive Oil: Avocado oil or melted butter can be used instead of olive oil for a different flavor.
  • Fresh Herbs: If you don’t have fresh herbs, dried herbs can be used—just remember to use about a third of the amount.

Equipment You’ll Need

To make this dish, you’ll need just a few simple tools:

  • Baking sheet
  • Aluminum foil
  • Mixing bowl
  • Measuring spoons
  • Knife and cutting board

Storage and Freezing Tips

If you happen to have leftovers (though I doubt you will!), here’s how to store them:

  • Refrigeration: Store leftover salmon in an airtight container in the fridge for up to 3 days.
  • Freezing: Allow the salmon to cool completely before wrapping tightly in foil or plastic wrap, then place in a freezer-safe bag. It can be frozen for up to 2 months.
  • Reheating: To reheat, place the salmon in a foil packet and warm it in the oven until heated through.

FAQs About Baked Salmon

Here are some common questions I often hear about cooking salmon:

  • Can I use frozen salmon? Yes! Just make sure to thaw it completely before cooking for even results.
  • What sides pair well with this dish? I love serving this salmon with roasted vegetables, quinoa, or a light salad.
  • Can I make this dish in advance? You can prepare the foil packets ahead of time and store them in the fridge until you’re ready to bake.

Troubleshooting Common Issues

If you find yourself facing any hiccups in the kitchen, here are some tips to navigate:

  • Salmon is too dry: Ensure you’re checking the salmon for doneness early. If it feels dry, it may have been overcooked.
  • Fish doesn’t have enough flavor: Make sure to generously season and marinate the fish in the garlic mixture before cooking.
  • Foil packets are leaking: Ensure that you seal the packets tightly. If needed, you can double-wrap them for added security.

Serving Suggestions

To elevate your dining experience, consider serving the Baked Garlic Lemon Salmon in Foil with:

  • Easy Roasted Potatoes: Crispy and golden, they complement the salmon perfectly.
  • Asian Brussels Sprouts: Their crunch adds a delightful contrast to the tenderness of the fish.
  • Creamy Ricotta Zucchini Noodles: A light, refreshing side that balances out the meal.

In Conclusion

This Baked Garlic Lemon Salmon in Foil recipe is more than just a meal; it’s a way to bring warmth and comfort to your table. With its simple ingredients and effortless preparation, it’s perfect for any occasion—be it a casual weeknight dinner or a special gathering with friends. So grab your ingredients, preheat that oven, and let the magic unfold! I can’t wait for you to share this recipe with your loved ones, and remember: cooking is all about enjoying the process. Happy cooking!

Baked Garlic Lemon Salmon in Foil - Slender Kitchen

Prep Time 10 minutes
Cook Time 20 minutes
Total Time 30 minutes
Servings 4 servings
Calories 350
This easy and flavorful baked salmon recipe is perfect for a healthy dinner, featuring garlic, lemon, and fresh herbs wrapped in foil for tender, juicy results.

Ingredients

Salmon

  • 4 fillets salmon fillets
  • 4 cloves garlic, minced
  • 2 tablespoons olive oil
  • 1 lemon, sliced
  • 1 teaspoon salt
  • 0.5 teaspoon black pepper
  • 1 tablespoon fresh parsley, chopped

Instructions 

  • Preheat oven to 375°F (190°C).
  • Mix garlic, olive oil, salt, and pepper.
  • Place salmon on foil, spread with garlic mixture, top with lemon and parsley.
  • Seal foil and bake for 15-20 minutes.
  • Open foil carefully, serve with lemon wedges.

Notes

Use fresh lemon for the best flavor.
Calories: 350kcal
Cost: $15
Course: Main Course
Cuisine: American
Keyword: Salmon

Loved this recipe? Save it to your favorite Pinterest board so you can easily find it later! It’s the perfect way to keep all your sweet ideas in one place. ✨

A delicious serving of salmon wrapped in foil, featuring fresh herbs and citrus.

Welcome to a Cozy Kitchen Adventure!

Hey there, friend! I’m so glad you’ve wandered into my kitchen today. If you’re here, it’s likely because you’re in search of a dish that feels like home. Well, let me introduce you to a classic that’s close to my heart: the Tuna Rice Casserole. This dish is not just any casserole; it’s a warm hug in a baking dish, ready to bring comfort and joy to your dinner table.

This tuna casserole is the kind of meal that comes together in just 20 minutes, making it perfect for those busy weeknights when you want something delicious without spending hours in the kitchen. With tender rice, savory tuna, and creamy goodness, it’s a dish everyone in the family will love. So, let’s dive right in!

Why You’ll Love This Recipe

  • Quick and Easy: Whether you’re racing against the clock or just want a hassle-free meal, this casserole is ready in a snap—just 20 minutes from start to finish!
  • Comfort Food Classic: It’s the kind of dish that brings back memories of family dinners, cozy nights in, and the smell of something delicious wafting through the house.
  • Customizable: Want to switch it up? This recipe is flexible! Add your favorite veggies or try it with different proteins. The possibilities are endless.
  • Budget-Friendly: Tuna is a fantastic pantry staple that won’t break the bank, making this casserole a perfect go-to for families and individuals alike.
  • Leftover Love: This dish keeps well, so you can have tasty leftovers for lunch or dinner the next day. It’s even better when reheated!

Ingredient Breakdown

Now that you’re excited, let’s talk about what you’ll need to whip up this amazing tuna rice casserole:

  • 1 can (5 ounces) tuna: Make sure to drain it well. If you prefer a different protein, rotisserie chicken works beautifully here.
  • 2 cups cooked rice: Use leftover rice for an even quicker prep. Brown rice or quinoa can also be great substitutes for a health boost.
  • 1/2 cup chopped celery: Adds a nice crunch! You can swap this with chopped bell peppers or green onions if you’d like.
  • 1/4 cup chopped onion: Gives a savory depth. If you’re not a fan of onion, omit it or use onion powder instead.
  • 1/2 cup shredded cheddar cheese: The melty goodness that binds it all together! Feel free to experiment with different cheeses like mozzarella or pepper jack.
  • 1/4 cup mayonnaise: This adds creaminess. Greek yogurt is a lighter alternative if you prefer.
  • 1/4 cup milk: Use any milk you have on hand, even plant-based options.
  • 1 teaspoon lemon juice: Brightens up the flavors. You can substitute with vinegar if you need to.
  • Salt and pepper to taste: Essential for bringing all the flavors together!

How to Make Tuna Rice Casserole

Juicy tuna casserole with a golden topping, served in a glass baking dish.

Ready to get cooking? Here’s how to bring this dish to life:

  1. Preheat your oven to 375°F (190°C).
  2. In a large bowl, combine the drained tuna, cooked rice, chopped celery, and chopped onion.
  3. In a separate small bowl, whisk together the shredded cheddar cheese, mayonnaise, milk, and lemon juice until smooth.
  4. Pour the cheese mixture over the tuna and rice mixture.
  5. Season with salt and pepper to your liking.
  6. Stir everything together until well combined.
  7. Transfer the mixture to a greased 8×8 inch baking dish.
  8. Bake for 20-25 minutes, or until the casserole is heated through and bubbly, and the cheese is melted and lightly golden.
  9. Let it rest for a few minutes before serving—if you can wait that long!

Pro Tips for Success

  • Quality Tuna: Opt for chunk light tuna in water for the best flavor and texture.
  • Don’t Overmix: When combining the ingredients, mix just enough to incorporate everything. This keeps the casserole fluffy!
  • Make It Ahead: Prepare the casserole a day in advance, store it in the fridge, and pop it in the oven when you’re ready to eat. Just add a few extra minutes to the baking time.
  • Experiment with Toppings: Consider adding crushed potato chips or breadcrumbs on top for a delightful crunch.
  • Don’t Skimp on Seasoning: Taste as you go! Adjust the salt and pepper to suit your palate.
  • Use Leftover Rice: This is a perfect way to utilize leftover rice from another meal.
  • Check for Doneness: Ensure the casserole is heated through by checking the center with a knife.
  • Mix in Veggies: Feel free to sneak in some peas or corn for added nutrition and a pop of color!

Common Mistakes and Troubleshooting

We’ve all had those moments in the kitchen. Here are some common pitfalls and how to avoid them:

  • Dry Casserole: If your casserole turns out dry, it might need more moisture next time. Try adding a bit more milk or mayonnaise.
  • Too Runny: If you find your casserole too soupy, reduce the amount of milk or add more rice to absorb the excess liquid.
  • Flavorless Dish: Make sure to season well! Taste before baking and adjust accordingly.
  • Burnt Cheese: If your cheese is browning too quickly, cover the casserole with foil until the last few minutes of baking.

Variations to Try

Variety is the spice of life! Here are some fun twists on this classic tuna rice casserole:

  • Chicken Noodle Casserole: Substitute tuna with shredded rotisserie chicken for a comforting chicken noodle twist.
  • Veggie Delight: Add a medley of steamed vegetables like broccoli, carrots, or spinach for a nutritious boost.
  • Spicy Tuna Casserole: Mix in some diced jalapeños or a dash of hot sauce for a kick that’ll wake up your taste buds.
  • Italian Herb Casserole: Incorporate Italian seasoning and switch to mozzarella cheese for a deliciously herby flavor profile.

Storage and Make-Ahead Instructions

This casserole is perfect for meal prep! Here’s how to store and reheat:

  • Refrigerator: Store leftover casserole in an airtight container for up to 3 days.
  • Freezer: You can freeze the unbaked casserole for up to 2 months. Thaw in the fridge overnight before baking.
  • Reheating: To reheat, cover with foil and warm in a 350°F (175°C) oven until heated through, about 20-25 minutes.

Frequently Asked Questions

Got questions? I’ve got answers! Here are some common queries about this dish:

  • Can I use brown rice instead of white? Absolutely! Brown rice adds extra fiber and a nutty flavor.
  • Is this casserole gluten-free? Yes, as long as you use gluten-free mayonnaise and rice, you’re good to go!
  • What can I add for extra protein? You can boost the protein by adding cooked chickpeas or more tuna!
  • How can I make this dish vegetarian? Swap the tuna for cooked lentils or chickpeas for a filling vegetarian option.
  • Can I prepare this casserole in advance? Yes! Assemble it the night before and bake it when you’re ready to eat.
  • What side dishes go well with this casserole? A simple green salad or steamed vegetables make perfect pairings.
  • Can I use frozen vegetables? Definitely! Just add them in frozen and they’ll cook perfectly in the oven.
  • How do I know when it’s done? The casserole should be bubbly and the top slightly golden brown.

Nutrition Tips and Dietary Adaptations

Want to make this dish even healthier? Here are some tips:

  • Lean Protein: Use low-sodium tuna to reduce sodium intake.
  • Whole Grains: Opt for brown rice or quinoa for added nutrition.
  • Lower Fat Options: Substitute mayonnaise with Greek yogurt for a lighter version.
  • Increase Veggies: Boost the veggie content for extra fiber and vitamins.

Equipment Recommendations

Before we wrap up, here’s what you’ll need:

  • Mixing Bowls: A large bowl for combining ingredients and a smaller one for the cheese mixture.
  • Baking Dish: An 8×8 inch baking dish works perfectly for this recipe.
  • Whisk: For mixing the cheese and liquid ingredients smoothly.
  • Spatula: Essential for folding ingredients together gently.

Serving Suggestions

Now that your casserole is ready, here are some ideas for serving:

  • Fresh Herbs: Garnish with chopped parsley or dill for a fresh touch.
  • Hot Sauce: A drizzle of your favorite hot sauce can add a delightful kick!
  • Crunchy Toppings: Serve with a side of crunchy crackers or a simple green salad for a complete meal.

Final Thoughts

And there you have it, my friend! A Tuna Rice Casserole that’s not just quick and easy, but also packed with flavor and nostalgia. Whether you’re cooking for a family gathering or just treating yourself to a comforting meal, this recipe will surely impress.

Remember, cooking is all about experimenting and making it your own. Don’t be afraid to add your twist to this classic dish! I can’t wait to hear how your casserole turns out, so be sure to drop a comment below or share your version. Until next time, happy cooking and may your kitchen always be filled with love and laughter!

Amazing Tuna Rice Casserole: 20-Minute Comfort

Prep Time 10 minutes
Cook Time 20 minutes
Total Time 30 minutes
Servings 4 servings
Calories 450
A quick and hearty casserole combining tuna, rice, and cheese for a comforting meal in just 20 minutes.

Ingredients

Canned Goods

  • 1 can tuna, drained
  • 2 cups cooked rice
  • 0.5 cup chopped celery
  • 0.25 cup chopped onion
  • 0.5 cup shredded cheddar cheese
  • 0.25 cup mayonnaise
  • 0.25 cup milk
  • 1 teaspoon lemon juice

Seasonings

  • to taste Salt and pepper

Instructions 

  • Preheat oven to 375°F (190°C).
  • Mix tuna, rice, celery, and onion in a bowl.
  • Whisk cheese, mayonnaise, milk, and lemon juice; pour over mixture.
  • Season with salt and pepper, then stir to combine.
  • Transfer to a greased baking dish and bake 20 minutes.
  • Let rest a few minutes before serving.

Notes

You can add a dash of hot sauce or herbs for extra flavor.
Calories: 450kcal
Cost: $10
Course: Main Course
Cuisine: American
Keyword: Tuna

Welcome to Your New Favorite Comfort Food: Lazy Lasagna

If you’re looking for a dish that’s as comforting as a hug from your grandmother, you’ve landed in the right place. This Lazy Lasagna is the perfect blend of nostalgia and convenience, designed for those busy weeknights when you still want to impress. With layers of gooey cheese, hearty meat, and tender noodles, this dish captures all the magic of traditional lasagna without the fuss. Let’s dive into why this lazy lasagna recipe is destined to become a staple in your kitchen!

Why You’ll Love This Recipe

  • Quick Preparation: This lazy lasagna can be whipped up in just 30 minutes, making it perfect for those evenings when time is not on your side.
  • Layered Comfort: Enjoy all the classic flavors of lasagna without the tedious layering. It’s a one-pot wonder that still delivers on taste.
  • Family-Friendly: Kids and adults alike will adore this dish. It’s cheesy, hearty, and downright satisfying—what’s not to love?
  • Versatile Ingredients: Feel free to swap in your favorite proteins or veggies. This recipe is so adaptable that it welcomes your personal touch.
  • Leftover Friendly: Lazy lasagna stores beautifully; it’s even better the next day! Perfect for meal prep or feeding a crowd.

Ingredients Breakdown

Let’s gather our ingredients! Here’s what you’ll need for this easy lazy lasagna:

  • 1 cup wide egg noodles: These provide the perfect base. If you’re out of egg noodles, feel free to use any pasta shape you have on hand!
  • 0.5 pound ground beef: A classic choice for a hearty lasagna. Ground turkey or chicken works just as well for a lighter option.
  • 4 ounces bulk Italian sausage: Adds a delicious flavor kick; you can use spicy or mild based on your preference.
  • 1.5 cups marinara sauce: Choose your favorite jarred sauce or whip up a quick homemade version. Either way, it’s the heart of this dish!
  • 0.5 cup cottage cheese: This creates a creamy texture. Ricotta can be used if you prefer a richer flavor.
  • 0.333 cups grated Parmesan cheese, divided: A must-have for that cheesy, golden topping.
  • 0.25 teaspoon onion powder: For flavor depth.
  • 0.25 teaspoon garlic salt: Because garlic makes everything better!
  • 0.25 teaspoon Italian seasoning: A blend of herbs that enhances the overall flavor.
  • 0.5 cup grated mozzarella cheese: The star of the show! Use fresh mozzarella for a gourmet touch.

How to Make Lazy Lasagna

Juicy lazy lasagna layered with noodles, ground beef, and marinara.

Follow these easy steps to create your masterpiece:

  1. Preheat the Oven: Preheat your oven to 350°F (175°C). This will ensure your lasagna cooks evenly.
  2. Cook the Noodles: In a large pot, bring lightly salted water to a boil. Cook the egg noodles until they are tender yet firm to the bite, about 7 to 9 minutes. Drain and set aside.
  3. Brown the Meat: In a large skillet over medium-high heat, cook the ground beef and sausage until browned and crumbly, about 5 to 7 minutes. Drain excess grease.
  4. Combine Ingredients: Stir in the marinara sauce, cooked egg noodles, cottage cheese, 2 tablespoons of Parmesan cheese, onion powder, garlic salt, and Italian seasoning. Mix until everything is well combined.
  5. Assemble the Dish: Pour the mixture into an 8-inch square baking dish. Top with mozzarella cheese and sprinkle the remaining Parmesan on top.
  6. Bake: Place your baking dish in the preheated oven and bake until the cheese is golden brown, about 25 minutes.

Pro Tips for Perfect Lazy Lasagna

  • Layering Made Easy: If you want to add veggies, consider spinach or zucchini for added nutrition without compromising flavor.
  • Cheese Variations: Experiment with different cheese combinations like adding ricotta or using a blend of mozzarella and provolone.
  • Meat Alternatives: For a vegetarian version, replace the meat with sautéed mushrooms or a mix of your favorite vegetables.
  • Freezing Tips: This lazy lasagna freezes well! Assemble it without baking, then cover tightly and freeze for up to three months. Thaw in the fridge before baking.
  • Spice it Up: Add crushed red pepper flakes for an extra kick, or sprinkle fresh basil before serving for a flavor boost.
  • Serving Size: This dish serves about 4-6 people, making it ideal for family dinners or potlucks.
  • Garnishing: Fresh parsley or basil adds a lovely touch and bright flavor when serving.
  • Don’t Rush the Cheese: Allow the cheese to melt and bubble for the best texture; it’s worth the wait!

Common Mistakes and Troubleshooting

Even the best of us have kitchen mishaps. Here are some potential pitfalls and how to avoid them:

  • Overcooking Noodles: Make sure to cook your noodles al dente; they’ll soften further in the oven.
  • Too Much Sauce: While it’s tempting to add more sauce, this can lead to a soupy lasagna. Stick to the recipe for balance.
  • Uneven Baking: Ensure even heat distribution in your oven. If you find that one side cooks faster, rotate the dish halfway through baking.

Variations to Try

Get creative with these twists on the classic lazy lasagna:

  • Mexican Lazy Lasagna: Substitute marinara with salsa and add black beans and corn for a fun twist.
  • Spinach and Ricotta: Swap cottage cheese for ricotta and layer in fresh spinach for a healthier option.
  • Buffalo Chicken Lazy Lasagna: Use shredded buffalo chicken instead of beef for a spicy kick!
  • Vegetarian Delight: Stack in layers of roasted vegetables like zucchini, bell peppers, and eggplant for a colorful, hearty meal.

Storage and Make-Ahead Instructions

You can easily prepare this dish in advance:

  • Make Ahead: Assemble your lazy lasagna in the baking dish but don’t bake it. Cover with foil and refrigerate for up to 24 hours.
  • Freezing: For longer storage, freeze the unbaked lasagna. Thaw overnight in the fridge before baking.
  • Leftovers: Store any leftovers in an airtight container in the fridge for up to 3 days. Reheat in the microwave or oven until heated through.

Frequently Asked Questions

  • Can I use whole wheat noodles? Absolutely! Whole wheat noodles are a great substitute and add a nutty flavor.
  • What can I serve with lazy lasagna? A fresh salad and garlic bread make perfect sides for a complete meal.
  • How can I make this dish gluten-free? Use gluten-free pasta and ensure your sauces and cheeses are gluten-free.
  • Can I make this in a slow cooker? Yes, layer the ingredients in a slow cooker and cook on low for about 4 hours.
  • Is it possible to make this dairy-free? Use dairy-free cheese alternatives and swap cottage cheese with a blended tofu mixture.
  • How spicy is this dish? It’s mild, but you can easily add chili flakes or hot sausage for heat.
  • What if I don’t have marinara sauce? Use any tomato-based pasta sauce or a simple homemade sauce with crushed tomatoes and herbs.
  • Can I use frozen noodles? Yes, just adjust the cooking time slightly to ensure they’re tender.

Nutritional Tips and Dietary Adaptations

This lazy lasagna can be tailored to fit various dietary needs:

  • Low-Carb Option: Use zucchini or thinly sliced eggplant instead of noodles.
  • High-Protein Version: Add more meat or legumes like lentils for a protein boost.
  • Lower Fat Choices: Opt for leaner ground meats and low-fat cheese.

Essential Equipment Recommendations

Before you start cooking, make sure you have the following:

  • 8-inch Square Baking Dish: Ideal for this recipe for even cooking.
  • Large Pot: For boiling noodles efficiently.
  • Large Skillet: To brown your meat to perfection.
  • Mixing Spoon: A sturdy spoon for combining all those delicious ingredients.

Serving Suggestions

To elevate your meal, consider these serving ideas:

  • Garnish: Sprinkle fresh herbs like basil or parsley on top before serving.
  • Pair with Wine: A light red wine like Chianti pairs wonderfully with the flavors of lasagna.
  • Add a Side: A simple arugula salad dressed with lemon vinaigrette balances the richness of the lasagna.

Conclusion

And there you have it! This Lazy Lasagna is more than just a meal; it’s a celebration of flavors, memories, and the joy of cooking. Whether you’re treating yourself after a long day or gathering loved ones around the table, this recipe is sure to spark smiles and seconds. So grab your spatula, embrace the magic of cooking, and enjoy every bite of this delightful dish!

Easy Lazy Lasagna

Prep Time 15 minutes
Cook Time 25 minutes
Total Time 40 minutes
Servings 4 servings
Calories 650
A quick and delicious lasagna recipe that combines simple ingredients for a comforting meal.

Ingredients

Noodles

  • 1 cup wide egg noodles
  • 0.5 pound ground beef
  • 4 ounces bulk Italian sausage
  • 1.5 cups marinara sauce
  • 0.5 cup cottage cheese
  • 0.33333334326744 cup grated Parmesan cheese, divided
  • 0.25 teaspoon onion powder
  • 0.25 teaspoon garlic salt
  • 0.25 teaspoon Italian seasoning
  • 0.5 cup grated mozzarella cheese

Instructions 

  • Preheat oven to 350°F (175°C).
  • Cook noodles until tender, drain, and set aside.
  • Brown beef and sausage, drain fat, then stir in marinara, noodles, cottage cheese, Parmesan, onion powder, garlic salt, and Italian seasoning.
  • Transfer mixture to a casserole dish, top with mozzarella and remaining Parmesan, then bake for 25 minutes until golden.

Notes

For a lighter version, use part-skim cheese and lean meat.
Calories: 650kcal
Cost: $12
Course: Main Course
Cuisine: Italian
Keyword: lasagna

Welcome to my kitchen, where we’re about to embark on a delightful journey into the world of creamy, cheesy goodness! This Alfredo Pasta Bake is more than just a meal; it’s a warm embrace at the dinner table, a dish that brings everyone together after a long day. Imagine digging into a bubbling casserole, the aroma wafting through the air, making your mouth water in anticipation. If you love comfort food as much as I do, you’re in for a treat.

This recipe is not just easy to whip up; it transforms simple ingredients into a dish that feels downright luxurious. With the perfect balance of flavors and textures, it’s bound to become a family favorite, just like it has in my home. Let’s dive into why you will absolutely love this recipe!

Why You’ll Love This Recipe

  • Quick and Easy: This dish comes together in no time, making it perfect for busy weeknights when you crave something comforting without spending hours in the kitchen.
  • Make-Ahead Friendly: You can assemble it ahead of time and pop it in the oven when you’re ready to eat, saving you precious time and effort.
  • Customizable: With endless variations possible, this alfredo pasta bake can adapt to whatever ingredients you have on hand—be it chicken, veggies, or different cheeses.
  • Family-Friendly: Kids and adults alike will love the creamy, cheesy goodness of this dish, making it a surefire crowd-pleaser for dinner parties or family gatherings.
  • Comforting and Satisfying: There’s something magical about a cheesy pasta dish that warms the soul and fills the belly, reminding you of cozy nights spent with loved ones.

Ingredients Breakdown

Gathering your ingredients is the first step, and I promise you won’t need anything too fancy! Here’s what you’ll need:

  • 12 oz penne or rigatoni pasta: Any short pasta works great! If you want a twist, try using whole grain or gluten-free pasta.
  • 2 cups cooked chicken, shredded or diced (optional): Perfect for using up leftovers—feel free to switch it up with turkey or even skip the meat for a vegetarian version!
  • 2 tbsp unsalted butter: A must for that rich flavor base.
  • 3 garlic cloves, minced: Adds a punch of flavor! Don’t be shy—garlic is your friend.
  • 2 cups heavy cream: This creates the luscious sauce; however, you can substitute with half-and-half for a lighter option.
  • 1 cup grated Parmesan cheese: For that classic Italian flavor, but feel free to experiment with Pecorino Romano or nutritional yeast for a vegan alternative.
  • 1 cup shredded mozzarella cheese: This is what makes it cheesy and gooey! You can also mix in some cheddar for a different flavor profile.
  • ½ tsp salt & ¼ tsp black pepper: Essential for seasoning.
  • 1 tsp Italian seasoning: A blend of herbs that enhances the flavor—feel free to add your favorite herbs if you don’t have this on hand!
  • 1 cup shredded mozzarella or cheddar (for topping): Because who doesn’t love a cheesy crust?!
  • 2 tbsp chopped parsley (optional, for garnish): This adds a pop of color and freshness to your dish.

Step-by-Step Instructions

Now that we have our ingredients, it’s time to get cooking! Follow these simple steps for a dinner that’s sure to impress:

  1. Boil pasta in salted water according to package instructions. Drain and set aside. Preheat your oven to 375°F (190°C).
  2. In a large skillet, melt butter over medium heat. Add garlic and sauté until fragrant (about 1 minute). Stir in heavy cream, Parmesan cheese, salt, pepper, and Italian seasoning. Simmer for 2-3 minutes until slightly thickened.
  3. Toss the cooked pasta and chicken (if using) into the Alfredo sauce until well-coated.
  4. Transfer the pasta mixture to a greased 9×13-inch baking dish. Top with shredded mozzarella or cheddar cheese.
  5. Bake for 20-25 minutes or until the cheese is melted and bubbly, creating a golden crust.
  6. Garnish with parsley and serve hot. Enjoy every cheesy bite!

Pro Tips for the Perfect Alfredo Pasta Bake

Juicy Alfredo pasta bake with a golden cheese crust and vibrant green parsley garnish.
  • Perfectly cooked pasta: Ensure your pasta is al dente before combining it with the sauce; it will continue to cook in the oven and absorb flavors!
  • Cheese choices: Experiment with different cheese blends to find your perfect mix—smoked gouda or fontina can add a unique twist!
  • Make it healthier: Add fresh or frozen veggies like spinach, broccoli, or bell peppers for added nutrition and color.
  • Leftover magic: This dish is a great way to use up leftover cooked meats or veggies—be creative!
  • Spice it up: Add red pepper flakes or a dash of hot sauce to the Alfredo sauce for a kick.
  • Storage tips: Store leftovers in an airtight container in the fridge for up to 3 days. Reheat in the oven for best results!
  • Garnish wisely: Fresh herbs like basil or thyme can elevate the dish and add freshness.
  • Be patient: Let the pasta bake sit for a few minutes after taking it out of the oven. This helps it set and makes serving easier!

Common Mistakes & Troubleshooting

Even the best cooks can have off days. Here are some common pitfalls and how to avoid them:

  • Too watery: If your sauce seems too runny, let it simmer a bit longer to thicken before mixing with the pasta.
  • Overcooked pasta: Always aim for al dente! This will prevent mushy pasta after baking.
  • Not enough flavor: Taste your sauce before combining it with the pasta; adjust seasoning as needed!
  • Uneven baking: Ensure your oven is preheated properly and avoid opening the door frequently while it bakes.

Delicious Variations

One of the best parts about this Alfredo Pasta Bake is how easily it can be adapted! Here are some variations to consider:

  • Vegetable Alfredo Bake: Add sautéed mushrooms, spinach, or zucchini for a veggie-packed version.
  • Seafood Twist: Incorporate shrimp or crab for a luxurious seafood Alfredo bake.
  • Spicy Chicken Alfredo: Use spicy Italian sausage instead of chicken and add jalapeños or crushed red pepper for heat.
  • Cheesy Broccoli Alfredo: Mix in steamed broccoli for a delightful crunch and extra nutrients.

Make-Ahead & Storage Instructions

This dish is perfect for meal prep! Here’s how to make it ahead of time:

  • Assemble the dish, cover tightly with foil, and refrigerate for up to 24 hours before baking.
  • For longer storage, freeze before baking. When ready to enjoy, thaw overnight in the fridge and bake as directed.
  • Leftovers can be kept in an airtight container for up to 3 days; reheat in the oven for best texture.

Frequently Asked Questions

  • Can I make this dish without chicken?
    Absolutely! Feel free to omit the chicken for a vegetarian version.
  • Can I use a different type of pasta?
    Yes, any short pasta like fusilli or farfalle will work well!
  • Can I use low-fat dairy?
    Yes, you can substitute with low-fat cream or milk, but the sauce may be less rich.
  • What if I don’t have heavy cream?
    You can use a mixture of milk and cream cheese for a similar creamy texture.
  • How can I make this dish spicier?
    Add crushed red pepper flakes or a dash of hot sauce to the alfredo sauce.
  • Can this dish be frozen?
    Yes! Assemble and freeze before baking, then thaw and bake when ready.
  • What sides go well with this bake?
    A fresh salad, garlic bread, or steamed vegetables are perfect companions.
  • How can I make this dish gluten-free?
    Simply use gluten-free pasta and ensure your sauces and seasonings are also gluten-free.

Nutritional Information & Dietary Adaptations

This Alfredo Pasta Bake can be made healthier by incorporating more vegetables, using whole grain pasta, and opting for low-fat dairy options. Here are some quick tips:

  • Whole Grain Pasta: Provides more fiber and nutrients compared to regular pasta.
  • Plant-Based Alternatives: Use cashew cream or almond milk for a dairy-free version.
  • Add Vegetables: Increase the nutritional value by mixing in your favorite veggies.

Equipment Recommendations

For this recipe, you’ll need:

  • Large Pot: For boiling the pasta.
  • Skillet: To prepare the sauce.
  • 9×13-inch Baking Dish: Perfect for holding all that cheesy goodness!
  • Measuring Cups and Spoons: Essential for getting those ingredient amounts just right.

Serving Suggestions

To elevate your dining experience, consider these serving suggestions:

  • Fresh Herbs: Garnish with freshly chopped parsley or basil for a burst of color.
  • Grated Cheese: Serve with additional grated Parmesan or a sprinkle of mozzarella on top.
  • Pair with Wine: A crisp white wine complements the creaminess beautifully.

Conclusion

And there you have it! A magical Alfredo Pasta Bake that’s sure to bring smiles and satisfaction to your dinner table. Whether you’re cooking for your family or hosting friends, this dish is one you’ll want to return to time and time again. Remember, cooking is all about sharing love and creativity, so don’t hesitate to make this recipe your own! Now, grab your apron and let’s create some kitchen magic together!

Easy Alfredo Pasta Bake Recipe

Prep Time 10 minutes
Cook Time 25 minutes
Total Time 35 minutes
Servings 6 servings
Calories 650
A creamy and cheesy baked pasta dish that's perfect for a quick weeknight dinner or comforting meal.

Ingredients

Pasta

  • 12 oz penne or rigatoni pasta
  • 2 cups cooked chicken, shredded or diced (optional)
  • 2 tbsp unsalted butter
  • 3 cloves garlic, minced
  • 2 cups heavy cream
  • 1 cup grated Parmesan cheese
  • 1 cup shredded mozzarella cheese
  • ½ tsp salt
  • ¼ tsp black pepper
  • 1 tsp Italian seasoning
  • 1 cup shredded mozzarella or cheddar (for topping)
  • 2 tbsp chopped parsley (optional, for garnish)

Instructions 

  • Cook pasta in salted water, drain, and set aside. Preheat oven to 375°F (190°C).
  • Melt butter in a skillet, sauté garlic, then add cream, Parmesan, salt, pepper, and Italian seasoning. Simmer briefly.
  • Mix cooked pasta and chicken into the sauce. Transfer to a greased baking dish and top with shredded cheese.
  • Bake for 20-25 minutes until bubbly and golden. Garnish with parsley and serve hot.

Notes

For a lighter version, use less cheese or substitute with low-fat options.
Calories: 650kcal
Cost: $15
Course: Main Course
Cuisine: Italian-American
Keyword: baked, cheese, pasta

Welcome to the World of Stuffed Shells

Ah, stuffed shells! If there’s one dish that effortlessly combines comfort and charm, it’s this classic Italian-American favorite. Imagine plump, **jumbo pasta shells** cradling a creamy, dreamy filling of ricotta and spinach, all lovingly blanketed in a rich **marinara sauce**. This dish is more than just food; it’s an experience, a celebration of flavors that invites everyone to gather around the table. Whether you’re cooking for a family dinner, a cozy gathering, or simply treating yourself to a comforting meal, these stuffed shells are sure to bring a smile to your face and warmth to your heart.

Why You’ll Love This Recipe

There are plenty of reasons to fall head over heels for this stuffed shells recipe. Here are just a few:

  • Quick and Easy: With simple ingredients and straightforward steps, this recipe comes together quickly, making it perfect for busy weeknights.
  • Make Ahead Friendly: You can assemble the shells ahead of time, making dinner prep a breeze.
  • Customizable: Feel free to swap in your favorite ingredients or add extra veggies for a personal touch.
  • Feeds a Crowd: This recipe is easily scalable, so it’s perfect for gatherings or meal prep.
  • Comfort in Every Bite: There’s something magical about digging into a plate of cheesy, saucy stuffed shells that brings instant comfort.

Ingredients Needed to Make Stuffed Shells

Let’s gather our ingredients! Here’s what you’ll need:

  • 12 jumbo pasta shells: The star of the show! Choose large shells that can hold all that delicious filling.
  • 1 cup ricotta cheese (whole milk): This creamy cheese creates the base of our filling.
  • 1 cup shredded mozzarella cheese: For that gooey, melty goodness.
  • 1/2 cup grated Parmesan cheese: Adds a nutty, savory flavor.
  • 1 cup fresh spinach (sautéed): A great way to sneak in some greens.
  • 2 cups marinara sauce (store-bought or homemade): Choose your favorite sauce to tie everything together.
  • 1/4 cup fresh basil (chopped): For a pop of freshness.
  • 1 tsp garlic powder: Because garlic makes everything better!
  • Salt and pepper to taste: Essential for seasoning.

Instructions to Prepare Stuffed Shells

Side view showcasing a plate of stuffed shells topped with marinara sauce and cheese.

Ready to create some magic in your kitchen? Follow these simple steps:

Boil the Pasta Shells

Start by boiling salted water in a large pot. Cook the jumbo pasta shells until they are **al dente** (usually about 8-10 minutes). Drain and set aside to cool.

Make the Cheese Filling

In a mixing bowl, combine the ricotta cheese, 1/2 cup of mozzarella, 1/2 cup of Parmesan, sautéed spinach, garlic powder, salt, and pepper. Mix until well combined. This creamy cheese mixture will be the heart of your stuffed shells!

Prepare the Baking Dish

Preheat your oven to 375°F (190°C). Spread 1 cup of marinara sauce on the bottom of a baking dish to prevent the shells from sticking.

Fill the Shells

Carefully fill each cooked shell with a generous amount of the cheese mixture. Place the filled shells in the baking dish, open side up.

Top with Sauce and Cheese

Pour the remaining marinara sauce over the stuffed shells. Sprinkle the leftover mozzarella and Parmesan cheese on top for extra cheesiness!

Bake Until Bubbly

Cover the baking dish with foil and bake for 25 minutes. After that, remove the foil and bake for an additional 10 minutes, or until the cheese is golden and bubbly.

Rest and Serve

Once removed from the oven, let the stuffed shells rest for about 5 minutes. Garnish with fresh basil before serving. Enjoy your delicious creation!

Pro Tips for Perfect Stuffed Shells

Want to elevate your stuffed shells game? Here are some expert insights:

  • Perfect texture: Ensure your pasta shells are cooked just right—**al dente**—to avoid them becoming mushy during baking.
  • Flavor boost: Add a dash of red pepper flakes to the cheese mixture for a spicy kick!
  • Be generous: Don’t skimp on the cheese! A little extra mozzarella on top makes for a deliciously cheesy crust.
  • Experiment: Try adding cooked ground turkey or sausage to the cheese filling for a meatier version.
  • Marinara magic: If you prefer a homemade sauce, try simmering crushed tomatoes with garlic, onion, and Italian herbs for a fresh taste.
  • Broil for a finish: For an extra crispy top, broil the stuffed shells for a minute or two after baking.
  • Use leftovers: This dish is a great way to use up leftover vegetables or meats—get creative!
  • Freeze for later: Stuffed shells freeze beautifully. Just assemble and freeze before baking, then follow baking instructions when ready to eat.

Common Mistakes and Troubleshooting

Even the best of us can make mistakes in the kitchen. Here are some common pitfalls and how to avoid them:

  • Overcooking the shells: Make sure to cook the shells just until **al dente** to prevent them from turning mushy in the oven.
  • Too much filling: Be careful not to overfill the shells; a generous spoonful is enough to achieve that perfect balance.
  • Skipping the sauce: Always place some marinara sauce at the bottom of the baking dish to keep the shells from drying out.
  • Not letting them rest: Allow the stuffed shells to rest after baking. This helps them set and makes serving easier.

Variations of Stuffed Shells

Feeling adventurous? Here are some delightful variations to try:

  • Meat Lovers: Add cooked ground beef or sausage to the cheese filling for a hearty option.
  • Veggie Delight: Mix in sautéed mushrooms, zucchini, or bell peppers for a veggie-packed filling.
  • Seafood Twist: Replace spinach with chopped cooked shrimp for a seafood-inspired version.
  • Spicy Italian: Mix in some **Italian sausage** for a little heat and flavor.

Storage and Make-Ahead Instructions

Want to prep ahead? Here’s how to store and make your stuffed shells in advance:

  • Make-ahead: Assemble the stuffed shells and place them in the baking dish. Cover tightly with foil and refrigerate for up to 24 hours before baking.
  • Freezing: To freeze, assemble the shells, wrap tightly, and store in the freezer for up to 2 months. Bake from frozen, adding extra cooking time as needed.
  • Leftovers: Store leftover stuffed shells in an airtight container in the fridge for up to 3 days. Reheat in the oven or microwave until warmed through.

Comprehensive FAQ

Got questions? I’ve got answers! Here are some frequently asked questions about stuffed shells:

  • Can I use regular pasta instead of jumbo shells? Yes, but the cooking time and assembly will differ. Consider using lasagna sheets for a similar effect!
  • What can I substitute for ricotta cheese? Cottage cheese or a blend of cream cheese and sour cream can work in a pinch.
  • How do I make this dish gluten-free? Use gluten-free jumbo pasta shells and ensure your marinara sauce is gluten-free.
  • Can I make stuffed shells without cheese? Yes! You can use a mixture of cooked lentils or beans and veggies for a dairy-free filling.
  • What’s the best way to reheat stuffed shells? Reheat in the oven covered with foil to prevent drying out, or microwave for quick servings.
  • How can I make this dish lighter? Use part-skim ricotta and mozzarella, and add more veggies to the filling for a healthier option.
  • Can I add more spices? Absolutely! Feel free to personalize the flavor with your favorite herbs and spices.
  • What should I serve with stuffed shells? A fresh salad, garlic bread, or steamed vegetables make excellent side dishes.

Nutrition Tips and Dietary Adaptations

Want to make this dish fit your dietary needs? Here are some tips:

  • Low-Fat Option: Use part-skim cheese and reduce the amount of oil used in sautéing.
  • Protein Boost: Add cooked chicken or turkey to the cheese filling for extra protein.
  • Vegan Version: Substitute ricotta with a blend of blended tofu, nutritional yeast, and lemon juice, and use vegan cheese.
  • Whole Grain: Opt for whole wheat jumbo shells for added fiber and nutrients.

Equipment Recommendations

Here’s what you’ll need to make your stuffed shells:

  • Large Pot: For boiling the pasta shells.
  • Mixing Bowl: To combine your cheese filling.
  • Baking Dish: A 9×13 inch dish works perfectly for this recipe.
  • Wooden Spoon: For mixing and filling your shells with ease.

Serving Suggestions

As you prepare to serve your stuffed shells, consider these delightful pairings:

  • Fresh Garden Salad: A crisp salad with a tangy vinaigrette complements the richness of the dish.
  • Garlic Bread: Nothing beats a slice of warm garlic bread for mopping up that delicious marinara sauce.
  • Roasted Vegetables: A side of seasonal roasted veggies adds color and nutrition to your plate.
  • Wine Pairing: A glass of Chianti or a light Pinot Grigio pairs beautifully with this comforting meal.

Conclusion

And there you have it—your ultimate guide to making irresistible stuffed shells! This dish is not just a recipe; it’s a celebration of flavors, a gathering of loved ones around the dinner table, and a reminder of the comforts found in home-cooked meals. So, gather your ingredients, roll up your sleeves, and let the magic happen in your kitchen. I can’t wait for you to experience the joy of these stuffed shells! Happy cooking!

Stuffed Shells

Prep Time 15 minutes
Cook Time 35 minutes
Total Time 50 minutes
Servings 4 servings
Calories 450
A delicious baked pasta dish featuring jumbo shells filled with a cheesy spinach mixture and topped with marinara sauce.

Ingredients

Pasta

  • 12 pieces jumbo pasta shells
  • 1 cup ricotta cheese (whole milk)
  • 1 cup shredded mozzarella cheese
  • 1/2 cup grated Parmesan cheese
  • 1 cup fresh spinach (sautéed)
  • 2 cups marinara sauce (store-bought or homemade)
  • 1/4 cup fresh basil (chopped)
  • 1 tsp garlic powder
  • to taste Salt and pepper

Instructions 

  • Preheat oven to 375°F (190°C). Boil salted water and cook shells until al dente; drain and cool.
  • Sauté spinach in olive oil until wilted; mix with ricotta, mozzarella, Parmesan, garlic powder, salt, and pepper.
  • Fill each shell with cheese mixture and place in a baking dish with marinara sauce at the bottom.
  • Pour remaining marinara over shells, sprinkle with mozzarella, cover with foil, and bake for 25 minutes. Remove foil and bake 10 more minutes.

Notes

For a richer flavor, add a sprinkle of extra Parmesan before baking.
Calories: 450kcal
Cost: $15
Course: Main Course
Cuisine: Italian
Keyword: pasta

Welcome to My Culinary Adventure with Ground Beef Lo Mein

Join me on a flavorful journey as we dive into the world of Ground Beef Lo Mein! This dish is not just a meal; it’s a cozy hug on a plate that transforms your weeknight dinners into something magical. With tender ground beef, vibrant vegetables, and perfectly cooked lo mein noodles, this recipe has quickly become a staple in my kitchen. Whether you’re a busy parent or someone just looking for a delicious meal, this lo mein recipe is here to rescue your dinner plans!

Why lo mein, you ask? Well, it’s versatile, satisfying, and a perfect vehicle for all your favorite flavors. Plus, it’s super easy to whip up! Let’s get started on this culinary adventure together.

Why You’ll Love This Recipe

  • Quick and Easy: Perfect for busy weeknights, this recipe comes together in just 30 minutes, allowing you to enjoy a homemade meal without the fuss.
  • Flavor Explosion: The combination of soy sauce, oyster sauce, and sesame oil creates a savory sauce that coats the beef and noodles beautifully.
  • Customizable: Feel free to swap in your favorite vegetables or proteins! This dish can easily accommodate whatever you have on hand.
  • Family-Friendly: Kids and adults alike will love this dish. It’s a great way to introduce them to new flavors without overwhelming their taste buds.
  • Meal Prep Friendly: Make a big batch and enjoy leftovers for lunch or freeze them for a quick meal later!

Ingredients You’ll Need

Here’s a detailed breakdown of the ingredients for your Ground Beef Lo Mein:

  • 1 pound ground beef: The star of the show! It adds a hearty, savory flavor base and a satisfying chew to every bite.
  • 8 oz lo mein noodles: Use fresh or dried lo mein noodles; they soak up the sauce beautifully, but you can use any thin pasta in a pinch.
  • 1/4 cup soy sauce: This is your umami booster! Use tamari for a gluten-free option.
  • 2 tbsp oyster sauce: Adds depth and richness; it’s a must for that authentic taste.
  • 1 tbsp sesame oil: Provides a nutty flavor that elevates the dish.
  • 3 cloves garlic, minced: For that aromatic punch!
  • 1-inch piece of ginger, minced: Adds warmth and a kick.
  • 2 cups mixed vegetables: Bell peppers, carrots, and broccoli work perfectly; feel free to use whatever you love!
  • 2 green onions, chopped: For garnish and a fresh crunch.
  • Optional: Sriracha or chili flakes: If you like it spicy, add some heat!

Step-by-Step Instructions

Juicy Ground Beef Lo Mein noodles garnished with green onions and colorful vegetables.

Let’s get cooking! Follow these simple steps to create your delicious Ground Beef Lo Mein.

  1. Cook the lo mein noodles according to package instructions. Drain and set aside.
  2. In a large skillet or wok, heat oil over medium-high heat. Add the ground beef and cook until browned, breaking it apart with a spatula.
  3. Add the minced garlic and ginger, cooking for 1 minute until fragrant. Stir in the mixed vegetables and cook until they start to soften.
  4. In a small bowl, mix soy sauce, oyster sauce, and sesame oil. Pour over the beef and vegetables, stirring well to combine.
  5. Add the cooked noodles to the skillet, tossing until everything is evenly coated with the sauce.
  6. Garnish with green onions, Sriracha, or chili flakes. Serve hot and enjoy!

Pro Tips for Success

  • Don’t Overcook the Noodles: Keep an eye on your lo mein noodles to ensure they stay al dente—nobody likes mushy noodles!
  • High Heat is Key: Cooking over medium-high heat helps achieve that perfect stir-fry texture—crispy veggies and juicy beef.
  • Measure Your Sauces: Accurate measurements will help balance the flavors perfectly—too much soy sauce can overpower the dish.
  • Toss, Don’t Stir: Use a tossing motion rather than stirring to keep the noodles intact and prevent clumping.
  • Let it Rest: Allow the dish to sit for a couple of minutes before serving; this allows the flavors to meld.
  • Use Fresh Ingredients: Fresh garlic and ginger make a world of difference in flavor. Don’t skimp on them!
  • Experiment with Proteins: Feel free to swap the ground beef for chicken, shrimp, or tofu for a different twist!
  • Make It Spicy: Adjust the heat level by adding more Sriracha or chili flakes according to your preference.

Common Mistakes and Troubleshooting

Even the best of us have kitchen mishaps! Here are some common mistakes to avoid:

  • Overcrowding the Pan: If your pan is too crowded, the beef will steam rather than brown. Cook in batches if necessary.
  • Skipping the Marinade: While not traditional, marinating your meat can infuse more flavor. A quick 30-minute marinade in soy sauce can work wonders!
  • Not Prepping Ingredients: Make sure all your ingredients are prepped and ready to go before you start cooking. Stir-frying moves fast!
  • Using Cold Meat: Allow your ground beef to come to room temperature before cooking for even browning.

Variations to Try

Here are some fun twists to keep your Ground Beef Lo Mein exciting:

  • Vegetarian Version: Use a mix of mushrooms, bell peppers, and tofu instead of meat for a plant-based delight.
  • Spicy Beef Lo Mein: Add more Sriracha or a dash of chili oil for a fiery kick.
  • Pineapple and Beef Lo Mein: Toss in fresh pineapple chunks for a sweet and savory combination.
  • Sesame Chicken Lo Mein: Substitute ground beef for diced chicken and sprinkle sesame seeds on top for added texture.

Storage and Make-Ahead Instructions

This dish is perfect for meal prep! Here’s how to store it:

  • Refrigeration: Store leftovers in an airtight container in the fridge for up to 3 days.
  • Freezing: This dish freezes well! Store in freezer-safe containers for up to 3 months. Just reheat on the stovetop or microwave.
  • Make-Ahead: You can prep the ingredients a day in advance. Just cook the noodles and store them separately to avoid sogginess.

Frequently Asked Questions

Here are some common questions about making Ground Beef Lo Mein:

  • Can I use different noodles? Absolutely! Any thin pasta or rice noodles work well.
  • Is lo mein gluten-free? Use gluten-free soy sauce and rice noodles to make it gluten-free.
  • What can I substitute for oyster sauce? Hoisin sauce or a mix of soy sauce and sugar can work as a substitute.
  • Can I add more vegetables? Yes! Feel free to add any of your favorites or whatever is in season.
  • How do I make it less salty? Reduce the soy sauce and add more vegetables or noodles.
  • Can I make this dish vegetarian? Yes! Substitute the ground beef with tofu or a variety of veggies.
  • How do I store leftovers? Refrigerate in an airtight container for up to 3 days or freeze for up to 3 months.
  • What’s the best way to reheat it? Reheat on the stovetop with a splash of water or broth to keep it from drying out.

Nutritional Tips and Dietary Adaptations

This dish can easily be adapted to suit various dietary needs:

  • Low-Carb Option: Swap out the noodles for zucchini noodles or cauliflower rice.
  • High-Protein: Add edamame or chickpeas for an extra protein boost!
  • Low-Sodium: Use low-sodium soy sauce and limit additional salt in the recipe.
  • Vegetarian/Vegan: Use plant-based ground meat and substitute oyster sauce with mushroom sauce.

Essential Equipment You’ll Need

  • Wok or Large Skillet: A wok is ideal for stir-frying, but a large skillet works just as well.
  • Sharp Knife: For chopping vegetables and mincing garlic and ginger.
  • Cutting Board: To keep your workspace organized.
  • Measuring Cups and Spoons: For accurate ingredient measurements.
  • Spatula or Tongs: For tossing the ingredients in the skillet.

Serving Suggestions

For a complete meal, consider pairing your Ground Beef Lo Mein with:

  • Spring Rolls: Crispy spring rolls make for a delightful appetizer.
  • Asian Cucumber Salad: A refreshing salad to balance the richness of the lo mein.
  • Steamed Dumplings: Perfect for dipping and enjoying alongside your meal.
  • Edamame: A simple and healthy snack to munch on while you eat.

Conclusion: Let’s Create Some Magic in Your Kitchen!

There you have it! My comprehensive guide to creating the best Ground Beef Lo Mein that’s sure to wow your family and friends. Remember, cooking is all about having fun and experimenting. Don’t hesitate to make this recipe your own! With each bite, you’ll feel the love and creativity you put into your meal. So, pull up a chair, grab a spatula, and let’s make something unforgettable together. Happy cooking!

Ground Beef Lo Mein

Prep Time 10 minutes
Cook Time 15 minutes
Total Time 25 minutes
Servings 4 servings
Calories 550
A quick and flavorful Asian-inspired dish featuring ground beef, vegetables, and savory sauces tossed with noodles.

Ingredients

Meat

  • 1 pound ground beef

Noodles

  • 8 oz lo mein noodles

Sauces & Oils

  • 1/4 cup soy sauce (or tamari for gluten-free option)
  • 2 tbsp oyster sauce
  • 1 tbsp sesame oil

Aromatics

  • 3 cloves garlic, minced
  • 1 inch ginger, minced

Vegetables

  • 2 cups mixed vegetables (bell peppers, carrots, broccoli)

Garnish & Optional

  • 2 green onions chopped
  • Optional Sriracha, chili flakes

Instructions 

  • Cook noodles according to package; drain and set aside.
  • Cook ground beef in a skillet until browned.
  • Add garlic and ginger; cook 1 minute. Stir in vegetables and cook until tender.
  • Mix soy sauce, oyster sauce, and sesame oil; pour over beef and vegetables, stir well.
  • Add noodles; toss to coat. Garnish with green onions and optional chili.

Notes

Feel free to add Sriracha or chili flakes for extra heat.
Calories: 550kcal
Cost: $15
Course: Main Course
Cuisine: Asian
Keyword: ground beef