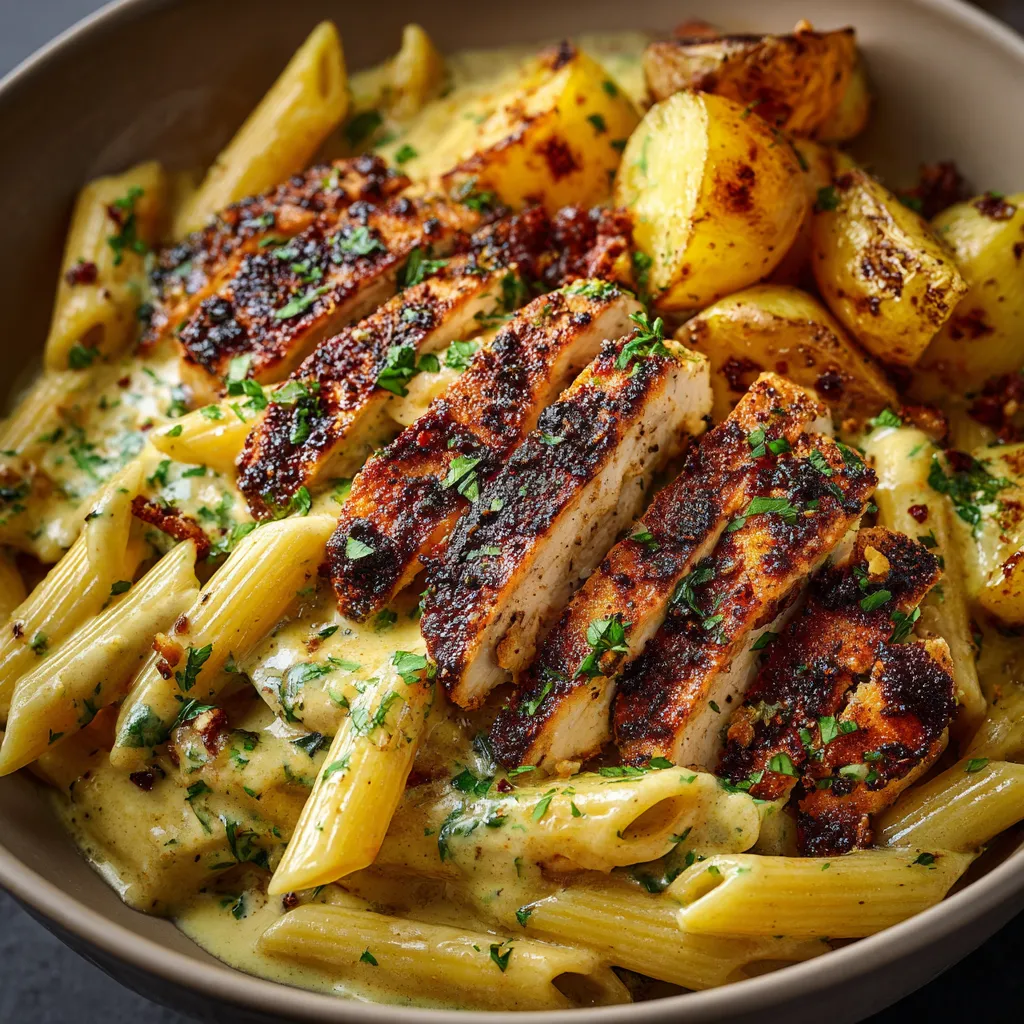
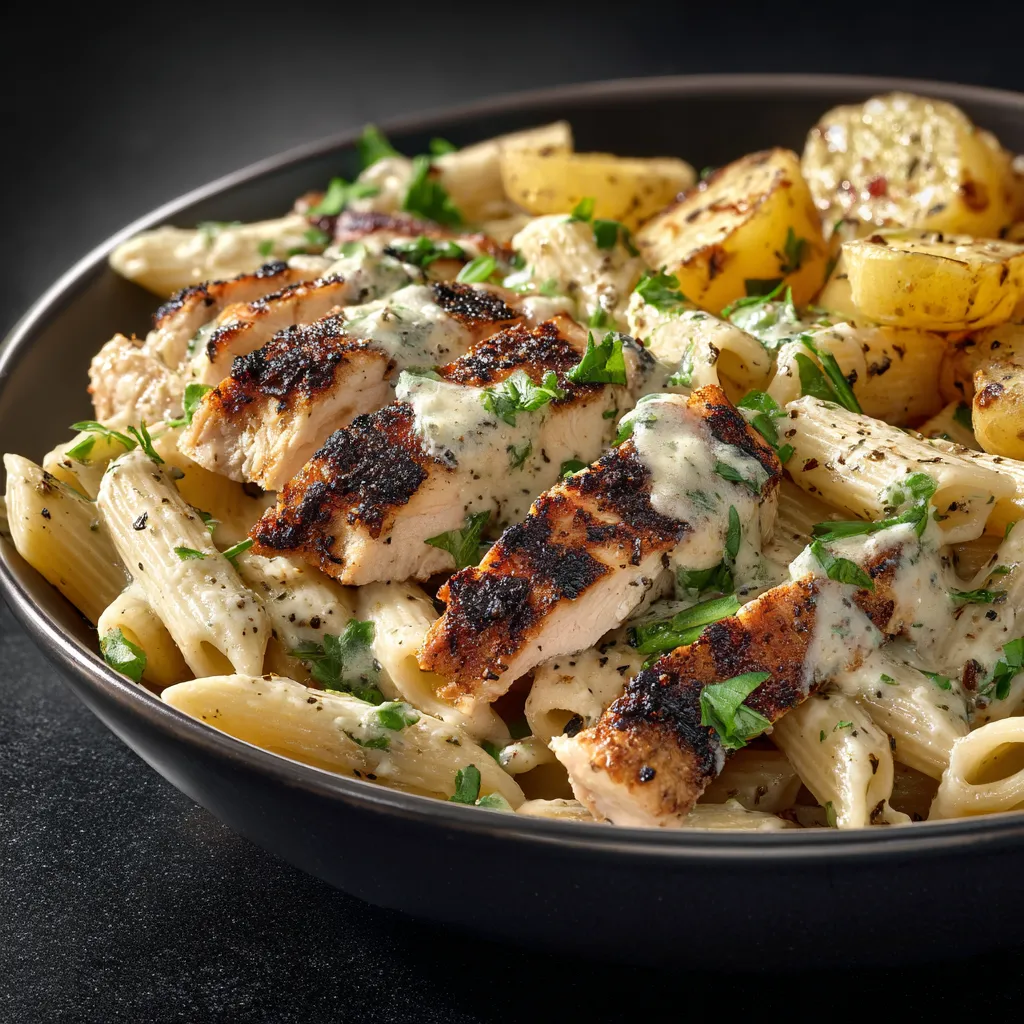
Author

Ava

Browsing

The Ultimate Grilled Cheese Burrito: A Cheesy Hug Wrapped in Tortilla

Ah, the grilled cheese burrito—a delightful combination of two beloved comfort foods that takes your taste buds on a joyride! It’s like wrapping up a warm hug in a tortilla, and I can promise you this is a recipe you’ll want to keep in your back pocket for cozy nights or those days when you need a little extra love. Let’s dive into the cheesy goodness and discover how to create this magical meal that’s sure to impress anyone lucky enough to snag a bite!

Why You’ll Love This Grilled Cheese Burrito

Life can be complicated, but your meals don’t have to be. This Grilled Cheese Burrito Made Easy is the ultimate solution for busy weeknights or lazy weekends. Here’s why this recipe will become a staple in your kitchen:

  • Quick and Easy: With just a few ingredients and minimal prep time, you can whip up this burrito in under 15 minutes!
  • Cheesy Goodness: Who can resist a gooey, melted cheese experience? This burrito is loaded with cheddar and mozzarella, ensuring every bite is pure bliss.
  • Customizable: Whether you prefer beef, beans, or just a mountain of cheese, you can easily adjust the fillings to suit your taste.
  • Kid-Approved: Perfect for picky eaters, this burrito is a surefire way to get your kids excited about dinner.
  • Perfect Any Time: Breakfast, lunch, or dinner—this burrito fits any meal occasion!

Ingredients for the Ultimate Grilled Cheese Burrito

A delicious grilled cheese burrito with a crispy golden exterior, showcasing gooey cheese oozing out, surrounded by soft shadows.

Let’s gather our magic ingredients! Here’s what you’ll need to create your very own grilled cheese burrito:

  • 2 large flour tortillas
  • 1 cup shredded cheddar cheese
  • 1 cup shredded mozzarella cheese
  • 1/2 cup cooked and seasoned ground beef or beans (optional)
  • 2 tablespoons butter
  • Salsa or hot sauce (optional for serving)

Step-by-Step Instructions for Easy Grilled Cheese Burrito

Ready to turn your kitchen into a cozy cheese haven? Here’s how to make your Grilled Cheese Burrito Made Easy:

Step 1: Heat Up the Skillet

Start by heating a skillet over medium heat. The key to a great grilled cheese burrito is a hot skillet that will give your tortillas that perfect golden brown crust.

Step 2: Prepare the Tortilla Layers

Place one tortilla in the skillet and sprinkle half of the cheddar and mozzarella cheese evenly on top. This cheesy base is going to melt beautifully!

Step 3: Add Your Filling

If you’re using ground beef or beans (which I highly recommend for added flavor), now’s the time to layer it on! Spread it evenly over the cheese.

Step 4: Top It Off

Sprinkle the remaining cheese on top and cover with the second tortilla. You’re building a cheesy fortress here, and it’s going to be glorious!

Step 5: Cook It Up

Cook for about 3-4 minutes until the bottom tortilla is golden brown and the cheese starts to melt. You’ll hear that lovely sizzle as it cooks—music to a cook’s ears!

Step 6: Flip and Butter

Carefully flip the burrito using a spatula. This can be a little tricky, but don’t worry—you’ve got this! Add a tablespoon of butter to the skillet for that extra richness, and cook the other side for another 3-4 minutes until it’s golden brown and the cheese is fully melted.

Step 7: Slice and Serve

Once both sides are grilled to perfection, remove the burrito from the skillet. Let it cool for a minute (if you can resist the temptation!), then cut it in half to reveal the melty insides. Serve with a side of salsa or hot sauce if you’re feeling adventurous.

Storage and Freezing Tips

Now, let’s talk about how to keep those delicious leftovers fresh:

Storing Leftovers

If you have any leftover burritos (which is highly unlikely, but just in case!), store them in an airtight container in the fridge for up to 3 days. When you’re ready to enjoy them, simply reheat in a skillet over low heat until warmed through.

Freezing Your Burritos

To freeze your burritos, wrap each one tightly in foil and place them in a freezer bag. They’ll be good for up to a month! When you’re ready to dig in, reheat in the oven at 350°F (175°C) for about 20 minutes, or until heated through and crispy.

Tips for the Perfect Grilled Cheese Burrito

As with any recipe, a few tips can take your grilled cheese burrito from good to incredible:

  • Use Fresh Ingredients: Fresh tortillas and quality cheese make a world of difference in flavor.
  • Don’t Skimp on Cheese: The more, the merrier! Load it up for that ooey-gooey experience.
  • Experiment with Fillings: Try adding sautéed peppers, onions, or even jalapeños for a kick!
  • Press Down: Gently pressing down on the burrito while it cooks helps to melt the cheese and achieve a crispy exterior.

Variations and Substitutions

Got dietary restrictions or simply want to switch things up? Here are some variations and substitutions you can try:

  • Vegetarian Option: Swap out the ground beef for black beans, lentils, or grilled veggies for a meat-free delight.
  • Dairy-Free Twist: Use vegan cheese and dairy-free butter to create a similar cheesy experience without the dairy.
  • Whole Grain Tortillas: For a healthier option, use whole wheat or spinach tortillas.
  • Extra Protein: Feel free to add grilled chicken or turkey for an extra protein boost.

FAQs About the Grilled Cheese Burrito

How do I make the best grilled cheese burrito?

To make the best grilled cheese burrito, focus on using high-quality cheese and fresh ingredients. Ensure your skillet is hot before cooking, and don’t be afraid to experiment with fillings!

Can I substitute the tortillas?

Absolutely! You can use corn tortillas, low-carb wraps, or even lettuce leaves for a gluten-free version!

What’s the best way to store leftovers?

Leftovers can be stored in an airtight container in the fridge for up to 3 days or frozen for up to a month. Reheat gently to maintain that crispy texture.

Can I make this burrito ahead of time?

Yes! You can prepare the filling ahead of time and assemble the burritos when you’re ready to cook.

Conclusion

There you have it! The Ultimate Grilled Cheese Burrito is a simple yet satisfying dish that’s sure to become a favorite in your household. With its cheesy goodness, customizable options, and quick prep time, this recipe is perfect for any occasion. So grab your tortillas and cheese, and let’s create something magical in your kitchen! Remember, cooking is all about having fun and enjoying the process. Happy cooking!

Grilled Cheese Burrito Made Easy

Prep Time 5 minutes
Cook Time 8 minutes
Total Time 13 minutes
Servings 2 servings
Calories 650
A quick and delicious way to enjoy a cheesy burrito with crispy tortillas and melty cheese.

Ingredients

Tortillas

  • 2 pieces large flour tortillas
  • 1 cup shredded cheddar cheese
  • 1 cup shredded mozzarella cheese
  • 0.5 cup cooked and seasoned ground beef or beans (optional)
  • 2 tablespoons butter
  • salsa or hot sauce optional salsa or hot sauce (for serving)

Instructions 

  • Heat a skillet over medium heat.
  • Place one tortilla in the skillet, add cheese, optional meat, then top with second tortilla.
  • Cook 3-4 minutes until golden and cheese melts, flip, add butter, cook another 3-4 minutes.
  • Remove, cool briefly, then cut in half. Serve with salsa or hot sauce if desired.

Notes

For extra flavor, add some chopped herbs or a dash of hot sauce inside the burrito before cooking.
Calories: 650kcal
Cost: $10
Course: Main Course
Cuisine: American
Keyword: Burrito, cheese

Loved this recipe? Save it to your favorite Pinterest board so you can easily find it later! It’s the perfect way to keep all your sweet ideas in one place. ✨

Eye-level photograph of a grilled cheese burrito cut in half, revealing its cheesy interior, with a blurred cozy background.

A One-Pan Wonder: Honey BBQ Chicken That Makes Meal Prep a Breeze

Welcome to my kitchen, friends! Today, I’m thrilled to share a recipe that not only tantalizes your taste buds but also makes meal prep a breeze—my Honey BBQ Chicken Recipe. This one-pan dinner is perfect for busy weeknights when you want something delicious without the fuss. Imagine tender chicken pieces, fluffy rice, and vibrant veggies all drizzled with a sweet and tangy honey BBQ sauce. It’s a meal that brings everyone to the table, and trust me, you’ll want to make it again and again!

Why You’ll Love This Recipe

Let’s face it: life can be hectic. Between work, family commitments, and everything else in between, finding time to cook can feel like a chore. That’s where this recipe shines. This dish not only fits into your busy schedule but also offers the kind of comfort food that warms the heart. Plus, it’s versatile, family-friendly, and budget-conscious. Who doesn’t love a meal that checks all those boxes?

Ingredients

A vibrant dish featuring honey BBQ chicken, rice, and colorful vegetables, highlighted by soft lighting.

To whip up this delicious Honey BBQ Chicken, you’ll need the following ingredients:

  • 1 pound chicken breasts, cut into bite-sized pieces
  • 1 cup long-grain rice
  • 2 cups chicken broth
  • 1/2 cup honey
  • 1/2 cup BBQ sauce
  • 1 tablespoon olive oil
  • 1 teaspoon garlic powder
  • 1 teaspoon onion powder
  • Salt and pepper to taste
  • 1 cup mixed vegetables (e.g., bell peppers, broccoli, carrots)
  • Chopped green onions for garnish (optional)

How to Make Honey BBQ Chicken

Now, let’s dive into the magic of cooking! Follow these steps to create your own one-pan wonder:

Step 1: Sizzle the Chicken

In a large skillet, heat the olive oil over medium heat. As the oil warms, it will start to shimmer—this is your cue to add the chicken pieces. Sprinkle them with garlic powder, onion powder, salt, and pepper. Cook the chicken until it’s browned and cooked through, about 5-7 minutes. The aroma of the chicken sizzling in the pan will make your mouth water!

Step 2: Create the BBQ Sauce

While the chicken is cooking, let’s prepare the star of this dish—the honey BBQ sauce! In a small bowl, mix together the honey and BBQ sauce until well combined. This mixture is where the magic happens, transforming ordinary chicken into something extraordinary.

Step 3: Combine Everything

Once the chicken is browned, pour the honey BBQ mixture over the chicken. Stir to coat each piece evenly. Next, add the rice and chicken broth to the skillet. Give everything a good stir to combine. The rice will absorb all those delicious flavors as it cooks.

Step 4: Simmer Away

Bring the mixture to a boil, then reduce the heat to low. Cover the skillet and let it simmer for about 15 minutes. This is the moment when the kitchen starts to smell heavenly, and you can almost taste the deliciousness to come!

Step 5: Add the Veggies

After 15 minutes, it’s time to add some color! Toss in your mixed vegetables, stir, and cover again. Let it cook for an additional 5-7 minutes, or until the rice is tender and the liquid is absorbed. Your one-pan meal is almost ready!

Step 6: Fluff and Serve

Remove the skillet from heat and let it sit covered for 5 minutes. This helps the flavors meld together beautifully. Finally, fluff the rice with a fork, garnish with chopped green onions if desired, and serve. You’re in for a treat!

Serving Suggestions

This Honey BBQ Chicken pairs wonderfully with a fresh garden salad or some steamed broccoli for a complete meal. The sweetness of the honey and the smokiness of the BBQ sauce create a delightful contrast to the crispness of fresh veggies. If you’re feeling adventurous, consider serving it with some homemade cornbread or crusty rolls to soak up every last drop of that luscious sauce.

Tips for Perfect Honey BBQ Chicken

  • Marinate for More Flavor: If you have a bit more time, marinating the chicken in the honey BBQ mixture for an hour or even overnight can enhance the flavor.
  • Use Leftovers Wisely: If you have any leftovers, this dish makes for an excellent lunch the next day! Just store it in an airtight container and reheat in the microwave.
  • Mix and Match: Feel free to swap out the mixed vegetables for your favorites—zucchini, snap peas, or even corn would work beautifully!

Variations and Substitutions

This recipe is incredibly versatile! Here are a few ideas to customize your dish:

  • Protein Swap: Substitute chicken with tofu, shrimp, or even a lean cut of beef for a different twist.
  • Rice Alternatives: If you’re looking for a healthier option, use brown rice or quinoa instead of white rice. Just be sure to adjust the cooking time based on the grain you choose.
  • Vegan Version: For a vegan-friendly option, use chickpeas instead of chicken and maple syrup in place of honey.

Storage and Freezing Tips

If you’re like me and love meal prepping, storing leftovers is key! Here’s how:

  • Store any leftovers in an airtight container in the refrigerator for up to 3 days.
  • To freeze, allow the dish to cool completely, then transfer it to a freezer-safe container. It can be frozen for up to 3 months. When you’re ready to eat, simply thaw in the refrigerator overnight and reheat on the stove or in the microwave.

FAQs

Can I use brown rice instead of white rice?

Absolutely! Just be mindful that brown rice requires more cooking time—about 30-40 minutes—so adjust accordingly.

What’s the best way to ensure my chicken is juicy?

Make sure not to overcook the chicken. It’s best to remove it from heat as soon as it reaches an internal temperature of 165°F (75°C).

Can I add more vegetables?

Of course! The more, the merrier. Feel free to toss in any veggies you have on hand. Just remember to adjust the cooking time as needed.

Conclusion

This Honey BBQ Chicken Recipe is a crowd-pleaser that will have everyone asking for seconds. It’s a dish that celebrates the joy of cooking and the warmth of sharing a meal with loved ones. I hope you feel inspired to bring this one-pan wonder into your home, creating not just a meal, but memories. Don’t forget to let me know how it turns out! Happy cooking, and may your kitchen always be filled with love and laughter!

For more delicious recipes that will brighten your day, check out my Cheesy Garlic Chicken Wraps or Simple Garlic Parmesan Chicken Pasta. Let’s keep the flavors flowing!

Honey BBQ Chicken Recipe – One-Pan Dinner with Rice That’s Perfect for Meal Prep

Prep Time 10 minutes
Cook Time 30 minutes
Total Time 40 minutes
Servings 4 servings
Calories 550
A delicious and easy one-pan meal combining tender chicken, flavorful honey BBQ sauce, rice, and vegetables—perfect for meal prep and weeknight dinners.

Ingredients

Protein

  • 1 pound chicken breasts (cut into bite-sized pieces)

Grains

  • 1 cup long-grain rice

Broth & Sauces

  • 2 cups chicken broth
  • 1/2 cup honey
  • 1/2 cup bbq sauce

Oils & Seasonings

  • 1 tablespoon olive oil
  • 1 teaspoon garlic powder
  • 1 teaspoon onion powder
  • to taste salt and pepper salt and pepper

Vegetables

  • 1 cup mixed vegetables ((e.g., bell peppers, broccoli, carrots))

Garnish

  • chopped green onions green onions for garnish (optional)

Instructions 

  • Heat olive oil in a skillet over medium heat. Cook chicken until browned, about 5-7 minutes.
  • Mix honey and BBQ sauce; pour over chicken and coat evenly.
  • Add rice and chicken broth; bring to a boil, then simmer covered for 15 minutes.
  • Stir in vegetables, cover, and cook for 5-7 minutes until tender.
  • Remove from heat, let sit covered for 5 minutes, then fluff and garnish with green onions.

Notes

For extra flavor, marinate the chicken beforehand or add a splash of soy sauce.
Calories: 550kcal
Cost: $15
Course: Main Course
Cuisine: American
Keyword: BBQ, Chicken, Rice

Loved this recipe? Save it to your favorite Pinterest board so you can easily find it later! It’s the perfect way to keep all your sweet ideas in one place. ✨

Tantalizing honey BBQ chicken with rice and a mix of vegetables, captured in warm natural light.

A Cheesy Delight: Garlic Parmesan Cheeseburger Bombs That Steal the Show

Welcome to my kitchen! Today, we’re diving into a recipe that combines two of life’s greatest pleasures: cheeseburgers and comfort food in a delightful little package known as Garlic Parmesan Cheeseburger Bombs. Trust me, these beauties are the culinary equivalent of a warm hug on a chilly evening. They’re perfect for family dinners, game nights, or just when you want to treat yourself to something special. So, grab your apron, and let’s get cooking!

Why You’ll Love These Garlic Parmesan Cheeseburger Bombs

Imagine sinking your teeth into a fluffy bite of biscuit dough, only to be greeted by a savory explosion of seasoned ground beef, ooey-gooey cheddar, and a hint of garlic. Yes, these cheeseburger bombs are not just food; they’re an experience! The combination of flavors and textures will have your taste buds singing with joy. Plus, they come together quickly, making them a staple in my collection of fast dinner recipes.

Key Ingredients in Garlic Parmesan Cheeseburger Bombs

A mouthwatering Garlic Parmesan Cheeseburger Bombs, featuring a warm biscuit exterior filled with beef and cheese.

Before we roll up our sleeves, let’s take a peek at the star players in this recipe:

  • 1 pound ground beef: The foundation of our bombs. It brings that classic cheeseburger flavor.
  • 1 cup shredded cheddar cheese: Melty goodness that binds our filling and adds a rich, creamy flavor.
  • 1/2 cup grated parmesan cheese: For that nutty kick and a fabulous cheesy crust.
  • 1 teaspoon garlic powder: To enhance the savory notes in our beef mixture.
  • 1 teaspoon onion powder: A subtle sweetness that complements the beef perfectly.
  • Salt and pepper to taste: Essential for bringing out all the flavors.
  • 1 can (16 oz) refrigerated biscuit dough: The magical outer layer that encases all the deliciousness.
  • 2 tablespoons melted butter: For brushing on top, giving our bombs a golden finish.
  • 1 teaspoon garlic salt: An extra layer of garlicky goodness.
  • Fresh parsley for garnish: Because we eat with our eyes too!

How to Make Garlic Parmesan Cheeseburger Bombs

Alright, let’s get to the fun part! Here’s how to whip up these delightful bites:

  1. Preheat the oven: Set your oven to 375°F (190°C). This ensures our bombs bake evenly and become golden brown.
  2. Prepare the filling: In a large bowl, combine the ground beef, shredded cheddar cheese, grated parmesan cheese, garlic powder, onion powder, salt, and pepper. Mix until everything is well incorporated. Smell that? That’s the aroma of deliciousness coming together!
  3. Separate the biscuit dough: Open the can of biscuit dough and gently separate the biscuits. Flatten each one into a circle about 1/4 inch thick.
  4. Fill the biscuits: Place a generous spoonful of the beef mixture in the center of each biscuit circle. Don’t skimp on the filling; you want every bite to be packed with flavor!
  5. Seal them up: Fold the edges of the biscuit over the filling and pinch them together to seal, forming a ball. Make sure they’re well sealed to avoid any leaks during baking.
  6. Prepare for baking: Line a baking sheet with parchment paper and place the filled biscuit balls seam-side down on the sheet, giving them a little space to breathe.
  7. Brush with butter: In a small bowl, mix the melted butter with garlic salt. Brush this flavorful mixture over the tops of the bombs to give them that golden, buttery finish.
  8. Bake: Pop them in the oven and bake for 15-20 minutes, until they’re golden brown and cooked through. The smell will be heavenly!
  9. Garnish and serve: Once they’re out of the oven, let them cool for a few minutes, then garnish with fresh parsley before serving. Enjoy the gooey, cheesy goodness!

Serving Suggestions for Garlic Parmesan Cheeseburger Bombs

These bombs are incredibly versatile! Serve them as a fun appetizer at your next gathering, or pair them with a fresh salad for a satisfying family dinner. You can also set up a dipping station with some of your favorite sauces like:

  • Classic ketchup
  • Spicy mustard
  • Barbecue sauce
  • Ranch dressing
  • Sriracha mayo for a zing!

They’re sure to be a hit with both kids and adults alike!

Storage and Freezing Tips

If you find yourself with leftovers (which is unlikely because they’re so delicious), here’s how to store them:

  • Place the cooled bombs in an airtight container in the refrigerator. They should stay fresh for up to 3-4 days.
  • For longer storage, freeze them! Lay the bombs on a baking sheet and freeze until solid, then transfer them to a freezer-safe bag. They’ll keep for about 2-3 months.
  • When you’re ready to enjoy your frozen bombs, you can bake them straight from the freezer—just add a few extra minutes to the baking time.

Tips for Perfect Garlic Parmesan Cheeseburger Bombs

  • Don’t overfill: While it’s tempting to add a lot of filling, be cautious not to overstuff your bombs, or they might burst open during baking.
  • Use fresh ingredients: Freshly grated cheese and herbs will enhance the flavors much more than pre-packaged alternatives.
  • Experiment with spices: Feel free to get creative! Add a pinch of cayenne for heat or some chopped jalapeños for extra flavor.

Frequently Asked Questions

Can I substitute the ground beef with another type of meat?

Absolutely! You can use ground turkey, chicken, or even plant-based meat alternatives. Just keep in mind that the flavor and texture may vary slightly.

What if I don’t have Worcestershire sauce?

No worries! Soy sauce can be a great substitute for Worcestershire sauce, providing that savory umami flavor. Alternatively, a mix of soy sauce and apple cider vinegar will work too.

Can I prepare these cheeseburger bombs in advance?

You sure can! Assemble them, cover with plastic wrap, and refrigerate for up to a day before baking. For longer storage, freeze them and bake them straight from the freezer.

How should I store leftovers, and how long will they last?

Store any leftovers in an airtight container in the fridge for up to 3-4 days. For long-term storage, freeze them as mentioned above.

Conclusion

There you have it—your guide to making Garlic Parmesan Cheeseburger Bombs that will steal the show at any gathering! These little bites of joy are easy to make, packed with flavor, and perfect for sharing (or not!). So, whether you’re whipping them up for a cozy family dinner or an epic game night with friends, I can guarantee that they’ll be met with smiles and satisfied bellies. Remember, cooking is all about joy and creativity, so don’t hesitate to make this recipe your own. Happy cooking, and enjoy every cheesy, garlicky morsel!

If you enjoyed this recipe, check out my Cheesy Garlic Chicken Wraps or my Cheesy Garlic Bread for more delicious ideas. Let’s keep spreading the joy of cooking together!

Garlic Parmesan Cheeseburger Bombs

Prep Time 15 minutes
Cook Time 20 minutes
Total Time 35 minutes
Servings 8 pieces
Calories 650
These savory cheeseburger bombs wrapped in biscuit dough are perfect for a quick, crowd-pleasing appetizer or main dish.

Ingredients

Meat and Cheese

  • 1 pound ground beef
  • 1 cup shredded cheddar cheese
  • 1/2 cup grated parmesan cheese

Seasonings

  • 1 teaspoon garlic powder
  • 1 teaspoon onion powder
  • to taste salt and pepper

Dough and Topping

  • 1 can (16 oz) refrigerated biscuit dough
  • 2 tablespoons melted butter
  • 1 teaspoon garlic salt

Garnish

  • as needed fresh parsley (for garnish)

Instructions 

  • Preheat oven to 375°F (190°C).
  • Mix ground beef, cheddar, parmesan, garlic powder, onion powder, salt, and pepper.
  • Flatten biscuits, add beef mixture, seal into balls, and place on baking sheet.
  • Brush with melted butter, sprinkle garlic salt, and bake 15-20 minutes until golden.
  • Garnish with parsley before serving.

Notes

Ensure not to overfill the biscuits to prevent leakage during baking.
Calories: 650kcal
Cost: $15
Course: Appetizer
Cuisine: American
Keyword: Biscuit, Cheeseburger

Loved this recipe? Save it to your favorite Pinterest board so you can easily find it later! It’s the perfect way to keep all your sweet ideas in one place. ✨

Savory Garlic Parmesan Cheeseburger Bombs displayed with a fresh parsley garnish and soft shadows.

One-Pan Wonder: The Honey BBQ Chicken Rice That’ll Steal Your Heart

Hey there, fellow food lover! If you’re anything like me, you’re always on the lookout for meals that are not just tasty but also easy to whip up on those busy nights. Well, gather ’round because I’ve got a cozy, comforting dish that’s about to become your kitchen MVP: One-Pan Honey BBQ Chicken Rice. Imagine tender chicken, smothered in a sweet and smoky honey BBQ sauce, resting on a fluffy bed of rice that soaks up every droplet of flavor. It’s the kind of dish that turns your kitchen into a cozy haven and makes your taste buds dance with joy. Let’s dive into this culinary adventure together!

Why You’ll Love This One-Pan Honey BBQ Chicken Rice

  • All-in-One Goodness: One-pan meals are a lifesaver! Less cleanup means more time to relax or enjoy a glass of wine while dinner cooks.
  • Flavor Explosion: The combination of sweet honey and tangy BBQ sauce creates a flavor profile that’s truly addictive. Your family will be asking for seconds (or thirds!).
  • Simple Ingredients: With just a handful of pantry staples, you can create a meal that feels gourmet without breaking the bank.
  • Customizable: Want to spice things up? Add some chili flakes! Prefer it mild? No problem! This dish is as flexible as your mood.
  • Kid-Approved: If you’re cooking for little ones, rest assured this dish has the sweet factor that even the pickiest eaters can’t resist.

Ingredients You’ll Need

A beautifully plated dish of One-Pan Honey BBQ Chicken Rice featuring chicken, rice, and bell peppers in warm lighting.

Let’s gather our supplies! Here’s what you’ll need for this delightful dish:

  • 1 lb chicken thighs or breasts
  • 1 cup rice (long-grain or jasmine)
  • 2 cups chicken broth
  • 1/2 cup honey BBQ sauce
  • 1 medium onion, chopped
  • 2 cloves garlic, minced
  • 1 cup bell peppers, diced
  • 1 tablespoon olive oil
  • Salt and pepper to taste
  • Chopped green onions for garnish (optional)

Let’s Get Cooking!

Ready to fill your kitchen with delicious aromas? Here’s how to make this one-pan wonder:

  1. Heat the Oil: In a large skillet, heat the olive oil over medium heat. This step is crucial to getting that lovely sear on the chicken.
  2. Season the Chicken: While the oil heats up, season your chicken with salt and pepper. This simple step enhances the flavor and makes a world of difference.
  3. Brown the Chicken: Add the seasoned chicken to the skillet. Cook until it’s beautifully browned on both sides, about 5-7 minutes. Don’t rush this step; that golden color is where the flavor lives!
  4. Set the Chicken Aside: Once browned, remove the chicken from the skillet and set it aside. This will give us room to sauté the vegetables without overcrowding.
  5. Sauté the Aromatics: In the same skillet, toss in the chopped onion and minced garlic. Sauté until softened, about 3-4 minutes. The smell will start to make your mouth water!
  6. Add the Bell Peppers: Stir in the diced bell peppers and let them cook for another 2-3 minutes. They’ll add a lovely crunch and color to our dish.
  7. Mix in the Rice: Now, it’s time to add the rice to the skillet. Stir it in well with the vegetables, allowing it to soak in all those flavors.
  8. Pour in the Broth and Sauce: Add the chicken broth and honey BBQ sauce, stirring to combine everything nicely. This is where it starts to get exciting!
  9. Nestle the Chicken: Place the chicken back into the skillet, making sure it’s nestled among the rice mixture. This ensures the flavors meld beautifully.
  10. Cook It All Together: Bring everything to a gentle boil, then reduce the heat to low. Cover the skillet and let it simmer for 20-25 minutes, or until the rice is fluffy and the chicken is fully cooked.
  11. Fluff and Serve: Once cooked, fluff the rice with a fork and garnish with chopped green onions if desired. Serve warm and enjoy every delightful bite!

Tips for Perfecting Your One-Pan Honey BBQ Chicken Rice

Here are some handy tips to elevate your dish:

  • Use Quality Chicken: Opt for organic or free-range chicken if possible. The flavor difference is significant!
  • Don’t Skip the Searing: Browning the chicken adds depth and flavor to your dish. Take your time with this step!
  • Experiment with Vegetables: Feel free to mix in your favorite veggies—zucchini, corn, or even spinach can work beautifully.
  • Adjust the Sauce: If you love a bit of heat, add some chili powder or hot sauce to the BBQ sauce for an extra kick!

Storage and Freezing Tips

Got leftovers? Lucky you! Here’s how to store and freeze your Honey BBQ Chicken Rice:

  • Refrigerator: Store leftovers in an airtight container in the fridge for up to 3 days. Reheat gently in the microwave or on the stove.
  • Freezer: You can also freeze the dish! Place it in a freezer-safe container, and it will last for up to 2 months. Thaw overnight in the fridge before reheating.

Variations and Substitutions

This recipe is incredibly versatile! Here are some ideas to make it your own:

  • Different Proteins: Swap chicken for shrimp or tofu for a vegetarian option. Just adjust cooking times accordingly.
  • Rice Alternatives: Try brown rice for a nuttier flavor or quinoa for a healthier twist.
  • BBQ Sauce Options: Use your favorite store-bought BBQ sauce or make your own for a personal touch.

FAQs About One-Pan Honey BBQ Chicken Rice

Can I use chicken breasts instead of thighs?

Absolutely! Chicken breasts work well too; just be mindful that they may cook a bit faster.

What if I don’t have honey BBQ sauce?

No worries! You can mix ketchup with a bit of Worcestershire sauce, brown sugar, and vinegar for a quick homemade sauce.

How do I know when the chicken is fully cooked?

The internal temperature should reach 165°F (75°C). Use a meat thermometer for accuracy!

Can I prepare this dish ahead of time?

Yes! You can prep everything up to the cooking step and store it in the fridge for up to 24 hours before cooking.

What sides pair well with this dish?

A fresh salad, crusty bread, or roasted veggies make fantastic accompaniments to this meal.

Conclusion

There you have it, my dear friends! One-Pan Honey BBQ Chicken Rice is not just a meal; it’s a heartwarming experience that brings the family together. With its sweet and smoky flavors, along with the ease of preparation, this dish is bound to become a staple in your home. So gather your loved ones, share some laughs, and dig into this delightful creation. I can’t wait for you to try it! If you do, drop me a note and let me know how it turned out. Happy cooking!

One-Pan Honey BBQ Chicken Rice

Prep Time 10 minutes
Cook Time 25 minutes
Total Time 35 minutes
Servings 4 servings
Calories 650
A quick and flavorful one-pan dish combining tender chicken, rice, and sweet honey BBQ sauce for a satisfying meal.

Ingredients

Protein

  • 1 lb chicken thighs or breasts
  • 1 cup rice (long-grain or jasmine)
  • 2 cups chicken broth
  • 1/2 cup honey BBQ sauce
  • 1 medium onion, chopped
  • 2 cloves garlic, minced
  • 1 cup bell peppers, diced
  • 1 tablespoon olive oil
  • to taste salt and pepper
  • for garnish chopped green onions (optional)

Instructions 

  • Heat olive oil in a skillet, season chicken, and cook until browned. Remove and set aside.
  • Sauté onion and garlic in the same skillet until softened, then add bell peppers and cook briefly.
  • Add rice, chicken broth, and BBQ sauce; stir to combine. Return chicken to the skillet.
  • Bring to a boil, then reduce heat, cover, and simmer for 20-25 minutes until rice is cooked.
  • Fluff rice, garnish with green onions if desired, and serve.

Notes

Use skinless chicken for a healthier option and adjust seasoning to taste.
Calories: 650kcal
Cost: $15
Course: Main Course
Cuisine: American
Keyword: BBQ, Chicken, Rice

Loved this recipe? Save it to your favorite Pinterest board so you can easily find it later! It’s the perfect way to keep all your sweet ideas in one place. ✨

An appetizing presentation of One-Pan Honey BBQ Chicken Rice with chicken thighs, rice grains, and garnished with green onions.

One-Pan Korean Ground Beef Bowl: Your New Go-To for Cozy Weeknight Dinners

If you’re on the hunt for a dinner recipe that’s not only quick and easy but also bursting with flavor, you’ve landed in the right place! Let me introduce you to my beloved Korean Ground Beef Bowl. This dish is a delightful harmony of sweet and savory flavors, all cooked up in a single pan. It’s perfect for those busy weeknights when you want something comforting yet vibrant enough to make your taste buds dance. Trust me, it’s a meal that’ll make you pause and say, ‘Wow!’

Ingredients for Your Korean Ground Beef Bowl

Essential Ingredients

A delicious bowl of Korean Ground Beef served over rice, garnished with green onions and sesame seeds.

Gather these simple ingredients that will take your bowl from basic to brilliant:

  • 1 lb ground beef – the star of the show!
  • 2 tablespoons soy sauce – for that umami kick.
  • 2 tablespoons brown sugar – a touch of sweetness to balance the saltiness.
  • 1 tablespoon sesame oil – brings a nutty aroma.
  • 3 cloves garlic, minced – because everything is better with garlic!
  • 1 teaspoon ginger, grated – adds warmth and zest.
  • 2 green onions, chopped – for freshness and crunch.
  • 1 cup cooked rice – your comforting base.
  • 1 cup steamed broccoli – a pop of color and nutrition!
  • Sesame seeds for garnish – a little something extra to make it pretty.

Optional Ingredients

Feeling adventurous? Here are a few optional ingredients to elevate your dish:

  • Carrots – julienned for added crunch and sweetness.
  • Bell peppers – diced for a pop of color.
  • Kimchi – for a tangy kick and authentic Korean flair.
  • Fried egg – because what’s better than a runny yolk over beef and rice?

How to Prepare the Ground Beef

Now that you have your ingredients ready, it’s time to unleash your inner chef! In a large skillet over medium heat, add the ground beef and let it sizzle. The sound of the meat hitting the hot pan is music to my ears! Use a spatula to break it apart as it cooks, turning it into golden, crumbly perfection. After a few minutes, when the beef is beautifully browned, drain any excess fat if needed. We want the beef to be flavorful but not swimming in grease!

Next, it’s time to kick things up a notch. Add the minced garlic and grated ginger to the pan, stirring them into the beef. The aroma that fills your kitchen will have everyone asking, “What’s cooking?” Add in the soy sauce, brown sugar, and sesame oil as well. Stir everything together until well combined, and let it cook for another 2-3 minutes. You’ll notice the sauce thickening slightly, clinging to the meat in the most delightful way.

Making the Perfect Rice Base

While your beef is simmering in that savory sauce, let’s talk about the rice. You can use white rice, brown rice, or even quinoa if you’re looking for a healthier alternative. The key is to cook it according to package instructions so it’s fluffy and ready to soak up all that delicious beef sauce. I love using a rice cooker for this, but a pot on the stove works just as well. Once it’s cooked, set it aside while we finish up the beef.

Assembly: Bringing It All Together

Now for the fun part—assembly! Take your cooked rice and pile it high in a bowl. Spoon the savory Korean ground beef mixture right over the top, making sure to get all that delicious sauce. Now, add your steamed broccoli for a burst of color and nutrition. It’s like a little green crown for your beef! Finally, sprinkle with chopped green onions and a generous dusting of sesame seeds. Voila! You’ve got a stunning Korean Ground Beef Bowl that’s not only a feast for the eyes but also a hug for your belly.

Variations and Customizations

One of the best parts about this recipe is its versatility. Feel free to swap in different vegetables based on what you have on hand. Here are a few ideas:

  • Bell Peppers: Diced and sautéed, they add sweetness and crunch.
  • Mushrooms: Sliced and cooked with the beef for an earthy flavor.
  • Spinach: Stir in fresh spinach right before serving for some added greens.
  • Cauliflower Rice: For a low-carb option, swap out regular rice for cauliflower rice.

Serving Suggestions

This Korean Ground Beef Bowl shines on its own, but you can amp up the experience with some delicious sides. Consider serving it with:

  • Pickled Vegetables: A tangy contrast to the richness of the beef.
  • Fresh Cucumber Salad: Refreshing and crunchy to balance the meal.
  • Kimchi: For those who love that spicy, fermented kick.
  • Iced Green Tea: A light beverage to wash it all down.

Storage and Freezing

Got leftovers? No problem! You can store any leftover Korean Ground Beef in an airtight container in the refrigerator for up to 3 days. Reheat it on the stovetop or in the microwave until warmed through. If you want to freeze it, let the beef cool completely before transferring it to a freezer-safe container. It should keep well for up to 3 months. Just thaw in the refrigerator overnight before reheating!

FAQs

Can I use ground turkey or chicken instead of beef?

Absolutely! Ground turkey or chicken will work beautifully in this recipe. Just keep in mind that the flavor will be a bit lighter, so you might want to adjust the seasoning slightly.

What should I serve with the Korean Ground Beef Bowl?

This dish is quite filling on its own, but you can enhance your meal with some pickled vegetables, a fresh salad, or even a side of kimchi for an authentic Korean experience.

How can I store leftovers?

Leftovers can be stored in an airtight container in the refrigerator for up to 3 days. For freezing, make sure the beef cools completely before storing in a freezer-safe container. Thaw overnight in the fridge before reheating.

Final Thoughts

There you have it! My Korean Ground Beef Bowl is not just a meal; it’s an experience—one that brings warmth and joy to your home, just like the cozy dinners of my childhood. I hope this dish becomes a staple in your kitchen, just as it has in mine. Remember, cooking is all about enjoying the process and making it your own. So, pull up a chair, grab your spatula, and let’s make mealtime a little more magical together!

And if you’re looking for more comforting recipes, check out my One-Pan Wonder: A Cozy Chicken and Potatoes Recipe That Feels Like Home or Wholesome Delights: Simple Recipes for Family Gatherings. Happy cooking!

Korean Ground Beef Bowl

Prep Time 10 minutes
Cook Time 15 minutes
Total Time 25 minutes
Servings 4 servings
Calories 450
A quick and flavorful Korean-inspired ground beef bowl perfect for a satisfying meal.

Ingredients

Meat

  • 1 lb ground beef
  • 2 tablespoons soy sauce
  • 2 tablespoons brown sugar
  • 1 tablespoon sesame oil
  • 3 cloves garlic, minced
  • 1 teaspoon ginger, grated
  • 2 green onions green onions, chopped
  • 1 cup cooked rice
  • 1 cup steamed broccoli
  • sesame seeds for garnish sesame seeds

Instructions 

  • Cook ground beef in a skillet until browned, then drain excess fat.
  • Add garlic, ginger, soy sauce, brown sugar, and sesame oil; cook 2-3 minutes.
  • Serve beef over rice, topped with broccoli and green onions. Garnish with sesame seeds.

Notes

Use low-sodium soy sauce for a healthier option.
Calories: 450kcal
Cost: $12
Course: Main Course
Cuisine: Korean
Keyword: ground beef

Loved this recipe? Save it to your favorite Pinterest board so you can easily find it later! It’s the perfect way to keep all your sweet ideas in one place. ✨

Eye-level shot of a Korean Ground Beef Bowl showcasing tender beef, colorful steamed broccoli, and sesame seeds.

A Wholesome Bowl of Serbian Chicken Rice That Feels Like Home

Welcome to my cozy kitchen! If you’re here, it’s likely because you’re craving something comforting and warm that reminds you of home. Well, my friend, you’re in for a treat! Today, we’re diving into a delightful dish that has made its way into my heart and home: Serbisches Reisfleisch mit Hähnchen. This one-pot chicken rice recipe is not just a meal; it’s a hug in a bowl, filled with flavors that dance together beautifully and evoke those cherished family moments.

Imagine walking into your kitchen and being greeted by the tantalizing aroma of sautéed onions, garlic, and tender chicken mingling with the rich scent of spices. It’s the kind of dish that envelops you in nostalgia, evoking memories of gathering around the table with loved ones, sharing stories, and enjoying hearty laughter. So, let’s roll up our sleeves and get cooking!

Why You’ll Love This Recipe

This Serbian Chicken Rice dish is:

  • Flavorful: With a combination of spices and fresh ingredients, each bite is a burst of flavor.
  • Comforting: A warm, satisfying meal that feels like a big hug on a chilly evening.
  • Easy to Make: This one-pot wonder simplifies the cooking process, making cleanup a breeze.
  • Healthy: Packed with lean chicken and colorful veggies, it’s a nutritious option for the whole family.

Let’s gather our ingredients and get started!

Ingredients for Serbisches Reisfleisch mit Hähnchen

Vibrant dish of Serbian Chicken Rice, featuring diced chicken, vegetables, and rice, beautifully presented.

Here’s what you’ll need to create this delightful dish:

  • 500g hähnchenbrustfilet, gewürfelt
  • 200g reis (z.B. langkornreis)
  • 1 zwiebel, gewürfelt
  • 2 knoblauchzehen, gehackt
  • 1 paprika, gewürfelt
  • 2 karotten, gewürfelt
  • 400ml hühnerbrühe
  • 1 dose tomaten (stückig)
  • 1 tl paprikapulver
  • 1 tl oregano
  • salz und pfeffer nach geschmack
  • 2 el olivenöl
  • frische petersilie zum garnieren

Steps to Make Serbian Chicken Rice

Now that we have everything ready, let’s break down the cooking process:

  1. Heat the oil: In a large pot, heat the olive oil over medium heat. You want it to shimmer but not smoke—just the right temperature to get things sizzling!
  2. Sauté the Aromatics: Add the diced onion and minced garlic to the pot. Let them cook until they’re soft and translucent, stirring occasionally. The smell will start to fill your kitchen, making your stomach growl.
  3. Brown the Chicken: Toss in the chicken breast pieces and sauté them until they’re lightly browned on all sides. This step is crucial—browning adds depth of flavor!
  4. Add the Veggies: Stir in the diced bell pepper and carrots. Let them sauté for a few minutes until they begin to soften. The colors are so vibrant; it’s like a little rainbow in your pot!
  5. Incorporate the Rice: Add the rice to the pot and stir well, ensuring it’s coated with the oil and flavors. This helps the rice absorb all that deliciousness.
  6. Mix in the Liquids: Pour in the diced tomatoes and chicken broth, then sprinkle in the paprika, oregano, salt, and pepper. Bring everything to a boil, then reduce the heat.
  7. Simmer: Cover the pot and let it simmer for about 20 minutes. This is when the magic happens! The rice will cook and soak up all those tasty flavors.
  8. Garnish and Serve: Once the rice is tender and the liquid has been absorbed, fluff it with a fork and garnish with fresh parsley. Serve it warm and watch everyone’s eyes light up!

Tips for Perfect Serbian Chicken Rice

To ensure your dish turns out just right, here are some handy tips:

  • Use High-Quality Chicken: Fresh chicken breast is key for this dish. If you have it, organic or free-range chicken will provide even better flavor.
  • Rinse the Rice: Rinsing the rice before cooking helps remove excess starch, preventing it from becoming gummy.
  • Don’t Skip the Browning: Browning the chicken and vegetables adds a depth of flavor that makes this dish truly special.

Variations to Try

Feeling adventurous? Here are some fun variations you can try:

  • Add More Veggies: Feel free to throw in some peas, corn, or even zucchini for added nutrition and color.
  • Spice It Up: If you enjoy a bit of heat, add some red pepper flakes or diced jalapeños to the mix.
  • Herb Variations: Swap oregano with thyme or basil for a different flavor profile.

Substitutions You Can Make

Cooking is all about improvisation! Here are some substitutions you can use if you’re missing an ingredient:

  • Instead of chicken, you can use turkey or even tofu for a vegetarian option.
  • If you don’t have long-grain rice, any rice variety will do—just adjust the cooking time as needed.
  • Low-sodium chicken broth can be used if you’re watching your salt intake.

Storage and Freezing Tips

Got leftovers? No problem! Here’s how to store your Serbian Chicken Rice:

  • Refrigeration: Store in an airtight container in the fridge for up to 3 days.
  • Freezing: This dish freezes beautifully! Allow it to cool completely, then transfer to a freezer-safe container. It can be frozen for up to 3 months.
  • Reheating: To reheat, thaw in the refrigerator overnight and warm on the stovetop or in the microwave, adding a splash of broth if needed to loosen it up.

Frequently Asked Questions

Can I make this dish in a slow cooker?

Absolutely! Combine all the ingredients in your slow cooker and cook on low for 6-8 hours or high for 3-4 hours. Just make sure to sauté the chicken and vegetables first for the best flavor!

What can I serve with Serbian Chicken Rice?

This dish is hearty enough to stand alone, but it pairs wonderfully with a simple side salad or some crusty bread to soak up the juices.

Can I use brown rice instead?

Yes, but keep in mind that brown rice has a longer cooking time. You’ll need to increase the liquid and cooking time accordingly.

Conclusion

There you have it—a wholesome bowl of Serbisches Reisfleisch mit Hähnchen that’s easy to make and feels like home. This dish is perfect for cozy evenings or when you want to impress your family and friends with minimal fuss. Remember, cooking is about joy and connection, so don’t stress the little things. Enjoy every step, and let the magic happen! I hope this recipe becomes a beloved part of your family traditions, just like it has in mine. Happy cooking, my friends!

Serbisches Reisfleisch mit Hähnchen | One Pot Reis | gesund kochen | kalorienarme Rezepte

Prep Time 10 minutes
Cook Time 20 minutes
Total Time 30 minutes
Servings 4 portionen
Calories 550
Ein gesundes und schmackhaftes Gericht aus Hähnchen, Reis und frischem Gemüse, perfekt für eine schnelle Mahlzeit.

Ingredients

Protein

  • 500 g Hähnchenbrustfilet, gewürfelt

Grundzutaten

  • 200 g Reis (z.b. Langkornreis)
  • 1 stück Zwiebel, gewürfelt
  • 2 zehen Knoblauchzehen, gehackt
  • 1 stück Paprika, gewürfelt
  • 2 stück Karotten, gewürfelt
  • 400 ml Hühnerbrühe
  • 1 dose stückige Tomaten
  • 1 tl Paprikapulver
  • 1 tl Oregano
  • nach geschmack Salz und Pfeffer
  • 2 EL Olivenöl
  • frische Petersilie zum Garnieren

Instructions 

  • Olivenöl erhitzen und Zwiebel sowie Knoblauch glasig braten.
  • Hähnchen anbraten, dann Paprika und Karotten hinzufügen und kurz mitbraten.
  • Reis hinzufügen, gut umrühren, dann Tomaten, Brühe, Gewürze hinzufügen und aufkochen.
  • Hitze reduzieren, abdecken und 20 Minuten köcheln lassen, bis der Reis gar ist.
  • Mit Petersilie garnieren und servieren.

Notes

Für eine noch gesündere Variante, verwenden Sie mageres Hähnchen und wenig Salz.
Calories: 550kcal
Cost: $15
Course: Hauptgericht
Cuisine: serbisch
Keyword: gesund, Hähnchen, Reis

Loved this recipe? Save it to your favorite Pinterest board so you can easily find it later! It’s the perfect way to keep all your sweet ideas in one place. ✨

Delicious Serbian Chicken Rice dish, emphasizing the mix of chicken, vegetables, and warm colors in natural lighting.

Why This One-Pan Chicken and Potato Dinner Feels Like Home

Imagine coming home after a long day, your stomach rumbling and your heart yearning for something comforting. You open the door to a warm kitchen where the delicious aroma of roasted chicken and potatoes fills the air, wrapping around you like a cozy blanket. That’s the magic of this One-Pan Chicken and Potato Dinner—a dish that not only satisfies your hunger but also brings a sense of home and comfort to your table.

This recipe is all about simplicity and flavor, making it perfect for busy weeknights when you want something delicious without spending hours in the kitchen. With just a handful of ingredients and minimal effort, you can create a meal that feels like a warm hug, something that will make your family pause and appreciate the beauty of a home-cooked dinner.

Gathering Your Ingredients

Before we dive into the cooking process, let’s gather our stars for the show. Here’s what you’ll need:

  • 4 chicken thighs (bone-in, skin-on)
  • 4 medium potatoes (cut into wedges)
  • 2 tablespoons olive oil
  • 1 teaspoon garlic powder
  • 1 teaspoon paprika
  • 1 teaspoon dried thyme
  • Salt and pepper to taste
  • Fresh parsley (for garnish, optional)

As you gather these ingredients, take a moment to appreciate their fresh aromas. The earthy scent of potatoes, the rich aroma of chicken, and the fragrance of dried thyme all promise a delightful culinary experience.

Step-by-Step Guide to Your One-Pan Chicken and Potato Dinner

A beautifully arranged One-Pan Chicken and Potato Dinner, highlighting juicy chicken thighs and perfectly roasted potato wedges.

How to Make This Comforting Dish

Now that we have everything ready, let’s walk through the steps to create this magical meal:

  1. Preheat the Oven: Begin by setting your oven to 400°F (200°C). This ensures that your chicken and potatoes will roast beautifully, developing that golden-brown crispiness we all crave.
  2. Prepare the Marinade: In a large mixing bowl, combine the olive oil, garlic powder, paprika, dried thyme, and a sprinkle of salt and pepper. This blend of spices is where the magic starts. Feel free to adjust the seasonings based on your preference; if you love a little heat, toss in some cayenne pepper!
  3. Coat the Chicken: Add the chicken thighs to the bowl. Using your hands (don’t be shy!), massage the marinade into the chicken, ensuring every inch is coated. The skin-on thighs will render delicious fat as they cook, making the dish even more flavorful.
  4. Prepare the Potatoes: Next, add the potato wedges to the bowl and toss them in the remaining marinade. You want them to be evenly coated, so they soak up all that flavor while they roast.
  5. Arrange on a Baking Sheet: Spread the chicken and potatoes in a single layer on a large baking sheet. Make sure they have enough space to roast nicely—crowding the pan can lead to steaming instead of roasting.
  6. Bake to Perfection: Place the baking sheet in the preheated oven and bake for 35-40 minutes. You’ll know it’s done when the chicken is cooked through (the juices should run clear) and the potatoes are tender and golden. As it cooks, your kitchen will fill with a mouthwatering aroma that will have everyone asking, ‘What’s for dinner?’

Garnishing and Serving

Once your One-Pan Chicken and Potato Dinner is out of the oven, don’t forget to sprinkle some fresh parsley on top for a pop of color and freshness. Serve it hot, and watch the smiles spread across the faces of your loved ones as they dig into this comforting meal.

Tips for Success

  • Use Bone-In, Skin-On Chicken: This cut not only adds flavor but also keeps the meat juicy and tender.
  • Ensure Even Cooking: Try to cut your potatoes into uniform wedges so they cook evenly.
  • Let It Rest: Allow the chicken to rest for a few minutes after removing it from the oven. This helps retain its juices.

Variations to Try

If you’re feeling adventurous, here are some tasty variations to make this dish your own:

  • Add Vegetables: Toss in some carrots, bell peppers, or Brussels sprouts for extra color and nutrition.
  • Change the Herbs: Experiment with other herbs like rosemary, oregano, or even a dash of Italian seasoning for a different flavor profile.
  • Spicy Kick: Add a pinch of cayenne pepper or red pepper flakes for a bit of heat.

Substitutions

Don’t have all the ingredients on hand? No problem! Here are some easy substitutions:

  • Chicken: You can substitute chicken breasts or drumsticks; just adjust the cooking time accordingly.
  • Potatoes: Sweet potatoes or even butternut squash would work beautifully in this recipe.
  • Olive Oil: Any cooking oil you have on hand, like avocado oil or canola oil, will suffice.

Equipment You’ll Need

To make this One-Pan Chicken and Potato Dinner, you’ll need:

  • A large mixing bowl
  • A baking sheet (preferably rimmed to catch any drippings)
  • A sharp knife for cutting the potatoes
  • A measuring spoon for precise seasoning

Storage and Freezing

If you find yourself with leftovers (which I doubt will happen), here’s how to store them:

  • Refrigerator: Store in an airtight container for up to 3 days.
  • Freezer: You can freeze the chicken and potatoes for up to 3 months. Just be sure to let them cool completely before sealing.

FAQs

What’s the best way to ensure my chicken is juicy?

Choosing bone-in, skin-on chicken thighs is key, as they tend to stay moist during cooking. Also, avoid overcooking them; use a meat thermometer to check for 165°F (75°C) at the thickest part.

Can I substitute the chicken for a vegetarian option?

Absolutely! You can swap the chicken for chickpeas or tofu, but adjust the cooking time accordingly, as these will require less time to cook.

How do I know when the potatoes are done?

The potatoes should be tender when pierced with a fork and have a lovely golden color. If you enjoy a crispy texture, feel free to broil them for a couple of minutes at the end of cooking.

Wrapping Up

This One-Pan Chicken and Potato Dinner is more than just a meal; it’s a celebration of simplicity, comfort, and the joy of cooking. Every bite is a reminder of home, of love, and of the memories we create around the dinner table. So, whether you’re cooking for your family, impressing friends, or simply treating yourself, give this recipe a try. I promise it will become a staple in your kitchen, just like it has in mine. Pull up a chair, grab a fork, and let’s dig into the magic of home-cooked goodness together!

One-Pan Chicken and Potato Dinner

Prep Time 10 minutes
Cook Time 40 minutes
Total Time 50 minutes
Servings 4 servings
Calories 550
A simple and flavorful one-pan meal combining tender chicken thighs with crispy potatoes, perfect for a quick dinner.

Ingredients

Protein

  • 4 pieces chicken thighs (bone-in, skin-on)

Vegetables

  • 4 medium potatoes (cut into wedges)

Seasonings & Oils

  • 2 tablespoons olive oil
  • 1 teaspoon garlic powder
  • 1 teaspoon paprika
  • 1 teaspoon dried thyme

Salt and Pepper

  • to taste salt and pepper

Garnish

  • optional fresh parsley (for garnish)

Instructions 

  • Preheat oven to 400°F (200°C).
  • Mix olive oil, garlic powder, paprika, thyme, salt, and pepper in a bowl.
  • Toss chicken and potatoes in the mixture.
  • Arrange on a baking sheet and bake for 35-40 minutes.
  • Garnish with parsley if desired and serve hot.

Notes

Ensure chicken is cooked through before serving.
Calories: 550kcal
Cost: $15
Course: Main Course
Cuisine: American
Keyword: Chicken, one pan, potatoes

Loved this recipe? Save it to your favorite Pinterest board so you can easily find it later! It’s the perfect way to keep all your sweet ideas in one place. ✨

An appetizing shot of a One-Pan Chicken and Potato Dinner, showcasing tender chicken and golden potato wedges with soft shadows.

The Dinner Recipe That Feels Like Home on a Plate

Welcome, dear friends! If you’re looking for a recipe that not only fills your belly but also wraps you in the warm embrace of nostalgia, you’ve come to the right place. Today, we’re diving into a dish that feels like home on a plate—one that brings back memories of family gatherings, laughter around the table, and the simple joy of sharing a meal with loved ones. Grab your apron because we’re making a delightful One Pan Chicken and Potatoes dish that’s sure to become a staple in your kitchen!

Why This Recipe is So Special

There’s something magical about the way certain meals can transport us back to the comfort of our childhood kitchens. For me, this recipe evokes memories of cozy dinners with my family, where the aroma of roasted chicken mingled with the earthy scent of potatoes, filling our home with warmth and love. Not only is this dish easy to prepare, but it also offers a wonderful medley of flavors and textures that will have everyone asking for seconds.

Want to Save This Recipe?

Colorful vegetable quinoa dish served in a bowl, garnished with fresh parsley.

If you want to bookmark this recipe for later, don’t forget to pin it! This One Pan Chicken and Potatoes recipe is perfect for busy weeknights, yet special enough for a weekend feast.

Table of Contents

Ingredients

Here’s what you’ll need to create this comforting dish:

  • 2 cups quinoa
  • 4 cups vegetable broth
  • 1 cup cherry tomatoes, halved
  • 1 bell pepper, diced
  • 1 zucchini, diced
  • 1 cup black beans, rinsed
  • 2 tablespoons olive oil
  • 1 teaspoon garlic powder
  • 1 teaspoon cumin
  • Salt and pepper to taste
  • Fresh parsley for garnish

How to Make One Pan Chicken and Potatoes

Let’s get into the nitty-gritty of creating this delightful meal. Follow these simple steps and let the magic unfold:

  1. Rinse the Quinoa: Start by rinsing the quinoa under cold water. This step removes the natural coating called saponin, which can give quinoa a bitter taste. Give it a good rinse and then drain it well.
  2. Boil the Broth: In a large pot, bring the vegetable broth to a boil. The broth will infuse the quinoa with flavor, making each bite more delicious.
  3. Add the Quinoa: Once the broth is boiling, add the rinsed quinoa. Reduce the heat to low, cover the pot, and let it simmer for about 15 minutes. You’ll know it’s done when the quinoa has absorbed all the broth and is fluffy.
  4. Sauté the Vegetables: While the quinoa is cooking, heat olive oil in a skillet over medium heat. Add the diced bell pepper and zucchini, sautéing them for about 5-7 minutes until they’re tender and slightly caramelized.
  5. Mix in Cherry Tomatoes and Black Beans: Stir in the halved cherry tomatoes and black beans, cooking for another 3-4 minutes. The tomatoes will soften and mingle beautifully with the beans.
  6. Add Seasonings: Sprinkle in the garlic powder, cumin, salt, and pepper. This is where the flavors really come together, so stir well to combine all the ingredients.
  7. Combine with Quinoa: Fluff the cooked quinoa with a fork and add it to the skillet with the veggies and beans. Give everything a good stir, ensuring that the quinoa is well mixed and coated in flavor.
  8. Serve and Garnish: Serve your One Pan Chicken and Potatoes hot, garnished with fresh parsley. Enjoy the vibrant colors and enticing aromas!

Recipe Tips

To make the most out of your cooking experience, here are some tips:

  • Mind the Size: Cut your vegetables and potatoes into even pieces for uniform cooking. This ensures everything is tender and delicious.
  • Don’t Rush the Flavors: Allow the dish to sit for a few minutes after cooking. This lets the flavors meld together beautifully.
  • Get Creative: Feel free to experiment with different vegetables based on what’s in season or what you have on hand. The beauty of this recipe is its versatility!

Variations

If you’re looking to switch things up, here are some delicious variations:

  • Spicy Twist: Add a pinch of cayenne pepper or some red pepper flakes for a little heat.
  • Herb Infusion: Toss in some fresh herbs like basil or thyme for an aromatic touch.
  • Protein Boost: For added protein, consider including grilled chicken, shrimp, or tofu to the mix.

Substitutions

No need to fret if you’re missing an ingredient. Here are some easy swaps:

  • Quinoa: If you don’t have quinoa, feel free to use brown rice or couscous as an alternative.
  • Vegetable Broth: Chicken broth works just as well if you’re not strictly vegetarian.
  • Black Beans: You can substitute with kidney beans or chickpeas for a different flavor profile.

Storage and Freezing

Got leftovers? No problem! Here’s how to store them:

  • Refrigerator: Store in an airtight container for up to 3-4 days. Reheat in the oven or microwave until warmed through.
  • Freezing: This dish freezes beautifully! Just portion it into freezer-safe containers and it should last for up to 2 months. Thaw in the refrigerator before reheating.

FAQs

Here are some commonly asked questions about this recipe:

  • Can I make this dish ahead of time? Absolutely! You can prepare the ingredients and store them separately until you’re ready to cook.
  • What’s the best way to reheat leftovers? The oven is ideal for reheating to maintain crispness. Heat at 350°F (175°C) until warmed through.
  • Can I use frozen vegetables? Yes, frozen veggies work well! Just add them to the skillet directly, and adjust the cooking time accordingly.

Conclusion

And there you have it! A One Pan Chicken and Potatoes recipe that not only nourishes your body but also feeds your soul. This dish is a celebration of flavors, memories, and the joy of cooking. Whether you’re whipping it up for a weeknight dinner or serving it at a family gathering, it’s bound to leave a lasting impression. So gather your loved ones, share a laugh, and dig in! Happy cooking, my friends, and may your kitchen always feel like home.

Pin by Joy 🌻 on {dinner} in 2025

Prep Time 10 minutes
Cook Time 20 minutes
Total Time 30 minutes
Servings 4 servings
Calories 350
A vibrant and healthy quinoa bowl perfect for a quick dinner, packed with fresh vegetables and flavorful spices.

Ingredients

Grains

  • 2 cups quinoa

Broth

  • 4 cups vegetable broth

Vegetables

  • 1 cup cherry tomatoes, halved
  • 1 diced bell pepper
  • 1 diced zucchini

Legumes

  • 1 cup black beans, rinsed

Oils & Spices

  • 2 tablespoons olive oil
  • 1 teaspoon garlic powder
  • 1 teaspoon cumin

Seasonings

  • to taste salt and pepper

Garnish

  • for garnish fresh parsley

Instructions 

  • Rinse quinoa and drain.
  • Bring vegetable broth to a boil, add quinoa, cover, and simmer 15 minutes.
  • Sauté bell pepper and zucchini in olive oil for 5-7 minutes.
  • Add cherry tomatoes and black beans, cook 3-4 minutes.
  • Mix in spices, fluff quinoa, and combine with vegetables. Garnish with parsley.

Notes

Feel free to add your favorite herbs for extra flavor.
Calories: 350kcal
Cost: $15
Course: dinner
Keyword: Quinoa

Loved this recipe? Save it to your favorite Pinterest board so you can easily find it later! It’s the perfect way to keep all your sweet ideas in one place. ✨

A vibrant, healthy meal showcasing quinoa with diced vegetables, illuminated by natural light.

A Whirlwind of Flavor: My Go-To Beef and Broccoli Stir Fry

Welcome to my cozy kitchen, where the aroma of sizzling beef and fresh broccoli fills the air, and the promise of a delightful meal awaits! If you’re hunting for an easy, mouthwatering dinner that you can whip up in under 30 minutes, then you’ve come to the right place. My Beef and Broccoli Stir Fry Recipe is not just a dish; it’s a vibrant celebration of flavors and textures that will have your family begging for seconds. Trust me, this is one of those recipes that feels like a warm hug, making busy weeknights feel a little more special.

Why You’ll Love Beef and Broccoli Stir Fry

Let me tell you, this dish is a lifesaver! You get tender slices of beef, crisp-tender broccoli, and a luscious sauce that clings to every bite, creating a dish that’s as satisfying as it is quick to prepare. Plus, it’s versatile! You can easily swap in your favorite veggies or adjust the sauce to suit your taste. Want to know the best part? You can enjoy this hearty meal without feeling guilty—it’s packed with nutrients and flavor!

Ingredients Needed To Make Beef and Broccoli Stir Fry

A mouthwatering Beef and Broccoli Stir Fry featuring glossy sauce and fresh broccoli florets.
  • 1 pound beef sirloin, thinly sliced
  • 2 cups broccoli florets
  • 2 tablespoons vegetable oil
  • 3 cloves garlic, minced
  • 1 tablespoon ginger, minced
  • 1/4 cup soy sauce
  • 2 tablespoons oyster sauce
  • 1 tablespoon cornstarch
  • 1/2 cup beef broth
  • Salt and pepper to taste
  • Cooked rice for serving

How To Make Beef and Broccoli Stir Fry

Now, let’s dive into the magic of making this delicious dish! Follow these simple steps, and you’ll have a restaurant-quality meal right at home.

  1. Prepare the Sauce: In a small bowl, mix together the soy sauce, oyster sauce, cornstarch, and beef broth. Set this mixture aside; it’s going to be the flavor booster your stir fry needs!
  2. Cook the Beef: Heat 1 tablespoon of vegetable oil in a large skillet or wok over medium-high heat. Add the sliced beef and stir-fry until browned, about 3-4 minutes. Once cooked, remove the beef from the skillet and set it aside.
  3. Stir-Fry the Aromatics: In the same skillet, add the remaining tablespoon of oil, followed by the minced garlic and ginger. Stir-fry for about 30 seconds until fragrant—your kitchen will smell heavenly!
  4. Add the Broccoli: Toss in the broccoli florets and stir-fry for 2-3 minutes until they are bright green and tender-crisp. You want them to maintain a little bite; trust me, it makes all the difference!
  5. Combine Everything: Return the beef to the skillet and pour the sauce mixture over everything. Stir well to combine and cook for another 2-3 minutes until the sauce thickens. This is where the magic happens!
  6. Season to Taste: Give your stir-fry a taste, and season with salt and pepper as needed. Remember, balance is key!
  7. Serve: Serve hot over a bed of cooked rice. Enjoy the delightful colors and the smell—your taste buds are in for a treat!

Variations & Substitutions

The beauty of this easy homemade beef stir-fry is its versatility. Here are some ideas to mix things up:

  • Vegetable Variations: Feel free to swap out broccoli for snap peas, bell peppers, or even carrots. You can even toss in some mushrooms for an earthy flavor.
  • Protein Alternatives: If you’re not a beef fan, try chicken, shrimp, or tofu. Just adjust the cooking times accordingly.
  • Gluten-Free Option: Substitute soy sauce with tamari to make this dish gluten-free.
  • Spicy Kick: If you like it hot, add a sprinkle of red pepper flakes or a dash of sriracha to the sauce for a spicy twist.

Commonly Asked Questions

How can I store leftover Beef and Broccoli Stir Fry?

Leftovers can be stored in an airtight container in the refrigerator for up to 3 days. When you’re ready to enjoy them, simply reheat in a skillet over medium heat with a splash of water or broth to keep things moist.

Can I freeze Beef and Broccoli Stir Fry?

Absolutely! You can freeze leftover stir fry for up to 3 months. Just let it cool completely, then portion it into freezer-safe containers. When you’re ready to eat, thaw overnight in the refrigerator and reheat as instructed above. Keep in mind that the broccoli may lose some crispness after freezing, but the flavor will still be there!

What cut of beef is best for stir-fry?

For the best results, opt for cuts like flank steak, skirt steak, or sirloin steak. These cuts are lean and tender, making them ideal for quick cooking methods like stir-frying.

What should I serve with Beef and Broccoli Stir Fry?

This stir-fry is delicious served over cooked white rice, brown rice, or noodles. For a lower-carb option, you can enjoy it with quinoa or cauliflower rice. A simple side salad or steamed vegetables also pair beautifully!

Tips for the Perfect Stir-Fry

  • Prep Everything First: Stir-frying happens fast, so have all your ingredients prepped and ready to go before you start cooking.
  • High Heat: Make sure your skillet or wok is hot! This helps to sear the beef quickly, locking in the flavors and juices.
  • Don’t Overcrowd the Pan: If you’re making a large batch, cook in batches. Overcrowding can cause the ingredients to steam instead of fry.
  • Fresh Ingredients: Use the freshest vegetables you can find. They not only taste better but also add vibrant color to your dish.

Equipment You’ll Need

  • A large skillet or wok
  • Cutting board and sharp knife
  • Measuring cups and spoons
  • A small bowl for mixing the sauce

Conclusion

So there you have it, my friends—a delightful Beef and Broccoli Stir Fry that brings the magic of restaurant-quality meals right into your home. With its burst of flavors, satisfying textures, and quick cooking time, this dish is bound to become a staple in your kitchen. Whether you’re cooking for a cozy family dinner, a quick meal after a long day, or impressing friends, this recipe has got you covered. So pull up that chair, grab your spatula, and let’s make some magic happen in the kitchen. Happy cooking!

Beef and Broccoli Stir Fry Recipe

Prep Time 10 minutes
Cook Time 10 minutes
Total Time 20 minutes
Servings 4 servings
Calories 350
A quick and flavorful stir-fry combining tender beef and crisp broccoli in a savory sauce.

Ingredients

Meat

  • 1 pound beef sirloin, thinly sliced

Vegetables

  • 2 cups broccoli florets

Oils & Sauces

  • 2 tablespoons vegetable oil
  • 3 cloves garlic, minced
  • 1 tablespoon ginger, minced
  • 1/4 cup soy sauce
  • 2 tablespoons oyster sauce
  • 1 tablespoon cornstarch
  • 1/2 cup beef broth

Seasonings

  • to taste salt and pepper

Servings

  • cooked rice for serving cooked rice

Instructions 

  • Mix soy sauce, oyster sauce, cornstarch, and beef broth. Set aside.
  • Heat 1 tablespoon of oil in a skillet. Cook beef until browned, then remove.
  • Add remaining oil, garlic, and ginger; stir-fry 30 seconds.
  • Add broccoli; stir-fry 2-3 minutes. Return beef, pour sauce, cook until thickened.
  • Season with salt and pepper. Serve over rice.

Notes

Use fresh ingredients for best flavor.
Calories: 350kcal
Cost: $15
Course: Main Course
Cuisine: Asian
Keyword: Beef, Broccoli

Loved this recipe? Save it to your favorite Pinterest board so you can easily find it later! It’s the perfect way to keep all your sweet ideas in one place. ✨

An appetizing plate of Beef and Broccoli Stir Fry, showcasing the colorful ingredients in a professional setting.

The Cozy Crockpot Meal That Turns Dinner into a Hug

Welcome back to my kitchen, dear friends! Today, I’m thrilled to share a recipe that’s not just a meal but a warm embrace in a bowl—Garlic Parmesan Crockpot Chicken and Potatoes. This dish is the culinary equivalent of curling up with your favorite blanket on a chilly evening, and trust me, it’s bound to become a staple in your household.

Why You’ll Love This Recipe

Let’s be honest—life can get hectic. Between work, family obligations, and everything in between, the last thing you want to do is spend hours slaving away over a hot stove. That’s where this Garlic Parmesan Chicken Crockpot recipe shines. It’s easy to prepare, requires minimal hands-on time, and the results are nothing short of magical.

Imagine coming home after a long day, the tantalizing aroma of garlic and cheese wafting through your front door, welcoming you like an old friend. This cozy crockpot meal transforms simple ingredients into a heartwarming feast, making it perfect for busy weeknights or a relaxed Sunday dinner with loved ones.

Preparation and Cooking Time

A bowl of Garlic Parmesan Chicken and Potatoes, showcasing tender chicken and vibrant garnishes.
  • Prep Time: 15 minutes
  • Cook Time: 6–7 hours on low or 3–4 hours on high

Ingredients

Here’s what you’ll need to create this mouthwatering dish:

  • 4 boneless, skinless chicken breasts
  • 1 lb baby potatoes, halved
  • 1 cup grated Parmesan cheese
  • 1/2 cup unsalted butter, melted
  • 4 cloves garlic, minced
  • 1 teaspoon Italian seasoning
  • Salt and pepper to taste
  • Fresh parsley for garnish (optional)

Step-by-Step Instructions

Ready to dive in? Let’s get cooking!

1. Mix the Sauce

In a medium bowl, combine the melted butter, minced garlic, grated Parmesan cheese, Italian seasoning, salt, and pepper. This mixture is the heart of the dish, bringing together flavors that will make your taste buds dance. The butter adds richness, while the garlic and Parmesan provide that irresistible savory punch.

2. Prepare the Potatoes

Start by placing the halved baby potatoes at the bottom of your crockpot. These little gems will soak up all the delicious flavors as they cook, becoming tender and flavorful.

3. Add the Chicken

Next, lay the chicken breasts on top of the potatoes. Make sure they’re nestled in nicely; this helps them cook evenly. After all, we want that chicken to be juicy and flavorful, not dry and sad!

4. Pour on the Goodness

Now, it’s time to pour that heavenly garlic Parmesan mixture over the chicken and potatoes. Ensure everything is well coated—this is where the flavor magic happens!

5. Cook to Perfection

Cover your crockpot and set it to cook on low for 6–7 hours or on high for 3–4 hours. The slow cooking process allows the chicken to become tender, while the potatoes reach that perfect fork-tender texture.

6. Garnish and Serve

Once the cooking time is up, remove the lid and prepare yourself for a delicious aroma that will fill your kitchen. Gently remove the chicken and potatoes from the crockpot and plate them up. If you like, sprinkle some fresh parsley on top for a pop of color and freshness.

How to Serve

This dish is fantastic on its own, but you can also pair it with a simple green salad or some crusty bread to soak up the remaining buttery goodness. Your family and friends will be raving about this meal long after the last bite!

Additional Tips

  • Make Ahead: You can prep everything the night before. Just store the chicken and potatoes in the refrigerator, and add the sauce in the morning before you head out for the day.
  • Don’t Rush the Cooking: The longer you allow it to cook on low, the more tender and flavorful the chicken will become.
  • Adjust the Seasoning: Feel free to taste and adjust the seasoning in the sauce mixture. If you love a little kick, add some red pepper flakes!

Recipe Variations

While this recipe is delicious as it is, don’t hesitate to make it your own! Here are a few ideas:

  • Add Veggies: Toss in some carrots or green beans for extra color and nutrition.
  • Substitute Chicken: Try using bone-in chicken thighs for a juicier option.
  • Herb Swap: Experiment with fresh herbs like rosemary or thyme for a different flavor profile.

Storage & Freezing

If you find yourself with leftovers (which is unlikely, but hey, it happens), you can store them in an airtight container in the refrigerator for up to 3 days. To freeze, place the chicken and potatoes in a freezer-safe container, and they’ll last for about 3 months. Just be sure to thaw them in the fridge overnight before reheating.

Special Equipment

This recipe requires a crockpot. If you don’t have one, consider investing in a slow cooker; it’s a game-changer for busy weeknights!

Frequently Asked Questions

Can I substitute the chicken with something else?

Absolutely! You can use boneless skinless thighs or even a whole chicken. Just adjust the cooking time as necessary.

What if I don’t have Parmesan cheese?

No worries! You can use any hard cheese you have on hand, like Pecorino Romano or even a blend of cheeses.

How do I ensure the chicken stays moist?

Cooking on low for a longer period helps retain moisture. Also, make sure to coat the chicken well with the sauce to lock in flavor and juiciness.

Conclusion

And there you have it—Garlic Parmesan Crockpot Chicken and Potatoes! A dish that’s not only simple and delicious but also filled with warmth and comfort. I hope you bring this recipe into your home and share it with those you love. Remember, cooking is about making memories just as much as it is about good food. So gather your loved ones, whip up this cozy meal, and watch as it turns dinner into a hug. Happy cooking!

For more delightful recipes, check out my Cheesy Garlic Chicken Wraps or take a flavorful adventure with Chicken Fillet in Creamy Garlic Parmesan Sauce. Until next time!

Garlic Parmesan Crockpot Chicken and Potatoes

Prep Time 10 minutes
Cook Time 4 hours
Total Time 4 hours 10 minutes
Servings 4 servings
Calories 550
A flavorful and easy crockpot dish combining tender chicken, crispy potatoes, and a cheesy garlic sauce.

Ingredients

Protein

  • 4 pieces boneless, skinless chicken breasts

Vegetables

  • 1 lb baby potatoes, halved

Dairy & Cheese

  • 1 cup grated parmesan cheese

Fats & Oils

  • 1/2 cup unsalted butter, melted

Spices & Herbs

  • 4 cloves garlic, minced
  • 1 teaspoon italian seasoning

Seasonings

  • to taste salt and pepper

Garnish

  • for garnish fresh parsley (optional)

Instructions 

  • Mix melted butter, garlic, Parmesan, Italian seasoning, salt, and pepper.
  • Place halved potatoes in the crockpot, then add chicken on top.
  • Pour the garlic Parmesan mixture over chicken and potatoes.
  • Cover and cook on low for 6-7 hours or high for 3-4 hours.
  • Garnish with parsley before serving.

Notes

Ensure chicken is cooked through and potatoes are tender before serving.
Calories: 550kcal
Cost: $15
Course: Main Course
Cuisine: American
Keyword: Chicken, garlic, parmesan, potatoes

Loved this recipe? Save it to your favorite Pinterest board so you can easily find it later! It’s the perfect way to keep all your sweet ideas in one place. ✨

An appetizing plate of Garlic Parmesan Crockpot Chicken with melted cheese and fresh parsley on top.