Author

Ava

Browsing

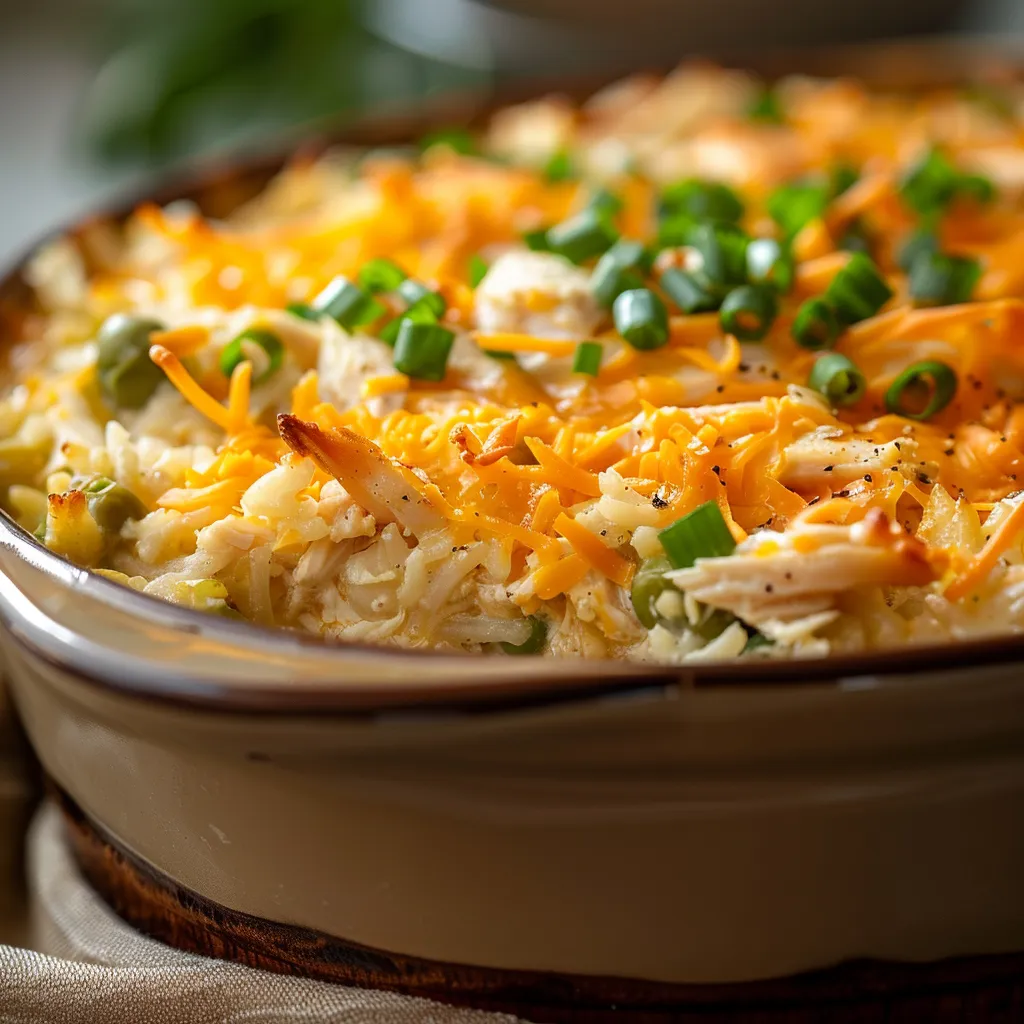
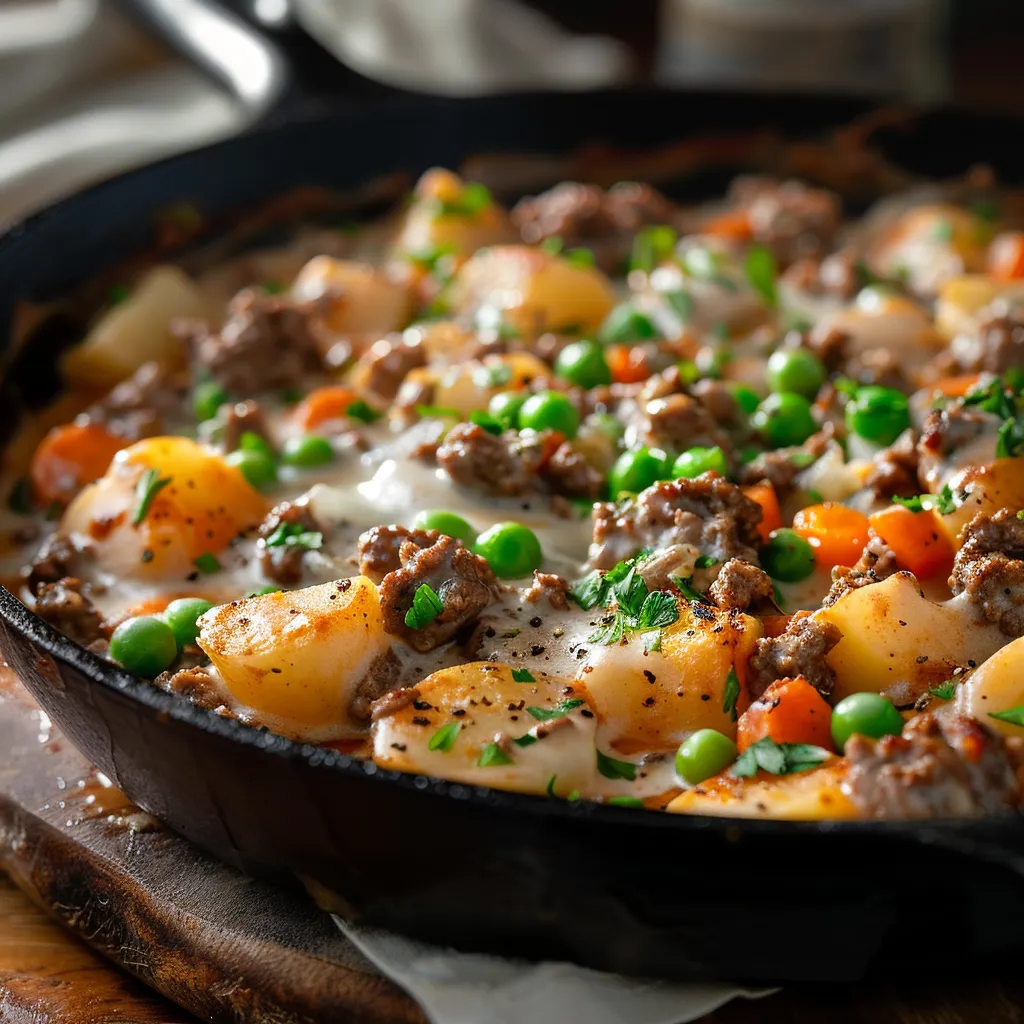
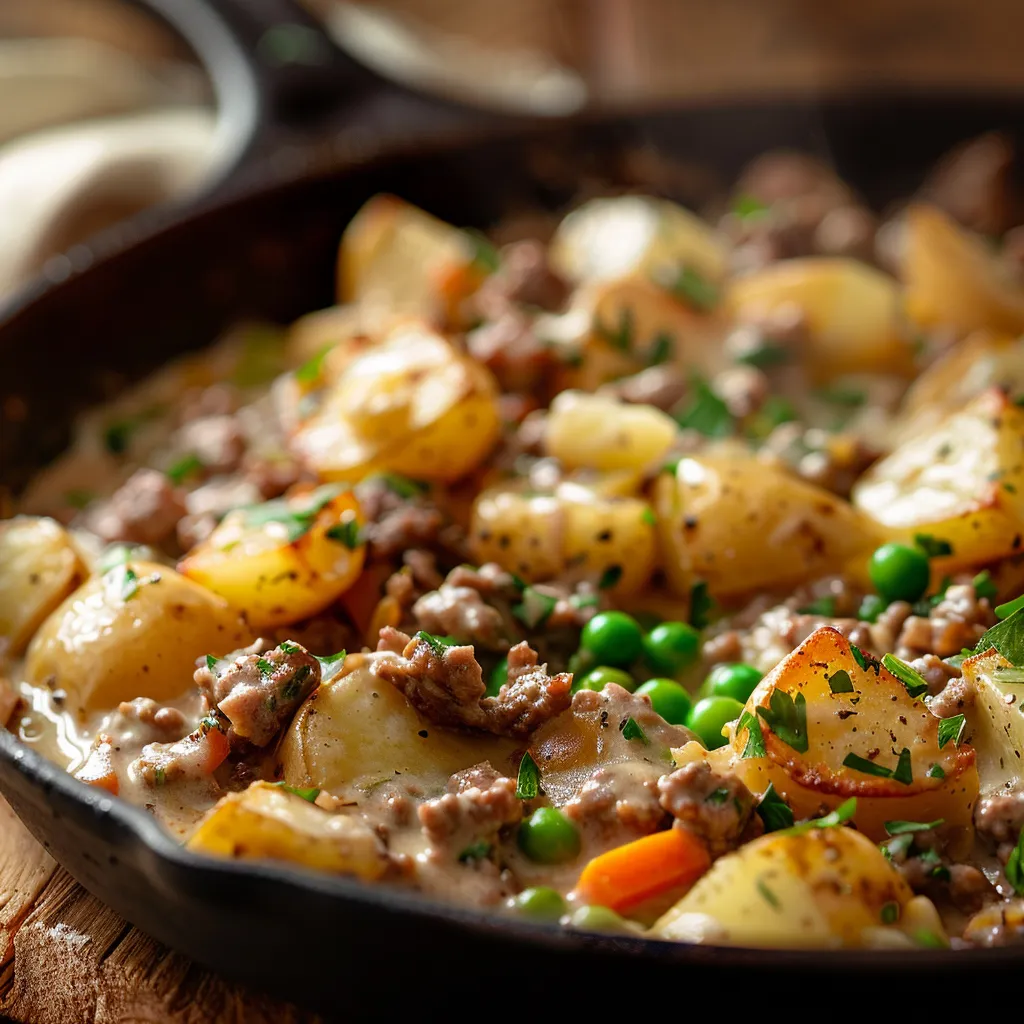
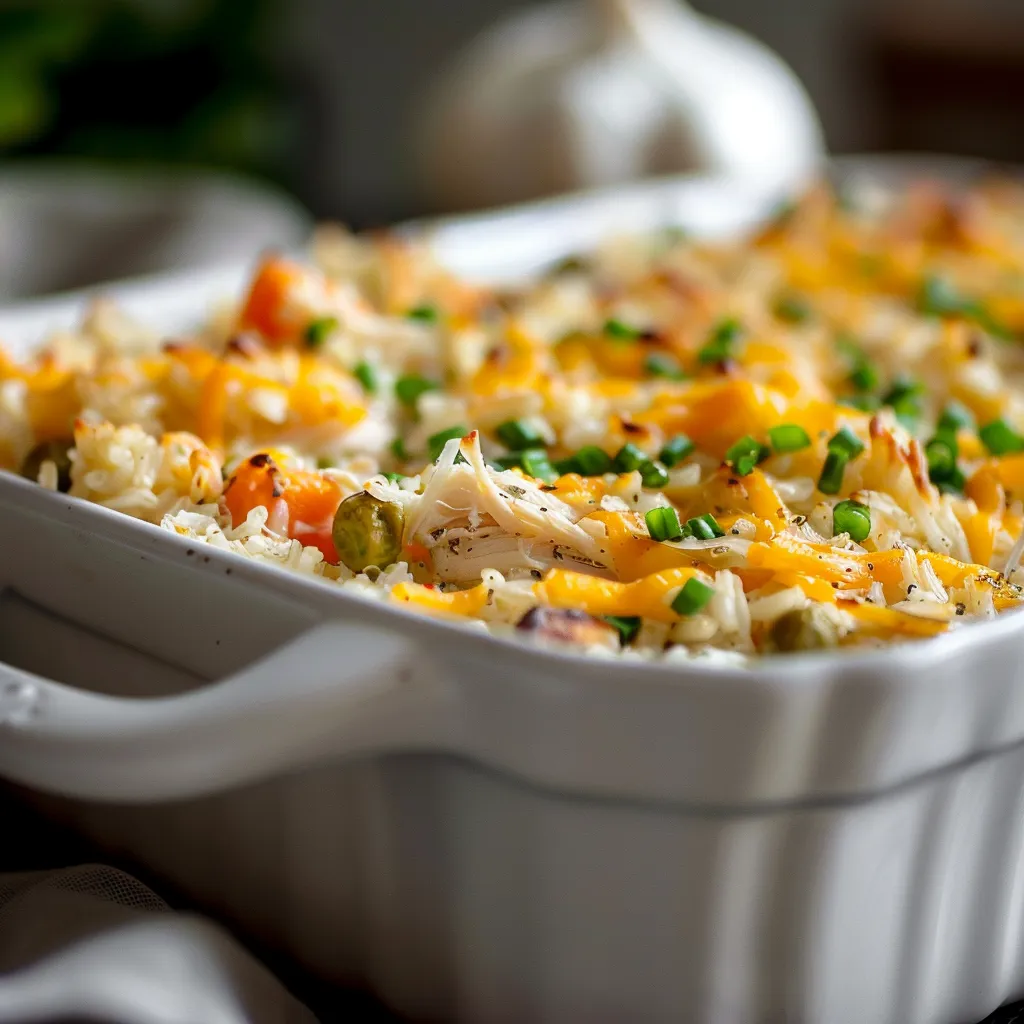
The Comfort of Home: Best Ever Chicken and Rice Casserole

Welcome to my kitchen, where magic happens with just a few simple ingredients! If you’ve landed here, you’re probably in search of a dish that wraps you in warmth and comfort—like a cozy blanket on a chilly evening. Look no further! This Best Ever Chicken and Rice Casserole is not just a recipe; it’s a heartfelt invitation to create something that will make your family pause mid-bite and say, ‘Wow.’ With a delightful combination of tender chicken, fluffy rice, and creamy goodness, this dish is perfect for family dinners, cozy nights in, or even as a potluck star. Let’s dive into why you’ll love this casserole and how to make it sing!

Why You’ll Love This Recipe

Here are just a few reasons why this chicken and rice casserole is bound to become a favorite in your home:

  • Easy Preparation: With just a handful of ingredients and a single baking dish, you can whip this up in no time—perfect for busy weeknights.
  • Comforting Flavors: The combination of chicken, creamy soup, and savory spices creates a flavor profile that feels like a warm hug from the inside out.
  • Customizable: You can easily swap ingredients based on what you have on hand or to suit your family’s preferences—like using leftover rotisserie chicken!
  • Great for Meal Prep: This casserole is an excellent make-ahead dish that reheats beautifully, making it ideal for lunches or quick dinners.
  • Kid-Friendly: With its cheesy topping and hearty ingredients, kids love it, making dinner time a breeze!

Ingredients for Best Ever Chicken and Rice Casserole

A rustic Chicken and Rice Casserole displayed in a baking dish, showcasing its creamy texture and colorful vegetables.

Now, let’s gather our ingredients. Here’s what you’ll need:

  • 2 cups cooked chicken, shredded: Feel free to use leftover chicken or rotisserie chicken for ease.
  • 1 cup uncooked long-grain white rice: This will cook perfectly in the oven while absorbing all the flavors.
  • 2 cups chicken broth: Use low-sodium broth for a healthier option. You can also use homemade broth for an extra flavor boost.
  • 1 cup cream of chicken soup: This adds creaminess and depth to the casserole. You can use a homemade version if you prefer!
  • 1 cup frozen mixed vegetables: A colorful mix of peas, carrots, and corn works well. You can also use fresh veggies if you have them on hand.
  • 1 small onion, diced: Adds sweetness and flavor to the dish.
  • 2 cloves garlic, minced: Because garlic makes everything better!
  • 1 teaspoon paprika: A sprinkle of paprika gives it warmth and a touch of color.
  • 1 teaspoon salt & 1/2 teaspoon black pepper: Essential seasonings to enhance the flavors.
  • 1 cup shredded cheddar cheese: For that gooey, melty topping that everyone loves.
  • 2 tablespoons olive oil: To sauté the onion and garlic for extra flavor.

Don’t have everything? Here are some substitutions you can make:

  • Rice: You can replace long-grain rice with jasmine or basmati rice for a different flavor.
  • Chicken: Use turkey or even canned chicken if you’re in a pinch.
  • Vegetables: Feel free to use any leftover veggies you have in the fridge—broccoli, bell peppers, or spinach all work great!
  • Cheese: Swap cheddar for mozzarella or pepper jack for a twist.

How to Make This Chicken and Rice Casserole

Ready to get cooking? Let’s follow these simple steps to create a dish that will fill your home with delicious aromas:

  1. Preheat your oven: Set your oven to 350°F (175°C) to get it nice and hot.
  2. Sauté the aromatics: In a large skillet, heat the olive oil over medium heat. Add the diced onion and minced garlic, sautéing until softened and fragrant—about 3-4 minutes.
  3. Mix it all together: In a large mixing bowl, combine the cooked chicken, uncooked rice, chicken broth, cream of chicken soup, frozen mixed vegetables, sautéed onion and garlic, paprika, salt, and black pepper. Mix well until everything is evenly distributed.
  4. Assemble the casserole: Pour the mixture into a greased 9×13 inch casserole dish, spreading it out evenly.
  5. Cover and bake: Cover the casserole with aluminum foil and bake in the preheated oven for 45 minutes.
  6. Add the cheese: After 45 minutes, remove the foil, stir the casserole gently, and sprinkle the shredded cheddar cheese on top.
  7. Bake again: Return to the oven and bake uncovered for an additional 15 minutes, or until the cheese is bubbly and golden.
  8. Cool and serve: Let it cool for a few minutes before serving. Enjoy your heartwarming meal!

Pro Tips for Perfecting Your Casserole

To ensure your casserole turns out perfectly every time, consider these expert tips:

  • Don’t overcook the rice: Since it will cook further in the oven, make sure it’s slightly undercooked before mixing.
  • Use a flavorful broth: A good quality chicken broth will elevate the taste of the dish.
  • Add spices: Feel free to experiment with herbs like thyme or rosemary for added flavor.
  • Let it rest: Allow the casserole to sit for a few minutes before serving to let the flavors meld.
  • Garnish: Sprinkle some fresh parsley on top for a pop of color and freshness.
  • Consider texture: If you prefer a crunch, add breadcrumbs or crushed crackers on top before the final bake.
  • Make it in advance: Assemble the casserole ahead of time and refrigerate it; just add a few extra minutes to the baking time.
  • Individual portions: Consider making smaller casseroles in ramekins for easy serving!

Common Mistakes and Troubleshooting

Even the best cooks face a few hiccups now and then. Here’s how to troubleshoot some common issues:

  • Dry casserole: If your casserole ends up dry, you may have overcooked it or not used enough liquid. Always ensure the rice is covered in broth.
  • Sticking to the dish: To prevent sticking, grease your casserole dish well or use parchment paper.
  • Too salty: If it tastes overly salty, consider using a low-sodium broth next time.
  • Undercooked rice: If the rice isn’t fully cooked, it may need a bit more time in the oven—just cover it to prevent burning.

Recipe Variations to Try

Want to switch things up? Here are some fun variations you can try:

  • Bacon Ranch Chicken and Rice: Add cooked, crumbled bacon and a packet of ranch seasoning for a flavorful twist.
  • Mexican Chicken and Rice: Use black beans, corn, and taco seasoning for a zesty variation. Top with jalapeños and cilantro!
  • Vegetable-Only Casserole: Omit the chicken and load it up with your favorite vegetables for a hearty vegetarian option.
  • Cheesy Broccoli Chicken Casserole: Stir in fresh or frozen broccoli florets and use a blend of cheeses for a cheesy delight.

Storage and Make-Ahead Instructions

This chicken and rice casserole is fantastic for meal prep! Here’s how to store it:

  • Refrigerator: Store leftovers in an airtight container for up to 3-4 days.
  • Freezer: You can freeze this casserole before baking (cover tightly) for up to 2 months. Just bake straight from the freezer, adding extra time as needed.
  • Reheating: To reheat, cover with foil and bake at 350°F (175°C) until heated through, about 20-30 minutes.

Frequently Asked Questions

Here are some common questions you might have about this recipe:

  • Can I use brown rice instead of white rice? Yes, but be aware that brown rice requires more cooking time and liquid.
  • What can I serve with this casserole? A fresh salad, garlic bread, or steamed vegetables make excellent side dishes.
  • Can I make this casserole dairy-free? Yes! Use dairy-free cream of chicken soup and omit the cheese or use a dairy-free alternative.
  • Is this casserole kid-friendly? Absolutely! The cheesy, creamy nature of the dish appeals to kids of all ages.
  • How can I make it spicier? Add diced jalapeños or a dash of hot sauce for a kick!
  • Can I make this in a slow cooker? Yes, combine all ingredients in a slow cooker and cook on low for 4-6 hours.
  • What if I don’t have cream of chicken soup? You can substitute with cream of mushroom soup or a homemade creamy sauce.
  • How do I prevent the rice from becoming mushy? Make sure to follow the recipe accurately, particularly with the liquid ratios and cooking times.

Nutritional Tips and Dietary Adaptations

Want to make this dish a bit healthier? Here are some tips:

  • Lower fat: Use low-fat cream of chicken soup and reduced-fat cheese.
  • Add greens: Toss in some spinach or kale for an extra nutritional boost.
  • Gluten-free: Ensure the cream of chicken soup and broth are gluten-free.
  • Whole grains: For a healthier base, consider using quinoa instead of rice.

Essential Equipment for Casserole Success

Here’s what you’ll need to create this delicious casserole:

  • Large skillet: For sautéing the onion and garlic.
  • Mixing bowl: To combine all the ingredients.
  • Casserole dish: A 9×13 inch dish is perfect for baking and serving.
  • Aluminum foil: To cover the casserole while it cooks.

Serving Suggestions

This casserole is a complete meal on its own, but here are some ideas to complement it:

  • Fresh Salad: A light, crisp salad with a vinaigrette pairs beautifully.
  • Garlic Bread: Serve with warm garlic bread for a comforting touch.
  • Roasted Vegetables: Add some color and nutrition with seasonal roasted veggies.

And there you have it! The Best Ever Chicken and Rice Casserole is not just a dish; it’s a way to bring warmth, comfort, and joy to your dining table. So gather your loved ones, share stories, and enjoy every delicious bite. Happy cooking!

BEST EVER CHICKEN AND RICE CASSEROLE

Prep Time 10 minutes
Cook Time 1 hour
Total Time 1 hour 10 minutes
Servings 6 servings
Calories 650
A hearty and flavorful casserole combining tender chicken, rice, vegetables, and cheese, baked to perfection.

Ingredients

Protein

  • 2 cups cooked chicken, shredded

Grain

  • 1 cup uncooked long-grain white rice

Broth & Soup

  • 2 cups chicken broth
  • 1 cup cream of chicken soup

Vegetables

  • 1 cup frozen mixed vegetables

Aromatics & Spices

  • 1 small onion, diced
  • 2 cloves garlic, minced
  • 1 teaspoon paprika
  • 1 teaspoon salt
  • 0.5 teaspoon black pepper

Cheese

  • 1 cup shredded cheddar cheese

Oils & Fats

  • 2 tablespoons olive oil

Instructions 

  • Preheat oven to 350°F (175°C).
  • Heat olive oil, sauté onion and garlic until softened.
  • Mix chicken, rice, broth, soup, vegetables, spices, and sautéed aromatics.
  • Pour into a greased casserole dish, cover, and bake 45 minutes.
  • Remove foil, add cheese, bake uncovered 15 minutes until bubbly.
  • Let cool briefly before serving.

Notes

Use cooked chicken for quick assembly and enjoy a comforting meal.
Calories: 650kcal
Cost: $15
Course: Main Course
Cuisine: American
Keyword: Casserole, Chicken, Rice

Loved this recipe? Save it to your favorite Pinterest board so you can easily find it later! It’s the perfect way to keep all your sweet ideas in one place. ✨

An inviting Chicken and Rice Casserole with a bubbling cheese crust, served in a cozy kitchen setting.

Welcome to a Wholesome Cooking Adventure

Hey there, friend! I’m Ava, and I’m thrilled that you’ve stopped by my kitchen today. If you’re looking for a recipe that feels as comforting as a warm hug, you’re in the right place. Today, we’re diving into the delightful world of Ground Turkey and Peppers Stir-Fry. This dish is not only quick to whip up but also bursts with flavor, making it perfect for those busy weeknights or cozy family dinners. Trust me, once you try it, you’ll want to add it to your regular rotation!

Why You’ll Love This Recipe

Let’s chat about what makes this Ground Turkey and Peppers Stir-Fry stand out:

  • Quick & Easy: Ready in under 30 minutes, it’s a lifesaver for busy weeknights.
  • Healthy & Nutritious: Packed with lean protein and vibrant vegetables, this dish supports a balanced diet.
  • Customizable: You can easily swap out ingredients based on what you have on hand or your dietary preferences.
  • Flavorful & Satisfying: The combination of spices and fresh ingredients creates a delicious meal that everyone will love.
  • Perfect for Leftovers: This stir-fry stores well, making it great for meal prep or quick lunches.

Gather Your Ingredients

Here’s what you’ll need to create this delicious stir-fry:

  • 1 lb ground turkey: A lean protein that cooks quickly and absorbs flavors beautifully.
  • 2 bell peppers, sliced: Choose a mix of colors for a vibrant dish—red, yellow, and green all work wonders!
  • 1 onion, sliced: Adds sweetness and depth to the flavor profile.
  • 2 cloves garlic, minced: The aromatic base that elevates the taste.
  • 1 tbsp olive oil: Perfect for sautéing and adding a hint of richness.
  • 1 tsp cumin: Provides an earthy warmth that complements the turkey.
  • 1 tsp paprika: Adds a touch of smokiness and color.
  • Salt and pepper to taste: Essential for balancing flavors.
  • Fresh cilantro (optional): For a burst of freshness at the end!

How to Make Ground Turkey and Peppers Stir-Fry

Close-up view of ground turkey and sliced bell peppers sautéed in a pan.

Let’s get cooking! Follow these simple steps:

  1. Heat olive oil in a skillet over medium heat. Add garlic and sauté for 1 minute until fragrant.
  2. Add ground turkey, breaking it apart with a spoon. Cook until browned, about 5-7 minutes.
  3. Stir in the sliced bell peppers and onion. Cook for another 5-7 minutes until the vegetables are tender.
  4. Season with cumin, paprika, salt, and pepper. Stir to combine and cook for an additional 2-3 minutes.
  5. Garnish with fresh cilantro if desired and serve warm.

Pro Tips for Perfecting Your Stir-Fry

Want to take your stir-fry to the next level? Check out these expert insights:

  • Prep Ahead: Chop your veggies and garlic in advance to make cooking a breeze!
  • Use High Heat: Stir-frying is best done at high temperatures to achieve that perfect crispy texture.
  • Don’t Overcrowd the Pan: Cook in batches if necessary to ensure even cooking.
  • Experiment with Spices: Feel free to add other spices like chili powder or ginger for an extra kick!
  • Serve with a Side: Pair this stir-fry with rice, quinoa, or even over a bed of greens for a complete meal.
  • Stay Fresh: Add fresh herbs like basil or mint for a burst of flavor right before serving.
  • Check for Seasoning: Always taste and adjust the seasoning before serving to make it perfect for you!
  • Make it Colorful: Don’t hesitate to throw in other veggies like zucchini or snap peas for added nutrients.

Common Mistakes to Avoid

Even the best cooks have off days! Here are some common pitfalls and how to avoid them:

  • Overcooking the Turkey: Keep an eye on it while cooking to prevent dryness; you want it just cooked through.
  • Skipping the Garlic: Don’t skip the garlic—it’s crucial for flavor!
  • Using Low Heat: Stir-fries need high heat for proper cooking; don’t be shy with the flame.
  • Ignoring Fresh Herbs: Adding fresh herbs at the end can elevate the dish tremendously—don’t miss out!

Variations to Try

Feeling adventurous? Here are some fun ways to mix up this recipe:

  • Spicy Kick: Add red pepper flakes or a splash of sriracha for a heat boost.
  • Sweet and Savory: Toss in some pineapple chunks for a tropical twist.
  • Asian-Inspired: Use soy sauce instead of salt and add some sesame oil for a different flavor profile.
  • Vegetarian Version: Substitute ground turkey with tofu or tempeh for a plant-based delight.

Storage & Make-Ahead Instructions

This stir-fry is fantastic for meal prep! Here’s how to store it:

  • Refrigeration: Store in an airtight container in the fridge for up to 3 days.
  • Freezing: You can freeze it for up to 3 months; just thaw in the fridge overnight before reheating.
  • Reheating: Warm it up in a skillet over medium heat or microwave until heated through.

Frequently Asked Questions

Got questions? I’ve got answers!

  • Can I use ground chicken instead of turkey? Absolutely! Ground chicken works just as well.
  • What can I use instead of bell peppers? You can substitute with any vegetables like broccoli, carrots, or snap peas.
  • How do I make this dish gluten-free? Ensure that any sauces used are gluten-free, and you’re good to go!
  • What’s the best way to serve this stir-fry? It pairs beautifully with rice, quinoa, or even wrapped in lettuce for a low-carb option.
  • Can I add more vegetables? Yes! Feel free to add any veggies you love.
  • Is this recipe kid-friendly? Definitely! It’s colorful and packed with flavors that kids typically enjoy.
  • How spicy is this recipe? It’s mild, but you can adjust the spice level to your liking!
  • Can I make this vegetarian? Yes, just swap the turkey for tofu or your favorite plant-based protein!

Nutritional Insights

This Ground Turkey and Peppers Stir-Fry is not only delicious but also packed with nutrients:

  • Protein-Packed: With ground turkey as the base, it offers a lean source of protein.
  • Rich in Vitamins: The bell peppers are loaded with vitamins A and C, enhancing your immune system.
  • Low in Carbs: Perfect for those watching their carb intake, especially when served with veggies instead of rice.

Essential Kitchen Equipment

To make this stir-fry, you’ll need a few basic kitchen tools:

  • Skillet or Wok: For that classic stir-fry experience!
  • Wooden Spoon: Perfect for stirring and breaking up the turkey.
  • Cutting Board: A must for prepping your veggies.
  • Knife: A sharp knife makes slicing and dicing a breeze!

Serving Suggestions

Now that your stir-fry is ready, let’s talk about how to serve it:

  • Over Rice: Serve it over steamed white or brown rice for a filling meal.
  • In a Wrap: Use lettuce leaves to make fresh wraps for a crunchy twist.
  • With Noodles: Toss it with your favorite noodles for a hearty dish.
  • On a Bed of Greens: Serve it on top of spinach or kale for a light, healthy option.

Conclusion

And there you have it! My Ground Turkey and Peppers Stir-Fry is not just a meal; it’s a love letter to the simple joys of cooking. It’s all about bringing people together around the table, sharing stories, and enjoying wholesome food that warms the heart. I can’t wait for you to try this recipe and make it your own. Don’t forget to share your creations with me—I love seeing what you whip up in your own kitchens! Happy cooking!

Ground Turkey and Peppers Stir-Fry

Prep Time 10 minutes
Cook Time 15 minutes
Total Time 25 minutes
Servings 4 servings
Calories 350
A quick and flavorful stir-fry combining lean ground turkey with colorful peppers and aromatic spices.

Ingredients

Meat

  • 1 lb ground turkey

Vegetables

  • 2 bell peppers bell peppers, sliced
  • 1 onion onion, sliced

Aromatics & Oils

  • 2 cloves garlic, minced
  • 1 tbsp olive oil

Spices

  • 1 tsp cumin
  • 1 tsp paprika

Seasonings

  • to taste Salt and pepper

Garnish

  • optional Fresh cilantro

Instructions 

  • Heat olive oil in a skillet over medium heat. Add garlic and sauté for 1 minute.
  • Add ground turkey, cook until browned, then add peppers and onion. Cook for 5-7 minutes.
  • Stir in cumin, paprika, salt, and pepper. Cook for another 2-3 minutes.
  • Garnish with cilantro if desired and serve warm.

Notes

Feel free to add more vegetables or adjust spices to taste.
Calories: 350kcal
Cost: $15
Course: Main Course
Cuisine: American
Keyword: ground turkey

Welcome to Your New Favorite Dinner

Hey there, fellow food enthusiasts! If you’re looking for a cozy, comforting dish that brings the magic of home-cooked meals to your table, you’ve stumbled upon the right recipe. Today, we’re diving into the world of Garlic Butter Pasta with Ground Beef. This one-pot wonder is not only delicious but also super easy to whip up on a busy weeknight. Imagine the aroma of garlic and butter wafting through your kitchen as you prepare this delightful meal—sounds inviting, right? Let’s get started!

Why You’ll Love This Recipe

This dish is more than just a quick meal; it’s a comforting hug in a bowl. Here’s why you’ll fall head over heels for it:

  • Quick and Easy: Made in under 30 minutes, perfect for those busy weeknights!
  • One-Pot Cleanup: All ingredients cook together in a single pot, saving you precious time on cleanup.
  • Comforting Flavors: The rich combination of garlic, butter, and creamy Parmesan cheese creates a sauce that’s simply irresistible.
  • Hearty and Filling: Packed with ground beef, this dish is sure to satisfy even the hungriest of appetites.
  • Customizable: You can easily tweak the recipe to fit your taste preferences or dietary needs.

Ingredients You’ll Need

Here’s what you’ll need to make this Garlic Butter Pasta with Ground Beef. Most of these ingredients are staples, so you might already have them in your pantry!

  • 8 oz pasta: Any type works—spaghetti, penne, or even gluten-free options.
  • 1 lb ground beef: For a leaner option, opt for ground turkey or chicken.
  • 4 cloves garlic, minced: Fresh garlic adds amazing flavor.
  • 1/2 cup butter: This is what makes the sauce rich and velvety.
  • 1 cup heavy cream: For that luxurious creamy texture.
  • 1 cup Parmesan cheese, grated: Always a hit; it adds depth to the sauce.
  • Salt and pepper to taste: Essential for flavor enhancement.
  • Fresh parsley, chopped (for garnish): Adds a pop of color and freshness to the dish.

Step-by-Step Instructions

Juicy Garlic Butter Pasta with ground beef, showcasing a creamy texture and minced garlic.

Now that we have everything ready, let’s dive into the cooking process. Follow these simple steps to create your delightful meal:

  1. In a large pot, cook the pasta according to package instructions until al dente. Drain and set aside.
  2. In the same pot, melt the butter over medium heat.
  3. Add minced garlic and sauté for 1-2 minutes until fragrant.
  4. Add ground beef to the pot and cook until browned.
  5. Stir in the heavy cream and Parmesan cheese. Mix well until smooth.
  6. Add the cooked pasta to the pot and toss until well coated.
  7. Season with salt and pepper to taste.
  8. Serve hot, garnished with fresh parsley.

Pro Tips for Perfect Garlic Butter Pasta

Want to take your dish to the next level? Here are some expert insights:

  • Don’t overcook the pasta: Aim for al dente; it will continue to cook slightly in the sauce.
  • Customize your beef: For extra flavor, try using a mix of ground beef and Italian sausage.
  • Adjust the creaminess: Depending on your preference, feel free to add more or less heavy cream.
  • Make it spicy: Add a pinch of red pepper flakes for a little kick!
  • Herb it up: Fresh basil or thyme can elevate the dish even further.

Common Mistakes and Troubleshooting

Even the best cooks face hiccups in the kitchen. Here’s how to troubleshoot:

  • Too greasy: Drain excess fat from the beef before adding the cream.
  • Flavorless sauce: Make sure to season generously with salt and pepper.
  • Too thick: If your sauce is too thick, add a splash of pasta water to loosen it up.

Delicious Variations to Try

Feeling adventurous? Here are some tasty variations to switch things up:

  • Vegetarian Delight: Swap ground beef for lentils or mushrooms for a hearty vegetarian option.
  • Cheesy Broccoli: Add steamed broccoli florets to the pasta for a veggie boost.
  • Spicy Garlic Shrimp: Substitute the beef with shrimp for a seafood twist.
  • Italian Sausage: Use ground Italian sausage for a flavorful kick.

Storage and Make-Ahead Instructions

Planning to enjoy this dish later? Here’s how to store it:

  • Refrigerate: Store leftovers in an airtight container for up to 3 days.
  • Freeze: This dish freezes well! Just thaw and reheat gently on the stove.
  • Make-ahead: You can prepare the meat sauce a day in advance and simply cook the pasta when you’re ready to serve.

Frequently Asked Questions

Let’s tackle some common queries about this recipe:

  • Can I use different types of pasta? Absolutely! Any pasta shape will work.
  • Is there a dairy-free option? Yes! Use coconut cream and nutritional yeast instead of heavy cream and cheese.
  • Can I make this gluten-free? Sure! Just use gluten-free pasta and ensure your beef is gluten-free.
  • How can I make it spicier? Add red pepper flakes or a dash of hot sauce to the sauce.
  • What can I serve with this pasta? A simple green salad and garlic bread make great sides!
  • Can I add more vegetables? Yes! Peas, bell peppers, and spinach are all fantastic additions.
  • How do I reheat the leftovers? Gently warm on the stove, adding a splash of cream or broth to keep it from drying out.
  • Is this dish kid-friendly? Definitely! It’s creamy and flavorful, perfect for little ones.

Nutritional Tips and Dietary Adaptations

Looking to balance your meal? Here are some ideas:

  • Protein boost: Add beans or legumes for extra protein.
  • Low-carb option: Substitute pasta with zucchini noodles or spaghetti squash.
  • Whole grain: Use whole wheat pasta for added fiber.

Equipment Recommendations

For this recipe, here are some kitchen essentials:

  • Large pot: A good quality pot is key for cooking pasta and sauce together.
  • Wooden spoon: Perfect for stirring and combining ingredients.
  • Measuring cups and spoons: For precise ingredient measurements.

Serving Suggestions

Now that your dish is ready, here are some ideas for serving:

  • Sprinkle fresh herbs: A bit of extra parsley or basil on top makes it visually appealing.
  • Pair with a salad: A light, crisp salad can balance the richness of the pasta.
  • Serve with crusty bread: Perfect for scooping up extra sauce!

Wrapping Up Your Dinner Adventure

And there you have it—your guide to making the ultimate Garlic Butter Pasta with Ground Beef. This dish is not just a meal; it’s a way to create lasting memories with friends and family around the dinner table. So grab your apron, channel your inner chef, and get ready to savor every delightful bite. Happy cooking, my friends!

Garlic Butter Pasta with Ground Beef

Prep Time 10 minutes
Cook Time 20 minutes
Total Time 30 minutes
Servings 4 servings
Calories 850
A rich and creamy pasta dish featuring savory ground beef, fragrant garlic, and a buttery sauce topped with Parmesan cheese.

Ingredients

Pasta

  • 8 oz pasta

Ground Beef

  • 1 lb ground beef

Garlic

  • 4 cloves garlic, minced

Butter

  • 1/2 cup butter

Heavy Cream

  • 1 cup heavy cream

Parmesan Cheese

  • 1 cup Parmesan cheese, grated

Salt and Pepper

  • to taste Salt and pepper

Fresh Parsley

  • for garnish Fresh parsley, chopped

Instructions 

  • Cook pasta until al dente, then drain.
  • Melt butter in the same pot, sauté garlic for 1-2 minutes.
  • Add ground beef and cook until browned.
  • Stir in heavy cream and Parmesan, then combine with cooked pasta.
  • Season with salt and pepper, garnish with parsley, and serve.

Notes

For a richer flavor, add a pinch of red pepper flakes or extra Parmesan.
Calories: 850kcal
Cost: $15
Course: Main Course
Cuisine: Italian
Keyword: pasta

Transform Your Dinner Routine with This One-Pan Wonder

Welcome to my kitchen, friends! If you’re looking to bring a little magic to your weeknight dinners, you’ve landed in the right place. This Easy One-Pan Roasted Chicken & Veggies recipe is not just a meal; it’s a celebration of comfort food, family time, and the joy of cooking. With just a handful of ingredients and minimal cleanup, this dish is perfect for busy nights when you want something hearty and satisfying without spending hours in the kitchen. Let’s dive into why you’ll love this recipe and how it can become a staple in your household!

Why You’ll Love This Recipe

  • One-Pan Simplicity: Everything cooks together in one pan, making cleanup a breeze. Spend less time washing dishes and more time enjoying your meal.
  • Quick and Easy: With just 10 minutes of prep time, you’ll be able to pop this delicious dinner into the oven and focus on the things that matter most.
  • Balanced Nutrition: This recipe combines lean protein from the chicken with colorful, nutritious vegetables, creating a meal that is both filling and wholesome.
  • Flavor Explosion: The roasting process enhances the natural sweetness of the vegetables and locks in the juicy goodness of the chicken, making every bite a delight.
  • Versatile Ingredients: Feel free to swap out the veggies based on what you have on hand or what’s in season. This recipe is adaptable to your taste!

Ingredients to Make This One-Pan Wonder

One-pan meal featuring golden chicken thighs and vibrant veggies, beautifully arranged.

Let’s gather our ingredients! Here’s what you’ll need:

  • 4 bone-in, skin-on chicken thighs: These provide rich flavor and stay juicy during roasting.
  • 2 cups baby potatoes, halved: These tender potatoes soak up all the savory goodness.
  • 1 cup carrots, sliced: Sweet and colorful, they add a delightful crunch.
  • 1 cup broccoli florets: A nutritious addition that cooks perfectly alongside the chicken.
  • 3 tablespoons olive oil: For drizzling and ensuring everything roasts beautifully.
  • 1 teaspoon garlic powder: Adds depth of flavor without any fuss.
  • 1 teaspoon paprika: Provides a lovely color and a hint of warmth.
  • Salt and pepper to taste: Essential for bringing out all the flavors.
  • Fresh parsley for garnish (optional): A touch of green to brighten up the dish!

How to Make One-Pan Roasted Chicken & Veggies

Ready to get cooking? Follow these simple steps, and you’ll have a delicious dinner on the table in no time!

  1. Preheat the oven to 400°F (200°C).
  2. In a large mixing bowl, toss the chicken thighs, baby potatoes, carrots, and broccoli with olive oil, garlic powder, paprika, salt, and pepper until evenly coated.
  3. Spread the chicken and veggies in a single layer on a large baking sheet, making sure they have some space to roast evenly.
  4. Roast in the preheated oven for 35-40 minutes, or until the chicken is cooked through and the vegetables are tender. The internal temperature of the chicken should reach 165°F (75°C).
  5. Remove from the oven and let rest for a few minutes. This allows the juices to redistribute for maximum tenderness.
  6. Garnish with fresh parsley if desired and serve warm. Enjoy the smiles and seconds that follow!

Pro Tips for Success

  • Uniform Cuts: Cut your vegetables into even sizes to ensure they cook at the same rate.
  • Don’t Crowd the Pan: Give your ingredients enough space to roast instead of steam. This helps achieve that crispy texture we all love.
  • Check for Doneness: Use a meat thermometer to make sure the chicken reaches 165°F (75°C) for safe consumption.
  • Seasoning Balance: Adjust the salt and spices according to your taste. Don’t be afraid to experiment!
  • Let It Rest: Always let the chicken rest after roasting to keep it juicy and flavorful.
  • Make It Ahead: You can prep and marinate the chicken and veggies a day in advance. Just cover and refrigerate until you’re ready to roast!
  • Swap Ingredients: Feel free to use different seasonal vegetables or even different cuts of chicken based on what you have available.
  • Experiment with Herbs: Fresh herbs like thyme or rosemary can be added for extra flavor.

Common Mistakes and Troubleshooting

Here are a few tips to avoid common pitfalls:

  • Overcooking the Chicken: Keep an eye on the cooking time and use a thermometer to prevent dry chicken.
  • Undercooked Veggies: If you notice your veggies are still hard after 40 minutes, give them a few extra minutes in the oven.
  • Missing Flavor: If your dish lacks flavor, try adding more seasoning next time or marinating the chicken beforehand.
  • Not Using Enough Oil: A drizzle of olive oil is key for crispiness—don’t skimp on it!

Variations to Try

Want to mix things up? Here are some fun variations:

  • Herb-Infused Chicken: Marinate chicken thighs in a mixture of olive oil, lemon juice, and fresh herbs for added zest.
  • Spicy Kick: Add a pinch of cayenne pepper or red pepper flakes to the seasoning mix for a spicy version.
  • Sweet Potato Swap: Replace baby potatoes with sweet potatoes for a sweeter flavor profile and extra nutrients.
  • Mixed Vegetables: Use seasonal vegetables like zucchini, bell peppers, or asparagus for a different medley.

Storage and Make-Ahead Instructions

This dish is perfect for leftovers! Here’s how to store it:

  • Refrigerate: Store leftovers in an airtight container in the fridge for up to 3-4 days.
  • Freeze: You can also freeze leftovers for up to 3 months. Just make sure to cool completely before sealing in a freezer-safe container.
  • Reheat: To reheat, simply place in the oven at 350°F (175°C) until warmed through, or microwave for a quick option.

Frequently Asked Questions (FAQ)

  • Can I use boneless chicken thighs? Yes, boneless thighs will work well, but adjust the cooking time as they may cook faster.
  • What vegetables can I use? Feel free to use any vegetables you love or have on hand, like bell peppers, zucchini, or Brussels sprouts.
  • Can I make this dish ahead of time? Absolutely! Prep the chicken and veggies in advance and store them in the fridge until you’re ready to cook.
  • What can I serve with this dish? This pairs well with a simple green salad, rice, or crusty bread for soaking up the delicious juices.
  • How do I know when the chicken is done? Use a meat thermometer to check that the internal temperature has reached 165°F (75°C).
  • Can I double the recipe? Yes, just ensure your baking sheet has enough space and consider using two sheets if needed.
  • What if I don’t have paprika? You can substitute it with chili powder or just leave it out; the dish will still be flavorful.
  • Is this recipe gluten-free? Yes, all the ingredients are naturally gluten-free!

Nutritional Tips and Dietary Adaptations

This recipe is not only delicious but also allows for some healthy modifications:

  • Low-Calorie Option: Skipping the skin on the chicken can reduce calories and fat.
  • Vegetarian Version: Substitute chicken with firm tofu or tempeh for a plant-based alternative.
  • Whole30-Friendly: Ensure that all ingredients, particularly spices, are compliant with Whole30 guidelines.

Equipment Recommendations

To make this dish, you’ll need:

  • Large Baking Sheet: A heavy-duty sheet ensures even cooking.
  • Mixing Bowl: For tossing the chicken and veggies with oil and seasoning.
  • Meat Thermometer: To check for the perfect doneness of the chicken.

Serving Suggestions

For a complete meal, consider serving this one-pan wonder with:

  • A Light Salad: A fresh green salad with a tangy vinaigrette.
  • Crusty Bread: Perfect for soaking up any leftover juices on your plate.
  • Rice or Quinoa: A side of rice or quinoa can make the meal even more filling.

Conclusion

There you have it! A cozy, comforting, and utterly delicious One-Pan Roasted Chicken & Veggies recipe that’s sure to become a family favorite. With minimal prep and cleanup, this dish allows you to spend more time with loved ones and less time in the kitchen. So gather your ingredients, preheat that oven, and let’s make mealtime a little more magical together. Happy cooking!

Easy One-Pan Roasted Chicken & Veggies Family Dinner

Prep Time 10 minutes
Cook Time 40 minutes
Total Time 50 minutes
Servings 4 servings
Calories 550
A simple and delicious one-pan meal perfect for family dinners, combining tender roasted chicken thighs with flavorful vegetables.

Ingredients

Protein

  • 4 pieces bone-in, skin-on chicken thighs

Vegetables

  • 2 cups baby potatoes, halved
  • 1 cup carrots, sliced
  • 1 cup broccoli florets

Seasonings & Oil

  • 3 tablespoons olive oil
  • 1 teaspoon garlic powder
  • 1 teaspoon paprika
  • to taste salt and pepper salt and pepper

Garnish

  • optional fresh parsley for garnish

Instructions 

  • Preheat oven to 400°F (200°C).
  • Toss chicken and vegetables with olive oil, garlic powder, paprika, salt, and pepper.
  • Spread on a baking sheet and roast for 35-40 minutes.
  • Let rest briefly, then garnish with parsley if desired and serve.

Notes

Use fresh herbs for extra flavor and adjust seasoning to taste.
Calories: 550kcal
Cost: $15
Course: dinner
Cuisine: American
Keyword: Chicken, family, roasted

Loved this recipe? Save it to your favorite Pinterest board so you can easily find it later! It’s the perfect way to keep all your sweet ideas in one place. ✨

Delicious roasted chicken with baby potatoes, carrots, and broccoli under soft lighting.

Welcome to my kitchen, dear friends! Today, we’re diving into the delightful world of creamy baked penne—a dish that brings back memories of my childhood, where every bite feels like a warm hug. This creamy baked penne with ground beef and mozzarella is not just a meal; it’s an experience, perfect for family dinners or cozy gatherings with friends. Let’s make something magical together!

Why You’ll Love This Recipe

This recipe is a celebration of flavors and comfort. Here’s why you’ll absolutely adore it:

  • Rich and Creamy Flavor: The combination of cream cheese, heavy cream, and mozzarella creates a luscious sauce that envelops every piece of pasta.
  • Family Favorite: Trust me, this dish disappears faster than you can say “seconds.” Even the pickiest eaters will be begging for more!
  • Simple Ingredients: You probably have most of these items in your pantry, making it easy to whip up on a weeknight.
  • Customizable: Whether you want to swap out ground beef for turkey or add in your favorite veggies, this recipe can adapt to your taste.
  • Meal Prep Friendly: Perfect for making ahead of time and even better the next day! This dish also freezes beautifully.

Ingredients You’ll Need

Gather these stars for your culinary adventure:

  • 12 oz penne pasta: This tubular pasta holds onto the sauce beautifully, ensuring every bite is a delight.
  • 1 lb ground beef: A hearty protein that adds richness. Feel free to swap it for ground turkey or chicken for a lighter option.
  • 2 cups shredded mozzarella cheese: The star of the show! It melts into a gooey, cheesy blanket that everyone loves.
  • 1 cup heavy cream: This adds that dreamy creaminess we all crave.
  • 1 cup marinara sauce: A tangy base that pairs perfectly with the creamy elements.
  • 1 small onion, diced: Adds depth and flavor; a clove or two of minced garlic would be delicious too!
  • 2 garlic cloves, minced: Because what’s a good recipe without garlic?
  • 1 tbsp olive oil: For sautéing and adding extra flavor.
  • Salt, pepper & oregano to taste: Essential seasonings to elevate your dish.
  • Fresh basil or parsley for garnish: A pop of color and freshness to finish!

How to Make Your Creamy Baked Penne

Let’s get cooking! Follow these simple steps:

  1. Preheat the oven to 375°F (190°C). Cook penne until al dente according to package instructions, drain, and set aside.
  2. In a skillet, heat olive oil over medium heat. Sauté the diced onion and minced garlic until fragrant and translucent.
  3. Add the ground beef, seasoning with salt, pepper, and oregano. Cook until browned, breaking it apart as it cooks.
  4. Stir in marinara sauce and heavy cream. Let it simmer for about 2-3 minutes until combined and heated through.
  5. Combine the cooked pasta with the sauce mixture in a large bowl or directly in the skillet.
  6. Pour the pasta mixture into a greased baking dish and top generously with mozzarella cheese.
  7. Bake for 15-20 minutes until bubbly and golden on top.
  8. Garnish with fresh basil or parsley before serving for that extra touch of love.

Pro Tips for Making the Best Creamy Baked Penne

Side view of a serving of baked penne with ground beef and a creamy cheese layer.

Here are some expert insights to elevate your dish:

  • Cook Pasta Al Dente: This ensures the pasta holds its shape and doesn’t become mushy in the oven.
  • Use Quality Ingredients: Opt for fresh mozzarella and high-quality marinara sauce for the best flavor.
  • Don’t Overcook the Beef: Sauté just until browned; it’ll continue to cook in the oven.
  • Adjust Seasonings: Feel free to tweak the spices according to your preference—add a pinch of red pepper flakes for some heat!
  • Make it Ahead: Prepare the dish and store it in the refrigerator for up to 24 hours before baking.
  • Freeze for Later: Assemble the dish and freeze before baking. It can be cooked directly from frozen; just add extra baking time.
  • Garnish Creatively: Try adding different herbs or even a sprinkle of parmesan for added flavor.
  • Serve with a Salad: A light salad on the side balances the richness of the pasta.

Common Mistakes and Troubleshooting

Even the best chefs have off days! Here are some common pitfalls and how to avoid them:

  • Pasta becoming mushy: Always cook pasta al dente, as it will continue to cook in the oven.
  • Too dry: If the dish seems dry, consider adding more cream or marinara sauce before baking.
  • Uneven cooking: Ensure the pasta is well mixed with the sauce before baking to promote even cooking.
  • Cheese not melting: Make sure to cover the dish with foil for the first part of baking to help the cheese melt perfectly.

Variations to Try

Feel free to get creative with these delightful variations:

  • Veggie-Packed: Add chopped spinach, bell peppers, or zucchini to sneak in some extra nutrients.
  • Spicy Twist: Mix in jalapeños or use spicy sausage instead of ground beef for a kick.
  • Italian Sausage: Swap ground beef for Italian sausage for a more robust flavor.
  • Four-Cheese Penne: Combine mozzarella with ricotta, parmesan, and fontina for a cheesy extravaganza!

Make-Ahead and Storage Instructions

Want to enjoy this dish later? Here’s how:

  • Make-Ahead: Assemble the dish up to a day in advance. Cover and refrigerate until ready to bake.
  • Freezing Instructions: You can freeze the unbaked dish for up to 2 months. Just be sure to cover it tightly with foil.
  • Reheating: For leftovers, reheat in the oven at 350°F (175°C) until heated through—about 20-25 minutes.

Comprehensive FAQ

Here are some questions I often receive:

  • Can I use gluten-free pasta? Absolutely! Just ensure to adjust cooking times as needed.
  • What can I substitute for heavy cream? You can use half-and-half or a dairy-free alternative like coconut cream.
  • Is this dish kid-friendly? Yes! Kids love the creamy texture and cheesy goodness.
  • Can I make it vegetarian? Yes! Substitute ground beef with lentils or mushrooms for a hearty vegetarian option.
  • How long does it last in the fridge? Store leftovers in an airtight container for up to 3 days.
  • Can I add more cheese on top? Always! More cheese is never a bad idea.
  • How spicy is this recipe? It’s mild, but you can always add red pepper flakes to spice things up!
  • Can I use marinara sauce from a jar? Absolutely! Store-bought marinara works great in this recipe.

Nutrition Tips and Dietary Adaptations

Keeping it balanced is key! Here are some tips:

  • For a lighter version: Use ground turkey or chicken and reduce the amount of cream.
  • Add veggies: Incorporate spinach, bell peppers, or mushrooms for added fiber and nutrients.
  • Low-carb option: Substitute pasta with zucchini noodles for a fresh twist.
  • Watch the servings: Enjoy in moderation, especially if you’re watching your calorie intake.

Essential Equipment Recommendations

Here’s what you’ll need:

  • Large Pot: For boiling the pasta to perfection.
  • Skillet: A good non-stick skillet makes sautéing easy and cleanup a breeze.
  • Baking Dish: A 9×13 inch dish works well for this recipe.
  • Mixing Spoon: To combine all those delicious ingredients together.

Serving Suggestions

To make your meal even more delightful:

  • Pair with a Side Salad: A light green salad with a vinaigrette balances the richness of the baked penne.
  • Garlic Bread: Serve with warm, buttery garlic bread to mop up the cheesy goodness.
  • Wine Pairing: A light red wine or a crisp white complements the flavors beautifully.

In conclusion, this Indulgent Creamy Baked Penne is more than just a recipe; it’s a chance to gather with loved ones and create lasting memories over a hearty meal. So, roll up your sleeves, let your creativity flow, and enjoy the magic of cooking. I can’t wait to hear how your version turns out—happy cooking!

Creamy Baked Penne with Ground Beef and Mozzarella delights your tastebuds!

Prep Time 10 minutes
Cook Time 30 minutes
Total Time 40 minutes
Servings 4 servings
Calories 850
A hearty and cheesy baked pasta dish combining ground beef, creamy sauce, and melted mozzarella for a satisfying meal.

Ingredients

Pasta

  • 12 oz penne pasta
  • 1 lb ground beef
  • 2 cups shredded mozzarella cheese
  • 1 cup heavy cream
  • 1 cup marinara sauce
  • 1 small onion, diced
  • 2 cloves garlic, minced
  • 1 tbsp olive oil
  • Salt, pepper & oregano to taste Seasonings
  • Fresh basil or parsley for garnish Garnish

Instructions 

  • Preheat oven to 375°F (190°C). Cook pasta until al dente, drain, and set aside.
  • In a skillet, heat olive oil, sauté onion and garlic until fragrant. Add ground beef, season, and cook until browned.
  • Stir in marinara sauce and heavy cream, simmer briefly. Combine with cooked pasta.
  • Transfer mixture to a baking dish, top with mozzarella cheese, and bake for 15–20 minutes until bubbly and golden.
  • Garnish with basil or parsley before serving.

Notes

For a richer flavor, let the dish rest for a few minutes before serving.
Calories: 850kcal
Cost: $15
Course: Main Course
Cuisine: Italian
Keyword: pasta

Welcome to Your New Favorite Comfort Food

Hey there, friend! If you’ve wandered into my kitchen looking for a dish that feels like a warm hug after a long day, you’re in the right place. Today, we’re diving into the world of one-pan meals with a delightful and creamy meat and potato skillet that’s bound to steal your heart. This dish is not just about eating; it’s about creating memories around the table, sharing laughter, and savoring every bite. With only a handful of ingredients and less than 30 minutes of your time, you’ll have a wholesome meal that’s perfect for the whole family. Are you ready to make some magic? Let’s get cooking!

Why You’ll Love This Recipe

This one-pan creamy meat and potato skillet is not only easy to whip up, but it also has some fantastic perks:

  • Quick and Simple: This recipe comes together in about 30 minutes, making it a perfect choice for busy weeknights.
  • Minimal Cleanup: With everything cooked in one pan, you’ll spend less time washing dishes and more time enjoying your meal.
  • Comforting Flavor: The creamy sauce combined with seasoned ground meat and tender potatoes creates a cozy, satisfying dish that everyone will love.
  • Customizable: Feel free to swap out ingredients based on what you have on hand or your family’s preferences.
  • Kid-Approved: It’s the kind of dish that even the pickiest eaters will devour, making family dinners a breeze!

Ingredient Breakdown

A skillet filled with creamy meat and potatoes, garnished with fresh parsley and illuminated by natural light.

Before we get into the nitty-gritty of cooking, let’s talk about what you’ll need. Here’s a detailed list of ingredients along with some substitution options:

  • 1 lb ground beef or turkey: You can use any ground meat you prefer, including chicken or plant-based options for a vegetarian twist.
  • 4 medium potatoes, diced: Russets or Yukon gold potatoes work beautifully here. If you’re in a hurry, feel free to use frozen diced potatoes.
  • 1 cup onion, chopped: Yellow onion is ideal, but red or even green onions can add a nice flavor.
  • 2 cloves garlic, minced: Fresh garlic is preferred for its robust flavor. Garlic powder can be used in a pinch.
  • 1 cup beef broth: Chicken broth or vegetable broth can be used as alternatives.
  • 1 cup heavy cream: You can substitute half-and-half or even a non-dairy cream for a lighter version.
  • 1 cup frozen peas and carrots: These add a pop of color and nutrition. You can use any frozen veggies you have on hand.
  • 2 tablespoons olive oil: Feel free to use butter for a richer flavor.
  • 1 teaspoon salt and 1/2 teaspoon black pepper: Adjust to your taste preferences.
  • 1 teaspoon paprika: This adds a lovely warmth; smoked paprika can give it an extra kick.
  • 1 teaspoon Italian seasoning: A blend of dried herbs like basil, oregano, and thyme works well.
  • Fresh parsley for garnish: This is optional, but it adds a beautiful touch and bright flavor!

Step-by-Step Instructions

Now that we have everything we need, let’s get this one-pan creamy meat and potato skillet cooking!

  1. Heat the olive oil: In a large skillet over medium heat, warm up the olive oil.
  2. Sauté the aromatics: Add the chopped onion and minced garlic, stirring until softened and fragrant—about 2-3 minutes.
  3. Brown the meat: Toss in the ground beef (or turkey) and cook until browned and crumbly, about 5-7 minutes. Make sure to break it up with a spoon!
  4. Add the potatoes: Stir in the diced potatoes, salt, pepper, paprika, and Italian seasoning until everything is well combined.
  5. Simmer: Pour in the beef broth and bring to a simmer. Cover the skillet and cook for about 10 minutes, or until the potatoes are tender.
  6. Stir in the cream and veggies: Reduce the heat and incorporate the heavy cream along with the frozen peas and carrots. Cook for an additional 5 minutes until everything is heated through.
  7. Garnish and serve: Sprinkle fresh parsley on top before serving. Dive in and enjoy!

Pro Tips for Perfection

Want to take your skillet dish to the next level? Here are some expert insights:

  • Prep Ahead: Chop your veggies and meat the night before to make cooking even quicker!
  • Cook in Batches: If you’re feeding a crowd, double the recipe and use two pans for even cooking.
  • Experiment with Spices: Don’t be afraid to add your favorite spices—cumin or chili powder can give it a nice kick!
  • Let It Rest: Allow the skillet to sit for a few minutes off the heat before serving; this helps the flavors meld beautifully.
  • Make It Extra Creamy: For a richer sauce, add a splash of cream cheese or sour cream just before serving.
  • Pair with Bread: Serve with crusty bread or a side salad for a complete meal experience.
  • Freezing Tips: This dish freezes well! Store leftovers in an airtight container for up to 3 months.
  • Vegetarian Option: Substitute the meat with lentils or chickpeas for a hearty vegetarian version.
  • Cooking Time: Keep an eye on the potatoes; they should be tender but not mushy.
  • Flavor Boost: Add a splash of Worcestershire sauce for an extra depth of flavor!

Common Mistakes and Troubleshooting

Cooking is all about learning, and I’ve made my share of mistakes! Here’s how to avoid a few common pitfalls:

  • Overcooking the meat: If you cook the ground meat too long, it can become dry. Cook just until browned.
  • Undercooking the potatoes: Ensure your diced potatoes are evenly cut to avoid any crunchy bits in your dish.
  • Forgetting the seasoning: Seasoning at each step enhances the flavor. Taste as you go!
  • Too thick sauce: If your creamy sauce is too thick, add a little extra broth or water to loosen it up.
  • Burning garlic: If the garlic burns, it can turn bitter. Keep an eye on it while sautéing!

Delicious Variations

Feel like mixing things up? Here are some tasty variations to try:

  • Cheesy Skillet: Stir in some shredded cheese during the last few minutes of cooking for a gooey, cheesy finish.
  • Mexican Twist: Add black beans, corn, and taco seasoning for a fun, southwestern flair.
  • Herb-Infused: Try adding fresh herbs like thyme or rosemary for a fragrant touch.
  • Spicy Kick: Add diced jalapeños or a pinch of cayenne pepper to heat things up!

Storing and Make-Ahead Instructions

This dish is perfect for meal prep! Here’s how to store and reheat:

  • Refrigerate: Store any leftovers in an airtight container in the fridge for up to 4 days.
  • Freeze: Freeze the skillet in portions for easy meals. Just thaw overnight in the fridge before reheating.
  • Reheat: Gently reheat in a pan over low heat, adding a splash of broth or cream to keep it creamy.

Frequently Asked Questions

Got questions? I’ve got answers! Here are some common queries about this creamy meat and potato skillet:

  • Can I use different types of ground meat? Absolutely! Ground turkey, chicken, or even plant-based alternatives work well.
  • What if I don’t have heavy cream? You can substitute it with half-and-half or a non-dairy cream.
  • How do I make this dish gluten-free? Use gluten-free broth and ensure your seasonings are gluten-free.
  • Can I add more vegetables? Yes! Feel free to toss in any veggies your family loves.
  • How spicy is this dish? It’s mild, but you can easily adjust the seasoning to your heat preference.
  • How long can I store leftovers? Leftovers can be stored in the fridge for up to 4 days or frozen for up to 3 months.
  • Can I make this vegetarian? Yes! Swap the ground meat for lentils or chickpeas.
  • What do I serve this with? This dish pairs wonderfully with a simple salad or crusty bread.

Nutritional Tips and Dietary Adaptations

Looking to make this dish even healthier? Here are some tips:

  • Add More Veggies: Increase the nutritional value by adding more colorful vegetables.
  • Opt for Lean Meat: Choose lean ground turkey or chicken to cut down on fat.
  • Control Portions: Serve with a side salad to balance your meal and keep portions in check.
  • Use Low-Fat Dairy: Substitute heavy cream with a lower-fat option to reduce calories.

Essential Equipment Recommendations

To make this creamy skillet dish, you’ll need:

  • Large Skillet: A non-stick skillet makes cleanup a breeze!
  • Wooden Spoon: Perfect for stirring and breaking up the meat.
  • Measuring Cups and Spoons: For accurate ingredient measurements.
  • Sharp Knife: A good knife will make chopping vegetables quick and easy.

Serving Suggestions

This one-pan creamy meat and potato skillet is delicious on its own, but here are some ideas to enhance your meal:

  • Fresh Salad: A light green salad with vinaigrette complements the richness of the dish.
  • Crusty Bread: Offer a side of warm, crusty bread to soak up all that creamy goodness.
  • Fruit Dessert: Finish with a light fruit-based dessert to cleanse the palate.
  • Wine Pairing: A glass of red wine can enhance the flavors beautifully.

Wrap Up

There you have it, friend! A one-pan creamy meat and potato skillet that’s not only delicious but also incredibly easy to make. I hope you feel inspired to bring this dish into your kitchen and share it with your loved ones. Remember, cooking is all about creating joy and connection. So, grab your spatula and get ready to whip up something magical. Happy cooking!

One-Pan Creamy Meat & Potato Skillet (30-Minute Family Dinner!)

Prep Time 10 minutes
Cook Time 20 minutes
Total Time 30 minutes
Servings 4 servings
Calories 650
A quick and hearty one-pan meal combining ground meat, potatoes, and vegetables in a creamy sauce, perfect for a family dinner in just 30 minutes.

Ingredients

Meat and Potatoes

  • 1 lb ground beef or turkey
  • 4 medium potatoes diced potatoes
  • 1 cup onion, chopped
  • 2 cloves garlic, minced
  • 1 cup beef broth
  • 1 cup heavy cream
  • 1 cup frozen peas and carrots
  • 2 tablespoons olive oil
  • 1 teaspoon salt
  • 0.5 teaspoon black pepper
  • 1 teaspoon paprika
  • 1 teaspoon italian seasoning

Garnish

  • fresh parsley for garnish

Instructions 

  • Heat olive oil in a large skillet over medium heat.
  • Sauté onion and garlic until softened.
  • Add ground meat; cook until browned.
  • Stir in potatoes, seasonings, and broth; simmer until potatoes are tender.
  • Mix in cream and peas; cook until heated through. Garnish with parsley.

Notes

Ensure potatoes are diced small for quicker cooking.
Calories: 650kcal
Cost: $15
Course: Main Course
Cuisine: American
Keyword: creamy, meat, potatoes

Loved this recipe? Save it to your favorite Pinterest board so you can easily find it later! It’s the perfect way to keep all your sweet ideas in one place. ✨

Rich creamy meat and potato dish in a skillet, showcasing texture and vibrant colors of the ingredients.

Welcome to Your New Favorite One Pot Wonder!

Hey there, kitchen adventurers! If you’ve found your way here, you’re probably in search of a cozy dish that’s as comforting as a warm hug on a chilly day. Today, I’m excited to share my One Pot Ground Turkey Pasta recipe that is not only delicious but also super easy to whip up after a long day. It’s an effortless meal that warms your soul and brings everyone to the table, perfect for busy nights!

Let’s dive right in and explore why this recipe will be your go-to for family dinners, gatherings, or even just a treat for yourself. Trust me, by the end of this, you’ll want to hear more about this culinary gem!

Why You’ll Love This Recipe

  • Quick & Easy: With everything cooked in one pot, cleanup is a breeze—because who wants to deal with a mountain of dishes after a long day?
  • Flavor Packed: The combination of ground turkey, savory spices, and fresh veggies creates a symphony of flavors that will have your taste buds dancing.
  • Health-Conscious: Ground turkey is a lean protein, making this dish a healthier alternative to traditional pasta dishes.
  • Versatile: Customize this recipe! Swap in your favorite vegetables or add some extra spice to cater to your personal taste.
  • Great for Meal Prep: This dish stores beautifully, so you can enjoy the leftovers for lunch or dinner throughout the week!

Ingredient Breakdown

Let’s take a closer look at the ingredients that make this dish shine, along with some handy substitutions to suit your pantry and preferences.

  • Ground Turkey (750 g): Use 85/15 lean ground turkey for the best balance of flavor and moisture. You can substitute with ground chicken or lean beef if you prefer.
  • Italian Herb Seasoning: This adds a wonderful depth of flavor. If you don’t have this on hand, a mix of oregano, basil, and thyme works beautifully.
  • Fresh Vegetables: Onions, carrots, and celery create a flavorful base. Feel free to toss in any veggies you have—zucchini or bell peppers are great options!
  • Balsamic Vinegar: This adds a hint of sweetness. If you don’t have it, red wine vinegar or even a splash of lemon juice can work in a pinch.
  • Gluten-Free Soy Sauce or Tamari: Use this for a gluten-free option. Coconut aminos can be a fantastic substitute if you’re looking for a soy-free alternative.
  • Dried Gluten-Free Penne: Any pasta works, but I love using gluten-free penne for a comforting bite. You could also use whole wheat or regular pasta if gluten isn’t a concern.
  • Nutritional Yeast: This adds a cheesy flavor without the dairy! If you prefer, you can substitute with grated Parmesan cheese.
  • Chicken or Beef Stock: Homemade stock is always the best, but store-bought works just fine. Low-sodium options are great for controlling salt levels.
  • Canned Diced Tomatoes: These add moisture and flavor. You can use fresh tomatoes, but you’ll need to add some water to compensate.
  • Fresh Spinach: This is a great way to sneak in some greens. You can swap it for kale or any leafy green you have on hand.

Pro Tips for Recipe Success

Side view of a plate filled with One Pot Ground Turkey Pasta, highlighting its rich sauce and colorful vegetables.

Before diving into the cooking process, here are some expert insights to ensure your One Pot Ground Turkey Pasta turns out perfectly every time!

  • Don’t Rush the Browning: Take your time browning the turkey. This step builds flavor that’s vital to the overall dish.
  • Chop Evenly: Dice vegetables into uniform pieces so they cook evenly. No one wants crunchy carrots in an otherwise tender dish!
  • Covering is Key: Keep the lid on while cooking to trap steam and moisture, ensuring the pasta cooks evenly and absorbs all the delicious flavors.
  • Taste as You Go: Don’t be shy about tasting your dish throughout the cooking process. Adjust seasoning as needed for a custom flavor!
  • Use a Wide Pan: A high-sided sauté pan or Dutch oven is ideal for this dish, allowing pasta to expand while cooking.
  • Stir Gently: When you add the pasta and stock, use the back of a spoon to smooth everything out. You want the pasta submerged for optimal cooking.
  • Let it Rest: After cooking, allow the dish to rest for a few minutes before serving. This helps the flavors meld beautifully.
  • Garnish Wisely: Fresh herbs or a sprinkle of red chili flakes can elevate the dish visually and add an extra kick of flavor.

Common Mistakes and Troubleshooting

Even the best chefs have their off days! Here are some common pitfalls and how to avoid them:

  • Overcooked Pasta: Keep an eye on the pasta! Test for doneness a couple of minutes before the time is up to avoid mushy noodles.
  • Too Much Liquid: If your dish is too soupy, continue cooking uncovered for a few minutes to thicken it up.
  • Not Enough Seasoning: If it tastes bland, don’t hesitate to add more spices or salt—flavor is key!
  • Burnt Bottom: If you notice the bottom starting to burn, lower the heat and stir more frequently.

Variations to Spice Things Up

While this recipe is incredible as is, don’t be afraid to get creative with these variations:

  • Mexican Twist: Add taco seasoning instead of Italian herbs and top with avocado and cheese for a Mexican-inspired dish.
  • Veggie Loaded: Add in your favorite seasonal vegetables like bell peppers, zucchini, or mushrooms for more nutrition.
  • Spicy Kick: Toss in some jalapeños or a dash of hot sauce to give your dish a fiery twist.
  • Creamy Version: Stir in a splash of cream or a dollop of sour cream at the end for a rich finish.

Storage and Make-Ahead Instructions

This dish is perfect for meal prep! Here’s how to store and reheat:

  • Storage: Let leftovers cool completely before transferring to an airtight container. It will keep in the fridge for up to 5 days.
  • Freezing: This dish can be frozen for up to 3 months. Thaw in the fridge overnight before reheating.
  • Reheating: Warm in a skillet over low heat, adding a splash of stock or water to loosen it up, or microwave in short bursts until heated through.

Frequently Asked Questions

Got questions? I’ve got answers! Here are some FAQs to help you along:

  • Can I use a different type of meat? Absolutely! Ground chicken, beef, or even plant-based meat substitutes work well.
  • Is this dish gluten-free? Yes, just make sure to use gluten-free pasta and soy sauce.
  • How can I make this dairy-free? Simply skip the cheese or nutritional yeast, or use a dairy-free cheese alternative.
  • Can I double the recipe? Yes! Just make sure your pot is large enough to accommodate the extra ingredients.
  • What if I don’t have nutritional yeast? You can substitute with Parmesan cheese or skip it altogether.
  • How spicy is this dish? It’s mild, but you can easily adjust the spiciness by adding more chili flakes or hot sauce.
  • Can I prepare this ahead of time? You can prep ingredients in advance, but I recommend cooking it fresh for the best texture.
  • What can I serve with this dish? A simple side salad or crusty bread complements this pasta beautifully.

Nutrition Tips and Dietary Adaptations

This One Pot Ground Turkey Pasta is not only delicious but also nutritious! Here are some tips to make it even better for you:

  • Load Up on Veggies: Incorporate as many vegetables as you can to boost fiber and nutrients. Think spinach, kale, or even sweet potatoes!
  • Reduce Sodium: Use low-sodium stock and soy sauce to keep the salt content in check.
  • Whole Grains: Opt for whole grain or legume-based pasta for added fiber and protein.
  • Mind the Fat: Ground turkey is lean, but if you choose beef, go for a leaner cut to keep it heart-healthy.

Equipment Recommendations

Having the right tools can make a world of difference in your cooking experience. Here’s what I recommend:

  • High-Sided Pan: A good quality sauté pan or Dutch oven is perfect for this recipe.
  • Wooden Spoon: Great for stirring and won’t scratch your cookware.
  • Measuring Cups and Spoons: Accurate measurements help ensure your dish turns out just right.
  • Sharp Knife: For easy chopping and dicing of vegetables.

Serving Suggestions

Now that your One Pot Ground Turkey Pasta is ready, how do you serve it? Here are some delightful ideas:

  • Garnish: A sprinkle of fresh herbs or a drizzle of olive oil adds a touch of elegance.
  • Pair with Wine: A glass of white wine or a light red can complement the flavors beautifully.
  • Side Salads: A simple arugula salad with lemon vinaigrette pairs perfectly for a fresh crunch.
  • Crusty Bread: Don’t forget some warm, crusty bread to mop up all that delicious sauce!

Conclusion

And there you have it—your ultimate guide to creating the perfect One Pot Ground Turkey Pasta! I hope this recipe brings as much joy to your kitchen as it has to mine. Remember, cooking is all about love and creativity, so don’t be afraid to make it your own. Pull up a chair, grab a spatula, and let’s make something magical together. Happy cooking!

One Pot Ground Turkey Pasta Recipe

Prep Time 10 minutes
Cook Time 20 minutes
Total Time 30 minutes
Servings 4 servings
Calories 550
A quick and healthy one-pot pasta dish featuring ground turkey, vegetables, and gluten-free penne, perfect for a satisfying weeknight dinner.

Ingredients

Main ingredients

  • 1 tbsp extra virgin olive oil
  • 750 g ground turkey (7% fat)
  • 1 tbsp Italian herb seasoning
  • 0.5 tsp ground black pepper
  • 1 piece onion (diced)
  • 2 stalks celery (diced)
  • 1 piece large carrot (diced)
  • 3 cloves garlic (minced)
  • 1 tbsp balsamic vinegar
  • 1 tbsp gluten free soy sauce or tamari
  • 10 oz dried gluten free penne
  • 3 tbsp nutritional yeast (can sub with parmesan cheese)
  • 2.5 cups chicken or beef stock
  • 1 can diced tomatoes (15oz | 400g)
  • 2 cups spinach (60 g)

Toppings

  • Red chili flakes and fresh herbs (optional)

Instructions 

  • Heat oil in a large skillet over medium-high heat. Add turkey, Italian seasoning, and black pepper. Cook until no pink, about 5 minutes, stirring often.
  • Add onion, carrot, celery, and garlic. Cook until vegetables soften and turkey browns, about 5 minutes. Stir in vinegar and soy sauce, cook 1 minute.
  • Stir in pasta, diced tomatoes, and stock. Cover and simmer for 7-8 minutes until pasta is tender.
  • Remove from heat, stir in nutritional yeast or parmesan. Add spinach, cover for 1 minute to wilt, then stir in fully. Season to taste and serve.
  • Let leftovers cool and store in an airtight container up to 5 days.

Notes

This dish is versatile and can be customized with your favorite herbs and toppings for added flavor.
Calories: 550kcal
Cost: $15
Course: Main Course
Cuisine: American
Keyword: ground turkey

Welcome to the World of One-Pan Roasted Chicken Thighs

If you’re here, it’s likely because you’re on the lookout for a recipe that brings the family together, fills the kitchen with mouthwatering aromas, and doesn’t require a culinary degree to execute. Well, you’ve come to the right place! My name’s Ava, and I’m thrilled to share with you a dish that’s as comforting as a warm hug and as delightful as a sunny afternoon. The One-Pan Roasted Chicken Thighs with Carrots and Potatoes is not just a meal; it’s a celebration of flavors, a gathering of loved ones around the table, and a little sprinkle of magic in your kitchen.

In the hustle and bustle of life, this recipe is a reminder that the best meals can come together with minimal fuss, allowing you to focus on what truly matters—sharing love, laughter, and delicious food with those you cherish. Let’s dive in and discover why this dish will become your new go-to for weeknight dinners.

Why You’ll Love This Recipe

Here’s what makes this dish a standout:

  • Simple Ingredients: With just a handful of pantry staples, you can create a meal that feels gourmet without breaking the bank.
  • One-Pan Convenience: Less time on dishes means more time enjoying your meal with family and friends.
  • Flavor Explosion: The combination of seasoned chicken, tender carrots, and fluffy potatoes creates a symphony of tastes in every bite.
  • Perfect for Meal Prep: This dish is fantastic for making ahead, ensuring you have a delicious meal ready for those busy weekdays.
  • Endless Variations: Feel free to mix things up with different vegetables or spices, making it a versatile addition to your recipe repertoire.

Ingredients to Make This Recipe

A beautifully arranged dish of one-pan roasted chicken thighs surrounded by sliced carrots and diced potatoes, highlighting textures and colors.

Gather these ingredients to whip up your One-Pan Roasted Chicken Thighs:

  • 4 bone-in, skin-on chicken thighs: These are juicy and full of flavor, making them the star of the dish.
  • 4 medium carrots: Peeled and sliced, they add sweetness and color.
  • 4 medium potatoes: Diced into bite-sized pieces, they soak up the delicious juices.
  • 3 tablespoons olive oil: A healthy fat that helps achieve a crispy skin.
  • 2 teaspoons garlic powder: For that aromatic touch.
  • 1 teaspoon onion powder: Adds depth to the flavor profile.
  • 1 teaspoon dried thyme: A classic herb that complements the chicken beautifully.
  • 1 teaspoon paprika: This gives a lovely color and mild flavor.
  • Salt and pepper to taste: Essential for enhancing flavors.
  • Fresh parsley (optional): For garnish, adding a pop of color and freshness.

How to Make One-Pan Roasted Chicken Thighs with Carrots and Potatoes

Ready to get cooking? Follow these simple steps:

  1. Preheat the oven: Set your oven to 425°F (220°C) to prepare for roasting.
  2. Mix the seasoning: In a large mixing bowl, combine the olive oil, garlic powder, onion powder, thyme, paprika, salt, and pepper.
  3. Coat the chicken: Add the chicken thighs to the bowl and toss them to ensure they’re evenly coated with the seasoning mixture.
  4. Prepare the vegetables: In a large baking dish or sheet pan, arrange the sliced carrots and diced potatoes in an even layer.
  5. Assemble the dish: Place the seasoned chicken thighs on top of the vegetables, skin side up, allowing the skin to crisp up beautifully while roasting.
  6. Drizzle the remaining seasoning: Any leftover seasoning should be drizzled over the vegetables for added flavor.
  7. Roast: Bake in the preheated oven for 30-35 minutes, or until the chicken reaches an internal temperature of 165°F (75°C).
  8. Broil for extra crisp: If desired, broil for an additional 2-3 minutes to achieve that perfect crispy skin.
  9. Rest and serve: Once out of the oven, let the dish rest for a few minutes before serving. Garnish with fresh parsley for an added touch.

Pro Tips for Perfect One-Pan Chicken

Here are some expert insights to take your dish to the next level:

  • Choose the right chicken: Bone-in, skin-on thighs are recommended for their rich flavor and moisture retention.
  • Uniform vegetable size: Cut your carrots and potatoes into similar sizes to ensure even cooking.
  • Season generously: Don’t be shy with your spices; they’re what make the dish pop!
  • Use fresh herbs: If you have fresh thyme or parsley, use them for a more vibrant flavor.
  • Let it rest: Allowing the chicken to rest after cooking helps retain its juices, making it more tender.
  • Experiment with spices: Try adding a pinch of cayenne for heat or rosemary for a different flavor profile.
  • Check for doneness: Always use a meat thermometer to ensure your chicken is cooked through.
  • Save the drippings: Use the drippings from the pan to make a delicious gravy for serving.

Common Mistakes and Troubleshooting

Even the most seasoned cooks can hit a few bumps along the way. Here’s how to avoid common pitfalls:

  • Chicken not crispy: Ensure your oven is hot enough and avoid overcrowding the pan, which can trap moisture.
  • Vegetables undercooked: If vegetables remain firm, cut them smaller next time to ensure they cook evenly with the chicken.
  • Too salty: Always taste your seasoning before applying it to avoid over-salting.
  • Dry chicken: Make sure to monitor the cooking time; overcooking can lead to dryness.

Variations to Try

Feel free to mix and match ingredients to suit your taste or what you have on hand:

  • Herb-Infused: Swap dried thyme for rosemary or oregano for a different flavor profile.
  • Veggie Medley: Add bell peppers, zucchini, or Brussels sprouts for more color and nutrition.
  • Citrus Twist: Squeeze fresh lemon or orange juice over the dish before serving for a zesty finish.
  • Spicy Kick: Incorporate red pepper flakes or a splash of hot sauce for some heat.

Storage and Make-Ahead Instructions

Planning ahead can save you time and stress during busy weeks. Here’s how to store and prepare this dish:

  • Refrigeration: Store any leftovers in an airtight container in the fridge for up to 3 days.
  • Freezing: This dish can be frozen before cooking. Just season the chicken and veggies, then freeze in a sealed bag. Thaw overnight before roasting.
  • Make-ahead: Prep the seasoning and chop the vegetables a day in advance to streamline cooking.

Comprehensive FAQ

Got questions? I’ve got answers! Here are some frequently asked questions about this recipe:

  • Can I use boneless chicken thighs? Yes, but adjust the cooking time since they will cook faster.
  • What can I serve with this dish? This pairs well with a simple green salad or crusty bread to soak up the juices.
  • Can I use other vegetables? Absolutely! Feel free to get creative with what you have available.
  • How do I store leftovers? Keep them in an airtight container in the fridge for up to three days.
  • Can I make this dish ahead of time? Yes, prep and season the chicken and veggies ahead of time, then roast when ready.
  • Is this recipe gluten-free? Yes, all the ingredients are gluten-free, making it a safe option for those with dietary restrictions.
  • What’s the best way to reheat leftovers? Reheat in the oven at 350°F (175°C) to maintain the chicken’s crispiness.
  • Can I make this dish in a slow cooker? Yes, you can, but the texture will differ. Cook on low for 6-8 hours.

Nutritional Tips and Dietary Adaptations

This dish is not only delicious but can also cater to various dietary needs:

  • Low-carb option: Skip the potatoes and add more non-starchy vegetables like green beans or asparagus.
  • Dairy-free: This recipe is naturally dairy-free, perfect for those with lactose intolerance.
  • Whole30 compliant: With the right vegetable choices, this dish fits well within Whole30 guidelines.

Equipment Recommendations

To make your cooking experience smoother, here are a few tools I recommend:

  • Sheet pan: A large, sturdy sheet pan is essential for even cooking.
  • Mixing bowl: A big bowl for tossing your chicken and veggies in seasoning.
  • Meat thermometer: This will help ensure your chicken is cooked perfectly every time.
  • Spatula or tongs: For easy handling of the chicken and veggies.

Serving Suggestions

Now that your One-Pan Roasted Chicken Thighs are ready, here are some delightful ways to serve them:

  • Garnish: A sprinkle of fresh parsley or a squeeze of lemon can brighten the dish beautifully.
  • Side dishes: Pair with a light salad or steamed green beans for a balanced meal.
  • Leftover magic: Shred any leftover chicken to make a delicious chicken salad or add to tacos!

As we wrap up this culinary adventure, I hope you feel inspired to bring this comforting dish into your home. Cooking is a journey, and every recipe is a chance to create lasting memories. So, grab your apron, channel your inner chef, and let’s make those One-Pan Roasted Chicken Thighs with Carrots and Potatoes a new family favorite. Happy cooking, my friends!

One-Pan Roasted Chicken Thighs with Carrots and Potatoes

Prep Time 10 minutes
Cook Time 35 minutes
Total Time 45 minutes
Servings 4 servings
Calories 550
A simple and flavorful one-pan meal featuring juicy roasted chicken thighs with tender carrots and potatoes, perfect for a quick dinner.

Ingredients

Protein

  • 4 pieces bone-in, skin-on chicken thighs

Vegetables

  • 4 medium carrots (peeled and sliced)
  • 4 medium potatoes (diced)

Seasonings and Oil

  • 3 tablespoons olive oil
  • 2 teaspoons garlic powder
  • 1 teaspoon onion powder
  • 1 teaspoon dried thyme
  • 1 teaspoon paprika

Salt and Pepper

  • to taste salt and pepper

Garnish

  • optional fresh parsley (for garnish)

Instructions 

  • Preheat oven to 425°F (220°C). Mix oil and seasonings, then coat chicken.
  • Arrange carrots and potatoes in a baking dish, place chicken on top, and drizzle remaining seasoning.
  • Roast for 30-35 minutes until chicken reaches 165°F (75°C). Broil 2-3 minutes for crispy skin.
  • Let rest briefly, garnish with parsley if desired, and serve.

Notes

Use fresh herbs for extra flavor and adjust seasoning to taste.
Calories: 550kcal
Cost: $15
Course: Main Course
Cuisine: American
Keyword: Chicken, one pan, roast

Loved this recipe? Save it to your favorite Pinterest board so you can easily find it later! It’s the perfect way to keep all your sweet ideas in one place. ✨

Eye-level shot of golden chicken thighs with a side of roasted carrots and potatoes, emphasizing the freshness of the ingredients.

A Flavorful Journey into Sheet Pan Garlic Butter Chicken

Welcome, dear friend! If you’re searching for a dish that’s not only a breeze to prepare but also delivers a symphony of flavors, then you’ve landed in the right spot. This Easy Sheet Pan Garlic Butter Chicken recipe is just what your busy weeknights need. It’s packed with juicy chicken, vibrant veggies, and a heavenly garlic butter sauce that will have your taste buds dancing! Let’s dive into the magic of cooking that transforms simple ingredients into something extraordinary.

Why You’ll Love This Recipe

Here are some reasons why this sheet pan garlic butter chicken will become a staple in your kitchen:

  • One Pan Wonder: Enjoy quick cleanup with everything roasted together on a single sheet pan.
  • Flavor Explosion: The garlic butter sauce infuses the chicken and vegetables with irresistible flavor.
  • Minimal Prep Time: This recipe requires only a few minutes of hands-on time, making it perfect for busy evenings.
  • Customizable: Feel free to swap in your favorite vegetables or adjust the seasonings to suit your taste.
  • Family Favorite: With its comforting flavors and vibrant presentation, this dish will leave everyone asking for seconds.

Gather Your Ingredients

A beautifully arranged dish of garlic butter chicken thighs with fresh greens and potatoes on a warm-toned surface.

Let’s get cooking! Here’s what you’ll need for this delightful dish:

  • 4 chicken thighs (bone-in, skin-on): These juicy pieces provide maximum flavor and moisture.
  • 1/4 cup unsalted butter, melted: The star of our garlic butter sauce.
  • 4 cloves garlic, minced: Essential for that rich, garlicky goodness.
  • 1 teaspoon dried thyme: Adds a wonderful herbaceous note.
  • 1 teaspoon paprika: For a touch of warmth and color.
  • Salt and pepper to taste: Simple seasonings with a big impact.
  • 1 pound baby potatoes, halved: Creamy and delicious, these roast beautifully.
  • 1 pound green beans, trimmed: Fresh, crisp, and vibrant.
  • Fresh parsley, chopped (for garnish): A pop of color and freshness to finish.

Let’s Cook It Up!

Now that we have our ingredients, let’s walk through the steps to create this culinary masterpiece:

  1. Preheat your oven to 400°F (200°C).
  2. In a bowl, mix the melted butter, minced garlic, thyme, paprika, salt, and pepper.
  3. Place the chicken thighs on a sheet pan and generously brush them with the garlic butter mixture.
  4. Add the halved baby potatoes around the chicken on the sheet pan.
  5. Drizzle the remaining garlic butter over the potatoes and toss to coat.
  6. Bake in the preheated oven for 25 minutes.
  7. After 25 minutes, add the green beans to the sheet pan, tossing them in the remaining juices.
  8. Return the sheet pan to the oven and bake for an additional 15-20 minutes, or until the chicken is cooked through and the vegetables are tender.
  9. Remove from the oven and garnish with fresh parsley before serving.

Pro Tips for Perfection

Want to take your sheet pan garlic butter chicken to the next level? Here are some expert insights:

  • Chicken Choice: Opt for bone-in, skin-on thighs for juicy flavor, but boneless options work too.
  • Veggie Variety: Experiment with seasonal vegetables like zucchini, bell peppers, or carrots for a colorful twist.
  • Garlic Cloves: Adjust the garlic based on your preference—more for a stronger flavor, less for a milder taste.
  • Resting Time: Let the chicken rest for a few minutes after baking to retain its juices.
  • Leftover Magic: Use leftover chicken in salads, wraps, or sandwiches for a quick meal.
  • Flavor Boost: Add a splash of lemon juice before serving for a bright finish.
  • Butter Sauce: If you want more sauce, double the garlic butter mixture and drizzle it over before serving.
  • Spice It Up: For heat lovers, add red pepper flakes or cayenne pepper to the butter mixture.

Common Mistakes to Avoid

Even the best cooks can have an off day! Here are some tips to avoid common pitfalls:

  • Overcrowding the Pan: Ensure there’s enough space between chicken and veggies for even cooking.
  • Not Preheating: Always preheat your oven to ensure the chicken cooks evenly and crisps up nicely.
  • Skipping Seasoning: Don’t skimp on seasoning—salt and pepper enhance the flavors significantly.
  • Ignoring Cooking Times: Keep an eye on the cooking time to avoid undercooked chicken or mushy veggies.

Delicious Variations

Feel free to mix it up! Here are some tasty variations to try:

  • Spicy Garlic Butter Chicken: Add chili powder or sriracha to the garlic butter for a fiery kick.
  • Mediterranean Twist: Incorporate olives, artichokes, and feta cheese for a Mediterranean flair.
  • Honey Garlic Glaze: Mix honey with the garlic butter for a sweet and savory profile.
  • Asian-Inspired: Use soy sauce, ginger, and sesame oil for an Asian twist on garlic butter chicken.

Storage and Make-Ahead Instructions

Got leftovers? Here’s how to store and prepare ahead:

  • Storage: Store leftovers in an airtight container in the fridge for up to 3 days.
  • Reheating: Reheat in the oven at 350°F (175°C) until heated through for the best texture.
  • Make-Ahead: Prep the chicken and veggies ahead of time, marinating in the garlic butter mixture overnight for enhanced flavor.

Frequently Asked Questions

Here are some common queries about this recipe:

  • Can I use chicken breasts instead of thighs? Yes, but remember that they may dry out faster, so adjust cooking time accordingly.
  • What if I don’t have fresh garlic? You can use garlic powder, but the flavor won’t be as robust—use about 1 teaspoon.
  • Can I freeze this dish? Yes, it freezes well! Just make sure to cool completely before transferring to a freezer-safe container.
  • What other vegetables can I use? Feel free to use asparagus, bell peppers, or even sweet potatoes based on your preference.
  • How do I know when the chicken is done? The internal temperature should reach 165°F (75°C) for safe consumption.
  • Can I add cheese to this recipe? Absolutely! Sprinkle some cheese on top during the last few minutes of baking for a cheesy finish.
  • Is this recipe gluten-free? Yes, all the ingredients used are naturally gluten-free!
  • What nutrients does this dish contain? It’s packed with protein from the chicken and essential vitamins from the veggies, making it a balanced meal.

Nutritional Tips and Dietary Adaptations

This dish is not just delicious; it’s also nutritious! Here are some tips:

  • Protein Punch: This dish is a great source of protein, which is essential for muscle repair and growth.
  • Vitamins Galore: The veggies provide essential vitamins and minerals, promoting overall health.
  • Low-Carb Option: Substitute potatoes with extra green beans or cauliflower to keep it low-carb.

Essential Equipment for Success

Here’s what you’ll need to make this recipe a success:

  • Sheet Pan: A sturdy sheet pan ensures even cooking and easy cleanup.
  • Mixing Bowl: For combining your garlic butter sauce ingredients.
  • Meat Thermometer: An essential tool for checking the chicken’s doneness.

Serving Suggestions

Now, let’s talk about how to serve this dish:

  • On a Bed of Greens: Serve over a bed of arugula or spinach for a fresh, crunchy contrast.
  • With Crusty Bread: Pair with a loaf of crusty bread to soak up that delicious garlic butter sauce.
  • As a Meal Prep: Pack in meal prep containers with rice or quinoa for lunches throughout the week.

So there you have it, my beloved friends! A one-pan wonder that brings ease and flavor to your kitchen. Whether you’re cooking for your family or just treating yourself, this Easy Sheet Pan Garlic Butter Chicken is sure to impress. Don’t forget to share your creations and any variations you try—I love hearing your stories! Now, let’s get cooking and fill our homes with the delightful aroma of garlic and butter!

Easy Sheet Pan Garlic Butter Chicken Recipe

Prep Time 10 minutes
Cook Time 40 minutes
Total Time 50 minutes
Servings 4 servings
Calories 550
This flavorful sheet pan chicken with garlic butter, potatoes, and green beans is perfect for a quick and satisfying meal.

Ingredients

Protein

  • 4 pieces chicken thighs (bone-in, skin-on)

Dairy

  • 1/4 cup unsalted butter, melted

Produce

  • 4 cloves garlic, minced
  • 1 teaspoon dried thyme
  • 1 teaspoon paprika
  • salt and pepper to taste salt and pepper
  • 1 pound baby potatoes, halved
  • 1 pound green beans, trimmed

Garnish

  • fresh parsley, chopped fresh parsley (for garnish)

Instructions 

  • Preheat oven to 400°F (200°C).
  • Mix melted butter, garlic, thyme, paprika, salt, and pepper.
  • Brush chicken with garlic butter, place on sheet pan, add potatoes.
  • Bake for 25 minutes, then add green beans and bake 15-20 more minutes.
  • Garnish with parsley before serving.

Notes

Ensure chicken is cooked through before serving.
Calories: 550kcal
Cost: $15
Course: Main Course
Cuisine: American
Keyword: Chicken, garlic, Sheet Pan

Loved this recipe? Save it to your favorite Pinterest board so you can easily find it later! It’s the perfect way to keep all your sweet ideas in one place. ✨

Gourmet presentation of easy sheet pan garlic butter chicken with vibrant vegetables, shot in natural light.

Welcome to Your New Favorite Comfort Food

There’s something undeniably cozy about the aroma of a simmering skillet, don’t you think? It’s like a warm hug for your senses! Today, I’m excited to share with you my recipe for a Ground Turkey-Zucchini Skillet that’s not just easy to whip up but also filled with vibrant flavors and nutritious ingredients. Perfect for those bustling weeknights when you want something delicious without the fuss. This dish combines lean ground turkey with tender zucchini and sweet potatoes, creating a symphony of taste that will have your loved ones asking for seconds. Let’s dive into the magic of this comforting meal!

Why You’ll Love This Recipe

This Ground Turkey-Zucchini Skillet isn’t just another weeknight dinner—it’s a dish that delivers on so many fronts:

  • Nutritious and Wholesome: Packed with lean protein, fresh vegetables, and healthy fats, this meal is a balanced choice for anyone looking to eat well.
  • Quick and Easy: Ready in under 30 minutes, this skillet meal is perfect for busy evenings.
  • One-Pan Wonder: Less cleanup means more time to relax after a delicious meal.
  • Meal Prep Friendly: Make a double batch and enjoy leftovers for lunch or dinner throughout the week.
  • Customizable: Easily swap in your favorite vegetables or spices to make this dish your own.

Ingredient Breakdown

Let’s take a closer look at what goes into this delightful skillet:

  • 1 tablespoon plus 1½ teaspoons vegetable oil, divided: Use olive oil for an extra dose of flavor and health benefits.
  • 2 cups ½-inch-diced peeled sweet potato: Sweet potatoes add a subtle sweetness and are rich in vitamins.
  • 4 cups 1-inch-diced zucchini: Zucchini is a fantastic low-calorie vegetable that absorbs flavors beautifully.
  • 1 package (16 ounces) BUTTERBALL® All-Natural Lean Ground Turkey: The star of the dish! Lean ground turkey is high in protein and lower in fat compared to beef.
  • 1 cup chopped sweet onion: For a touch of sweetness and depth in flavor.
  • 1 teaspoon chopped garlic: Garlic adds a wonderful aroma and flavor that elevates the entire dish.
  • 1 cup fresh baby spinach: A handful of greens adds nutrients and a pop of color.
  • ½ cup chopped broccoli florets: Broccoli is a powerhouse of nutrition and adds a crunchy texture.
  • 2½ teaspoons kosher salt: Essential for enhancing the flavors.
  • 1 teaspoon smoked paprika: This adds a subtle smokiness that pairs beautifully with the turkey.
  • ½ teaspoon white pepper: For a mild heat that complements the dish without overpowering it.
  • Chopped fresh parsley (optional): A bright finish to your skillet!

Feel free to get creative here! Substitute the sweet potato with butternut squash or the zucchini with bell peppers for a twist. The beauty of this recipe lies in its flexibility.

How to Cook Your Ground Turkey-Zucchini Skillet

A vibrant skillet filled with sautéed ground turkey and zucchini, with diced sweet potatoes and spinach.

Ready to get cooking? Here’s how to bring this comforting dish to life:

  1. In a large Dutch oven or braiser, heat 1 tablespoon of oil over medium heat.
  2. Add the sweet potato and cook until lightly browned, about 6 minutes.
  3. Stir in the zucchini and cook, stirring occasionally, until both the sweet potato and zucchini are just tender, about 10 to 15 minutes. Remove this mixture from the pot.
  4. In the same pot, heat the remaining 1½ teaspoons of oil over medium heat.
  5. Add the ground turkey, onion, and garlic. Cook, stirring occasionally, until the turkey is browned and crumbly, about 10 minutes.
  6. Stir in the spinach and broccoli, letting them wilt and soften.
  7. Return the sweet potato and zucchini mixture to the pot.
  8. Stir in the salt, smoked paprika, and white pepper.
  9. Cover and cook until everything is heated through, about 10 minutes.
  10. Garnish your Ground Turkey-Zucchini Skillet with fresh parsley before serving.

Pro Tips for the Best Skillet

Want to take your skillet game to the next level? Here are some of my top tips:

  • Cook in batches: If your skillet is small, cook the turkey in batches to avoid steaming it, which can lead to a rubbery texture.
  • Don’t rush the vegetables: Allow the sweet potato and zucchini to caramelize a bit for deeper flavor.
  • Use fresh herbs: Fresh basil or thyme can elevate your dish to a whole new level.
  • Adjust the seasoning: Taste as you go! Adjust the salt and spices to suit your palate.
  • Pre-chop veggies: For a quicker prep, chop your veggies ahead of time.
  • Flavor boosters: Consider adding a splash of soy sauce or a drizzle of balsamic vinegar for an extra kick.
  • Let it sit: Allowing the skillet to rest for a few minutes off the heat can help the flavors meld together.
  • Pair wisely: Serve with crusty bread or over a bed of quinoa or brown rice for a hearty meal.

Common Mistakes and Troubleshooting

We all have our cooking moments, so here’s how to avoid common pitfalls:

  • Overcrowding the pan: This leads to steaming instead of browning. Make sure to give your ingredients room to breathe.
  • Skipping the seasoning: Don’t be shy—season your food! It’s essential for building flavor.
  • Not letting the skillet rest: Allowing it to sit helps the flavors develop.
  • Using old spices: Ensure your spices are fresh for the best flavor. Old spices can dull the taste of your dish.

Variations to Try

Feeling adventurous? Here are some fun variations to switch things up:

  • Spicy Kick: Add red pepper flakes or diced jalapeños for a spicy version.
  • Italian Style: Mix in some Italian seasoning and serve with marinara sauce.
  • Mexican Flair: Incorporate black beans, corn, and taco seasoning for a tasty twist.
  • Vegetarian Option: Substitute ground turkey with lentils or chickpeas for a vegetarian version.

Storage and Make-Ahead Instructions

This Ground Turkey-Zucchini Skillet is perfect for meal prep! Here’s how to store and reheat:

  • Make Ahead: Prepare the skillet up to the point of adding the sweet potato and zucchini. Store in the fridge for up to 2 days.
  • Storage: Store leftovers in an airtight container in the refrigerator for up to 4 days.
  • Freezing: Cool completely, then freeze in suitable containers for up to 3 months.
  • Reheating: Reheat in the microwave or on the stovetop until warmed through. Add a splash of water or broth to prevent drying out.

Frequently Asked Questions

Let’s address some common queries about this recipe:

  • Can I use ground beef instead of turkey? Absolutely! Just note that it will change the nutritional profile slightly.
  • What can I use instead of zucchini? Bell peppers, mushrooms, or asparagus work well too!
  • Is this dish gluten-free? Yes, it’s naturally gluten-free. Just make sure your broth or sauces are gluten-free if you add any.
  • Can I make this in advance? Yes! It stores well in the fridge and tastes even better the next day.
  • How can I make it spicier? Add more spices or some diced jalapeños for a kick!
  • What about vegetarian options? Try substituting the turkey with cooked lentils or a meat alternative for a hearty meal.
  • Can I add more vegetables? Definitely! Carrots, peas, or any other seasonal veggies would be a great addition.
  • What’s the best way to serve this? It pairs beautifully with rice, quinoa, or even on its own for a lighter option.

Nutrition Tips and Dietary Adaptations

This recipe is not only delicious but also adaptable to meet various dietary needs:

  • Low Carb: Skip the sweet potatoes and serve over leafy greens instead.
  • High Protein: This dish is already high in protein due to the turkey; pair it with a side of black beans for a protein boost.
  • Dairy-Free: This recipe is naturally dairy-free, so enjoy without worry!
  • Whole30 Approved: All ingredients are compliant, making it a great option for Whole30 followers.

Essential Equipment

To create your Ground Turkey-Zucchini Skillet, you’ll need:

  • Large Dutch Oven or Skillet: A heavy-bottomed pan is ideal for even cooking.
  • Cutting Board and Knife: Essential for chopping your veggies.
  • Measuring Cups and Spoons: For accurate ingredient measurements.
  • Wooden Spoon or Spatula: Perfect for stirring without scratching your cookware.

Serving Suggestions

Wondering what to pair with your skillet? Here are some delicious ideas:

  • Crusty Bread: Perfect for scooping up the delicious mixture.
  • Quinoa or Brown Rice: Serve on a bed of these for a filling meal.
  • Side Salad: A fresh green salad with a tangy vinaigrette complements the dish beautifully.
  • Yogurt Sauce: A dollop of Greek yogurt with herbs adds a creamy finish.

In conclusion, this Ground Turkey-Zucchini Skillet is more than just a meal; it’s an experience that warms the heart and nourishes the body. So pull up a chair, grab a fork, and dive into this cozy dish that whispers comfort and joy. Together, let’s make mealtime magical and memorable!

Ground Turkey-Zucchini Skillet

Prep Time 10 minutes
Cook Time 25 minutes
Total Time 35 minutes
Servings 4 servings
Calories 350
A healthy and flavorful one-pan meal combining lean ground turkey with sweet potatoes, zucchini, and fresh greens.

Ingredients

Vegetables

  • 1 tablespoon vegetable oil (divided)
  • 1.5 teaspoons vegetable oil (additional)
  • 2 cups peeled sweet potato (½-inch diced)
  • 4 cups diced zucchini (1-inch pieces)
  • 1 package BUTTERBALL® All-Natural Lean Ground Turkey (16 ounces)
  • 1 cup chopped sweet onion
  • 1 teaspoon chopped garlic
  • 1 cup fresh baby spinach
  • ½ cup chopped broccoli florets
  • 2.5 teaspoons kosher salt
  • 1 teaspoon smoked paprika
  • ½ teaspoon white pepper

Chopped fresh parsley (optional)

Instructions 

  • Heat 1 tablespoon oil in a large Dutch oven over medium heat. Cook sweet potato until lightly browned, about 6 minutes.
  • Add zucchini; cook until tender, 10-15 minutes. Remove mixture from Dutch oven.
  • In same pot, heat remaining 1½ teaspoons oil. Cook turkey, onion, and garlic until turkey is browned, about 10 minutes.
  • Stir in spinach and broccoli, then return sweet potato mixture. Season with salt, paprika, and white pepper. Cover and cook until heated through, 10 minutes.

Notes

Feel free to garnish with fresh parsley for added flavor and color.
Calories: 350kcal
Cost: $15
Course: Main Course
Cuisine: American
Keyword: ground turkey