Author

Ava

Browsing

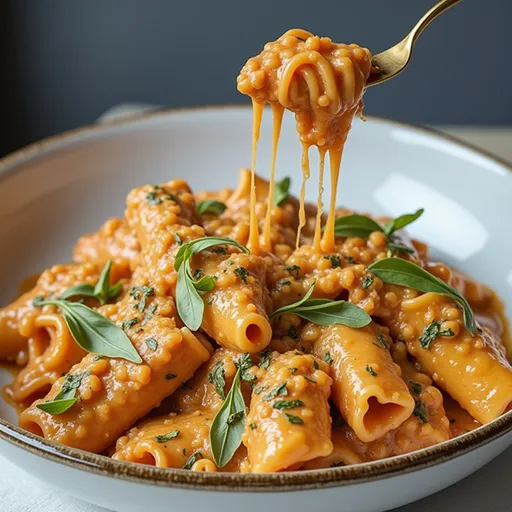
The Ultimate Guide to Crockpot Manicotti: Comfort Food at Its Best

Welcome to the enchanting world of crockpot manicotti! Here, we’re diving into a recipe that’s not just a meal; it’s a warm hug after a long day. Imagine creamy ricotta and spinach snugly nestled in tender manicotti shells, all simmered together in a rich marinara sauce. This dish is a delightful blend of flavors that’s sure to impress your family and friends alike. Let’s roll up our sleeves and get cooking!

Why You’ll Love This Recipe

  • Effortless Cooking: This recipe allows you to set it and forget it. Just pop everything into your slow cooker and let the magic happen!
  • Meal Prep Friendly: Perfect for busy weekdays, you can easily make this dish ahead of time and reheat it when needed.
  • Customizable: Make it your own! Swap ingredients to suit your dietary needs or personal preferences.
  • Family-Friendly: Even the pickiest eaters will be asking for seconds, thanks to its delicious flavors and creamy texture.
  • Impressive Presentation: Serve this beauty at your next gathering, and watch as your friends rave about your culinary skills!

Ingredient Breakdown

Let’s gather our ingredients! Here’s what you’ll need:

  • 1 Family Size jar of marinara sauce: You can choose your favorite brand or even make your own for a personal touch.
  • 1 box of manicotti pasta: No need to pre-cook! The slow cooker will take care of that.
  • 15 oz Ricotta cheese: This creamy cheese is the star of the show.
  • 1 egg: Helps bind the filling together.
  • ½ cup Parmesan cheese: Adds depth of flavor. Feel free to use more if you’re a cheese lover!
  • Spinach (washed and dried): An optional ingredient that boosts nutrition and flavor.
  • Italian seasoning: A blend of herbs that brings all the flavors together.
  • Salt and pepper: Essential seasonings to elevate your dish.
  • Garlic powder: A must for that aromatic punch!
  • 1 ½ cups shredded mozzarella cheese: The gooey topping that brings this dish to life!

Step-by-Step Instructions

Side view of a serving of manicotti topped with marinara sauce and melted mozzarella.

Ready to dive into the cooking process? Let’s go!

  1. Spray your slow cooker with nonstick spray or line it with a slow cooker liner for easy cleanup.
  2. Pour half of the family size jar of marinara sauce into the bottom of the slow cooker.
  3. In a bowl, combine the ricotta cheese, egg, and Parmesan cheese. Mix until smooth.
  4. If desired, chop some fresh spinach and fold it into the cheese mixture for added flavor and nutrition.
  5. Season the mixture with salt, pepper, Italian seasoning, and garlic powder to taste.
  6. Transfer your cheese mixture into a plastic bag and snip off a small corner to pipe into the uncooked manicotti shells.
  7. Layer the filled manicotti shells over the marinara sauce in the crockpot.
  8. Cover the shells with the remaining marinara sauce, ensuring they are well-coated.
  9. Cook on high for 2 hours.
  10. Sprinkle the shredded mozzarella cheese on top, cover, and cook for an additional 30 minutes until melted and bubbly.

Pro Tips for Success

  • Perfect Texture: Ensure that the filling is mixed well to achieve a creamy consistency that pipes easily into the shells.
  • Don’t Overfill: Be careful not to overstuff the manicotti shells; they need some space to expand while cooking.
  • Watch the Cooking Time: Slow cookers vary in heat intensity, so keep an eye on your manicotti to avoid overcooking.
  • Layering is Key: Start with sauce, then add stuffed shells, and top with more sauce for even cooking.
  • Cheese Variations: Mix in different cheeses like feta or goat cheese for unique flavor profiles.
  • Herb Infusion: Add fresh basil or oregano for an aromatic touch.
  • Make It Spicy: Toss in some red pepper flakes if you enjoy a little heat!
  • Cook It Low & Slow: If you have time, cook on low for 4-6 hours for even more flavor development.

Common Mistakes and Troubleshooting

Let’s tackle some common hiccups you might encounter:

  • Pasta Sticking: If the shells stick together, try using a bit more sauce and ensure they are well-coated.
  • Dry Manicotti: If they turn out dry, next time add a bit more marinara sauce and check cooking times.
  • Understuffed Shells: Don’t be shy! Fill those shells generously for the best flavor.
  • Overcooked Cheese: Keep an eye on the cheese during the last cooking phase to prevent it from burning.

Variations to Try

Feeling adventurous? Here are some variations to switch things up:

  • Vegetarian Delight: Omit the meat and load up on veggies like bell peppers, zucchini, or mushrooms.
  • Meaty Madness: Add cooked ground beef or sausage to the ricotta mixture for a heartier meal.
  • Gluten-Free Option: Use gluten-free manicotti shells and ensure your marinara sauce is gluten-free.
  • Cheesy Spinach Lasagna: Layer the manicotti with lasagna noodles instead for a twist on a classic!

Storage and Make-Ahead Instructions

Planning to make this dish ahead of time? Here’s how to store it:

  • Refrigeration: Store leftovers in an airtight container for up to 4 days in the fridge.
  • Freezing: You can freeze uncooked manicotti for up to 3 months. Just assemble and store it tightly wrapped.
  • Reheating: To reheat, simply pop it back in the oven at 350°F until heated through, or microwave individual portions.

Frequently Asked Questions

Got questions? I’ve got answers!

  • Can I use pre-cooked manicotti shells? Yes, but you’ll need to adjust the cooking time to avoid overcooking.
  • How do I prevent the pasta from sticking or drying out? Ensure the shells are well-coated with sauce and add a bit of water if needed.
  • Can I make this manicotti vegetarian? Absolutely! Just skip the meat and load up on veggies.
  • What if my slow cooker runs hot or cold? Adjust the cooking time as needed, and consider using a thermometer to check the internal temperature.
  • Can I use ricotta substitutes? Cottage cheese can work in a pinch, but it won’t be quite as creamy.
  • Can I use homemade marinara? Yes! Homemade adds a personal touch and can be tailored to your taste.
  • How do I make this dish healthier? Use low-fat cheese and add more veggies to boost the nutritional content.
  • What can I serve with crockpot manicotti? A fresh garden salad or garlic bread pairs perfectly with this dish!

Nutrition Tips and Dietary Adaptations

While this dish is comfort food at its finest, here are some tips to make it healthier:

  • Lower Fat: Use low-fat cheeses and lean meats to cut down on calories without losing flavor.
  • Add Veggies: Load up with extra vegetables to increase fiber and nutrients.
  • Whole Grain Pasta: Opt for whole wheat manicotti shells for added fiber.

Equipment Recommendations

Here’s what you’ll need to make this dish a success:

  • Slow Cooker: A reliable slow cooker is essential for even cooking.
  • Mixing Bowls: For combining your cheese mixture and marinara.
  • Plastic Bag or Piping Bag: To easily fill the manicotti shells without mess.
  • Measuring Cups and Spoons: Accurate measurements are key!

Serving Suggestions

Ready to serve your masterpiece? Here are some ideas:

  • Garnish: Fresh basil or parsley sprinkled on top makes for a beautiful presentation.
  • Pairing: A crisp green salad or garlic bread complements the richness of the dish.
  • Wine: A nice Chianti or Pinot Grigio pairs beautifully with Italian flavors.

In conclusion, this crockpot manicotti is not just a recipe; it’s a way to create memories around the dinner table. So gather your loved ones and enjoy the magic that unfolds in your kitchen. Happy cooking, and remember—every bite is a little piece of joy! Thank you for sharing this delightful journey with me, and I can’t wait to hear how your manicotti turns out!

Crockpot Manicotti Recipe With Cheese

Prep Time 15 minutes
Cook Time 2 hours 30 minutes
Total Time 2 hours 45 minutes
Servings 6 servings
Calories 450
A delicious and easy crockpot manicotti with cheesy filling, perfect for a comforting family dinner.

Ingredients

Sauces and Pasta

  • 1 jar Family Size jar of marinara sauce
  • 1 box manicotti pasta

Cheese and Seasonings

  • 15 oz Ricotta cheese
  • 1 egg egg
  • 0.5 cup parmesan cheese
  • 1 1/2 cups shredded mozzarella cheese
  • to taste Spinach, washed and dried (optional) (optional)
  • to taste Italian seasoning
  • to taste Salt and pepper
  • to taste Garlic Powder

Instructions 

  • Spray slow cooker and add half of marinara sauce.
  • Mix ricotta, egg, parmesan, seasonings, and spinach if desired.
  • Transfer cheese mixture to a bag, pipe into uncooked shells, and layer over sauce.
  • Cover shells with remaining sauce, cook on high for 2 hours.
  • Sprinkle mozzarella on top and cook for 30 more minutes.

Notes

Ensure to cover and cook thoroughly for best results.
Calories: 450kcal
Cost: $15
Course: Main Course
Cuisine: Italian
Keyword: manicotti

Why You’ll Fall in Love with This Dish

When it comes to weeknight dinners, I often find myself in a battle between wanting something quick and easy and craving a meal that’s bursting with flavor. Enter these Air Fryer Honey Garlic Salmon Bites. They check all the boxes: they’re simple to prepare, incredibly delicious, and perfect for impressing both family and friends. You know that moment when you take a bite of something and it feels like a warm hug? That’s what these little bites of joy are all about.

The combination of sweet honey and savory garlic creates a sticky glaze that clings to tender bites of salmon, making each piece utterly irresistible. Plus, they cook up in the air fryer, which means less mess and more time to relax with your loved ones. So, whether you’re looking to whip up a quick dinner or serve something special, these salmon bites are sure to steal the show!

What You’ll Need for Air Fryer Honey Garlic Salmon Bites

Before we dive into the cooking, let’s gather our ingredients. This recipe is designed to be straightforward, so you won’t need to hunt down any exotic items. Here’s what you’ll need:

Complete Ingredients List

Air fryer salmon pieces drizzled with honey sauce, showcasing a tender and crispy texture.
  • 1 lb salmon fillet, skinless and diced into bite-sized pieces
  • 3 tablespoons honey
  • 2 tablespoons soy sauce
  • 2 cloves garlic, minced
  • 1 tablespoon olive oil
  • 1 teaspoon ground ginger
  • Salt and pepper to taste
  • Chopped green onions for garnish

Ingredient Substitutions & Alternatives

Cooking should never feel restrictive, so here are some easy substitutions if you’re missing an ingredient:

  • Honey: Maple syrup works beautifully if you’re looking for a vegan option.
  • Soy Sauce: Tamari is a great gluten-free alternative, or you can use coconut aminos for a soy-free version.
  • Ground Ginger: Fresh ginger can be used instead; just grate a small amount for a fresher taste.

How to Make Air Fryer Honey Garlic Salmon Bites

Now that we’ve got our ingredients ready, let’s get cooking! This recipe is incredibly straightforward and perfect for both seasoned cooks and kitchen novices. Follow these steps, and you’ll have a plate of delicious salmon bites in no time.

Step 1: Prepare the Marinade

In a mixing bowl, combine the honey, soy sauce, minced garlic, olive oil, ground ginger, salt, and pepper. This marinade is where the magic begins, so take a moment to whisk everything together until it’s well combined. The aroma of garlic and honey is already enough to make your mouth water!

Step 2: Marinate the Salmon

Add the diced salmon to the marinade, tossing gently to ensure every piece is coated. Let it marinate for at least 15 minutes. If you have the time, letting it sit for 30 minutes will allow the flavors to penetrate even deeper, creating a more flavorful bite.

Step 3: Preheat the Air Fryer

While the salmon is soaking in that delicious marinade, it’s time to preheat your air fryer. Set it to 400°F (200°C) and let it warm up for about 5 minutes. Preheating ensures that your salmon bites will cook evenly and achieve that lovely crispiness we all crave.

Step 4: Arrange the Salmon Bites

Once marinated, carefully place the salmon bites in the air fryer basket in a single layer. Be sure not to overcrowd the basket; give the salmon some space to breathe so they can cook evenly. If you have a smaller air fryer, you may need to cook them in batches.

Step 5: Air Fry the Salmon

Cook the salmon bites in the air fryer for about 8-10 minutes. Remember to shake the basket halfway through to ensure they cook evenly. You’ll know they’re done when they’re golden brown and flake easily with a fork. Trust me, the smell wafting through your kitchen will be enough to make everyone gather around!

Step 6: Garnish and Serve

Once cooked, carefully remove the salmon bites from the air fryer and transfer them to a serving plate. For that extra touch, garnish with chopped green onions. If you’re feeling indulgent, drizzle a little of the leftover marinade over the top. Serve these bites warm, and watch them disappear as quickly as you can say “salmon!”

Serving Suggestions for Air Fryer Honey Garlic Salmon Bites

How to Serve Air Fryer Honey Garlic Salmon Bites

These salmon bites are incredibly versatile and can be served in various ways. Here are a few ideas:

  • Over a bed of fluffy rice or quinoa for a complete meal.
  • With a side of steamed vegetables for a healthy option.
  • As an appetizer or snack—perfect for parties and gatherings!

Perfect Pairings & Toppings

For an extra burst of flavor, consider pairing your salmon bites with:

  • A squeeze of fresh lemon juice.
  • A sprinkle of sesame seeds for added crunch.
  • Some fresh herbs like cilantro or parsley for a pop of color.

Storing & Preserving Air Fryer Honey Garlic Salmon Bites

Best Storage Methods

If you happen to have leftovers (which is rare in my house), store them in an airtight container in the fridge for up to 3 days. Make sure they’re completely cooled before sealing to keep them fresh.

Reheating or Freezing Tips

To reheat your salmon bites, pop them back into the air fryer for a few minutes until warmed through. If you want to freeze them, lay the cooked bites in a single layer on a baking sheet and freeze until solid. Once frozen, transfer them to a freezer bag for up to 2 months. Just remember to thaw and reheat gently to avoid drying them out.

Tips for Perfect Air Fryer Honey Garlic Salmon Bites Every Time

Avoid These Common Mistakes

To ensure your salmon bites turn out perfectly, keep these tips in mind:

  • Don’t skip the marinating step; it’s essential for flavor!
  • Make sure not to overcrowd the air fryer basket to prevent steaming.

Helpful Tricks for Success

Here are a few extra tips to elevate your dish:

  • Use a meat thermometer to check for doneness—salmon should be cooked to an internal temperature of 145°F (63°C).
  • Experiment with different marinades or add spices to personalize your bites.

Fun Variations of Air Fryer Honey Garlic Salmon Bites

Flavor Variations or Recipe Twists

Feeling adventurous? Here are some variations you can try:

  • Add a teaspoon of sriracha to the marinade for a spicy kick.
  • Incorporate orange juice or zest for a citrusy twist.
  • Try using other types of fish, like tilapia or chicken, using the same marinade.

Dietary-Friendly Adjustments

If you’re accommodating dietary preferences, here are some adjustments you can make:

  • Make it gluten-free by using tamari instead of soy sauce.
  • For a low-carb version, serve it over cauliflower rice instead of traditional rice.

FAQs

What If My Air Fryer Honey Garlic Salmon Bites Don’t Turn Out Right?

If you find they’re not as flavorful as expected, consider marinating longer next time or adjusting the seasoning to your taste. Don’t be too hard on yourself; cooking is all about learning!

Can I Prepare This in Advance?

Absolutely! Marinate the salmon ahead of time and store it in the fridge until you’re ready to cook. This can save you time on busy nights.

What Ingredients Can I Swap?

Feel free to play around with the ingredients! As mentioned, you can use different types of fish or adjust the sweetness by swapping honey for another sweetener.

Conclusion

There you have it—Air Fryer Honey Garlic Salmon Bites that are not only a treat for your taste buds but also a breeze to make. Whether you’re cooking for yourself or entertaining guests, these bites are sure to impress. So grab your ingredients, roll up your sleeves, and let’s create some magic in the kitchen. I can’t wait to hear how yours turn out—happy cooking!

Air Fryer Honey Garlic Salmon Bites – Recipes Finds in 2025

Prep Time 15 minutes
Cook Time 10 minutes
Total Time 25 minutes
Servings 4 servings
Calories 250
Enjoy tender, flavorful salmon bites glazed with honey and garlic, cooked to perfection in the air fryer for a quick and healthy meal.

Ingredients

Main

  • 1 lb salmon fillet, skinless and diced into bite-sized pieces
  • 3 tablespoons honey
  • 2 tablespoons soy sauce
  • 2 cloves garlic, minced
  • 1 tablespoon olive oil
  • 1 teaspoon ground ginger
  • to taste salt and pepper
  • chopped green onions for garnish chopped green onions (for garnish)

Instructions 

  • Mix honey, soy sauce, garlic, olive oil, ginger, salt, and pepper.
  • Marinate salmon for at least 15 minutes.
  • Preheat air fryer to 400°F (200°C).
  • Place salmon in air fryer basket and cook for 8-10 minutes.
  • Garnish with green onions before serving.

Notes

Ensure not to overcook the salmon for best texture.
Calories: 250kcal
Cost: $15
Course: Main Course
Cuisine: American
Keyword: Salmon

Loved this recipe? Save it to your favorite Pinterest board so you can easily find it later! It’s the perfect way to keep all your sweet ideas in one place. ✨

Colorful plate of honey garlic salmon bites with subtle shadows and a soft-focus background.

Why You’ll Fall in Love with This Dish

Ah, sweet potatoes! Those glorious, orange gems of the culinary world. When you mix them with a creamy, savory filling of mushrooms and spinach, you’ve got a dish that’s not just a meal; it’s an experience. Imagine cozying up on a chilly evening, diving into a plate of Irresistible Creamy Mushroom Stuffed Sweet Potatoes, and feeling the warmth of home-cooked comfort wash over you. This recipe is like a culinary hug, perfect for family dinners, gatherings with friends, or simply treating yourself after a long day.

What makes this dish so special? It’s all about the balance of flavors and textures. The natural sweetness of the roasted sweet potatoes contrasts beautifully with the earthiness of sautéed mushrooms and the freshness of spinach. And let’s not forget the creamy goodness of cream cheese and Parmesan that ties it all together. Every bite feels like a celebration of flavors!

Ingredients You’ll Need

To whip up this delightful recipe, gather the following ingredients:

  • 4 medium sweet potatoes
  • 2 cups mushrooms, sliced
  • 1 cup spinach, chopped
  • 1/2 cup cream cheese, softened
  • 1/4 cup grated Parmesan cheese
  • 2 tablespoons olive oil
  • 2 cloves garlic, minced
  • Salt and pepper to taste
  • Fresh parsley, for garnish

Step-by-Step Guide to Making This Delight

Delicious baked sweet potatoes filled with creamy mushroom filling and garnished.

Let’s dive into the magic of creating these stuffed sweet potatoes! Here’s how to do it:

  1. Preheat your oven: Start by preheating your oven to 400°F (200°C). This step is crucial for roasting those sweet potatoes to perfection!
  2. Prepare the sweet potatoes: Wash them thoroughly to remove any dirt. Then, pierce each sweet potato several times with a fork—this allows steam to escape while they bake, ensuring they don’t explode in your oven!
  3. Bake the sweet potatoes: Place your pierced sweet potatoes on a baking sheet and pop them into the oven. Bake for 45-60 minutes, or until they’re tender and can be easily pierced with a fork.
  4. Sauté the filling: While the sweet potatoes are baking, heat the olive oil in a skillet over medium heat. Add the minced garlic and sliced mushrooms, sautéing them for about 5-7 minutes until the mushrooms are golden brown and tender.
  5. Add the spinach: Stir in the chopped spinach and continue cooking for another 2 minutes, just until the spinach wilts. This is where the dish starts to smell absolutely heavenly!
  6. Mix in the creaminess: Remove the skillet from heat and mix in the softened cream cheese and grated Parmesan until everything is well combined. Season it all with salt and pepper to taste, because we want those flavors to shine!
  7. Stuff the sweet potatoes: Once the sweet potatoes are done baking, let them cool slightly. Cut each potato in half lengthwise and scoop out a bit of the flesh to create space for the filling. Don’t toss that delicious flesh—it’s going to be mixed back in!
  8. Fill them up: Fill each sweet potato half with the creamy mushroom and spinach mixture, making sure to pack it in generously.
  9. Final bake: Return the stuffed sweet potatoes to the oven and bake for an additional 10 minutes. This last step helps everything meld together beautifully.
  10. Garnish and serve: Before serving, sprinkle fresh parsley on top for a pop of color and freshness. Enjoy each bite of this delightful dish!

Tips for Perfecting Your Stuffed Sweet Potatoes

Here are a few tips to ensure your stuffed sweet potatoes turn out perfectly every time:

  • Choose the right sweet potatoes: Look for medium-sized sweet potatoes that are firm and without any blemishes. They should bake evenly and hold up well to stuffing.
  • Experiment with mushrooms: While this recipe calls for regular mushrooms, feel free to use shiitake, portobello, or even a mix for added depth of flavor.
  • Don’t skip the seasoning: Properly seasoning each layer enhances the overall flavor. Taste as you go, adjusting salt and pepper to your preference.

Delicious Variations to Try

This recipe is wonderfully versatile! Consider these variations to customize your stuffed sweet potatoes:

  • Meat lovers: Add cooked and crumbled sausage or shredded chicken to the mushroom and spinach mixture for added protein.
  • Cheese lovers: Swap out the Parmesan for feta or goat cheese for a tangy twist. You can also mix in different cheeses for a gooey filling.
  • Herb it up: Fresh or dried herbs like thyme, rosemary, or Italian seasoning can add an extra flavor dimension to the filling.

Storing and Freezing Your Leftovers

Did you make too much? Not a problem! Here’s how to store your delicious leftovers:

  • Refrigerating: Store any leftover stuffed sweet potatoes in an airtight container in the fridge for up to 3 days. Reheat in the oven or microwave until warmed through.
  • Freezing: You can freeze the stuffed sweet potatoes before baking. Just assemble them and then wrap tightly in foil or plastic wrap. When you’re ready to eat, thaw overnight in the fridge and bake as directed.

FAQs About This Comforting Dish

Here are some common questions you might have about these stuffed sweet potatoes:

  • Can I use other vegetables? Absolutely! Feel free to add bell peppers, zucchini, or even some cooked quinoa for extra nutrients.
  • How do I know when the sweet potatoes are done? They should be tender when pierced with a fork. If there’s resistance, give them a bit more time.
  • What if I don’t have cream cheese? You can substitute with Greek yogurt for a lighter option, or use ricotta cheese for a different flavor profile.

Troubleshooting Common Issues

If you run into any hiccups while making your stuffed sweet potatoes, here are some solutions:

  • Dry filling: If your filling seems too dry, add a splash of milk or vegetable broth to loosen it up.
  • Sweet potatoes are too hard: If they’re not tender after baking, they may need a bit longer in the oven. Wrap them in foil to steam them a little faster.
  • Too much filling: If you end up with excess filling, it makes a great side dish or can be used in an omelet the next morning!

Conclusion: A Recipe to Cherish

There you have it! Irresistible Creamy Mushroom Stuffed Sweet Potatoes are more than just food; they’re a testament to the love and care we put into our meals. This dish has a way of bringing people together—whether it’s at the dinner table or during a cozy night in. I invite you to try this recipe and discover the joy it brings. Whether you’re cooking for family, friends, or just yourself, remember that every meal shared is a memory made. So grab your apron, warm up that oven, and let’s create something truly magical together!

Irresistible Creamy Mushroom Stuffed Sweet Potatoes Recipe

Prep Time 15 minutes
Cook Time 55 minutes
Total Time 1 hour 10 minutes
Servings 4 servings
Calories 350
A delicious and healthy dish featuring baked sweet potatoes filled with a creamy mushroom and spinach mixture, perfect for a satisfying meal.

Ingredients

Sweet Potatoes

  • 4 medium sweet potatoes

Mushrooms

  • 2 cups mushrooms, sliced

Spinach

  • 1 cup spinach, chopped

Cream Cheese

  • 1/2 cup cream cheese, softened

Parmesan Cheese

  • 1/4 cup grated parmesan cheese

Olive Oil

  • 2 tablespoons olive oil

Garlic

  • 2 cloves garlic, minced

Salt and Pepper

  • to taste salt and pepper

Fresh Parsley

  • for garnish fresh parsley

Instructions 

  • Preheat oven to 400°F (200°C). Bake sweet potatoes for 45-60 minutes until tender.
  • Sauté garlic and mushrooms in olive oil for 5-7 minutes until browned.
  • Add spinach and cook until wilted, then mix in cream cheese and Parmesan. Season with salt and pepper.
  • Cut sweet potatoes in half, scoop out some flesh, and fill with mushroom mixture.
  • Bake stuffed sweet potatoes for 10 minutes, garnish with parsley, and serve.

Notes

For extra flavor, sprinkle with additional Parmesan or fresh herbs before serving.
Calories: 350kcal
Cost: $15
Course: Main Course
Cuisine: American
Keyword: Sweet Potatoes

Loved this recipe? Save it to your favorite Pinterest board so you can easily find it later! It’s the perfect way to keep all your sweet ideas in one place. ✨

An appetizing dish featuring sweet potatoes stuffed with mushrooms and spinach.

Welcome to the Cozy World of Spinach Ricotta Stuffed Manicotti

Ah, the smell of a bubbling casserole in the oven! If you’re anything like me, it brings back memories of family dinners filled with laughter and stories. Today, we’re diving into the heart of Italian comfort food with a recipe that’s as delightful to make as it is to eat: Spinach Ricotta Stuffed Manicotti. This dish is perfect for those chilly nights when you want to wrap yourself in warmth and flavor.

Why this recipe? Well, let me tell you, it’s not just about the creamy filling and savory marinara. It’s about bringing people together, sharing meals, and creating moments that linger in your heart long after the plates are cleared. So, grab your apron, and let’s get started!

Why You’ll Love This Recipe

  • Comforting and Cozy: There’s nothing quite like a warm plate of manicotti to hug your soul.
  • Simple Ingredients: This dish features pantry staples, making it an easy choice for a weeknight meal.
  • Customizable: The filling and sauce can be adjusted to your taste preferences or dietary needs.
  • Make Ahead Friendly: Prep it in advance, pop it in the oven, and let the magic happen.
  • Family Approved: Packed with flavor, it’s sure to please even the pickiest eaters!

Ingredient Breakdown

Before we jump into the cooking, let’s chat about what you’ll need to whip up this delicious dish.

  • 12 manicotti pasta shells: These are the perfect vessel for our creamy filling.
  • 15 oz ricotta cheese: The star of the filling—rich, creamy, and oh so delightful!
  • 2 cups fresh spinach, chopped: Adds a pop of color and nutrition. You can use frozen spinach, just make sure to thaw and drain it well!
  • 1/2 cup Parmesan cheese, grated: For that salty, nutty flavor that complements the ricotta perfectly.
  • 2 cups marinara sauce: Use your favorite store-bought brand or make your own; it’s all good!
  • 2 cloves garlic, minced: Because what’s Italian food without garlic?
  • 1 small onion, diced: A flavor base that’s hard to beat.
  • 1 tbsp olive oil: For sautéing and bringing everything together.
  • 1 tsp fresh basil, chopped: Fresh herbs elevate the dish with aromatic goodness.
  • 1 tsp fresh oregano, chopped: Another herb that brings a burst of flavor.
  • Salt and pepper to taste: Essential for seasoning your dish to perfection.

Pro Tips for Perfect Manicotti

Side view of juicy spinach and ricotta manicotti topped with cheese.

Now that you have your ingredients ready, let’s go over some pro tips to ensure your manicotti turns out flawless.

  • Choose the right pasta: Ensure your manicotti shells are not overcooked when boiling. They should be al dente, as they’ll continue cooking in the oven.
  • Moisture control: To prevent a soggy filling, make sure to squeeze excess moisture from the spinach before adding it to the ricotta.
  • Use a piping bag: Filling the shells can be messy. Using a piping bag makes it easier and cleaner—you’ll thank me later!
  • Layer wisely: Spread a thin layer of marinara at the bottom of the baking dish to prevent sticking and to add flavor.
  • Foil it up: Cover your baking dish tightly with foil to keep the moisture in during the first part of baking.
  • Let it rest: Allow the manicotti to cool for a few minutes after baking. This helps the filling set, making it easier to serve.
  • Garnish generously: Fresh herbs and extra Parmesan on top before serving take your dish to the next level!
  • Experiment with fillings: Feel free to add sautéed mushrooms, roasted red peppers, or even swap out the ricotta for goat cheese!

Common Mistakes and Troubleshooting

Even the best of us have kitchen mishaps. Here’s how to avoid common pitfalls:

  • Overcooked pasta: Watch the cooking time! Overcooked shells will break when stuffing.
  • Too much moisture: Excess moisture in the filling can lead to watery manicotti. Always squeeze out water from cooked spinach.
  • Filling leaks: If your filling is too runny, add more ricotta or a bit of breadcrumbs to thicken it.

Variations to Try

Feeling adventurous? Here are some fun twists on the classic recipe:

  • Meat Lover’s Manicotti: Add cooked ground beef, turkey, or sausage to the filling for a hearty meal.
  • Veggie Delight: Incorporate roasted zucchini, bell peppers, and mushrooms into the filling for added flavor and nutrition.
  • Cheesy Spinach Manicotti: Add a blend of mozzarella, fontina, or goat cheese to the ricotta for a rich, cheesy experience.
  • Spicy Kick: Add crushed red pepper flakes to the filling or marinara sauce for a spicy twist!

Storage and Make-Ahead Instructions

This recipe is a great candidate for meal prep! Here’s how to do it:

  • Make ahead: Assemble the manicotti and store it uncooked in the fridge for up to 24 hours.
  • Freezing: You can freeze the assembled manicotti (without sauce) for up to 3 months. Just thaw in the fridge overnight before baking.
  • Reheating: Bake at 350°F (175°C) until heated through, about 20-30 minutes. If frozen, add an extra 10 minutes.

Frequently Asked Questions

Let’s tackle some common questions about making Spinach Ricotta Stuffed Manicotti:

  • Can I use other types of pasta? Absolutely! If you can’t find manicotti, use large shells or even lasagna sheets.
  • What can I substitute for ricotta? Cottage cheese (blended for creaminess) or even mascarpone can be great alternatives.
  • How can I make this dish vegetarian? This recipe is already vegetarian! Just ensure your marinara sauce is meat-free.
  • Can I use frozen spinach? Yes, just make sure to thaw and thoroughly drain it before using.
  • What’s the best way to serve this dish? Garnish with fresh basil or parsley and serve with a side salad and garlic bread for a complete meal.
  • Can I make this gluten-free? Yes! Use gluten-free manicotti or pasta shells.
  • How long does it take to bake? Bake for about 25 minutes at 350°F (175°C), removing foil for the last 10 minutes.
  • What’s the nutritional value? This dish is packed with protein from the cheese and spinach, making it a filling option for dinner.

Equipment Recommendations

To make your cooking experience smooth and enjoyable, here’s what I recommend having on hand:

  • Large pot: For boiling pasta.
  • Skillet: For sautéing garlic and onions.
  • Mixing bowl: To combine your filling ingredients.
  • Piping bag or zip-top bag: For easy filling of manicotti shells.
  • Baking dish: A 9×13 dish works perfectly for this recipe.

Serving Suggestions

Let’s talk about how to present your beautiful creation:

  • Fresh Salad: A light arugula or Caesar salad pairs wonderfully with the richness of manicotti.
  • Garlic Bread: Because what’s Italian without garlic bread? It’s the perfect side for scooping up that extra marinara.
  • Wine Pairing: A light red wine, like Chianti, complements the flavors beautifully.

Conclusion: Your Next Family Favorite

There you have it! A cozy, comforting recipe for Spinach Ricotta Stuffed Manicotti that’s sure to become a beloved staple in your kitchen. Remember, cooking is all about having fun and experimenting, so don’t be afraid to make this dish your own. Whether you’re enjoying it on a quiet night in or serving it at a family gathering, it’s a dish that brings joy and connection to the table. Now, let’s make some memories together, one delicious bite at a time!

Spinach Ricotta Stuffed Manicotti

Prep Time 15 minutes
Cook Time 25 minutes
Total Time 40 minutes
Servings 4 servings
Calories 450
A delicious baked pasta dish featuring tender manicotti shells filled with a flavorful spinach and ricotta mixture, topped with marinara sauce.

Ingredients

Pasta

  • 12 shells manicotti pasta shells
  • 15 oz ricotta cheese
  • 2 cups fresh spinach, chopped
  • 1/2 cup Parmesan cheese, grated
  • 2 cups marinara sauce
  • 2 cloves garlic, minced
  • 1 small onion, diced
  • 1 tbsp olive oil
  • 1 tsp fresh basil, chopped
  • 1 tsp fresh oregano, chopped
  • to taste Salt and pepper

Instructions 

  • Sauté garlic and onion in olive oil until fragrant. Add spinach and cook until wilted.
  • Mix spinach, ricotta, Parmesan, herbs, salt, and pepper in a bowl.
  • Fill each manicotti shell with the cheese-spinach mixture.
  • Spread marinara sauce in a baking dish, arrange stuffed shells, then cover with remaining sauce.
  • Bake at 350°F (175°C) for 25 minutes, uncover for last 10 minutes.
  • Let cool slightly, garnish with Parmesan and herbs before serving.

Notes

Ensure to cover with foil during baking to prevent drying out.
Calories: 450kcal
Cost: $15
Course: Main Course
Cuisine: Italian
Keyword: Spinach

Why You’ll Love This Recipe

Let’s face it: weeknight dinners can often feel like a chore. After a long day, the last thing you want to do is spend hours in the kitchen. Enter Honey Butter Garlic Glazed Salmon Bites. This dish not only brings a delightful array of flavors to your table, but it also transforms your ordinary evening into something truly special. With its perfect balance of sweet and savory, it’s like a little flavor party in your mouth! Plus, it’s quick enough to make on a busy night yet fancy enough to impress guests on a special occasion.

The Story Behind Honey Butter Garlic Glazed Salmon Bites

I still remember the first time I decided to experiment with salmon. It was a rainy evening in Seattle, and I was craving something comforting yet elegant. I rummaged through my pantry and found some honey, garlic, and butter—ingredients that were practically begging to be combined. The aroma filled my kitchen, wrapping around me like a cozy blanket. That evening, I discovered a dish that would soon become my go-to for everything from casual dinners to celebratory feasts.

Why This Recipe Stands Out

Glazed salmon pieces arranged on a plate, showcasing a shiny, golden-brown finish.

This recipe truly shines for several reasons:

  • Quick and Easy: You can whip this up in under 20 minutes, making it perfect for those hectic weeknights.
  • Flavor Explosion: The combination of honey, garlic, and butter creates a rich glaze that elevates the salmon and makes you want to go back for seconds.
  • Health Benefits: Salmon is a powerhouse of omega-3 fatty acids, making this dish not only delicious but also nutritious.
  • Versatile: Serve it as an appetizer, main course, or toss it in a salad—the possibilities are endless!

Health Benefits of Honey Butter Garlic Glazed Salmon Bites

Did you know that salmon is one of the healthiest proteins you can eat? It’s rich in omega-3 fatty acids, which are essential for heart health, reducing inflammation, and even boosting brain function. Not to mention, it’s packed with high-quality protein that keeps you feeling full and satisfied.

Adding honey not only enhances the flavor but also provides natural sweetness along with antioxidants. Garlic, on the other hand, is known for its immune-boosting properties and can help keep those pesky colds at bay. Together, these ingredients create a dish that’s not just tasty but also a nutritional powerhouse.

Tips for Perfect Honey Butter Garlic Glazed Salmon Bites

To make sure your salmon bites turn out perfectly every time, keep these tips in mind:

  • Fresh Salmon: Always choose the freshest salmon you can find for the best flavor and texture.
  • Don’t Overcook: Salmon is best when it’s just cooked through. Aim for a golden brown exterior while keeping the inside juicy and flaky.
  • Toss Gently: When coating the salmon with the glaze, toss gently to avoid breaking the pieces.
  • Adjust Sweetness: If you prefer a sweeter glaze, feel free to add a bit more honey to taste.

Pairing Suggestions

While these salmon bites are delicious on their own, pairing them with complementary sides can take your meal to the next level. Here are some delightful suggestions:

  • Roasted Vegetables: Asparagus, Brussels sprouts, or a medley of seasonal veggies roasted to perfection.
  • Grain Bowls: Serve over a bed of quinoa or brown rice for a hearty meal.
  • Fresh Salad: A light cucumber or mixed greens salad with a tangy lemon vinaigrette.
  • Dip: Try serving with a drizzle of sriracha mayo for a spicy kick or a yogurt sauce for a cool contrast.

Honey Butter Garlic Glazed Salmon Bites Recipe

Now, let’s get to the good part—the recipe!

Ingredients:

  • 1 lb salmon fillet, cut into bite-sized pieces
  • 2 tablespoons honey
  • 2 tablespoons unsalted butter
  • 3 cloves garlic, minced
  • 1 tablespoon soy sauce
  • 1 teaspoon lemon juice
  • Salt and pepper, to taste
  • Chopped parsley, for garnish

Steps:

  1. In a small saucepan, melt the butter over medium heat.
  2. Add the minced garlic and sauté for about 1 minute until fragrant.
  3. Stir in the honey, soy sauce, and lemon juice. Cook for another 2-3 minutes until slightly thickened.
  4. Season the salmon bites with salt and pepper.
  5. Heat a non-stick skillet over medium-high heat and add the salmon pieces.
  6. Cook the salmon for about 3-4 minutes on each side or until golden brown and cooked through.
  7. Pour the honey butter garlic glaze over the salmon bites, tossing to coat evenly.
  8. Remove from heat and garnish with chopped parsley before serving.

Variations to Try

Want to mix things up? Here are a few variations to consider:

  • Spicy Twist: Add a pinch of red pepper flakes or a dash of hot sauce to the glaze for a spicy kick.
  • Citrus Zing: Experiment with different citrus juices like lime or orange instead of lemon for a unique flavor.
  • Herbaceous Touch: Add fresh herbs like dill or cilantro to the glaze for an extra layer of flavor.

Storage and Freezing

If you happen to have leftovers (which is rare in my house!), here’s how to store them:

  • Refrigerator: Store in an airtight container for up to 3 days. Reheat gently in a skillet over low heat.
  • Freezing: You can freeze the cooked salmon bites for up to 2 months. Thaw in the refrigerator overnight before reheating.

FAQs

Here are some frequently asked questions to help you along your cooking journey:

  • Can I use frozen salmon? Absolutely! Just make sure to thaw it completely before cooking.
  • What can I substitute for honey? Maple syrup or agave nectar can be great alternatives if you’re looking for a vegan option.
  • How do I know when the salmon is done? Salmon is perfectly cooked when it flakes easily with a fork and has a slightly opaque color.

Troubleshooting Common Issues

If you run into any hiccups while making this dish, here are a few tips:

  • Glaze Too Thick: If your glaze thickens too much, simply add a splash of water to thin it out.
  • Salmon Sticking to the Pan: Make sure your skillet is adequately heated and use a non-stick spray or a bit of oil to prevent sticking.

Conclusion

There you have it! Honey Butter Garlic Glazed Salmon Bites are not just a meal; they’re a delightful experience that can brighten up any weeknight. Whether you’re cooking for yourself, your family, or entertaining friends, this dish is sure to impress. The combination of flavors is so enticing that it will have everyone asking for the recipe. So, roll up your sleeves, grab your spatula, and let’s make some culinary magic happen in your kitchen. Happy cooking!

Honey Butter Garlic Glazed Salmon Bites

Prep Time 10 minutes
Cook Time 10 minutes
Total Time 20 minutes
Servings 4 servings
Calories 350
Delight in tender salmon bites coated with a sweet and savory honey garlic glaze, perfect for a quick and flavorful meal.

Ingredients

Main

  • 1 lb salmon fillet, cut into bite-sized pieces
  • 2 tablespoons honey
  • 2 tablespoons unsalted butter
  • 3 cloves garlic, minced
  • 1 tablespoon soy sauce
  • 1 teaspoon lemon juice
  • to taste salt and pepper
  • chopped parsley for garnish

Instructions 

  • Melt butter in a small saucepan over medium heat.
  • Add garlic and sauté for 1 minute.
  • Stir in honey, soy sauce, and lemon juice; cook 2-3 minutes until thickened.
  • Season salmon with salt and pepper, then cook in a skillet for 3-4 minutes per side.
  • Pour glaze over salmon bites, toss to coat, then garnish with parsley before serving.

Notes

Serve immediately for best flavor and texture.
Calories: 350kcal
Cost: $15
Course: Main Course
Cuisine: American
Keyword: Salmon

Loved this recipe? Save it to your favorite Pinterest board so you can easily find it later! It’s the perfect way to keep all your sweet ideas in one place. ✨

Mouthwatering salmon bites with a rich honey garlic glaze, captured in warm light.

Why This Dish Is a Must-Try

Let’s be honest: there are days when all you want is a comforting plate of pasta that wraps you in a warm hug. Enter the Creamy Tomato Garlic Pasta—a dish that effortlessly combines rich creaminess with the vibrant flavors of sun-kissed tomatoes and fragrant garlic. It’s the kind of meal that not only fills your belly but also warms your heart. Whether you’re whipping it up for a quick weeknight dinner or impressing guests at a cozy gathering, this recipe promises to deliver a burst of flavor in every bite.

Imagine twirling your fork into a creamy, dreamy sauce that clings to perfectly cooked pasta, each mouthful a delightful dance of textures and tastes. And the best part? It’s incredibly easy to make! You don’t need to be a culinary wizard to create this masterpiece—just gather a few simple ingredients and follow along. Ready to dive in? Let’s go!

Ingredients for Creamy Tomato Garlic Pasta

Gathering quality ingredients is the first step toward culinary success. Here’s what you’ll need to create this creamy delight:

  • 200g pasta of your choice (spaghetti, fettuccine, or penne work beautifully)
  • 2 tablespoons olive oil (extra virgin for that rich flavor)
  • 3 cloves garlic, minced (because garlic makes everything better!)
  • 1 can (400g) diced tomatoes (the secret to a robust sauce)
  • 1/2 cup heavy cream (for that luscious creaminess)
  • 1 teaspoon dried basil (or a handful of fresh if you have it on hand)
  • Salt and pepper to taste
  • Grated Parmesan cheese for serving (because cheese is life)
  • Fresh basil leaves for garnish (optional, but oh-so-pretty!)

How to Make Creamy Tomato Garlic Pasta

Delicious creamy tomato garlic pasta topped with fresh basil leaves, featuring rich textures in warm lighting.

Now that we have our ingredients ready, let’s get cooking! This dish comes together in under 30 minutes, making it perfect for those busy evenings when you need something delicious without spending hours in the kitchen.

  1. Start by cooking the pasta. Bring a large pot of salted water to a boil and add your pasta. Cook according to the package instructions until al dente. Drain and set aside. Take a moment to admire your handiwork—perfectly cooked pasta is a sight to behold!
  2. While your pasta is cooking, heat the olive oil in a large skillet over medium heat. Add the minced garlic and sauté for about 1 minute until fragrant. Be careful not to burn it—burnt garlic is a culinary crime!
  3. Next, add the canned diced tomatoes (with their juices) to the skillet. Stir in the dried basil, salt, and pepper. Let this simmer for about 5 minutes, allowing all those flavors to meld together like old friends catching up over coffee.
  4. Lower the heat and pour in the heavy cream, stirring until the sauce is creamy and heated through. It’s like watching magic happen right in your skillet!
  5. Finally, add the cooked pasta to the skillet and toss everything together until the pasta is thoroughly coated in that luscious sauce. This is the moment where culinary dreams come true!
  6. Serve immediately, topped with grated Parmesan cheese and fresh basil leaves, if desired. You might want to take a photo before diving in—this dish is as stunning as it is delicious!

Tips for Perfecting Your Pasta Dish

While this recipe is pretty foolproof, here are a few tips to elevate your dish:

  • Don’t skip the salt in the pasta water: It’s your chance to season the pasta from the inside out.
  • Add a pinch of sugar: If your tomatoes are too acidic, a pinch of sugar can balance the flavors beautifully.
  • Experiment with herbs: Fresh herbs like parsley or oregano can add a lovely freshness to the dish.
  • Don’t rush the simmer: Allowing the sauce to simmer helps develop deeper flavors, so be patient!

Variations to Make It Your Own

The beauty of Creamy Tomato Garlic Pasta lies in its versatility. Here are some fun variations to consider:

  • Add veggies: Toss in fresh spinach, sautéed mushrooms, or bell peppers for extra nutrition and color.
  • Protein boost: Grilled chicken, shrimp, or even chickpeas can make this dish heartier and more filling.
  • Go vegan: Swap heavy cream with coconut milk or cashew cream and use nutritional yeast instead of Parmesan for a dairy-free option.

Storing and Reheating Your Pasta

Made too much? No problem! Here’s how to store and enjoy leftovers:

  • Storage: Store leftover pasta in an airtight container in the fridge for up to 3 days. Just know that the pasta might absorb more sauce over time.
  • Reheating: When it’s time to enjoy your leftovers, add a splash of water or cream while reheating to bring back that creamy texture. Microwave or heat on the stove over low heat until warmed through.

Frequently Asked Questions

Got questions? I’ve got answers! Here are some common queries about this delightful dish:

  • Can I use fresh tomatoes instead of canned? Absolutely! Just make sure to peel and chop them before adding them to the skillet. You may need to cook them a bit longer to break them down.
  • What if I don’t have heavy cream? You can substitute with half-and-half or even Greek yogurt for a lighter option, but keep in mind it may alter the flavor slightly.
  • Can I freeze this pasta? While it’s best enjoyed fresh, you can freeze it for up to 2 months. Just reheat gently, adding a bit of cream or water to revive the sauce.

Troubleshooting Common Issues

Even the best of us can run into a few hiccups in the kitchen. Here are some common issues and how to fix them:

  • The sauce is too thick: Add a splash of pasta water or cream to thin it out and achieve your desired consistency.
  • The sauce is too thin: Simmer it a little longer to reduce and thicken it up.
  • Too salty: If the dish is too salty, adding a splash of cream can help balance it out.

Conclusion: Your New Favorite Pasta Recipe Awaits!

There you have it! A Creamy Tomato Garlic Pasta recipe that’s not only quick and easy but also bursting with flavor and comfort. This dish is perfect for those nights when you want something satisfying without spending hours in the kitchen. It’s a reminder that simple ingredients can come together to create something truly magical.

So, the next time you’re in need of a cozy meal that feels like a warm hug on a plate, remember this recipe. I can’t wait to hear how it turns out for you! Don’t forget to share your culinary creations with me—tag me on social media or drop a comment below. Happy cooking!

Whip Up Creamy Tomato Garlic Pasta Fast!

Prep Time 10 minutes
Cook Time 15 minutes
Total Time 25 minutes
Servings 4 servings
Calories 550
This quick and delicious pasta recipe combines fresh tomatoes, garlic, and creamy sauce for a satisfying meal in no time.

Ingredients

pasta

  • 200 g pasta of your choice
  • 2 tablespoons olive oil
  • 3 cloves garlic, minced
  • 1 can (400g) diced tomatoes
  • 0.5 cup heavy cream
  • 1 teaspoon dried basil
  • to taste salt and pepper
  • for serving grated parmesan cheese
  • for garnish (optional) fresh basil leaves

Instructions 

  • Cook pasta until al dente, then drain.
  • Heat olive oil and sauté garlic for 1 minute.
  • Add diced tomatoes with juices, basil, salt, and pepper; simmer 5 minutes.
  • Stir in heavy cream and heat through.
  • Combine cooked pasta with sauce, then serve topped with Parmesan and basil if desired.

Notes

Use fresh basil for extra flavor and adjust salt to taste.
Calories: 550kcal
Cost: $12
Course: Main Course
Cuisine: Italian
Keyword: pasta

Loved this recipe? Save it to your favorite Pinterest board so you can easily find it later! It’s the perfect way to keep all your sweet ideas in one place. ✨

Eye-level view of a bowl of creamy tomato garlic pasta garnished with parmesan, captured in soft natural light.

Welcome to Your New Favorite Oatmeal Bars!

If you’ve ever found yourself craving something wholesome, delicious, and downright comforting, then you’re in the right place. These oatmeal bars are a delightful blend of chewy oats, sweet fruit preserves, and just the right amount of buttery goodness. Perfect for breakfast, snacks, or dessert, they promise to make your heart sing with each bite! Let’s dive into why this recipe will become a staple in your kitchen.

Why You’ll Love This Recipe

There are countless reasons to adore these oatmeal bars. Here are just a few that might tempt you to whip them up right now:

  • Easy to Make: With simple pantry ingredients and straightforward steps, you can bake these bars in no time!
  • Healthy and Wholesome: Packed with oats, these bars are a nutritious option that keep you feeling satisfied.
  • Versatile Treat: Whether you enjoy them as a breakfast bar, snack, or dessert, they fit any occasion beautifully.
  • Customizable: You can easily switch up the fruit preserves or add your favorite nuts and seeds for a unique twist each time.
  • Perfect for Meal Prep: Make a batch at the beginning of the week, and you’ll have grab-and-go snacks ready!

Ingredient Breakdown

Let’s take a closer look at what you’ll need to create these scrumptious bars:

  • 1 ½ cups old-fashioned rolled oats: The star of the show! They provide texture and heartiness.
  • 1 cup all-purpose flour: For binding everything together. You can substitute with whole wheat or a gluten-free blend if needed.
  • ¾ cup packed brown sugar: Adds a rich sweetness. You can reduce this amount or swap for maple syrup for a healthier option.
  • ½ teaspoon baking soda: Helps the bars rise and stay fluffy.
  • ¼ teaspoon salt: Balances the sweetness and enhances flavors.
  • 10 tablespoons unsalted butter, melted: Provides moisture and flavor. For a dairy-free option, try coconut oil instead!
  • 1 teaspoon vanilla extract: Adds a warm, aromatic flavor.
  • ¾ cup fruit preserves or jam: Choose your favorite—raspberry, strawberry, or something unique!

Step-by-Step Instructions for Oatmeal Bars

Side view of freshly baked oatmeal bars showcasing a rich fruit jam topping.

Now that you have your ingredients ready, let’s get baking! Follow these simple steps:

  1. Preheat your oven to 350°F (175°C) and line an 8×8 inch baking pan with parchment paper or lightly grease it.
  2. In a large bowl, mix together the oats, flour, brown sugar, baking soda, and salt.
  3. Add the melted butter and vanilla to the dry mix. Stir until crumbly and well combined.
  4. Press two-thirds of the oat mixture firmly into the bottom of the pan to form an even base.
  5. Spread the fruit preserves gently over the base, ensuring an even layer without disturbing the crust.
  6. Sprinkle the remaining oat mixture evenly on top and gently press it down.
  7. Bake for 30–35 minutes or until golden brown on top and bubbly at the edges.
  8. Let the bars cool completely in the pan before cutting into 12 squares.

Expert Tips & Tricks

Here are some tips to ensure your oatmeal bars turn out perfectly every time:

  • Don’t Overmix: Mix just until combined to keep the texture light and chewy.
  • Use Fresh Ingredients: Make sure your oats and baking soda are fresh for the best results.
  • Cool Down: Let the bars cool completely before slicing to avoid crumbling.
  • Experiment with Flavors: Don’t hesitate to add spices like cinnamon or nutmeg for extra warmth!
  • Store Properly: Keep them in an airtight container to maintain freshness.
  • Try Different Toppings: Drizzle with a little melted chocolate or sprinkle with nuts before baking for an extra layer of flavor.
  • Adjust for Sweetness: Taste the mixture before baking; you can always add a little more sugar or syrup if desired.
  • Use Parchment Paper: This makes it easier to lift the bars out of the pan for clean slicing.

Common Mistakes and Troubleshooting

Even the best bakers make mistakes sometimes! Here are some common pitfalls and how to avoid them:

  • Too Dry?: If your bars turn out dry, try reducing the baking time or adding a touch more butter.
  • Too Crumbly?: Ensure you’re pressing the mixture firmly into the pan and letting them cool completely before slicing.
  • Not Sweet Enough?: Adjust the sugar to your taste; everyone’s sweetness preference is different!

Variations to Try

Looking to shake things up? Here are some fun variations for your oatmeal bars:

  • Nutty Oatmeal Bars: Add ½ cup of chopped nuts like walnuts or almonds for a satisfying crunch.
  • Chocolate Chip Oatmeal Bars: Stir in a cup of chocolate chips for a decadent treat.
  • Dried Fruit Bars: Replace the jam with ¾ cup of dried fruits like cranberries or apricots.
  • Spiced Pumpkin Bars: Add ½ cup of pumpkin puree and a teaspoon of pumpkin spice for a fall-inspired version.

Storage and Make-Ahead Instructions

These oatmeal bars are perfect for meal prep! Here’s how to store them:

  • Room Temperature: Store in an airtight container for up to 5 days.
  • Refrigerate: For longer freshness, keep them in the fridge for up to a week.
  • Freeze: Wrap individual bars in plastic wrap and freeze for up to 3 months. Thaw before enjoying!

Comprehensive FAQ

Got questions? We’ve got answers! Here are some frequently asked questions about oatmeal bars:

  • Can I make these bars gluten-free? Yes! Just substitute the all-purpose flour with a gluten-free flour blend.
  • What can I use instead of butter? Coconut oil or a vegan butter substitute works beautifully.
  • Can these be made vegan? Absolutely! Use flax eggs and coconut oil for a tasty vegan alternative.
  • How do I know when they are done baking? Look for a golden top and bubbly sides; a toothpick inserted should come out clean.
  • Can I use quick oats instead of rolled oats? While rolled oats are preferred for texture, you can use quick oats in a pinch.
  • What fruits work best? Any fruit preserves or jam you love will work well—get creative!
  • Can I add protein powder? Yes! Just substitute a small amount of flour with protein powder.
  • How do I prevent them from sticking? Use parchment paper or grease the pan well to avoid sticking.

Nutrition Tips and Dietary Adaptations

When it comes to nutrition, these oatmeal bars offer a wholesome option:

  • High Fiber: Oats are a great source of fiber, supporting digestive health.
  • Customizable Sweetness: Control the sugar content based on your dietary needs.
  • Nut-free Options: Easily omit nuts for a nut-free version, making them safe for school lunches.

Essential Equipment Recommendations

To create these oatmeal bars, you’ll need a few essential tools:

  • Baking Pan: An 8×8 inch square pan works perfectly for this recipe.
  • Mixing Bowls: Use a large mixing bowl for combining ingredients and a smaller one for melting butter.
  • Spatula: A rubber spatula makes mixing and spreading easy.

Serving Suggestions

Serve these oatmeal bars warm or at room temperature. Here are some delightful serving ideas:

  • Top with Yogurt: Serve with a dollop of Greek yogurt for a creamy contrast.
  • Pair with Fresh Fruit: Complement with sliced bananas or berries for a refreshing balance.
  • Drizzle with Honey: A light drizzle of honey or maple syrup takes them to the next level.

Conclusion: Bake and Enjoy!

There you have it—your guide to creating the most delicious oatmeal bars that are sure to impress! With their delightful texture and customizable flavors, these bars are like a warm hug for your taste buds. So grab your ingredients, preheat that oven, and let the magic happen. I can’t wait to hear how yours turn out! Happy baking!

Oatmeal Bars

Prep Time 15 minutes
Cook Time 35 minutes
Total Time 50 minutes
Servings 12 bars
Calories 180
Delicious and easy-to-make oatmeal bars with fruit preserves, perfect for a quick snack or breakfast.

Ingredients

Dry ingredients

  • 1 ½ cups old-fashioned rolled oats
  • 1 cup all-purpose flour
  • ¾ cup packed brown sugar
  • ½ teaspoon baking soda
  • ¼ teaspoon salt

Wet ingredients

  • 10 tablespoons unsalted butter, melted
  • 1 teaspoon vanilla extract
  • ¾ cup fruit preserves or jam (raspberry, strawberry, or your choice)

Instructions 

  • Preheat oven to 350°F (175°C). Line an 8x8 inch pan.
  • Mix oats, flour, brown sugar, baking soda, and salt.
  • Add melted butter and vanilla; stir until crumbly.
  • Press two-thirds of mixture into pan; spread preserves over.
  • Top with remaining oat mixture; press down gently.
  • Bake 30–35 minutes until golden; cool before cutting into 12 bars.

Notes

Store in an airtight container for best freshness.
Calories: 180kcal
Cost: $10
Course: Dessert
Keyword: oats

Why You’ll Adore This Recipe

Let’s talk about a dish that’s not just food; it’s an experience that wraps you in warmth and flavor. My Best Honey Garlic Salmon recipe is a glorious blend of sweet and savory that dances on your palate, making each bite a delightful adventure. Perfect for busy weeknights or special gatherings, this dish is a reliable crowd-pleaser. Imagine pulling a beautifully glazed salmon fillet from the oven, the aroma of garlic and honey swirling around your kitchen, and the excitement in your loved ones’ eyes as they gather around the table. It’s the kind of magic that makes you want to cook again and again.

Recipe Ingredients

To embark on this culinary journey, you’ll need the following ingredients:

  • 4 salmon fillets
  • 1/4 cup honey
  • 1/4 cup soy sauce
  • 3 cloves garlic, minced
  • 1 tablespoon olive oil
  • 1 teaspoon ground ginger
  • Salt and pepper to taste
  • Chopped green onions for garnish

These ingredients are not just staples; they’re the building blocks of a dish that elevates your dinner game while remaining incredibly easy to prepare. I love how the sweetness of honey complements the rich, buttery flavor of salmon, creating a harmony that’s simply irresistible.

Kitchen Equipment You’ll Need

Glazed honey garlic salmon on a plate, showcasing a rich texture.

Before we dive into the cooking process, let’s gather our trusty kitchen companions:

  • Baking sheet
  • Parchment paper
  • Mixing bowl
  • Whisk
  • Measuring cups and spoons
  • Sharp knife and cutting board

Having the right tools on hand makes the cooking process smoother and more enjoyable. Trust me; a well-prepared kitchen leads to fewer headaches and more happy moments.

How To Make the Magic Happen

Ready to whip up this delicious dish? Let’s get started with the steps:

  1. In a mixing bowl, combine honey, soy sauce, minced garlic, olive oil, ground ginger, and a sprinkle of salt and pepper. Whisk until well combined and set aside.
  2. Take your salmon fillets and place them in a shallow dish. Pour the glorious marinade over the salmon, ensuring each piece is well-coated. Cover and let it marinate for at least 30 minutes to allow the flavors to meld.
  3. Preheat your oven to 400°F (200°C). This is the perfect temperature for achieving a beautifully cooked salmon that’s both tender and flaky.
  4. Line a baking sheet with parchment paper for easy cleanup. Place the marinated salmon on the sheet, skin side down.
  5. Bake in your preheated oven for 12-15 minutes, or until the salmon flakes easily with a fork. Keep an eye on it; overcooking can lead to dry salmon, and we want it to be moist and luscious!
  6. Once done, remove the salmon from the oven and, if desired, drizzle with the remaining marinade for an extra punch of flavor. Garnish with finely chopped green onions before serving.

And there you have it! A dish that comes together in no time and fills your kitchen with delightful aromas.

Recipe Tips for Perfect Salmon

As with any recipe, a few tips can help you achieve perfection:

  • Marinate Longer: If you have time, marinate the salmon for up to an hour. This gives the flavors even more time to penetrate the fish.
  • Check for Freshness: Always choose fresh salmon fillets. Look for vibrant color and a slight sheen.
  • Use a Meat Thermometer: For precision, a meat thermometer should read 145°F in the thickest part of the salmon.

Variations to Try

Feeling adventurous? Here are a few variations to spice things up:

  • Add Citrus: Incorporate a splash of orange or lime juice to the marinade for a zesty twist.
  • Spicy Kick: If you love heat, add a pinch of red pepper flakes or a drizzle of sriracha to the marinade.
  • Herb Infusion: Fresh herbs like cilantro or parsley can be tossed in before serving for an herbal note.

Storage and Freezing Tips

Let’s talk about leftovers. If you find yourself with extra salmon:

  • Store any leftover salmon in an airtight container in the refrigerator for up to 3 days.
  • If you want to freeze it, wrap the salmon tightly in plastic wrap and then in aluminum foil. It can be frozen for up to 3 months.
  • When reheating, use low heat to prevent drying it out.

Frequently Asked Questions

Let’s address some common queries:

  • Can I use other types of fish? Absolutely! This marinade works beautifully with other fish like tilapia or cod.
  • What can I serve it with? Pair it with steamed vegetables, rice, or a fresh salad for a well-rounded meal.
  • Can I make this on the stovetop? Yes! You can sear the salmon in a skillet over medium heat, then pour the marinade over it to finish cooking.

Troubleshooting Common Issues

If things don’t go as planned, don’t worry! Here are some troubleshooting tips:

  • Salmon is too dry: Check your cooking time and temperature; salmon should be cooked just until it flakes.
  • Flavor is too strong: Adjust the soy sauce next time; you can always start with less and add more to taste.
  • Marinade not thickening: If you want a thicker sauce, simmer it on the stove for a few minutes after removing the salmon.

Bringing It All Together

As you can see, my Best Honey Garlic Salmon recipe is more than just a meal; it’s a way to create beautiful moments around the table. Whether you’re cooking for family, friends, or just for yourself, this dish brings a touch of magic to your dining experience. The balance of sweet and savory is perfect for any palate, making it a versatile go-to recipe. So, roll up your sleeves, gather your ingredients, and let’s make some culinary magic happen. I can’t wait for you to try this recipe and share the love it brings into your life. Happy cooking!

Best Honey Garlic Salmon

Prep Time 10 minutes
Cook Time 15 minutes
Total Time 25 minutes
Servings 4 servings
Calories 350
This flavorful honey garlic salmon is quick to prepare and perfect for a healthy, delicious meal.

Ingredients

Main ingredients

  • 4 fillets salmon fillets
  • 1/4 cup honey
  • 1/4 cup soy sauce
  • 3 cloves garlic, minced
  • 1 tablespoon olive oil
  • 1 teaspoon ground ginger
  • to taste salt and pepper salt and pepper
  • chopped green onions for garnish green onions

Instructions 

  • Whisk honey, soy sauce, garlic, olive oil, ginger, salt, and pepper.
  • Marinate salmon in the mixture for at least 30 minutes.
  • Preheat oven to 400°F (200°C).
  • Place salmon on a parchment-lined baking sheet and bake for 12-15 minutes.
  • Garnish with chopped green onions before serving.

Notes

For extra flavor, baste the salmon with additional marinade during baking.
Calories: 350kcal
Cost: $15
Course: Main Course
Cuisine: American
Keyword: Salmon

Loved this recipe? Save it to your favorite Pinterest board so you can easily find it later! It’s the perfect way to keep all your sweet ideas in one place. ✨

Delicious honey garlic salmon served with a soft-focus background.

Why You’ll Love This Recipe

If you’re anything like me, the thought of coming home to a warm, inviting meal after a long day is pure bliss. This Slow Cooker Chicken Stew Recipe encapsulates that feeling perfectly. Imagine walking through your door to the savory aroma of tender chicken and fresh vegetables wafting through the air, making your stomach rumble in anticipation. There’s something so comforting about a hearty stew, especially on a chilly evening. This dish not only warms your body but also your soul, bringing a sense of nostalgia and coziness that we all crave.

With minimal effort required, you can create a meal that’s rich in flavor and brimming with wholesome ingredients. This recipe is designed with busy lives in mind. Whether you’re juggling work, kids, or just the chaos of everyday life, this stew is your ticket to a satisfying dinner without the fuss. As a bonus, it’s packed with nutrients, making it a wholesome choice for the whole family.

Overview of the Dish

This Slow Cooker Chicken Stew is a beautiful blend of juicy chicken thighs, vibrant vegetables, and aromatic herbs simmered to perfection. The slow cooking process allows the flavors to meld together, resulting in a stew that’s both hearty and comforting. With a base of chicken broth, you’ll find tender potatoes, sweet carrots, and crisp green beans, all bathed in a savory, herb-infused sauce. Every bite is a delightful explosion of flavor that will leave you wanting more.

What You’ll Need

A warm bowl of chicken stew featuring sliced carrots, potatoes, and green beans.

Before we dive into the cooking process, let’s gather our ingredients. Here’s what you’ll need to whip up this fantastic stew:

Ingredients

  • 2 pounds boneless, skinless chicken thighs
  • 4 cups chicken broth
  • 3 carrots, sliced
  • 3 potatoes, diced
  • 1 onion, chopped
  • 3 cloves garlic, minced
  • 2 cups green beans, trimmed
  • 1 teaspoon dried thyme
  • 1 teaspoon dried rosemary
  • Salt and pepper to taste
  • 2 tablespoons olive oil

Preparation Steps

Now that we have everything we need, let’s get cooking! Follow these simple steps to create a stew that will become a staple in your home:

Step-by-Step Instructions

  1. In a skillet over medium heat, heat the olive oil. Once hot, add the chicken thighs and sear for 3-4 minutes on each side until nicely browned. This step locks in flavor and gives the chicken a beautiful color.
  2. In your slow cooker, combine the chicken broth, sliced carrots, diced potatoes, chopped onion, minced garlic, and trimmed green beans. Add the dried thyme, dried rosemary, salt, and pepper, mixing everything well.
  3. Place the seared chicken thighs on top of the vegetable mixture in the slow cooker, ensuring they’re nestled in the broth.
  4. Cover the slow cooker and cook on low for 6-8 hours or on high for 4-5 hours, until the chicken is cooked through and the vegetables are tender.
  5. Once cooked, remove the chicken thighs. Using two forks, shred the chicken into bite-sized pieces and return it to the stew. Give everything a good stir to combine.

Tips for Making the Perfect Stew

To ensure your stew is as delicious as possible, consider these handy tips:

  • Choosing the Right Chicken Cut: While this recipe calls for chicken thighs, you can also use chicken breasts if you prefer. Just keep in mind that thighs tend to stay juicier during the slow cooking process.
  • Vegetable Variations: Feel free to get creative with your vegetable choices! You can swap in sweet potatoes, parsnips, or even corn for a sweet twist. Just be mindful of cooking times—harder vegetables like potatoes should be added earlier, while softer ones like peas can go in during the last hour of cooking.
  • Herb and Spice Enhancements: Don’t hesitate to add your own flair! Fresh herbs like parsley or basil can brighten up the flavors right before serving. For a bit of heat, a pinch of red pepper flakes can do wonders.
  • Thickening Options: If you prefer a thicker stew, consider mashing a few of the cooked potatoes into the broth or adding a cornstarch slurry about 30 minutes before the cooking time is up.
  • Serving Suggestions: This stew is fantastic on its own, but pairing it with crusty bread or fluffy rice can elevate the meal. A simple side salad can add a refreshing touch to balance the richness of the stew.

Storage and Freezing Tips

This stew makes great leftovers! Here’s how to store and reheat it:

  • Refrigeration: Store any leftovers in an airtight container in the fridge for up to 4 days. It often tastes even better the next day as the flavors continue to meld.
  • Freezing: You can freeze portions of this stew for up to 3 months. Just let it cool completely before transferring it to a freezer-safe container. To reheat, thaw overnight in the fridge and warm it on the stovetop or microwave, adding a splash of broth if needed.

Frequently Asked Questions

Can I Use Frozen Chicken in This Recipe?

Absolutely! You can use frozen chicken thighs, but for safety, it’s best to thaw them in the refrigerator overnight. If you’re using frozen chicken, you may need to extend the cooking time slightly to ensure it’s cooked through.

Can I Make This Stew on the Stovetop Instead?

Yes! If you don’t have a slow cooker or are short on time, you can simmer this stew on the stovetop. Use a large pot or Dutch oven and cook over low heat for about 1.5 to 2 hours, stirring occasionally. Add more broth if necessary to prevent sticking.

How Do I Prevent Vegetables from Getting Too Soft?

To avoid mushy vegetables, cut them into larger chunks. You can also add more delicate veggies, like peas or spinach, during the last 30 minutes of cooking.

Conclusion

There you have it! This Slow Cooker Chicken Stew Recipe is your ticket to a comforting meal that requires little effort but delivers big on flavor. With its tender chicken, hearty vegetables, and a broth that warms the soul, it’s bound to become a beloved dish in your household. Plus, the flexibility of this recipe allows you to make it uniquely yours, adapting it to your tastes and what you have on hand. So, whether you’re cooking for a family gathering or just treating yourself, this stew is sure to impress. I can’t wait for you to try it! Don’t forget to share your experience and any personal twists you’ve added. Happy cooking!

Slow Cooker Chicken Stew Recipe

Prep Time 15 minutes
Cook Time 6 hours
Total Time 6 hours 15 minutes
Servings 4 servings
Calories 350
A hearty and comforting chicken stew perfect for slow cooking, packed with vegetables and herbs.

Ingredients

Protein

  • 2 pounds boneless, skinless chicken thighs

Broth & Vegetables

  • 4 cups chicken broth
  • 3 carrots carrots, sliced
  • 3 potatoes potatoes, diced
  • 1 onion onion, chopped
  • 3 cloves garlic, minced
  • 2 cups green beans, trimmed
  • 1 teaspoon dried thyme
  • 1 teaspoon dried rosemary
  • to taste salt and pepper salt and pepper
  • 2 tablespoons olive oil

Instructions 

  • Heat olive oil and sear chicken thighs 3-4 minutes per side until browned.
  • Combine broth, vegetables, herbs, salt, and pepper in slow cooker.
  • Add seared chicken on top, cover, and cook on low 6-8 hours.
  • Shred chicken, return to stew, stir, and serve.

Notes

Use fresh herbs for more flavor and adjust salt to taste.
Calories: 350kcal
Cost: $15
Course: Main Course
Cuisine: American
Keyword: Chicken, Stew

Loved this recipe? Save it to your favorite Pinterest board so you can easily find it later! It’s the perfect way to keep all your sweet ideas in one place. ✨

Delicious slow cooker chicken stew displayed in soft natural light, highlighting its textures.

Why This Recipe is a Must-Try

Ah, salmon! This versatile fish has a special place in my heart and my kitchen. The moment you take a bite of Honey Glazed Baked Salmon, you’ll understand why it’s one of my go-to dishes. Imagine a succulent piece of salmon, kissed with a sweet and savory glaze, fresh from the oven, and just waiting for you to dig in. This dish isn’t just about the flavors; it’s about creating a memorable experience around the dinner table, whether it’s a cozy family meal or a gathering with friends. The combination of honey, soy sauce, and a hint of Dijon mustard creates a glaze that’s both simple and sophisticated, making it perfect for any occasion. So, roll up your sleeves and get ready to impress!

Ingredients You’ll Need

To whip up this delightful dish, you’ll need:

  • 4 salmon fillets
  • 1/4 cup honey
  • 2 tablespoons soy sauce
  • 1 tablespoon Dijon mustard
  • 2 cloves garlic, minced
  • 1 tablespoon olive oil
  • Salt and pepper to taste
  • Lemon wedges for serving
  • Chopped fresh parsley for garnish

Each ingredient plays a crucial role in building the flavor profile of this dish, so don’t skip any of them!

Step-by-Step Guide to Making Honey Glazed Baked Salmon

A beautifully plated salmon dish drizzled with honey glaze and garnished.

Let’s get down to the nitty-gritty of preparing this incredible dish. Follow these simple steps:

  1. Preheat your oven: Set your oven to 375°F (190°C) to get it nice and warm.
  2. Prepare the glaze: In a small bowl, whisk together the honey, soy sauce, Dijon mustard, minced garlic, olive oil, salt, and pepper. This is where the magic happens—your kitchen will smell divine!
  3. Coat the salmon: Place the salmon fillets in a baking dish, skin-side down, and pour the honey glaze over the top. Make sure they are well coated, as this will add that sticky sweetness we all love.
  4. Bake the salmon: Pop the dish into the oven and bake for 15-20 minutes. You know it’s ready when it flakes easily with a fork. Keep an eye on it to avoid overcooking!
  5. Rest before serving: Once out of the oven, let the salmon rest for a couple of minutes. This allows the juices to redistribute, ensuring each bite is as juicy as the last.
  6. Garnish and serve: Serve your beautiful salmon with lemon wedges and a sprinkle of chopped parsley for a pop of color.

Tips for Perfect Results

Now that you know how to make this dish, here are some handy tips to ensure everything goes smoothly:

  • Choose fresh salmon: Opt for wild-caught salmon if possible. It’s not just about taste; it’s healthier and more sustainable.
  • Keep an eye on the cooking time: Salmon can go from perfect to overcooked in the blink of an eye. Use an instant-read thermometer; it should register about 145°F (63°C) when done.
  • Customize your glaze: Feel free to add spices like paprika or crushed red pepper for an extra kick. A little heat can elevate the dish beautifully!
  • Let it rest: This step is crucial for juicy salmon. Don’t skip it!

Creative Variations to Try

Don’t be afraid to experiment with this recipe! Here are a few variations to keep things interesting:

  • Add citrus: Incorporate orange juice or zest into the glaze for a delightful citrus twist.
  • Mix in fresh herbs: Adding fresh dill or cilantro can bring a fresh flavor to your dish.
  • Try different mustards: Swap out the Dijon for whole grain or spicy brown mustard for a different flavor profile.

Substitutions for Dietary Needs

If you have dietary restrictions or simply want to mix things up, here are some substitutions you can make:

  • For gluten-free: Use tamari instead of soy sauce to keep it gluten-free.
  • For a vegan option: Substitute the salmon with tofu or tempeh, adjusting the baking time accordingly.
  • For a lower-sugar option: Use agave nectar or maple syrup instead of honey.

Essential Equipment

Having the right tools can make your cooking experience easier and more enjoyable. Here’s what I recommend for this recipe:

  • Baking dish or sheet
  • Whisk
  • Measuring cups and spoons
  • Instant-read thermometer
  • Pastry brush (for glazing)

Storing and Freezing Leftovers

Got leftovers? No problem! Here’s how to store or freeze your Honey Glazed Baked Salmon:

  • Refrigerating: Place any leftovers in an airtight container and store them in the fridge for up to 3 days.
  • Freezing: To freeze, wrap the salmon tightly in plastic wrap and then place it in a freezer-safe bag. It can be frozen for up to 2 months. Just remember to thaw it overnight in the fridge before reheating.

Frequently Asked Questions

Here are some common questions I get about this dish:

  • Can I use other types of fish? Absolutely! This glaze works well for trout or cod as well. Just adjust the cooking times based on the thickness of the fillets.
  • What should I serve with Honey Glazed Baked Salmon? It pairs wonderfully with steamed asparagus, quinoa, or a fresh salad. You can’t go wrong with roasted sweet potatoes either!
  • Is this recipe healthy? Yes! Salmon is packed with omega-3 fatty acids and protein, making it a nutritious choice for any meal.

Troubleshooting Common Issues

If you encounter any hiccups while making this dish, here are some tips to navigate through:

  • Salmon is dry: This often happens if it’s overcooked. Keep an eye on your cooking time and use a thermometer to check doneness.
  • Glaze too sweet: If you find the glaze is too sweet for your taste, consider adding a splash of vinegar or lemon juice to balance it out.
  • Not enough flavor: Ensure you’re using fresh ingredients, especially garlic and herbs, to get the best flavor.

Final Thoughts

In conclusion, Honey Glazed Baked Salmon is not just a meal; it’s a celebration of flavors that brings joy to any table. With its delightful combination of sweet and savory, this dish is sure to impress your family and friends time and again. So whether you’re cooking for a special occasion or just want to treat yourself on a weeknight, let this recipe be your go-to. Remember, cooking is all about joy and creativity, so make it your own. Enjoy every bite, and don’t forget to share your delicious creations with loved ones. Happy cooking!

Honey Glazed Baked Salmon: A Flavorful Seafood Sensation

Prep Time 10 minutes
Cook Time 20 minutes
Total Time 30 minutes
Servings 4 servings
Calories 350
Enjoy tender baked salmon coated in a sweet and savory honey glaze, perfect for a quick and delicious meal.

Ingredients

Main ingredients

  • 4 fillets salmon fillets
  • 1/4 cup honey
  • 2 tablespoons soy sauce
  • 1 tablespoon dijon mustard
  • 2 cloves garlic, minced
  • 1 tablespoon olive oil
  • to taste salt and pepper
  • for serving lemon wedges
  • for garnish chopped fresh parsley

Instructions 

  • Preheat oven to 375°F (190°C).
  • Mix honey, soy sauce, Dijon mustard, garlic, olive oil, salt, and pepper.
  • Place salmon in a baking dish and coat with glaze.
  • Bake for 15-20 minutes until flaky.
  • Serve with lemon wedges and parsley.

Notes

Use fresh parsley for best flavor.
Calories: 350kcal
Cost: $15
Course: Main Course
Cuisine: American
Keyword: Seafood

Loved this recipe? Save it to your favorite Pinterest board so you can easily find it later! It’s the perfect way to keep all your sweet ideas in one place. ✨

A vibrant salmon fillet showing a caramelized honey glaze and fresh herbs.