Author

Ava

Browsing

Juicy Smash Burgers with Baconnaise Sauce: A Seattle Kitchen Story

My name’s Ava, and welcome to my little corner of the internet, where the aroma of something delicious is always in the air. If you’re here, chances are you’re on the hunt for a burger that’s not just good, but unforgettable. Well, buckle up, because these Juicy Smash Burgers with Baconnaise Sauce are about to become your new obsession. I’m talking about that kind of burger that makes you close your eyes with each bite, the kind that has everyone asking for the recipe. I grew up in Oregon, where simple, hearty food was a way of life, and now, in my Seattle kitchen, I’m putting a little twist on those classics. Trust me, these aren’t your average backyard burgers; they’re a culinary hug.

Remember that time I tried to make a seven-layer dip for a potluck and completely forgot the sour cream? Everyone laughed, including me! It’s moments like these that remind me cooking should be fun and stress-free. And that’s exactly what these smash burgers are—a joyful, easy, and incredibly tasty experience.

Why You’ll Love This Smash Burger Recipe

Okay, let’s get real. Why *should* you make these smash burgers? Here’s the lowdown:

  • Unmatched Flavor: The combination of the crispy, caramelized patty with the smoky, creamy baconnaise sauce? It’s a flavor explosion in every bite.
  • Quick and Easy: Forget spending hours in the kitchen. These smash burgers come together in minutes. Perfect for a weeknight dinner or a weekend gathering.
  • Crowd-Pleaser: Seriously, I’ve never met anyone who didn’t love these burgers. They’re a guaranteed hit.
  • Customizable: Want to add some extra toppings? Go for it! These burgers are a blank canvas for your culinary creativity.

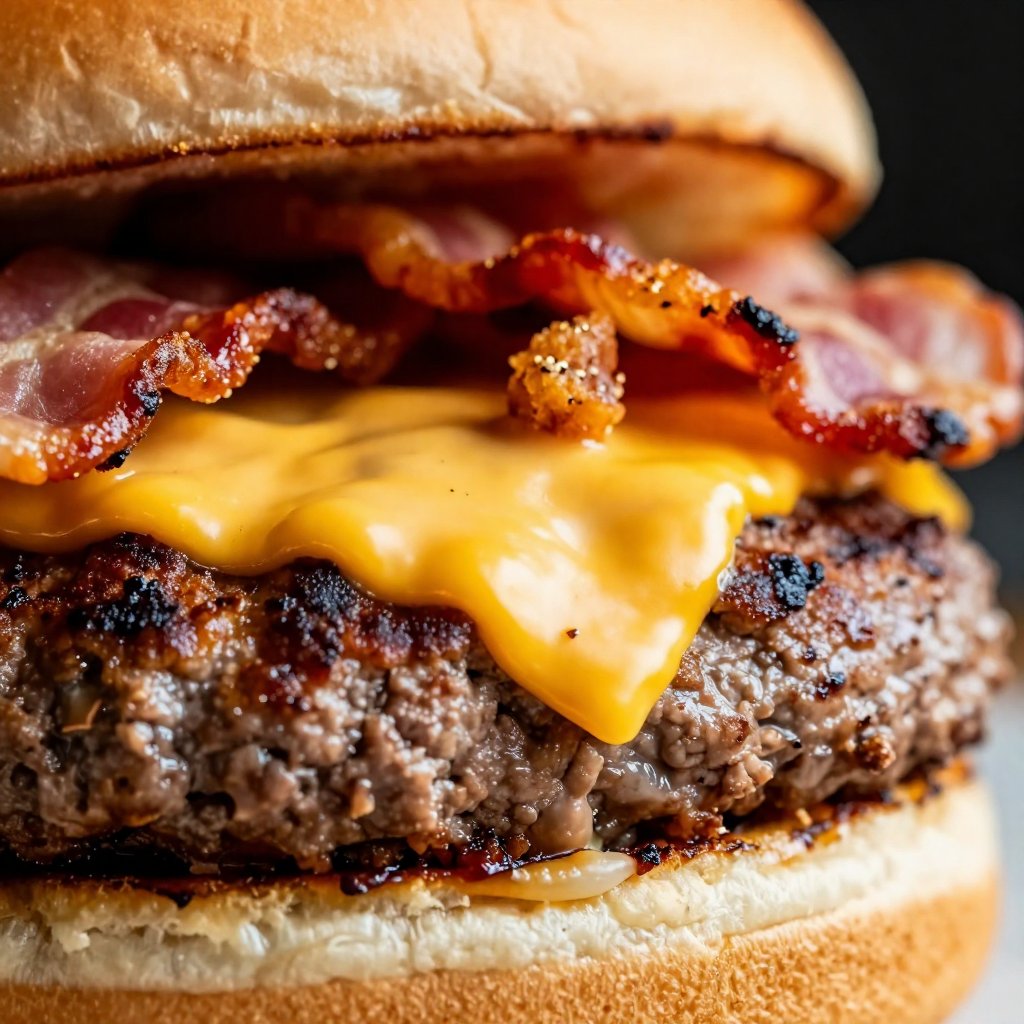
These smash burgers are more than just a meal; they’re an experience. The delightful contrast between the crispy, thin patty and the rich, creamy baconnaise is simply divine. Plus, who doesn’t love a good burger? This recipe elevates the classic burger to a whole new level.

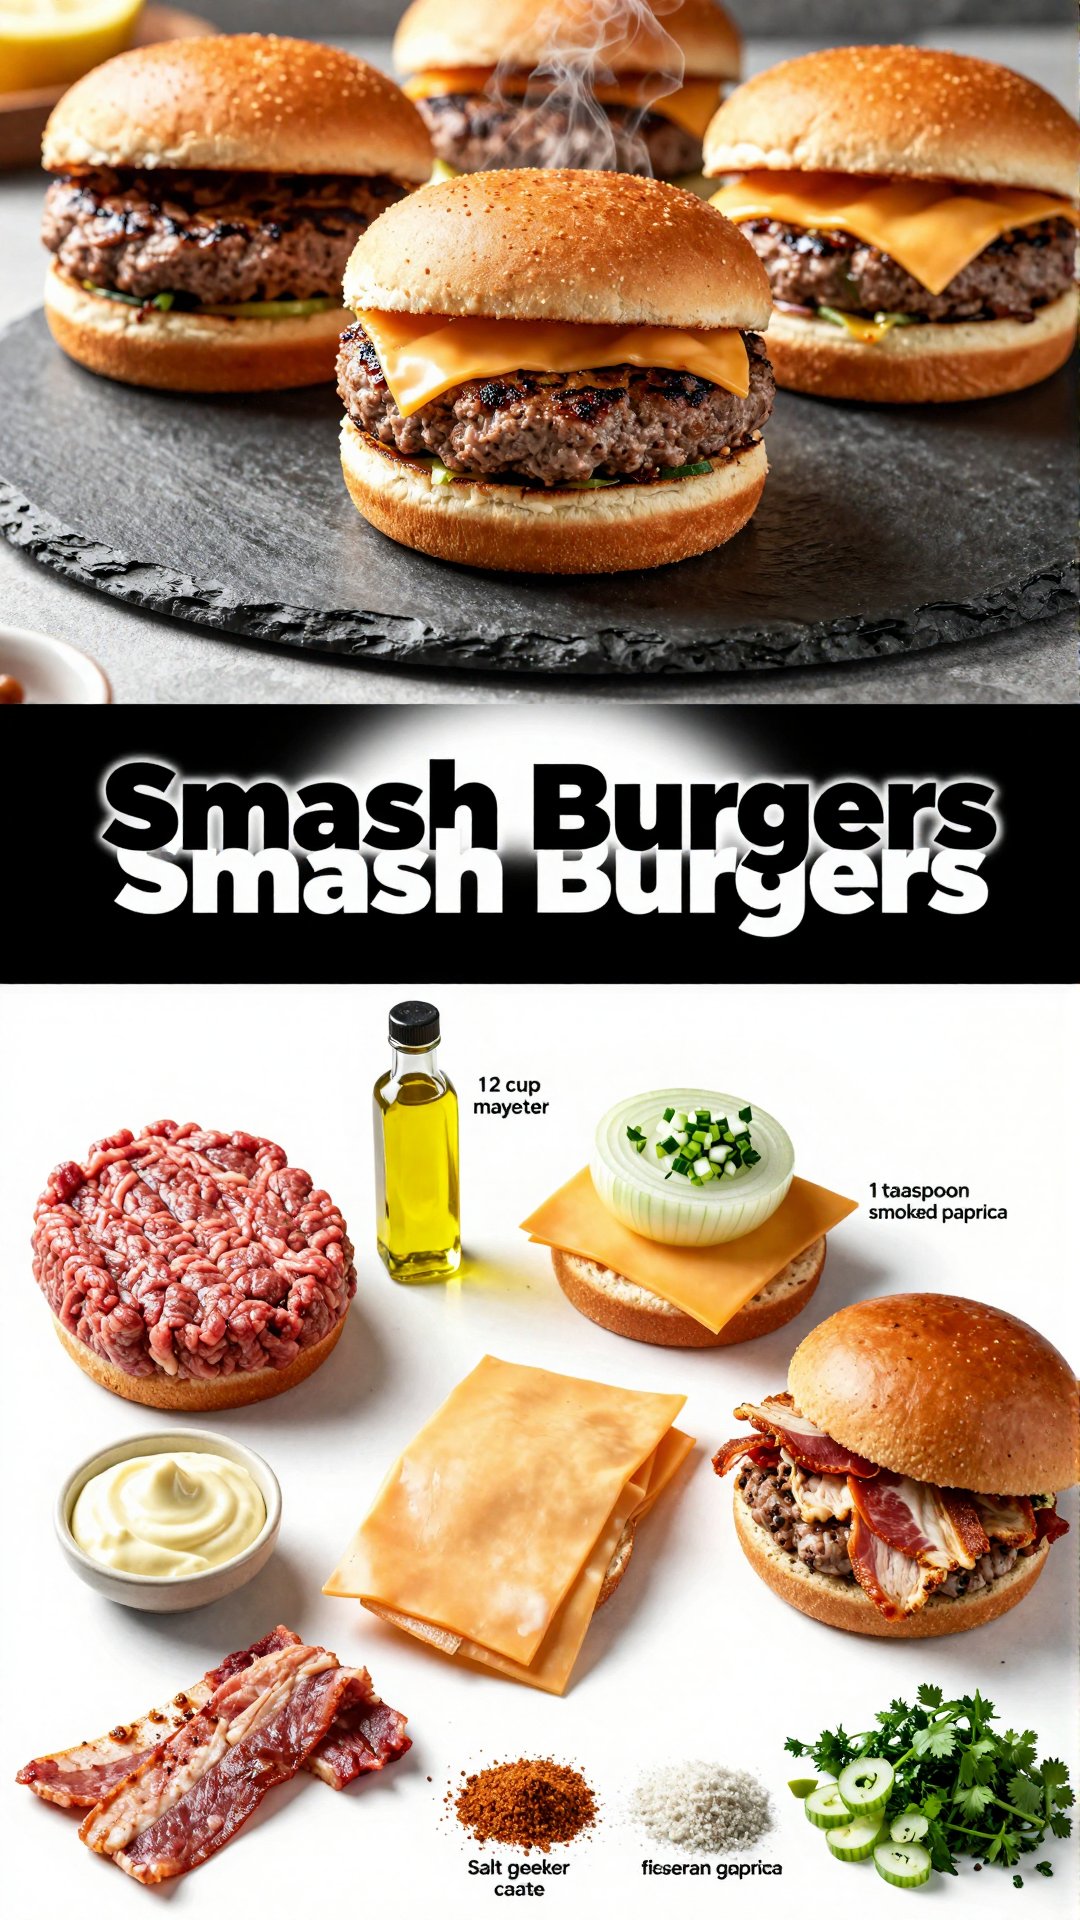
Ingredients for the Best Smash Burgers with Baconnaise Sauce

Here’s what you’ll need to create these masterpieces. Don’t worry, you probably have most of these ingredients already!

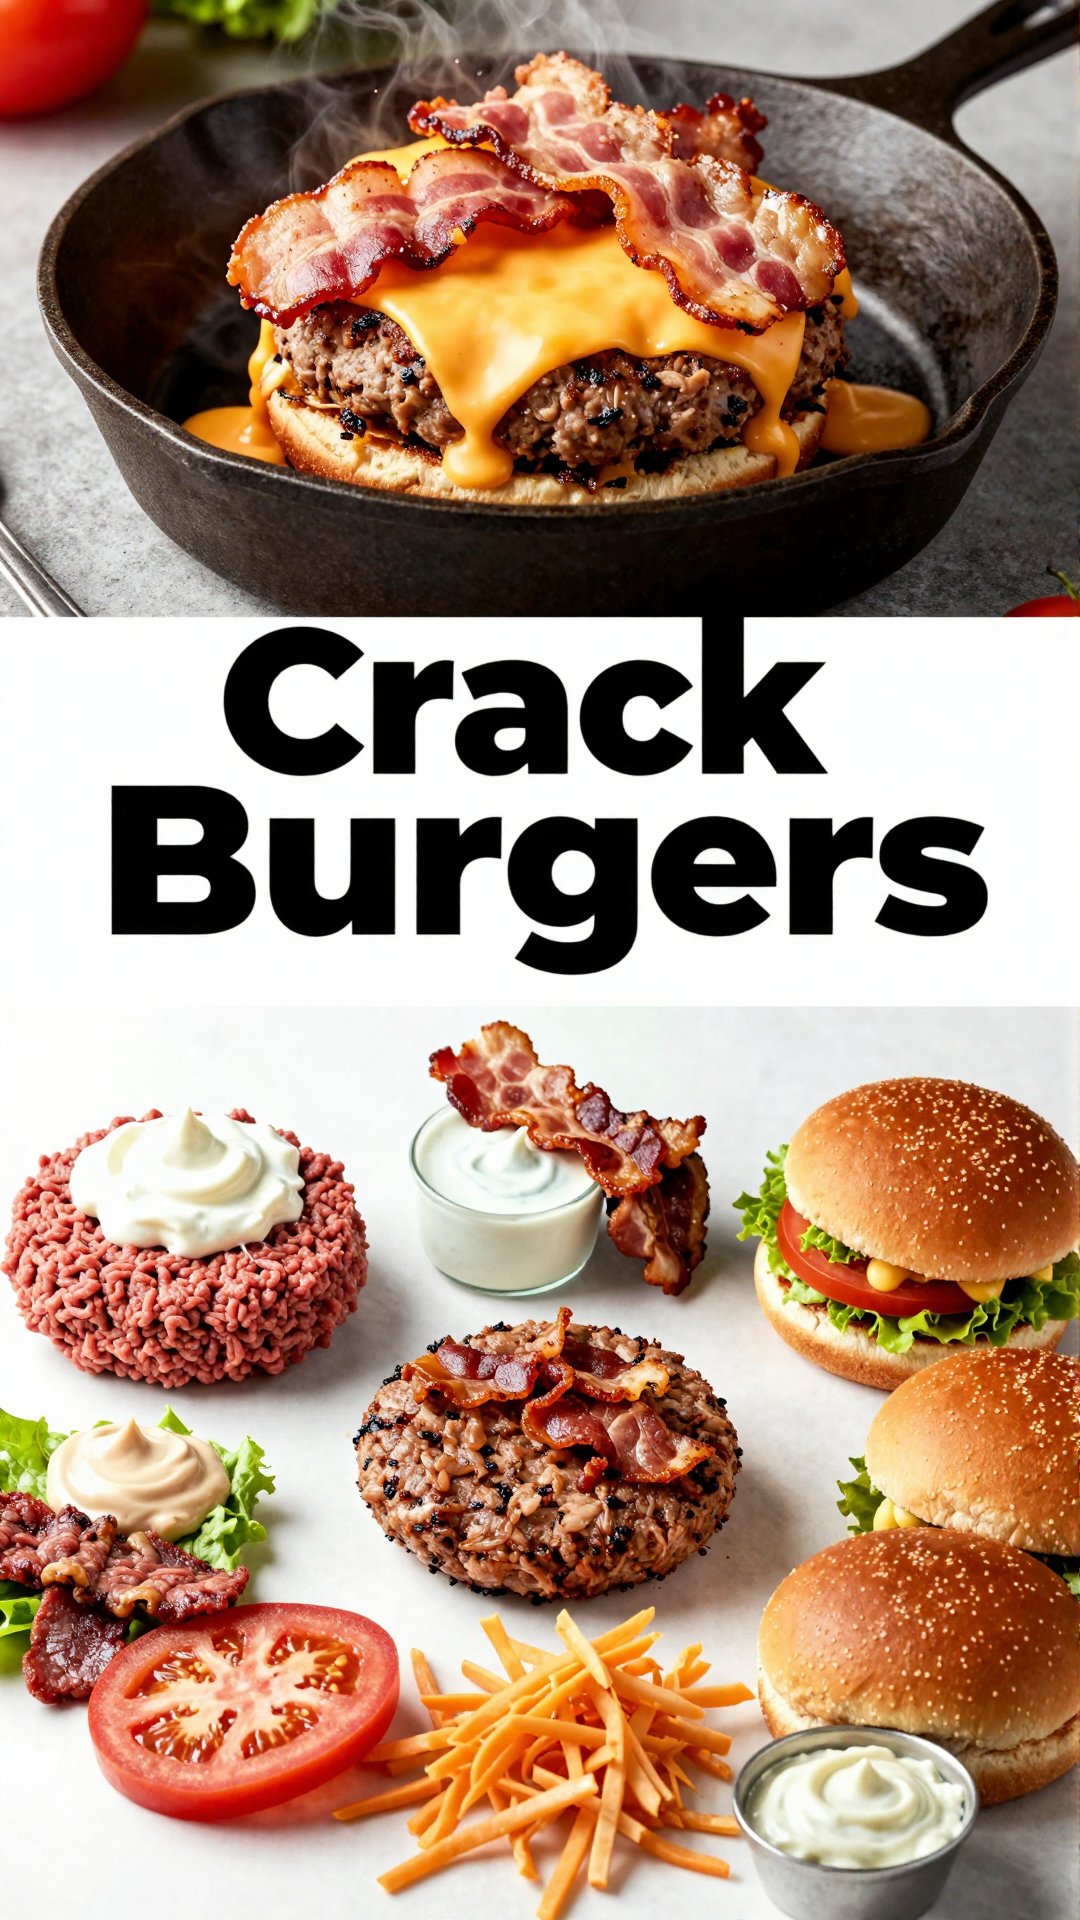
  • ‘1 lb ground beef (80/20 blend)’
  • ‘4 burger buns’
  • ‘4 slices of American cheese’
  • ‘1/2 onion, finely chopped’
  • ‘1 tablespoon vegetable oil’
  • ‘Salt and pepper to taste’
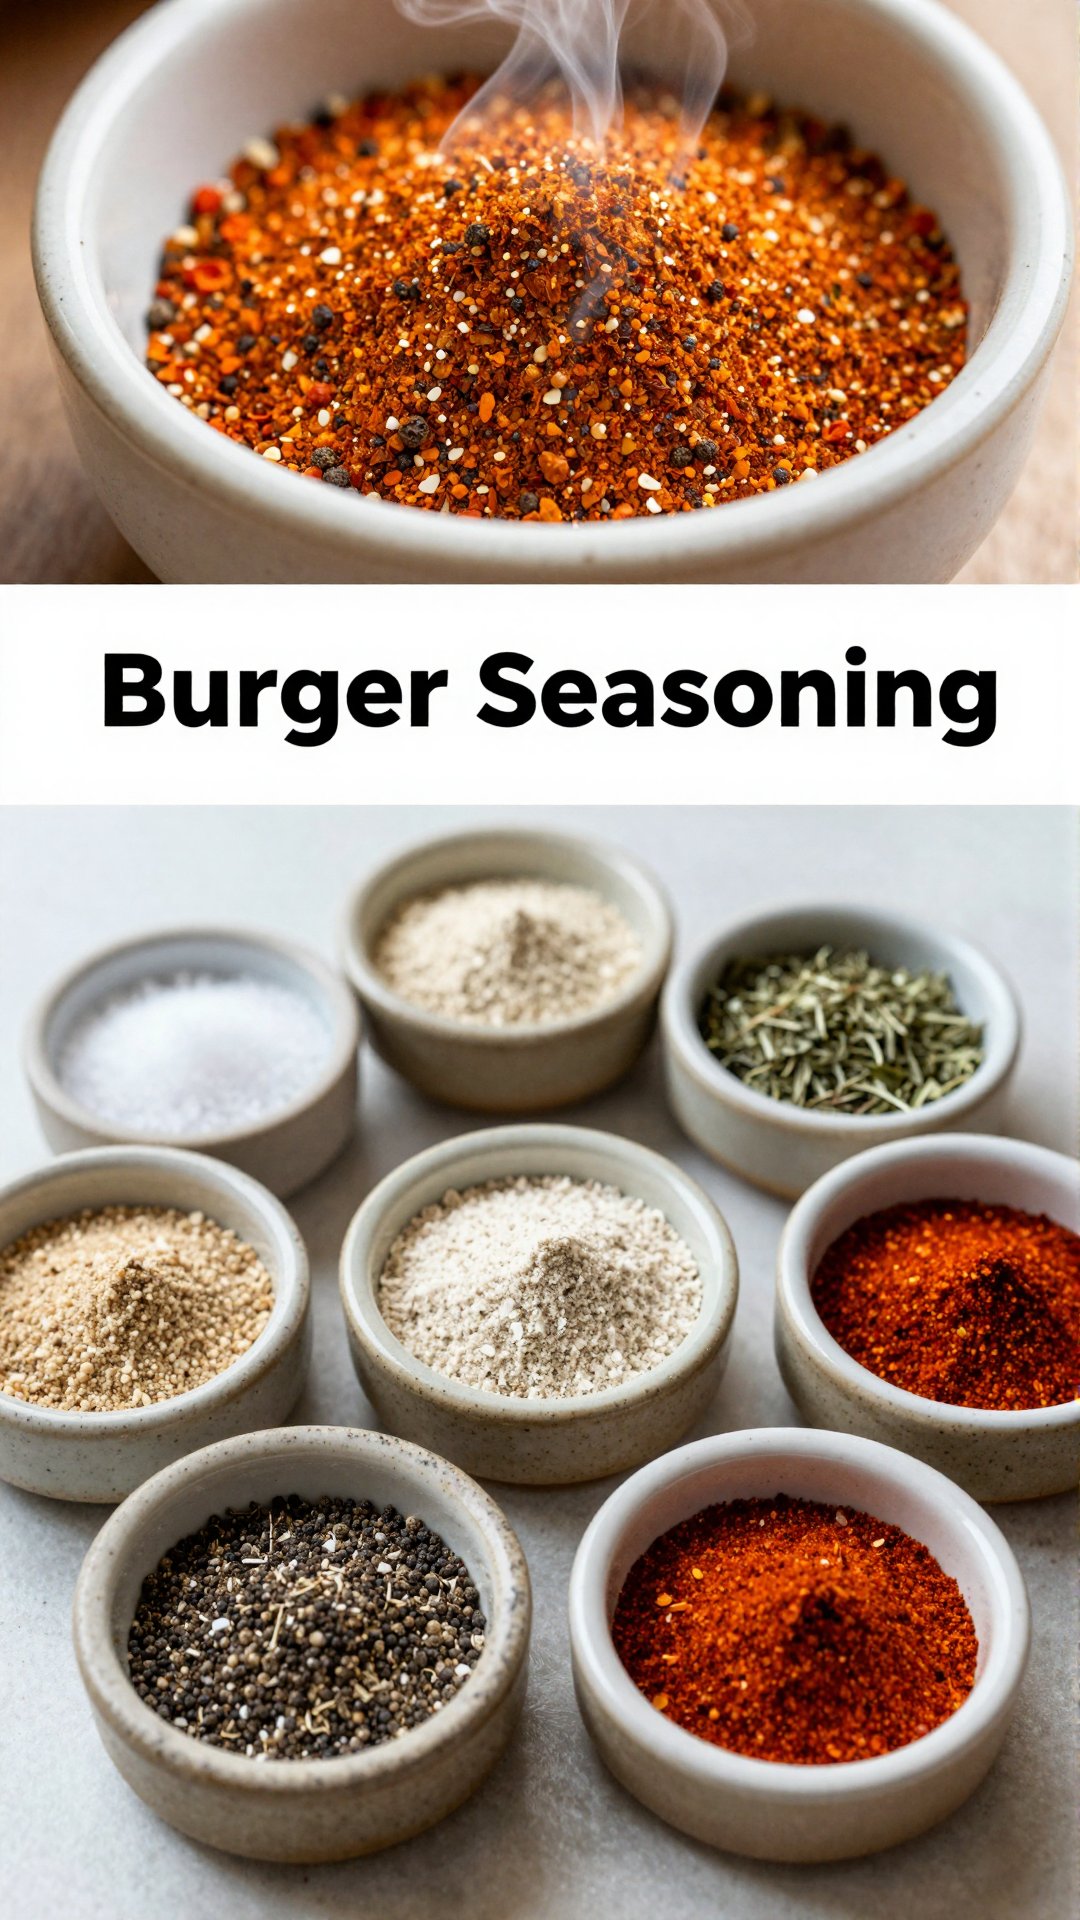
  • ‘1/2 cup mayonnaise’
  • ‘2 tablespoons cooked turkey bacon, crumbled’
  • ‘1 teaspoon smoked paprika’
  • ‘1 teaspoon garlic powder’
  • ‘1 tablespoon fresh parsley, chopped (optional)’
Recipe Image

How to Make Juicy Smash Burgers with Baconnaise Sauce: Step-by-Step

Alright, let’s get cooking! Here’s how to make these amazing smash burgers:

  1. Prep the Pan: Heat a large skillet or cast-iron pan over medium-high heat.
  2. Shape the Patties: While the pan heats, form the ground beef into 4 equal-sized balls.
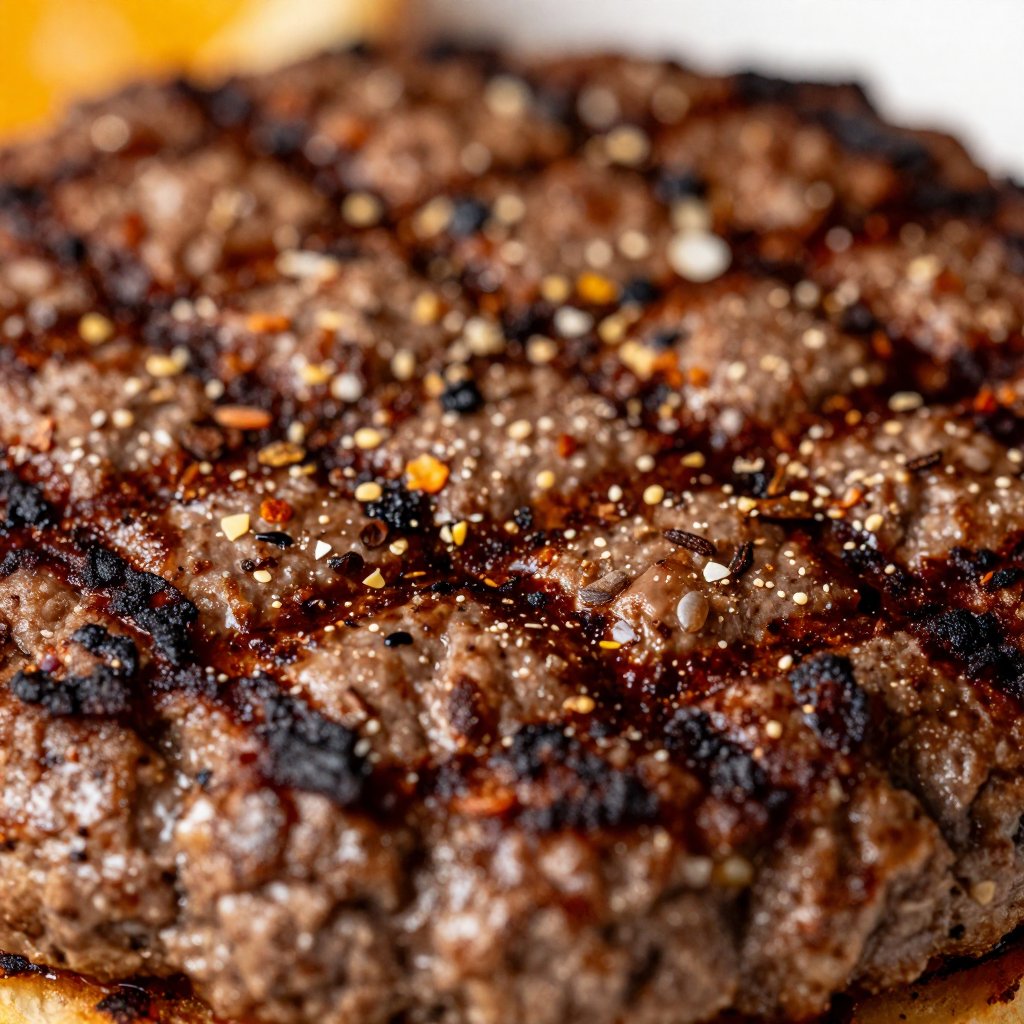
  3. Smash Time!: Once the pan is hot, add a tablespoon of vegetable oil and place the beef balls onto the pan. Immediately smash each ball with a spatula to form thin patties. Season with salt and pepper.
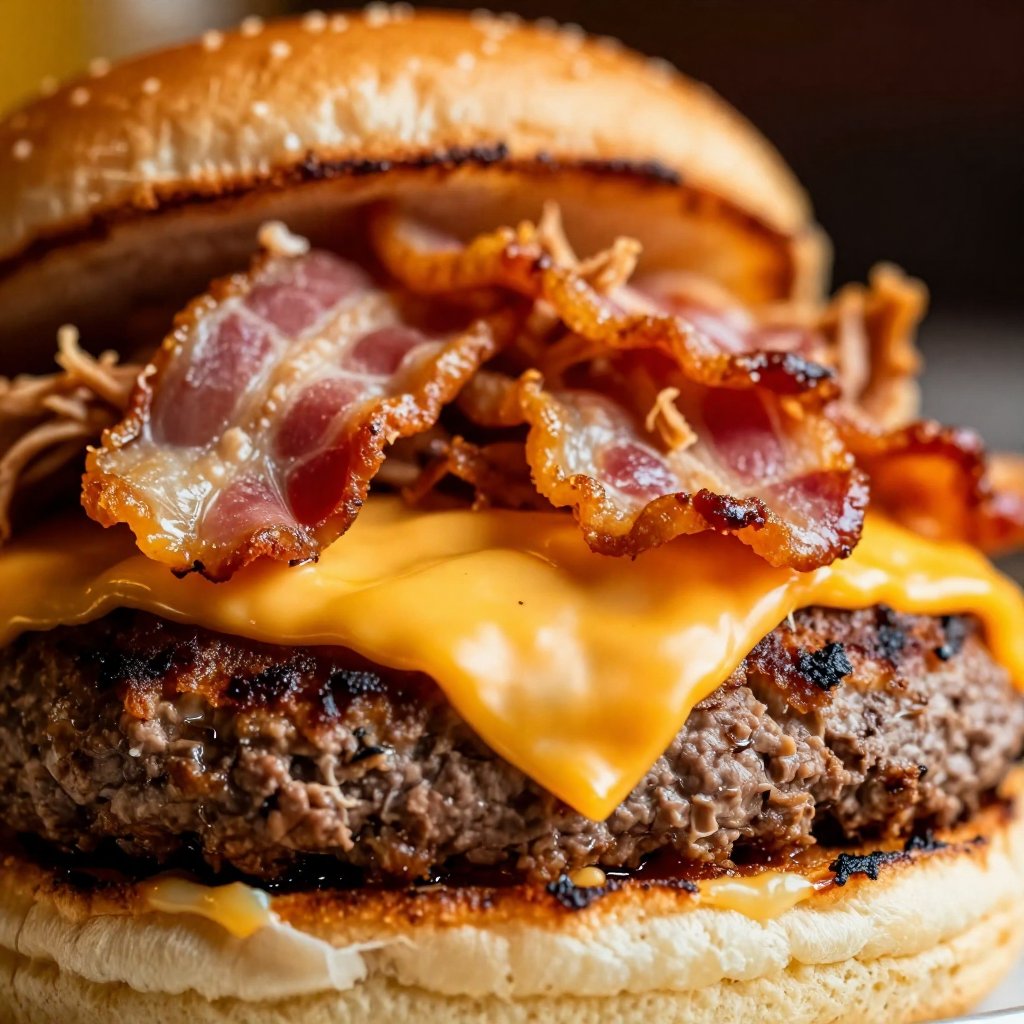
  4. Cook ‘Em Up: Cook for 2-3 minutes on the first side, then flip the patties, adding a slice of cheese to each patty.
  5. Melt the Cheese: Cook for another 1-2 minutes until the cheese has melted and the burgers are cooked to your desired doneness.
  6. Baconnaise Magic: In a small bowl, combine mayonnaise, crumbled turkey bacon, smoked paprika, and garlic powder to make the baconnaise sauce.
  7. Toast the Buns: Toast the burger buns lightly on the grill or in a skillet.
  8. Assemble and Devour!: Assemble the burgers: spread a generous amount of baconnaise sauce on the bottom half of each bun, then place a burger patty on top. Add a sprinkle of fresh parsley if desired, then top with the other half of the bun and serve immediately.

See? Easy peasy! The key to a great smash burger is the smashing technique. Don’t be shy—really press down on those patties to get that crispy, caramelized crust. It’s where all the flavor is!

Pro Tips for the Perfect Smash Burger

Want to take your smash burger game to the next level? Here are a few of my tried-and-true tips:

  • Use the Right Beef: An 80/20 blend of ground beef is ideal for smash burgers. The fat content helps create that crispy crust and keeps the patty juicy.
  • Get Your Pan HOT: A hot pan is crucial for achieving that perfect sear. Make sure your skillet is screaming hot before you add the beef.
  • Don’t Overcrowd the Pan: Cook the patties in batches if necessary to avoid overcrowding the pan, which can lower the temperature and prevent proper searing.
  • Smash with Authority: Use a sturdy spatula and apply firm pressure when smashing the patties. You want them as thin as possible.
  • Toast the Buns: Toasting the buns adds a nice texture and prevents them from getting soggy.

These tips are what separate a good smash burger from a *great* smash burger. Trust me, they make all the difference.

Common Mistakes to Avoid

We all make mistakes in the kitchen, but knowing what to watch out for can save you from a burger disaster. Here are a few common pitfalls to avoid:

  • Using Lean Ground Beef: Lean ground beef won’t have enough fat to create that crispy crust. Stick with an 80/20 blend.
  • Not Getting the Pan Hot Enough: A lukewarm pan will result in a steamed, not seared, patty.
  • Overcooking the Burgers: Smash burgers cook quickly, so keep a close eye on them to avoid overcooking.
  • Skipping the Seasoning: Don’t forget to season the patties generously with salt and pepper. It’s crucial for flavor.
  • Adding Too Many Toppings: While toppings are great, too many can overwhelm the burger. Keep it simple and focus on quality ingredients.

I once tried to make smash burgers with 90/10 ground beef. Let’s just say they were… dry. Lesson learned!

Smash Burger Variations: Get Creative!

One of the best things about smash burgers is how versatile they are. Here are a few variations to try:

  • Spicy Smash Burger: Add a pinch of cayenne pepper to the ground beef and use a spicy mayo instead of baconnaise.
  • BBQ Smash Burger: Top the burger with BBQ sauce, crispy fried onions, and a slice of cheddar cheese.
  • Truffle Smash Burger: Mix truffle oil into the baconnaise sauce for a luxurious twist.
  • Mushroom Swiss Smash Burger: Sauté sliced mushrooms and top the burger with Swiss cheese.
  • Jalapeño Popper Smash Burger: Add cream cheese and pickled jalapeños to the burger.

Don’t be afraid to experiment and come up with your own unique smash burger creations! The possibilities are endless.

How to Store and Reheat Smash Burgers

If you happen to have leftovers (which is rare!), here’s how to store and reheat them:

  • Storage: Store the burger patties and baconnaise sauce separately in airtight containers in the refrigerator. They’ll keep for up to 3 days.
  • Reheating: Reheat the burger patties in a skillet or microwave until warmed through. Toast the buns again before assembling the burgers.

While freshly made smash burgers are always best, these reheating instructions will help you enjoy them the next day.

Frequently Asked Questions About Smash Burgers

Got questions? I’ve got answers! Here are some frequently asked questions about smash burgers:

  • What kind of pan should I use?: A cast-iron pan is ideal, but any heavy-bottomed skillet will work.
  • Can I use a grill?: Yes, you can make smash burgers on a grill. Just make sure to use a flat griddle or cast-iron pan on the grill grates.
  • Can I freeze the patties?: Yes, you can freeze the patties. Wrap them individually in plastic wrap and store them in a freezer bag for up to 2 months.
  • What if I don’t have turkey bacon?: You can use regular bacon or skip it altogether. The smoked paprika will still give the baconnaise sauce a smoky flavor.
  • Can I make the baconnaise sauce ahead of time?: Absolutely! The baconnaise sauce can be made up to 2 days in advance and stored in the refrigerator.

Serving Suggestions: Complete the Meal

What to serve with these amazing smash burgers? Here are a few ideas:

  • French Fries: A classic pairing!
  • Sweet Potato Fries: A healthier and equally delicious option.
  • Onion Rings: Crispy and flavorful.
  • Coleslaw: A refreshing side dish to balance the richness of the burger.
  • Side Salad: A light and healthy option.

No matter what you choose, these smash burgers are sure to be the star of the show! Whether you’re planning weeknight dinner ideas burger or amazing burgers to impress your friends, these smash burgers with baconnaise sauce are a guaranteed winner. They’re the perfect combination of juicy hamburger flavor and smoky creamy sauce. These burgers are a step up from standard food truck burgers and even unwhich recipe options, offering a unique experience. So, next time you’re looking for tasty burgers or cheesy burger recipes, remember this recipe for a guaranteed hit!

Smash Burgers with Baconnaise Sauce

Prep Time 10 minutes
Cook Time 10 minutes
Total Time 20 minutes
Servings 4 burgers
Calories 450
These smash burgers are quick, easy, and packed with flavor, thanks to the creamy baconnaise sauce. Perfect for a weeknight dinner!

Ingredients

Burger Ingredients

  • 1 lb ground beef (80/20 blend)
  • 4 burger buns
  • 4 slices American cheese
  • 0.5 onion (finely chopped)
  • 1 tablespoon vegetable oil
  • to taste Salt and pepper

Baconnaise Sauce

  • 0.5 cup mayonnaise
  • 2 tablespoons cooked turkey bacon (crumbled)
  • 1 teaspoon smoked paprika
  • 1 teaspoon garlic powder
  • 1 tablespoon fresh parsley (chopped (optional))

Instructions 

  • Heat skillet over medium-high heat.
  • Form beef into 4 balls.
  • Add oil, place beef balls, and smash into patties. Season with salt and pepper.
  • Cook 2-3 minutes, flip, add cheese.
  • Cook 1-2 minutes until cheese melts and burgers are done.
  • Combine mayonnaise, bacon, paprika, and garlic powder for baconnaise.
  • Toast buns.
  • Assemble burgers: baconnaise, patty, parsley (optional), bun.
  • Serve immediately.

Notes

For extra crispy edges, don't move the patties while they're searing!
Calories: 450kcal
Cost: $12
Course: Main Course
Cuisine: American
Keyword: Beef
pin

Hey there, friend! Ava here, back in my Seattle kitchen, and today we’re diving headfirst into the world of sizzling, mouthwatering fajitas. If you’ve ever bitten into a fajita that was anything less than explosively flavorful, trust me, I feel your pain. I’ve had my share of bland, sad fajitas in the past, and I decided enough was enough! So, I embarked on a quest to create the absolute best fajita marinade – one that guarantees juicy, tender, and unforgettable flavor every single time. And guess what? I cracked the code!

Growing up, my momma always said the secret to amazing food was in the marinade. Turns out, she was right! This fajita marinade isn’t just a recipe; it’s a flavor bomb waiting to happen. It’s simple, quick, and uses ingredients you probably already have in your pantry. Prepare for a fiesta in your mouth!

Why You’ll Love This Fajita Marinade

Seriously, what’s not to love? But let’s break it down:

  • Flavor Explosion: This marinade is a symphony of savory, tangy, and subtly spicy notes. It’s that perfect balance I’m always chasing!
  • Super Easy: Just whisk everything together. No fancy techniques or hard-to-find ingredients.
  • Versatile: Works like a charm on chicken, beef, shrimp, and even veggies!
  • Juicy Goodness: The marinade tenderizes the protein, ensuring every bite is succulent and juicy.
  • Quick Prep: Ready in minutes. You can even make it ahead of time.

Whether you’re planning a weeknight dinner or a weekend barbecue, this marinade will be your new best friend. It’s the secret weapon to transforming ordinary ingredients into extraordinary meals.

Ingredients for the Best Fajita Marinade

Here’s what you’ll need to whip up this magical elixir:

  • ‘1/4 cup fresh lime juice (about 2 limes)’
  • ‘1/4 cup olive oil’
  • ‘3 cloves garlic, minced’
  • ‘1 teaspoon ground cumin’
  • ‘1 teaspoon chili powder’
  • ‘1/2 teaspoon smoked paprika’
  • ‘1/2 teaspoon dried oregano’
  • ‘1/2 teaspoon salt’
  • ‘1/2 teaspoon black pepper’
  • ‘1 tablespoon soy sauce or Worcestershire sauce (optional, for depth of flavor)’
  • ‘1 tablespoon brown sugar or honey (optional, for slight sweetness)’
  • ‘1/4 teaspoon red pepper flakes (optional, for heat)’
  • ‘Fresh cilantro, chopped (optional, for garnish)’
Recipe Image

How to Make the Best Fajita Marinade: Step-by-Step

Ready to get cooking? Here’s how to make this incredible marinade:

  1. Mix the Marinade: In a medium bowl, whisk together the fresh lime juice, olive oil, minced garlic, ground cumin, chili powder, smoked paprika, dried oregano, salt, and black pepper. Make sure everything is mixed well for the best flavor. The fresh lime juice is key to that tangy zest we all love.
  2. Add Optional Ingredients: If you’re using them, add the soy sauce or Worcestershire sauce, brown sugar or honey, and red pepper flakes. Whisk again to evenly mix these ingredients into the marinade. If you’re looking for a deeper flavor, the soy sauce is your friend.
  3. Prepare Your Protein: Take your choice of protein—whether it’s chicken strips, beef strips, shrimp, or even some vegetables like bell peppers and onions—and place them in a large ziplock bag or a shallow dish. The protein is where the magic happens!
  4. Marinate: Pour the marinade over the protein, ensuring everything is well-coated. Seal the bag tightly or cover the dish, and place it in the refrigerator. Let it marinate for at least 30 minutes, but ideally 1-2 hours for maximum flavor. You can marinate for up to 4 hours for even more intense flavor.
  5. Cook the Protein: After marinating, take the protein out of the fridge and let it come to room temperature for about 15 minutes. Remove the protein from the marinade, allowing any excess to drip off, and grill or cook it in a hot skillet over medium-high heat. Cook until the meat is fully cooked and has a nice char on the edges.
  6. Serve Your Fajitas: Serve the cooked protein immediately with warm tortillas, sautéed peppers and onions. Garnish with freshly chopped cilantro if you’d like a burst of color and flavor! Enjoy your homemade fajitas!

Pro Tips for Perfect Fajitas

  • Fresh Lime Juice is Key: Don’t even think about using the bottled stuff. The flavor difference is night and day.
  • Don’t Over-Marinate: While marinating enhances flavor, too long can make the protein mushy, especially with the lime juice. Aim for 1-2 hours.
  • Room Temperature Matters: Letting the protein come to room temperature before cooking ensures even cooking.
  • Hot Skillet is a Must: A screaming hot skillet or grill is essential for that beautiful sear and smoky flavor.
  • Rest the Meat: After cooking, let the meat rest for a few minutes before slicing. This helps retain the juices.

Common Mistakes to Avoid

We all make mistakes in the kitchen, but here are a few to watch out for with this marinade:

  • Using Too Much Lime Juice: While lime juice is crucial, too much can make the protein tough. Stick to the recipe.
  • Skipping the Optional Ingredients: The soy sauce, brown sugar, and red pepper flakes add depth and complexity. Don’t be afraid to experiment!
  • Not Coating the Protein Evenly: Make sure every piece of protein is well-coated in the marinade for consistent flavor.
  • Cooking at Too Low a Heat: You want a nice sear, so crank up the heat!

Fajita Marinade Variations

Want to mix things up? Here are a few variations you can try:

  • Spicy Fajitas: Add more red pepper flakes or a pinch of cayenne pepper for extra heat.
  • Smoky Fajitas: Use smoked salt or add a dash of liquid smoke to the marinade.
  • Citrusy Fajitas: Add a splash of orange juice or lemon juice to the marinade.
  • Herbaceous Fajitas: Add fresh herbs like parsley, thyme, or rosemary to the marinade.

Storage Instructions

Got leftover marinade? Here’s how to store it:

  • In the Fridge: Store the marinade in an airtight container in the refrigerator for up to 3 days.
  • Freezing: You can also freeze the marinade for up to 2 months. Just thaw it in the refrigerator before using.

Important: Do not reuse marinade that has been in contact with raw meat. Always discard it to avoid foodborne illness.

Fajita Marinade FAQs

Got questions? I’ve got answers!

  • Can I use this marinade on vegetables? Absolutely! It’s fantastic on bell peppers, onions, zucchini, and mushrooms.
  • Can I make this marinade ahead of time? Yes! In fact, I recommend it. The flavors meld together even more when it sits for a day or two.
  • What if I don’t have fresh limes? While fresh limes are best, you can use bottled lime juice in a pinch. Just be sure to adjust the amount to taste.
  • Can I use this marinade for other dishes? Of course! It’s great on grilled chicken, fish, or even tofu.

Serving Suggestions for the Best Fajitas

Now that you’ve got your perfectly marinated protein, here are some serving suggestions to complete your fajita feast:

  • Tortillas: Warm flour or corn tortillas are a must.
  • Toppings: Load up on your favorite toppings like sour cream, guacamole, salsa, cheese, and pico de gallo.
  • Sides: Serve with rice, beans, or a fresh salad.
  • Drinks: Margaritas, anyone? Or maybe a refreshing agua fresca.

And there you have it! The best fajita marinade recipe that will transform your meals from ordinary to extraordinary. I hope you enjoy it as much as I do! Happy cooking, friends!

Remember, cooking should be fun and stress-free. If you don’t have fresh lime, bottled will work. If you don’t like spicy, don’t add the red pepper flakes. Adjust the flavor and enjoy your time in the kitchen. This marinade is the best because you can adjust the flavor to your liking. If you’re looking for the best flavor, be sure to marinate for at least 30 minutes. If you’re using steak, you can marinate for up to 4 hours. The best flavor comes from fresh ingredients, so don’t skip the fresh lime! This marinade can be used on chicken or beef, so feel free to experiment. You don’t have to be a professional chef to make great food. Just have fun and trust your instincts. This is a quick and easy recipe that will impress your friends and family. Remember, if you re ever feeling down, a good meal can always lift your spirits. I hope you enjoy this recipe and that it brings a little bit of sunshine into your kitchen!

The Best Fajita Marinade for Juicy Flavor

Prep Time 5 minutes
Cook Time 15 minutes
Total Time 20 minutes
Servings 6 servings
Calories 150
This fajita marinade recipe delivers incredibly juicy and flavorful results. Perfect for chicken, beef, shrimp, or vegetables, it's a quick way to elevate your fajita night!

Ingredients

Marinade

  • 1/4 cup fresh lime juice (about 2 limes)
  • 1/4 cup olive oil
  • 3 cloves garlic (minced)
  • 1 teaspoon ground cumin
  • 1 teaspoon chili powder
  • 1/2 teaspoon smoked paprika
  • 1/2 teaspoon dried oregano
  • 1/2 teaspoon salt
  • 1/2 teaspoon black pepper
  • 1 tablespoon soy sauce or Worcestershire sauce (optional, for depth of flavor)
  • 1 tablespoon brown sugar or honey (optional, for slight sweetness)
  • 1/4 teaspoon red pepper flakes (optional, for heat)
  • Fresh cilantro (chopped (optional, for garnish))

Instructions 

  • Mix lime juice, olive oil, garlic, cumin, chili powder, paprika, oregano, salt, and pepper.
  • Add soy sauce/Worcestershire, brown sugar/honey, and red pepper flakes (optional).
  • Place protein (chicken, beef, shrimp, or vegetables) in a bag or dish.
  • Pour marinade over protein, coat well, and refrigerate for 30 min - 2 hours.
  • Let protein come to room temperature. Remove from marinade and grill or cook in a skillet until cooked through.
  • Serve with tortillas, peppers, and onions. Garnish with cilantro (optional).

Notes

For best results, marinate the protein for at least 1 hour to allow the flavors to fully penetrate.
Calories: 150kcal
Cost: $8
Course: Main Course
Cuisine: Mexican
Keyword: fajitas
pin

Hey there, fellow food lovers! Ava here, back from my Seattle kitchen with a recipe that’s going to rock your weeknight dinner routine. If you’re anything like me, you crave those dishes that deliver big on flavor without requiring hours of slaving away in the kitchen. That’s where these Instant Pot Steak Fajitas come in. They’re quick, easy, and bursting with the kind of vibrant, savory goodness that makes everyone around the table happy. Growing up, fajitas were always a special occasion meal, something my mom whipped up when we had friends over or just needed a little fiesta in our lives. Now, thanks to the magic of the Instant Pot, you can have that same celebratory meal on the table in a fraction of the time.

This recipe is a game-changer. Forget standing over a hot stove, endlessly sautéing vegetables and hoping the steak cooks just right. With the Instant Pot, it’s all about layering flavors, setting the timer, and letting the pressure cooker do its thing. The result? Perfectly tender steak, beautifully softened peppers and onions, and a symphony of spices that will transport you straight to a sunny Mexican cantina. So grab your Instant Pot, and let’s get cooking! These instant pot steak fajitas will be a new favorite.

Why You’ll Love This Recipe

Okay, let’s get real. Why should you even bother with this recipe when there are a million other things vying for your attention? Here’s the deal: These Instant Pot Steak Fajitas aren’t just another dinner option; they’re a shortcut to deliciousness. Trust me, after you try them, you’ll be saying, ‘Thanks for’ this recipe!

  • Unbelievably Quick: From prep to plate, you’re looking at about 30 minutes. Seriously!
  • Minimal Cleanup: Everything cooks in one pot, which means fewer dishes to wash. Hallelujah!
  • Tender, Juicy Steak: The Instant Pot works its magic to create steak that’s perfectly cooked and incredibly tender.
  • Customizable: Easily adapt this recipe to your liking. Swap out the veggies, adjust the spice level, or add a different cut of steak.
  • Crowd-Pleaser: Whether you’re feeding a family of four or hosting a dinner party, everyone loves fajitas!
  • Gluten Free: For those with dietary restrictions, these instant pot fajitas are naturally gluten-free.

The best part? You can easily double or triple the recipe to feed a larger crowd or have leftovers for lunch. Plus, the flavors only get better as they sit, so these fajitas are perfect for meal prepping. Are you ready to get the complete ingredients list? Let’s do it!

Ingredients

Here’s what you’ll need to whip up these amazing Instant Pot Steak Fajitas. Don’t worry, it’s a pretty straightforward list, and you probably already have most of these ingredients in your pantry. This is the complete ingredients list for the recipe:

  • 1/2 cup beef stock: Adds moisture and depth of flavor to the steak and vegetables.
  • 1 lbs (450g) sirloin steak or flank steak (cut into strips): Sirloin and flank steak are great options because they are flavorful and cook quickly.
  • 1 1/2 tbsp taco seasoning: Use your favorite store-bought blend or make your own taco seasoning for a personalized touch.
  • 3 bell peppers (multi-color) (deseeded, and sliced into big strips): A mix of colors not only looks beautiful but also offers a variety of flavors.
  • 1 onion (peeled and cut into half rings): Adds a sweet and savory base to the fajitas.
  • Juice of 1-2 limes (to suit your taste): Brightens up the flavors and adds a zesty kick.
Recipe Image

How to Make Instant Pot Steak Fajitas: Step-by-Step Instructions

Alright, let’s get down to business. Follow these simple steps, and you’ll have a sizzling plate of Instant Pot Steak Fajitas in no time. Trust me, it’s easier than ordering takeout!

  1. Prep the Steak: Cut the sirloin or flank steak into strips about 1/4 inch thick. This ensures that the steak cooks quickly and evenly in the Instant Pot.
  2. Season the Steak: In a bowl, toss the steak strips with the taco seasoning. Make sure each piece is well-coated for maximum flavor.
  3. Layer the Ingredients: Pour the beef stock into the Instant Pot. Add the seasoned steak, bell peppers, and onion. Layering the ingredients helps to distribute the flavors evenly.
  4. Pressure Cook: Secure the lid on the Instant Pot, making sure the valve is set to sealing. Cook on high pressure for 5 minutes.
  5. Quick Release: Once the cooking time is up, do a quick release of the pressure. Be careful, as the steam will be hot!
  6. Add Lime Juice: Stir in the lime juice to brighten up the flavors. Taste and adjust the seasoning as needed.
  7. Serve: Serve the steak fajitas immediately with your favorite toppings, such as tortillas, sour cream, guacamole, and salsa.

And that’s it! You’ve just made delicious Instant Pot Steak Fajitas. See? I told you it was easy!

Pro Tips for Perfect Instant Pot Steak Fajitas

Want to take your Instant Pot Steak Fajitas from good to amazing? Here are a few pro tips that will help you achieve fajita perfection.

  • Don’t Overcook the Steak: The key to tender steak is to avoid overcooking it. Five minutes on high pressure is usually perfect, but you may need to adjust the cooking time depending on the thickness of your steak strips.
  • Use Fresh Ingredients: Fresh bell peppers and onions will give you the best flavor and texture. Avoid using frozen vegetables, as they can become mushy in the Instant Pot.
  • Sear the Steak for Extra Flavor: For an extra layer of flavor, sear the steak strips in a hot skillet before adding them to the Instant Pot. This will give them a nice crust and enhance their savory taste.
  • Deglaze the Pot: After cooking, use a wooden spoon to scrape up any browned bits from the bottom of the Instant Pot. These bits are packed with flavor and will add depth to your fajitas.
  • Adjust the Spice Level: If you like your fajitas spicy, add a pinch of cayenne pepper or a diced jalapeño to the Instant Pot. If you prefer a milder flavor, use a mild taco seasoning or reduce the amount of seasoning you use.
  • Warm Your Tortillas: Warm tortillas are softer and more pliable, making them easier to fill and roll. You can warm them in a dry skillet, in the microwave, or over an open flame.

Common Mistakes to Avoid

Even with a simple recipe like this, it’s easy to make a few common mistakes. Here’s what to watch out for to ensure your Instant Pot Steak Fajitas turn out perfectly every time.

  • Forgetting to Deglaze the Pot: Skipping this step means missing out on a lot of flavor. Those browned bits at the bottom of the pot are liquid gold!
  • Adding Too Much Liquid: The Instant Pot needs liquid to create steam, but too much liquid can result in soggy fajitas. Stick to the 1/2 cup of beef stock recommended in the recipe.
  • Using the Wrong Cut of Steak: Tougher cuts of steak, like round steak, can become dry and chewy in the Instant Pot. Stick to sirloin or flank steak for the best results. Venison steak instant pot is an option, but may require some modifications to the cooking time.
  • Not Seasoning Properly: Fajitas are all about bold, vibrant flavors. Don’t be shy with the taco seasoning!
  • Overfilling the Instant Pot: Overfilling the Instant Pot can prevent it from reaching pressure and can result in unevenly cooked fajitas. Make sure to leave enough space for the steam to circulate.

Variations and Add-Ins

One of the best things about fajitas is how versatile they are. Feel free to get creative and add your own personal touch to this recipe. Here are a few variations and add-ins to inspire you.

  • Chicken Fajitas: Substitute the steak with chicken breast or chicken thighs for a lighter option.
  • Shrimp Fajitas: Use shrimp instead of steak for a seafood twist. Reduce the cooking time to 2 minutes, as shrimp cooks very quickly.
  • Vegetarian Fajitas: Omit the steak and add extra vegetables, such as mushrooms, zucchini, and corn.
  • Spicy Fajitas: Add a diced jalapeño or a pinch of cayenne pepper to the Instant Pot for a spicy kick.
  • Bell Pepper Variations: Experiment with different colored bell peppers. Red, yellow, and orange bell peppers are sweeter than green bell peppers.
  • Add Beans: Stir in a can of black beans or pinto beans for added protein and fiber.
  • Different Steak Cuts: While sirloin and flank steak are great, you can also use skirt steak or even a top round steak recipes instant pot, just adjust cooking times as needed.

Serving Suggestions

Fajitas are a complete meal on their own, but here are a few serving suggestions to make your fajita experience even more enjoyable.

  • Tortillas: Serve the fajitas with warm tortillas. Corn or flour tortillas both work well.
  • Toppings: Offer a variety of toppings, such as sour cream, guacamole, salsa, shredded cheese, and chopped cilantro.
  • Sides: Serve the fajitas with a side of Mexican rice, refried beans, or a fresh salad.
  • Drinks: Pair the fajitas with a refreshing margarita, a cold beer, or a glass of iced tea.
  • Dessert: Finish off the meal with a sweet treat, such as churros, flan, or a slice of tres leches cake.

How to Store and Reheat Leftovers

If you happen to have any leftovers (which is rare in my house!), here’s how to store and reheat them properly.

  • Storage: Store the leftover fajitas in an airtight container in the refrigerator for up to 3-4 days.
  • Reheating: Reheat the fajitas in a skillet over medium heat, stirring occasionally, until heated through. You can also reheat them in the microwave, but be careful not to overcook them.
  • Freezing: For longer storage, you can freeze the leftover fajitas for up to 2-3 months. Thaw them in the refrigerator overnight before reheating.

Frequently Asked Questions (FAQ)

Got questions? I’ve got answers! Here are some frequently asked questions about making Instant Pot Steak Fajitas.

  • Can I use frozen steak?: While it’s best to use fresh steak for the best texture, you can use frozen steak in a pinch. Just make sure to thaw it completely before cooking.
  • Can I make this recipe without an Instant Pot?: Yes, you can make this recipe in a skillet on the stovetop. Just sauté the steak and vegetables until they are cooked through.
  • Can I use a different type of seasoning?: Absolutely! Feel free to experiment with different seasonings, such as chili powder, cumin, or smoked paprika.
  • How do I prevent the steak from becoming tough?: The key is to avoid overcooking the steak. Five minutes on high pressure is usually perfect, but you may need to adjust the cooking time depending on the thickness of your steak strips.
  • Can I add other vegetables?: Of course! Feel free to add other vegetables, such as mushrooms, zucchini, or corn.
  • Is this recipe gluten-free?: Yes, this recipe is naturally gluten-free. Just make sure to use gluten-free taco seasoning.

I hope these FAQs have been helpful! If you have any other questions, feel free to leave a comment below.

Final Thoughts

So there you have it—my quick and easy recipe for Instant Pot Steak Fajitas! I hope you’ll give it a try and let me know what you think. These instant pot fajitas are a guaranteed crowd-pleaser. Remember, cooking is all about having fun and experimenting with flavors. Don’t be afraid to get creative and add your own personal touch to this recipe. And most importantly, enjoy the process and savor every bite!

Whether you’re cooking for your family, impressing friends, or just treating yourself, I hope this recipe brings a little magic to your kitchen. Until next time, happy cooking!

Ava

Instant Pot Steak Fajitas

Prep Time 15 minutes
Cook Time 20 minutes
Total Time 35 minutes
Servings 4 servings
Calories 350
Quick and easy steak fajitas made in the Instant Pot! Tender steak and flavorful peppers and onions make this a weeknight favorite.

Ingredients

Ingredients

  • 1/2 cup beef stock
  • 1 lbs sirloin steak or flank steak (cut into strips)
  • 1 1/2 tbsp taco seasoning
  • 3 bell peppers (multi-color, deseeded, and sliced into big strips)
  • 1 onion (peeled and cut into half rings)
  • 1-2 limes (Juice of, to suit your taste)

Notes

Serve with your favorite fajita toppings like sour cream, guacamole, and salsa.
Calories: 350kcal
Cost: $18
Course: Main Course
Cuisine: Mexican
Keyword: Steak
pin

Hey there! Ava here, welcoming you back to my kitchen. If you’re anything like me, you’re always on the lookout for meals that are both exciting and easy to whip up after a long day. Well, look no further! Today, we’re diving headfirst into a dish that’s bursting with flavor, customizable to your spice preference, and guaranteed to impress: Shrimp and Steak Fajitas! This isn’t just a recipe; it’s an invitation to a fiesta in your kitchen.

Growing up, fajitas were a staple at our family gatherings. My mom always had a knack for throwing together the most amazing spreads, filled with vibrant colors and even bolder flavors. Now, I’m bringing that same magic to your table. Whether you’re a seasoned cook or just starting out, this guide will walk you through every step to create the perfect fajita experience.

Why You’ll Love This Shrimp and Steak Fajitas Recipe

Seriously, what’s not to love? But if you need convincing, here are a few reasons why this recipe will become a regular in your meal rotation:

  • Quick and Easy: From prep to plate, you’re looking at about 30 minutes. Perfect for busy weeknights!
  • Customizable: Don’t like steak? Use chicken! Want it spicier? Add more jalapeños! This recipe is your canvas.
  • Crowd-Pleaser: Everyone loves fajitas. They’re interactive, fun, and utterly delicious.
  • Versatile: Serve them in tortillas, over rice, or even as a salad topping. The possibilities are endless!

This dish is all about bold flavors and fresh ingredients, making it a satisfying and healthy option. And let’s be honest, there’s something incredibly satisfying about assembling your own fajita, piling it high with your favorite toppings. It’s a meal that brings people together, sparking conversation and creating memories. Fajitas are a guaranteed good time!

Ingredients You’ll Need

Let’s gather our ingredients. Don’t worry if you need to make substitutions; this recipe is very forgiving!

  • 1 lb Shrimp (peeled and deveined)
  • 1 lb Sliced Sirloin (or substitute with boneless, skinless chicken breast sliced into strips)
  • 1 tbsp Chili Powder
  • 1 tsp Cayenne Pepper (adjust to taste for spice level)
  • 1 tsp Onion Powder
  • 1 tsp Garlic Powder
  • 1 tsp Cumin
  • 2 tsp Smoked Paprika
  • 2 Bell Peppers (sliced, any color)
  • 3 Jalapeños (sliced, adjust based on spice preference)
  • 1 Onion (sliced)
  • 1 tbsp Soy Sauce
  • Olive Oil (for cooking)
  • Flour or Corn Tortillas (for serving)
  • 1 Avocado
  • ½ cup Sour Cream (or Greek yogurt for a healthier option)
  • 2 cloves Garlic
  • ¼ cup Cilantro (fresh)
  • Salt to taste
  • 1 tbsp Lime Juice
Recipe Image

Step-by-Step Instructions: Let’s Get Cooking!

Alright, let’s get down to business. Follow these simple steps, and you’ll be enjoying delicious shrimp and steak fajitas in no time!

Step 1: Prep the Proteins

  • Pat the shrimp and steak dry with a paper towel. This helps them sear properly and prevents steaming in the pan.
  • Divide the shrimp and steak into separate bowls. If using chicken instead of steak, follow the same process.

Step 2: Season Generously

  • In a small bowl, mix together the chili powder, cayenne pepper, onion powder, garlic powder, cumin, smoked paprika, and salt.
  • Sprinkle half of the spice mixture over the steak (or chicken) and the other half over the shrimp. Make sure everything is well coated.
  • Add soy sauce to the steak and mix well.

Step 3: Sauté the Veggies

  • Heat a tablespoon of olive oil in a large skillet or cast-iron pan over medium-high heat.
  • Add the sliced bell peppers, jalapeños, and onion to the pan.
  • Sauté until the vegetables are tender-crisp and slightly charred, about 8-10 minutes. Remove from the pan and set aside.

Step 4: Cook the Steak (or Chicken)

  • Add another tablespoon of olive oil to the same skillet.
  • Add the seasoned steak (or chicken) to the pan in a single layer. Don’t overcrowd the pan; cook in batches if necessary.
  • Sear for 2-3 minutes per side for medium-rare, or longer if you prefer it more well-done. Remove from the pan and set aside.

Step 5: Cook the Shrimp

  • Add another tablespoon of olive oil to the skillet.
  • Add the seasoned shrimp to the pan in a single layer.
  • Cook for 2-3 minutes per side, until pink and opaque. Be careful not to overcook the shrimp, as they can become rubbery. Remove from the pan.

Step 6: Combine and Serve

  • Return the cooked vegetables and steak (or chicken) to the skillet with the shrimp.
  • Toss everything together to combine.
  • Squeeze lime juice over the mixture and stir well.
  • Serve immediately with warm tortillas and your favorite toppings!

Pro Tips for Perfect Fajitas

Want to take your fajitas to the next level? Here are a few of my favorite tips:

  • Marinate for Maximum Flavor: If you have time, marinate the steak (or chicken) for at least 30 minutes before cooking. This will infuse it with even more flavor and make it extra tender.
  • Use a Hot Pan: A hot pan is key to getting that beautiful sear on the steak and shrimp. Make sure the pan is preheated before adding the ingredients.
  • Don’t Overcrowd the Pan: Overcrowding the pan will cause the ingredients to steam instead of sear. Cook in batches if necessary.
  • Warm Your Tortillas: Warm tortillas are softer and more pliable, making them easier to fold. You can warm them in a dry skillet, in the microwave, or wrapped in foil in the oven.
  • Get Creative with Toppings: Don’t be afraid to experiment with different toppings. Some of my favorites include guacamole, pico de gallo, shredded cheese, and pickled onions.

Common Mistakes to Avoid

Even experienced cooks make mistakes! Here are a few common pitfalls to watch out for:

  • Overcooking the Shrimp: Overcooked shrimp is tough and rubbery. Cook it just until it turns pink and opaque.
  • Not Drying the Protein: Drying the steak and shrimp with a paper towel is crucial for getting a good sear.
  • Overcrowding the Pan: As mentioned before, overcrowding the pan will lead to steaming instead of searing.
  • Using Dull Knives: Sharp knives make prepping the vegetables much easier and safer.
  • Forgetting to Season: Don’t be afraid to season generously! This is where the bold flavors come from.

Variations to Keep Things Interesting

One of the best things about fajitas is how easy they are to customize. Here are a few variations to try:

  • Chicken and Steak or Chicken Fajitas: Swap the steak for chicken or combine both for a surf-and-turf extravaganza!
  • Vegetarian Fajitas: Use mushrooms, zucchini, and other vegetables instead of meat.
  • Spicy Fajitas: Add more cayenne pepper or a pinch of chili flakes to the spice mixture.
  • Grilled Fajitas: Grill the steak, shrimp, and vegetables for a smoky flavor. Shrimp fajitas on the griddle are a great option for outdoor cooking.
  • Steak and Shrimp Fajitas Skillet: Serve the fajitas directly in the skillet for a rustic presentation.

Remember, cooking is all about experimenting and finding what you love. Don’t be afraid to put your own spin on this recipe and make it your own!

Storage Tips for Leftovers

If you’re lucky enough to have leftovers, here’s how to store them properly:

  • Refrigerate: Store the cooked steak, shrimp, and vegetables in an airtight container in the refrigerator for up to 3 days.
  • Reheat: Reheat in a skillet over medium heat or in the microwave until warmed through.
  • Freezing: While not ideal, you can freeze the cooked steak and vegetables for up to 2 months. The shrimp may become a bit rubbery after freezing.

Frequently Asked Questions (FAQ)

Got questions? I’ve got answers! Here are some common questions about making shrimp and steak fajitas:

  • Can I use frozen shrimp? Yes, but make sure to thaw them completely and pat them dry before cooking.
  • Can I use a different cut of steak? Yes, flank steak, skirt steak, or even sirloin steak will work well.
  • Can I make this recipe ahead of time? You can prep the vegetables and marinate the steak ahead of time, but it’s best to cook the fajitas right before serving.
  • What kind of tortillas should I use? Flour or corn tortillas both work well. It’s a matter of personal preference.
  • Is there a good shrimp fajita marinade I can use? Yes! A simple marinade of lime juice, olive oil, garlic, and spices works wonders.

Serving Suggestions: Complete the Fiesta!

No fajita feast is complete without the right sides and toppings! Here are some of my go-to serving suggestions:

  • Toppings: Guacamole, pico de gallo, sour cream, shredded cheese, pickled onions, cilantro, and lime wedges.
  • Sides: Rice and beans, Mexican street corn, tortilla chips and salsa, and a refreshing margarita.

Remember, the key to a great meal is to have fun and enjoy the process. So put on some music, gather your friends and family, and get ready to create some unforgettable memories around the table. This dish is something truly special about bringing people together!

So, there you have it—my ultimate guide to making shrimp and steak fajitas. I hope you enjoy this recipe as much as my family and I do. Now, go forth and create some magic in your kitchen! Until next time, happy cooking!

Shrimp and Steak Fajitas: A Beginner’s Guide to a Flavorful, Quick, and Easy Meal

Prep Time 15 minutes
Cook Time 15 minutes
Total Time 30 minutes
Servings 4 people
Calories 450
Enjoy a quick and easy meal with these flavorful shrimp and steak fajitas. Perfect for a weeknight dinner, this recipe is customizable to your spice preference.

Ingredients

Fajita Ingredients

  • 1 lb Shrimp (peeled and deveined)
  • 1 lb Sliced Sirloin (or substitute with boneless, skinless chicken breast sliced into strips)
  • 1 tbsp Chili Powder
  • 1 tsp Cayenne Pepper (adjust to taste for spice level)
  • 1 tsp Onion Powder
  • 1 tsp Garlic Powder
  • 1 tsp Cumin
  • 2 tsp Smoked Paprika
  • 2 Bell Peppers (sliced, any color)
  • 3 Jalapeños (sliced, adjust based on spice preference)
  • 1 Onion (sliced)
  • 1 tbsp Soy Sauce

Serving Ingredients

  • Olive Oil (for cooking)
  • Flour or Corn Tortillas (for serving)
  • 1 Avocado
  • 0.5 cup Sour Cream (or Greek yogurt for a healthier option)
  • 2 cloves Garlic
  • 0.25 cup Cilantro (fresh)
  • to taste Salt
  • 1 tbsp Lime Juice

Instructions 

  • Pat the shrimp and steak dry with a paper towel. This helps them sear properly and prevents steaming in the pan.
  • Divide the shrimp and steak into separate bowls. If using chicken instead of steak, follow the same process.

Notes

Adjust the amount of cayenne pepper and jalapeños to control the spice level.
Calories: 450kcal
Cost: $20
Course: dinner
Cuisine: Mexican
Keyword: shrimp, Steak
pin

Easy Slow Cooker Steak Fajitas Recipe: A Flavor Fiesta in Your Crockpot!

Hey there, fellow food lovers! Ava here, back with another recipe that’s guaranteed to bring a little sunshine to your kitchen. Today, we’re diving headfirst into a world of sizzling flavors with my Easy Slow Cooker Steak Fajitas! If you’re anything like me, the thought of tender, juicy steak, vibrant peppers, and onions mingling together in a symphony of deliciousness probably makes your mouth water. And guess what? This recipe is so simple, even the busiest weeknight won’t stand a chance against it!

I remember the first time I made fajitas. It was a complete disaster! I tried to rush the process, the steak was tough, and the vegetables were unevenly cooked. It was a far cry from the restaurant-style fajitas I was craving. But, as with all cooking adventures, I learned from my mistakes. And that’s how this slow cooker version was born. It’s foolproof, packed with flavor, and requires minimal effort. What’s not to love?

This isn’t just a recipe; it’s an invitation to a flavor fiesta. So, grab your slow cooker, gather your ingredients, and let’s get cooking!

Why You’ll Absolutely Love This Slow Cooker Steak Fajitas Recipe

Okay, so you might be thinking, ‘Why slow cooker fajitas?’ Trust me, there are so many reasons why this recipe is a game-changer. Here are just a few:

  • Effortless Flavor: The slow cooker does all the work! You simply toss everything in, set it, and forget it. The low and slow cooking process allows the flavors to meld together beautifully, resulting in a depth of flavor you just can’t achieve with traditional cooking methods.
  • Tender, Juicy Steak: Say goodbye to tough, chewy steak! The slow cooker transforms even the most budget-friendly cuts into melt-in-your-mouth perfection. The result is incredibly tender and flavorful.
  • Perfect for Meal Prep: This recipe is fantastic for meal prepping. Make a big batch on Sunday, and you’ll have delicious fajitas ready to go for lunch or dinner throughout the week.
  • Customizable: The beauty of fajitas is that they’re totally customizable. Add your favorite toppings, swap out the vegetables, or adjust the spice level to your liking. The possibilities are endless!
  • Crowd-Pleaser: Whether you’re feeding a family of four or hosting a party, these slow cooker steak fajitas are guaranteed to be a hit. They’re easy to serve, fun to eat, and always a crowd-pleaser.

Seriously, once you try this recipe, you’ll never go back to making fajitas any other way. It’s that good!

The Star Players: Ingredients You’ll Need

Alright, let’s talk ingredients! Here’s what you’ll need to create these mouthwatering slow cooker steak fajitas:

  • 2 lbs flank steak, skirt steak, or sirloin steak: This is the heart of our fajitas. I personally love using flank steak for its rich flavor and tenderness, but skirt steak and sirloin work just as well. Ensure that it’s about an inch thick.
  • 1 large onion, sliced: Onions add a touch of sweetness and depth to the fajita mixture. I prefer using yellow onions, but white or red onions will also work.
  • 2 bell peppers (any color), sliced: Bell peppers bring color, crunch, and a slightly sweet flavor to the fajitas. I like to use a combination of red, yellow, and green peppers for visual appeal, but feel free to use your favorites.
  • 1 (1 ounce) package fajita seasoning: This is where all the magic happens! Fajita seasoning provides that classic Tex-Mex flavor we all know and love. You can use store-bought or make your own (I’ll share my favorite homemade recipe later!).
  • 1/2 cup beef broth: Beef broth adds moisture and helps to create a flavorful sauce for the fajitas. You can also use chicken broth or vegetable broth if you prefer.
  • Optional toppings: tortillas, sour cream, guacamole, salsa, shredded cheese: These are the finishing touches that take your fajitas to the next level. Tortillas are a must, of course, and the rest is up to you! I’m a big fan of sour cream, guacamole, and salsa, but feel free to add your favorite toppings.
Recipe Image

Let’s Get Cooking: Step-by-Step Instructions

Okay, are you ready to transform these ingredients into a flavor explosion? Here’s how to make my Easy Slow Cooker Steak Fajitas:

  1. Layer the Veggies: Place the sliced onions and bell peppers in the bottom of the slow cooker. This creates a bed for the steak and prevents it from sticking to the bottom.
  2. Top with Steak: Place the steak on top of the vegetables. Make sure the steak is evenly distributed over the vegetables.
  3. Season Generously: Sprinkle the fajita seasoning evenly over the steak. Don’t be shy with the seasoning – it’s what gives the fajitas their signature flavor.
  4. Add Broth: Pour the beef broth over the steak. This will help to keep the steak moist and tender during the cooking process.
  5. Slow Cook to Perfection: Cover and cook on low for 6-8 hours or on high for 3-4 hours, or until the steak is very tender and easily shreds. The cooking time will vary depending on your slow cooker, so be sure to check the steak periodically.
  6. Shred the Steak: Remove the steak from the slow cooker and shred it with two forks. It should be so tender that it practically falls apart!
  7. Combine and Simmer: Return the shredded steak to the slow cooker and stir to combine with the vegetables and juices. This will allow the steak to soak up all the delicious flavors.
  8. Serve and Enjoy: Serve immediately in warm tortillas with your favorite toppings. Get creative and have fun with it!

And that’s it! You’ve just made the most amazing slow cooker steak fajitas. I told you it was easy!

Ava’s Pro Tips for the Best Slow Cooker Steak Fajitas

Alright, now that you know the basics, let’s dive into some pro tips that will take your slow cooker steak fajitas to the next level:

  • Sear the Steak (Optional): For an extra layer of flavor, sear the steak in a hot skillet before adding it to the slow cooker. This will create a beautiful crust and add a smoky flavor.
  • Don’t Overcook the Steak: Overcooked steak can become dry and tough, even in a slow cooker. Be sure to check the steak periodically and remove it from the slow cooker as soon as it’s tender enough to shred.
  • Use Fresh Vegetables: Fresh vegetables will give you the best flavor and texture. If you’re short on time, you can use frozen vegetables, but be sure to thaw them before adding them to the slow cooker.
  • Homemade Fajita Seasoning: For the ultimate flavor, make your own fajita seasoning. It’s easy to do and you can customize it to your liking. Here’s my go-to recipe: 2 tablespoons chili powder, 1 tablespoon cumin, 1 tablespoon paprika, 1 teaspoon garlic powder, 1 teaspoon onion powder, 1/2 teaspoon oregano, 1/4 teaspoon cayenne pepper, salt and pepper to taste.
  • Warm Your Tortillas: Warm tortillas are a must! You can warm them in a dry skillet, in the microwave, or in the oven.
  • Get Creative with Toppings: Don’t be afraid to get creative with your toppings! Some of my favorites include: sour cream, guacamole, salsa, shredded cheese, pico de gallo, pickled onions, cilantro, and lime wedges.

Common Mistakes to Avoid When Making Slow Cooker Steak Fajitas

Even though this recipe is super easy, there are a few common mistakes that people make. Here’s what to watch out for:

  • Using the Wrong Cut of Steak: The best cuts of steak for slow cooker fajitas are flank steak, skirt steak, and sirloin steak. These cuts are relatively inexpensive and they become incredibly tender when cooked low and slow. Avoid using tougher cuts of steak, as they may not become tender enough in the slow cooker.
  • Not Using Enough Seasoning: Fajita seasoning is essential for giving the fajitas their signature flavor. Don’t be shy with the seasoning – use a generous amount to ensure that the steak and vegetables are well-flavored.
  • Adding Too Much Liquid: The slow cooker creates a lot of moisture, so you don’t need to add a lot of liquid. Half a cup of beef broth is usually enough to keep the steak moist without making the fajitas too soupy.
  • Overcooking the Vegetables: Overcooked vegetables can become mushy and unappetizing. To prevent this, add the vegetables to the slow cooker at the same time as the steak. They will cook perfectly alongside the steak.
  • Serving with Cold Tortillas: Cold tortillas can ruin the entire fajita experience. Be sure to warm your tortillas before serving.

Spice It Up: Delicious Variations on This Recipe

One of the best things about fajitas is that they’re so versatile. Here are a few delicious variations to try:

  • Chicken Fajitas: Substitute the steak with chicken breasts or thighs. Follow the same instructions, but reduce the cooking time to 4-6 hours on low or 2-3 hours on high.
  • Shrimp Fajitas: Add shrimp to the slow cooker during the last 30 minutes of cooking. Be careful not to overcook the shrimp, as they can become rubbery.
  • Vegetarian Fajitas: Omit the steak and add more vegetables, such as mushrooms, zucchini, and corn. You can also add a can of black beans or pinto beans for extra protein.
  • Spicy Fajitas: Add a pinch of cayenne pepper or a few chopped jalapeños to the slow cooker for a spicy kick.
  • Sweet and Savory Fajitas: Add a tablespoon of brown sugar or honey to the slow cooker for a touch of sweetness.

The possibilities are endless! Get creative and experiment with different ingredients and flavors to find your perfect fajita combination.

Storing and Reheating Your Slow Cooker Steak Fajitas

Got leftovers? No problem! Here’s how to store and reheat your slow cooker steak fajitas:

  • Storage: Allow the fajitas to cool completely before storing them in an airtight container in the refrigerator. They will keep for up to 3-4 days.
  • Reheating: You can reheat the fajitas in the microwave, in a skillet, or in the oven. To reheat in the microwave, simply microwave for 1-2 minutes, or until heated through. To reheat in a skillet, heat a small amount of oil over medium heat and cook the fajitas for 5-7 minutes, or until heated through. To reheat in the oven, preheat the oven to 350°F (175°C) and bake the fajitas for 10-15 minutes, or until heated through.

Leftover fajitas are also great for making burrito bowls, salads, and quesadillas. Get creative and use them in your favorite recipes!

Frequently Asked Questions About Slow Cooker Steak Fajitas

Got questions? I’ve got answers! Here are some frequently asked questions about slow cooker steak fajitas:

  • Can I use frozen steak? While it’s best to use fresh steak for optimal flavor and texture, you can use frozen steak if you’re in a pinch. Be sure to thaw the steak completely before adding it to the slow cooker.
  • Can I use pre-cut fajita vegetables? Yes, you can use pre-cut fajita vegetables to save time. Just be sure to check the expiration date and wash the vegetables thoroughly before adding them to the slow cooker.
  • Can I make this recipe ahead of time? Yes, you can make this recipe ahead of time. Simply cook the fajitas according to the instructions, then store them in the refrigerator until you’re ready to serve. Reheat the fajitas according to the instructions above.
  • Can I freeze this recipe? Yes, you can freeze this recipe. Allow the fajitas to cool completely before storing them in a freezer-safe container. They will keep for up to 2-3 months. Thaw the fajitas in the refrigerator overnight before reheating.
  • My fajitas are too watery. What can I do? If your fajitas are too watery, you can drain off some of the excess liquid after cooking. You can also add a tablespoon of cornstarch to the slow cooker during the last 30 minutes of cooking to thicken the sauce.

Serving Suggestions: Complete Your Fajita Fiesta!

Now that your slow cooker steak fajitas are ready, it’s time to serve them up and enjoy! Here are some serving suggestions to complete your fajita fiesta:

  • Warm Tortillas: Warm tortillas are a must! Serve the fajitas with warm flour or corn tortillas.
  • Toppings Galore: Offer a variety of toppings for your guests to choose from, such as sour cream, guacamole, salsa, shredded cheese, pico de gallo, pickled onions, cilantro, and lime wedges.
  • Sides: Serve the fajitas with a side of Mexican rice, refried beans, or black beans.
  • Drinks: Pair the fajitas with your favorite Mexican-inspired drinks, such as margaritas, cervezas, or agua fresca.
  • Dessert: Finish off the meal with a sweet treat, such as churros, flan, or tres leches cake.

Remember, the most important thing is to have fun and enjoy the deliciousness of your homemade slow cooker steak fajitas! I often think about how the grill adds such amazing flavor, but this recipe gives similar flavor without needing one. There s something special about how the slow cooker tenderizes the meat. Using a slow cooker makes this recipe so easy, you re going to wonder why you haven’t tried it before.

And that s a wrap, friends! I hope you enjoyed this recipe for Easy Slow Cooker Steak Fajitas. Whether you re cooking for a crowd or just treating yourself to a delicious meal, these fajitas are sure to be a hit. Don t forget to share your creations with me on social media – I love seeing what you come up with! Until next time, happy cooking!

The steak is so tender, it s almost unbelievable how easy this recipe is. Steak fajitas are a classic, and this crockpot version is a game-changer. The meat practically melts in your mouth. There s no need to stand over a hot stove; just set it and forget it! That s why I love this recipe. Sour cream and guacamole are a must for toppings. You won t be disappointed with the flavor. If you re looking for an easy dinner, this is it! Cut the steak into strips for easy serving. For fajitas, this recipe is perfect. After cooking, the steak is so tender. When you take your first bite, you ll be amazed. A few simple steps and you have a delicious meal. Vegetables in the slow cooker become so flavorful. For serving, warm tortillas are essential. Ree s recipe is great, but this slow cooker version is even easier. Cut the steak after it’s cooked to make it easy to serve. For a few minutes of prep, you get hours of deliciousness. A few toppings can really elevate the dish.

This recipe requires the steak to be about an inch thick for optimal results. Of meat, flank steak is the best choice. The vegetables in the slow cooker become incredibly tender. You re going to love this recipe. It s so easy to make. There s no need to worry about overcooking the steak. Using a slow cooker makes this recipe foolproof. Cut the vegetables into even slices for even cooking. For fajitas, you can use any type of bell pepper. After cooking, let the steak rest for a few minutes before shredding. When you re ready to serve, the steak should be incredibly tender. A few simple steps are all it takes to make this delicious meal. Vegetables in the slow cooker absorb all the flavors from the steak and seasoning. For serving, add your favorite toppings. Ree s recipe is delicious, but this slow cooker version is even more convenient. Cut the steak against the grain for maximum tenderness. For a few minutes of prep, you get hours of delicious flavor. A few toppings can really make a difference in the overall taste.

I hope this recipe brings as much joy to your kitchen as it has to mine. Happy cooking, friends!

Slow Cooker Steak Fajita Recipe

Prep Time 15 minutes
Cook Time 7 hours
Total Time 7 hours 15 minutes
Servings 6 servings
Calories 350
Enjoy delicious and tender steak fajitas with minimal effort using your slow cooker. This recipe is perfect for a weeknight meal and can be customized with your favorite toppings.

Ingredients

Ingredients

  • 2 lbs flank steak, skirt steak, or sirloin steak
  • 1 large onion (sliced)
  • 2 bell peppers (any color, sliced)
  • 1 ounce fajita seasoning
  • 0.5 cup beef broth

Optional Toppings

  • tortillas
  • sour cream
  • guacamole
  • salsa
  • shredded cheese

Instructions 

  • Place sliced onions and bell peppers in the bottom of the slow cooker.
  • Place steak on top of the vegetables.
  • Sprinkle fajita seasoning evenly over the steak.
  • Pour beef broth over the steak.
  • Cover and cook on low for 6-8 hours or on high for 3-4 hours, or until the steak is very tender and easily shreds.
  • Remove steak from slow cooker and shred with two forks.
  • Return shredded steak to the slow cooker and stir to combine with the vegetables and juices.
  • Serve immediately in warm tortillas with your favorite toppings.

Notes

For extra flavor, sear the steak before placing it in the slow cooker.
Calories: 350kcal
Cost: $20
Course: Main Course
Cuisine: Mexican
Keyword: Steak
pin

Hey there, friend! Ava here, and I’m beyond excited to share one of my absolute go-to recipes for busy weeknights: Sheet Pan Steak Fajitas. If you’re anything like me, you crave delicious, home-cooked meals but don’t always have hours to spend in the kitchen. This recipe is the answer! It’s quick, easy, and packed with flavor. Plus, the cleanup is a breeze. Honestly, what’s not to love?

Growing up, fajitas were always a special occasion meal. My mom would spend hours marinating the steak and prepping all the fixings. While I cherish those memories, I wanted to create a version that fits into my fast-paced Seattle life. And that’s how these oven-baked sheet pan steak fajitas were born. They capture all the deliciousness of traditional fajitas with minimal effort. So, let’s get cooking!

Why You’ll Love This Sheet Pan Steak Fajitas Recipe

Okay, let’s be real. We all want dinner to be easy, delicious, and relatively healthy. This recipe ticks all those boxes. But here’s a more detailed breakdown of why I think you’ll absolutely adore these sheet pan steak fajitas:

  • Quick & Easy: Seriously, from prep to plate, you’re looking at about 35-40 minutes. Perfect for those nights when you’re short on time.
  • Minimal Cleanup: Everything cooks on one sheet pan! Less dishes equals more happiness, right?
  • Customizable: Feel free to adjust the veggies and spices to your liking. I’ll share some fun variations later on.
  • Healthy & Delicious: Packed with protein and colorful veggies, these fajitas are a nutritious and satisfying meal.
  • Crowd-Pleaser: Whether you’re cooking for your family or entertaining friends, these fajitas are always a hit.

Ingredients You’ll Need

Here’s what you’ll need to whip up these amazing sheet pan steak fajitas. I always try to use high quality ingredients whenever possible, as it really makes a difference in the final flavor. Don’t worry, I’ll also offer some suggestions for substitutions and variations later on.

  • 2 steak filets (I like to use flank steak or skirt steak, but sirloin works too)
  • 3 bell peppers (any color you like; I usually go for a mix)
  • 1 sweet onion
  • 1 lime
  • 2 tbsp taco seasoning (I like to make my own, but store-bought is fine too)
  • 2 tbsp avocado oil (or olive oil)
Recipe Image

Pro Tips for Perfect Sheet Pan Steak Fajitas

Alright, let’s talk about some pro tips that will take your sheet pan steak fajitas to the next level. These are the little things I’ve learned over time that make a big difference in the final result.

  • Don’t Overcrowd the Pan: Make sure the steak and veggies are spread out in a single layer. Overcrowding will cause them to steam instead of roast. If needed, use two sheet pans.
  • Preheat the Oven Properly: A hot oven is essential for getting that nice char on the steak and veggies. Make sure your oven is fully preheated before you put the sheet pan in.
  • Use High Heat: 400°F (200°C) is the sweet spot for these fajitas. It’s hot enough to cook the steak quickly and caramelize the veggies.
  • Season Generously: Don’t be shy with the taco seasoning! It’s what gives the fajitas their signature flavor.
  • Let the Steak Rest: After cooking, let the steak rest for a few minutes before slicing. This allows the juices to redistribute, resulting in a more tender and flavorful steak.

How to Make Sheet Pan Steak Fajitas: Step-by-Step

Here’s a detailed breakdown of how to make these delicious sheet pan steak fajitas. Don’t worry, it’s super easy! I promise.

  1. Preheat oven to 400 °F (200°C) and gather ingredients. Make sure you have everything prepped and ready to go before you start.
  2. Chop the peppers and onions. I like to slice them into strips about 1/4-inch thick.
  3. Slice the steak filets. Aim for slices that are about 1/4-inch thick as well. This ensures they cook evenly.
  4. Arrange steak and vegetables on sheet pan. Spread them out in a single layer. If you’re using two sheet pans, divide the ingredients evenly between them.
  5. Season with lime, avocado oil and taco seasoning. Drizzle the avocado oil over the steak and veggies, then sprinkle generously with taco seasoning. Squeeze the juice of one lime over everything.
  6. Bake for 25-30 minutes, or until steak if cooked to your preference. Keep an eye on the steak and veggies. You want them to be nicely browned and tender.
  7. Serve with avocado, beans, tortillas and lettuce! Warm the tortillas before serving for the best experience.

Common Mistakes to Avoid

Even though this recipe is super easy, there are a few common mistakes that people make. Here’s what to watch out for:

  • Overcooking the Steak: Steak can go from perfectly cooked to tough and chewy in a matter of minutes. Use a meat thermometer to ensure it’s cooked to your liking.
  • Not Using Enough Taco Seasoning: Taco seasoning is key to the flavor of these fajitas. Don’t be afraid to use a generous amount.
  • Skipping the Lime Juice: The lime juice adds a brightness and acidity that balances out the richness of the steak and veggies.
  • Not Letting the Steak Rest: As I mentioned earlier, letting the steak rest is crucial for a tender and juicy result.

Delicious Variations to Try

One of the best things about this recipe is how easily it can be customized. Here are a few variations to try:

  • Chicken Fajitas: Substitute chicken breasts or thighs for the steak. Adjust the cooking time as needed.
  • Shrimp Fajitas: Use shrimp instead of steak. Shrimp cooks very quickly, so reduce the cooking time accordingly.
  • Vegetarian Fajitas: Add more veggies, such as mushrooms, zucchini, or corn. You can also add black beans or pinto beans for extra protein.
  • Spicy Fajitas: Add a pinch of cayenne pepper or a few chopped jalapeños to the taco seasoning for an extra kick.
  • Dairy Free Fajitas: To make these fajitas dairy free, simply omit any dairy-based toppings like sour cream or cheese. The recipe is already naturally gluten free, but be sure to check your taco seasoning to ensure it is gluten free and dairy free.

How to Store and Reheat Leftovers

If you have any leftovers (which is rare in my house!), you can store them in an airtight container in the refrigerator for up to 3 days. To reheat, simply warm them up in a skillet or microwave until heated through. The leftovers are also great in salads or omelets!

Frequently Asked Questions (FAQ)

Here are some frequently asked questions about this recipe:

  • Can I use frozen vegetables? I recommend using fresh vegetables for the best flavor and texture, but frozen vegetables will work in a pinch. Just be sure to thaw them completely before using.
  • Can I make my own taco seasoning? Absolutely! I actually prefer making my own taco seasoning. There are tons of recipes online.
  • Can I use a different type of steak? Yes, you can use any type of steak you like. Flank steak, skirt steak, and sirloin are all good options.
  • Can I make this recipe ahead of time? You can chop the vegetables and slice the steak ahead of time, but I recommend cooking the fajitas right before serving for the best flavor and texture.

Serving Suggestions

These sheet pan steak fajitas are delicious on their own, but they’re even better with all the fixings! Here are some of my favorite serving suggestions:

  • Warm Tortillas: Corn or flour tortillas, your choice!
  • Toppings: Avocado, sour cream, salsa, cheese, guacamole, chopped cilantro, diced onions, lime wedges. I like to use a little bit of everything!
  • Sides: Refried beans, rice, or a simple salad. And don’t forget the chips and salsa!

There you have it! My go-to recipe for easy weekday sheet pan steak fajitas. I hope you love it as much as I do! If you try it, be sure to let me know in the comments below. And don’t forget to tag me in your photos on social media. Happy cooking!

The Best Easy Weekday Sheet Pan Steak Fajitas (Oven-Baked)

Prep Time 15 minutes
Cook Time 30 minutes
Total Time 45 minutes
Servings 4 people
Calories 450
Enjoy delicious and easy steak fajitas made on a sheet pan! This recipe is perfect for a quick and flavorful weekday meal.

Ingredients

Ingredients

  • 2 steak filets
  • 3 bell peppers
  • 1 sweet onion
  • 1 lime
  • 2 tbsp taco seasoning
  • 2 tbsp avocado oil

Instructions 

  • Preheat oven to 400 °F and gather ingredients.
  • Chop the peppers and onions.
  • Slice the steak filets.
  • Arrange steak and vegetables on sheet pan and season with lime, avocado oil and taco seasoning. Bake for 25-30 minutes, or until steak if cooked to your preference. Serve with avocado, beans, tortillas and lettuce!

Notes

Adjust cooking time based on your preferred steak doneness.
Calories: 450kcal
Cost: $20
Course: dinner
Cuisine: Mexican
Keyword: Steak
pin

Hey there, burger aficionados! Ava here, ready to spill the beans on a recipe that’s taken my kitchen by storm: Crack Burgers. Yes, you read that right. Crack. Burgers. Don’t worry, there’s nothing illegal going on here – just an incredibly addictive combination of flavors that will have you craving these juicy patties every time. I stumbled upon a similar recipe years ago, tweaked it, and now, it’s a staple at every summer barbecue and cozy winter night in. It’s a testament to how simple ingredients, when combined perfectly, can create something truly extraordinary. And trust me, these are extraordinary!

Growing up, my mom always said the best meals are the ones made with love, and that’s exactly what these Crack Burgers embody. They’re packed with so much flavor, it’s almost unfair. The secret? A creamy, cheesy mixture that transforms ordinary ground beef into something truly special. So, ditch the boring burgers and get ready to experience a taste sensation that will have everyone begging for your recipe.

Why You’ll Love This Crack Burger Recipe

Seriously, what’s not to love? But let’s break it down:

  • Flavor Explosion: The combination of sour cream, ranch dressing mix, bacon, and cheddar cheese creates a symphony of flavors that will dance on your taste buds.
  • Incredibly Moist: The sour cream keeps the burgers unbelievably juicy, even when cooked well-done. You don’t have to worry about dry, crumbly burgers ever again!
  • Easy to Make: This recipe is so simple, even a beginner can nail it. It’s perfect for a quick weeknight dinner or a weekend cookout.
  • Crowd-Pleaser: These burgers are always a hit, no matter who you’re serving. They’re guaranteed to be the star of any gathering.
  • Customizable: You can easily adapt this recipe to suit your preferences. Swap out the cheese, add different spices, or use a different type of meat – the possibilities are endless!

These Crack Burgers are truly a game-changer. They’re the kind of recipe that becomes a family favorite, passed down through generations. And honestly, that’s what I love most about sharing my recipes with you all. It’s about creating those memories, those moments around the table where everyone is happy and well-fed.

Crack Burgers Ingredients

  • 1 ½ lb ground chuck: The foundation of our delicious burgers.
  • 3 Tbsp sour cream: This adds moisture and a tangy flavor.
  • 2 Tbsp ranch dressing mix: The secret ingredient that brings everything together.
  • ⅓ cup cooked and crumbled turkey bacon: Adds a smoky, savory crunch.
  • 1 cup shredded cheddar cheese: For that melty, cheesy goodness.
  • Hamburger buns: Your choice of buns to hold these amazing burgers.
  • Lettuce, tomato, mustard, mayo (for topping): The classic burger toppings to complete the experience.
Recipe Image

How to Make Crack Burgers: Step-by-Step

Alright, let’s get cooking! Here’s how to create these addictive Crack Burgers, step-by-step. Don’t worry, it’s easier than you think!

  1. Combine Ingredients: In a large bowl, combine the ground chuck, sour cream, ranch dressing mix, crumbled turkey bacon, and shredded cheddar cheese. Mix until well combined. Use your hands or a sturdy spoon to mix the ingredients thoroughly. Beginner Note: Don’t overmix the meat, as this can result in tough burgers. Mix just until the ingredients are evenly distributed. Ensure all ingredients are well incorporated for a consistent flavor.
  2. Form Patties: Form the mixture into 6 hamburger patties. To ensure even cooking, try to make the patties the same size and thickness. Use a burger press or the lid of a container to help shape the patties. Press a small dimple in the center of each patty before grilling. This will help prevent the burgers from puffing up in the middle. Beginner Note: Wet your hands with cold water before forming the patties to prevent the meat from sticking. Make sure the patties are not too thick, or they will take longer to cook.
  3. Grill the Patties: Grill the patties to your desired doneness, being careful as the burgers will be very moist. Use a grill pan, outdoor grill, or even a skillet on the stovetop. Cook the burgers over medium heat. Flip them carefully to avoid breaking. Use a meat thermometer to check the internal temperature. For medium-rare burgers, cook to 130-135°F. For medium burgers, cook to 140-145°F. For well-done burgers, cook to 160°F. Don’t press down on the patties while they are grilling, as this will release the juices and make the burgers dry. Beginner Note: Preheat the grill or skillet before adding the patties. Use a timer to ensure even cooking. Let the burgers rest for a few minutes after grilling to allow the juices to redistribute.
  4. Serve and Enjoy: Serve the burgers on your favorite hamburger buns, topped with lettuce, tomato, mustard, and mayo. You can add other toppings, such as pickles, onions, avocado, or your favorite condiments. Beginner Note: Toast the buns for a crispier texture. Consider using a variety of toppings to create a unique burger experience.

And that’s it! You’ve just created Crack Burgers. I promise, they’re worth every single bite. The beauty of this recipe is in its simplicity. It’s the kind of meal you can throw together on a busy weeknight and still feel like you’re treating yourself to something special. It’s a little bit of magic, right there on your plate.

Pro Tips for the Best Crack Burgers

Want to take your Crack Burgers to the next level? Here are a few pro tips from my kitchen to yours:

  • Use High-Quality Ground Beef: The better the beef, the better the burger. Look for ground chuck with a good amount of marbling for the most flavorful and juicy results.
  • Don’t Overmix: Overmixing the meat can result in tough burgers. Mix just until the ingredients are evenly distributed.
  • Chill the Patties: If you have time, chill the patties in the refrigerator for 30 minutes before grilling. This will help them hold their shape and prevent them from falling apart.
  • Use a Meat Thermometer: A meat thermometer is your best friend when it comes to grilling burgers. It ensures they’re cooked to your desired doneness every time.
  • Let the Burgers Rest: After grilling, let the burgers rest for a few minutes before serving. This allows the juices to redistribute, resulting in a more flavorful and juicy burger.

These little tricks can make a big difference in the final result. It’s all about paying attention to the details and taking your time. Remember, cooking should be fun, so don’t be afraid to experiment and find what works best for you.

Common Mistakes to Avoid

Even the best cooks make mistakes, but here are a few common pitfalls to avoid when making Crack Burgers:

  • Overcooking the Burgers: Dry burgers are a crime! Use a meat thermometer and cook to your desired doneness.
  • Pressing Down on the Patties While Grilling: This releases the juices and makes the burgers dry. Resist the urge to press down!
  • Using Too Much Ranch Dressing Mix: Too much ranch can overpower the other flavors. Stick to the recommended amount.
  • Skipping the Sour Cream: The sour cream is essential for keeping the burgers moist. Don’t leave it out!
  • Not Preheating the Grill: A preheated grill ensures even cooking and prevents the burgers from sticking.

Learning from mistakes is part of the cooking journey. Don’t be discouraged if your first attempt isn’t perfect. Just keep practicing, and you’ll be a Crack Burger pro in no time!

Crack Burger Variations

Want to mix things up? Here are a few variations on the classic Crack Burger recipe:

  • Spicy Crack Burgers: Add a pinch of cayenne pepper or a dash of hot sauce to the meat mixture for a spicy kick.
  • Garlic Parmesan Crack Burgers: Add minced garlic and grated Parmesan cheese to the meat mixture for an Italian-inspired twist.
  • Jalapeño Popper Crack Burgers: Add diced jalapeños and cream cheese to the meat mixture for a flavor explosion.
  • Bacon Cheddar Ranch Turkey Burgers: Substitute ground turkey for the ground beef for a leaner option.
  • Mushroom Swiss Crack Burgers: Top the burgers with sautéed mushrooms and Swiss cheese for a gourmet touch.

The beauty of this recipe is that it’s so versatile. Feel free to get creative and experiment with different flavors and ingredients. You might just discover your new favorite burger combination!

How to Store Leftover Crack Burgers

If you happen to have any leftover Crack Burgers (which is rare!), here’s how to store them:

  • Refrigerate: Store cooked burgers in an airtight container in the refrigerator for up to 3-4 days.
  • Freeze: For longer storage, wrap the burgers individually in plastic wrap and then place them in a freezer bag. Freeze for up to 2-3 months.

To reheat, simply microwave the burgers until heated through, or pan-fry them for a crispier texture. They’re still delicious the next day!

Frequently Asked Questions (FAQ)

  • Can I use a different type of cheese? Absolutely! Feel free to use your favorite cheese, such as pepper jack, Gouda, or Monterey Jack.
  • Can I make these burgers ahead of time? Yes, you can prepare the patties ahead of time and store them in the refrigerator until you’re ready to grill.
  • Can I use a different type of meat? Yes, you can use ground turkey, ground chicken, or even ground lamb.
  • Can I grill these burgers indoors? Yes, you can use a grill pan or a skillet on the stovetop.
  • What should I serve with these burgers? These burgers pair well with classic sides like fries, potato salad, coleslaw, or a simple green salad.

Serving Suggestions for Crack Burgers

Alright, you’ve got your Crack Burgers ready to go. Now, let’s talk about how to serve them up in style. Here are a few ideas to get you started:

  • Classic Burger Night: Serve the burgers on toasted buns with lettuce, tomato, onion, pickles, and your favorite condiments. Add a side of crispy fries and a cold drink for the ultimate burger night experience.
  • Gourmet Burger Bar: Set up a burger bar with a variety of toppings, such as sautéed mushrooms, caramelized onions, avocado, bacon, and different cheeses. Let everyone customize their own burger masterpiece.
  • Burger Bowls: For a lighter option, serve the burgers over a bed of greens with your favorite toppings. This is a great way to enjoy the flavors of a Crack Burger without the bun. Keto Hamburgers Ground Beef, Keto Burgers Ground Beef, How To Make Salmon Burgers Keto, Low Carb Burgers, Keto Grilled Salmon Burgers, Keto Cheeseburger Air Fryer Foil Packets are all great search terms for those looking for a no-bun option, too.
  • Slider Party: Make smaller patties and serve them on slider buns for a fun and festive appetizer.

Ultimately, the best way to serve Crack Burgers is however you enjoy them most. Whether you’re keeping it simple or going all out, these burgers are guaranteed to be a hit. So gather your friends and family, fire up the grill, and get ready to experience the magic of Crack Burgers. Your crack burger is about to be the star of the show!

These crack burgers are so good, you’ll want to make them again and again. That’s the truth! They’re delicious and satisfying, a testament to simple ingredients combined in a way that creates pure burger bliss. They’re delicious and way to make any day better. And remember, cooking should be fun! Don’t be afraid to experiment and make this recipe your own. After all, the best meals are the ones made with love (and a little bit of ranch dressing mix!).

So there you have it – my secret recipe for Crack Burgers. I hope you love them as much as I do! If you try this recipe, be sure to leave a comment and let me know what you think. And don’t forget to share your photos on social media using #Avaskitchen. I can’t wait to see your creations!

Crack Burgers: Your New Go-To Burger Recipe

Prep Time 15 minutes
Cook Time 15 minutes
Total Time 30 minutes
Servings 6 burgers
Calories 450
These Crack Burgers are incredibly flavorful and easy to make, perfect for a quick and satisfying meal. The combination of ground chuck, sour cream, ranch dressing mix, turkey bacon, and cheddar cheese creates an irresistible taste that will have everyone asking for more!

Ingredients

Burger Ingredients

  • 1.5 lb ground chuck
  • 3 Tbsp sour cream
  • 2 Tbsp ranch dressing mix
  • 0.33 cup cooked and crumbled turkey bacon
  • 1 cup shredded cheddar cheese

Toppings

  • Hamburger buns
  • Lettuce, tomato, mustard, mayo (for topping)

Instructions 

  • Combine ground chuck, sour cream, ranch dressing mix, turkey bacon, and cheddar cheese in a bowl. Mix well.
  • Form mixture into 6 patties. Press a dimple in the center of each patty.
  • Grill patties to desired doneness. Be careful as burgers will be moist.
  • Serve burgers on buns with lettuce, tomato, mustard, and mayo.

Notes

Don't overmix the meat for tender burgers. Wet hands to prevent sticking.
Calories: 450kcal
Cost: $18
Course: Main Course
Cuisine: American
Keyword: Beef
pin

Air Fryer Chicken Fajitas: The Weeknight Dinner Game Changer

Hey there, kitchen adventurers! Ava here, ready to share a recipe that’s become a staple in my Seattle kitchen: Air Fryer Chicken Fajitas. If you’re anything like me, weeknights are a whirlwind of activity, and the last thing you want is a complicated dinner routine. That’s where these fajitas swoop in to save the day. They’re quick, easy, and packed with flavor. Think sizzling, perfectly cooked chicken and tender-crisp veggies, all ready in under 20 minutes. Yes, you read that right!

I remember the first time I made these. It was a Tuesday, I was running late from a farmers market haul, and my stomach was rumbling louder than a Seattle thunderstorm. I needed something fast, something healthy, and something that would satisfy my craving for vibrant flavors. I peeked into my fridge, saw some colorful bell peppers and chicken breasts, and the idea struck me: Air Fryer Chicken Fajitas! The result? A culinary triumph that even my picky-eater nephew approved of. It’s a recipe that’s been on repeat ever since.

Why You’ll Absolutely Love This Recipe

Seriously, get ready to fall in love. Here’s why these Air Fryer Chicken Fajitas are about to become your new go-to:

  • Lightning Fast: From prep to plate, you’re looking at around 20 minutes. Perfect for those busy weeknights.
  • Healthy and Delicious: Packed with lean protein and colorful veggies, these fajitas are a guilt-free indulgence.
  • Easy Clean-Up: The air fryer makes clean-up a breeze. No more scrubbing a greasy stovetop!
  • Customizable: Swap out the veggies, add your favorite spices, or adjust the heat level to your liking. The possibilities are endless!
  • Incredibly Flavorful: The air fryer gives the chicken and veggies a slightly charred, smoky flavor that’s simply irresistible.

If you want a simple recipe, this is it.

The Magic Ingredients: What You’ll Need

Let’s gather our ingredients. Don’t worry; you probably already have most of these in your pantry:

  • 2 boneless skinless chicken breasts, thinly sliced
  • 1 red bell pepper, sliced into strips
  • 1 yellow bell pepper, sliced
  • 1 green bell pepper, sliced
  • 1 small red or yellow onion, sliced
  • 2 tbsp olive oil
  • 1 1/2 tsp chili powder
  • 1 tsp smoked paprika
  • 1/2 tsp garlic powder
  • 1/2 tsp cumin
  • Salt and pepper to taste
  • Juice of half a lime (optional)
Recipe Image

Let’s Get Cooking: Step-by-Step Instructions

Ready to turn these ingredients into a fiesta of flavor? Here’s how:

  1. Prep the Goodness: In a large bowl, toss together the sliced chicken, peppers, and onions with olive oil, chili powder, smoked paprika, garlic powder, cumin, salt, and pepper until everything is well coated. Let it sit for 5–10 minutes if you have time for the flavors to soak in.
  2. Preheat the Air Fryer: Preheat your air fryer to 375°F (190°C) for 2–3 minutes. Once hot, place the mixture into the basket in a single layer (you might need to cook in two batches depending on your air fryer size).
  3. Air Fry to Perfection: Air fry for 14–16 minutes, shaking halfway through, until the chicken is fully cooked and the veggies are slightly charred and tender. Finish with a squeeze of lime juice for extra brightness and serve hot in warm tortillas.

Ava’s Pro Tips for Air Fryer Fajita Success

Over the years, I’ve learned a few tricks to make these fajitas even better. Here are my top tips:

  • Don’t Overcrowd the Basket: This is key! If the air fryer basket is too full, the chicken and veggies will steam instead of charring. Cook in batches if needed.
  • Thinly Slice the Chicken: Thinly sliced chicken cooks quickly and evenly in the air fryer. Aim for slices that are about 1/4 inch thick.
  • Shake It Up: Shaking the basket halfway through ensures that everything cooks evenly and gets that delicious char.
  • Marinate for Extra Flavor: If you have time, marinate the chicken and veggies for at least 30 minutes (or even overnight) for a deeper, more intense flavor.
  • Check the Internal Temperature: Use a meat thermometer to ensure that the chicken reaches an internal temperature of 165°F (74°C).
  • Editor’s tip: If you want the peppers and onions to be softer, you can cook them for a few minutes before adding the chicken.

If you don’t have an air fryer, you can cook the fajitas in a cast iron skillet. Make sure the meat is cooked all the way through. If he can cook it, he can eat it!

Common Mistakes to Avoid

We all make mistakes in the kitchen—it’s part of the fun! Here are a few common pitfalls to watch out for when making air fryer chicken fajitas:

  • Overcooking the Chicken: Air fryers can vary in temperature, so keep a close eye on the chicken to prevent it from drying out.
  • Not Preheating the Air Fryer: Preheating ensures that the chicken and veggies start cooking immediately and get that desirable char.
  • Using Too Much Oil: A little oil is necessary to help the spices adhere and promote browning, but too much oil can make the fajitas greasy.
  • Forgetting to Season: Don’t be shy with the spices! They’re what give these fajitas their signature flavor.

Spice It Up: Flavor Variations to Try

One of the best things about this recipe is how easily you can customize it. Here are a few fun variations to try:

  • Spicy Fajitas: Add a pinch of cayenne pepper or a finely chopped jalapeño to the marinade for a fiery kick.
  • Lemon-Lime Fajitas: Use a combination of lemon and lime juice for a zesty, citrusy flavor.
  • Honey-Garlic Fajitas: Add a tablespoon of honey and an extra clove of minced garlic to the marinade for a sweet and savory twist.
  • Vegetarian Fajitas: Swap out the chicken for sliced portobello mushrooms or firm tofu for a delicious vegetarian option.
  • Shrimp Fajitas: Use shrimp instead of chicken. Reduce the cook time to 8-10 minutes.

If you want to experiment, go for it! I’m sure it’s going to be great.

Storage and Reheating Tips

Got leftovers? No problem! Here’s how to store and reheat your air fryer chicken fajitas:

  • Storage: Store leftover fajitas in an airtight container in the refrigerator for up to 3 days.
  • Reheating: Reheat in the air fryer at 350°F (175°C) for 3–5 minutes, or until heated through. You can also reheat in a skillet over medium heat.

Frequently Asked Questions (FAQ)

Got questions? I’ve got answers! Here are some common questions about air fryer chicken fajitas:

  • Can I use frozen chicken? Yes, but make sure to thaw it completely before cooking.
  • Can I use different vegetables? Absolutely! Feel free to add other veggies like zucchini, squash, or mushrooms.
  • Do I need to use olive oil? You can substitute with another oil like avocado oil or vegetable oil.
  • Can I make these ahead of time? You can prep the chicken and veggies ahead of time, but it’s best to cook them right before serving.
  • What air fryer do you recommend? I personally use a Ninja Air Fryer, but any air fryer will work for this recipe.

Serving Suggestions: Complete the Fiesta

These air fryer chicken fajitas are delicious on their own, but they’re even better with all the fixings! Here are some of my favorite serving suggestions:

  • Warm Tortillas: Serve in warm flour or corn tortillas.
  • Toppings: Top with your favorite toppings like sour cream, guacamole, salsa, shredded cheese, and chopped cilantro.
  • Sides: Serve with a side of rice and beans for a complete meal.
  • Drinks: Pair with a refreshing margarita or a cold Mexican beer.

And there you have it! Air Fryer Chicken Fajitas that are easy, quick, and bursting with flavor. I hope you enjoy this recipe as much as I do. Happy cooking, friends! And remember, don’t be afraid to experiment and make it your own. Now, if you’ll excuse me, I’m off to whip up another batch. Until next time, happy cooking!

Air Fryer Chicken Fajitas (Easy, Quick Recipe)

Prep Time 10 minutes
Cook Time 16 minutes
Total Time 26 minutes
Servings 4 servings
Calories 350
Enjoy delicious and healthy chicken fajitas made quickly and easily in your air fryer. This recipe is perfect for a weeknight meal and is packed with flavor.

Ingredients

Ingredients

  • 2 boneless skinless chicken breasts (thinly sliced)
  • 1 red bell pepper (sliced into strips)
  • 1 yellow bell pepper (sliced)
  • 1 green bell pepper (sliced)
  • 1 small red or yellow onion (sliced)
  • 2 tbsp olive oil
  • 1.5 tsp chili powder
  • 1 tsp smoked paprika
  • 0.5 tsp garlic powder
  • 0.5 tsp cumin
  • to taste Salt and pepper
  • Juice of half a lime (optional)

Instructions 

  • Toss chicken, peppers, and onions with olive oil, chili powder, smoked paprika, garlic powder, cumin, salt, and pepper. Let sit for 5–10 minutes.
  • Preheat air fryer to 375°F (190°C) for 2–3 minutes. Place mixture in the basket in a single layer.
  • Air fry for 14–16 minutes, shaking halfway through, until chicken is cooked and veggies are tender. Finish with lime juice.

Notes

Serve in warm tortillas with your favorite toppings like salsa, guacamole, and sour cream.
Calories: 350kcal
Cost: $12
Course: Main Course
Cuisine: Mexican
Keyword: Chicken
pin

Hey, friend! Ava here, back from my little Seattle kitchen, ready to share a recipe that’s become a total weeknight lifesaver: Easy Sheet Pan Chicken Fajitas. If you’re anything like me, you’re always on the hunt for meals that are quick, healthy, and, most importantly, bursting with flavor. These fajitas check all the boxes and then some! I remember the first time I made these; I was rushing to get dinner on the table after a long day, and I needed something fast. I threw everything onto a sheet pan, crossed my fingers, and the result was pure magic. Now, my family begs me to make them every week. Let me show you how to create this magic in your own kitchen.

Why You’ll Love This Sheet Pan Chicken Fajitas Recipe

Trust me, once you try these baked chicken fajitas, you’ll be hooked. Here’s why:

  • Effortless Cleanup: Everything cooks on one sheet pan, meaning minimal dishes. Hallelujah!
  • Customizable: Load them up with your favorite toppings. Sour cream? Guacamole? Salsa? The sky’s the limit.
  • Healthy and Delicious: Packed with lean protein and colorful veggies, these fajitas are a guilt-free way to enjoy a satisfying meal.
  • Quick and Easy: From prep to plate, you’re looking at about 30 minutes. Perfect for busy weeknights!
  • Incredible Flavor: The combination of spices, lime juice, and perfectly cooked chicken and veggies creates a flavor explosion.

What I love most about this recipe is its versatility. You can easily adapt it to suit your dietary needs or personal preferences. Want to make it vegetarian? Swap the chicken for tofu or extra veggies. Need it to be gluten-free? Simply use corn tortillas instead of flour ones. It’s all about making it your own!

The Ingredients You’ll Need

Let’s gather the ingredients. This list might seem long, but trust me, it’s mostly spices, and they’re what make these sheet pan chicken fajitas sing!

  • 1 1/2 lb. chicken breasts (boneless, skinless (about 3 large breasts))
  • 1 Green Bell Pepper (sliced (about 1 cup))
  • 1 Red Bell Pepper (sliced (about 1 cup))
  • 1 Yellow Bell Pepper (sliced (about 1 cup))
  • 1 Medium Red Onion (sliced, can also use a white or yellow onion)
  • 3 cloves garlic (minced)
  • Juice of 2 limes (about 1/4 cup)
  • 3 Tbsp. Extra Virgin Olive Oil
  • 2 tsp. chili powder
  • 1 1/2 tsp. cumin
  • 1 tsp. smoked paprika
  • 1 tsp. garlic salt
  • 1/2 tsp. ground pepper
  • Medium-sized flour or corn tortillas
Recipe Image

How to Make Sheet Pan Chicken Fajitas: Step-by-Step

Alright, let’s get cooking! Here’s how to bring these delicious sheet pan chicken fajitas to life:

  1. Preheat and Prep: Preheat your oven to 400 degrees Fahrenheit. Lightly spray a 17 x 12″ baking sheet with non-stick coconut oil spray. Set aside.
  2. Slice and Dice: Slice all the bell peppers and onion thinly. Place them on the pan. Add the minced garlic. Slice the chicken into thin strips and place it on the pan with the vegetables. Drizzle with the olive oil and lime juice.
  3. Spice It Up: In a small bowl, combine the chili powder, cumin, paprika, garlic salt, and pepper. Stir together and then sprinkle all over the top of the chicken and vegetables.
  4. Mix and Spread: Using your hands (or tongs, if you prefer), toss all of the ingredients together until well coated. Spread into an even layer on the pan. Make sure the chicken and vegetables are evenly distributed for even cooking.
  5. Bake to Perfection: Bake at 400 degrees for 20-24 minutes, or until the chicken has cooked through completely. The chicken should reach an internal temperature of 165 degrees Fahrenheit. Use a meat thermometer to check!
  6. Serve and Enjoy: Remove from the oven and serve right away while warm with tortillas and your desired toppings.

See? It’s as easy as pie… or should I say, as easy as chicken fajitas! The beauty of this recipe lies in its simplicity. You’ll love how quickly it comes together and how little effort it requires.

Pro Tips for the Best Sheet Pan Chicken Fajitas

Want to take your sheet pan chicken fajitas to the next level? Here are a few of my go-to pro tips:

  • Don’t Overcrowd the Pan: Make sure the ingredients are spread in a single layer. Overcrowding can lead to steaming instead of roasting, resulting in soggy veggies.
  • Marinate the Chicken: For even more flavor, marinate the chicken in the lime juice and spices for at least 30 minutes before baking.
  • Use a Hot Oven: A high oven temperature is key to getting that nice char on the chicken and vegetables.
  • Broil for Extra Char: If you want even more char, broil the fajitas for the last few minutes of cooking, but keep a close eye on them to prevent burning.
  • Warm the Tortillas: Warm tortillas are a must! You can warm them in a dry skillet, in the microwave, or even directly over a gas flame for a few seconds per side.

These little tricks can make a world of difference. Trust me, your taste buds will thank you!

Common Mistakes to Avoid

Even the simplest recipes can have their pitfalls. Here are a few common mistakes to avoid when making sheet pan chicken fajitas:

  • Undercooking the Chicken: Always make sure the chicken is cooked to an internal temperature of 165 degrees Fahrenheit. Undercooked chicken is a big no-no.
  • Overcooking the Vegetables: Nobody likes mushy veggies! Keep an eye on them and pull the pan out of the oven when they’re tender-crisp.
  • Skipping the Lime Juice: The lime juice is essential for both flavor and tenderizing the chicken. Don’t skip it!
  • Using Dull Spices: Make sure your spices are fresh and fragrant. Old spices can lose their potency and affect the overall flavor of the dish.
  • Forgetting to Season Generously: Don’t be shy with the spices! They’re what give these fajitas their signature flavor.

Learning from mistakes is part of the fun! And hey, even if you mess up, it’ll still probably taste pretty good.

Sheet Pan Chicken Fajitas Variations

Want to mix things up? Here are a few fun variations to try:

  • Spicy Fajitas: Add a pinch of cayenne pepper or a diced jalapeño to the spice mixture for a kick.
  • Vegetarian Fajitas: Swap the chicken for tofu, portobello mushrooms, or extra bell peppers and onions.
  • Shrimp Fajitas: Use shrimp instead of chicken. Shrimp cooks much faster, so reduce the baking time accordingly.
  • Pineapple Fajitas: Add chunks of pineapple to the pan for a sweet and tangy twist.
  • Different Veggies: Try adding other veggies like zucchini, corn, or poblano peppers.

Don’t be afraid to get creative and experiment with different flavors and ingredients. Cooking should be fun, after all!

How to Store and Reheat Leftovers

If you happen to have leftovers (which is rare in my house!), here’s how to store and reheat them:

  • Storage: Store the cooked chicken and vegetables in an airtight container in the refrigerator for up to 3-4 days.
  • Reheating: Reheat the fajitas in a skillet over medium heat or in the microwave until heated through. You can also reheat them in the oven at 350 degrees Fahrenheit for about 10-15 minutes.
  • Freezing: While you can freeze the cooked chicken and vegetables, the texture may change slightly. If freezing, store in an airtight container for up to 2-3 months.

Leftovers are great for lunch the next day or for a quick and easy dinner later in the week.

Frequently Asked Questions (FAQ)

Got questions? I’ve got answers! Here are some frequently asked questions about sheet pan chicken fajitas:

  • Can I use frozen chicken? Yes, but make sure to thaw it completely before cooking. Pat it dry with paper towels to remove any excess moisture.
  • Can I use different types of tortillas? Absolutely! Use your favorite type of tortilla, whether it’s flour, corn, or even gluten-free.
  • Can I make this ahead of time? You can prep the vegetables and chicken ahead of time and store them in the refrigerator. However, it’s best to cook the fajitas right before serving for the best flavor and texture.
  • Can I add beans to the fajitas? Sure! Black beans or pinto beans would be a great addition.
  • What toppings go well with fajitas? The possibilities are endless! Some popular toppings include sour cream, guacamole, salsa, shredded cheese, lettuce, tomatoes, and cilantro.

If you have any other questions, feel free to ask in the comments below. I’m always happy to help!

Serving Suggestions for Sheet Pan Chicken Fajitas

Now that you’ve made these amazing sheet pan chicken fajitas, here are some serving suggestions to complete the meal:

  • Classic Fajita Platter: Serve the fajitas with warm tortillas, sour cream, guacamole, salsa, shredded cheese, and all your favorite toppings.
  • Fajita Bowls: Create a healthy and delicious fajita bowl by serving the chicken and vegetables over rice or quinoa. Top with your favorite toppings.
  • Fajita Salad: Toss the fajitas with lettuce, tomatoes, avocado, and a light vinaigrette for a refreshing salad.
  • Fajita Quesadillas: Use the fajitas as a filling for quesadillas. Serve with sour cream and salsa.
  • Side Dishes: Pair the fajitas with a side of Mexican rice, refried beans, or a simple salad.

No matter how you choose to serve them, these sheet pan chicken fajitas are sure to be a hit!

So there you have it! My go-to recipe for Easy Sheet Pan Chicken Fajitas. I hope you love them as much as my family does. Remember, cooking is all about having fun and experimenting, so don’t be afraid to put your own spin on this recipe. And most importantly, enjoy every bite!

Sheet Pan Chicken Fajitas

Prep Time 15 minutes
Cook Time 24 minutes
Total Time 39 minutes
Servings 6 servings
Calories 350
These sheet pan chicken fajitas are an easy and delicious weeknight meal. Simply toss everything on a pan and bake!

Ingredients

Ingredients

  • 1.5 lb chicken breasts (boneless, skinless (about 3 large breasts))
  • 1 Green Bell Pepper (sliced (about 1 cup))
  • 1 Red Bell Pepper (sliced (about 1 cup))
  • 1 Yellow Bell Pepper (sliced (about 1 cup))
  • 1 Medium Red Onion (sliced, can also use a white or yellow onion)
  • 3 cloves garlic (minced)
  • 2 limes (Juice of (about 1/4 cup))
  • 3 Tbsp Extra Virgin Olive Oil
  • 2 tsp chili powder
  • 1.5 tsp cumin
  • 1 tsp smoked paprika
  • 1 tsp garlic salt
  • 0.5 tsp ground pepper
  • Medium-sized flour or corn tortillas

Instructions 

  • Preheat oven to 400 degrees. Spray baking sheet with non-stick spray.
  • Slice peppers, onion, and chicken. Place on pan with garlic. Drizzle with olive oil and lime juice.
  • Combine spices, sprinkle over chicken and vegetables, and toss to coat.
  • Bake at 400 degrees for 20-24 minutes, until chicken is cooked through.
  • Remove from oven and serve warm with tortillas and toppings.

Notes

For extra flavor, marinate the chicken for at least 30 minutes before cooking.
Calories: 350kcal
Cost: $18
Course: Main Course
Cuisine: Mexican
Keyword: Chicken
pin

Hey there, burger aficionados! Ava here, straight from my cozy kitchen in Seattle. If you’re anything like me, you believe that a truly great burger isn’t just about the patty – it’s about the symphony of flavors that dance on your taste buds. And what’s the conductor of that flavor orchestra? The seasoning, of course! I grew up with my mom making the best burger seasoning; it’s a core memory for me. That’s why I’m so excited to share my absolute *favorite* burger seasoning recipe with you. Trust me, this blend will transform your grilling game forever. Get ready for burgers so good, they’ll have your neighbors peeking over the fence!

I’ve tested countless combinations over the years, tweaking and perfecting until I landed on what I truly believe is the best burger seasoning recipe ever. This isn’t just another seasoning recipe; it’s a flavor experience. Forget those pre-made blends filled with who-knows-what – with this recipe, you control every ingredient, ensuring the freshest, most flavorful burgers imaginable. It’s so easy, even if you’re just starting out in the kitchen, you can master this recipe in minutes!

Why You’ll Love This Burger Seasoning

So, what makes this particular burger seasoning so special? Let me tell you!

  • Unbeatable Flavor: This isn’t your average salt-and-pepper mix. The combination of spices creates a depth of flavor that will make your burgers sing.
  • Customizable: Want a little more heat? Add a pinch of cayenne! Prefer a smoky flavor? Smoked paprika is your friend. This recipe is a fantastic base that you can easily adjust to your liking.
  • Cost-Effective: Making your own seasoning blend is much cheaper than buying pre-made versions. Plus, you probably already have most of these spices in your pantry.
  • No Mystery Ingredients: You know exactly what’s going into your burger seasoning. No artificial flavors, preservatives, or fillers here!
  • Makes Your Burger Better: Seriously, this seasoning will make your burger unforgettable.

Best Burger Seasoning Recipe

Alright, let’s get down to business! Here’s what you’ll need to create burger magic:

Ingredients

  • 1 tablespoon salt
  • 1 tablespoon black pepper
  • 1 teaspoon garlic powder
  • 1 teaspoon onion powder
  • 1 teaspoon paprika
  • 1/2 teaspoon dried oregano
  • 1/2 teaspoon chili powder
Recipe Image

Steps

The best part? This seasoning is incredibly easy to make. No fancy equipment or culinary skills required!

  1. Combine all ingredients in a small bowl.
  2. Mix thoroughly until the spices are evenly distributed.
  3. Use 1 to 1.5 teaspoons of the seasoning mix per pound of ground meat.
  4. Sprinkle the seasoning over the meat and mix gently before forming patties.
  5. Cook burgers to your desired doneness.

Pro Tips for the Perfect Burger Seasoning

Want to take your burger seasoning game to the next level? Here are a few of my favorite pro tips:

  • Use Fresh Spices: The fresher your spices, the more flavorful your seasoning will be. Check the expiration dates and replace any spices that are past their prime.
  • Toast Your Spices (Optional): For an even deeper, more complex flavor, try toasting your spices before grinding them. Simply heat a dry skillet over medium heat, add the spices, and cook for a few minutes, until fragrant. Be careful not to burn them!
  • Grind Your Own Spices (Optional): If you’re feeling ambitious, grind your own spices using a spice grinder or mortar and pestle. This will give you the freshest, most potent flavor.
  • Don’t Overmix the Meat: When mixing the seasoning into your ground beef, be gentle! Overmixing can result in tough burgers.
  • Let the Seasoning Sit: For the best flavor, let the seasoned meat sit in the refrigerator for at least 30 minutes before forming patties. This allows the flavors to meld together.

Common Mistakes to Avoid

Even with a simple recipe like this, it’s easy to make a few common mistakes. Here’s what to watch out for:

  • Using Too Much Salt: Salt is essential for flavor, but too much can ruin your burgers. Start with the recommended amount and adjust to taste.
  • Over-Seasoning: More isn’t always better! Too much seasoning can overpower the flavor of the beef. Stick to the recommended amount of seasoning per pound of meat.
  • Not Mixing Thoroughly: Make sure the seasoning is evenly distributed throughout the ground beef. Otherwise, you’ll end up with some bites that are bland and others that are overly seasoned.
  • Forgetting to Taste: Always taste the seasoned meat before forming patties. This is your chance to adjust the seasoning to your liking.

Burger Seasoning Variations

The beauty of this recipe is that it’s incredibly versatile. Feel free to experiment and create your own signature burger seasoning blend! Here are a few ideas to get you started:

  • Spicy Burger Seasoning: Add 1/4 teaspoon of cayenne pepper or red pepper flakes for a kick.
  • Smoky Burger Seasoning: Substitute smoked paprika for regular paprika. You can also add a pinch of chipotle powder.
  • Herby Burger Seasoning: Add 1 teaspoon of dried thyme, rosemary, or marjoram.
  • Sweet and Savory Burger Seasoning: Add 1 teaspoon of brown sugar for a touch of sweetness.
  • Garlic Lover’s Burger Seasoning: Double the amount of garlic powder. Because you can never have too much garlic, right?

How to Store Your Burger Seasoning

To keep your burger seasoning fresh and flavorful, store it in an airtight container in a cool, dark place. A spice cabinet or pantry works perfectly. Properly stored, your homemade burger seasoning will last for up to 6 months. Make sure when you seal the container that it’s airtight; you don’t want to lose any of that delicious flavor!

Frequently Asked Questions (FAQ)

Got questions? I’ve got answers!

  • Can I use this seasoning on other meats? Absolutely! This seasoning is delicious on chicken, pork, and even fish.
  • Can I make a big batch of this seasoning? Of course! Simply multiply the ingredient amounts to make a larger batch.
  • Is this seasoning gluten-free? Yes, this seasoning is naturally gluten-free. However, always check the labels of your individual spices to be sure.
  • Can I use fresh herbs instead of dried herbs? Yes, but you’ll need to use about three times the amount of fresh herbs as dried herbs. Also, keep in mind that fresh herbs will shorten the shelf life of your seasoning.
  • What kind of salt should I use? I recommend using kosher salt or sea salt. Avoid using iodized salt, which can have a metallic taste.

Serving Suggestions

Now that you’ve got the best burger seasoning ever, it’s time to fire up the grill and make some amazing burgers! Here are a few serving suggestions:

  • Classic Burger: Serve your seasoned burger on a toasted bun with your favorite toppings, such as lettuce, tomato, onion, and cheese. Don’t forget the ketchup and mustard!
  • Gourmet Burger: Get fancy with it! Top your burger with gourmet ingredients like caramelized onions, sautéed mushrooms, and Gruyere cheese.
  • Sliders: Make mini burgers (sliders) for parties or appetizers.
  • Burger Bowls: Skip the bun and serve your seasoned burger over a bed of lettuce or rice with your favorite toppings.
  • Beyond Burgers: This seasoning isn’t just for beef! It’s amazing on plant-based burgers too.

So there you have it – my secret to the best burger seasoning ever! I hope you love this recipe as much as I do. Now go forth and grill some amazing burgers! And remember, cooking should be fun and stress-free. Don’t be afraid to experiment and make this recipe your own. Happy grilling!

Best Burger Seasoning Recipe

Prep Time 5 minutes
Total Time 5 minutes
Servings 20 burgers
Calories 5
This homemade burger seasoning blend is the perfect way to elevate your burgers. It's easy to make and adds a ton of flavor!

Ingredients

Seasoning

  • 1 tablespoon salt
  • 1 tablespoon black pepper
  • 1 teaspoon garlic powder
  • 1 teaspoon onion powder
  • 1 teaspoon paprika
  • 1/2 teaspoon dried oregano
  • 1/2 teaspoon chili powder

Instructions 

  • Combine all ingredients in a small bowl.
  • Mix thoroughly until the spices are evenly distributed.
  • Use 1 to 1.5 teaspoons of the seasoning mix per pound of ground meat.
  • Sprinkle the seasoning over the meat and mix gently before forming patties.
  • Cook burgers to your desired doneness.

Notes

Adjust the amount of chili powder to your preferred level of spice.
Calories: 5kcal
Cost: $2
Course: Main Course
Cuisine: American
Keyword: Beef
pin