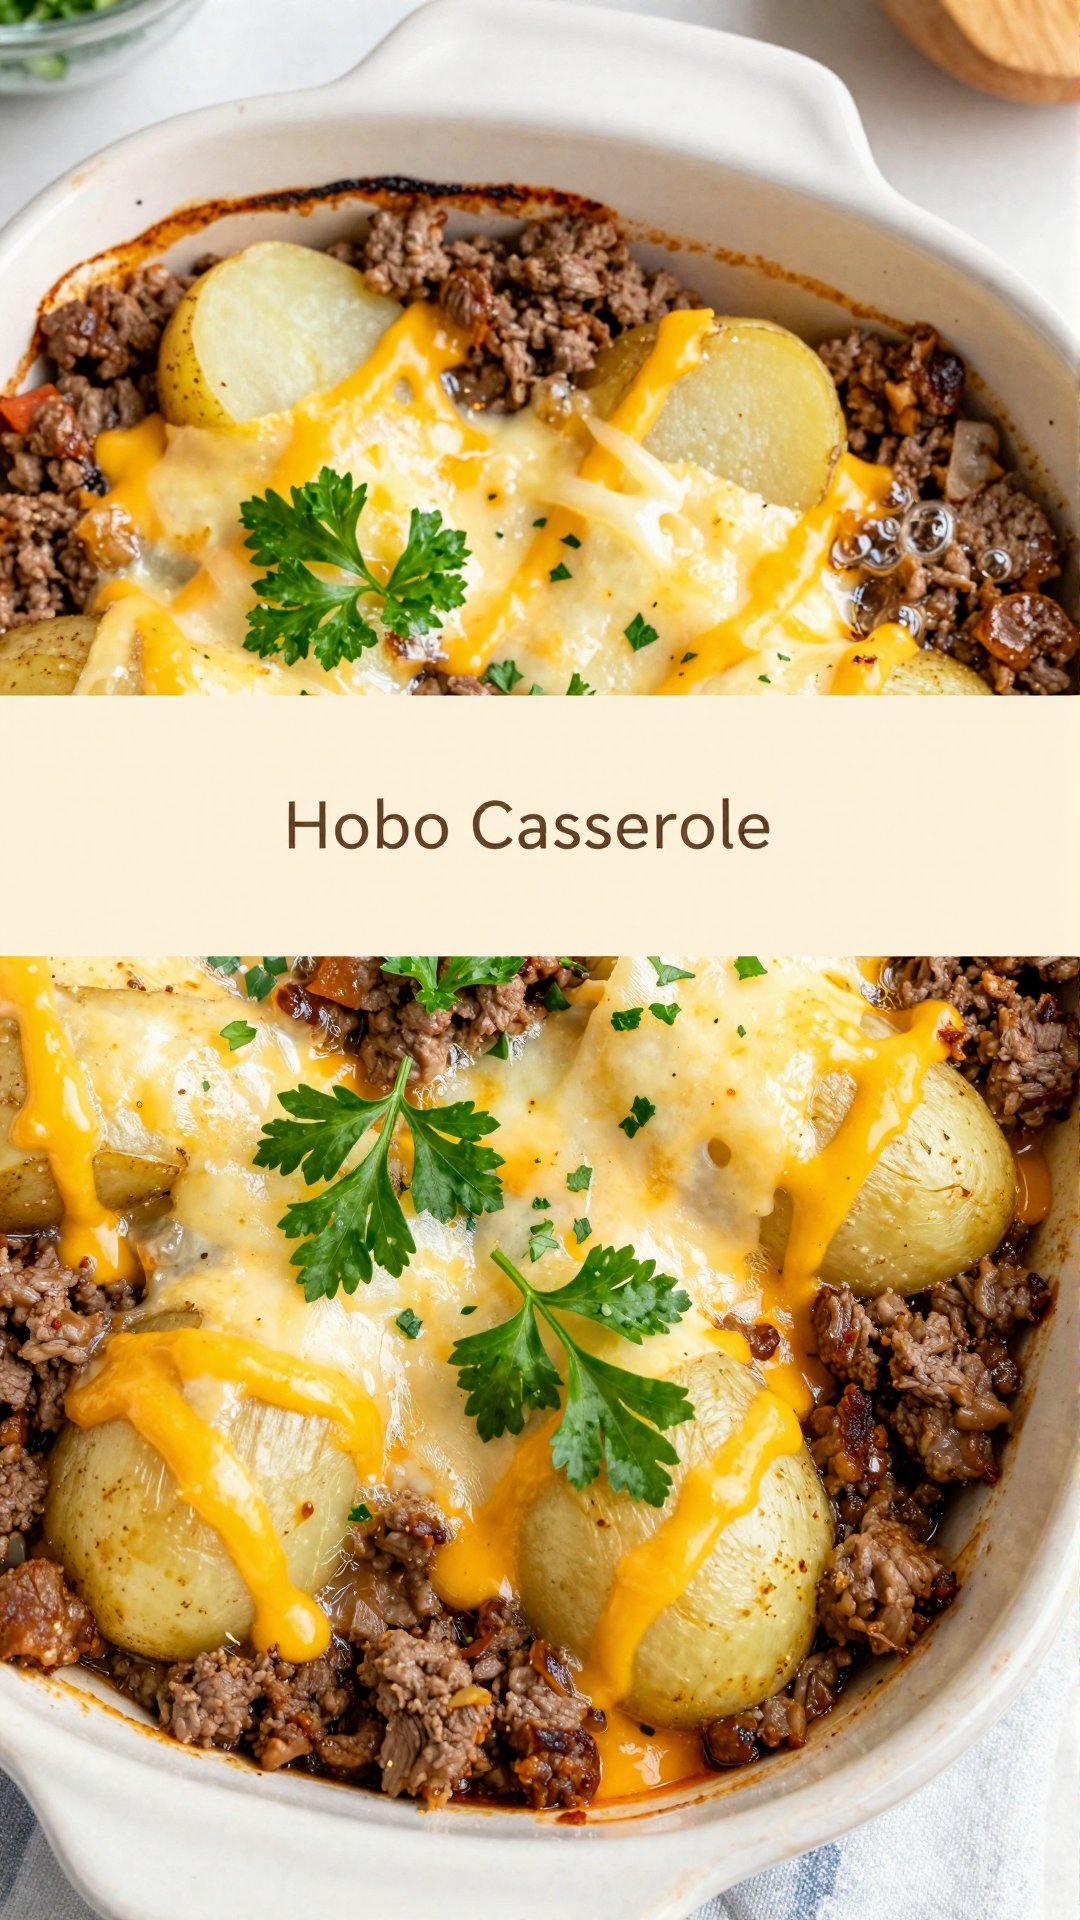
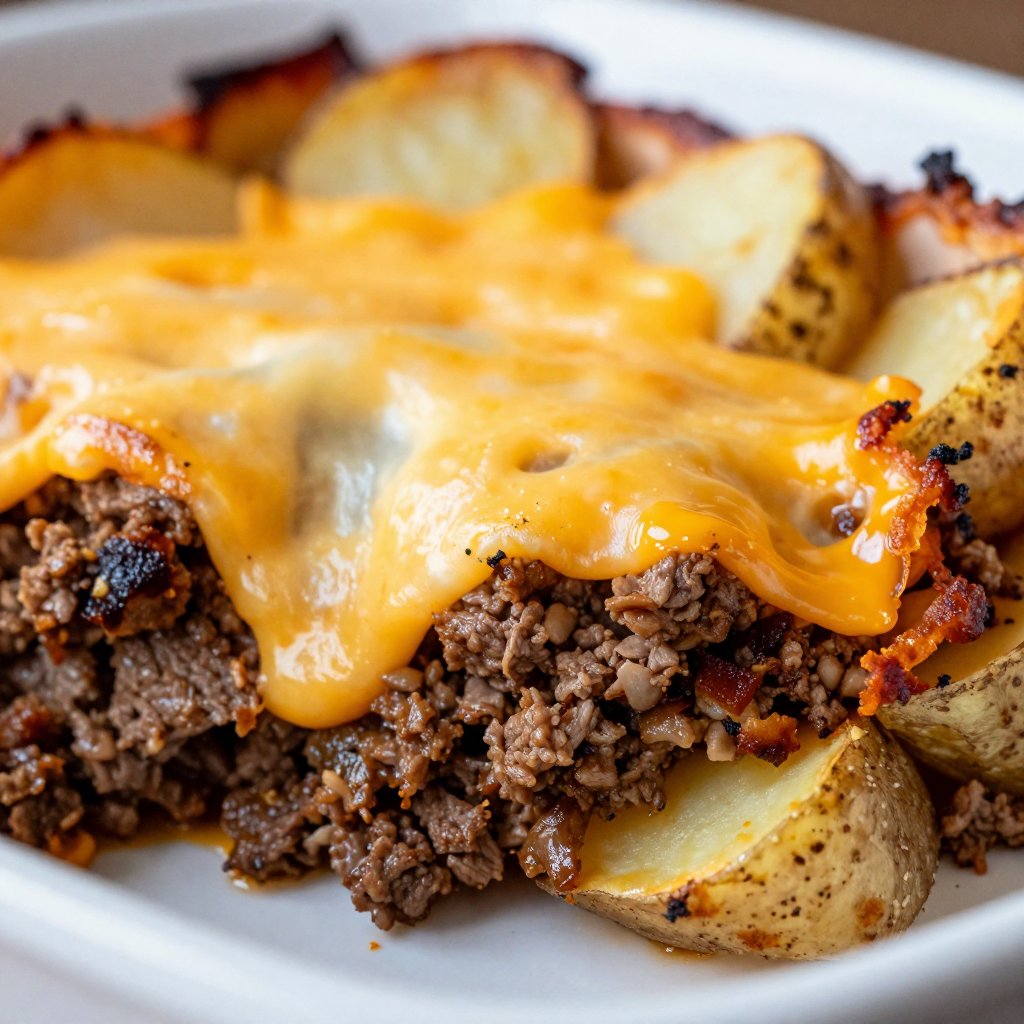
Author

Ava

Browsing

Bacon Cheese Stuffed Burgers: A Seattle Kitchen Classic

Hey there, burger aficionados! Ava here, straight from my little kitchen in Seattle, ready to share a recipe that’s been a game-changer in our household: Bacon Cheese Stuffed Burgers. If you’re anything like me, you believe a burger should be more than just a patty on a bun. It should be an experience, a flavor explosion, a moment of pure joy. And trust me, these burgers deliver all that and more.

I still remember the first time I made these. It was a rainy Seattle evening (surprise!), and I was craving something comforting but also a little exciting. I had some ground beef, a block of cheddar, and a package of bacon staring back at me from the fridge. An idea sparked – why not stuff all that goodness inside the burger itself? After a little experimentation, these bacon cheese stuffed burgers were born. Now, they’re a regular feature on our summer grill menu, and honestly, they’re just as good cooked indoors when the Seattle weather decides to be… well, Seattle weather.

Why You’ll Love This Bacon Cheese Stuffed Burger Recipe

Okay, let’s get real. Why should you try this recipe? Here’s the lowdown:

  • Flavor Bomb: We’re talking juicy ground beef, melty cheddar cheese, and crispy bacon all in one bite. It’s a symphony of flavors that will make your taste buds sing.
  • Surprisingly Easy: Don’t let the ‘stuffed’ part intimidate you. This recipe is incredibly straightforward and easy to make, even on a busy weeknight.
  • Customizable: Want to swap out the cheddar for pepper jack? Go for it! Feel like adding some caramelized onions? Absolutely! This recipe is a blank canvas for your burger dreams.
  • Impress Your Friends (and Yourself!): These burgers look and taste like something you’d order at a fancy restaurant, but you made them in your own kitchen. Bragging rights are definitely included.

I’ve tweaked and perfected this recipe over time, adding my own little touches to make it extra special. I can’t wait for you to try it and make it your own too! Be sure to adapt this recipe to your preferences.

Ingredients for the Ultimate Stuffed Cheeseburgers

Here’s what you’ll need to create these masterpieces:

  • Ground Beef (80/20): 1 1/2 pounds. This ratio gives you the perfect balance of flavor and juiciness.
  • Salt: 1 teaspoon. Enhances the flavor of the beef.
  • Black Pepper: 1/2 teaspoon. Adds a little kick.
  • Garlic Powder: 1/2 teaspoon. Because everything’s better with garlic.
  • Onion Powder: 1/4 teaspoon. A subtle hint of oniony goodness.
  • Cheddar Cheese: 4 slices, cut into cubes. The star of the show! Feel free to use your favorite cheese.
  • Cooked Turkey Bacon: 4 slices, crumbled. Adds a smoky, savory crunch. I prefer turkey bacon, but pork bacon works great too.
  • Hamburger Buns: 4. Choose your favorite kind – brioche, sesame, potato, whatever floats your boat.
  • Toppings of Choice: Lettuce, tomato, onion, ketchup, mustard, burger sauce, pickles – the sky’s the limit!
Recipe Image

How to Make Bacon Cheese Stuffed Burgers: Step-by-Step

Alright, let’s get cooking! Here’s how to bring these bad boys to life:

  1. Prep the Beef: In a large bowl, gently mix together the ground beef, salt, pepper, garlic powder, and onion powder. Be careful not to overmix, as this can make the burgers tough.
  2. Divide and Flatten: Divide the ground beef into 8 equal portions. Flatten each portion into a thin patty. Aim for patties that are slightly larger than your buns, as they’ll shrink a bit during cooking.
  3. Stuff ‘Em!: Place a quarter of the cheese cubes and crumbled turkey bacon in the center of 4 of the patties.
  4. Seal the Deal: Top with the remaining 4 patties and pinch the edges together to seal, making sure the cheese and turkey bacon are completely enclosed. This is crucial to prevent the cheese from leaking out during cooking.
  5. Preheat: Preheat your grill or skillet to medium-high heat. If using a grill, make sure the grates are clean and lightly oiled to prevent sticking.
  6. Cook: Cook the burgers for about 4-6 minutes per side, or until cooked through and the internal temperature reaches 160°F. Use a meat thermometer to ensure they’re cooked safely.
  7. Assemble and Enjoy: Place the cooked burgers on hamburger buns and add your favorite toppings. Serve immediately and enjoy the cheesy, bacony goodness!

Ava’s Pro Tips for Perfect Stuffed Burgers

Over the years, I’ve learned a few tricks to ensure burger perfection. Here are my top tips:

  • Don’t Overmix the Beef: Overmixing can result in tough burgers. Mix the ingredients just until they’re combined.
  • Seal Tightly: Make sure the edges of the patties are sealed tightly to prevent the cheese from leaking out. I like to use my fingers to pinch the edges together and then gently press down with a fork to create a decorative seal.
  • Use a Meat Thermometer: This is the best way to ensure your burgers are cooked to a safe temperature. Aim for an internal temperature of 160°F.
  • Let Them Rest: After cooking, let the burgers rest for a few minutes before serving. This allows the juices to redistribute, resulting in a more flavorful and juicy burger.
  • Toast the Buns: Toasting the buns adds a nice texture and prevents them from getting soggy.

Common Mistakes to Avoid When Making Stuffed Burgers

We all make mistakes in the kitchen – it’s part of the fun! But here are a few common pitfalls to watch out for when making stuffed burgers:

  • Using Lean Ground Beef: Lean ground beef can result in dry burgers. Opt for 80/20 ground beef for the best flavor and juiciness.
  • Overstuffing the Burgers: Too much cheese and bacon can make the burgers difficult to seal and cook evenly.
  • Cooking at Too High a Heat: Cooking the burgers at too high a heat can cause the outside to burn before the inside is cooked through.
  • Pressing Down on the Burgers While Cooking: This squeezes out the juices and results in dry burgers. Resist the urge to press down!

Bacon Cheese Stuffed Burger Variations

Want to mix things up? Here are a few fun variations to try:

  • Cheese Swaps: Try using pepper jack, mozzarella, or Gruyere cheese instead of cheddar.
  • Bacon Alternatives: Experiment with different types of bacon, such as maple bacon or jalapeno bacon. You can also use prosciutto or pancetta for a different flavor profile.
  • Add Veggies: Mix some finely chopped onions, peppers, or mushrooms into the ground beef mixture.
  • Spice It Up: Add a pinch of cayenne pepper or some chopped jalapenos to the ground beef mixture for a spicy kick.
  • Burger Sauce Magic: Mix mayonnaise, ketchup, mustard, and a dash of Worcestershire sauce for a classic burger sauce.

How to Store and Reheat Leftover Stuffed Burgers

If you happen to have any leftovers (which is rare in my house!), here’s how to store and reheat them:

  • Storage: Store the cooked burgers in an airtight container in the refrigerator for up to 3 days.
  • Reheating: Reheat the burgers in a skillet over medium heat or in the microwave until heated through. You can also reheat them in the oven at 350°F for about 10-15 minutes.

Frequently Asked Questions About Stuffed Burgers

Got questions? I’ve got answers!

  • Can I use frozen ground beef?: Yes, but make sure to thaw it completely before using.
  • Can I make these ahead of time?: You can prepare the patties ahead of time and store them in the refrigerator for up to 24 hours.
  • Can I freeze these burgers?: Yes, you can freeze the cooked burgers for up to 2 months. Wrap them individually in plastic wrap and then place them in a freezer-safe bag.
  • What if the cheese leaks out while cooking?: It happens! Just try to seal the patties as tightly as possible. A little leakage is okay.

Serving Suggestions for Bacon Cheese Stuffed Burgers

These burgers are delicious on their own, but here are a few serving suggestions to take them to the next level:

  • Classic Sides: Serve with fries, onion rings, or coleslaw.
  • Salads: Pair with a fresh green salad or a tomato and cucumber salad.
  • Grilled Veggies: Grill some vegetables, such as corn on the cob, zucchini, or bell peppers.
  • Burger Bar: Set up a burger bar with a variety of toppings and sauces so everyone can customize their own burger.

And there you have it – my go-to Bacon Cheese Stuffed Burger recipe! I hope you love it as much as we do. Remember, cooking is all about experimenting and having fun, so don’t be afraid to put your own spin on this recipe. And be sure to enter your email below to receive more delicious recipes like this one straight to your inbox, plus enjoy exclusive content I create just for my subscribers. I agree to keep your email safe and only send you the good stuff. You’re going to absolutely love these, and it’s easy to see why! The burger is calling your name!

Happy grilling, friends! And don’t forget to share your creations with me on social media using #AvasKitchenAdventures. I can’t wait to see what you come up with!

P.S. If you want to make sure you don’t miss out on any of my latest recipes, be sure to subscribe to your inbox! We’ll send this burger recipe and more straight to your email below! Here’s to making everyday meals a little more magical!

Bacon Cheese Stuffed Burgers

Prep Time 20 minutes
Cook Time 12 minutes
Total Time 32 minutes
Servings 4 burgers
Calories 450
These juicy Bacon Cheese Stuffed Burgers are packed with flavor and are surprisingly easy to make. Perfect for a summer barbecue or a quick weeknight dinner!

Ingredients

Burger Ingredients

  • 1.5 pounds ground beef (80/20)
  • 1 teaspoon salt
  • 0.5 teaspoon black pepper
  • 0.5 teaspoon garlic powder
  • 0.25 teaspoon onion powder

Filling

  • 4 slices cheddar cheese, cut into cubes
  • 4 slices cooked turkey bacon, crumbled

Serving

  • 4 hamburger buns
  • Toppings of choice (lettuce, tomato, onion, ketchup, mustard, etc.)

Instructions 

  • Mix ground beef, salt, pepper, garlic powder, and onion powder.
  • Divide beef into 8 portions; flatten into patties.
  • Place cheese and bacon in the center of 4 patties.
  • Top with remaining patties and seal edges.
  • Preheat grill or skillet to medium-high heat.
  • Cook burgers 4-6 minutes per side, until 160°F.
  • Place burgers on buns and add toppings.
  • Serve immediately.

Notes

For best results, don't overmix the ground beef. This will keep the burgers tender and juicy.
Calories: 450kcal
Cost: $18
Course: Main Course
Cuisine: American
Keyword: Beef
pin

Easy Sheet Pan Steak Fajitas Recipe: A Flavor Fiesta on a Single Pan

Hey there, kitchen adventurers! Ava here, ready to whisk you away to a land where dinner is quick, easy, and bursting with flavor. If you’re anything like me, you love a good fajita night, but the thought of standing over a hot stove, juggling multiple pans, can sometimes feel…less than magical. That’s where these Easy Sheet Pan Steak Fajitas come to the rescue! This recipe is all about streamlining the process without sacrificing a single ounce of that authentic Tex-Mex taste we all crave. Imagine tender steak, vibrant bell peppers, and sweet red onions, all perfectly seasoned and roasted to perfection on just one sheet pan. Yes, you read that right—one pan! Less mess, more flavor, and a whole lot of happy faces around the dinner table. Let’s dive in!

Why You’ll Love This Sheet Pan Steak Fajitas Recipe

Seriously, where do I even begin? This recipe has become a staple in my Seattle kitchen for so many reasons. Firstly, the cleanup is a breeze. I mean, who doesn’t love a meal that requires minimal dishwashing? But beyond the convenience, it’s the taste that really seals the deal. The flavors are vibrant, the steak is juicy, and the vegetables are tender with just the right amount of char. It’s like a fiesta in your mouth! Plus, it’s incredibly versatile. You can customize the toppings to your heart’s content, making it a crowd-pleaser for even the pickiest eaters. Here’s a quick rundown of why this recipe will become your new go-to:

  • Quick and Easy: Ready in under 30 minutes, perfect for busy weeknights.
  • Minimal Cleanup: All cooked on a single sheet pan!
  • Bursting with Flavor: A delicious mix of savory, smoky, and slightly spicy.
  • Versatile: Customize your toppings to create your perfect fajita.
  • Healthy: Packed with protein and colorful veggies.

The Secret to the Best Sheet Pan Steak Fajitas

The secret to amazing sheet pan steak fajitas lies in a few key elements. First, the quality of the steak matters. I prefer flank steak or sirloin, thinly sliced, for its tenderness and ability to absorb flavors. Secondly, don’t skimp on the seasoning. A generous coating of chili powder, smoked paprika, cumin, and other spices is what gives these fajitas that authentic Tex-Mex taste. And finally, don’t overcrowd the pan. Spreading the steak and vegetables in a single layer ensures they roast evenly and develop that delicious char we all love. When I first started making these, I’d often try to cram everything onto one pan, resulting in steamed, rather than roasted, veggies. Lesson learned!

Sheet Pan Steak Fajitas Ingredients

  • 1.5 lbs flank steak or sirloin, thinly sliced
  • 3 bell peppers (red, yellow, green), seeded and sliced
  • 1 large red onion, sliced
  • 2 tbsp olive oil
  • Juice of 1 lime
  • 2 tsp chili powder
  • 1 tsp smoked paprika
  • 1 tsp ground cumin
  • 0.5 tsp garlic powder
  • 0.5 tsp onion powder
  • 0.5 tsp dried oregano
  • 0.5 tsp salt
  • 0.25 tsp black pepper
  • 0.25 tsp crushed red pepper flakes (optional)
  • 8 small flour or corn tortillas, warmed
  • Fresh cilantro, chopped
  • Sour cream (optional)
  • Salsa or pico de gallo (optional)
  • Lime wedges
Recipe Image

How to Make Sheet Pan Steak Fajitas: Step-by-Step

Alright, let’s get cooking! Here’s how to make these incredibly easy and flavorful sheet pan steak fajitas:

  1. Preheat your oven to 425°F (220°C). Line a large baking sheet with parchment paper or foil. This makes cleanup a breeze!
  2. In a small bowl, whisk together the chili powder, smoked paprika, ground cumin, garlic powder, onion powder, dried oregano, salt, black pepper, and red pepper flakes (if using). This spice mix is the heart and soul of our fajita flavor.
  3. In a large bowl, toss the sliced steak, bell peppers, and red onion with olive oil, lime juice, and the prepared seasoning. Make sure everything is thoroughly coated. This is where the magic happens!
  4. Evenly spread the seasoned steak and vegetables in a single layer on the prepared baking sheet. Avoid overcrowding the pan; this ensures everything roasts properly.
  5. Cook in the oven for 18 to 20 minutes, stirring halfway through, until the steak reaches your desired doneness and the vegetables are tender with slight charring.
  6. Remove from the oven and let the mixture rest for 2 minutes. This allows the juices to redistribute, resulting in even more tender steak.
  7. Serve hot with warmed tortillas, garnished with fresh cilantro, sour cream, salsa, and lime wedges, as preferred.

Pro Tips for Perfect Sheet Pan Fajitas

  • Use High Heat: Roasting at 425°F ensures the steak and vegetables get a nice char without becoming soggy.
  • Don’t Overcrowd the Pan: Spread the ingredients in a single layer to promote even cooking. If necessary, use two sheet pans.
  • Marinate the Steak: For even more flavor, marinate the steak for at least 30 minutes before cooking.
  • Preheat the Pan: Placing the sheet pan in the oven while it preheats can help the steak and vegetables sear better.
  • Rest the Steak: Allowing the steak to rest for a few minutes after cooking helps it retain its juices.

Common Mistakes to Avoid

Even the easiest recipes can have a few pitfalls. Here are some common mistakes to avoid when making sheet pan steak fajitas:

  • Overcooking the Steak: Steak cooks quickly in a hot oven, so keep a close eye on it to prevent it from becoming tough.
  • Not Using Enough Seasoning: Don’t be shy with the spices! They’re what give the fajitas their signature flavor.
  • Overcrowding the Pan: As mentioned before, overcrowding leads to steamed, not roasted, vegetables.
  • Skipping the Lime Juice: The lime juice not only adds flavor but also helps to tenderize the steak.
  • Forgetting the Toppings: The toppings are what make fajitas fun! Don’t forget the cilantro, sour cream, salsa, and lime wedges.

When I first tried this, I didn’t use enough seasoning, and the steak was bland. That’s when I realized the importance of a generous spice rub! Also, the first time I made sheet pan fajitas, the peppers were still crunchy because I didn’t slice them thin enough. It’s all about learning and adjusting!

Delicious Variations on Sheet Pan Steak Fajitas

One of the best things about fajitas is how easy they are to customize. Here are a few variations to try:

  • Chicken Fajitas: Substitute the steak with chicken breasts or thighs, sliced into strips.
  • Shrimp Fajitas: Use large shrimp instead of steak. Reduce the cooking time to about 12-15 minutes.
  • Vegetarian Fajitas: Add more vegetables like mushrooms, zucchini, and corn.
  • Spicy Fajitas: Add a pinch of cayenne pepper or a finely chopped jalapeño to the seasoning mix.
  • Pineapple Fajitas: Add chunks of fresh pineapple to the pan for a sweet and tangy twist.

I’d been wanting to try a pineapple version for a while now; something about the sweet and savory combination just sounds amazing! Another time, I added a mix of poblano and bell peppers for a smoky flavor.

How to Store and Reheat Leftover Fajitas

If you happen to have any leftovers (which is rare in my house!), here’s how to store and reheat them:

  • Storage: Store the cooked steak and vegetables in an airtight container in the refrigerator for up to 3 days.
  • Reheating: Reheat in a skillet over medium heat or in the microwave until warmed through. You can also reheat them in the oven at 350°F for about 10-15 minutes.
  • Freezing: While you can freeze the cooked steak and vegetables, the texture may change slightly upon thawing. Store in an airtight container for up to 2 months.

Frequently Asked Questions (FAQ)

  • Can I use a different type of steak? Yes, you can use other cuts of steak like skirt steak or ribeye. Just make sure to slice it thinly.
  • Can I make this ahead of time? You can slice the vegetables and prepare the seasoning mix ahead of time. Store them separately and combine them just before cooking.
  • Can I grill the steak and vegetables instead of roasting them? Absolutely! Grill the steak and vegetables separately until cooked to your liking.
  • What kind of tortillas should I use? I prefer flour tortillas for their soft texture, but corn tortillas are a great gluten-free option.
  • Can I add cheese to my fajitas? Of course! Shredded cheddar, Monterey Jack, or pepper jack cheese are all delicious options.

Serving Suggestions: Complete Your Fajita Feast

These sheet pan steak fajitas are fantastic on their own, but here are a few serving suggestions to take your meal to the next level:

  • Classic Fajitas: Serve with warmed tortillas, sour cream, salsa, guacamole, and fresh cilantro.
  • Fajita Bowls: Create a fajita bowl by serving the steak and vegetables over rice or quinoa, topped with your favorite fixings.
  • Fajita Salad: Toss the steak and vegetables with mixed greens, avocado, and a lime vinaigrette for a light and refreshing meal.
  • Fajita Nachos: Layer tortilla chips with the steak and vegetables, cheese, and your favorite nacho toppings.
  • Sides: Serve with Mexican rice, black beans, or a side salad.

And there you have it! Easy Sheet Pan Steak Fajitas that are quick and flavorful. This recipe is something that will bring a little Tex-Mex magic to your kitchen, perfect for a weeknight dinner or a weekend BBQ party food. Remember, cooking is all about having fun and experimenting, so don’t be afraid to put your own spin on this recipe. I’m sure you’ll create something that tasted like a masterpiece! Enjoy!

Sheet Pan Steak Fajitas

Prep Time 15 minutes
Cook Time 20 minutes
Total Time 35 minutes
Servings 4 people
Calories 450
Enjoy delicious and easy steak fajitas made on a single sheet pan! This recipe is perfect for a quick weeknight dinner with minimal cleanup.

Ingredients

Fajita Ingredients

  • 1.5 lbs flank steak or sirloin (thinly sliced)
  • 3 bell peppers (red, yellow, green, seeded and sliced)
  • 1 large red onion (sliced)
  • 2 tbsp olive oil
  • 1 lime (Juice of)
  • 2 tsp chili powder
  • 1 tsp smoked paprika
  • 1 tsp ground cumin
  • 0.5 tsp garlic powder
  • 0.5 tsp onion powder
  • 0.5 tsp dried oregano
  • 0.5 tsp salt
  • 0.25 tsp black pepper
  • 0.25 tsp crushed red pepper flakes (optional)

Serving

  • 8 small flour or corn tortillas (warmed)
  • Fresh cilantro (chopped)
  • Sour cream (optional)
  • Salsa or pico de gallo (optional)
  • Lime wedges

Instructions 

  • Preheat oven to 425°F. Line a baking sheet with parchment paper or foil.
  • Whisk together chili powder, smoked paprika, cumin, garlic powder, onion powder, oregano, salt, pepper, and red pepper flakes in a bowl.
  • Toss steak, bell peppers, and red onion with olive oil, lime juice, and seasoning.
  • Spread steak and vegetables on the baking sheet in a single layer.
  • Cook for 18-20 minutes, stirring halfway, until steak is done and vegetables are tender.
  • Rest for 2 minutes.
  • Serve with warmed tortillas, cilantro, sour cream, salsa, and lime wedges.

Notes

For extra flavor, marinate the steak for at least 30 minutes before cooking.
Calories: 450kcal
Cost: $20
Course: dinner
Cuisine: Mexican
Keyword: Steak
pin

My name’s Ava, and if you’ve stumbled upon my kitchen, you’re probably here for one thing—the kind of recipes that make people pause mid-bite and say, ‘Wow.’ Today, we’re diving headfirst into burger bliss with my secret to the best stove top burgers you’ll ever make. Forget firing up the grill; we’re keeping things simple, quick, and outrageously delicious. I grew up in a small town in Oregon, where the smell of fresh bread and roasted vegetables often drifted out of my mother’s kitchen window. Cooking wasn’t just something we did to eat—it was how we celebrated, comforted, and connected. I was the kid who would rather stir a pot of chili than go ride my bike, and by the time I was twelve, I could whip up a pie from scratch that made my grandmother proud. These days, I’m 34 and living in Seattle, where my kitchen has become my favorite corner of the world. So, grab your skillet, and let’s get cooking!

Why You’ll Love This Stove Top Burgers Recipe

Let’s be honest, sometimes you just need a burger, and you need it now. That’s where this recipe comes in. It’s quick, easy, and delivers that classic burger satisfaction without any fuss. Plus, clean-up is a breeze! This recipe is perfect for busy weeknights when you crave something comforting and delicious. I believe the best recipes aren’t always the fanciest—they’re the ones that feel like a warm hug, the ones you make over and over because they just work. Sure, I’ve had my share of flops (ask me about the infamous triple-layer cake that collapsed right before a dinner party), but I’ve learned that every ‘oops’ moment is just an invitation to try again—this time with a little more patience and maybe a pinch more salt. Here’s why this recipe will become your new go-to:

  • Quick & Easy: Ready in under 30 minutes!
  • Minimal Ingredients: Only 7 key ingredients (plus toppings!).
  • Incredible Flavor: Perfectly seasoned ground beef, cooked to juicy perfection.
  • No Grill Needed: Perfect for any time of year, rain or shine!

Ingredients for the Best Stove Top Burgers

Here’s what you’ll need to make these mouthwatering stove top burgers. I’m a bit obsessed with balance: sweet with savory, creamy with crunchy, familiar with unexpected. And I believe that cooking is less about following rules and more about trusting your senses. If it smells amazing and makes you smile, you’re probably on the right track.

  • – 1 pound ground beef (80% lean)
  • – 1 teaspoon salt
  • – 1/2 teaspoon black pepper
  • – 1 teaspoon garlic powder
  • – 1 teaspoon onion powder
  • – 4 slices of cheese (optional)
  • – Hamburger buns
  • – Optional toppings: lettuce, tomato, pickles, and condiments
Recipe Image

How to Make Stove Top Burgers: Step-by-Step

Crafting these flavorful Stove Top Burgers is easy when you follow these simple steps:

  1. Place a large skillet over medium-high heat and allow it to heat up for about 2-3 minutes. Getting the skillet nice and hot is key to achieving a good sear on the burgers.
  2. Prepare the Meat: In a mixing bowl, combine the ground beef, salt, black pepper, garlic powder, and onion powder. Mix until well combined but don’t overwork the meat. Overmixing can lead to tough burgers, and we definitely don’t want that!
  3. Form Patties: Divide the mixture into four equal portions and shape each into a patty about 1 inch thick. Make a slight indentation in the center of each patty to prevent them from bulging as they cook.
  4. Cook the Patties: Place the patties into the hot skillet. Cook for about 4-5 minutes on one side, undisturbed. This allows for a beautiful crust to form.
  5. Flip and Cook: Carefully flip each patty and cook for another 4-5 minutes on the other side. If you are using cheese, add a slice on top of each patty in the last minute and cover the skillet to melt.
  6. Toast the Buns: While the burgers are cooking, slice the hamburger buns and toast them in a toaster or on a separate skillet to your desired crispness. Toasted buns add a delightful texture contrast.
  7. Assemble the Burgers: Place each cooked patty on the bottom half of the toasted burger bun. Add desired toppings such as lettuce, tomato, pickles, and your favorite condiments. Don’t be shy with your favorite sauces!
  8. Serve: Cap the burgers with the top half of the buns and enjoy while hot!
    Following these steps will guarantee a delicious meal with maximum flavor!

Pro Tips for Perfect Stove Top Burgers

Want to take your stove top burger game to the next level? Here are a few of my tried-and-true tips:

  • Don’t Overwork the Meat: Gently mix the seasonings into the ground beef until just combined. Overworking the meat results in a tough burger.
  • Hot Skillet is Key: Make sure your skillet is properly heated before adding the patties. This ensures a good sear and locks in the juices.
  • Use a Meat Thermometer: For perfectly cooked burgers, use a meat thermometer to check the internal temperature. The USDA recommends 160°F (71°C) for ground beef.
  • Let Rest Before Serving: Allow the burgers to rest for a few minutes after cooking to let the juices redistribute, resulting in a juicier burger.

Common Mistakes to Avoid

Even the best cooks make mistakes! Here are some common pitfalls to avoid when making stove top burgers:

  • Overcrowding the Skillet: Cook the patties in batches to avoid overcrowding the skillet, which can lower the temperature and result in steamed instead of seared burgers.
  • Pressing Down on the Patties: Resist the urge to press down on the patties while they’re cooking. This squeezes out the juices and results in a dry burger.
  • Using Too Lean Ground Beef: While lean ground beef is healthier, it can result in a dry burger. Opt for 80% lean ground beef for the best balance of flavor and juiciness.
  • Skipping the Seasoning: Don’t underestimate the power of seasoning! Salt, pepper, garlic powder, and onion powder are the perfect base for a flavorful burger.

Variations to Spice Things Up

Want to get creative with your stove top burgers? Here are a few fun variations to try:

  • Cheese Stuffed Burgers: Stuff the patties with your favorite cheese, such as cheddar, mozzarella, or blue cheese, for an extra gooey surprise.
  • Spicy Burgers: Add a pinch of cayenne pepper or a dash of hot sauce to the ground beef mixture for a fiery kick.
  • Mushroom & Swiss Burgers: Sauté sliced mushrooms and onions in butter and top the burgers with Swiss cheese for a gourmet twist.
  • BBQ Burgers: Brush the burgers with your favorite BBQ sauce during the last minute of cooking and top with crispy fried onions and coleslaw.

How to Store Leftover Stove Top Burgers

If you happen to have any leftover burgers (though I doubt you will!), here’s how to store them:

  • Refrigerate: Store cooked burger patties in an airtight container in the refrigerator for up to 3-4 days.
  • Freeze: For longer storage, wrap each patty individually in plastic wrap and place them in a freezer-safe bag. Freeze for up to 2-3 months.
  • Reheat: Reheat leftover burgers in a skillet over medium heat, in the microwave, or in the oven until heated through.

Frequently Asked Questions (FAQ)

Got questions? I’ve got answers! Here are some frequently asked questions about making stove top burgers:

  • Can I use frozen ground beef?: Yes, but make sure to thaw it completely before cooking.
  • Can I use a different type of ground meat?: Absolutely! Ground turkey, chicken, or even plant-based ground meat all work well in this recipe.
  • How do I prevent the burgers from shrinking?: Make a small indentation in the center of each patty before cooking to prevent them from bulging and shrinking.
  • Can I add breadcrumbs to the ground beef mixture?: Yes, adding a tablespoon or two of breadcrumbs can help bind the patties together and keep them from falling apart.

Serving Suggestions for Stove Top Burgers

These stove top burgers are delicious on their own, but here are a few serving suggestions to complete your meal:

  • Classic Sides: Serve with classic sides like french fries, onion rings, coleslaw, or potato salad.
  • Salads: Pair with a fresh salad, such as a garden salad, Caesar salad, or a tomato and cucumber salad.
  • Vegetable Skewers: Grill or roast vegetable skewers with bell peppers, onions, zucchini, and cherry tomatoes for a healthy and colorful side.
  • Sweet Potato Fries: For a healthier alternative to regular fries, serve with baked or air-fried sweet potato fries.

There you have it! My secret to incredible stove top burgers that are perfect for any weeknight meal. I share them because I want you to have a little magic in your kitchen too—meals that bring people together, that become your ‘go-to,’ that make someone you love ask for seconds. So whether you’re cooking for your family, impressing friends, or just treating yourself, I’m here to help you find your next favorite dish. Pull up a chair, grab a spatula, and let’s make something unforgettable together.

Stove Top Burgers: An Incredible Secret 7-Ingredient Weeknight Meal

Prep Time 5 minutes
Cook Time 10 minutes
Total Time 15 minutes
Servings 4 burgers
Calories 350
Enjoy juicy and flavorful burgers cooked right on your stovetop! This simple 7-ingredient recipe is perfect for a quick and delicious weeknight meal.

Ingredients

Burger Ingredients

  • 1 pound ground beef (80% lean)
  • 1 teaspoon salt
  • 0.5 teaspoon black pepper
  • 1 teaspoon garlic powder
  • 1 teaspoon onion powder
  • 4 slices cheese (optional)
  • Hamburger buns
  • Optional toppings (lettuce, tomato, pickles, and condiments)

Instructions 

  • Heat a large skillet over medium-high heat for 2-3 minutes.
  • Combine ground beef, salt, pepper, garlic powder, and onion powder in a bowl. Mix well.
  • Divide the mixture into four patties, about 1 inch thick.
  • Place patties in the hot skillet and cook for 4-5 minutes on one side.
  • Flip and cook for another 4-5 minutes. Add cheese in the last minute, if desired.
  • Toast the hamburger buns.
  • Place each patty on a bun, add toppings, and serve.
  • Cap the burgers with the top half of the buns and enjoy while hot!

Notes

Don't overwork the meat when mixing to keep the burgers tender.
Calories: 350kcal
Cost: $12
Course: Main Course
Cuisine: American
Keyword: Beef
pin

Hey there, fellow food lovers! Ava here, back in my Seattle kitchen, and I’m bursting to share a recipe that’s been a total game-changer for our weeknight dinners. Imagine tender, juicy steak strips mingling with vibrant, colorful peppers and fluffy, flavorful rice, all cooked together in one glorious pan. Sounds dreamy, right? Well, stop imagining and let’s make it a reality with this One Pan Steak Fajita and Rice Skillet!

This recipe isn’t just about convenience; it’s about creating a delicious symphony of flavors with minimal effort. It’s the kind of meal that makes you feel like a kitchen rockstar, even when you’re short on time and energy. Think of it as a warm, comforting hug in a skillet – the perfect antidote to a busy day.

Growing up, fajitas were always a special occasion meal. But with this simplified, one-pan version, you can enjoy that same festive flavor any night of the week. So, pull up a chair, grab your favorite skillet, and let’s dive into this culinary adventure together!

Why You’ll Love This One Pan Steak Fajita and Rice Skillet

Okay, let’s get real. We all crave those meals that are both incredibly tasty and unbelievably easy to make. This skillet ticks both boxes, and then some. Here’s why this dish is about to become your new weeknight staple:

  • Minimal Cleanup: Seriously, only one pan! Need I say more?
  • Quick and Easy: From prep to table in under 30 minutes – perfect for busy weeknights.
  • Flavor Explosion: A delicious blend of tender steak, vibrant veggies, and perfectly seasoned rice.
  • Customizable: Easily adapt the ingredients to suit your taste and dietary preferences.
  • Crowd-Pleaser: This dish is a guaranteed hit with both kids and adults.

I mean, who can resist the allure of a sizzling skillet filled with all those delicious goodies? It’s a visual feast that’s just as satisfying to eat as it is to look at. Plus, the aroma alone is enough to make your mouth water!

Ingredients You’ll Need

Here’s what you’ll need to whip up this amazing One Pan Steak Fajita and Rice Skillet. Don’t worry if you don’t have everything on hand; feel free to substitute and get creative!

  • 0.5 pound strip steak
  • 1 teaspoon minced garlic
  • 1 teaspoon soy sauce
  • 1 teaspoon baking soda
  • 1.5 teaspoons steak seasoning blend
  • Avocado oil spray
  • 0.5 red bell pepper, sliced
  • 0.5 yellow bell pepper, sliced
  • 0.5 green bell pepper, sliced
  • 0.5 white onion, sliced
  • 1 tablespoon butter
  • 1 tablespoon tomato paste
  • 1 cup pre-cooked basmati rice
  • 1/3 cup store-bought white queso
  • 1/3 cup Mexican cheese blend
Recipe Image

Step-by-Step Instructions: Let’s Get Cooking!

Alright, let’s get down to business! Follow these simple steps, and you’ll have a sizzling skillet of deliciousness in no time. Remember, cooking should be fun, so don’t be afraid to experiment and make it your own.

  1. Tenderize the Steak: Prepare the steak by sprinkling baking soda and letting it sit for 15 minutes to enhance tenderness. Rinse completely and thoroughly dry with paper towels. This is a crucial step to break down the fibers and ensure a melt-in-your-mouth texture.
  2. Marinate the Steak: Combine steak seasoning, minced garlic, and soy sauce in a mixing bowl. Coat the steak strips evenly with the marinade and let rest for 5 minutes. This infuses the steak with flavor and helps to keep it moist during cooking.
  3. Sear the Steak: Preheat a large skillet to medium-high heat and lightly coat with avocado oil. Sear steak strips for 2-3 minutes per side until golden brown and cooked to desired doneness. Transfer to a separate plate. You’re looking for a beautiful sear on the outside and a juicy, tender interior.
  4. Sauté the Veggies: In the same skillet, melt butter and sauté bell peppers and onions for 4-5 minutes until they become slightly caramelized and tender. The key here is to not overcrowd the pan, so the vegetables can properly brown.
  5. Add Tomato Paste and Rice: Incorporate tomato paste into the vegetable mixture, stirring to distribute evenly. Add pre-cooked basmati rice and gently mix to combine all ingredients. This adds depth of flavor and helps to bind the dish together.
  6. Combine Everything: Return the cooked steak strips to the skillet, nestling them into the rice and vegetable mixture. Make sure everything is evenly distributed for maximum flavor in every bite.
  7. Cheese it Up: Distribute white queso in dollops across the surface and sprinkle Mexican cheese over the entire dish. Because, let’s be honest, everything is better with cheese!
  8. Broil to Perfection: Position the skillet under the broiler for 60-90 seconds, watching carefully to prevent burning. Remove once cheese is melted and slightly bubbling. This creates a beautiful, golden-brown crust that’s simply irresistible.
  9. Garnish and Serve: Garnish with fresh cilantro and serve with lime wedges for an extra burst of flavor. Enjoy immediately while hot. The fresh cilantro and lime add a bright, zesty finish that complements the richness of the dish.

Pro Tips for the Perfect One Pan Steak Fajita and Rice Skillet

Want to take your skillet game to the next level? Here are a few of my tried-and-true tips for achieving skillet perfection:

  • Use High Heat: Searing the steak at high heat is crucial for developing a flavorful crust and locking in the juices. Make sure your skillet is nice and hot before adding the steak strips.
  • Don’t Overcrowd the Pan: Overcrowding the pan will lower the temperature and result in steamed, rather than seared, steak and veggies. Work in batches if necessary.
  • Pre-Cook the Rice: Using pre-cooked rice saves time and ensures that the rice doesn’t become mushy. You can use leftover rice or store-bought pre-cooked rice.
  • Adjust the Seasoning: Taste as you go and adjust the seasoning to your liking. Don’t be afraid to add a pinch of salt, a dash of chili powder, or a squeeze of lime juice to enhance the flavors.
  • Get Creative with Toppings: The possibilities are endless! Top your skillet with sour cream, guacamole, pico de gallo, or any of your favorite fajita toppings.

Remember, cooking is all about experimentation and having fun. Don’t be afraid to try new things and put your own spin on this recipe. You might just discover your new favorite flavor combination!

Common Mistakes to Avoid

We all make mistakes in the kitchen, but knowing what to watch out for can help you avoid common pitfalls. Here are a few mistakes to avoid when making this One Pan Steak Fajita and Rice Skillet:

  • Overcooking the Steak: Overcooked steak is tough and dry. Use a meat thermometer to ensure that the steak is cooked to your desired doneness.
  • Burning the Cheese: Keep a close eye on the skillet while it’s under the broiler to prevent the cheese from burning.
  • Using Too Much Liquid: Adding too much liquid can make the rice mushy. Use just enough liquid to moisten the rice without making it soggy.
  • Not Seasoning Properly: Seasoning is key to bringing out the flavors of the dish. Don’t be afraid to season generously with salt, pepper, and other spices.
  • Ignoring the Sizzle: If you don’t hear a sizzle when you add the steak to the pan, the pan isn’t hot enough. Wait until the pan is properly heated before adding the steak.

Even if you do make a mistake, don’t sweat it! Just learn from it and try again. Cooking is a journey, not a destination.

Variations: Customize Your Skillet

One of the best things about this recipe is how easily you can customize it to suit your taste and dietary preferences. Here are a few variations to get you started:

  • Chicken Fajita Skillet: Substitute the steak with chicken breast or chicken thighs.
  • Vegetarian Fajita Skillet: Omit the steak and add more vegetables, such as mushrooms, zucchini, or corn.
  • Spicy Fajita Skillet: Add a pinch of cayenne pepper or a few slices of jalapeño to kick up the heat.
  • Low-Carb Fajita Skillet: Omit the rice and serve the steak and vegetables over cauliflower rice or lettuce wraps.
  • Cheesy Fajita Skillet: Add more cheese! Use a combination of different cheeses, such as cheddar, Monterey Jack, or pepper jack.

Don’t be afraid to get creative and experiment with different ingredients and flavors. The possibilities are endless!

Storage Instructions

Got leftovers? No problem! This One Pan Steak Fajita and Rice Skillet stores beautifully in the refrigerator. Here’s how to store it properly:

  • Cool Completely: Allow the skillet to cool completely before transferring it to an airtight container.
  • Refrigerate Promptly: Refrigerate the skillet within two hours of cooking to prevent bacterial growth.
  • Use Within 3-4 Days: The skillet will keep in the refrigerator for 3-4 days.
  • Reheat Thoroughly: Reheat the skillet thoroughly before serving. You can reheat it in the microwave, in a skillet on the stovetop, or in the oven.

Leftovers can be just as delicious as the original dish, especially when stored and reheated properly.

Frequently Asked Questions (FAQ)

Got questions? I’ve got answers! Here are a few frequently asked questions about this One Pan Steak Fajita and Rice Skillet:

  • Can I use frozen vegetables?: Yes, you can use frozen vegetables, but be sure to thaw them completely before adding them to the skillet.
  • Can I use brown rice instead of basmati rice?: Yes, you can use brown rice, but it will take longer to cook. Make sure the rice is fully cooked before adding the other ingredients.
  • Can I make this dish ahead of time?: Yes, you can make this dish ahead of time and reheat it later. However, the cheese may not be as melty and gooey.
  • Can I freeze this dish?: I don’t recommend freezing this dish as the texture of the rice and vegetables may change.
  • What kind of steak is best for fajitas?: I prefer to use strip steak, but you can also use flank steak, skirt steak, or sirloin steak.

If you have any other questions, feel free to ask in the comments below. I’m always happy to help!

Serving Suggestions

This One Pan Steak Fajita and Rice Skillet is a complete meal in itself, but here are a few serving suggestions to take it to the next level:

  • Serve with Warm Tortillas: Warm tortillas are a must for fajitas! Serve the skillet with warm flour or corn tortillas for a customizable fajita experience.
  • Add Your Favorite Toppings: Top the skillet with sour cream, guacamole, pico de gallo, shredded lettuce, or any of your favorite fajita toppings.
  • Serve with a Side Salad: A simple side salad with a light vinaigrette is a refreshing complement to the richness of the skillet.
  • Pair with a Cold Drink: A cold beer, margarita, or iced tea is the perfect way to wash down this delicious meal.
  • Enjoy with Friends and Family: This skillet is best enjoyed with friends and family. Gather around the table, share some laughs, and savor every bite!

So there you have it – my One Pan Steak Fajita and Rice Skillet recipe! I hope you love it as much as we do. Happy cooking, and may your kitchen always be filled with delicious aromas and joyful moments!

One Pan Steak Fajita And Rice Skillet Recipe

Prep Time 20 minutes
Cook Time 20 minutes
Total Time 40 minutes
Servings 4 people
Calories 450
Enjoy a delicious and easy One Pan Steak Fajita and Rice Skillet, perfect for a quick weeknight dinner. This recipe combines tender steak, colorful bell peppers, onions, and flavorful rice, all topped with melted cheese.

Ingredients

Ingredients

  • 0.5 pound strip steak
  • 1 teaspoon minced garlic
  • 1 teaspoon soy sauce
  • 1 teaspoon baking soda
  • 1.5 teaspoons steak seasoning blend
  • Avocado oil spray
  • 0.5 red bell pepper, sliced
  • 0.5 yellow bell pepper, sliced
  • 0.5 green bell pepper, sliced
  • 0.5 white onion, sliced
  • 1 tablespoon butter
  • 1 tablespoon tomato paste
  • 1 cup pre-cooked basmati rice
  • 1/3 cup store-bought white queso
  • 1/3 cup Mexican cheese blend

Instructions 

  • Prepare steak with baking soda, let sit for 15 minutes, then rinse and dry.
  • Combine steak seasoning, garlic, and soy sauce. Marinate steak for 5 minutes.
  • Sear steak in skillet for 2-3 minutes per side. Transfer to plate.
  • Sauté bell peppers and onions in butter for 4-5 minutes.
  • Incorporate tomato paste, then add rice and mix.
  • Return steak to skillet, nestling into rice and vegetables.
  • Distribute queso and sprinkle Mexican cheese over dish.
  • Broil for 60-90 seconds until cheese is melted and bubbling.
  • Garnish with cilantro and serve with lime wedges.

Notes

For extra flavor, marinate the steak overnight.
Calories: 450kcal
Cost: $18
Course: dinner
Cuisine: Mexican
Keyword: Steak
pin

Hey there, friend! Ava here, ready to share a kitchen secret that’s been a game-changer for me: cooking flank steak in the oven. Now, I know what you might be thinking – flank steak? Oven? Isn’t that usually a grill thing? Well, buckle up, because I’m about to show you how to get a perfectly tender, flavorful flank steak without ever firing up the barbecue. I’m talking melt-in-your-mouth deliciousness, all thanks to the magic of your oven. This method is so easy, it’s practically foolproof, and it’s become my go-to for busy weeknights or when the weather outside is less than ideal. This recipe is inspired by some lessons I learned from The Kitchn, incorporating my own personal touches and tips to make it even more accessible and delicious.

Why You’ll Love This Oven-Baked Flank Steak

Okay, let’s get real. Why should you even bother cooking flank steak in the oven? Here’s the lowdown:

  • Effortless: Seriously, it’s so simple. Minimal prep, minimal cleanup, maximum flavor.
  • Consistent Results: No more guessing games with grill temperatures. The oven provides consistent heat for even cooking.
  • Year-Round Enjoyment: Rain or shine, you can enjoy perfectly cooked flank steak any time you want.
  • Tender and Juicy: With the right technique, your flank steak will be incredibly tender and juicy, not tough and chewy.
  • Versatile: Perfect for tacos, salads, sandwiches, or a simple steak dinner.

This recipe is a winner, whether you’re a seasoned cook or just starting out. It’s all about taking a few simple steps and letting the oven do its thing.

Ingredients You’ll Need

Here’s what you’ll need to whip up this masterpiece. Don’t worry, it’s a short and sweet list:

  • 1 (1 1/2- to 2-pound) flank steak
  • 2 tablespoons olive oil
  • 1 teaspoon kosher salt
  • 1/2 teaspoon black pepper
  • Optional: Marinade or dry rub of your choice

That’s it! Of course, feel free to get creative with marinades and rubs, but sometimes, simple is best. A good quality flank steak, olive oil, salt, and pepper – that’s all you really need for a fantastic meal.

Recipe Image

Step-by-Step: Cooking Flank Steak in the Oven

Alright, let’s get cooking! Here’s how to cook flank steak in the oven like a pro:

  1. Preheat the oven: Set your oven to 425°F (220°C). High heat is key for searing the steak and locking in those juices.
  2. Prepare the flank steak: Pat the flank steak dry with paper towels. This is crucial for getting a good sear. Moisture is the enemy of browning!
  3. Season the steak: Rub the flank steak with olive oil, salt, and pepper. Don’t be shy with the seasoning! If using a marinade or dry rub, apply it evenly to both sides of the steak. A simple salt pepper blend is often the best way to highlight the flavor of the steak.
  4. Sear the steak (optional, but recommended): Heat an oven-safe skillet (cast iron is ideal) over medium-high heat. Once the skillet is very hot, sear the flank steak for 2-3 minutes per side, until nicely browned. This step enhances flavor and texture. Trust me, it’s worth the extra effort!
  5. Transfer to the oven: Place the skillet with the seared steak (or the unseared steak in an oven-safe dish) into the preheated oven.
  6. Roast the steak: Roast for 8-12 minutes for medium-rare (internal temperature of 130-135°F or 54-57°C), or longer for more well-done. Use a meat thermometer to check the internal temperature. Remember, every oven is different, so keep an eye on it.
  7. Rest the steak: Remove the steak from the oven and transfer it to a cutting board. Tent loosely with foil and let it rest for at least 10 minutes. This is the most important step! Letting the steak rest allows the juices to redistribute, resulting in a more tender steak.
  8. Slice against the grain: Using a sharp knife, slice the flank steak thinly against the grain. This is crucial for tenderness, as flank steak has long muscle fibers. If you slice with the grain, you’ll end up with tough, chewy steak.
  9. Serve: Serve immediately and enjoy!

See? Easy peasy! With these steps, you’ll have a perfectly cooked flank steak every time. This method ensures the steak is cooked evenly and retains its delicious flavor. Trust me, the resting period is non-negotiable!

Pro Tips for the Perfect Flank Steak

Want to take your flank steak game to the next level? Here are a few pro tips I’ve learned over the years:

  • Use a Meat Thermometer: Seriously, it’s the best way to ensure your steak is cooked to perfection. Aim for 130-135°F for medium-rare.
  • Don’t Overcook It: Flank steak is best served medium-rare to medium. Overcooking will make it tough.
  • Let It Rest: I can’t stress this enough! Resting is key for a tender, juicy steak.
  • Slice Thinly: Thin slices make all the difference in tenderness.
  • Marinate for Extra Flavor: If you have time, marinating the flank steak for a few hours (or even overnight) will add tons of flavor and help tenderize the meat.
  • Sear it Hot: If you’re searing the steak, make sure your skillet is screaming hot before you add the steak. This will give you a beautiful crust.

Common Mistakes to Avoid

We’ve all been there – kitchen mishaps happen! Here are a few common mistakes to avoid when cooking flank steak:

  • Not Patting the Steak Dry: Moisture prevents browning.
  • Overcooking: Flank steak is not forgiving when overcooked.
  • Skipping the Resting Period: This is crucial for tenderness.
  • Slicing with the Grain: This will result in tough steak.
  • Not Seasoning Properly: Don’t be afraid to use salt and pepper!

Remember, cooking is all about learning and experimenting. Don’t be discouraged if you make a mistake – just learn from it and try again!

Flavor Variations to Try

Want to mix things up? Here are a few delicious variations to try:

  • Garlic Herb Marinade: Combine olive oil, minced garlic, fresh herbs (like rosemary and thyme), salt, and pepper.
  • Citrus Marinade: Combine olive oil, lemon or lime juice, orange zest, garlic, and chili flakes.
  • Spicy Dry Rub: Combine chili powder, cumin, paprika, garlic powder, onion powder, salt, and pepper.
  • Asian-Inspired Marinade: Combine soy sauce, sesame oil, ginger, garlic, and honey.
  • Coffee Rub: Combine ground coffee, brown sugar, smoked paprika, garlic powder, onion powder, salt, and pepper.

The possibilities are endless! Feel free to get creative and experiment with different flavors to find your favorite combination.

How to Store Leftover Flank Steak

If you happen to have any leftover flank steak (which is rare in my house!), here’s how to store it properly:

  • Cool Completely: Let the steak cool completely before storing.
  • Wrap Tightly: Wrap the steak tightly in plastic wrap or aluminum foil.
  • Store in the Refrigerator: Store in the refrigerator for up to 3-4 days.

To reheat, you can slice the steak and warm it gently in a skillet or microwave. Be careful not to overcook it!

Frequently Asked Questions (FAQ)

  • Can I use a different cut of steak? While this recipe is specifically for flank steak, you could try it with skirt steak or hanger steak. Just keep in mind that cooking times may vary.
  • Can I cook flank steak from frozen? I don’t recommend cooking flank steak from frozen, as it will be difficult to get a good sear and the steak may not cook evenly.
  • How do I know when the steak is done? The best way to tell if the steak is done is to use a meat thermometer. Insert the thermometer into the thickest part of the steak.
  • Can I grill flank steak instead? Absolutely! Flank steak is delicious grilled. Just be sure to preheat your grill to high heat and cook for about 4-5 minutes per side for medium-rare.

Serving Suggestions: What to Serve with Flank Steak

Now for the fun part – what to serve with your delicious flank steak! Here are a few of my favorite pairings:

  • Tacos: Slice the flank steak thinly and serve in warm tortillas with your favorite toppings, like salsa, guacamole, and sour cream.
  • Salads: Top a fresh salad with sliced flank steak for a protein-packed meal.
  • Sandwiches: Make a steak sandwich with crusty bread, horseradish mayo, and caramelized onions.
  • Roasted Vegetables: Serve with roasted vegetables like asparagus, Brussels sprouts, or sweet potatoes.
  • Mashed Potatoes: A classic pairing!
  • Hawaiian Rolls: Slice the steak thin and make sliders using Hawaiian Rolls.

The possibilities are endless! Flank steak is incredibly versatile and pairs well with just about anything. Whether you are looking to cook it in tacos, or broiling it to perfection, this recipe is sure to be a winner. It’s one of those meals that just works, no matter what you serve it with. Remember, cooking should be fun and stress-free. Trust your instincts, and don’t be afraid to experiment!

How To Cook Flank Steak In The Oven Cooking Lessons From The Kitchn

Prep Time 5 minutes
Cook Time 15 minutes
Total Time 30 minutes
Servings 4 people
Calories 350
Learn how to cook a delicious and tender flank steak in the oven with this easy recipe. Perfect for a quick and flavorful weeknight meal.

Ingredients

Ingredients

  • 1 flank steak (1 1/2- to 2-pound)
  • 2 tablespoons olive oil
  • 1 teaspoon kosher salt
  • 1/2 teaspoon black pepper
  • Marinade or dry rub (Optional)

Instructions 

  • Preheat oven to 425°F (220°C).
  • Pat flank steak dry with paper towels.
  • Rub steak with olive oil, salt, and pepper (or marinade/rub).
  • Sear steak in oven-safe skillet for 2-3 minutes per side (optional).
  • Transfer to the oven.
  • Roast for 8-12 minutes for medium-rare (130-135°F or 54-57°C).
  • Rest the steak for at least 10 minutes.
  • Slice thinly against the grain.
  • Serve immediately.

Notes

For best results, use a meat thermometer to ensure the steak is cooked to your desired level of doneness.
Calories: 350kcal
Cost: $20
Course: Main Course
Cuisine: American
Keyword: Beef
pin

Instant Pot Steak Fajitas: A Weeknight Fiesta in Minutes!

Hey there, amigos! Ava here, back from my Seattle kitchen with a recipe that’s going to revolutionize your Taco Tuesday (or any night, really!). If you’re anything like me, you love the sizzling, flavorful goodness of steak fajitas but sometimes lack the time or energy for all the chopping, marinating, and pan-frying. Well, say hello to your new best friend: the Instant Pot! These Instant Pot Steak Fajitas are quick, easy, and packed with so much flavor, you’ll think you’re dining at your favorite Mexican restaurant. Seriously, get ready to have your taste buds do a happy dance!

I remember the first time I tried making fajitas. It was a total disaster. The steak was tough, the peppers were soggy, and the whole thing just tasted…blah. I almost gave up on my fajita dreams until I discovered the magic of the Instant Pot. This recipe is a game-changer, folks. Trust me.

Why You’ll Absolutely Love These Instant Pot Steak Fajitas

Let’s be honest, we all crave those dishes that are both delicious and convenient. This recipe delivers on both fronts! Forget slaving over a hot stove for hours. The Instant Pot transforms tough cuts of steak into tender, flavorful strips in a fraction of the time. And the best part? Clean-up is a breeze! But there are so many more reasons to love these. Here are a few:

  • Speedy Gonzales: Seriously, from prep to plate, you’re looking at about 30 minutes. That’s faster than takeout!
  • Tender, Juicy Steak: The Instant Pot’s pressure cooking magic turns even budget-friendly cuts of steak into melt-in-your-mouth goodness. If you’ve struggled with tough steak in the past, your struggles are over!
  • Flavor Explosion: We’re talking layers of smoky, savory, and slightly spicy flavors that will tantalize your taste buds. I’ve perfected the spice blend, and you’re going to love it.
  • One-Pot Wonder: Less mess, less stress! Everything cooks together in the Instant Pot, making clean-up a snap.
  • Customizable: Add your favorite toppings, swap out veggies, adjust the spice level – make it your own!
  • Perfect for Meal Prep: These fajitas are fantastic for meal prepping. Make a big batch on Sunday and enjoy delicious lunches or dinners all week long.

The Secret to Amazing Instant Pot Steak Fajitas

The secret to these Instapot Fajitas isn’t just the Instant Pot itself (although that definitely helps!). It’s all about the combination of quality ingredients, a killer spice blend, and the right cooking technique. Don’t skimp on the spices! This is where the magic happens. And don’t be afraid to experiment with different cuts of steak to find your favorite. I personally love flank steak or London broil, but skirt steak also works well.

Gather Your Ingredients for Instant Pot Fajitas Steak

Here’s what you’ll need to create these flavor-packed fajitas:

  • 2 to 3 pounds flank steak or London Broil sliced into strips
  • 1 tablespoon olive oil
  • 1 onion, sliced
  • 3 bell peppers in various colors, seeded and sliced
  • 1 ½ cups beef broth
  • ¼ teaspoon dried oregano
  • ½ teaspoon smoked paprika
  • 1 teaspoon chili powder
  • 1 teaspoon garlic powder
  • ½ teaspoon onion powder
  • 1 teaspoon ground cumin
  • 1 teaspoon salt
  • ½ teaspoon black pepper
  • 1 teaspoon chopped chipotle peppers in adobo sauce, optional
Recipe Image

Step-by-Step: Making Your Instant Pot Steak Fajitas

Alright, let’s get cooking! Here’s how to make these amazing Instant Pot Steak Fajitas:

  1. Start by setting your Instant Pot to sauté and heat that until it’s “hot”.
  2. Next, add in olive oil and your sliced meat. Do so in small batches and make certain to brown it on both sides. Set aside but keep it warm.
  3. Pour the beef broth into the Instant Pot and use this liquid to help scrape the bottom of the pot with a flat-edged spoon or spatula.
  4. Next, add in the steak and all the seasonings and sliced veggies, too.
  5. Grab the top of the lid and close while setting the valve to sealing. Set the Instant Pot to manual or pressure cook for 8 minutes of time.
  6. Make certain that you naturally release for 5 minutes before you do a quick release.
  7. Serve in a bowl or over rice or with a tortilla.

Pro Tips for Perfect Instant Pot Steak Fajitas Every Time

Want to take your Instant Pot Steak Fajitas to the next level? Here are a few of my tried-and-true tips:

  • Don’t overcrowd the pot: Brown the steak in batches to ensure even browning and prevent steaming. Overcrowding the pot will lower the temperature and result in less flavorful steak.
  • Deglaze, deglaze, deglaze!: Don’t skip the step of deglazing the pot with beef broth. This is crucial for preventing the dreaded “burn” notice and adding extra flavor to your fajitas.
  • Don’t overcook the steak: 8 minutes is usually perfect for flank steak or London broil, but adjust the cooking time depending on the thickness of your steak. You want it to be tender but not mushy.
  • Natural Pressure Release is Key: Allow for a natural pressure release of at least 5 minutes before doing a quick release. This helps the steak retain its juices and prevents it from becoming tough.
  • Warm Your Tortillas: Warm tortillas are a must! You can warm them in a dry skillet, in the microwave, or even in the oven.

Common Mistakes to Avoid When Making Instant Pot Steak Fajitas

Even with a simple recipe like this, it’s easy to make a few common mistakes. Here’s what to watch out for:

  • Not searing the steak: Searing the steak adds a depth of flavor that you just can’t get without it. Don’t skip this step!
  • Using the wrong cut of steak: Tougher cuts of steak like flank steak or London broil are best for the Instant Pot. More tender cuts like sirloin can become overcooked and dry.
  • Adding too much liquid: The Instant Pot needs liquid to create steam, but too much liquid will result in watery fajitas. Stick to the recipe’s recommendation of 1 ½ cups of beef broth.
  • Forgetting to season: Don’t be shy with the spices! Season the steak and vegetables generously for maximum flavor.

Variations: Spice Up Your Instant Pot Steak Fajitas

Want to get creative with your Instant Pot Steak Fajitas? Here are a few fun variations to try:

  • Spicy Fajitas: Add a pinch of cayenne pepper or a few extra chopped chipotle peppers to the spice blend for a fiery kick.
  • Chicken Fajitas: Substitute the steak with chicken breasts or thighs. Adjust the cooking time accordingly (usually around 6-7 minutes).
  • Vegetarian Fajitas: Skip the steak altogether and load up on extra veggies like mushrooms, zucchini, and corn.
  • Shrimp Fajitas: Add shrimp during the last minute of cooking for a quick and easy shrimp fajita variation.
  • Pineapple Fajitas: Add chunks of fresh pineapple to the Instant Pot for a sweet and tangy twist.

Serving Suggestions: Complete Your Fajita Fiesta!

These Instant Pot Steak Fajitas are delicious on their own, but they’re even better with all the fixings! Here are a few of my favorite serving suggestions:

  • Tortillas: Warm flour or corn tortillas are a must.
  • Toppings: Load up on your favorite toppings like sour cream, guacamole, salsa, shredded cheese, and chopped cilantro.
  • Sides: Serve with a side of rice and beans for a complete and satisfying meal.
  • Drinks: Wash it all down with a refreshing margarita or a cold Mexican beer.

How to Store and Reheat Leftover Instant Pot Steak Fajitas

Got leftovers? Lucky you! Here’s how to store and reheat them:

  • Storage: Store leftover fajitas in an airtight container in the refrigerator for up to 3-4 days.
  • Reheating: Reheat in the microwave, in a skillet over medium heat, or in the Instant Pot using the sauté function. Add a splash of beef broth to prevent drying out.

Frequently Asked Questions About Instant Pot Steak Fajitas

Still have questions? Here are some frequently asked questions about Instant Pot Steak Fajitas:

  • Can I use frozen steak? Yes, you can use frozen steak, but you’ll need to add a few minutes to the cooking time.
  • Can I make this ahead of time? Yes, you can make the fajitas ahead of time and store them in the refrigerator until ready to serve.
  • Can I use a different type of pepper? Absolutely! Feel free to use any type of pepper you like.
  • Can I add other vegetables? Of course! Mushrooms, zucchini, and corn are all great additions.
  • My Instant Pot says “burn.” What do I do? This usually means that there are stuck-on bits at the bottom of the pot. Release the pressure, carefully remove the steak and vegetables, and deglaze the pot thoroughly before continuing.

Let’s Get Cooking!

So there you have it, folks! My quick and easy Instant Pot Steak Fajitas recipe. I hope you enjoy it as much as my family and I do. Remember, cooking should be fun and stress-free. Don’t be afraid to experiment, get creative, and most importantly, enjoy the process. Happy cooking!

This recipe is sure to become a staple in your household. The combination of tender steak, flavorful vegetables, and a zesty spice blend is simply irresistible. And with the convenience of the Instant Pot, you can have delicious, restaurant-quality fajitas on the table in minutes. Taco Tuesday just got a whole lot easier!

These instant pot steak fajitas are the perfect solution for busy weeknights. The instant pot ensures the meat is incredibly tender and flavorful. You can easily adjust the ingredients to your liking, adding more or less spice, or including your favorite vegetables. It’s a versatile recipe that’s sure to please everyone.

To make the steak even more flavorful, consider marinating it for a few hours before cooking. A simple marinade of lime juice, soy sauce, and garlic can really enhance the taste. And don’t forget the toppings! A dollop of sour cream, a sprinkle of cheese, and a handful of fresh cilantro can take your fajitas to the next level.

If you’re looking for a quick, easy, and delicious meal, these instant pot steak fajitas are the perfect choice. They’re packed with flavor, incredibly tender, and ready in minutes. Give them a try and let me know what you think!

The meat is so tender, it practically melts in your mouth. The vegetables are perfectly cooked, retaining their crispness and flavor. And the spice blend is just right, adding a touch of heat without being overpowering. It’s a symphony of flavors that will leave you wanting more.

The instant pot is a game-changer for weeknight dinners. It’s so easy to use, and it cooks food incredibly quickly. These instant pot steak fajitas are a testament to the power of this amazing appliance. If you don’t have an instant pot, I highly recommend getting one. It will transform your cooking life!

The best part about this recipe is that it’s so customizable. You can easily adjust the ingredients to your liking, adding more or less spice, or including your favorite vegetables. It’s a versatile recipe that’s sure to please everyone.

So what are you waiting for? Grab your instant pot, gather your ingredients, and let’s get cooking! These instant pot steak fajitas are sure to become a new family favorite.

If you are, looking for something quick, easy, and delicious, you’ve found it! It’s a fantastic recipe to make.

Instant Pot Steak Fajitas

Prep Time 15 minutes
Cook Time 20 minutes
Total Time 35 minutes
Servings 6 servings
Calories 350
Quick and easy steak fajitas made in the Instant Pot! Tender steak and flavorful vegetables cooked to perfection in minutes.

Ingredients

Ingredients

  • 2 to 3 pounds flank steak or London Broil (sliced into strips)
  • 1 tablespoon olive oil
  • 1 onion (sliced)
  • 3 bell peppers (in various colors, seeded and sliced)
  • 1.5 cups beef broth
  • 0.25 teaspoon dried oregano
  • 0.5 teaspoon smoked paprika
  • 1 teaspoon chili powder
  • 1 teaspoon garlic powder
  • 0.5 teaspoon onion powder
  • 1 teaspoon ground cumin
  • 1 teaspoon salt
  • 0.5 teaspoon black pepper
  • 1 teaspoon chopped chipotle peppers in adobo sauce (optional)

Instructions 

  • Set Instant Pot to saute and heat until 'hot'. Add olive oil and sliced meat in small batches, browning on both sides. Set aside and keep warm.
  • Pour beef broth into the Instant Pot and scrape the bottom of the pot with a flat-edged spoon or spatula.
  • Add steak, seasonings, and sliced vegetables.
  • Close the lid, setting the valve to sealing. Set to manual or pressure cook for 8 minutes.
  • Naturally release for 5 minutes, then quick release.
  • Serve in a bowl, over rice, or with tortillas.

Notes

Adjust cooking time based on desired steak doneness. For a spicier dish, add more chipotle peppers.
Calories: 350kcal
Cost: $20
Course: Main Course
Cuisine: Mexican
Keyword: Steak
pin

Hey there, burger aficionados! Ava here, from my cozy Seattle kitchen, ready to share a secret weapon for burger bliss: cooking them on the stove. Now, I know what you might be thinking – burgers belong on the grill, right? Well, sometimes life (and weather!) throws you a curveball. Maybe it’s raining cats and dogs outside, or perhaps you just don’t feel like firing up the grill. That’s where the humble stovetop swoops in to save the day. Trust me, with the right technique, you can achieve juicy, flavorful, and perfectly cooked burgers right in your kitchen. Let’s dive in!

I grew up with the aroma of my mom’s cooking, always experimenting and improvising. I remember one time, we had a huge family gathering, and a sudden thunderstorm ruined our outdoor barbecue plans. Mom, without missing a beat, pulled out her trusty cast iron skillet and cooked the burgers on the stove. They were a hit! Everyone raved about how juicy and delicious they were. That’s when I realized the stovetop could be a burger’s best friend.

Why You’ll Love This Stovetop Burger Recipe

Okay, let’s get down to brass tacks. Why should you ditch the grill and embrace the stovetop burger? Here’s why:

  • Convenience: No need to brave the elements or wait for the grill to heat up. The stovetop is ready when you are.
  • Year-Round Burger Bliss: Rain or shine, you can enjoy a delicious burger any time of year.
  • Easy Cleanup: Fewer tools, less mess. Cleaning a skillet is a breeze compared to scrubbing a grill.
  • Perfect Sear: A hot skillet creates a beautiful, flavorful crust on the outside of the burger while keeping the inside juicy.
  • Customizable: Easily add cheese, sauté onions, or create a delicious pan sauce right in the same skillet.

Ingredients You’ll Need

Let’s gather our ingredients. This recipe is simple, but quality ingredients make all the difference. I always prefer to use high-quality ground beef; it truly elevates the flavor.

  • 1 1/3 pounds ground beef
  • 3 tablespoons butter, softened, divided
  • 4 hamburger buns, split
  • 1 teaspoon kosher salt
  • Optional: Cheese, lettuce, tomato, red onion, mayonnaise, ketchup and mustard
Recipe Image

How to Cook the Burgers on the Stove: Step-by-Step

Alright, let’s get cooking! Follow these simple steps, and you’ll be enjoying a delicious stovetop burger in no time. Remember, the key is to keep an eye on the burgers and adjust the heat as needed. The goal is to achieve a beautiful sear without burning them.

  1. Shape the Patties: Shape the ground beef into four 1-inch-thick patties. Using your thumb, press a 1/2-inch hole in the center of each patty. This helps prevent the burgers from bulging in the middle as they cook. Refrigerate the patties until cooking. Editor’s Tip: Store the burger patties in the refrigerator, covered, until you’re ready to cook. If the fat is cold, it will rapidly expand when the burgers hit the hot skillet, forming flavorful pockets inside the patties.
  2. Toast the Buns: Spread 2 tablespoons butter over the cut sides of the buns. In a large cast-iron skillet over medium-high heat, toast the buns, cut sides down, in batches. Remove to serving plates, and wipe the skillet clean. Editor’s Tip: A wet paper towel is the easiest way to remove any errant crumbs from the skillet. The crumbs will cling to the damp towel, leaving the skillet clean of any debris that might burn.
  3. Season the Patties: Sprinkle the chilled burger patties with salt. Editor’s Tip: Keep the salt away from your burger patties until the last possible moment. Salt draws out moisture, and you want the burgers to retain as much moisture as possible to keep them juicy. Salting hamburgers too early will make them dense and tough.
  4. Cook the Burgers: In the same skillet, melt the remaining 1 tablespoon butter over medium-high heat. Add the chilled, seasoned patties. Cook until a thermometer reads 160°, 8 to 10 minutes, turning once. Editor’s Tip: Make sure the burger patties have a little space to breathe. If they’re crowded, the burgers won’t sear and cook properly. You’ll know it’s time to flip the burgers when the edges start to brown.
  5. Serve and Enjoy: Serve the burgers on toasted buns with toppings as desired. Editor’s Tip: For cheeseburgers, place a slice of cheese on each burger immediately after removing it from the skillet. You can cover the burgers with a plate to help the cheese melt faster.

Pro Tips for the Best Pan-Fried Burgers

Want to take your stovetop burger game to the next level? Here are a few pro tips I’ve learned over the years:

  • Use a Cast Iron Skillet: Cast iron retains heat beautifully and provides even cooking, resulting in a perfect sear.
  • Don’t Overcrowd the Pan: Cook the patties in batches if necessary to avoid overcrowding the pan. Overcrowding lowers the temperature and prevents proper searing.
  • Don’t Press the Patties: Resist the urge to press down on the patties with a spatula. This squeezes out the juices and makes the burgers dry.
  • Use a Meat Thermometer: A meat thermometer is your best friend for ensuring the burgers are cooked to the perfect internal temperature.
  • Let the Meat Rest: After cooking, let the burgers rest for a few minutes before serving. This allows the juices to redistribute, resulting in a more flavorful and juicy burger.

Common Mistakes to Avoid

We all make mistakes in the kitchen, but knowing what to avoid can save you from a burger disaster. Here are a few common pitfalls to watch out for:

  • Overcooking the Burgers: Overcooked burgers are dry and tough. Use a meat thermometer and cook to an internal temperature of 160°F (71°C) for medium doneness.
  • Using Lean Ground Beef: Lean ground beef can result in dry burgers. Opt for ground beef with a higher fat content (around 80/20) for juicier results.
  • Salting Too Early: As mentioned earlier, salt draws out moisture. Wait until just before cooking to season the patties.
  • Not Preheating the Skillet: A hot skillet is essential for achieving a good sear. Make sure the skillet is properly preheated before adding the patties.
  • Flipping Too Often: Resist the urge to flip the burgers constantly. Let them cook for several minutes on each side to develop a nice crust.

Burger Variations to Try

The beauty of burgers is their versatility. Here are a few fun variations to spice things up:

  • Cheese Stuffed Burgers: Stuff the patties with your favorite cheese before cooking for a melty surprise.
  • Mushroom and Swiss Burgers: Sauté sliced mushrooms and top the burgers with Swiss cheese.
  • Bacon Cheeseburgers: Add crispy bacon to your cheeseburgers for extra flavor and texture.
  • Spicy Jalapeño Burgers: Mix diced jalapeños into the ground beef for a spicy kick.
  • BBQ Burgers: Brush the burgers with your favorite BBQ sauce during the last few minutes of cooking.

How to Store Leftover Burgers

If you happen to have any leftover burgers (which is rare in my house!), here’s how to store them properly:

  • Refrigerate: Store cooked burgers in an airtight container in the refrigerator for up to 3-4 days.
  • Reheat: Reheat the burgers in a skillet, microwave, or oven until heated through.
  • Freeze: For longer storage, freeze cooked burgers in an airtight container for up to 2-3 months.

Frequently Asked Questions (FAQ)

Got questions? I’ve got answers! Here are a few frequently asked questions about cooking burgers on the stove:

  • What is the best type of pan to use?: A cast iron skillet is ideal, but a heavy-bottomed stainless steel skillet will also work.
  • What is the best temperature to cook burgers on the stove?: Medium-high heat is generally recommended.
  • How long does it take to cook burgers on the stove?: It depends on the thickness of the patties, but typically 8-10 minutes, turning once.
  • How do I know when the burgers are done?: Use a meat thermometer to check the internal temperature. 160°F (71°C) for medium.
  • Can I cook frozen burgers on the stove?: Yes, but it’s best to thaw them first for even cooking.

Serving Suggestions

Now for the fun part: serving your delicious stovetop burgers! Here are a few ideas to get you started:

  • Classic Burger: Serve on a toasted bun with lettuce, tomato, onion, ketchup, and mustard.
  • Cheeseburger: Add your favorite cheese, such as cheddar, Swiss, or pepper jack.
  • Bacon Cheeseburger: Top with crispy bacon and cheese.
  • Gourmet Burger: Get creative with toppings like avocado, caramelized onions, and a special sauce.
  • Sides: Serve with fries, onion rings, coleslaw, or a fresh salad.

So there you have it! Everything you need to know to cook juicy and delicious burgers on the stove. Now go forth and create your own burger masterpiece! Remember, cooking is all about experimentation and having fun. Don’t be afraid to try new things and put your own spin on this recipe. And as always, happy cooking!

This recipe is one of my favorite ways to make the burger when the weather isn’t cooperating. I used the same technique my mom used when I was growing up. This recipe is sure to become your favorite, too! All the patties are cooked until the internal temperature reaches 160°F. You’ll find it’s like a restaurant-quality burger, but cooked in your own kitchen. Set aside some time this week to make this recipe and cook it for your family. I hope you enjoy!

How to Cook the Burgers on the Stove

Prep Time 10 minutes
Cook Time 10 minutes
Total Time 20 minutes
Servings 4 burgers
Calories 450
Learn how to cook juicy and delicious burgers on the stove with this simple recipe. Perfect for a quick and satisfying meal any time of the year!

Ingredients

Burger Ingredients

  • 1 1/3 pounds ground beef
  • 3 tablespoons butter (softened, divided)
  • 4 hamburger buns (split)
  • 1 teaspoon kosher salt
  • Cheese, lettuce, tomato, red onion, mayonnaise, ketchup and mustard (Optional)

Instructions 

  • Shape beef into patties with a thumb-sized hole. Refrigerate until cooking.
  • Butter and toast buns in a skillet. Remove and wipe skillet clean.
  • Sprinkle chilled burger patties with salt.
  • Melt butter in skillet, add patties, and cook to 160°, 8-10 minutes, turning once.
  • Serve burgers on toasted buns with desired toppings.

Notes

Keep the salt away from your burger patties until the last possible moment to retain moisture.
Calories: 450kcal
Cost: $12
Course: Main Course
Cuisine: American
Keyword: Beef
pin

Hey there, friend! Ava here, back in my Seattle kitchen, where the magic (and delicious smells!) happen. Tonight, we’re ditching the complicated recipes and embracing pure weeknight bliss with these Sheet Pan Steak Fajitas. Seriously, if you’re anything like me, you crave meals that are both incredibly tasty and incredibly easy. And let me tell you, this one checks all the boxes.

Growing up, fajitas were a special occasion meal. My mom would spend hours marinating the steak and prepping all the fixings. While I loved those fajitas, as an adult, I needed a quicker, simpler version. That’s where the sheet pan comes in! It’s a game-changer, allowing you to roast everything together in one pan for maximum flavor and minimal cleanup. And trust me, once you taste these, you’ll wonder why you ever made fajitas any other way.

Why You’ll Love This Sheet Pan Steak Fajitas Recipe

Okay, let’s get real. Why should you try this recipe? Well, besides the fact that it’s ridiculously easy, here’s why I think you’re going to fall head-over-heels for these sheet pan steak fajitas:

  • Quick Prep: Seriously, you’re looking at about 15 minutes of prep time. That’s it!
  • Minimal Cleanup: Everything cooks on one sheet pan. Hallelujah!
  • Flavor Explosion: The combination of spices, lime juice, and perfectly cooked steak and vegetables is simply irresistible.
  • Customizable: Add your favorite toppings and make it your own! Sour cream, salsa, guacamole… the possibilities are endless.
  • Weeknight Winner: This is the perfect meal for busy weeknights when you need something delicious and satisfying on the table fast.
  • Gluten-Free Friendly: Simply use corn tortillas to make these fajitas entirely gluten-free.

I remember the first time I made these. My husband, Mark, who is a bit of a steak snob, was skeptical. But after one bite, he was completely sold. He even declared them “better than restaurant fajitas!” And that, my friends, is high praise indeed.

Sheet Pan Steak Fajitas Ingredients

Here’s what you’ll need to create these flavor-packed fajitas. Don’t worry, it’s a pretty straightforward list!

  • ‘1.5 lbs flank steak or sirloin, thinly sliced against the grain’
  • ‘3 bell peppers (red, yellow, green), seeded and sliced’
  • ‘1 large red onion, peeled and sliced’
  • ‘3 tbsp olive oil’
  • ‘2 tbsp lime juice (about 1 lime)’
  • ‘2 tsp chili powder’
  • ‘1 tsp ground cumin’
  • ‘1 tsp smoked paprika’
  • ‘0.5 tsp garlic powder’
  • ‘0.5 tsp onion powder’
  • ‘0.5 tsp dried oregano’
  • ‘1 tsp salt’
  • ‘0.5 tsp black pepper’
  • ‘8 small flour or corn tortillas, warmed’
  • ‘Lime wedges’
  • ‘Fresh cilantro, chopped’
  • ‘Optional: sour cream, salsa, sliced avocado, shredded cheese’
Recipe Image

How to Make Sheet Pan Steak Fajitas: Step-by-Step

Alright, let’s get cooking! Here’s a breakdown of how to make these amazing sheet pan steak fajitas:

  1. Prep the Oven and Pan: Preheat your oven to 425°F (220°C). Line a large sheet pan with parchment paper for easy cleanup, or lightly grease it with cooking spray.
  2. Make the Marinade: In a large bowl, whisk together the olive oil, lime juice, chili powder, cumin, smoked paprika, garlic powder, onion powder, oregano, salt, and black pepper. This marinade is the secret to the incredible flavor of these fajitas.
  3. Combine Ingredients: Add the sliced steak, bell peppers (red, yellow, and green for a colorful mix!), and red onion to the bowl with the marinade. Toss everything thoroughly to make sure the steak and vegetables are evenly coated.
  4. Arrange on Sheet Pan: Spread the steak and vegetables in a single layer on the prepared sheet pan. Try not to overcrowd the pan, as this can steam the vegetables instead of roasting them.
  5. Roast to Perfection: Roast in the preheated oven for 18 to 20 minutes, stirring halfway through. You’ll know they’re ready when the steak is cooked through and the vegetables are tender and slightly caramelized. The peppers and onions all should be tender and slightly charred.
  6. Warm Tortillas: While the fajitas are roasting, warm your tortillas. You can do this in a dry skillet, in the microwave, or wrapped in foil in the oven.
  7. Serve and Enjoy: Serve the cooked steak and vegetables with the warmed tortillas. Garnish with fresh cilantro and lime wedges. And don’t forget your favorite toppings!

Pro Tips for the Best Sheet Pan Steak Fajitas

Want to take your sheet pan steak fajitas to the next level? Here are a few of my favorite pro tips:

  • Choose the Right Steak: Flank steak or sirloin are both great choices for fajitas. Make sure to slice the steak thinly against the grain for maximum tenderness.
  • Don’t Overcrowd the Pan: Overcrowding the sheet pan will steam the vegetables instead of roasting them. If necessary, use two sheet pans to ensure everything cooks properly.
  • Marinate for Extra Flavor: While not essential, marinating the steak for 30 minutes to an hour before roasting will enhance the flavor.
  • Use Fresh Lime Juice: Fresh lime juice makes a huge difference in the flavor of the marinade.
  • Preheat the Pan: For even better caramelization, preheat the sheet pan in the oven for a few minutes before adding the steak and vegetables.

I learned the hard way about overcrowding the pan. The first time I made these, I piled everything on, and the vegetables ended up soggy. Now, I always make sure to spread everything out in a single layer, and the results are so much better!

Common Mistakes to Avoid

Even the easiest recipes can have pitfalls. Here are a few common mistakes to watch out for:

  • Overcooking the Steak: The steak should be cooked to medium-rare or medium for the best texture. Overcooked steak will be tough and dry.
  • Not Slicing Against the Grain: Slicing the steak with the grain will result in chewy, tough fajitas. Always slice against the grain to break up the muscle fibers.
  • Skipping the Marinade: The marinade is essential for adding flavor and tenderizing the steak. Don’t skip it!
  • Using Dull Spices: Make sure your spices are fresh for the best flavor.

That s when I realized the importance of using a meat thermometer! Now, I always check the internal temperature of the steak to make sure it’s cooked perfectly.

Variations on Sheet Pan Steak Fajitas

Want to mix things up? Here are a few fun variations on this recipe:

  • Chicken Fajitas: Substitute chicken breast or thighs for the steak.
  • Shrimp Fajitas: Use shrimp instead of steak for a lighter option.
  • Vegetarian Fajitas: Omit the steak and add extra vegetables, such as zucchini, squash, or mushrooms.
  • Spicy Fajitas: Add a pinch of cayenne pepper or a chopped jalapeño to the marinade for extra heat.
  • Different Vegetables: Feel free to experiment with different vegetables, such as poblano peppers, mushrooms, or even sweet potatoes.

One time, I added pineapple to the sheet pan, and it was a surprisingly delicious addition! The sweetness of the pineapple paired perfectly with the savory steak and spices.

How to Store and Reheat Leftovers

If you have any leftovers (which is rare in my house!), here’s how to store and reheat them:

  • Storage: Store the cooked steak and vegetables in an airtight container in the refrigerator for up to 3 days.
  • Reheating: Reheat in a skillet over medium heat until warmed through. You can also reheat in the microwave, but the steak may become a bit tougher.
  • Freezing: While you can freeze the cooked steak and vegetables, the texture may change upon thawing. If you do freeze them, store in an airtight container for up to 2 months.

I ve found that adding a little bit of water or broth to the skillet when reheating helps to keep the steak moist.

Frequently Asked Questions (FAQ)

Got questions? I’ve got answers! Here are some of the most common questions I get about this recipe:

  • Can I use a different type of steak? Yes, you can use other cuts of steak, such as skirt steak or ribeye. Just make sure to slice it thinly against the grain.
  • Can I make this ahead of time? You can prep the vegetables and marinade ahead of time. Store them separately in the refrigerator until ready to cook.
  • Can I use frozen vegetables? While fresh vegetables are best, you can use frozen vegetables in a pinch. Just make sure to thaw them completely and pat them dry before adding them to the sheet pan.
  • How do I know when the steak is cooked? Use a meat thermometer to check the internal temperature of the steak. Medium-rare is 130-135°F, medium is 135-140°F.
  • Can I grill the steak and vegetables instead of roasting them? Absolutely! Grill the steak over medium-high heat until cooked to your liking. Grill the vegetables until tender-crisp.

When I first started making these, I was always worried about overcooking the steak. But after a few tries, I got the hang of it, and now it’s a breeze!

Serving Suggestions for Sheet Pan Steak Fajitas

These Sheet Pan Steak Fajitas are delicious on their own, but here are a few ideas for how to serve them:

  • Classic Fajitas: Serve with warm tortillas, sour cream, salsa, guacamole, shredded cheese, and chopped cilantro.
  • Fajita Bowls: Create a fajita bowl with rice, black beans, corn, and your favorite toppings.
  • Fajita Salad: Top a bed of lettuce with the steak and vegetables, and add a dollop of sour cream and salsa.
  • Fajita Nachos: Layer tortilla chips with the steak and vegetables, and top with melted cheese and your favorite toppings.

I love serving these with a side of Mexican rice and a refreshing margarita. It’s the perfect way to transport yourself to a sunny beach, even on a rainy Seattle evening.

So there you have it! My go-to recipe for Sheet Pan Steak Fajitas. I hope you love them as much as my family does. And remember, cooking is all about having fun and experimenting. So don’t be afraid to get creative and make this recipe your own. Happy cooking!

These fajitas feel like a warm hug. They make you feel like you re eating something people actually wanted to eat, because it s the best and because you can make them. That s what makes me love cooking. I hope it makes you feel the same.

Sheet Pan Steak Fajitas

Prep Time 15 minutes
Cook Time 20 minutes
Total Time 35 minutes
Servings 4 people
Calories 450
Enjoy a quick and easy weeknight dinner with these flavorful sheet pan steak fajitas. Tender steak and colorful bell peppers are roasted to perfection and served with warm tortillas and your favorite toppings.

Ingredients

Main Ingredients

  • 1.5 lbs flank steak or sirloin (thinly sliced against the grain)
  • 3 bell peppers (red, yellow, green, seeded and sliced)
  • 1 large red onion (peeled and sliced)

Marinade

  • 3 tbsp olive oil
  • 2 tbsp lime juice (about 1 lime)
  • 2 tsp chili powder
  • 1 tsp ground cumin
  • 1 tsp smoked paprika
  • 0.5 tsp garlic powder
  • 0.5 tsp onion powder
  • 0.5 tsp dried oregano
  • 1 tsp salt
  • 0.5 tsp black pepper

Serving

  • 8 small flour or corn tortillas (warmed)
  • Lime wedges
  • Fresh cilantro (chopped)
  • sour cream, salsa, sliced avocado, shredded cheese (Optional)

Instructions 

  • Preheat oven to 425°F. Line a sheet pan with parchment paper or grease it.
  • Whisk together olive oil, lime juice, chili powder, cumin, smoked paprika, garlic powder, onion powder, oregano, salt, and pepper.
  • Add steak, bell peppers, and red onion to the bowl. Toss to coat.
  • Spread the steak and vegetables in a single layer on the sheet pan.
  • Roast for 18-20 minutes, stirring halfway, until steak is cooked and vegetables are tender.
  • Warm tortillas. Serve steak and vegetables with tortillas, cilantro, and lime wedges. Add desired toppings.

Notes

For extra flavor, marinate the steak for at least 30 minutes before cooking.
Calories: 450kcal
Cost: $20
Course: dinner
Cuisine: Mexican
Keyword: Steak
pin

Hey there, burger aficionados! Ava here, and today we’re diving headfirst into the delicious world of homemade hamburger seasoning. More specifically, we’re tackling a recipe inspired by one of my all-time favorite burger joints: Five Guys. If you’ve ever craved that simple, yet utterly addictive flavor from their burgers, you’re in the right place. I’m going to show you how to recreate it in your own kitchen. Trust me, this is a game-changer. You’re about to level up your burger game!

Growing up, burgers were a staple at our family barbecues. My dad always had his secret blend of spices, but I was never quite satisfied. I wanted something more… something that would make my burgers sing. It wasn’t until I tasted a Five Guys burger that I knew I’d found my muse. The simplicity, the perfect balance of salt, pepper, and just a hint of something special. So, I did what any self-respecting food lover would do: I reverse-engineered it! And after many trials (and many delicious burgers), I cracked the code. This is it, folks. The Five Guys-inspired hamburger seasoning recipe that will make your taste buds do a happy dance.

Why You’ll Love This Hamburger Seasoning

Okay, let’s get down to brass tacks. Why should you bother making your own hamburger seasoning when you can just grab a pre-made blend from the store? Here’s why:

  • Control: You get to control every single ingredient. No weird additives, no excessive salt, just pure, unadulterated flavor.
  • Customization: Want a little more heat? Add a pinch of cayenne pepper. Craving a smoky flavor? Bump up the smoked paprika. This recipe is your canvas.
  • Freshness: Nothing beats the taste of freshly ground spices. The aroma alone will make you swoon.
  • It’s Easy!: Seriously, this recipe takes about 5 minutes to whip up. And it makes a big batch, so you’ll have plenty on hand for all your burger needs.

Plus, let’s be honest, there’s something incredibly satisfying about making something from scratch. It makes you feel like a culinary wizard, even if you’re just mixing a few spices together. And when you bite into that perfectly seasoned burger, you’ll know it was worth every second. Whether you’re a seasoned grill master or a newbie in the kitchen, this recipe is for you. It’s simple, straightforward, and guaranteed to deliver mouthwatering results. So, let’s get started!

Five Guys Hamburger Seasoning Ingredients

Here’s what you’ll need to create this magical blend:

  • 1 tablespoon kosher salt
  • 1 tablespoon ground black pepper
  • 1 teaspoon garlic powder
  • ½ teaspoon onion powder
  • ½ teaspoon smoked paprika (optional for added depth)
  • ¼ teaspoon ground mustard (optional for subtle tang)

A quick note on the ingredients: I highly recommend using kosher salt for this recipe. It has a cleaner, brighter flavor than regular table salt. As for the smoked paprika, it’s optional, but it adds a lovely depth of flavor that I personally adore. If you’re not a fan, feel free to leave it out. And if you’re feeling adventurous, try experimenting with different types of paprika – sweet, hot, or even Hungarian. The possibilities are endless!

Recipe Image

How to Make Five Guys Hamburger Seasoning: Step-by-Step

Alright, let’s get down to business. Here’s how to make this incredible hamburger seasoning, step-by-step:

  1. Mix the seasoning blend

    In a small bowl, combine salt, pepper, garlic powder, onion powder, paprika, and ground mustard (if using). Stir until fully combined.

  2. Store or use immediately

    Transfer the seasoning to an airtight container if storing for later, or set aside to use right away on your burgers.

  3. Form your patties

    Shape ground beef into 4-ounce patties, handling it gently to avoid overworking. Press a small dimple in the center of each to prevent puffing during cooking.

  4. Season the patties

    Just before cooking, sprinkle a generous pinch of seasoning on both sides of each patty. Press it in lightly.

  5. Cook to perfection

    Grill or cook the patties over medium-high heat for about 3–4 minutes per side, or until your preferred doneness. Add cheese during the last minute if desired.

  6. Assemble and serve

    Place the cooked burgers on toasted buns with your favorite toppings — lettuce, tomato, pickles, onions, ketchup, and mustard. Serve immediately.

See? I told you it was easy! Now, let’s talk about some pro tips to take your burger game to the next level.

Pro Tips for the Perfect Burger

Here are a few insider tips to ensure your burgers are nothing short of spectacular:

  • Use High-Quality Beef: This is crucial. Look for ground beef with a fat content of around 80/20. The fat is what makes the burgers juicy and flavorful. The meat will thank you.
  • Don’t Overwork the Meat: Overworking the ground beef will result in tough, dry burgers. Handle it gently and mix it as little as possible.
  • Make a Dimple: Press a small dimple in the center of each patty before cooking. This will prevent them from puffing up like little footballs.
  • Season Generously: Don’t be shy with the seasoning! The more, the merrier (within reason, of course).
  • Let the Meat Rest: After cooking, let the burgers rest for a few minutes before serving. This will allow the juices to redistribute, resulting in a juicier burger.

These tips might seem small, but they can make a world of difference in the final product. Trust me, your taste buds will thank you.

Common Mistakes to Avoid

We all make mistakes in the kitchen, it’s how we learn! Here are some common burger-making blunders to watch out for:

  • Overcooking the Burgers: Nobody likes a dry, hockey-puck burger. Use a meat thermometer to ensure they’re cooked to your preferred doneness.
  • Using Too Lean Ground Beef: Lean ground beef might seem healthier, but it will result in dry, flavorless burgers. Opt for 80/20 for the best results.
  • Skipping the Toasted Bun: A toasted bun adds texture and prevents the burger from becoming soggy. Don’t skip this step!
  • Forgetting the Condiments: Ketchup, mustard, mayo… they’re all essential for a truly satisfying burger experience.

Remember that infamous triple-layer cake I mentioned earlier? Well, I overcooked the layers, used the wrong type of flour, and forgot the frosting. It was a disaster! But I learned from my mistakes, and now I can whip up a triple-layer cake that would make even Martha Stewart jealous. The same goes for burgers. Learn from your mistakes, and you’ll be a burger-making pro in no time.

Hamburger Seasoning Variations

Okay, now for the fun part: variations! This recipe is a fantastic base, but feel free to get creative and add your own personal touch. Here are a few ideas to get you started:

  • Spicy Burger: Add a pinch of cayenne pepper or red pepper flakes for a little heat.
  • Smoked Burger: Use all smoked paprika instead of regular paprika for an extra smoky flavor.
  • Herbaceous Burger: Add a teaspoon of dried oregano, thyme, or rosemary for an herbaceous twist.
  • Sweet and Savory Burger: Add a teaspoon of brown sugar for a touch of sweetness.

Don’t be afraid to experiment! Cooking is all about having fun and discovering new flavors. Try different combinations of spices and herbs until you find your perfect blend.

How to Store Hamburger Seasoning

Proper storage is key to keeping your hamburger seasoning fresh and flavorful. Here’s what you need to know:

  • Airtight Container: Store the seasoning in an airtight container to prevent it from losing its potency.
  • Cool, Dark Place: Keep the container in a cool, dark place away from direct sunlight and heat.
  • Shelf Life: When stored properly, this seasoning will last for up to months.

I like to use a small mason jar with a tight-fitting lid. It’s cute, functional, and keeps the seasoning fresh for a long time. Plus, it looks great on my spice rack!

Frequently Asked Questions (FAQ)

Got questions? I’ve got answers! Here are some frequently asked questions about hamburger seasoning:

  • Can I use this seasoning on other meats?: Absolutely! This seasoning is fantastic on chicken, pork, and even fish.
  • Can I make a bigger batch?: Of course! Simply double, triple, or quadruple the recipe as needed.
  • Is this seasoning gluten-free?: Yes, this seasoning is naturally gluten-free.
  • Can I use fresh garlic instead of garlic powder?: While you can, the texture will be different. Fresh garlic is best used in the burger patty itself, not the seasoning blend.

If you have any other questions, feel free to ask in the comments below! I’m always happy to help.

Serving Suggestions

Now that you’ve made the perfect hamburger seasoning, it’s time to put it to good use! Here are a few serving suggestions to get your creative juices flowing:

  • Classic Burger: Serve the burgers on toasted buns with lettuce, tomato, onion, pickles, ketchup, and mustard.
  • Cheeseburger: Add a slice of your favorite cheese (cheddar, Swiss, or provolone are all great choices) during the last minute of cooking.
  • Bacon Cheeseburger: Add a few strips of crispy bacon for an extra layer of flavor.
  • Gourmet Burger: Top the burgers with caramelized onions, sautéed mushrooms, and a dollop of aioli.

No matter how you choose to serve them, these burgers are guaranteed to be a hit. They’re perfect for backyard barbecues, family dinners, or even a quick weeknight meal. And with this incredible hamburger seasoning, you’ll be able to recreate the iconic Five Guys flavor right in your own kitchen. Enjoy!

This seasoning makes a fantastic base for smash burger seasoning recipe. It’s also great for grilled hamburger seasoning recipes. Remember, the key is to season the beef just before cooking. You can store it for up to months in an airtight container. This seasoning is not just for Five Guys copycats; it’s the best hamburger patties seasoning. Whether you’re grilling or using a griddle, this seasoning will transform the beef. A big part of the flavor comes from salt pepper, garlic powder, and onion powder. This is hamburger seasoning recipe burgers will love. Try it on your next burger patty!

Five Guys Hamburger Seasoning Recipe

Prep Time 5 minutes
Cook Time 10 minutes
Total Time 15 minutes
Servings 6 burgers
Calories 15
Recreate the iconic Five Guys burger flavor at home with this simple seasoning blend. Perfect for adding a delicious kick to your homemade burgers.

Ingredients

Seasoning Blend

  • 1 tablespoon kosher salt
  • 1 tablespoon ground black pepper
  • 1 teaspoon garlic powder
  • 0.5 teaspoon onion powder
  • 0.5 teaspoon smoked paprika (optional for added depth)
  • 0.25 teaspoon ground mustard (optional for subtle tang)

Instructions 

  • Mix the seasoning blend
  • Store or use immediately
  • Form your patties
  • Season the patties
  • Cook to perfection
  • Assemble and serve

Notes

Adjust seasoning to taste. For a spicier kick, add a pinch of cayenne pepper.
Calories: 15kcal
Cost: $5
Course: Main Course
Cuisine: American
Keyword: Beef
pin

Easy Sheet Pan Steak Fajitas Recipe: A Weeknight Fiesta!

Hey there, kitchen adventurers! Ava here, ready to whisk you away on a culinary journey that’s as simple as it is sensational. If you’re anything like me, weeknights are a whirlwind of activity, and the last thing you want is a complicated dinner routine. That’s where this Easy Sheet Pan Steak Fajitas recipe comes in to save the day! It’s the perfect solution for a quick, delicious, and crowd-pleasing meal that will have everyone asking for seconds. Forget the complicated steps and mountains of dishes – we’re keeping it easy and flavorful!

Growing up, fajitas were always a special occasion meal. My mom would spend hours marinating the steak, chopping vegetables, and prepping all the fixings. While I loved the result, I always thought there had to be an easier way. And guess what? I found it! This sheet pan method simplifies the process without sacrificing any of that authentic fajita flavor. It’s a game-changer, trust me.

In Seattle, where I live now, finding fresh ingredients is a breeze, which makes this recipe even more enjoyable. The vibrant colors of the bell peppers and onions, combined with the sizzle of the steak, create a dish that’s as visually appealing as it is delicious. So, let’s dive in and make some magic happen!

Why You’ll Love This Sheet Pan Steak Fajitas Recipe

Okay, let’s get real. Why should you spend your precious time making this recipe? Here’s why:

  • Quick and Easy: From prep to plate, this meal is ready in under 30 minutes. Seriously, you can have dinner on the table faster than you can order takeout.
  • Minimal Cleanup: One sheet pan means fewer dishes. Hallelujah!
  • Customizable: Add your favorite veggies, adjust the spice level, and load up on your favorite toppings. This recipe is a blank canvas for your culinary creativity.
  • Flavor Explosion: The combination of tender steak, caramelized vegetables, and zesty spices creates a flavor profile that will tantalize your taste buds.
  • Healthy and Wholesome: Packed with protein and veggies, this is a meal you can feel good about serving your family.

I’m always looking for ways to make my life easier without sacrificing flavor, and this recipe does just that. Plus, it’s a great way to use up any leftover vegetables you have in the fridge. It’s a win-win!

Ingredients You’ll Need

Here’s what you’ll need to create this amazing sheet pan feast:

  • 2 lbs skirt or flank steak (diced into 1 inch pieces)
  • 1 large red bell pepper (sliced thinly (about 1/4 inch thick))
  • 1 small yellow onion (peeled and sliced thinly, about 1/4 inch thick)
  • 4 1/2 tsp ground chili powder
  • 1 1/2 tsp ground cumin
  • 1 1/2 tsp smoked paprika
  • 1 tsp dried oregano
  • 3/4 tsp garlic powder
  • 1/2 tsp onion powder
  • 1/4 tsp cayenne powder
  • 1 tbsp kosher salt
  • 2 tbsp extra virgin olive oil
  • 2 tbsp fresh lime juice
  • 3 tbsp scallions (finely chopped)
  • flour or corn tortillas (for serving)
  • sour cream (for serving)
  • guacamole (for serving)
  • salsa (for serving)
  • cilantro-lime rice (for serving)
Recipe Image

Step-by-Step Instructions: Let’s Get Cooking!

Ready to transform these ingredients into a mouthwatering meal? Follow these simple steps:

  1. Preheat the oven: Get that oven roaring at 375°F (190°C).
  2. Prep the veggies and steak: In a large bowl, add the steak, bell pepper, and onion. Make sure the steak is diced and the vegetables are thinly sliced for even cooking.
  3. Mix the spices: In a small bowl, add all of the spices and salt. Whisk to combine. This ensures that the spices are evenly distributed.
  4. Marinate: Pour extra virgin olive oil and 4 tablespoons of the fajita mixture onto the steak and vegetables. Toss until well-coated. Let sit at room temperature for at least 20 minutes. This step is crucial for infusing the steak and vegetables with flavor.
  5. Bake: Line a sheet pan with foil or parchment paper for easy cleanup. Spread the steak and vegetables in a single layer. Bake until the steak is cooked and browned on the outside, about 10 to 12 minutes. Use a meat thermometer to check the internal temperature of the steak. Aim for about 130-135°F for medium-rare and 145°F for medium. Stir once halfway through cooking to ensure even browning.
  6. Finish and serve: Just before serving, toss the steak and vegetables with fresh lime juice and scallions. Serve in warmed tortillas with your favorite toppings like sour cream, guacamole, salsa, cheese, and rice.

And there you have it! A delicious and easy meal that’s perfect for any night of the week. The aroma alone will have your family rushing to the table.

Pro Tips for Sheet Pan Steak Fajitas Perfection

Want to take your sheet pan steak fajitas to the next level? Here are a few pro tips that I’ve learned over the years:

  • Use high heat: While the recipe calls for 375F, you can broil for the last few minutes to get extra char.
  • Don’t overcrowd the pan: Make sure the steak and vegetables are spread out in a single layer. Overcrowding will cause them to steam instead of roast, resulting in soggy fajitas. If needed, use two sheet pans.
  • Marinate for at least 20 minutes: The longer you marinate, the more flavorful your fajitas will be. If you have time, marinate for a few hours in the refrigerator.
  • Use a meat thermometer: This is the best way to ensure that your steak is cooked to your desired level of doneness.
  • Warm your tortillas: Warm tortillas are softer and more pliable, making them easier to fill and roll. You can warm them in a dry skillet, in the microwave, or in the oven.

These tips are like little secrets that can elevate your cooking from good to great. Trust me, they make a difference!

Common Mistakes to Avoid

We all make mistakes in the kitchen, but knowing what to avoid can save you time and frustration. Here are a few common mistakes to watch out for when making sheet pan steak fajitas:

  • Not preheating the oven: A hot oven is essential for achieving that perfect sear on the steak and caramelization on the vegetables.
  • Using the wrong cut of steak: Tougher cuts of steak, like sirloin, can become dry and chewy when cooked on a sheet pan. Skirt or flank steak are your best bets.
  • Overcooking the steak: Overcooked steak is tough and dry. Use a meat thermometer to monitor the internal temperature and pull it out of the oven when it’s just a few degrees shy of your desired doneness. It will continue to cook as it rests.
  • Skipping the marinade: The marinade is what infuses the steak and vegetables with flavor. Don’t skip it!
  • Adding too much liquid to the sheet pan: Too much liquid will cause the steak and vegetables to steam instead of roast. Drain any excess marinade before spreading them on the sheet pan.

I’ve made all of these mistakes at one point or another (yes, even me!), so don’t feel bad if you do too. Just learn from them and keep practicing!

Variations: Spice It Up!

Want to put your own spin on this recipe? Here are a few variations to get you started:

  • Add different vegetables: Try adding sliced bell peppers (green, orange, or yellow), mushrooms, zucchini, or corn.
  • Adjust the spice level: If you like it hot, add more cayenne pepper or a pinch of chili flakes to the spice mixture. If you prefer a milder flavor, reduce the amount of chili powder.
  • Use different protein: Chicken, shrimp, or tofu can be used in place of steak. Adjust the cooking time accordingly.
  • Make it vegetarian: Use a combination of hearty vegetables like cauliflower, broccoli, and sweet potatoes. Add a can of black beans for extra protein.
  • Add a smoky flavor: Use smoked salt or liquid smoke to enhance the smoky flavor of the fajitas.

Don’t be afraid to experiment and create your own signature version of this recipe. Cooking is all about having fun and making it your own!

How to Store and Reheat Leftovers

If you have any leftovers (which is rare in my house!), here’s how to store and reheat them:

  • Storage: Store leftover steak and vegetables in an airtight container in the refrigerator for up to 3 days.
  • Reheating: Reheat in a skillet over medium heat until warmed through. You can also reheat them in the microwave, but they may become a little soggy.
  • Serving suggestions: Leftover steak and vegetables can be used in tacos, salads, or omelets. They’re also great on top of rice or quinoa.

I often make a double batch of this recipe so that I have leftovers for lunch the next day. It’s a delicious and convenient way to enjoy a healthy meal on the go.

Frequently Asked Questions (FAQ)

Got questions? I’ve got answers! Here are a few frequently asked questions about sheet pan steak fajitas:

  • Can I use frozen steak? Yes, but make sure to thaw it completely before marinating.
  • Can I make this recipe ahead of time? You can prep the vegetables and mix the spices ahead of time, but I recommend marinating the steak just before cooking.
  • What kind of tortillas should I use? Flour or corn tortillas work well. Choose your favorite!
  • Can I grill the steak and vegetables instead of baking them? Absolutely! Grill them over medium-high heat until cooked through.
  • Can I add cheese to my fajitas? Of course! Shredded cheddar, Monterey Jack, or pepper jack cheese are all great options.

If you have any other questions, feel free to leave a comment below. I’m always happy to help!

Serving Suggestions: Complete the Fiesta!

No fajita feast is complete without the right accompaniments. Here are a few of my favorite serving suggestions:

  • Sour cream: A dollop of sour cream adds a cool and creamy contrast to the spicy fajitas.
  • Guacamole: Creamy and flavorful, guacamole is a must-have for any fajita meal.
  • Salsa: Choose your favorite salsa, from mild to hot, to add a burst of flavor.
  • Cilantro-lime rice: This fragrant rice is the perfect side dish for fajitas.
  • Shredded cheese: Cheddar, Monterey Jack, or pepper jack cheese adds a cheesy goodness to your fajitas.
  • Pico de gallo: Fresh and vibrant, pico de gallo adds a zesty kick to your meal.

I love setting up a fajita bar with all of these toppings and letting everyone customize their own creations. It’s a fun and interactive way to enjoy a meal together.

And that’s a wrap on our Easy Sheet Pan Steak Fajitas adventure! I hope you enjoy this recipe as much as I do. Remember, cooking is all about experimenting, having fun, and creating memories. So, gather your ingredients, put on some music, and let’s get cooking!

Until next time, happy cooking!

Sheet Pan Steak Fajitas Recipe

Prep Time 20 minutes
Cook Time 12 minutes
Total Time 32 minutes
Servings 6 servings
Calories 450
Enjoy delicious and easy steak fajitas made on a sheet pan! This recipe is perfect for a quick weeknight dinner.

Ingredients

Fajita Ingredients

  • 2 lbs skirt or flank steak (diced into 1 inch pieces)
  • 1 large red bell pepper (sliced thinly (about 1/4 inch thick))
  • 1 small yellow onion (peeled and sliced thinly, about 1/4 inch thick)
  • 4.5 tsp ground chili powder
  • 1.5 tsp ground cumin
  • 1.5 tsp smoked paprika
  • 1 tsp dried oregano
  • 0.75 tsp garlic powder
  • 0.5 tsp onion powder
  • 0.25 tsp cayenne powder
  • 1 tbsp kosher salt
  • 2 tbsp extra virgin olive oil
  • 2 tbsp fresh lime juice
  • 3 tbsp scallions (finely chopped)

Serving Ingredients

  • flour or corn tortillas (for serving)
  • sour cream (for serving)
  • guacamole (for serving)
  • salsa (for serving)
  • cilantro-lime rice (for serving)

Instructions 

  • Preheat the oven to 375 F.
  • In a large bowl, add steak, bell pepper and onion.
  • In a small bowl, add all of the spices and salt and whisk to combine.
  • Pour extra virgin olive oil and 4 tablespoons fajita mixture onto steak and vegetables and toss until well-coated. Let sit at room temperature for at least 20 minutes.
  • Line a sheet pan with foil or parchment paper and spread steak and vegetables into single layer. Bake until steak is cooked until browned on the outside, about 10 to 12 minutes. Use a meat thermometer to check the internal temperature of the steak. Aim for about 130-135F for medium-rare and 145F for medium. Stir once halfway through cooking.
  • Just before serving, toss steak and vegetables with fresh lime juice and scallions. Serve in warmed tortillas with sour cream, guacamole, salsa, cheese and rice.

Notes

For extra flavor, marinate the steak for a longer period, up to 4 hours in the refrigerator.
Calories: 450kcal
Cost: $25
Course: dinner
Cuisine: Mexican
Keyword: Steak
pin