Quick & Easy Chocolate Chip Cookies: Ready in 30 Mins!
My name’s Ava, and if you’ve stumbled upon my kitchen, you’re probably here for one thing—the kind of recipes that make people pause mid-bite and say, ‘Wow.’ Growing up in a small town in Oregon, the smell of fresh bread and roasted vegetables often drifted out of my mother’s kitchen window. Cooking wasn’t just something we did to eat—it was how we connected, how we expressed care, and how we marked special occasions. I was the kid who would rather stir a pot of chili than go ride my bike, and by the time I was twelve, I could whip up a pie from scratch that made my grandmother beam with approval.
These days, I’m 34 and living in Seattle, where my kitchen has become my favorite corner of the world. I believe the best recipes aren’t always the fanciest—they’re the ones that provide deep satisfaction, the ones you make over and over because they just work. Sure, I’ve had my share of flops (ask me about the infamous triple-layer cake that collapsed right before a dinner party), but I’ve learned that every ‘oops’ moment is just an invitation to try again—this time with a little more patience and maybe a pinch more salt.
What I find most engaging is taking a recipe and finding ways to make it even better—whether it’s swapping in a secret ingredient, adjusting the texture, or adding a touch of spice to wake up the flavors. I’m a bit obsessed with balance: sweet with savory, creamy with crunchy, familiar with unexpected. And I believe that cooking is less about following rules and more about trusting your senses. If it smells amazing and makes you smile, you’re probably on the right track. Today, we’re diving into a classic that truly makes people happy: the humble chocolate chip cookie, but with a speed and ease that might just surprise you. Get ready for a truly good experience!
Table of Contents
- Why This Recipe Works
- Ingredients You’ll Need
- Step-by-Step Instructions
- Pro Tips
- Variations & Substitutions
- Frequently Asked Questions
- Final Thoughts
Why This Recipe Works
This isn’t just another chocolate chip cookie recipe; it’s a testament to achieving superior results without spending all day in the kitchen. I’ve tweaked and tested this method countless times to ensure it delivers on its promise of quick, delicious cookies every single time. Here’s why this particular approach stands out and has earned its place as a staple in my Seattle kitchen.
-
Speed and Efficiency
From the moment you start mixing to the second those golden-edged, gooey-centered cookies emerge from the oven, you’re looking at a mere 30 minutes. This recipe is designed for those spontaneous cravings or when unexpected guests arrive and you need a superb treat in a flash. The streamlined process cuts down on chilling time, allowing you to get from ingredients to indulgence with impressive rapidity. It’s perfect for busy weeknights or when you simply can’t wait for a gratifying dessert.
-
Perfect Texture Every Time
Achieving that coveted balance between a crispy edge and a soft, chewy middle can be elusive. This recipe nails it. The precise ratio of sugars and butter, combined with the quick baking time at a slightly higher temperature, ensures a cookie that holds its shape while remaining tender and yielding inside. The subtle chewiness is what makes these truly exceptional, providing a satisfying bite that keeps you reaching for another. It’s a texture that speaks to quality baking, even when done in a hurry.
-
Simple, Accessible Ingredients
You won’t find any exotic or hard-to-source items here. This recipe relies on pantry staples that most home bakers already have on hand. Unsalted butter, granulated sugar, brown sugar, an egg, vanilla, flour, baking soda, salt, and chocolate chips—that’s it! The beauty of this simplicity means you can whip these up without a special trip to the store, making it an incredibly convenient option whenever the mood for freshly baked cookies strikes. It proves that extraordinary flavor doesn’t require an extensive ingredient list.
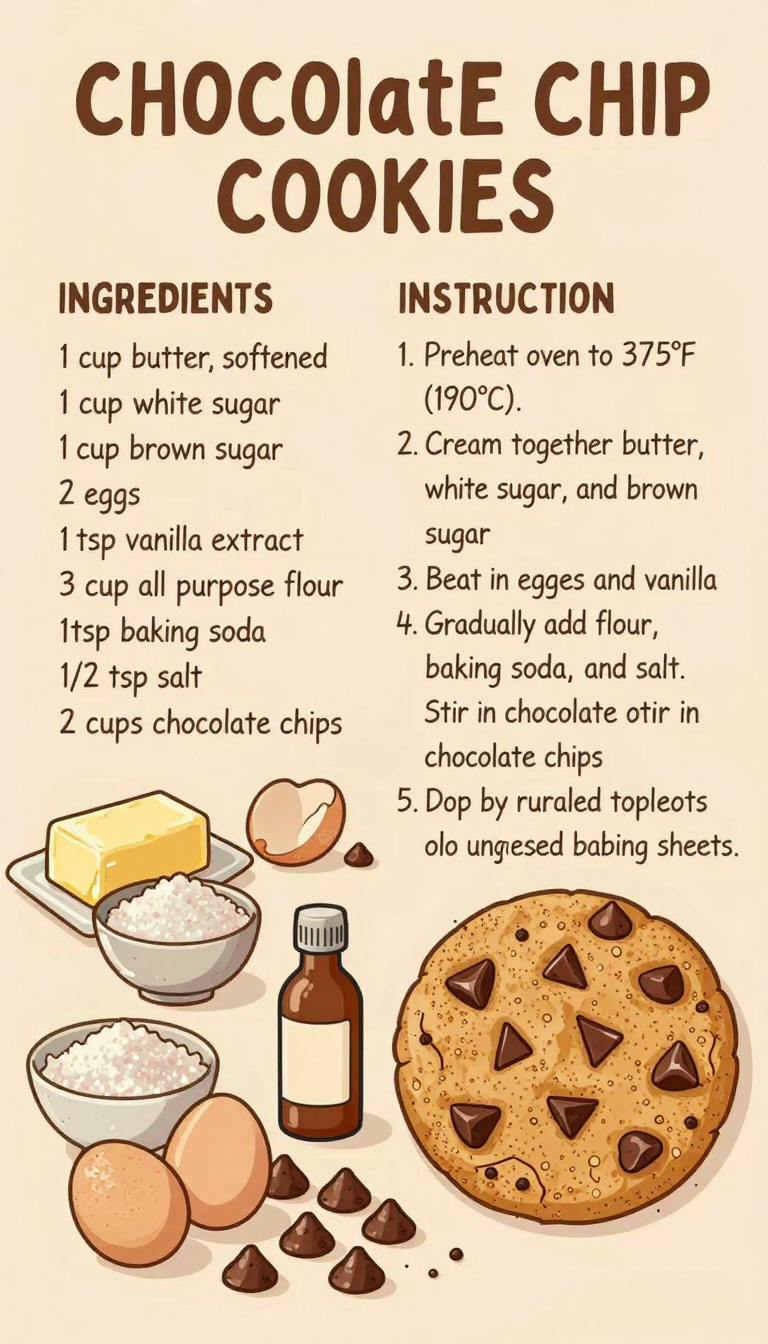
Ingredients You’ll Need
Gathering your ingredients before you begin is always a good practice. It ensures a smooth baking process and prevents any mid-recipe scrambling. Here’s what you’ll need for these remarkable chocolate chip cookies:
- 1/2 cup (113g) unsalted butter, softened
- 1/2 cup (100g) granulated sugar
- 1/4 cup (50g) packed light brown sugar
- 1 large egg
- 1 teaspoon vanilla extract
- 1 1/4 cups (150g) all-purpose flour
- 1/2 teaspoon baking soda
- 1/4 teaspoon salt
- 1 cup (170g) chocolate chips (milk, semi-sweet, or a mix!)
Step-by-Step Instructions
Baking doesn’t have to be intimidating. Follow these simple steps, and you’ll be enjoying perfectly baked chocolate chip cookies in no time. Precision is good, but don’t forget to have some fun with it!
-
Prepare Your Oven and Baking Sheet
Start by preheating your oven to 375°F (190°C). This temperature is key for getting those slightly crispy edges while keeping the centers wonderfully soft. Line a baking sheet with parchment paper. Parchment paper is your friend here; it prevents sticking and makes cleanup a breeze, ensuring your cookies slide right off without a fuss.
-
Cream the Wet Ingredients
In a large mixing bowl, combine the softened unsalted butter, granulated sugar, and packed light brown sugar. Using an electric mixer (handheld or stand mixer), beat these ingredients together on medium speed until the mixture becomes light and fluffy. This usually takes about 2-3 minutes. This creaming process incorporates air, which contributes to the cookies’ final texture. Don’t rush this step—it makes a difference!
-
Incorporate Egg and Vanilla
Crack in the large egg and add the vanilla extract to the creamed butter and sugar mixture. Continue to beat on medium speed until these are thoroughly combined and the mixture is smooth. Scrape down the sides of the bowl with a spatula to ensure everything is evenly mixed. Vanilla is truly essential for that classic cookie taste, so don’t skip it!
-
Whisk Dry Ingredients
In a separate, medium-sized bowl, whisk together the all-purpose flour, baking soda, and salt. Whisking dry ingredients separately ensures that the leavening agent (baking soda) and salt are evenly distributed throughout the flour. This prevents pockets of unmixed ingredients and leads to a consistent rise and flavor in every cookie.
-
Combine Wet and Dry
Gradually add the dry ingredients to the wet ingredients in the large bowl. Mix on low speed or by hand until just combined. The key here is to avoid overmixing. Overmixing flour can develop too much gluten, resulting in tough, dry cookies instead of the desired tender, chewy texture. Stop mixing as soon as you no longer see streaks of dry flour.
-
Fold in the Chocolate Chips
Gently fold in the chocolate chips using a spatula. Distribute them evenly throughout the dough. You can use any type of chocolate chips you prefer—semi-sweet is classic, but milk chocolate for extra richness or even a mix of dark and white chocolate can provide an appealing variation. This is where the magic truly starts to take shape!
-
Scoop and Bake
Drop rounded tablespoons of dough onto your prepared baking sheet, leaving about 2 inches of space between each cookie. This spacing is important to allow the cookies to spread without running into each other. Place the baking sheet into the preheated oven and bake for 9-11 minutes. Keep an eye on them; you’re looking for edges that are golden brown and centers that appear set but still look wonderfully soft. They will firm up more as they cool.
-
Cool and Enjoy
Once baked, remove the cookies from the oven. Let them cool on the baking sheet for about 5 minutes before carefully transferring them to a wire rack to cool completely. This initial cooling on the hot sheet helps them set properly without breaking. While they are still a bit warm, they are absolutely phenomenal, but they are also quite tasty once fully cooled. Prepare for disappearing cookies!
Pro Tips
After years of experimenting in my kitchen, from Oregon to Seattle, I’ve picked up a few tricks that can elevate even the simplest recipes. These insights will help you achieve phenomenal results with your quick chocolate chip cookies, making them truly special.
-
Room Temperature Ingredients are Critical
This might sound like a minor detail, but using room temperature butter and egg makes a substantial difference. Softened butter creams much more effectively with sugar, incorporating more air and creating a lighter, more tender cookie. A room temperature egg emulsifies better with the butter mixture, leading to a smoother, more cohesive dough. If your butter isn’t soft enough, you can cut it into smaller pieces and let it sit for 15-20 minutes, or gently warm it in the microwave for a few seconds (be careful not to melt it!). This attention to ingredient temperature is a foundational aspect of successful baking.
-
Don’t Overmix the Dough
Once you add the flour, mix only until just combined. I mentioned this in the steps, but it’s worth reiterating because it’s a frequent pitfall. Overmixing develops the gluten in the flour too much, which can result in tough, dense cookies rather than the desired chewy texture. The moment you no longer see dry streaks of flour, stop mixing. A few small lumps are perfectly acceptable and won’t affect the final product, but an over-worked dough will significantly impact the cookie’s tenderness. Trust your instincts and resist the urge to keep mixing.
-
The Power of Good Vanilla
Vanilla extract might seem like a small addition, but it plays a starring role in the overall flavor profile of your cookies. Invest in a good quality pure vanilla extract. The difference between artificial vanilla and pure vanilla is quite noticeable, adding depth and a rich, aromatic foundation to the chocolate and butter flavors. If you can find vanilla bean paste, that’s an even more intense option and will add lovely flecks of vanilla bean to your cookies. It’s a small upgrade that yields significant flavor dividends.
-
Experiment with Salt Types
While fine salt is used in the recipe, finishing your cookies with a sprinkle of flaky sea salt right after they come out of the oven can elevate the experience. The little crystals of salt provide a subtle crunch and a burst of savory counterpoint that really makes the chocolate sing. It’s a trick I picked up years ago, and it never fails to impress. This technique is especially good if you’re using semi-sweet or dark chocolate chips, as the salt balances their inherent richness. It’s an easy way to add a gourmet touch to an otherwise simple cookie.
Variations & Substitutions
One of the aspects I appreciate most about baking is the opportunity for creativity and personalization. While this recipe is fantastic as written, it also serves as an excellent canvas for your own culinary explorations. Don’t be afraid to experiment a bit and make these cookies truly your own. After all, the best recipes are the ones that adapt to your preferences!
-
Chocolate Choices
While classic semi-sweet chocolate chips are undeniably good, don’t limit yourself! Try using milk chocolate chips for a sweeter, creamier cookie, or dark chocolate chips for a more intense, less sugary profile. A blend of different chocolate types—perhaps white chocolate chunks alongside semi-sweet chips—can also create a more complex and visually appealing cookie. For a truly decadent experience, chop up a high-quality chocolate bar instead of using chips; the irregular pieces will melt into exquisite pools throughout the cookie. My secret sometimes involves adding a touch of espresso powder to the dough to really enhance the chocolate flavor, a trick that works wonders here.
-
Add-ins and Mix-ins
This is where you can really let your imagination run wild. Consider adding a half cup of chopped nuts like walnuts, pecans, or almonds for extra crunch and a nutty depth. Dried cranberries or cherries can introduce a lovely tartness that balances the sweetness. A sprinkle of shredded coconut offers a tropical twist. For a truly unique flavor, try adding a pinch of cinnamon or a tiny dash of cayenne pepper to the dry ingredients for a subtle warmth that complements the chocolate beautifully. Just be mindful not to overcrowd the dough; usually, about half a cup of extra mix-ins is sufficient.
-
Flavor Extracts
Beyond vanilla, other extracts can transform the cookie’s character. A quarter teaspoon of almond extract can add a sophisticated note, while a few drops of peppermint extract are superb for a festive, holiday-inspired cookie. Orange zest (about a teaspoon) grated into the wet ingredients can also provide a bright, citrusy lift that pairs surprisingly well with chocolate. Just be cautious with stronger extracts, as a little goes a long way and you want to enhance, not overpower, the primary flavors.
-
Flour Alternatives
If you’re looking to modify the flour, you can experiment with a small portion of whole wheat flour for a nuttier flavor and denser texture, though I wouldn’t recommend substituting more than a quarter of the all-purpose flour to maintain the desired chewiness. For those avoiding gluten, a 1:1 gluten-free baking flour blend can often be substituted successfully, but be aware that the texture might be slightly different. Always look for a blend that contains xanthan gum for the best results in terms of structure. I’ve heard from readers who’ve had success with protein banana muffins using alternative flours, so it’s definitely an area ripe for exploration.
-
Sugar Adjustments
While the sugar ratio here is designed for optimal chewiness and spread, you can slightly adjust it. For a less sweet cookie, reduce the granulated sugar by a tablespoon or two, but be aware this might slightly alter the texture. Increasing the brown sugar slightly will yield a chewier, more molasses-flavored cookie. Conversely, more granulated sugar will result in a crisper cookie. Finding your ideal balance is part of the fun of personalizing a recipe, much like how I’m always tweaking my homemade oatmeal bars to get that perfect bite.
Frequently Asked Questions
Baking can sometimes bring up a few questions, especially when you’re trying a new recipe or looking to troubleshoot. Here are some common queries I receive about making the ideal chocolate chip cookie, along with my best advice:
Why are my cookies flat and greasy?
Flat, greasy cookies are often a result of butter that was too soft or even melted before mixing, or an incorrect ratio of wet to dry ingredients. Ensure your butter is softened but still cool to the touch—it should yield slightly when pressed, but not be oily. Also, double-check your measurements, especially for flour and leavening agents. Sometimes, a warm baking sheet can also contribute; always use a cool or room-temperature sheet for each batch. If your kitchen is very warm, consider chilling the dough for 10-15 minutes before baking.
Can I make the cookie dough ahead of time?
Absolutely! While this recipe is designed for quick baking, making the dough ahead can actually enhance the flavors as they meld over time. You can prepare the dough and store it in an airtight container in the refrigerator for up to 3 days. When you’re ready to bake, let the dough sit at room temperature for about 15-20 minutes to soften slightly before scooping and baking. You can also freeze scooped dough balls for up to 3 months; just bake them from frozen, adding a minute or two to the baking time, similar to how I often prepare components for my apple crisp cake in advance.
What’s the secret to perfectly chewy cookies?
Several factors contribute to a chewy cookie! First, the ratio of brown sugar to granulated sugar is important; brown sugar adds moisture and molasses, which promotes chewiness. Second, avoid overbaking. Pull the cookies from the oven when the edges are golden but the centers still look slightly underbaked. They will continue to cook and set on the hot baking sheet. Lastly, don’t overmix the dough, as this can develop too much gluten and make them tough instead of chewy. This balance is something I’m always aiming for, whether it’s these cookies or even my cinnamon twists.
How do I store leftover cookies?
To keep your cookies fresh and soft, store them in an airtight container at room temperature. They will maintain their quality for up to 3-4 days. If you find they’re starting to dry out, you can place a half-slice of bread in the container with them; the cookies will absorb moisture from the bread, helping to soften them. For longer storage, cookies freeze well in an airtight container or freezer bag for up to 2-3 months. Just thaw them at room temperature when you’re ready to enjoy, or give them a quick warm-up in the microwave for that fresh-baked feel, much like how I might prepare my cherry pineapple dump cake for a future occasion.
Final Thoughts
There’s something truly special about the aroma of freshly baked chocolate chip cookies filling your kitchen. It’s a scent that evokes a sense of well-being, a promise of something good about to happen. This quick and easy recipe isn’t just about baking a dessert; it’s about creating those fleeting, satisfying moments that make life a little brighter, a little more delicious. It’s about having a reliable method up your sleeve for when you need a little pick-me-up or want to share a tangible bit of kindness.
I hope this recipe becomes your new go-to, the one you reach for when you need a consistently excellent result without a lot of fuss. It’s the kind of simple, yet profound, recipe that truly connects people and makes a gathering a bit more memorable. Whether you’re cooking for your family, impressing friends, or just treating yourself to a well-deserved indulgence, I’m here to help you find your next favorite dish.
So, pull up a chair, grab a spatula, and let’s make something unforgettable together. Don’t hesitate to leave a comment below if you try these cookies or have any questions. I always appreciate hearing about your kitchen adventures!
Chocolate Chip Cookies
Ingredients
- 1/2 cup unsalted butter (softened)
- 1/2 cup granulated sugar
- 1/4 cup packed light brown sugar
- 1 large egg
- 1 teaspoon vanilla extract
- 1 1/4 cups all-purpose flour
- 1/2 teaspoon baking soda
- 1/4 teaspoon salt
- 1 cup chocolate chips
Instructions
- Preheat oven to 375°F (190°C). Line a baking sheet with parchment paper.
- In a large bowl, cream together the softened butter, granulated sugar, and brown sugar until light and fluffy.
- Beat in the egg and vanilla extract until well combined.
- In a separate medium bowl, whisk together the flour, baking soda, and salt.
- Gradually add the dry ingredients to the wet ingredients, mixing until just combined. Do not overmix.
- Fold in the chocolate chips.
- Drop rounded tablespoons of dough onto the prepared baking sheet, spacing them about 2 inches apart.
- Bake for 9-11 minutes, or until the edges are golden brown and the centers are set but still look soft.
- Remove from oven and let cool on the baking sheet for 5 minutes before transferring to a wire rack to cool completely.
Notes
Loved this recipe? Save it to your favorite Pinterest board so you can easily find it later! ✨