

Welcome to Your New Favorite Wrap Recipe
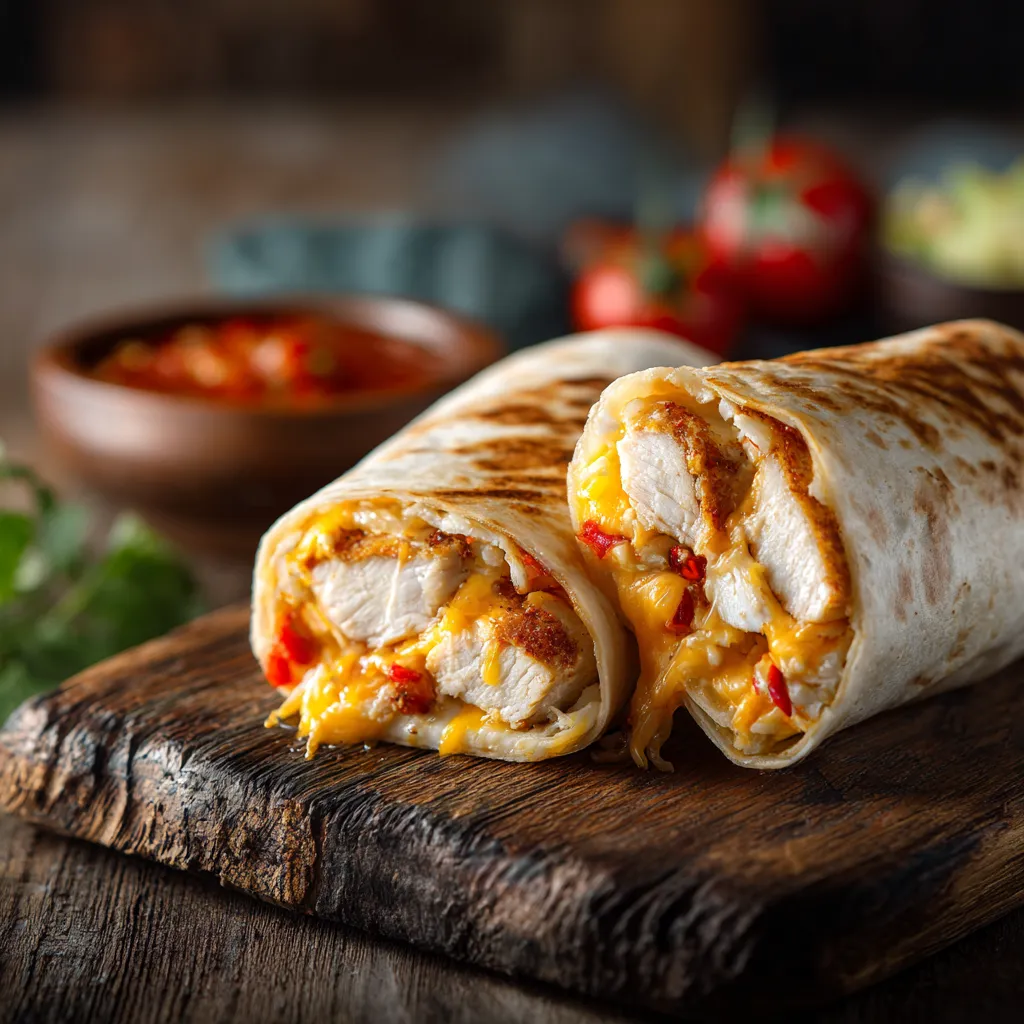
Hey there, kitchen adventurer! If you’ve landed here, you’re probably just as obsessed with delicious, comforting food as I am. Today, we’re diving into the world of Cheesy Garlic Chicken Wraps—the kind of meal that makes you feel like you’re wrapped in a warm hug. Trust me, these wraps are not just food; they’re a delightful experience that’s cheesy, savory, and oh-so-satisfying. Are you ready? Let’s embark on this tasty journey together!
Why You’ll Love These Cheesy Garlic Chicken Wraps
What makes these wraps so irresistible? Here are five reasons:
- Quick and Easy: Perfect for busy weeknights, you can whip these wraps up in under 30 minutes!
- Flavor Explosion: The combination of garlic, melted cheese, and tender chicken creates a flavor profile that’s simply unforgettable.
- Customizable: Feel free to mix in your favorite veggies or experiment with different cheeses for a unique twist.
- Kid-Friendly: These wraps are a hit with kids and adults alike, making them perfect for family dinners.
- Meal Prep Friendly: Make a batch ahead of time and enjoy them throughout the week!
Ingredients You’ll Need
Gathering your ingredients is the first step to culinary success! Here’s what you’ll need to create these cheesy garlic chicken wraps:
- 2 cups cooked chicken, shredded (you can use rotisserie chicken for convenience)
- 1 cup shredded mozzarella cheese (feel free to mix in some cheddar for added flavor)
- 1/2 cup cream cheese, softened (this adds an extra creaminess that’s hard to resist)
- 4 cloves garlic, minced (because who doesn’t love garlic?)
- 1 teaspoon Italian seasoning (a sprinkle of dried herbs elevates the flavor)
- 1/2 teaspoon salt
- 1/4 teaspoon black pepper
- 4 large flour tortillas (or whole wheat for a healthier option)
- 1/4 cup fresh parsley, chopped (for garnish)
- Olive oil (for cooking)
Step-by-Step Cooking Instructions
Now that you have all your ingredients prepped, let’s get cooking! Follow these simple steps to make your cheesy garlic chicken wraps:
- In a large mixing bowl, combine the shredded chicken, mozzarella cheese, cream cheese, minced garlic, Italian seasoning, salt, and black pepper. Mix until well combined.
- Lay out the flour tortillas on a flat surface and divide the cheesy chicken mixture evenly among them.
- Fold in the sides of each tortilla and then roll them up tightly from the bottom to form a wrap.
- Heat a skillet over medium heat and add a drizzle of olive oil.
- Place the wraps seam-side down in the skillet and cook for about 3-4 minutes on each side, until golden brown and crispy.
- Remove from the skillet and let cool for a minute. Slice in half diagonally.
- Garnish with chopped parsley and serve immediately.
Pro Tips for Perfect Wraps
Here are some expert insights to take your wraps from good to absolutely delicious:
- Don’t Overstuff: Be mindful of the quantity you fill your tortillas with; too much filling can make rolling difficult.
- Prep Ahead: You can prepare the filling a day in advance and store it in the fridge for quick assembly later.
- Get Creative: Add spinach, bell peppers, or even avocado to the filling for a nutritional boost.
- Perfect Sear: Make sure your skillet is hot enough for a nice golden brown finish on the wraps.
- Experiment with Cheese: Try mixing different cheeses like pepper jack or gouda for a flavor twist.
- Watch the Heat: If you prefer a bit of spice, consider adding some red pepper flakes to the chicken mixture.
- Serving Temperature: These wraps are best served warm, so make sure to enjoy them fresh off the skillet!
Common Mistakes and Troubleshooting
Even the best chefs have their off days! Here are some common pitfalls and how to avoid them:
- Wraps Falling Apart: Ensure you’re rolling the wraps tightly and sealing them properly to prevent spillage.
- Dry Filling: If your mixture is too dry, add a splash of chicken broth or extra cream cheese to enhance creaminess.
- Burnt Tortillas: Keep an eye on the heat; cooking too high can result in burnt outsides with cold insides.
Variations to Try
Feeling adventurous? Here are some fun variations to keep things exciting:
- Buffalo Chicken Wraps: Mix in buffalo sauce for a spicy kick!
- Mediterranean Twist: Incorporate feta cheese, olives, and spinach for a fresh, Mediterranean flavor.
- BBQ Chicken Wraps: Swap the garlic for BBQ sauce and add some crispy onion straws for crunch.
- Veggie Delight: Use a mix of grilled veggies and chickpeas for a hearty vegetarian option.
Storage and Make-Ahead Instructions
Want to meal prep? Here’s how to store your wraps:
- Refrigeration: Store any leftovers in an airtight container in the fridge for up to 3 days.
- Freezing: You can freeze the assembled but uncooked wraps. When ready to eat, thaw and cook as directed!
Frequently Asked Questions
Here are some common questions I get about these wraps:
- Can I use a different kind of meat? Absolutely! Shredded turkey or even beef works great.
- What if I don’t have cream cheese? You can substitute with sour cream or Greek yogurt, but the texture will vary.
- Are these wraps gluten-free? Use gluten-free tortillas to make them suitable for a gluten-free diet.
- Can I bake these instead of frying? Yes! Place them on a baking sheet at 400°F (200°C) for about 15 minutes or until golden.
- How do I reheat leftovers? A quick reheat in a skillet over medium heat will bring back their crispy texture.
- What’s the best way to serve these? Pair them with a fresh salad or some homemade dipping sauce for extra flavor.
- Can I make these vegan? Substitute chicken with tofu or tempeh and use vegan cheese for a delicious plant-based option.
- How spicy are these wraps? They’re not spicy by default, but you can easily add heat with hot sauce or peppers!
Nutritional Tips and Dietary Adaptations
Want to make these wraps even healthier? Here are some tips:
- Add More Veggies: Incorporate a variety of colorful vegetables to boost nutrients and fiber.
- Lower the Cheese: Use less cheese or opt for lower-fat cheese to reduce calories.
- Whole Grain Tortillas: Choose whole grain or spinach tortillas for added health benefits.
Kitchen Equipment Recommendations
To make the cooking process smoother, here are some kitchen essentials you’ll need:
- Non-Stick Skillet: A quality non-stick skillet is essential for achieving that perfect golden-brown wrap.
- Mixing Bowl: A large mixing bowl makes it easy to combine your filling.
- Spatula: Use a sturdy spatula to flip your wraps without tearing them.
Serving Suggestions
Ready to dig in? Here are some delightful serving ideas:
- With Dipping Sauces: Try ranch, buffalo sauce, or even a homemade garlic aioli for an extra flavor boost.
- On a Bed of Greens: Serve the wraps over a fresh salad for a well-rounded meal.
- With a Side of Chips: Pair your wraps with crunchy tortilla chips or sweet potato fries for a satisfying crunch.
Conclusion
And there you have it! Your new go-to recipe for Cheesy Garlic Chicken Wraps that are as comforting as they are delicious. Whether you’re cooking for a crowd or just treating yourself, these wraps are sure to impress. So, grab your apron, gather your ingredients, and let’s make some kitchen magic together!
Ooey-Gooey Cheesy Garlic Chicken Wraps You’ll Devour in 2025
Ingredients
Protein
- 2 cups cooked chicken, shredded
Cheese
- 1 cup shredded mozzarella cheese
- 1/2 cup cream cheese, softened
Garlic & Seasonings
- 4 cloves garlic, minced
- 1 teaspoon italian seasoning
- 1/2 teaspoon salt
- 1/4 teaspoon black pepper
Wraps & Garnish
- 4 large flour tortillas
- 1/4 cup fresh parsley, chopped (for garnish)
- olive oil for cooking olive oil
Instructions
- Mix shredded chicken, mozzarella, cream cheese, garlic, seasonings until combined.
- Divide mixture onto tortillas, fold sides, and roll up.
- Heat oil in skillet, cook wraps seam-side down 3-4 mins per side until golden.
- Let cool slightly, slice diagonally, garnish with parsley, and serve.
Notes
Loved this recipe? Save it to your favorite Pinterest board so you can easily find it later! It’s the perfect way to keep all your sweet ideas in one place. ✨


